

Page 1
Page 2

Contents
Introduction ....................................................................................................................................3
About the NetComm NP6800 - Wireless LAN Access Point ..................................................4
Wireless LAN Basics .............................................................................................................. 5
Installation ...................................................................................................................................... 8
Driver Installation & Configuration ........................................................................................ 10
Installing the Driver in Windows XP ...................................................................................... 11
Installing the Access Point Utility ................................................................................................. 12
Uninstallation Procedure ....................................................................................................... 13
Configuring the Access Point .....................................................................................................14
Configuring the Access Point via USB .................................................................................14
Configuring the Access Point via Ethernet .......................................................................... 18
Assigning a Temporary IPAddress ....................................................................................... 18
Connecting to the Access Point using the SNMP Manager ................................................. 19
File Menu ...............................................................................................................................21
Setup Menu ...........................................................................................................................22
Commands Menu ...................................................................................................................31
Info Menu ............................................................................................................................... 32
Traps Menu ........................................................................................................................... 33
Network Menu ....................................................................................................................... 33
Window Menu ....................................................................................................................... 34
About Menu ........................................................................................................................... 34
Advanced Topics ........................................................................................................................35
Network Topology ................................................................................................................. 35
How to Make Your Wireless Network More Secure ............................................................ 36
Glossary ......................................................................................................................................37
Troubleshooting ...........................................................................................................................39
Windows Troubleshooting Tips ............................................................................................ 39
Registering your NetComm Product ............................................................................................ 40
Contact Information ...............................................................................................................40
Trademarks and Notices ....................................................................................................... 40
Product Warranty .................................................................................................................. 43
Limitations of Warranty .........................................................................................................43
www.netcomm.com.au Rev.1 - YML655
Page 2 NP6800 - Wireless LAN Access Point
Page 3

Introduction
The NetComm NP6800 - Wireless LAN Access Point is a Direct-Sequence Spread Spectrum
(DSSS) product. DSSS is a spread spectrum network operating between 2.4 and 2.5 GHz. This
provides a high-capacity network within either large or small environments using multiple access
points.
Based on IEEE 802.11b, Wireless LAN (WLAN) products can perform at speeds of up to 11
Mbps. This technology works by using multiple frequencies in the 2.4 GHz range utilizing
Direct Sequence Spread Spectrum (DSSS) technology.
Designed to cover distances of up to 100 metres indoors and 300 metres outdoors, WLAN
technology lets you access your network from anywhere within this radius. The range of
WLAN is limited by the number of walls, ceilings, floors, or other objects the wireless signals
must pass through. Typical ranges vary depending upon the types of materials and background
radio-frequency in the WLAN area.
WLAN products offer the following network features:
■ WLAN bridging architecture allows communication between wired network devices and
mobile devices.
■ WLAN products support the IEEE 802.11b and WiFi specifications. This open architecture
allows WLAN devices to communicate with wireless devices from other manufacturers that
conform to the same specifications.
■ WLAN products allow mobile devices to roam throughout large facilities while remaining
connected to the network.
■ WLAN products allow establishment of ad-hoc wireless workgroup networks.
■ WLAN products are protocol-independent, allowing mobile devices to communicate with a
wide range of servers, hosts and systems.
Rev.1 - YML655 www.netcomm.com.au
NP6800 - Wireless LAN Access Point Page 3
Page 4

About the NetComm NP6800 - Wireless LAN Access Point
The NetComm NP6800 - Wireless LAN Access Point allows USB equipped host systems to
configure, connect to and link a wireless network.
Features Include:
■ IEEE 802.11b compatibility providing wireless Ethernet connectivity at speeds of up to 11
Mbps.
■ Dynamic scaling of the connection speed between 11, 5.5, 2, and 1 Mbps to match the
wireless network conditions.
■ Wireless security with 64-bit and 128-bit WEP data encryption.
■ Support for Microsoft Windows 98, Millennium (ME) 2000, and Windows XP.
■ C-Tick compliance.
■ Multiple operating mode options for access point (infrastructure), peer-to-peer (ad-hoc) or
bridging associations.
■ LED indicators provide power and network link status.
NetComm NP6800 - Wireless LAN Access Point LED Descriptions
The NetComm NP6800 - Wireless LAN Access Point has two LED's.
■ The PWR LED illuminates during connection
■ The LAN LED indicates that the access point is functioning and is connected to the LAN.
■ The WLAN LED flashes when activity is detected on the wireless link.
www.netcomm.com.au Rev.1 - YML655
Page 4 NP6800 - Wireless LAN Access Point
Page 5

Wireless LAN Basics
In order to set up and use your NetComm NP6800 - Wireless LAN Access Point you should
have some basic understanding of both wired and wireless network technology and the various
functions of the device.
WLAN devices use electromagnetic waves within a broad, unlicensed range of the radio
spectrum to transmit and receive Frequency Modulation (FM) radio signals. WLAN devices
generate a carrier wave and modulate this signal using various techniques. In this way, digital data
can then be superimposed onto the carrier signal. The radio signal carries data to wirelesscapable devices within its range. The antennas of wireless-equipped devices transmit and receive
the signal. The transmission method used by WLAN devices is called Direct Sequence Spread
Spectrum (DSSS) and they operate in a range of the radio spectrum between 2.4 and 2.5 GHz.
Wireless LANs support the same network applications that are used on wired Ethernet LANs.
The NetComm NP6800 - Wireless LAN Access Point may be used on laptop and desktop
computer systems and support the same protocols as Ethernet adaptors. For most users, there
is no noticeable functional difference between a desktop workstation hard-wired to an Ethernet
network and a WLAN workstation other than the added benefit of being able to roam within the
WLAN.
Your NetComm NP6800 - Wireless LAN Access Point providea a link between the WLAN and
a wired Ethernet network and its resources.
Ad-Hoc (IBSS) Mode
Connecting to other network devices, without access points, to form a peer-to-peer network is
called Ad-Hoc (IBSS) mode. Use Ad-Hoc to create simple wireless networks where the number
of wireless computers (also referred to as network nodes) are small. In this configuration, the
first wireless LAN card to start transmitting a beacon will determine the channel and data rate
used for the other Adaptors in the IBSS network. Ad-Hoc networks are very easy to set up and
require minimal involvement by network administrators or IT personnel.
Infrastructure (ESS or 802.11-Station) Mode
In Infrastructure (ESS or 802.11-Station) mode, the NetComm NP6800 - Wireless LAN Access
Point connects to an access point (AP). In ESS mode, the WLAN workstation can roam freely
between other access point cells in the network or transmit and receive across subnets. ESS is
the default mode for the NetComm NP6800- Wireless LAN Access Point.
A Windows based utility is supplied to select the operational mode and to generally monitor and
configure, the NetComm NP6800 - Wireless LAN Access Point.
Rev.1 - YML655 www.netcomm.com.au
NP6800 - Wireless LAN Access Point Page 5
Page 6

11 Mbps Operation
The NetComm NP6800 - Wireless LAN Access Point supports a maximum 11 Mbps data
transfer rate. When the adaptors transmit (TX) rate is set to Auto, the adaptor automatically
shifts to a 5.5, 2 or 1 Mbps data rate when unable to maintain a high quality connection at 11
Mbps. When the adaptor detects improved signal strength, it shifts to an increased data rate, up
to the maximum 11 Mbps.
The following factors can dynamically alter the data rate:
■ signal strength between the access point and adaptor,
■ the ratio of good transmitted packets to attempted transmitted packets that fall below a
threshold, or -
■ the adaptor finds a higher transmit rate with another AP or it encounters an unspecified data
rate.
Physical obstructions and numerous devices operating in close proximity to one another
negatively impact the ability to maintain an 11 Mbps access point association.
Signal Range
WLAN devices are designed to operate over a radius of 100 meters indoors and 300 metres
outdoors. Obstructions such as walls, ceilings, floors, office equipment, and furniture can reduce
this range. The following example or just some factors that affect the signal range of your
Wireless network.
■ Obstructions. The Wireless LAN radio signal can penetrate through ceilings and walls.
However, each wall or ceiling the signal must pass through to reach other WLAN devices
will reduce the effective range your Wireless LAN.
You should also keep the depth of the obstructions to a minimum. Take an example of a wall
that is half a metre thick. For a radio signal going through the wall, at a forty degree angle, it
must pass through almost one metre of material. At a two degree angle, this increases to over
14 metres! Position adaptors and access points so that the signal will travel straight through
a wall or ceiling for better reception.
Position your adaptors and access points above desk height so as to minimise the number
and depth of obstructions and always position your adaptors and access points so that the
signal passes through drywalls or open doorways and not through metallic materials.
www.netcomm.com.au Rev.1 - YML655
Page 6 NP6800 - Wireless LAN Access Point
Page 7

■ Antenna Position: Where possible, keep your adaptors and access points at least 1 or 2
metres away from devices that generate strong radio-frequency or electromagnetic signals,
such as microwaves, computer monitors, cellular telephones and electric motors. Use the
utilities included with your product to measure the best reception (signal quality/strength)
achieved when repositioning the antenna.
Should the signal be inadequate in an area where you wish to use your wireless network,
consider adding Access Points to increase the signal strength in that area.
Rev.1 - YML655 www.netcomm.com.au
NP6800 - Wireless LAN Access Point Page 7
Page 8
Installation
Before beginning the installation, verify the hardware package contains the NetComm NP6800 Wireless LAN Access Point and ensure that you have the requirements listed below. Keep the
serial number in a safe place. The Support Centre uses this information to reference warranty
and service contract information.
Note: The MAC Address of the Access Point is indicated on the bottom of the case.
The NetComm NP6800 - Wireless LAN Access Point installation requires:
■ a computer with an available USB port.
■ a CD-ROM drive or Internet access.
■ Microsoft Windows 98, Millennium (ME), Windows 2000 or Windows XP
■ an ethernet cable to connect to your LAN.
Avoid exposing the NetComm NP6800 - Wireless LAN Access Point to liquids or
abrasive materials.
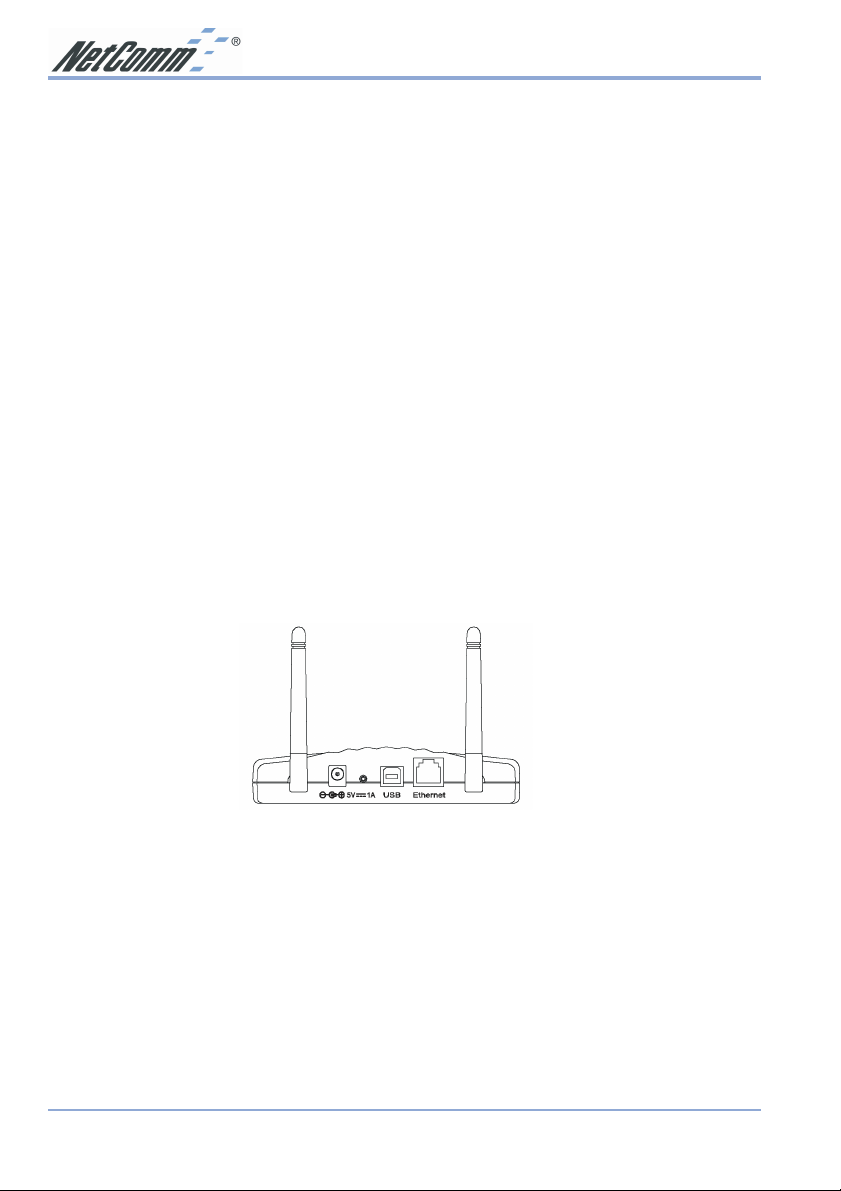
1. Place the NetComm NP6800 - Wireless LAN Access Point in an optimum position so that
the minimum number of obstructions such as walls, floors, ceilings, and office equipment are
between it and the nearest connecting access point or wireless device.
2. Fix the direction of the antenna. Try to place it in a position which can best cover your
wireless network. Normally, the higher you place the antenna, the better the performance
will be. The position of the antennas will enhance the receiving sensitivity.
www.netcomm.com.au Rev.1 - YML655
Page 8 NP6800 - Wireless LAN Access Point
Page 9
3. Connect a standard UTP ethernet cable to the Wireless Network Access Point.
Then, connect the other end of the Ethernet cable to a switch or hub or computer with a
Network Interface Card installed. The Wireless Network Access Point will then be
connected to your 10/100 Network.
4. Connect the AC Power Adapter supplied to the Access Point’s power socket.
5. Connect the appropriate end of the USB Cable to the Wireless Network Access Point’s
Configuration Port. Connect the other end to the USB port on your PC. Your system will
immediately recognize the Access Point and attempt to install drivers for it. Refer to the
appropriate operating system section for instructions on how to install the drivers.
Note: Once your Access Point is installed and configured, the USB cable may be
removed.
Rev.1 - YML655 www.netcomm.com.au
NP6800 - Wireless LAN Access Point Page 9
Page 10

Driver Installation & Configuration
The NetComm NP6800 - Wireless LAN Access Point is supplied with a Windows driver and a
USB and Ethernet Access Point Utility. The utility should be installed at the same time as the
Windows USB driver and is used to view and edit NetComm NP6800 - Wireless LAN Access
Point settings.
After following the driver installation instructions for your operating system, refer to the section
on Access Point Utility for installation instructions.
Before installing the Wireless Access Point Windows driver:
■ Connect the NetComm NP6800 - Wireless LAN Access Point to the USB port of your
computer.
■ Have the NetComm Driver CD ready for insertion.
Installing the WLAN Driver in Windows 98/ME/2000
To install the Wireless LAN Access Point driver in Windows 98, Windows Millennium (ME) or
Windows 2000, you must login as Administrator or a member of the Administrator Group (see
Windows Help for more information on this.)
1. After inserting the Access Point’s USB cable into an available USB port on the computer,
Windows recognises the Adaptor and the Add New Hardware Wizard dialog box
appears.
2. Insert the NetComm Driver CD.
3. Select the Specify the location of the driver checkbox. Click Next.
4. Type in the location of the driver or browse for D:\Drivers\
the letter of your CD ROM drive. Type or select the correct
(Win98, WinMe or Win2000) for your computer and click Next to continue.
5. Click Next when the Add New Hardware Wizard displays the location of the driver
files.
operating system
operating system
, where D:\ is
directory
Note: The Microsoft Digital 'Signature Not Found' dialog box could appear at this point in
the installation. A Microsoft digital signature is not required for the driver
installation. Click Yes to continue.
The Add New Hardware Wizard dialog box displays stating the required software has
been installed.
6. Click Finish to complete the installation and refer to the section on installing the Access
Point Utility.
www.netcomm.com.au Rev.1 - YML655
Page 10 NP6800 - Wireless LAN Access Point
Page 11

Installing the Driver in Windows XP
To install the Wireless LAN driver in Windows XP:
1. After inserting the Access Point into an available USB port on the computer, Windows XP
recognizes the adaptor and the Add New Hardware Wizard dialog box appears.
2. Insert the NetComm Driver CD.
3. Select the Install the software automatically (recommended) checkbox. Click Next.
4. The drivers will be found on the CD ROM in the location of D:\Drivers\WinXP, where D:\
is the letter of your CD ROM drive. Select a driver and click Next to continue.
Note: The Microsoft Windows Logo testing screen will appear advising that the driver has
not been tested. Click Continue anyway to proceed.
5. Click Finish to complete the installation and refer to the section on installing the Access
Point Utility.
Rev.1 - YML655 www.netcomm.com.au
NP6800 - Wireless LAN Access Point Page 11
Page 12

Installing the Access Point Utility
The Access Point Utility is used to configure and monitor the NetComm NP6800 - Wireless
LAN Access Point for all Windows operating systems.
The procedure described in this section can be used in order to install the Access Point Utility
under Microsoft® Windows®.
■ In this section it is assumed that you have a basic working knowledge of Microsoft
Windows and networking principles.
■ During the installation, you may be prompted to load operating system files from the
Windows installation disk. Please keep this disk handy.
■ You will need the CD provided with your Access Point.
To install the Access Point Utility:
1. Insert the provided CD into your CD-ROM drive and select Start -> Run and type in the
location of the software or browse for D:\AP Utility\Setup.exe, where D:\ is the letter of
your CD ROM drive.
2. The InstallShield Wizard will install Access Point Utility on your computer. To continue,
click Next.
3. Select the Program Folder for the Utility. The default folder will be 802.11 Wireless LAN.
Click Next to continue.
4. When the InstallShield Wizard has completed installation, click on the Finish button. Refer
to the section on Configuring the Access Point to set up your device.
www.netcomm.com.au Rev.1 - YML655
Page 12 NP6800 - Wireless LAN Access Point
Page 13

Uninstallation Procedure
To uninstall the application from Windows, follow the procedure described bellow:
1. Open the Add/Remove Programs icon under the Control Panel.
2. Select the Acess Point Utility option and click the Change/Remove... button under the
Control Panel to begin the uninstallation procedure.
3. Click OK in order to finish the removal of the Access Point Utility.
Rev.1 - YML655 www.netcomm.com.au
NP6800 - Wireless LAN Access Point Page 13
Page 14
Configuring the Access Point
The Access Point Utility consists of two programs, an AP Utility and an SNMP Manager,
which are used for the configuration of the NetComm NP6800 - Wireless LAN Access Point.
We recommend using the AP Utility for initial setup and configuration, with further
customisation available within the SNMP Manager to fine tune your Access Point settings.
Configuring the Access Point via USB
The AP Utility uses the USB connection to the Access Point and gives a one-screen listing of all
the settings of the Access Point.
Note: The AP Utility can only be used when the Access Point is connected via a USB
cable to your computer. If the USB cable is not connected, you will receive an error
message.
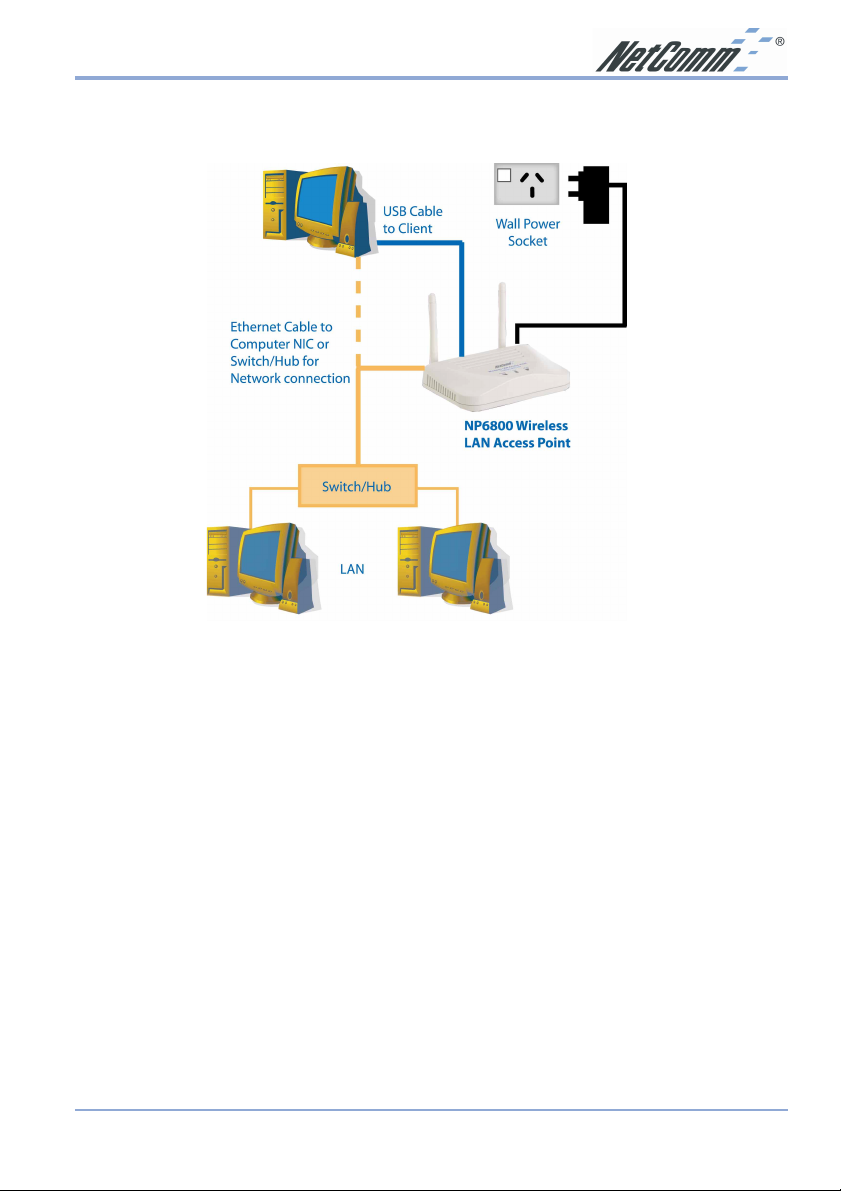
1. Open Start->Programs->802.11 Wireless LAN->Acess Point Utility and click on AP
Utility. The AP Utility screen will appear.
From this utility, the Access point can be reset or the settings may be altered or returned to
the default values. To Restore Defaults to your Access Point, click on the Restore
Defaults button. The factory default settings of your Access Point will be restored
immediately.
www.netcomm.com.au Rev.1 - YML655
Page 14 NP6800 - Wireless LAN Access Point
Page 15

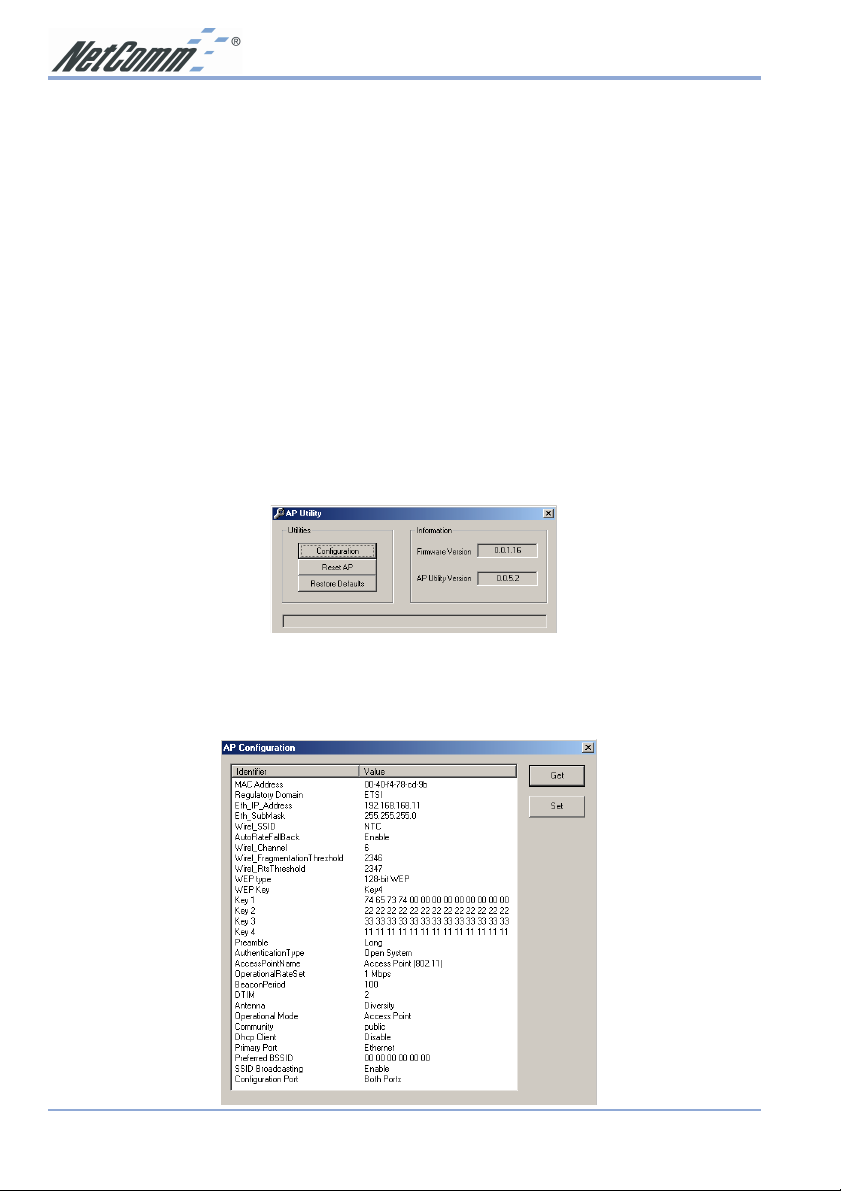
2. Click on the Configuration button to display the values stored within the Access Point.
It is important to configure the following settings before continuing:
■ IP Address and Subnet Mask
■ Community (Password)
■ WEP
Note: Refer to the table on Page 40 and write down the changes you make to
your Access Point configuration for future reference.
Other settings may also be changed at this point, however, the following settings are covered
in detail to make the necessary changes to install your Access Point.
IP Address
You may wish to change this IP setting from the default of “192.168.168.10”. A table is
provided on page 40 for you to record the amended setting.
1. Double-click on the Eth_IP_Address to display the following window:
2. Type in the new IP Address and click the OK button.
3. Click on the Set button to configure the Access Point.
Subnet Mask
You may wish to change this IP setting from the default of “255.255.255.0”. A table is provided
on page 40 for you to record the amended setting.
1. Double-click on the Eth_SubMask to display the following window:
2. Type in the new SubNet Mask and click the OK button.
3. Click on the Set button to configure the Access Point.
Rev.1 - YML655 www.netcomm.com.au
NP6800 - Wireless LAN Access Point Page 15
Page 16

Community (password)
The AP Utility and the SNMP Manager use a Community setting to password protect the
Access Point. We recommend that you change this setting from the default of “public”. A table
is provided on page 40 for you to record the amended setting.
1. Double-click on the Community to display the following window:
2. Type in the new password string and click the OK button.
3. Click on the Set button to configure the Access Point.
WEP
Wireless Equivalent Privacy (WEP) is an authentication algorithm which protects authorised
Wireless LAN users against eavesdropping. WEP is recommended to ensure that your Wireless
Network is secure.
Note: You must use the same WEP key identification number and encryption key in the
Access Point that you will be using in all accessing wireless stations, i.e. other
Access Points, PCMCIA cards or USB adaptors.
The following WEP types are available:
■ 64bit WEP allows four 5 Hex digit encryption keys
■ 128bit WEP allows four 13 Hex digit encryption keys
■ Disable will disable WEP and allow any wireless station within the radius of the Access
Point to access your Network.
Note: It is highly recommended that you use WEP to secure your wireless network.
1. Double-click on WEP Type and select the WEP option you wish to use in order to activate
WEP encryption for transmissions between the stations and the AP.
www.netcomm.com.au Rev.1 - YML655
Page 16 NP6800 - Wireless LAN Access Point
Page 17

2. Double-click on WEP Key and select the identification number of the WEP key you wish to
use.
3. Double-click on the Key you will be using and enter the encryption key that you will be
using.
Note: You must use the same WEP key identification number and encryption key in the
Access Point that you will be using in all accessing wireless stations, i.e. other
Access Points, PCMCIA cards or USB adaptors.
4. Click the Set button to complete the changes.
Rev.1 - YML655 www.netcomm.com.au
NP6800 - Wireless LAN Access Point Page 17
Page 18

Configuring the Access Point via Ethernet
The SNMP Manager provides a GUI custsomisation tool which can be accessed by your
ethernet or wireless connection. Before using the SNMP Manager you will need to assign a
temporary IP address.
Assigning a Temporary IPAddress
If you wish to use the SNMP Manager utility to configure the Access Point, you must assign a
temporary IP address to your computer.
1. Click on Start->Settings->Control Panel, and then double-click on the Network icon.
2. Select the network adapter associated with the TCP/IP and click Properties.
3. Write down your current settings in order to restore your TCP/IP configuration.
4. Select Specify an IP address and enter the following values:
IP Address: 192.168.168.50
Subnet Mask: 255.255.255.0
5. Click OK and click OK again in the Network window.
6. Restart your computer and continue .
Once you have completed the Access Point configuration, you can set the computer back to its
previous settings. For example, to “Obtain an IP Address automatically.”
www.netcomm.com.au Rev.1 - YML655
Page 18 NP6800 - Wireless LAN Access Point
Page 19

Connecting to the Access Point using the SNMP Manager
1. Open Start->Programs->802.11 Wireless LAN->Acess Point Utility and click on
SNMP Manager. There are two ways to connect to the NetComm NP6800 - Wireless
LAN Access Point with the AP Utility:
■ Select File -> Connect to Access Point option and enter the IP and the Community.
■ Select File -> Find Access Point option. After a while a window will display any Access
Point devices that the Utilty has found.
Note: If the Access Point is found and displayed but you can not connect to it, you will
need to temporarily change your computer’s IP address. Refer to the section on
Assigning a temporary IP Address for further information.
2. From that window you can select the Access Point that you want to configure and click the
connect button. The Connect to Access Point window will appear with the correct IP
address displayed. Enter the Community in order to get access to the functionality of the
NetComm NP6800 - Wireless LAN Access Point.
Rev.1 - YML655 www.netcomm.com.au
NP6800 - Wireless LAN Access Point Page 19
Page 20

3. If the IP address and Community are correct the following window will be displayed.
The SNMP Manager will display the following menus, which can be used to configure the
Access Point.
■ File menu
■ Setup Menu
■ Commands Menu
■ Info Menu
■ Traps Menu
■ Network Menu
■ Window Menu
■ About Menu
Refer to the following sections for more information on the above menus.
www.netcomm.com.au Rev.1 - YML655
Page 20 NP6800 - Wireless LAN Access Point
Page 21

File Menu
Under this menu you can find the following options:
■ Connect to Access Point - Using this option you can directly connect with the AP.
First, type its IP Address in the panel which appears (Figure 4-2). Then, type the
appropriate password in the Community field (The default password is “public”).
■ Find Access Point - This option allows you to find and connect with an AP without the
necessity of knowing its IP Address. Choose this option in order to find the Aps available
for connection . Select one of the available APs and press “Connect”. Then, the IP of the
selected AP is passed to the IP field of the panel to write the appropriate password at the
community field.
■ Close Connection AP - Terminates the connection with the AP.
■ Exit - Terminates the connection with the AP and exits the application.
Rev.1 - YML655 www.netcomm.com.au
NP6800 - Wireless LAN Access Point Page 21
Page 22

Setup Menu
As soon as the connection has been established, you are able to start viewing or setting the AP
parameters.
Bridge
Under the “Bridge” submenu, there are two options:
■ IP Configuration
■ Filtering
IP Configuration
Under this window you see and change the followings:
■ The Mac Address, IP Address, and IP Mask of the AP.
Note: The Mac Address can not be altered. This is a unique number that is assigned by
the manufacturer to an Ethernet network device to allow easy identification. The
Mac Address is also printed on a label on the base of the Access Point unit.
■ The option to enable the DHCP client function of the AP.
■ Additionally you have to select the Primary Port, which is the interface that determines the
DHCP server. Also you can select which port (Ethernet and/or Wirless) will be used for the
AP configuration.
www.netcomm.com.au Rev.1 - YML655
Page 22 NP6800 - Wireless LAN Access Point
Page 23

Wireless LAN
Under this submenu the following Operational Settings are available:
Operational Settings
Using this option you can either view or modify the following parameters of the Wireless LAN
AP:
Access Point Name - The name of the AP.
SSID - It is an ASCII string, up to 32 characters, used to identify a
WLAN that prevents the unintentional merging of two colocated WLANs. The ESSID value must be the same in all
stations and AP in the extended WLAN.
SSID Broadcasting - When checked the Access Point broadcasts the SSID to the
stations, if not checked then the stations must know the Access
Point SSID in advance.
Channel - Select the channel to be used. Depending on the Regulatory
Domain of the AP the number of available channels can be 1 - 14.
Fragmentation Threshold - The size at which packets will be fragmented. Choose a setting
within a range of 256 to 2346 bytes.
RTS Threshold - Minimum packet size to require an RTS (Request To Send). For
packets smaller than this threshold, an RTS is not sent and the
packet is transmitted directly to the WLAN. This is the option
for the RTS Threshold activation.
Rev.1 - YML655 www.netcomm.com.au
NP6800 - Wireless LAN Access Point Page 23
Page 24

Authentication Type - Select Open System, Shared Key, or Both:
Open System: With this setting any station in the WLAN can associate with an
AP and receive and transmit data (null authentication).
Shared Key: With this setting only stations using a shared key encryption
identified by the AP are allowed to associate with it.
Both: With this setting stations communicate with the AP either with
or without data encryption.
Preamble Type (Short/Long) - Preamble is the first subfield of PPDU, which is the appropriate
frame format for transmission to PHY (Physical layer). There are
two options, Short Preamble and Long Preamble. The Short
Preamble option improves throughput performance.
Rate - By default the unit adaptively selects the highest possible rate
for transmission.
Select the basic & supported rates to be used among the
following options 1 - 2 - 5.5 - 11 (Mbps).
Auto Rate Fall Back - When this is enabled the transmission rate is the optimum rate.
In case of obstacles or interference, the system will automatically
fall back.
Regulatory Domain - The value of this field is already set and can not be modified.
Rx/Tx Antenna - Here you can decide how the AP will use each Antenna.
International Roaming - The Access Point can support the International Roaming (IEEE
802.11d) function if this option is enabled.
www.netcomm.com.au Rev.1 - YML655
Page 24 NP6800 - Wireless LAN Access Point
Page 25

Authorized MAC Address (MAC Address Filter)
For security reasons the AP can use the Authorization Table option. The AP allows only
authorized stations to get associated to it . Under the Authorized MAC Address option you
may press the following buttons:
Load file: Use this button in order to load a txt file with the MAC
Addresses that can be associated with the AP (Authorized MAC
Addresses).
The txt file must have one MAC address at a line and with the
following format:
000425000146 not 00-04-25-00-01-46 or 00 04 25 00 01 46.
Download: Use this button button in order to download the Authorized
MAC Address to the AP.
Get: Use this button button in order to get from the AP the
Authorized MAC Addresses.
Authorization Table Enable: If this option is enabled, the AP allows anly authorized stations
to get associated to it.
Rev.1 - YML655 www.netcomm.com.au
NP6800 - Wireless LAN Access Point Page 25
Page 26

Operation Mode
The NetComm NP6800 Wireless LAN Access Point can be configured to three different modes
of operation:
■ Access Point,
■ Access Point Client
■ Wireless Bridge (Point to Point or Point to Multipoint).
For each mode you can either view or modify the Wireless LAN parameters of the Wireless
Operational Settings window.
Access Point Mode
The NP6800 Wireless LAN Access Point is set to Access Point by default and will connect
your wireless computer to a wired network (LAN). It is recommended that WEP be configured
to block unwanted access to your network.
In most cases, no change is necessary, however the WEP key identification number and
encryption used must be consistent to enable access.
www.netcomm.com.au Rev.1 - YML655
Page 26 NP6800 - Wireless LAN Access Point
Page 27

Access Point Client Mode
When set to Access Point Client Mode, the NetComm NP6800 Wireless LAN Access Point is
able to talk to one main Access Point and wireless clients within its range. This mode allows
your Access Point to act as a client of a main Access Point. A LAN attached to your Access
Point client can then be wirelessly bridged to the main Access Point.
1. Select Access Point Client and check the Preferred BSS box. Enter the required MAC
address of the main Access Point to create a direct connection.
2. Click the OK button to store the information.
Wireless Bridge Mode
If you are trying to make a wireless connection between two or more wired networks, select
Wireless Bridge. There are two options: Point to Point and Point to MultiPoint.
Note: In Wireless Bridge mode, the NetComm NP6800 Wireless LAN Access Point can
ONLY be accessed by another wireless bridge. In order for your other wireless
devices to access the NetComm NP6800 Wireless LAN Access Point, you must
reset it to Access Point mode.Access Point
This mode provides access from Wireless Stations to Wired LANs and from Wired LANs to
Wireless Stations. Furthermore, Wireless Stations within the range of the AP device may
communicate with each other via the AP.
Rev.1 - YML655 www.netcomm.com.au
NP6800 - Wireless LAN Access Point Page 27
Page 28

Point to Point
This mode connects two physically separated LAN segments using two Wireless Access Points.
To configure a Point to Point bridged environment:
1. Click Point to Point.
2. Set the Remote MAC Address of the Access Point in LAN 1 to look for the MAC Address
of the Access Point in LAN 2.
3. The remote Access Point also needs to be set up as a Wireless Bridge.. In the Operational
Mode of the remote Access Point, set the Remote MAC address of the Access Point in
LAN 2 to look for the MAC Address of the Access Point in LAN 1.
Note: All devices on each LAN must be connected through a hub or switch.
4. Click the OK button to store the information.
www.netcomm.com.au Rev.1 - YML655
Page 28 NP6800 - Wireless LAN Access Point
Page 29

Point to MultiPoint
This mode allows you to construct a network that has multiple Wireless Access Point units
bridging LANs.
To configure a Point to MultiPoint bridged environment:
1. Click Point to MultiPoint for the NetComm NP6800 Wireless LAN Access Point used in
LAN 1. No MAC Address binding is needed.
2. Set the Access Points in LAN 2 and LAN 3 to Point to Point, and have them look for the
MAC Address of the Access Point in LAN 1.
Note: Only one of the Access Points must be in Point to MultiPoint mode. For all other
bridged Access Points, select the Point to Point option, and enter the Remote MAC
Address of the Access Point set to Point to MultiPoint.
3. Click the OK button to store the information.
Rev.1 - YML655 www.netcomm.com.au
NP6800 - Wireless LAN Access Point Page 29
Page 30

Enable SNMP traps
Using this option you can either enable or disable SNMP traps, which are messages displayed in
the right bottom corner of the main window indicating that an action related to the AP took
place. Permitted messages are:
Trap Reassociation: This trap message is sent when a Station’s reassociation request
is received from the AP - Bridge.
Trap Association: Indicates the reception of an association request packet.
Trap Disassociation: This trap message is sent when a disassociation notification
packet is received from a station.
Trap Reset: This trap message is sent when the AP resets.
Trap Setting IP with Ping: This trap message is sent when the APBridge IP Address is set
with the transmission of a ping message.
Trap Start Up: This trap message is sent when the AP starts up.
www.netcomm.com.au Rev.1 - YML655
Page 30 NP6800 - Wireless LAN Access Point
Page 31

Authorization
Using this option the Administrator can change the passwords used in the community field of
the Connect to AP window. A table is provided on page 40 to record the updated setting.
Commands Menu
Under this menu there are two options.
■ Reset Device - You can reset the AP.
■ Restore Defaults - You can restore the factory default values of the AP.
If you have lost the password to your Access Point, connect a USB cable and refer to the
section on Configuring your Access Point via USB to restore your settings.
Rev.1 - YML655 www.netcomm.com.au
NP6800 - Wireless LAN Access Point Page 31
Page 32

Info Menu
This menu lets you view Wireless and Ethernet statistics.
■ Wireless statistics: This option reports the statistics concerning the unit’s Wireless
activity.
Field name Description
Unicast Transmitted Packets The number of Unicast packets successfully transmitted.
Broadcast Transmitted Packets The number of broadcast packets transmitted.
Multicast Transmitted Packets The number of multicast packets transmitted.
Unicast Received Packets The number of unicast packets that were successfully
Broadcast Received The number of broadcast packets that were
Multicast Received The number of multicast packets that were successfully
■ Ethernet statistics: This option reports the statistics concerning the unit’s Ethernet port
activity.
received.
successfully received.
received.
Field Description
Received Packets:
Total Bytes The number of bytes in the frames that were received
Total Packets Total number of received packets
Packet CRC Errors The number of packets with CRC Errors
Transmitted Packets:
Total Bytes The number of bytes in the frames that were transmitted
Total Packets Total number of transmitted packets
Packet CRC Errors The number of packets with CRC Errors
www.netcomm.com.au Rev.1 - YML655
Page 32 NP6800 - Wireless LAN Access Point
Page 33

Traps Menu
Provides information for trap messages
■ View Record displays additional information for every Trap Message.
Network Menu
The Network menu provides information about the devices connected to your network.
■ Associated stations - Using this option you can view the MAC Addresses of the
Associated stations with the AP.
Rev.1 - YML655 www.netcomm.com.au
NP6800 - Wireless LAN Access Point Page 33
Page 34

■ Known BSSs - This option allows you to view all Wireless devices currently connected to
the network, including the SSID, BSSID, RSSI, Channel, WEP, Type and Preamble of each
device.
Click Get/Refresh to update the listing.
Window Menu
The Window menu there are the following options
■ Cascade - All opened windows are arranged on the desktop in a cascade fashion.
■ Tile - All open windows are visible on the desktop.
About Menu
The About menu rovides the version number of the application under the About SNMP
Manager option.
www.netcomm.com.au Rev.1 - YML655
Page 34 NP6800 - Wireless LAN Access Point
Page 35

Advanced Topics
Network Topology
The IEEE 802.11 standard supports three basic topologies for WLANs - the Independent Basic
Service Set (IBSS), the Basic Service Set (BSS), and the Extended Service Set (ESS). WLAN
components can be used to extend, enhance or entirely replace existing Ethernet infrastructure.
The NetComm NP6800 - Wireless LAN Access Point can accommodate any of these WLAN
topologies.
IBSS
An Independent Basic Service Set or Ad Hoc network consists of two or more wireless stations
that communicate directly, peer-to-peer, without the services of a wireless access point. An
example of an Ad Hoc or IBSS network would be a group of wireless-equipped laptop
computers at a trade show set up to share information. In this arrangement, one of the WLAN
units is elected to act as a controller or base station, similar to the function of a wireless access
point except there is no connection to a wired Ethernet LAN.
BSS
In a Basic Service Set network, a wireless access point performs multiple tasks - it is a base
station and a network access controller for the wireless stations in the WLAN. The access point
can also provide a connection to a wired Ethernet LAN for the BSS member stations. An
example of a BSS might be a business meeting conducted in a room with only a single Ethernet
port available. Each participant has a wireless laptop computer and requires simultaneous access
to a data server on the Ethernet LAN. A wireless access point provides the connection to the
Ethernet LAN and acts as the network control station for the BSS network members.
In a BSS network, the wireless access point performs functions similar to an Ethernet switch.
The access point controls network access and maintains a dynamically updated list of all the
members of the BSS. Wireless stations in the BSS are identified by their MAC Addresses.
ESS
An Extended Service Set is a series of two or more basic service sets (BSSs) networked on an
Ethernet LAN. Each access point provides connections to the Ethernet LAN for their respective
BSS members. Each BSS member is identified by a unique number, the BSSID (actually the
MAC address of the access point). Wireless stations (such as a laptop computer with a
NetComm NP7032 - Wireless LAN PC Card installed) on an ESS network automatically select
the access point or BSS that can serve them best (has the best signal). If no access point can be
found, the device will scan for a usable access point.
An ESS network can be set up so that wireless stations can roam anywhere within the range of
the access points and still maintain links to both the WLAN and the Ethernet LAN. In this case,
each station shares a common ESS. The ESS network is identified by an ESSID that is known
and used by all of the stations in the ESS network.
Wireless access points can also be used to segment a wireless network. Under such
circumstances, more than one ESS might be used. Two or more separate ESS's can occupy the
same physical space. Each station on a WLAN can use only one ESS - and thus only one ESSID.
Rev.1 - YML655 www.netcomm.com.au
NP6800 - Wireless LAN Access Point Page 35
Page 36

How to Make Your Wireless Network More Secure
Wireless networks can be vulnerable to an outsider gaining access if the encryption settings are
not set adequately. Some of the default security settings on some wireless hardware, and in
Microsoft Windows, may allow access to your wireless network from other wireless devices.
The concepts that are presented here are offered only as a guide, and may help make your
wireless network more difficult for an outsider to gain access. For more specific information
about the implementation of these suggestions, you should consult a trusted security source.
■ Enable Wired Equivalent Privacy (WEP) encryption
The 802.11b standard, which your NetComm WLAN device is based on, permits Wired
Equivalent Privacy (WEP) encryption. Depending on what other hardware you use your
NetComm NP6800 - Wireless LAN Access Point with, there are two levels of WEP
typically available: 64-bit encryption (based on a 40-bit encryption key), and 128-bit
encryption (based on a 104-bit key). We strongly recommend that you enable WEP.
■ Change the default Service Set Identifier (SSID) and passwords for your network devices.
Do not change the SSID or password (Community) setting to reflect your name, address, or
anything that would be easy to guess as this could make it easy for an outsider to gain access
to your wireless network.
■ Install Access Points away from windows
If you are installing access points, think about locating them towards the centre of your
home instead of near the windows. Plan your coverage to radiate out to the windows, but
not beyond. If the access points are located near the windows, a stronger signal will be
radiated outside your home making it easier for those outside the building to locate your
network.
■ Check the range of your network
Take a notebook, or a PDA computer, that is equipped with a wireless network PC Card and
go outside your home to survey what range you get when moving around your property or
neighbourhood. You may be surprised how far the signal radiates. If you can connect from
three or four houses away, so can someone else.
■ Use a combination of the previous suggestions.
www.netcomm.com.au Rev.1 - YML655
Page 36 NP6800 - Wireless LAN Access Point
Page 37

Glossary
A
Ad-Hoc Mode - A client setting that provides
independent peer to peer connectivity in a
wireless LAN. An alterative setup is where
PCs communicate with each other through an
access point.
B
Bandwidth - The transmission capacity of a
given facility, in terms of how much data the
facility can transmit in a fixed amount of time;
expressed in bits per second (bps).
Bit - A binary digit. The value - 0 or 1-used in
the binary numbering system. Also, the
smallest form of data.
D
Default Gateway - The routing device used
to forward all traffic that is not addressed to a
station within the local subnet.
DHCP server and client - DHCP stands for
Dynamic Host Configuration Protocol. This
protocol is designed to automatically load
parameters for the TCP/IP network, including
the IP address, host name, domain name,
netmask, default gateway, and name server
address. The machine that provides this
service is called the DHCP server, and its
client computers are called DHCP clients. If
client computers support DHCP, a TCP/IP
configuration is not needed on each client
computer.
Domain - A subnetwork comprised of a
group of clients and servers under the control
of one security database. Dividing LANs into
domains improves performance and security.
Driver - A workstation or server software
module that provides an interface between a
network interface card and the upper-layer
protocol software running in the computer; it
is designed for a specific NIC, and is installed
during the initial installation of a networkcompatible client or server operating system.
DSSS (Direct-Sequencing Spread-Spectrum) DSSS operate over the radio airwaves in the
unlicensed ISM band (industrial, scientific,
medical). DSSS uses a radio transmitter to
spread data packets over a fixed range of
frequency band.
E
Encryption - A security method that applies a
specific algorithm to data in order to alter the
data's appearance and prevent other devices
from reading the information.
Ethernet - The most widely used LAN
access method which is defined by the IEEE
802.3 standard. Ethernet is normally a shared
media LAN meaning all devices on the
network segment share total bandwidth.
Ethernet networks operate at 10Mbp using
CSMA/CD to run over 10Base T cables.
F
Fragmentation Threshold Value Indicates how much of the network
resources is devoted to recovering packet
errors. The value should remain at its default
setting of 2,432. If you experience high packet
error rates, you can decrease this value but it
will likely decrease overall network
performance. Only minor modifications of this
value are recommended.
Fragmentation - Breaking a packet into
smaller units when transmitting over a
network medium that cannot support the
original size of the packet.
I
IP Address - An IP address is a 32-bit
number that identifies each sender & receiver
of information that is sent across the Internet.
An IP address has two parts: the identifier of
a particular network on the Internet and one
identifier of a particular device (which can be
a server or a workstation within that
network).
L
LAN - A local area network (LAN) is a group
of computers and associated devices that
share a common communications line and
typically share the resources of a single
processor or server within a small geographic
area (for example, within an office building).
M
MAC Address - 12-digit hexadecimal
number that identifies a networking product
on the network.
Mbps (Megabits per second) - One million
bits per second; unit of measurement for data
transmission.
Rev.1 - YML655 www.netcomm.com.au
NP6800 - Wireless LAN Access Point Page 37
Page 38

N
Network - A system that transmits any
combination of voice, video and/or data
between users.
Node - A network junction or connection
point, typically a computer or work station.
O
Open System - Is when the sender and the
recipient do not share a secret key. Each
party generates its own key-pair and asks the
receiver to accept the (usually randomly)
generated key. Once accepted, this key is
used for a short time only; then a new key is
generated and agreed upon.
P
Packet - A unit of data routed between an
origin and a destination in a network.
Plug and Play - The ability of a computer
system to configure expansion boards and
other devices automatically without requiring
the user to turn off the system during
installation.
R
RTS/CTS Threshold Value - Should remain
at its default setting of 2,347. A preamble is a
signal used to synchronize the transmission
timing between two or more systems. A
series of transmission pulses is sent before
the data to indicate that “someone is about
transmit data.” This ensures that systems
receiving the information correctly when the
data transmission starts.
S
Shared Key - Is when both the sender and
recipient share a secret key. Both units use
this key for an extended length of time,
sometimes indefinitely. Any eavesdropper that
discovers the key may decipher all packets
until the key is changed.
Signal Strength - The signal level indicates
the strength of the signal as received at the
wireless network interface.
SNMP (Simple Network Management Protocol)
- A standard network protocol that can be
used to manage networks locally, or
worldwide via the Internet.
SSID (Service Set Identifier) - Is the unique
name shared among all points in a wireless
network. The SSID must be identical for all
points in the network. It is case sensitive and
must not exceed 32 characters.
Static IP Address - A permanent IP address
that is assigned to a node in an IP or a TCP/IP
network.
Subnet - A subnet is a logical sub-division of
a Local Area Network that has been divided
by means of routers or gateways. A subnet
may include multiple LAN segments. Each
subnet is identified by the Subnet Mask.
T
TCP/IP (Transmission Control Protocol/
Internet Protocol) - The basic communication
language or protocol of the Internet. It can
also be used as a communications protocol in
a private network (either an intranet or an
extranet). When you are set up with direct
access to the Internet, your computer is
provided with a copy of the TCP/IP program
just as every other computer that you may
send messages to or get information from
also has a copy of TCP/IP.
W
WEP (Wired Equivalent Privacy) - The optional
cryptographic confidentiality algorithm
specified by IEEE 802.11 used to provide data
confidentiality that is subjectively equivalent to
the confidentiality of a wired LAN medium that
does not employ cryptographic techniques to
enhance privacy.
Windows workgroup - A Windows
workgroup can consist of either wireless or
wired network connections or a combination
of the two. Usually a Windows workgroup
consists of members who are related
because of a shared function, e.g. members
of the same department. For a Windows
workgroup it is not relevant where the
workgroup participants are located, since the
members of a Windows workgroup are
identified by their workgroup name only.
www.netcomm.com.au Rev.1 - YML655
Page 38 NP6800 - Wireless LAN Access Point
Page 39

Troubleshooting
Windows Troubleshooting Tips
Many problems can easily be diagnosed using the tools provided by Microsoft Windows, such
as the PING utility, Network Monitors, TELNET and FTP. Other more elaborate tools, such as
LAN analysers, for example NETXRAY or Novell's LAN analyser, may also be used.
Some common problems exhibited when the Access Point has not been properly installed
include:
■ Windows 95/98 does not recognize the Access Point when installed.
■ Verify that Windows 95/98 Wireless LAN USB support is installed.
■ Verify the computer has a Plug and Play BIOS.
■ The driver fails to load.
■ A resource conflict could exist. Use the Device Manager to resolve resource conflicts.
Select the System applet from the Control Panel.
■ The workstation cannot associate to the Wireless access point.
■ Verify the adaptor ESSID matches the ESSID of the Access Point.
■ Make sure that the WEP identification key and the WEP encryption are uniform for
both workstation and Access Point.
■ Degraded performance from the Wireless Access Point.
■ Verify a secure antenna connection on the adaptor.
■ The Access Point is found in the SNMP utility, but fails to connect.
■ Refer to the section on Configuring a Temporary IP Address.
Rev.1 - YML655 www.netcomm.com.au
NP6800 - Wireless LAN Access Point Page 39
Page 40

Registering your NetComm Product
To ensure that the conditions of your warranty are complied with, please go to the NetComm
web site for quick and easy registration of your product at
www.netcomm.com.au
Alternatively, you can fill in the Warranty Registration Form and mail it to NetComm Limited,
PO Box 1200, Lane Cove NSW 2066.
Contact Information
If you have any technical difficulties with your product, please do not hesitate to contact
NetComm’s Customer Support Department.
Email: support@netcomm.com.au
Fax: (02) 9424-2010
Web: www.netcomm.com.au
Trademarks and Notices
NetComm™ is a trademark of NetComm Limited. Windows® is a registered trademark of
Microsoft Corporation. Other brand and product names are trademarks or registered trademarks
of their respective holders. Information is subject to change without notice. All rights reserved.
Please note that the images used in this document may vary slightly from those of the actual
product. Specifications are accurate at the time of the preparation of this document but are
subject to change without notice.
Default Settings
IP Address: 192.168.168.10
Subnet Mask: 255.255.255.0
Community (password): public
New Settings
IP Address: _______ . _______ . _______ . ________
Subnet Mask: _______ . _______ . _______ . ________
Community (password): __________________________________
www.netcomm.com.au Rev.1 - YML655
Page 40 NP6800 - Wireless LAN Access Point
Page 41

Warranty Registration Form
Date of Purchase …….......………………...........……….................................
Name …….......………………...........……….................................
Company …….......………………...........……….................................
Address …….......………………...........……….................................
…………………….........……........... Post Code .....………...……….
Tel No ( ) ..............………....……. Fax No ( ) .....………...……….
Cut along the line
E-mail …….......………………...........……….................................
The following information is vital for your warranty
Please make sure it’s correct and complete.
Serial No …….......………………...........……….................................
Model …….......………………...........……….................................
Product Type:
I intend to use this modem at:
Dealer’s Name …….......………………...........……….................................
Dealer’s Address …….......………………...........……….................................
…………………….........……........... Post Code .....………...……….
PC Card External
Internal Other
Home School/College/University
Business Government Office
Make sure
you fill this
section in!
!
Tel No ( ) ..............………....……. Fax No ( ) .....………...……….
How did you find out about our products?
…………………….............................………………………………………....…………
…………………….............................………………………………………....…………
Page 42

Page 43

Product Warranty
The warranty is granted on the following
conditions:
1. This warranty extends to the original
purchaser (you) and is not transferable;
2. This warranty shall not apply to software
programs, batteries, power supplies,
cables or other accessories supplied in or
with the product;
3. The customer complies with all of the
terms of any relevant agreement with
NetComm and any other reasonable
requirements of NetComm including
producing such evidence of purchase as
NetComm may require;
4. The cost of transporting product to and
from NetComm’s nominated premises is
your responsibility; and,
5. NetComm does not have any liability or
responsibility under this warranty where
any cost, loss, injury or damage of any
kind, whether direct, indirect,
consequential, incidental or otherwise
arises out of events beyond NetComm’s
reasonable control. This includes but is
not limited to: acts of God, war, riot,
embargoes, acts of civil or military
authorities, fire, floods, electricity
outages, lightning, power surges, or
shortages of materials or labour.
6. The customer is responsible for the
security of their computer and network at
all times. Security features may be
disabled within the factory default
settings. NetComm recommends that you
enable these features to enhance your
security.
The warranty is automatically voided if:
1. You, or someone else, use the product, or
attempts to use it, other than as specified
by NetComm;
2. The fault or defect in your product is the
result of a voltage surge subjected to the
product either by the way of power
supply or communication line, whether
caused by thunderstorm activity or any
other cause(s);
3. The fault is the result of accidental
damage or damage in transit, including but
not limited to liquid spillage;
4. Your product has been used for any
purposes other than that for which it is
sold, or in any way other than in strict
accordance with the user manual
supplied;
5. Your product has been repaired or
modified or attempted to be repaired or
modified, other than by a qualified person
at a service centre authorised by
NetComm; and,
6. The serial number has been defaced or
altered in any way or if the serial number
plate has been removed.
7. The Telephone Line Cord used with this
unit must comply with the ACA Technical
Standard TS008.
Limitations of Warranty
The Trade Practices Act 1974 and
corresponding State and Territory Fair Trading
Acts or legalisation of another Government
(“the relevant acts”) in certain circumstances
imply mandatory conditions and warranties
which cannot be excluded. This warranty is
in addition to and not in replacement for such
conditions and warranties.
To the extent permitted by the Relevant Acts,
in relation to your product and any other
materials provided with the product (“the
Goods”) the liability of NetComm under the
Relevant Acts is limited to, at the option of
NetComm to:
■ Replacement of the Goods; or
■ Repair of the Goods; or
■ Payment of the cost of replacing the
Goods; or
■ Payment of the cost of having the Goods
repaired.
All NetComm ACN 002 490 486 products have
a standard 12 months warranty from date of
purchase. However some products have an
extended warranty option (refer to
packaging). To be eligible for the extended
warranty you must supply the requested
warranty information to NetComm within 30
days of the original purchase by registering
on-line via the NetComm web site at
www.netcomm.com.au.
NetComm reserves the right to request proof
of purchase upon any warranty claim.
Rev.1 - YML655 www.netcomm.com.au
NP6800 - Wireless LAN Access Point Page 43
Page 44

 Loading...