

Page 1

NetComm LSV40 USB VoIP Phone Quick Start Guide
1
Introduction:
The NetComm LSV40 USB VoIP Phone is designed for the telecommuter who would
like to make VoIP calls using a PC and an Internet connection. This user guide provides
instructions on how to install the NetComm LSV40 USB phone and start making VoIP
calls in 3 simple steps.
What’s in your LSV40 VoIP USB Phone Box:
1. LSV40 USB VoIP Handset.
2. USB Connection Cable.
3. Mini Installation CD.
4. This Quick Start Guide.
Installation and Configuration
Step1: Installing the LSV40 VoIP USB Phone Software
You will need to install the NetComm V40 USB Phone application onto your
Desktop PC or Laptop in order to configure the phone. Follow these steps to
install the software:
1. Ensure your Desktop PC or Laptop is connected to an Internet Connection and
that the connection is active.
2. Test that you can access the Internet (open a website).
3. Do NOT plug your LSV40 phone into a USB port on your PC.
4. Insert the accompanying CD into your PC’s CDROM drive:
[screenshot]
5. Click the ‘Install NetComm LSV40 USB Phone software’ button and follow
the instructions:
[screenshot]
6. You have now finished installing your software and need to complete Step 2,
Installing the LSV40 Hardware.
Step 2: Installing the LSV40 hardware.
1. Locate a free USB port on your Desktop PC or Laptop.
Page 2
2. Attach the supplied USB Cable to the USB socket on the bottom of the LSV40
2
handset. You can connect either end of the cable depending upon your
preferences.
3. Attach the other end of the USB cable to the USB port of your Desktop PC or
Laptop.
4. You have finished the hardware installation and need to complete Step3,
Configuring the NetComm LSV40 USB Phone.
Step 3: Configuring the NetComm LSV40 USB Phone
VoIP Service Provider Configuration:
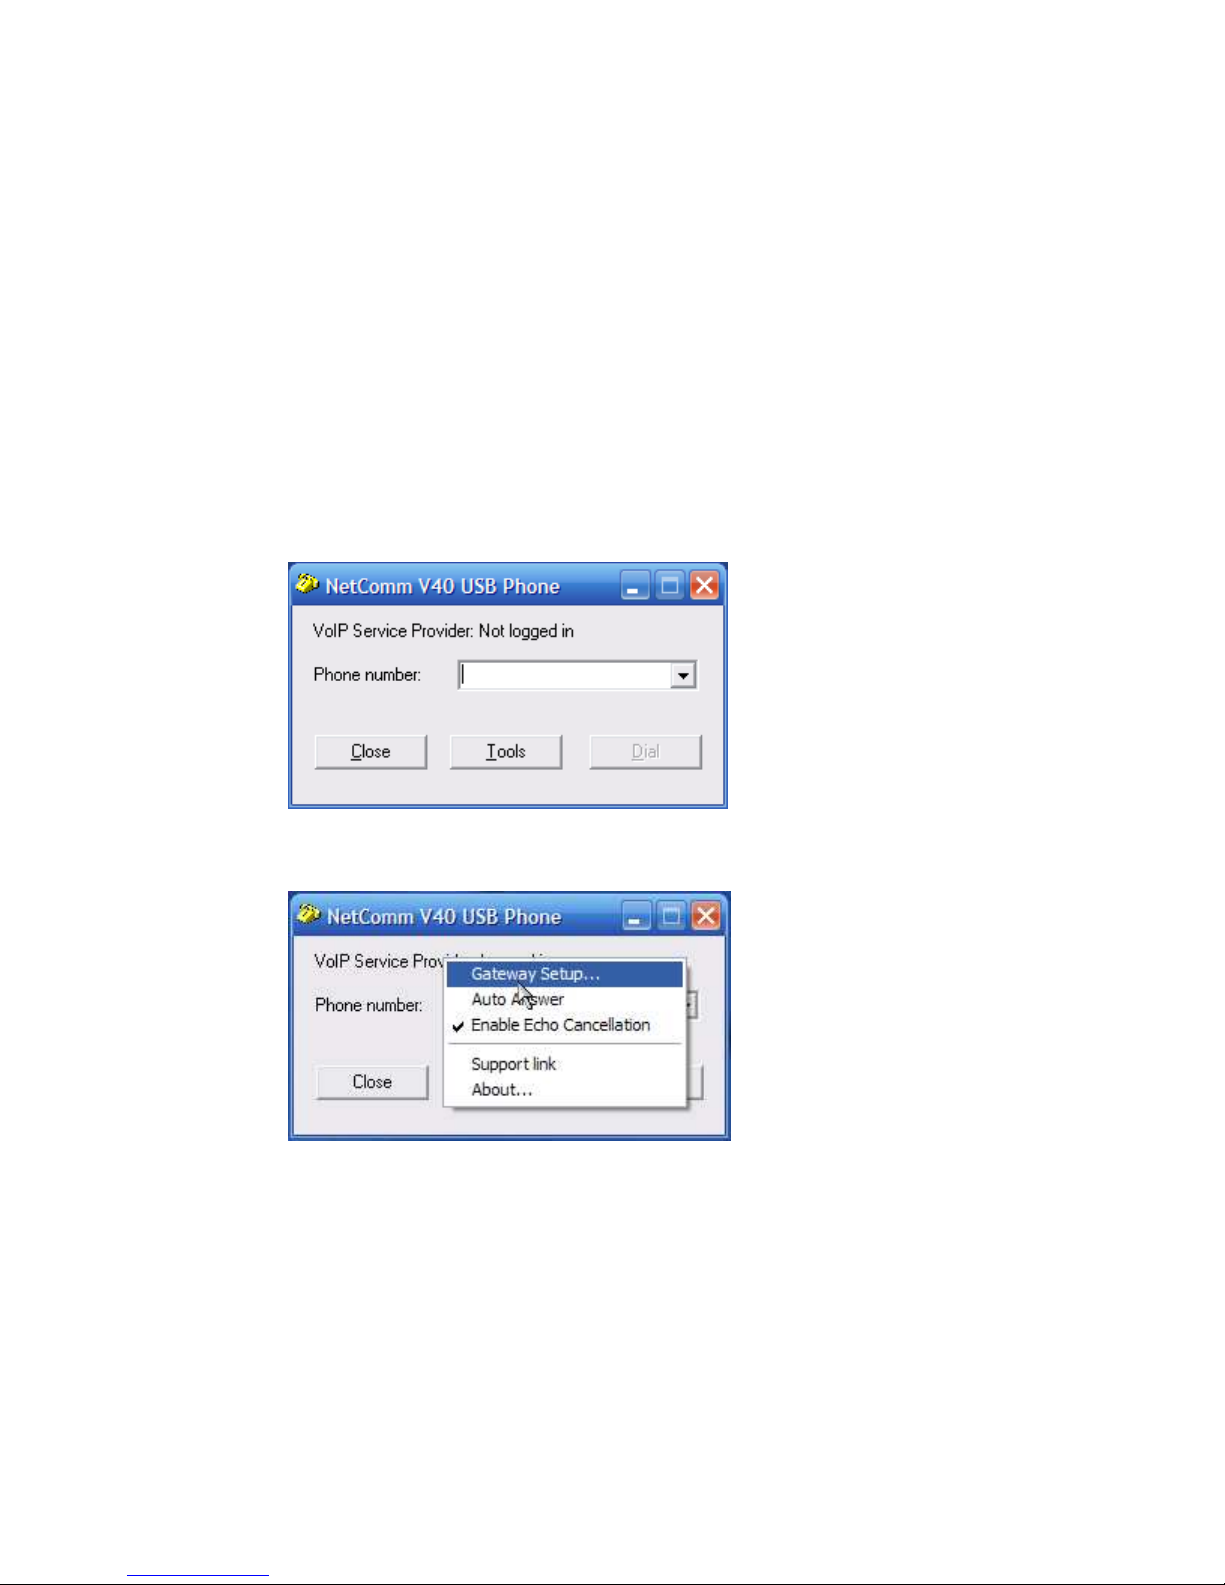
1. Run the NetComm LSV40 USB Phone software (Start Programs
NetComm LSV40 USB Phone NetComm LSV40 USB Phone):
2. Click the ‘Tools’ button and select ‘Gateway Setup’ to setup the phone:
3. Enter the details issued by your VoIP service provider (VSP):
Page 3
• Display Name: Name of your VSP.
3
• SIP Proxy: The SIP proxy server responsible for registering your VoIP
account. This is issued by your VSP.
• Your User Name and Password: This is for the MyNetFone VoIP
service and is located on a sticker on the back of the handset.
• Register to SIP Proxy Server: Sends authentication requests to your
VSP’s (VoIP Service Provider) SIP proxy server.
4. Click OK.
5. Check that you have successfully registered with your VSP:
Refer to Appendix 1 – Troubleshooting if you are unable to see a Logged in
status.
6. If you have a Logged in status, you are ready to make a phone call.
Getting to Know the LSV40 USB Phone
Page 4
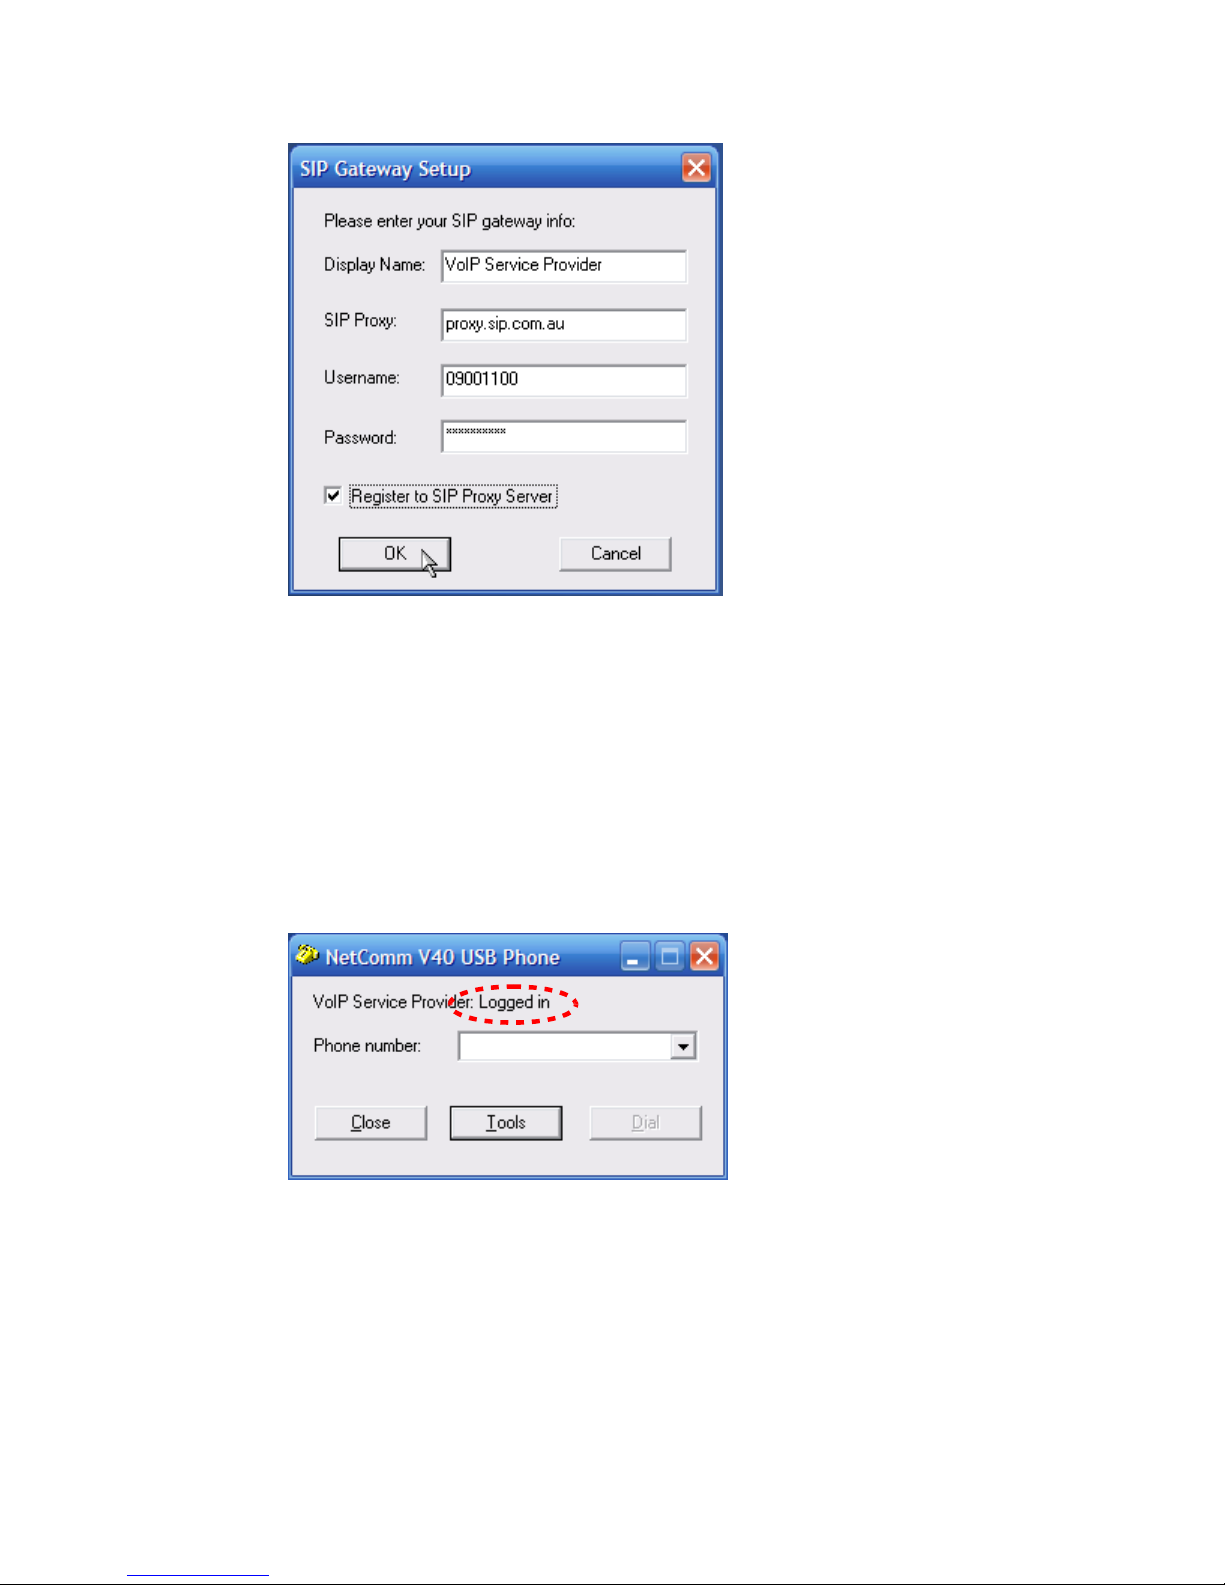
4
Power-On
LED
Speaker.
4. Use the red ‘C’ button to correct
any digits dialled.
3. Use the red phone button to
hangup on a call in progress.
2. Use the green phone button to
accept an incoming call or dial an
outgoing number after the number
has been entered using the keypad.
1. Use the numbers on the keypad to
dial your destination number.
Microphones.
Group 1 Buttons:
Use these buttons on the LSV40 USB phone to dial a number. Please refer to your VSP
for any specific dialling rules they have for their service.
Group 2 Button:
Use the Green button on the LSV40 USB phone to accept an incoming call or to dial the
outgoing number you have entered. The default setting on the phone is not to dial a
number automatically. Refer to Appendix 2 – Advanced Configuration to change any
settings of the phone using the .ini file.
Group 3 Button:
Use the Red button on the LSV40 USB phone is to hang up or reject an incoming call.
Group 4 Button:
Page 5

Use the Red ‘C’ button to clear any incorrect numbers you have entered via the keypad
5
before dialling.
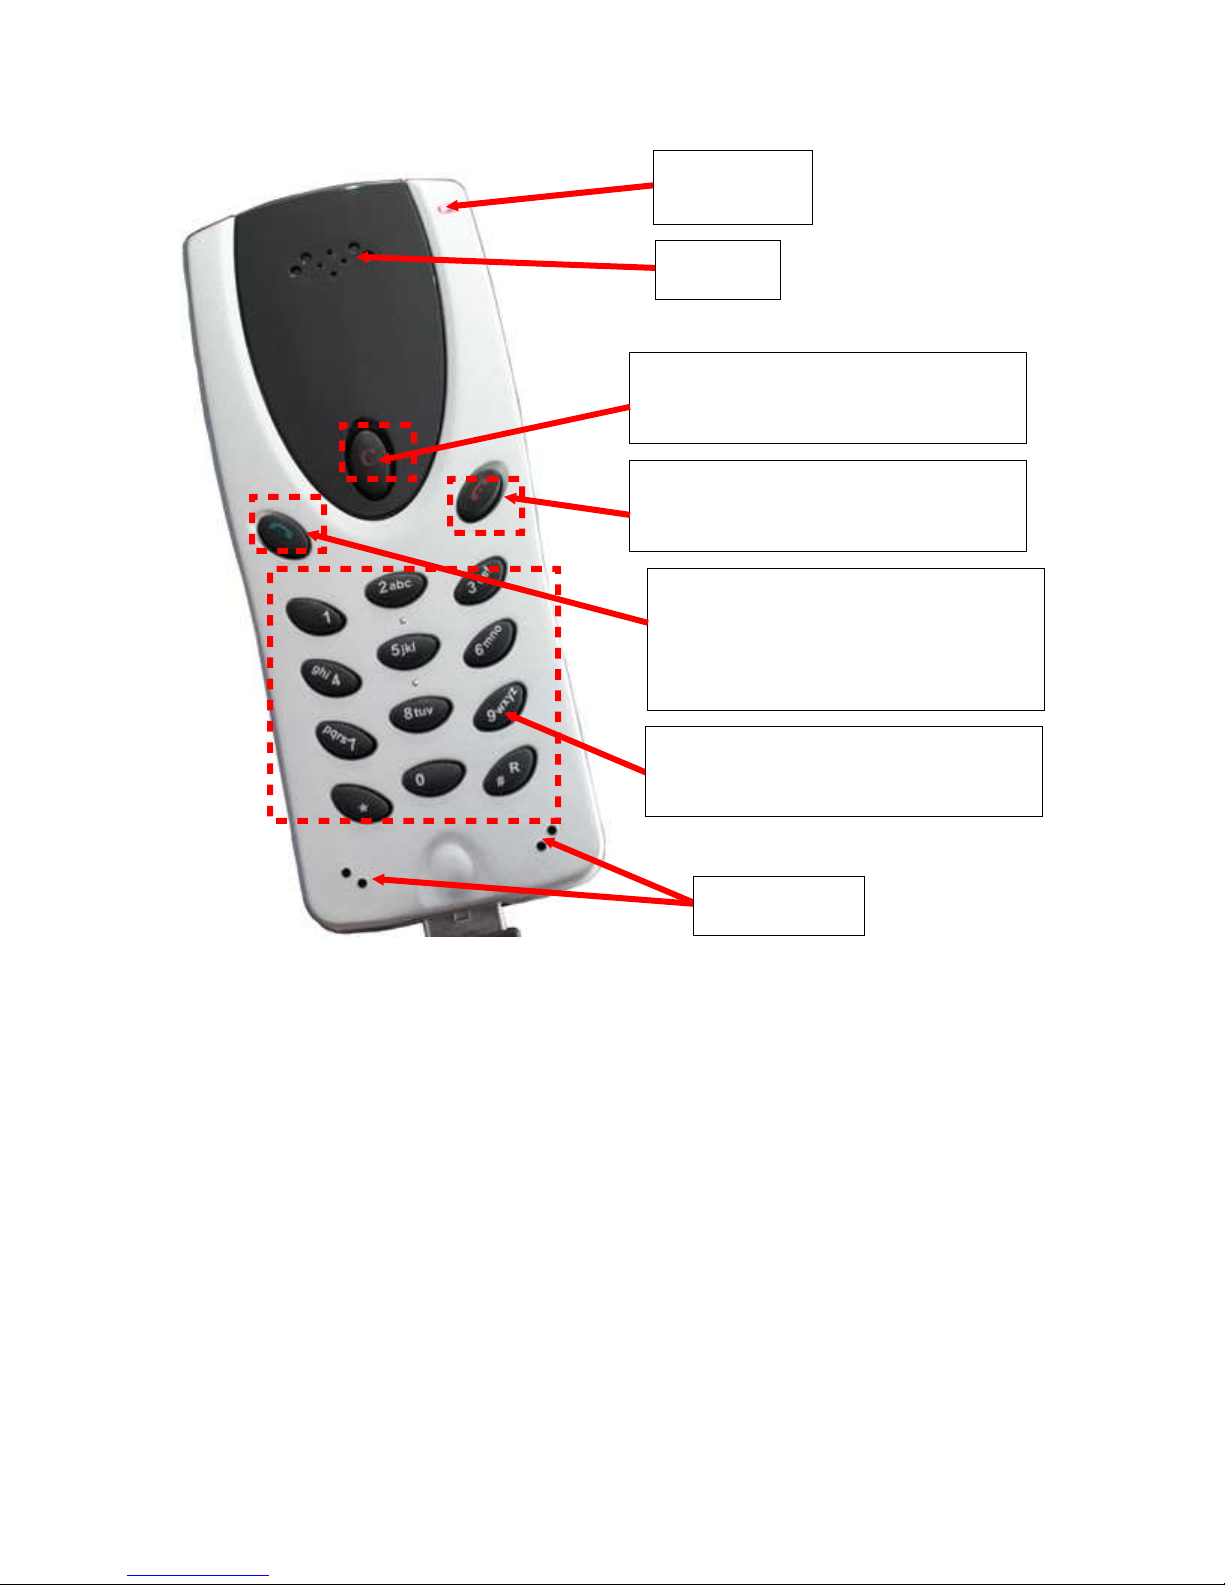
Call in progress Interface on your PC:
1. Once pressing the green dial button or clicking the Dial button on the LSV40
software interface, you will see the following:
Click the hang-up button to release a
call, or use the red phone button on
the USB phone to end a call.
Speaker – adjust this setting for the
volume of the speaker on your USB
phone.
Speaker
Mute.
Use the numeric keypad if you
require “touch-phone” functionality,
e.g. telephone banking, IVR’s and
other applications.
Microphone – adjust this setting if the
person you are calling complains that
your voice is too soft (increase
setting) or distorted (decrease
setting). Ideal volume is when you
see 2 yellow bars in the level
indicator.
Page 6

Using your LSV40
6
Once you have installed the LSV40 USB phone and you have checked your internet
connection, you are ready to make your first call.
Note: You can dial 181 at any time using your LSV40 Phone or 1300 731 048 using
your landline to contact MyNetFone customer service.
Your LSV40 package also comes with complimentary credit that allows you to begin
making and receiving calls immediately.
To ensure that your account is billed correctly, call 151 from your LSV40 Phone or 1300
731 048 from a landline to register your VoIP Handset.
Making outgoing calls
Your MyNetFone service works just as a normal landline, but without the higher costs.
Simply plug in your LSV40 Phone and start making calls.
Dial the telephone number you wish to call and press the green dial button to initiate a
call. You will hear a ringing or busy tone through the handset, just as you would on a
standard landline phone, except that this call will be made using your VoIP account. For
the latest rates and country codes, visit the http://www.myfone.com.au website.
Receiving incoming calls
Your new VoIP number is displayed on the base of the LSV40 Phone and on the back of
the box that it came in.
The phone will ring when a VoIP call is made to your number. Simply pick up the phone
and press the green phone button to accept and answer the call. If you have voicemail
enabled, your phone will ring 7 times before diverting to your voice mail box.
Please note that your Desktop PC or Laptop and Broadband service must be running and
operational to receive calls.
The default MyNetFone plan for your LSV40 Phone is a Super Saver plan. Please refer to
MyNetFone's website (www.myfone.com.au) for the features available with each plan.
The Super Saver plan allows you to:
•
Make VoIP calls to PSTN numbers. For example, you can make calls to landline
numbers (e.g. 02 9999 9999).
•
Make VoIP calls to mobile numbers (e.g. 0499 999 999).
•
Make FREE VoIP calls to other MyNetFone subscribers (e.g. 09 9999 9999).
•
Receive VoIP calls ONLY from other MyNetFone subscribers and NOT PSTN
(Landline) or mobile numbers.
Page 7

Note: To receive PSTN calls (i.e. calls from a standard landline) you will need to
7
contact MyNetFone customer service and upgrade your account to a MegaSaver plan. To
call MyNetFone customer service, dial 181 using your LSV40 Phone or dial 1300 731
048 using your landline.
Voicemail
Your voice mail box is ready to go when you purchase the product! All you need to do is
activate it before people can start leaving messages for you.
How do I setup my voice mail box?
1. To access your voicemail, dial 121 from your VoIP handset.
2. Follow the voice prompts to setup your personal greeting so your friends know it's you
that they are leaving a message for.
How do I collect my voice mail?
Just call 121 using your LSV40 Phone. If you have any new messages, the system will let
you know how many messages there are. Follow the voice prompts to listen to your
messages.
Note: You can dial 181 at any time using your LSV40 Phone or 1300 731 048 using
your landline to contact MyNetFone customer service.
Appendix 1 – Troubleshooting
1. I cannot login to my VoIP service provider and I see the following window:
This usually means that your router (ADSL modem / Router) has a problem
communicating with your VoIP service provider’s SIP proxy. Please check that your
ADSL modem / router has the ability to route SIP packets by checking with the
manufacturer.
Page 8

2. I cannot login to my VoIP service provider and I see the following window:
8
This indicates that your SIP proxy server you entered under the Gateway Setup
window is incorrect. Confirm these settings and try again.
3. I cannot login to my VoIP service provider and I see the following window:
This indicates that you are able to connect to your VoIP service provider but your
username and password are incorrect. Confirm these and try again.
4. The person I have called is saying that my voice is too soft.
Adjust the settings of the microphone using the slider on the V40 software interface:
Page 9
5. The person I am speaking with sounds too soft.
9
Adjust the settings of the speaker using the slider on the V40 software interface (see
above).
Appendix 2 – Advanced Configuration
1. Changing the ring tone on your USB phone when someone calls you from the
buzzer sound.
Note: You need a sound card installed on your PC to set this up.
a. Download or create a WAV file for your ring tone.
b. Open the following folder: c:\Program Files\NetComm LSV40 USB Phone.
c. Replace the RINGIN.WAV file with your WAV file.
d. Rename your WAV file to RINGIN.WAV.
e. Open the file tjsipinfo.ini located in c:\Program Files\NetComm LSV40 USB
Phone using a text editing program such as Notepad or Wordpad.
f. Edit the value of EnableSpeakerRing from 0 to 1.
g. Edit the value of EnableBuzzerRing from 1 to 0.
h. Save the changes to this file and close.
i. Restart the LSV40 USB Phone application for the new settings to take effect.
2. Changing the default dial wait period.
The USB phone (by default) does not automatically dial the number entered unless
you either click the Dial button on the software interface or press the green
telephone button on phone. You can change the setting in the tjsipinfo.ini file to
automatically dial the number entered after a certain number of seconds.
Open the tjsipinfo.ini file and edit the value of dial_wait_period to the number of
seconds the phone should wait before automatically dialling the number entered.
Page 10

Appendix 3: Registering your NetComm Product.
10
All NetComm Limited (“NetComm”) products have a standard 12 month warranty from
date of purchase against defects in manufacturing and that the products will operate in
accordance with the specifications outlined in the User Guide. However some products
have an extended warranty option (please refer to packaging). To be eligible for the
extended warranty you must supply the requested warranty information to NetComm
within 30 days of the original purchase by registering on-line via the NetComm web site
at:
www.netcomm.com.au
Contact Information
If you have any technical difficulties with your product, please do not hesitate to contact
NetComm’s Customer Support Department.
Email: support@netcomm.com.au
Fax: (+612) 9424-2010
Web: www.netcomm.com.au
NOTE: NetComm Technical Support for this product only covers the basic installation
and features outlined in the Quick Start Guide. For further information regarding the
advanced features of this product, please refer to the configuring sections in this User
Guide or contact a Network Specialist.
Appendix 4: Legal & Regulatory Information
This manual is copyright. Apart from any fair dealing for the purposes of private study,
research, criticism or review, as permitted under the Copyright Act, no part may be
reproduced, stored in a retrieval system or transmitted in any form, by any means, be it
electronic, mechanical, recording or otherwise, without the prior written permission of
NetComm Limited. NetComm Limited accepts no liability or responsibility, for
consequences arising from the use of this product.
NetComm Limited reserves the right to change the specifications and operating details of
this product without notice. NetComm is a registered trademark of NetComm Limited.
All other trademarks are acknowledged the property of their respective owners.
Customer Information
ACA (Australian Communications Authority) requires you to be aware of the following
information and warnings:
(1) This unit shall be connected to the Telecommunication Network through a line cord
which neets the requirements of the ACA TS008 Standard.
(2) This equipment has been tested and found to comply with the Standards for C-Tick
and or A-Tick as set by the ACA. These standards are designed to provide reasonable
protection against harmful interference in a residential installation. This equipment
generates, uses, and can radiate radio noise and, if not installed and used in accordance
with the instructions detailed within this manual, may cause interference to radio
Page 11

communications. However, there is no guarantee that interference will not occur with the
11
installation of this product in your home or office. If this equipment does cause some
degree of interference to radio or television reception, which can be determined by
turning the equipment off and on, we encourage the user to try to correct the interference
by one or more of the following measures:
•
Change the direction or relocate the receiving antenna.
•
Increase the separation between this equipment and the receiver.
•
Connect the equipment to an alternate power outlet on a different power circuit
from that to which the receiver/TV is connected.
•
Consult an experienced radio/TV technician for help.
(3) The power supply that is provided with this unit is only intended for use with this
product. Do not use this power supply with any other product or do not use any other
power supply that is not approved for use with this product by NetComm. Failure to do
so may cause damage to this product, fire or result in personal injury.
Product Warranty
The warranty is granted on the following conditions:
1. This warranty extends to the original purchaser (you) and is not transferable;
2. This warranty shall not apply to software programs, batteries, power supplies, cables or
other accessories supplied in or with the product;
3. The customer complies with all of the terms of any relevant agreement with NetComm
and any other reasonable requirements of NetComm including producing such evidence
of purchase as NetComm may require;
4. The cost of transporting product to and from NetComm's nominated premises is your
responsibility; and,
5. NetComm does not have any liability or responsibility under this warranty where any
cost, loss, injury or damage of any kind, whether direct, indirect, consequential,
incidental or otherwise arises out of events beyond NetComm's reasonable control. This
includes but is not limited to: acts of God, war, riot, embargoes, acts of civil or military
authorities, fire, floods, electricity outages, lightning, power surges, or shortages of
materials or labour.
6. The customer is responsible for the security of their computer and network at all times.
Security features may be disabled within the factory default settings. NetComm
recommends that you enable these features to enhance your security.
The warranty is automatically voided if:
1. You, or someone else, use the product, or attempts to use it, other than as specified by
NetComm;
2. The fault or defect in your product is the result of a voltage surge subjected to the
product either by the way of power supply or communication line, whether caused by
thunderstorm activity or any other cause(s);
3. The fault is the result of accidental damage or damage in transit, including but not
limited to liquid spillage;
Page 12

4. Your product has been used for any purposes other than that for which it is sold, or in
12
any way other than in strict accordance with the user manual supplied;
5. Your product has been repaired or modified or attempted to be repaired or modified,
other than by a qualified person at a service centre authorised by NetComm; and,
6. The serial number has been defaced or altered in any way or if the serial number plate
has been removed.
Limitations of Warranty
The Trade Practices Act 1974 and corresponding State and Territory Fair Trading Acts or
legalisation of another Government ("the relevant acts") in certain circumstances imply
mandatory conditions and warranties which cannot be excluded. This warranty is in
addition to and not in replacement for such conditions and warranties.
To the extent permitted by the Relevant Acts, in relation to your product and any other
materials provided with the product ("the Goods") the liability of NetComm under the
Relevant Acts is limited at the option of NetComm to:
•
Replacement of the Goods; or
•
Repair of the Goods; or
•
Payment of the cost of replacing the Goods; or
•
Payment of the cost of having the Goods repaired.
All NetComm ACN 002 490 486 products have a standard 12 months warranty from date
of purchase. However some products have an extended warranty option (refer to
packaging). To be eligible for the extended warranty you must supply the requested
warranty information to NetComm within 30 days of the original purchase by registering
on-line via the NetComm web site at www.netcomm.com.au.
 Loading...