

Page 1
HSPA+ WIFI ROUTER
WITH VOICE
NETCOMM LIBERTY SERIES
Page 2

HSPA+ WIFI ROUTER WITH VOICE User Guide YML10WVR2
2 www.netcommlimited.com
Preface
The purpose of this manual is to provide you with detailed information on the installation, operation and application of your HSPA WiFi
Router with Voice.
Important Notice and Safety Precaution
• Before servicing or disassembling this equipment, always disconnect all power or telephone lines from the device.
• Use an appropriate power supply, preferably the supplied power adapter, with an output of DC 12V 1.5A
• Do not operate the device near ammable gas or fumes. Turn o the device when you are near a petrol station, fuel depot or chemical
plant/depot. Operation of such equipment in potentially explosive atmospheres can represent a safety hazard.
• The device and antenna shall be used only with a minimum of 20cm from human body.
• The operation of this device may aect medical electronic devices, such as hearing aids and pacemakers
• The antennas must be connected to this product prior to connecting the telephone cord.
• The telephone cord must be disconnected prior to disconnecting the antennas.
Page 3

YML10WVR2 HSPA+ WIFI ROUTER WITH VOICE User Guide
www.netcommlimited.com 3
HSPA+ WIFI ROUTER WITH VOICE
NETCOMM LIBERTY SERIES
TABLE OF CONTENTS
Introduction������������������������������������������������������������������������������������������������������������������������������������������������������������������������������������������� 5
1.1 Features .................................................................................................................................................................................................................5
1.2 Package Contents..................................................................................................................................................................................................5
1.3 LED Indicators........................................................................................................................................................................................................6
1.4 Rear Panel .............................................................................................................................................................................................................7
QuickSetup������������������������������������������������������������������������������������������������������������������������������������������������������������������������������������������� 9
2.1 Setup Procedure ....................................................................................................................................................................................................9
WebUserInterface������������������������������������������������������������������������������������������������������������������������������������������������������������������������������ 11
3.1 Default Settings ...................................................................................................................................................................................................11
3.2 TCP/IP Settings....................................................................................................................................................................................................11
3.3 Login Procedure ..................................................................................................................................................................................................14
3.4 Web User Interface Homepage ............................................................................................................................................................................14
3GSettings������������������������������������������������������������������������������������������������������������������������������������������������������������������������������������������ 16
4.1 3G Service Setup .................................................................................................................................................................................................16
4.2 PIN Conguration .................................................................................................................................................................................................17
Wireless����������������������������������������������������������������������������������������������������������������������������������������������������������������������������������������������� 20
5.1 Setup ...................................................................................................................................................................................................................20
5.2 Security ...............................................................................................................................................................................................................21
5.3 Conguration........................................................................................................................................................................................................22
5.4 MAC Filter ............................................................................................................................................................................................................24
5.5 Wireless Bridge ....................................................................................................................................................................................................25
5.6 Station Info ...........................................................................................................................................................................................................25
Management���������������������������������������������������������������������������������������������������������������������������������������������������������������������������������������� 27
6.1 Device Settings ....................................................................................................................................................................................................27
6.2 Congure SNMP agent on 3G10WVR2 ...............................................................................................................................................................29
6.3 Simple Network Time Protocol (SNTP) .................................................................................................................................................................30
6.4 Access Control .....................................................................................................................................................................................................31
AdvancedSetup���������������������������������������������������������������������������������������������������������������������������������������������������������������������������������� 34
7.1 Local Area Network (LAN) ....................................................................................................................................................................................34
7.2 Network Address Translation (NAT).......................................................................................................................................................................36
7.3 Security ................................................................................................................................................................................................................38
7.4 Routing ................................................................................................................................................................................................................40
Voice����������������������������������������������������������������������������������������������������������������������������������������������������������������������������������������������������� 43
Status��������������������������������������������������������������������������������������������������������������������������������������������������������������������������������������������������� 45
8.1 Diagnostics ..........................................................................................................................................................................................................45
8.2 System Log ..........................................................................................................................................................................................................46
8.3 3G Network .........................................................................................................................................................................................................48
8.4 Statistics ..............................................................................................................................................................................................................50
8.5 Route ...................................................................................................................................................................................................................51
8.6 ARP .....................................................................................................................................................................................................................51
8.7 Dynamic Host Conguration Protocol (DHCP) ......................................................................................................................................................52
8.8 PING....................................................................................................................................................................................................................52
AppendixA:PrintServer��������������������������������������������������������������������������������������������������������������������������������������������������������������������� 54
For Windows Vista/7 ..................................................................................................................................................................................................54
For MAC OSX ............................................................................................................................................................................................................56
AppendixB:USBStorage������������������������������������������������������������������������������������������������������������������������������������������������������������������� 58
For Windows Vista/7 ..................................................................................................................................................................................................58
For MAC OSX ............................................................................................................................................................................................................58
Legal&RegulatoryInformation���������������������������������������������������������������������������������������������������������������������������������������������������������� 59
Page 4

INTRODUCTION
Page 5

YML10WVR2 HSPA+ WIFI ROUTER WITH VOICE User Guide
www.netcommlimited.com 5
HSPA+ WIFI ROUTER WITH VOICE
NETCOMM LIBERTY SERIES
Introduction
With the increasing popularity of the 3G standard worldwide, this HSPA WiFi Router with Voice provides you with triple-band coverage
through expanding cellular networks throughout the world.
By following these simple step-by-step instructions, you can share your connection with multiple wireless and wired devices using the
3G network.
Integrating a Sierra Wireless HSPA module, this Router downloads at turbo speeds of up to 7.2Mbps.
This Router also provides state-of-the-art security features such as WiFi Protected Access (WPA) data encryption, Firewall and Virtual Private
Networks (VPN) pass through.
1.1 Features
• This HSPA WiFi Router with Voice allows you to share your 3G connection with multiple wireless or wired devices
• Provides you with worldwide coverage through triple-band HSUPA/HSDPA/UMTS (850 / 1900 / 2100MHz), quad-band EDGE/GSM (850
/ 900 / 1800 / 1900 MHz)
• Embedded multi-mode HSUPA/HSDPA/UMTS/EDGE/GPRS/GSM module
• 1 x RJ11 port for voice calling over the 3G network via a connected standard Analogue Telephone (not included).
• Integrated 802.11g/54Mbps AP (backward compatible with 802.11b)
• WiFi Protected Access (WPA)/ WiFi Protected Access 2 (WPA2) and 802.1x wireless encryption
• Static route/ Routing Information Protocol (RIP)/RIP v2 routing functions
• Media Access Control (MAC) address and IP ltering
• Network Address Translation (NAT)/ Port Address Translation (PAT)
• Supports Universal Plug and Play (UPnP) and Internet Group Management Protocol (IGMP) snooping
• Supports Virtual Private Network (VPN) Pass-Through
• Dynamic Host Conguration Protocol (DHCP) Server/Relay/Client
• Domain Name System (DNS) Proxy and Dynamic Domain Name System (DDNS)
• Web-based Management
• Command Line Interface (CLI) command interface via Telnet
• Conguration backup and restoration
• Remote conguration
• Router and 3G module rmware upgrade
• Supports half-bridging mode
• Supports Simple Network Management Protocol (SNMP)
1.2 Package Contents
Your package contains the following:
• 3G10WVR2 – HSPA WiFi Router with Voice
• Printed Quick Start Guide
• Ethernet Cable
• Wireless Security Card
• 1 x 3G Antenna
• Power Supply
• Support CD
Page 6
HSPA+ WIFI ROUTER WITH VOICE User Guide YML10WVR2
6 www.netcommlimited.com
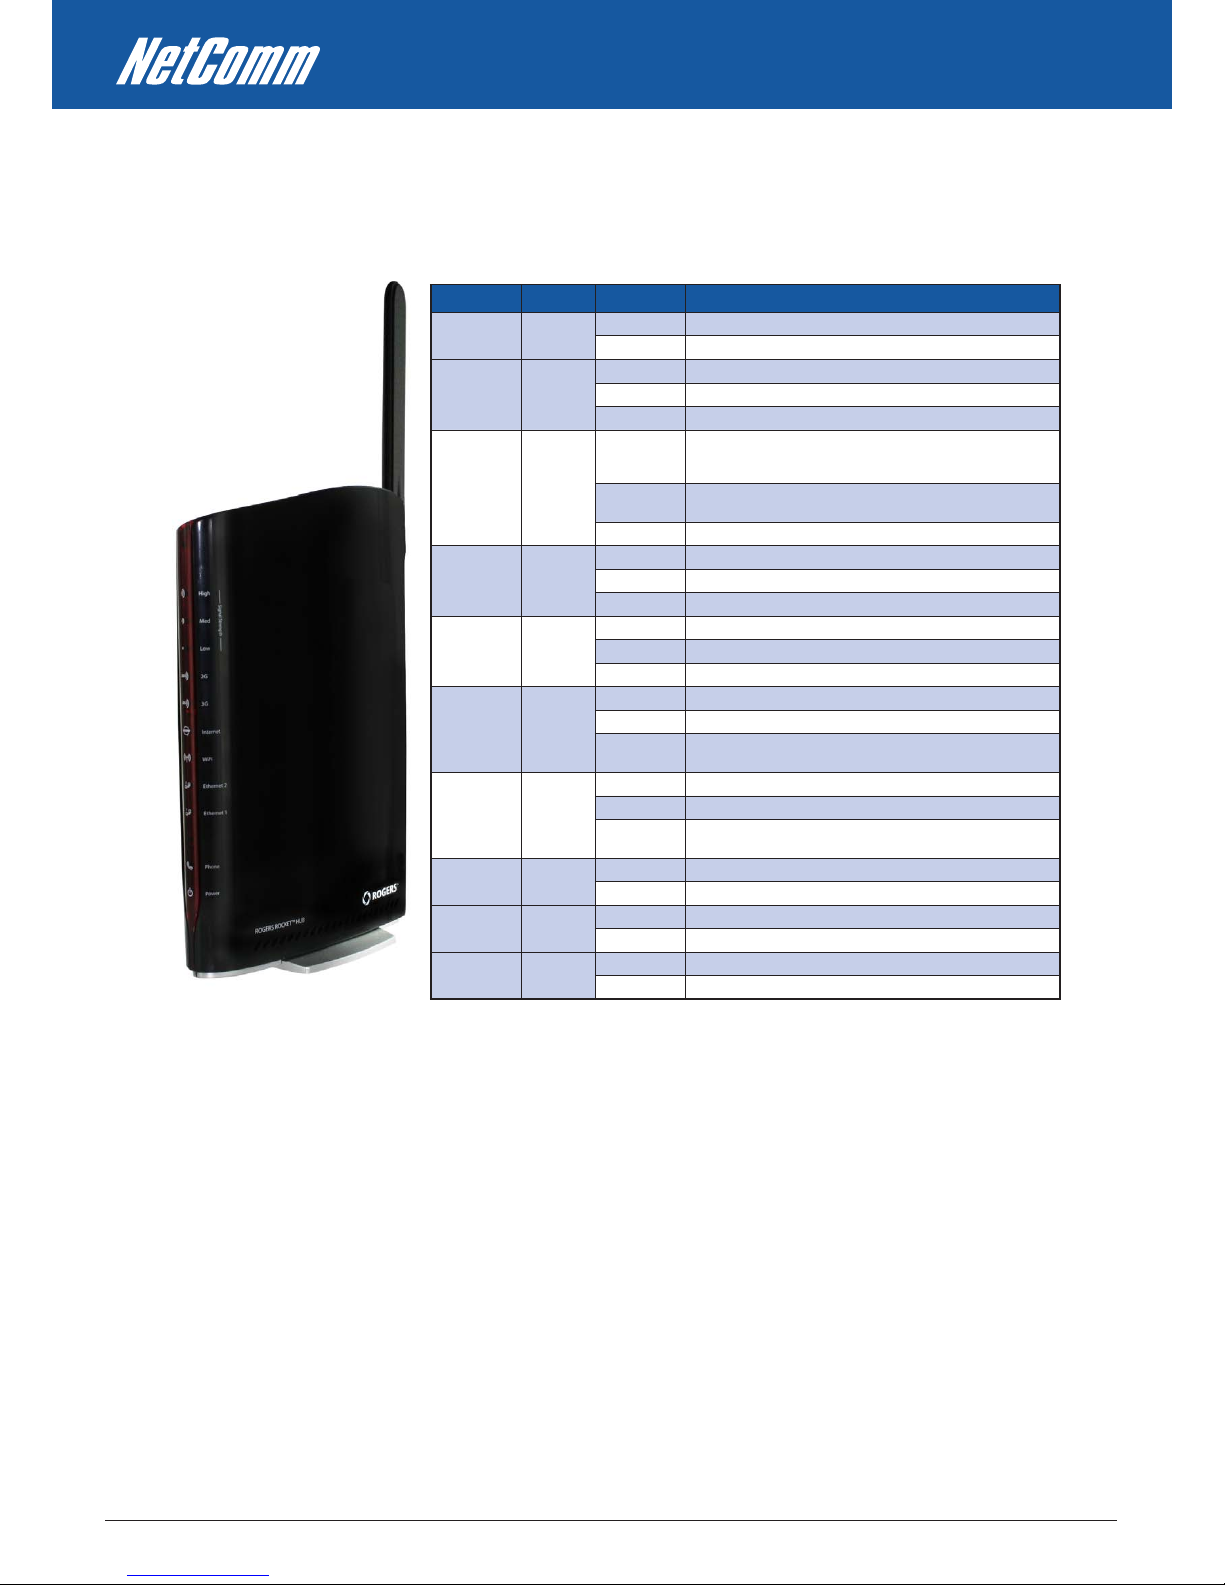
1.3 LED Indicators
The front panel LED indicators are shown in this illustration and followed by detailed explanations in the table below.
LED COLOR MODE DESCRIPTION
PO WE R Re d On Po we r on
Of f Po we r of f
Ph on e Re d On Ph on e li ne a ct ive
Of f Ph on e li ne i na ct ive o r no t co nn ec ted
Fl as hi ng Ne w Voi ce m ai l
LA N 1~ 2 Re d On Po we re d dev ic e co nn ec te d t o th e as so ci ate d po rt ( in cl ud es
de vi ce s wi th wa ke - on - L AN c ap ab il it y wh ere a s li gh t vol ta ge i s
su pp li ed t o an Et he rn et c on ne ct io n)
Of f No a ct iv it y, mo de m po we re d o ff , no c ab le or n o po we red
de vi ce c on ne ct ed to t he a ss oc iat ed p or t
Bl in k LA N ac ti vi ty p re sen t (t ra ff ic i n eit he r di re ct io n)
Wi Fi Re d On Th e wi re le ss mo du le i s re ad y.
Of f Th e wi re le ss mo du le i s no t in sta ll ed .
Bl in k Da ta b ei ng t ra nsm it te d or r ece iv ed o ve r W iF i.
In te rn et Re d Bl in k Da ta i s tr an sm itt ed t hr ou gh I nte rn et c on ne ct io n
Of f No c on ne ct io n to th e in te rn et o r r ou te r po we red o ff
On In te rn et c on ne ct ion e st ab li sh ed
3G Re d On In te rn et c on ne ct ion e st ab li sh ed .
Bl in k Co nn ec ti ng w it h U MT S ce ll ul ar st at io n
Of f No c on ne ct io n wi th UM TS c el lu lar s ta ti on , no a ct ivi ty o r
ro ut er p ow ere d of f.
2G Re d On In te rn et c on ne ct ion e st ab li sh ed .
Bl in k Co nn ec ti ng t o an ED GE , GP RS o r GSM c el lu la r st ati on
Of f No c on ne ct io n wi th ED GE , GP RS o r GSM c el lu la r st ati on , no
ac ti vi ty o r ro ut er po we re d of f.
Lo w R ed O n L ow s ign al s tr en gt h
Of f No a ct iv it y, ro ut er p ow ere d of f or o n ot her s ig na l st re ngt h
Me d Re d On Me di um si gn al s tr en gth
Of f No a ct iv it y, ro ut er p ow ere d of f or o n ot her s ig na l st re ngt h
Hi gh Re d On Hi gh s ig na l st ren gt h
Of f No a ct iv it y, ro ut er p ow ere d of f or o n ot her s ig na l st re ngt h
NOTE: The six LEDs on the right side of the front panel display (Internet, 3G, 2G, Low, Med, High) will cycle on and
o if PIN code protection is activated. In this case, you should consult section 4.2.1 PIN Code Protection for
further instructions.
Page 7
YML10WVR2 HSPA+ WIFI ROUTER WITH VOICE User Guide
www.netcommlimited.com 7
HSPA+ WIFI ROUTER WITH VOICE
NETCOMM LIBERTY SERIES
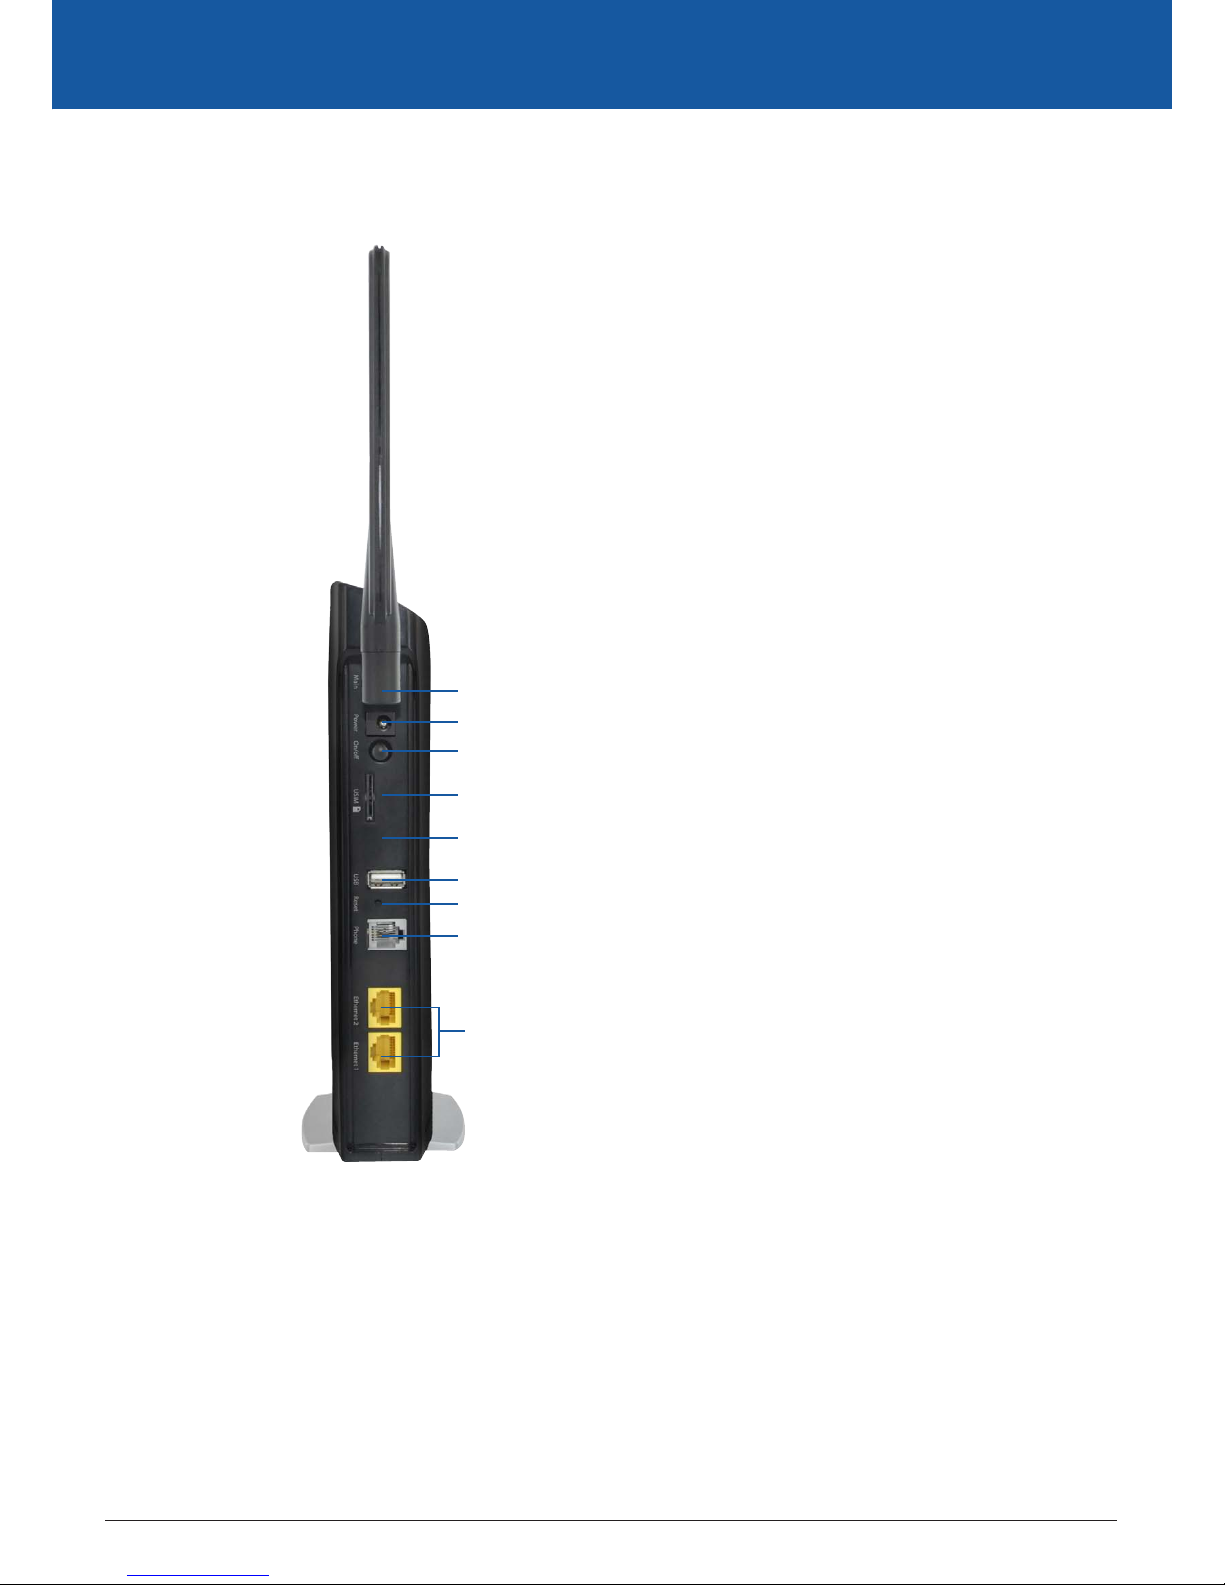
1.4 Rear Panel
The rear panel contains the ports for data and power connections.
2 RJ-45 Ethernet Ports
Main 3G Antenna (removable, SMA connection)
Power jack for DC power input (12VDC / 1.5A)
Power button
USIM card slot
Aux 3G Antenna (internal)
USB Port (For connecting a USB Printer or USB Storage Device)
Reset button
Phone Port (for Circuit-Switched Voice Call)
Page 8

QUICK SETUP
Page 9
YML10WVR2 HSPA+ WIFI ROUTER WITH VOICE User Guide
www.netcommlimited.com 9
HSPA+ WIFI ROUTER WITH VOICE
NETCOMM LIBERTY SERIES
Quick Setup
2.1 Setup Procedure
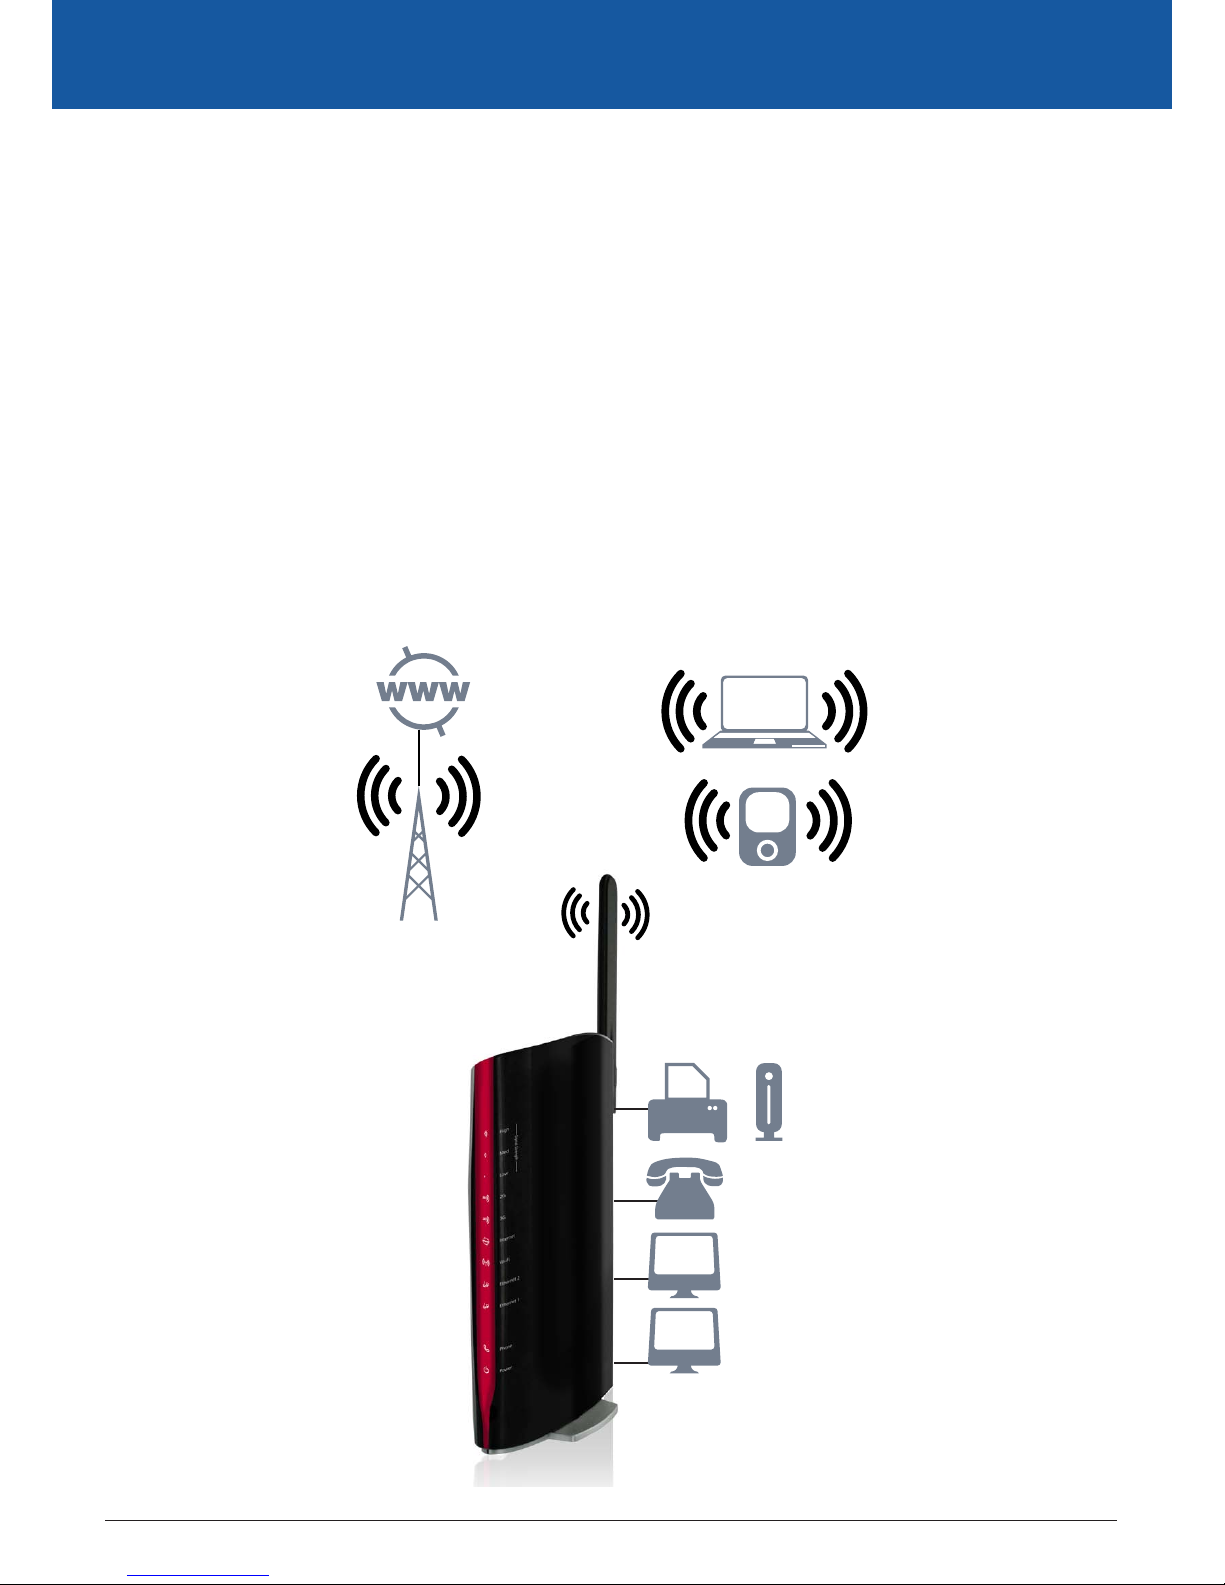
These steps explain how to quickly setup your 3G Router:
1. Attach the 3G antenna provided to the port marked Main on the back of the router. The antenna should be screwed
in a clockwise direction.
2. Insert your SIM card (until you hear a click) into the USIM slot at the back of the Router.
3. Connect the yellow networking cable to one of the yellow ports found at the back of the Router.
4. Connect the other end of the yellow networking cable to the port on your computer.
5. If required, connect a standard Analogue Telephone to the port labeled “Phone” using an RJ-11 Cable (not included)
6. Connect the power adapter to the Power socket on the back of the Router.
7. Plug the power adapter into the wall socket and press the power button into the ON position (in).
8. Congure the router through the Web User Interface (WUI).
NOTE: Chapters 3 through 8 explain how to setup and use the WUI
9. Save the router conguration and reboot (see section 6.4).
Telephone
Laptop
Computer
Computer
3G Tower
Smart Phone
Printer USB Storage
OR
Page 10

WEB USER
INTERFACE
Page 11
YML10WVR2 HSPA+ WIFI ROUTER WITH VOICE User Guide
www.netcommlimited.com 11
HSPA+ WIFI ROUTER WITH VOICE
NETCOMM LIBERTY SERIES
Web User Interface
This section describes how to access the device via the web user interface using a web browser such as Microsoft Internet Explorer (version
6.0 or later).
3.1 Default Settings
The following are the default settings for the device.
• Local (LAN) access (username: admin, password: admin)
• Remote (WAN) access (username: support, password: support)
• User access (username: user, password: user)
• LAN IP address: 192.168.1.1
• Remote WAN access: disabled
• NAT and rewall: enabled
• Dynamic Host Conguration Protocol (DHCP) server on LAN interface: enabled
Technical Note:
During power on, the device initializes all settings to default values. It will then read the conguration prole from the permanent storage section of ash memory. The default
attributes are overwritten when identical attributes with dierent values are congured. The conguration prole in permanent storage can be created via the web user interface or
telnet user interface, or other management protocols. The factory default conguration can be restored either by pushing the reset button for more than ve seconds until the power
indicates LED blinking or by clicking the Restore Default Conguration option in the Restore Default Settings screen.
3.2 TCP/IP Settings
It is likely that your computer will automatically obtain an IP Address and join the network. This is because the Dynamic Host Conguration
Protocol (DHCP) server (on the device) will start automatically when your Router powers up.
This automatic assignment requires that DHCP is congured on your computers. It is likely that this is already the case, but should you be
required to congure this, please see the instructions below.
Windows XP/Vista/7
DHCP Mode
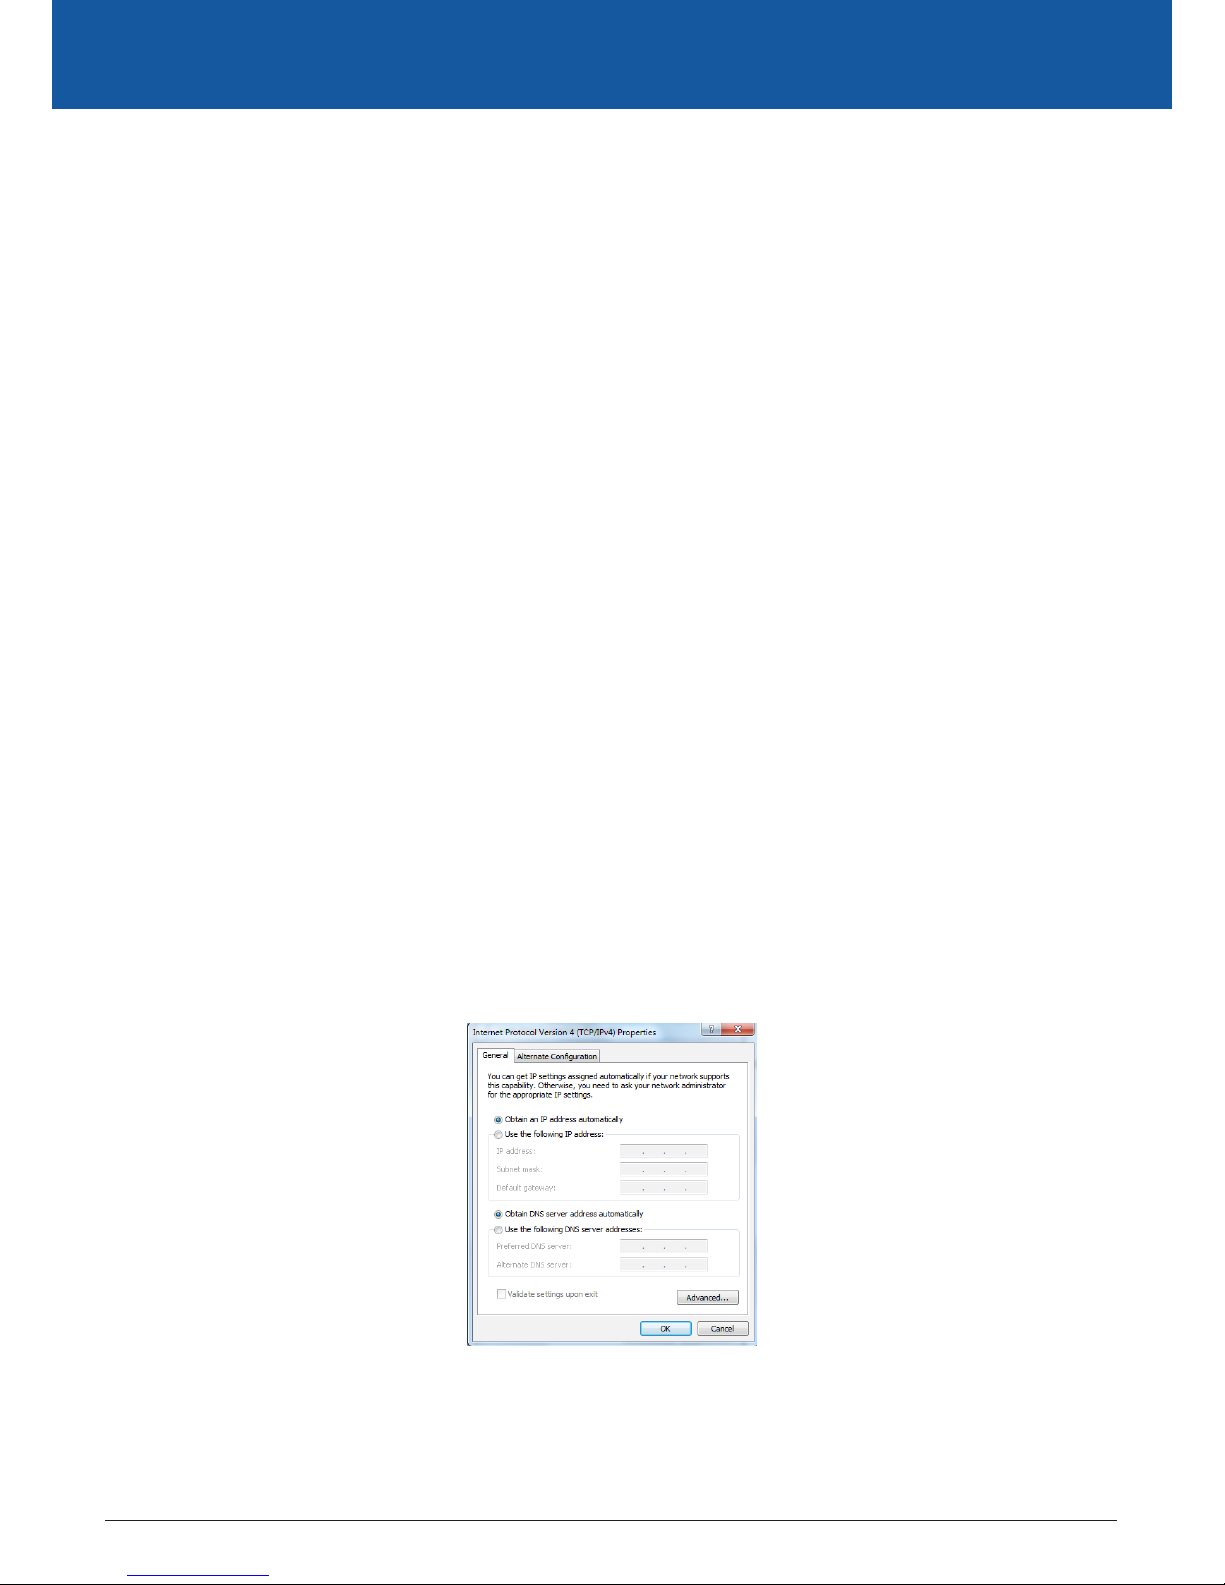
To set your PC for DHCP mode, check the Internet Protocol properties of your Local Area Connection. You can set your PC to DHCP mode by
selecting Obtain an IP address automatically in the dialog box shown below.
Page 12
HSPA+ WIFI ROUTER WITH VOICE User Guide YML10WVR2
12 www.netcommlimited.com
STATIC IP Mode
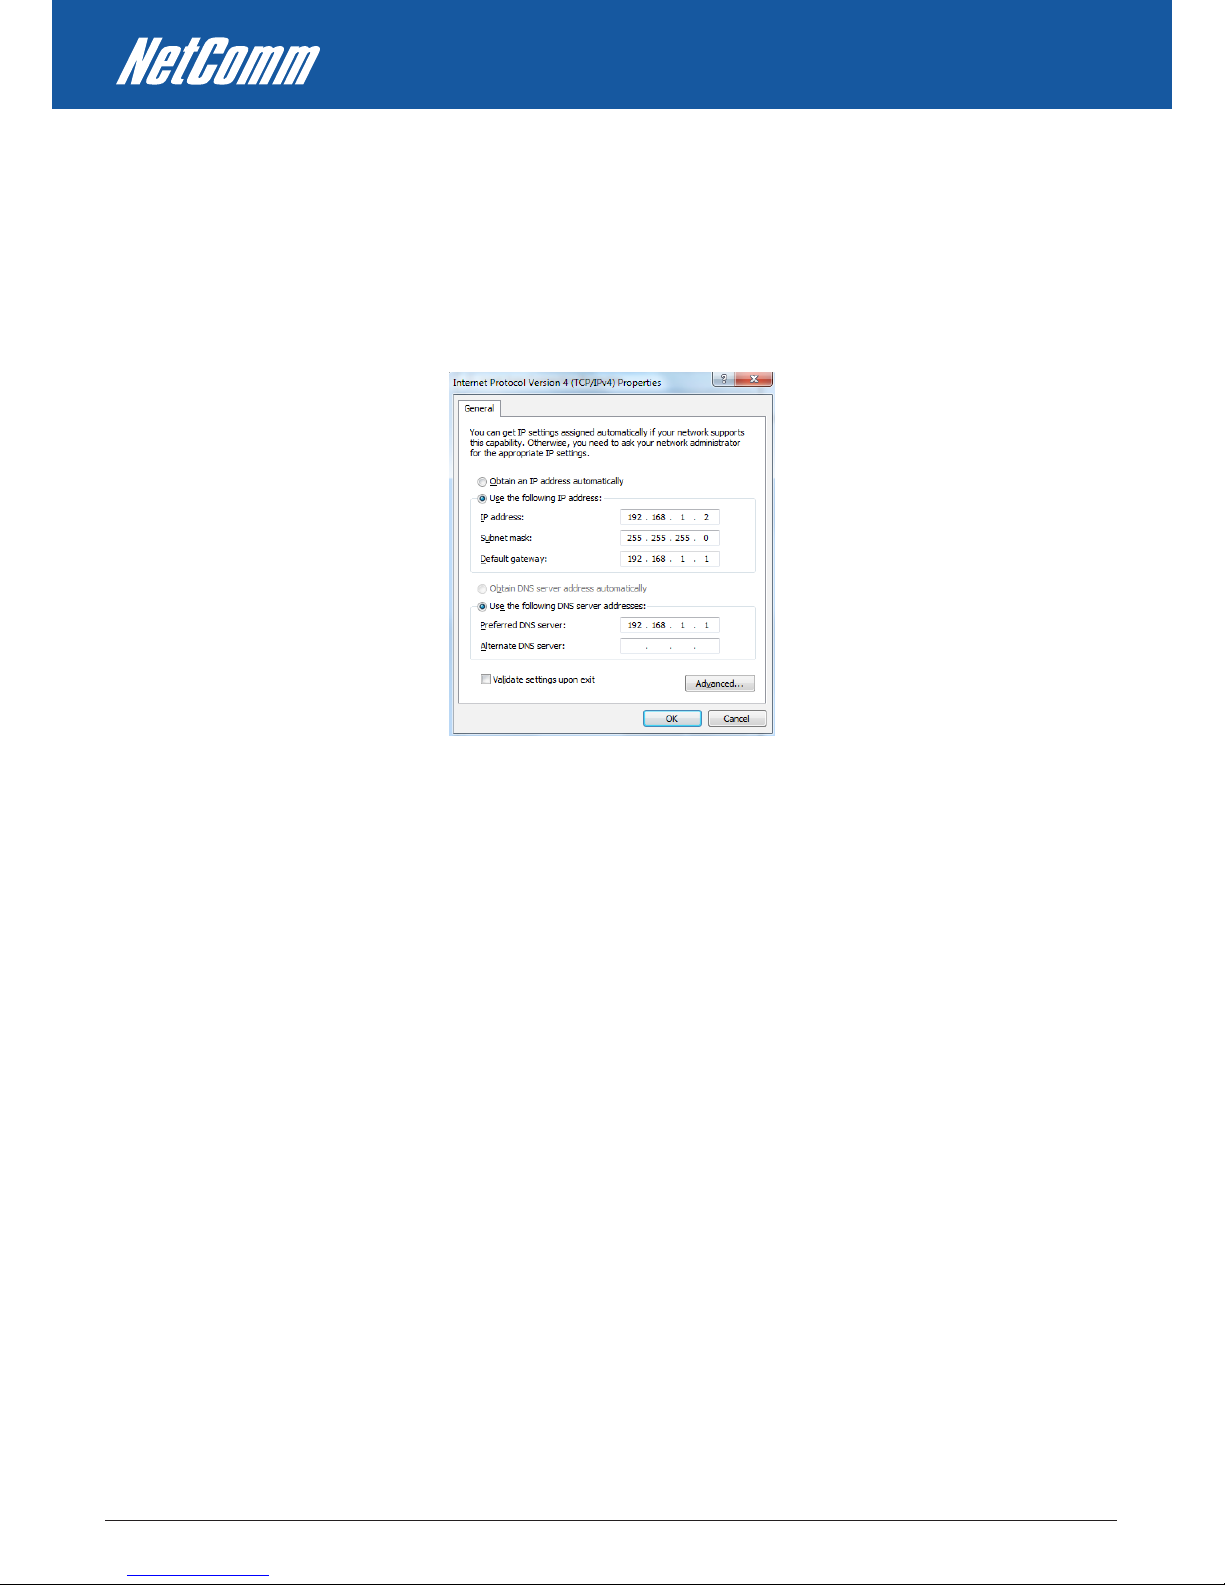
To congure your Router manually, your PC must have a static IP address within the Router’s subnet. The following steps show how to
congure your PC IP address using subnet 192.168.1.x. The following assumes you are running Windows XP .
1. From the Network Connections window, open Local Area Connection (You may also access this screen by double-clicking the Local
Area Connection icon on your taskbar). Click the Properties button.
2. Select Internet Protocol (TCP/IP) and click the Properties button. The screen should now display as below. Change the IP address
to the domain of 192.168.1.x (1<x<254) with subnet mask of 255.255.255.0. Set the default router and DNS server to the router’s IP
address.
NOTE: The IP address of the router is 192.168.1.1 (default), so the PC must be set with a dierent IP. In the case below, the PC’s IP address is set as 192.168.1.2
3. Click OK to submit the settings.
Page 13

YML10WVR2 HSPA+ WIFI ROUTER WITH VOICE User Guide
www.netcommlimited.com 13
HSPA+ WIFI ROUTER WITH VOICE
NETCOMM LIBERTY SERIES
MAC OSX 10.4
DHCP Mode
To set your Apple Mac for DHCP mode, browse to the Apple menu and select System Preferences. In the System Preferences menu, click on
the Network icon and select Ethernet. Next select Using DHCP from the Congure drop down list. After clicking Apply, your Mac’s IP Address
will now be automatically assigned from the Gateway.
STATIC Mode
If you do not wish to use automatic assignment of IP Addresses and wish to congure your Router manually, your computer must have
a static IP address within the Router’s subnet. The following steps show how to congure your computer’s IP address within the subnet
192.168.1.x
1. Browse to the Apple menu and select System Preferences. From the System Preferences, click the Network icon and select the
Ethernet connection.
2. From the Congure drop down list, you can set your computer to Static IP mode by selecting the “Manually” option.
3. Choose an IP address between 192.168.1.2 – 192.168.1.254 (Do not choose the Router IP of 192.168.1.1). Enter this IP address into the
eld marked IP Address, and enter a Subnet Mask of 255.255.255.0
4. Set the Router and DNS server eld to 192.168.1.1 (The Router’s IP address).
NOTE: The IP address of the router is 192.168.1.1 (default), so the computer must be set with a dierent IP to the router. In the case below, the PC’s IP address is set as 192.168.1.2
5. Click Apply to submit the settings.
Page 14
HSPA+ WIFI ROUTER WITH VOICE User Guide YML10WVR2
14 www.netcommlimited.com
3.3 Login Procedure
To login to the web interface, follow the steps below:
NOTE: The default settings can be found in 3.1 Default Settings.
1. Open a web browser and enter the default IP address for the Router in the Web address eld. In this case http://192.168.1.1 .
NOTE: For local administration (i.e. LAN access), the PC running the browser must be attached to the Ethernet, and not necessarily to the device. For remote access, use the WAN IP
address shown on the WUI Homepage screen and login with remote username and password.
2. Enter the default username and password, as dened in section 3.1 Default Settings.Click OK to continue.
NOTE: The login password can be changed later (see 6.4.2 Passwords)
3. After successfully logging in for the rst time, you will reach this screen.
3.4 Web User Interface Homepage
The web user interface (WUI) is divided into two window panels, the main menu (on the top) and the display screen (on the bottom). The
main menu has the following options: Basic, 3G Settings, Wireless, Management, Advanced, and Status.
Selecting one of these options will open a submenu with more options. Basic is discussed below while subsequent chapters introduce the
other main menu selections.
NOTE: The menu options available within the web user interface are based upon the device conguration and user privileges (i.e. local or remote).
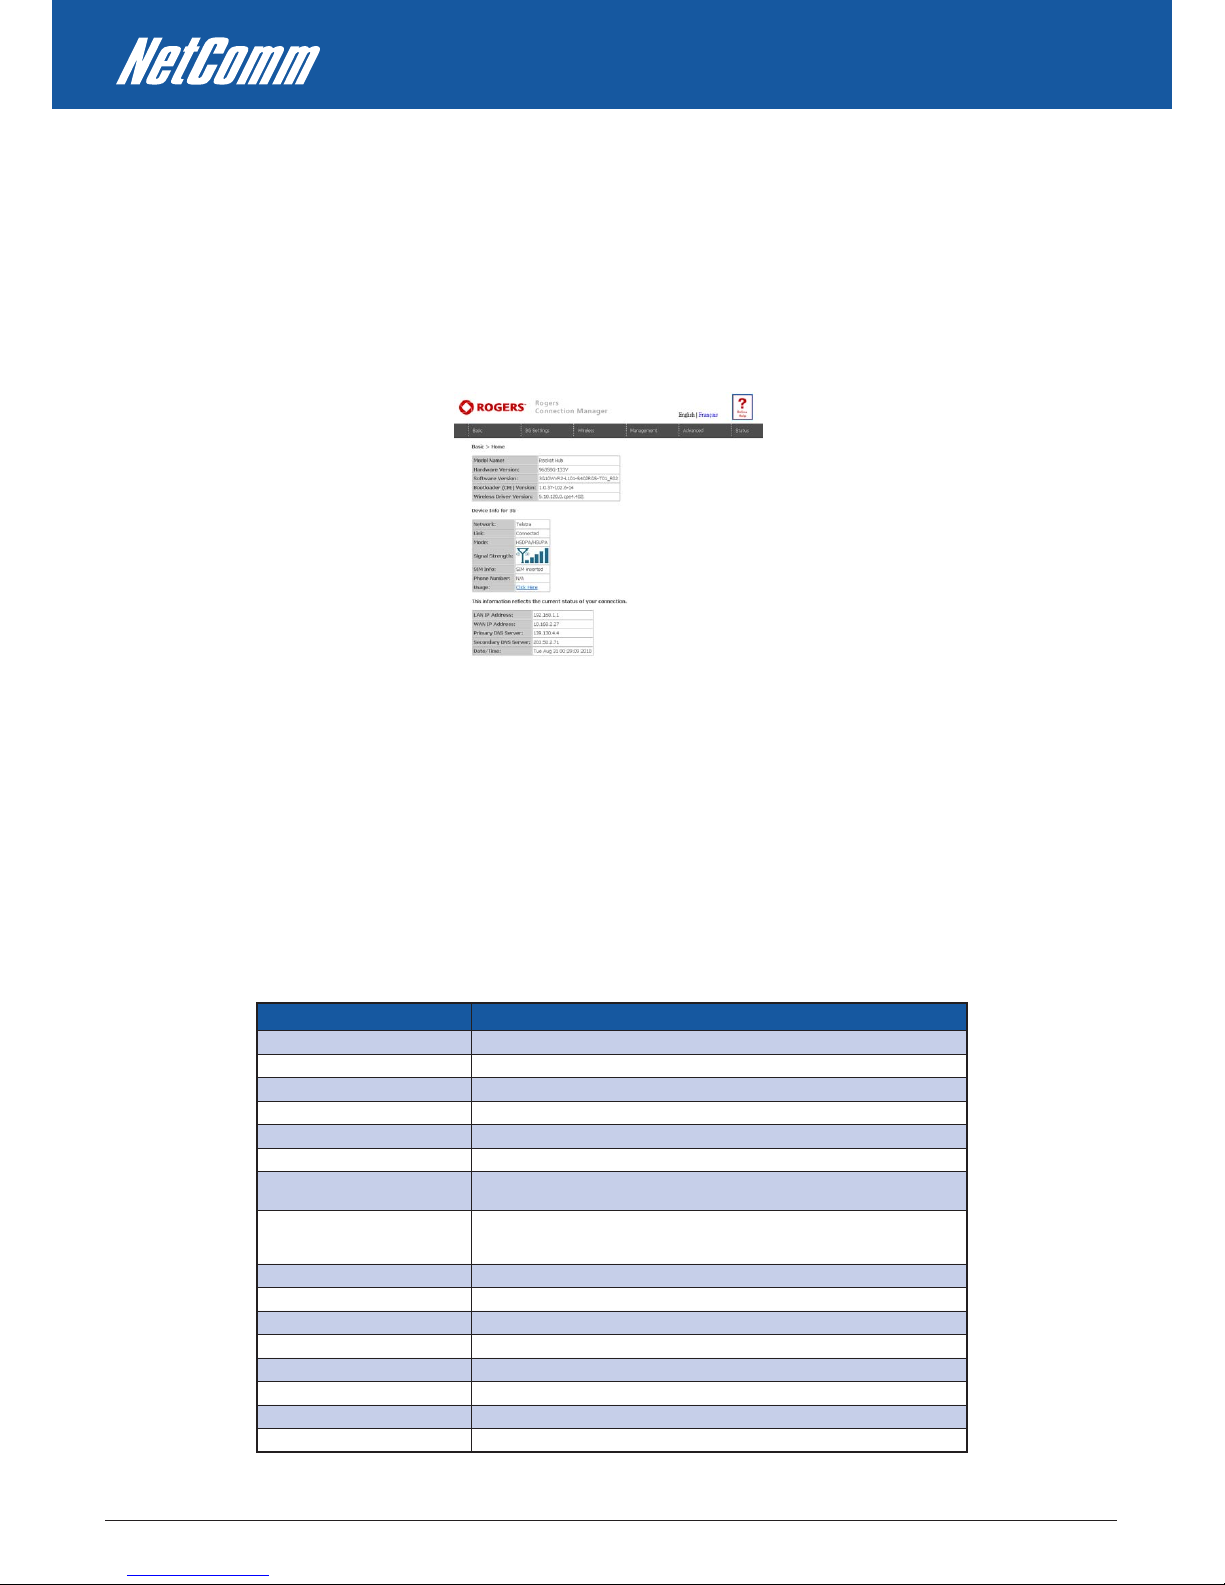
BASIC / HOME
The Basic / Home screen is the WUI homepage and the rst selection on the main menu. It provides information regarding the rmware, 3G,
and IP conguration.
The following table provides further details
FIELDS DESCRIPTION
So ft wa re v er si on Th e so ft wa re ve rs io n of t he d ev ice .
Ha rd wa re ve rs io n Th e Ha rd wa re ve rs io n of t he de vi ce
Bo ot lo ad er v er sio n Th e bo ot lo ad er ve rs io n of t he de vi ce .
Wi re le ss d riv er v er si on Th e wi re le ss dr iv er v er si on of t he w ir el es s m od ul e.
Ne tw or k Th e na me o f or ot he r re fe ren ce t o th e mo bi le ne tw or k op er ato r.
Li nk Sh ow s th e co nne ct io n st at us o f the c ur re nt 3 G con ne ct io n.
Mo de T he ra di o ac ce ss te ch ni qu e cu rr ent ly u se d to e na ble i nt er ne t ac ces s. I t ca n be
HS UPA , HS DPA , UM TS , EDG E, G PR S or D is con ne ct ed .
Si gn al s tr en gth Th e mo bi le n et wor k (U MT S or G SM) s ig na l qu al it y ava il ab le a t th e d ev ic e lo ca ti on.
Th is s ig na l qua li ty a ff ec ts t he pe r for ma nc e of t he u nit . If t wo o r mo re ba rs a re
gr ee n, t he co nn ec ti on i s us ua ll y a cc ep ta bl e.
SI M in fo Sh ow s th e SI M c ar d st at us o n t he d ev ic e.
LA N IP A dd res s S how s th e IP a dd res s fo r LA N in ter f ace .
WA N IP Ad dr es s Sh ow s th e IP ad dr es s fo r W AN in te rf ac e.
De fa ul t Ga te way Sh ow s th e IP ad dr es s of t he d efa ul t ga te wa y f or t he WA N in ter f ace .
Pr im ar y DN S Se rv er Sh ow s th e IP ad dr es s of t he p rim ar y DN S se rv er.
Se co nd ar y DN S Se rv er Sh ow s th e IP ad dr es s of t he s eco nd ar y DN S se rv er.
Da te /T im e Th e ti me a cc ord in g to t he d evi ce ’s in te rn al cl oc k
On li ne H el p Cl ic k th is I co n f or O nl in e Us er Gu id e
Page 15

3G SETTINGS
Page 16
HSPA+ WIFI ROUTER WITH VOICE User Guide YML10WVR2
16 www.netcommlimited.com
3G Settings
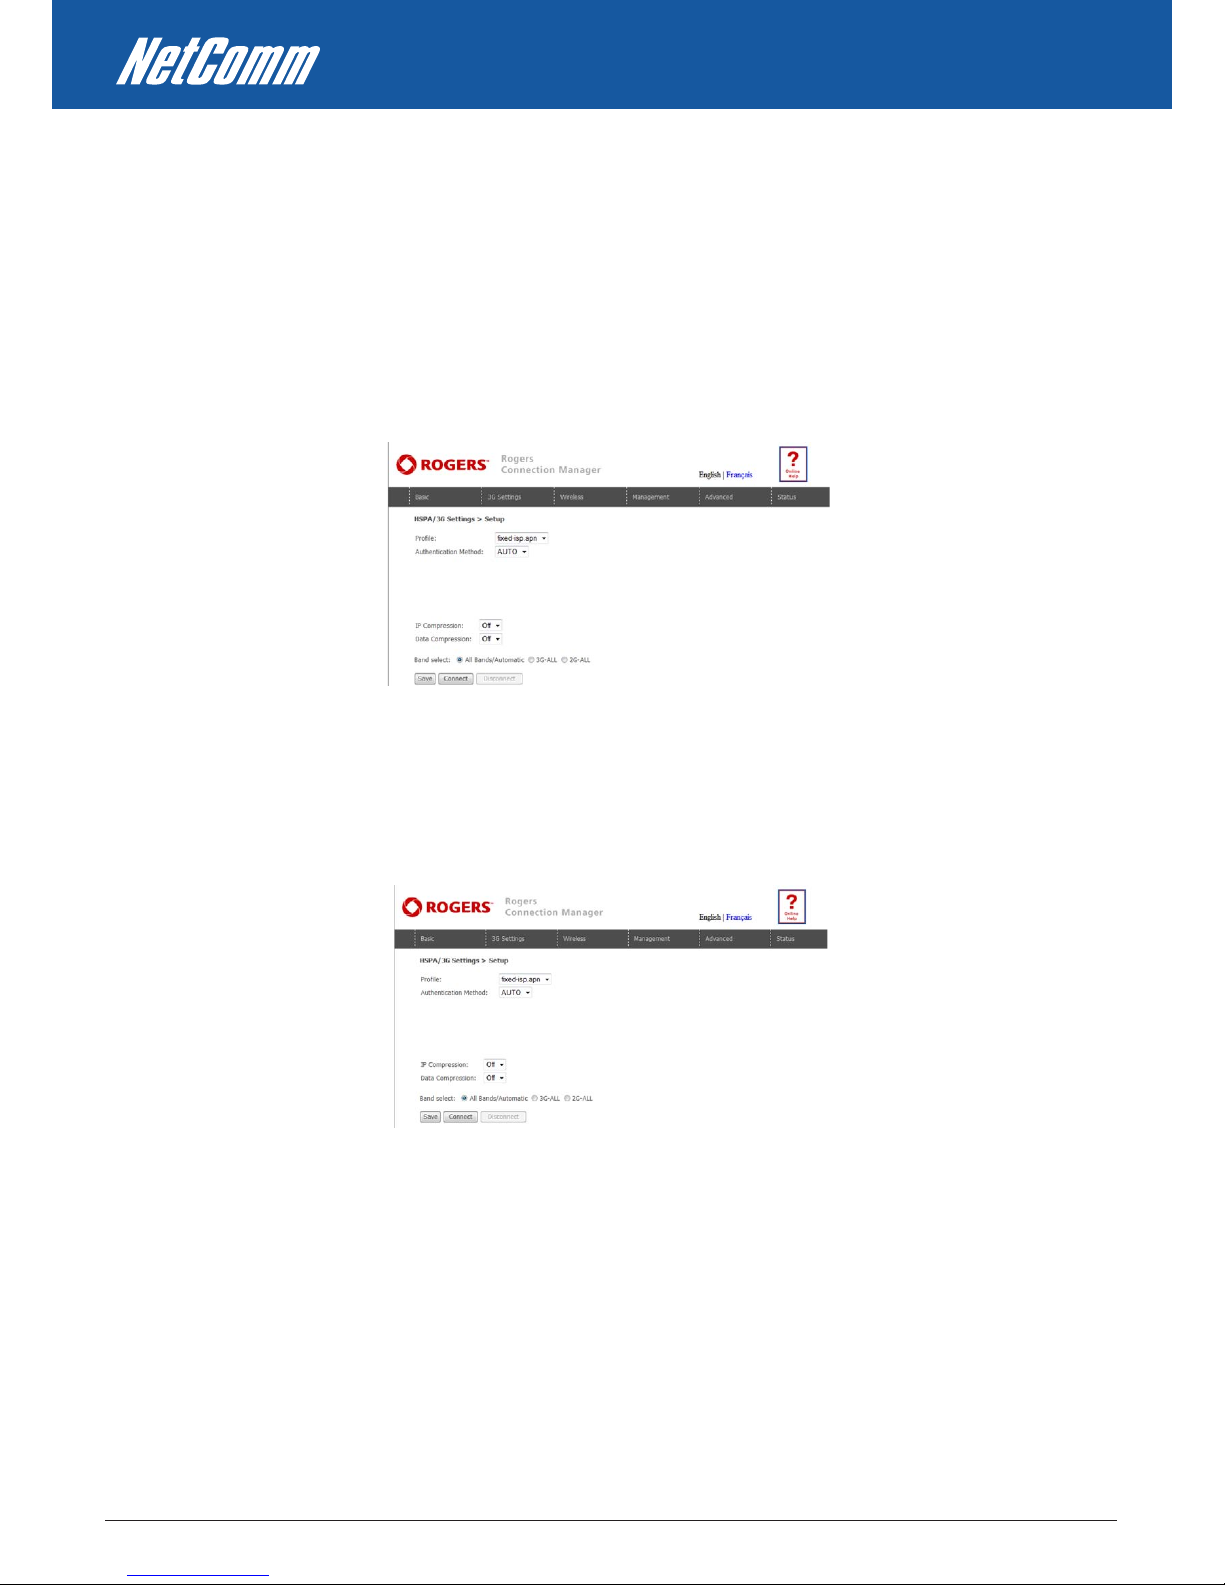
4.1 3G Service Setup
Select your 3G service settings according to predened or custom proles. Setup instructions are provided in the following sections for your
assistance.
4.1.1 3G Settings
This menu includes 3G service Setup and PIN Conguration.
NOTE: Sections 8.3 and 8.4.2 also provide information about the 3G service.
4.1.2 Prole Setup
Your Service Provider will provide the information required to complete the rst time setup instructions below. This includes prole,
username and password. Only complete those steps for which you have information and skip the others.
1. If your SIM card is not inserted into the Router, then do so now.
2. Type the APN in the APN eld. Authentication Method should be provided by your Internet service provider; or just leave it to AUTO if
not acquired. If you have not received the username and password., leave these elds empty.
3. Select IP compression and Data compression to be ON or O. By default they are set to o.
4. Click the Save button to save the new settings.
5. Press the Connect button to reboot the router and to connect to Internet. After reboot, the Device Info for 3G network box in the WUI
Basic screen should indicate an active connection, as shown below. The 3G and Internet LEDs on the front panel of the Router should
also be blinking. If the LEDs are o, then either your prole settings are incorrect, the SIM card is not working or the service network is
unavailable. In either case, contact Technical Support for further instructions.
NOTE: If the LEDs light in an on/o pattern moving from left to right this indicates that your SIM is PIN Locked, please lee PIN Lock O on page 17 for instruction on how to x this
Page 17
YML10WVR2 HSPA+ WIFI ROUTER WITH VOICE User Guide
www.netcommlimited.com 17
HSPA+ WIFI ROUTER WITH VOICE
NETCOMM LIBERTY SERIES
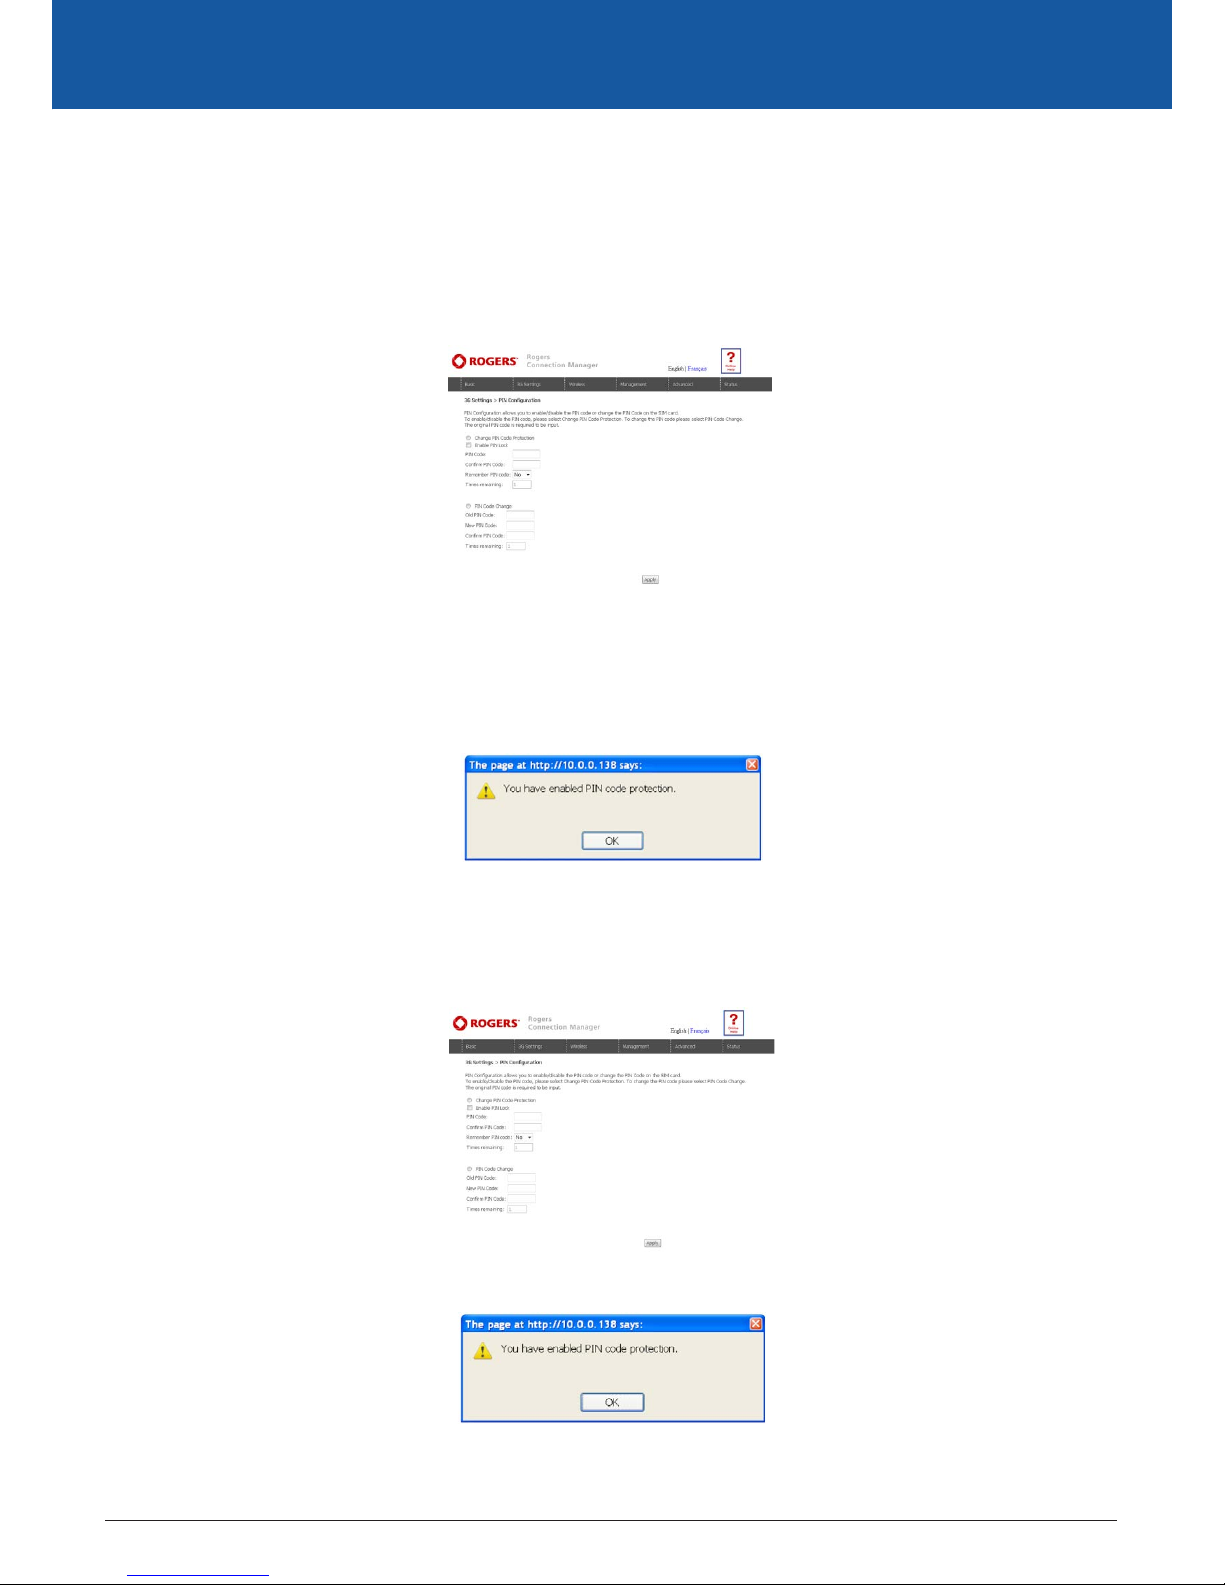
4.2 PIN Conguration
This screen allows for changes to the 3G SIM card PIN code protection settings.
NOTE: If you have entered the incorrect PIN 3 times, your SIM card will be locked for your security. Please call your 3G Provider for assistance.
4.2.1 PIN Code Protection
PIN code protection prevents the use of a SIM card by unauthorized persons. To use the 3G internet service with this router however, the PIN
code protection must be disabled. If the SIM card inserted into the Router is locked with a PIN code, the web user interface will display the
following screen after login.
PIN Lock O
If you wish to connect to the Internet using a PIN locked SIM card, you must rst turn PIN code protection O. Select PIN lock O, enter the
PIN Code twice. Please keep in mind you only have 3 attempts before your SIM card is locked. The remaining attempts’ number shows how
many attempts left. Contact Your 3G Carrieryour 3G Carrier if you require assistance. You can select Remember PIN Code to ON so you don’t
need to input the PIN code every time when the router turns on. Afterwards, click Apply. The following dialog box should now appear.
PIN Lock On
After you are nished using your SIM card for Internet service, you may wish to lock it again. In this case, rst go to the 3G Settings - PIN
Conguration screen, as shown below. Select PIN lock ON, enter the PIN code twice. You can select Remember PIN code to Yes so you don’t
need to input the PIN code every time when the router turns on.
After you do so, the following dialog box should appear.
You can now return your SIM card to your cellular phone or other mobile device.
Page 18
HSPA+ WIFI ROUTER WITH VOICE User Guide YML10WVR2
18 www.netcommlimited.com
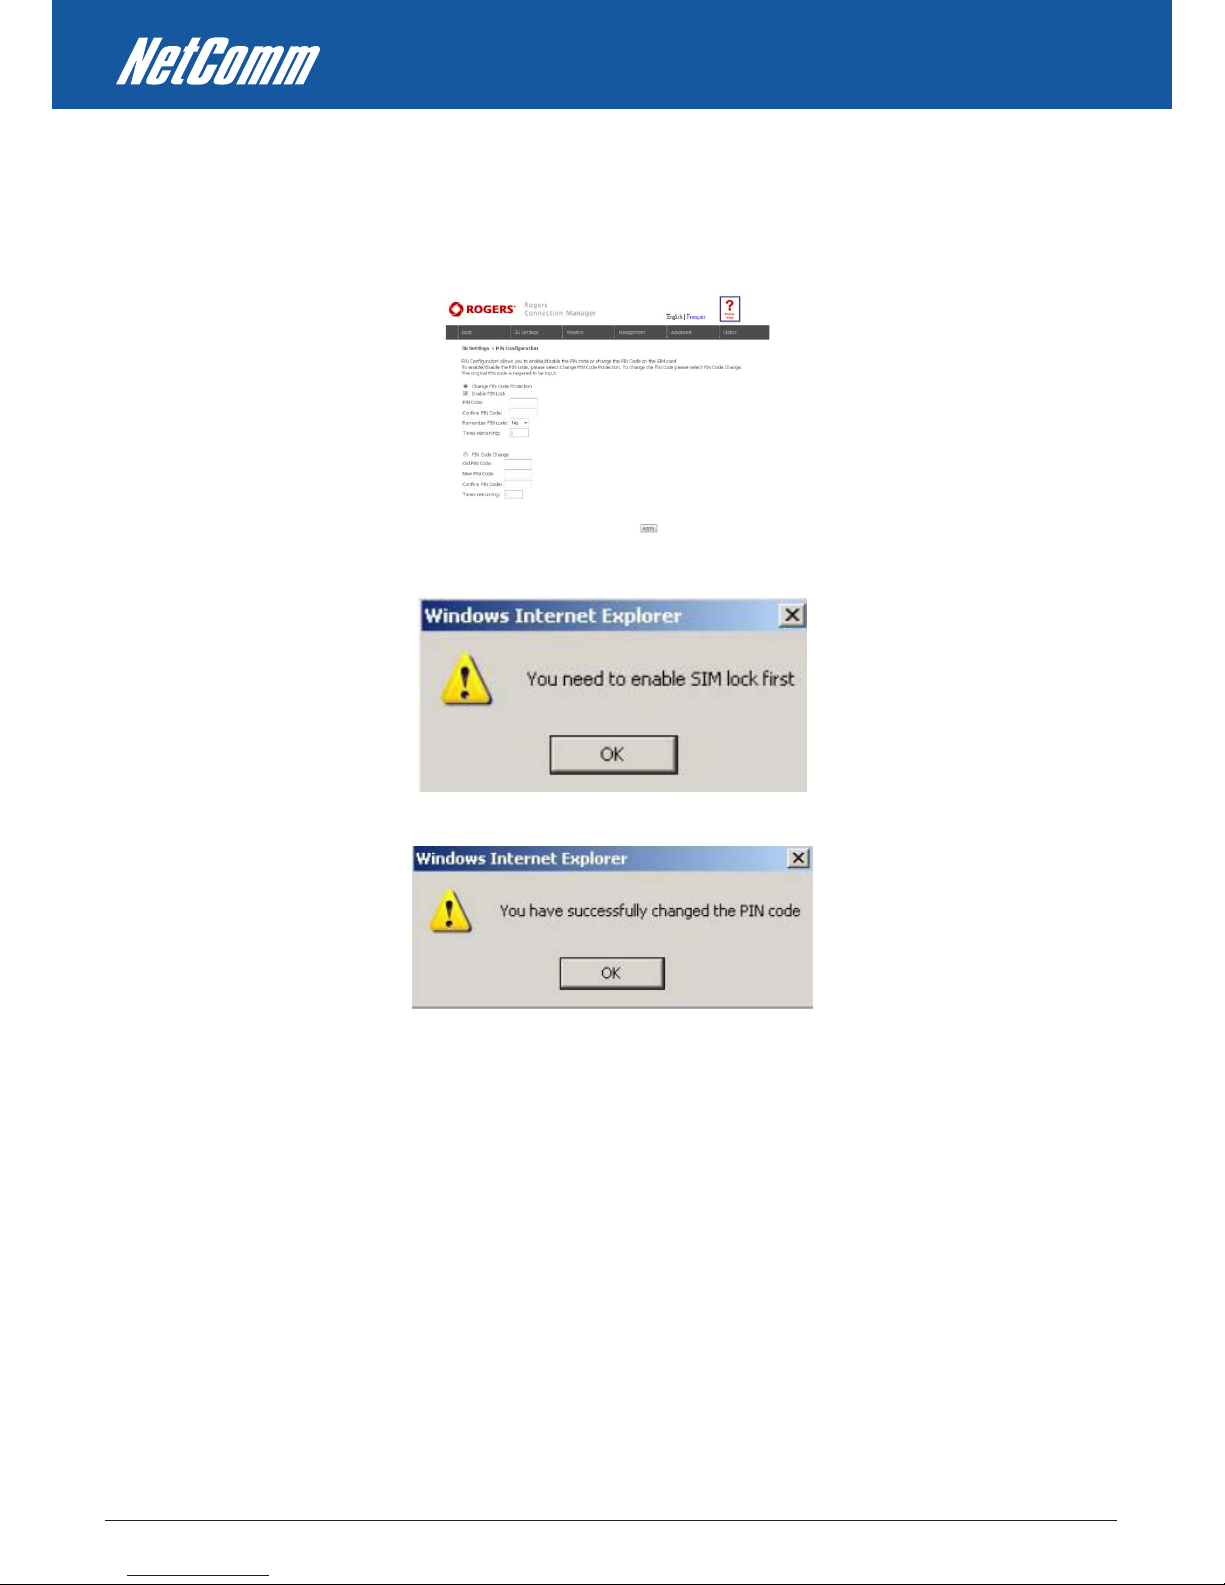
4.2.2 PIN Code Change
If you wish to change your PIN code for greater security, enable the PIN Code protection. Go to the previous section and follow the procedure
listed under PIN Lock On.
After locking the SIM card, select PIN Code Change and enter your Old and New PIN codes in the elds provided. Keep in mind you only have
3 attempts before your SIM card is locked. The remaining attempts’ number shows how many attempts left. Contact Your 3G Carrier if you
require assistance. Afterwards, click Apply to activate the change.
NOTE: If you forget to change the PIN Code without rst turning on PIN lock protection, you will see this dialog box as a helpful reminder.
NOTE: If your PIN Code change request was successful the following dialog box will display.
Page 19

WIRELESS
Page 20

HSPA+ WIFI ROUTER WITH VOICE User Guide YML10WVR2
20 www.netcommlimited.com
Wireless
The Wireless submenu provides access to Wireless Local Area Network (WLAN) conguration settings including:
• Wireless network name
• Channel restrictions (based on country)
• Security
• Access point or bridging behaviour
• Station information
5.1 Setup
This screen allows you to congure basic features of the wireless LAN interface. You can enable or disable the wireless LAN interface, hide the
network from active scans, set the wireless network name (also known as SSID) and restrict the channel set based on country requirements.
The Wireless Guest Network function adds extra networking security when connecting to remote hosts.
OPTION DESCRIPTION
En ab le Wi re le ss A ch ec kb ox t ha t e na bl es ( de fa ul t) or d is ab le s th e wir el es s LA N in ter f ace . Wh en
se le ct ed , th e W eb U I dis pl ay s Hi de A cce ss p oi nt , SSI D, B SS ID a nd Co un tr y se tt in gs.
Hi de A cc es s Poi nt Se lec t Hi de A cc es s Poi nt t o pr ote ct t he a cc es s poi nt f ro m de te ct ion b y wi re le ss
ac ti ve s ca ns . To c he ck A P st at us in W in dow s XP, o pen N et wo rk C on nec ti on s fr om
th e st ar t Me nu a nd s ele ct V ie w Ava il ab le N et wor k Co nn ec ti on s. I f t he a cc es s po int
is h id de n, i t wil l no t be l is te d t he re . T o con ne ct a c li en t to a hi dd en a cc es s p oi nt ,
th e st at io n mu st ad d th e ac ce ss po in t ma nu al ly to i ts w ir el es s c on fi gu ra ti on .
SS ID [ 1- 32 c ha rac te rs ] Se ts th e wi re le ss ne tw or k na me . SS ID st an ds f or S er vi ce Se t Id en ti fi er. A ll s ta tio ns
mu st b e co nf ig ure d wi th t he c orr ec t SS ID t o ac ces s th e WL AN. I f th e SS ID d oe s n ot
ma tc h, t ha t use r wi ll n ot b e gra nt ed a cc es s.
BS SI D Th e BS SI D is a 48 bi t id en ti ty u sed t o id en ti fy a pa r tic ul ar B SS ( Ba si c S er vi ce
Se t) w it hi n an a rea . In I nf ra st ru ct ure B SS n et wo rk s, th e BS SI D is t he MA C (M ed ia
Ac ce ss C ont ro l) a dd re ss of t he A P (A cce ss P oi nt ) a nd i n In de pe nd en t B SS o r ad h oc
ne tw or ks , th e BSS ID i s ge ne ra ted r an do ml y.
Co un tr y A dr op -d ow n me nu t hat p er mi ts w or ldw id e an d sp ec if ic na ti on al s et ti ng s.
Wi re le ss G ues t T he Gu es t SS ID ( Vi rt ua l Ac ces s Po in t) c an be e na bl ed b y sel ec ti ng t he E na bl e
Wi re le ss G ues t
Ne tw or k ch ec kb ox Re na me t he Wi re le ss G ue st Ne tw or k as y ou wi sh .
Cl ie nt s Is ol at ion Pr ev en t wir el es s cl ie nt s f ro m co mm un ic ati ng w it h ea ch o the r
NOTE: wireless hosts cannot scan Guest SSIDs.
Page 21

YML10WVR2 HSPA+ WIFI ROUTER WITH VOICE User Guide
www.netcommlimited.com 21
HSPA+ WIFI ROUTER WITH VOICE
NETCOMM LIBERTY SERIES
5.2 Security
This Router includes a number of security options that provides you with a secure connection to your wireless network. State-of-the art
security includes:
• WEP / WPA / WPA2 data encryption
• SPI Firewall
• VPN Pass-Through
• MAC address IP ltering
• Authentication protocols – PAP / CHAP
You can authenticate or encrypt your service on the Wired Equivalent Privacy (WEP) algorithm, which provides protection against
unauthorized access such as eavesdropping.
The following screen appears when Security is selected. The Security page allows you to congure security features of your Router’s
wireless LAN interface. You can set the network authentication method, select data encryption, specify whether a network key is required to
authenticate to this wireless network and specify the encryption strength.
Click Save/Apply to congure the wireless security options.
OPTION DESCRIPTION
Se le ct S SI D Yo ur Se r vic e Se t Id en ti fi er (S SI D) , se ts yo ur W ire le ss N et wo rk N ame . You c an
co nn ec t mu lt ip le de vi ce s in cl ud in g L ap to ps , De sk top P Cs a nd P DAs t o yo ur
Wi re le ss R out er . T o g et a dd it io na l dev ic es c on ne ct ed, s ca n fo r a ne two rk , an d
lo ca te t he S SID s ho wn o n yo ur Wi re le ss Se cu ri ty C ar d. If t he S SI D do es no t ma tc h,
ac ce ss i s de nie d.
Ne tw or k Au th ent ic at io n Th is o pt io n is us ed f or a ut he nti ca ti on t o th e w ir el es s ne tw or k. Ea ch a ut he nt ic at ion
ty pe h as i ts o wn se tt in gs a s il lu str at ed b el ow. F or e xam pl e, s el ec ti ng 80 2. 1X
au th en ti ca ti on wi ll r ev ea l the R AD IU S Se rv er I P ad dre ss , Po rt a nd Ke y fi el ds . W EP
En cr yp ti on w il l al so be e na bl ed .
Page 22

HSPA+ WIFI ROUTER WITH VOICE User Guide YML10WVR2
22 www.netcommlimited.com
The settings for WPA authentication are shown below.
OPTION DESCRIPTION
WE P En cr yp ti on Th is o pt io n in dic at es w he th er da ta s en t ov er th e ne tw or k is e ncr y pte d. T he sa me
ne tw or k ke y is u sed f or d at a enc r yp tio n an d ne tw or k aut he nt ic at io n. Wh il st f ou r
ne tw or k ke ys c an be d ef in ed , on ly on e ca n be u se d a t an y on e ti me. U se t he
ne tw or k ke y fou nd i n th e dr op do wn l is t.
En cr yp ti on S tr en gth T hi s dr op -d ow n li st bo x wi ll d is pla y wh en W EP En cr yp ti on i s en ab led . Th e key
st re ng th i s pro po rt io na l to t he nu mb er o f bi na ry b it s com pr is in g th e ke y. Thi s
me an s th at k eys w it h a gr ea ter n um be r of b it s h av e a gr eat er d eg re e en cr yp ted
da ta . of s ec ur it y a nd a re c on si der ab ly m or e di ffi cu lt t o cr ac k. E ncr y pti on s tr en gt h
ca n be s et t o eit he r 64 -b it o r 128 -b it . A 64 -b it ke y is e qu iv al en t t o 5 AS CI I
ch ar ac te rs o r 10 he xa de ci ma l nu mb ers . A 12 8- bi tk ey co nt ai ns 1 3 ASC II c ha ra ct er s
or 2 6 he xa de ci mal n um be rs . FY I: Ea ch k ey c on tai ns a 2 4- bi t he ad er (a n in it ia ti on
ve ct or ) wh ic h ena bl es p ar al le l dec od in g of m ul ti ple s tr ea ms o f enc r ypt ed d at a.
5.3 Conguration
The amount of time between beacon transmissions is in milliseconds.
• Select the channel which you wish to operate from
• Force the transmission rate to a particular speed
• Set the fragmentation threshold
• Set the RTS threshold
• Set the wake-up interval for clients in power-save mode
• Set the beacon interval for the access point
• Set Xpress mode
• Program short or long preambles
Click Save/Apply to set the advanced wireless conguration.
Page 23

YML10WVR2 HSPA+ WIFI ROUTER WITH VOICE User Guide
www.netcommlimited.com 23
HSPA+ WIFI ROUTER WITH VOICE
NETCOMM LIBERTY SERIES
OPTION DESCRIPTION
Ba nd T he n ew am en dm en t al lo ws IE EE 8 02 .1 1g u nit s to f al l ba ck to s pe ed s of 1 1 M bp s, s o IE EE 8 02. 11 b an d IE EE 8 02. 11 g
de vi ce s ca n coe xi st i n th e sa me ne tw or k.
Ch an ne l Al lo ws s el ec ti on of a s pe ci fi c cha nn el ( 1- 11 ) or Au to m od e.
Au to C ha nn el Ti me r (m in) T he A ut o Cha nn el t im es t he le ng th i t ta ke s to sc an i n mi nu te s.
54 g Ra te I n Aut o (d ef au lt ) mod e, y ou r Ro ute r us es t he m ax imu m da ta r at e and l ow er s th e dat a ra te d ep en den t on t he s ig nal
st re ng th . T he a pp ro pr iat e se tt in g is d epe nd en t on s ig nal s tr en gt h. O th er ra te s ar e di scr et e va lu es b et wee n 1 to
54 Mb ps .
Mu lt ic as t Ra te Se tt in g fo r mu lti ca st p ac ke t tr ans mi ss io n ra te. ( 1- 54 M bp s)
Ba si c Ra te Se ts b as ic t ra nsm is si on r at e.
Fr ag me nt ati on T hre sh ol d A th re sho ld ( in b yt es ) det er mi ne s wh et he r p ac ke ts w il l be fr ag me nt ed a nd at w ha t si ze . P ac ke ts t ha t e xc ee d th e
fr ag me nt at io n t hr es ho ld o f an 80 2. 11 W LA N w il l be s pl it i nto s ma ll er u ni ts su it ab le f or t he ci rc ui t si ze. P ac ke ts s mal le r
th an t he s pe ci fie d fr ag me nt at ion t hr es ho ld v alu e ho we ve r are n ot f ra gm en ted . Val ue s be tw ee n 256 a nd 2 34 6 ca n be
en te re d bu t sho ul d re ma in a t a d ef au lt s et ti ng of 2 34 6. S et ti ng th e Fr ag me nta ti on T hre sh ol d to o low m ay r es ul t in po or
pe rf or ma nc e.
RT S Th res ho ld Re qu es t To Se nd (R TS ) sp ec if ie s th e p ac ke t si ze t hat e xc ee ds t he sp ec if ie d RT S th res ho ld , wh ic h the n tr ig ge rs t he R TS/
C TS me ch an is m. S ma lle r pa ck et s ar e sen t wi th ou t us in g R TS /C TS . Th e d ef au lt s et ti ng of 2 34 7 (m ax l en gt h) wi ll d is ab le s
th e RT S Thr es ho ld .
DT IM I nt er va l D eli ve ry Tr af fi c In di ca ti on Me ss ag e (D TIM ) is a ls o kn ow n as Be ac on R at e. Th e en tr y ra nge i s a va lu e be twe en 1 a nd
65 53 5. A D TIM i s a co un td own v ar ia bl e th at in fo rm s cl ie nt s o f th e ne xt w in dow f or l is te ni ng to b ro ad ca st an d mu lt ic as t
me ss ag es . W he n th e AP h as bu ff er ed b roa dc as t or m ul ti cas t me ss ag es f or as so ci at ed c li ent s, i t se nd s the n ex t DT IM
wi th a D TI M I nt er va l va lu e. A P C li en ts h ea r th e b ea co ns a nd a wak en t o re ce ive t he b ro ad ca st an d mu lt ic as t mes sa ge s.
Th e de fa ul t is 1.
Be ac on I nt er va l Th e am ou nt o f t im e be tw ee n be aco n tr an sm is si on s i n is m il li se co nds . Th e d ef au lt i s 10 0 ms an d th e ac ce pt abl e ra ng e
is 1 – 6 55 35 . T he b ea co n t ra ns mi ss io ns i den ti fy t he p re sen ce o f an a cc ess p oi nt . By d ef aul t, n et wo rk d ev ice s pa ss iv el y
sc an a ll R F ch ann el s li st en in g for b ea co ns c omi ng f ro m ac ce ss po in ts . Be for e a st at io n ent er s po we r sav e mo de , th e
st at io n ne ed s the b ea co n in te rv al to k no w wh en t o wak e up t o re cei ve t he b ea co n.
Xp re ss ™ T ec hno lo gy B ro ad com ’s Xp re ss ™ T ech no lo gy i s co mpl ia nt w it h dr af t spe ci fi ca ti on s of t wo pl an ne d wi rel es s in du st ry s ta nd ard s. I t ha s
be en d es ig ne d to im pr ov e wir el es s ne tw or k eff ic ie nc y. D is abl ed b y de fa ul t.
54 g Mo de Se le ct A ut o mo de fo r gr ea tes t co mp at ib il it y. Se le ct P er fo rma nc e mo de f or th e fa st es t pe rf or man ce a mo ng 5 4g c er ti fie d
eq ui pm en t. S el ec t L RS m od e if y ou ar e ex pe ri en ci ng di ff ic ul ty w it h leg ac y 80 2. 11 b eq ui pm ent . If t hi s do es n ot wo rk ,
yo u ma y al so tr y 80 2. 11 b on ly m od e.
54 g Pr ot ec ti on I n Aut o mo de , th e r ou te r wi ll u se RT S/ CT S to i mp rov e 80 2. 11 g pe rf or ma nce i n mi xe d 802 .1 1g /8 02 .1 1b n et wor ks . Tur ni ng
pr ot ec ti on O ff w ill m ax im iz e 80 2. 11g t hr ou gh pu t un der m os t co nd it ion s.
Pr ea mb le Ty pe Sh or t pr ea mb le i s i nt en de d fo r app li ca ti on s wh ere m ax im um t hr ou ghp ut i s de si re d b ut i t do es n ot wo rk w it h le ga cy
eq ui pm en t. L ong p re am bl e wor ks w it h th e cu rre nt 1 a nd 2 M bi t/s D SS S sp ec if ic ati on a s de sc ri be d in IE EE S td 8 02 .1 119 99
Tr an sm it Po we r Se t th e po we r o ut pu t (b y pe rce nt ag e) a s de si red .
Page 24

HSPA+ WIFI ROUTER WITH VOICE User Guide YML10WVR2
24 www.netcommlimited.com
5.4 MAC Filter
This screen appears when Media Access Control (MAC) Filter is selected. This option allows access to be restricted based upon the unique
48-bit MAC address.
To add a MAC Address lter, click the Add button shown below.
To delete a lter, select it from the table below and click the Remove button.
OPTION DESCRIPTION
MA C Re st ri ct M ode Di sa bl ed – Di sa bl es M AC fi lt er in g
Al lo w – Per mi ts a cc es s for t he s pe ci fi ed MA C ad dr es se s.
NOTE: Add a wireless device’s MAC address before clicking the Allow radio button or
else you will need to connect to the Router’s web user interface using the supplied
yellow Ethernet cable and add the wireless device’s MAC address.
De ny – R ej ec ts a cce ss f or t he sp ec if ie d MA C a dd re ss es
MA C Ad dre ss Li st s th e MAC a dd re ss es su bj ec t to t he MA C Re st ri ct M od e. Th e Add b ut to n pro mp ts
an e nt ry f ie ld t ha t r eq ui re s yo u t yp e in a M AC ad dr es s in a t wo -c ha rac te r, 6 -by te
co nv en ti on : x x: xx :x x: xx :x x: xx wh er e xx a re he xa de ci ma l nu mb ers . A ma xi mu m of 60
MA C ad dr ess es c an b e ad de d.
Enter the MAC address on the screen below and click Save/Apply.
Page 25

YML10WVR2 HSPA+ WIFI ROUTER WITH VOICE User Guide
www.netcommlimited.com 25
HSPA+ WIFI ROUTER WITH VOICE
NETCOMM LIBERTY SERIES
5.5 Wireless Bridge
The following screen appears when selecting Wireless Bridge, and goes into a detailed explanation of how to congure wireless bridge
features of the wireless LAN interface.
Click Save/Apply to implement new conguration settings.
FEATURE DESCRIPTION
AP M od e S el ec ti ng Wi re les s Br id ge ( Wi re le ss D ist ri bu ti on S ys tem ) di sa bl es A cce ss P oi nt (A P fu nc ti on al it y
wh il e se le ct in g Acc es s Po int e na bl es A P fu nc ti ona li ty . In Ac ce ss P oi nt mo de , wi re le ss br id ge
fu nc ti on al it y wi ll st il l be a va il abl e an d wi re le ss st at io ns w il l be ab le t o as so ci ate t o th e AP.
Br id ge R es tr ic t Sel ec ti ng D is ab le d in Br id ge R es tr ic t di sab le s Wi rel es s Br id ge r est ri ct io n, w hi ch m ea ns th at a ny
wi re le ss b ri dg e w il l be g ra nte d ac ce ss . Se lec ti ng E na bl ed o r En abl ed ( Sc an ) al lo ws wi re le ss b ri dge
re st ri ct io n. O nl y t ho se b ri dg es s el ec ted i n Re mo te B ri dge s wi ll b e gr ant ed a cc es s. Cl ic k Re fr es h to
up da te t he s tat io n li st w he n Br idg e Re st ri ct i s en ab led .
5.6 Station Info
The following screen appears when you select Station Info, and shows authenticated wireless stations and their status.
Click the Refresh button to update the list of stations in the WLAN.
OPTION DESCRIPTION
As so ci at ed Li st s al l th e sta ti on s th at a re as so ci at ed w it h t he A cc es s Poi nt , al on g wit h th e
am ou nt o f ti me si nc e pa ck et s wer e tr an sf er red t o an d fr om ea ch s ta ti on . If a
st at io n is i dl e f or t oo l on g, it i s re mo ved f ro m th is l ist .
Au th or iz ed Li st s th os e de vic es w it h au th or ize d ac ce ss .
Page 26

MANAGEMENT
Page 27

YML10WVR2 HSPA+ WIFI ROUTER WITH VOICE User Guide
www.netcommlimited.com 27
HSPA+ WIFI ROUTER WITH VOICE
NETCOMM LIBERTY SERIES
Management
The Management menu has the following maintenance functions and processes:
• Device Settings
• Simple Network Management Protocol (SNMP)
• Simple Network Time Protocol (SNTP)
• Access Control
• Save and Reboot
6.1 Device Settings
The Device Settings screens allow you to backup, retrieve and restore the default settings of your Router. It also provides a function for you to
update your Routers rmware.
6.1.1 Backup Settings
The following screen appears when Backup is selected. Click the Backup Settings button to save the current conguration settings. You will
be prompted to dene the location of a backup le to save to your PC.
6.1.2 Update Settings
The following screen appears when selecting Update from the submenu. By clicking on the Browse button, you can locate a previously saved
lename as the conguration backup le. Click on the Update settings to load it.
Page 28

HSPA+ WIFI ROUTER WITH VOICE User Guide YML10WVR2
28 www.netcommlimited.com
6.1.3 Restore Default
The following screen appears when selecting Restore Default. By clicking on the Restore Default Settings button, you can restore your
Routers default rmware settings. To restore system settings, reboot your Router.
NOTE: The default settings can be found in section 3.1 Default Settings.
Once you have selected the Restore Default Settings button, the following screen will appear. Close the window and wait 2 minutes
before reopening your browser. If required, recongure your PCs IP address to match your new conguration(see section 3.2 TCP/IP Settings
for details).
After a successful reboot, the browser will return to the Device Info screen. If the browser does not refresh to the default screen, close and
restart the browser.
NOTE: The Restore Default function has the same eect as the reset button. The device board hardware and the boot loader support the reset to default button. If the reset
button is continuously pushed for more than 5 seconds (and not more than 12 seconds), the boot loader will erase the conguration settings saved on ash memory.
6.1.4 Update Firmware
The following screen appears when selecting Update Firmware. By following this screens steps, you can update your Routers rmware.
Manual device upgrades from a locally stored le can also be performed using the following screen.
1. Obtain an updated software image le
2. Enter the path and lename of the rmware image le in the Software File Name eld or click the Browse button to locate the
image le.
3. Click the Update Software button once to upload and install the le.
NOTE: The update process will take about 2 minutes to complete. The Router will reboot and the browser window will refresh to the default screen upon successful installation.
It is recommended that you compare the Software Version at the top of the Basic screen (WUI homepage) with the rmware version installed,
to conrm the installation was successful.
Page 29

YML10WVR2 HSPA+ WIFI ROUTER WITH VOICE User Guide
www.netcommlimited.com 29
HSPA+ WIFI ROUTER WITH VOICE
NETCOMM LIBERTY SERIES
6.2 Congure SNMP agent on 3G10WVR2
The Simple Network Management Protocol (SNMP) allows a network administrator to monitor a network by retrieving settings on remote
network devices. To do this, the administrator typically runs an SNMP management station program such as MIB browser on a local host to
obtain information from the SNMP agent, in this case the 3G10WVR2 (if SNMP enabled). An SNMP ‘community’ performs the function of
authenticating SNMP trac. A ‘community name’ acts as a password that is typically shared among SNMP agents and managers.
By default, SNMP agent is enabled on the router.
Setting up SNMP agent
1. Open a web browser (IE/refox/Safari), type in LAN address of the router (http://192.168.1.1 by default)
to log into the web interface.
2. The login username and password by default is admin/admin.
3. Go to Management> SNMP
4. Enable SNMP agent and set up all options according to the description form below.
5. Press Save/Apply to activate setting.
Page 30

HSPA+ WIFI ROUTER WITH VOICE User Guide YML10WVR2
30 www.netcommlimited.com
6.3 Simple Network Time Protocol (SNTP)
This screen allows you to congure the time settings of your Router. To automatically synchronize with Internet timeservers, tick the box as
illustrated below.
The following options should now appear (see screenshot below):
First NTP timeserver: Select the required server.
Second NTP timeserver: Select second timeserver, if required.
Time zone oset: Select the local time zone.
Congure these options and then click Save/Apply to activate.
NOTE: SNTP must be activated to use Parental Control (section 7.3.2).
Page 31

YML10WVR2 HSPA+ WIFI ROUTER WITH VOICE User Guide
www.netcommlimited.com 31
HSPA+ WIFI ROUTER WITH VOICE
NETCOMM LIBERTY SERIES
6.4 Access Control
The Access Control option found in the Management drop down menu, congures access related parameters in the following areas:
• Services
• Passwords
Access Control is used to control remote management settings for your Router.
6.4.1 Services
The Service Control List (SCL) allows you to enable or disable your Wide Area Network (WAN) services by ticking the checkbox as illustrated
below. These access services are available: FTP, HTTP, ICMP, SNMP, SSH, TELNET, and TFTP. Click Save/Apply to continue.
Page 32

HSPA+ WIFI ROUTER WITH VOICE User Guide YML10WVR2
32 www.netcommlimited.com
6.4.2 Passwords
The Passwords option congures your account access password for your Router. Access to the device is limited to the following three
user accounts:
• admin is to be used for local unrestricted access control
• support is to be used for remote maintenance of the device
• user is to be used to view information and update device rmware
Use the elds illustrated in the screen below to change or create your password. Passwords must be 16 characters or less with no spaces. Click
Save/Apply to continue.
6.5 Save and Reboot
This function saves the current conguration settings and reboots your Router.
NOTE1: It may be necessary to recongure your TCP/IP settings to adjust for the new conguration. For example, if you disable the Dynamic Host Conguration Protocol (DHCP)
server you will need to apply Static IP settings.
NOTE2: If you lose all access to your web user interface, simply press the reset button on the rear panel for 5-7 seconds to restore default settings.
Page 33

ADVANCED SETUP
Page 34

HSPA+ WIFI ROUTER WITH VOICE User Guide YML10WVR2
34 www.netcommlimited.com
Advanced Setup
This chapter explains advanced setup for your Router:
7.1 Local Area Network (LAN)
This screen allows you to congure the Local Area Network (LAN) interface on your Router.
Page 35

YML10WVR2 HSPA+ WIFI ROUTER WITH VOICE User Guide
www.netcommlimited.com 35
HSPA+ WIFI ROUTER WITH VOICE
NETCOMM LIBERTY SERIES
See the eld descriptions below for more details.
OPTION DESCRIPTION
IP A dd re ss En te r th e IP ad dr es s fo r th e L AN i nt er fa ce
Su bn et M as k En te r th e su bne t ma sk f or t he LA N in te rf ac e
En ab le U Pn P T ic k t he b ox t o en abl e Un iv er sa l Plu g an d Pl ay
En ab le H al f- Br id ge Th e Ro ut er c an be s et u p as a h alf - tr an sp ar en t b ri dg e to c op e w it h so me s pe ci al
ap pl ic at io ns s uch a s VP N pas s- th ro ug h. B y def au lt h al f- b ri dg e i s of f.
En ab le I nt er ne t Gro up M an ag em en t P ro to co l (IG MP ) Sn oo pi ng En ab le b y ti ck in g t he b ox
St an da rd M od e: In s ta nd ar d mo de, m ul ti ca st t raf fi c wi ll f lo od to a ll b ri dg e po rt s wh en no c li en t
su bs cr ib es t o a m ul ti ca st g ro up.
Bl oc ki ng M od e: In b lo ck in g mo de , the m ul ti ca st d at a t ra ff ic w il l be bl oc ke d. Wh en t he re a re no
cl ie nt s ub sc ri pti on s to a m ul ti cas t gr ou p, it w il l no t fl oo d t o th e br id ge p or ts .
Dy na mi c Ho st C on fig ur at io n Pro to co l (D HC P) S er ver S ele ct E na bl e DH CP s er ve r a nd e nt er y ou r s ta rt in g an d en di ng IP a dd re ss es a nd th e
le as e ti me . T hi s se tt in g c on fi gu re s th e r ou te r to a uto ma ti ca ll y as si gn IP, d ef aul t
ga te wa y an d D NS s er ve r ad dr es ses t o ev er y DH CP c lie nt o n yo ur L AN
En ab le N AT To en ab le /d is ab le N et wor k Ad dr es s T ra nsl at io n (N AT, pl ea se r ef er to 7 .2 f or N AT
se tt in g) . By d ef aul t NAT i s en ab le d.
Op ti on 4 2, 6 6, 150 ,1 60 Th es e op ti on s are u se d fo r spe ci al D HC P se t up.
St at ic I P Le ase L is t To s pe cif y th e IP a dd re ss as si gn ed t hr oug h DH CP a cc ord in g to t he M AC ad dr es s of
th e ho st s co nn ec ted t o HS PA WiF i Ro ut er.
Congure a second IP address by ticking the checkbox shown below and enter the following information:
IP A dd re ss : E nt er th e se co nd ar y IP a ddr es s fo r th e LAN i nt er fa ce .
Su bn et M as k: En te r th e se con da ry s ub ne t ma sk fo r th e LA N in te rf ac e.
NOTE: The Save button saves new settings to allow continued conguration, while the Save/Reboot button not only saves new settings but also reboots the device to apply the
new conguration (i.e. all new settings).
Page 36

HSPA+ WIFI ROUTER WITH VOICE User Guide YML10WVR2
36 www.netcommlimited.com
7.2 Network Address Translation (NAT)
7.2.1 Port Forwarding
Port Forwarding allows you to direct incoming trac from the Internet side (identied by Protocol and External port) to the internal server
with a private IP address on the LAN side. The Internal port is required only if the external port needs to be converted to a dierent port
number used by the server on the LAN side. A maximum of 32 entries can be congured.
To add a Virtual Server, click the Add button. The following screen will display.
OPTION DESCRIPTION
Se le ct a S er vi ce
Or
Cu st om S er ve r
Us er s ho ul d se lec t th e se rv ic e fr om th e li st .
Or
Cr ea te a c ust om s er ve r an d en ter a n am e fo r the c us to m se rv er
Se r ver I P Ad dr ess En te r th e IP ad dr es s fo r th e s er ve r.
Ex te rn al P or t St ar t En te r the s ta rt in g ex te rn al p or t num be r (w he n yo u s el ec t Cu st om S er ve r). W he n a
se rv ic e is s el ec te d t he p or t ra ng es a re au to ma ti ca ll y con fi gu re d.
Ex te rn al P or t En d En te r th e en din g ex te rn al p or t nu mb er (w he n yo u se le ct Cu st om S er ve r) . W he n a
se rv ic e is s el ec te d t he p or t ra ng es a re au to ma ti ca ll y con fi gu re d.
Pr ot oc ol Us er c an s el ec t fro m: TC P, T CP /U DP o r UDP.
In te rn al P or t Sta r t E nt er t he i nt ern al p or t st ar ti ng n um be r (wh en y ou s el ec t Cus to m Se rv er ). Wh en a
se rv ic e is s el ec te d t he p or t ra ng es a re au to ma ti ca ll y con fi gu re d
In te rn al P or t En d En te r th e i nt er na l po rt e nd in g n um be r (w he n yo u s el ec t Cu st om S er ver ). W he n a
se rv ic e is s el ec te d t he p or t ra ng es a re au to ma ti ca ll y con fi gu re d.
Page 37

YML10WVR2 HSPA+ WIFI ROUTER WITH VOICE User Guide
www.netcommlimited.com 37
HSPA+ WIFI ROUTER WITH VOICE
NETCOMM LIBERTY SERIES
7.2.2 Port Triggering
Some applications require specic ports in the Router’s rewall to be open for access by remote parties. Port Triggering opens up the ‘Open
Ports’ in the rewall when an application on the LAN initiates a TCP/UDP connection to a remote party using the ‘Triggering Ports’. The Router
allows the remote party from the WAN side to establish new connections back to the application on the LAN side using the ‘Open Ports’. A
maximum 32 entries can be congured.
To add a Trigger Port, simply click the Add button. The following will be displayed.
OPTION DESCRIPTION
Se le ct a n Ap pl ic ati on
Or
Cu st om A pp li cat io n
Us er s ho ul d se lec t th e ap pl ic at io n f ro m th e li st .
Or
Us er c an e nt er th e na me o f th eir c ho ic e.
Tr ig ge r Por t St ar t En te r th e st ar ti ng tr ig ge r po rt n um be r (wh en y ou s el ec t cu sto m ap pl ic at io n). W he n
an a pp li ca ti on is s el ec te d, t he po r t r an ge s ar e au tom at ic al ly c on fig ur ed .
Tr ig ge r Por t En d En te r th e en din g tr ig ge r po rt n um be r ( wh en y ou s el ec t cus to m ap pl ic at ion ). W he n
an a pp li ca ti on is s el ec te d, t he po r t r an ge s ar e au tom at ic al ly c on fig ur ed .
Tr ig ge r Pro to co l TC P, TCP /U DP o r UD P.
Op en P or t St ar t E nt er t he s ta rt in g ope n po rt n um be r (w he n y ou s el ec t cu st om ap pl ic at io n) . W he n
an a pp li ca ti on is s el ec te d, t he po r t r an ge s ar e au tom at ic al ly c on fig ur ed .
Op en P or t En d En te r th e en din g op en p or t nu mb er ( whe n yo u se le ct c ust om a pp li ca ti on ). Wh en a n
ap pl ic at io n is se le ct ed , th e po rt r ang es a re a ut om ati ca ll y co nf ig ure d.
Op en P ro to col TC P, T CP /U DP or U DP
7.2.3 Demilitarized (DMZ) Host
Your Router will forward IP packets from the Wireless Area Network (WAN) that do not belong to any of the applications congured in the
Virtual Servers table to the DMZ host computer.
Enter the computer’s IP address and click Apply to activate the DMZ host. Clear the IP address eld and click Apply to deactivate the
DMZ host.
Page 38

HSPA+ WIFI ROUTER WITH VOICE User Guide YML10WVR2
38 www.netcommlimited.com
7.3 Security
Your Router can be secured with IP Filtering or Parental Control functions.
7.3.1 IP Filtering
The IP Filtering screen sets lter rules that limit incoming and outgoing IP trac. Multiple lter rules can be set with at least one limiting
condition. All conditions must be fullled when individual IP packets pass lter.
Outgoing IP Filter
The default setting for Outgoing trac is ACCEPTED. Under this condition, all outgoing IP packets that match the lter rules will be BLOCKED.
To add a ltering rule, click the Add button. The following screen will display.
FILTER NAME THE FILTER RULE LABEL
Pr ot oc ol TC P, T CP /U DP, UD P or I CMP S ou rc e IP a dd res s
So ur ce I P ad dre ss En te r so ur ce IP a dd re ss S ou rce S ub ne t Ma sk
De st in at io n IP ad dr es s En te r so ur ce s ubn et m as k
So ur ce P or t (po r t o r po rt :p or t) E nt er s ou rce p or t nu mb er o r po rt r ang e
De st in at io n IP ad dr es s En te r de st in at io n I P ad dr es s
De st in at io n Su bne t Ma sk En te r de st in ati on s ub ne t ma sk
De st in at io n po rt ( por t or p or t: po rt ) En te r de st in ati on p or t nu mb er o r ran ge
Incoming IP Filter
The default setting for all Incoming trac is BLOCKED. Under this condition only those incoming IP packets that match the lter rules will be
ACCEPTED.
Page 39

YML10WVR2 HSPA+ WIFI ROUTER WITH VOICE User Guide
www.netcommlimited.com 39
HSPA+ WIFI ROUTER WITH VOICE
NETCOMM LIBERTY SERIES
To add a ltering rule, click the Add button. The following screen will display.
Please refer to the Outgoing IP Filter table for eld descriptions.
Click Save/Apply to save and activate the lter.
7.3.2 Parental Control
This Parental Control allows you to restrict access from a Local Area Network (LAN) to an outside network through the Router on selected
days at certain times. Make sure to activate the Internet Time server synchronization as described in section 6.3 SNTP, so that the scheduled
times match your local time.
Click Add to display the following screen.
See instructions below and click Save/Apply to apply the settings.
OPTION DESCRIPTION
Us er N am e A us er -d ef in ed l abe l fo r th is r est ri ct io n
Br ow se r’s M AC A ddr es s M AC ad dr es s of t he P C r un ni ng t he b row se r
Ot he r MA C Ad dre ss MA C ad dr es s o f an ot he r LA N dev ic e
Da ys o f th e W ee k Th e da ys t he re st ri ct io ns a pp ly.
St ar t Bl oc ki ng Ti me T he ti me t he r es tr ic ti ons s ta rt
En d Bl oc ki ng Ti me T he t im e th e res tr ic ti on s en d.
Page 40

HSPA+ WIFI ROUTER WITH VOICE User Guide YML10WVR2
40 www.netcommlimited.com
7.4 Routing
Static Route and Dynamic Route settings can be found in the Routing link as illustrated below.
7.4.1 Static Route
The Static Route screen displays the congured static routes. Click the Add or Remove buttons to change settings.
Click the Add button to display the following screen.
Enter Destination Network Address, Subnet Mask, Gateway IP Address and/or WAN Interface. Then click Save/Apply to add the entry to the
routing table.
7.4.2 Dynamic Route
To activate this option, select the Enabled radio button for Global RIP Mode.
To congure an individual interface, select the desired RIP version and operation, followed by placing a check in the Enabled checkbox for
that interface. Click Save/Apply to save the conguration and to start or stop dynamic routing.
Page 41

YML10WVR2 HSPA+ WIFI ROUTER WITH VOICE User Guide
www.netcommlimited.com 41
HSPA+ WIFI ROUTER WITH VOICE
NETCOMM LIBERTY SERIES
7.5 Domain Name Servers (DNS)
7.5.1 DNS Server Conguration
If the Enable Automatic Assigned DNS checkbox is selected, this device will accept the rst received DNS assignment from the Wide Area
Network (WAN) interface during the connection process. If the checkbox is not selected, a eld will appear allowing you to enter the primary
and optional secondary DNS server IP addresses. Click on Save to apply.
NOTE: Click the Save button to save the new conguration. To make the new conguration eective, reboot your Router.
7.5.2 Dynamic DNS
The Dynamic DNS service allows a dynamic IP address to be aliased to a static hostname in any of a selection of domains, allowing the router
to be more easily accessed from various locations on the internet.
Note: The Add/Remove buttons will be displayed only if the router has been assigned an IP address from the remote server.
To add a dynamic DNS service, click the Add button and this screen will display.
OPTION DESCRIPTION
D-DNS provider Select a dynamic DNS provider from the list.
Hostname Enter the name for the dynamic DNS server.
Interface Select the interface from the list.
Username Enter the username for the dynamic DNS server.
Password Enter the password for the dynamic DNS server.
Page 42

VOICE
Page 43

YML10WVR2 HSPA+ WIFI ROUTER WITH VOICE User Guide
www.netcommlimited.com 43
HSPA+ WIFI ROUTER WITH VOICE
NETCOMM LIBERTY SERIES
Voice
The 3G10WVR2 Router with Voice allows you to make telephone calls over the 3G Mobile/Cellular Telephone network using a standard
Analogue Telephone via the built in RJ-11 Phone port.
Please refer to the documentation provided by the manufacturer for operating your Analogue Telephone.
Note: That your SIM card and Mobile service needs to be provisioned for Voice Calling. Please consult with your Network Provider for verication.
Note: That any telephone calls placed using the 3G10WVR2 may incur call usage charges determined by your Network Provider. Please consult with your Network Provider for
verication.
Conguring your 3G10WVR2 for placing Voice Calls
Once your 3G10WVR2 has been correctly congured to access the mobile network as outlined in Section 2.1 – Quick Setup, you can make
and receive telephone calls after connecting your Analogue Telephone to the socket labeled Voice on the back of your Router.
Calling Features
The 3G10WVR2 router allows you to experience the calling features provided by your service provider. Please refer to the table below for
more details.
CALLING FEATURE USAGE
ACT CODE
DEACT CODE
Ac ce ss Vo ic e Ma il Acc es s Voi ce M ai l St an da rd wi re le ss *9 8
Ca ll D is pl ay - Bl oc ki ng p er c al l #3 1#
Ca ll F or wa rdi ng A ll C al ls *2 1* #2 1#
Ca ll Wa it in g *4 3# # 43 #
A ns we ri ng C al l w ai ti ng H oo k Fla sh ”
T o sw itc h be tw ee n ca lls Hoo k Fl as h”
Di re ct or y As si st an ce D ia l 41 1
Em er ge nc y Ca ll D ia l 91 1
Co ll ec t Ca ll s Co lle ct c al ls c an no t be re ce iv ed o n you r wi re le ss
ph on e. H ow eve r yo u ca n ma ke an o ut go in g
co ll ec t ca ll .
Ro am in g Th e Ro ck et Hu b wi ll f un ct io nal o nl y in C an ad a,
an d on ly o n th e R og er s Wi rel es s Ne tw or k
Page 44

STATUS
Page 45

YML10WVR2 HSPA+ WIFI ROUTER WITH VOICE User Guide
www.netcommlimited.com 45
HSPA+ WIFI ROUTER WITH VOICE
NETCOMM LIBERTY SERIES
Status
The Status menu has the following submenus:
• Diagnostics
• System Log
• 3G network
• Statistics
• Route
• ARP
• DHCP
• PING
8.1 Diagnostics
The Diagnostics menu provides feedback on the connection status of the device. The individual tests are listed below. If a test displays
a fail status:
1. Click on the Help link
2. Now click Re-run Diagnostic Tests at the bottom of the screen to re-test and conrm the error
3. If the test continues to fail, follow the troubleshooting procedures in the Help screen.
OPTION DESCRIPTION
LA N Co nn ec ti on P as s: I nd ic ate s th at t he E the rn et i nt er fa ce f rom y ou r co mp ut er is c on ne ct ed t o t he
LA N po rt o f th is R ou ter .
Fa il : In dic at es t ha t th e Rou te r do es n ot d ete ct t he E th er ne t int er fa ce o n yo ur
co mp ut er.
Wi re le ss c onn ec ti on P as s: I nd ic ate s th at t he w ire le ss c ar d is ON .
Do wn : In di ca te s t ha t th e wi re les s ca rd i s OF F.
DAT A APN a ss ig ne d IP Ad dr es s Pa ss: I nd ic at es t ha t t he R ou te r ca n com mu ni ca te w it h t he f ir st e nt ry p oi nt to t he
ne tw or k. I t is u su al ly th e IP a dd re ss of t he I SP ’s lo ca l Ga te way .
Fa il : In dic at es t ha t th e Rou te r wa s un ab le to c om mu ni ca te wi th t he f ir st en tr y
po in t on t he n et wor k, a nd i t ma y not h av e an e ffe ct o n yo ur I nt er net c on ne ct iv it y.
If t hi s te st f ai ls an d yo u ca n acc es s th e In te rn et, t he re i s no ne ed t o tr ou bl esh oo t
th is i ss ue .
Pi ng P ri ma ry D oma in N am e Se rv er Pa ss : I nd ic at es t ha t the R ou te r ca n co mmu ni ca te w it h the p ri ma ry D om ai n Na me
Se r ver ( DN S) .
Fa il : In dic at es t ha t th e Rou te r wa s un ab le to c om mu ni ca te wi th t he p ri ma ry
Do ma in N am e Se rv er (D NS ). I t ma y no t hav e an e ff ec t on yo ur I nt er ne t
co nn ec ti vi ty. T he re for e if t hi s tes t fa il s bu t you a re s ti ll a bl e t o ac ce ss t he In te rn et ,
th er e is n o nee d to t ro ub le sho ot t hi s is su e.
Page 46

HSPA+ WIFI ROUTER WITH VOICE User Guide YML10WVR2
46 www.netcommlimited.com
8.2 System Log
This function allows you to view system events and congure related options. Follow the steps below to enable and view the
System Log.
1. Click Congure System Log to continue.
2. Select the system log options (see table below) and click Save/Apply.
OPTION DESCRIPTION
Lo g In di ca tes w he th er t he s yst em i s cu rr ent ly r ec or di ng ev en ts . Y ou ca n en ab le o r dis ab le
ev en t lo gg in g. By d ef au lt , it is d is ab le d.
Lo g le ve l Al lo ws yo u to c on fi gu re th e ev en t le vel a nd f il te r out u nw an te d eve nt s be lo w th is le ve l.
Th e ev en ts ra ng in g fr om t he hi gh es t cr it ic al le ve l “ Em er ge nc y” do wn t o thi s co nf ig ur ed
le ve l wi ll b e r ec or de d to th e lo g bu ff er on t he R ou te r’s S DR AM . W he n th e lo g bu ffe r is f ul l,
th e ne we st e ven t wi ll w ra p up to t he t op o f the l og b uf fe r and o ve rw ri te t he o lde st e ve nt .
By d ef au lt , th e l og l ev el i s “ De bu ggi ng ”, w hi ch i s th e lo wes t cr it ic al l eve l. T he lo g le ve ls
ar e de fi ne d as fo ll ow s:
Em er ge nc y is t he mo st s er io us e ve nt le ve l, w he rea s De bu gg in g is th e le as t im po rt an t. Fo r
in st an ce , if th e lo g le ve l is se t to D eb ug gi ng, a ll t he e ven ts f ro m th e low es t De bu gg in g
le ve l to t he mo st c ri ti ca l le vel E me rg en cy l ev el wi ll b e re co rde d. I f th e lo g lev el i s se t to
Er ro r, on ly E rr or a nd th e le ve l ab ove w il l be l og ge d.
Di sp la y Le vel Al lo ws yo u to s el ec t th e log ge d ev en ts a nd di sp la ys o n th e V ie w Sys te m Lo g wi ndo w fo r
ev en ts o f th is le ve l an d ab ove t o th e hi gh est E me rg en cy l ev el.
Mo de A ll ows y ou t o sp eci fy w he th er e ven ts s ho ul d be s tor ed i n th e lo cal m em or y, b e sen t to a
re mo te s ys log s er ve r, o r t o bo th s im ul tan eo us ly .
If r em ot e mo de is s el ec te d, t he vi ew s ys te m lo g w il l no t be a bl e to di sp la y ev ent s sa ve d in
th e re mo te s ysl og s er ve r. Wh en e it her R em ot e mo de o r B ot h mo de i s co nfi gu re d, t he WE B
UI w il l pr om pt th e yo u to e nte r th e Se rv er I P ad dre ss a nd S er ve r UD P p or t.
Page 47

YML10WVR2 HSPA+ WIFI ROUTER WITH VOICE User Guide
www.netcommlimited.com 47
HSPA+ WIFI ROUTER WITH VOICE
NETCOMM LIBERTY SERIES
3. Click View System Log. The results are displayed as follows.
Page 48

HSPA+ WIFI ROUTER WITH VOICE User Guide YML10WVR2
48 www.netcommlimited.com
8.3 3G Network
Select this option for detailed status information on your Routers 3G connection.
Page 49

YML10WVR2 HSPA+ WIFI ROUTER WITH VOICE User Guide
www.netcommlimited.com 49
HSPA+ WIFI ROUTER WITH VOICE
NETCOMM LIBERTY SERIES
Consult the table on the next page for detailed eld descriptions.
STATUS DESCRIPTION
Ma nu fa ct ur er T he m an uf ac tu rer o f th e em be dd ed 3G m od ul e.
Mo de l The m od el n am e of t he em be dd ed 3 G mo dul e
FW R ev Th e fi rm wa re ve rs io n of t he 3G m od ul e.
IM EI Th e IM EI ( In te rna ti on al M ob il e Equ ip me nt I de nt it y) is a 1 5 di gi t num be r th at i s
us ed t o id en tif y a mo bi le d ev ice o n a ne tw or k.
FS N Fa ct or y Se ri al Nu mb er o f th e 3G mo du le .
IM SI Th e IM SI ( In te rna ti on al M ob il e Sub sc ri be r Id en ti ty ) is a un iq ue 1 5- di gi t n um be r
us ed t o id en tif y an i nd iv id ua l use r on a G SM o r UMT S ne tw or k.
HW R ev . Th e ha rd wa re ve rs io n of t he 3G m od ul e.
Sy st em M od e W CD MA /E ur ope C DM A 20 00 / Am er ic a
HS PA ba nd Th e 3G r ad io fr eq ue nc y ba nd w hi ch su pp or ts t ri -b an d UT MS/ HS DPA /H SU PA
fr eq ue nc ie s (85 0/ 19 00 /2 10 0 MH z) , IMT 20 00 i s 21 00 MH z, W CD MA 80 0 i s 85 0 MH z,
WC DM A1 90 0 is 19 00 M Hz .
GS M ba nd Th e 2G ra di o fr eq ue nc y ban d wh ic h su pp or ts Q uad -b an d GS M/ GR PS f req ue nc ie s,
in cl ud in g GS M8 50, G SM 90 0, D CS 18 00 , P CS 19 00 w it h ea ch nu mb er r ep re sen ti ng t he
re sp ec ti ve f req ue nc y in M Hz .
HS PA ch an ne l The 3 G ch an ne l.
GS M (P S) s ta te P ac ke t S wi tc hi ng s ta te
MM ( CS ) st ate C irc ui t Sw it ch in g s ta te
Si gn al S tr en gth Th e 3G /2 G se rv ic e si gna l st re ng th i n d Bm .
OPTION DESCRIPTION
Si gn al L ev el (R SS I) 3 G Ra dio S ig na l St ren gt h In de x
Qu al it y (E c/ Io ) Th e to ta l en er gy pe r ch ip p er p owe r de ns it y (E c/ Io) v al ue o f th e ac tiv e se t’s t hr ee
st ro ng es t ce lls .
Ne tw or k Re gi st rat io n St at us S ho ul d di sp la y as re gi st er ed wi th a v al id u nlo ck ed S IM c ar d.
Ne tw or k Na me T he 3G i nt er ne t Se rv ic e P ro vi de r.
Co un tr y & Ne tw or k C od es Ea ch c ou nt ry a nd ne tw or k ha s a un iq ue co de .
Ce ll I D Th e ne tw or k in for ma ti on f or th e “se rv in g” ce ll ID .
Pr im ar y Sc ra mb li ng Co de ( PS C) Th e PS C of t he re fe re nc e W CD MA c el l
Da ta S es si on S tat us Co nn ec te d or D isc on ne ct ed
HS UPA /H SD PA Ca te go ri es T he H SU PA/ HSD PA ca te go ri es c or res po nd t o di ffe re nt d at a tr ans mi ss io n ra te s w it h
hi gh er n um be rs ge ne ra ll y in di ca tin g fa st er r ate s
Re ce iv ed S ig nal C od e Po wer ( RS CP ) The R SC P of t he ac ti ve s et ’s th re e st ro nge st c el ls
Page 50

HSPA+ WIFI ROUTER WITH VOICE User Guide YML10WVR2
50 www.netcommlimited.com
8.4 Statistics
These screens provide detailed information for:
• Local Area Network (LAN) and Wireless Local Area Network (WLAN)
• 3G Interfaces
NOTE: These statistics page refresh every 15 seconds.
8.4.1 LAN Statistics
This screen displays statistics for the Ethernet and Wireless LAN interfaces.
INTERFACE SHOWS CONNECTION INTERFACES
Re ce iv ed / Tr an smi tt ed Byt es Rx /T X (r ec ei ve/ tr an sm it ) pa cke t in b yt es
Pk ts Rx /T X (r ec ei ve/ tr an sm it ) pa ck ets
Er rs Rx /T X (r ec ei ve /tr an sm it ) pa ck et s w it h er ro rs
Dr op s Rx /T X (r ec ei ve/ tr an sm it ) pa cke ts d ro pp ed
8.4.2 3G Statistics
Click 3G network in the Statistics submenu to display the screen below.
In bo un d O c tet s N um be r of re ce iv ed o ct ets o ve r th e in ter f ace .
Pa ck et s N um be r of re ce iv ed p ac ket s ov er t he i nte rf ac e.
Dr op s R ece iv ed p ac ke ts w hic h ar e dr op ped .
Er ro r R ec ei ve d p ac ke ts w hi ch a re er ro rs .
Ou tb ou nd Oc tet s N um be r of Tr ans mi tt ed o ct et s ove r th e in te rf ac e.
Pa ck et s N um be r of Tra ns mi tt ed p ac ke ts ov er t he i nte r fa ce.
Dr op s Tr an sm it te d p ac ke ts w hi ch a re dr op pe d
Er ro r T ran sm it te d pa ck et s w hi ch a re e rr ors .
Page 51

YML10WVR2 HSPA+ WIFI ROUTER WITH VOICE User Guide
www.netcommlimited.com 51
HSPA+ WIFI ROUTER WITH VOICE
NETCOMM LIBERTY SERIES
8.5 Route
Select Route to display the paths the Router has found.
DESTINATION DESTINATION NET WORK OR DESTINATION HOST
Ga te wa y Ne xt h op IP a dd re ss
Su bn et M as k S ub ne t Ma sk o f D es ti na ti on
Fl ag U : rou te i s up
!: r ej ec t ro ute
G: u se g at ew ay
H: t ar ge t is a ho st
R: r ei ns ta te ro ut e fo r dy nam ic r ou ti ng
D: d yn am ic al ly in st al le d by d ae mon o r re di re ct
M: m od if ie d fro m ro ut in g da em on or r ed ir ec t
Me tr ic T he ‘di st an ce ’ t o the t ar ge t (u su all y co un te d in ho ps ). I t is n ot u se d b y re ce nt
ke rn el s, b ut m ay be n ee de d by ro ut in g da em on s.
Se r vic e Sh ow s th e na me fo r WAN c on ne ct io n
In te rf ac e S ho ws c on ne ct ion i nt er fa ce s
8.6 ARP
Click ARP to display the ARP information.
FIELD DESCRIPTION
IP a dd re ss Sh ow s IP a dd res s of h os t pc
Fl ag s C om pl et e
In co mp le te
Pe rm an en t
Pu bl is h
HW A dd re ss S ho ws th e MA C ad dre ss o f ho st p c
De vi ce Sho ws t he c onn ec ti on i nt er fa ce
Page 52

HSPA+ WIFI ROUTER WITH VOICE User Guide YML10WVR2
52 www.netcommlimited.com
8.7 Dynamic Host Conguration Protocol (DHCP)
Click DHCP to display the DHCP information.
FIELD DESCRIPTION
Hostname
Sh ow s th e de vic e/ ho st /P C ne tw ork n am e
MAC Address
Sh ow s th e Et her ne t MA C ad dre ss o f th e de vi ce/ ho st /P C
IP address
Sh ow s IP a dd res s of d ev ic e/ hos t/ PC
Expires In
Sh ow s ho w mu ch ti me i s le ft f or ea ch D HC P Le ase
8.8 PING
The PING menu provides feedback of connection test to an IP address or a host name.
Input an IP address or a host name, e.g www.google.com and press Submit.
Page 53

APPENDICES
Page 54

HSPA+ WIFI ROUTER WITH VOICE User Guide YML10WVR2
54 www.netcommlimited.com
Appendix A: Print Server
These steps explain the procedure for enabling the Printer Server.
1. Click on Print Server from the Web User Interface
2. Select Enable on-board print server checkbox and enter Printer name and Make and model
NOTE: The Printer name can be any text string up to 40 characters. The Make and model can be any text string up to 128 characters.
For Windows Vista/7
1. Go to the control panel, and select ‘Printers’ if you are using Windows Vista or select “Devices and Printers” if you are using Windows7.
Once in the ‘Printers’ page, click the ‘Add a printer’ button as shown below.
Select ‘Add a network, wireless or bluetooth printer’.
Page 55

YML10WVR2 HSPA+ WIFI ROUTER WITH VOICE User Guide
www.netcommlimited.com 55
HSPA+ WIFI ROUTER WITH VOICE
NETCOMM LIBERTY SERIES
2. Click on the radio-button labelled ‘Select a shared printer by name’, and type “http://192.168.1.1:631/printers/samsung” in the box
below. Click ‘Next’.
NOTE: The PrinterName must be the same as the printer name entered into the Printer section of 3G10WVR2.
3. Next, select the driver that came with your printer. Browse through the list to select your printer driver, or click ‘Have Disk’ if you have
your printer driver installation media.
Choose whether you want this printer to be the default printer, and then click ‘Next’.
4. Click ‘Finish’. Your device is now congured and ready for use.
Page 56

HSPA+ WIFI ROUTER WITH VOICE User Guide YML10WVR2
56 www.netcommlimited.com
For MAC OSX
To set up your printer, check the Apple menu, select System Preferences. In the System Preference menu click on the Print & Fax.
With your Printer driver installed, please add your printer from the Print &Fax menu.
Mouseover to the Protocol drop down list and select Internet Printing Protocol – IPP.
Input the Address eld with “192.168.1.1:631” and the Queue with “/printers/PrinterName”
NOTE: The PrinterName must be the same as the printer name entered into the Printer section of 3G10WVR2.
Page 57

YML10WVR2 HSPA+ WIFI ROUTER WITH VOICE User Guide
www.netcommlimited.com 57
HSPA+ WIFI ROUTER WITH VOICE
NETCOMM LIBERTY SERIES
From Print Using drop down list and select your corresponding printer driver.
Click Add and check the printer status.
Page 58

HSPA+ WIFI ROUTER WITH VOICE User Guide YML10WVR2
58 www.netcommlimited.com
Appendix B: USB Storage
Click on USB Storage from the Web User Interface
1. Select the Enable USB Storage checkbox.
For Windows Vista/7
Open a web-browser (such as internet Explorer, Firefox or Safari)
Type in the address \\“NetbiosName”\“DirectoryName”\ (eg \\Rocket Hub\USB-Storage)
Note: There are no username and password required to access the USB drive, the user will be able to read/write the folder/les in the USB drive.
For MAC OSX
Click the nder icon in the Dock.
Choose Connect to Server from the Go menu.
In the address eld of the Connect to Server dialog, type in the URL Smb://“NetbiosName”/“DirectoryName” (eg smb://Rocket Hub/
USB-Storage)
Select Connect to connect your USB storage.
Page 59

YML10WVR2 HSPA+ WIFI ROUTER WITH VOICE User Guide
www.netcommlimited.com 59
HSPA+ WIFI ROUTER WITH VOICE
NETCOMM LIBERTY SERIES
Legal & Regulatory Information
This manual is copyright. Apart from any fair dealing for the purposes of private study, research, criticism or review, as permitted under the
Copyright Act, no part may be reproduced, stored in a retrieval system or transmitted in any form, by any means, be it electronic, mechanical,
recording or otherwise, without the prior written permission of NetComm Limited. NetComm Limited accepts no liability or responsibility, for
consequences arising from the use of this product.
NetComm Limited reserves the right to change the specications and operating details of this product without notice.
NetComm is a registered trademark of NetComm Limited.
All other trademarks are acknowledged the property of their respective owners.
Federal Communication Commission Interference Statement
This device complies with part 15 of the FCC Rules. Operation is subject to the following two conditions: (1) This device may not cause
harmful interference, and (2) this device must accept any interference received, including interference that may cause undesired operation.
This device has been tested and found to comply with the limits for a Class B digital device, pursuant to Part 15 of the FCC Rules. These limits
are designed to provide reasonable protection against harmful interference in a residential installation. This equipment generates uses and
can radiate radio frequency energy and, if not installed and used in accordance with the instructions, may cause harmful interference to radio
communications. However, there is no guarantee that interference will not occur in a particular installation If this equipment does cause
harmful interference to radio or television reception, which can be determined by turning the equipment o and on, the user is encouraged
to try to correct the interference by one or more of the following measures:
• Reorient or relocate the receiving antenna.
• Increase the separation between the equipment and receiver.
• Connect the equipment into an outlet on a circuit dierent from that to which the receiver is connected.
• Consult the dealer or an experienced radio/TV technician for help.
Changes or modications not expressly approved by the party responsible for compliance could void the user‘s authority to operate
the equipment.
The antenna(s) used for this transmitter must not be co-located or operating in conjunction with any other antenna or transmitter.
This device complies with FCC radiation exposure limits set forth for an uncontrolled environment. In order to avoid the possibility of
exceeding the FCC radio frequency exposure limits, human proximity to the antenna shall not be less than 20cm (8 inches) during
normal operation.
Operation is subject to the following two conditions: (1) this device may not cause interference, and (2) this device must accept any
interference, including interference that may cause undesired operation of the device.
Page 60

HSPA+ WIFI ROUTER WITH VOICE User Guide YML10WVR2
60 www.netcommlimited.com
IC Important Note
IC Radiation Exposure Statement:
This equipment complies with IC RSS-102 radiation exposure limits set forth for an uncontrolled environment. This equipment should be
installed and operated with minimum distance 20cm between the radiator & your body.
This device and its antenna(s) must not be co-located or operating in conjunction with any other antenna or transmitter.
The County Code Selection feature is disabled for products marketed in the US/Canada.
Operation is subject to the following two conditions: (1) this device may not cause interference, and (2) this device must accept any
interference, including interference that may cause undesired operation of the device.
This Class B digital apparatus complies with Canadian ICES-003.
Cet appareil numérique de la classe B est conforme à la norme NMB-003 du Canada.
To reduce potential radio interference to other users, the antenna type and its gain should be so chosen that the equivalent isotropically
radiated power (EIRP) is not more than that required for successful communication
This device has been designed to operate with an antenna having a maximum gain of 4 dBi. Antenna having a higher gain is strictly
prohibited per regulations of Industry Canada. The required antenna impedance is 50 ohms.
To reduce potential radio interference to other users, the antenna type and its gain should be so chosen that the equivalent isotropically
radiated power (e.i.r.p.) is not more than that permitted for successful communication.
Operation is subject to the following two conditions:
(1) this device may not cause interference, and
(2) this device must accept any interference, including interference that may cause undesired operation of the device.
Page 61

YML10WVR2 HSPA+ WIFI ROUTER WITH VOICE User Guide
www.netcommlimited.com 61
HSPA+ WIFI ROUTER WITH VOICE
NETCOMM LIBERTY SERIES
Trademarks and registered trademarks are the property of NetComm Limited or their respective owners. Specications are subject to change without notice. Images shown may vary slightly from the actual product.
NETCOMM LIMITED Head Oce
PO Box 1200, Lane Cove NSW 2066 Australia
W: www.netcommlimited.com
TM
Rogers,RocketandMobiusdesignaretrademarksoforusedunderlicensefromRogersCommunicationsInc.
oranaffiliate.NetCommandtheNetCommlogoaretrademarksofNetcommLimited.
 Loading...