

Page 1

Page 2

Contents
1. Introduction ................................................................................................................................. 4
1-1 Package Contents .......................................................................................................... 5
1-2 Features ......................................................................................................................... 6
1-3 Precautions .................................................................................................................... 6
1-4 Overview of the HS800 Wireless Gateway .................................................................... 6
1-4-1 Front Panel ........................................................................................................ 7
1-4-2 Rear Panel ........................................................................................................ 8
1-4-3 Left Side Panel .................................................................................................. 9
1-5 Three Button Printer ..................................................................................................... 10
1-5-1 Changing the paper ......................................................................................... 10
1-5-2 Test Print ......................................................................................................... 10
2. Logging in to the HS800 ........................................................................................................... 11
3. Customising the HS800 ............................................................................................................ 13
3-1 Customisation .............................................................................................................. 13
3-1-1 Logo ................................................................................................................ 13
3-1-2 Login Page ...................................................................................................... 14
3-1-3 Redirect ........................................................................................................... 16
3-1-4 Advanced ........................................................................................................ 17
3-1-5 Frame .............................................................................................................. 18
3-1-6 Information Window ........................................................................................ 19
3-1-7 Account Printout .............................................................................................. 22
3-1-8 Credit Card ...................................................................................................... 25
3-1-9 Service Selection Page ................................................................................... 26
3-2 Billing............................................................................................................................ 30
3-3 Accounting ...................................................................................................................35
3-4 Pass Through ............................................................................................................... 46
3-5 Advertisement .............................................................................................................. 48
3-6 Walled Garden ............................................................................................................. 50
4. Troubleshooting ........................................................................................................................ 52
4-1 Frequently Asked Questions ........................................................................................ 52
4-2 HS800 Wireless Gateway – Remote Administration ................................................... 53
4-2-1 Connecting to HS800 on Internal LAN (within Office / Site) ........................... 53
4-2-2 Connecting to HS800 from External WAN (outside Office / Site) ................... 54
www.netcomm.com.au Rev. 1 - YML698
Page 2 HS800 User’s Guide
Page 3

Appendix A – Cable Connections .......................................................................................................... 57
RJ-45 Network ports ................................................................................................................. 57
Twisted pair cables ................................................................................................................... 57
Straight and crossover cable configuration .............................................................................. 58
RJ11 connector and cable ........................................................................................................58
605 to RJ-11 adapter ................................................................................................................ 59
USB cable ................................................................................................................................. 59
9 Pin (RS-232 ) Serial Cable ....................................................................................................59
Appendix B – Technical Specifications .................................................................................................. 60
Hardware Specifications ........................................................................................................... 60
Software Specifications ............................................................................................................ 62
Appendix C – Registering your NetComm Product ............................................................................... 64
Contact Information .................................................................................................................. 64
Trade marks and Notices.......................................................................................................... 64
Legal & Regulatory Information Copyright Information ............................................... 65
Customer Information .................................................................................................. 66
Warranty....................................................................................................................... 67
Conditions and exclusions: .......................................................................................... 67
Rev. 1 - YML698 www.netcomm.com.au
HS800 User’s Guide Page 3
Page 4

1. Introduction
Congratulations on purchasing your NetComm HS800 Wireless Gateway. This guide covers
areas specific to administrators of the Wireless Gateway and will help in you in customizing
the device to suit your needs.
Login page: The HS800 Wireless Gateway allows you to change the look and
feel of the login page that a subscriber will see when logging
onto the Internet. You can decide what the welcome message is,
if you want a logo on the page, or if you would like the web
page split into two frames with the login fields in the bottom
frame and a website of your choice in the top frame. You can
even code your own login page or redirect the subscriber to a
different website address.
Receipt: Customize what is printed on the receipt issued to subscribers.
Billing: You can decide how much to charge people to use the service,
and customize a billing profile for each button on the printer that
comes with the HS800 Wireless Gateway. You can implement
discounts based on button sequences on the HS800 printer.
Decide how you would like your customers to pay for the
service - before logging in, or once they have finished using the
Internet.
Accounting: Decide whether you would like to use the HS800 printer or a
printer on your network to print account details. Set expiration
times for accounts.
Pass Through: Allow certain machines to access the internet without having to
enter a username and password. This is ideal for VIP members.
You can also allow subscribers to access certain websites
without having to enter a username and password by listing the
website addresses under the Pass Through section.
Advertisements: Advertise specials that your organisation may have, or charge
companies to use the HS800 Wireless Gateway for advertisements. The adverts will be pop-ups that appear while a subscriber is surfing the Internet.
Filtering: Decide which websites you want to restrict access to (e.g.
competitors, X-rated sites, download sites).
www.netcomm.com.au Rev. 1 - YML698
Page 4 HS800 User’s Guide
Page 5

1-1 Package Contents
Please inspect your package. The following items should be included:
■ One HS800 Wireless Gateway
■ Two antennas
■ One AC Power Adapter for HS800
Wireless Gateway
■ One CD containing Manuals
■ Two screws for wall-mount
■ One UTP Ethernet/Fast Ethernet
cable (Cat.5 Twisted-pair)
■ Package Contents Note
■ One Account Generator Printer
■ One AC Power Adapter for mini account generator printer
■ One RJ-11 to DB25 male connector cable
■ One Account Generator Printer User’s Guide
If any of the above items are damaged or missing, please contact your dealer immediately.
Rev. 1 - YML698 www.netcomm.com.au
HS800 User’s Guide Page 5
Page 6

1-2 Features
■ IP Plug and Play connectivity
■ Wireless 802.11b+ 22Mbps
■ Built-in AAA (Authentication/Accounting/Authorization) and Billing mechanism
■ Comprehensive security
■ Intelligent Management
Note: The “PnP” Function can only be used with a TCP/IP-based Network.
1-3 Precautions
■ Never remove or open the cover. You may suffer serious injury if you touch these parts.
■ Never install the system in wet areas.
■ Only use the original fitting AC power adapter otherwise there is a danger of severe
electrical shock.
■ Avoid exposing the HS800 Wireless Gateway to direct sunlight or another heat source.
■ Choose a well-ventilated area to position your HS800 Wireless Gateway.
1-4 Overview of the HS800 Wireless Gateway
Figure 1-1 HS800 Wireless Gateway Outlook
www.netcomm.com.au Rev. 1 - YML698
Page 6 HS800 User’s Guide
Page 7

1-4-1 Front Panel
The front panel of the HS800 Wireless Gateway is shown below.
Figure 1-2 HS800 Wireless Gateway Front Panel
Description of LEDs
LED State Description
Power Off The HS800 Wireless Gateway is not receiving
Green The HS800 Wireless Gateway is receiving
WAN Green The WAN port is connected to your xDSL or
Green (Blinking) Data is travelling through the WAN port.
LAN (1-4) Green A port has established a valid 10/100Mbps
Green (Blinking) 10/100Mbps traffic is traversing the port.
Off Port has not established any network
Wireless Green The HS800 Wireless Gateway has
Green (Blinking) The Wireless connection is active.
Status Off The HS800 Wireless Gateway status is
Green The HS800 Wireless Gateway status is
Green (Blinking) During firmware upgrades, the status LED will
electrical power.
electrical power.
Cable modem.
network connection.
connection.
established a valid wireless connection.
defective.
complete.
blink.
Rev. 1 - YML698 www.netcomm.com.au
HS800 User’s Guide Page 7
Page 8

1-4-2 Rear Panel
The rear panel of the HS800 Wireless Gateway is shown below.
Figure 1-3 HS800 Wireless Gateway Rear Panel
1. Power Jack: Used to connect the external power supply with the HS800 Wireless
Gateway.
2. LAN Ports:
The rear panel supports four auto-sensing RJ-45 ports and all ports can be auto-switched
to MDI-II connections. The LAN ports are used for linking hosts or other network
devices. The individual port can be either connected to 100BaseTX networks or
10BaseT networks. When connecting to a 100BaseTX network, the ports operate at
100Mbps in half-duplex mode or 200Mbps in full-duplex mode. When connecting to a
10BaseT network, the ports operate at 10Mbps in half-duplex mode or 20Mbps in fullduplex mode.
3. WAN Port: One Ethernet port used for linking a xDSL or Cable Modem.
4. Device Port: Used to connect the Account Generator Printer.
1.2.3.4.
www.netcomm.com.au Rev. 1 - YML698
Page 8 HS800 User’s Guide
Page 9

1-4-3 Left Side Panel
The left side panel of the HS800 Wireless Gateway is shown below.
Reset Button
Figure 1-4 HS800 Wireless Gateway Left Side Panel
Reset Button:
The HS800 Wireless Gateway has a reset button on the left side panel of the device. In
some circumstances you might need to reset the HS800 Wireless Gateway device.
Rev. 1 - YML698 www.netcomm.com.au
HS800 User’s Guide Page 9
Page 10

1-5 Three Button Printer
Button A
Button B
Button C
Figure 1-5 Three Button Thermal Printer
1-5-1 Changing the paper
If there is no paper, the Button A indicator will be flashing. To change the paper:
Step 1: Open the clear cover by pressing down the lever on the right hand side of the
printer.
Step 2: Remove the old roll.
Step 3: Insert the new roll so that the paper edge is facing away from the front of the
printer.
Step 4: Close the clear cover.
Step 5: Press and release Button A to feed the paper through.
1-5-2 Test Print
To print a test page on the Printer:
Step 1: Turn the power off.
Step 2: Hold down Button A and turn the power on.
Step 3: Release Button A and the printer will print a test page.
www.netcomm.com.au Rev. 1 - YML698
Page 10 HS800 User’s Guide
Page 11

2. Logging in to the HS800
Step 1: Start your Browser
Start your browser, and then enter the factory default IP address 10.0.0.1 in your
browser’s location box. Press Enter.
Figure 2-1 Web Browser Location Field (Factory Default)
Step 2: The HS800 Wireless Gateway Configuration Tools Menu
The HS800 Wireless Gateway configuration tools menu will appear. In the
Username and Password field, type the factory default user name (admin) and
password (admin)and click “Getting Started”. Select the “Advanced Setup”
tab to access the customisation screens.
Figure 2-2 Configuration Tools Menu
Rev. 1 - YML698 www.netcomm.com.au
HS800 User’s Guide Page 11
Page 12

Step 2: The HS800 Wireless Gateway Advanced Setup Menu
This section details the most common customisation issues. For more
detailed information on the HS800, please refer to the HS800
Installation Guide.
The Advanced Setting enables you to configure advanced settings
related to accessing the Internet, including,
1. System
2. WAN/LAN
3. Server
4. Authentication
5. Billing
6. Accounting
7. Credit Card
8. Keypad
9. Customization
10. Pass Through
11. Filtering
12. Share
13. Portal Page
14. Advertisement
15. Walled Garden
16. DDNS
17. LAN Device Management
18. Syslog
19. Wireless
Figure 2-3 Advance Setup Menu Screen
Note: After changing the settings of the device, please click the Apply button to save
the new settings.
www.netcomm.com.au Rev. 1 - YML698
Page 12 HS800 User’s Guide
Page 13

3. Customising the HS800
To customise your HS800, click on Customisation in the Advanced Setup screen.
3-1 Customisation
3-1-1 Logo
This function allows uploading the service provider’s logo file, which can be shown on the
standard login page and account printout from the PC-connected printer.
Note: Maximum file size is 60KB (kilobytes).
Figure 3-1 Logo Setting Screen
Item Description
File Path Enter the path to the file (e.g. c:\images\logo.jpg)
Click the Apply button to save the new settings. The Success! dialog box appears.
Figure 3-2 Success Dialog Box
Click on Back to return to Customization setting screen.
Rev. 1 - YML698 www.netcomm.com.au
HS800 User’s Guide Page 13
Page 14

3-1-2 Login Page
Standard
Service Providers have the ability to customize the login page. The page elements include
the welcome image, background color, article etc. The HS800 Wireless Gateway provides
three different login page formats, including standard, redirect, advanced and frame format.
Figure 3-3 Standard Login Page Customization Setting Screen
Item Default Description
Logo Disable Select the checkbox to display the provider’s
Title Welcome Enter the title for the login page. The
Subtitle Hot Spot
Internet Service Enter the subtitle for the login page. The
Footnote Disable Allows the administrator to input a footnote
Copyright Enable Copyright information can be included. The
Background Color FFFFFF Enter a hexadecimal number that represents
logo. NOTE: You will need to specify the path
to the logo before checking this tickbox.
maximum allowed characters is 80.
maximum allowed characters is 80.
such as “Please Contact our Customer
Service Center on EXT 142”. Maximum
characters: 240.
maximum character length is 80.
the background colour. The default FFFFFF is
white.
www.netcomm.com.au Rev. 1 - YML698
Page 14 HS800 User’s Guide
Page 15

Figure 3-4 Login Page Screen
Before you add your logo to the login page, please make sure the logo image file is defined.
For details, see section 3-1-9 Customization->Logo.
Figure 3-5 Error Dialog Box
Rev. 1 - YML698 www.netcomm.com.au
HS800 User’s Guide Page 15
Page 16

3-1-3 Redirect
This allows the service provider to redirect the subscriber’s browser to a specified home
page.
Figure 3-6 Redirect Login Page Setting Screen
Copy and paste the following HTML Code into your home page to produce redirect
subscriber login page.
Figure 3-7 Redirect Login Page Code Screen
www.netcomm.com.au Rev. 1 - YML698
Page 16 HS800 User’s Guide
Page 17

3-1-4 Advanced
This function allows users to design a login page for the HS800 Wireless Gateway.
Figure 3-8 Advanced Login Page Setting Screen
Item Default Description
Welcome Slogan Welcome A Welcome message with a maximum length
Page Background None The page background can be none or a
Article Empty The article is generally used for an
Article Text Color 000000 The article text color can be specified color.
Article Background Color None The article background can be a specified
Information Empty Allows the administrator to include text
Comments Empty Allows the administrator to include text
Rev. 1 - YML698 www.netcomm.com.au
HS800 User’s Guide Page 17
of 80 characters can be added.
specified color. For the background color
format please view the color grid. The
allowed format is Hexadecimal (RGB values
of Red, Green, and Blue, where each
component has a hexadecimal value from 00
to FF. 000000 is black and FFFFFF is white.)
advertisement or a special announcement.
Maximum character length is 1024.
For the specified text color format please view
the color grid. The allowed format is
Hexadecimal.
color. For the background color format please
view the color grid. The allowed format is
Hexadecimal. (e.g. FFFFFF)
information such as address, telephone
number and fax information. The maximum
character length is 80.
comments such like “Please Contact our
Customer Service Center on EXT 142”. The
maximum character length is 80.
Page 18

Figure 3-9 Color Gird
3-1-5 Frame
If “Frame” is selected the subscriber login page will be separated into Top and Bottom
frame. The Bottom Frame is a default format for username and password input. The Top
frame can be specified as a URL.
Figure 3-10 Frame Login Page Setting Screen
Item Default Description
Top Frame URL Link Empty The input format can be http://
Bottom Frame - This frame will show the standard login page.
www.yahoo.com. The maximum character
length of the URL Link is 200.
Figure 3-11 Example-Login Page Screen
www.netcomm.com.au Rev. 1 - YML698
Page 18 HS800 User’s Guide
Page 19

3-1-6 Information Window
The Information Window is a pop-up window that is displayed to subscribers within their
browser once after the subscriber logs in successfully. The subscriber can type http://
1.1.1.1/info to open this window again or http://1.1.1.1/logout to logout immediately if
accumulation billing is selected.
Figure 3-12 Example-Login Page Screen
Figure 3-13 Example-Login Page Screen
Rev. 1 - YML698 www.netcomm.com.au
HS800 User’s Guide Page 19
Page 20

Figure 3-14 Information Window
Billing Type=Time to Finish
Can be replenished by subscriber=Disable
Figure 3-15 Information Window
Billing Type=Time to Finish
Can be replenished by subscriber=Enable
Figure 3-16 Information Window
Billing Type=Accumulation
Can be replenished by subscriber=Disable
Figure 3-17 Information Window
Billing Type=Accumulation
Can be replenished by subscriber=Enable
www.netcomm.com.au Rev. 1 - YML698
Page 20 HS800 User’s Guide
Page 21

Figure 3-18 Information Window
Super Subscriber Account (Default username=”super” & password=”super”)
Figure 3-19Logout Successfully Dialog Box
Billing Type=Accumulation
Figure 3-20 Disconnected Dialog Box
Figure 3-21 Alarm Dialog Box
Rev. 1 - YML698 www.netcomm.com.au
HS800 User’s Guide Page 21
Page 22

3-1-7 Account Printout
This function allows the service provider to specify the text on the account printout.
Figure 3-22 Account Printout Customization Setting Screen
Click the Apply button to save the new settings.
Figure 3-23 Success Dialog Box
Click the Back button to return to Account Printout Customization setting screen.
www.netcomm.com.au Rev. 1 - YML698
Page 22 HS800 User’s Guide
Page 23

Figure 3-24 PC-connected Printer Printout
Figure 3-25 Account Generator Printer Printout
Rev. 1 - YML698 www.netcomm.com.au
HS800 User’s Guide Page 23
Page 24

Figure 3-26 Account Generator Printer Printout
www.netcomm.com.au Rev. 1 - YML698
Page 24 HS800 User’s Guide
Page 25

3-1-8 Credit Card
Standard Login Page
This function allows the service provider to customize the additional credit card message for
the standard login page.
Figure 3-27 Credit Customization Setting Screen
Figure 3-28 Standard Login Page
(Enable Credit Card Service=enable)
Figure 3-29 Billing Setting Screen
Rev. 1 - YML698 www.netcomm.com.au
HS800 User’s Guide Page 25
Page 26

3-1-9 Service Selection Page
This function allows the service providers to customize the additional credit card message
for the standard login page.
Figure 3-30 Service Selection Page Setting Screen
www.netcomm.com.au Rev. 1 - YML698
Page 26 HS800 User’s Guide
Page 27

Successful Page
Figure 3-31 Example-Service Selection Page
Figure 3-32 Successful Page Setting Screen
Rev. 1 - YML698 www.netcomm.com.au
HS800 User’s Guide Page 27
Page 28

Figure 3-33 Example-Successful Page
Fail Page
This function allows the service provider to customize the message for the fail page.
Figure 3-34 Fail Page Setting Screen
Figure 3-35 Example-Fail Page
www.netcomm.com.au Rev. 1 - YML698
Page 28 HS800 User’s Guide
Page 29

Click the Apply button to save the new settings. The Success! dialog box appears.
Figure 3-36 Success Dialog Box
Click the Back button to return to Credit Card Customization setting screen.
Rev. 1 - YML698 www.netcomm.com.au
HS800 User’s Guide Page 29
Page 30
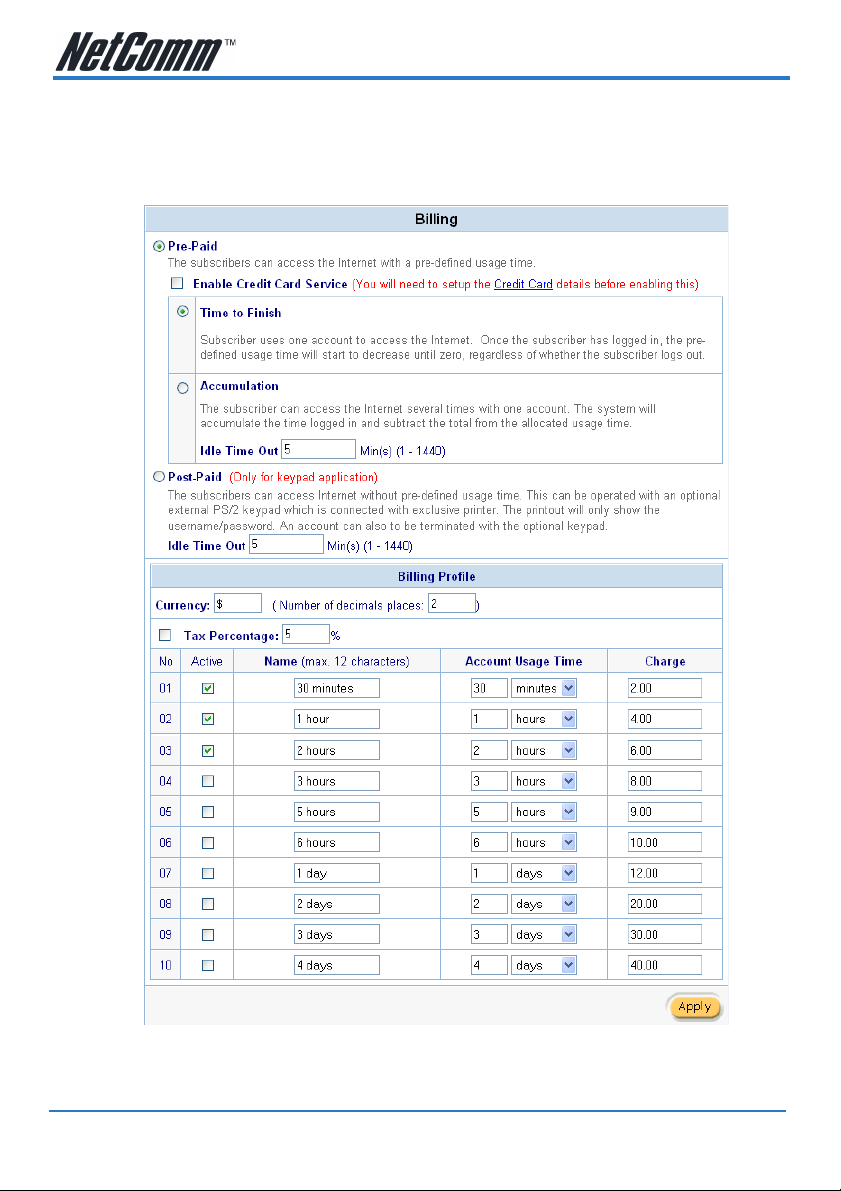
3-2 Billing
The function is used to setup a billing profile. A billing profile is a description of how you
want to charge your customer.
Figure 3-37 Billing Setting Screen
www.netcomm.com.au Rev. 1 - YML698
Page 30 HS800 User’s Guide
Page 31

Item Default Description
Pre-Paid Enable The subscribers can access Internet with pre-
Note: If you change billing mode (Pre-paid->Post-paid or Post-paid->Pre-paid), the system will
erase all accounts and disconnect all on-line users.
Figure 3-38 Message Box
Item Default Description
Enable Credit Card Service Disable Enables or disables the credit card service.
defined usage time.
Before you enable the credit card service,
make sure that your credit service is
configured to work and the currency is
American dollars. You must be converting all
prices on your billing page into American
dollars (U.S. dollars). For details, see section
3-1-7 Credit Service. The credit card service
only supports American dollars.
Figure 3-39 Credit Service Setting Screen
Rev. 1 - YML698 www.netcomm.com.au
HS800 User’s Guide Page 31
Page 32

Item Default Description
Time to Finish Enable Subscriber uses one account to access the
Accumulation
Accumulation Disable Subscriber can access the internet several
Idle Time Out 5 Min(s) The idle time out valid range is 1-1440. If the
internet. Once the subscriber has logged in,
the pre-defined usage time will start to
decrease until zero, regardless of whether the
subscriber logs out.
times with one account. The system will
accumulate the time logged in and subtract
the total from the allocated usage time.
idle time out is set as 5 minutes, it means if
the account doesn’t send packet in 5 minutes,
the account will logout automatically.
Figure 3-40 Accumulation and Time to Finish
www.netcomm.com.au Rev. 1 - YML698
Page 32 HS800 User’s Guide
Page 33

Item Default Description
Post-Paid Disable The subscribers can access Internet without
Note: Only the three-button printer supports the Post-paid function.
pre-defined usage time. This can be operated
with an optional external PS/2 keypad that is
connected with exclusive printer. The printout
will only show the username/password. An
account can also to be terminated with the
optional keypad.
Idle Time Out 5 Min(s) The idle time out valid range is 1-1440. If the
Billing Profile
Currency $ Enter the appropriate currency unit or
Number of decimals places 2 Enter the number of decimal places.
Tax Percentage Disable This check box is used to indicate the taxable
5% Enter the tax rate (i.e. a 5% sales tax is
No. +1~+10 The index number of billing profile. In
Active - Click on check box to activate/deactivate the
Name - The name of the Billing profile. Maximum
Account Usage time - The duration of the billing period. When this
Charge - Enter the unit rate amount (i.e. 35.00) that
idle time out is set as 5 minutes, it means if
the account doesn’t send packet in 5 minutes,
the account will logout automatically.
currency symbol.
Maximum: 3.
status of the account.
entered as 5).
Advanced setup, we provide 10 billing profiles.
billing profile.
characters: 12.
period expires, user account will be
discontinued.
most of your accounts are charged for one
day of service.
Rev. 1 - YML698 www.netcomm.com.au
HS800 User’s Guide Page 33
Page 34

Figure 3-41 Post-paid Procedure Diagram
Click the Apply button to save the new settings. The Success! dialog box appears.
Figure 3-42 Success Dialog Box
Click the Back to return to Billing setting screen.
www.netcomm.com.au Rev. 1 - YML698
Page 34 HS800 User’s Guide
Page 35

3-3 Accounting
This function allows the service provider to generate the subscriber accounts.
Figure 3-43 Accounting Setting Screen
Rev. 1 - YML698 www.netcomm.com.au
HS800 User’s Guide Page 35
Page 36

Item Default Description
Expiration Un-used account will be deleted after ~hours
12 hours Enter the number of hours.
Printout 1 Number of copies to print.
Replenish Enable Can be replenished by subscriber
automatically
Accumulation account will be deleted after
logged in ~ 3 months Enter the number
and select time unit from list box.
The system allows you to print all your bills.
Enter the number of copies.
Click the check box to enable the replenish
function.
Figure 3-44 Account Process Diagram
Can be replenished by subscriber=Enable
www.netcomm.com.au Rev. 1 - YML698
Page 36 HS800 User’s Guide
Page 37

Web-based Accounting Generator
Figure 3-45 Web-based Account Generator Panel Setting Screen
Item Default Description
Button A~C - Define each button’s billing profile. Select one
Print to… Account
Generator Printer Select printer to print out your account.
Preview / Operate Click on button to preview and operate
billing profile by clicking in the list box.
account generator panel.
Figure 3-46 Account Generator Panel
Rev. 1 - YML698 www.netcomm.com.au
HS800 User’s Guide Page 37
Page 38

Figure 3-47 Web-based Account Generator Printout (Time to Finish)
Figure 3-48 PC-connected Printer Printout (Time to Finish)
www.netcomm.com.au Rev. 1 - YML698
Page 38 HS800 User’s Guide
Page 39

Figure 3-49 Web-based Account Generator Printout (Accumulation)
Figure 3-50 PC-connected Printer Printout (Accumulation)
Rev. 1 - YML698 www.netcomm.com.au
HS800 User’s Guide Page 39
Page 40

One-Button Printer
Figure 3-51 One-Button Printer Setting Screen
Figure 3-52 Web-based Account Generator Panel
Item Default Description
Pre-defined Disable The number of button presses on the printer
Incremental based
on Button ~ Enable
Button A The usage time of account is based on the
Discount Price Plan based
on “Button Presses” Disable Enables or disables the discount price plan.
Note: Configuring the one-button printer accounting, you have to set the billing profile of the
web-based account generator panel.
will equal the number specified in the webbased account operator.
Press once for button A, twice for button B,
and thrice for button C.
number of times the button is pressed; you
have to select one button by clicking in the list
box.
EX. If Incremental based on Button A is
selected. Pressed one time is button A, and 3
times is button A x 3.
www.netcomm.com.au Rev. 1 - YML698
Page 40 HS800 User’s Guide
Page 41

Example 1 : If button on One-Button Printer is pressed 6 times
Discount Price Plan based on “Button Presses” is disabled.
Figure 3-53 Example 1
Amount: 6 x $4.00= $24.00
Rev. 1 - YML698 www.netcomm.com.au
HS800 User’s Guide Page 41
Page 42

Example 2
Discount Price Plan based on “Button Presses” is enabled.
The Charge by level is disabled.
Figure 3-54 Example 2
Amount: 6 x $ 3.8 = $ 22.80
www.netcomm.com.au Rev. 1 - YML698
Page 42 HS800 User’s Guide
Page 43

Example 3
Discount Price Plan based on “Button Presses” is enabled.
Charge by level is enabled.
Figure 3-55 Example 3
Amount: 2 x $4.00 + 4 x 3.8= $23.20
When the button is pressed 6 times on a one-button printer, the total amount is calculated by
adding level one (Base Charge) twice & Level 2 ($3.80) four times.
Rev. 1 - YML698 www.netcomm.com.au
HS800 User’s Guide Page 43
Page 44

Three-Button Printer
Figure 3-56 Web-based Account Generator Panel Setting Screen
Item Default Description
Print to… Account Generator
Printer Select printer to print out your account.
Use ~ for Discount Price
Plan based on “Button
Presses”: Disable Select one button by clicking in the list box to
Note: Before configuring the one-button printer accounting, you have to set the billing profile
of the web-based account generator panel.
assign the base charge and select enable to
activate the discount price plan.
www.netcomm.com.au Rev. 1 - YML698
Page 44 HS800 User’s Guide
Page 45

Discount Price Plan based on “Button Presses”
Figure 3-57 Discount Price Plan Setting Screen
Item Default Description
Charge by levels Enable Enables or disables the charge by levels
Level 1~10 The level number of charge rate.
Conditions When>= The discount condition.
Button Presses - Enter the number of times the button needs to
Unit Price - Enter the amount to be charged.
function.
be pressed.
Click the Apply button to save the new settings. The Success! dialog box appears.
Figure 3-58 Success Dialog Box
Click the Back to return to Accounting setting screen.
Rev. 1 - YML698 www.netcomm.com.au
HS800 User’s Guide Page 45
Page 46

3-4 Pass Through
This function allows the administrator to allow some special devices to pass through the
HS800 Wireless Gateway system. Some network devices might be connected under the
HS800 Wireless Gateway, but do not need to be checked and authorized for access. The
HS800 Wireless Gateway provides a pass through list that allows the administrator to
control which devices can pass through without authentication.
Figure 3-59 Pass through Setting Screen
Item Default Description
Pass Through Disable Enables or disables the pass through function.
Destination URL/IP Address Pass Through
URL or Website Empty Enter the URL of the page in this format: http:/
Start IP Address Empty Enter the first IP address in the range to allow
End IP Address Empty Enter the last IP address in the range to allow
Subscriber IP/MAC Address or LAN Device Pass Through
Start IP Address Empty Enter the first IP address you would like to
End IP Address Empty Enter the last IP address you would like to
www.netcomm.com.au Rev. 1 - YML698
Page 46 HS800 User’s Guide
/www.yahoo.com. Maximum characters: 20.
pass through.
pass through.
pass through.
pass through.
Page 47

Item Default Description
IP Address Empty Enter the IP address you would like to pass
Subnet Mask Empty Enter the subnet mask you would like to pass
MAC Address Empty Enter the MAC address you would like to pass
Mask Empty Enter the subnet mask of you would like to
Pass Through List Display the pass through Information of
No. - The index number of the pass through
Active Disable Click on check box, active or inactive the pass
Address List - Display the pass through address(s).
Type - Display the type of pass through address.
Delete Disable Select the check boxes and click ‘Delete’ to
through.
through.
through.
pass through.
HS800 Wireless Gateway.
address.
through address.
delete the pass through address(s).
Click the Add to List button to add a new entry.
Click the Apply button to save the new settings.
Click the Delete All & Apply button to delete all entries.
Note: The priority of “pass through” is higher than “Filtering”.
Rev. 1 - YML698 www.netcomm.com.au
HS800 User’s Guide Page 47
Page 48

3-5 Advertisement
Up to 10 URL links can be specified for advertisers.
Figure 3-60 Advertisement URL Link Setting Screen
Item Default Description
Frequency One Time Only One Time Only—Displays the advertisement
Sequence Randomly Displays the advertisements in a random
URL Link 1~10 Empty This function allows the administrator to enter
link once after the subscriber Logs in.
Every~Min(s)—Displays the advertisement
link at a specified interval. The range can be
between 1 and 60 minutes.
order.
From 1 to 10 —Display the advertisement
pages from 1 to 10.
ten different websites in the table for
advertisements. The input format can be
“http://www.yahoo.com”. Maximum length is
200 characters.
Click the Apply button to save the new settings. The Success! dialog box appears.
www.netcomm.com.au Rev. 1 - YML698
Page 48 HS800 User’s Guide
Page 49

Figure 3-61 Success Dialog Box
Click the Back button to return to Advertisement URL Link setting screen.
Rev. 1 - YML698 www.netcomm.com.au
HS800 User’s Guide Page 49
Page 50

3-6 Walled Garden
Walled Garden refers to links that are displayed on the login page and that can be used for
advertising purposes. Users can access the links without having to enter a username and
password.
Figure 3-62 Walled Garden
Figure 3-63 Login Page
www.netcomm.com.au Rev. 1 - YML698
Page 50 HS800 User’s Guide
Page 51

Item Description
Link 1~10
Name The name of the link can be specified for up
URL 1~10 The address of the URL is listed for the links,
to 10 links, with a maximum of 80 characters
each.
with a maximum character length of 200 .
Click the Apply button to save the new settings. The Success! dialog box appears.
Figure 3-64 Success Dialog Box
Click the Back button to return to Walled Garden setting screen.
Rev. 1 - YML698 www.netcomm.com.au
HS800 User’s Guide Page 51
Page 52

4. Troubleshooting
4-1 Frequently Asked Questions
Is it possible to allow accounts generated at one HotSpot site to be
used at other locations?
No. However, the HS900 supports RADIUS server authentication allowing roaming
accounts.
Are there any AG-100 printer drivers for Windows?
I’m afraid not. The printer has been specifically designed for use with the HS800.
How long can accounts last, and will accounts be erased if the HS800
is powered off?
Accounts last for up to 999 days, and accounts will not be erased if the HS800 is powered
off because this data is stored in flash ROM.
My browser has an HTTP Proxy Server setup, do I need to disable it?
No, the HS800 will work with a proxy server setup. However, if you wish to access the Web
Configuration page you will need to disable the proxy server on your web browser.
www.netcomm.com.au Rev. 1 - YML698
Page 52 HS800 User’s Guide
Page 53

4-2 HS800 Wireless Gateway – Remote Administration
4-2-1 Connecting to HS800 on Internal LAN (within Office / Site)
Scenario:
The HS800 is connected to a LAN via an Ethernet port as a DHCP client (getting IP,
Gateway and DNS from your DHCP server). Note: you can also set it up with a Static IP if
necessary.
You have a connection to the Internet and you can surf using devices that are connected to
the LAN side of the HS800 (default IP’s in the 10.0.0.x range)
You would like to specify certain IP addresses that can administer the HS800 from both the
LAN and WAN side.
Login to http://10.0.0.1/ as the administrator and navigate to Advanced Setup / System and
scroll down to following section:
Click on Specify
Rev. 1 - YML698 www.netcomm.com.au
HS800 User’s Guide Page 53
Page 54

List the IP addresses that will allow people to access HS800 login screen and click the
Apply button. In this example there are three IP’s that are able to access the HS800:
10.0.0.2, 10.0.0.3 and 172.16.1.143. The first two are on the LAN side of the HS800 and the
last one is on the WAN side of the HS800 (i.e. another PC on your office network)
You cannot browse to 10.0.0.1 from the 172.. machine. You need to find out the IP your
DHCP server has allocated to the HS800. To find this, you click on System Quick View in
the bottom left of the screen:
You will see the System Status screen. The section you are concerned with is:
In this example the HS800’s WAN IP is 172.16.1.239. This is the address that 172.16.1.143
will need to browse to.
4-2-2 Connecting to HS800 from External WAN (outside Office / Site)
Scenario:
The HS800 is connected to an xDSL modem via an Ethernet port as a DHCP client (getting
IP, Gateway and DNS from your router/modem (if possible). Note: you can also set it up
with a Static IP if necessary.
www.netcomm.com.au Rev. 1 - YML698
Page 54 HS800 User’s Guide
Page 55

You have a connection to the Internet via your modem and you can surf using devices that
are connected to the LAN side of the HS800 (default IP’s in the 10.0.0.x range)
You would like to specify certain IP addresses that can administer the HS800 both from the
LAN and WAN (outside of office) side.
Login to http://10.0.0.1/ as the administrator and navigate to Advanced Setup / System and
scroll down to following section:
Click on Specify
List IP addresses that will allow people to access HS800 login screen and click the Apply
button. In this example three IP’s are able to access the HS800: 10.0.0.2, 10.0.0.3 and
202.44.165.195. The first two are on the LAN side of the HS800 and the last one is the
WAN IP of the other machine (i.e. another PC outside the office network).
To find out the IP if the PC is located on an intranet with an address in the private IP range
(most common case), you can browse to the following address from the remote PC:
http://www.whatismyip.com/
You cannot browse to 10.0.0.1 from the 202.. machine. You need to find out the IP the
modem/router/ISP has allocated to the HS800. To find this, you click on System Quick View
in the bottom left of the screen:
You will see the System Status screen. The section you are concerned with is:
Rev. 1 - YML698 www.netcomm.com.au
HS800 User’s Guide Page 55
Page 56

The address the remote PC needs to navigate to in this example is 220.240.2.67.
Note: If the remote PC’s public IP is not listed as an administrator, the HS800 login page will
not be displayed.
www.netcomm.com.au Rev. 1 - YML698
Page 56 HS800 User’s Guide
Page 57

Appendix A – Cable Connections
This cable information is provided for your reference only. Please ensure you only connect
the appropriate cable into the correct socket on either this product or your computer.
If you are unsure about which cable to use or which socket to connect it to, please refer to
the hardware installation section in this manual. If you are still not sure about cable
connections, please contact a professional computer technician or NetComm for further
advice.
RJ-45 Network ports
The HS800 Wireless Gateway RJ-45 Ethernet port can connect to any networking devices
that use a standard LAN interface, such as a Hub/Switch Hub or Router. Use unshielded
twisted-pair (UTP) or shield twisted-pair (STP) cable to connect the networking device to
the RJ-45 Ethernet port. Depending on the type of connection, 10Mbps or 100Mbps, use
the following Ethernet cable, as prescribed.
10Mbps: Use EIA/TIA-568-100-Category 3, 4 or 5 cable.
100Mbps: Use EIA/TIA-568-100-Category 5 cable.
Note: To prevent loss of signal, make sure that the length of any twisted-pair connection does
not exceed 100 meters.
RJ-45 Connector
Pin Assignment Normal Assignment
1 Input Receive Data +
2 Input Receive Data 3 Output Transmit Data +
6 Output Transmit Data -
4,5,7,8 Not used
Figure 1
Twisted pair cables
Figures 1 and 2 illustrate the use of straight-through and crossover twisted pair cables along
with the connector.
RJ-45 plug
attached to cable
Figure 2
Rev. 1 - YML698 www.netcomm.com.au
HS800 User’s Guide Page 57
Page 58

Straight and crossover cable configuration
Figure 3
Figure 4
RJ11 connector and cable
An RJ-11 connector is the small, modular plug used for most analog telephones. It has six
pin slots in the head, but usually only two or four of them are used.
RJ-11 Connector
Pin Assignment Normal Assignment
1 Signal Ground
2 CTS
3 RXD
4 TXD
5 +5 Volts In
6 Signal Ground
Figure 5
www.netcomm.com.au Rev. 1 - YML698
Page 58 HS800 User’s Guide
Page 59

605 to RJ-11 adapter
The 605 to RJ-11 adaptor is provided to comply with the older 610
Telstra wall socket. The 605 to RJ-11 adapter may be used to
convert the supplied RJ-11 cable, if the older connection is
required.
USB cable
A typical USB cord has an "A" connection (“upstream” to plug into the computer) and a “B”
connection (“downstream” to plug into the device).
“B” Connection
“A” Connection
By using different connectors on the upstream and downstream ends, cable connection is
simplified. The “B” connection will fit a into the “B” socket of any USB device. Similarly,
any "A" connector can be plugged into any "A" socket, such as on a computer.
If it is a new device, the operating system auto-detects it and asks for the driver disk. If the
device has already been installed, the computer activates it and starts talking to it. USB
devices can be connected and disconnected at any time.
9 Pin (RS-232 ) Serial Cable
A 9 Pin (RS-232) Serial Cable may be used to connect a device to a serial console terminal
or a PC running a terminal emulation program, such as Hyper Terminal.
Pin No Name Notes/Description No.
1 DCD Data Carrier Detect
2 RD Receive Data (a.k.a RxD, Rx)
Male Connector
Rev. 1 - YML698 www.netcomm.com.au
HS800 User’s Guide Page 59
3 TD Transmit Data (a.k.a TxD, Tx)
4 DTR Data Terminal Ready
5 SGND Ground
6 DSR Data Set Ready
7 RTS Request To Send
8 CTS Clear To Send
9 RI Ring Indicator
Page 60

Appendix B – Technical Specifications
Hardware Specifications
Network Specification
IEEE802.3 10BaseT Ethernet
IEEE802.3u 100BaseTX Fast Ethernet
IEEE802.11b Wireless LAN
ANSI/IEEE 802.3 NWay auto-negotiation
Wi-Fi Compatible
Connectors
Four LAN Ports (10BaseT/100BaseTX Auto cross-over)
One WAN Port (10BaseT/100BaseT)
One Device Port (1 DB25 male RS232 for external device application)
Wireless Operation Range
Open Space: 100~300m
Indoors: 35~100m
Wireless Data Rate
22 Mbps, 11 Mbps, 5.5 Mbps, 2 Mbps, 1 Mbps
Encryption
64/128/256-bit RC4
External Antenna Type
2dBi (Max) Dual detachable diversity antenna with reverse SMA
Power Requirement
External Power Adapter
Input: 100-240 VAC, 50/60 Hz
Output: 5V, 1.4A
LED Indicators
One POWER LED
One WAN Link/Activity LED
Four LAN Link/Activity LEDs
One Wireless Link/Activity LED
www.netcomm.com.au Rev. 1 - YML698
Page 60 HS800 User’s Guide
Page 61

One Status LED
Dimension
Size: 200(L) x 130(W) x 44(H) mm
Weight: About 400g (Net)
Environment Conditions
Operating Temperature: 0 to 50°C
Storage Temperature: -10 to 60°C
Operating Humidity: 10~80% non-condensing
Storage Humidity: 10% to 95% non-condensing
Certifications
FCC part 15 Class B, CE, VCCI Class B, UL,
CE / R&TTE, C-Tick
Mounting
Desktop, Wall mounted
Rev. 1 - YML698 www.netcomm.com.au
HS800 User’s Guide Page 61
Page 62

Software Specifications
Networking
■ IEEE802.3 10BaseT Ethernet
■ IEEE802.3u 100BaseTX Fast Ethernet
■ Supports 100 Simultaneous Users
■ IP Plug and Play (iPnP)
■ HTTP Proxy Support
■ WEP Data Encryption
■ SMTP Server Redirection
■ DHCP Server
■ DHCP Relay
■ Static IP WAN Client
■ DHCP WAN Client
■ PPPoE WAN Client
■ PPTP WAN Client
■ NAT
■ IP Routing
■ NTP (Network Time Protocol) Support
■ IP Multicast support
Marketing Cooperation
■ Advertisement URL link
■ Walled garden
■ Customize Login Page
■ Portal Page
AAA/Billing
■ Built-in Authentication
■ Web-based Login Page Authentication
■ Exclusive Printer Accounting without PC operating
■ Web-based Accounting
■ Flexible Billing Profiles and Price Plan
■ Flexible Billing Mechanism (Pre-Paid and Post-Paid)
www.netcomm.com.au Rev. 1 - YML698
Page 62 HS800 User’s Guide
Page 63

■ Flexible Time Mechanism (Time to Finish and Accumulation)
■ Credit Card Support (Authorize.net)
■ External PS/2 Keypad Support
Security
■ Layer 2 Isolation
■ SSL Login Page
■ SSL Administration
■ VPN Pass through (IPSec/PPTP/L2TP)
■ Customize SSL Certificate
■ Pass through Destination IP/URL
■ Pass through Source IP/MAC
■ Restricted Destination Filtering IP/URL
■ Share LAN Resources
Management
■ Administrator/Super Subscriber/Account Manager Management Access
■ Remote Browser-based Configuration and management
■ Authorized remote management (Access Control List)
■ Firmware Upgrade via HTTP/TFTP
■ Scheduled Firmware Upgrade
■ Backup/Restore/Factory Default Setting
■ LAN Device Management
■ Dynamic DNS
■ System Information Table
■ Real-time Current User List / DHCP Clients List / Session List / Account List
■ Syslog
■ Status Report (Daily/Monthly/System/Network)
Rev. 1 - YML698 www.netcomm.com.au
HS800 User’s Guide Page 63
Page 64

Appendix C – Registering your NetComm Product
All NetComm Limited (“NetComm”) products have a standard 12 month warranty from
date of purchase against defects in manufacturing and that the products will operate in
accordance with the specifications outlined in the User Guide. However some products have
an extended warranty option (please refer to packaging). To be eligible for the extended
warranty you must supply the requested warranty information to NetComm within 30 days
of the original purchase by registering on-line via the NetComm web site at:
www.netcomm.com.au
Contact Information
If you have any technical difficulties with your product, please do not hesitate to contact
NetComm’s Customer Support Department.
Email: support@netcomm.com.au
Fax: (+612) 9424-2010
Web: www.netcomm.com.au
Trade marks and Notices
“NetComm” is a trade mark of NetComm. Windows® is a registered trade mark of
Microsoft Corporation. Other brand and product names are trade marks or registered trade
marks of their respective holders. Information is subject to change without notice. All rights
reserved.
Please note that the images used in this document may vary slightly from those of the actual
product. Specifications are accurate at the time of the preparation of this document but are
subject to change without notice.
www.netcomm.com.au Rev. 1 - YML698
Page 64 HS800 User’s Guide
Page 65

Legal & Regulatory Information Copyright Information
This manual is a copyright protected work. Apart from any fair dealing exceptions for the
purposes of private study, research, criticism or review, as permitted under the Australian
Copyright Act 1968 (Cth), no part of this manual may be reproduced, stored in a retrieval
system or communicated, published, performed or adapted in any form, by any means, be it
electronic, mechanical, recording or otherwise, without the prior written permission of
NetComm. NetComm accepts no liability or responsibility, for consequences arising from
the use of this product or manual.
NetComm reserves the right to change the specifications and operating details of this
product and manual without notice and does not warrant that any changes to the
specifications or operating details of the product will meet the requirements of the customer
or will be able to interoperate, remain compatible or coexist with any other hardware or
software the customer uses.
Registration of warranties, either via the NetComm web site or via post is subject to
NetComm’s privacy policy and procedures. Copies of NetComm’s privacy policy and
procedures can be obtained from www.netcomm.com.au.
Customer Information
ACA (Australian Communications Authority) requires you to be aware of the following
information and warnings in relation to the purchased product:“
(I) This unit shall be connected to the Telecommunication Network through a line cord
which meets the requirements of the ACA TSOOS Standard.“
(2) This equipment has been tested and found to comply with the Standards for C-Tick and
or A-Tick as set by the ACA. These standards are designed to provide reasonable
protection against harmful interference in a residential installation. This equipment
generates, uses, and can radiate radio noise and, if not installed and used in accordance
with the instructions detailed within this manual, may cause interference to radio
communications. However, there is no guarantee that interference will not occur with
the installation of this product in your home or office. If this equipment does cause some
degree of interference to radio or television reception, which can be determined by
turning the equipment off and on, we encourage the user to try to correct the interference by one or more of the following measures:
• Change the direction or relocate the receiving antenna.
• Increase the separation between this equipment and the receiver.
• Connect the equipment to an alternate power outlet on a different power circuit from
that to which the receiver/TV is connected.
• Consult an experienced radio/TV technician for help.
(3) The power supply that is provided with this unit is only intended for use with this
product. Do not use this power supply with any other product or do not use any other
power supply that is not approved for use with this product by NetComm. Failure to do
so may cause damage to this product, fire or result in personal injury.
Rev. 1 - YML698 www.netcomm.com.au
HS800 User’s Guide Page 65
Page 66

Warranty
Where the Customer (you) is a consumer as defined by any relevant law such as the Trade
Practices Act 1974 (Commonwealth) and similar State laws, certain conditions and
warranties (“the consumer warranties”) cannot be excluded, restricted or modified. You
then have the benefit of both the consumer warranties and any other warranty that may be
provided by the Company or by the manufacturer of the goods. To the extent permitted by
Law, all implied warranties and conditions are excluded.
All NetComm products have a standard 12 months warranty from date of purchase.
However some products have an extended warranty option (refer to packaging). To be
eligible for the extended warranty you must supply the requested warranty information to
NetComm within 30 days of the original purchase by registering on-line via the NetComm
web site at www.netcomm.com.au.
To the extent permitted by the consumer warranties, in relation to your product and any
other materials provided with the product (“the Goods”) the liability of NetComm under the
Relevant Acts is limited at the option of NetComm to:
■ replace the Goods; or
■ repair of the Goods; or
■ pay for the cost to replace the Goods; or
■ pay for the cost to repair the Goods.
www.netcomm.com.au Rev. 1 - YML698
Page 66 HS800 User’s Guide
Page 67

Conditions and exclusions:
The warranty is granted on the following conditions:
1. This warranty extends to the original retail Customer (you) and is not transferable;
2. This warranty does not apply to software programs, batteries, power supplies, cables or
other accessories supplied in or with the product;
3. You must comply with all of the terms of any relevant agreement with NetComm and
any other reasonable requirements of NetComm including producing such evidence of
purchase as NetComm may require;
4. The cost of transporting the product under a claim based on this warranty to and from
NetComm’s nominated premises is your responsibility; and
5. NetComm does not have any liability or responsibility under this warranty where any
cost, loss, injury or damage of any kind, whether direct, indirect, consequential,
incidental or otherwise arises out of events beyond NetComm’s reasonable control. This
includes but is not limited to: acts of God, war, riot, embargoes, acts of civil or military
authorities, fire, floods, electricity outages, lightning, power surges, or shortages of
materials or labour.
6. You are responsible for the security of your computer and network at all times. Security
features may be disabled within the factory default settings. NetComm recommends that
you enable these features to enhance your security.
The warranty is void if:
1. You, or someone else, use the product, or attempt to use it, other than as specified by
NetComm;
2. The fault or defect in your product is the result of a voltage surge subjected to the
product either by the way of power supply or communication line, whether caused by
thunderstorm activity or any other cause(s);
3. The fault is the result of accidental damage or damage in transit, including but not
limited to liquid spillage;
4. Your product has been used for any purposes other than that for which it is sold, or in
any way other than in strict accordance with the user manual supplied;
5. Your product has been repaired or modified or attempted to be repaired or modified,
other than by a qualified person at a service center authorised by NetComm; and,
6. The serial number has been defaced or altered in any way or if the serial number plate
has been removed.
Rev. 1 - YML698 www.netcomm.com.au
HS800 User’s Guide Page 67
Page 68

 Loading...