

Page 1

Wireless Hotspot
(AG400-Optional extra)
User Guide
Page 2

HS1100 Wireless Hotspot Gateway User Manual
Table of Contents
1. Before You Start.............................................................................................................................3
Preface .................................................................................................................................................................3
Document Conventions........................................................................................................................................3
2. System Overview...........................................................................................................................4
Introduction of HS1100 .......................................................................................................................................4
System Concept ...................................................................................................................................................4
3. Installation ......................................................................................................................................5
Hardware Installation ...........................................................................................................................................5
System Requirements..................................................................................................................................................5
Package Contents........................................................................................................................................................5
Panel Function Descriptions........................................................................................................................................6
Installation Steps.........................................................................................................................................................7
Quick Software Configuration.............................................................................................................................8
4. Web Interface Configuration.................................................................................................17
System Configuration ........................................................................................................................................19
Configuration Wizard................................................................................................................................................20
System Information...................................................................................................................................................21
WAN Configuration..................................................................................................................................................25
LAN1 & LAN2 Configuration..................................................................................................................................27
LAN3 & LAN4 Configuration..................................................................................................................................31
Wireless Configuration..............................................................................................................................................34
User Authentication ...........................................................................................................................................41
Authentication Configuration....................................................................................................................................42
Black List Configuration...........................................................................................................................................78
Policy Configuration.................................................................................................................................................80
Guest User Configuration..........................................................................................................................................83
Additional Configuration ..........................................................................................................................................84
Network Configuration....................................................................................................................................106
Network Address Translation..................................................................................................................................107
Privilege List...........................................................................................................................................................109
Monitor IP List........................................................................................................................................................110
Walled Garden List..................................................................................................................................................112
Walled Garden Ad List............................................................................................................................................113
Proxy Server Properties...........................................................................................................................................115
Dynamic DNS.........................................................................................................................................................116
i
Page 3

HS1100 Wireless Hotspot Gateway User Manual
Utilities.............................................................................................................................................................117
Network Utilities.....................................................................................................................................................118
Change Password....................................................................................................................................................119
Backup/Restore Settings .........................................................................................................................................120
Firmware Upgrade ..................................................................................................................................................121
Restart .....................................................................................................................................................................122
Status................................................................................................................................................................123
System Status..........................................................................................................................................................124
Interface Status........................................................................................................................................................126
Current Users ..........................................................................................................................................................128
Traffic History.........................................................................................................................................................129
Notify Configuration...............................................................................................................................................132
Session Log.............................................................................................................................................................134
Help..................................................................................................................................................................136
Appendix A. Console Interface .................................................................................................137
Appendix B. Accepting Payment via Authorize.Net........................................................140
Appendix C. Accepting Payment via PayPal......................................................................149
Appendix D. Accepting Payment via SecurePay ..............................................................159
Appendix E. RADIUS Accounting............................................................................................170
Appendix F. Proxy Setting..........................................................................................................177
1. Proxy Setting for Hotspot.................................................................................................................177
2. Proxy Setting for Enterprise............................................................................................................180
Appendix G. Network Configuration & External Network Access............................185
1. Network Configuration on PC.........................................................................................................185
2. External Network Access / User Login.........................................................................................198
Appendix H. Session Limit and Session Log.......................................................................201
Appendix I: NetComm AG400 Thermal Ticket Printer Quick Start Guide...............203
1. Package Contents.........................................................................................................................................203
2. Product Overview ........................................................................................................................................204
3. Installation ...................................................................................................................................................206
Appendix J: Legal & Regulatory Information...................................................................203
ii
Page 4
HS1100 Wireless Hotspot Gateway User Manual
1. Before You Start
Preface
This manual is for Hotspot owners or network administrators to set up a network environment using the HS1100
system. It contains step-by-step procedures and graphic example s to guide MIS staff or individuals with slight
network system knowledge to complete the installation. It also contains a Quick Start Guide for the NetComm
AG400 Thermal Ticket Printer .
Document Conventions
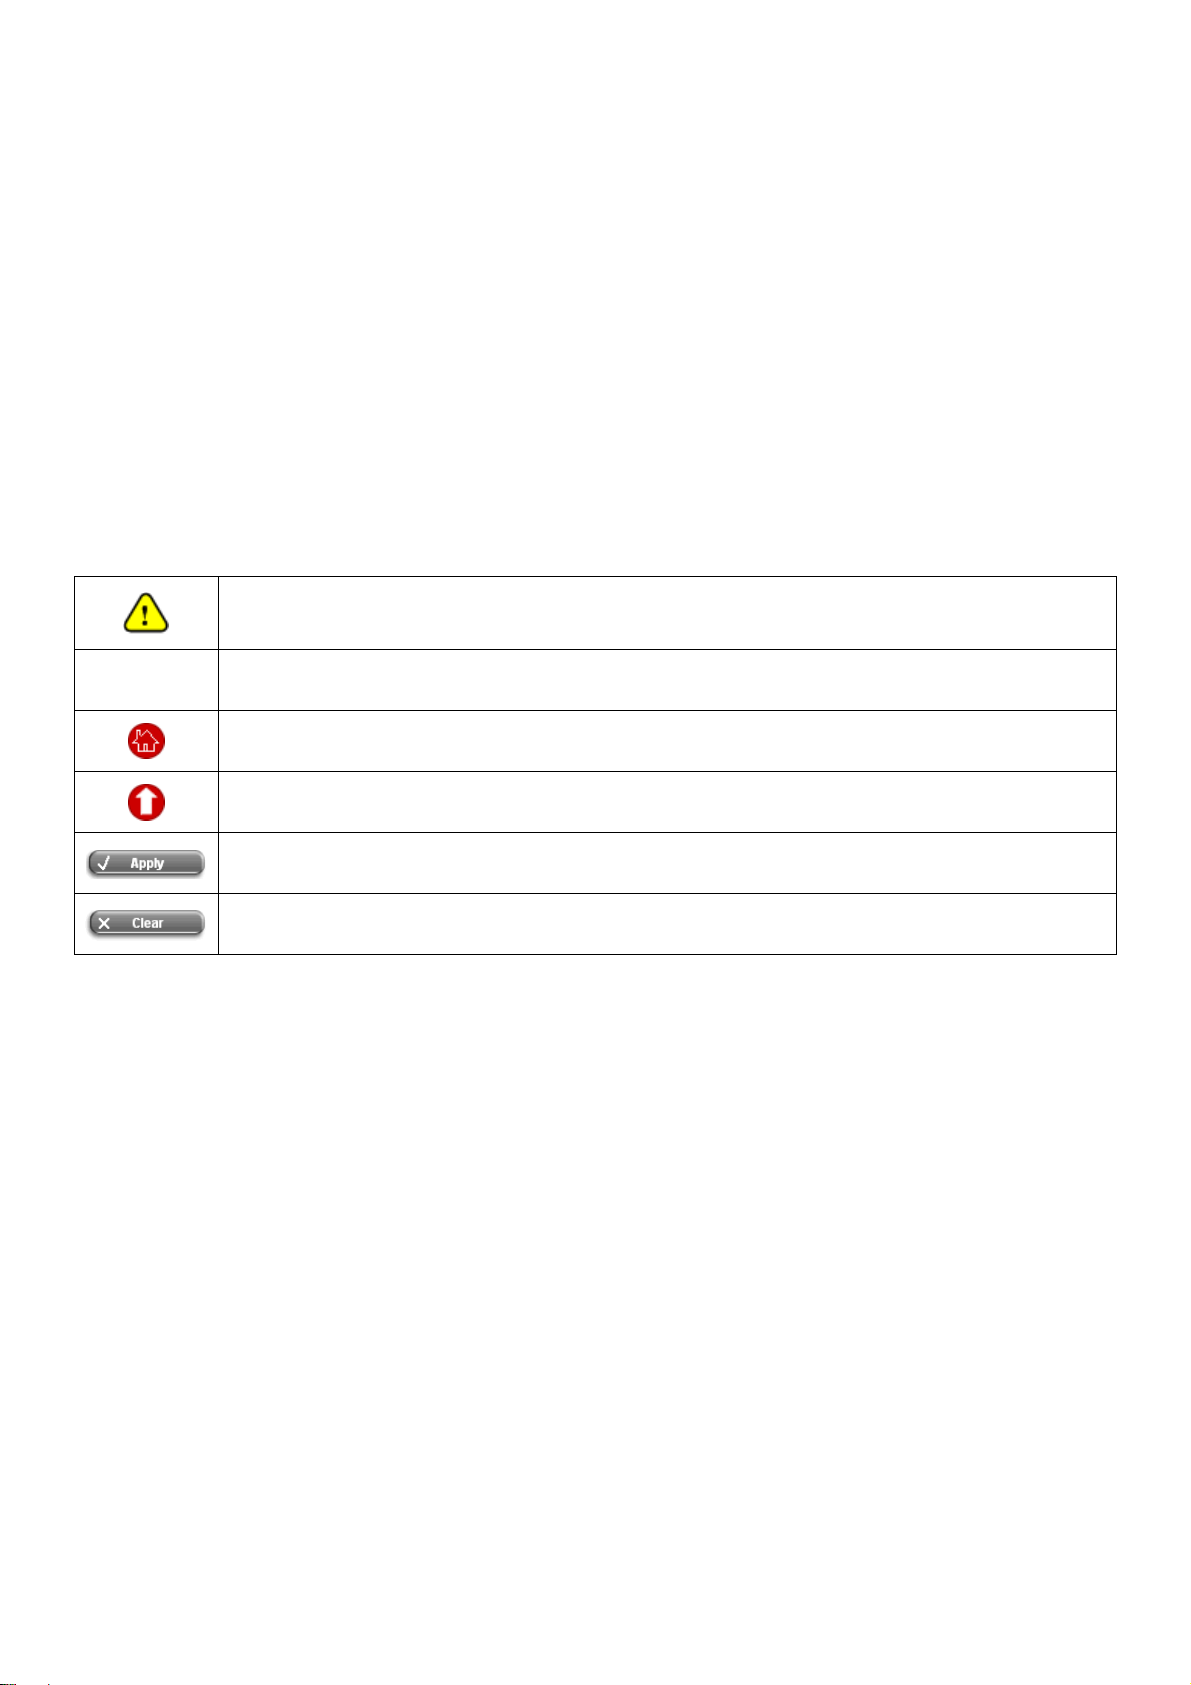
Note:
Represents essential steps, actions, or messages that should not be ignored.
Contains related information that corresponds to a topic.
Indicates that clicking this button will return to the homepage of this section.
Indicates that clicking this button will return to the previous page.
Indicates that clicking this button will apply all of your settings.
Indicates that clicking this button will clear what you have set before these settings are applied.
3
Page 5
HS1100 Wireless Hotspot Gateway User Manual
2. System Overview
Introduction of HS1100
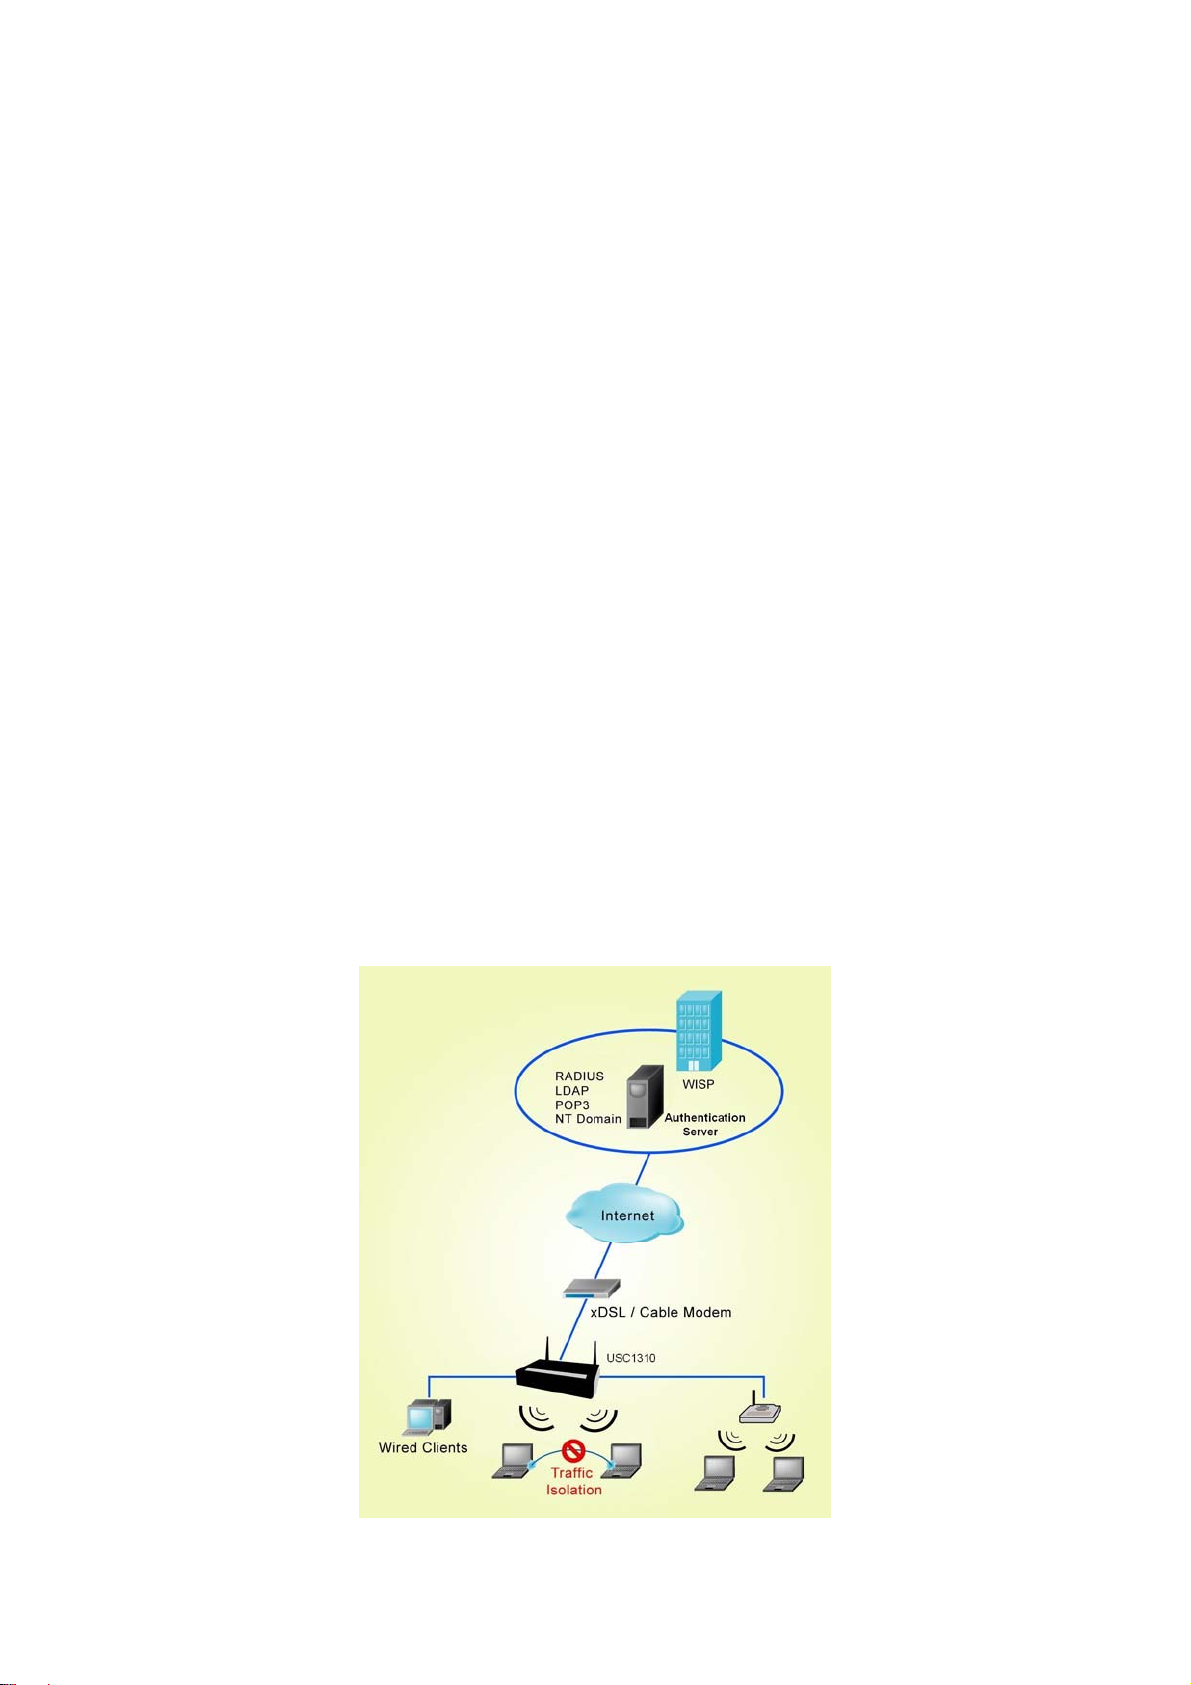
HS1100 is an all-in-one product specially designed for small wireless/wired netwo rk environments. It integrates
“secure access control”, “visitor account provisioning”, and “high-speed secure wireless connection” into
one system to fulfill the needs in Hotspot locations. HS1100 supports 802.11b and 802.11g dual wireless
transmission modes, and at the same time, incorporates convenience, efficiency, and friendliness for network
services.
System Concept
HS1100 is specially designed for user authentication, authorization and accounting management. The user account
information is stored in the local database or a specified external databases server. The user authentication is
processed via the SSL encrypted web interface. This interface is compatible to most desktop devices and palm
computers. HS1100 manages network services for both wired and wireless network users.
The users located at the managed network will be unable to access network resources without permissi on. When a
user attempts to connect to the Internet by opening a web browser on his computer, HS1100 will redirect the
browser to the user login webpage of HS1100. The user must enter a username and password for authentication.
After the identity is authenticated successfully, the user will gain proper access right defined on HS1100.
4
Page 6

HS1100 Wireless Hotspot Gateway User Manual
3. Installation
Hardware Installation
System Requirements
y Standard 10/100BaseT including five network cables with RJ-45 connectors
y All PCs need to install the TCP/IP network protocol
Package Contents
The standard package of HS1100 includes:
y HS1100 x 1
y CD-ROM x 1
y Power Adaptor (DC 12V) x 1
y Ethernet Cable x 1
y Console Cable x 1
y 2dbi Omni-antenna x 2
It is highly recommended to use all the supplies in the package instead of substituting any components by
other suppliers to guarantee best performance.
5
Page 7
Panel Function Descriptions
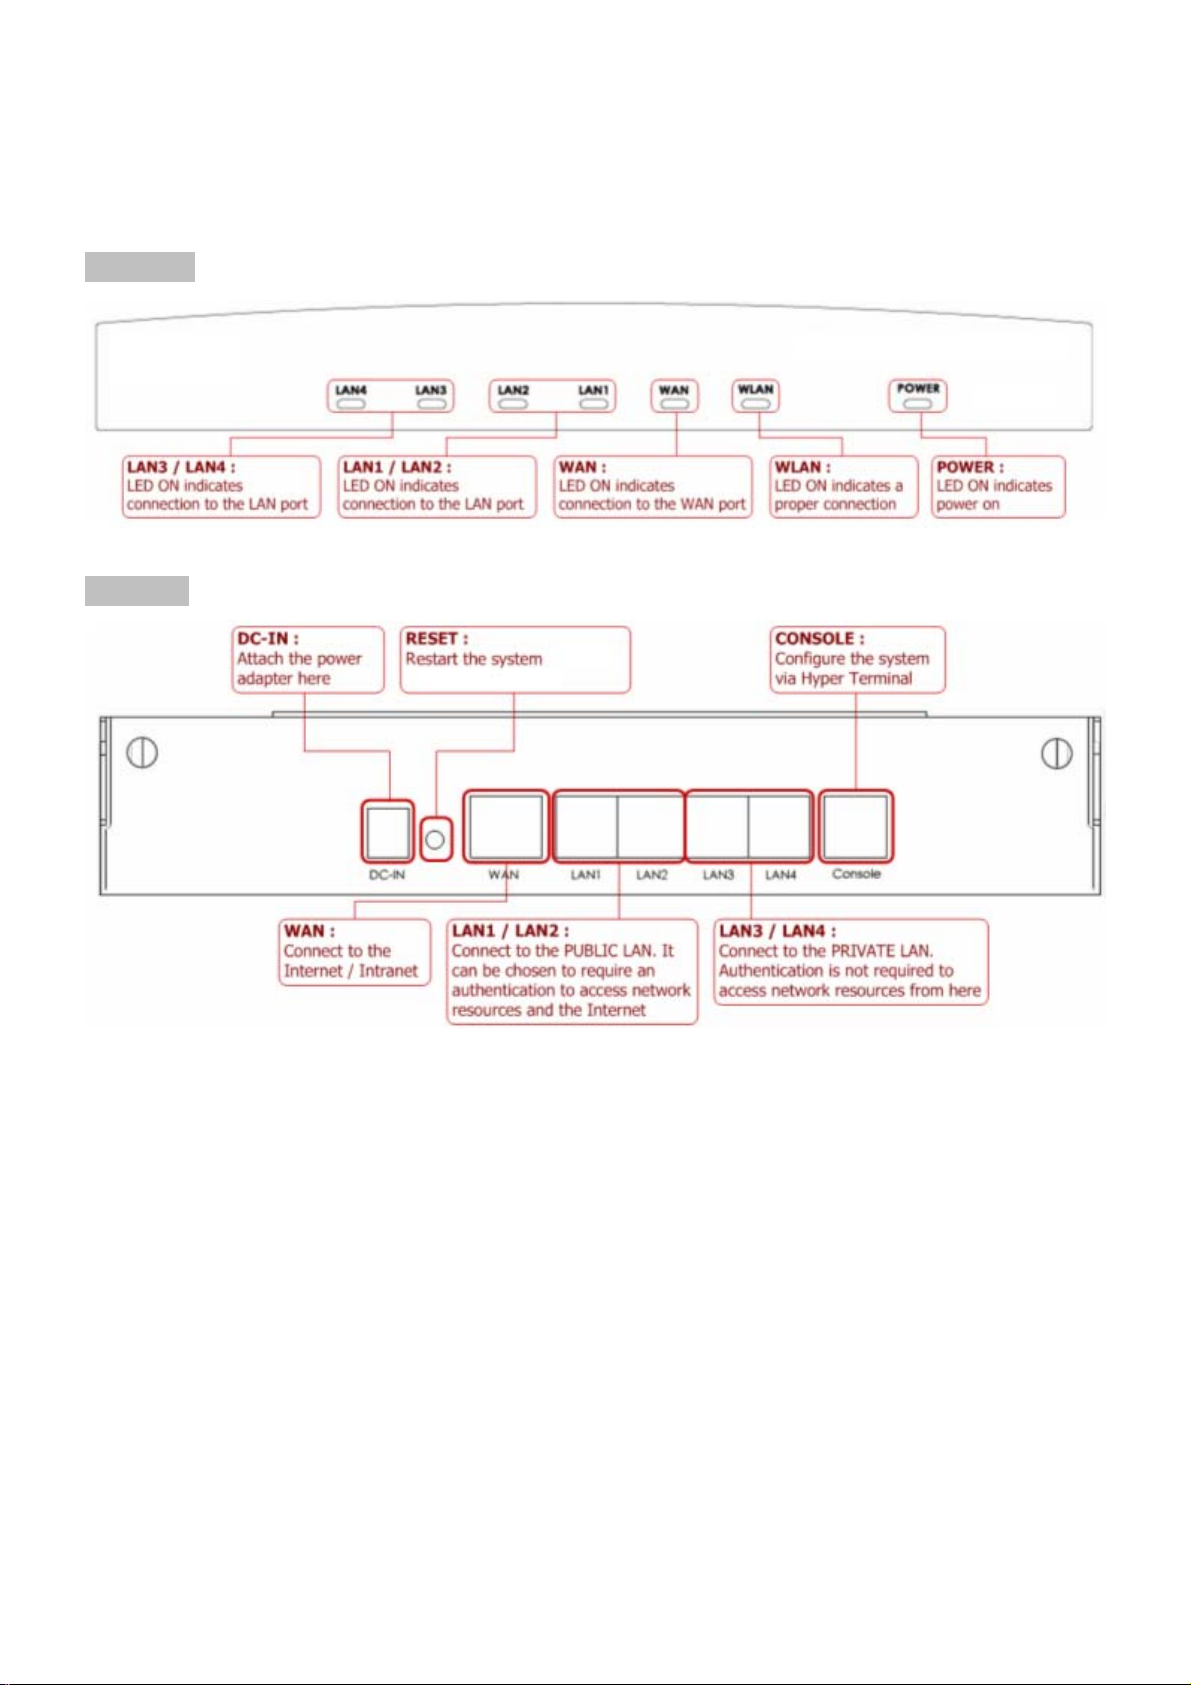
Front Panel
Rear Panel
HS1100 Wireless Hotspot Gateway User Manual
y DC IN: The power adaptor plugs here.
y RESET: Press this button to restart/reboot the system (NOT reset back to factory default).
y WAN: The WAN port is used to connect to a network which is not managed by HS1100, and this port can be
used to connect an xDSL/cable modem, or a switch/hub on a LA N of a company/organization.
y LAN1/LAN2: These two default authentication-demanding Public LAN ports are connected to the managed
network or WLAN. They may be configured as authentication-demanding Public LAN or authe ntication-free
Private LAN ports.
y LAN3/LAN4: These two default authentication-free Private LAN ports are connected to a trustful network, where
the users can always access network resources without authentication. These ports may be connected to an
external server such as a File Server or Database Server.
y Console: The system can be configured via HyperTerminal. For example, if you need to set the Administrator’s
Password, you can connect a PC to this port as a Console Serial Port via a terminal connection program (such
as the super terminal with the parameters of 9600, 8, N, 1, None flow control) to change the Administrator’s
Password.
6
Page 8
HS1100 Wireless Hotspot Gateway User Manual
Installation Steps
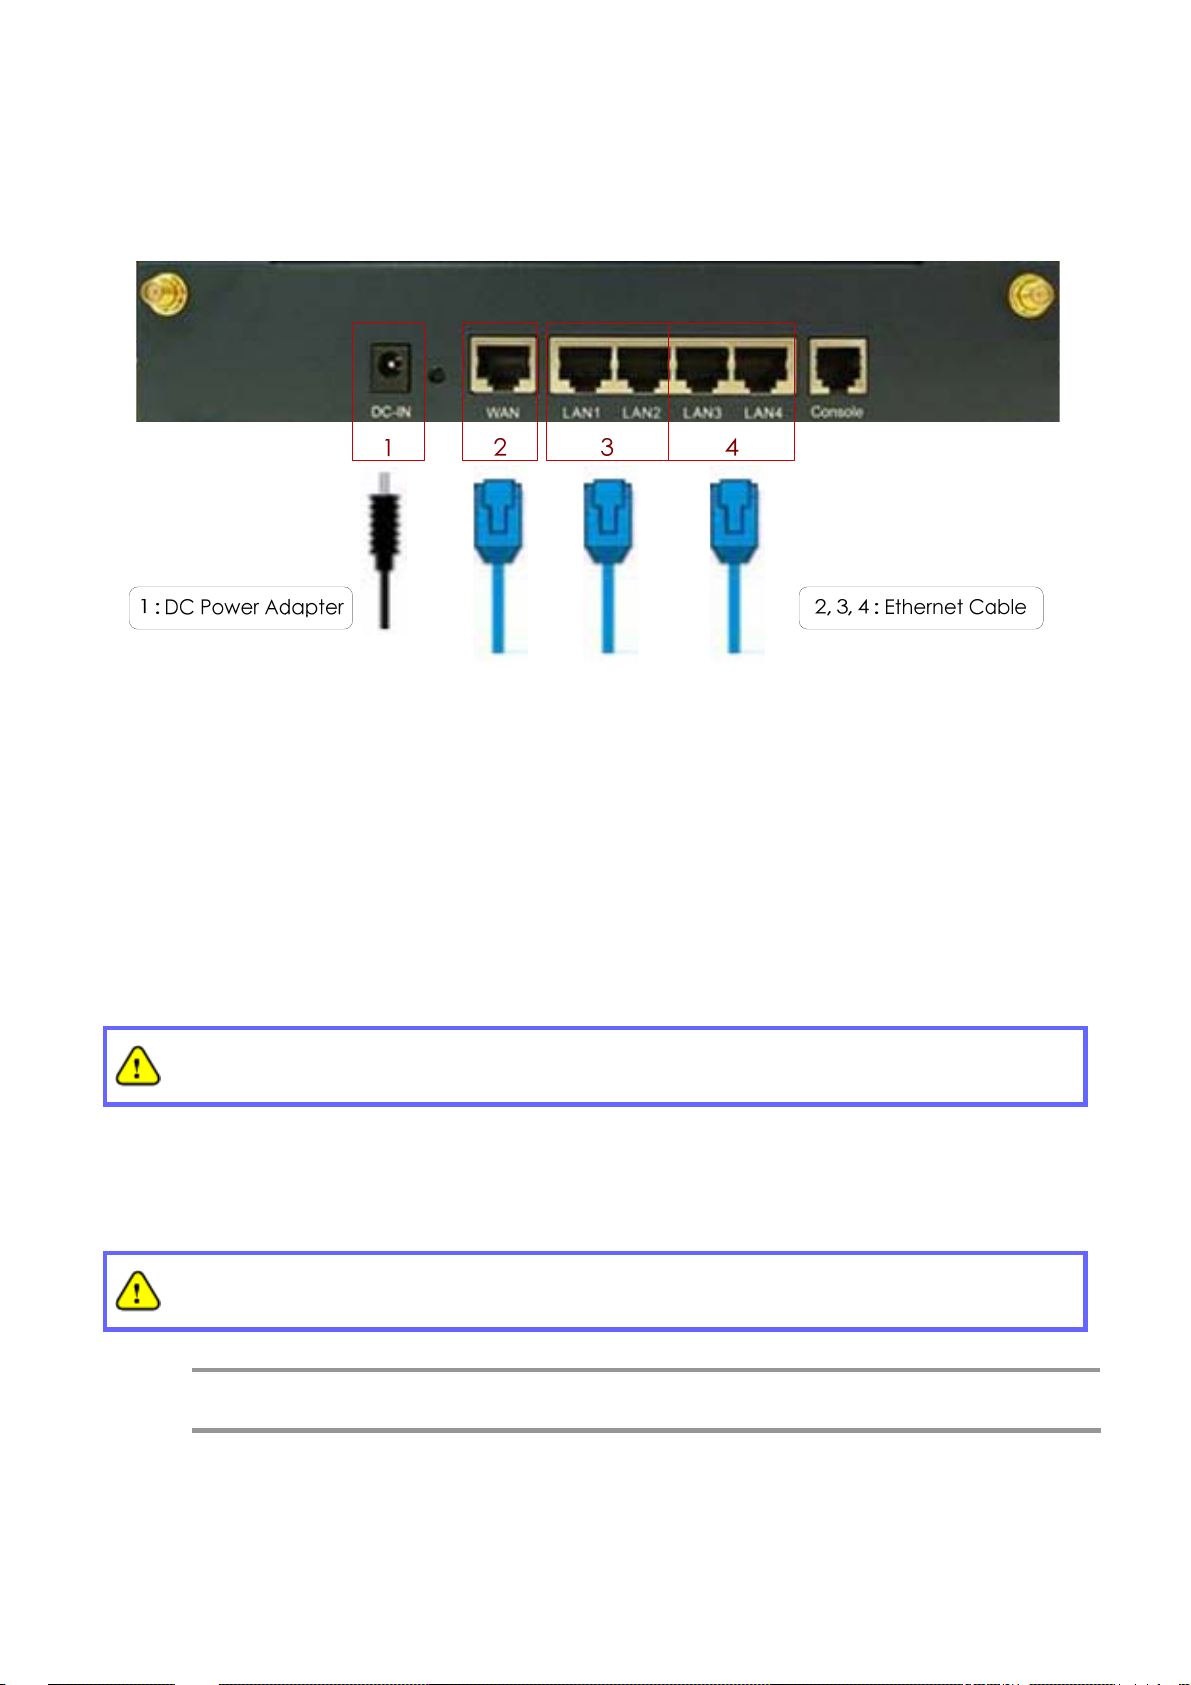
Please follow the steps below to install HS1100:
1. Connect the power adapter to the power socket on the rear panel. If the power supply and connection are
normal, the Power LED will light up.
2. Connect an Ethernet cable to the WAN Port on the rear panel. Connect the other end of the Ethernet cable to
an xDSL/cable modem, or a switch/hub on the LAN of a company/organization. The LED of this port should be
on to indicate a proper connection.
3. Connect an Ethernet cable to the LAN1/LAN2 Port on the rear panel. Per your needs, connect the other end of
the Ethernet cable to an AP for extending wireless coverage, a switch for connecting more wired clients, or a PC.
The LED of LAN1/LAN2 should be on to indicate a proper connection.
Authentication is required for the clients to access the network via LAN1/LAN2 Port. The LAN port
with authentication function is referred to as Public LAN.
4. Connect an Ethernet cable to the LAN3/LAN4 Port on the rear panel. Connect the other end of the Ethernet
cable to a PC for configuring the HS1100 system. The LED of LAN3/LAN4 should be on to indicate a proper
connection.
Authentication is NOT required for the clients to access the n etwo rk via the LAN3/LAN4 Port. The
LAN port WITHOUT authentication function is referred to as Private LAN.
Note:
After the hardware of HS1100 properly installed, follow the steps below to set up the HS1100 system.
HS1100 supports Auto Sensing MDI/MDIX. You may use eithe r a straight-th rough or a cross-over
Ethernet cable to connect the Ethernet port.
7
Page 9
HS1100 Wireless Hotspot Gateway User Manual
Quick Software Configuration
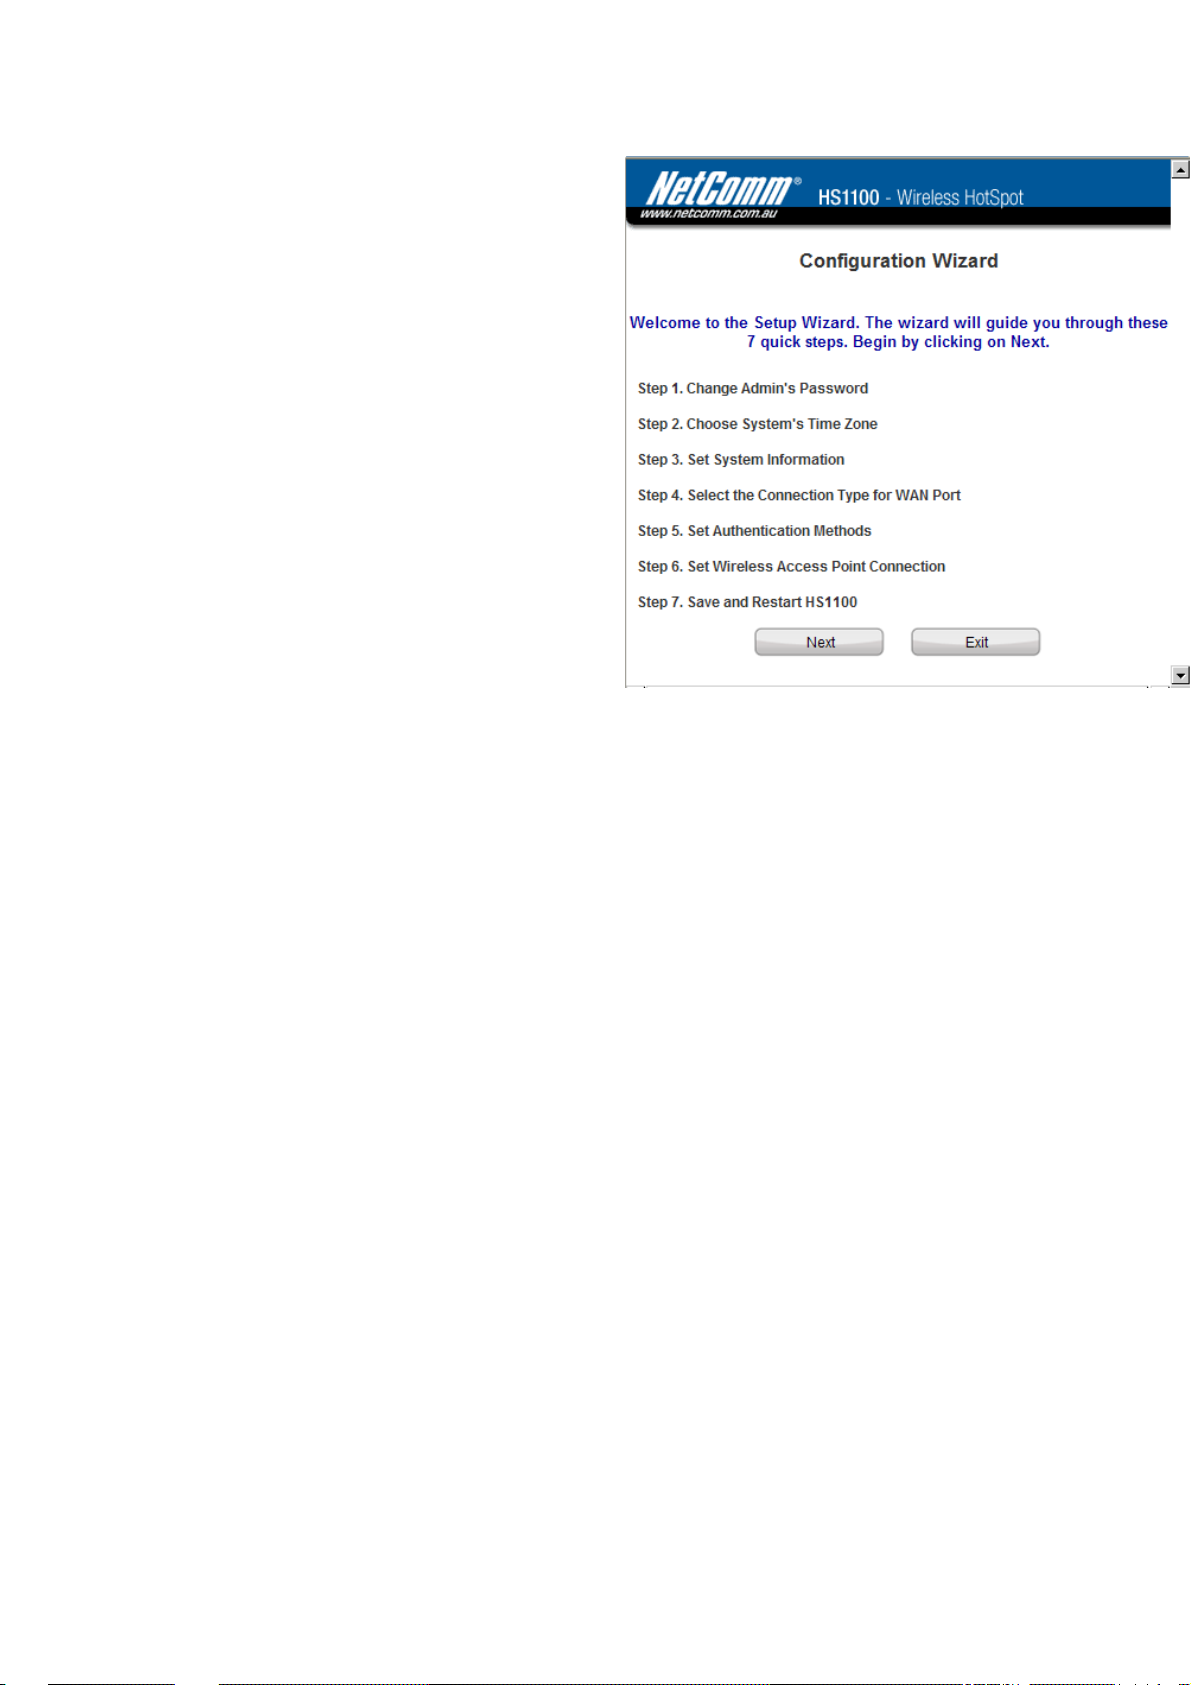
There are two ways to configure the HS1100 system: using the online Configuration Wizard or changing the
settings by commands manually. The Configuration Wizard comprises of seven basic steps as follows. Follow the
instructions of Configuration Wizard to enter the required information step by step, save your settings, and restart
HS1100. The seven steps of Configuration Wizard are listed below:
Step 1. Change Admin’s Password
Step 2. Choose System’s Time Zone
Step 3. Set System Information
Step 4. Select the Connection Type for WAN Port
Step 5. Set Authentication Methods
Step 6. Set Wireless – Access Point Connection
Step 7. Save and Restart HS1100
Please follow the following steps to complete the quick configuration:
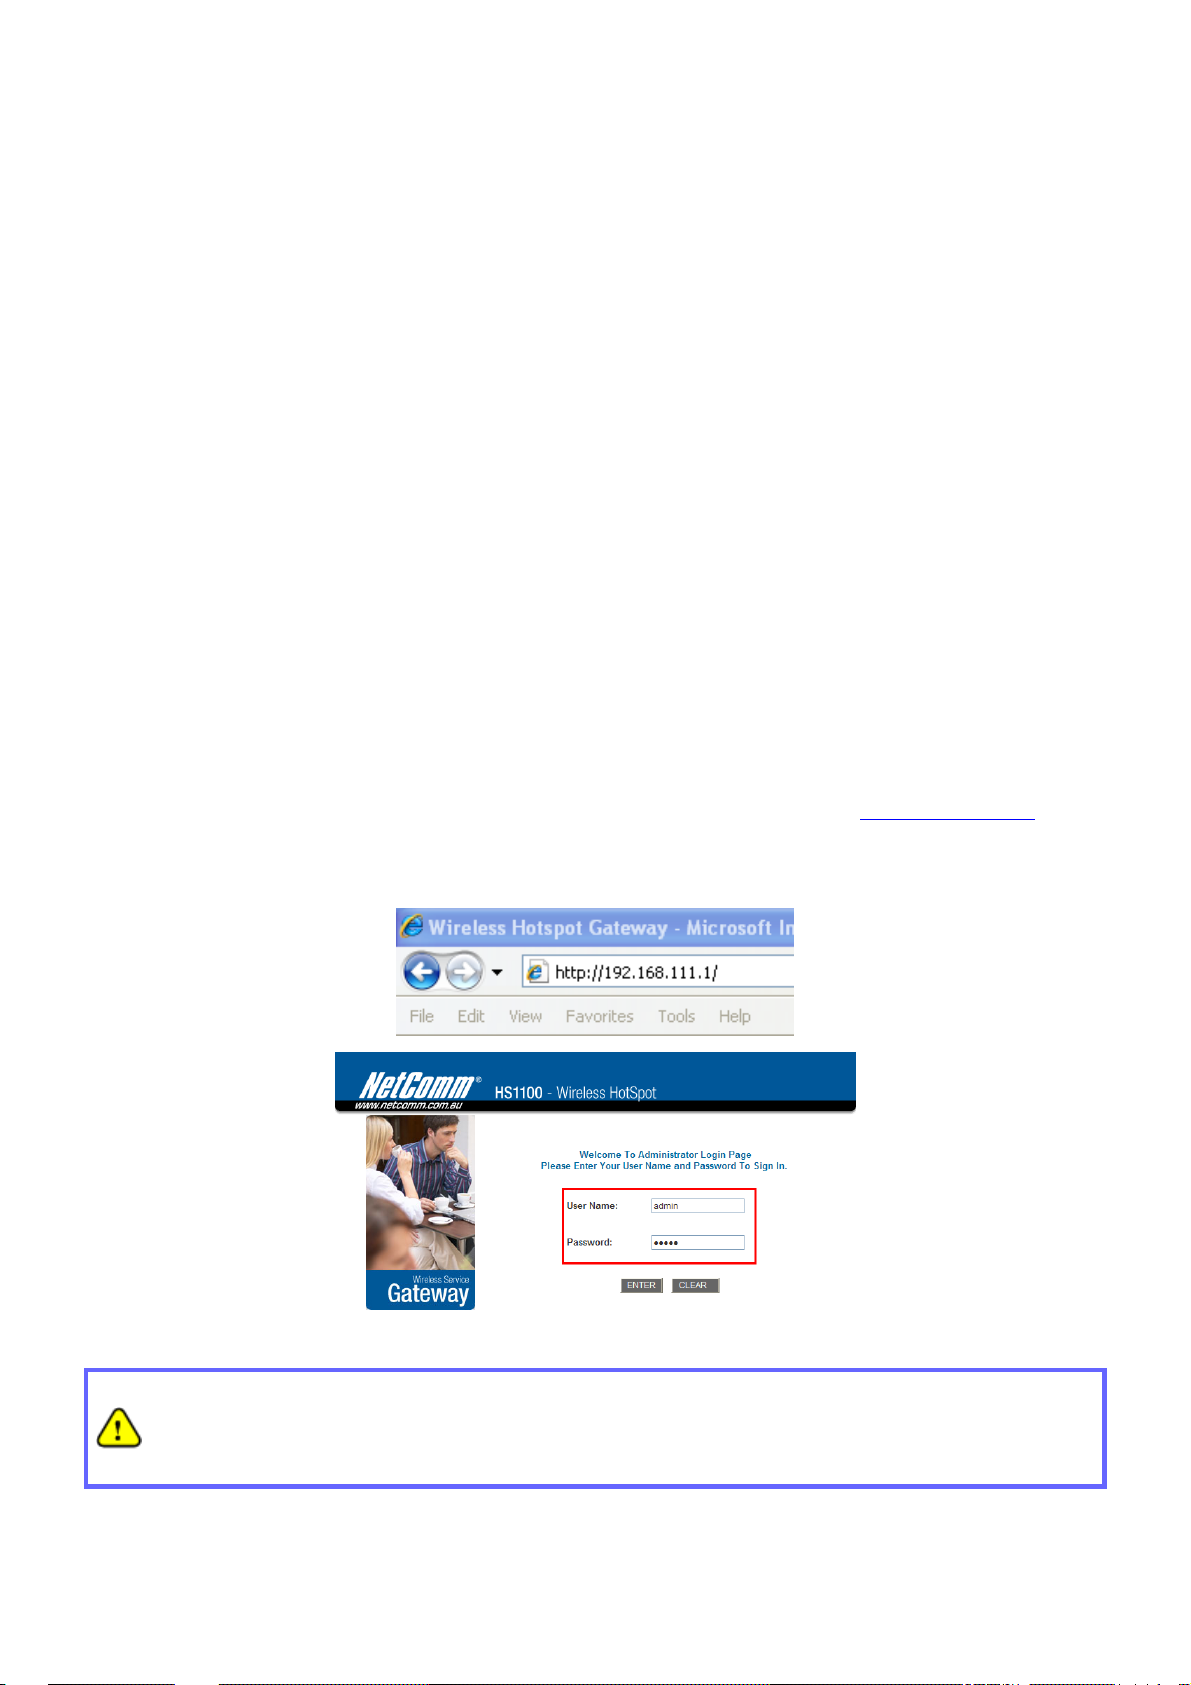
1. Use the network cable of the 10/100BaseT to connect a PC to the LAN3/LAN4 port, and then start a browser
(such as Microsoft IE). Next, enter the gateway address for that port, the default is
opened webpage, a login screen will appear. Enter “admin”, the default username, and “admin”, the default
password, in the User Name and Password fields. Click Enter to log in.
http://192.168.111.1. In the
If you cannot get the login screen, your PC may have been set in DHCP to obta in an IP address
automatically from another existing authentication LAN port, or the IP address used does not have the
same subnet as the default URL of HS1100. Please use default IP address such as 192.16 8.111.xxx (xxx:
2~254) in your network and then try it again.
You can log in as admin, manager or operator. The default usernames and passwords show as follows:
8
Page 10
HS1100 Wireless Hotspot Gateway User Manual
Admin: The administrator can access all configuration p ages of HS1100.
User Name: admin
Password: admin
Manager: The manager can only access the configuration pages under User Authentication to manage the user
accounts, but without the permission to change the settings of the profiles of Firewall, Specific Route and Schedule.
User Name: manager
Password: manager
Operator: The operator can only access the configuration page of Crea te On-demand User to create new
on-demand user accounts and print out the on-demand user acco unt receipts.
User Name: operator
Password: operator
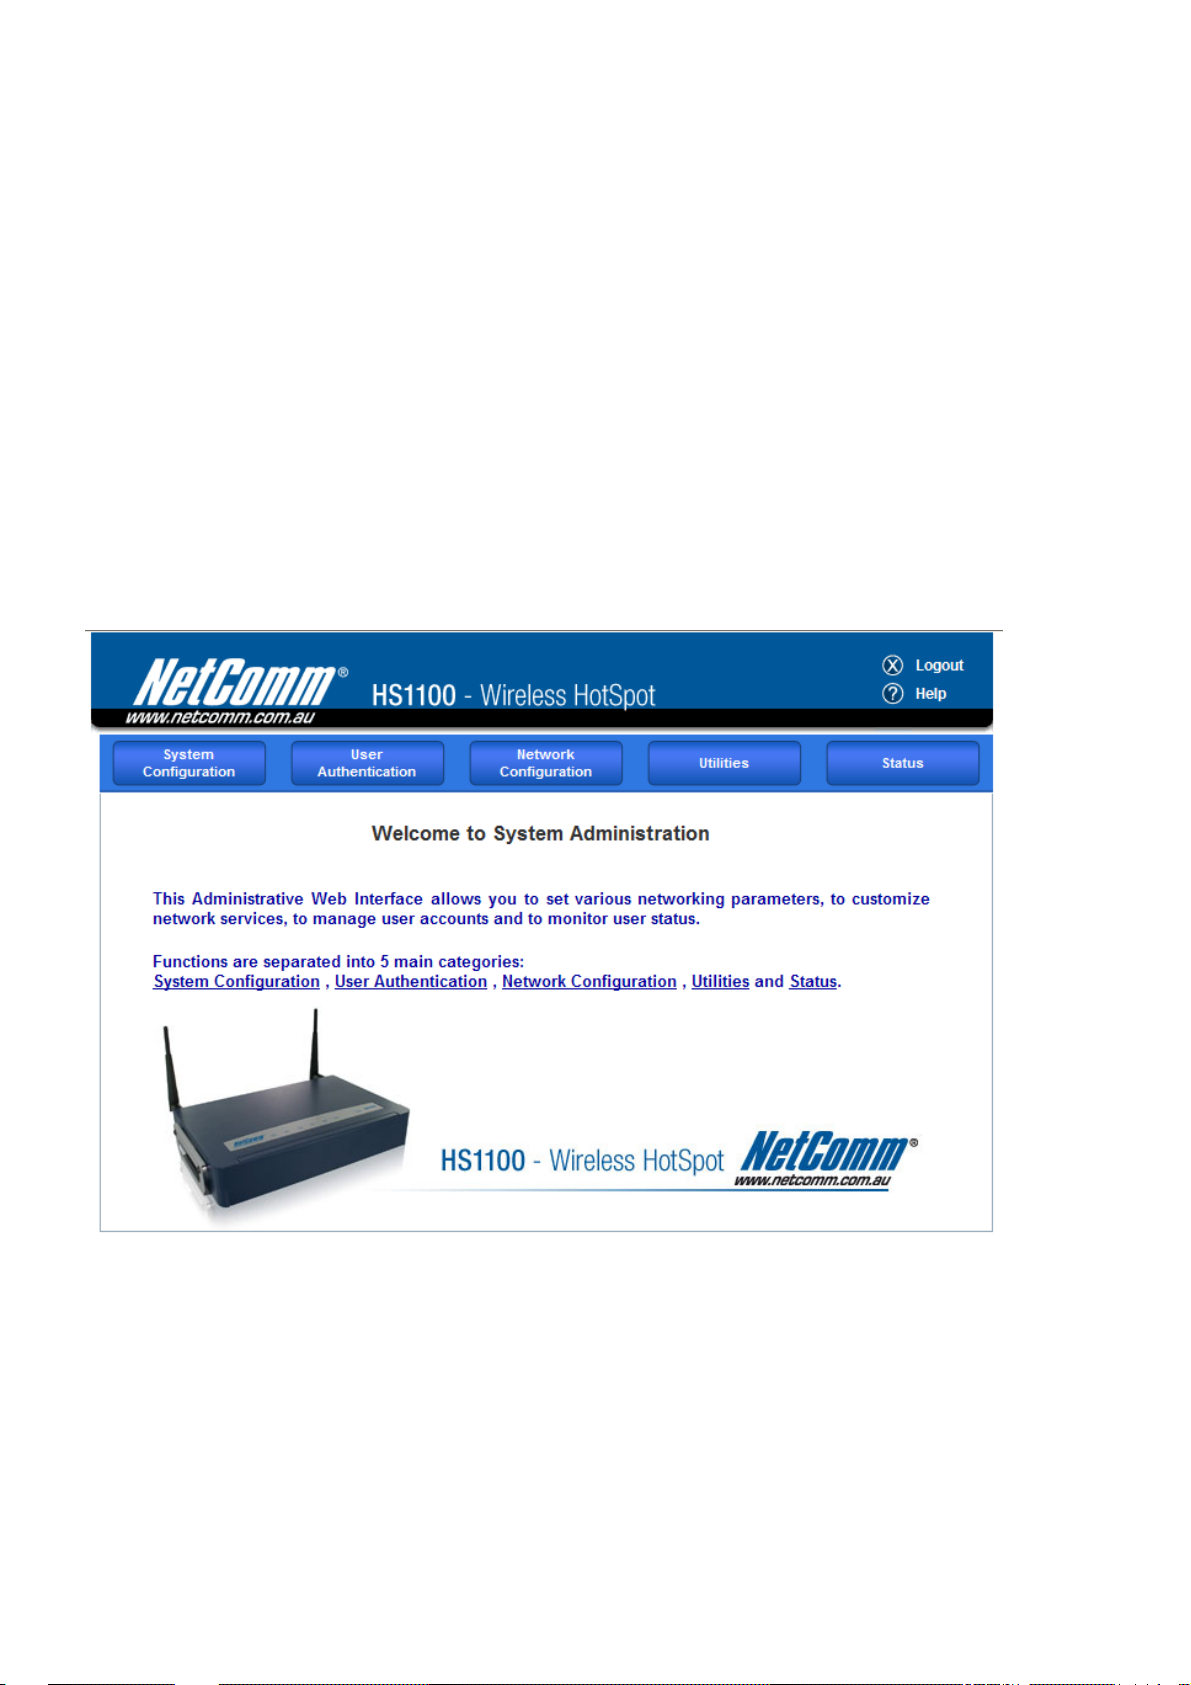
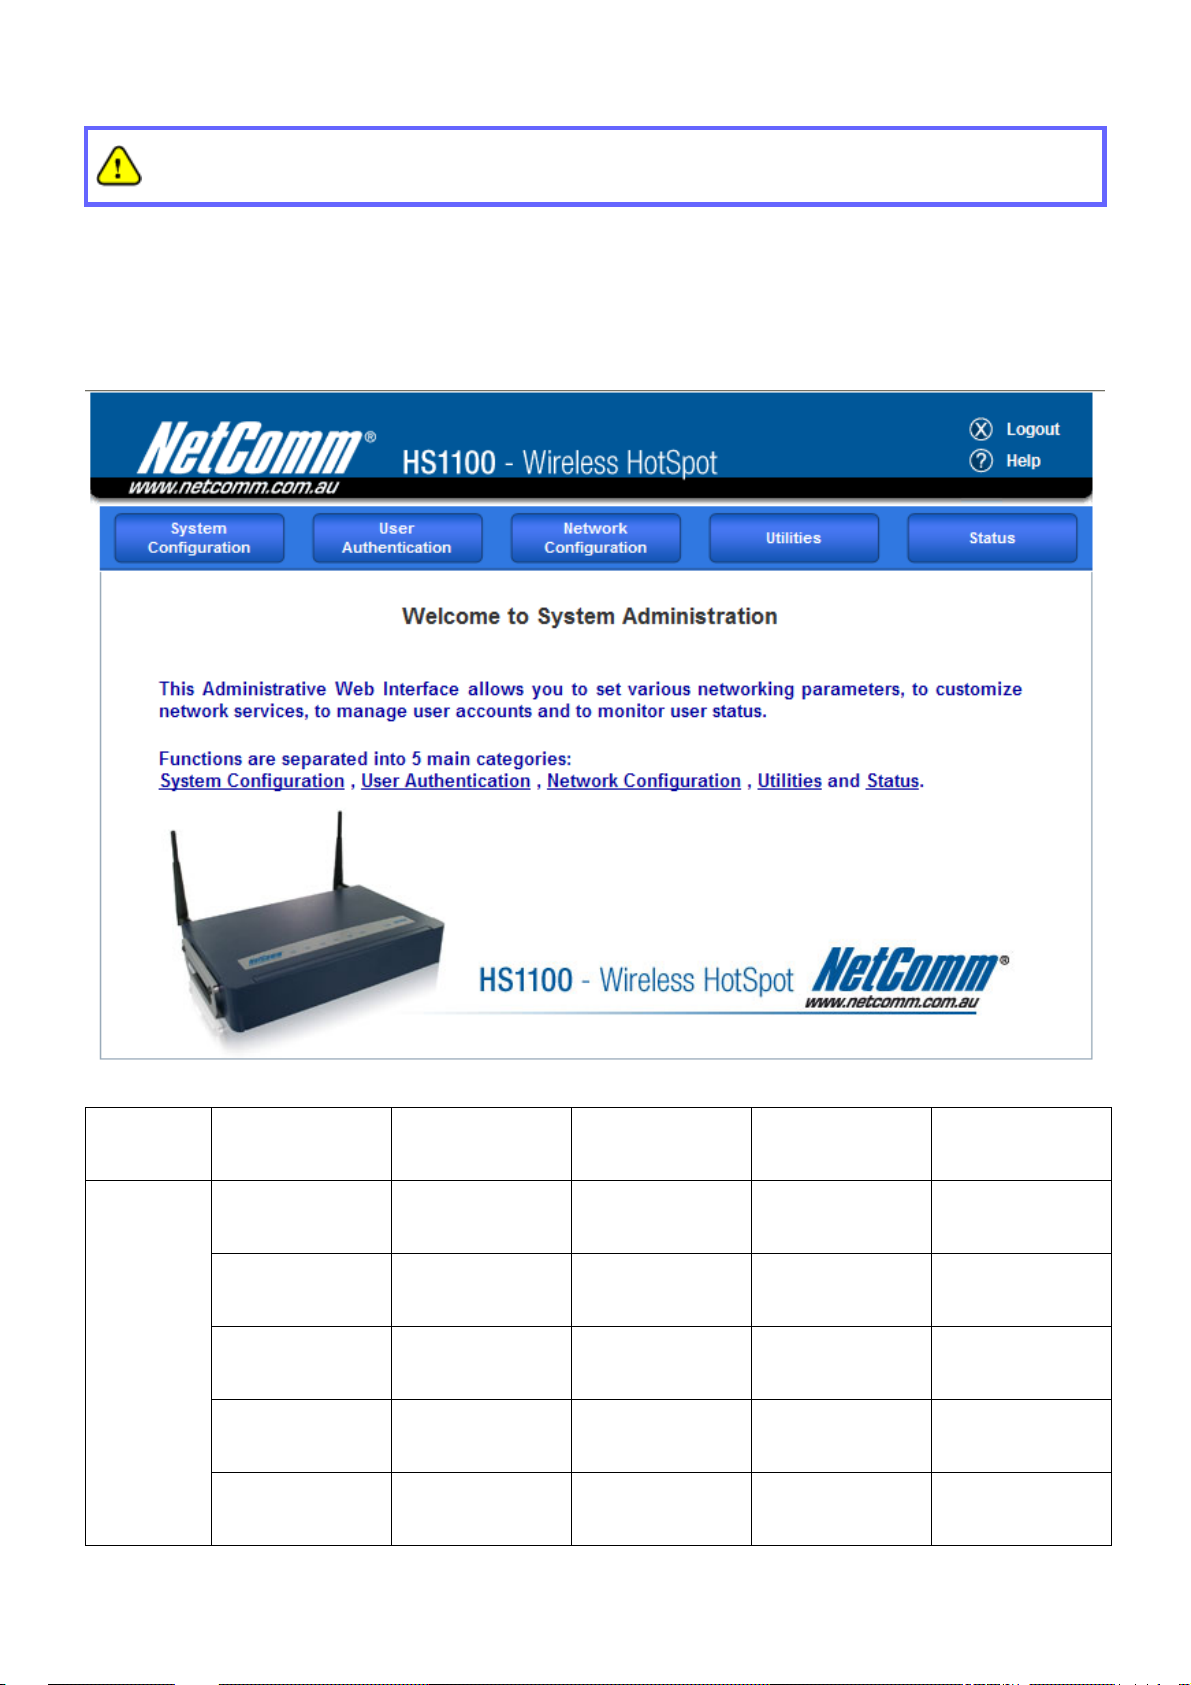
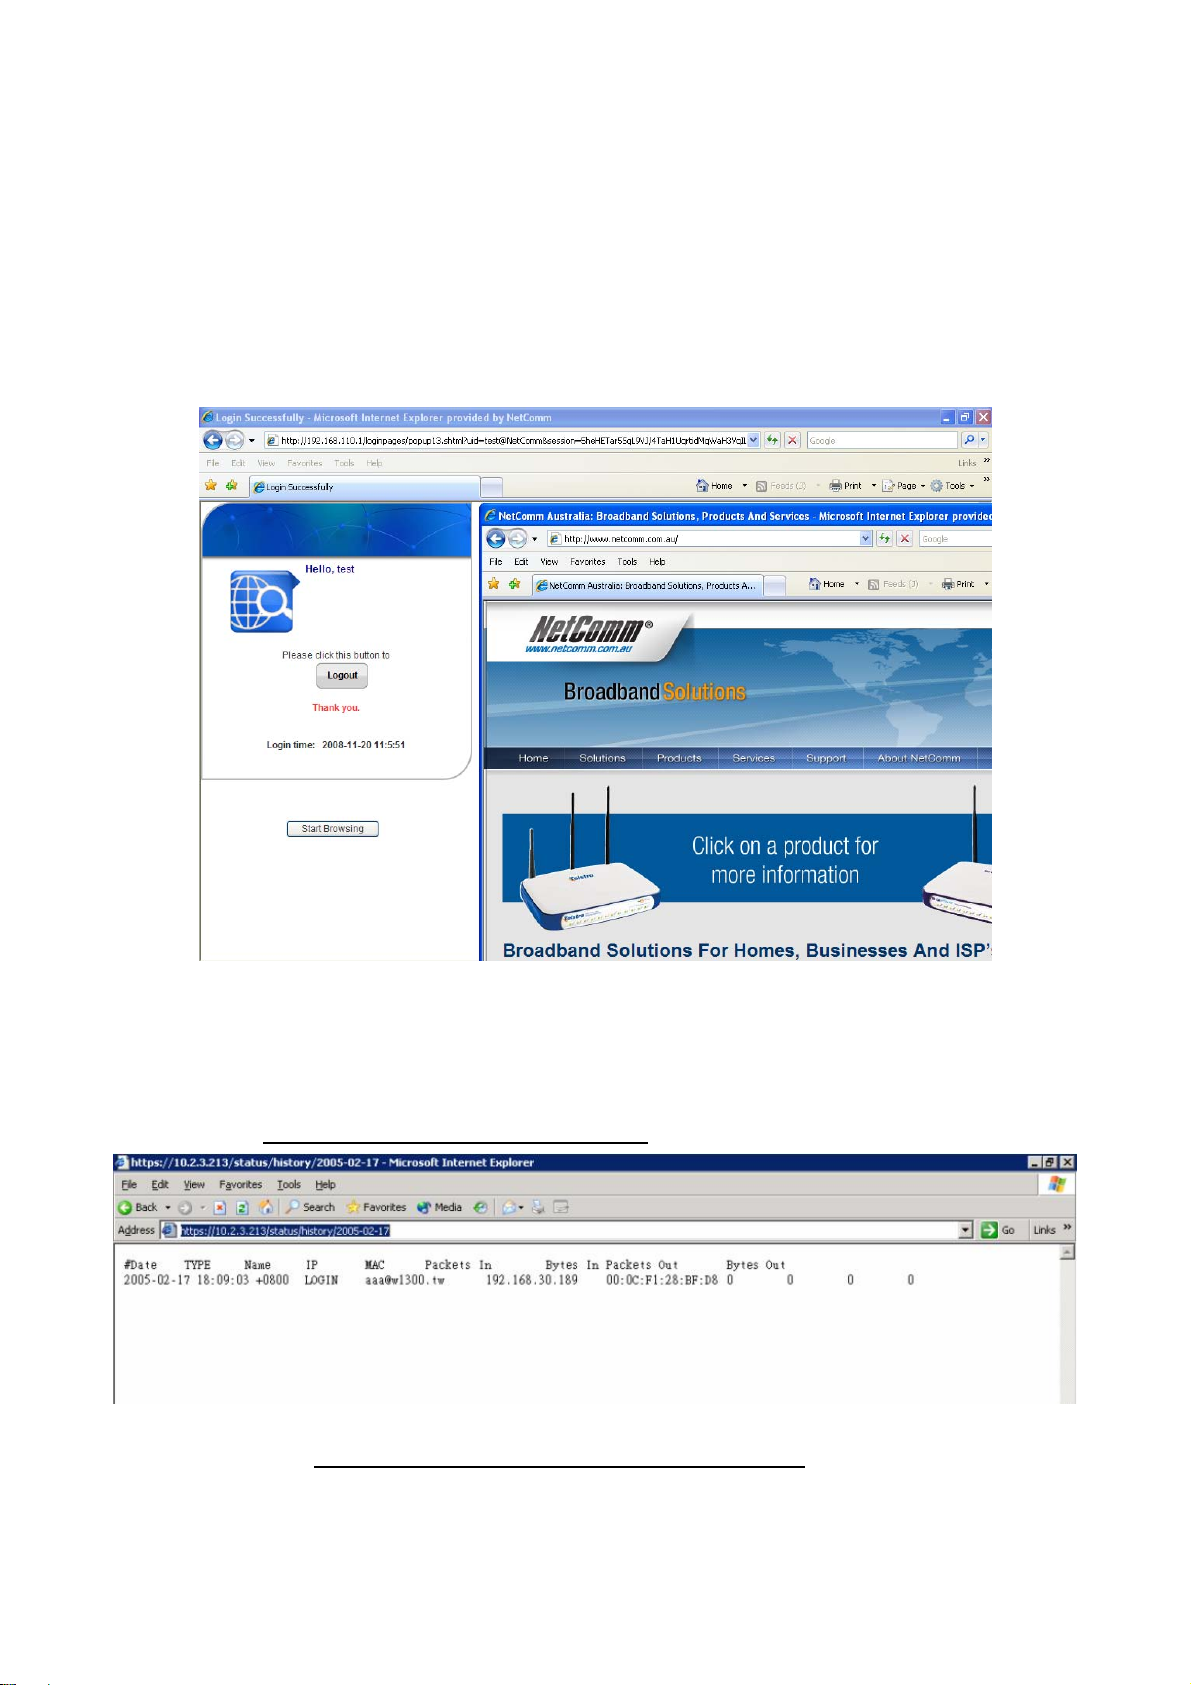
2. After successfully logging into HS1100, a web management interface with a welcome message will appear.
There is a Logout button on the upper right corner to log out the system when finished.
3. To quickly configure HS1100 by using the Configuration Wizard, click System Configuration to go to the
System Configuration homepage.
9
Page 11
HS1100 Wireless Hotspot Gateway User Manual
4. Then, select Configuration Wizard and click the Run Wizard button to start the wizard.
10
Page 12
5. Configuration Wizard
A welcome screen that briefly introduces the 7 steps
will appear. Click Next to begin.
HS1100 Wireless Hotspot Gateway User Manual
11
Page 13
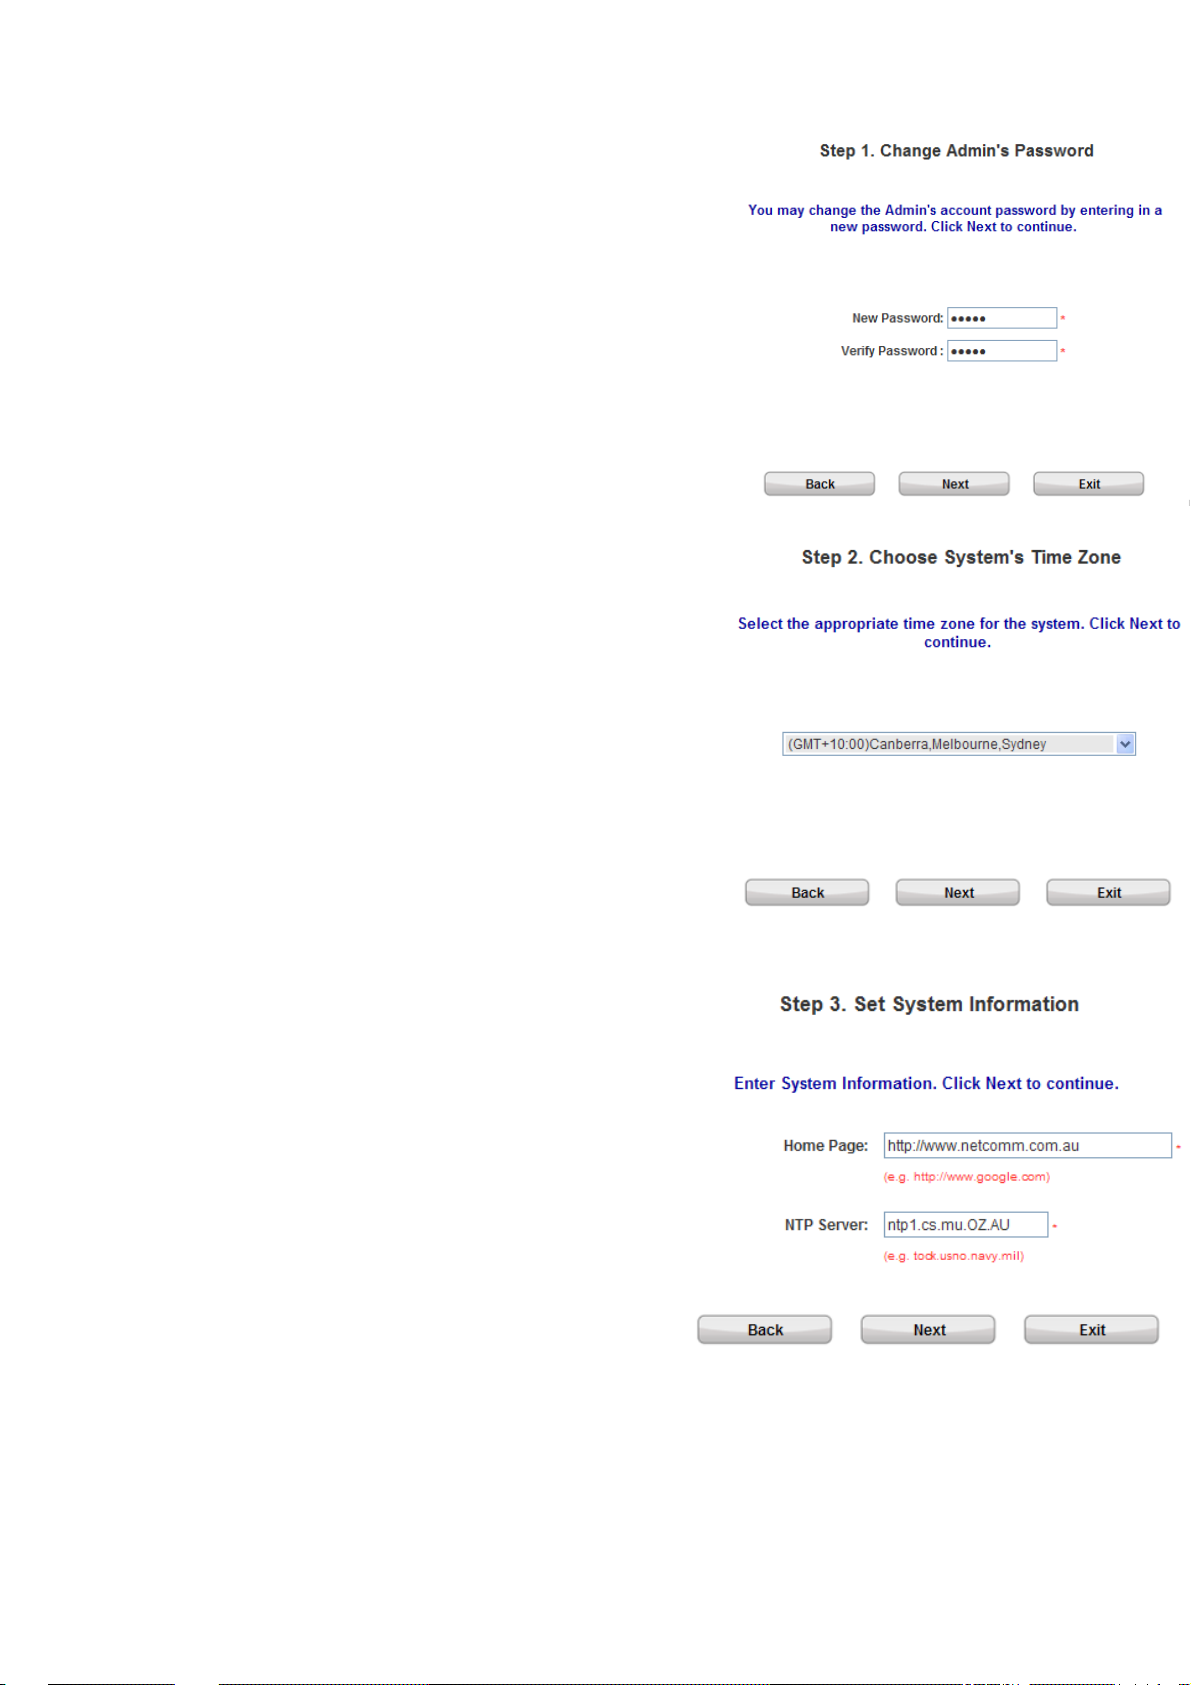
y Step 1. Change Admin’s Password
Enter a new password for the admin account and retype it in
the verify password field (maximum number of characters up
to 20 and no spaces allowed).
Click Next to continue.
y Step 2. Choose System’s Time Zone
Select a proper time zone from the drop-down list box.
Click Next to continue.
HS1100 Wireless Hotspot Gateway User Manual
y Step 3. Set System Information
¾ Home Page: Enter the URL to where the users
should be directed when they are successfully
authenticated.
¾ NTP Server: Enter the URL of the external time
server for HS1100 time synchronization or use the
default setting.
Click Next to continue.
12
Page 14
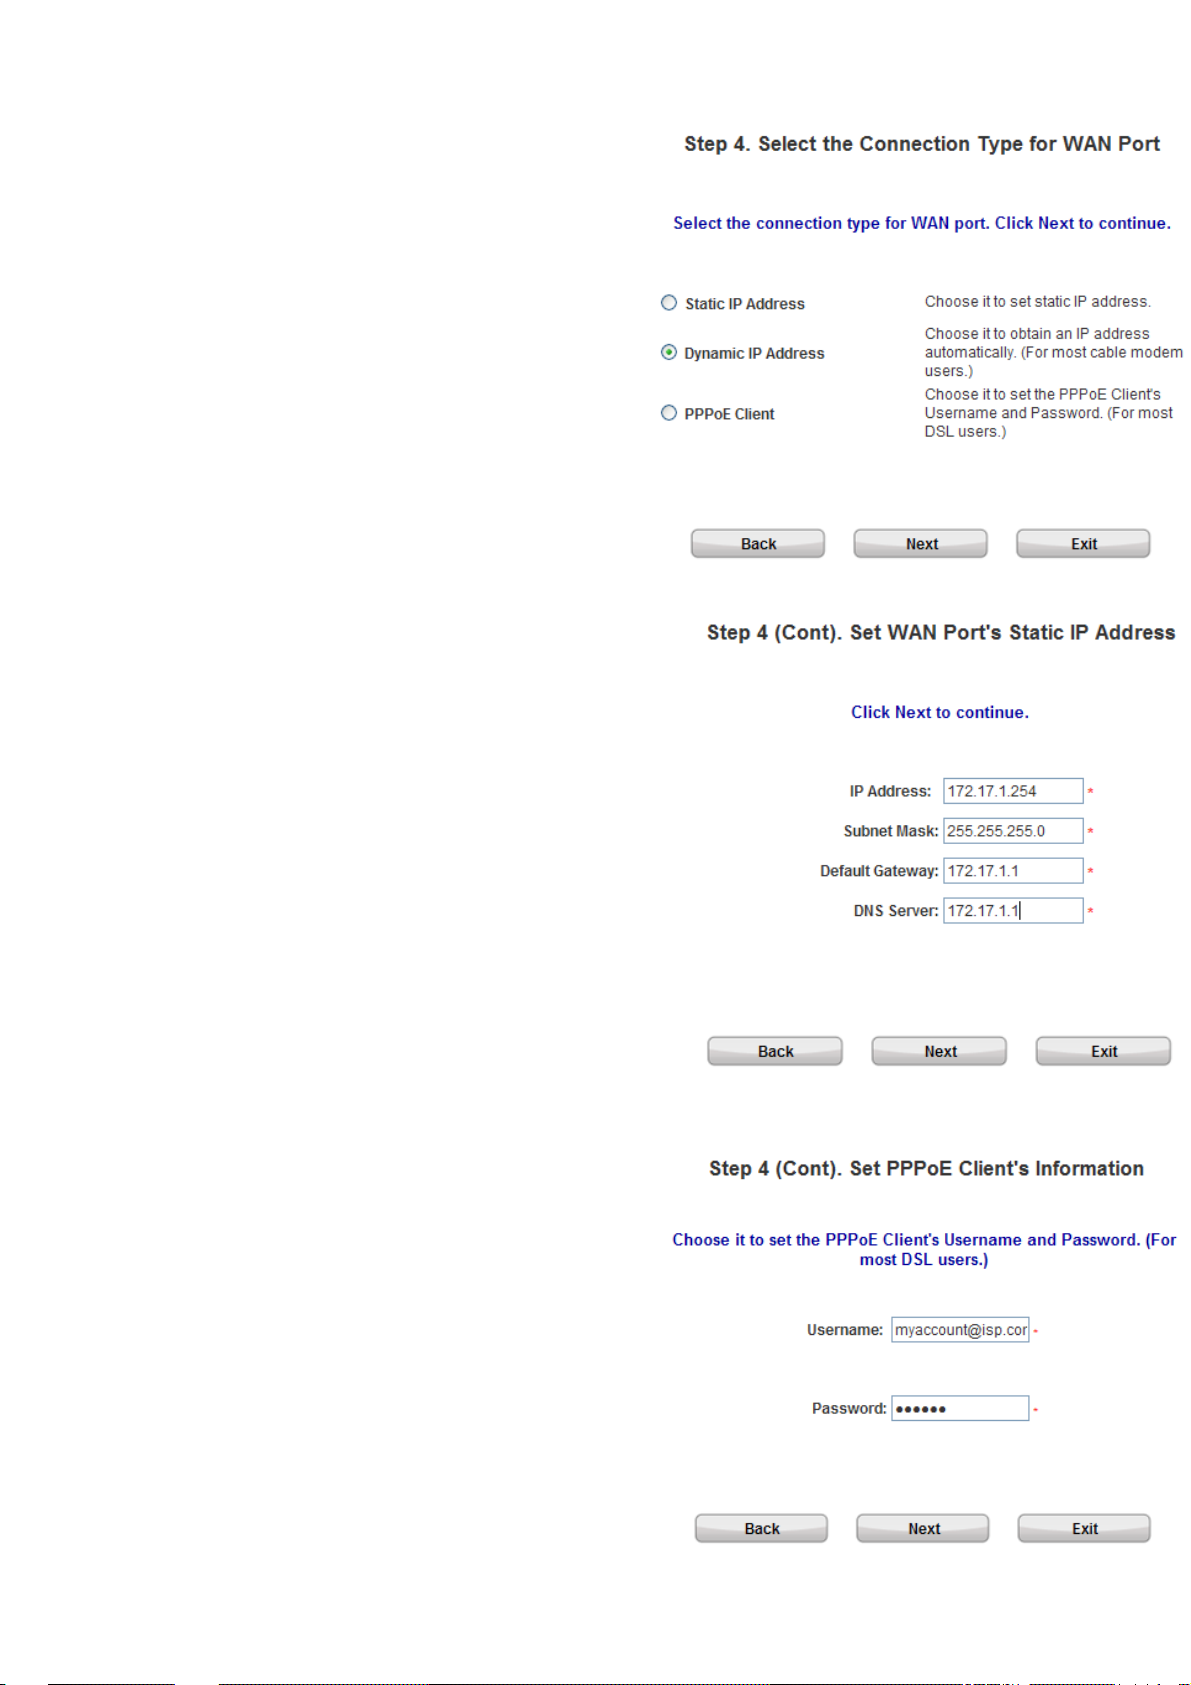
y Step 4. Select the Connection Type for WAN Port
Three are three types of WAN port to select from:
Static IP Address, Dynamic IP Address and
PPPoE Client.
Select a proper Internet connection type and click
Next to continue.
¾ Dynamic IP Address
If this option is selected, an appropriate IP
address and related information will
automatically be assigned.
Click Next to continue.
¾ Static IP Address: Set WAN Port’s Static IP
HS1100 Wireless Hotspot Gateway User Manual
Address
Enter the “IP Address”, “Subnet Mask”, “Default
Gateway” and “DNS Server” provided by your
Internet Service Provider.
Click Next to continue.
¾ PPPoE Client: Set PPPoE Client’s Information
Enter the “Username” and “Password” provided
by your ISP.
Click Next to continue.
13
Page 15
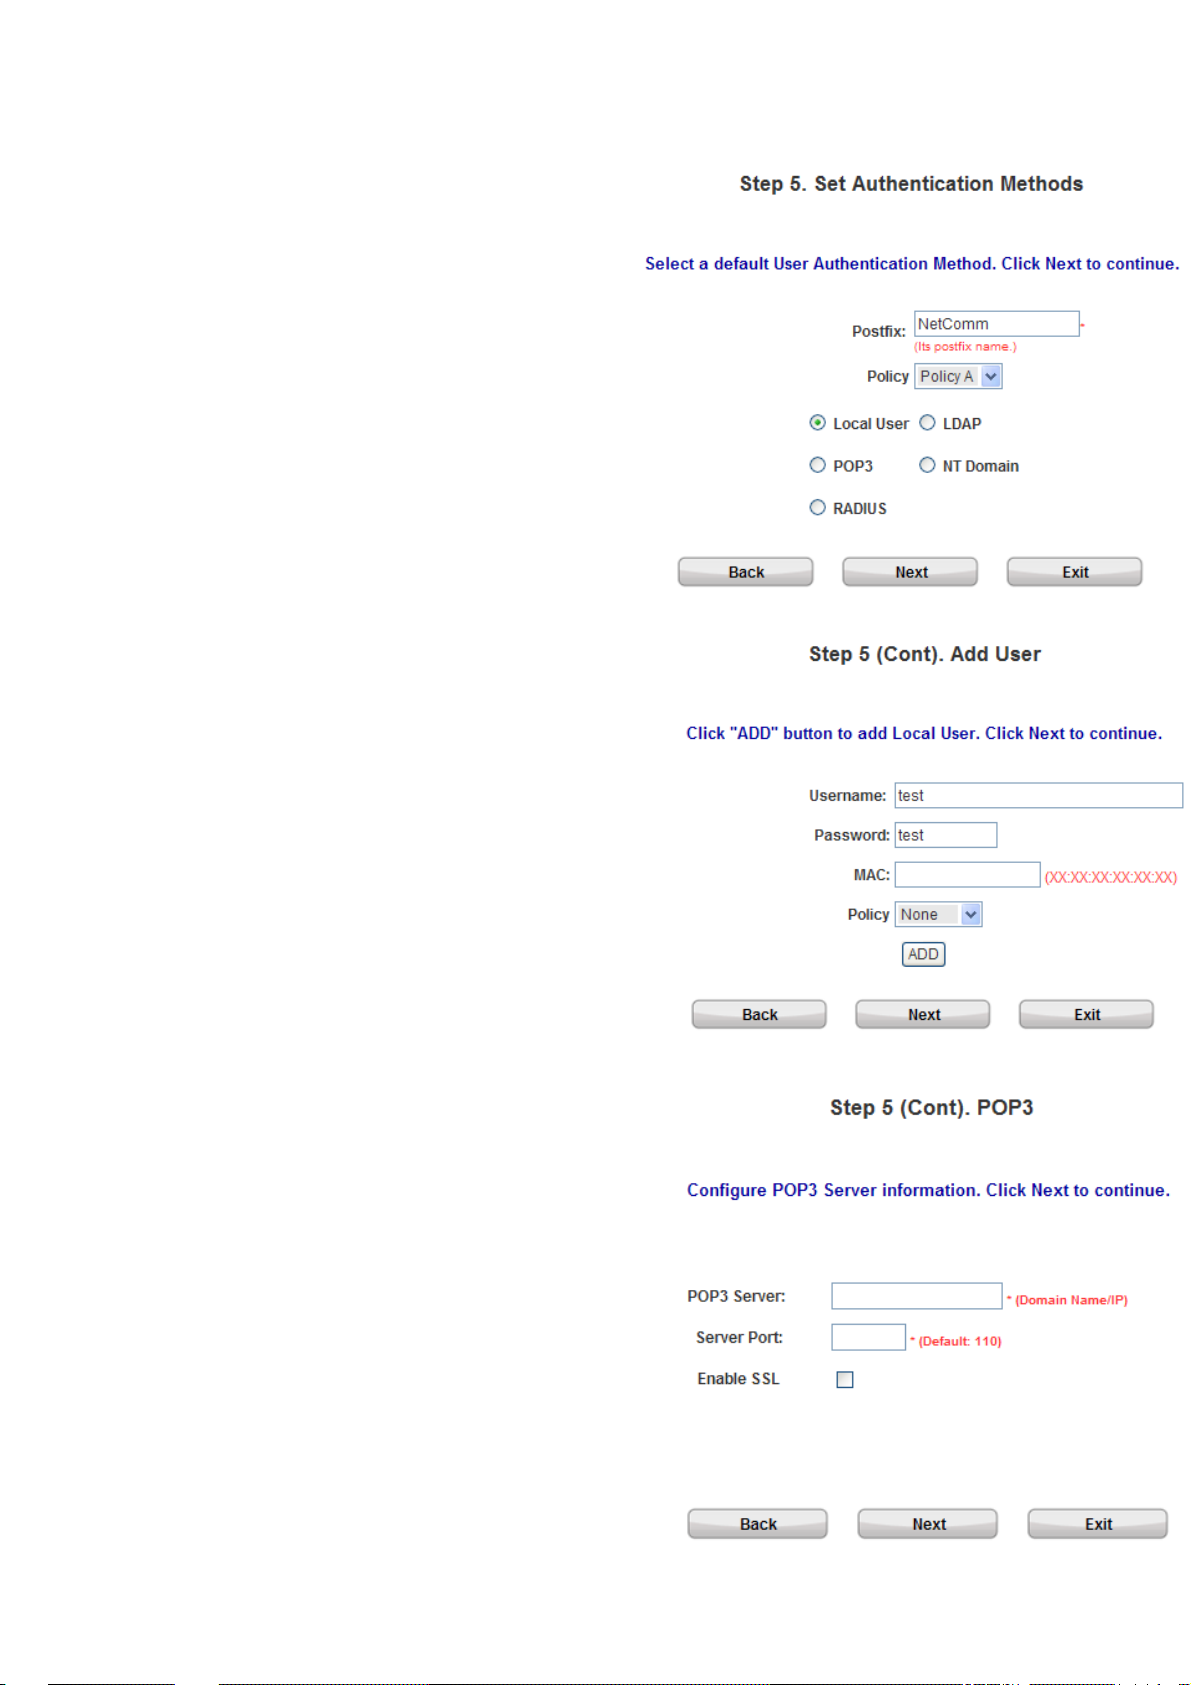
y Step 5. Set Authentication Methods
¾ Set the user’s information in advance. Enter an
easily identified name as the postfix name in
the “Postfix” field (e.g. test@Postfix1), select
a “Policy” (or use the default value), and
choose one authentication method from the 5
options appearing in this window.
Click Next to continue.
¾ Local User: Add User
HS1100 Wireless Hotspot Gateway User Manual
A new user can be added to the local user data
base. To add a user here, enter the “Username”
(e.g. test), “Password” (e.g. test), “MAC”
(optional) and assign it a policy (or use the default).
Upon completing adding a user , more users can be
added to this authentication method by clicking the
ADD button.
Click Next to continue.
¾ POP3 User: POP3
Enter POP3 Server’s “Domain Name/IP” and
“Server Port”, and then choose “Enable SSL” or
not.
Click Next to continue.
14
Page 16
HS1100 Wireless Hotspot Gateway User Manual
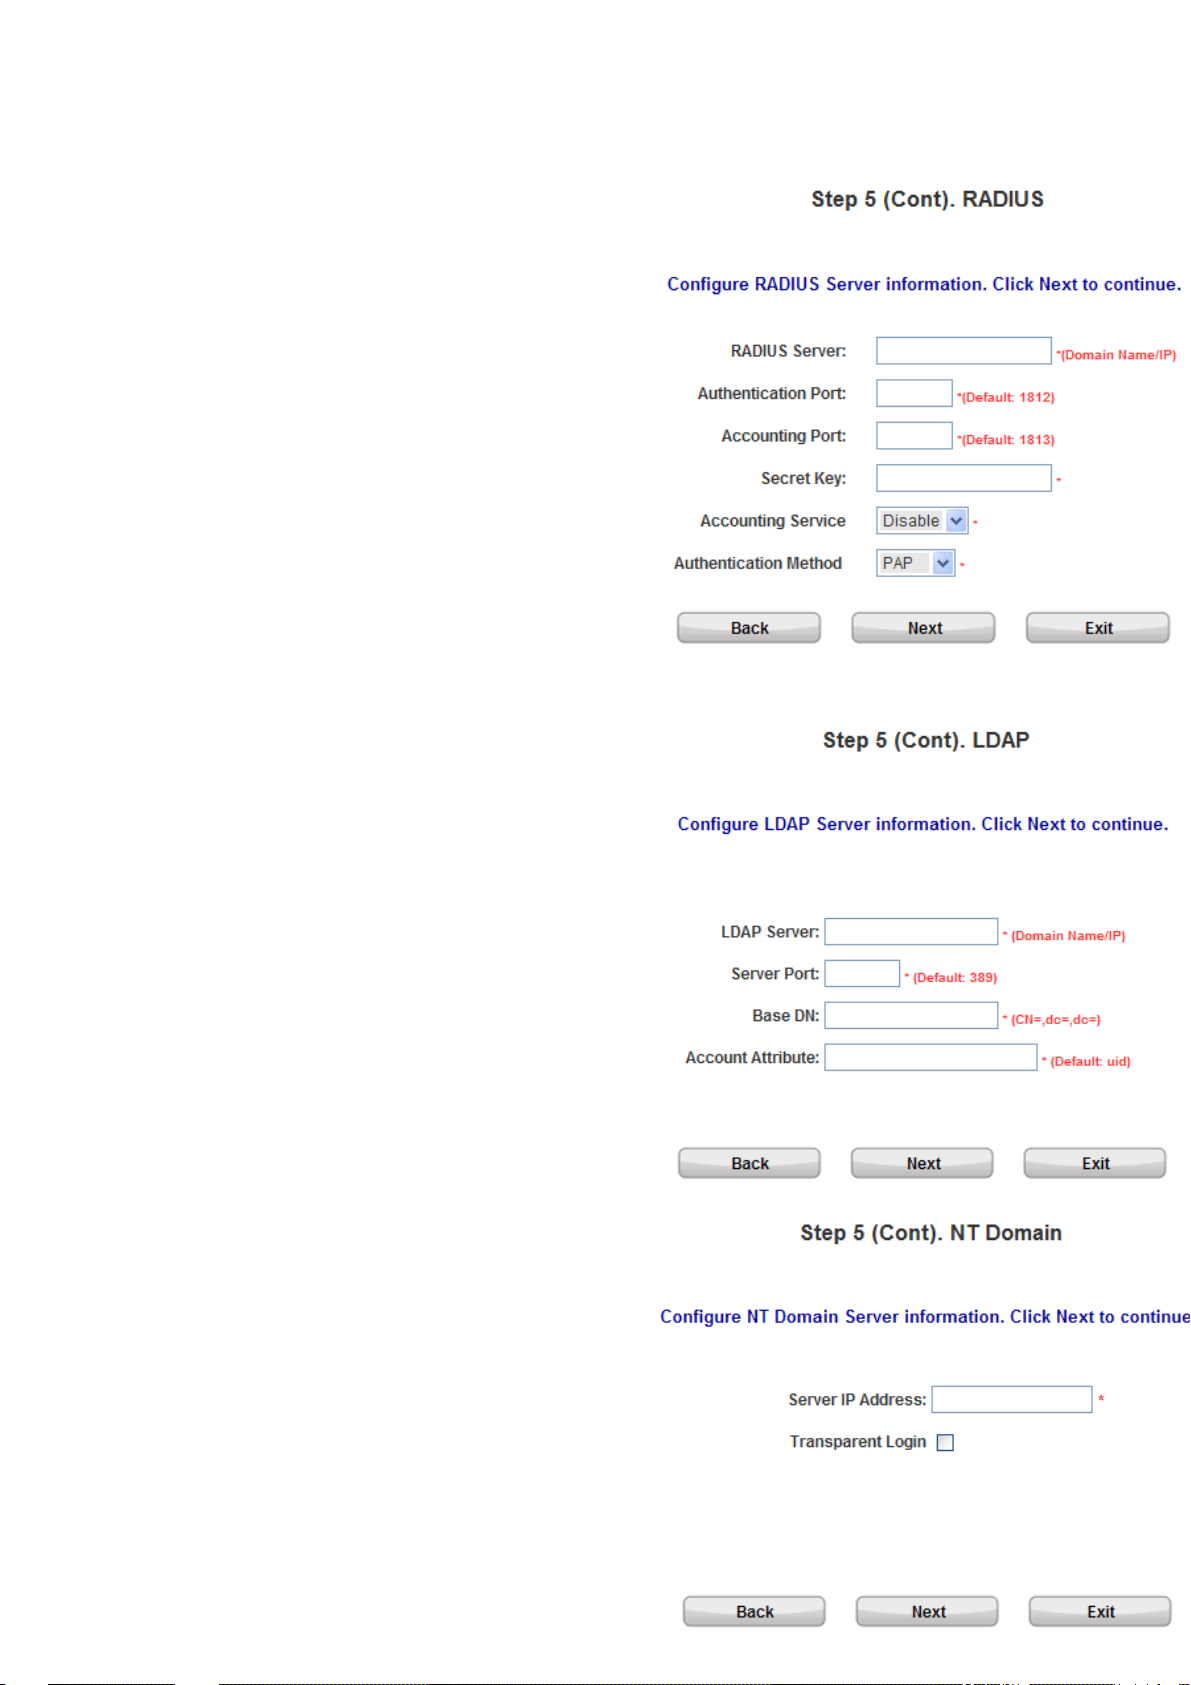
¾ RADIUS User: RADIUS
Enter RADIUS Server’s “Domain Name/IP”,
“Accounting Port” and “Secret Key”. Then
choose to enable or disable “Accounting
Service”, and select the desired
“Authentication Method”.
Click Next to continue.
¾ LDAP User: LDAP
Add a new user to the LDAP user data base if
desired. Enter the LDAP Server’s “Domain
Name/IP”, “Server Port”, and “Base DN”.
Click Next to continue.
¾ NT Domain User: NT Domain
When NT Domain User is selected, enter the
information for “Server IP Address”, and
choose to enable/disable “Transparent Login”.
If “Transparent Login” is e nabled, users are
logged in HS1100’s NT Domain active directory
and authenticated automatically when they log
into their Windows OS domain.
Click Next to continue.
15
Page 17
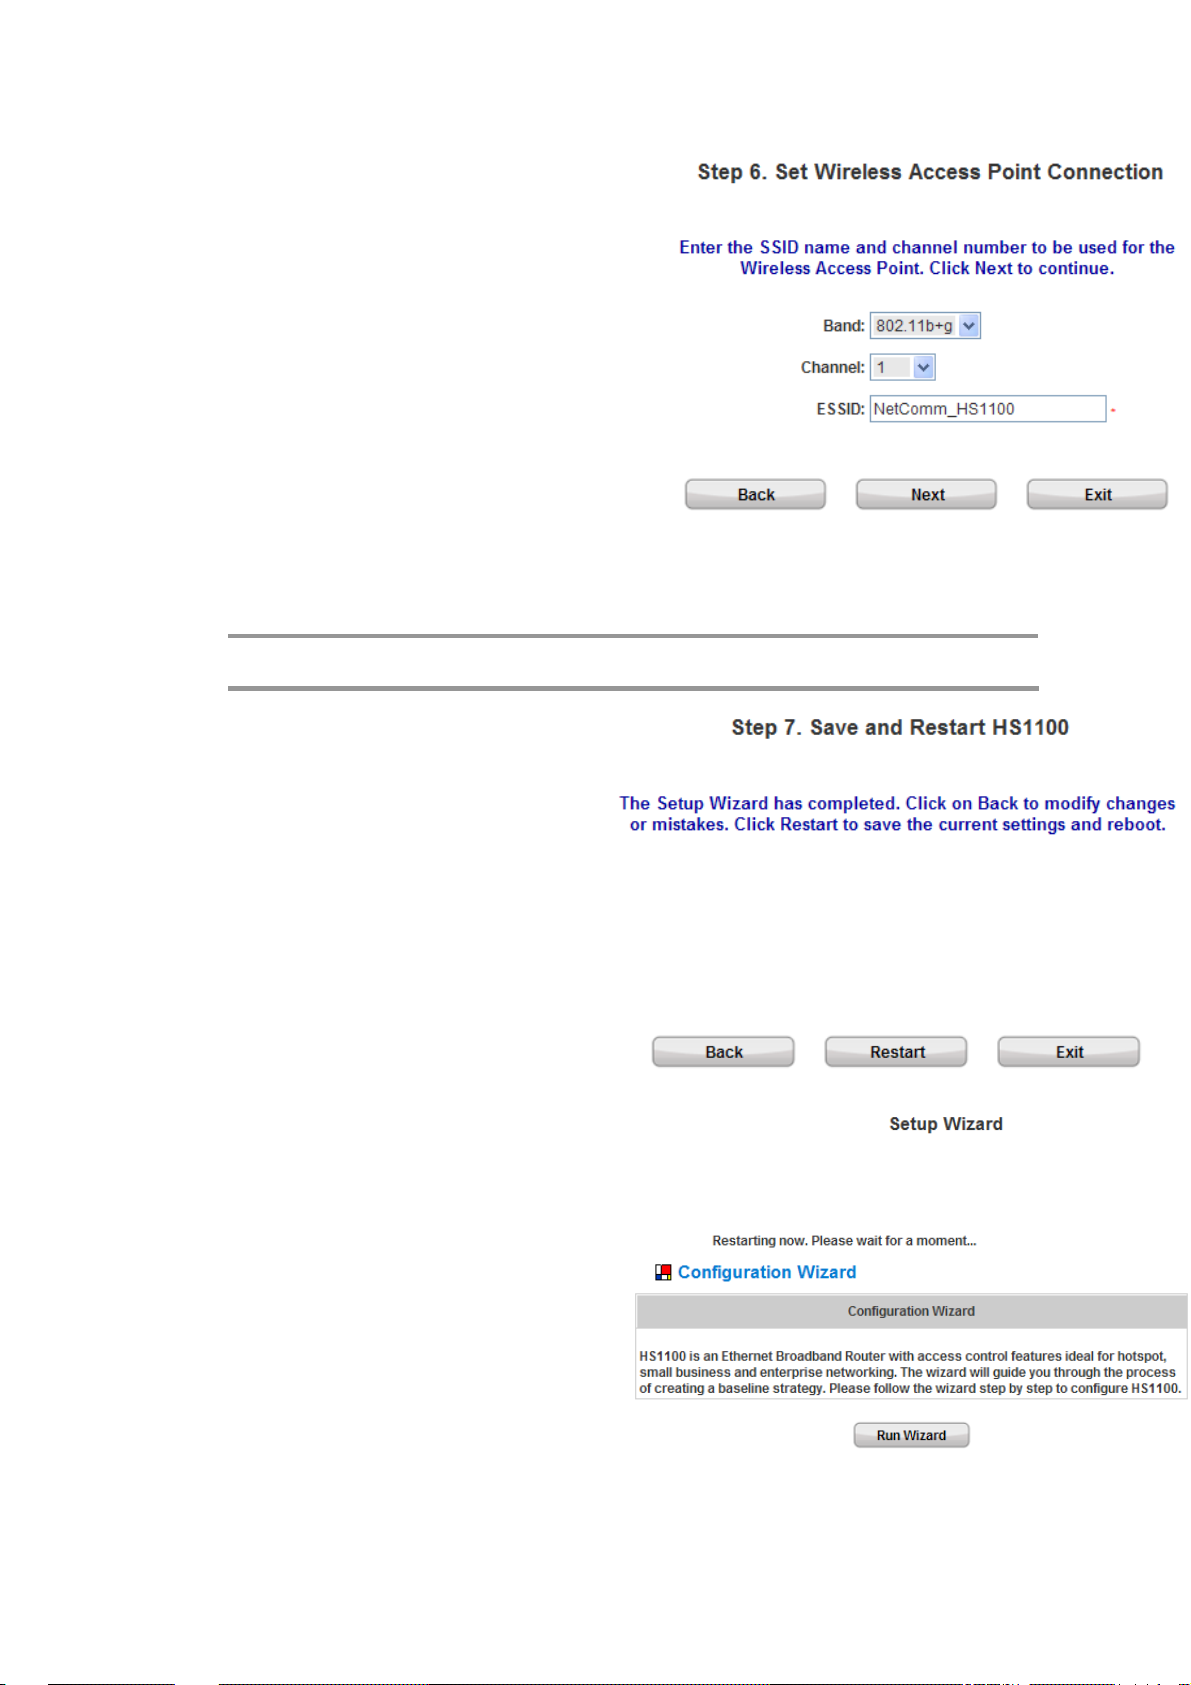
y Step 6. Set Wireless – Access Point Connection
¾ Band: HS1100 supports two transmission modes,
Disabled, 802.11b, 802.11g and 802.11 (b+g).
Select the appropriate transmission mode to work
with the wireless clients in the network.
¾ Channel: If the default channel has been used by
many other access points, it is necessary to
select another channel from the drop-down list
box for a better performance.
¾ ESSID: Enter a SSID (up to 32 characters) for
the system. The default is HS1100. ESSID is a
unique identifier used for the wireless users’
devices to associate with HS1100.
Click Next to continue.
HS1100 Wireless Hotspot Gateway User Manual
Note:
Available channels depend upon the region you are located. For instance, Channel 1~11
is available in North America, and Chann el 1-13 in Europe.
y Step 7. Save and Restart HS1100
Click Restart to save current settings and restart
HS1100. The Setup Wizard is now completed.
y Setup Wizard. During HS1100 restart, a “Restarting now.
Please wait for a while.” message will appear on the
screen. Please do not interrupt HS1100 restarting process
until the message has disappeared. This indicates
that the entire restart process has been completed
successfully.
16
Page 18
HS1100 Wireless Hotspot Gateway User Manual
During every step of the wizard, if you wish to go back to modify the settings, please click the Back button
to go back to the previous step.
4. Web Interface Configuration
This chapter will guide you through further detailed settings. The following table shows all the functions of HS1100.
OPTION
FUNCTION
System
Configuration
Configuration
Wizard
System
Information
WAN
Configuration
LAN1 & LAN2
Configuration
LAN3 & LAN4
Configuration
User
Authentication
Authentication
Configuration
Black List
Configuration
Policy
Configuration
Guest User
Configuration
Additional
Configuration
Network
Configuration
Network Address
Translation
Privilege List
Monitor IP List
Walled Garden
List
Walled Garden
AD List
17
Utilities Status
Network Utilities System Status
Change
Interface Status
Password
Backup/Restore
Current Users
Settings
Firmware
Traffi c Histo ry
Upgrade
Notify
Restart
Configuration
Page 19

HS1100 Wireless Hotspot Gateway User Manual
Wireless
Configuration
Proxy Server
Properties
Dynamic DNS
After finishing the configuration of the settings, please click Apply a nd pay attention to see if a RESTART
message appears on the screen. If such message appears, the system must be rest arted to allow the new
settings to take effect. All on-line users will be disconnected during restart.
18
Page 20
HS1100 Wireless Hotspot Gateway User Manual
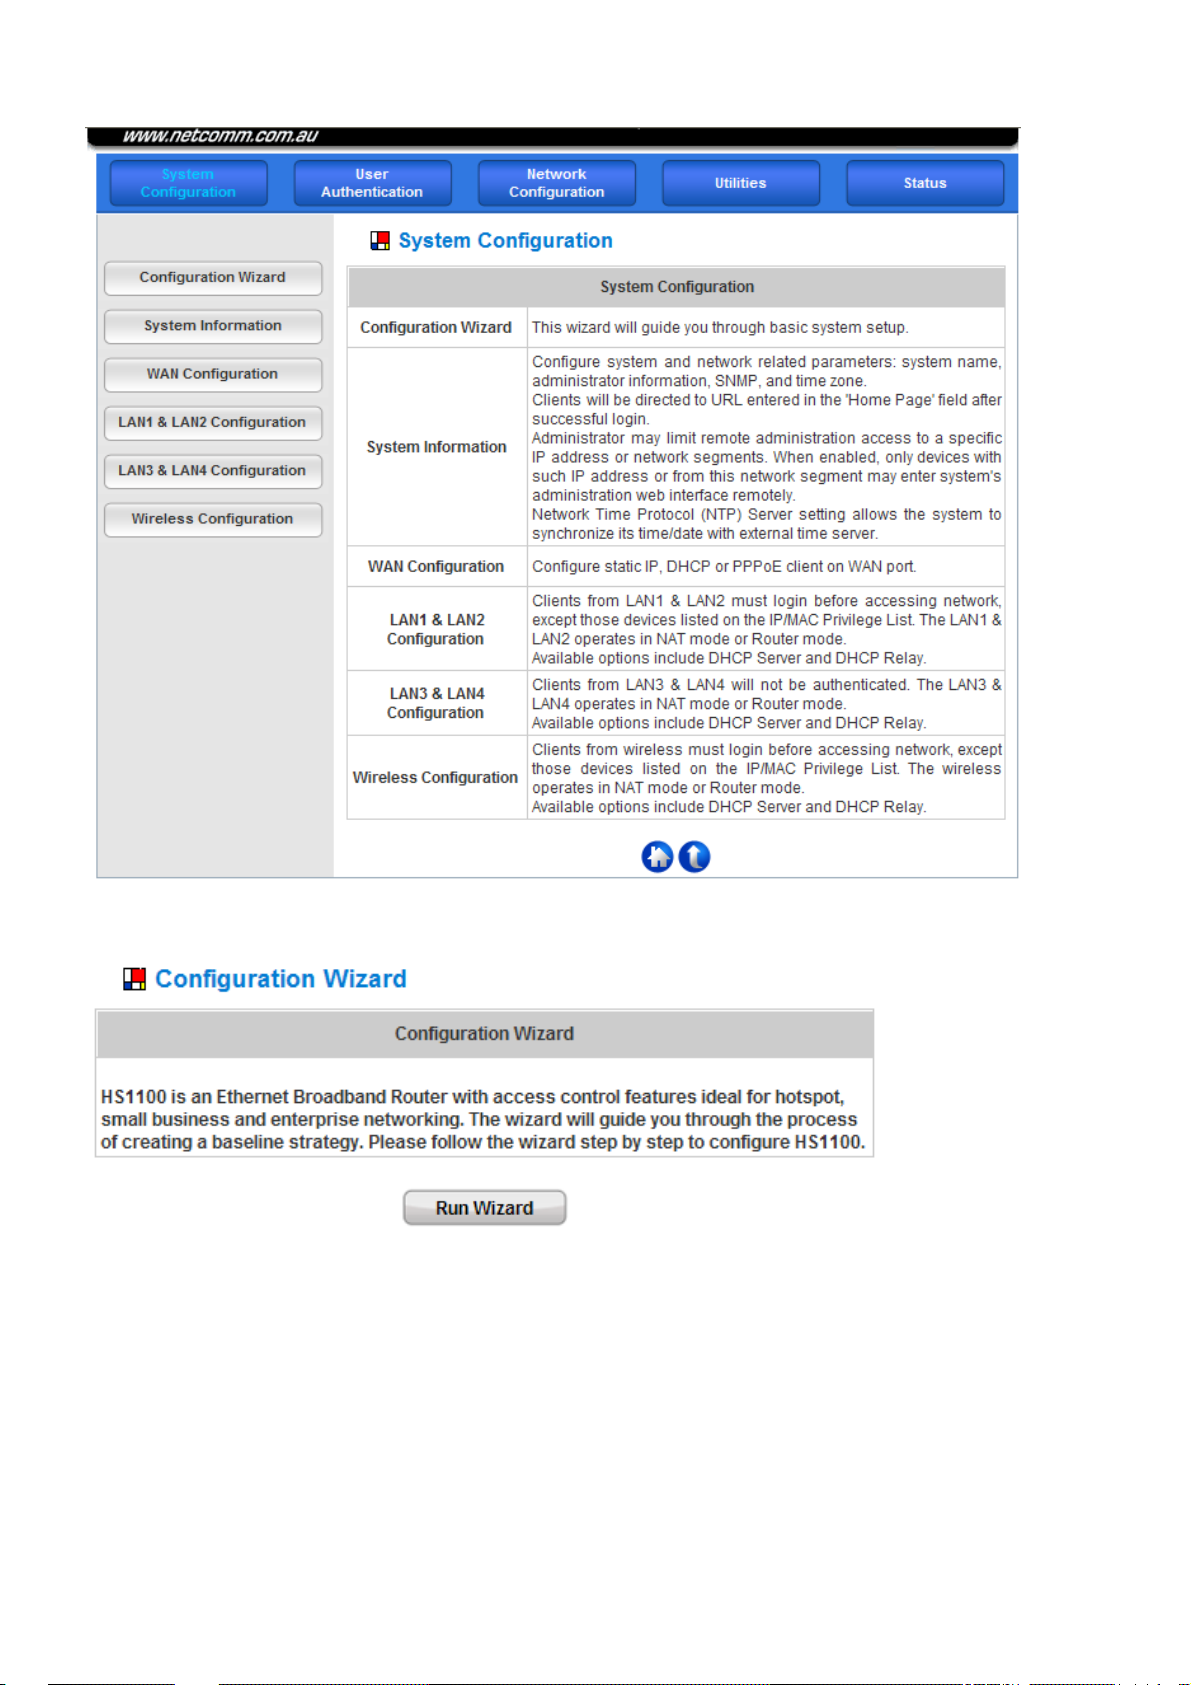
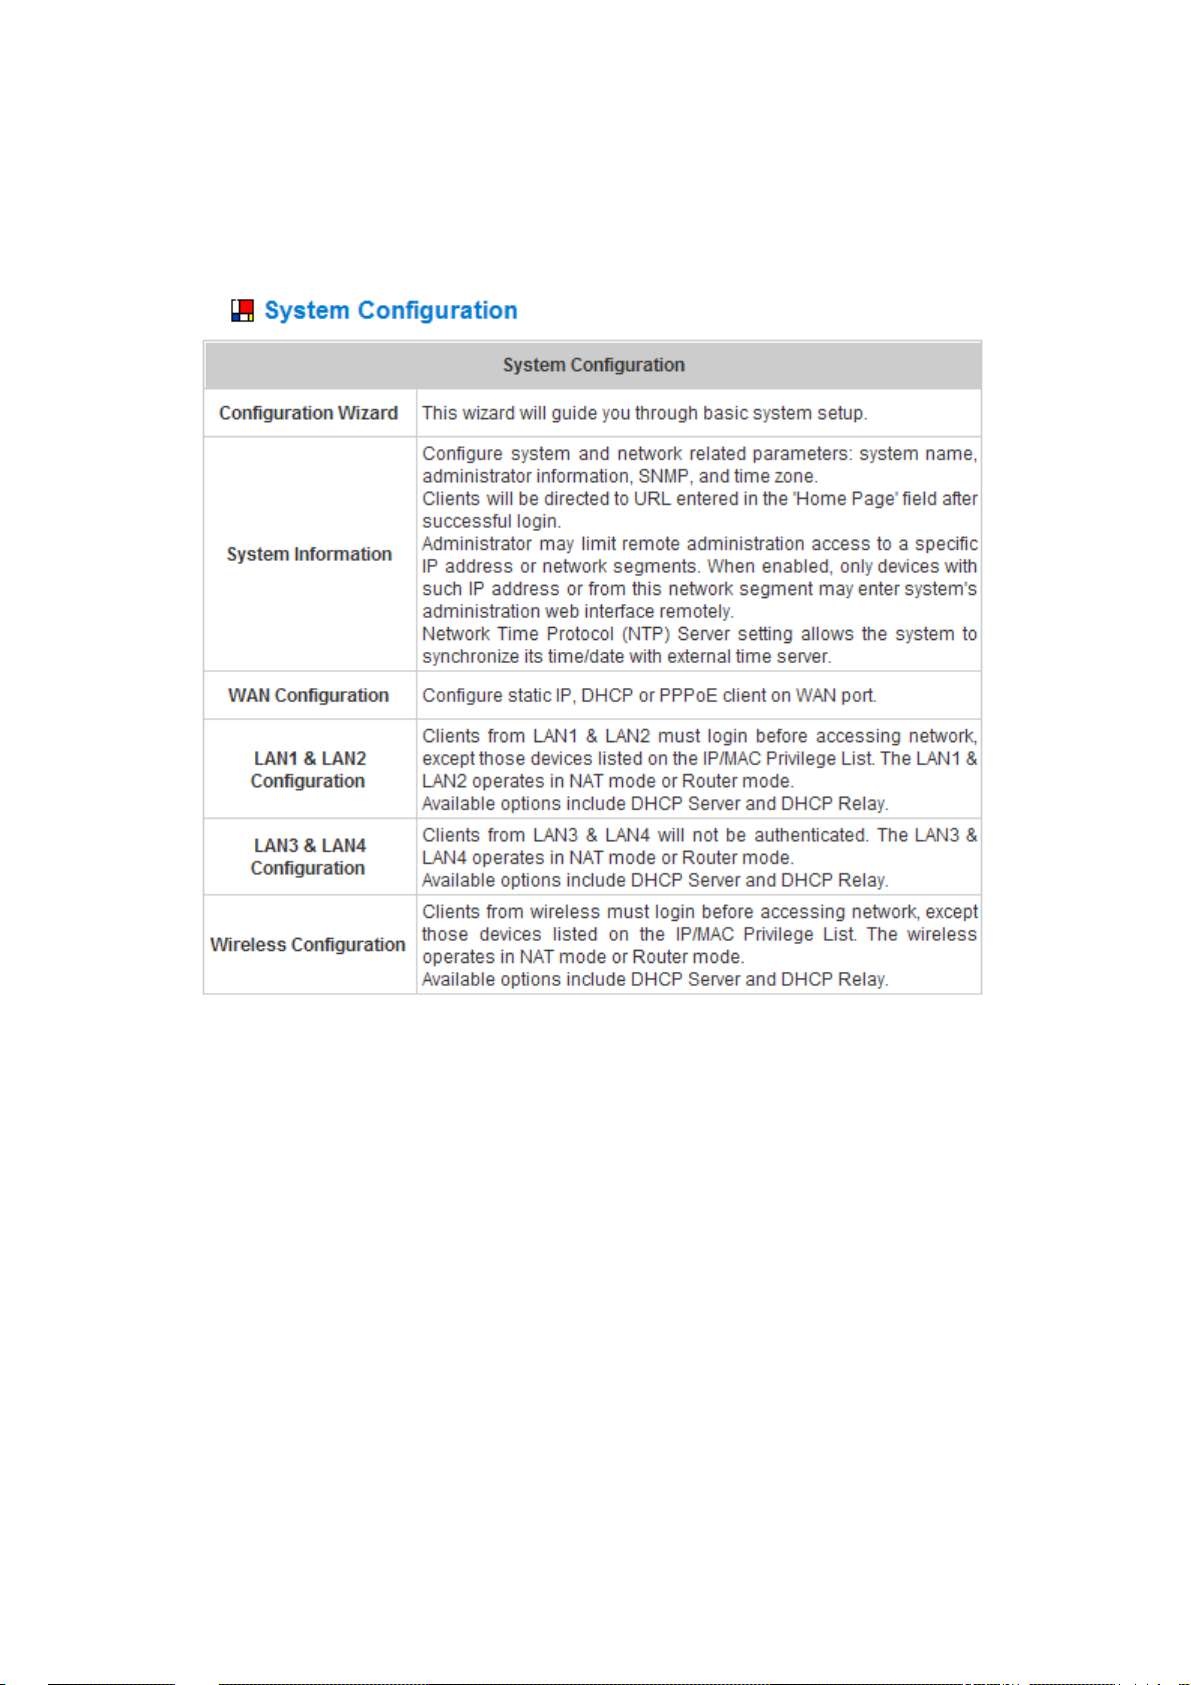
System Configuration
This section includes the following functions: Configuration Wizard, System Information, WAN Configuration,
LAN1 & LAN2 Configuration, LAN3 & LAN4 Configuration and Wireless Configuration.
19
Page 21
HS1100 Wireless Hotspot Gateway User Manual
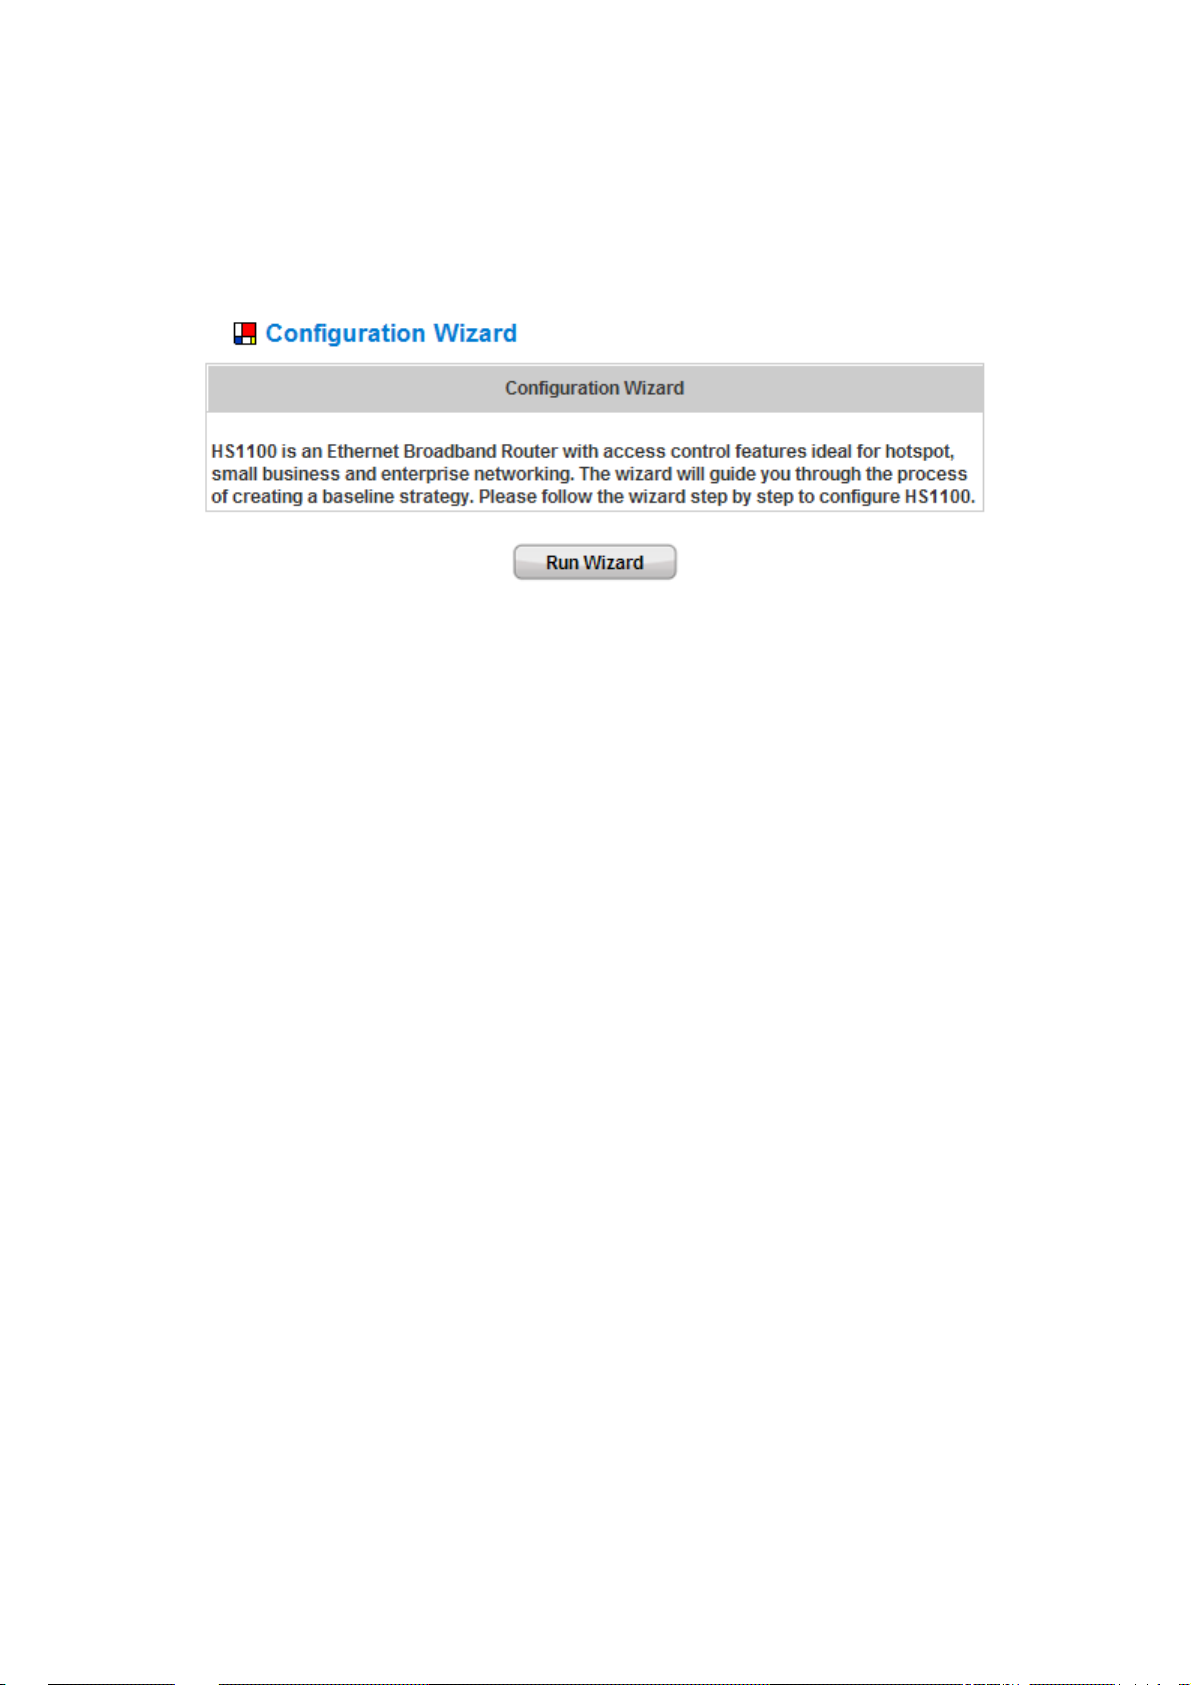
Configuration Wizard
There are two ways to configure the HS1100 system: using the online Configuration Wizard or changing the
settings by commands manually. The Configuration Wizard comprises of seven basic steps, providing a simple
and easy way to go through the basic setups of HS1100 and is served as Quick Configuration.
20
Page 22
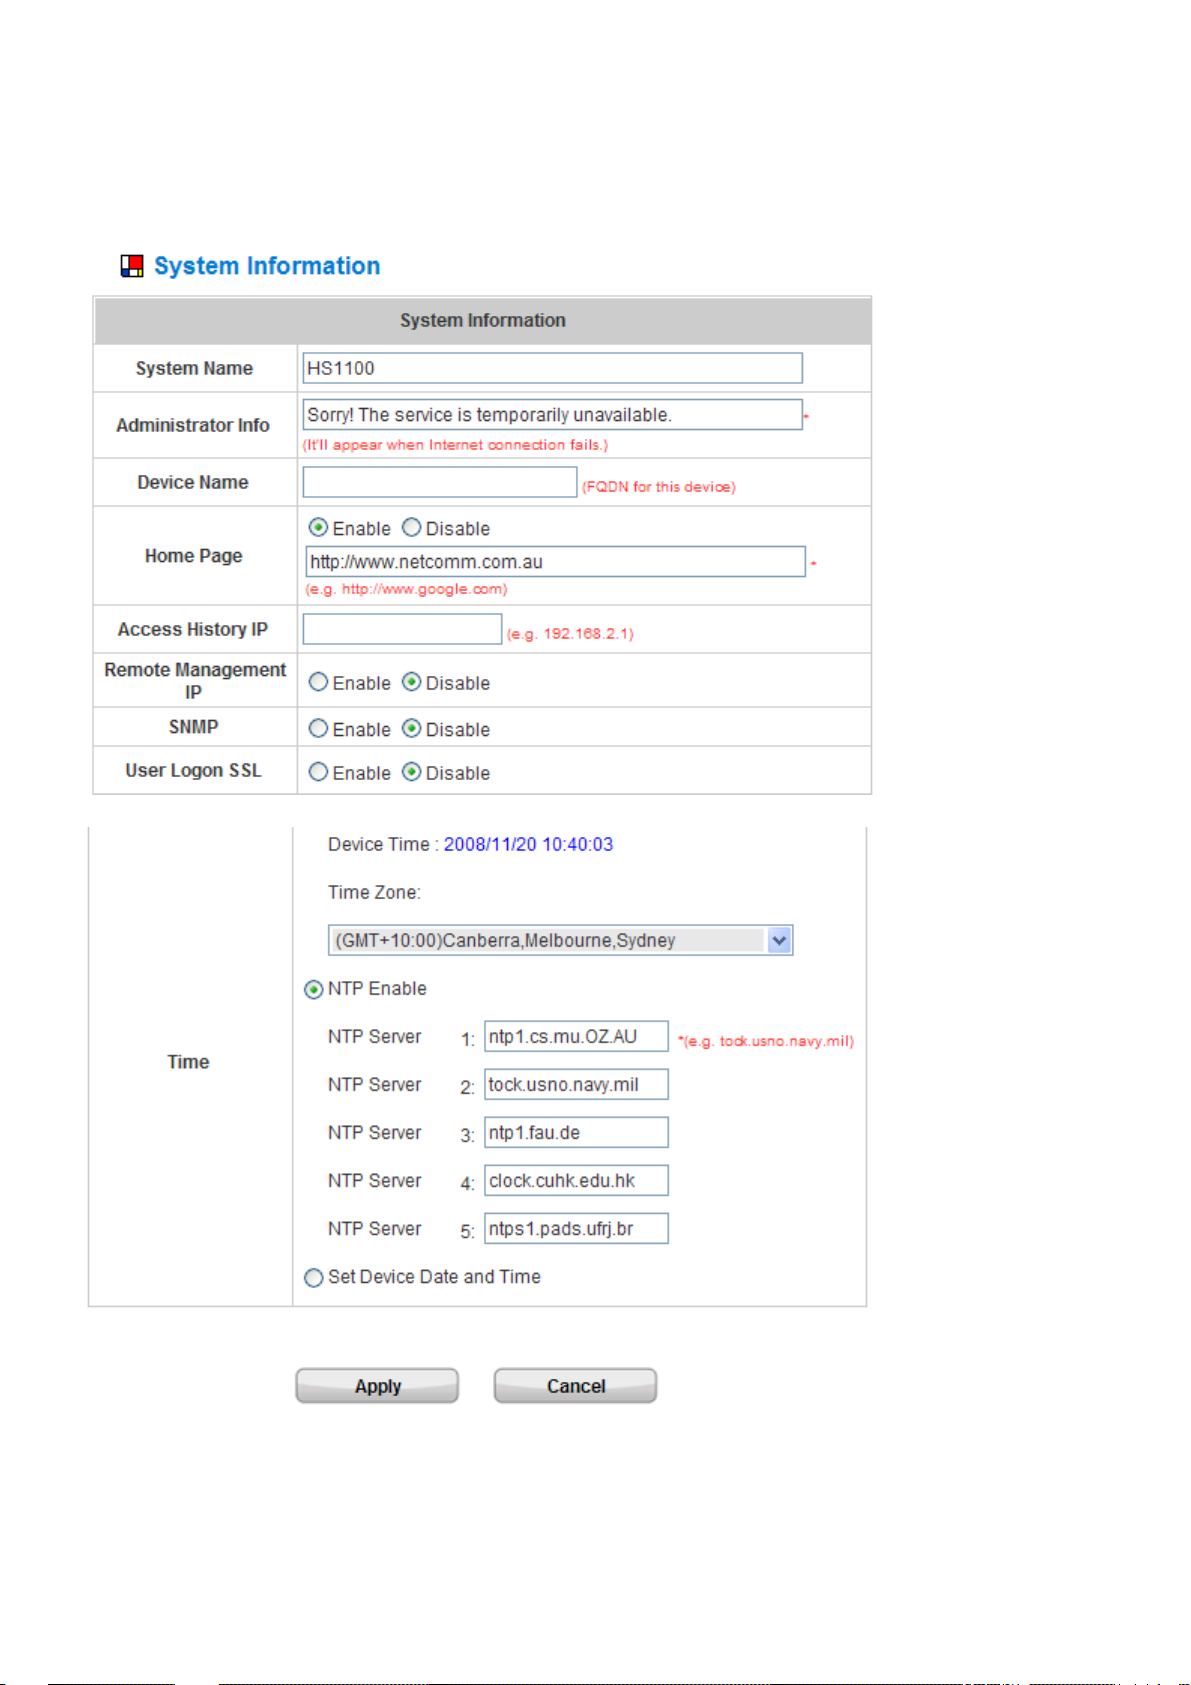
System Information
Main information about HS1100 is shown as follows:
HS1100 Wireless Hotspot Gateway User Manual
y System Name: Set the system’s name or use the default.
y Administrator Info: Enter the administrator’s information here, such as the administrator’s name, telephone
21
Page 23
HS1100 Wireless Hotspot Gateway User Manual
number, e-mail address, etc. If a user encounters problems while connecting to HS1100’s WAN and can’t get
online, this information will appear on the user’s login screen.
y Home Page: Enter the URL of a Web server as the homepage. Once logged in successfully, the users will be
directed to this homepage, such as http://www.netcomm.com.au, regardless of the original homepage set in
their computers.
¾ Homepage Redirect is the system’s spe cial feature that would redirect client to your configured
homepage right after the successful login. Your homepage appears after a successful login no matter
what their browser’s homepages are.
y Access History IP: Specify an IP address of the administrator’s computer or a billing system to get billing
history information of HS1100. An example is provided as follows (“10.2.3.213” is the WAN IP of HS1100).
Traffi c Histo ry:
On-demand History:
https://10.2.3.213/status/history/2005-02-17
https://10.2.3.213/status/ondemand_history/2005-02-17
22
Page 24

HS1100 Wireless Hotspot Gateway User Manual
23
Page 25
HS1100 Wireless Hotspot Gateway User Manual
y Remote Manage IP: Set the IP range where the web management interface of HS1100 can be connected via
the authenticated port (WAN or Public LAN). For example, 10.2.3.0/24 means that as long as you are within the
IP range of 10.2.3.0/24, you can reach the management interface.
y SNMP: HS1100 supports SNMPv2. If this function is enabled, the administrator can assign the Manager IP
address and the SNMP community name used to access the Management Information Base (MIB) of the
system.
y User logon SSL: Enable to activate https (encryption) or disable to activate http (non encryption) login page.
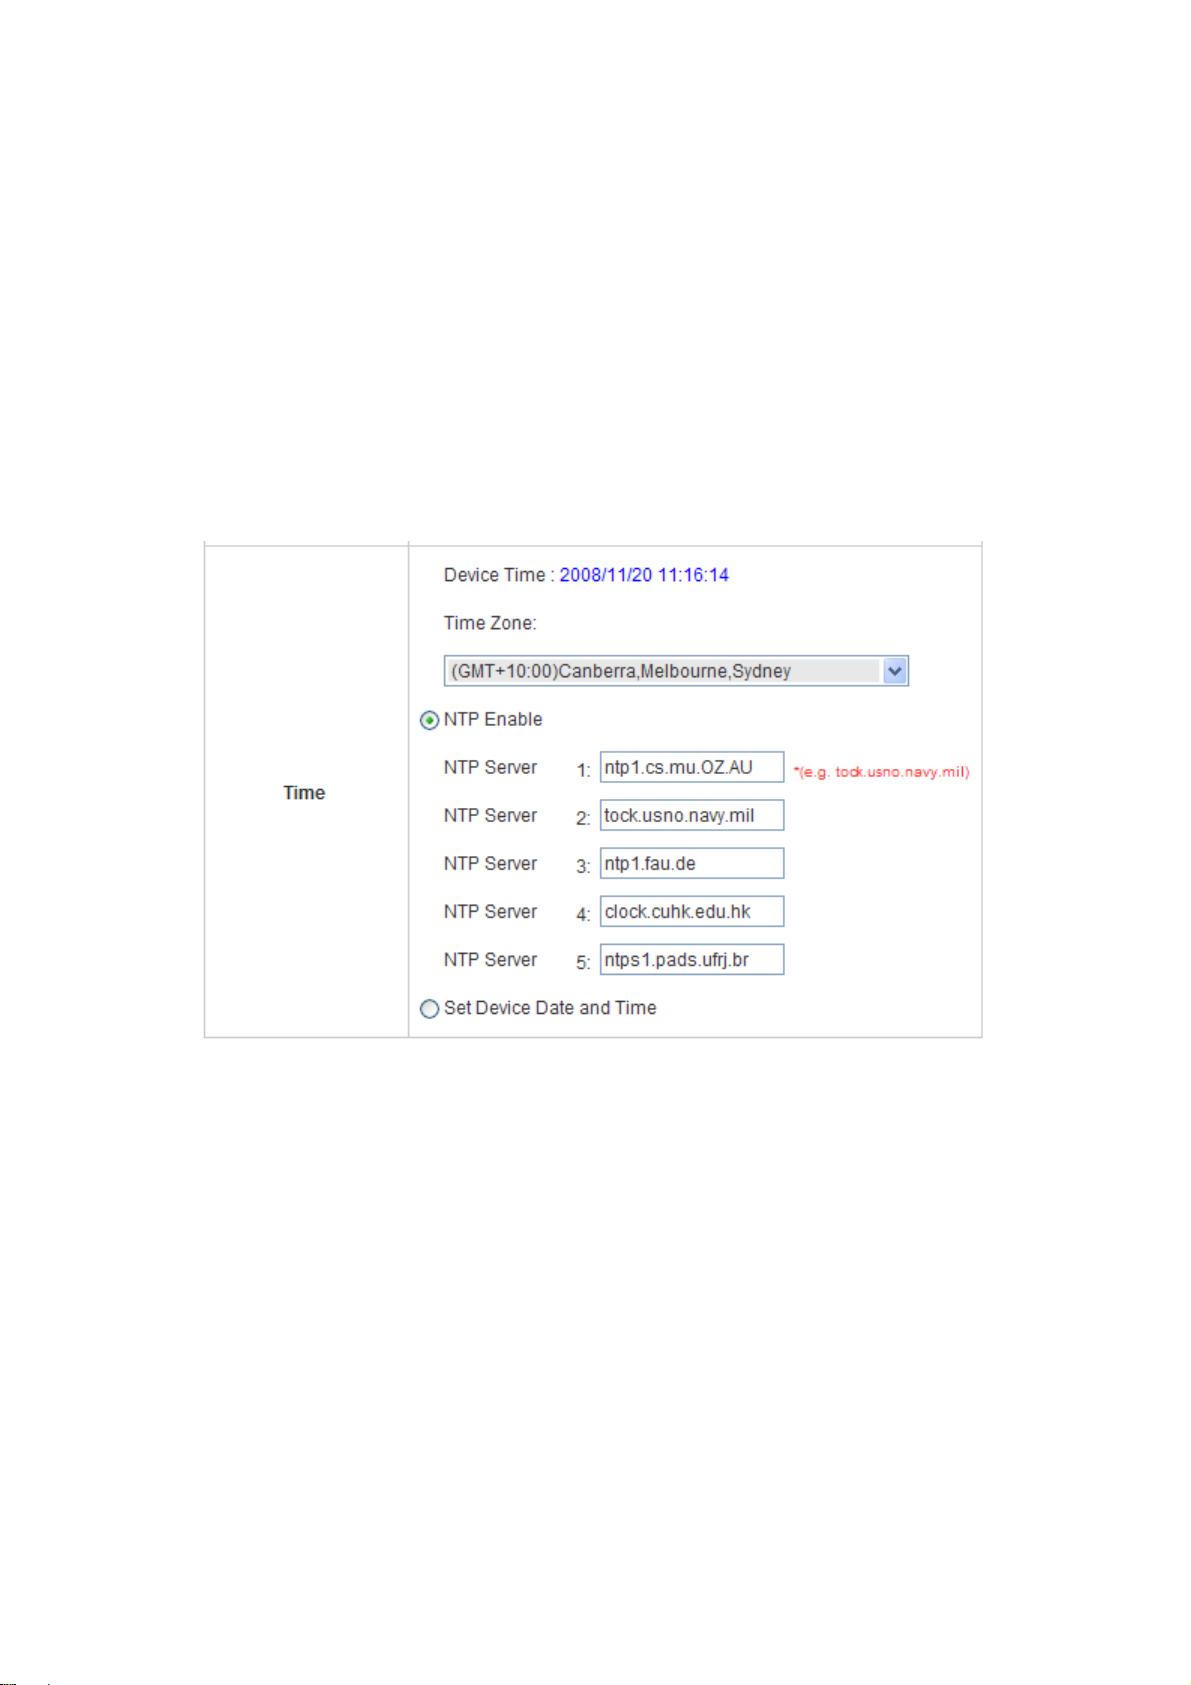
y Time: HS1100 supports NTP (Network Time Protocol) communication protocol to synchronize the network time.
Please specify the IP address of a NTP server to adjust the time automatically (Universal Time is Greenwich
Mean Time, GMT). The time can also be set manually by selecting “Set Device Date and Time” and then
entering the date and time in these fields.
24
Page 26

HS1100 Wireless Hotspot Gateway User Manual
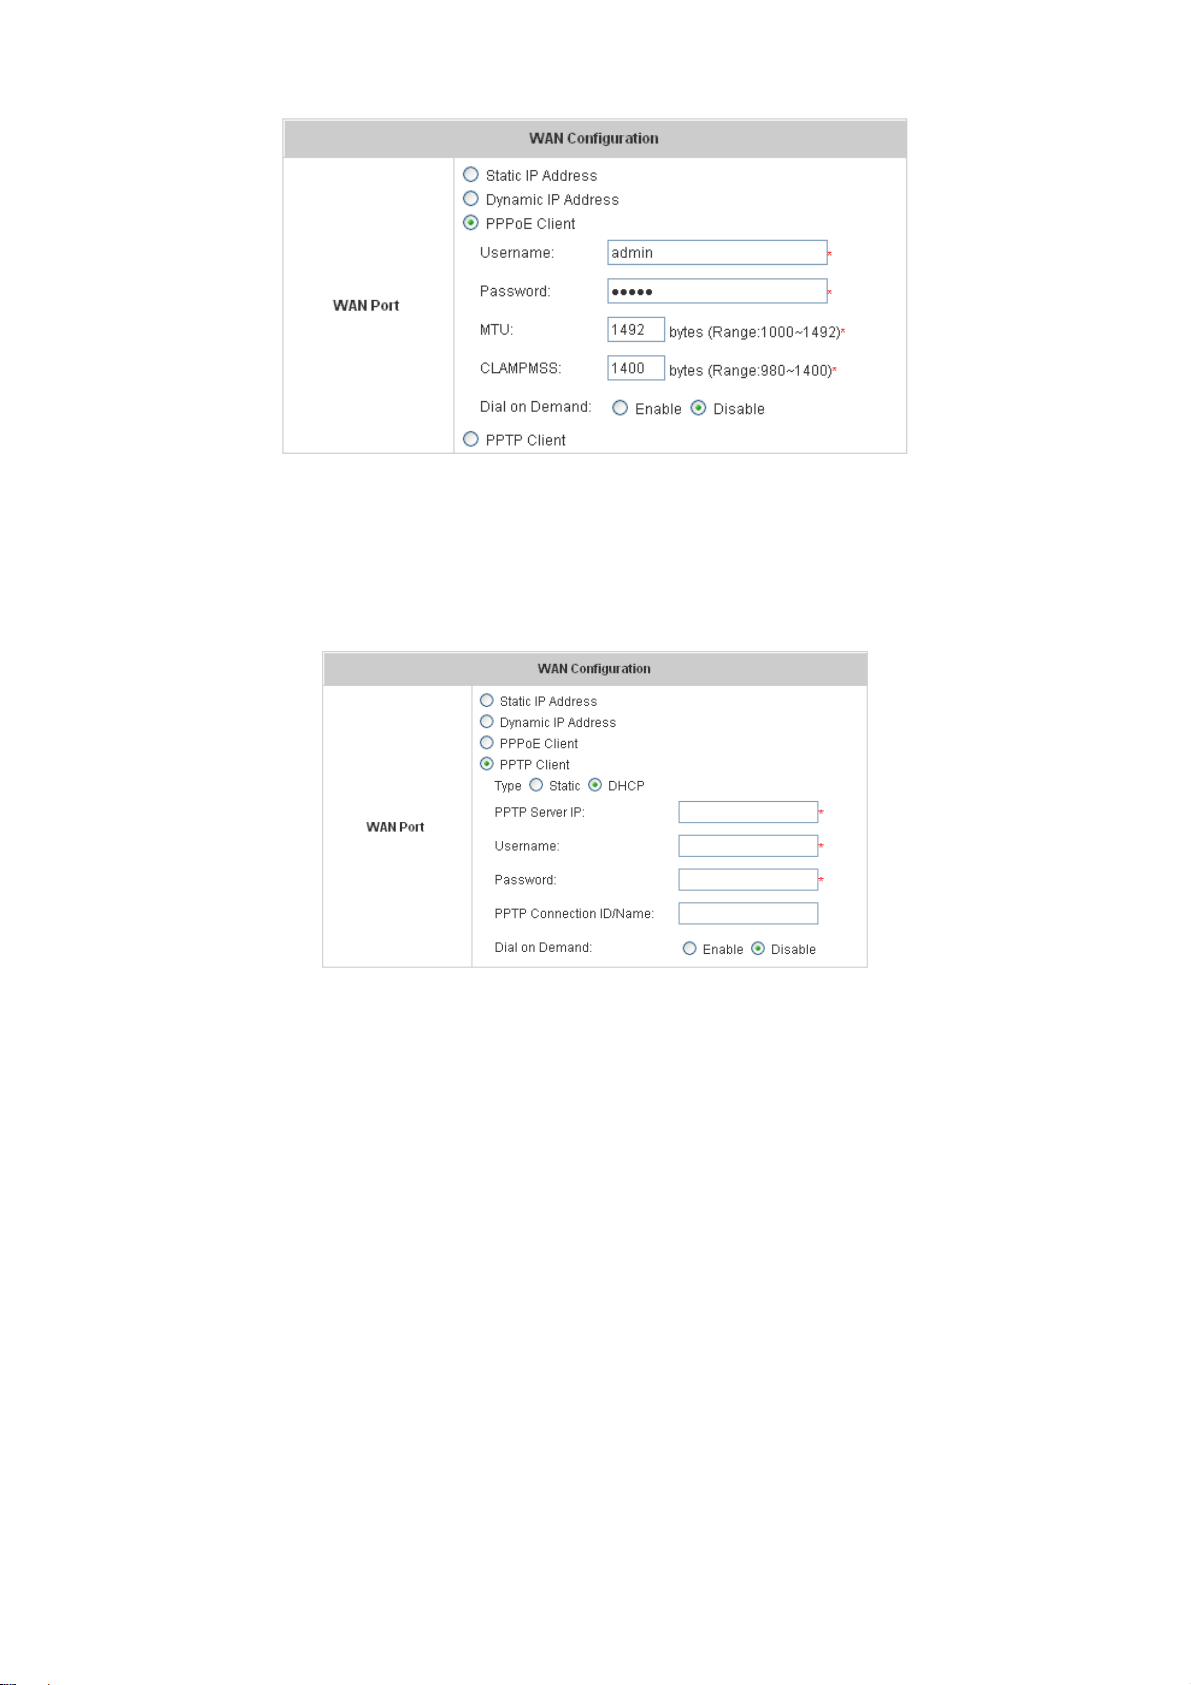
WAN Configuration
There are 4 methods of obtaining IP address for the WAN Port: Static IP Address, Dynamic IP Address, PPPoE
and PPTP Client.
y Static IP Address: Manually specifying the IP address of the WAN Port is applicable for the network
environment where the DHCP server is unavailable. The fields with red asterisks are required to be filled in.
IP Address: The IP address of the WAN port.
Subnet Mask: The subnet mask of the WAN port.
Default Gateway: The gateway of the WAN port.
Preferred DNS Server: The primary DNS Server of the WAN port.
Alternate DNS Server: The substitute DNS Server of the WAN port. This is not required.
y Dynamic IP Address: It is only applicable for the network environment where the DHCP server is available on
the network. Click the Renew button to get an IP address automatically.
y PPPoE Client: When selecting PPPoE to connect to the network, please set the “User Name”, “Password”,
“MTU” and “CLAMPMSS”. There is a Dial on demand function under PPPoE. If this function is enabled, a
Maximum Idle Time can be set. When the idle time is reached, the system will automatically disconnect itself.
25
Page 27
HS1100 Wireless Hotspot Gateway User Manual
y PPTP Client: Select STATIC to specify the IP address of the PPTP Client manual ly or select D HCP to get the IP
address automatically. The fields with red asterisks are required to be filled in. There is a Dial on demand
function under PPPoE. If this function is enabled, a Maximum Idle Time can be set. When the idle time is
reached, the system will automatically disconnect itself.
26
Page 28
HS1100 Wireless Hotspot Gateway User Manual
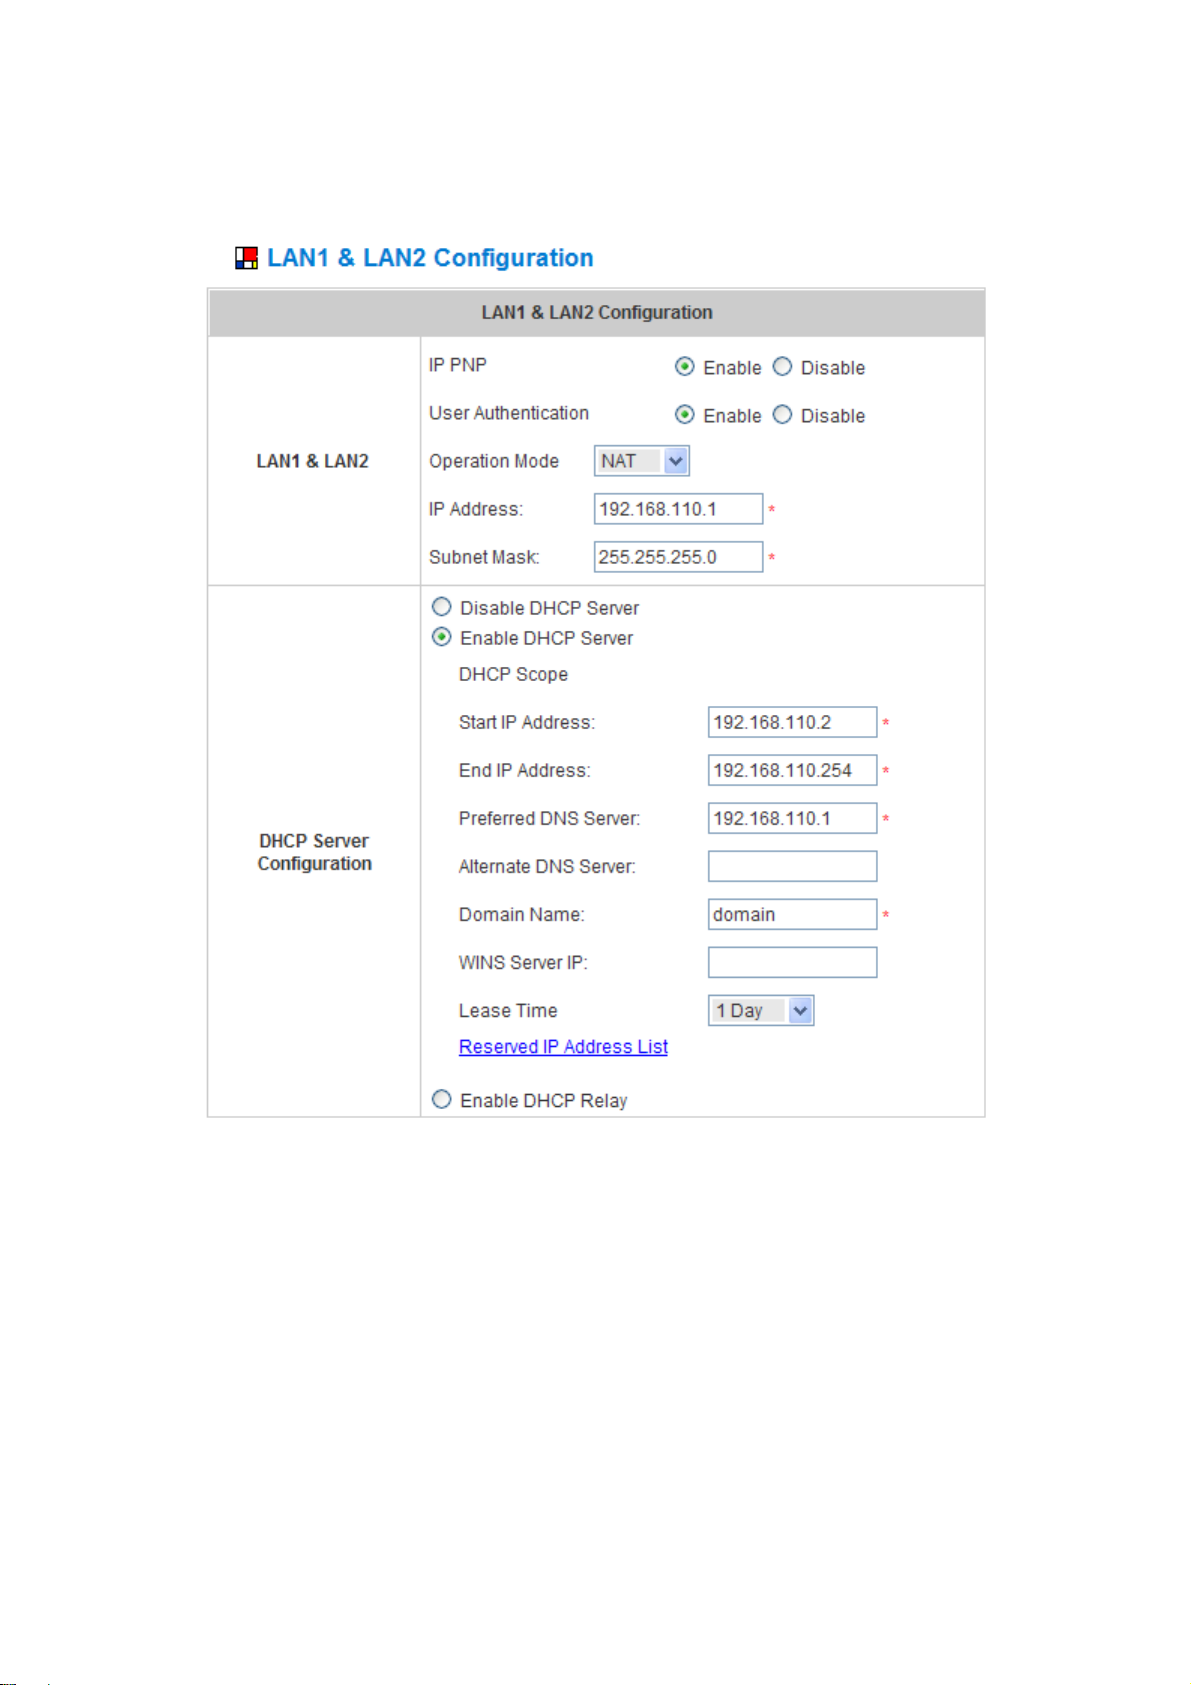
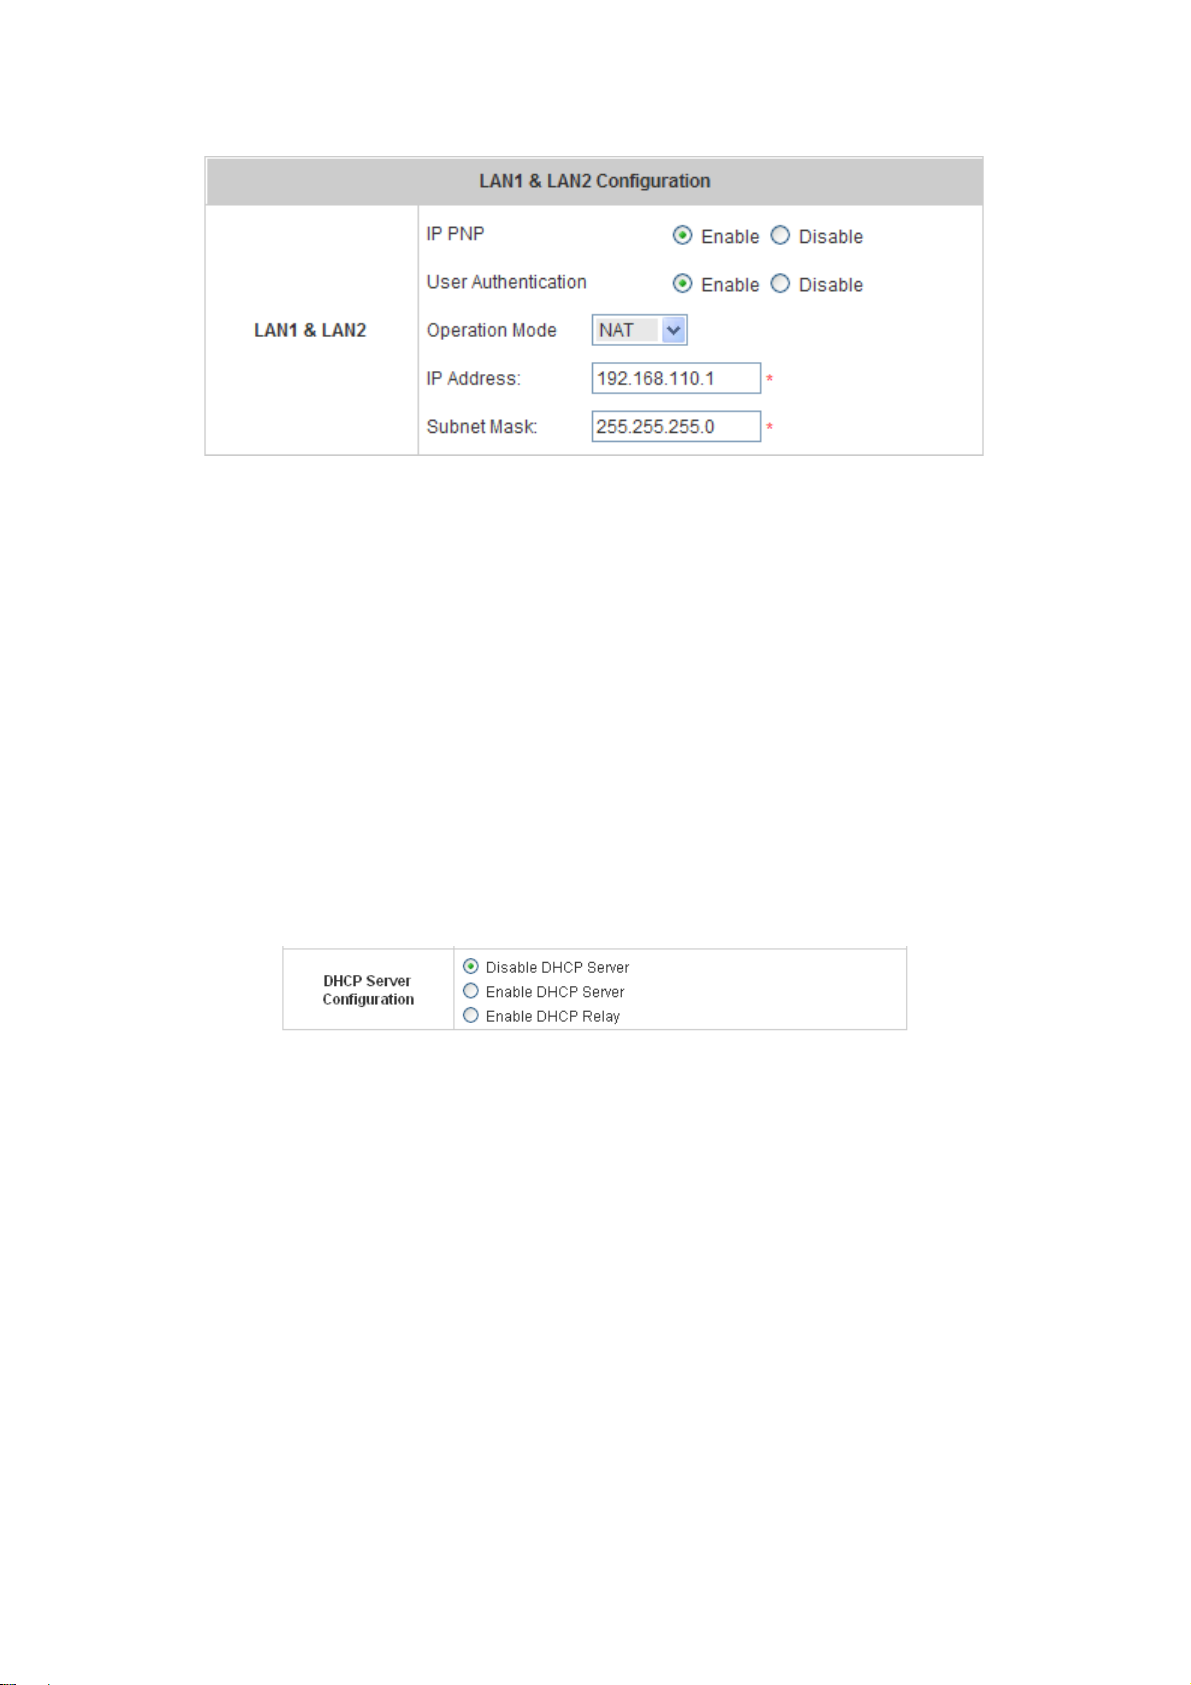
LAN1 & LAN2 Configuration
In this section, set the configuration for LAN1/LAN2 port and DHCP server. User authentication for LAN1/LAN2 port
can be enabled or disabled.
27
Page 29
HS1100 Wireless Hotspot Gateway User Manual
y LAN1 & LAN2 Port
IP PNP: Choose to enable or disable this function. If “IP PnP” is enabled, no matter what the IP address of the
client device is – static or dynamic IP, users can access the network without changing the client IP address after
being authenticated by HS1100.
User Authentication: Choose to enable or disable this function. If “User Authentication” is disabled, users
can access the Internet without being authenticated.
Operation Mode: Choose one of the two modes, NAT mode and Router mode, by the requirements.
IP Address: Enter the desired IP address for the LAN1 & LAN2 p ort.
Subnet Mask: Enter the desired subnet mask for the LAN1 & LAN2 port.
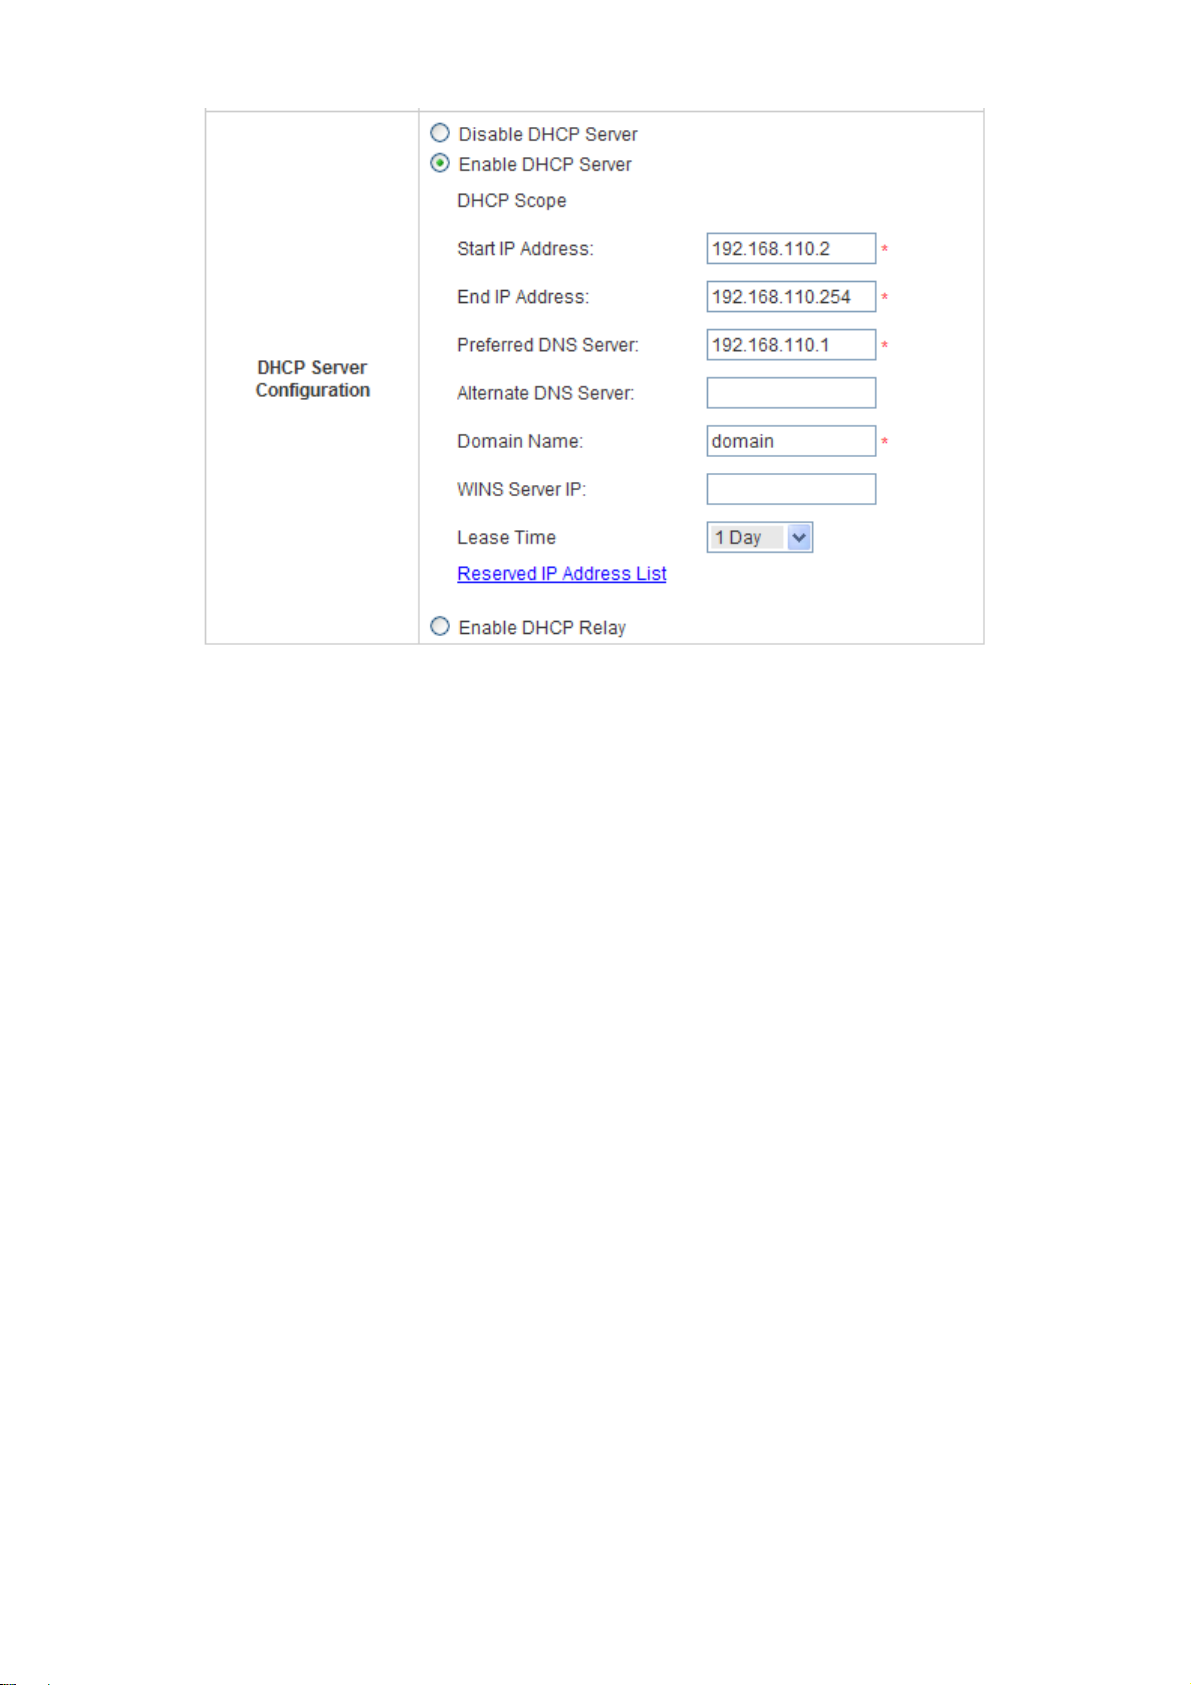
y DHCP Server Configuration
There are three methods to set the DHCP Server: Disable DHCP Server, Enable DHCP Server and Enable
DHCP Relay.
1. Disable DHCP Server: Disable DHCP Server function.
2. Enable DHCP Server: Choose “Enable DHCP Sever” function and set the appropriate configuration for
the DHCP server. The fields with red asterisks are required to be filled in.
28
Page 30
HS1100 Wireless Hotspot Gateway User Manual
29
Page 31

HS1100 Wireless Hotspot Gateway User Manual
DHCP Scope: Enter the “Start IP Address” and the “End IP Address” of this DHCP block. These fields
define the IP address range that will be assigned to the Public LAN clients.
Preferred DNS Server: The primary DNS server for the DHCP.
Alternate DNS Server: The substitute DNS server for the DHCP.
Domain Name: Enter the domain name.
WINS IP Address : Enter the IP address of WINS.
Lease Time: Choose the time interval to update DHCP IP addresses autom atically.
Reserved IP Address List: To reserve an IP address for a specific client device via MAC, click the hyperlink
of Reserved IP Address. Then, the setup screen of the Reserved IP Address List as sho wn in the following
figure will appear. Enter the related “Reserv ed IP Address”, “MAC”, and Description (not mandatory).
Click Apply to save the settings.
3. Enable DHCP Relay: If enabling this function is desired, the other DHCP Server IP addre ss must be
specified. See the following figure.
30
Page 32

HS1100 Wireless Hotspot Gateway User Manual
LAN3 & LAN4 Configuration
In this section, set the configuration for LAN3/LAN4 port and DHCP server.
y LAN3 & LAN4 Port
Operation Mode: Choose one of the two modes, NAT mode and Router mode, by the requirements.
IP Address: Enter the desired IP address for the LAN3 & LAN4 p ort.
Subnet Mask: Enter the desired subnet mask for the LAN3 & LAN4 port.
31
Page 33

HS1100 Wireless Hotspot Gateway User Manual
y DHCP Server Configuration
There are three methods to set the DHCP server: Disable DHCP Server, Enable DHCP Server and Enable
DHCP Relay.
1. Disable DHCP Server: Disable DHCP Server function.
2. Enable DHCP Server: Choose “Enable DHCP Sever” function and set the appropriate configuration for
the DHCP server. The fields with red asterisks are required to be filled in.
DHCP Scope: Enter the “Start IP Address” and the “End IP Address” of this DHCP block. These fields
define the IP address range that will be assigned to the Private LAN clients.
Preferred DNS Server: The primary DNS server for the DHCP.
Alternate DNS Server: The substitute DNS server for the DHCP.
Domain Name: Enter the domain name.
WINS IP Address : Enter the IP address of WINS.
Lease Time: Choose the time interval to update DHCP IP addresses autom atically.
Reserved IP Address List: To reserve an IP address for a specific client device via MAC, click the hyperlink
of Reserved IP Address. Then, the setup screen of the Reserved IP Address List as shown in the following
figure will appear. Enter the related “Reserv ed IP Address”, “MAC”, and Description (not mandatory).
Click Apply to save the settings.
32
Page 34

HS1100 Wireless Hotspot Gateway User Manual
3. Enable DHCP Relay: If enabling this function is desired, the other DHCP Server IP address must be
specified. See the following figure.
33
Page 35

Wireless Configuration
In this section, set the configuration for the wireless port.
HS1100 Wireless Hotspot Gateway User Manual
y Wireless Configuration
Band: There are 4 modes to select from, 802.11b (2.4G, 1~11Mbps) and 802.11 (b+g) (2.4G, 1~11Mbps and
2.4G, 54Mbps).
34
Page 36

HS1100 Wireless Hotspot Gateway User Manual
Channel: Select the appropriate channel from the list to correspond to the network settings; for example,
Channel 1~11 is available in the North America area. All access points on the same wireless network must use
the same channel to ensure correct connection.
Max Transmit Rate: T he default value is Auto. The range is from 1 to 54Mbps. The rate of data transmission
should be set depending on the speed of this particular wireless n etwork.
ESSID: The SSID is a unique name shared among all devices in a wireless network. The SSID must be the
same for all devices in the wireless network. The SSID must not exceed 32 characters and may be any
character on the keyboard. The administrator can give a new name in this field or use the default name.
¾ Security: Configure wireless encryption methods. For security settings in detail, please click the
hyperlink of Security to go into the Security page. Choose Security
WEP Type
to configure the settings.
802.1X Type
35
Page 37

HS1100 Wireless Hotspot Gateway User Manual
WPA-PSK Type
WPA-RADIUS Type
1. Security Type: There are disabled and 4 other security types to ch oose from, WEP (Wired
Equivalent Privacy), 802.1X, WPA-PSK and WPA-RADIUS.
2. Detail Settings
o 802.11 Authen tication: Choose either Open System or encryption with static Shared Key.
o WEP Key Length/Format/Index: This is a data privacy mechanism based on a 64 bit or 128 bits
shared key algorithm. There are types of encryption, HEX or ASCII.
o Re-keying Period: The default is 300 seconds.
o Cipher Suite: Choose among WPA, WPA2 or Mixed.
o Pass-phrase: Type the pass phrase for administrators.
o Group Key Update Period: The default is 600 seconds. Time for updated period.
¾ Advanced: Configure wireless transmission data packet format (for advanced users only, default
recommended). Please click the hyperlink Advanced
to go into the Advanced configuration page.
36
Page 38

HS1100 Wireless Hotspot Gateway User Manual
o Super G: Choose Enable or Disable this function.
o Short Preamble: Choose Enable or Disable this function.
o Transmit Power: The default value is Auto. Select a range of transmission speeds or use the
default setting, Auto, to allow the access point to automatically use the fastest possible data rate.
o Beacon Interval: The default value is 100 milliseconds. The specified value represents the
amount of time between access point beacon signal transmissions.
o RTS Threshold: Ready To Send threshold. The range is from 256 to 2346 and the default is OFF.
The administrator can set the value which is the amount of time between p acket transmi ssions. It is
recommended that the value remains in the range of 256 to 2346.
o Fragment Threshold: The range is from 256 to 2346 and the default is OFF. The value specifies
the maximum size of a packet allowed before data is fragm ented int o multiple packets. It should be
remained in the range of 256 to 2346. A smaller value results in smaller packets but allows a larger
number of packets in transmission.
o Broadcast SSID: Enable or disable SSID broadcast. When disabled, clients cannot detect Access
Point by its SSID broadcast, they must manually connect to Access Point by entering SSID on their
devices.
o Station Isolation: When enabled, wireless clie nt stations are isolated from each other. In other
words, one PC on the wireless network is not able to see other PCs on the same wireless network.
o WMM: WMM (Wi-Fi Multimedia) provides basic Quality of service (QoS) features to Wi-Fi networks.
When enabled, it prioritizes traffic according to four Access Categories (AC) - voice, video, best
effort, and background. However, it does not provide guaranteed throughput.
o IAPP: IAPP (Inter-Access Point Protocol) is to support smooth users’ hand-over (roaming) from
one access point to another. When enabled, it provides a better capability for wireless client
stations to roam among APs with the same SSID.
37
Page 39

¾ WDS Settings:
HS1100 Wireless Hotspot Gateway User Manual
Choose WDS Setting
network. When this function is enabled, please enter the MAC address of the repeater in the blank and
choose Security Type.
to configure the settings. This function can extend the range of accessing the
y Wireless Configuration
IP PNP: Choose to enable or disable this function. If “IP PnP” is enabled, no matter what the IP address of the
client device is – static or dynamic IP, users can access the network without changing the client IP address after
being authenticated by HS1100.
User Authentication: If “User Authentication” is disabled, “Specific Route Profile” needs to be specified for
users to access the Internet.
Operation Mode: Select one from the two modes, NAT mode and Router mode, by the requirements.
IP Address: Enter desired IP address for the wireless port.
Subnet Mask: Enter desired subnet mask for the wireless port.
38
Page 40

HS1100 Wireless Hotspot Gateway User Manual
y DHCP Server configuration
There are three methods to set the DHCP server: Disable DHCP Server, Enable DHCP Server and Enable
DHCP Relay.
1. Disable DHCP Server: Disable the DHCP Server function.
2. Enable DHCP Server: Choose “Enable DHCP Sever” function and set the appropriate configuration for
the DHCP server. The fields with red asterisks are required to be filled in.
DHCP Scope: Enter “Start IP Address” and “End IP Address” of this DHCP bl ock. These fields define
the IP address range that will be assigned to the Wireless LAN clients.
Preferred DNS Server: The primary DNS server for the DHCP.
Alternate DNS Server: The substitute DNS server for the DHCP.
Domain Name: Enter the domain name.
WINS IP Address : Enter the IP address of WINS.
Lease Time: Choose the time interval to update DHCP IP addresses autom atically.
Reserved IP Address List: To reserve an IP address for a specific client device via MAC, click the hyperlink
of Reserved IP Address. Then, the setup screen of the Reserved IP Address List as shown in the following
figure will appear. Enter the related “Reserv ed IP Address”, “MAC”, and Description (not mandatory).
Click Apply to save the settings.
39
Page 41

HS1100 Wireless Hotspot Gateway User Manual
3. Enable DHCP Relay: If enabling this function is desired, the other DHCP Server IP address must be
specified. See the following figure.
40
Page 42

HS1100 Wireless Hotspot Gateway User Manual
User Authentication
This section includes the following functions: Authentication Configuration, Black List Configuration, Policy
Configuration, Guest User Configuration and Additional Configuration.
41
Page 43

HS1100 Wireless Hotspot Gateway User Manual
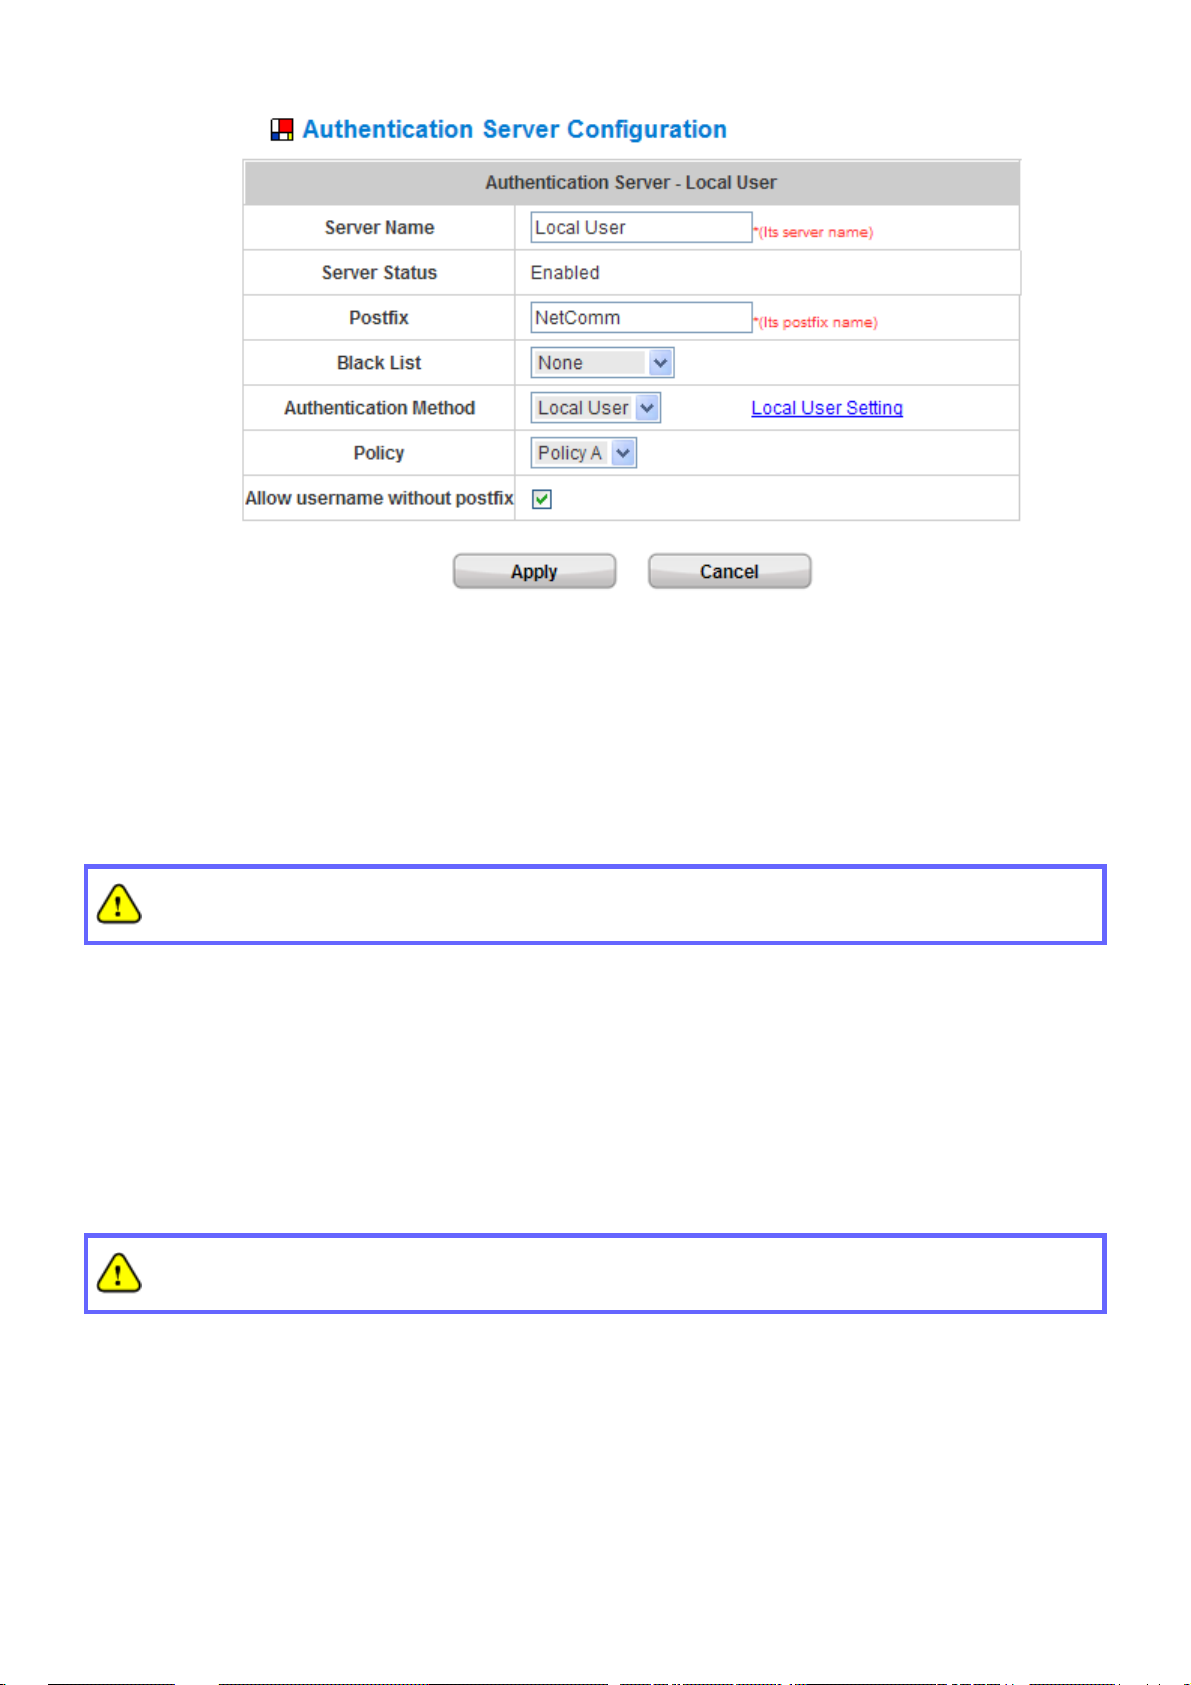
Authentication Configuration
In this section, set the configuration for authentication servers, and on-demand user authentication. The
On-demand User authentication is designed to create on-demand user accou nts to provide temporary users with
free or paid wireless Internet access.
y Authentication Server Configuration
HS1100 provides three authentication servers and one on-demand server that the administrator can apply with
different policy. Click on the server name to set the configuration for that particular server. After completing and
clicking Apply to save the settings, go back to the previous page to select a server to be the default server and
enable or disable any server on the list. Users can log into the default server without the postfix to allow faster
login process.
Server 1~3: There are 5 authentication methods, Local User, POP3, RADIUS, LDAP and NTDomain, to
select from.
42
Page 44
HS1100 Wireless Hotspot Gateway User Manual
Server Name: Set a name for the server using numbers (0 to 9), alphabets (a to z or A to Z), dash (-),
underline (_) and dot (.) with a maximum of 40 characters, all other letters are not allowed.
Sever Status: The status shows that the server is enabled or disabled.
Postfix: Set a postfix that is easy to distinguish (e.g. Local) for the server using numbers (0 to 9), alphabets
(a to z or A to Z), dash (-), underline (_) and dot (.) with a maximum of 40 characters, all other letters are not
allowed.
The Policy Name cannot contain these words: MAC and IP.
Black List: There are 5 sets of the black lists. Select from one of them or choose “None”. Please refer to
4.2.2 Black List Configuration
Authentication Methods: There are 5 authentication methods, Local, POP3, RADIUS, LDAP and NT
Domain to select from for further configuration. Select the desired method and click the link besides the
pull-down menu for the advanced configuration. For more details, please refe r to 4.2.1.1~6 Authentica tion
Method.
Enabling two or more servers of the same authentication method is NOT allowed.
Policy: Select one from the 3 policies and apply it to this server.
43
Page 45

HS1100 Wireless Hotspot Gateway User Manual
Authentication Method – Local User Setting
Choose “Local User” from the Authentication Method field, the hyperlink besides the pull-down menu will
become “Local User Setting”.
A. Local User Setting
Click the hyperlink of Local User Setting for further configuration.
Ø
44
Page 46
HS1100 Wireless Hotspot Gateway User Manual
45
Page 47

HS1100 Wireless Hotspot Gateway User Manual
y Edit Local User List: Click this to enter the “Local User List” screen.
Add User: Click the hyperlink of Add User to enter the Add User interface. Fill in the necessary information
such as “Username”, “Password”, “MAC” (optional) and “Remark” (optional). Then, select a desired Policy
and click Apply to complete adding the user(s).
Add the user(s) and enter the necessary information.
46
Page 48

HS1100 Wireless Hotspot Gateway User Manual
After adding the user(s) and all necessary information, click Apply.
Upload User: Click this to enter the Upload User interface. Click the Browse button to select t he text file for the
user account upload. Then click Submit to complete the upload process.
The uploading file should be a text file and the format of each line is "ID, Password, MAC, Policy, Remark"
without the quotes. There must be no spaces between the fields and commas. The MAC field could be omitted
but the trailing comma must be retained. When adding user accou nts by uploa ding a file, the existing acco unts in
the embedded database will not be replaced by new ones.
47
Page 49

HS1100 Wireless Hotspot Gateway User Manual
48
Page 50

HS1100 Wireless Hotspot Gateway User Manual
Download User: Click this to enter the Users List page and the system will show a list of all created user
accounts. Click Download to create a .txt file and then save it on disk.
Refresh: Click Refresh to renew the user list.
49
Page 51

HS1100 Wireless Hotspot Gateway User Manual
50
Page 52

HS1100 Wireless Hotspot Gateway User Manual
Search: Enter a keyword of a username to be searched in the text field and click the Search button to perform
the search. All usernames matching the keyword will be listed.
Del All: This will delete all the users at once.
Delete: This will delete the user(s) one by one.
Edit User: If editing the content of any individual user account is desired, click the username of that desired user
account to enter its Edit User Interface, and then modify or add any desired information such as “Username”,
“Password”, “MAC” (optional) and “Remark” (optional). Then, click Apply to complete the modification.
B. Radius Client Setting
Click the hyperlink of Radius Client Setting for further configuration.
51
Page 53

HS1100 Wireless Hotspot Gateway User Manual
Ø
802.1X Authentication: Enable this function and the hyperlink of Radius Client List will appear. Click the
hyperlink of Radius Client List to get into the RADIUS Client Configuration list for further configuration. In the
Radius Client Configuration table, depending on the T ype to be selecte d (either Roaming O ut or 802.1x), the
client’s IP address will be either an other NAC’s IP address (Roaming Out) or wireless AP/802.1x switch’s IP
addess (802.1x). The system will handle the authentication request from these client s accordingly.
Authentication Method – POP3
Choose “POP3” from the Authentication Method field, the hyperlink beside the pull-down menu will become
“POP3 Setting”.
Click the hyperlink of POP3 Setting for further configuration. Enter the information for the primary server and/or the
secondary server (the secondary server is not required). The fields with red asterisk are ne cessary information.
52
Page 54

HS1100 Wireless Hotspot Gateway User Manual
These settings will become effective immediately after clicking the Apply button.
y Server IP: Enter the IP address/domain name given by your ISP.
y Port: Enter the Port. The default value is 100.
y Enable SSL Connection: If this option is enabled, the POP3 protocol will perform the authentication.
53
Page 55

HS1100 Wireless Hotspot Gateway User Manual
Authentication Method – RADIUS
Choose “RADIUS” from the Authentication Method field, the hyperlink beside the pull-down menu will become
“Radius Setting”.
Click the hyperlink of Radius Setting for further configuration. The RADIUS server sets the external authentication
for user accounts. Enter the information for the primary server and/or the secondary server (the secondary server is
not required). The fields with red asterisk are necessary information. These settings will become effective
immediately after clicking the Apply button.
54
Page 56

HS1100 Wireless Hotspot Gateway User Manual
y 802.1X Authentication: Enable this function and the hyperlink of Radius Client List will appear. Click the
hyperlink of Radius Client List to get into the RADIUS Client Configuration list for further configuration. In the
Radius Client Configuration table, depending on the Type to be selected (either Roaming Out or 802.1x), the
client’s IP address will be either an other NAC’s IP address (Roaming Out) or wireless AP/802.1x switch’s IP
addess (802.1x). The system will handle the authentication request from these client s accordingly.
y Trans Full Name: When enabled, the ID and postfix will be transferred to the RADIUS server for authenti cation.
When disabled, only the ID will be transferred to the RADIUS server for authentication.
y NASID: Enter the NASID of HS1100 for the external RADIUS authentication server.
y Server IP: Enter the IP address/domain name of the RADIUS server.
y Authentication Port: Enter the authentication port for the RADIUS server and the default value is 1812.
y Accounting Port: Enter the accounting port for the RADIUS server and the default value is 1813.
y Secret Key: Enter the key for encryption and decryption.
y Accounting Service: Select this to enable or disable the “Accounting Service” for accounting capabilities.
y Authentication Protocol: There are two methods, CHAP and PAP for selection.
55
Page 57

HS1100 Wireless Hotspot Gateway User Manual
Authentication Method – LDAP
Choose “LDAP” from the Authentication Method field, the hyperlink besid e the pull-down menu will become
“LDAP Setting”.
Click the hyperlink of LDAP Setting for further configuration. Enter the information for the primary server and/or the
secondary server (the secondary server is not required). The blanks with red asterisk are ne cessary information
which should be filled in. These settings will become effective immediately after clicking the Apply button.
y Server IP: Enter the IP address or domain name of the LDAP server .
y Port: Enter the Port for the LDAP server, and the default value is 389.
y Base DN: Enter the distinguished name for the LDAP server.
y Account Attribute: Enter the account attribute of the LDAP server.
56
Page 58

HS1100 Wireless Hotspot Gateway User Manual
Authentication Method – NTDomain
Choose “NTDomain” from the Authentication Method field, the hyperlink beside the pull-down menu will become
“NT Domain Setting”.
Click the hyperlink of NT Domain Setting for further configuration. Enter the server IP address and enable/disable
the transparent login function. These settings will become effective immediately af ter clicking the Apply button.
y Server IP address: Enter the server IP address of the domain controller.
y Transparent Login: If the function is enabled, users will log into HS1100 automatically when they log into the
Windows domain.
57
Page 59

HS1100 Wireless Hotspot Gateway User Manual
Authentication Method – On-demand User
On-demand User Server Configuration: The administrator can enable and conf igure this aut hentication method to
create on-demand user accounts. This function is designed for hotspot owners to provide temporary users with free
or paid wireless Internet access in the hotspot environment. Major functions include accounts creation, users
monitoring list, billing plan, billing report statistics, and external payment gateway support.
y Server Status: The status shows that the server is enabled or disabled.
y Postfix: Set a postfix that is easy to distinguish (e.g. Local) for the server using numbers (0 to 9), alph abets (a to
z or A to Z), dash (-), underline (_) and dot (.) with a maximum of 40 characters, all other letters are not allowed.
y Receipt Header 1~3: Enter the receipt header message or use the default. When the administrator creates an
On-demand User account, he/she can print out a receipt containing this On-demand User’s information such as
Username and Password.
y Receipt Footer 1~3: Enter the receipt footer message or use the default.
y Serial Port Baud Rate: Select the desired transmission baud rate. The default value is 9600.
y Monetary Unit: Select the desired monetary unit.
y WLAN ESSID: Enter the ESSID of the access point. The administrator can supply a new name or use the
58
Page 60

HS1100 Wireless Hotspot Gateway User Manual
default
y Wireless Key: Enter the Wireless key of the access point such as WEP or WPA.
y Remark: Enter any additional information that will appear at the bottom of the receipt.
y Billing Notice Interval: While the on-demand user is still logged in, the system will update the billing notice of
the login successful page by the time interval defined here.
y Twin Ticket: Enable this function to print duplicate receipts.
y Terminal Server
Terminal Configuration is a list of serial devices that communicate with the system only; never get online and no
need to go through authentication.
For customers making purchase at the front desk in a hotel, a receptionist uses an account generator
(192.168.111.2) to create a guest account and print out receipts with account information. A client in the other
floor can print the same receipt without going to the front desk on the lobby by using the second floor account
generator (192.168.111.3). Both account generators work for the system on LAN side.
¾ Server IP: IP address of serial or converter devices.
¾ Server Port: Port number of serial or converter devices.
¾ Location: It will be displayed in on-demand users’ log.
¾ Remark: it will be shown only here.
59
Page 61

HS1100 Wireless Hotspot Gateway User Manual
y Users List: Click to enter the On-demand Users List page. In the On-demand Users List, detailed information
will be documented here. By default, the on-demand user database is empty.
¾ Search: Enter a keyword of a username which needs to be searched in the text field and click the
Search button to perform the search. All usernames matching the keyword will be listed.
¾ Username: The login name of the on-demand user.
¾ Password: The login password of the on-demand user.
¾ Remaining Time/Volume: The total time/volume that the user can use currently.
¾ Status: The status of the account. “Normal” indicates that the account is not in-use and not overdue.
“Online” indicates that the account is in-use and not overdue. “Expire” indicates that the account is
overdue and cannot be used.
¾ Expiration Time: The expiration time of the account.
¾ Del All: Delete all the users at once.
¾ Delete: Delete the users one by one.
60
Page 62

HS1100 Wireless Hotspot Gateway User Manual
¾ Upload User: Click this to enter the Upload User interface. Click the Browse button to select the text
file for the user account upload. Then click Submit to complete the upload process.
The uploading file should be a text file and the format of each line is "
Type, Status, Available Data Transfer or Session Length, Activation Deadline (Date ), Ex pired
Date, Validity Duration, Plan, Price, Total Data Transfer or Session Length when bought,
Generated Date, First Login Date, Last Logout Date, Logout Cause” without the quotes. The
separator between two columns in a line is a comma. When uploading a file, any format erro r or
duplicated username will terminate the uploading process and no account will be uploaded. Please
correct the format in the uploading file or delete the duplicated user account in the database, and then,
try again. The unit of data transfer is byte. The unit of session length is second. ID (Username) and
Password must be given in upper case.
>> Example 1: For Session Length type
Type must be written as “TIME,” and Status must be set as “0”. Set Session Length in seconds.
Activation Deadline must be in the format of “yyyy/mm/dd hh:mm:ss”. Set Validity Duration as “1”,
and give a Plan that’s already been generated and enabled from Billing Configuration pag e. Provide
a price in any monetary unit defined in On-demand User Server Configuration page. Finally, set
Session Length when bought the same as Session Length. Leave other fields blank.
ID (USERNAME), PASSWORD,
>> Example 2: For Total Data Transfer type
Type must be written as “DATA,” and Status must be set as “0”. Set Total Data Transfer in bytes.
Activation Deadline must be in the format of “yyyy/mm/dd hh:mm:ss”. Set Validity Duration as “1”,
and give a Plan that’s already been generated and enabled from Billing Configuration pag e. Provide
a price in any monetary unit defined in On-demand User Server Configuration page. Finally, set
Total Data Transfer when bought the same as Session Length. Leave othe r fields blank.
61
Page 63

HS1100 Wireless Hotspot Gateway User Manual
¾ Download User: Click this to create a .txt file and then save it on disk.
y Billing Configuration: The administrator can configure up to 10 billing plans.
¾ Status: Select to enable or disable this billing plan.
¾ Type: Set the billing plan by “Data” (the maximum volume allowed is 9,999,999 Mbyte) or “Time” (the
maximum days allowed is 999 days).
¾ Expiration time: This is the duration of time that the account must be activated after generating the
account. After this duration, the account will self-expire
¾ Valid Duration: This is the duration of time that the user can use the Internet after activating the
account. After this duration, the account will self-expire.
¾ Policy Name: Select policy to be applied upon login when user purchases this billing plan.
¾ Price: The price charged for this billing plan.
62
Page 64

HS1100 Wireless Hotspot Gateway User Manual
63
Page 65

HS1100 Wireless Hotspot Gateway User Manual
y Create On-demand User: The administrator can create on-demand user accounts.
Click the Create button for the desired plan, an On-demand User account will be created. Then, click
Printout to print a receipt containing this On-demand User’s information.
64
Page 66

HS1100 Wireless Hotspot Gateway User Manual
65
Page 67

HS1100 Wireless Hotspot Gateway User Manual
y Billing Report: The administrator can get a complete report or a report for a particular period.
¾ Report All: Click to get a complete report including all the on-demand records. This re port shows the
total income as well as the individual accounting record of each plan for all plans available.
¾ Search: Select a time period to get a period report. This report shows the total income as well as the
individual accounting record of each plan for all plans available for that period of time.
66
Page 68

HS1100 Wireless Hotspot Gateway User Manual
y Payment: This section is for hotspot owners to set up an external payment gateway to accept payment s when
providing wireless access service to end customers who wish to pay for the service on-line.
Three payment selections include Authorize.Net, PayPal, Secure Pay and Disable. The default is Disable.
67
Page 69

HS1100 Wireless Hotspot Gateway User Manual
Authorize.Net
Before setting up “Authorize.Net”, it is required that hotspot owners have a valid Authorize.Net account.
Please see Appendix B. Accepting Payments via Authorize.Net for more information about opening an
Authorize.Net account and its related maintenance functions.
¾ External Payment Gateway / Authorize.Net Payment Page Configuration
Merchant ID: The “Login ID” that comes with the Authorize.Net account
Merchant Transaction Key: The merchant transaction key is similar to a password and is used by
Authorize.Net to authenticate transactions.
Payment Gateway URL: The default website address to post all transaction data.
Verify SSL Certificate: This is to help protect the system from accessing a website other than
Authorize.Net.
y Trusted CA Management: Select the version of Trusted Certificate for the system.
Test Mode: In this mode, hotspot owners can post test transactions for f ree to check if the payment
function works properly.
MD5 Hash: If transaction responses need to be encrypted by the Payment Gateway, enter and
confirm a MD5 Hash value and select a reactive mode. The MD5 Hash security feature enables
merchants to verify that the results of a transaction or transaction response received by their server
were actually sent from the Authorize.Net.
68
Page 70

HS1100 Wireless Hotspot Gateway User Manual
¾ Service Disclaimer Content / Credit Card Payment Page /Client’s Purchasing Record
Service Disclaimer Content: View the service agree ment and fees for the st andard p ayment gateway
services as well as add or edit the service disclaimer content here.
Credit Card Payment Page Billing Configuration: These 10 plans are the plans in Billing
Configuration, and the desired plan(s) can be enabled.
Client’s Purchasing Record:
Invoice Number: An invoice number may be provided as additional information against a transaction.
This is a reference field that may contain any kind of information.
Description: Enter the product/service description (e.g. wireless access service).
Email Header: Enter the information that will appear in the header of the invoice.
69
Page 71

HS1100 Wireless Hotspot Gateway User Manual
¾ Credit Card Payment Page Fields Configuration / Credit Card Page Remark Content
Item: Check the box for the items that will show on the customer’s online payment interface.
Displayed Text: Enter what needs to be shown in this field.
Required: Check the box for the items that will show as required fields.
Credit Card Number: Credit card number of the customer. The Payment Gateway will only accept
card numbers that correspond to the listed card types.
Credit Card Expiration Date: Expired date of the credit card. This should be entered in the format of
MMYY (month & year). For example, if it is expired on July 2005, it should be entered as 0705.
First Name: The first name of a customer associated with the billing or shippin g address of a
transaction. In the case when John Doe places an order, enter John in the First Name field indicating
this customer’s first name.
Last Name: The last name of a customer associated with the billing or shipping address of a
transaction. In the case when John Doe places an order, enter Doe in the Last Name field indicating
this customer’s last name.
70
Page 72

HS1100 Wireless Hotspot Gateway User Manual
Card T ype: This value indicates the level of match between the Card Code entered on a transaction
and the value that is on file with a customer’s credit card company. A code and narrative description are
provided indicating the results returned by the processor.
Card Code: The three- or four-digit code assigned to a customer’s credit card number (found either on
the front of the card at the end of the credit card number or on the back of the card).
E-mail: An email address may be provided along with the billing information of a transaction. This is the
customer’s email address and should contain an “@” symbol.
Customer ID: This is an internal identifier for a customer that may be associated with the billing
information of a transaction. This field may contain any kind of information.
Company: The name of the company associated with the billing or shipping information entered on a
given transaction.
Address: The address entered either in the billing or shipping information of a given transaction.
City: The city is associated with either the billing address or shipping address of a transaction.
State: A state is associated with both the billing and shipping address of a transaction. This may be
entered as either a two-character abbreviation or the full text name of the state.
Zip: The ZIP code represents the five or nine digit postal code associated with the billing or shipping
address of a transaction. This may be entered as five digits, nine digits, or five digits - four digits.
Country: The country is associated with both the bill ing and shipping address of a transaction. This
may be entered as either an abbreviation or full value.
Phone: A phone number is associated with both a billing and shipping address of a transaction. Phone
number information may be entered as all numbers or it may include parentheses ( ) or dashes (-) to
separate the area code and number.
Fax: A fax number may be associated with the billing information of a transaction. This number may be
entered as all numbers or contain parentheses ( ) and dashes (-) to separate the area code and
number.
Credit Card Payment Page Remark Content
Enter additional details for the transaction such as Tax, Freight and Duty Amounts, Tax Exempt status,
and a Purchase Order Number, if applicable.
71
Page 73

HS1100 Wireless Hotspot Gateway User Manual
PayPal
Before setting up “PayPal”, it is required that the hotspot owners have a valid PayPal “Business Account”.
Please see Appendix C. Accepting Payments via PayPal for more information about setting up a PayPal
Business Account, relevant maintenance functions, and an example for clients.
After opening a PayPal Business Account, the hotspot owners should find the “Identity Toke n” of this
PayPal account to continue “PayPal Payment Page Configuration”.
¾ External Payment Gateway / PayPal Payment Page Configuration
Business Account: The “Login ID” (an email address) that is associated with the PayPal Business
Account.
Payment Gateway URL: The default website address to post all transaction data.
Identity Token: This is the key used by PayPal to validate all the transactions.
Verify SSL Certificate: This is to help protect the system from accessing a website other than PayPal
Currency: The currency to be used for the payment tran sactions.
72
Page 74

HS1100 Wireless Hotspot Gateway User Manual
¾ Service Disclaimer Content / Billing Configuration for Payment Page
Service Disclaimer Content: View the service agreement and fees for the stan dard payment gateway
services as well as add or edit the service disclaimer content here.
Billing Configuration for Payment Page: These 10 plans are the plans in Billing Configuration, and
the desired plan(s) can be enabled.
73
Page 75

HS1100 Wireless Hotspot Gateway User Manual
¾ Client’s Purchasing Record / PayPal Payment Page Remar k Content
Client’s Purchasing Record:
Invoice Number: An invoice number may be provided as additional information against a transaction.
This is a reference field that may contain any kind of information.
Description: Enter the product/service description (e.g. wireless access service).
Title for Message to Seller: Enter the information that will appear in the header of the PayPal p ayment
page.
PayPal Payment Page Remark Content: The message content will be displayed as a special notice
to end customers in the page of “Rate Plan”. For example, it can describe the cautions for making a
payment via PayPal.
74
Page 76

HS1100 Wireless Hotspot Gateway User Manual
SecurePay
Before setting up “SecurePay”, it is required that the hotspot owners have a valid SecurePay “Merchant
Account” from its official website. Please see Appendix D. Accepting Payments via SecurePay for more
information about setting up a SecurePay Account, relevant maintenance functions, and an example for
clients.
75
Page 77

HS1100 Wireless Hotspot Gateway User Manual
76
Page 78

HS1100 Wireless Hotspot Gateway User Manual
¾ Payment Page Configuration
Merchant ID: The ID that is associated with the Business Account.
Password: This is the key used by Secure Pay to validate all the transactions.
Payment Gateway URL: The default website address to post all transaction data.
Verify SSL Certificate: This is to help protect the system from accessing a website other than Secure
Pay.
Currency: The currency to be used for the payment tran sactions.
¾ Service Disclaimer Content
View the service agreement and fees for the standard payment gateway services as well as add or edit
the service disclaimer content here.
¾ SecurePay Payment Page Billing Configuration
These 10 plans are the plans in Billing Configuration, and the desired plan(s) can be enabled.
¾ SecurePay Payment Page Remark Content
The message content will be displayed as a special notice to end customers.
77
Page 79

HS1100 Wireless Hotspot Gateway User Manual
Black List Configuration
The administrator can add, delete, or edit the black list for user access control. Each black list can incl ude 40 users
at most. If a user in the black list wants to log into the system, the user’s access will be denied. The administrator
can use the pull-down menu to select the desired black list.
y Select Black List: There are 5 lists to select from for the desired black list.
y Name: Set the black list name and it will show on the pull-down menu above.
y Add User to List: Click the hyperlink of “Add User to List” to add users to the selected black list.
78
Page 80

HS1100 Wireless Hotspot Gateway User Manual
After entering the usernames in the “Username” fields and other information in the “Remark” field (not
required).
Click Apply to add these users.
To remove a user from the black list, select the user’s “Delete” check box and then click the Delete button to
remove that user from the black list.
79
Page 81

HS1100 Wireless Hotspot Gateway User Manual
Policy Configuration
Every Policy has three profiles, Firewall Profile, Specific Route Profile, and Schedule Profile as well as one
Bandwidth setting for that policy.
y Firewall Profile
Click the hyperlink of Setting for Firewall Profile, the Firewall Profiles list will appear. Click the numbers of
Filter Rule Item to edit individual rules and click Apply to save the settings. The rule status will show o n the list.
Check Active to enable that rule.
80
Page 82

HS1100 Wireless Hotspot Gateway User Manual
Rule Item: The rule selected.
Rule Name: The rule name can be changed here.
Enable this Rule: After checking this function, the rule will be enabled.
Action: There are two options, Block and Pass. Block. “Block” is to prevent packets from passing. “Pass” is
to permit packets passing.
Protocol: There are three protocols to select from, TCP, UDP and ICMP. Or choose ALL to use all three
protocols.
Source MAC Address: Th e MAC address of the source IP address. This is for specific MAC address filter.
Source/Destination Interface: There are five interfaces to choose from, ALL, WAN, Wireless, Public LAN
(LAN1/LAN2 by default) and Private LAN (LAN3/LAN4 by default).
Source/Destination IP: Enter the source and destination IP addresses.
Source/Destination Subnet Mask: Enter the source and destination subnet masks.
Source/Destination Start/End Port: En ter the range of source and destination ports.
y Specific Route Profile
Click the hyperlink of Setting for Specific Route Profile, the Specific Route Profile list will appear.
Profile Name: The profile name can be changed here.
IP Address: The destination IP address of the host or the network.
Subnet Netmask: Select a destination subnet netmask of the host or the network.
IP Address: The IP address of the next router to the destination.
Default: Check this option to apply the default value.
81
Page 83

HS1100 Wireless Hotspot Gateway User Manual
y Schedule Profile
Click the hyperlink of Setting for Schedule Profile to enter the Schedule Profile list. Select “Enable” to show
the list. This function is used to restrict the time that the users can log in. Please enable/disable the desired time
slot(s) and click Apply to save the settings. These settings will become effective immediately after clicking the
Apply button.
y Total Bandwidth
Choose one bandwidth limit for that particular policy.
y Individual Maximum Bandwidth
Choose one maximum bandwidth for that particular policy.
y Individual Request Bandwidth
Choose one individual bandwidth limit for that policy, from none to 54Mbps.
y Maximum Concurrent Sessions
The concurrent sessions for each user, it can be restricted by administrator.
82
Page 84

HS1100 Wireless Hotspot Gateway User Manual
Guest User Configuration
This function can permit guests to log into the system. Select “Enable Guest User” and click Apply to save the
settings.
y Guest User List: HS1100 allows 10 guest users to log in. To activate a guest user, just enter the password in
the corresponding “Password” field for that guest account. Guest accounts with blank password will not be
activated.
y Policy: Select one policy to apply to.
y Session Length: This restricts the connection time of the guest users. The default session length is 6 hours and
the available session time ranges from 1 to 12 hours or unlimited.
y Idle Timer: If a guest user has been idled with no network activities at all, the system will automatically kick out
the user. The Idle timer can be set in the range of 1~1440 minutes, and the default idle timer is 10 minutes.
83
Page 85

Additional Configuration
HS1100 Wireless Hotspot Gateway User Manual
y User Control: Functions under this section applies for all general users.
¾ Idle Timer: If a user has been idled with no network activities at all, the system will automatically kick out
the user. The Idle timer can be set in the range of 1~1440 minutes, and the default idle timer is 10
minutes.
¾ Multiple Login: When enabled, a user can log in from different computers with the same account. (This
function doesn’t support On-demand users and RADIUS authentic ation method.)
y Roaming Out Timer
¾ Session Timeout: Maximum session timeout.
¾ Idle Timeout: Maximum idle timeout.
¾ Interim Update: Constant records update time interval.
y Internet Connection Detection: Enter a specific URL or IP address to which HS1100 will send packets for
detecting network connection status. If there is a problem in the connection in the WAN port of HS1100, and the
URL or IP address specified cannot be reached, there will be a message appearing on users’ login screen
84
Page 86

HS1100 Wireless Hotspot Gateway User Manual
showing the Administrator Info, which can be set in 4.1.2 System Information section.
85
Page 87

HS1100 Wireless Hotspot Gateway User Manual
y Upload File
¾ Certificate: The administrator can upload new private key and customer certification. Click the Browse
button to select the file for the certificate upload. Then click Apply to complete the upload process;
otherwise click Use Default Certificate to use the default one.
Click Use Default Certificate to use the default certificate and key.
1. Certification Pass Verification
It helps to verify validity of the entire
2. Alert Message
y Administrators’ alert message is shown when any invalid certificate in the chain f ound.
y Users’ alert message is shown when any invalid certificate in the chain found.
86
Page 88

HS1100 Wireless Hotspot Gateway User Manual
3. How to avoid Alert Message
y For Clients, to install Root and Intermediate Certificates:
1. Obtain ALL certificate files Offline and save them on your deskto p.
2. Click to Install Root CA and Intermediate certificates.
y For Administrators, to install Website Certificate:
1. Go to “Additional Configuration >> Upload Files>> Certificate”
2. Upload “Private Key” and “Customer Certificate” to HS1100
¾ Login Page: The administrator can use the default login page o r get the customized logi n page by setting
the template page, uploading an edited page, or downloading a specific page from the designated
website. After finishing the setting, click Preview to see the login page.
a. Choose Default Page to use the default login page.
87
Page 89

HS1100 Wireless Hotspot Gateway User Manual
88
Page 90

HS1100 Wireless Hotspot Gateway User Manual
b. Choose Template Page to make a customized login page here. Click Select to pick a color and then fill
in all of the blanks. Click Preview to see the result.
9 Logo Image File: Customized logo can be edited with this function. The area circled in red in the
following image is the position of Logo.
89
Page 91

HS1100 Wireless Hotspot Gateway User Manual
90
Page 92
HS1100 Wireless Hotspot Gateway User Manual
Click on Preview and Edit the Image File to enter the editing interface as below.
Click on Browse to locate the desired image, and press Upload File to upload the file (the Logo file
size limit is 10 Kbytes and 120x60).
A warning message will appear . Click OK to complete the upload process.
9 Background and Image File: Click on Preview and Edit the Image File to enter the editing
interface. Repeat the steps of uploading logo image to upload the desired background ima ge.
After the logo and background image upload process is completed, the new login Template Page
can be previewed by clicking Preview button at the bottom. The built-in login Template Page is
shown as below.
91
Page 93

HS1100 Wireless Hotspot Gateway User Manual
c. Choose Uploaded Page to upload a new/edited login page. Click the Browse button to select the file for
uploading. Then, click Submit to complete the upload process.
After the upload process is completed, the new login page can be previewed by clicking Preview button
at the bottom.
The admin-defined login page must include the following HTML codes to provide the necessary fields for
username and password.
If the admin-defined login page includes an image file, the image file path in the HTML codes must be the
filename of the image file to be uploaded.
Then, enter or browse the filename of the images to upload in the “Upload Images” field on the “Upload
Images Files” page and then click Submit. The system will show the used space and the maximum size
of the image file of 512K. If the administrator wishes to restore the factory default of the login page, click
the Use Default Page button to restore it to default.
92
Page 94

HS1100 Wireless Hotspot Gateway User Manual
After the image file is uploaded, the file name will show on the “Existing Image Files” field. The
administrator can check the file and click Delete to delete that file.
>> How to edit “Terms of Use” or “Service Disclaimer” page:
In HS1 100, the client first get s a login pa ge when he/she opens a web brow ser right af ter associating with
an access point. However , in some situations, the hot spot owners or MIS st af f may want to display “term s
of use” or announcement information before the login page. Hotspot owners or MIS staff can design a
new disclaimer/announcement page and save the page in their local server. After the agreement shown
on the page is read, users are asked whether they agree or disagree with the disclaimer. By clicking “I
agree”, users are able to log in. If users choose to decline, they will get a popup window saying they are
unable to log in. The basic design is to have the disclaimer and login function in the same page but with
the login function hidden until users agree with the disclaimer.
If the disclaimer page is successfully uploaded, an upload success page will show up.
Click “Preview” to see the uploaded page.
93
Page 95

HS1100 Wireless Hotspot Gateway User Manual
If the user checks “I agree” and clicks Next, then he/she is prompted to fill in Login Name and Password.
If the user checks “I disagree” and clicks Next, a window shown as below will pop up to tell the user that
he/she cannot log in.
94
Page 96

HS1100 Wireless Hotspot Gateway User Manual
d. Choose External Page and get the login page from the designated website. Enter the website address
in the “External Page Setting” field and then click Apply.
The External Page prepared to be downloaded here must have the following HTML codes to ensure the
system can work properly
After applying the setting, the new login page can be previewed by clicking Preview button at the bottom
of this page.
¾ Logout Page: The administrator can apply a new/edited logout page here. The proce ss is similar to that of
Login Page.
95
Page 97

HS1100 Wireless Hotspot Gateway User Manual
The different part is the HTML codes of the admin-defined logout page must include the following HTML
codes to allow users to enter the username and password. After the upload is completed, the admin-defined
logout page can be previewed by clicking Preview at the bottom of this page. If the administrator wants to
restore the factory default setting of the logout interface, click the “Use Default Page” button.
¾ Login Success Page: The administrator can use the default login success page or get the customized
login success page by setting the template page, uploading an edited page or do wnloading a specific p age
from the designated website. After finishing the setting, click Preview to see the login success page.
a. Choose Default Page to use the default login success page.
96
Page 98

HS1100 Wireless Hotspot Gateway User Manual
b. Choose Template Page to make a customized login success page here. Click Select to pick a color and
then fill in all of the blanks. Click Preview to see the result first.
97
Page 99

HS1100 Wireless Hotspot Gateway User Manual
c. Choose Uploaded Page and upload a new/edited login success page. Click the Browse button to
select the file for uploading. Then, click Submit to complete the upload process.
After the upload process is completed, the new login success p age can be previewed by clicking Preview
button at the bottom.
Enter or browse the filename of the images to upload in the “Upload Images” field on the “Upload Images
Files” page and then click Submit. The system will show the used space and the maximum size of the
image file of 512K. If the administrator wishes to restore the factory default of the login success page, click
the Use Default Page button to restore it to default.
After the image file is uploaded, the file name will show on the “Existing Image Files” field. The
administrator can check the file and click Delete to delete the file.
98
Page 100

HS1100 Wireless Hotspot Gateway User Manual
d. Choose External Page and down a specific logi n success page from the designated website. Enter the
website address in the “External Page Setting” field and then click Apply. After applying the setting,
the new login success page can be previewed by clicking Preview button at the bottom of this p age.
¾ Login Success Page for On-Demand: The administrator can u se the default login success page for
on-demand users or get the customized login success page by sett ing the template page, uploading an
edited page or downloading a specific page from the designated website. After finishing the setting, click
Preview to see the login success page for on-demand users.
a. Choose Default Page to use the default login success page for on-dem and users.
99
 Loading...