

Page 1

5330 IP Phone Quick Reference
User Guide
Page 2

Mitel 5330 IP Phone
Quick Reference User Guide
In troduction to your Mitel 5330 IP Phon e
The Mitel 5330 IP Phone provides the similar functionality as the Mitel 3000 Feature Phone.
It can be connected directly to the Mitel 3000 system or installed at a remote location and
connected to the system via the Internet. When connected remotely, it retains all the
functionality and features of an extension directly connected to the system.
Extension Pairing
The IP Phone can be paired with another extension. For example, a user can have two
paired extensions, one in the ofce and one at home. By entering a 3-digit code in either
extension, the ofce extension can be transferred to the user’s home and the home
extension transferred to the ofce. The extension number and all programmed features,
including voicemail, are transferred, providing the user with all their normal telephony
facilities at home.
Call Quality
When the IP Phone is installed at a remote location, it uses the Internet to connect to the
Mitel 3000 system. The call quality depends on the amount of bandwidth available to the
IP Phone via the Internet connection. If the IP Phone is sharing the Internet connection
with PCs which are browsing or engaged in le transfers, the call quality may vary during
this activity.
In troduction to Programming your Mitel 5330 IP Ph one
There are three steps of programming before your Mitel 5330 IP Phone is active.
Step 1. Program the Broadband Module.
Step 2 Connecting the Mitel 5330 IP Phone.
Step 3 Program the Mitel 5330 IP Phone.
1
Page 3

Mitel 5330 IP Phone
Quick Reference User Guide
1. Programming the Broadband Module.
Before attempting to program IP extensions it is important that the following are
checked:
If any of the IP extensions are located remotely ensure that the broadband service
•
is connected to and working on the Broadband Module. The VoIP programming is not
available unless an IP address is provided on the WAN interface. This address is shown
on the status page. See the broadband module manual for more information.
The broadband service provides a static IP address.
•
If the IP extensions are located on the LAN only and no broadband service is sup-
•
ported then the VoIP interface must be changed to IP LAN. See the broadband
module manual for more information.
WARNING Your service provider MUST provide a static IP address for
IP phones to work remotely.
1. Connect to the Broadband Module programming Interface using the Wizard
or Browser Click VoIP from the Setup panel in the main Broadband Module
screen.
2
Page 4
Mitel 5330 IP Phone
Quick Reference User Guide
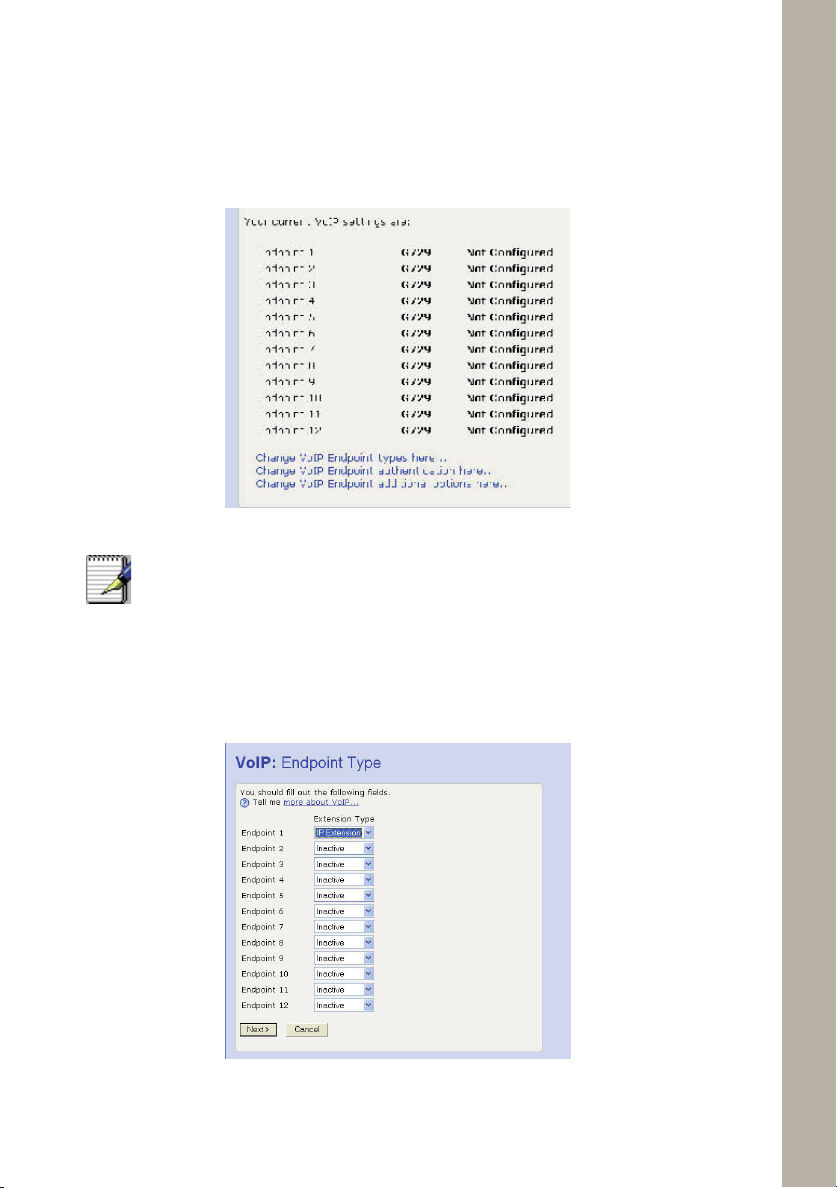
2. Click the link Change your VoIP endpoint types here ...
Note
3. Choose a free endpoint and select IP Extension from it’s drop-down menu. Note that
the extension number associated with the endpoint will be assigned to the Mitel 5330 IP
Phone.
If the Endpoint screen is not shown it is because an IP address is not available
to the WAN.
Ensure the broadband connection is available and working on the Broadband
Module.
3
Page 5
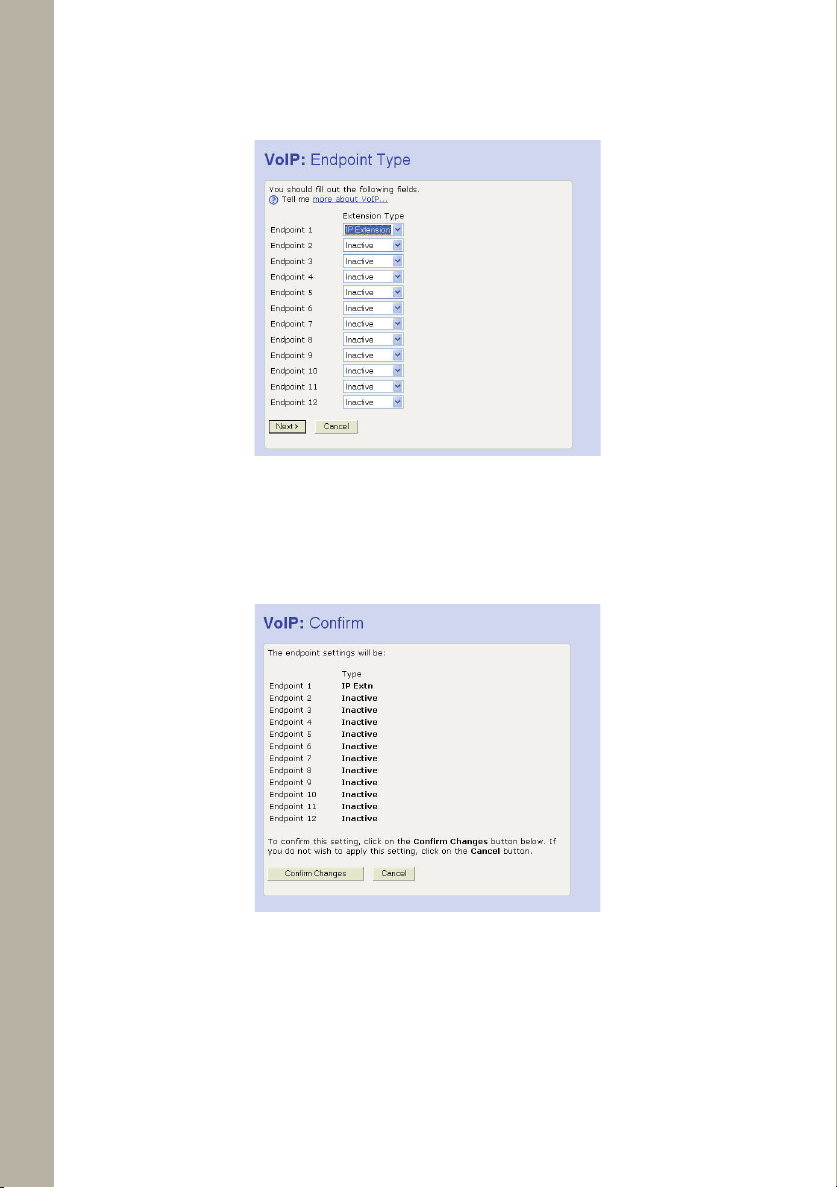
Click Next >
Confirm Changes.
4. Click
Mitel 5330 IP Phone
Quick Reference User Guide
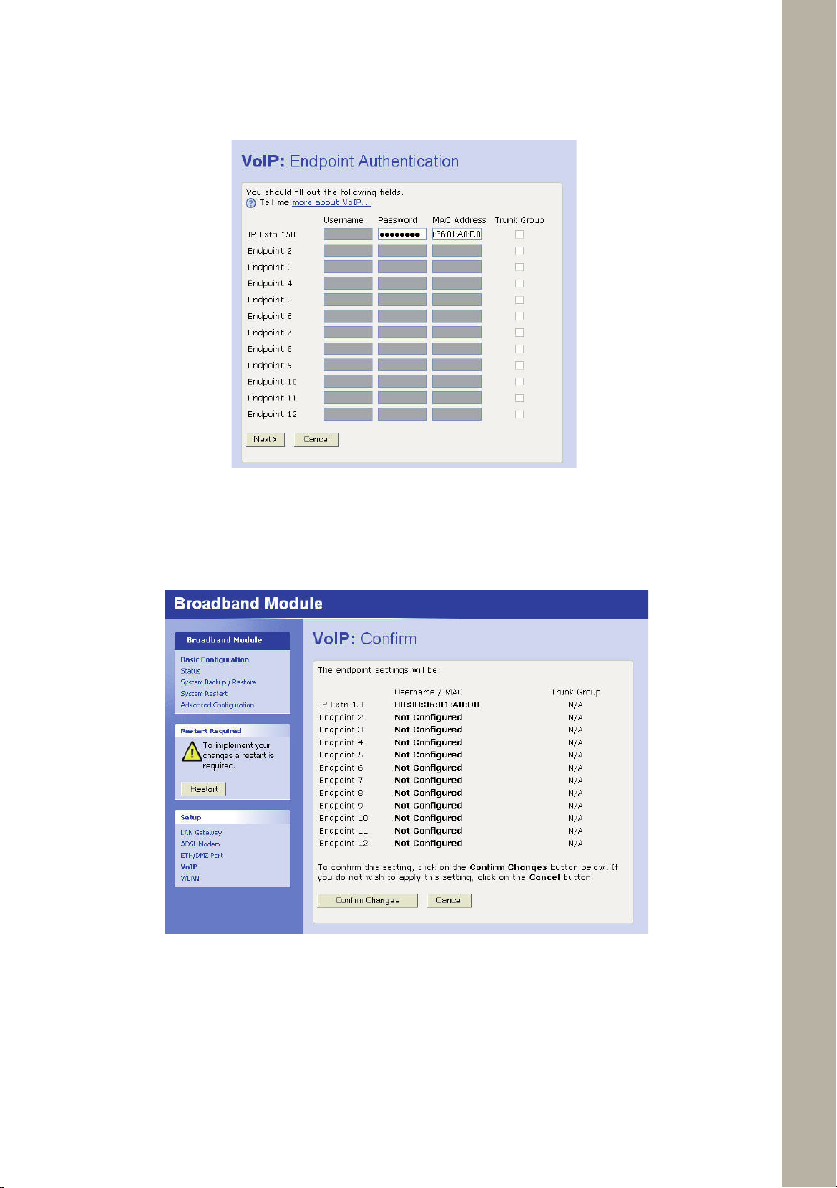
5. Enter the password (this must match the password programmed into the
Mite 5330 IP Phone, in default this is “iptpassw”)
The password is set at iptpassw which matches the default password in the IP
phones. This should not be changed.
The MAC address is printed on a label on the base of the IP Phone.
4
Page 6
Mitel 5330 IP Phone
Quick Reference User Guide
Click Next >
6. Click Confirm Changes
7. Click Restart
Restart the Broadband Module. Once the Broadband Module has restarted step 1 of
the programming is now complete. The Mitel 5330 IP Phone will now connect to the
Mitel 3000 system.
5
Page 7
Mitel 5330 IP Phone
Quick Reference User Guide
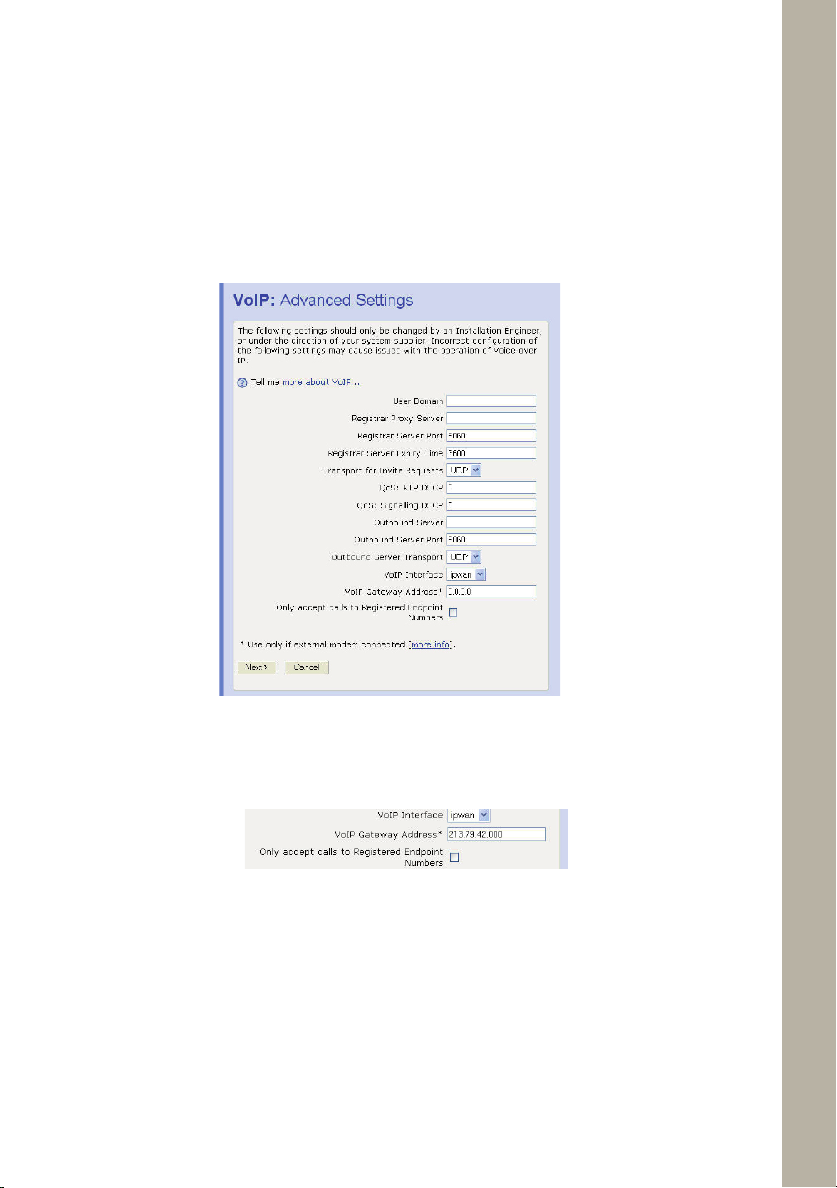
2. Changing the VOIP Interface.
Programming the IP Phone involves entering the ICP IP ADDRESS. This IP address will
be provided by the Mitel system administrator. The WAN address is for users who will
be accessing Remotely and internally. The LAN address is used for local users when
no external internet connection is available. If you want to use the LAN address, you
must change the VOIP Interface to IPLAN.
1. Connect to the Broadband Module programming Interface using the Wizard or
Browser
Click VoIP from the Setup panel in the main Broadband Module screen.
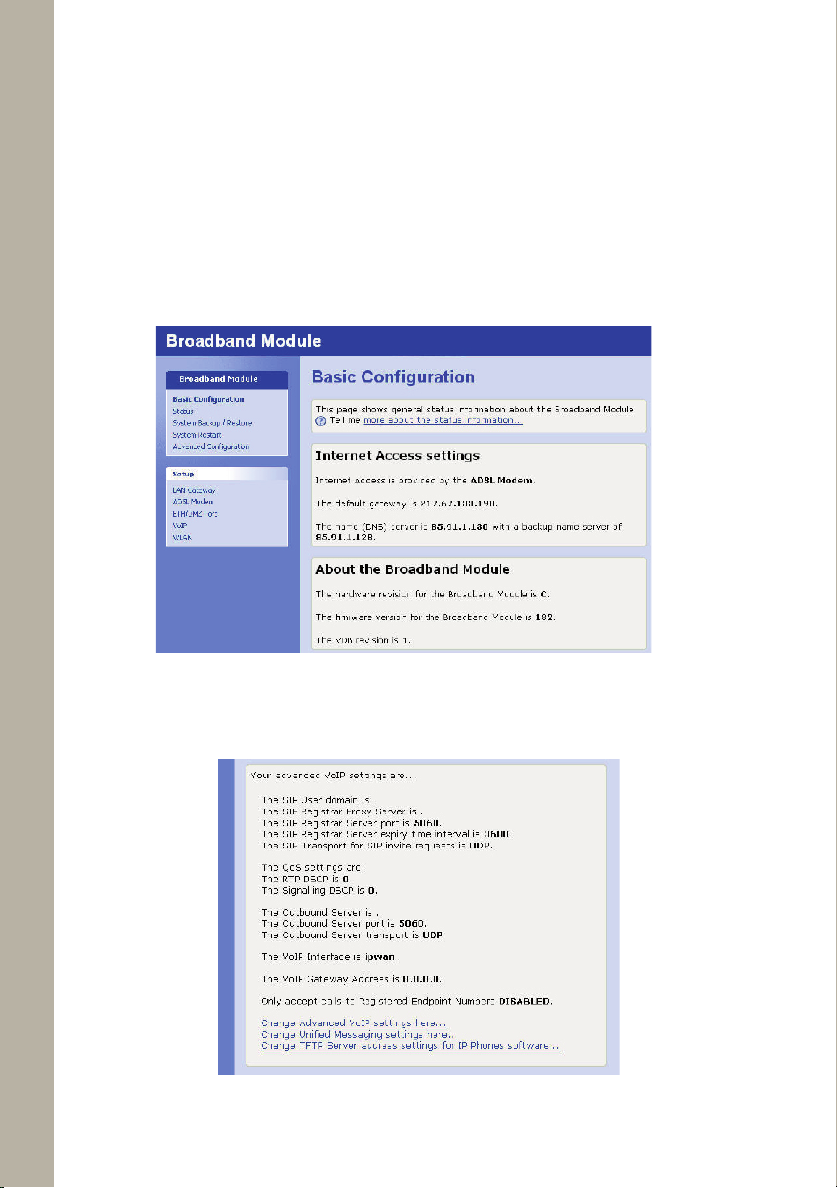
2. Scroll down and Click the link Change Advanced VoIP Settings here ...
6
Page 8
Mitel 5330 IP Phone
Quick Reference User Guide
3A. From the VOIP Interface section select IPWAN (default) from the
drop-down menu if used as a remote user.
3B. ONLY if the IP phone is used as stand alone of the PBX within the
LAN, from the VOIP Interface section select IPLAN from the drop-down
menu.
4. Enter the Public IP address of your DSL connection on the VoIP Gate-
way Address box.
Click Next >
7
Page 9
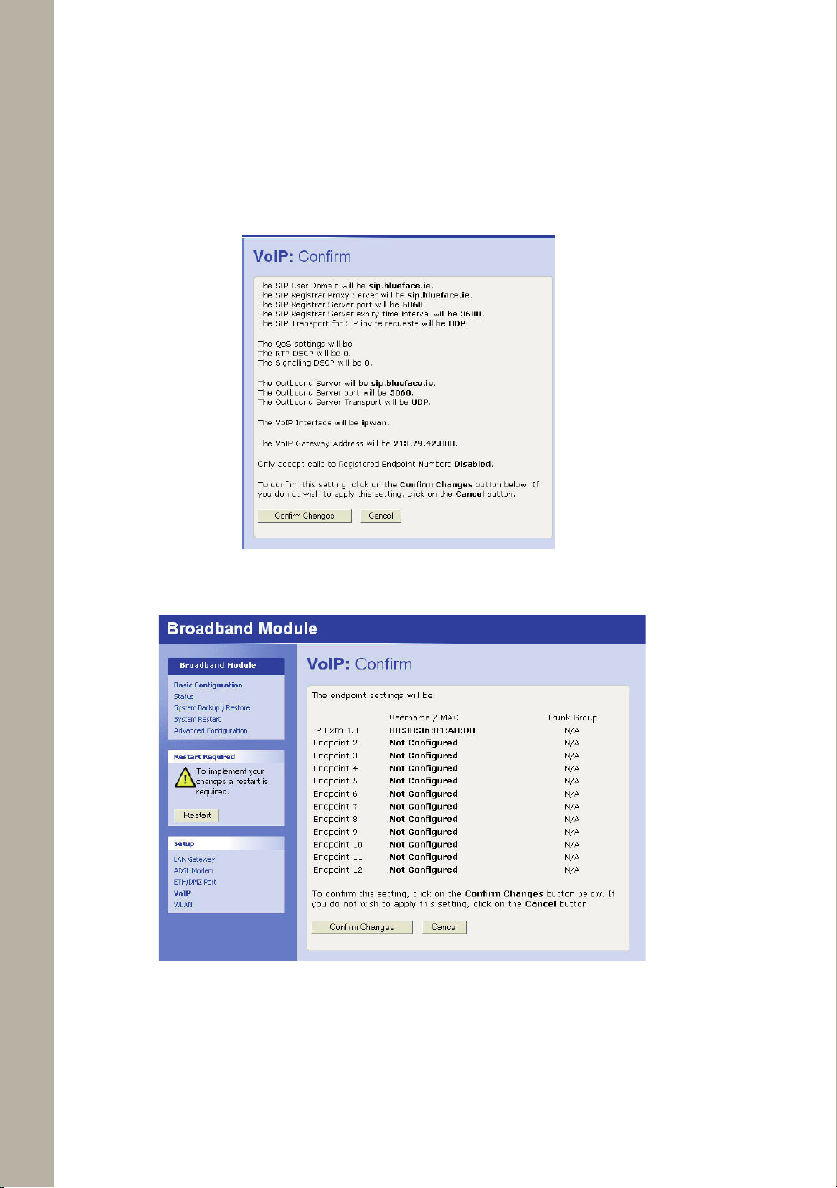
4. Click Confirm Changes.
5. Click Restart
Mitel 5330 IP Phone
Quick Reference User Guide
8
Page 10

Mitel 5330 IP Phone
Quick Reference User Guide
3. Connecting the Mitel 5330 IP Phone.
The IP Phone is supplied with a transformer and two Ethernet cables. Connect an
Ethernet cable to the LAN/PWR connector on the back of the IP Phone and connect
the other end of the cable to the PHONE connector on the Transformer.
Connect the other Ethernet cable to the LAN connector on the Transformer and
connect the other end of the cable to an Ethernet port on the Broadband Module (IP
Phone connected locally to the Mitel 3000) or broadband router (IP Phone installed
at a remote location).
Connect the transformer to a power source.
A PC can be connected to the broadband router via the PC port on the back of the IP
Phone if required.
Note
The Mitel 5330 IP Phone can also be powered via
a power over Ethernet LAN switch.
9
Page 11

Mitel 5330 IP Phone
Quick Reference User Guide
4. Programming the Mitel 5330 IP Phone.
When programming the phone th e * key on the keypad under the number
7 should be selected for Yes the # key on the keypad under the number 9
should be selected for No.
5A . Programming the Mitel 5330 IP Phone for a WAN
Co nnection or Remote User.
The Mitel 5330 IP phone needs to check with the Broadband Module if the SW
used is the most recent SW available. For this the phone needs to be connected
to the LAN port of your Broadband Module, then follow instructions below
Disconnect the power from the phone by removing the Ethernet cable from
the PHONE connector on the Transformer.
Hold down keypad <= & => arrows on the Mitel 5330 IP Phone and reconnect
the Ethernet cable to the Transformer.
Release keypad digits <= & => when the display on the IP Phone shows.
* = Yes # = No
1. Congure Phone?
10
Select * = Yes
Page 12

Mitel 5330 IP Phone
Quick Reference User Guide
2. Network Parameters? 3. View Current Values?
Select * = Yes Select # = No
4. View DHCP Values?
5. View Static Values?
Select # = No Select #= No
11
Page 13

6. Modify Static Value?
Mitel 5330 IP Phone
Quick Reference User Guide
7. At the Static Network Parms screen
arrow down until program ICP IP Address
is displayed.
Select * = Yes
8. Enter the IP Address provided by your
system administrator. This is the public
static IP address of the Broadband module
(WAN/DSL Public IP Address).
12
9. Arrow down until TFTP SVR
IP Address.
Enter the address 195.7.32.123.
Page 14

Mitel 5330 IP Phone
Quick Reference User Guide
10. Arrow to down TFTP PORT and
enter 69 as the port value.
12. Saving to the NVRAM. Do not
Remove Power will then display.
11. Arrow until Store Changes? is
displayed
Select *=Yes
13. Reboot Now? will display
Do not remove the power and wait for
the phone to reset.
Select *=Yes
13
Page 15

Mitel 5330 IP Phone
Quick Reference User Guide
Your phone will then look for the TFTP site and upgrade your phone.
Yor phone is now ready to be connected as a Remote User. Once you connect to your
router at home or remote ofce, the display on your phone should appear as:
Your phone is now ready for use.
If the following display appears, your phone software should be updated:
14
Page 16

Mitel 5330 IP Phone
Quick Reference User Guide
5B . Programming the Mitel 5330 IP Phone for a LAN address.
Programming involves entering the LAN IP Address this information is provided by
your system administrator. Disconnect the power from the phone by removing the
Ethernet cable from the PHONE connector on the Transformer. Hold down keypad
<= & => arrows on the Mitel 5330 IP Phone and reconnect the Ethernet cable to the
Transformer. Release keypad digits <= & => when the display on the IP Phone shows
1. Follow the same steps as programming for the WAN
until you reach step 6.
2. Enter the IPLAN address of the Broadband Module
in the ICP IP Address.
15
Page 17

Mitel 5330 IP Phone
Quick Reference User Guide
3. Arrow down until Store Changes?
is displayed
Select *=Yes
4. Saving to the NVRAM. Do not
Remove Power will then display.
16
5. Reboot Now ? will display
Select *=Yes
Do not remove the power and wait
for the phone to reset.
Page 18

Mitel 5330 IP Phone
Quick Reference User Guide
This diagram illustrates the Mitel 5330
IP Phone which has 15 programmable
keys.
17
Page 19

Mitel 5330 IP Phone
Quick Reference User Guide
6. Using the IP Phone
The IP Phone provides the similar functionality as the Mitel 3000 Feature Phone.
It has a similar menu system with Program, Message, Directory, Mute and Hold
buttons, as well as 15 programmable multi-function, self-labeling keys provided
in 3 pages of 5 keys each. It also has xed function keys, Voice Message indication
light, speaker with volume control.
18
MAIN DISPLAY 5330
Page 20

Mitel 5330 IP Phone
Quick Reference User Guide
Scr olling through the menu
Pho ne Setup
To select a different Display Contrast
Answering and making calls
Answer a call that is ringing on the IP Phone using the handset
Answer a call that is ringing on the IP Phone using hands-free
Make an external call
Make an internal call
Select <<< Previous to go back
Select >>> Next to go forward
Select the arrows at the bottom of the phone to change
the screen.
Select the blue settings key.
Select Contrast.
Select The + key to make the phone display darker.
Select The - key to make the phone display lighter.
Select The save key.
Select
The close key to return to the main display.
Pick up the handset or
Select Answer the call and/or pick up the handset.
Select Answer the call.
Pick up the handset.
Press the Line Key or Key 9 and Key the number.
Select Internal call.
Select Ext. no., or.
Key the Extension number (20 - 161), and
Pick up handset, or press handsfree.
Transferring calls
Note: The following instructions assume you are on a call.
Transfer a call to an internal number
Select Internal transfer.
Select Ext. no. and when the call is answered.
Select Transfer.
19
Page 21

Mitel 5330 IP Phone
Quick Reference User Guide
Transfer an external call to an external number
Select External transfer.
Select an available Line and then Key the external
number and when the call is answered
Select Transfer.
Re-Directing Calls
Note: The following instructions assume that your Extension is
ringing.
Re-Direct a call to another Extension
Select Re-Direct the call.
Select Ext. No. or dial the external number.
Forward Calls
Forward All Calls
Select >>> Next.
Select Forward.
Select Forward All Calls.
Select the required extension from the display or key
the Extension number, or Key 9 and the target external
number, (for incoming external calls only).
Cancel Forward All Calls
On the main display screen.
Select Cancel divert.
Forward calls when your Extension is busy
20
Select >>> Next.
Select Forward.
Select Forward When Busy.
Select the required extension from the display or key
the Extension number, or
Key 9 and the target external number, (for incoming
external calls only).
Page 22

Mitel 5330 IP Phone
Quick Reference User Guide
Cancel Forward When Busy
Select >>> Next.
Select Forward When Busy key.
Forward calls when your Ext. does not answer (after four rings)
Cancel Forward On No Answer
Select Forward When Busy key.
The key will be illuminated to indicate that a forward is
active. Once you have selected this key the forward is cancelled.
Select Forward When Busy.
The key will be illuminated to indicate that a forward is active.
Once you have selected this key the forward is cancelled.
Select >>> Next.
Select Forward On No Answer.
Select the required extension from the display or key the
Extension number, or
Key 9 and the target external number, (for incoming
external calls only).
Select >>> Next.
Select Forward When Busy.
Forwarding Group calls
Forwarding all calls
Select >>> Next 3 times.
Select Group Forwarding.
Select the group you wish to forward.
Select Forward All Calls.
Select the required extension from the display or key the
Extension number, or
Key 9 and the target external number, (for incoming
external calls only).
Cancel Forward all calls
Select Cancel Group Forwarding.
Select the group you wish to un-forward.
Select Forward All Calls.
The key will be illuminated to indicate that a forward is active.
Once you have selected this key the forward is cancelled.
21
Page 23

Forward calls when your group is busy
Select >>> Next 3 times.
Select Group Forwarding.
Select the group which is to be forwarded
Select Forward when busy
Select the required extension from the display or key the
Extension number, or
Key 9 and the target external number, (for incoming
external calls only).
Cancel group divert on busy
Select >>> Next 3 times.
Select Group Forwarding.
Select the group you wish to un-forward.
Select Forward when busy.
The key will be illuminated to indicate that a forward
is active. Once you have selected this key the forward is
cancelled.
Forward calls when your group does not answer (after four
rings)
Select >>> Next 3 times.
Select Group Forwarding.
Select the group you wish to forward.
Select Forward on no answer
Select the required extension from the display or key the
Extension number, or
Key 9 and the target external number, (for incoming
external calls only).
Mitel 5330 IP Phone
Quick Reference User Guide
22
Cancel group Forward on no answer
Select >>> Next 3 times.
Select Group Forwarding.
Select the group you wish to un-forward.
Select Forward on no answer.
The key will be illuminated to indicate that a forward
is active. Once you have selected this key the forward is
cancelled.
Voice Mailbox
Page 24

Mitel 5330 IP Phone
Quick Reference User Guide
Note: Voicemail services require the Voicemail Module to be installed.
To Enter a personal greeting
Select Voice Mailbox
Select Enter your extension or select Other to access the
System Mail Voicebox (ext 0).
Select Enter Password followed by #.
Select Greeting.
Divert on “no answer” to the Voice Mailbox is automatically set
when a voice mailbox is allocated to your extension.
You may also select the other Divert options as required.
Scroll down
Select Divert
Select Divert when busy or
Select Divert all calls
Select “Divert to voicemail”
Retrieve messages from your voice mailbox
Select New voice messages
Enter your Extension number. You will be prompted to
Enter your Voice Mailbox Password, followed by #.
Select Play.
Press the Message Key and
Follow the instructions on the display or listen to the voice
prompts.
Turn on your voicemail
Change your Voice Mailbox Password.
Press , then
Select Voice Mailbox and enter your Extension
number.
Enter your existing password, (default is 1111), followed
by #.
Scroll down
Select Change password and
Enter your new password (up to 8 digits long - e.g.
12341234).
Select Conrm
23
Page 25

Mitel 5330 IP Phone
Quick Reference User Guide
Per sonal speed dials
To Program your personal speed dial list – numbers and names
Press <<< Previous once, then
Select Directories.
Select Personal entries.
Enter index 01-30.
Enter the number.
Select Conrm.
When prompted enter a name.
Press 2 once for A, twice for B, three times for C;
Press 3 for D, twice for E, three times for F; and so on.
Wait two seconds for the screen cursor to move on
before entering the next letter. A maximum of ten
characters per name (including spaces) is allowed.
On completion of the name.
Select Conrm.
Press Exit to nish programming or hang up.
To View/Dial a number from your personal speed dial list -
Press <<< Previous once, then
24
Select Directories.
Select Personal directory.
Select the desired location and the number will be dialled.
Sys tem speed dials
Any extension can program the 500 system speed dial numbers once the
system password is entered by them.
To program the system speed dial list - numbers and names.
Press <<< Previous once, then
Select Directories.
Select System Entries.
Select Directories.
Enter the system password.
Enter index 01-500.
Enter the number, and then
Select Conrm.
Page 26

Mitel 5330 IP Phone
Quick Reference User Guide
Press 2 once for A, twice for B, three times for C;
Press 3 for D, twice for E, three times for F; and so on.
Wait two seconds for the screen cursor to move on
before entering the next letter. A maximum of ten
characters per name (including spaces) is allowed.
On completion of the name.
Select Conrm.
Then select the outgoing line group.
Press Exit or hang up to nish programming.
To Dial/View a number from the System directory -
Press <<< Previous once, then
Select System Directory
Enter the rst letter of the name.
Select the entry and the number is dialled.
25
Page 27

NOTES:
Mitel 5330 IP Phone
Quick Reference User Guide
26
Page 28

Mitel 5330 IP Phone
Quick Reference User Guide
NOTES:
IP Phone Mitel 5330 Quick Reference Guide
PN LR2750.06200-1
27
Page 29

Global Headquarters
Tel: +1(613) 592-2122
Fax: +1(613) 592-4784
U.S.
Tel: +1(480) 961-9000
Fax: +1(480) 961-1370
EMEA
Tel: +44(0)1291-430000
Fax: +44(0)1291-430400
CALA
Tel: +1(613) 592-2122
Fax: +1(613) 592-7825
Asia Pacific
Tel: +852 2508 9780
Fax: +852 2508 9232
For more information on our worldwide office locations, visit our website at www.mitel.com/offices
THIS DOCUMENT IS PROVIDED TO YOU FOR INFORMATIONAL PURPOSES ONLY. The information furnished in this document, believed by Mitel to be accurate as of the
date of its publication, is subject to change without notice. Mitel assumes no responsibility for any errors or omissions in this document and shall have no obligation to you
as a result of having made this document available to you or based upon the information it contains.
M MITEL (design) is a registered trademark of Mitel Networks Corporation. All other products and services are the registered trademarks of their respective holders.
© Copyright 2008, Mitel Networks Corporation. All Rights Reserved.
www.mitel.com
 Loading...