


USER MANUAL
Netbiter®WS100/WS200
Doc ID: HMSI-27-323
Version: 1.00
HALMSTAD • CHICAGO • KARLSRUHE • TOKYO • BEIJING • MILANO • MULHOUSE • COVENTRY • PUNE • COPENHAGEN • RAVENSBURG
HMS Industrial Networks
Mailing address: Box 4126, 300 04 Halmstad, Sweden
Visiting address: Stationsgatan 37, Halmstad, Sweden
E-mail: info@hms-networks.com
Web: www.netbiter.com

Important User Information
Liability
Every care has been taken in the preparation of this manual. Please inform HMS Industrial Networks AB of any inaccuracies or omissions. The data and illustrations found in this document are not binding. We, HMS Industrial Networks AB, reserve the right to modify our products in line with our policy of continuous product development. The
information in this document is subject to change without notice and should not be considered as a commitment by
HMS Industrial Networks AB. HMS Industrial Networks AB assumes no responsibility for any errors that may appear in this document.
There are many applications of this product. Those responsible for the use of this device must ensure that all the
necessary steps have been taken to verify that the applications meet all performance and safety requirements including any applicable laws, regulations, codes, and standards.
HMS Industrial Networks AB will under no circumstances assume liability or responsibility for any problems that
may arise as a result from the use of undocumented features, timing, or functional side effects found outside the
documented scope of this product. The effects caused by any direct or indirect use of such aspects of the product
are undefined, and may include e.g. compatibility issues and stability issues.
The examples and illustrations in this document are included solely for illustrative purposes. Because of the many
variables and requirements associated with any particular implementation, HMS Industrial Networks AB cannot assume responsibility for actual use based on these examples and illustrations.
Intellectual Property Rights
HMS Industrial Networks AB has intellectual property rights relating to technology embodied in the product described in this document. These intellectual property rights may include patents and pending patent applications in
the USA and other countries.
Trademark Acknowledgements
Netbiter®is a registered trademark of HMS Industrial Networks AB. Java is a registered trademark of Oracle and/or
its affiliates. All other trademarks are the property of their respective holders.
This is a class A product. In a domestic environment this product may cause radio interference in
which case the user may be required to take adequate measures.
This product contains ESD (Electrostatic Discharge) sensitive parts that may be damaged if ESD control procedures are not followed. Static control precautions are required when handling the product.
Failure to observe this may cause damage to the product.
Copyright © 2015 HMS Industrial Networks AB. All rights reserved.
Netbiter
®
WS100/WS200 User Manual
Doc ID: HMSI-27-323 Version: 1.00

Netbiter®WS100/WS200 User Manual Doc ID: HMSI-27-323 Version: 1.00
Table of Contents
Page
1 Preface ............................................................................................................................... 3
1.1 About This Document.....................................................................................................3
1.2 Related Documents .......................................................................................................3
1.3 Document history ...........................................................................................................3
1.4 Conventions ..................................................................................................................4
2 Installation ........................................................................................................................ 5
3 Connections ..................................................................................................................... 6
3.1 D-sub Connector............................................................................................................6
3.2 Ethernet Connector ........................................................................................................6
3.3 Terminal Block (WS100) .................................................................................................7
3.4 Terminal Block (WS200) .................................................................................................8
3.5 Digital Input Wiring Example ...........................................................................................8
3.6 SIM Card (WS200).........................................................................................................9
3.7 Antenna Connector (WS200) ..........................................................................................9
4 LED Indicators ...............................................................................................................10
4.1 LED Indicators (WS100) ............................................................................................... 10
4.2 LED Indicators (WS200) ............................................................................................... 10
5 IP Configuration ............................................................................................................ 11
5.1 Installing the IPconfig Utility .......................................................................................... 11
5.2 Scanning for Connected Devices .................................................................................. 11
5.3 Changing IP settings ....................................................................................................12
6 The Web Interface ......................................................................................................... 13
6.1 Browser Support ..........................................................................................................13
6.2 Login ..........................................................................................................................13
6.3 Main Menu Bar ............................................................................................................13

Netbiter®WS100/WS200 User Manual Doc ID: HMSI-27-323 Version: 1.00
Table of Contents
7 Setup ................................................................................................................................14
7.1 Setup | Users...............................................................................................................14
7.2 Setup | Modbus............................................................................................................15
7.3 Setup | Modem ............................................................................................................ 17
7.4 Setup | Regional ..........................................................................................................19
7.5 Setup | E-Mail .............................................................................................................. 20
7.6 Setup | SNMP..............................................................................................................21
7.7 Setup | Webserver ....................................................................................................... 22
7.8 Setup | Ethernet ........................................................................................................... 23
7.9 Setup | System ............................................................................................................ 24
7.10 Setup | Netbiter Argos ..................................................................................................26
8 Configuration .................................................................................................................27
8.1 Configuration | Templates ............................................................................................. 27
8.2 Configuration | Devices ................................................................................................29
8.3 Configuration | Pages ...................................................................................................30
8.4 Configuration | Alarm.................................................................................................... 32
8.5 Configuration | Log....................................................................................................... 35
8.6 Configuration | Bindings................................................................................................37
9 Everyday Use .................................................................................................................38
9.1 Select page .................................................................................................................38
9.2 Status ......................................................................................................................... 38
9.3 Devices....................................................................................................................... 39
9.4 Alarm .......................................................................................................................... 40
9.5 Log ............................................................................................................................. 41
A Internal Registers..........................................................................................................43
B SNMP................................................................................................................................45
C Technical Specifications .............................................................................................46
D Regulatory Notices .......................................................................................................47
D.1 Netbiter WS100/WS200 ............................................................................................... 47
D.2 Netbiter WS200 ...........................................................................................................48

Preface 3 (50)
1 Preface
1.1 About This Document
This manual describes how to install and configure the Netbiter WS100 and WS200
gateways.
For additional related documentation and file downloads, please visit the Netbiter support website at www.netbiter.com/support.
1.2 Related Documents
Table 1 Related documents
Document Author
Netbiter WS100 Gateway Installation Guide HMS
Netbiter WS200 Gateway Installation Guide HMS
Netbiter Argos Administration Manual HMS
1.3 Document history
Table 2 Summary of recent changes
Change Where (section no.)
New document replacing the previous WS100 and WS200 User Manuals.
—
Table 3 Revision list
Version Date Author Description
1.00 Sep 2015 ThN Initial release
Netbiter
®
WS100/WS200 User Manual Doc ID: HMSI-27-323 Version: 1.00

Preface 4 (50)
1.4 Conventions
Unordered (bulleted) lists are used for:
• Itemized information
• Instructions that can be carried out in any order
Ordered (numbered or alphabetized) lists are used for instructions that must be carried
out in sequence:
1. First do this,
2. Then open this dialog, and
a. set this option...
b. ...and then this one.
Bold typeface indicates interactible parts, such as connectors and switches on the hardware, or menus and buttons in a graphical user interface.
Monospaced text is used to indicate program code and other
kinds of data input/output such as configuration scripts.
This is a cross-reference within this document: Conventions, p. 4
This is an external link (URL): www.hms-networks.com
This is additional information which may facilitate installation and/or operation.
This instruction must be followed to avoid a risk of reduced functionality and/or damage to the equipment, or to avoid a network security risk.
Caution
This instruction must be followed to avoid a risk of personal injury.
Netbiter®WS100/WS200 User Manual Doc ID: HMSI-27-323 Version: 1.00

Installation 5 (50)
2 Installation
Netbiter WS100 and WS200 are supplied ready for mounting on a DIN rail.
Mounting
Fig. 1 Mounting on DIN rail
1. Hook the unit onto the upper lip
of the rail.
2. Press the unit towards the rail until it snaps into place.
Removing
Fig. 2 Removing from DIN rail
1. Insert a flat-head screwdriver into
the slotted tab on the bottom of
the unit and pull the tab gently
downwards.
2. Pull the bottom end of the unit
free of the rail and lift the unit
from the rail.
Netbiter®WS100/WS200 User Manual Doc ID: HMSI-27-323 Version: 1.00

Connections 6 (50)
3 Connections
3.1 D-sub Connector
The 9-pin D-sub connector provides an RS-232 interface for connecting Modbus RTU
slave units or an external modem.
6 9
51 (male)
Fig. 3 D-sub connector
Table 4 D-sub connector pin layout
Pin Function
1 CD (Carrier Detect)
2 Rx (Receive)
3 Tx (Transmit)
4 DTR (Data Terminal Ready)
5
GND
6 DSR (Data Set Ready)
7
RTS (Request To Send)
8 CTS (Clear To Send)
9 RI (Ring Indicator)
3.2 Ethernet Connector
The RJ-45 socket provides Ethernet network connection. It also supports Modbus TCP via
Ethernet, which can be used at the same time as Modbus RTU units on another interface.
1 8
Fig. 4 Ethernet connector
Table 5 Ethernet connector pin layout
Pin Function
1 TD+
2 TD-
3 RD+
4, 5, 7, 8 Termination
6 RD-
Netbiter
®
WS100/WS200 User Manual Doc ID: HMSI-27-323 Version: 1.00

Connections 7 (50)
3.3 Terminal Block (WS100)
The 12–pin terminal block on the top of the WS100 is used for connecting the power supply and communication interfaces.
Use minimum wire size 24 AWG for the power supply and digital input.
The RS-485 and RS-232 terminal block interfaces cannot be used at the same time.
Fig. 5 Terminal block (WS100)
Table 6 Terminal block connections
Pin Label Function Note
24 Vin+ Power 9–24 VDC/VAC WS100 can optionally be powered by 9–24 VAC.
23 Vin- PE ground
22 DI:DI 2 Digital input #2 Low = 0–2 VDC, High = 10–24 VDC
21 DI:DI 1 Digital input #1 Low = 0–2 VDC, High = 10–24 VDC
20 DI:COM Digital input common
17 RS-232:RX RS-232 Receive
16 RS-232:TX RS-232 Transmit
15 COM Serial interface common Shared between RS-232 and RS485
14 RS-485:A RS-485 Line A
13 RS-485:B RS-485 Line B
AC Power Supply Connection (WS100)
AC
24 VAC
Vin+
Vin-
24 VAC
Power Supply
Line Voltage
AC
PE Ground
Fig. 6 Connecting AC power to WS100
PE ground must be connected to the Vin- terminal.
Netbiter®WS100/WS200 User Manual Doc ID: HMSI-27-323 Version: 1.00

Connections 8 (50)
3.4 Terminal Block (WS200)
The 12–pin terminal block on the top of the WS200 is used for connecting the power supply and communication interfaces.
Use minimum wire size 24 AWG for the power supply and digital input.
The RS-485/422 and RS-232 terminal block interfaces cannot be used at the same time.
Fig. 7 Terminal block (WS200)
Table 7 Terminal block connections
Pin Label Function Note
24 V+ Power 9–24 VDC
23 GND PE ground
22 DI:COM Digital input common
21 DI:DI 1 Digital input #1 Low = 0–2 VDC, High = 10–24 VDC
20 DI:DI 2 Digital input #2 Low = 0–2 VDC, High = 10–24 VDC
19 RS-232:RX RS-232 Receive
18 RS-232:TX RS-232 Transmit
17 COM Serial interface common Shared between RS232/422/485
16 RS-422:RD(A) RS-422 Receive A
15 RS-422:RD(B) RS-422 Receive B
14 RS-485:TD(A)
RS-422:TD(A)
RS-485 Line A
RS-422 Transmit A
13 RS-485:TD(B)
RS-422:TD(B)
RS-485 Line B
RS-422 Transmit B
3.5 Digital Input Wiring Example
DI:DI 1/2
WS100/200
DI:COM
10–24 VDC
0 VDC
Fig. 8 Digital input wiring example
Netbiter
®
WS100/WS200 User Manual Doc ID: HMSI-27-323 Version: 1.00

Connections 9 (50)
3.6 SIM Card (WS200)
Fig. 9 WS200 SIM card
Inserting a SIM Card
1. Push the small yellow tab next to the SIM card holder and remove the holder.
2. Place the SIM card in the holder and insert the holder into the Netbiter as shown in
the figure. Observe the position of the cut-off corner and the contact surfaces.
3.7 Antenna Connector (WS200)
The antenna connector is a standard female SMA screw connector. Optional external antennas are available from your supplier.
Netbiter®WS100/WS200 User Manual Doc ID: HMSI-27-323 Version: 1.00

LED Indicators 10 (50)
4 LED Indicators
4.1 LED Indicators (WS100)
Fig. 10 WS100 LED indicators
Name Color Meaning
Module Status
OFF No power
Steady green System is operating normally
Steady red Hardware fault
Flashing red Error during initialization
Serial Link Status
Flashing green Receiving serial packet
Flashing red Transmitting serial packet
Activity/Collision
Flashing green Receiving Ethernet packet
Flashing red Ethernet collision
Link
Steady green 10 Mbps Ethernet network detected
Steady orange 100 Mbps Ethernet network detected
4.2 LED Indicators (WS200)
Fig. 11 WS200 LED indicators
Name Color Meaning
Module Status
OFF No power
Steady green System is operating normally
Flashing red Error during initialization
Serial Status
Flashing green Receiving serial packet
Flashing red Transmitting serial packet
Ethernet Activity Flashing green Receiving Ethernet packet
Ethernet Link
Steady green 10 Mbps Ethernet network detected
Steady orange 100 Mbps Ethernet network detected
Netbiter
®
WS100/WS200 User Manual Doc ID: HMSI-27-323 Version: 1.00

IP Configuration 11 (50)
5 IP Configuration
5.1 Installing the IPconfig Utility
IPconfig is a Windows-based configuration utility for TCP/IP network settings in Netbiter
gateways. It detects connected Netbiter gateways and lets the user set the IP address, netmask, default gateway, DNS and hostname for each unit.
1. Download IPConfig from www.netbiter.com/support.
2. Extract the contents of the zip archive in a folder on your computer and double-click
the executable file to run it.
5.2 Scanning for Connected Devices
Make sure that the Netbiter gateways to be installed are connected on the same Ethernet
subnet as the computer running IPconfig. Use standard Ethernet cables.
When the IPconfig utility is started it will scan the Ethernet network for Netbiter gateways. All detected units will be presented in a list in the main window. To refresh the list,
click on Scan.
Fig. 12 IPconfig main window
Main window columns
IP IP address of the Netbiter gateway
SN Subnet mask
GW Default gateway
DHCP Automatically managed IP configuration
Version Firmware version
Type Netbiter model name
MAC Ethernet MAC address (System ID)
Netbiter
®
WS100/WS200 User Manual Doc ID: HMSI-27-323 Version: 1.00
IP Configuration 12 (50)
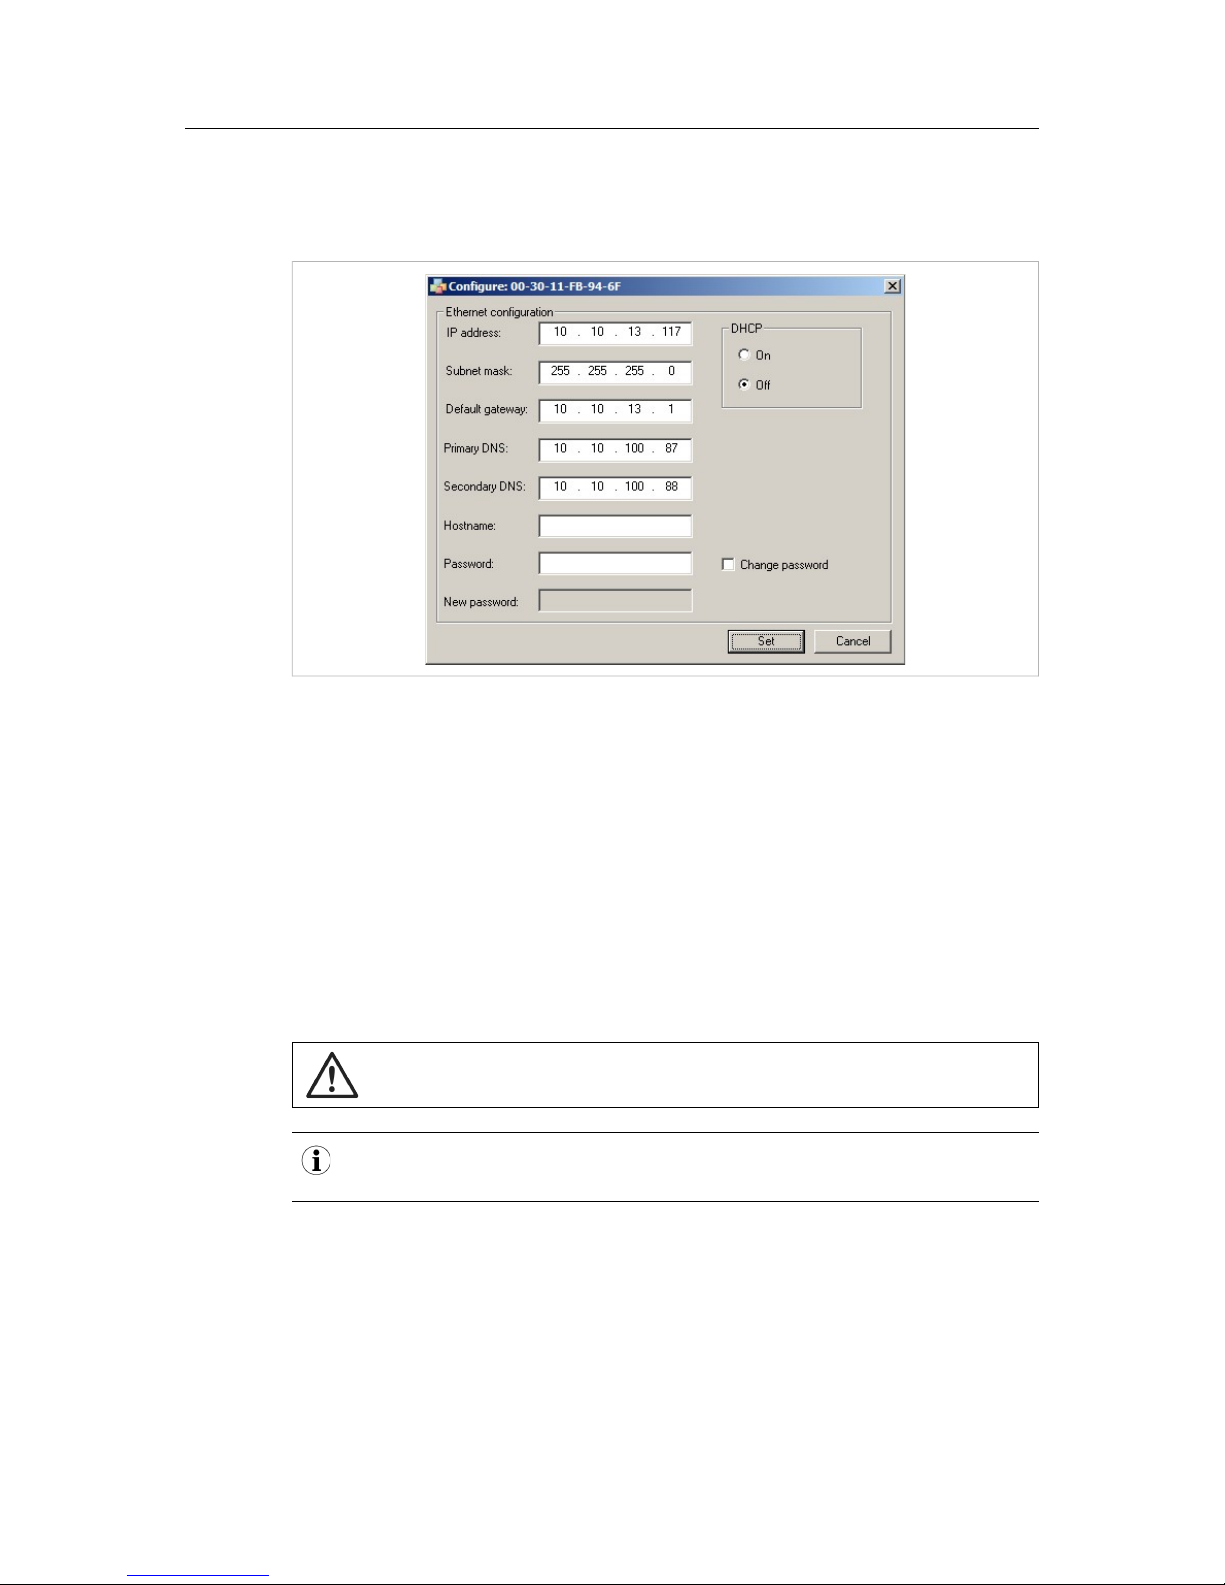
5.3 Changing IP settings
To change the IP settings for a unit in the list, either double-click on it or select it and click
on Settings to open the configuration window.
Fig. 13 IPConfig settings
Notes
• Do not enable DHCP if there is no DHCP server available on the network.
• You can add a name for the Netbiter gateway in the Hostname field. Only characters
a-z, A-Z, 0–9 and _ (underscore) are allowed.
• The default password for authentication of the new settings is admin for Netbiter
EC150, EC250, and WS series gateways. For Netbiter EC300 series gateways the default password is the activation code.
To change the password, check the Change password box and enter the current password in the Password field and the new password in the New password field, then
click on Set.
For security reasons, the password “admin” should always be changed.
Changing the password in IPconfig will not affect the password for logging in to the local
configuration pages.
Click Set to save the new settings and restart the Netbiter gateway. Please note it that may
take some time before the gateway is online again after a reboot.
Netbiter®WS100/WS200 User Manual Doc ID: HMSI-27-323 Version: 1.00

The Web Interface 13 (50)
6 The Web Interface
6.1 Browser Support
The web interface in Netbiter WS100/WS200 will work with most modern web browsers.
This includes IE 6 and later, Firefox 2.0 and later, and all versions of Google Chrome.
The log graph function requires a patch due to a Java compatibility issue. The patch can
be downloaded from www.netbiter.com/support/file-doc-downloads/ws-series.
6.2 Login
Open a web browser and enter the IP address of the Netbiter in the address field to bring
up the login screen. To find out or set the IP address, see IP Configuration, p. 11.
Fig. 14 Login screen
6.3 Main Menu Bar
Fig. 15 Main menu
Which menus and items are available depend on the user level, see Setup | Users, p. 14.
Menus and submenus are usually separated with the | (pipe) character when described in
this document. Example: Setup | Firmware.
Table 8 Main Menu Overview
Task Use menu(s) See section
Configuring hardware and setting up users Setup Setup, p. 14
Setting up data presentation, logs and alarms Configuration Configuration, p. 27
Everyday use Status, Devices, Alarm, Log Everyday Use, p. 38
Netbiter
®
WS100/WS200 User Manual Doc ID: HMSI-27-323 Version: 1.00

Setup 14 (50)
7 Setup
This menu contains settings for configuring users and hardware and getting the Netbiter
to communicate with the attached devices.
The recommended workflow is from left to right, starting with user setup.
7.1 Setup | Users
Fig. 16 Users setup page
Users can be added to the system with various access rights to logs, alarms, etc. Only
users with user level Super Admin can add and edit users.
To add a new user, click on Add user. To edit an existing user, click on the user name.
Click on Save when finished or Back to cancel.
Fig. 17 Add User dialog
Add/Modify User settings
User ID The user ’s login name. Must not contain spaces or special characters.
Name Full name of the user
E-mail Email address of the user.
Mobile Mobile phone number. Used for sending alarm SMS text messages.
Alarm class When adding an alarm it is given an Alarm Class. The user will only receive
notification of an alarm if its alarm class is enabled here. A user can have multiple
alarm classes
Netbiter
®
WS100/WS200 User Manual Doc ID: HMSI-27-323 Version: 1.00

Setup 15 (50)
Add/Modify User settings (cont.)
Receive log files via
E-mail
If enabled in the log configuration, logs will be e-mailed to the address entered in
the E-mail field.
Language Selects the user interface language for the user.
Show Device browser
in menu
If enabled, all parameters of the device templates will be accessible from the
Devices menu. For users with Read user level, the parameters can only be
viewed, not changed.
User level • Read: User can only monitor data.
• Write: Same as Read + user can acknowledge alarms and clear logs and
alarm history.
• Admin: Same as Write + access to the Configuration menu. Admin users
can add and change templates, devices, pages, alarms and bindings.
• Super Admin: Same as Admin + access to the Setup menu. The Super
Admin has full access to all parts of the system.
Password Enter a password here when adding a new user. To change the password for an
existing user: check the box Change password and enter a new password.
Repeat password When adding a new password the password has to be repeated here.
7.2 Setup | Modbus
Fig. 18 Modbus setup page
Make sure that any Modbus devices are correctly connected to the Netbiter gateway before continuing, see Connections, p. 6. Each Modbus device must also be setup with a template and a unique slave address, see Configuration, p. 27.
Two devices cannot have the same Modbus slave address. If this happens, the serial
bus will not be able to communicate with all slaves on the bus.
Netbiter®WS100/WS200 User Manual Doc ID: HMSI-27-323 Version: 1.00

Setup 16 (50)
Serial Settings (Modbus RTU/ASCII)
Transmission Mode Select Modbus RTU or Modbus ASCII transmission mode. Default = RTU.
Slave Response
Timeout
The time that the Netbiter will wait for a response from a slave before Serial
Timeout will occur Default = 1000. Serial Timeout can be monitored on the Status
page
Physical interface The physical interface used on the Netbiter. Default = RS-485.
Baudrate Baud rate setting: 300 bps to 115200 bps. Default = 9600.
Character Format Parity and stop bit settings. Default = No Parity, 1 Stop Bit.
Extra delay between
messages
Time in milliseconds between Modbus messages. Default = 0.
Character delimiter Time in milliseconds betweeen characters in a Modbus frame. Set to 0 (default) to
use Modbus standard 3.5 characters.
Use function code 15
when writing single
bits (coils)
When enabled, all writes to coils will be done with function code 15 (useful if
slaves do not support function code 05).
Use function code 16
when writing single
registers
When enabled, all writes to registers will be done with function code 16 (useful if
slaves do not support function code 06).
Ethernet Settings (Modbus TCP)
Port Number The TCP port to use for Modbus communication. Default = 502.
Gateway Register When enabled, the internal registers will be available at the slave address given in
the Address-field. The internal registers are specified in. Some of the registers can
be used for pages, alarms and logs using the internal register as device.
The queries sent to this Modbus address will not be sent to the Modbus RTU
network, the Netbiter will respond to the queries.
Server Idle Timeout When enabled, the idle timeout in seconds for the Modbus TCP connection can
be set. If there is no response within this time the connection will be closed.
Default = 60.
IP Authentication When enabled, the IP address allowed to connect to the gateway can be
configured. A range of IP addresses can be set using the Mask field.
Example: IP Number = 192.168.0.1 and Mask = 255.255.255.0 will allow all IP
addresses from 192.168.0.1 to 192.168.1.254 to connect.
The Status page gives information about the Modbus connection and can be useful as a
troubleshooting tool when setting up the Modbus interface.
Netbiter®WS100/WS200 User Manual Doc ID: HMSI-27-323 Version: 1.00

Setup 17 (50)
7.3 Setup | Modem
Fig. 19 Modem setup page
The Netbiter WS200 has a built-in GSM/GPRS modem that enables communication with
the Internet without an Ethernet connection.
For the Netbiter WS100, an external GSM/GPRS or analog (PSTN) modem can be connected to the RS-232 D-sub interface. See also Connections, p. 6.
The current status of the built-in or external modem can be monitored on the Status page.
Modem Settings
Modem type Modem type: Analog, GSM, GPRS or none.
Baudrate The baud rate used by the modem. If using an external modem, see the
documentation for the modem.
PIN code If the SIM card has PIN code security enabled, enter the PIN code here and click
on test pin code.
Clicking on modem info will display information about the active modem, such as
manufacturer, IMEI number, PIN status, and signal strength.
Test SMS If using a GSM/GPRS modem, enter a phone number to generate a test SMS text
message to that number.
Netbiter
®
WS100/WS200 User Manual Doc ID: HMSI-27-323 Version: 1.00

Setup 18 (50)
Dial-up/GPRS Settings
Dial-up Enables/disables communication with the Internet via modem.
Connection trigger • Always connected: The Netbiter will be connected to the Internet as long as
there is a signal. Must be selected if Netbiter Argos is enabled (see Setup |
Netbiter Argos, p. 26)
• Connect on alarm/event: The Netbiter will only connect to the Internet when
required.
Host to ping A hostname or IP address to send a ping packet to, which will keep the connection
to the Internet (keep-alive message).
Ping timer Sets the interval for the keep-alive message. Should be as long as possible to
avoid unnecessary mobile data traffic.
Access point name
(APN)
The name of the gateway for the SIM card operator.
Phone number The phone number to dial to the Internet Service Provider (ISP).
User name The user name assigned by the ISP.
Password The password assigned by the ISP.
Dial-in Settings
Dial-in Enables/disables the possibility to call the Netbiter from a computer using a
modem (remote client).
A dial-up network connection must be set up on the computer, where the phone
number is the number of the SIM card used in the Netbiter, and the user name and
password are those entered in this section.
Local IP address The IP address assigned to the Netbiter. This address should be entered in the
web browser after a connection is established.
Remote IP address The IP address that will be assigned to the remote client. Must be in the same
subnet as the Local IP address.
User name A user name that the remote client should use to log on.
Password A password required by the remote client to log on.
Netbiter
®
WS100/WS200 User Manual Doc ID: HMSI-27-323 Version: 1.00

Setup 19 (50)
7.4 Setup | Regional
Fig. 20 Regional setup page
This page contains date/time settings, choice of separator characters, and general info
about the installation. The date and time can be set either manually or automatically from
an NTP (Network Time Protocol) server on the local network or the Internet.
Time and Date
Date The current date.
Time The current time.
Time zone The time zone to use for the Netbiter.
For time zones marked with * daylight saving will be used (the time entered should
be the actual time, the Netbiter will adjust it automatically).
Network time protocol Enables/disables automatic date/time setting from an NTP server on the local
network or the Internet.
NTP server The IP adress or host name of the NTP server to use.
Update interval How often the date/time setting should be synchronized with the NTP server.
When using a mobile connection, keep the interval as long as possible to
conserve the amount of mobile data traffic.
Decimal separator
Decimal separator and
log file value separator
The decimal separator and the separator character to use for CSV format log files.
Module Information
Site name (Optional)
More information (Optional)
Netbiter
®
WS100/WS200 User Manual Doc ID: HMSI-27-323 Version: 1.00

Setup 20 (50)
7.5 Setup | E-Mail
Fig. 21 E-mail setup page
SMTP settings
SMTP Server The host name or IP address of the e-mail server. When using Netbiter Argos,
select netbiter.net.
Port number The port number to use when connecting to the SMTP server. This information
should be supplied by the Internet Service Provider. The default port number is 25.
When using Netbiter Argos the port number is automatically set to 2525.
SMTP Authentication If the SMTP server requires a login, select the type of authentication here.
User name User name for the SMTP server (if required).
Password Password for the SMTP server (if required).
Sender The name that will be shown in the FROM field in e-mails sent by the Netbiter.
Reply Path The e-mail address to be used as the reply address in e-mails set by the Netbiter.
Send test E-mail Enter an e-mail address and click send to send a test message.
Some e-mail servers may treat the test message as junk e-mail.
Netbiter
®
WS100/WS200 User Manual Doc ID: HMSI-27-323 Version: 1.00

Setup 21 (50)
7.6 Setup | SNMP
Fig. 22 SNMP setup page
For information on how to set up the sending of alarms as SNMP traps, see SNMP, p. 45
and Configuration | Alarm, p. 32.
SNMP settings
SNMP Manager The hostname or IP address of the SNMP Manager.
Port The port number that the SNMP Manager will listen on.
If a hostname is used for the SNMP Manager, make sure that the DNS server settings
for the Ethernet connection are correctly configured.
Netbiter®WS100/WS200 User Manual Doc ID: HMSI-27-323 Version: 1.00

Setup 22 (50)
7.7 Setup | Webserver
Fig. 23 Web server setup page
Settings for the internal web server in the Netbiter.
Web server settings
Extra webserver port The web server can listen on a second port in addition to the default HTTP port
(80). The extra port can be configured manually for some features that are
automatically configured on the default port.
To access the Netbiter web server on the extra port, add a colon followed by the
port number to the URL in the browser.
Example: http://10.10.10.30:8080 (if the extra port is set to 8080).
Compression on web
pages
Compressed web pages will reduce data traffic – which may be desired for low
bandwidth connections – but will also increase the workload of the Netbiter. The
default setting is disabled.
When set to enabled, the web server will send compressed HTTP data to
browsers that support this.
Compression support info is sometimes stripped when traffic passes through a
firewall or proxy server. If set to forced, the web server will always compress the
data even if browser support is not deteced.
This feature is only configurable for the extra web server port. On the default port,
compression is automatically enabled when using a modem connection,
otherwise it is always disabled.
Auto update value and
status
To reduce data traffic on low bandwidth connections, the automatic updating of
values on the web pages can be disabled. To refresh data on a page, the user will
have to click on the refresh icon
.
This feature is only configurable for the extra web server port. On the default port,
it is automatically disabled when using a modem connection, otherwise it is
always enabled.
Netbiter
®
WS100/WS200 User Manual Doc ID: HMSI-27-323 Version: 1.00

Setup 23 (50)
7.8 Setup | Ethernet
Fig. 24 Ethernet setup page
These are the same settings as those configured in IPconfig, see IP Configuration, p. 11.
Contact your network administrator if in doubt about how to configure these settings.
Ethernet settings
DHCP If enabled, the Netbiter will be assigned an IP address dynamically by a DHCP
server.
Do not enable this option unless there is a DHCP server available on the local
network.
Host Name A host name for the Netbiter. Must be unique.
IP Address Static IP address for the Netbiter. Must be unique.
Subnet mask The subnet mask to use on the local network.
Gateway The default gateway on the local network.
Primary DNS Primary domain name server, needed to be able to access servers by host name.
Secondary DNS Secondary domain name server (optional).
Netbiter
®
WS100/WS200 User Manual Doc ID: HMSI-27-323 Version: 1.00
Setup 24 (50)
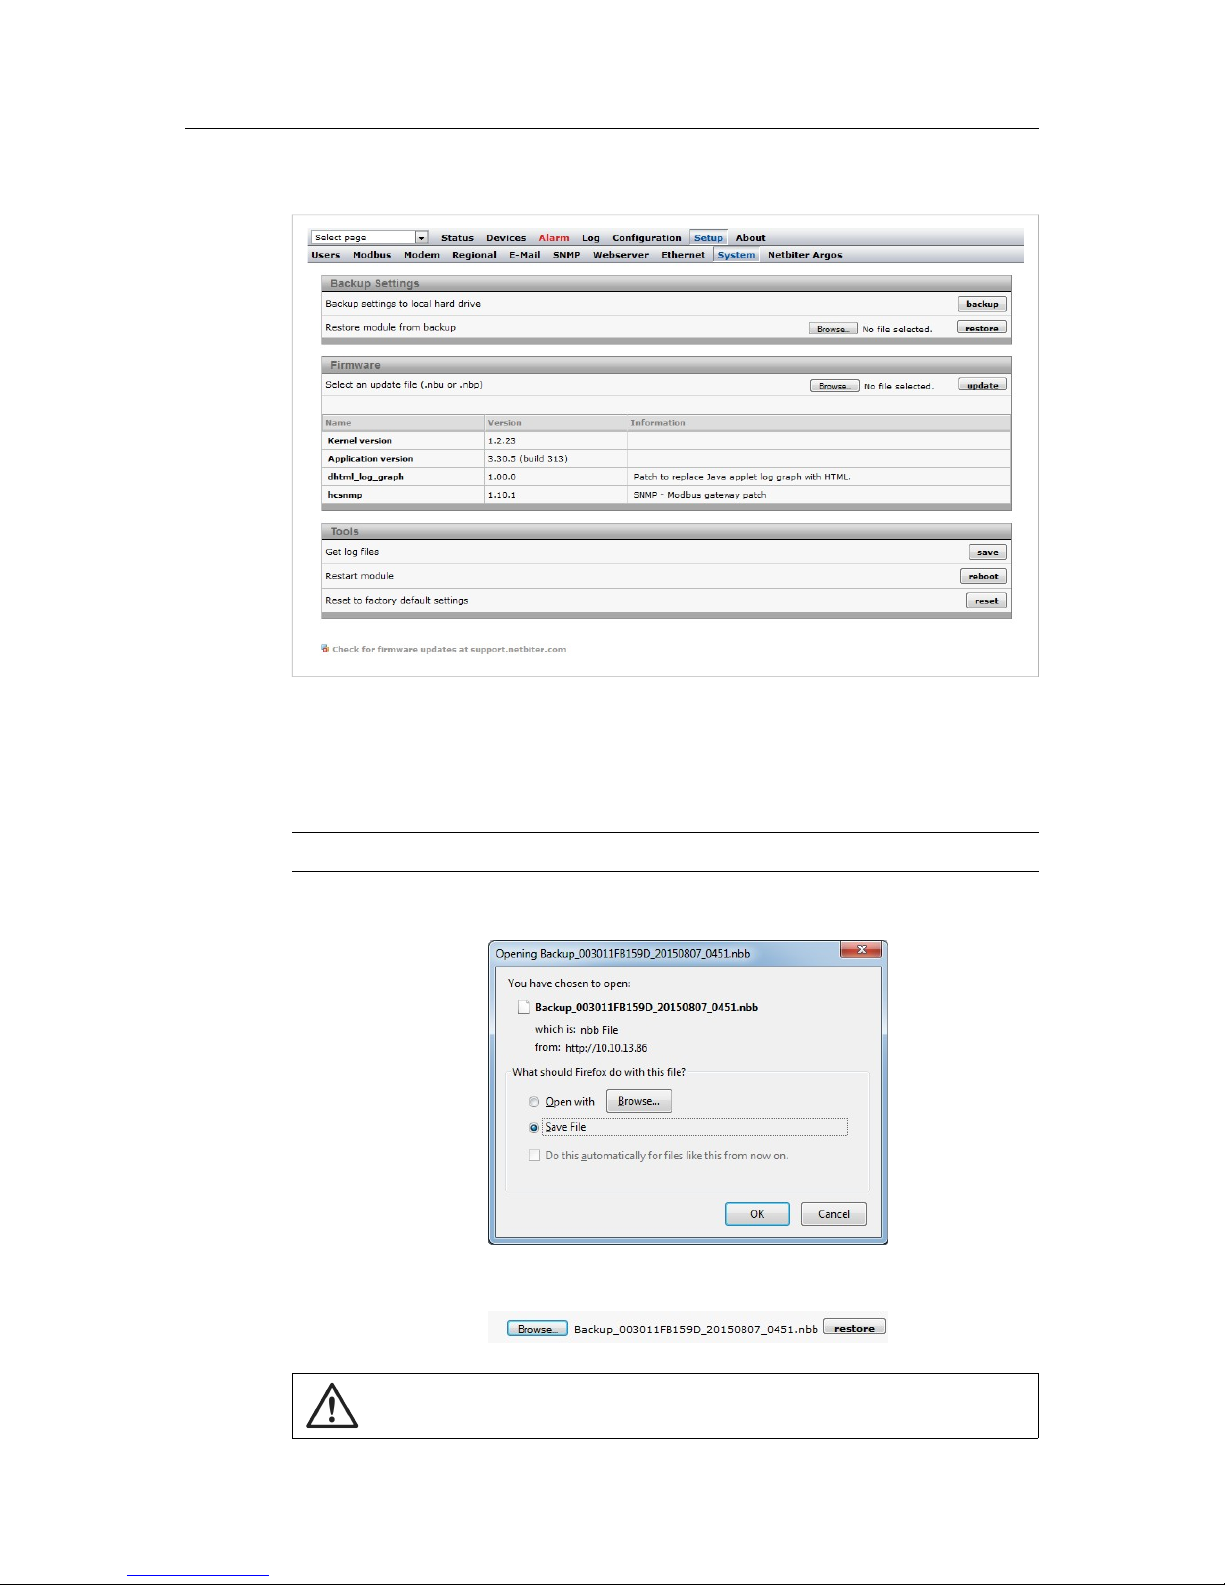
7.9 Setup | System
Fig. 25 System setup page
This page contains system information and settings for maintenance and backup.
A system backup will include all current settings and configurations except the Ethernet
settings, which are excluded to prevent the risk of IP address conflicts.
Backup settings
Backup settings to
local hard drive
Click on backup to create a system backup. When the backup file has been
created you will be asked to save it to your computer.
Restore module from
backup
Click Browse to select a previously saved backup file (*.nbb) from your computer,
then click on restore to upload the configuration.
Restoring from backup will remove all current settings and configurations (except the
Ethernet settings) and replace them with those saved in the backup file.
Netbiter®WS100/WS200 User Manual Doc ID: HMSI-27-323 Version: 1.00

Setup 25 (50)
Firmware
Select an update file Click on Browse to select a firmware file (*.nbu) or patch file (*.nbp) to upload to
the Netbiter, then click on update to start the procedure. The web pages may be
temporarily unavailable until the update is finished.
The latest firmware files and patches can be found at the Netbiter WS download
page www.netbiter.com/support/file-doc-downloads/ws-series.
Always take a system backup before updating firmware.
Kernel version Kernel version used in the Netbiter.
Application version Application version used in the Netbiter.
[patches] If any patches are installed they will be listed here including version information.
Tools
Get all log files Click on save to download an archive in *.tar format containing all log files and
system information.
Restart module Click on reboot to restart the Netbiter.
Reset to factory default
settings
Click on reset to remove all current settings and configurations and restore the
Netbiter to the factory default settings.
A system that has patches installed must be reset to the factory default settings before
uploading new firmware.
When using DHCP, the Netbiter may have been assigned a new IP address after being restarted. If you are not able to access the Netbiter in your browser after a reboot, use the
IPconfig tool to check if the IP address has changed.
Netbiter®WS100/WS200 User Manual Doc ID: HMSI-27-323 Version: 1.00

Setup 26 (50)
7.10 Setup | Netbiter Argos
Fig. 26 Netbiter Argos setup page
Netbiter Argos is a cloud-based solution for managing Netbiter gateways. The Netbiter
WS100 and WS200 gateways are able to send alarm and log data to Netbiter Argos.
For more information about Netbiter Argos, please visit www.netbiter.com.
Netbiter Argos configuration
Netbiter Argos service When enabled, the Netbiter WS gateway can be used with Netbiter Argos remote
management services.
Device ID The System ID (MAC address) of the Netbiter.
Activation code The activation code supplied with the Netbiter. If you have lost the activation code,
please contact Netbiter support.
Use proxy to connect
to Internet
If you are connecting to the Internet via a proxy server, select the type of proxy,
then enter the server hostname or IP address, port number and authentication
details here.
Enable transmission of
alarms/logs
Check the boxes as desired to enable transmission of alarms and/or logs to
Netbiter Argos.
When Netbiter Argos is enabled, the SMTP settings will automatically be reconfigured to
use the Netbiter Argos SMTP server with the correct username and password.
Netbiter Argos uses port 5222 for communication.
Netbiter®WS100/WS200 User Manual Doc ID: HMSI-27-323 Version: 1.00
Configuration 27 (50)
8 Configuration
This menu is used to configure presentation and logging of data read from Modbus devices, and for setting up alarms and log messaging. The normal workflow is from left to
right, starting with template setup.
To be able to read data from a Modbus device the communication interface must also be
set up correctly. See Setup | Modbus, p. 15.
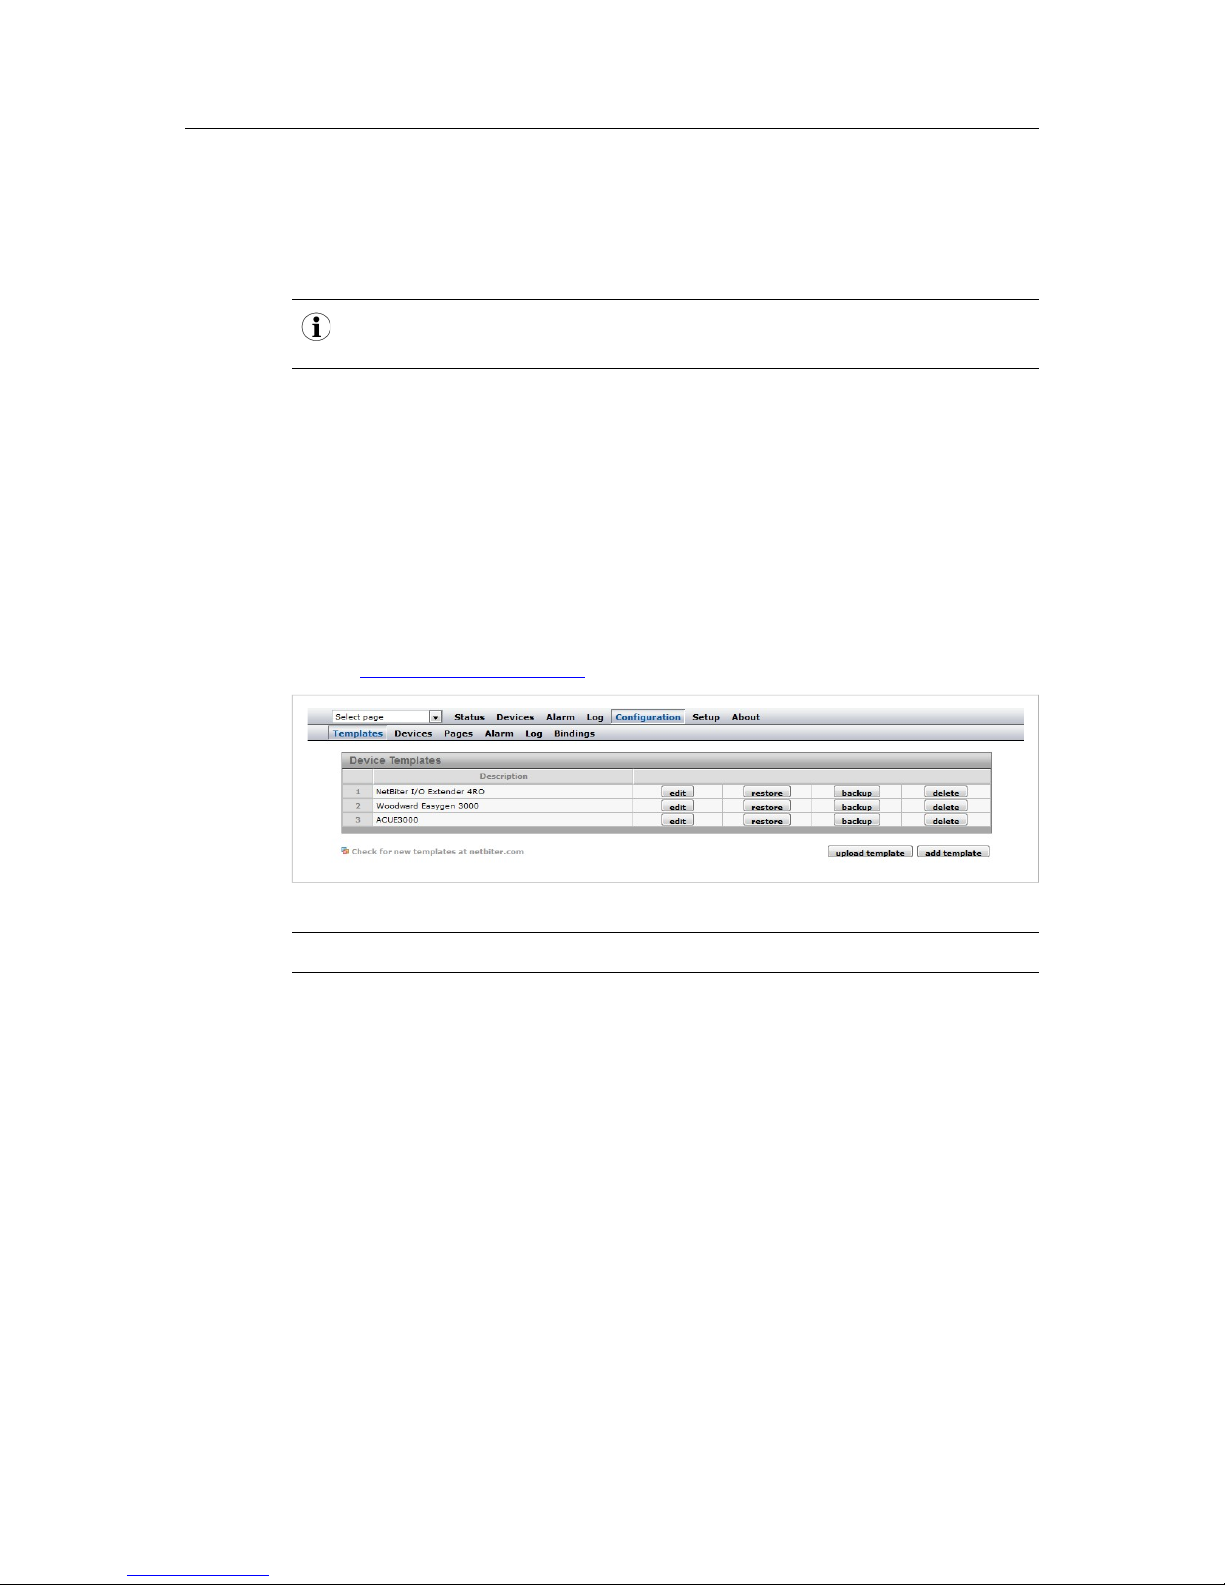
8.1 Configuration | Templates
A device template describes the parameters in a connected device and how they will be presented. It contains information about available registers and data types, configuration of
scaling and offsets, enumerations, and read/write conditions.
Each Modbus device connected to the Netbiter must have an associated template. The
normal workflow is to upload or create a template on the Templates page, then add the
device and associate it with the template on the Devices page.
Ready to use templates for Modbus devices can be downloaded from the Netbiter support
website www.netbiter.com/support.
Fig. 27 Templates configuration menu
Templates
Edit Edit the template
Restore Overwrite any edits in the template
Backup Create a local backup of the template
Delete Remove the template from the Netbiter
Upload template Upload a template file to the Netbiter
Add template Create a new template
Netbiter
®
WS100/WS200 User Manual Doc ID: HMSI-27-323 Version: 1.00

Configuration 28 (50)
8.1.1 Add, Upload and Edit Template
Fig. 28 Editing template parameters
A template is divided into groups of parameters. A parameter is description of a Modbus
register with information about presentation, data type, etc. Parameter groups can be
added, renamed and deleted as needed. A template must contain at least one group.
Deleting a group will also delete all the parameters in that group.
Edit Parameter
Name The name of the parameter
Type Modbus register type
Address Modbus register address
Datatype Data type for the register value
Scaling Scaling factor for the register value when presented
Offset Offset for the register value when presented
Mask Used to mask out specific bits from the Modbus register
Presentation How the value should be presented on the page (read only, read/write, etc.)
Enumeration Enumeration of values to present them as text. Example: 0=OFF;1=ON;
Number of decimals The number of decimals to include when presenting the value
Valid range Defines max/min allowed values for a write parameter
Click on the question mark icon in the Edit Parameter dialog to view detailed help
about the different options when adding and editing parameters.
Netbiter®WS100/WS200 User Manual Doc ID: HMSI-27-323 Version: 1.00

Configuration 29 (50)
8.2 Configuration | Devices
Fig. 29 Devices configuration page
Each connected Modbus device must be configured with a unique Modbus slave address
and be assigned a device template.
Devices can be added automatically by clicking on Autodetect. The Autodetect function
will scan each Modbus address in turn, using the current Modbus serial interface settings
(this may take several minutes).
Fig. 30 Autodetect devices
If the templates support identification of Modbus devices the correct template will automatically be assigned to a detected device. Otherwise, the template must be assigned
manually. To add a device manually, click on Add device.
Device
Name The name of the device
Template The template to use with this device
Modbus/TCP server IP
address
The IP address to use for a Modbus-TCP device
Modbus/TCP server
port
The port used to connect to the Modbus-TCP server. Default = 502.
Modbus slave address The unique Modbus slave address
Some templates support device-specific pre-configured alarms. The alarm conditions are
set in the template and cannot be changed.
Device-specific alarms
Set Click Set to set all alarms in the alarm list or an alarm group preconfigured in the
template. To set a single alarm, use the check box for each alarm.
The drop-down list to select an alarm class can be applied to a whole group or a
single alarm. See also Alarm Configuration, p. 33.
Clear Clear all alarms for the device specific alarm list or alarm group.
Netbiter
®
WS100/WS200 User Manual Doc ID: HMSI-27-323 Version: 1.00

Configuration 30 (50)
8.3 Configuration | Pages
Fig. 31 Page configuration
A page is a customized interface for interacting with a connected Modbus device, using
graphical or table representation of read data. A maximum of 30 pages can be added.
To create a new page, click on Add page (table) or Add page (picture). Enter a name for
the new page and click OK to save.
Click on Edit to edit an existing page, or Delete to remove it.
Click on Start page to make a page the first page presented when a user logs on. Click on
Clear start page to revert to using the default start page.
Fig. 32 General page configuration
General page configuration
Picture An image can be uploaded which will be displayed at the top of the page. Click on
browse to select an image file on your computer, then click on Upload to upload it
to the Netbiter. Click Delete to remove the image.
Uploaded image files will decrease the space left for log files. Keep the size of
image files as low as possible!
Page name Add a descriptive name for the page.
Overview name The name shown in the Select page menu for all users.
Advanced overview
name
The name shown in the Select page menu for administrators.
Set as start page Make the page the first page presented when a user logs on.
Save settings Save the settings made on this page.
Netbiter
®
WS100/WS200 User Manual Doc ID: HMSI-27-323 Version: 1.00

Configuration 31 (50)
After the General Configuration has been saved, it can be filled with parameters from the
template. Each page can have one “normal” overview which is accessible for all users,
and one advanced overview which is only accessible for admin level users. Each overview
has 2 columns with 10 parameters in each column.
To add or delete a parameter in a row, click on Edit or Clear.
Fig. 33 Edit parameter
Configuration Left/Right Overview/Advanced Overview
Device Select a device
Group Select a parameter group
Parameter Select the parameter to be displayed on the web page
Description A description that will be displayed next to the parameter
Presentation format Default = Use the value format set in the template
Hexadecimal = Show the value in hexadecimal format
Binary = Show the value in binary format
Presentation scaling The Modbus register value will be divided by this value before it is shown on the
web pages, and multiplied with it before written to the Modbus device.
Scaling is preferably set in the template, which will include scaling for use with
alarms and logging.
Netbiter
®
WS100/WS200 User Manual Doc ID: HMSI-27-323 Version: 1.00

Configuration 32 (50)
8.4 Configuration | Alarm
Fig. 34 Alarm configuration page
Alarm settings
SMS alarm Enables alarm messages to be sent as SMS text messages to users set up with
the correct alarm class and a valid mobile phone number.
The internal (WS200) or external (WS100) modem also has to be correctly
configured with a valid SIM card.
See also Setup | Modem, p. 17.
Email alarm Enables alarm messages to be sent as e-mail to users set up with the correct
alarm class and a valid e-mail address.
The e-mail server settings must also be correctly configured.
See also Setup | E-Mail, p. 20.
SNMP alarm Enables SNMP trap alarms if an SNMP manager has been configured.
See also Setup | SNMP, p. 21.
Manual alarm
acknowledge
Disabled: When an alarm condition has gone back to normal and then is fulfilled
again, a new alarm message will be sent.
Enabled: The user has to acknowledge the alarm before a new alarm message
will be sent.
Alarms can be acknowledged from Netbiter Argos if these services are enabled.
See also Setup | Netbiter Argos, p. 26.
Netbiter
®
WS100/WS200 User Manual Doc ID: HMSI-27-323 Version: 1.00

Configuration 33 (50)
8.4.1 Alarm Configuration
Fig. 35 Alarm parameters
The alarm configuration section contains a list of all configured alarm parameters. Each
alarm can be reconfigured by clicking edit or removed by clicking delete.
Click on add alarm parameter to add a new alarm. A maximum of 64 alarm parameters
can be configured.
The poll time for alarms is ~20 seconds.
Parameter select
Device Select a device
Group Select a parameter group
Parameter Select the parameter to use for the alarm
Netbiter
®
WS100/WS200 User Manual Doc ID: HMSI-27-323 Version: 1.00

Configuration 34 (50)
Alarm trigger operation
Trig on The condition that will trigger the alarm. Can be set to compare values in either
decimal (Value) or binary (Bit) representation. If scaling is used in the template,
the value set here will be compared to the scaled value.
For values, the conditions are:
• Greater than
• Less than
• Equal to
• Not equal to
• Change
For bit operations:
• Any
• Neither
• All
For the device:
• No response (value = number of consecutive timeouts)
Alarm properties
Alarm Class The alarm class, used to sort which alarm is sent to which user.
See also Setup | Users, p. 14.
Severity The severity of the alarm.
For SNMP the severity class Clear will be sent for an alarm that enters normal
alarm condition.
Description A text that will be displayed in the alarm list view and the alarm history, and sent to
the SNMP manager (if configured).
Subject The subject line of the alarm message to sent via e-mail or SMS.
Message The message body of the alarm message to sent via e-mail or SMS.
Message length is limited to 70 characters for SMS text messages.
Netbiter
®
WS100/WS200 User Manual Doc ID: HMSI-27-323 Version: 1.00
Configuration 35 (50)
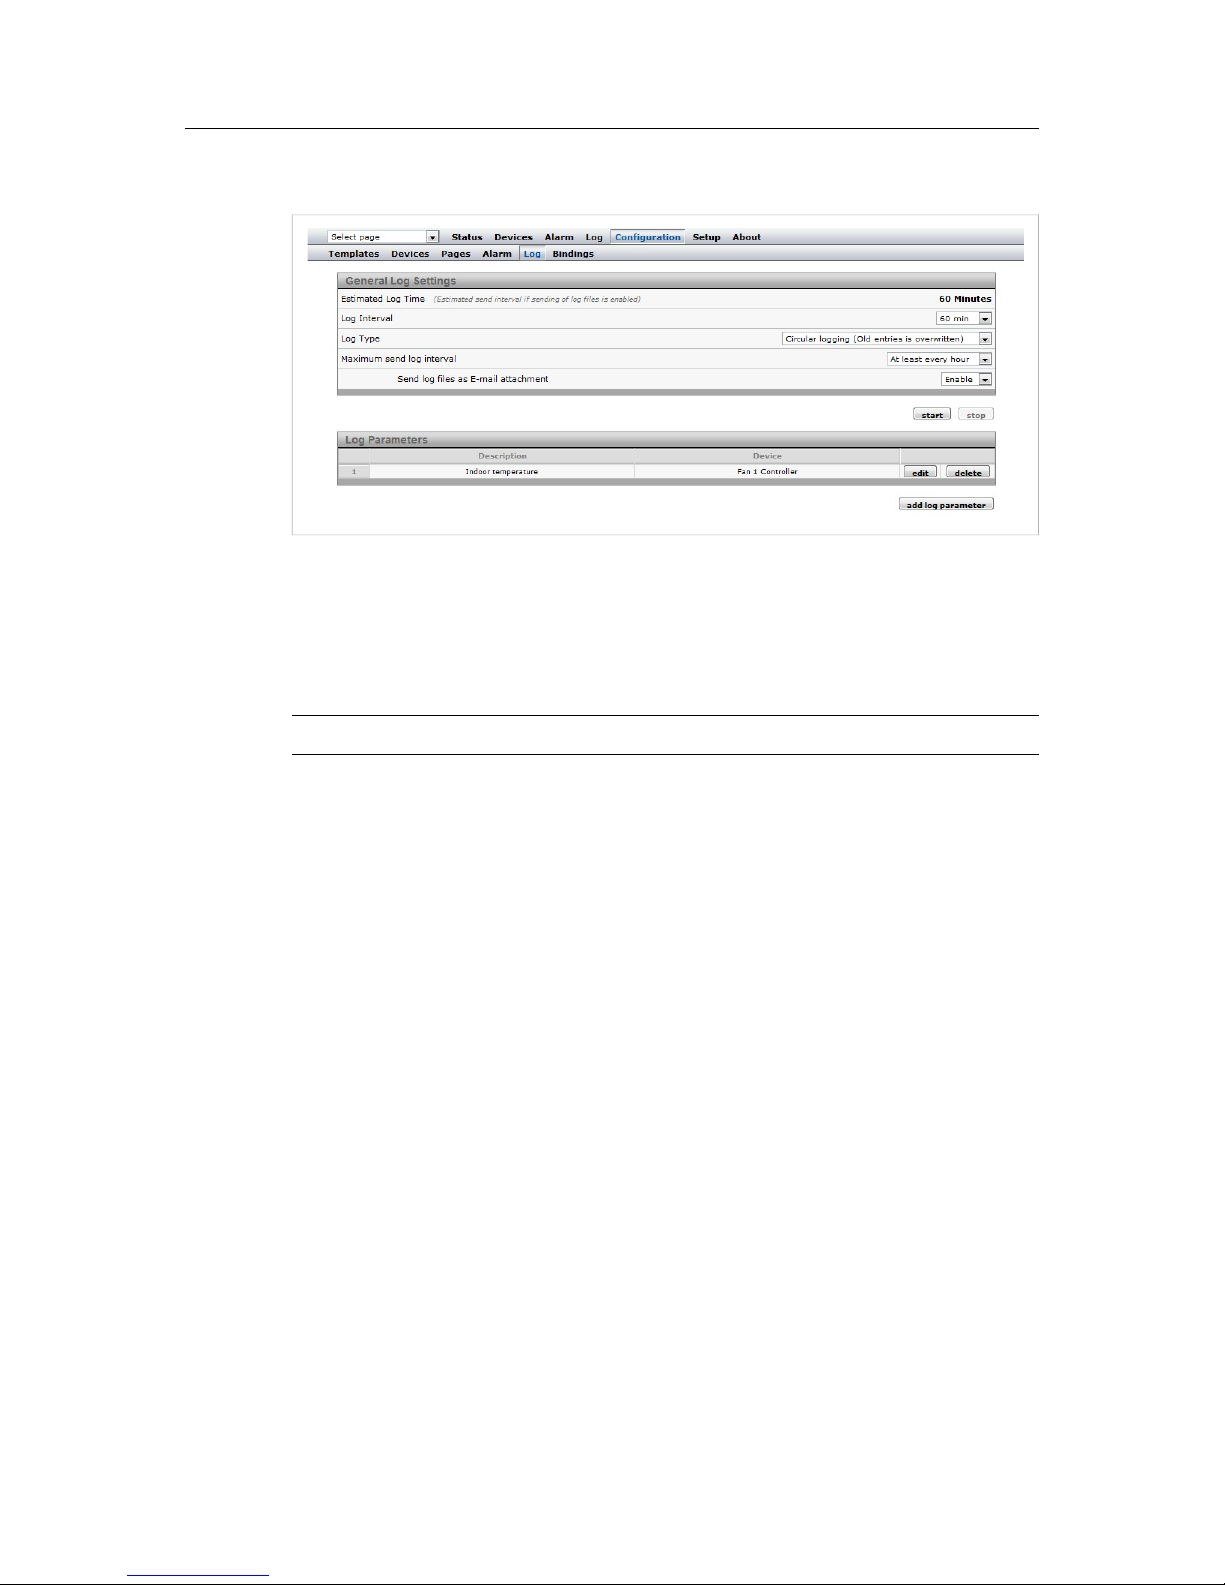
8.5 Configuration | Log
Fig. 36 Log configuration page
The log can have a maximum of 64 log parameters configured, and is stored in a csv (comma-separated values) text file. This file can be viewed on the Log | Graph page, or downloaded and opened in a text editor or spreadsheet program such as Microsoft Excel.
See also Log, p. 41.
General Log Settings
Estimated Log Time Gives an estimation of the time before the log file is full. This estimation will
depend on the configuration, i.e. the number of pages and parameters configured.
The number and size of graphics used in the pages will also affect the log file size.
If the log interval is set to a predefined time, this will show as the estimated log
time.
Log Interval Defines the time interval between the samples saved to the log file.
Log Type Can be set to either overwrite the oldest entries as the log fills up (circular
logging), or stop logging when the log space has been used up.
Maximum send log
interval
This will set the time when a log should be sent. If a time period is selected the log
will be sent with this interval, e.g. at the same minute for every hour when At least
every hour is chosen.
If Netbiter Argos is enabled the minute of the hour is different for each Netbiter, to
spread out Ethernet traffic and server load.
Send log as E-mail
attachment
If a Send log interval is specified the log file is sent as an e-mail attachment (if any
users are configured to receive log e-mails).
Netbiter
®
WS100/WS200 User Manual Doc ID: HMSI-27-323 Version: 1.00

Configuration 36 (50)
Fig. 37 Log parameters
To edit, delete or add log parameters, first click on stop (if the log is running) to stop the
current log process.Then click on edit or delete for an existing log parameter, or click on
add log parameter to add a new one. After you have finished adding/editing log parameters, click on start.
Edit log parameter
Device Select a device
Group Select a parameter group
Parameter Select the parameter to log
Delta logging If enabled, the difference between the two last samples will be logged.
Example: The values read from a device parameter during the first 4 log cycles
are: 5, 20, 32, 41. The logged values will then be: 5, 15, 12, 9.
Description A text that will be displayed on the Graph page and in the downloaded log file.
Netbiter
®
WS100/WS200 User Manual Doc ID: HMSI-27-323 Version: 1.00
Configuration 37 (50)
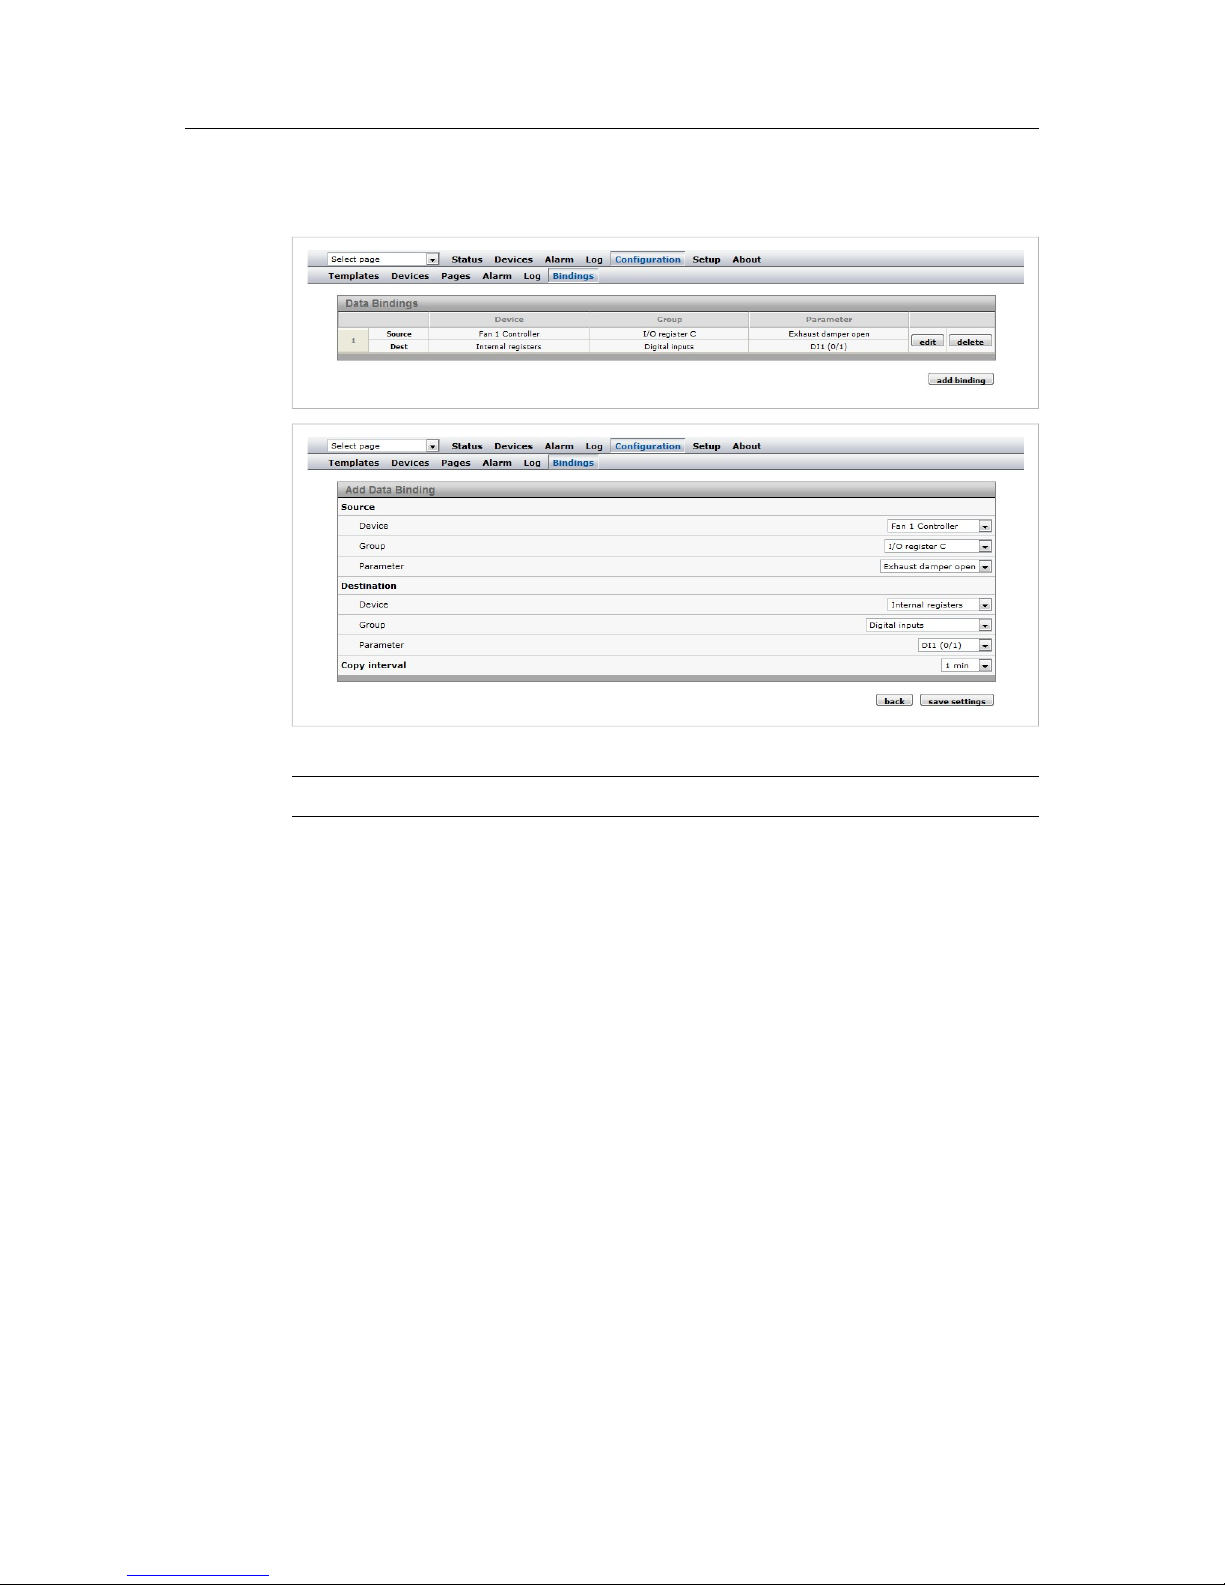
8.6 Configuration | Bindings
Bindings makes it possible to copy one Modbus register to another.
Fig. 38 Bindings configuration
Add Data Binding
Source Device/Group/
Parameter
The device parameter to be copied
Destination Device/
Group/Parameter
The device parameter that will be copied to
Copy Interval The time interval between each copy
Netbiter
®
WS100/WS200 User Manual Doc ID: HMSI-27-323 Version: 1.00

Everyday Use 38 (50)
9 Everyday Use
After the Netbiter WS100/200 has been setup and configured the web interface is ready to
be used for monitoring live data, logs and alarms.
9.1 Select page
Fig. 39 Select page menu
Use the drop-down menu to select a page to display. If a page has been set as Start Page it
will be open when you log in to the web interface. If no pages have been defined yet the
Status page will be open on login.
9.2 Status
Fig. 40 Status page
The Status page shows the current status of the Modbus interface and the internal/external modem (if present).
Netbiter®WS100/WS200 User Manual Doc ID: HMSI-27-323 Version: 1.00

Everyday Use 39 (50)
9.3 Devices
Fig. 41 Devices page
The Devices page lists all connected devices as well as the internal registers. Clicking on
Browse will open a browser tree with all available groups and parameters for the device
or internal register.
Fig. 42 Device parameter tree
Fig. 43 Internal register parameter tree
Netbiter
®
WS100/WS200 User Manual Doc ID: HMSI-27-323 Version: 1.00
Everyday Use 40 (50)
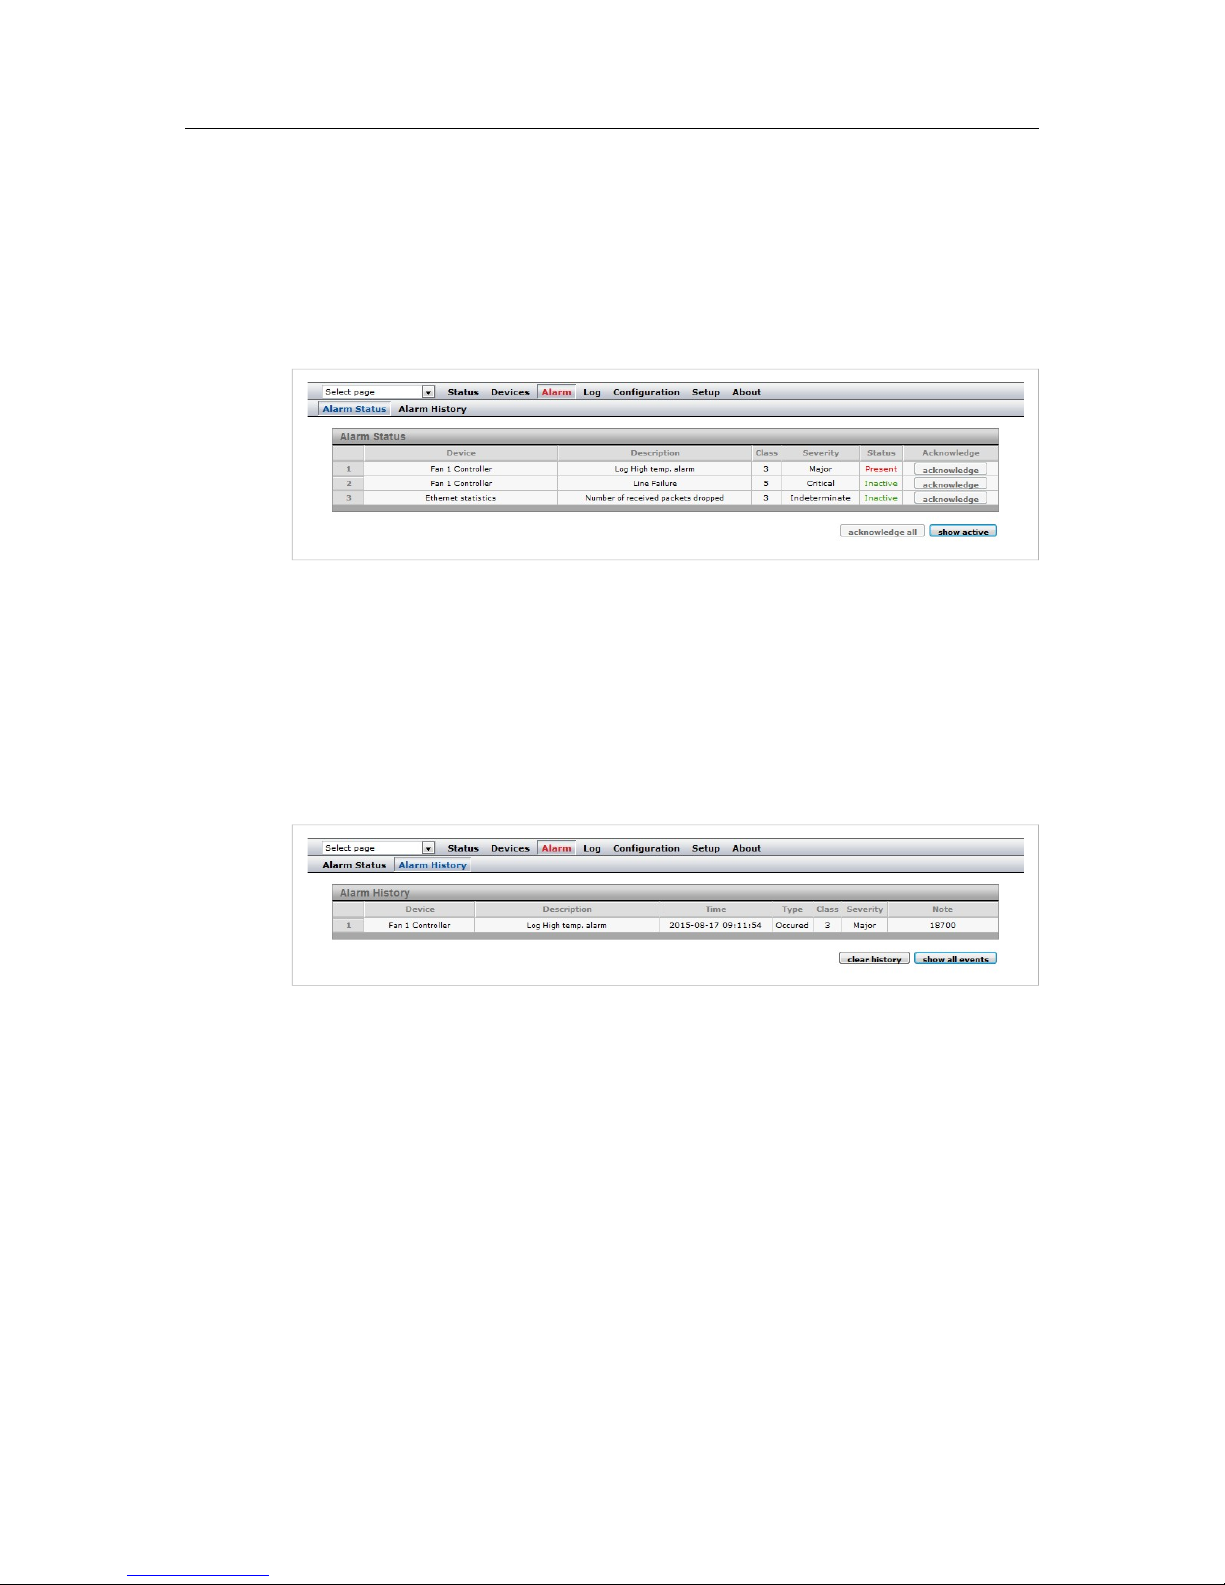
9.4 Alarm
The Alarm page gives access to all configured alarm parameters, the current state of the
alarms, and the alarm history.
When there is an active alarm the Alarm menu name will change color to red.
9.4.1 Alarm Status
Fig. 44 Alarm status page
Show active/Show all toggles between showing all configured alarms, or only those that
are present and unacknowledged.
Alarms can be acknowledged individually by clicking on Acknowledge, or all at the same
time by clicking on Acknowledge all. If an alarm does not require acknowledgement the
button will be grayed out.
9.4.2 Alarm History
Fig. 45 Alarm history
Every status change for an alarm parameter is logged on the Alarm History page, along
with information of the value for the parameter that triggered the alarm, and information
about what alarm messages were sent by the Netbiter gateway.
The alarm history can hold a maximum of 100 entries. If the list is full and a new alarm occurs, the oldest alarm history entry will be deleted.
Show all events All alarm events will be shown in the list.
Show occurrence Only alarm entries of type Occurred will be shown.
Clicking on Clear History will clear the alarm history.
Netbiter®WS100/WS200 User Manual Doc ID: HMSI-27-323 Version: 1.00

Everyday Use 41 (50)
9.5 Log
The event log can be viewed as a trend graph on the Log | Graph page. It can also be
downloaded as a csv (comma-separated values) text file for viewing in a text editor or
spreadsheet program such as Microsoft Excel.
Fig. 46 Log page
The log graph function requires a patch due to a Java compatibility issue. The patch can
be downloaded from www.netbiter.com/support/file-doc-downloads/ws-series.
The first 3 log parameters will be displayed in the graph as default. Use the checkboxes to
show/hide additional parameters.
Left-click and drag in the window to zoom in on a part of the graph, or use the + and –
buttons. Use the arrow buttons to scroll.
Scroll graph up
Zoom in
Scroll graph down
Zoom out
Scroll graph right
Reset view, view all
Scroll graph left
Download Log To Local
Hard Drive
Download the log to a local computer as a csv formatted text file.
The csv delimiter character can be set on the Setup | Regional page.
Clear Log File Delete the log from the Netbiter gateway.
Netbiter
®
WS100/WS200 User Manual Doc ID: HMSI-27-323 Version: 1.00

This page intentionally left blank

Appendix A: Internal Registers 43 (50)
A Internal Registers
Holding
register
Name Values
Options
Comment
1 Digital input 1 status 0 or 1 Read only
2 Digital input 2 status 0 or 1 Read only
3 Number Active Connections MB/TCP 0-10 Read only
4 Number Active Internal Connections 0-10 Read only
Serial Status (Modbus/TCP)
5 Valid responses 0–65535 Can be cleared
6 Serial timeouts 0–65535 Can be cleared
7
CRC errors 0–65535 Can be cleared
8 Input Buffer overruns 0–65535 Can be cleared
9 Frame errors 0–65535 Can be cleared
10 Exception responses 0–65535 Can be cleared
Serial Status (Buffered messages)
11 Valid responses 0–65535 Can be cleared
12 Serial timeouts 0–65535 Can be cleared
13 CRC errors 0–65535 Can be cleared
14 Input Buffer overruns 0–65535 Can be cleared
15 Frame errors 0–65535 Can be cleared
16 Exception responses 0–65535 Can be cleared
Serial Status (Internal requests and Webpages)
17 Valid responses 0–65535 Can be cleared
18 Serial timeouts 0–65535 Can be cleared
19 CRC errors 0–65535 Can be cleared
20 Input Buffer overruns 0–65535 Can be cleared
21 Frame errors 0–65535 Can be cleared
22 Exception responses 0–65535 Can be cleared
Configuration Registers
23 Modbus/TCP Port 1–65535 Default = 502
24 Gateway Modbus address (-1)–255
-1 Disabled Default
0–255 Enabled
25 Modbus/TCP idle timeout 0–65535 (seconds) Default = 60 s
0 Disabled
1–65525 Enabled
26 Baudrate 2400–115200 (bps) Default = 9600
27 Parity 0–2
0 No parity Default
1 Even parity
2 Odd parity
28 Number of Stop bits 1–2 Default = 1
29 Slave timeout time 25–65535
(milliseconds)
Default = 1000 ms
30 Physical interface 0–2
0 EIA-485
(RJ12)
Default
1 EIA-232
(DSUB)
2 EIA-232
(RJ12)
Netbiter
®
WS100/WS200 User Manual Doc ID: HMSI-27-323 Version: 1.00

Appendix A: Internal Registers 44 (50)
Holding
register
Name Values
Options
Comment
Authentication
31 Valid IP address 1 0–255 First byte of IP
address
0 Disabled IP address auth
disabled
1–255 Enabled
32 Valid IP address 2 0–255 Enabled Second byte of IP
address
33 Valid IP address 3 0–255 Enabled Third byte of IP
address
34 Valid IP address 4 0–255 Enabled Fourth byte of IP
address
35 Mask for Valid IP address 1 0–255 Enabled First byte of mask
36 Mask for Valid IP address 2 0–255 Enabled Second byte of mask
37 Mask for Valid IP address 3 0–255 Enabled Third byte of mask
38 Mask for Valid IP address 4 0–255 Enabled Fourth byte of mask
Netbiter
®
WS100/WS200 User Manual Doc ID: HMSI-27-323 Version: 1.00
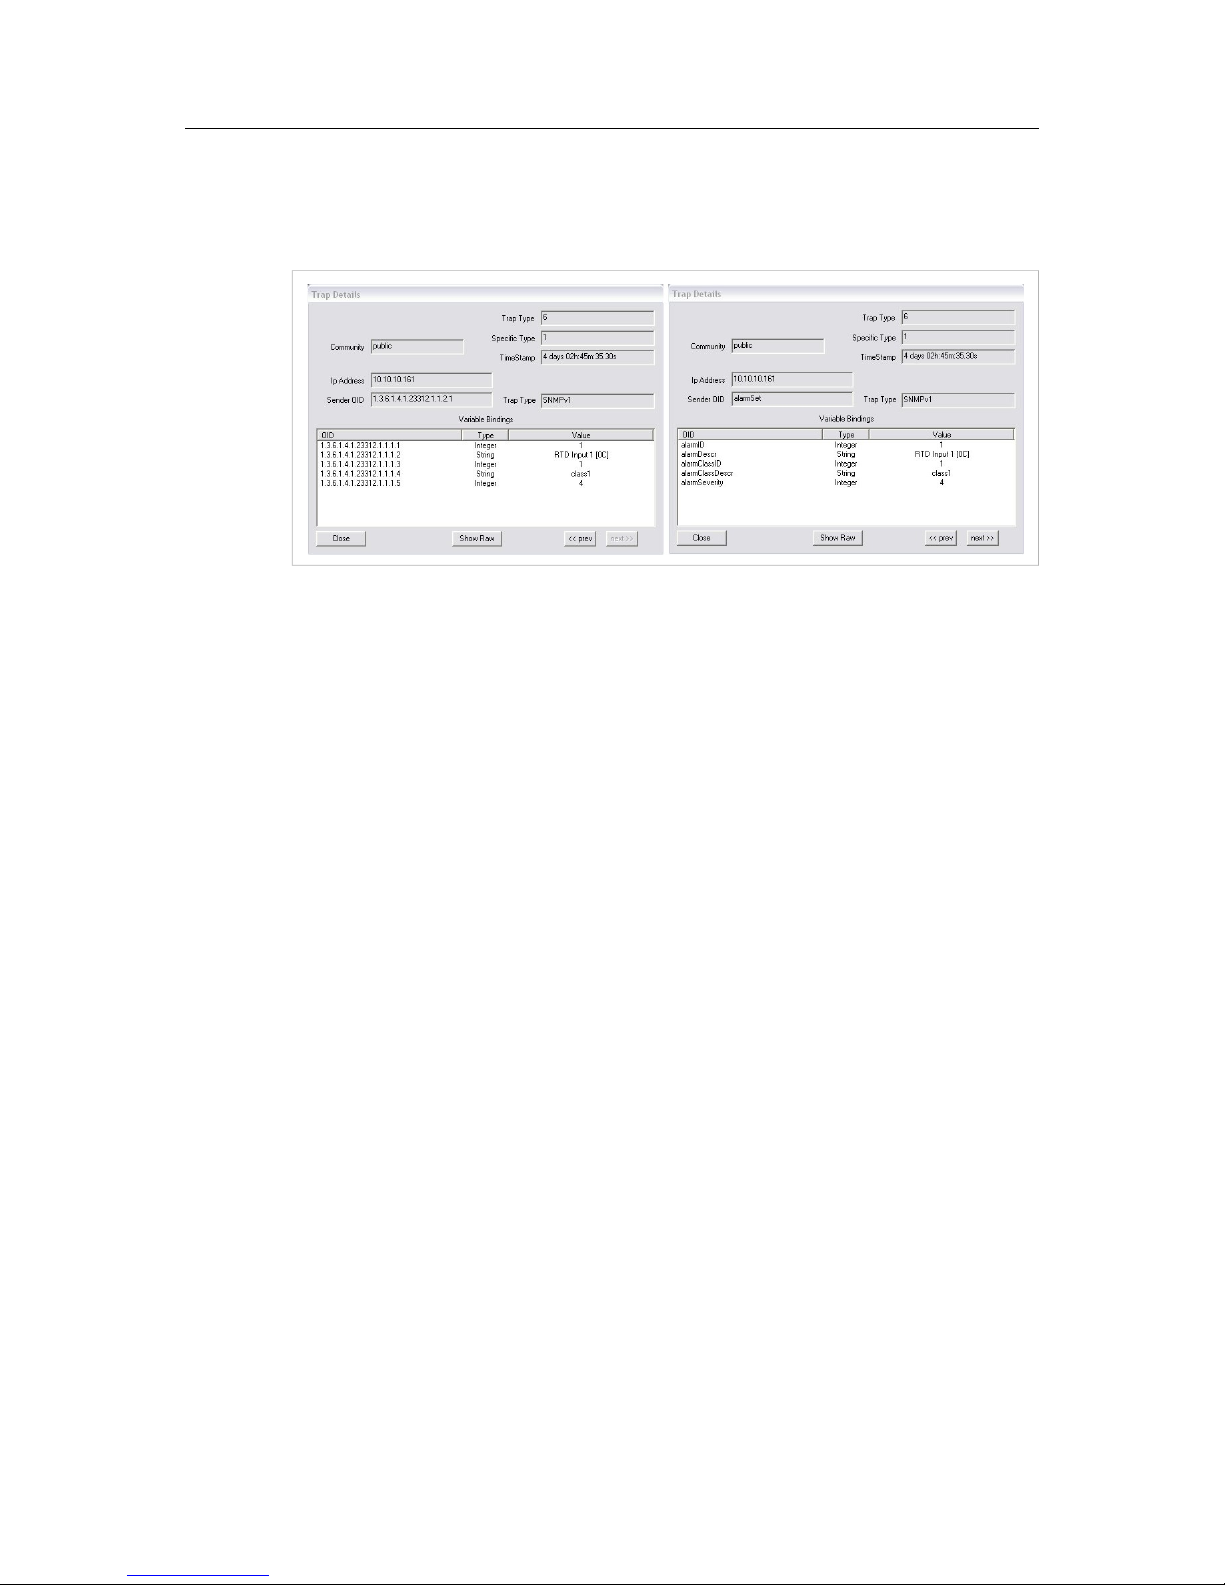
Appendix B: SNMP 45 (50)
B SNMP
If SNMP Alarms are enabled all alarms will be sent as SNMP traps to the host specified on
the SNMP page. See also Setup | SNMP, p. 21 and Configuration | Alarm, p. 32.
Fig. 47 SNMP trap example (high temperature alarm)
The OID is sent in the following numerical format:
.1.3.6.1.4.1.23312.1.1.2 [IP address][event]
.1.3.6.1.4.1.23312.1.1.[trap_id][trap_data]
where 23312.1.1 is the vendor/product identification.
Event 1 = Alarm set, event 2 = Alarm cleared.
The trap ID is divided into 5 messages with the following trap data:
1 Alarm ID
2 Alarm description
3 Class ID (1–10)
4 Class description
5 Alarm severity:
0 Indeterminate
1 Critical
2 Major
3 Minor
4 Warning
5 Cleared
Netbiter
®
WS100/WS200 User Manual Doc ID: HMSI-27-323 Version: 1.00

Appendix C: Technical Specifications 46 (50)
C Technical Specifications
Model name Netbiter WS100 Netbiter WS200
Order code WS100 WS200
Ethernet 10/100 Mbit/s
-
GPRS
-
Quad band GPRS Class 12
850/900/1800/1900 MHz
Alarms Email, SNMP, SMS Email, SMS
Digital inputs (max 24 VDC) 2 2
Serial port #1 RS-232 (D-sub) RS-232 (D-sub)
Serial port #2 RS-232/RS-485 RS-232/RS-422/RS-485
Antenna connector
-
SMA female
Protocols Modbus RTU, ASCII, TCP Modbus RTU, ASCII, TCP
Connected devices 32 32
Baud rates 300–115200 baud 300–115200 baud
Wall mounting No No
DIN rail mounting Yes Yes
Dimensions (WxDxH) 90 x 70 x 58 mm 90 x 70 x 58 mm
Operating temperature -40 to +65 °C -30 to +65 °C
Storage temperature -40 to +85 °C -40 to +85 °C
Housing class IP20 IP20
Power supply 9–24 V DC or AC 9–24 V DC
Power consumption 2 W 3 W
Certifications CE,
CULUS
, RoHS CE,CULUS, FCC/IC, PTCRB, RoHS
Netbiter
®
WS100/WS200 User Manual Doc ID: HMSI-27-323 Version: 1.00

Appendix D: Regulatory Notices 47 (50)
D Regulatory Notices
D.1 Netbiter WS100/WS200
D.1.1 EMC Compliance (CE)
This product is in compliance with the EMC directive 2004/108/EC through conformance
with the following standards:
EN 61000-6-4 (2007)
Emission standard for industrial environment
• EN 55022:2006 + A1:2007
EN 61000–6–2 (2005)
Immunity for industrial environment
• EN 61000–4–2 (2009)
• EN 61000–4–3 (2006)
• EN 61000–4–4 (2004)
• EN 61000–4–5 (2005)
• EN 61000–4–6 (2007)
D.1.2 UL/c-UL Compliance
UL 508
Netbiter®WS100/WS200 User Manual Doc ID: HMSI-27-323 Version: 1.00

Appendix D: Regulatory Notices 48 (50)
D.2 Netbiter WS200
D.2.1 FCC Compliance Statement
The design of this equipment complies with U.S. Federal Communications Commission
(FCC) guidelines respecting safety levels of radio frequency (RF) exposure for Mobile
devices.
This product contains FCC ID: QIPPHS8-P
RF Exposure - This device is only authorized for use in a mobile application. At least 20
cm of separation distance between the device and the user’s body must be maintained at
all times.
Any changes or modifications not expressly approved by HMS Industrial Networks
AB could void the user's authority to operate the equipment.
This equipment has been tested and found to comply with the limits for a Class A digital device, pursuant to part 15 of the FCC Rules. These limits are designed to provide
reasonable protection against harmful interference when the equipment is operated in
a commercial environment. This equipment generates, uses, and can radiate radio frequency energy and, if not installed and used in accordance with the instruction manual, may cause harmful interference to radio communications. Operation of this
equipment in a residential area is likely to cause harmful interference in which case
the user will be required to correct the interference at his own expense.
D.2.2 Industry Canada Statement
This product contains IC ID: 7380A-PHS8P
Netbiter®WS100/WS200 User Manual Doc ID: HMSI-27-323 Version: 1.00

This page intentionally left blank

last page
R285 / 2015-09-29 15:03 UTC © 2015 HMS Industrial Networks AB
 Loading...