

Page 1
EC150 User Guide
General
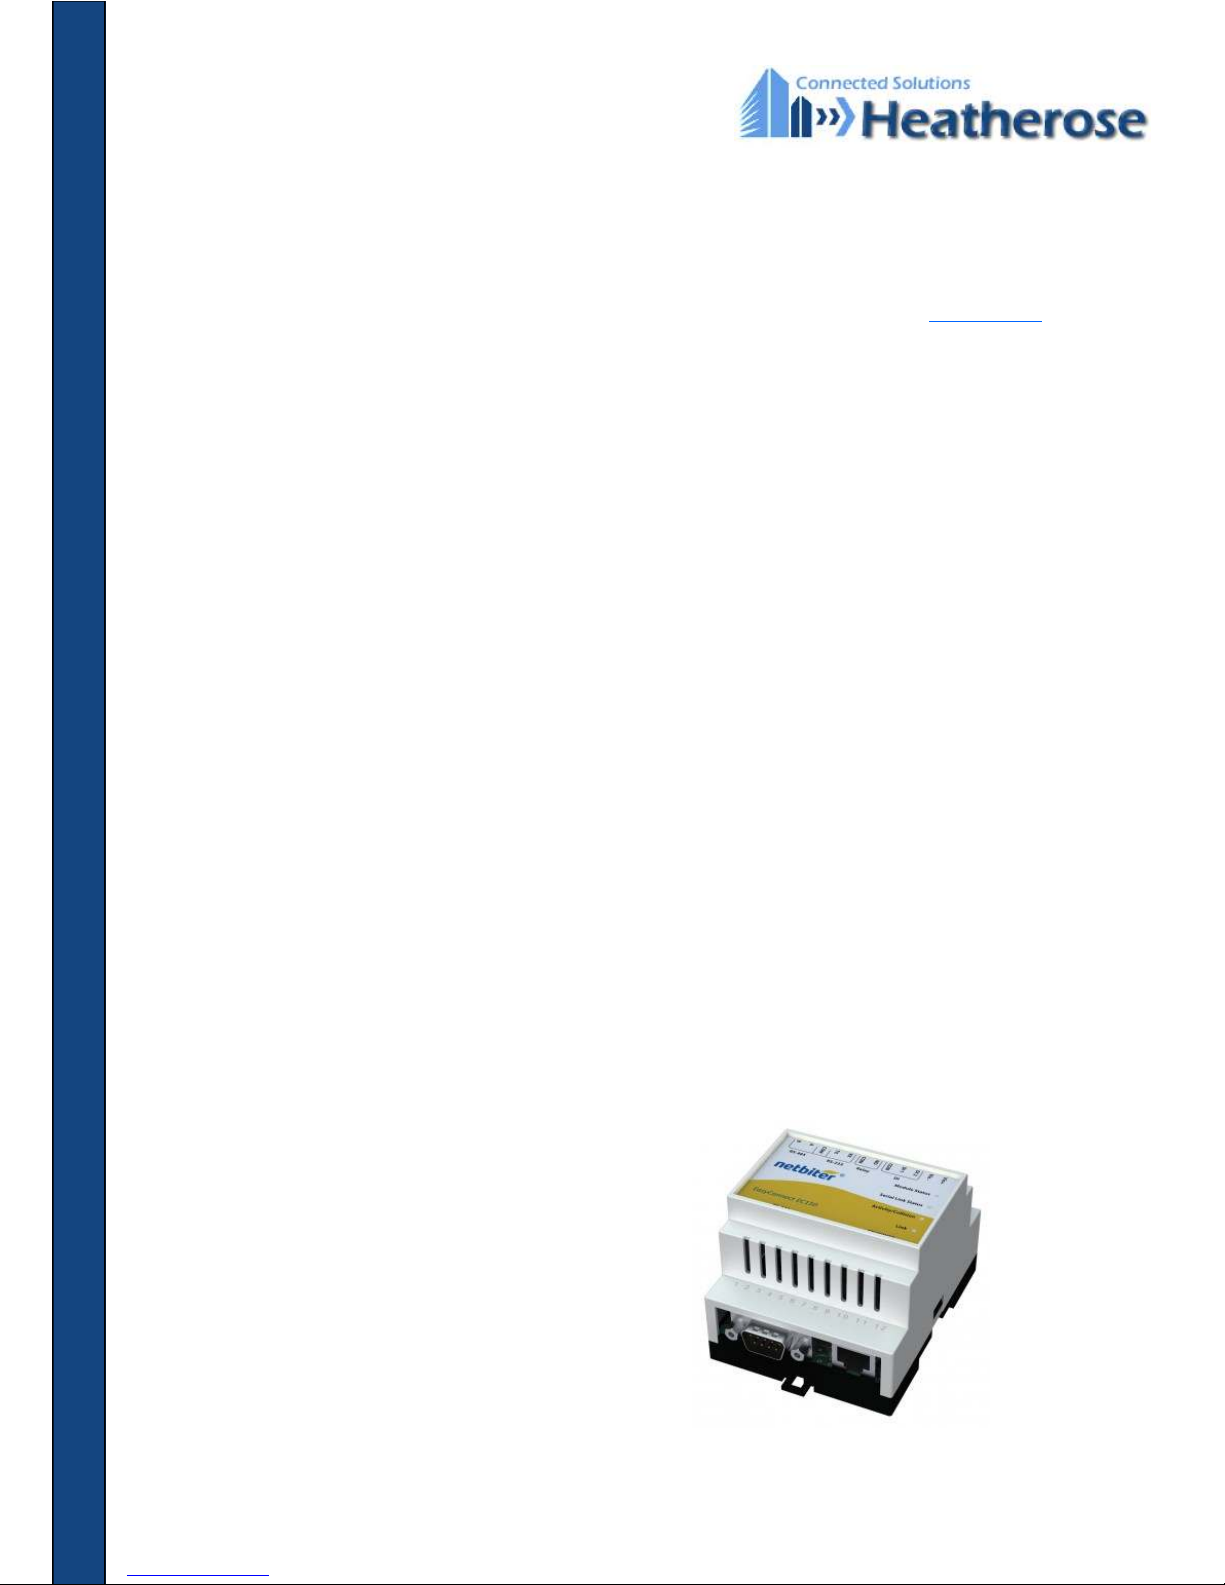
The Netbiter® EasyConnect EC150 is a small remote gateway that connects any Modbus device with the Netbiter Argos server
over Ethernet. This makes it possible to remotely monitor and control Modbus devices and networks.
The Netbiter® EasyConnect series is always used together with the Netbiter Argos server (www.netbiter.net) to make the remote
monitoring and control solutions easy to install, configure and maintain. This unique combination provides;
Access and security features
• No need for public or static IP number in the installation.
• Easy passing through firewalls in a secure way without the need of complex VPN solutions.
Data management features
The Netbiter Argos offers through a web interface a wide range of features.
• Monitor and control of data
• Alarm management (email, SMS etc)
• Historical data logging and graphical trend graphs
• Reports (weekly / monthly etc)
• Map overview and tracking
• Web services interface to exchange data to
other web sites
Service management features
The Netbiter Argos offers many management features, especially suitable for large sites.
• Management of authorized users, projects, devices etc
• Documentation of remote sites
• Automatic backup / restore or remote configurations and software
• Traffic analyser and reports
Additional functionality
• Transparent Modbus RTU/TCP Gateway
The Netbiter® EasyConnect product family is designed to be plug-n-play and easy to install, configure and maintain. It’s plug-nplay structure makes it possible to do large scale installations quickly without being an
IT/mobile network expert. Simplicity is key and this is what the Netbiter® EasyConnect series is about.
Page 2
EC150 User Guide
Connectors
Power
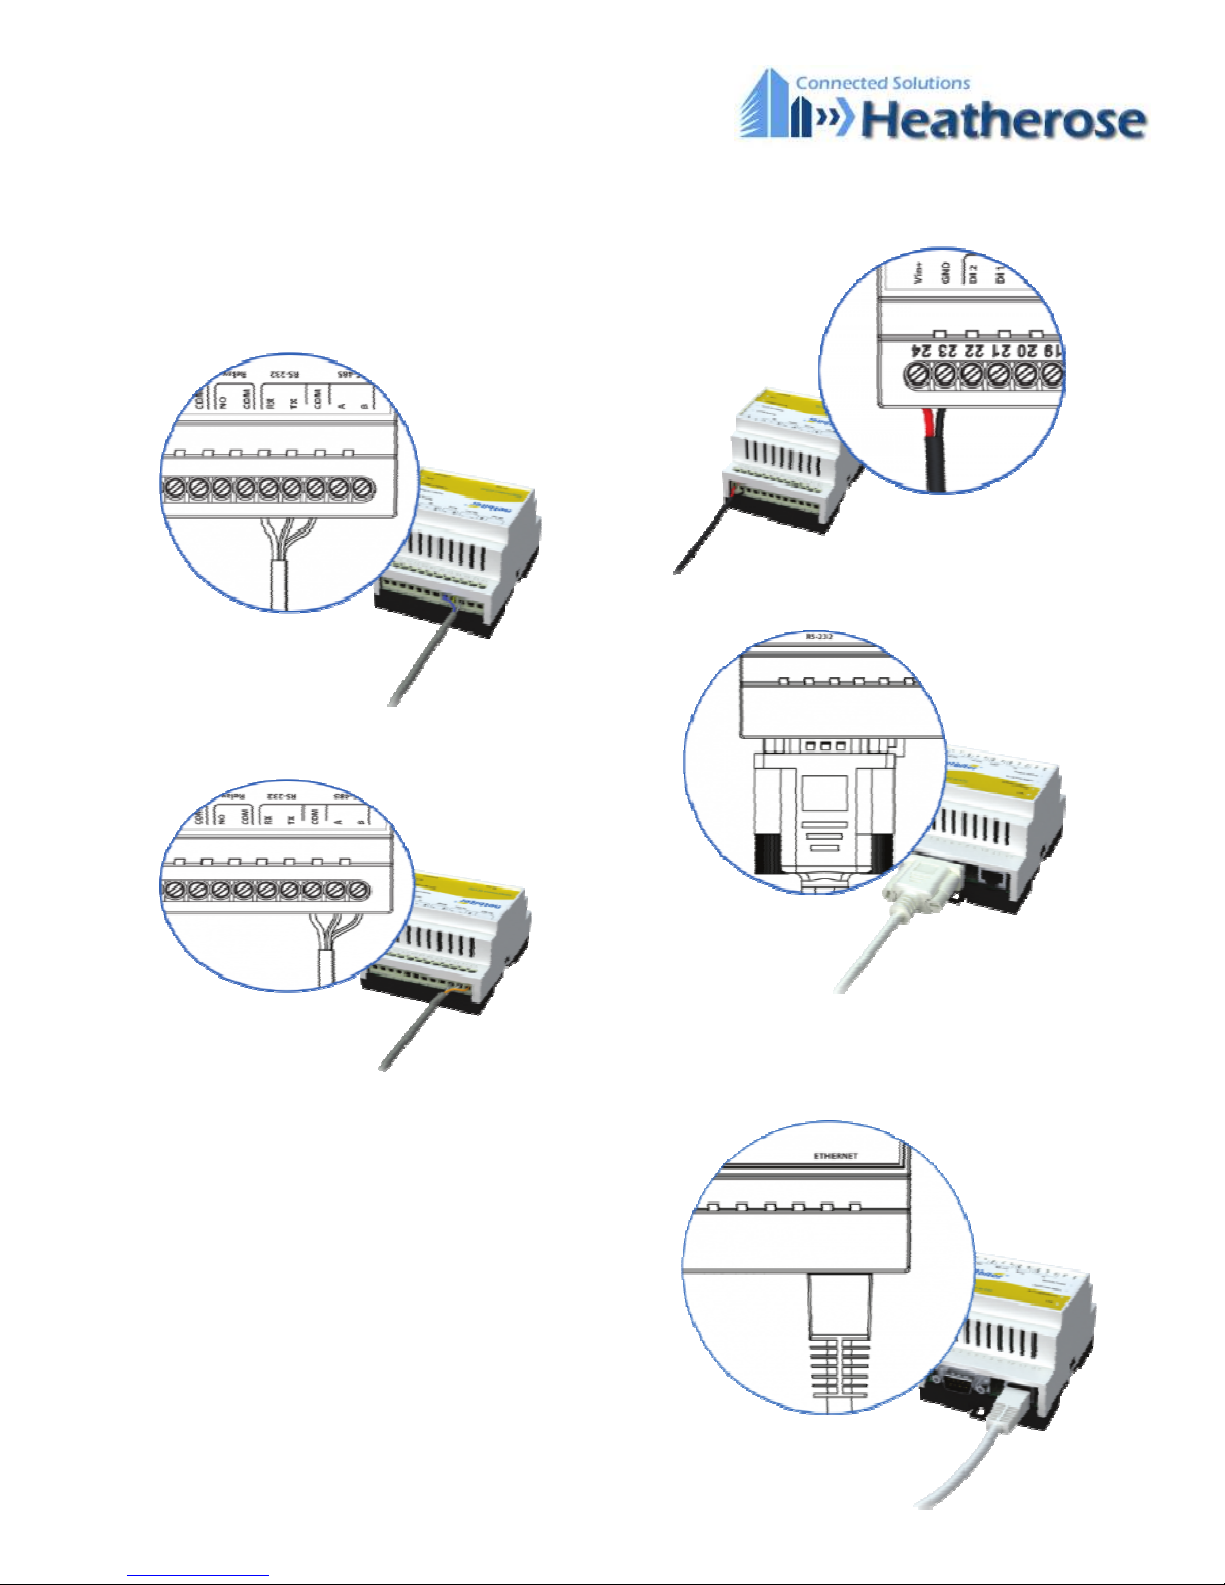
The Netbiter EC150 can be powered with 9-24 V DC or AC.
RS485
RS232 by wire or d-sub connector
Can be used to connect ModbusRTU slave devices, called sub
device at Netbiter Argos. There are two ways to connect RS232 to
EC150, directly by wire or through a standard 9-pin d-sub connector.
Connect directly by wire
RS232 using a d-sub connector
Ethernet
Page 3
EC150 User Guide
Activate the EC150
LED indicators
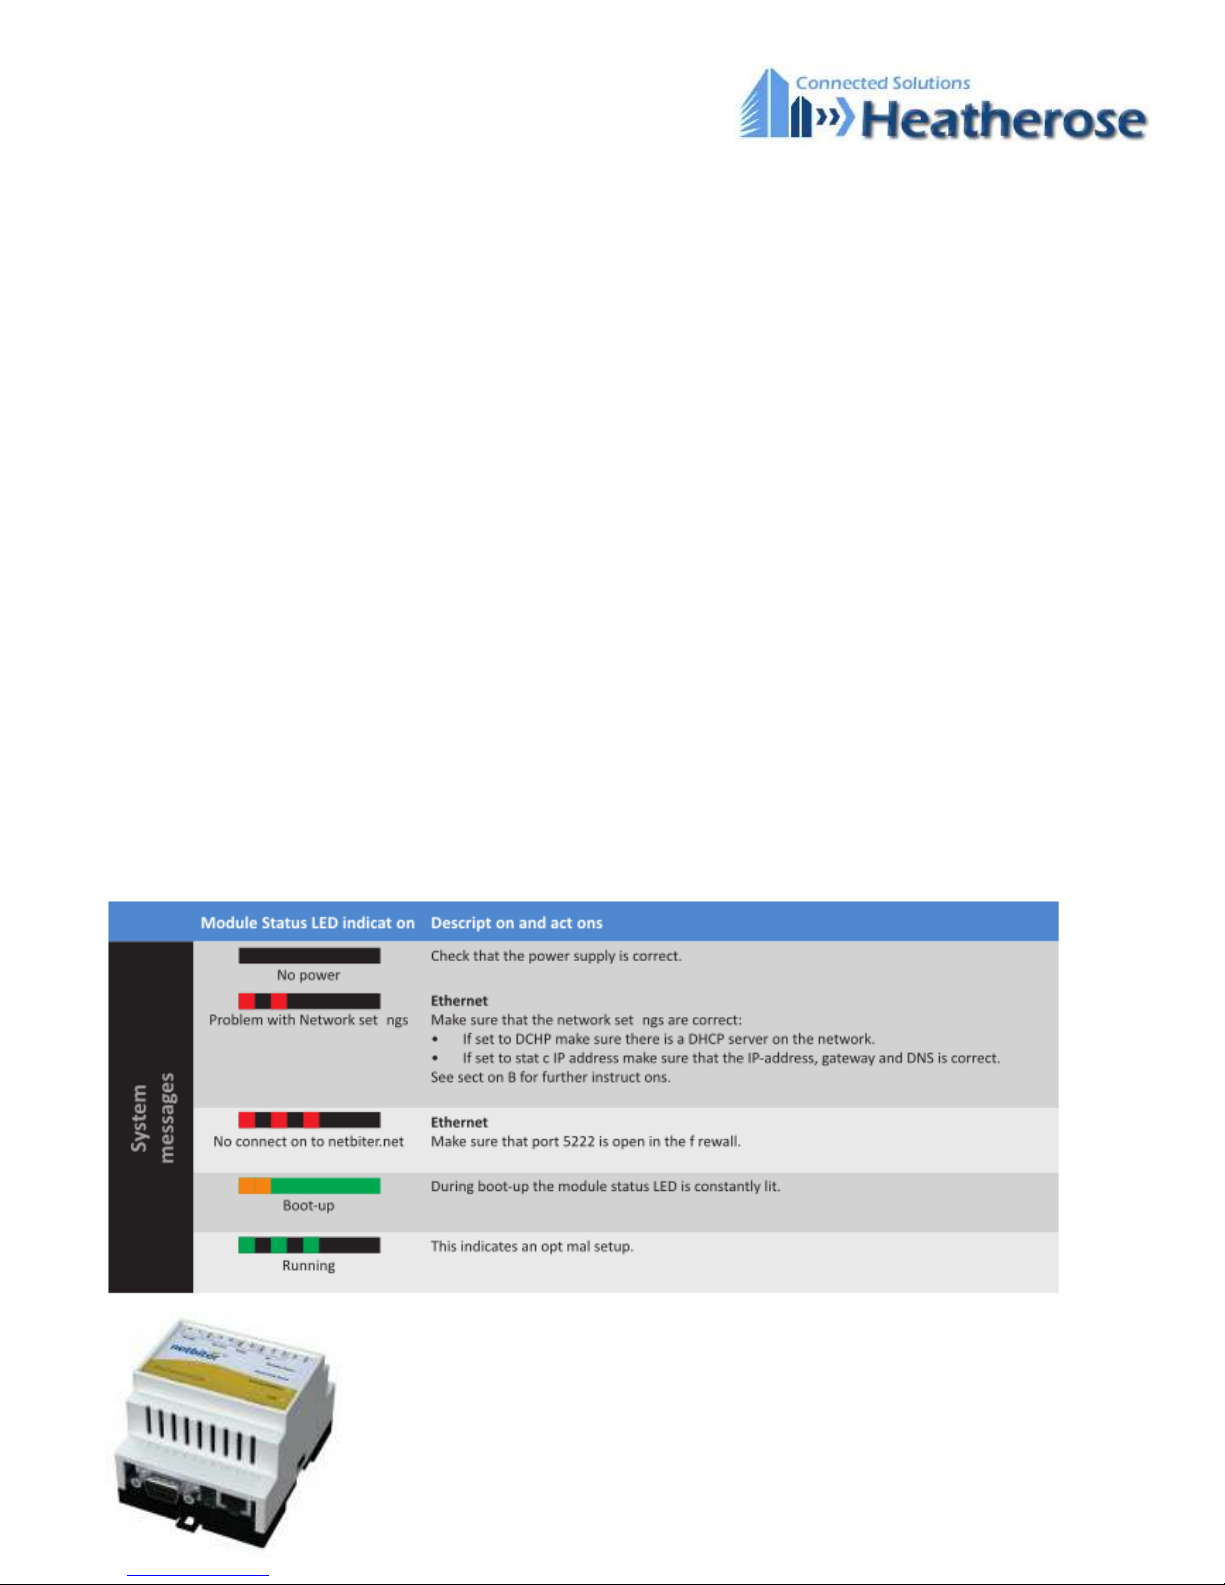
Module status LED
Name Color Function
Module Status
OFF
No power
Red/Green See Module status below
Serial Status
Green
Flashing – Serial packet receive
Red
Flashing – Serial packet transmit
Activity/Collision
Green
Flashing – Ethernet Packet, receive
Red
Flashing – Ethernet Collision detected
Ethernet link
Green
Turned on – Ethernet networkdetected, 10 Mbps
Orange
Turned on – Ethernet networkdetected, 100 Mbps
Page 4
Configure EC150
The configuration of the EasyConnect is done under the Menu Configure Devices
at NetBiter Argos. All the available devices will be listed.
Click Configure to get access to all settings.
Sub device
Every EasyConnect must have a sub device. The built in I/O will automatically show as a virtual sub device, and will be ready to
use immediately.
Every parameter in a sub device can be viewed as live values at the Overview page for the remote gateway.
Device templates
To communicate with a Modbus sub device connected to the EasyConnect, you need a Device template
which is a interface between the sub device
and the EasyConnect. The Device template contains information about the parameters in your sub device and how they should be han
dled. You can
upload, edit and create new device templates under the menu Device templates
. To create a new device template you will need the Modbus docu-
mentation from the manufacturer of your sub device.
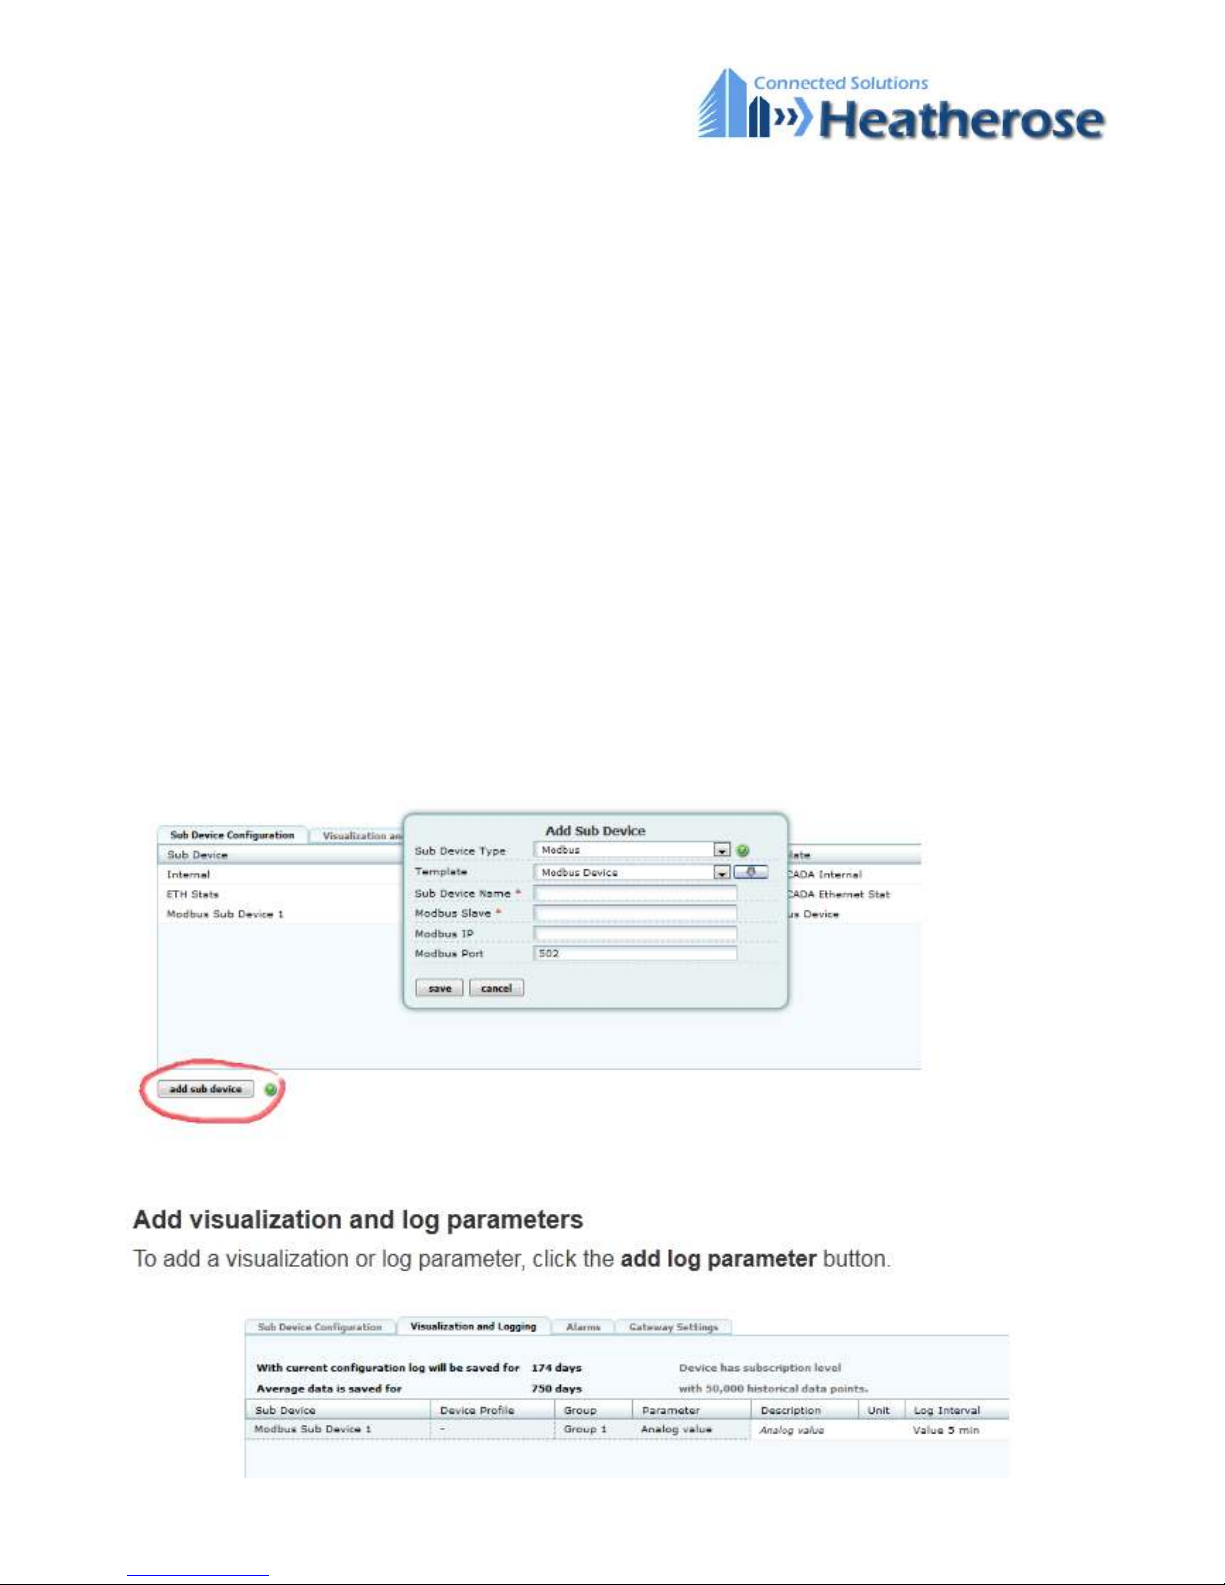
Adding a new Sub device
Press “add sub device” and fill in it´s settings.
EC150 User Guide
Page 5
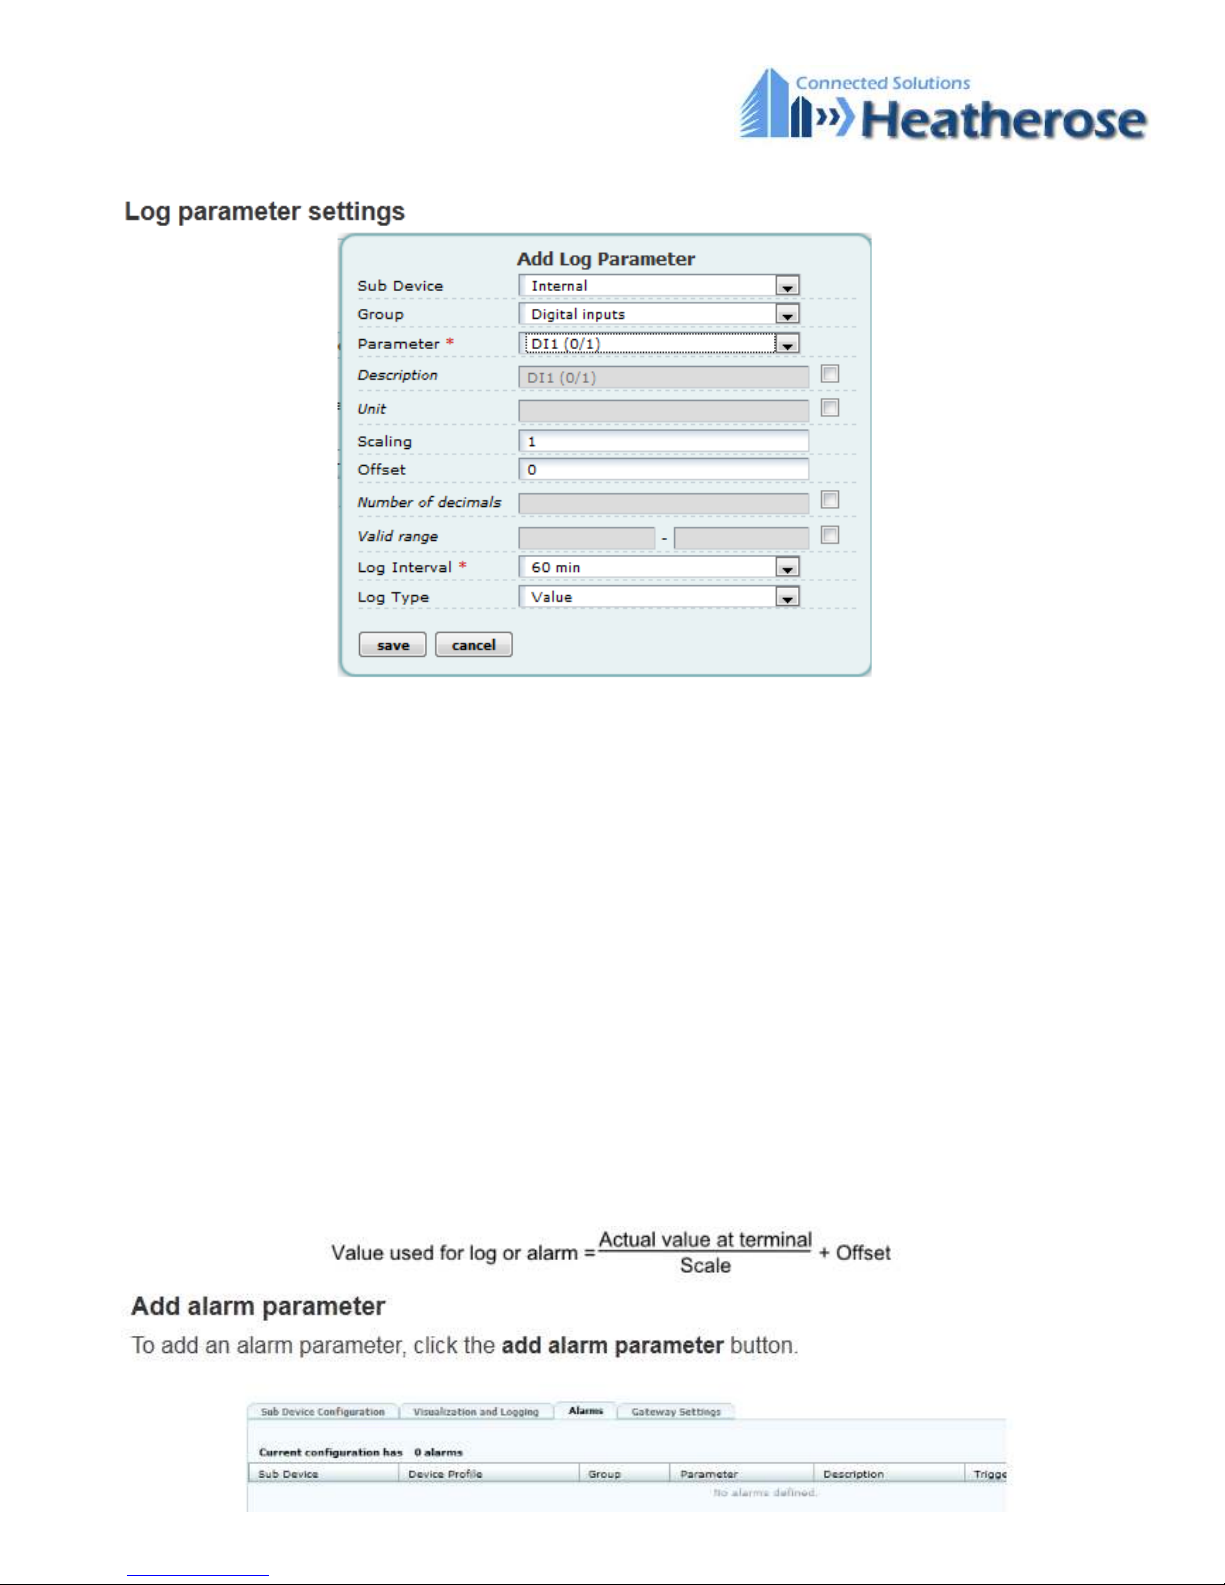
EC150 User Guide
•
Sub device: The sub device that has the parameter that shall be logged.
•
Group: The group in where the parameter resides.
•
Parameter: The parameter that shall be logged.
•
Description: A name and description for the parameter. If the box isn´t checked, the default description from the template
will be used.
•
Unit: The unit of the parameter. If the box isn´t checked, the default description from the template will be used.
•
Scaling: The logged parameter can be scaled with this value (Actual value at terminal/Scale).
•
Offset: An offset that is added to the parameter value.
•
Number of decimals: Defines the number of decimals to use for this parameter. If the box isn´t checked, the default description from the template will be used.
•
Valid range: Defines the maximum and minimum for a write parameter. If a user tries to enter a value outside the range a
warning message will appear. If used in combination with scaling, it is the scaled value that should be used. If the box isn´t
checked, the default description from the template will be used.
•
Log interval: The interval for every sample (5 minutes to 60 minutes). This could be set to Live value if the parameter only
should be read/(writeable) and not logged. If it is set to Live value this parameter will be accessible on the Live value page
under the device overview.
•
Log type: Set the log type. Here you can choose between Value and Delta. Value logs the parameters actual value and Delta
logs the difference since last log sample.
Example of use of scaling and offset:
Page 6
•
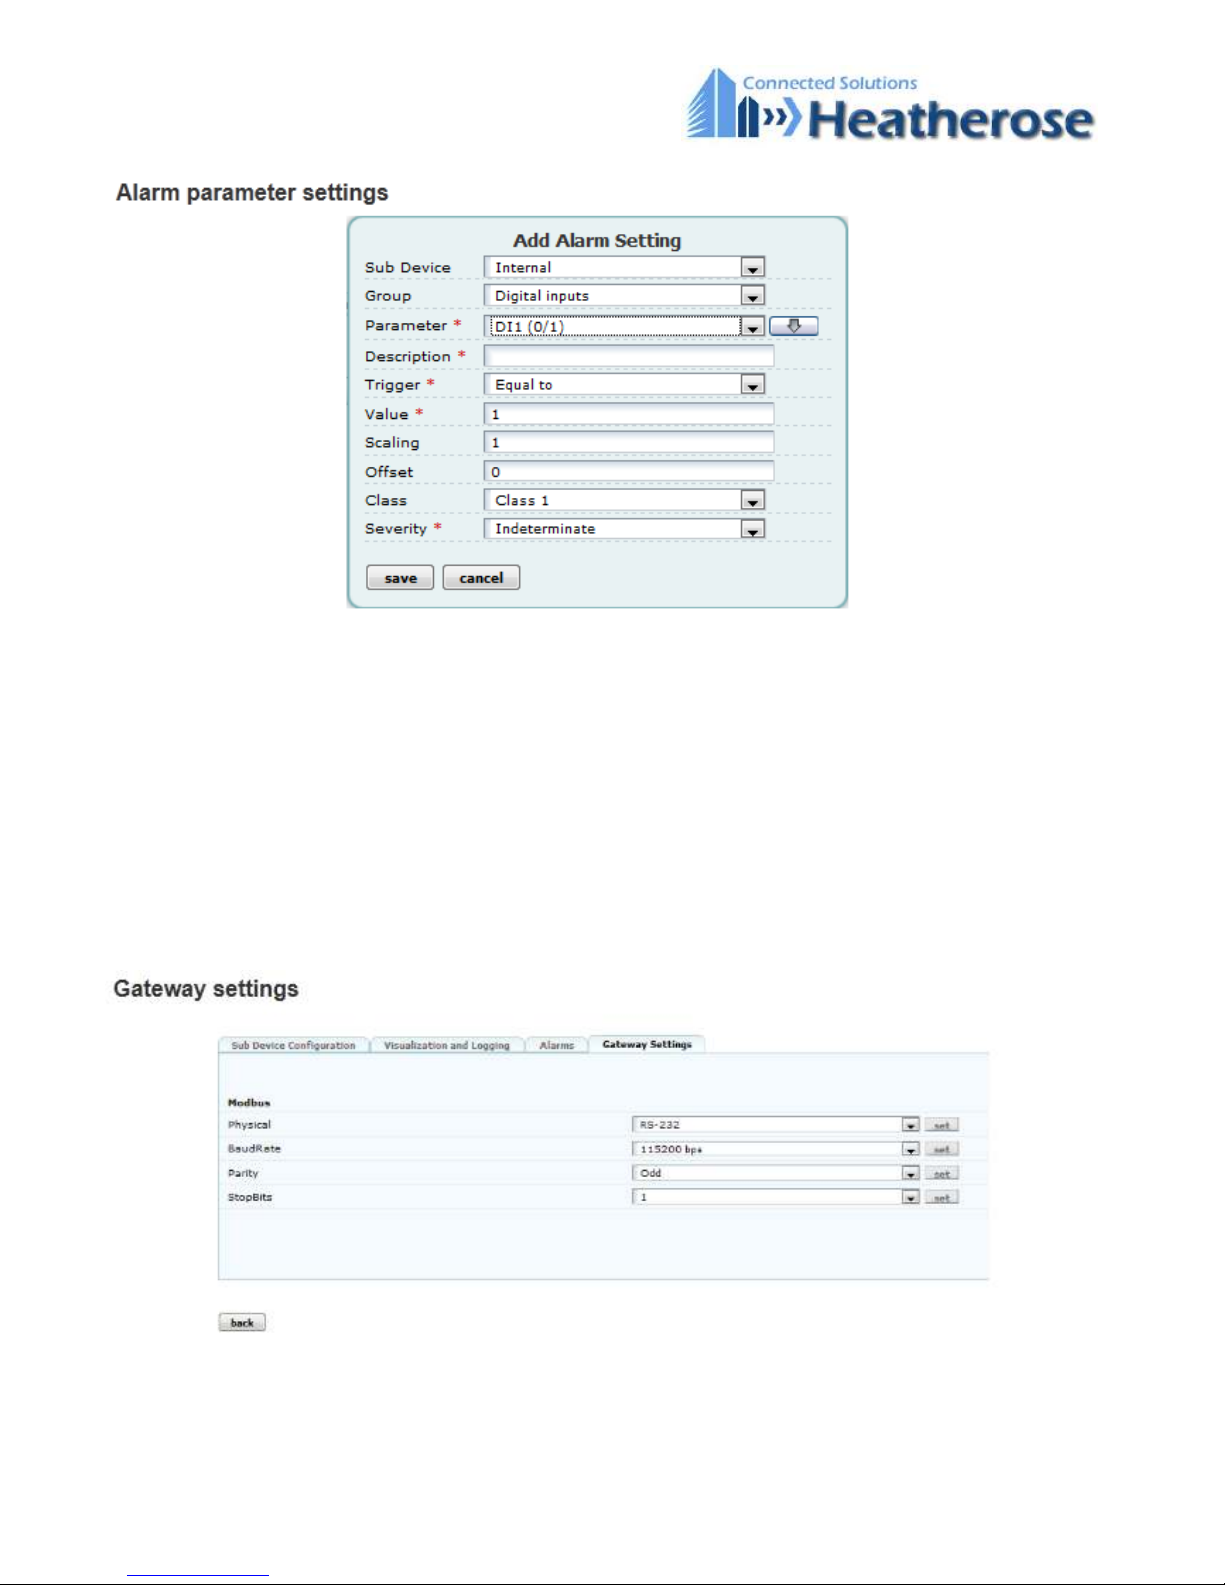
Sub device: The sub device that has the parameter that shall be logged.
•
Group: The group in where the parameter resides.
•
Parameter: The parameter that shall be logged.
•
Description: A name and description for the parameter. If you click the down arrow on the right hand side of the parameter list, the parameter name will be copied.
•
Trigger: Equal to, Not equal to, Greater than or Less than value.
•
Value: Triggvalue.
•
Scaling: The logged parameter can be scaled with this value (Parameter/Scale).
•
Offset: An offset that is added to the parameter value.
•
Alarm Class: Sets the class for the Alarm. You can choose between Class 1 to Class 10.
•
Severity: Can be set to Indeterminate, Warning, Minor, Major and Critical.
EC150 User Guide
Page 7
EC150 User Guide
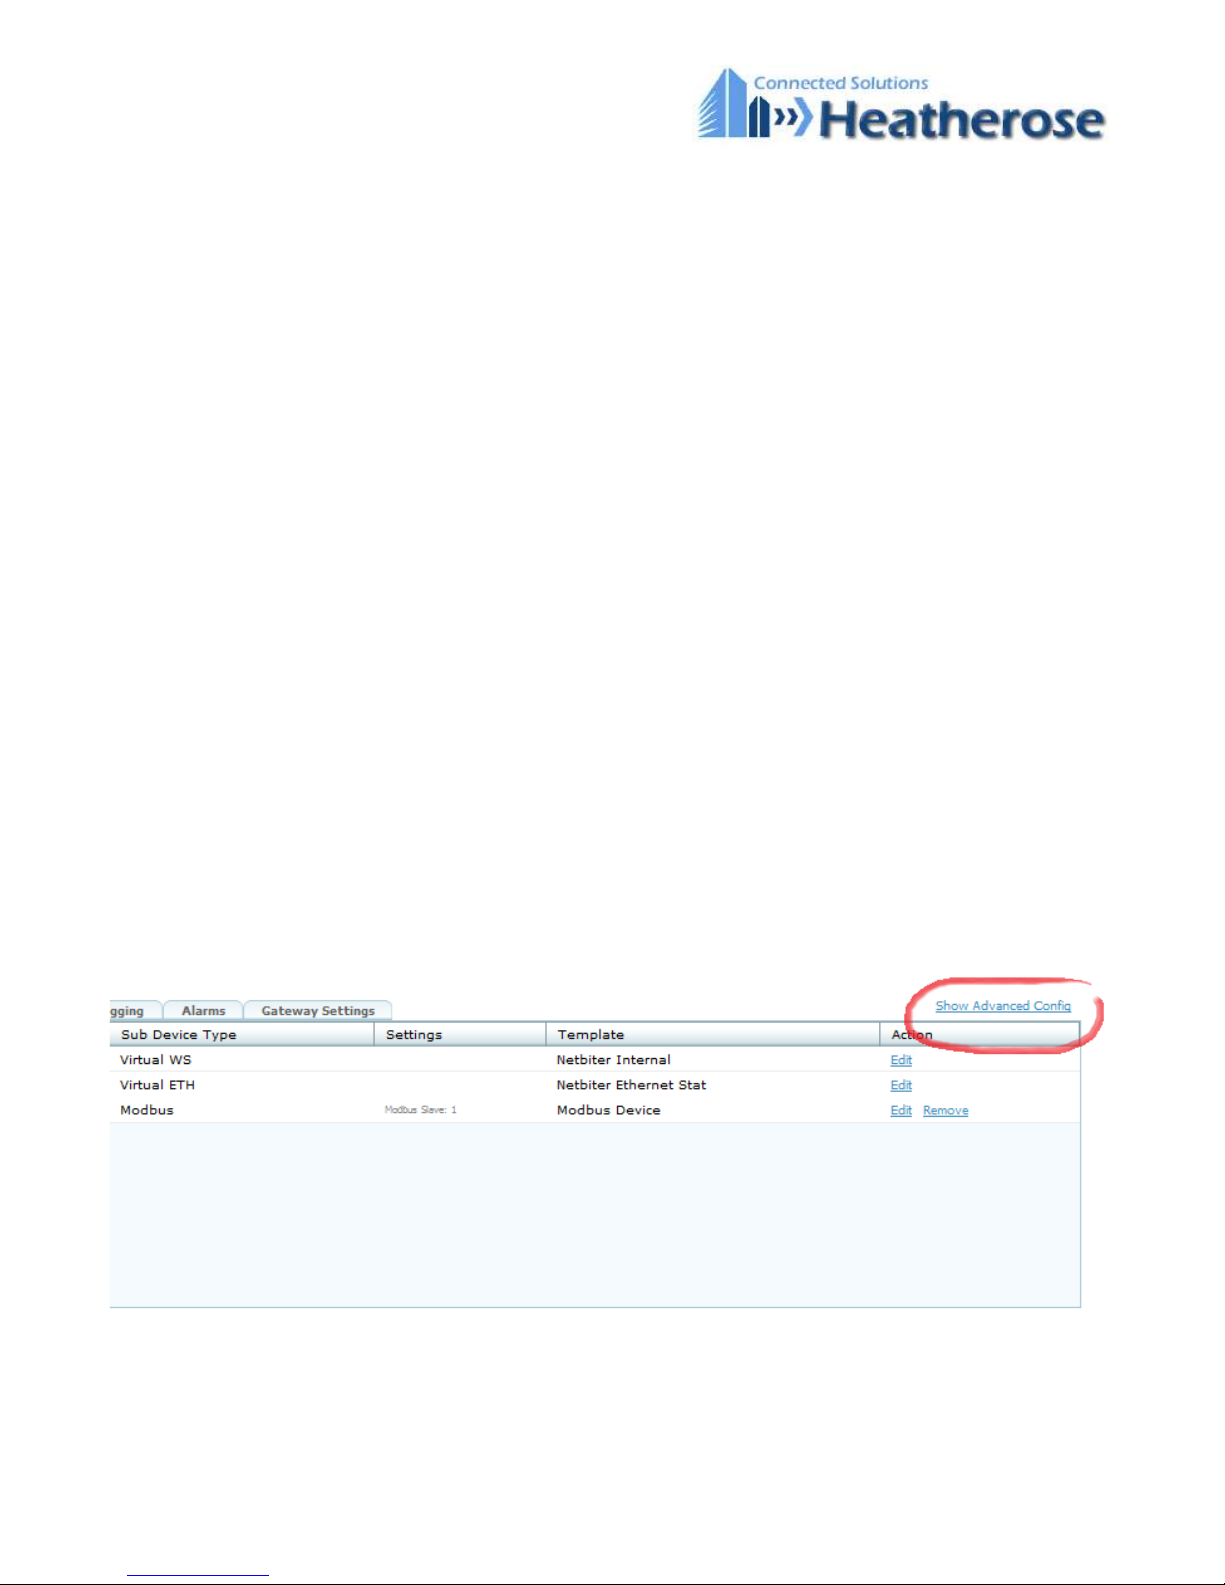
Modbus
•
Physical:Choose what physical Modbus interface your sub device is connected to.
•
Baudrate:Set the speed which your sub device is communicating with. Refer to the sub device’s manual.
•
Parity:Set the parity that your sub device uses for error detection. Refer to it’s manual.
•
Stopbits:Set the the amount of stopbits your sub device uses. 1 or 2 stopbits can be used. Refer to the sub device’s manual.
Advanced configuration
The EasyConnect has the capability to handle Device profiles, which are a shared configurations between several Remote gateways. When changing a device profile it will apply to all devices that are connected to the Device profile. Every device that is
sharing the Device profile has to be synchronized.
Using Device profiles decrease the workload for administrators and make it easy to manage installations that are similar.
Alarms and/or logs can be configured in a Device profile, and several Device profiles can be connected to one Remote gateway.
A Remote gateway that have Device profiles connected can also have individual alarm and log parameters, which makes it
quick and flexible to make powerful configurations and also easy to maintain.
In the example above there are log and alarm parameters configured in the device profiles. Device profile A is shared for all
the three slaves. Device Profile B, and the configured parameters, are shared by the sub device in the middle and to the right.
The device profile C are shared by the sub devices to the right and to the left.
The devices also has individual set of parameters, named configuration in the image above.
Page 8
EC150 User Guide
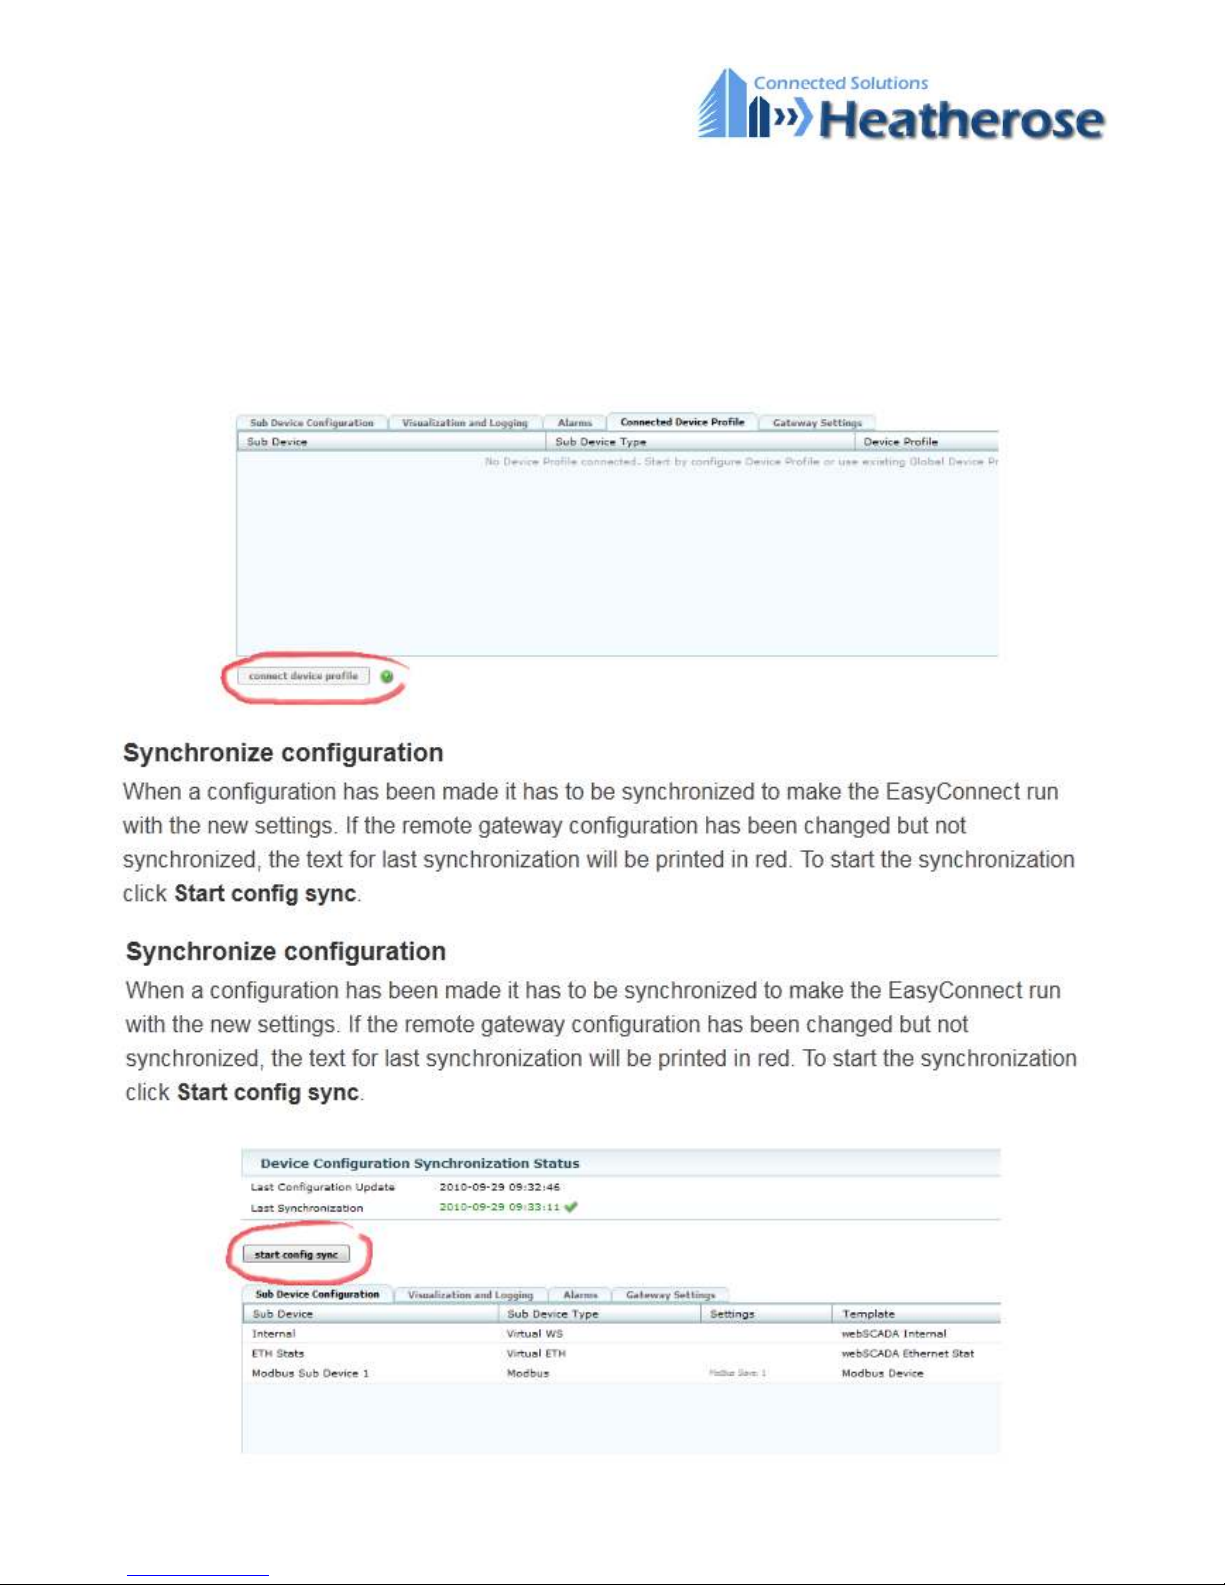
Click connect device profile to add a profile to a sub device.
To edit or create a device profile go to Device Profiles in the menu. Parameters are configured in the same way as for a remote
gateway.
Page 9
EC150 User Guide
Help & Support
Heatherose Connected Solutions Limited
Newark 01636 702805 - www.heatherose.co.uk
www.netbiter.co.uk
Email: [email protected]
Heatherose Limited
Unit 1 Oak Tree House
Brunel Drive Ind. Est.
Newark Notts
NG24 2EG
Tel: 01636 702805
01636 679376
Email: [email protected]
Web: www. heatherose.co.uk
 Loading...