

Page 1

NETAVIS Observer 4.6
User Manual
English
Page 2

NETAVIS Observer 4.6 User Manual (October 2015)
Page 2 of 204
NETAVIS Observer 4.6 User Manual
Valid from Observer 4.6.2
Published in October 2015
The software described in this manual is licensed under the terms of the NETAVIS end user license
agreement and may only be used in accordance with these terms.
Copyright
Copyright © 2003-2015 NETAVIS Software GmbH. All rights reserved.
NETAVIS and Observer are trademarks of NETAVIS Software GmbH. All other trademarks are
trademarks of their respective holders.
NETAVIS Software GmbH
Lerchenfelder Gürtel 43
A-1160 Vienna
Austria
Tel +43 (1) 503 1722
Fax +43 (1) 503 1722 360
Page 3

NETAVIS Observer 4.6 User Manual (October 2015)
Page 3 of 204
Contents
1 Introduction ...................................................................................................... 6
1.1 The Observer documentation set ........................................................................................................... 6
1.2 What is new with this release................................................................................................................... 6
1.3 Observer data security .............................................................................................................................. 7
1.4 Video streaming methods and compression ....................................................................................... 7
2 Observer clients on multiple platforms ............................................................... 11
2.1 Introduction to Observer clients .......................................................................................................... 11
2.2 Starting the Observer client from a desktop web browser............................................................. 12
2.3 Working with the installed Observer client ........................................................................................ 16
2.4 Client multi-window and multi-screen operation............................................................................ 20
2.5 Client preferences ................................................................................................................................... 22
2.6 Mobile Observer clients ......................................................................................................................... 24
2.7 Observer Transcoding™ for low-bandwidth client-server connections (ABS) ........................... 27
2.8 Exiting the client ...................................................................................................................................... 28
3 Guidelines for setting up a new system with Observer .......................................... 29
3.1 Guidelines for setting up cameras ....................................................................................................... 29
3.2 Guidelines for setting up users ............................................................................................................. 30
3.3 Guidelines for setting up views ............................................................................................................ 30
4 Setting up cameras .......................................................................................... 31
4.1 Preparations ............................................................................................................................................. 31
4.2 Adding a new camera and setting basic properties ........................................................................ 31
4.3 Setting up the camera recording archive........................................................................................... 38
4.4 Checking the Camera status ................................................................................................................. 39
4.5 Optional: Configuring video analytics (iCAT) .................................................................................... 40
4.6 Defining brightness, contrast, and saturation .................................................................................. 40
4.7 Working with camera groups ................................................................................................................ 41
4.8 Changing the port mapping of analog cameras............................................................................... 42
5 Managing users ................................................................................................ 43
5.1 Creating a new user account ................................................................................................................ 43
5.2 Setting general user privileges ............................................................................................................. 45
5.3 Setting camera access rights ................................................................................................................ 48
5.4 Working with user groups ...................................................................................................................... 50
5.5 Defining Online Monitor views for a new user ................................................................................... 50
5.6 Information about logged-in users ..................................................................................................... 50
5.7 Changing the password ......................................................................................................................... 50
5.8 Working with Active Directory and LDAP users ................................................................................. 51
6 Using the Online Monitor .................................................................................. 52
6.1 Creating a new view ................................................................................................................................ 52
6.2 Selecting cameras ................................................................................................................................... 53
6.3 Navigating in the Online Monitor ......................................................................................................... 54
6.4 Modifying view port settings ................................................................................................................. 55
6.5 Zooming in a view port and in archive recordings ........................................................................... 58
Page 4

NETAVIS Observer 4.6 User Manual (October 2015)
Page 4 of 204
6.6 Manual recording control in the Online Monitor .............................................................................. 59
6.7 Working with round tours (the Smart guard™ function) ................................................................. 61
6.8 Copying views between users .............................................................................................................. 61
6.9 Working with MPEG cameras and audio (MPEG-4, H.264, and MxPEG) ....................................... 63
6.10 Dynamic View Control in Online Monitor ......................................................................................... 64
7 Working with archive recordings ....................................................................... 71
7.1 Programming archive recordings ........................................................................................................ 71
7.2 Playback of archive recordings ............................................................................................................ 75
7.3 Exporting recordings (images and video sequences) ..................................................................... 80
7.4 Motion detection in archive recordings ............................................................................................. 82
7.5 External archive management (NEA) .................................................................................................. 84
8 Working with simple motion detection ............................................................... 87
8.1 Observer’s own server-based motion detection .............................................................................. 87
8.2 Motion detection in archive recordings ............................................................................................. 90
8.3 In-camera motion detection................................................................................................................. 90
9 Handling events ............................................................................................... 93
9.1 Event list and event details ................................................................................................................... 93
9.2 Searching in the event database ......................................................................................................... 95
9.3 Generating an event statistics report .................................................................................................. 98
9.4 Receiving notification on events .......................................................................................................... 99
10 Working with PTZ cameras ............................................................................ 101
10.1 Setting up a PTZ camera ................................................................................................................... 101
10.2 Defining fixed PTZ positions ............................................................................................................. 101
10.3 Defining PTZ routes ............................................................................................................................ 101
10.4 Controlling PTZ cameras................................................................................................................... 102
11 Administrating Observer servers .................................................................... 108
11.1 Server system information and restarting ..................................................................................... 108
11.2 Setting Observer server parameters ............................................................................................... 110
12 Working with interconnected Observer servers ............................................... 116
12.1 Basic concepts of interconnected Observer servers ................................................................... 116
12.2 Adding and defining a remote Observer server ............................................................................ 117
12.3 Working with cameras of another server ....................................................................................... 119
12.4 Working with events of remote servers .......................................................................................... 120
12.5 Monitoring remote servers ................................................................................................................ 121
12.6 Distributed upgrades ......................................................................................................................... 121
13 Active Directory Integration .......................................................................... 122
13.1 Configuring the users on the Active Directory server .................................................................. 122
13.2 Configuring Observer ......................................................................................................................... 123
14 Working with Layout Navigation .................................................................... 126
14.1 Basic concepts and how it works .................................................................................................... 126
14.2 Installing Layout Navigation ............................................................................................................. 126
Page 5

NETAVIS Observer 4.6 User Manual (October 2015)
Page 5 of 204
14.3 Starting Layout Navigation ............................................................................................................... 127
14.4 Setting up a project and defining layouts (Editing mode) ......................................................... 127
14.5 Customizing the behavior and appearance of controls ............................................................. 131
14.6 Layout navigation and operation (Navigation mode) ................................................................ 136
15 Video analytics with iCAT .............................................................................. 140
15.1 iCAT highlights ..................................................................................................................................... 140
15.2 Basic iCAT concepts ........................................................................................................................... 141
15.3 Setting up a camera for video analytics with iCAT ...................................................................... 144
15.4 Working with iCAT ............................................................................................................................... 163
16 I/O Device Administration ............................................................................. 168
16.1 Configuring I/O devices ..................................................................................................................... 168
16.2 Generic I/O devices ............................................................................................................................. 169
17 Rule Administration ..................................................................................... 170
17.1 Configuring rules ................................................................................................................................. 170
18 NPR List Management ................................................................................... 175
18.1 Configuring number plate lists ......................................................................................................... 175
19 Video walls with Observer ............................................................................. 177
19.1 Setting up a video wall with Observer ............................................................................................ 177
19.2 Controlling the video wall with the control application ............................................................. 179
20 Special functions .......................................................................................... 182
20.1 Video annotations .............................................................................................................................. 182
20.2 Embedding Observer video streams in web pages (Video4Web) ............................................. 182
20.3 Controlling Observer with HTTP commands from external sources (URL control) .............. 183
20.4 Matrix View function of the Online Monitor (VIP control) ........................................................... 184
20.5 Holiday calendar ................................................................................................................................. 186
20.6 Automatic export of event statistics ............................................................................................... 187
20.7 Configuring I/O devices ..................................................................................................................... 188
20.8 AXIS T8310 Control Board configuration ....................................................................................... 189
20.9 SNMP Support (Simple Network Management Protocol) .......................................................... 192
21 Index .......................................................................................................... 198
Page 6

NETAVIS Observer 4.6 User Manual (October 2015)
Page 6 of 204
1 Introduction
Thank you for choosing NETAVIS Observer 4.6 as the management software for your video monitoring
system. As you use it, you will find that Observer not only enables you to view live images and record
them, but also provides a full-scale platform for the intelligent utilization of your video data.
This User Manual guides you through the functionality of NETAVIS Observer 4.6.
If you have questions that are not answered in the Observer documentation set, please contact your
NETAVIS partner, or else get in touch with us via the usual channels.
We wish you a great experience with NETAVIS Observer 4.6.
Your NETAVIS Team.
1.1 The Observer documentation set
These documents are available:
NETAVIS Observer User Manual: It describes how to configure and use the Observer client.
NETAVIS Observer Supported Video Sources: It provides detailed information on the IP camera
models supported by Observer.
NETAVIS Observer Server Installation and Administration: It describes how to install and
administrate an Observer system.
NETAVIS Observer Server, Client and Storage Compatibility and Requirements: It explains the
hardware and software requirements for Observer systems.
NETAVIS Observer Server Customizing: It provides an overview on how to customize various
aspects of an Observer server.
NETAVIS Observer SNAP XML Interface: It describes the Simple NETAVIS Access Protocol (SNAP)
that allows bidirectional communication between an Observer server and other applications.
NETAVIS Observer URL Command API: It explains the URL Command API which is a simple and
effective way for Observer to interface with 3rd party applications.
These documents are available online as PDFs directly on each Observer server via the standard web
interface and also from each client via the Help - All Documentation menu.
1.2 What is new with this release
The changes of a release are documented in the Release Notes, which you can find on the standard
web interface of each Observer server and also under the following direct link:
http://<your-server>/relnotes
or on the public demo server
showroom.netavis.net/relnotes
There you also find the release information of previous releases.
Additionally, the new features of releases are also documented on www.netavis.net.
Page 7

NETAVIS Observer 4.6 User Manual (October 2015)
Page 7 of 204
1.3 Observer data security
Observer has been designed to provide the highest level of robustness and data security. The
following aspects of the Observer system document that:
All video and configuration data on an Observer server are stored in separate file system
partitions, protected by multiple levels of security.
Optionally the video data can be stored using 128 bit AES encryption (since Observer 4.0)
Optionally HTTPS can be used for streaming video data between cameras and servers (since
Observer 4.0).
Optionally HTTPS can be used for streaming video data between server and clients (since
Observer 4.2).
In any case, the authentication data (user names and passwords) transferred between clients
and servers are encrypted by MD5 strong encryption.
Please note: Encryption and decryption can mean higher CPU overhead at the server and/or the
client. Also doing something with the contents of an encrypted stream means decryption and
therefore higher CPU overhead. For example, doing video analytics with an encrypted video stream
means that is has to be decrypted at the server before processing. Likewise, storing an unencrypted
stream in an encrypted video database means that it has to be encrypted at the server before storing.
Likewise, displaying an encrypted video stream at the client means more CPU overhead at the client
because it has to be decrypted.
On the other hand, simply storing an already encrypted video stream coming from the camera does
not need more CPU at the server than storing an unencrypted video stream.
1.4 Video streaming methods and compression
Observer supports video streaming in several standards:
Motion JPEG (often also referred to as MJPEG)
MPEG-4 streaming
H.264 streaming (also known as MPEG-4/AVC)
MxPEG streaming (this is a streaming standard specially developed by www.mobotix.com for
their IP cameras)
The big difference between the various streaming methods is the way how the image data are
compressed and transferred. The selected streaming method has great influence on:
the bandwidth needed for transmission between cameras and server but also between servers
and clients,
the CPU load at the server and the client induced by compression and decompression, and
the storage requirements for recording
For low-bandwidth client-server connections Observer offers the unique Transcoding™ feature (see 2.7
Observer Transcoding™ for low-bandwidth client-server connections (ABS) on page 27).
1.4.1 Multi streaming (multiple parallel video streams from the camera)
Some cameras are capable of providing multiple parallel video streams to Observer. This can be
helpful, for example, when online viewing and recording is to be done in different formats (e.g.
Page 8
NETAVIS Observer 4.6 User Manual (October 2015)
Page 8 of 204
different sizes and frame rates) or for optimizing iCAT video analytics performance (see 15.2.1
Considerations for setting up a system with iCAT on page 142).
Usually MJPEG cameras can deliver several MJPEG streams while MPEG cameras (MPEG-4, H.264, and
MxPEG) usually can deliver only 1 or 2 MPEG streams and some camera types can deliver several
MJPEG streams in addition to the MPEG stream(s).
However there are a few important restrictions with multi streaming:
Some cameras have performance limitations in providing multiple streams depending on the
streaming format, resolution, and frame rate. We found out that some cameras just stop
streaming when the streaming processors of the camera get overloaded by certain resolution
and frame rates settings. Please refer to the camera data sheet and documentation.
In the current version Observer supports 1 format setting for MPEG streams (MPEG-4, H.264, and
MxPEG) and multiple format settings for MJPEG streams.
Please note: Please refer to camera data sheet and documentation for camera limitations. Also the
document NETAVIS Observer Supported Video Sources may provide further details on camera
restrictions.
1.4.2 Motion JPEG
A network camera captures individual images and compresses them into a JPEG format. The network
camera can capture and compress, for example, 30 such individual images per second (30 fps), and
then make them available as a continuous flow of images over a network to an Observer server which
then distributes it to Observer clients and / or stores it in the camera archive. At a frame rate of about
16 fps and above, the viewer will perceive full motion video.
As each individual image is a complete JPEG compressed image, they will all have the same
guaranteed quality, determined by the compression level as defined for the network camera or
network video server.
Example of a sequence of three complete JPEG images:
1.4.3 MPEG (MPEG-4, H.264, and MxPEG)
Some of the best-known audio and video streaming techniques are defined by the so called MPEG
consortium (Moving Pictures Expert Group). Under the MPEG umbrella several streaming methods are
available like MPEG-4, H.264, and MxPEG (strictly taken, MxPEG is not part of the standards defined by
the MPEG group but is a proprietary standard by the company Mobotix. However, because of reasons
of simplicity we refer to MxPEG also as an MPEG format). MPEG-4 and H.264 are well known and widely
supported MPEG streaming standards.
Simply described, MPEG’s basic principle is to compare two compressed images to be transmitted
over the network, and using the first compressed image as a reference image (called an I-frame), only
sending the parts of following images (B- and P-frames) that differ from the reference image. A viewing
client will then reconstruct all images based on the reference image and the “difference data”.
Page 9

NETAVIS Observer 4.6 User Manual (October 2015)
Page 9 of 204
At the cost of higher complexity, the result of applying MPEG video compression is that the amount of
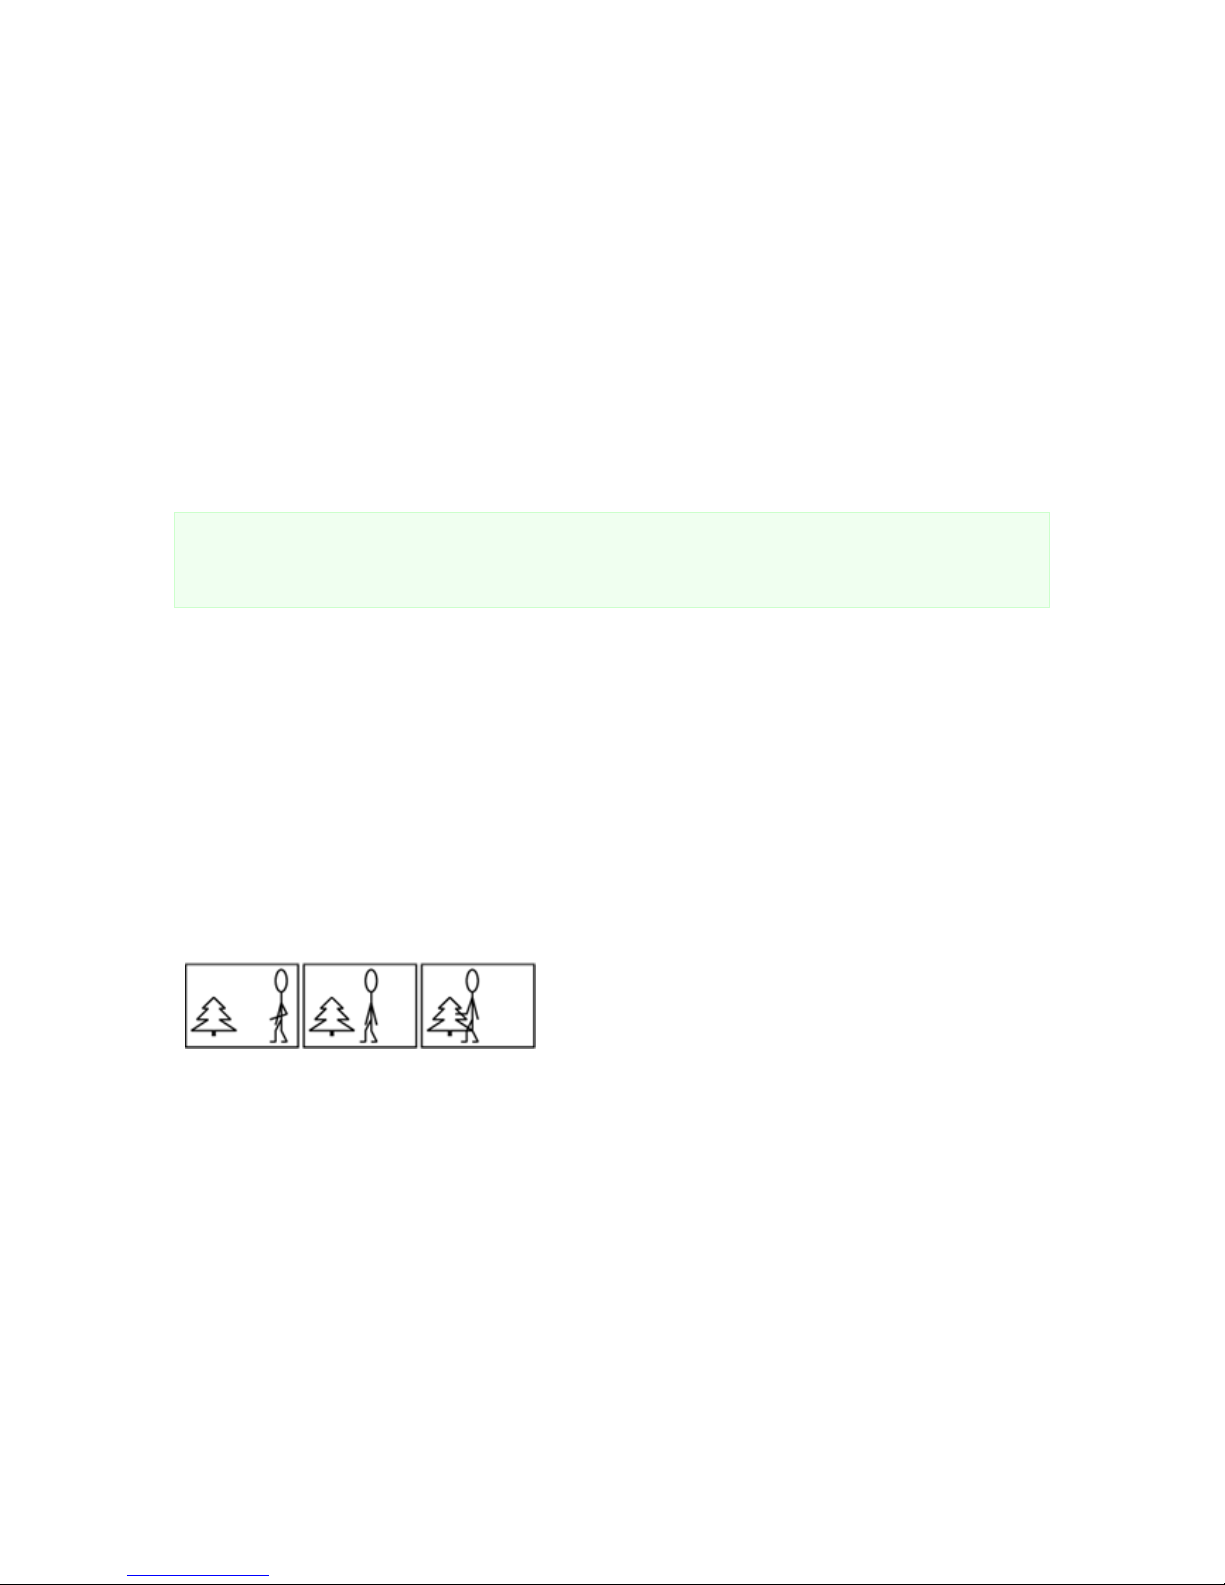
data transmitted across the network is less than that of Motion JPEG. This is illustrated below where
only information about the differences in the second and third frames is transmitted
H.264 and MxPEG all work very similar to MPEG-4 whereby H.264, for example, needs only about 60%
of the bandwidth of MPEG-4 for roughly the same video quality. However, this efficiency does not
come for free. Encoding and decoding H.264 needs more CPU power than MPEG-4. A general rule is
that the higher the compression factor the heavier the CPU burden (in the server and in the clients).
Therefore there is always a tradeoff between bandwidth utilization and CPU power needed.
1.4.4 Advantages and disadvantages of Motion JPEG and MPEG (MPEG-4, H.264, and
MxPEG)
Due to its simplicity, Motion JPEG (MJPEG) is a good choice for use in many applications. JPEG is a
widely available standard in many systems often by default. It is a simple
compression/decompression technique, which means the cost, in both system time and money, for
encoding and decoding is kept low. The time aspect means that there is limited delay between image
capturing in a camera, encoding, transferring over the network, decoding, and finally displaying at the
viewing station. In other words, MJPEG provides low latency due to its simplicity (image compression
and complete individual images), and for this reason it is also well suited for when image processing is
to be performed, for example video motion detection or object tracking.
MJPEG gives a guaranteed image quality regardless of movement or complexity of the image scenes. It
still offers the flexibility to select either high image quality (low compression) or lower image quality
(high compression) with the benefit of lower image file sizes, thus lower bit-rate and bandwidth usage.
At the same time the frame rate can be easily controlled, providing a means to limit bandwidth usage
by reducing the frame rate, but still with a guaranteed image quality.
Since MJPEG does not make use of a video compression technique, it generates a relatively large
amount of image data that is sent across the network. For this reason, at a given image compression
level (defining the image quality of the I-frame and JPEG image respectively), the network bandwidth
is less for MPEG compared to MJPEG, except at very low frame rates.
Another difference is that most MJPEG IP cameras can produce multiple simultaneous streams and in
different qualities (image sizes and compression quality) while most MPEG cameras can produce only
one stream in one quality. Therefore the same stream will be used in live viewing and recording.
This summarizes the benefit of MPEG: the ability to give a relatively high image quality at a lower bitrate (bandwidth usage). This can be especially important if the available network bandwidth is limited,
or if video is to be stored (recorded) at a high frame rate and there are storage space restraints. The
lower bandwidth demands come at the cost of higher complexity in encoding and decoding, which in
turn contributes to a higher latency when compared to MJPEG.
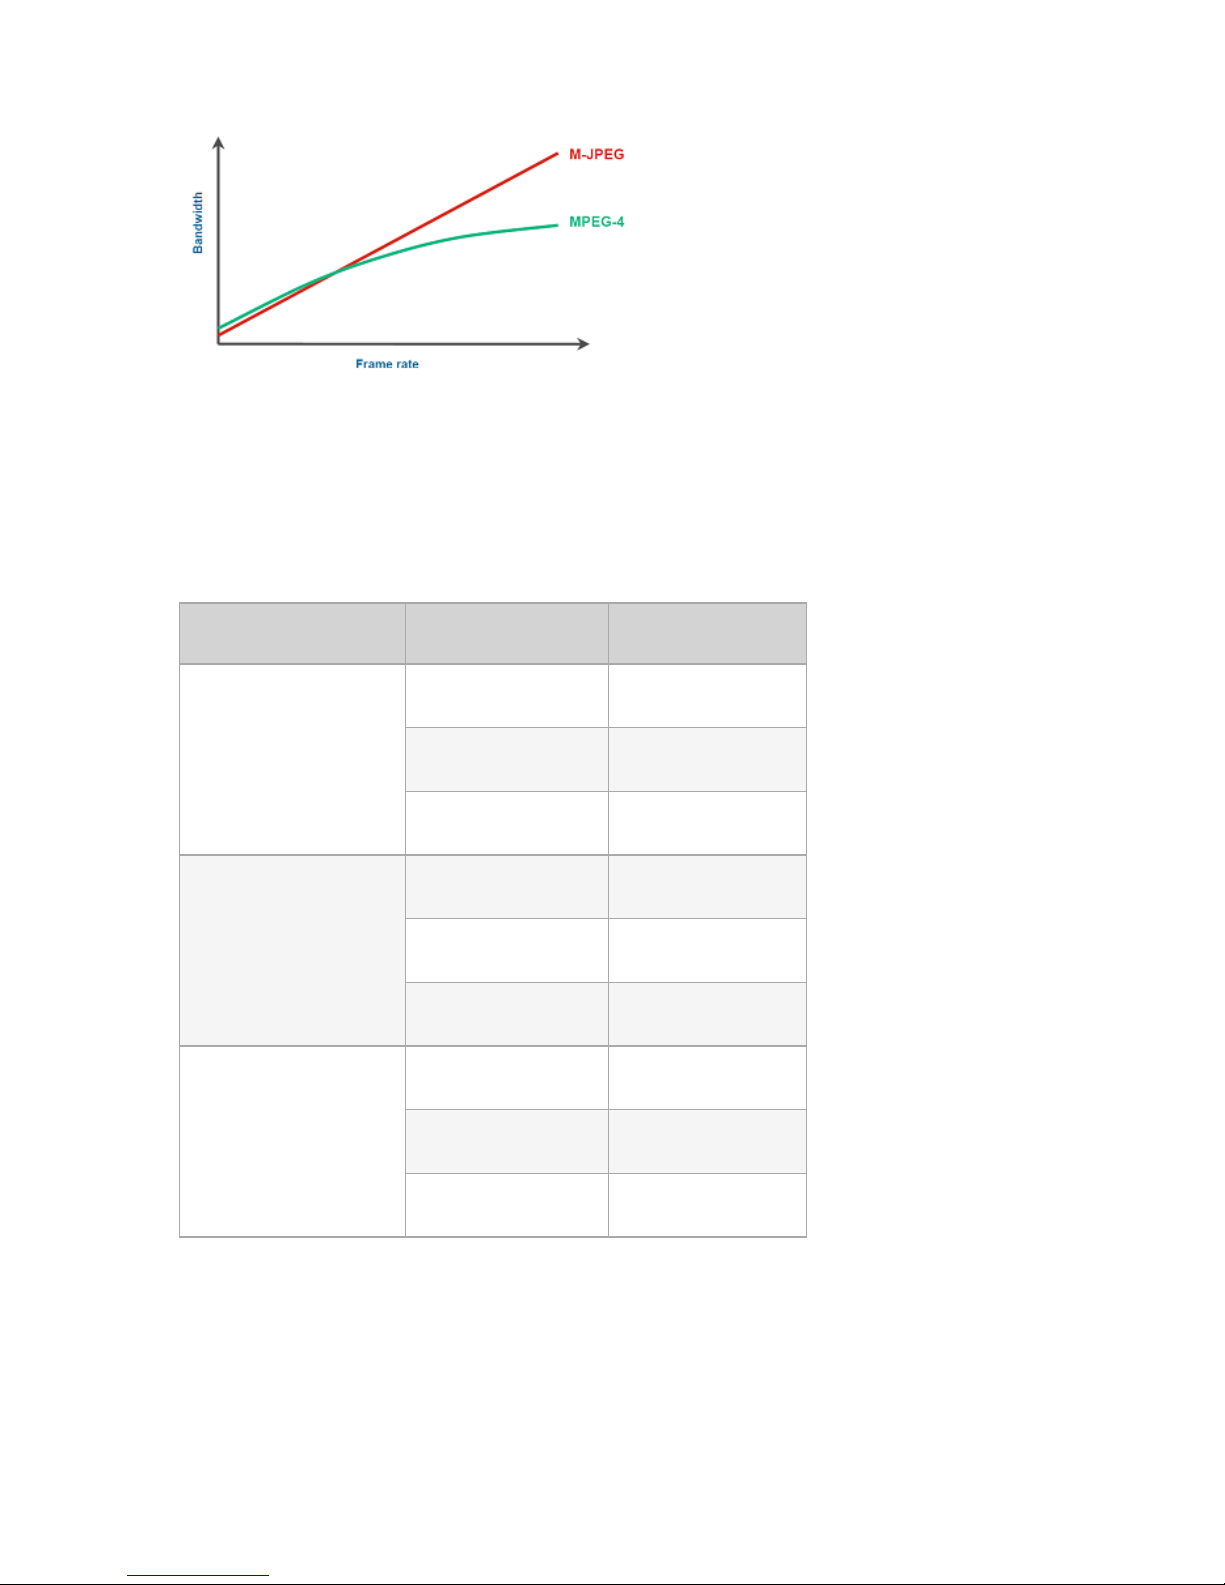
The graph below shows in principle how bandwidth use between MJPEG and MPEG compares at a
given image scene with motion. As can be seen, at very low frame rates, where MPEG compression
cannot make use of similarities between neighboring frames to a high degree, and due to the
overhead generated by the MPEG streaming format, the bandwidth consumption is actually higher
than MJPEG.
Page 10
NETAVIS Observer 4.6 User Manual (October 2015)
Page 10 of 204
1.4.5 JPEG image sizes and storage requirements
The image (recording) quality and image size affects the required storage per image (frame). Likewise
does the frame rate impact the recording storage and also the network bandwidth.
Observer supports all image sizes that a camera offers. The following are some values for typical
JPEG images:
JPEG Image size
Image quality
Storage per image
approximately
Small
176x144 QCIF PAL
176x120 QCIF NTSC
160x120 QQVGA
Low
3 KB
Medium
5 KB
High
8 KB
Medium
352x288 CIF PAL
352x240 CIF NTSC
320x240 QVGA
Low
8 KB
Medium
13 KB
High
20 KB
Large*
704x576 4CIF PAL
704x480 4CIF NTSC
640x480 VGA
Low
20 KB
Medium
34 KB
High
52 KB
* For mega-pixel cameras the image size will be much bigger than shown in the table.
Page 11
NETAVIS Observer 4.6 User Manual (October 2015)
Page 11 of 204
2 Observer clients on multiple platforms
2.1 Introduction to Observer clients
Once you have successfully installed Observer on your server, authorized users can access the server
via an Observer client.
Normally the Observer client runs on a PC separate from the server, however in a client-on-server
installation the client runs directly on the server (see the document NETAVIS Observer Server
Installation and Administration for further information on how to create and run a client-on-server
installation).
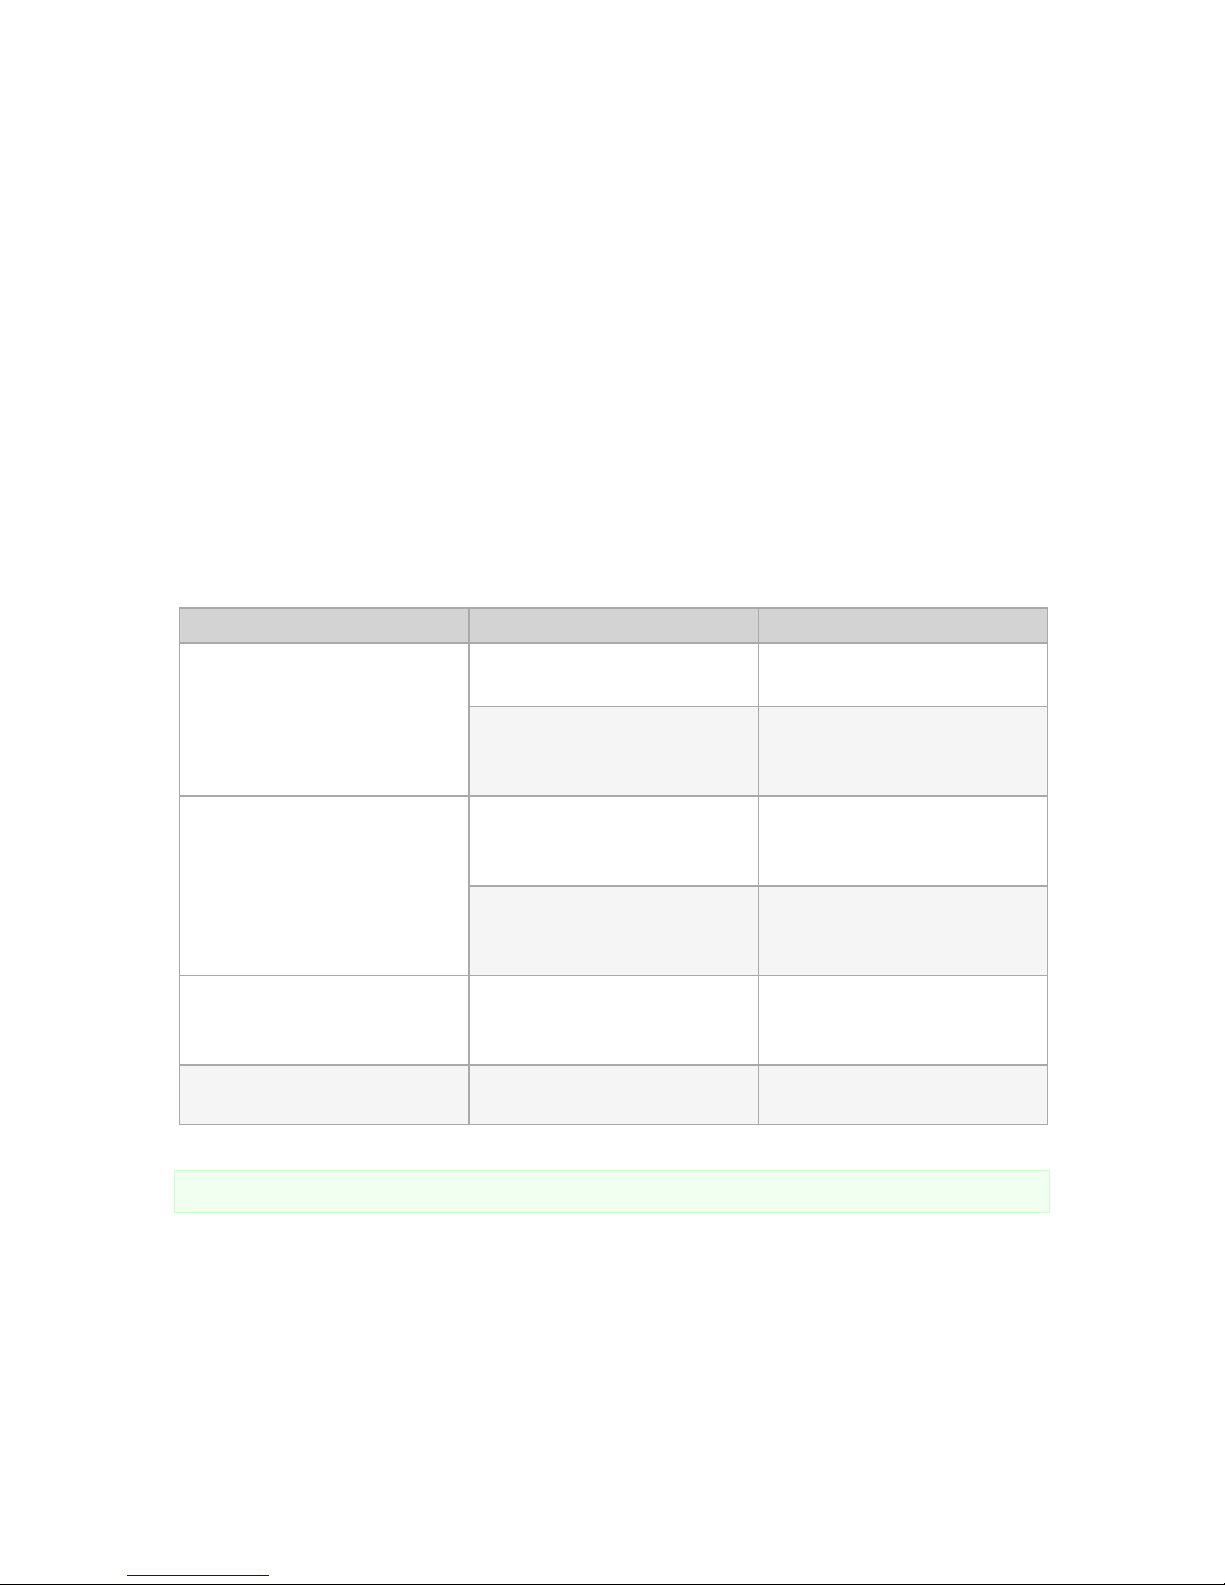
Clients for various platforms
You can choose among these Observer clients, operating systems and platforms:
Observer client
OS and platform
Supported functionality
Locally installed desktop client
MS Windows XP, Vista, 7, 8, 10
All
Linux, Unix (also client on server
CoS)
No audio, Layout Navigation, and
PTZ-Joysticks
Desktop web browser
MS Windows XP, Vista, 7, 8, 10
No support for joysticks for PTZ
control
Linux, Unix
No audio, Layout Navigation, and
PTZ-Joysticks
Client for iPad
Apple iPad with iOS 6 or later
Live viewing and archive access
(with MJPEG streams)
Client for Smartphone & Tablet
many smartphone platforms and
OSes
Live viewing (with
MJPEG streams)
Note: The Mac OS X operating system hasn’t been supported since Observer 4.0.
Please be aware that some functions like Layout Navigation and running SAFE export files are only
available on the MS Windows platform.
This chapter describes how to start the Observer client on a desktop PC. If you want to run Observer
on a mobile device please refer to 2.6 Mobile Observer clients on page 24.
The minimum screen resolution for running the Observer client is 1024x768 pixels.
Page 12

NETAVIS Observer 4.6 User Manual (October 2015)
Page 12 of 204
Licensing issues
The available functionality of your Observer installation is defined by the license string. The document
NETAVIS Observer Server Installation and Administration describes how licensing works and how to
obtain a license string. If you have a temporary demo license, a License dialog appears at every login
indicating that there is no permanent license. At this dialog just press the Continue button to operate
Observer in the demo mode.
See 11.1 Server system information and restarting on page 108 for how to display the current license of
your server.
2.1.1 Advanced client technology
The Observer uses advanced technologies to ease the operation of clients on MS Windows platforms:
Lazy-loading client technology: Observer clients (both browser-based and locally installed)
only load the needed application components from the server on demand, when they are
needed. This saves time at startup and also bandwidth. It also eases the management and
upgrading of clients. Libraries for one version are downloaded only once and are then stored
locally on the client machine. The path is <user’s home directory>\netavisLibs\<version> (e.g.
C:\Documents and Settings\user\netavisLibs\4.4.5.158.634).
Automatic client upgrading: Whenever the Observer server is upgraded to a new version, the
clients are automatically upgraded too. This is happening transparently to the user. The same
client will still be able to work with older server versions (see next point). Since release 1.9 the
client application has to be installed only once and every further Observer version will be
seamlessly accessible, without having to manually upgrade the client.
Different versions between servers and clients: Since release 1.9 Observer clients can
connect to servers running different versions (release 1.9 or newer) without the need to install
clients matching the servers’ versions.
As a summary, Observer clients...
…download libraries (for one version) only once
…share the same libraries for both browser-based (applet) and installed client application
…can connect to servers having different versions
…automatically upgrade themselves when the server has a new version
2.2 Starting the Observer client from a desktop web browser
This section describes how to start the client in a standard web browser. If you want to install the
client on your machine and run it independently of a web browser, please refer to 2.3 Working with the
installed Observer client on page 16.
You can start the client with an unencrypted HTTP connection or with an encrypted HTTPS
connection:
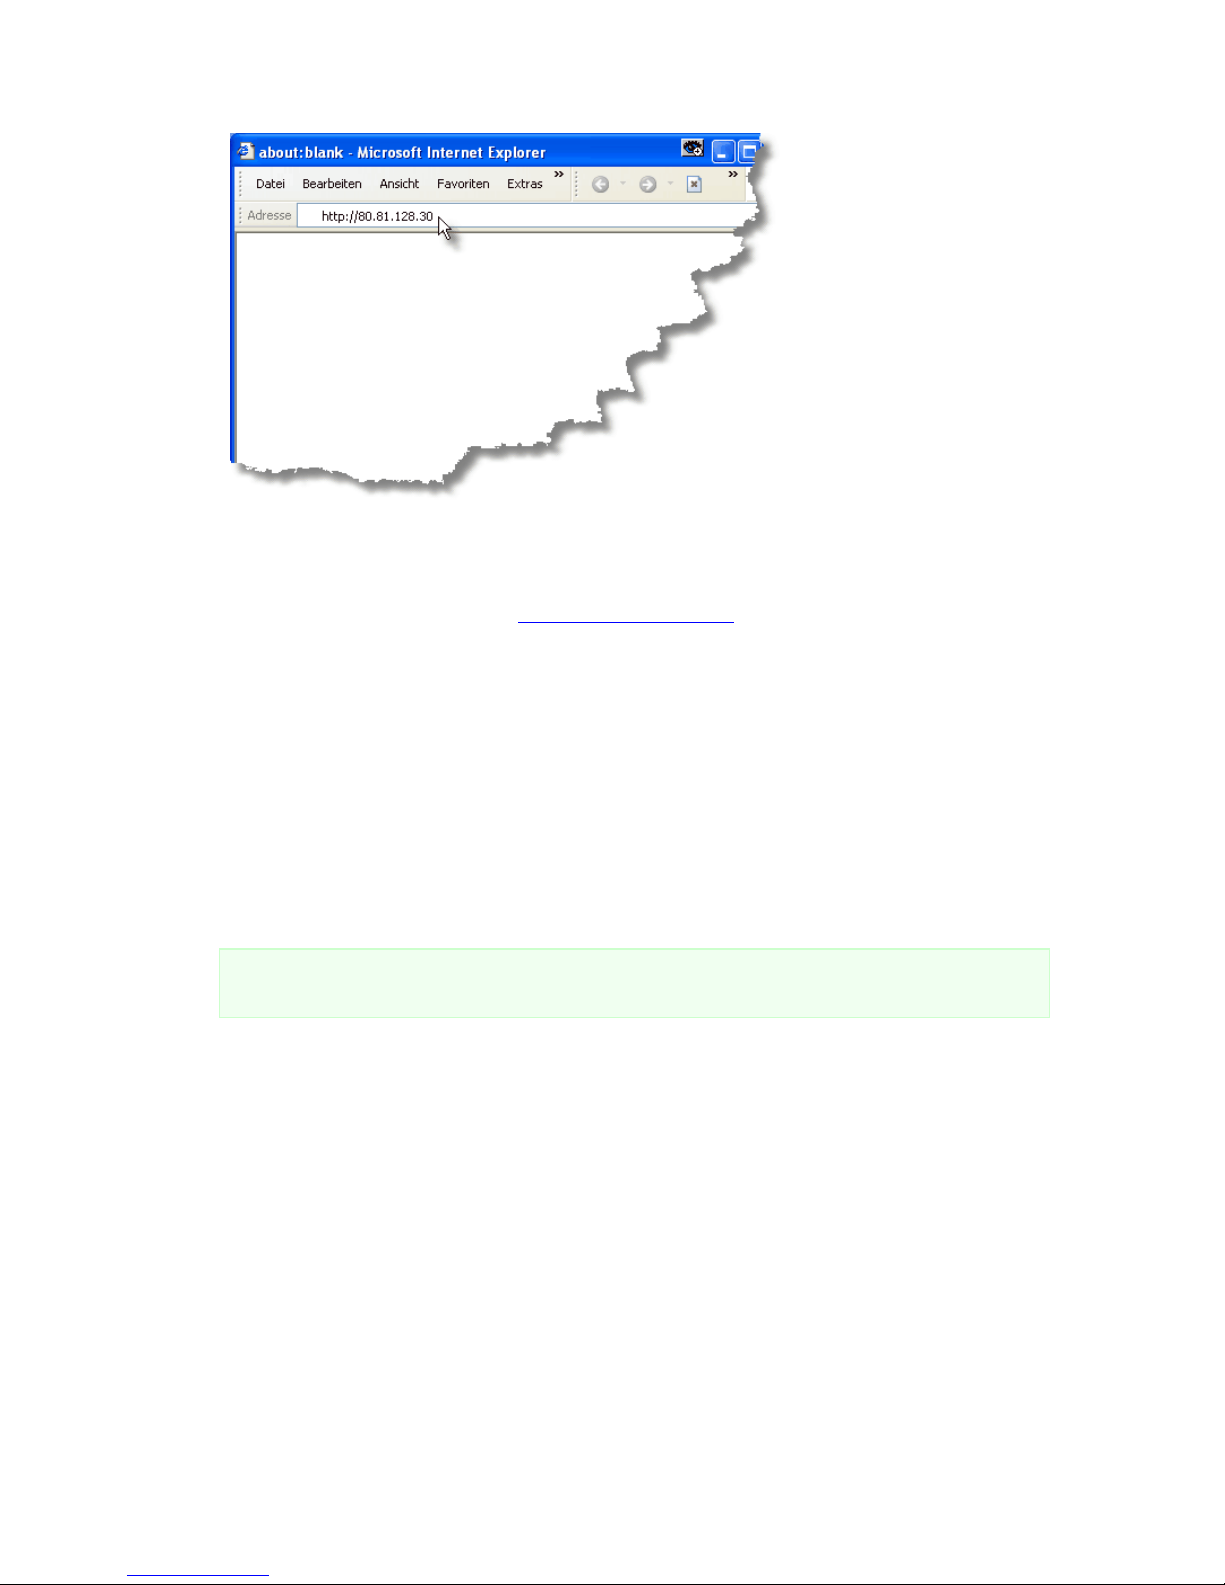
1. To access the client via an unencrypted HTTP connection start a web browser and enter the
address of your Observer server: http://IP-address-of-your-server
To access the client via an encrypted HTTPS connection start a web browser and enter the
address of your Observer server: https://IP-address-of-your-server
Page 13
NETAVIS Observer 4.6 User Manual (October 2015)
Page 13 of 204
Now a page that checks the availability of the Java on your computer appears. This page should
disappear in a few seconds.
If this page stays, it means that you do not have the Java plug-in installed on your browser. You
have to first install Java by visiting www.java.com/download to install the latest Java package
and then start the browser anew. Now the screen should disappear and you can continue as
shown below.
2. Next a startup screen is displayed that lets you choose the language that you want to use. Click
on your language of choice and push Start. This takes you to the start page of Observer:
3. Click on Start Observer client (from the browser using Web Start). Depending on the
browser you are using you might be asked whether you want to execute the Java JNLP link. Click
on OK (to tell the browser to automatically start see 2.2.1 Optimizing the Web Start behavior of
your browser on page 15). Now you will be advised that the program is being loaded. How long
loading takes depends on your network.
On completion of loading, you will be notified that Observer is initializing. Then user data are
loaded.
Note: By clicking on Install the Observer client on your PC you can also install the Observer
client on your machine locally (see 2.3 Working with the installed Observer client on page 16).
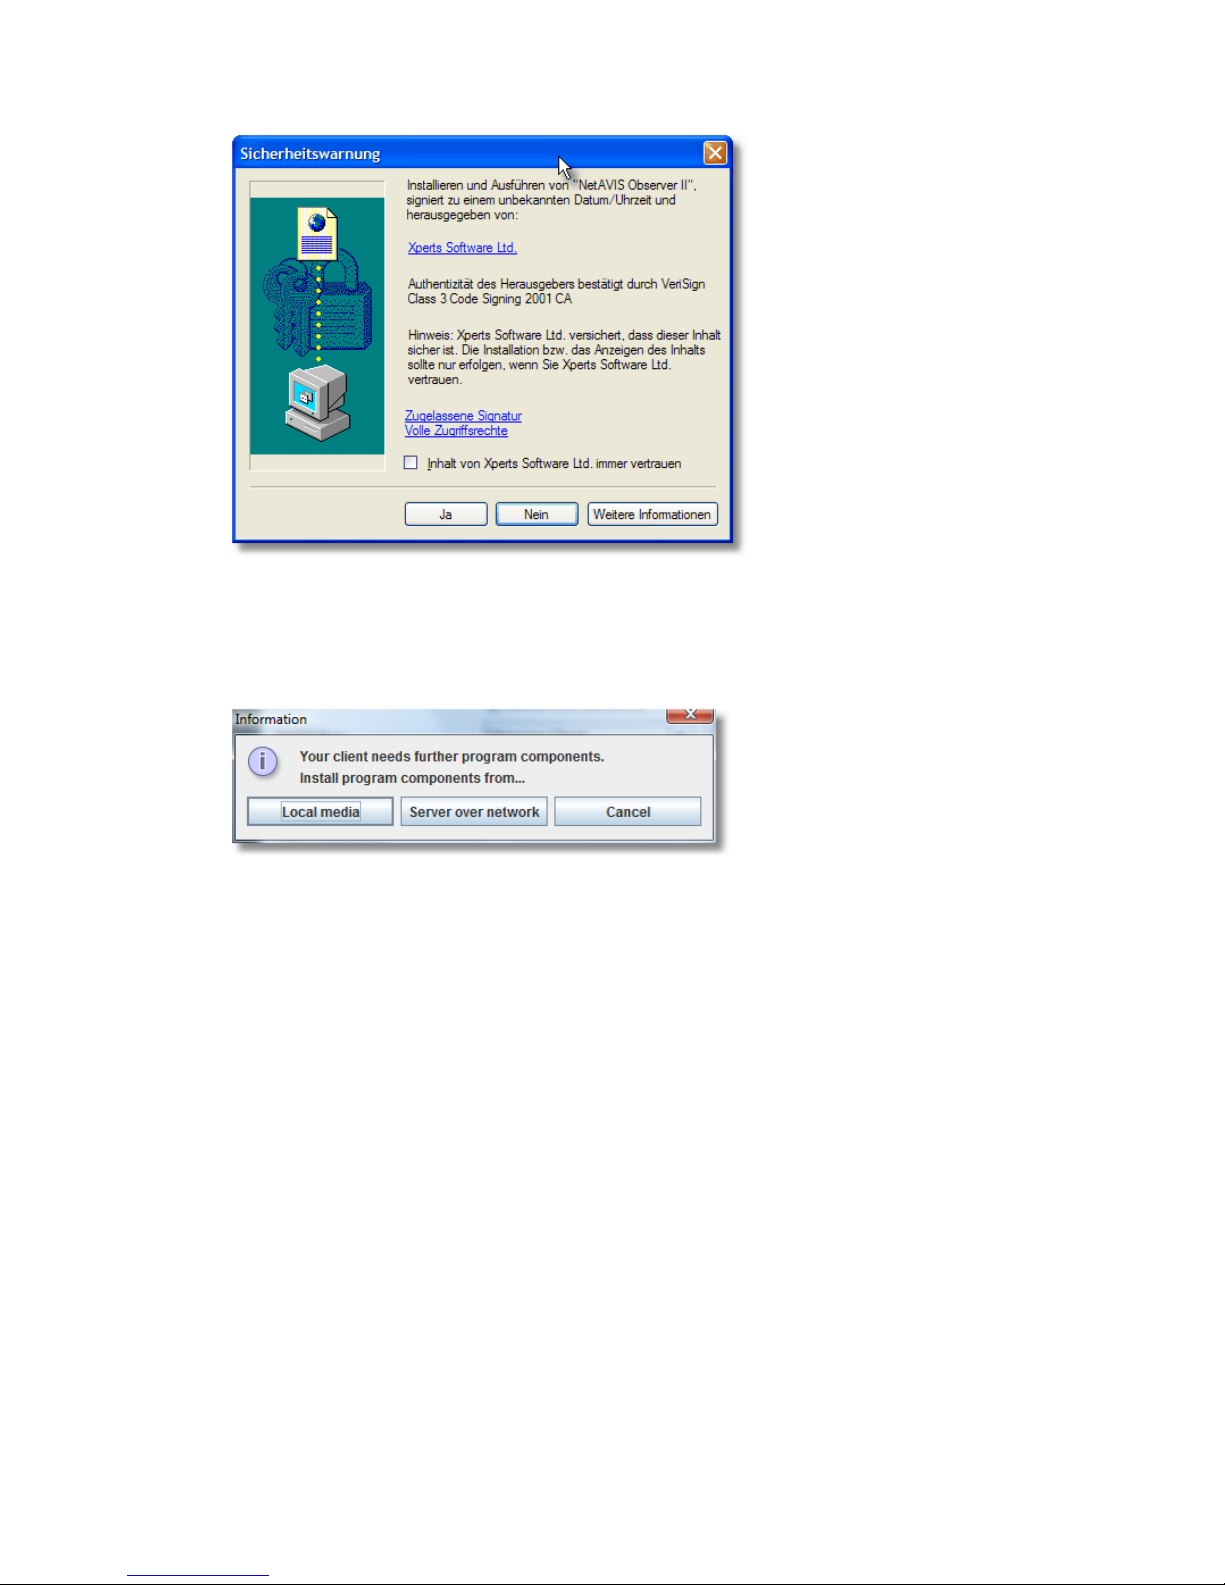
4. Before starting the Observer client you will be asked if you allow to execute the downloaded
trusted applet:
Page 14
NETAVIS Observer 4.6 User Manual (October 2015)
Page 14 of 204
Select the checkbox …always trust… and click on Yes to allow the download of the trusted
applet.
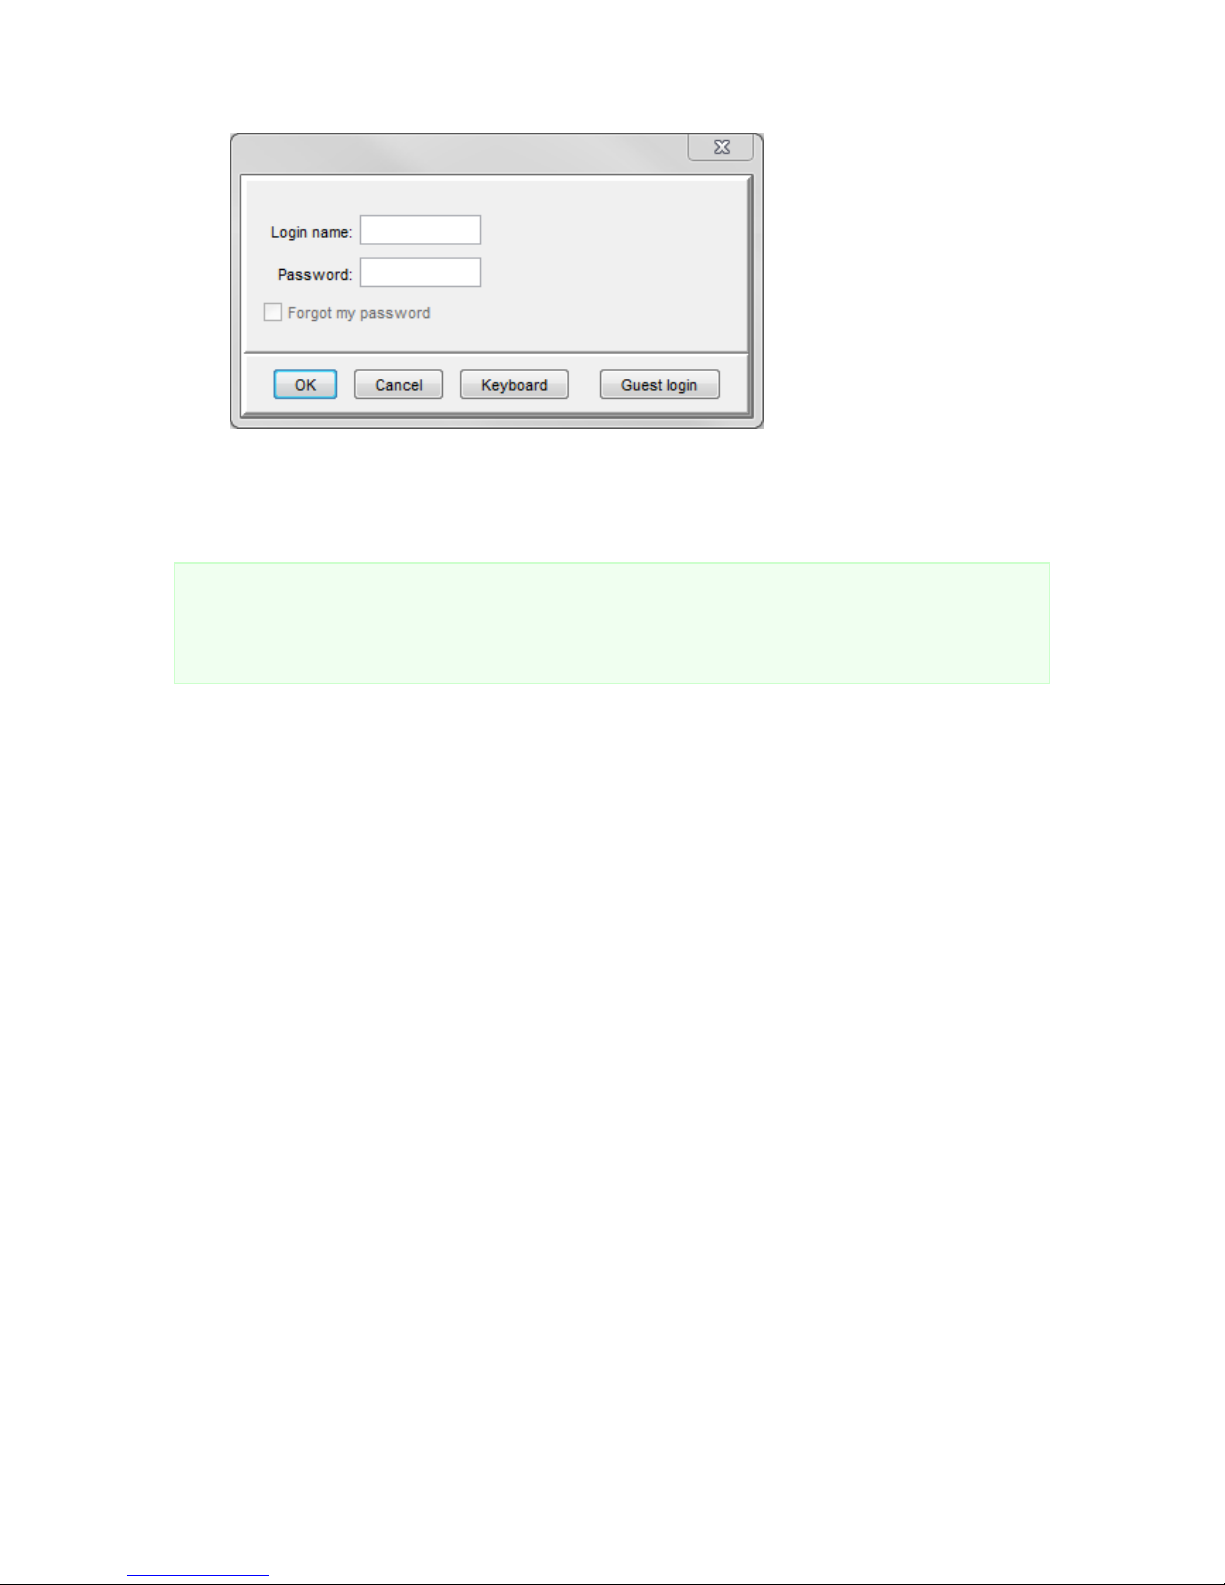
When you start the client the first time after a new installation some additional client application
components need to be installed (this is needed only once per client). You will be asked:
Normally you want choose to install the program components from Server over network.
However, if you have a very slow network connection between the client and the server you
might want to choose installation from Local media. When you choose this option you will be
asked to locate the directory ClientInstaller of the Observer installation CD. Once you choose
the correct location and push OK, the components will be installed.
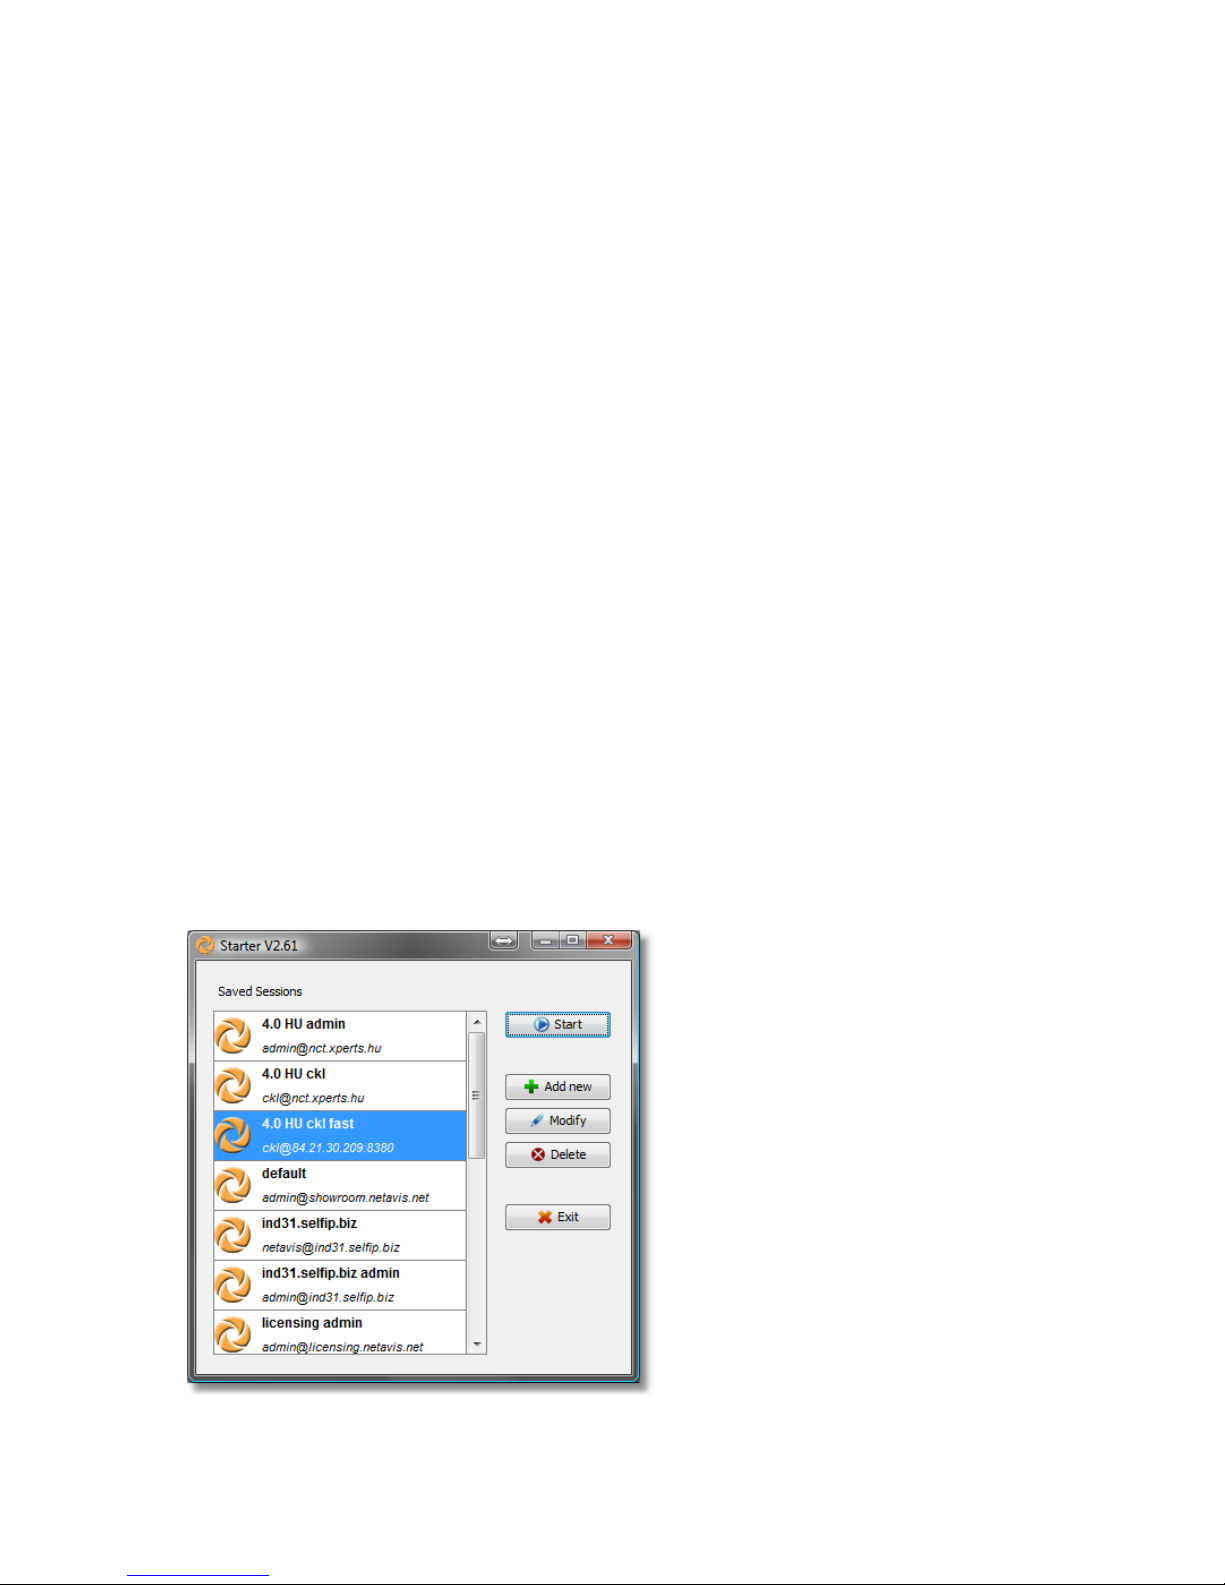
5. Next you either come to the login panel or to the license dialog.
If the license dialog appears you yet have to obtain a license for using Observer. Please consult
the manual NETAVIS Observer Server Installation and Administration for information on how to do
that.
At the login panel enter your Login name and Password and click OK.
Page 15
NETAVIS Observer 4.6 User Manual (October 2015)
Page 15 of 204
If you do not yet have a permanent license string for Observer, a License dialog appears. To
continue without a permanent license just push Continue. In this case the full functionality may
not be available. See also 2.1 Introduction to Observer clients on page 11 for further details about
licensing.
Please note: The authentication data transferred between client and server are encrypted with MD5
strong encryption.
The administration user admin has the default password admin. For security reasons you should
change this password (please see 5 Managing users on page 43).
A guest login is possible only if the guest has been defined on your server (which is the factory setting).
For further details contact your Observer administrator.
If you have forgotten your password, you can mark the Forgot my password checkbox, answer the
asked question, and click OK. For more information, ask your Observer administrator.
2.2.1 Optimizing the Web Start behavior of your browser
When you click on a Java Web Start link (JNLP) like the Start Observer client (from the browser
using Web Start), some browsers ask whether you want to download and save the file Web Start
JNLP file instead of executing it. This can be annoying because you have to first save the file and then
execute it manually. Here is how you can automate that:
Optimizing Web Start for Google Chrome
1. Click on the link that you are trying to launch, and Chrome will download it, as before.
2. By default Chrome will list the download on the bottom of the page. To the right of the filename is
a small drop down arrow, click it.
3. From the menu that pops up select Always open files of this type. Now, when you click on the
Web Start link the next time, the application will start automatically.
2.2.2 Next steps
If your Observer server already has cameras configured, then you can go to chapter 6 Using the Online
Monitor on page 52. If you have to setup cameras first, then continue with chapter 4 Setting up cameras
on page 31.
Furthermore, because Observer behaves in a context-sensitive way, you will find that certain menu
items are also disabled at certain times. Thus, for example, you cannot remove a camera if there is no
Page 16
NETAVIS Observer 4.6 User Manual (October 2015)
Page 16 of 204
camera to remove. Thus in different contexts the same menu might look quite different at different
times (menu entries and buttons in grey are disabled and in black are enabled).
2.3 Working with the installed Observer client
Alternatively to starting the Observer client from a web browser you can also install the Java client
application locally on your machine. Some functions are only available in the installed client (see 2.1
Introduction to Observer clients on page 11 for details).
2.3.1 Installing the Observer client
To install the client locally on your PC, please follow these steps:
1. At the Observer Start page click on the link Install the Observer client on your PC (using
Web Start).
2. Save and run the Web Start installer.
3. Follow the steps of the setup program.
Alternatively you can also download and run the client installer executable on Windows platforms:
1. At the Observer Start page click on the link Alternative installation: Download Observer
client installer executable (Windows only).
2. Save the client installer executable at an arbitrary location.
3. Execute the just downloaded client installer (Observer_setup.exe).
4. Follow the steps of the setup program (standard Windows installation).
2.3.2 Starting the installed Observer client
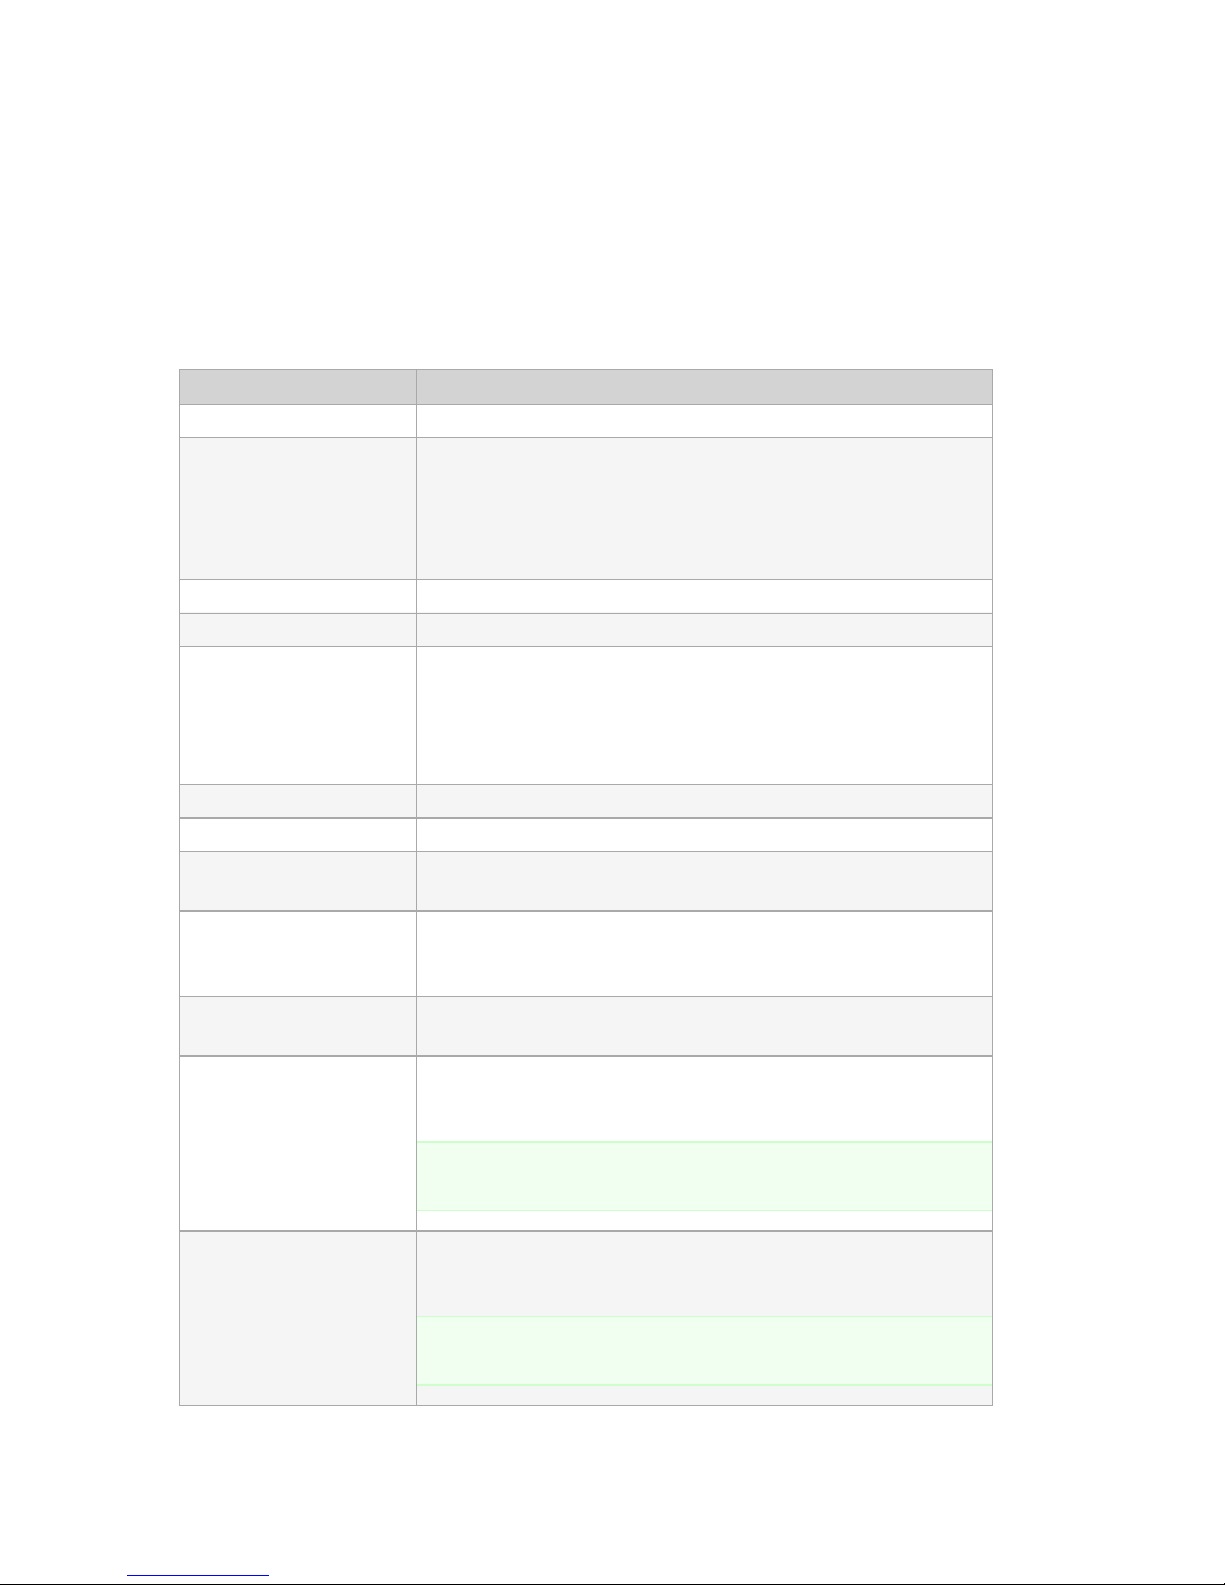
Once the setup finished you can start the client locally from your Windows Start menu (or also from a
desktop icon if you selected so at installation). The Starter window appears:
Page 17
NETAVIS Observer 4.6 User Manual (October 2015)
Page 17 of 204
Working with sessions
The Starter allows you to manage sessions. In a session you can define the server address, which
Observer application to start and the user/password details. Thus you can store and run different
sessions easily.
The Session editor is opened when you press Add new or Modify and allows you to define the
session details:
Element
Description
Session name
Name under which the session is stored.
Application
You can either choose Observer Client or Layout Navigation
Tool (for further details on the Layout Navigation Tool please refer
to 14 Working with Layout Navigation on page 126). The selected
application will start when you press OK.
Previous Connections
Offers you the list of previously active sessions.
Hostname or IP address
Enter the name or IP address of the server you want to connect to.
Use secure connection
Select this checkbox if you want to use an encrypted connection
between the client and the server (TLS HTTPS).
Please be aware that an encrypted connection needs more CPU
resources on the server and on the client. See also 1.3 Observer data
security on page 7.
Username
Enter the login name of the user.
Password
Enter the password for the user.
Remember password
Select the checkbox if you want the password to be remembered
for the next start of the application.
Alternative Session
Here you can select another session out of the already defined
session that should be started automatically when the server of this
session is not accessible.
Show message if
alternative session started
Select this checkbox if a message should be shown when the
alternative session is started.
Download client without
asking
Select this checkbox if you want updated versions of the client to be
downloaded automatically.
Note: Enabling this option is particularly recommended for systems
without a mouse and keyboard.
Reconnect count
Here you can set how many times the client will try to reconnect to
a server which it has lost its connection to.
Note: This does not handle situations in which no connection is
available upon the initial start of the client.
Page 18
NETAVIS Observer 4.6 User Manual (October 2015)
Page 18 of 204
Starting the Observer client
Pressing Start in the Starter will open the client window and connect you to the Observer server.
When the client is started, the Starter window will be hidden and in the task bar you will see its icon.
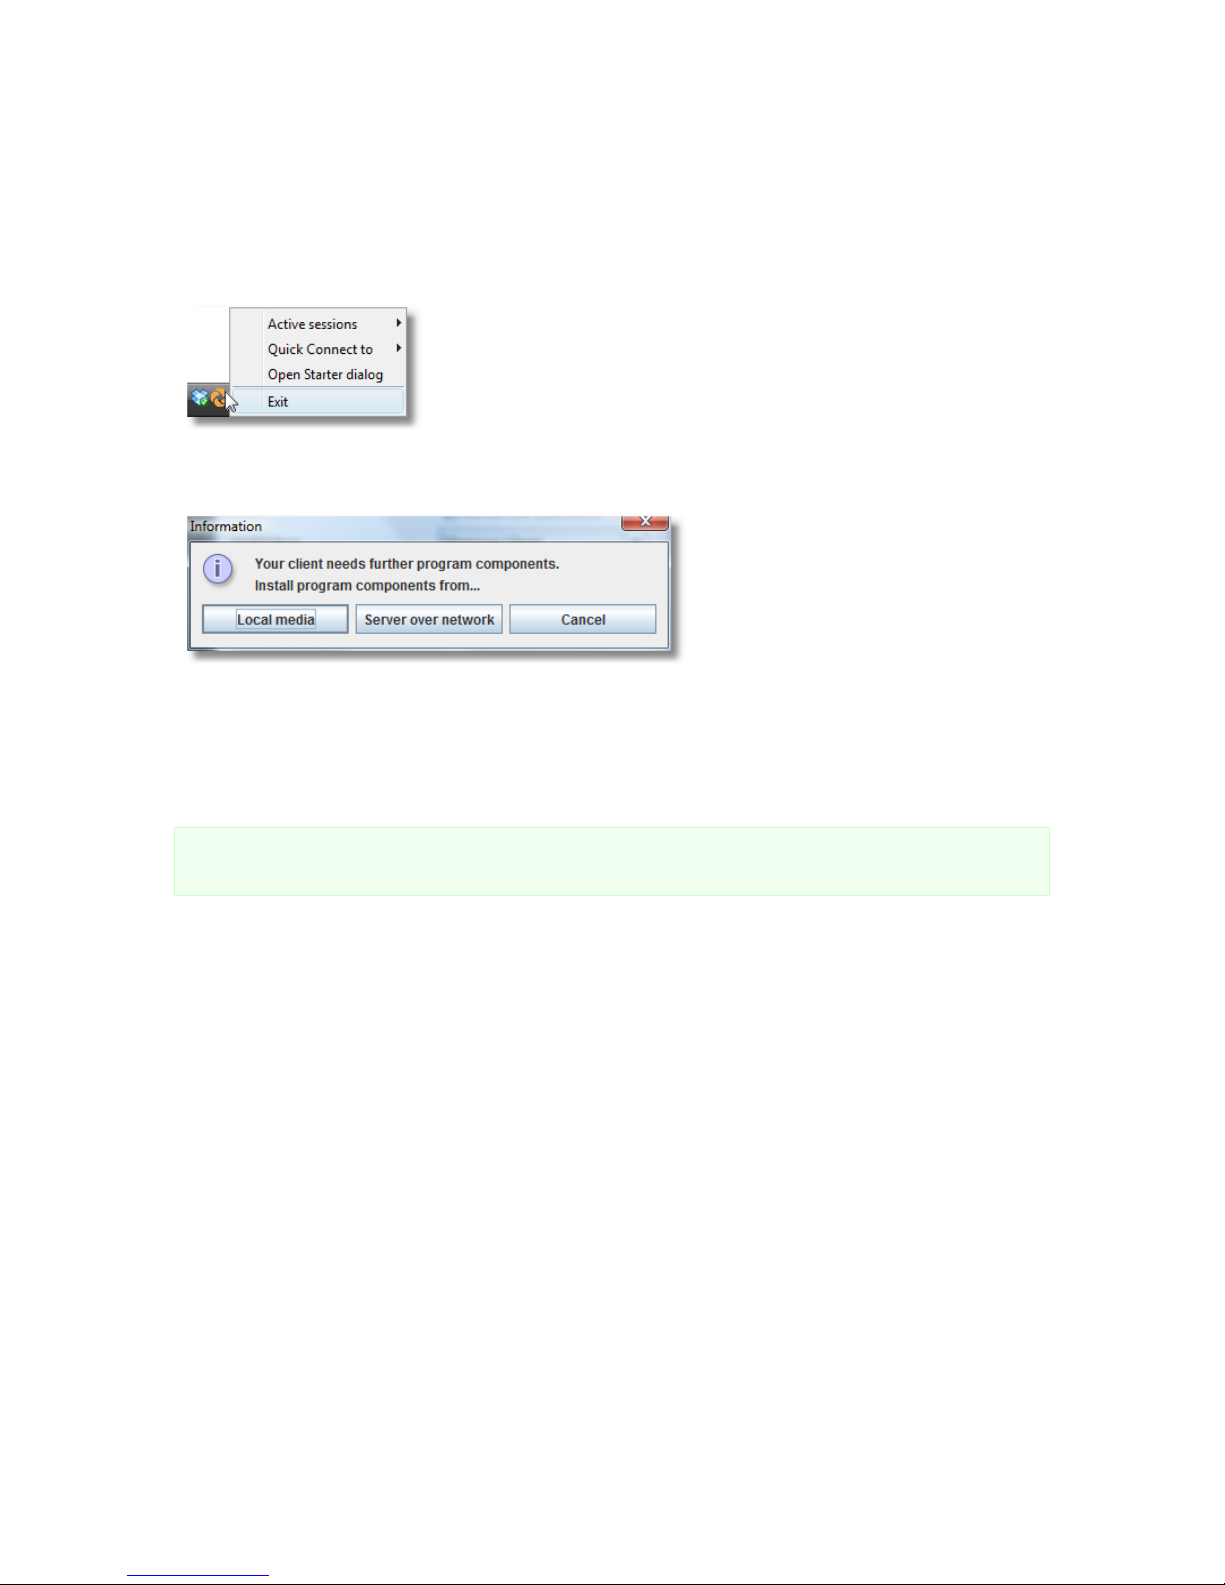
You can access the Starter by clicking its icon. There you can open the Starter dialog again and also
force an exit of the client application.
When you start the client the first time after a new installation some additional client application
components need to be installed (this is needed only once per client). You will be asked:
Normally you want choose to install the program components from Server over network. However,
if you have a very slow network connection between the client and the server you might want to
choose installation from Local media. When you choose this option you will be asked to locate the
directory ClientInstaller of the Observer installation CD. Once you choose the correct location and
push OK, the components will be installed.
Note: If you enable the Download client without asking option you won't be presented with this
dialogue.
If you do not yet have a permanent license string for Observer, a License dialog appears. To continue
without a permanent license just push Continue. In this case the full functionality may not be
available. See also 2.1 Introduction to Observer clients on page 11 for further details about licensing.
Starting multiple sessions of the Observer client
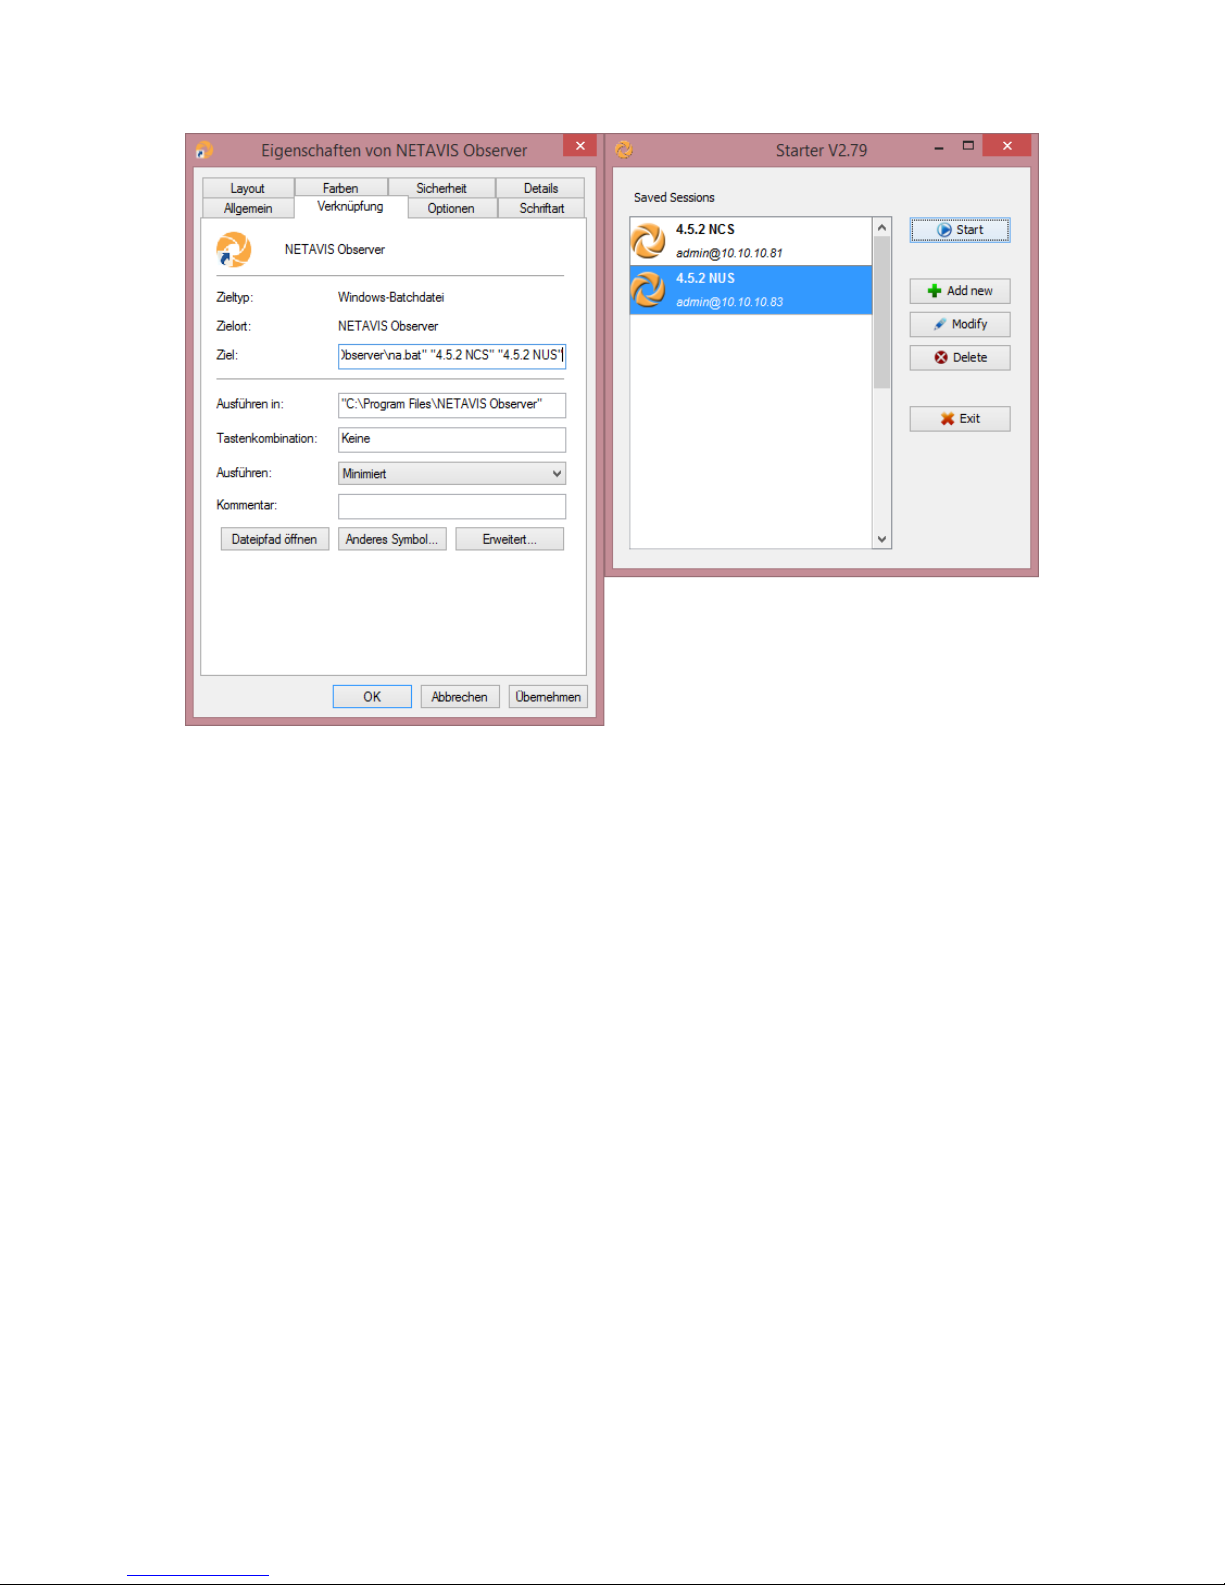
It is also possible to start multiple sessions of the Observer client with a single shortcut. To do so you
need to right-click on an existing shortcut to the Observer client and open its Properties. In the
Target field you can then add the names of the saved sessions which you would like to be started
upon clicking on the shortcut (e.g. "C:\Program Files\NETAVIS Observer\na.bat"
"4.5.2 NCS" "4.5.2 NUS" will open the two saved sessions called "4.5.2 NCS" and "4.5.2
NUS"):
Page 19
NETAVIS Observer 4.6 User Manual (October 2015)
Page 19 of 204
Using a different directory for the installed client application components
Per default, the downloaded client application components will be installed in the directory
%USERPROFILE%\netavisLibs (e.g. C:\Documents and
Settings\user\netavisLibs). You can change this directory by setting the environment
variable NETAVIS_DIRECTORY. The directory must exist prior to starting the Observer client. If the
variable does not exist, the client components will be installed in the standard directory.
Here is how you can set an environment variable in Windows 7:
1. Right click on the Computer icon in your Explorer or on your Desktop and choose Properties.
2. In the System window click on Advanced system settings in the left pane.
3. In the System Properties window select Advanced tab and click on the button Environment
Variables at the bottom of the dialog.
4. In the Environment Variables window you will notice two tables User variables for the current
user and System variables for all users.
5. To add a new User variable click on New… button. In the New User Variable dialog box enter
the variable name NETAVIS_DIRECTORY and the location of the directory and then click OK.
The default location would be %USERPROFILE%\netavisLibs.
6. Click OK in the Environment Variables dialog window and close the other dialogs as well.
Working with sessions of pre-4.0 servers
The Starter also allows you to also manage sessions with Observer servers running releases older
than 4.0. Just select the checkbox Show settings for pre-4.0 releases to show the additional
settings.
Page 20
NETAVIS Observer 4.6 User Manual (October 2015)
Page 20 of 204
Description of elements:
Element
Description
Window width, height
Define the size of the client window in pixels.
Upper left corner X, Y
Define the location of the upper left corner of the client window in
pixels. This setting can be changed, e.g., for multi-screen setups.
Initial monitor view name
Is optional and defines the initial Online monitor view.
Window decoration visible
Defines whether the windows decoration border is visible.
Tool control bar visible
Defines whether the tool control bar at the right side of the window
is visible. This bar allows switching between Online Monitor, Archive
Player, Event Management and Administration.
Event bar visible
Defines whether the event bar at the bottom of the window is
visible.
Online monitor control bar
visible
Defines whether the menu and the history buttons for Online
monitor control are visible.
Overlay painting enabled
When this is selected and the hardware supports it the Online
monitor uses the hardware overlay technique for displaying flickerfree MPEG streams. This can also boost the client performance and
relieve the main CPU.
In multi-screen operation, overlay painting of MPEG video streams
may result in pink colored view ports if the client is not running on
the primary screen of Windows. Then you should turn off this
feature.
2.4 Client multi-window and multi-screen operation
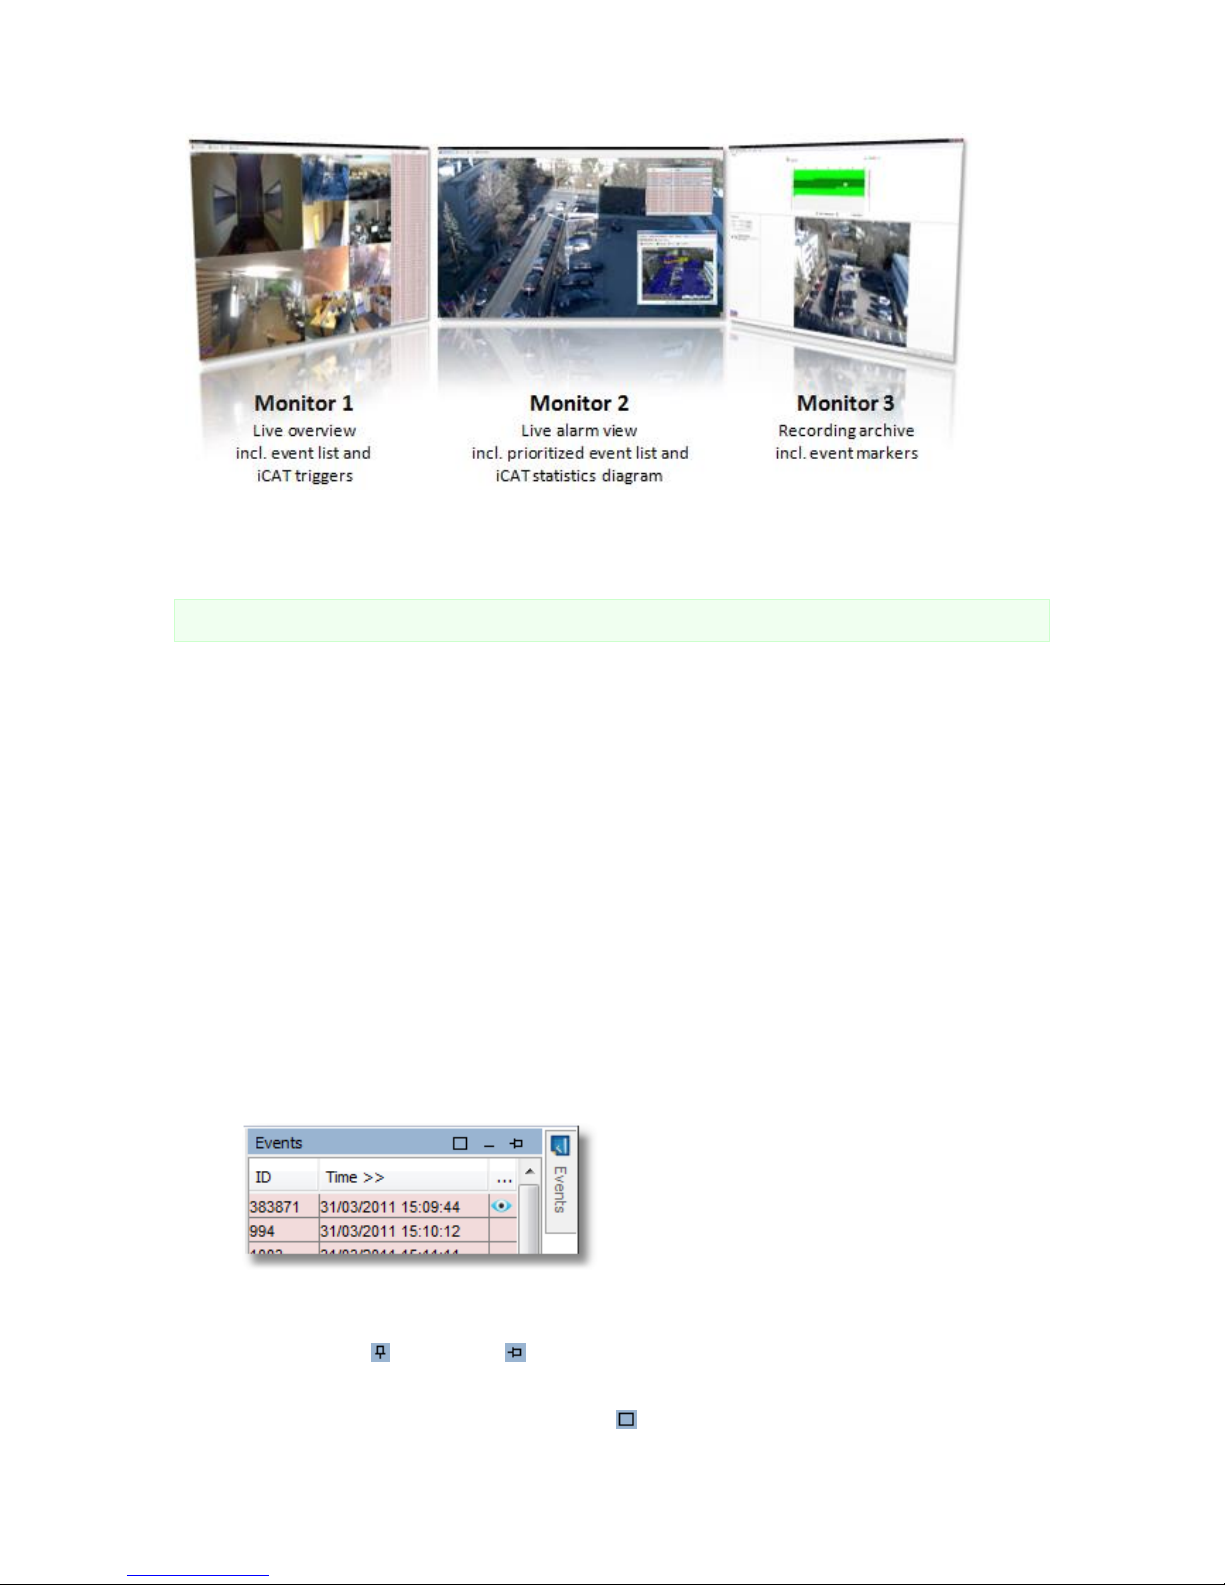
Observer supports multi-window and multi-screen operation. With clients workstations that have
multiple screens connected you can position windows on different screens.
Here is an example of a client setup with 3 screens:
Page 21
NETAVIS Observer 4.6 User Manual (October 2015)
Page 21 of 204
The window contents and positions are automatically stored per user and between sessions. This
means when a user has multiple windows positioned on 3 screens and he exits and then logs in again,
all the windows on the 3 screens will automatically be restored.
Please note: There can only be one Archive player and this is located in the main window.
2.4.1 Creating a new window
In the main application window select New window from the Windows menu.
The window title and the contents of the window can be adapted in the Client preferences (see 2.5
Client preferences on page 22 for more details).
2.4.2 Modifying window layouts
You can modify the layout of a window by rearranging its components. Once you have defined in the
Client preferences dialog what components are to be shown in a window you can customize the
layout. Select the menu Windows->Enable layout customization. For the Event list and the
Camera tree you can now define:
Where they are located inside the window: Just click on the title bar of the Event list or the
Camera tree and drag it to a different location. For example, when the Online monitor and the
Event list are enabled, then you can drag the Event list from the default position at the right
border of the window to the bottom of the window.
Whether they are floating (open when needed or there are new entries and collapsed or hidden
otherwise) or pinned (always shown): You can change the state of the Event list or the Camera
tree by pinning or unpinning it in the title bar.
Whether the Event list or the Camera tree should fill the whole window: You can maximize the
component by pushing the maximize button . When a component is maximized, it will
Page 22
NETAVIS Observer 4.6 User Manual (October 2015)
Page 22 of 204
occupy the whole space of the window and will automatically resize when you resize the
window. Thus you can create a window that contains only an Event list.
After you are done with the modifications deselect Windows->Enable layout customization.
The default location for the Event list is the right window border and for the Camera tree (that usually
only pops up when needed) it is the left window border.
Note: Only the Event list and the Camera tree can be dragged. The other components in the window
will then change their size accordingly.
2.4.3 Positioning a window on a specific screen
Positioning a window on a specific screen is very easy: Use the mouse to drag the window to the
desired screen and drop it there. You can also maximize the window on the screen.
When a window is configured to be in full screen mode (and therefore drag and drop is not possible)
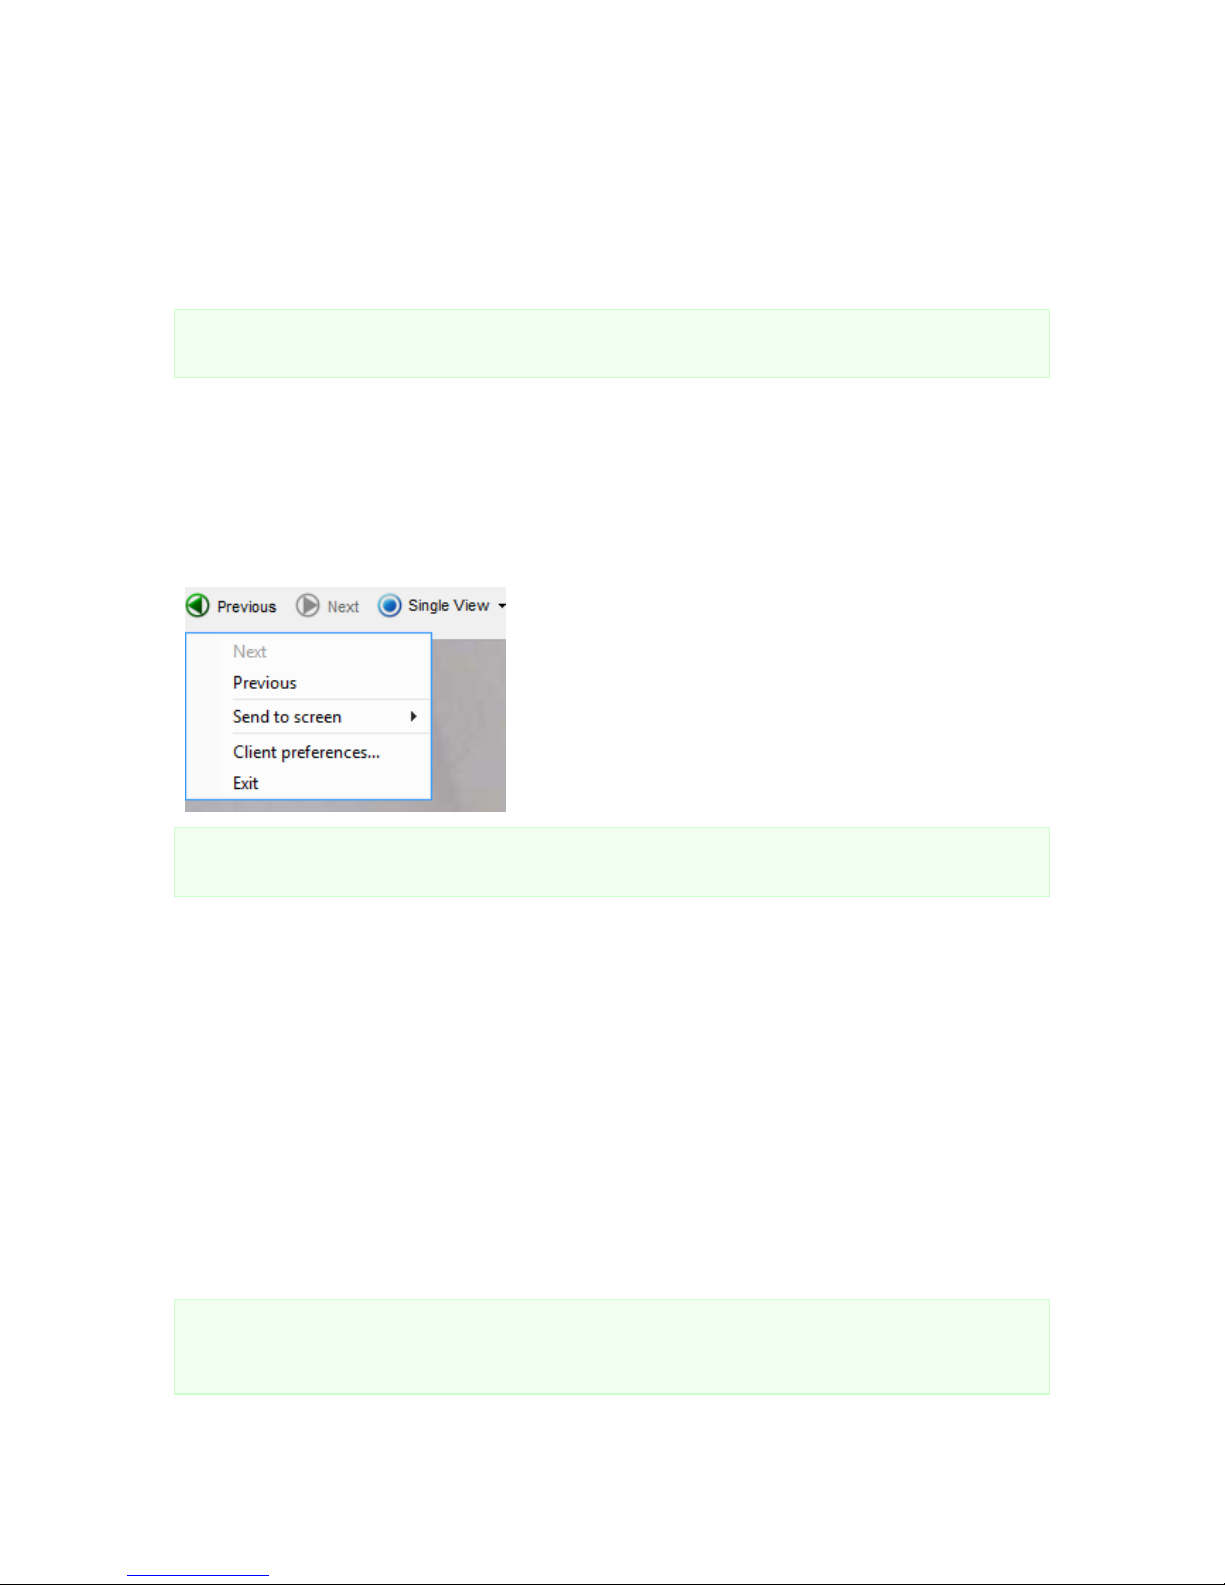
there is a Send to screen option in the context menu (accessible via a right mouse button click).
Note: See 2.5 Client preferences on page 22 for information on how to enable full screen mode for a
window.
All the window states will be remembered between sessions. This happens on a per-user basis, which
means when the user logs in on a different client workstation the same window setup as on the first
client workstation will be shown.
2.4.4 Deleting a window
In the main application window select Delete window... from the Windows menu. A Delete
window dialog will open, offering you the list of windows available for deletion.
2.5 Client preferences
The Observer client offers many configuration options which can be adjusted via the Client
preferences accessible via the Observer menu or the right mouse click menu in the main
application window.
Note: Depending on the authorization that your Observer administrator has assigned to you, some of
the client components could be disabled (menu shown in grey color). If you need more authorization,
please contact your local Observer administrator.
Page 23
NETAVIS Observer 4.6 User Manual (October 2015)
Page 23 of 204
2.5.1 Window preferences
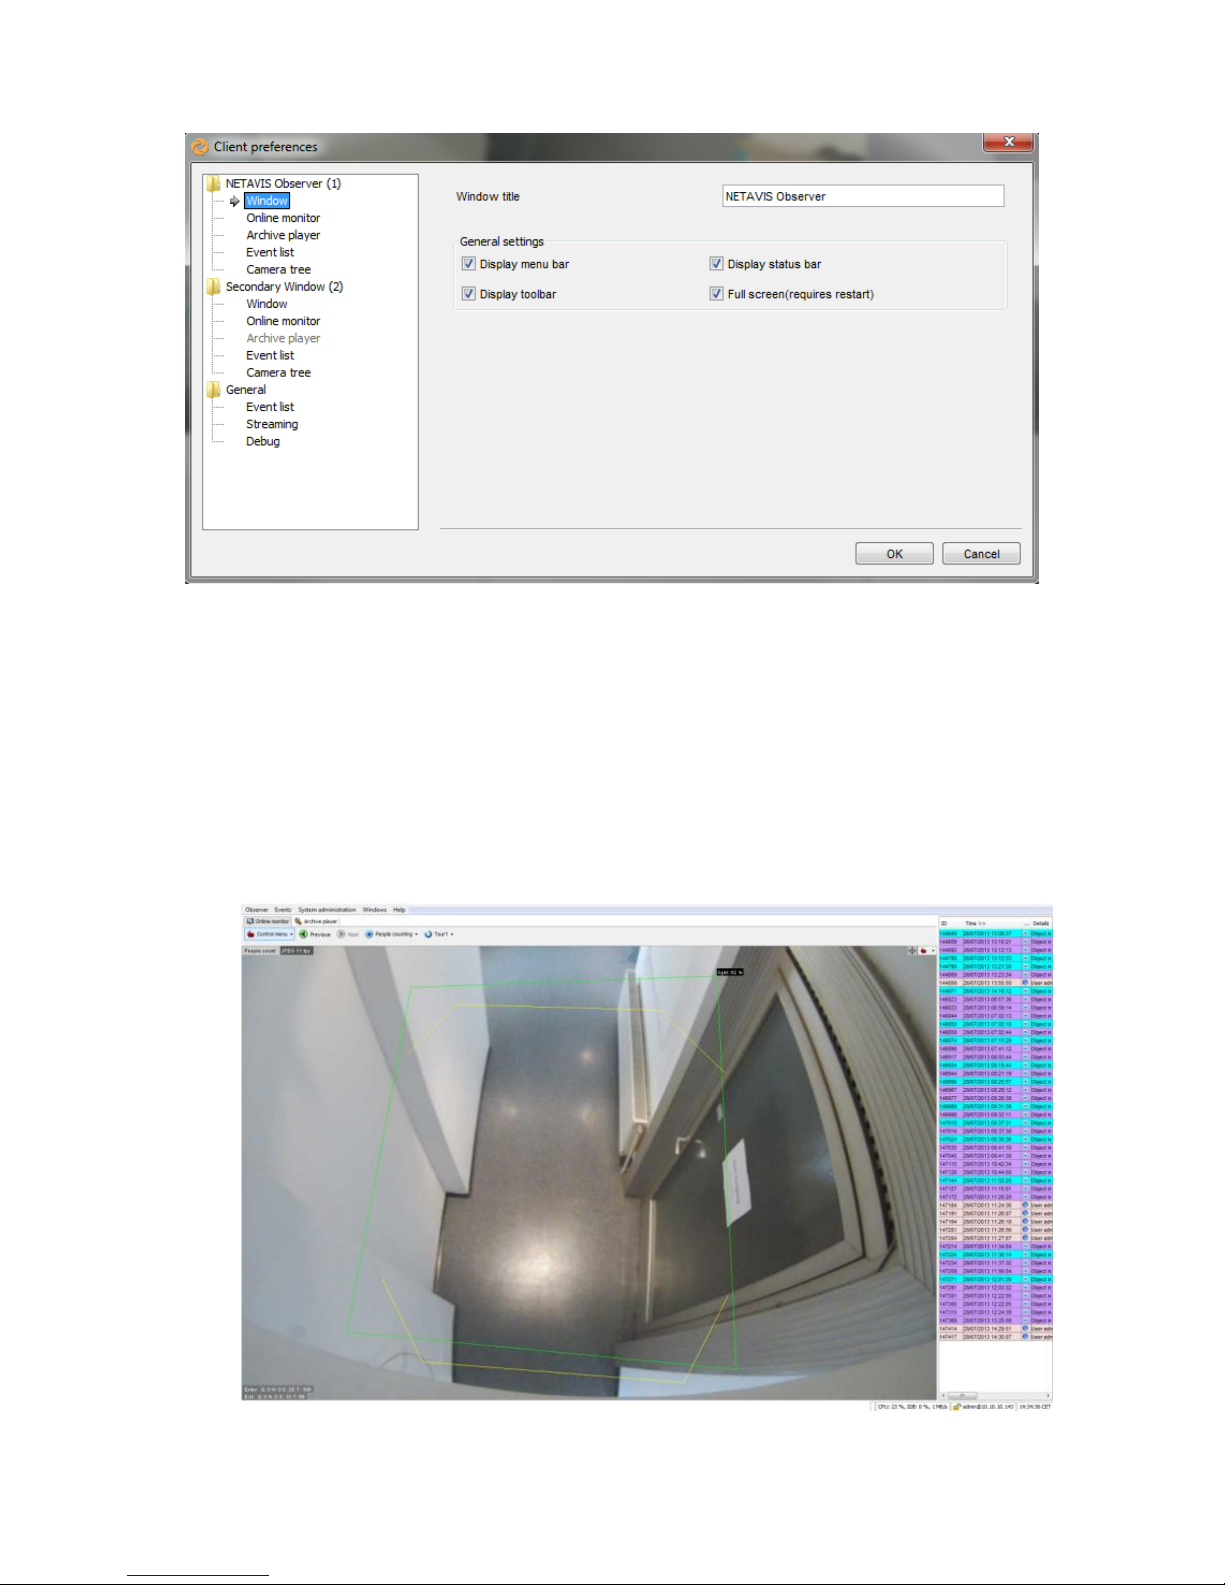
Here you can set some general configuration options for each individual window:
The Window title is shown in a window's title bar. Note that the number in brackets after the
window title in the left-hand menu is the ID of the window. That is important as only the main
application window designated by (1) can contain the Archive player. Similarly the Display
menu bar, Display status bar, and Display toolbar options are also only available for the
main application window.
The Full screen (requires restart) option is available for every window. In full screen mode a
window is shown without a title bar or the Windows task bar and fills the whole screen.
Page 24

NETAVIS Observer 4.6 User Manual (October 2015)
Page 24 of 204
2.5.2 Defining which components to display in a window
For each window you can define any combination of components and component-specific
configurations to be displayed:
Online monitor: You can choose to Display Online monitor and Show main controls (the
View control menu, Next and Previous buttons, View selector, and Round tour selector). For that
Online monitor's empty view ports you can configure whether the Add camera button should
Show on mouse over or else only be accessible via the right mouse click menu. The
Preferred monitor for large view on double click option can only be set for one window
and defines in which one big views of cameras are shown after a double click.
Archive player: You can choose to Display archive player.
Event list: You can choose to Display event list, Display titlebar, Hide acknowledged
events, Show hidden event list on new events and Scroll to reveal new events.
Additionally you can configure which columns to show in the event list: ID, Time, Details,
Camera ID, Camera, Priority, Icon, Server, and ACK state.
Camera tree: You can choose to Display camera tree always and Display titlebar.
Note: Normally it is not necessary to always display the camera tree since it is displayed on-
demand. Also note that as of NETAVISObserver 4.6.2 the state of the camera tree (which groups
are and are not expanded) is stored per user.
2.5.3 General preferences
The configuration options set here apply to all Observer client windows:
General: You can enable the Camera statistics display (see 4.4 Checking the Camera status
on page 39 for details).
Event list: You can enable/disable the Play event sound option and configure the Maximal
event count shown in the event list. It is also possible to configure the Default event video
export duration (how many seconds of the recording before and after the event should be
exported) and Override default archive playback duration (how many seconds of the
recording before and after the event should be shown per default in the archive player). This
last option overrides other pre- and post-event recording options which may have been set up
for specific events.
Streaming: To ensure smooth video and audio playback you can configure the length of the
local Live video cache (with and without audio) in milliseconds. In case of connectivity issues
it is advisable to raise the Live video cache (no audio) value above the default of 200ms.
Debug: You can enable different debug options and Show Log Debug.
Note: These debug options are only needed for advanced error diagnosis.
2.6 Mobile Observer clients
You can also access an Observer server from mobile devices such as smartphones and tablets. As of
NETAVIS Observer version 4.4.0 two different mobile clients are available:
Client for iPad, Version 2 is an app for Apple iPads (requires iOS 6 or later)
Page 25
NETAVIS Observer 4.6 User Manual (October 2015)
Page 25 of 204
Client for Smartphone & Tablet is a browser-based application for all platforms. Please refer to
the NETAVIS Observer Server, Client and Storage Compatibility and Requirements document for
details on compatibility.
Please note: These mobile clients do not support the full functionality of desktop clients (see 2.1
Introduction to Observer clients on page 11 for more details).
This chapter describes how to use these mobile Observer clients.
2.6.1 Client for iPad
To get the NETAVIS Client for iPad follow these steps:
1. Follow this link or go to the iTunes Store and search for "NETAVIS".
2. Install the Observer app on your iPad.
To use the app:
1. Start the NETAVIS Client for iPad.
2. Connect to an Observer server and login.
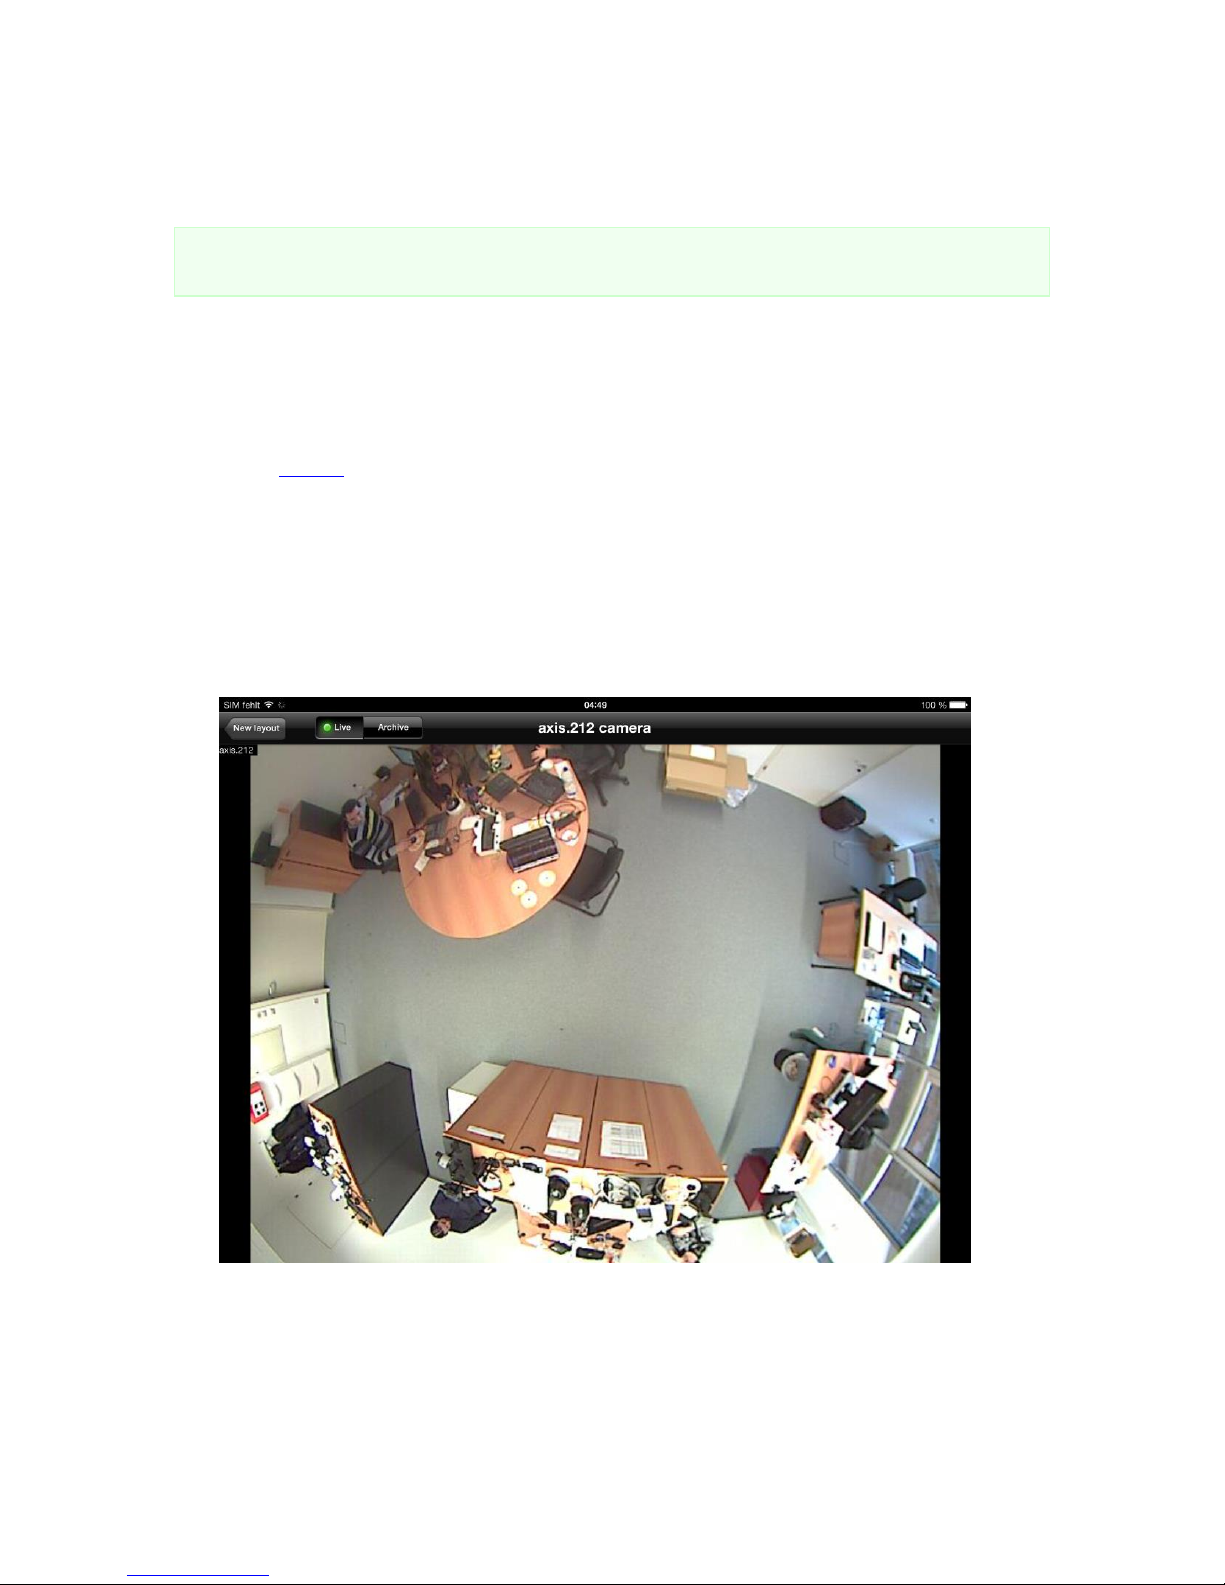
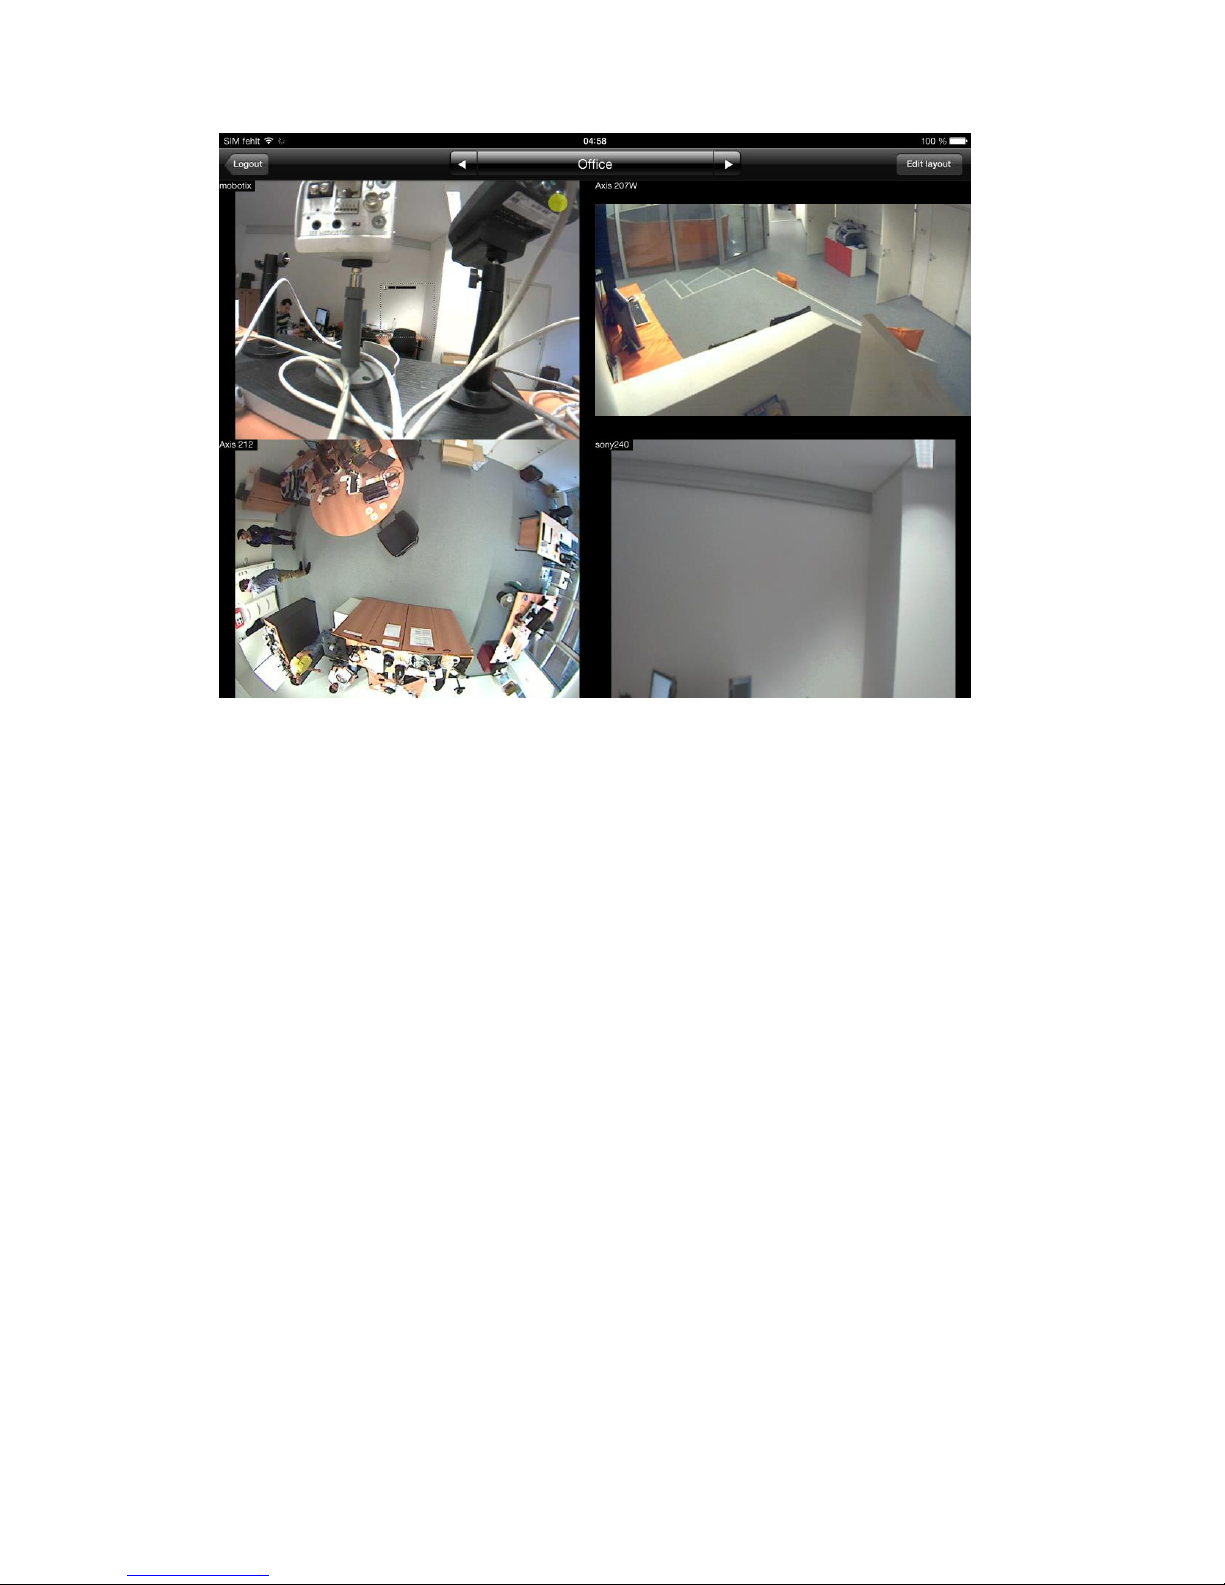
3. If you have previously configured a view port layout you will see it and be able to tap on a camera
for a full screen view and access to its archive:
Else you first have to tap Add layout, select the desired layout and then add cameras to the
individual view ports. It is possible to add multiple layouts and switch between them using the
arrow buttons or dropdown menu in the middle of the navigation bar:
Page 26
NETAVIS Observer 4.6 User Manual (October 2015)
Page 26 of 204
4. When you are finished using it, it is recommended to log out of the NETAVIS Client for iPad via the
Logout button on the overview screen (although there is an automatic logout after 10 seconds).
2.6.2 Client for Smartphone & Tablet
The Client for Smartphone & Tablet can be run directly in a smartphone or tablet web browser and
does not require an installation:
1. Start a web browser on your smartphone or tablet.
2. Enter the address of your Observer server followed by /browserclient (e.g. <Observer-
IP>/browserclient) and login. Both http and https are supported by the Client for Smartphone
& Tablet.
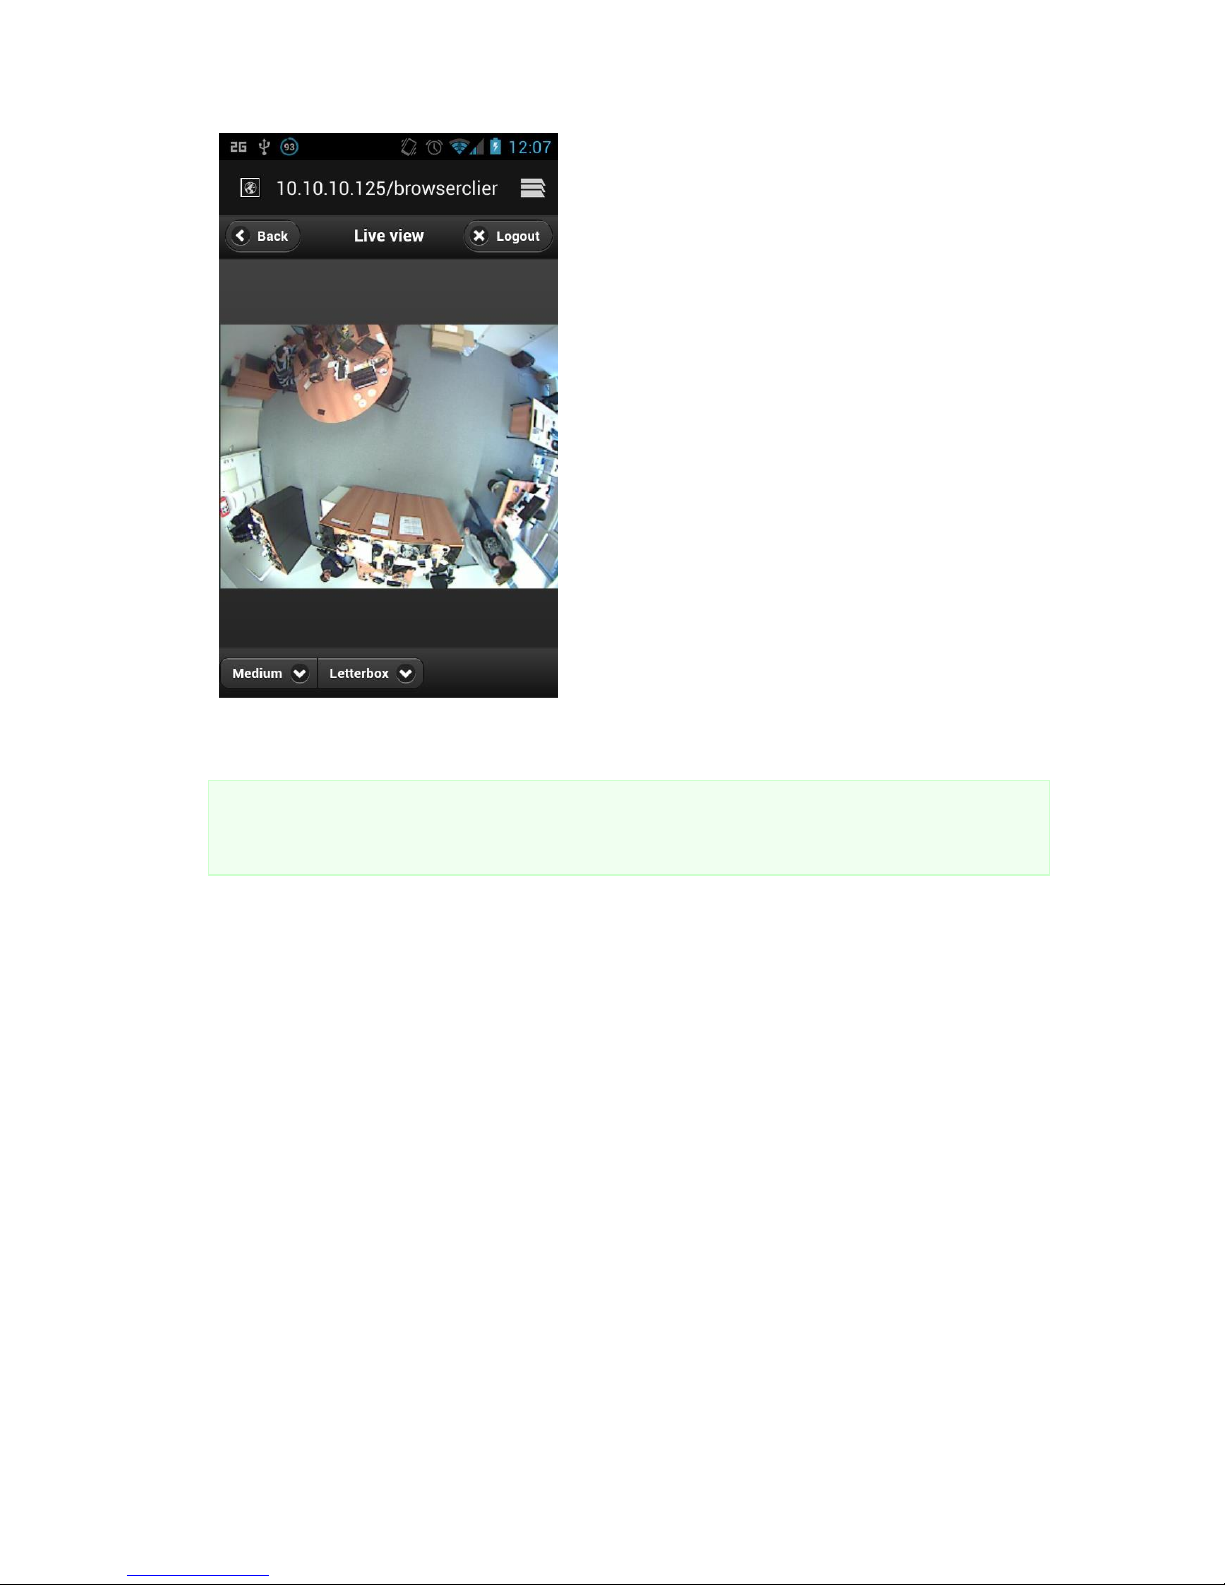
3. When you get the camera tree tap/click on camera groups to expand them and then on a camera
to show its live stream:
Page 27
NETAVIS Observer 4.6 User Manual (October 2015)
Page 27 of 204
4. You can choose whether to watch the live-stream in a Small, Medium or Large resolution and
which Letterbox mode should be used.
Please note: Changing the resolution only works for cameras where multiple MJPEG streams are
supported. Please see the NETAVIS Observer Supported Video Sources document for further
information.
5. When you are finished using it, it is recommended to log out of the Client for Smartphone & Tablet
via the Logout button (although there is an automatic logout after 10 seconds).
2.7 Observer Transcoding™ for low-bandwidth client-server connections (ABS)
The unique Observer Transcoding™ technology (also called ABS for adaptive balanced streaming)
reduces the necessary bandwidth for video streams to a fraction of the usual values. Especially highresolution cameras can thus be streamed from server to clients over low-bandwidth wide area
network (WAN) connections without loss of quality. Therefore even megapixel cameras can be
operated over very low bandwidth connections that would normally prevent their operation. The
technology works for all cameras, streaming resolutions, and formats (including MPEG-4, H.264, and
MxPEG).
Additional CPU resources are needed at the server and at the client for transcoding streams.
Transcoding™ can be set up in the server level by limiting bandwidth for live video and recording
playback streams as well as for recording exports (see 11.2 Setting Observer server parameters on page
110).
Page 28

NETAVIS Observer 4.6 User Manual (October 2015)
Page 28 of 204
Important: Although transcoding works with all streaming formats, the best results and least CPU
overhead are possible with MJPEG streaming. Also the transcoding bandwidth limit must be chosen
carefully.
Therefore we suggest:
• MJPEG streaming format.
• Limit the transcoding bandwidth to app. 70% of the available server-client connection
bandwidth.
For connections, like Internet connections, with heavily varying bandwidth it is much better to use a
lower limit than a higher limit. With low limits of 256 kbit/s or 128 kbit/s very good results are possible.
Some customers have even used 56 kbit/s or 30 kbit/s with transcoding. As mentioned above the
limits are defined in 11.2 Setting Observer server parameters on page 110.
2.8 Exiting the client
The Observer client can be closed by choosing Exit from the Observer menu at the main application
window. You will be asked whether you really want to exit.
If the menu bar is hidden, you can exit the client via the right mouse button menu.
Page 29

NETAVIS Observer 4.6 User Manual (October 2015)
Page 29 of 204
3 Guidelines for setting up a new system with Observer
This section guides you how to best set up a new system with Observer. It shows which steps are
needed in which order and gives you some hints on how to configure cameras and users.
For a simple system with 1 server take these steps:
1. Set up cameras
2. Set up users
3. Set up views
For a bigger system with connected servers take these steps:
1. Set up servers
2. Set up cameras
3. Set up users
4. Set up views
Please note: All of these steps should be taken by the administrator user (usually login admin).
Here we describe the steps for one server (for the setup of connected servers please see 12 Working
with interconnected Observer servers on page 116):
3.1 Guidelines for setting up cameras
Usually a system consists of several cameras of the same type with similar settings. Bigger systems
may have many cameras of the same type and several different types. Therefore Observer offers you
the possibility to duplicate cameras in order to facilitate the setup.
Take these steps for setting up cameras:
1. Define camera groups. We found that a good grouping criterion is the location of the camera.
Another grouping criterion could be access rights for various users groups. See 4.7 Working with
camera groups on page 41 for details.
2. For each of the cameras that are of the same type and have a similar setting for recording and
possibly motion detection create a camera that serves as a blueprint for other cameras and can be
duplicated later.
Define also the recording settings for this camera. For motion detection (MD) take useful default
values that can be tuned later on (please note that first you have to create the MD definition and
then you set up the scheduling/recording for the MD setting).
Since most video analytics settings are different between cameras, it does not make a lot of sense
to create default values for video analytics at this point in time. One exception could be that you
may want to set up the same object tracking regions for several cameras.
For further details please refer to 4.2 Adding a new camera and setting basic properties on page 31
and 8 Working with simple motion detection on page 87.
3. Now duplicate (clone) the cameras and, if necessary, move them to different camera groups.
After that you can fine tune the camera setup and define special settings like video analytics for
various purposes (see 15 Video analytics with iCAT on page 140).
Page 30

NETAVIS Observer 4.6 User Manual (October 2015)
Page 30 of 204
3.2 Guidelines for setting up users
Usually a bigger system will allow several users to login with different privileges and rights. Therefore it
can be useful to group several users with similar tasks and rights in so called user groups in Observer.
Take these steps for setting up users and groups:
1. Create user groups for the various roles and privileges (examples are: security personnel, view only
users, administrators). For each users group define the system wide privileges. See 5 Managing
users on page 43.
2. In the users groups create the users you need. Please note that by default the users will inherit the
privileges from the group they belong to.
3. Set the camera access rights per user.
3.3 Guidelines for setting up views
Observer allows you create several views for showing cameras in various configurations and sizes.
Therefore it makes sense to create various views for different surveillance purposes. Since the views
are configured per user, we suggest that the administrator creates the standard set of views and then
copies the views to the various users.
Take these steps for setting up views:
1. Create the various views needed by most users. See 6.1 Creating a new view on page 52.
2. Copy the views to the various users. See 6.8 Copying views between users on page 61.
Later on you can create further views and copy them again.
Page 31

NETAVIS Observer 4.6 User Manual (October 2015)
Page 31 of 204
4 Setting up cameras
Observer allows any authorized user to set up cameras in the system. Ask your Observer system
administrator whether you have such authorization.
4.1 Preparations
Before you begin to set up a new camera in Observer, be sure to have the following information
available:
Your camera type.
Is your camera type supported by Observer?
Please consult the document NETAVIS Observer Supported Video Sources.
Are there available licenses for setting up additional cameras?
IP addresses of cameras (or camera servers).
Please note: Here we describe how to setup a camera in Observer. If you setup an IP camera, then the
camera itself also can be configured. This is normally done via a web-based interface of the camera.
Please consult the manual of your IP camera for further details.
4.2 Adding a new camera and setting basic properties
Start the Observer client application (see 2 Observer clients on multiple platforms on page 11).
You can either
add a new camera from scratch, or
duplicate an existing camera and just modify some parameters (see 4.2.2 Duplicating an existing
camera on page 38). Duplicating an existing camera creates an exact duplicate with all settings
copied. This is useful when you have more than one camera of the same type or with
equal/similar settings (like recording or video analytics settings).
4.2.1 Adding a camera from scratch
1. Choose Camera admin from the System administration menu. This opens the Camera
admin dialog.
2. With a mouse click, select the camera group to which you want to add the new camera (later on
you can move the camera in the camera tree to a different group).
3. Choose Add new camera from the menu.
The Properties dialog opens in which you can configure the camera.
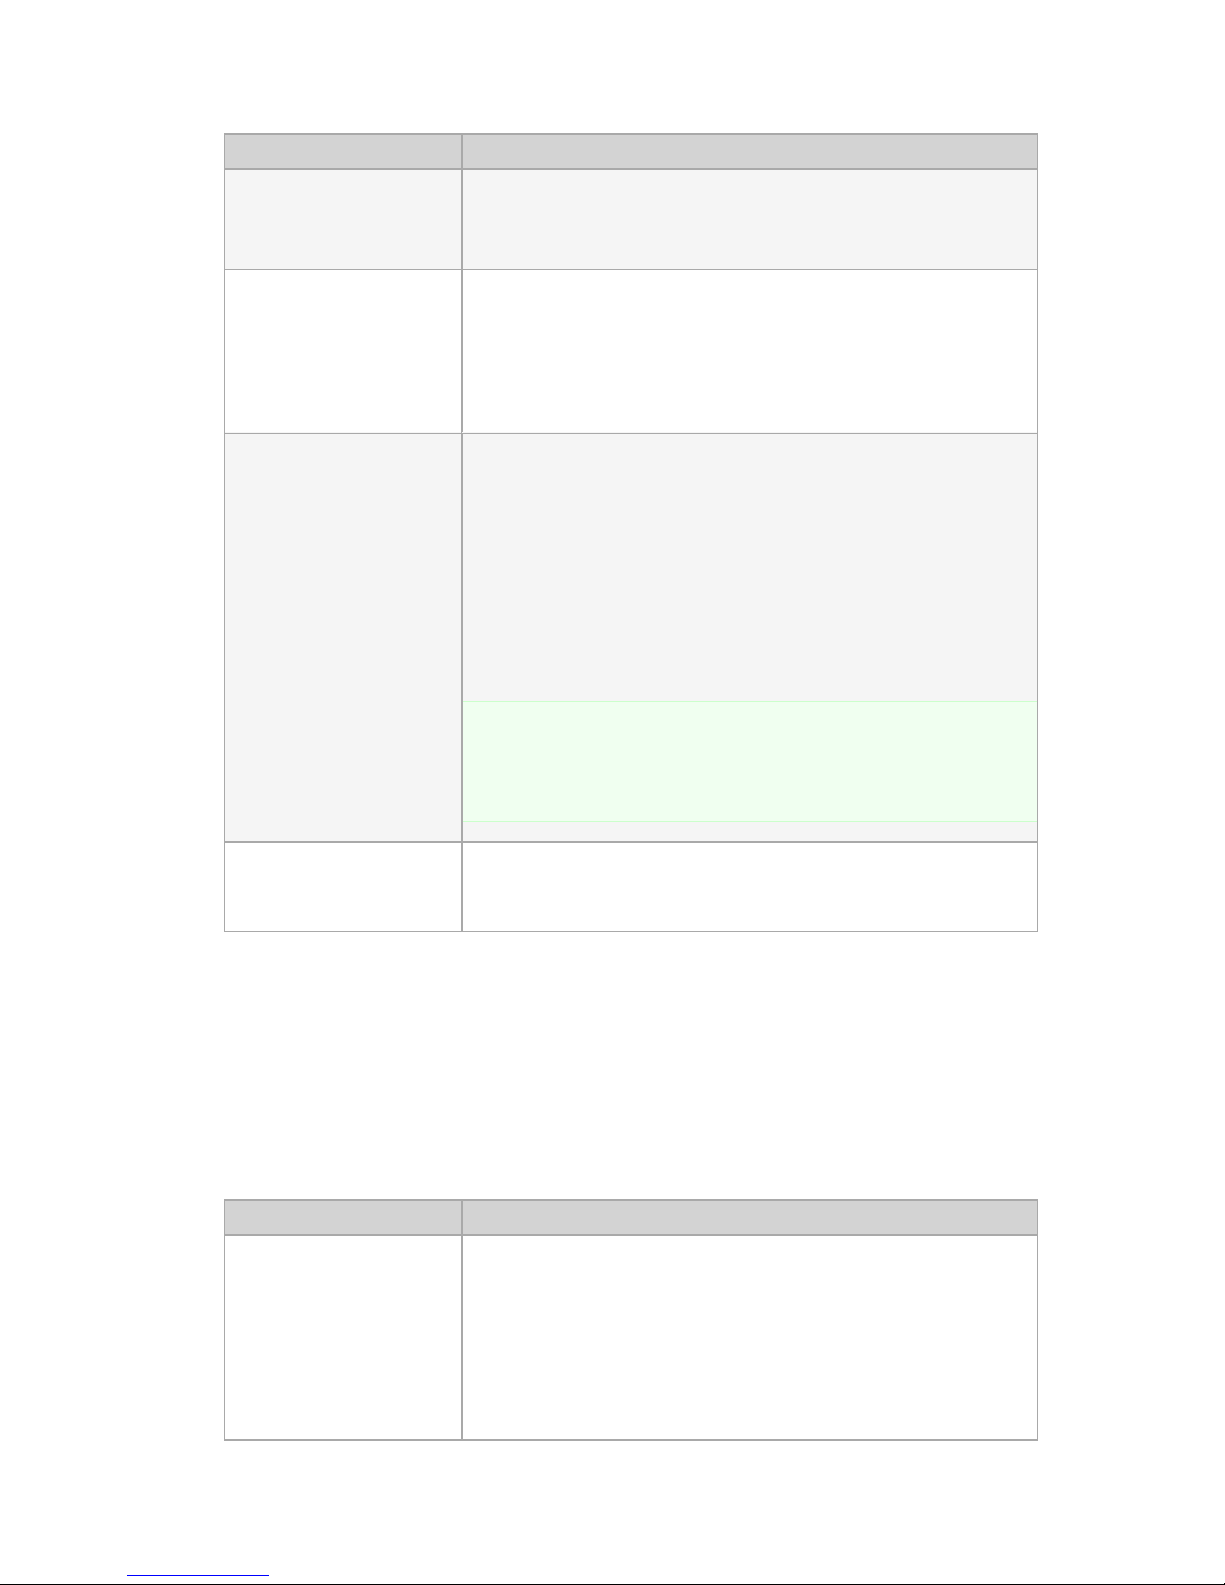
Enter your camera data in the corresponding fields. Use the following table as a guide. Fields
labeled in bold are mandatory while all others are optional:
Field label
Description
Camera name
Enter the name that you want to give your camera. This is the name
Page 32

NETAVIS Observer 4.6 User Manual (October 2015)
Page 32 of 204
Field label
Description
by which you will select or display this camera (e.g., camera 2).
Comment
Here you can add text that describes your camera.
Time zone
Select the time zone of your camera's location (e.g., CET for a
camera installed in Vienna).
Camera type
Specify the type of camera by selecting it from the camera pop-up
menu.
Important: If you want to connect an analog camera via a video
server then select the type of the video server from the menu. If you
connect an analog camera to a video capture card directly in the
Observer server, then select NDS (Observer Digitizer Server) as your
camera type.
Name of camera admin
If the camera needs authentication for administrating, then enter
the user name of the camera administrator here.
Pwd of camera admin
Enter the password of the administrator account of the camera
(only if used).
Camera IP address
Specify the IP address or network name of your camera or video
server. If you supply a network name, you must have access to a
domain name server (DNS) that resolves the name to an IP address.
Even dynamic DNS names (like dyndns) can be used. This field is
not needed for analog cameras connected directly via a video
capture card (NDS).
Camera server port
If you are adding an analog camera via a video capture card (NDS)
or via a video server, specify the port of the capture card or video
server to which the camera is connected.
Aspect ratio
This setting is only enabled for certain IP cameras that are shipped
with different aspect ratios (like PAL or NTSC). For cameras that are
delivered in one standard only, the correct value is set
automatically and cannot be changed. Please select the correct
value for your camera. If you select a value that does not fit your
camera, then the image might be distorted. Please refer also to 1.4.5
JPEG image sizes and storage requirements on page 10.
Streaming mode
(Mobotix only)
This option is only relevant if you use a Mobotix camera. Set it when
you would like to operate the camera in streaming mode. If this
option is not activated, the camera operates in single picture mode.
In streaming mode (MJPEG format) the camera delivers higher
Page 33
NETAVIS Observer 4.6 User Manual (October 2015)
Page 33 of 204
Field label
Description
frame rates than in single picture mode. If you activate the
streaming mode you also must set the according option in the
camera with the Admin tools of the camera.
Use HTTPS encryption
If the camera supports encrypted streaming using HTTPS this
setting will be enabled. It defines whether streaming from the
camera is encrypted using HTTPS. Please note that encryption
needs significantly more CPU resources on the server than
unencrypted communication (see also 1.3 Observer data security on
page 7).
JPEG RTSP URL
If you want to use the generic RTSP driver to get a JPEG stream
from a camera - which requires selecting "Generic RTSP" as the
Camera Type - then you have to enter the RTSP port of the camera
into the first field (if it is left empty then the default port 554 is used)
and the specific URL into the second field. The IP address and (if
applicable) username and password of the camera admin are used
from the corresponding configuration fields above. The stream
configuration (stream resolution, fps, etc.) has to be done in the
camera itself.
Note: Ensure that on the Basic video and audio settings page
(see the next section for details) you only enable the JPEG/MPEG4/H.265 checkboxes if you have entered a corresponding RTSP URL
here.
H.264/MPEG-4 RTSP URL
The configuration of a H.264/MPEG-4 stream via RTSP works just
like the JPEG stream configuration (see above for details).
Press Save to create the new camera.
4. Select the newly created camera again in the camera tree and then push the Next button at the
bottom. This invokes the Default settings dialog that lets you define the default image and
audio settings for your camera. To modify values choose Modify selected camera or group
menu.
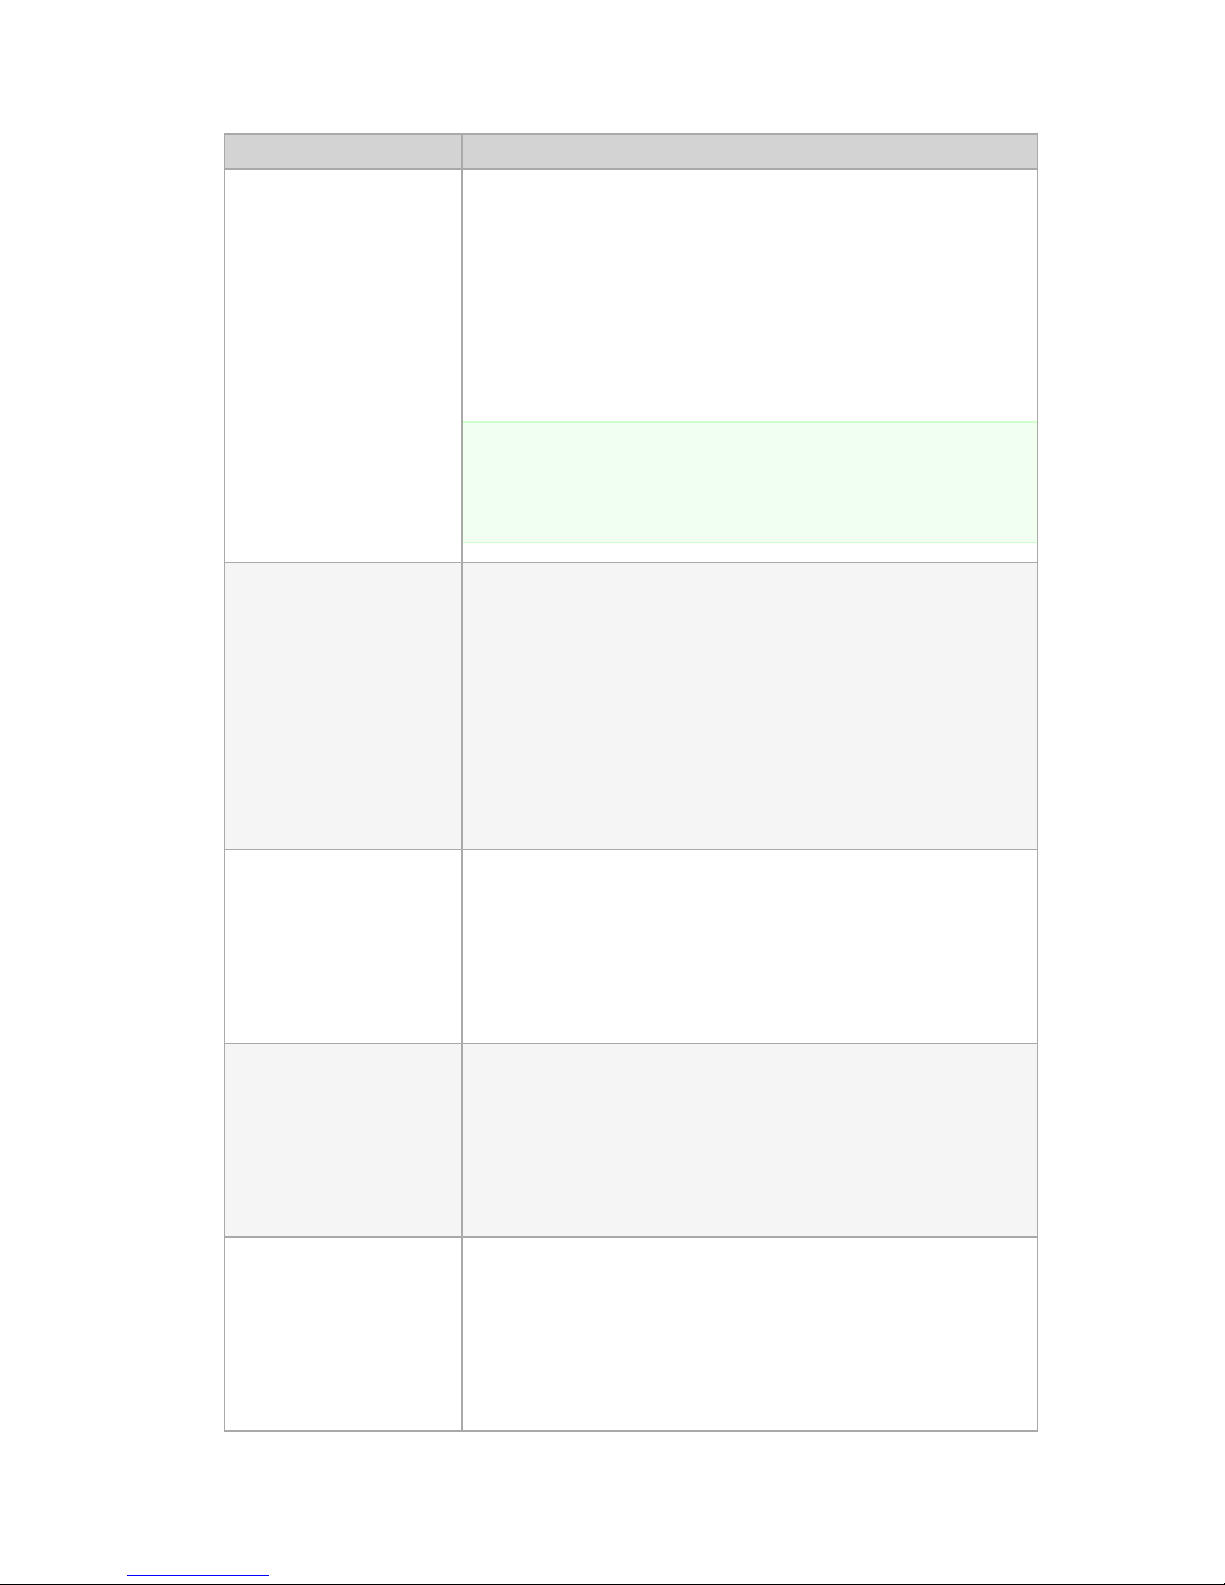
Fields for Basic video and audio settings:
Field label
Description
Multi stream allowed
Some cameras are capable of providing multiple video streams in
parallel. This can be helpful for example, when online viewing and
recording is to be done in different formats or for optimizing iCAT
video analytics performance (see 1.4 Video streaming methods and
compression on page 7 for a general discussion about multi
streaming).
Usually MJPEG cameras can deliver several MJPEG streams while
Page 34
NETAVIS Observer 4.6 User Manual (October 2015)
Page 34 of 204
Field label
Description
MPEG (MPEG-4, H.264, and MxPEG) cameras deliver only 1 MPEG
stream (some camera types can deliver several MJPEG streams in
addition to the MPEG stream).
If this option is not selected, then only 1 video stream will be pulled
from the camera regardless of how many different formats would
be needed.
If it is selected then multiple streams will be pulled.
Also consider the following checkboxes that define which formats
can be pulled from the camera.
Please note: Multi-streaming has some important restrictions that
depend heavily on the camera type. Please refer to the document
NETAVIS Observer Supported Video Sources for details on
restrictions.
Allow JPEG streaming
If your camera supports MJPEG video streaming, you can allow
using this mode by selecting this checkbox.
In one special case, Observer will try to pull an MJPEG stream even
if this checkbox is deselected. This is the case when iCAT video
analytics is working on MPEG streams (e.g. for motion detection)
and Multi stream allowed is selected. This special additional
MJPEG stream in QVGA is used only for iCAT and helps to minimize
server CPU load for iCAT processing (please refer also to 15.2.1
Considerations for setting up a system with iCAT on page 142).
Allow MPEG-4 streaming
If your camera supports MPEG-4 video streaming, you can allow
using this mode in the Online Monitor and the archive by marking
this checkbox.
Please note that platform restrictions may apply for this streaming
mode (please refer to 2.1 Introduction to Observer clients on page
11).
Allow H.264 streaming
If your camera supports H.264 video streaming, you can allow using
this mode in the Online Monitor and the archive by marking this
checkbox.
Please note that platform restrictions may apply for this streaming
mode (please refer to 2.1 Introduction to Observer clients on page
11).
Allow MxPEG streaming
If your camera supports MxPEG video streaming, you can allow
using this mode in the Online Monitor and the archive by marking
this checkbox.
Please not that platform restrictions may apply for this streaming
mode (please refer to 2.1 Introduction to Observer clients on page
11).
Page 35

NETAVIS Observer 4.6 User Manual (October 2015)
Page 35 of 204
Field label
Description
Stream MPEG-4 via
Multicast
This option should only be switched on in very special situations.
When marked then the MPEG-4 stream from the camera is received
via "multicast", when disabled via "RTSP over HTTP". Multicast is a
one-to-many, while RTSP is one-to-one type connection.
Mark this checkbox only if you want to have multicast MPEG-4
streaming of the camera. In most cases you want to leave this
checkbox not marked, which means that the MPEG-4 stream is
transmitted via RTSP over HTTP.
Allow Audio to camera
When marked, Observer will allow Audio to the camera and will
offer a button for that in the Online Monitor. Of course this feature
only works if you have a working microphone connected to the PC
where you run your client on and your camera has a loudspeaker
function.
Allow Audio from camera
When marked, Observer will allow Audio from the camera to your
client (in the Online Monitor and for recordings). Of course this
feature only works if you have a working loudspeaker connected to
the PC where you run your client on. Please note that platform
restrictions may apply for this streaming mode (please refer to 2.1
Introduction to Observer clients on page 11).
Audio from and to share
single button
If this checkbox is marked, then there is only one button in the
Online Monitor that switches MPEG and Audio on and off. If this
checkbox is not marked, then you will find 3 buttons for the three
functions. See also 6.9 Working with MPEG cameras and audio () on
page 63.
Anonymize (distort) audio
In some cases Laws do not allow the transmission or recording of
people's voices. The criterion often is whether one can recognize a
person by listening to its voice. Therefore Observer allows
anonymizing the audio stream by distorting it. If this checkbox is
marked then the live and recorded audio will be anonymized
(distorted).
The Default settings for MPEG-4, H.264, MxPEG and Default settings for single-stream
JPEG cameras define the streaming format for the various streaming types. These settings will
be used in the Online Monitor and also for recordings. For multi-stream JPEG cameras, the
Default settings for single-stream JPEG cameras are of no importance (because for each
view port in the Online Monitor and also for recording separate formats can be specified).
Please note: In the current version, Observer only supports 1 streaming format for MPEG
cameras for live viewing and recording.
Page 36

NETAVIS Observer 4.6 User Manual (October 2015)
Page 36 of 204
Field label
Description
Use these settings
Usually this checkbox must be set. It defines whether the default
camera settings are set via Observer or in the camera directly (via its
own setting utilities). When it is switched on, the settings in the
camera are overwritten by the values of this dialog. When it is
switched off, the values from the camera are taken and the settings
in Observer are ignored.
In very special situations only, e.g. when setting the values by
Observer causes some unwanted side effects in the camera, you
may want to set the values in the camera directly and switch off this
check box.
Image quality
Defines the image quality of the stream. The possible values are
High, Medium, and Low quality. The higher the quality, the more
bandwidth will be used for transmission and the bigger the space
requirements for recording will be (see also 1.4 Video streaming
methods and compression on page 7).
For multi-stream JPEG cameras, this value cannot be set here, since
separate image qualities can be set for recording and in each view
port in the Online Monitor.
Image size
Defines the image size of the stream. Possible values depend on the
camera model. The bigger the image size, the more bandwidth will
be used for transmission and the more space for recording will be
needed.
For multi-stream JPEG cameras, this value is of no importance,
since separate image sizes can be set for recording and in each view
port in the Online Monitor.
Frame rate
Defines the frame rate of the stream. Possible values depend on the
camera model. The bigger the frame rate, the more bandwidth will
be used for transmission and the more space for recording will be
needed.
For single-stream JPEG cameras, this value defines the maximum
possible frame rate. In the Online monitor and for recording lower
frame rates can be selected.
GOP size
For MPEG streams defines the how many frames are sent and
stored in a GOP (group of pictures). One GOP is an integral data
packet that is transmitted and recorded. Our default value is 10,
which means that there is 1 reference frame (I frame) and 9
difference frames (P frames). A bigger GOP size means a higher
compression rate but also a somewhat lower quality and a bigger
delay between a real scene and its viewed images (which is
relevant, e.g. for live viewing in the Online Monitor). We think that a
GOP size of 10 is optimal for most case, which, dependent on
camera model, covers a time between 0.5 ~ 1 sec.
Page 37
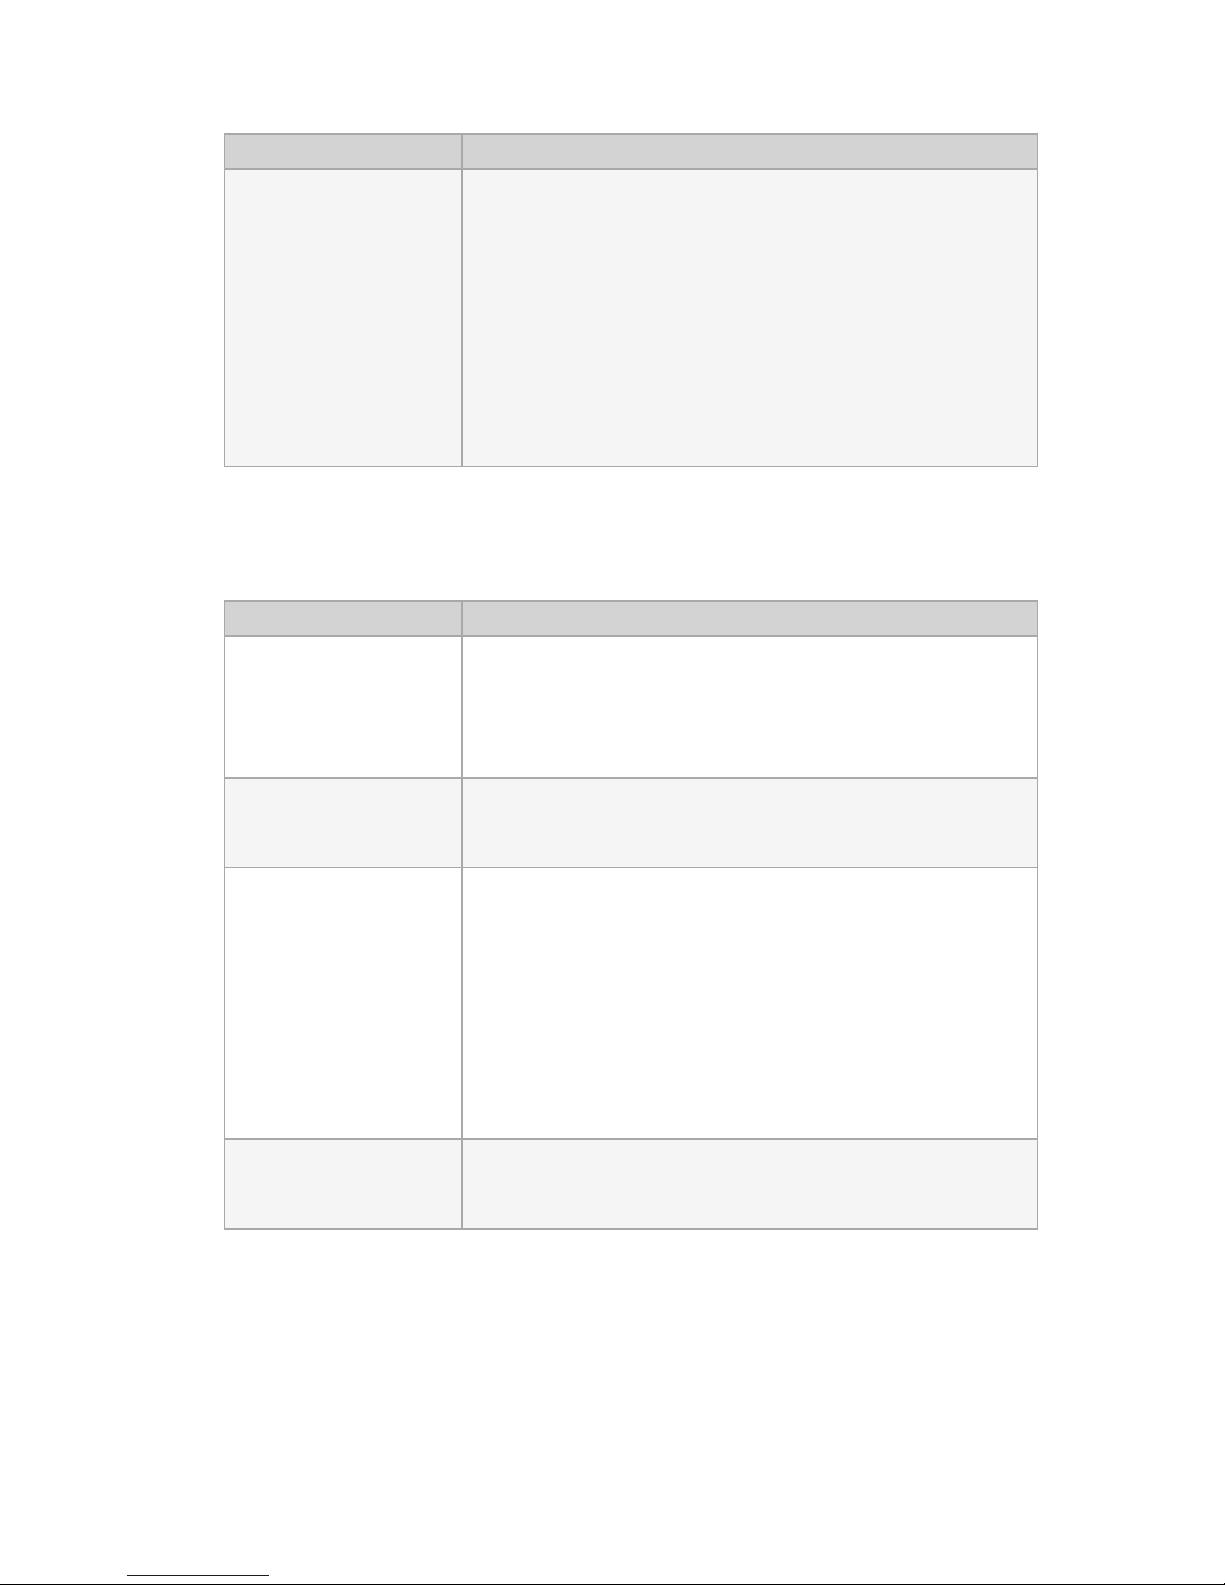
NETAVIS Observer 4.6 User Manual (October 2015)
Page 37 of 204
Field label
Description
Bandwidth limit (Kbps)
This setting limits the maximum bandwidth in kilobits per second
for the transmission of MPEG streams between the camera and the
server. As a consequence, also the bandwidth between the server
and the clients is thus limited and also the required storage in the
archive is influenced (limited). If this value is zero, then the
bandwidth is not limited.
This actually is a setting in the camera. The camera always
optimizes for the desired image quality and will sacrifice frame rate
in favor of quality in the case, the bandwidth would exceed the
supplied limit.
Fields for In-camera motion detection (please refer to 8.3 In-camera motion detection on page
90 for further details):
Field label
Description
Receive event images via
FTP
If this checkbox is marked, you enable the In-camera motion
detection and tell Observer to receive event images via FTP. Please
be aware that if you select this checkbox, the server-based motion
detection must be disabled.
Receive event images via
HTTP
The same as above, just that the images are received via HTTP
protocol (some cameras support only HTTP).
Post recording length (sec)
When Observer receives an in-camera event, then it can start a
parallel server-side recording in addition to the event images it
receives from the camera. The event images received from the
camera via HTTP (FTP is not supported with this option) are merged
with this server-side recording. This field defines how long this
parallel post-event recording is.
If it set to 0, then Observer does not start its own server-side
recording of images and just stores the event images it receives
from the camera via FTP/HTTP.
Frame rate
This field defines the frame rate of the above mentioned parallel
server-side post-event recording.
5. Push the Next button at the bottom of the dialog. This invokes the Scheduling dialog. Please
refer to 7.1 Programming archive recordings on page 71 on how to set up the camera archive and
scheduling.
6. Optional: Push the Next button again at the bottom of the dialog. This invokes the I/O Control
dialog that lets you define the handling of optional I/O contacts of your camera. If you do not
want to use I/O contacts you can just jump to the next step.
Page 38
NETAVIS Observer 4.6 User Manual (October 2015)
Page 38 of 204
Set your values:
Field label
Description
Input handling enabled
Select this check box if you want to process the state of the digital
input-contact port of the camera.
Input poll interval (msec)
The poll interval defines how often the state of the input port is
checked. Minimum time is 500 milliseconds.
Output handling enabled
Select this check box if you want to enable switching the digital
output port of the camera from within view port menu.
7. Push the Save button at the bottom of the dialog.
4.2.2 Duplicating an existing camera
Duplicating an existing camera creates an exact duplicate of the camera with all settings copied. This
is useful when you have more than one camera of the same type or with equal/similar settings (like
recording or video analytics settings).
With duplicating camera you can dramatically reduce the set up time for systems with many cameras
with similar settings.
Here is how you can do that:
1. Choose Camera admin from the System administration menu. This opens the Camera
admin dialog.
2. In the camera tree select the camera you would like to duplicate/clone.
3. Choose Duplicate camera from the menu.
Now a new camera named as the existing camera with "(copy)" appended has been created.
4. Set the basic properties like name and IP address.
5. Optionally modify other parameters as needed (see 4.2.1 Adding a camera from scratch on page
31 for details).
6. Push the Save button at the bottom of the dialog.
Note: Only local cameras and remote camera groups can be duplicated. It is not possible to duplicate
individually mounted remote cameras.
4.3 Setting up the camera recording archive
The configuration of camera recordings is covered in section 7.1 Programming archive recordings on
page 71.
Page 39
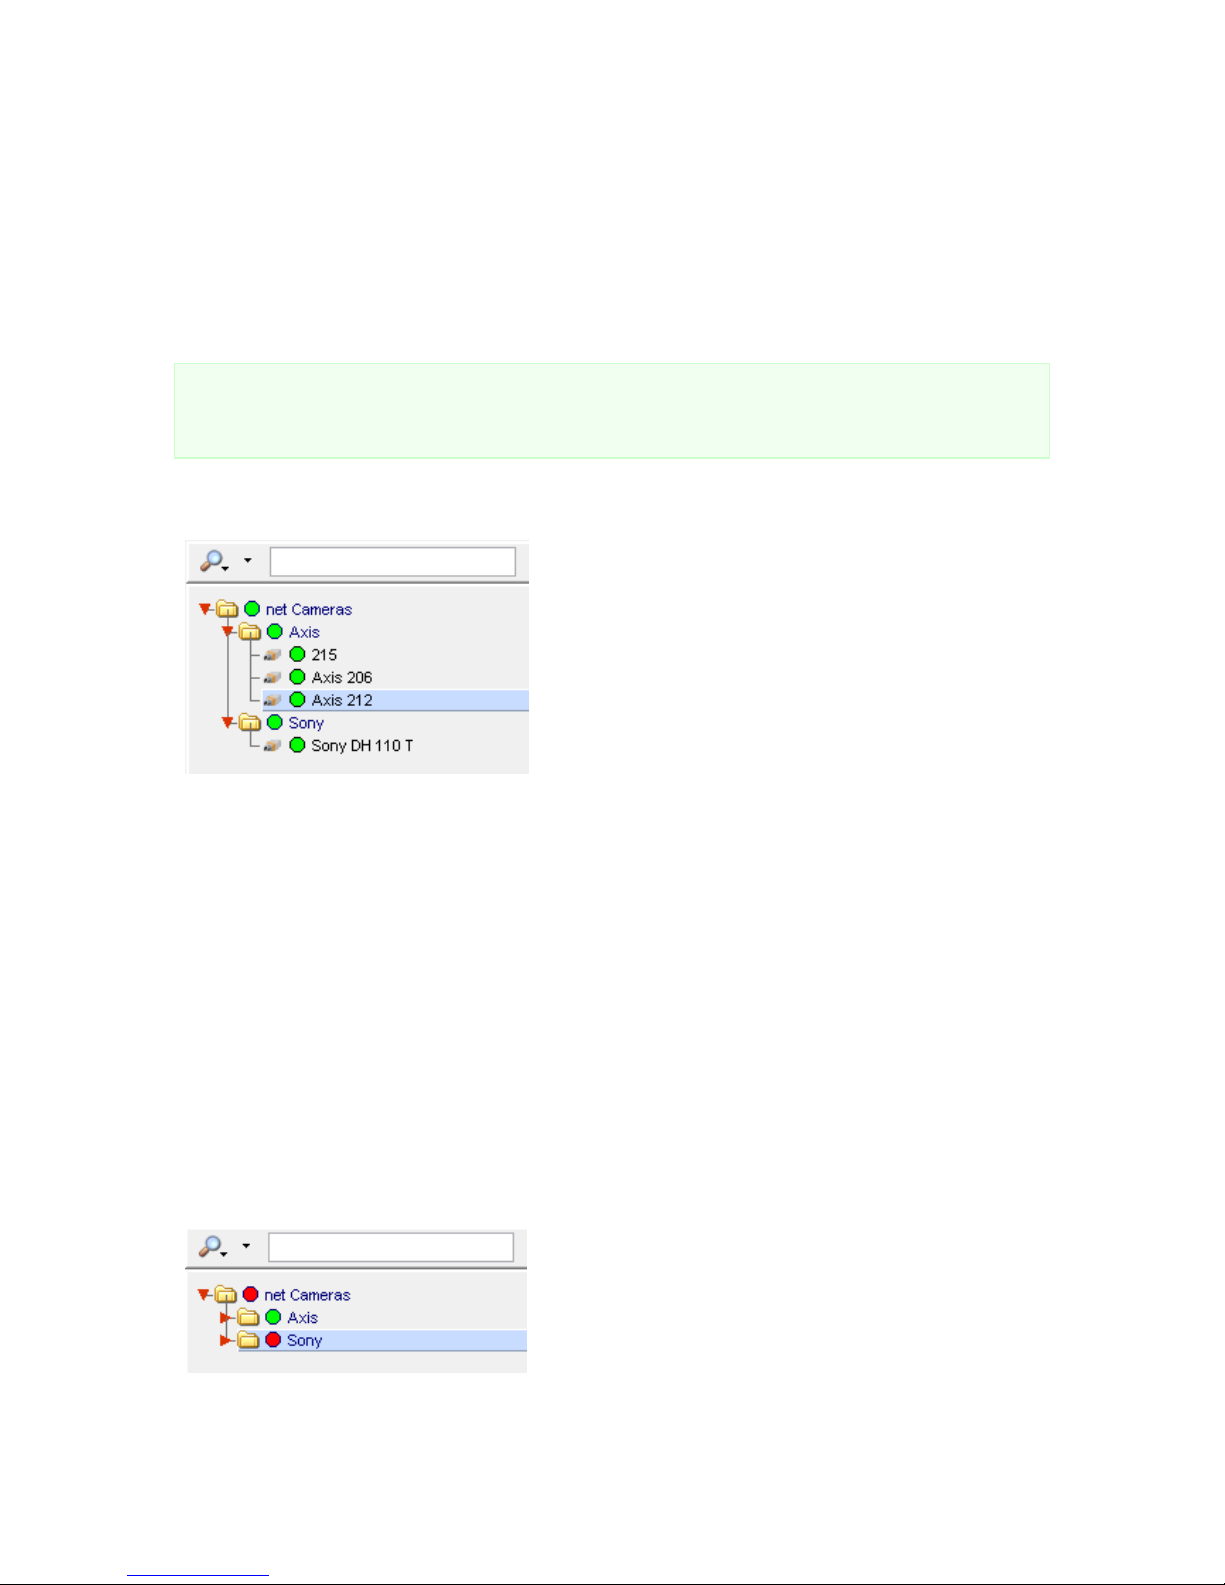
NETAVIS Observer 4.6 User Manual (October 2015)
Page 39 of 204
4.4 Checking the Camera status
Observer 4.5 added a camera status overview which enables users to quickly see whether the cameras
in their system or on connected remote servers are running normally. Issues such as a camera being
unreachable are indicated by a red icon. An overlay provides additional information about each
camera and its status and configuration.
In order for the camera status to be available the Camera statistics display option has to be
enabled in the Client preferences (see 2.5 Client preferences on page 22 for details).
Note: The camera status overview is only updated for cameras which are being actively used by
Observer for recordings, video analysis or live monitoring in the Online Monitor. For all other cameras
the status is not updated.
Once the option has been enabled a status icon is added next to each camera and camera group in
the camera tree within the Camera admin:
For cameras the status icon indicates one of three states:
If the icon is green everything is running normally.
If the icon is grey then the status is unknown or still being queried (please allow for up to a
minute for the status to be determined).
If the icon is red then one or more of the following issues have arisen:
o Unreachable: The camera is not reachable (equivalent to the "Camera not responding"
message in the Online Monitor's view port).
o Authentication: The username and/or password in the camera setup are not correct
(equivalent to the "Camera authentication error" message in the Online Monitor's view
port).
o Internal camera error: An internal camera error has occurred.
The status icon of a camera group is an aggregate of the statuses of its cameras. If one or more of the
cameras have a grey or red status icon then the group's icon also has that color. This makes it possible
to quickly get an overview of the cameras even when the groups aren't expanded:
More detailed information about each camera is available in an overlay which appears after hovering
over a camera entry:
Page 40
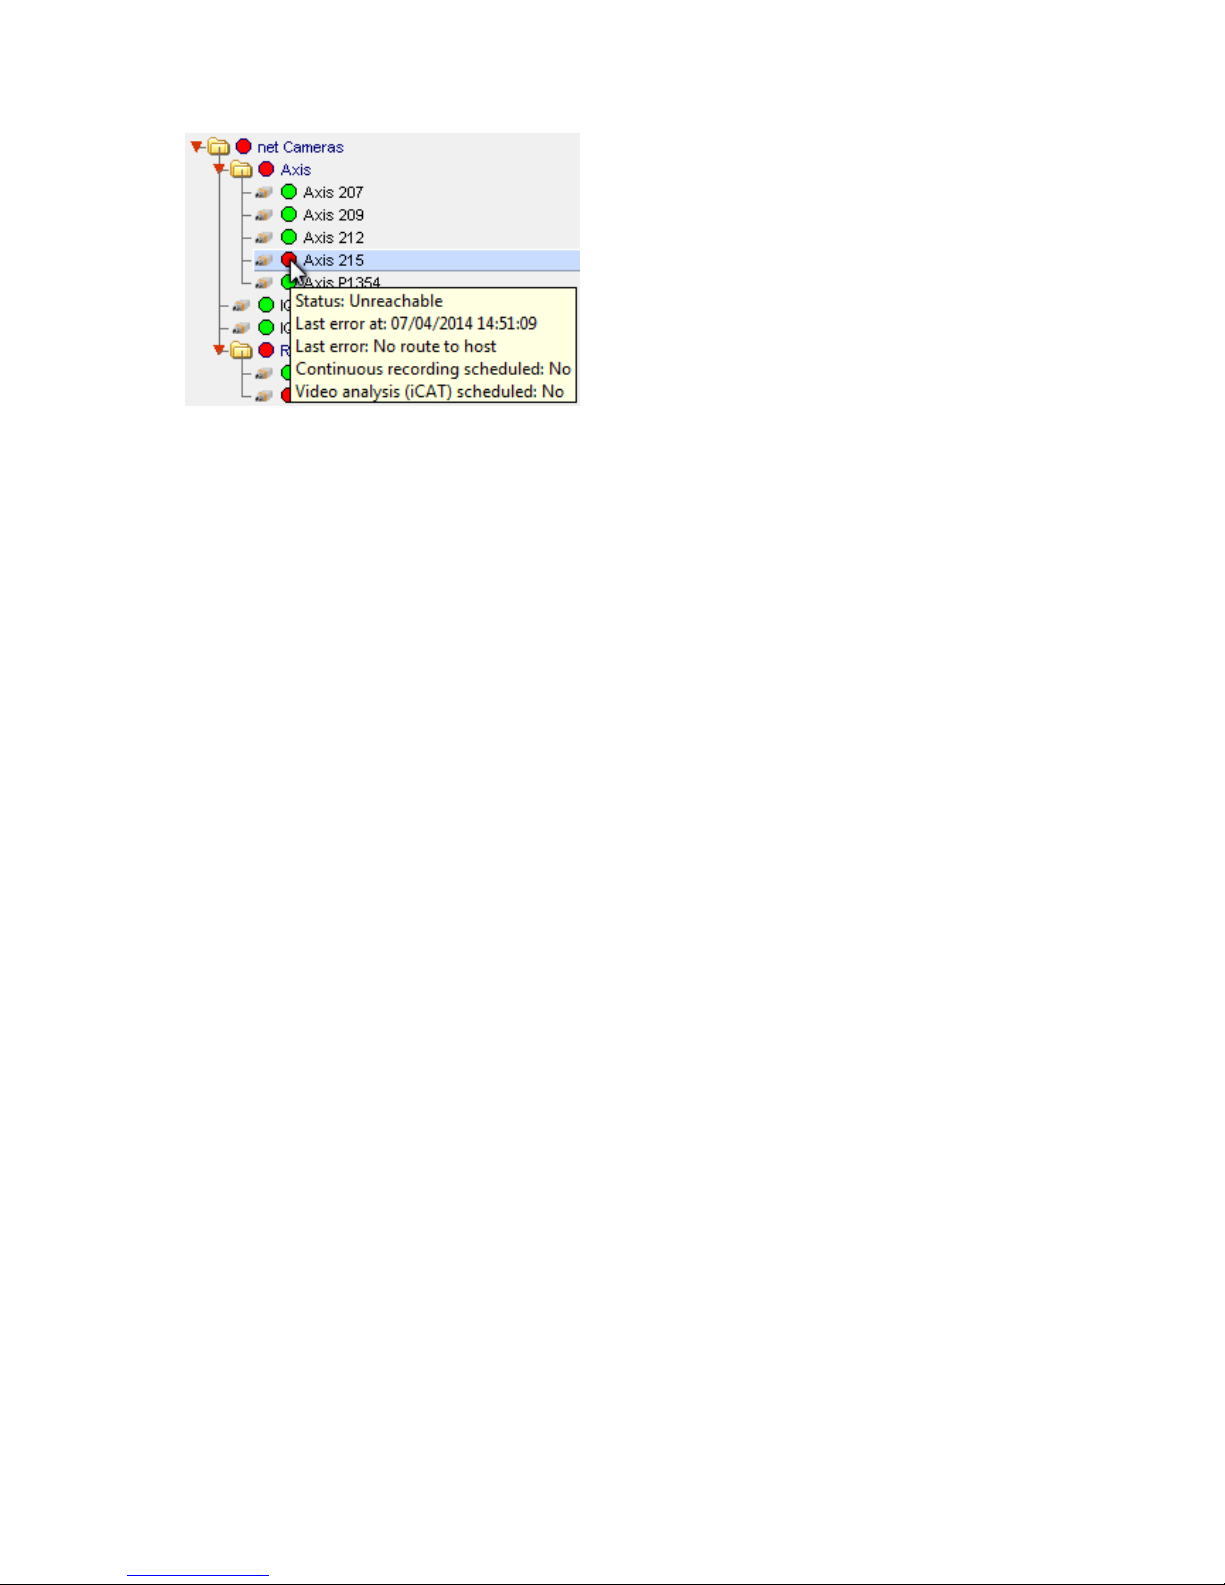
NETAVIS Observer 4.6 User Manual (October 2015)
Page 40 of 204
Status: One of the first three error states described above or "Normal".
Last error information: Includes the exact timestamp and a short description of the last error.
Continuous recording scheduled: If a recording is scheduled to run on the camera at this point
in time.
Video analysis (iCAT) scheduled: If an iCAT definition is scheduled to run on the camera at this
point in time.
4.5 Optional: Configuring video analytics (iCAT)
The configuration of video analytics with iCAT is covered in chapter 15 Video analytics with iCAT on
page 140.
4.6 Defining brightness, contrast, and saturation
If you are not satisfied with the brightness, contrast or saturation of camera video images then you can
modify them. For IP cameras and analog cameras there are two different ways of modifying those
video parameters:
IP cameras: Each IP camera has its own setup interface (usually available via web browser) to
define / modify the video parameters. Please consult the admin / setup manual of the IP
camera.
Analog cameras: Observer allows you to define video parameters via the System Admin menu.
Please see below for details.
4.6.1 Defining video parameters for analog cameras
1. Choose Camera admin from the System administration menu. This opens the Camera
admin dialog.
2. Select the camera in the camera tree for which you want to set the image values.
3. Press the Next button 4 times (starting from basic properties to scheduling to I/O control to
Image settings. Now you should see the Video parameters dialog:
Page 41
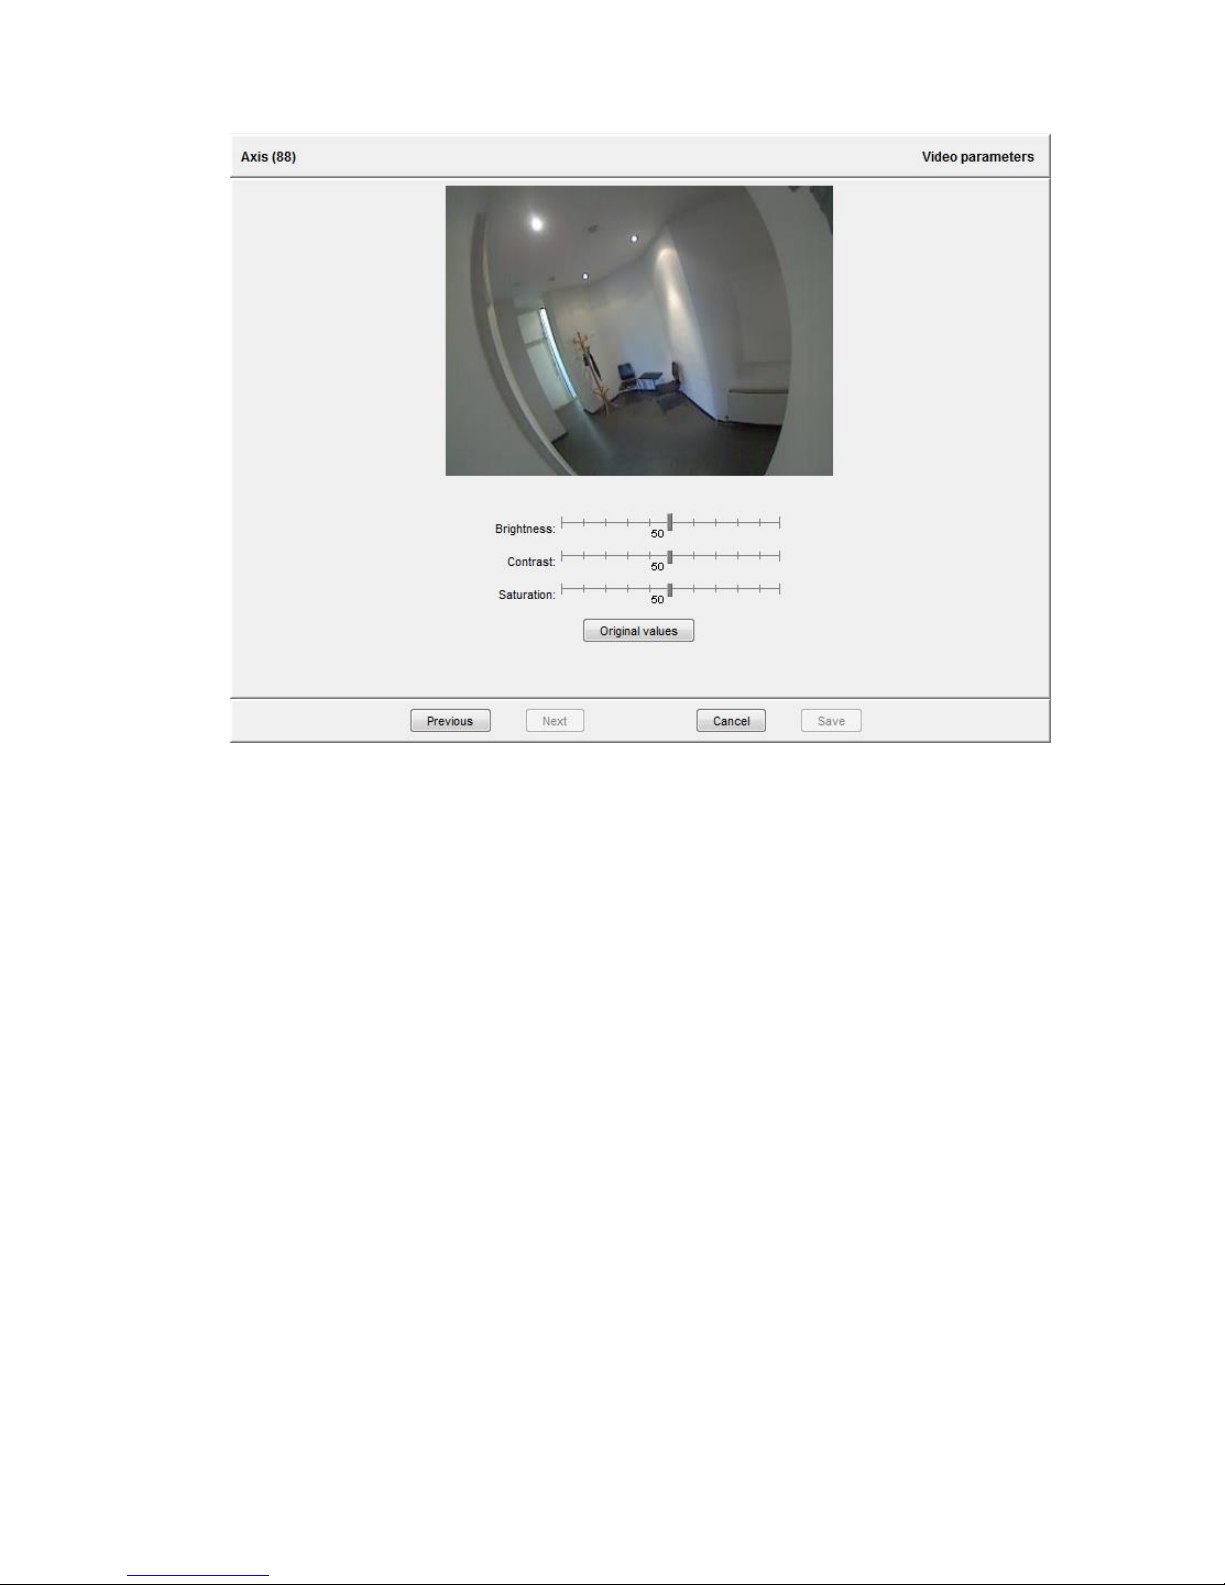
NETAVIS Observer 4.6 User Manual (October 2015)
Page 41 of 204
4. In the menu select Modify selected camera or group and then modify the brightness,
Contrast and Saturation values according to your needs. Please be aware that light conditions
may change during the day.
5. To store the settings press Save.
4.7 Working with camera groups
Camera groups are a powerful means for managing and organizing cameras.
4.7.1 Creating a new camera group
1. Choose Camera admin from the System administration menu. This opens the Camera
admin dialog.
2. In the camera tree select the group in which you want to create the new camera group.
3. In the menu select Add new camera group which will open new dialog that allows you to enter
the name and description for the new camera group.
4. Optionally select the Use group name as camera name qualifier checkbox. If this checkbox is
selected then the name of the camera group is displayed as prefix to the camera name, e.g.
“group-name:camera-name”.
5. Press Save to create the new camera group.
4.7.2 Moving a camera or camera group in the camera tree
A camera or a group of cameras in the camera tree can be moved to another location by following
these steps:
Page 42

NETAVIS Observer 4.6 User Manual (October 2015)
Page 42 of 204
1. Choose Camera admin from the System administration menu. This opens the Camera
admin dialog.
2. With a mouse click choose the camera or group you want to move.
3. In the menu select Move camera or group.
A new dialog appears that requires you to enter the password.
4. Enter the password.
After you enter the correct password a camera group dialog is opened showing the camera
groups.
5. In the newly opened camera groups dialog select the group where you want to move the camera
or group to and press Select.
Now the camera or group is moved to the new location and the camera tree is updated.
4.8 Changing the port mapping of analog cameras
This section is only valid for analog cameras. For analog cameras a port must be defined where the
camera is connected to at the video capture card or the video server.
Sometimes the port mapping of analog cameras needs to be changed but it is difficult to do that
physically by changing the cabling. To help the situation, Observer can change the port mapping in
the software.
There are two ways for doing that:
Either go to the Camera Administration and manually switch the port there. For this however
you need to know exactly which camera is connected to which port.
You can also swap the ports in the Online Monitor. This has the advantage that you see the
video pictures and therefore you can identify the correct ports visually.
In order to swap the ports of two analog cameras visually please follow these steps:
1. In the Online Monitor go to the view that shows the first analog camera in a view port.
2. CTRL-click into the view port that shows the first analog camera.
3. Now go to the view that shows the camera that you would like to swap with and CTRL-click in the
view port.
Now the ports of the two cameras have been swapped.
Page 43
NETAVIS Observer 4.6 User Manual (October 2015)
Page 43 of 204
5 Managing users
Observer requires users to login in order to work with the system. This chapter describes how to create
and manage users in Observer.
Generally, you can either
use Observer to administer users (see 5.1 Creating a new user account on page 43), or
use Active directory or LDAP to manage users (see 5.8 Working with Active Directory and LDAP
users on page 51).
5.1 Creating a new user account
An Observer administrator can create user accounts in the system.
Please note: At initial product installation a set of predefined users accounts and groups are created.
These users and groups model typical permissions of users in various roles. Instead of creating a new
user account you can take one of these predefined users and modify the settings accordingly.
Here are the steps for creating a new user account:
1. Choose User admin from the System administration menu. This opens the User admin
dialog.
2. Select a user group to which you want to add the user. Please refer to 5.4 Working with user
groups on page 50 if you want to create a new user group first.
3. In the menu select Add new user. The Properties dialog opens to allow you to enter user data.
4. Enter your user data in the corresponding fields of the dialog. Use the following table as a guide.
Fields labeled in bold (both in the dialog and in the table) are mandatory; all others are
optional:
Field label
Description
Login name
This is a short name that the user will use to log in.
Full user name
This is the complete name of the user.
Password
Enter a password for the user. The user can change this later on (see
5.7 Changing the password on page 50).
Re-enter password
Enter the password again for verification.
Secondary password
Enable the checkbox and enter a secondary password if a
secondary password is needed for logging in the user. This is
important for enforcing the four-eyes-principle for certain video
operations.
Re-enter sec. password
Enter the secondary password again for verification.
Page 44
NETAVIS Observer 4.6 User Manual (October 2015)
Page 44 of 204
Field label
Description
Forgot question
Formulate a question that (only) the user can answer if he has
forgotten his password.
Forgot answer
Provide the answer to the above password question.
SMS number
If the user is to receive an SMS in the event of an alarm or failure,
provide his cell phone number. Please insert a full international
number starting with a ‘+’. Example: +43 123 456 7890.
Please note that an SMS sending device has to be connected to the
Observer server for this feature to work. Refer to the manual
NETAVIS Observer Server Installation and Administration for
information about supported devices and how to connect and
setup them.
E-mail address
If the user is to receive an e-mail in the event of an alarm or failure,
provide his e-mail address.
Language
Specify the preferred language for this user.
Auto login after 1 min
timeout
Defines whether this user should be logged in automatically when
nobody else logs at the login panel in for 1 minute. This option can
be enabled for only one user at a time.
PTZ priority (1=lowest,
10=highest)
Defines the relative PTZ priority between users. A user with higher
priority can take away PTZ control from a user with lower priority.
Please note: The automated PTZ actions started by the event
manager and scheduled routes have priority 4. Therefore users with
priority 1 to 3 will be overridden by automatic PTZ actions, whereby
users with priority 5 to 10 can override automatic PTZ actions but
will not be interrupted by them.
Max. PTZ use time (sec)
Maximum allocation time, after which a PTZ camera is
automatically released. Zero means no limit.
PTZ inactivity timeout (sec)
When a user has taken PTZ control and is inactive for a certain
amount of time, the PTZ camera is freed automatically after this
timeout. Zero means no timeout.
5. Click on Next to go the Privileges dialog. Here you can set the privileges for the new user (see
5.2 Setting general user privileges on page 45 for details).
6. Click on Next to go the Camera Access Rights dialog. Here you can set the camera access
rights for the new user (see 5.3 Setting camera access rights on page 48 for details).
7. Click on Save to create the new user account with the settings you entered.
Page 45
NETAVIS Observer 4.6 User Manual (October 2015)
Page 45 of 204
Hints: In order to use the four-eyes-principle you first create a user with the desired privileges and
camera access rights. You then create a new user, set a secondary password for that second user,
grant the same privileges and camera access rights as the first user, and then add the desired
additional rights (e.g. Archive access) compared to the first user.
5.2 Setting general user privileges
For each user and group certain privileges can be defined. These privileges define which tools and
data a user has access to and what he can do.
1. Choose User admin from the System administration menu. This opens the User admin
dialog.
2. Select the user or group you want to modify.
3. Click on the Next button to move to the Privileges dialog.
Here you can edit privileges for the user or group. In their initial state, all privileges in this dialog
are inherited from the upper group level. Inherited privileges from the group level to which the
user or group belongs are displayed with normal font, while values that you define at the current
user or group level are displayed in bold.
Use the scroll bar to access the lower part of the list.
4. Choose Modify selected user or group from the menu.
5. Set the privileges according to your needs. To change a privilege click on its button and select
the status from the pop-up menu (either Inherited, Enabled, or Disabled):
Field label
Description
Online monitor: Access to Online
monitor
Defines if the user/group has access to the Online
monitor
Online monitor: Add cameras to views
in Online monitor
Defines if the user/group can add cameras to existing
views in the Online monitor
Online monitor: Remove cameras
from views in Online monitor
Defines if the user/group can remove cameras from
existing views in the Online monitor
Online monitor: Create and delete
views in Online monitor
Defines if the user/group can create and delete views in
the Online monitor
Online monitor: Save view layouts in
Online monitor
Defines if the user/group can save different view layouts
in the Online monitor
Recordings: Access to recording
archive player
Defines if the user/group can access the recording
archive
Recordings: View external archive
Defines if the user/group can view NEA recordings
Page 46
NETAVIS Observer 4.6 User Manual (October 2015)
Page 46 of 204
Field label
Description
recordings (NEA)
Recordings: Manage external archive
devices (NEA)
Defines if the user/group can manage external storage
devices for NEA
Events: Access to Event list and
database
Defines if the user/group can access the Event list and
database
Events: May acknowledge a system
event
Defines if the user/group can acknowledge system
events
Events: Notification in user interface
about system malfunction events
Defines if the user/group receives notifications about
system malfunction events within the client
Events: Sending email about system
malfunction events
Defines if the user/group receives notifications about
system malfunction events via email
Events: Sending SMS about system
malfunction events
Defines if the user/group receives notifications about
system malfunction events via SMS
Events: Notification in client user
interface about system information
messages
Defines if the user/group receives notifications about
system information messages within the client
Events: Sending email about system
information messages
Defines if the user/group receives notifications about
system information messages via email
Events: Sending SMS about system
information messages
Defines if the user/group receives notifications about
system information messages via SMS
Events: Notification in user interface
about I/O device malfunction events
Defines if the user/group receives notifications about I/O
device malfunction events within the client
Events: Sending email about I/O
device malfunction events
Defines if the user/group receives notifications about I/O
device malfunction events via email
Events: Sending SMS about I/O device
malfunction events
Defines if the user/group receives notifications about I/O
device malfunction events via SMS
Events: Notification in user interface
about I/O device port value change
events
Defines if the user/group receives notifications about I/O
device port change events within the client
Page 47

NETAVIS Observer 4.6 User Manual (October 2015)
Page 47 of 204
Field label
Description
Events: Sending email about I/O
device port value change events
Defines if the user/group receives notifications about I/O
device port change events via email
Events: Sending SMS about I/O device
port value change events
Defines if the user/group receives notifications about I/O
device port change events via SMS
User admin: Access to User
administration
Defines if the user/group has access to the User admin
configuration
User admin: Manipulate user data
Defines if the user/group can change the User admin
configuration
User admin: Access to information
about logged-in users
Defines if the user/group can access the Users tab to see
which other users are logged into the system
Camera admin: Access to camera
admin
Defines if the user/group has access to the Camera
admin configuration
Camera admin: Manipulate camera
configuration data
Defines if the user/group can change the Camera admin
configuration
iCAT: May set iCAT definitions readonly
Defines if the user/group can set iCAT definitions readonly
I/O device admin: Access to I/O device
admin
Defines if the user/group has access to the I/O device
admin
I/O device admin: Manipulate
I/O device configuration data
Defines if the user/group can change the I/O device
configuration
Rule Admin: Access to rule
administration
Defines if the user/group has access to the rule
administration
Rule Admin: Manipulate rules
Defines if the user/group can change the rule
configuration
Host admin: Access to Host
administration and System
information
Defines if the user/group has access to the Host admin
configuration and System information
Client: Allow GUI layout customization
Defines if the user/group can customize the layout of the
Page 48
NETAVIS Observer 4.6 User Manual (October 2015)
Page 48 of 204
Field label
Description
Client
Client: Allow window management
Defines if the user/group can create and delete windows
Client: Manage number plate lists
Defines if the user/group can manage number plate lists
Client: Modify client preferences
Defines if the user/group has access to the client
preferences
Client: Allow saving logfiles
Defines if the user/group can download the logfiles from
the server
iCAT: Reset heat map values manually
Defines if the user/group can reset heat map values
manually
To set privileges for all users in the system you can select and modify the root group (but please
be aware that at each group or user level privileges can be overridden).
6. Click Save to save your changes.
5.3 Setting camera access rights
1. Choose User admin from the System administration menu. This opens the User admin
dialog.
2. Select the user or group you want to modify.
Please note: The camera access rights can be set for regular individual users and Active
Directory groups but not for regular user groups or individual Active Directory users.
3. Click the Next button twice to get to the Camera Access Rights dialog.
As with the general user privileges also the camera access rights are initially inherited from the
upper group level. Inherited camera access rights from the group level to which the user or group
belongs are displayed with normal font, while values that you define at the current user or group
level are displayed in bold.
4. Select the camera or camera group you want to look at or modify.
5. Choose Modify selected user or group from the menu.
6. Set the rights according to your needs. To change a camera access right click on its button and
select the status from the pop-up menu (either Inherited, Enabled, or Disabled):
Field label
Description
Live viewing: View live streams in the
Online monitor
Defines if the user/group can view live streams in the
Online monitor.
Page 49
NETAVIS Observer 4.6 User Manual (October 2015)
Page 49 of 204
Field label
Description
Recordings: Access camera recording
archive
Defines if the user/group can view the camera recording
archive.
Recordings: May export camera
archive recordings
Defines if the user/group can export archive recordings.
Recordings: May protect archive
against deletion
Defines if the user/group is required to enter a reason for
accessing an archive recording which is stored on the
system.
Recordings: Ask user for reason of
accessing the archive recordings
Defines if the user/group is required to enter a reason for
accessing an archive recording which is stored on the
system.
Recordings: Manual recording control
in Online monitor
Defines if the user/group is able to manually start and
stop recordings in the Online monitor.
PTZ control (pan, tilt, zoom) and I/O
port control
Defines if the user/group is able to manually control
PTZ cameras and set I/O ports.
Camera admin: Manipulate camera or
group configuration data
Defines if the user/group is able to modify the
configuration of cameras and camera groups.
Events: Notification in client user
interface about camera malfunction
events
Defines if the user/group is notified about camera
malfunction events in the client.
Events: Sending email about camera
malfunction events
Defines if the user/group is notified about camera
malfunction events via email.
Events: Sending SMS about camera
malfunction events
Defines if the user/group is notified about camera
malfunction events via SMS.
Events: Notification in client user
interface about in-picture events (e.g.
motion detection, video analysis)
Defines if the user/group is notified about in-picture
events in the client.
Events: Sending email about inpicture events (e.g. motion detection,
video analysis)
Defines if the user/group is notified about in-picture
events via email.
Events: Sending SMS about in-picture
events (e.g. motion detection, video
Defines if the user/group is notified about in-picture
Page 50

NETAVIS Observer 4.6 User Manual (October 2015)
Page 50 of 204
Field label
Description
analysis)
events via SMS.
To set access rights for the selected user for all cameras in the system you can select and modify
the root camera group.
7. Click Save to save your changes.
5.4 Working with user groups
User groups are a powerful means to manage and organize users. For instance, you can set privileges
for groups that are then inherited by the users belonging to this group.
5.4.1 Creating a user group
1. Choose User admin from the System administration menu. This opens the User admin
dialog.
2. In the list of users and groups, select a user group to which you want to add a new group.
3. In the menu select Add new group which will open the new group dialog that allows you to
define a Group name.
4. Press Next to edit the group Privileges. The privileges are the same as for a user. Inherited
privileges are displayed in normal font while privileges defined at this group (level) are displayed
in bold font.
5. Press Save to create the new group.
5.5 Defining Online Monitor views for a new user
If a new user needs to work in the Online Monitor then camera views need to be defined. Generally,
there are 2 ways for doing that:
Login as the new user and manually create new views as described under 6.1 Creating a new
view on page 52, or
copy existing views from another administration user as described under 6.8 Copying views
between users on page 61.
5.6 Information about logged-in users
Observer allows you to get information about logged-in users:
1. Choose Users... from the System administration menu. Now you see the list of logged-in
users with information about the host from which the user logged in, login time, total bytes
transmitted since login, and bandwidth.
5.7 Changing the password
This section describes how to change passwords for users defined in Observer. For users defined in
Active Directory/LDAP, the passwords need to be changed there.
Page 51
NETAVIS Observer 4.6 User Manual (October 2015)
Page 51 of 204
Each Observer administrator with the appropriate privileges can change the passwords of other users
(see also 5.1 Creating a new user account on page 43).
Additionally, each user can change his own password by following these steps:
1. In the Observer menu choose Change password....
2. In the newly opened dialog enter the old (current) password and the new password twice.
3. Push OK to change the password. When you login the next time, you will have to enter the new
password.
Please note: The optional secondary password can only be changed by an Observer administrator
with the appropriate privileges.
5.8 Working with Active Directory and LDAP users
The configuration of Observer to work with users from Active Directory and LDAP is covered in chapter
13 Active Directory Integration on page 122.
Page 52

NETAVIS Observer 4.6 User Manual (October 2015)
Page 52 of 204
6 Using the Online Monitor
In the Online Monitor you can view live streams from cameras that are set up at the Observer server.
The prerequisite is that you must have authorization to access the Online Monitor (see 5.2 Setting
general user privileges on page 45). Furthermore, you can access only those cameras for which you
have access rights (see 5.3 Setting camera access rights on page 48).
When a new user logs in the first time he will encounter an empty Online Monitor waiting for new
camera views to be defined. Once you have defined your views they will reappear next time you log in.
You can also have several Online Monitors in multiple windows (see 2.4 Client multi-window and multi-
screen operation on page 20).
Important: If you are using a low-bandwidth connection between client and server (e.g. via wide area
networks) it can happen easily that the video streams cannot pass through the connection fast
enough, which results in bad frame rates and slow responsiveness of the client. In such a case you
should use the Transcoding™ feature of Observer. See 2.7 Observer Transcoding™ for low-bandwidth
client-server connections (ABS) on page 27 for further details.
6.1 Creating a new view
Observer lets you create an unlimited number of named views. Each of these views can contain up to
100 camera view ports.
1. Choose Create new view (either from the empty Online monitor or from the Control menu) to
open the Create new view dialog.
2. You can now choose the layout for your view from predefined templates and you also can define
an arbitrary matrix of up to 10 x 10 views. A new dialog is opened asking for the name of the view
and the aspect ratio for the view ports.
The Name of view is shown in the view selector at the top of the screen. Please note that you
can also create a view hierarchy by using a colon between the names. In the example below we
created a view in the group called “First floor” with a name “Entrance hall”. There might also be a
view called “Office 1” or “Kitchen”.
The Aspect ratio pop-up defines the aspect ratio of the view ports in the view:
o Fixed aspect ratios: PAL, NTSC, VGA, double VGA, or HDTV 16:9.
o Fill available space: This is the default setting and will adapt the view port size (and
hence the aspect ratio) to fill the available space.
o Custom aspect ratio: here you can freely define an N:M aspect ratio.
The setting Stretch image to fit into view port (selected by default) defines whether a
camera image can be stretched to fit into the view port. This may cause distorted images for
aspect ratios that do not fit the current view port aspect ratios.
The setting Crop image to fit into view port defines whether a camera image can be cropped
to fit into the view port. This may cause that some parts of the image are not visible in the view
port. In the section 6.4 Modifying view port settings on page 55 you can define what part of the
cropped camera image is to be shown in the view port.
Page 53
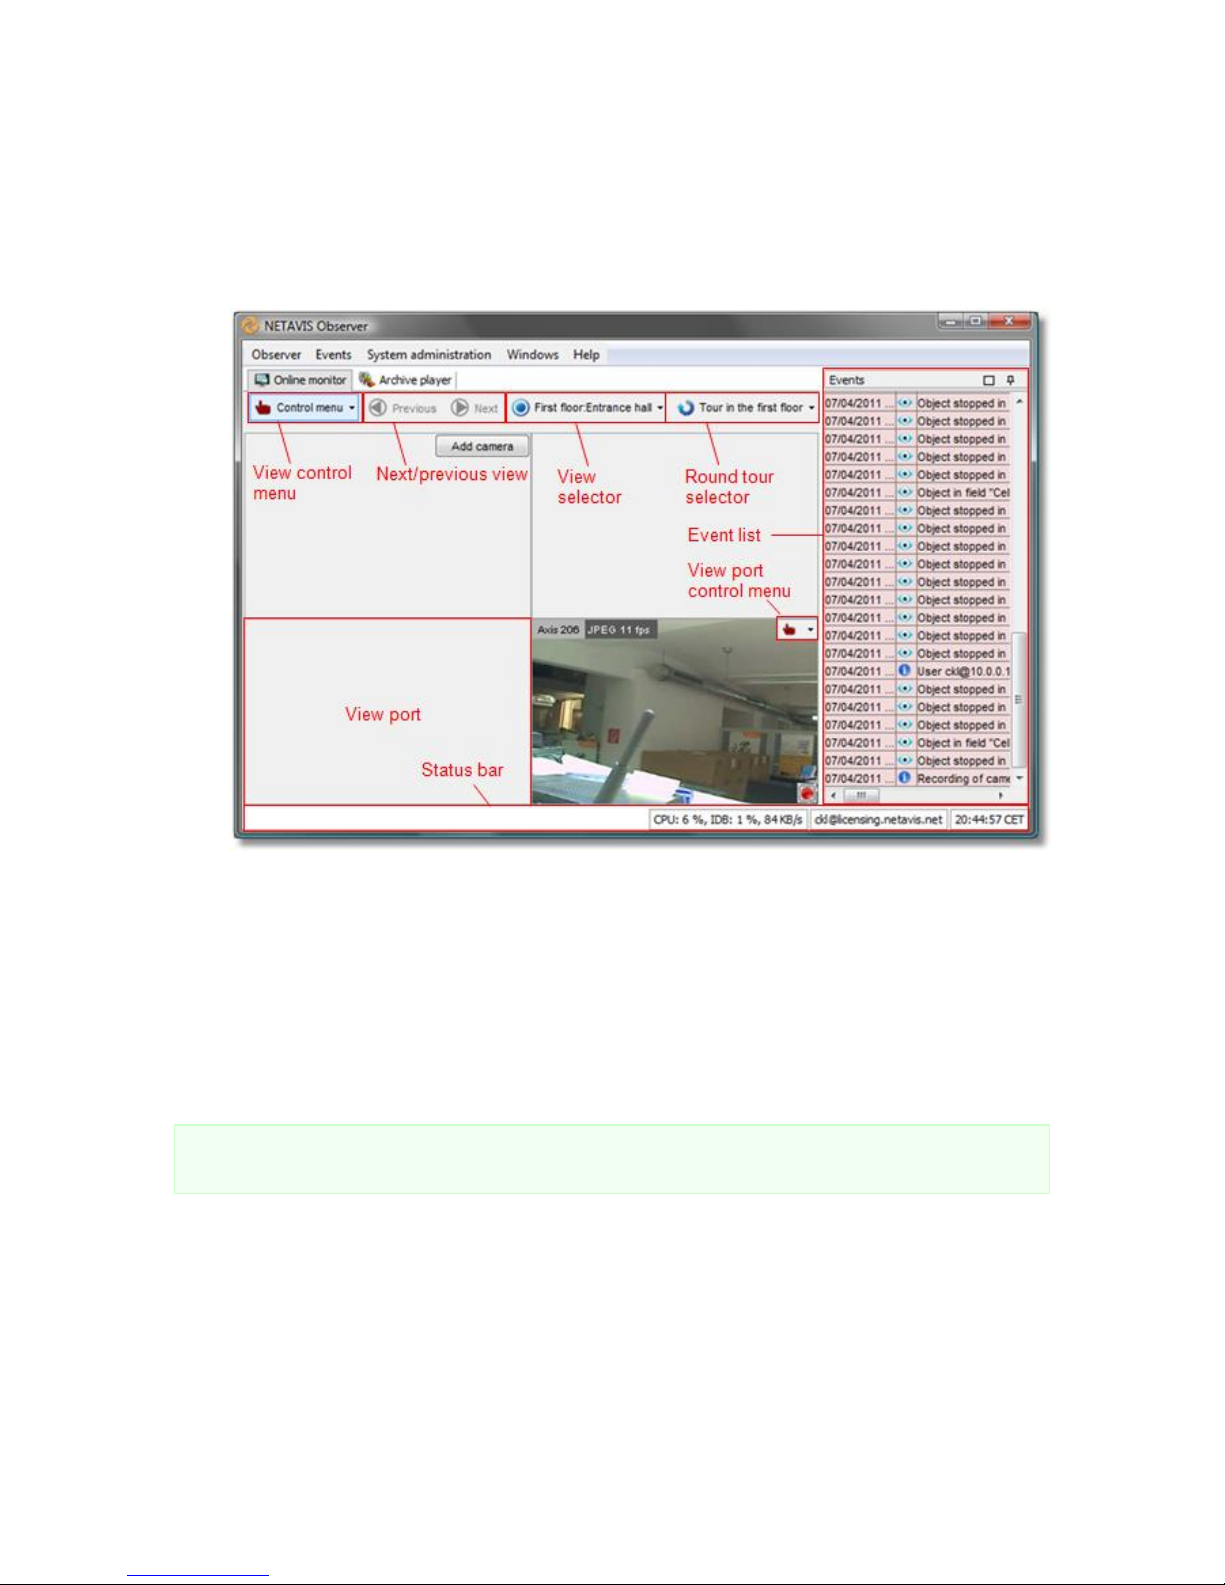
NETAVIS Observer 4.6 User Manual (October 2015)
Page 53 of 204
Please select an aspect ratio that fits most of your cameras you plan to show in the view.
Selecting an improper aspect ratio can lead to unused space on the screen.
Press OK to create a new view with these settings.
3. In accordance with the selection above, Observer creates a new view that might look as follows
(your view may have a different number of view ports depending on what you selected:
The view ports fill the central part of the window, and each view port has its own view port
controls.
At the right side of the window is the Event list, which is explained in 9 Handling events on page
93.
4. Choose Save all view settings from the menu in order to save all settings for your current user.
The next time you log on to Observer, all views will then be available again. If you neglect to save,
all changes are lost when you exit the application.
5. You can change the name of the current view with Rename view in the Control menu.
Please note: All view settings will be stored, also image quality and frame rate settings of view ports.
New views will be stored automatically without the need to save manually.
6.2 Selecting cameras
1. In the view port press the Add camera button. Please note that you first have to set up a camera
before you can select it in one of the view ports (see 4 Setting up cameras on page 31). This opens
the camera tree.
2. Select a camera from the camera tree.
Page 54
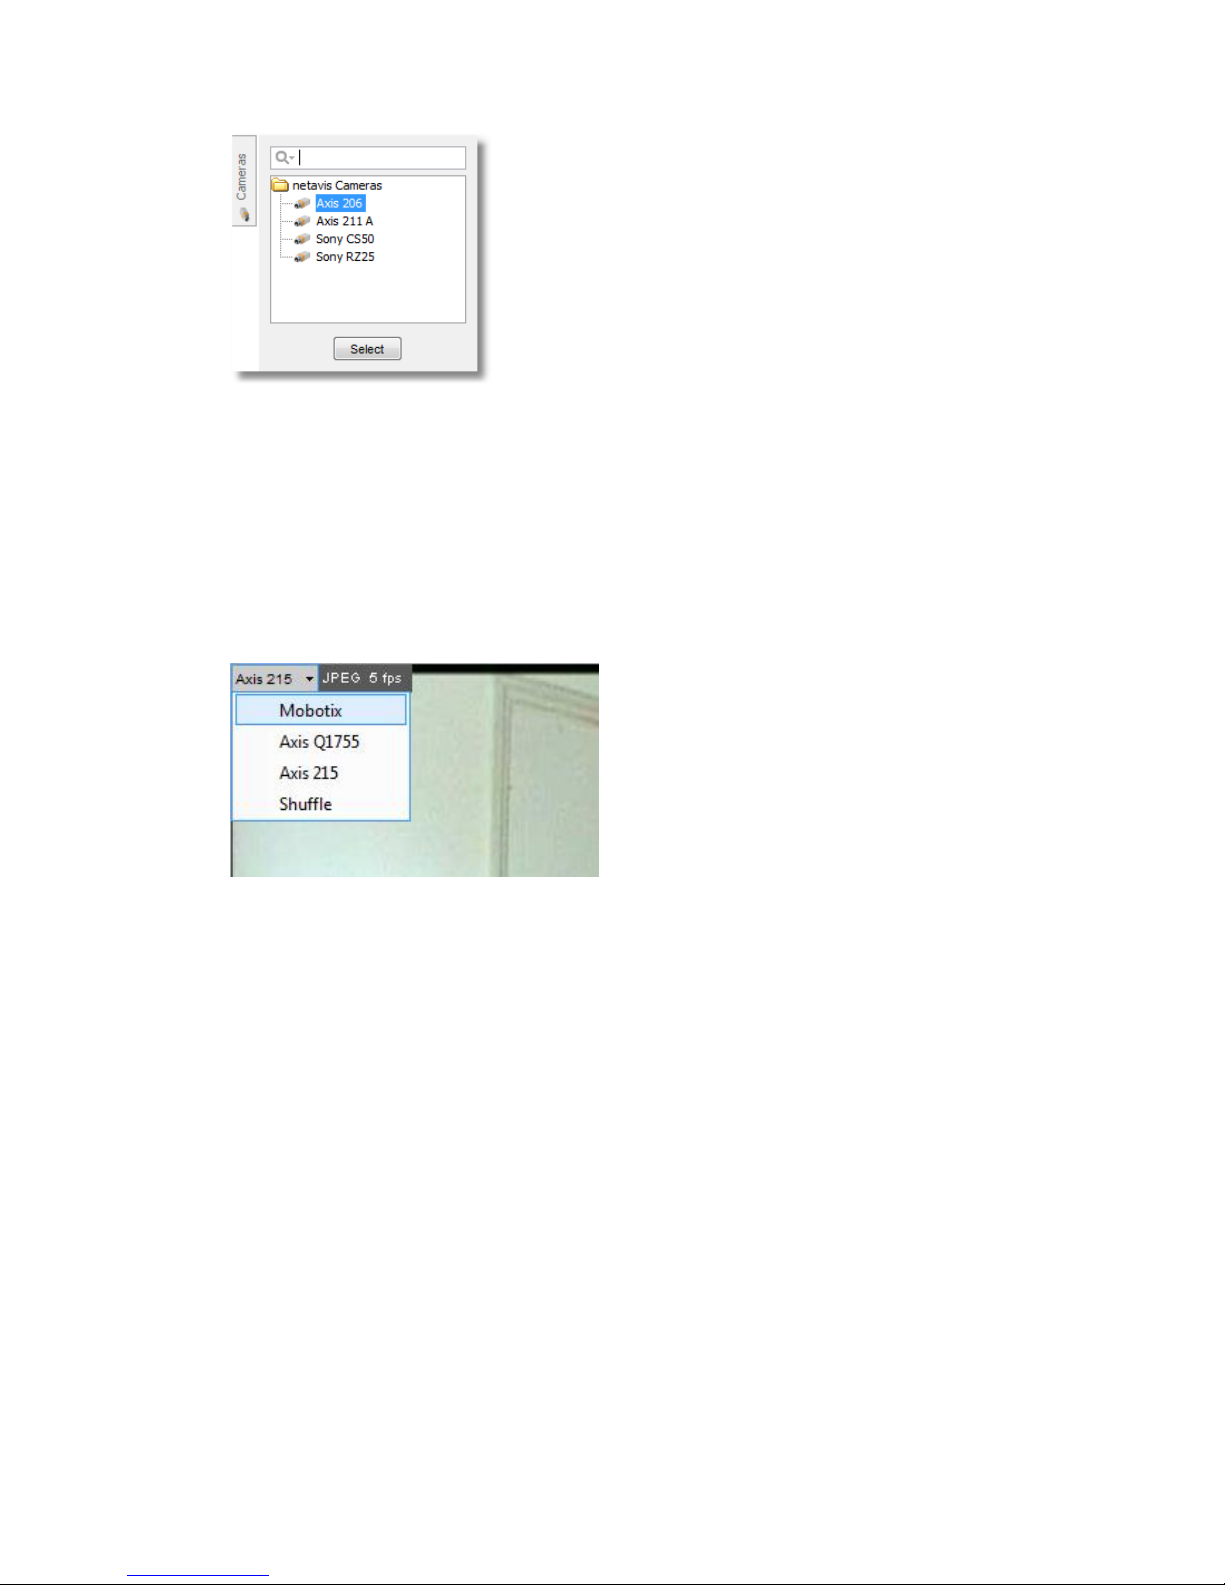
NETAVIS Observer 4.6 User Manual (October 2015)
Page 54 of 204
You can either:
o select a camera and press the Select button, or
o double click on a camera to add it to the view port where you press Add camera, or
o drag and drop a camera to the view port of your choice
3. Proceed in the same way with additional view ports in your view.
4. You can assign multiple cameras to each view port. However, since you can only view one
camera image in each view port, Observer lets you manually switch between cameras by clicking
on the camera selection menu at the upper left corner of the view port.
5. In the camera selection menu of a view port you can also select the option Shuffle. Then
Observer cyclically switches through all the cameras assigned to the view port.
6. Please select Save all view settings from the view Control menu in order to save all settings.
The next time you log in to Observer, all views and view ports will be available again.
6.3 Navigating in the Online Monitor
You have several options for navigating in the Online monitor:
Select a view from the View dropdown menu.
Select a Round tour from the Round tour dropdown menu.
Use the Next/Previous view buttons or the corresponding options in the context menu
(accessible via a right mouse button click) to navigate to the previously displayed views.
Page 55
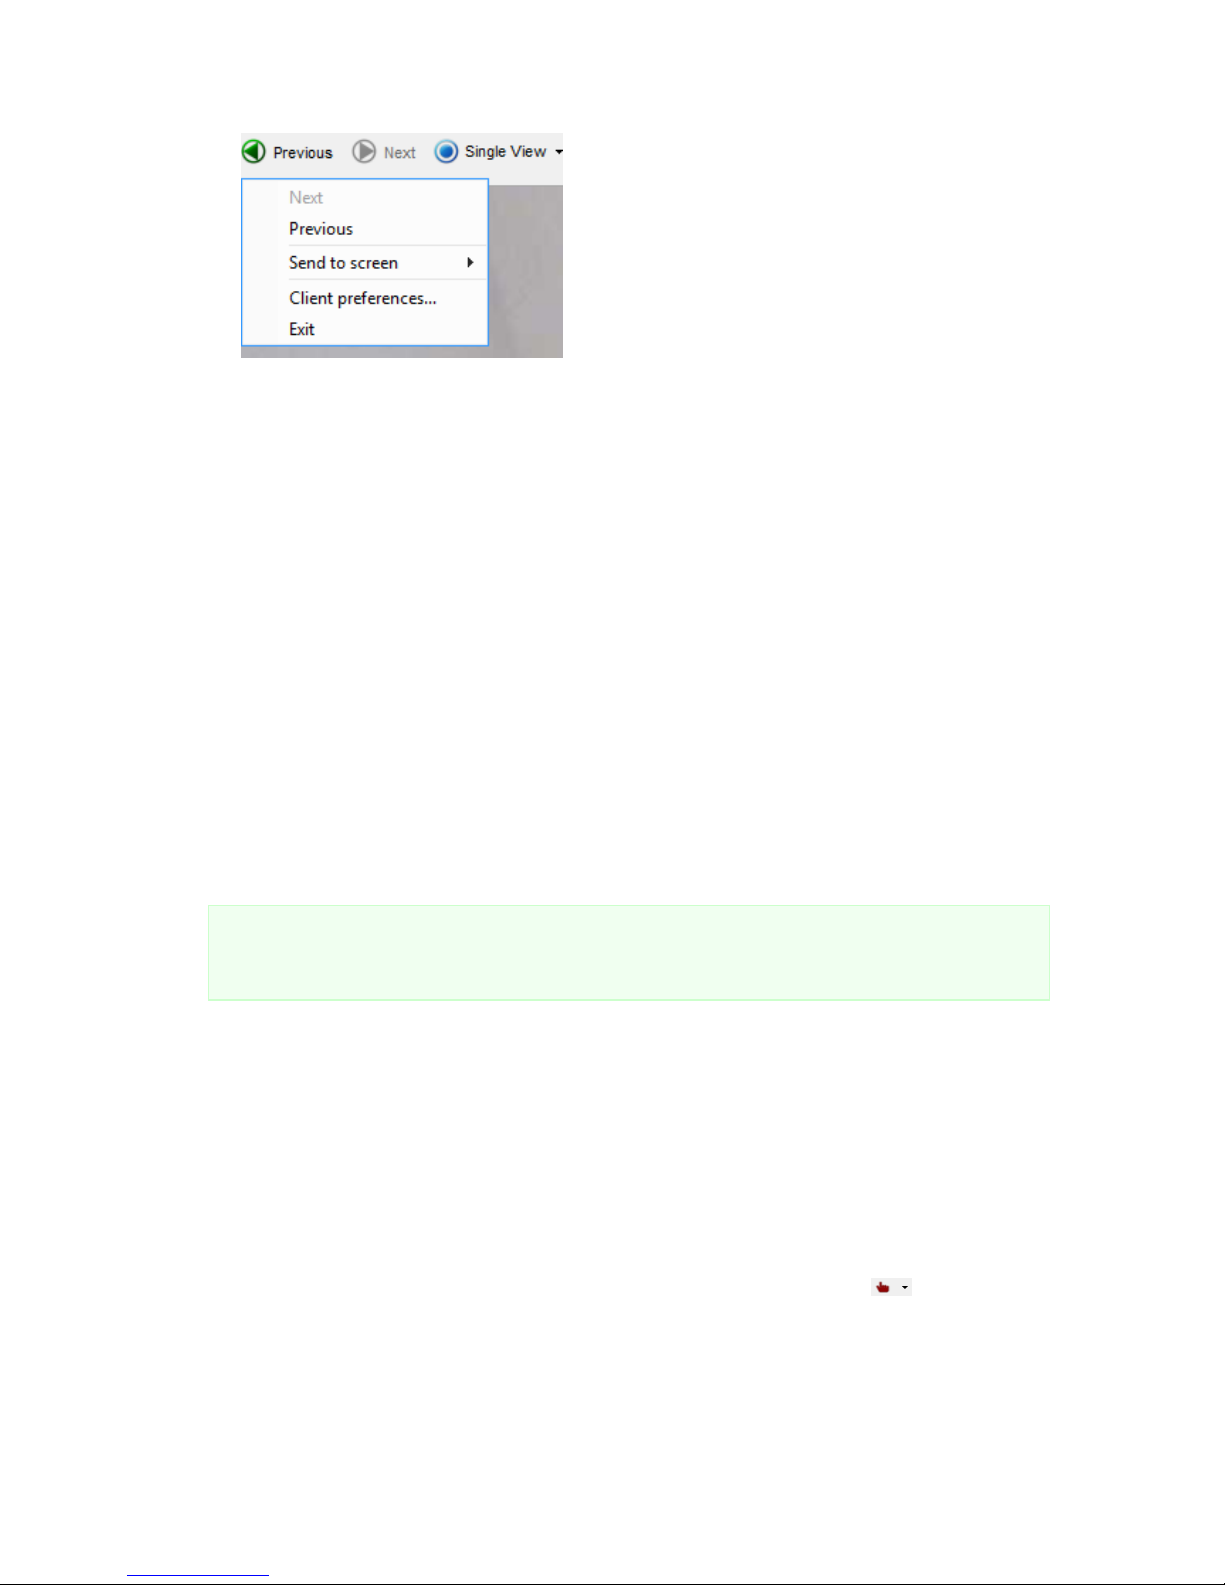
NETAVIS Observer 4.6 User Manual (October 2015)
Page 55 of 204
Double click in a view port to get a big view of the currently displayed camera in the view port. If
there is a view defined containing a big view port with the camera, then this view will be shown.
Otherwise a new temporary view with the camera will be created. You can then go back to the
previous view with the Previous view button or the corresponding option in the context
menu. Please see below for a few hints on how to manage big views of cameras.
6.3.1 Optimizing big views of cameras (views opened after a double click)
When you double click on a view port with a camera then Observer does the following:
1. It first tries to open up an already existing big view that contains the camera, or
2. If such a view does not exist, a new temporary view will be created. For the new view some
parameters such as the frame rate will be taken from the corresponding camera's default
configuration whereas the following parameters are inherited from the view port it is derived from:
Video stream type (MJPEG, MPEG-4, H.264 or MxPEG)
Aspect ratio, incl. different custom aspect ratios
Crop or stretch parameters
Current crop position
iCAT view options
Note: The new big view only inherits these parameters upon its initial creation. Subsequent
changes made in the original view port (e.g. video stream type or iCAT view options) will not affect
the big view.
To create a permanent big view for a particular camera: Create a view with this camera and adapt
the settings (see 6.1 Creating a new view on page 52 for details). Then a double click will open that
view. You can group those big camera views into view groups by supplying view group names such as
"Big:cam1", "Big:cam2" and so on.
6.4 Modifying view port settings
Observer allows you to set various options including video quality of either single view ports or all view
ports in the current view at once.
The settings of a single view port can be modified via the view port's control menu that appears
in the upper right corner of a view port when you move the mouse pointer over the view port.
The view port control menu offers the following options:
Page 56
NETAVIS Observer 4.6 User Manual (October 2015)
Page 56 of 204
6.4.1 Adding and removing cameras
Cameras can be added and removed with the Add camera and Remove camera menu entries.
Please refer to section 6.2 Selecting cameras on page 53 for more details.
6.4.2 Controlling PTZ cameras
The PTZ menu allows PTZ control and is enabled for PTZ cameras (see 10.4.1 Controlling PTZ cameras
in the Online Monitor on page 102).
6.4.3 Setting video parameters
The Video parameters menu offers the following options:
Set streaming
format
Defines the format in which the camera images should be streamed. The available
options depend on the camera and its configuration in Observer (see 4.2 Adding a
new camera and setting basic properties on page 31). Please also refer to 1.4 Video
streaming methods and compression on page 7 for further details on streaming
formats.
Set image
quality
Sets the quality of the streamed images by modifying the compression rate. The
options are High, Medium and Low. Refer to 1.4.5 JPEG image sizes and storage
requirements on page 10 for details on these values.
Note: Setting the image quality is only possible for MJPEG streams of cameras for
which Observer supports multiple MJPEG streams.
Set image size
Sets the image size (resolution) of the streamed images. The available size options
are camera-specific so please refer to your camera's manual.
Note: Setting the image size is only possible for MJPEG streams of cameras for
which Observer supports multiple MJPEG streams. You cannot change the image
size for MPEG-4, MxPEG and H.264 streams.
Set frame rate
Sets the frame rate of the video stream. The options are Max fps, various fps and
fpm (frames per minute) values and Stop.
Note: For cameras which provide a single MJPEG stream you can only select frame
rate values which are lower than the default MJPEG frame rate set in the Camera
settings.
Set camera
name
appearance
Defines the position where the camera name is displayed in the view port. The
options are Show at the top, Show at the bottom and Do not show.
Hint: As of NETAVIS Observer 4.5 it is also possible to change the size (CTRL button
+ mouse wheel up or down) and contrast (CTRL + Shift buttons + mouse wheel up or
down) of the camera name and hide/show the label with the stream type and fps
information (Shift buttons + mouse wheel up or down). For all of these commands
the mouse pointer has to be over the camera name.
Page 57
NETAVIS Observer 4.6 User Manual (October 2015)
Page 57 of 204
Rendering
preference
Defines which scaling algorithm will be used when images need to be scaled to fit
the available view port space. Optimized for quality means that the scaling is
done with a more CPU-intensive anti-aliasing which causes straight lines to be
smoother. Optimized for speed means that the scaling is done with a faster
algorithm that may cause lines to be not so smooth.
These settings can be modified all at once for all view ports in the current view via Set parameters of
all view ports from the view's Control menu. Holding down the CTRL key while selecting any of the
Set parameters of all view ports commands will modify all view ports of all views (not just the
current view).
Note: When modifying all view ports at once the selected options are only set for the view ports with
cameras which support the desired options.
With the Set image size option there are 5 categories of image sizes for modifying all view ports and
the closest possible match supported by each camera will be used:
Very small (QCIF, QQVGA, QCGA,...)
Small (CIF, QVGA, CGA,...)
Medium (VGA, 4CIF, NTSC, D1,...)
Large (HD-720, SVGA, XGA, SXGA,...)
Very large (HD-1080, SXGA+, UXGA,...)
Note: Setting the image size and image quality is only possible for MJPEG streams of cameras for
which Observer supports multiple MJPEG streams. Please refer to the NETAVIS Observer Supported
Video Sources document for information about for which cameras this functionality is supported.
6.4.4 Controlling video analysis (iCAT) display
The iCAT menu offers various options for displaying iCAT-related video analysis information. Please
refer to 15.4 Working with iCAT on page 163 for further information.
6.4.5 Replaying archived images
The Replay archived images menu offers the option to directly jump into the Archive Player to
replay the previous 10 minutes, 1 hour, 24 hours or 1 week of recordings of that camera. An error
message is displayed in case no such recordings are available.
Page 58
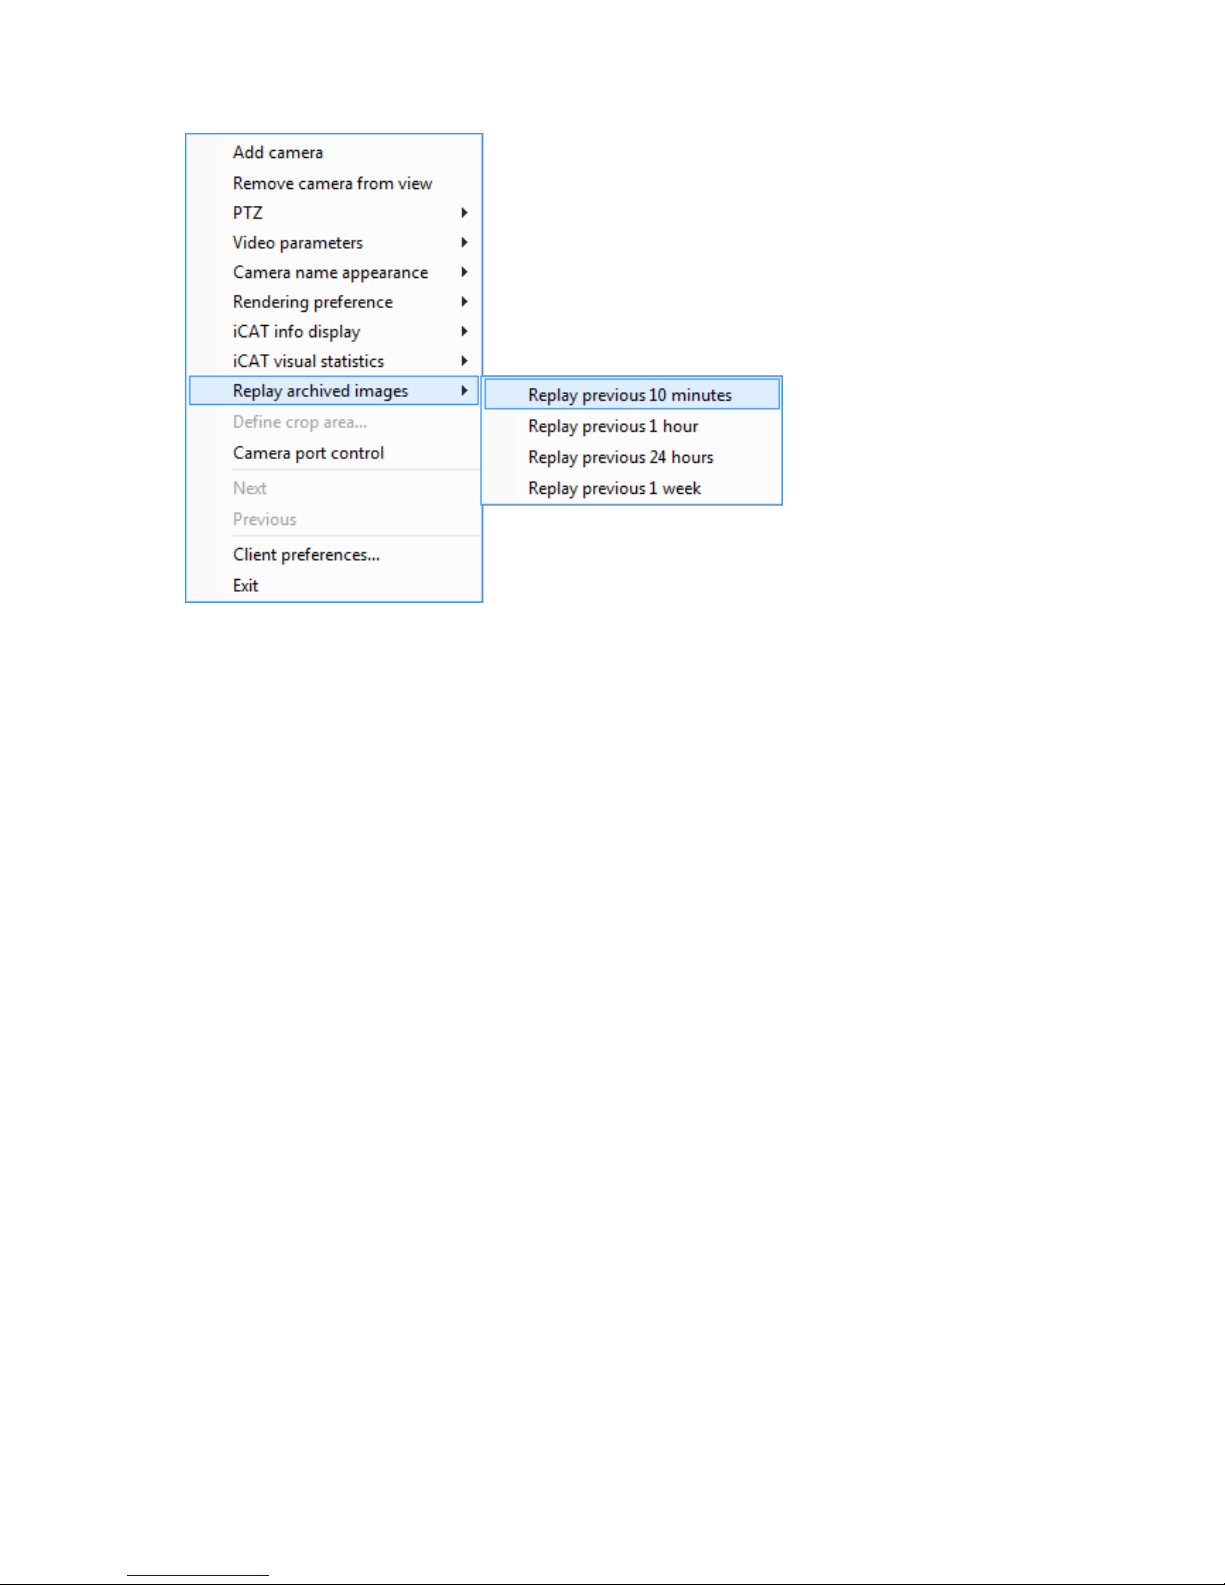
NETAVIS Observer 4.6 User Manual (October 2015)
Page 58 of 204
6.4.6 Defining a crop area
For views where you have the Crop image to fit view port setting selected, you can define what part
of the cropped camera image you want to see by choosing Define crop area... from the menu.
6.5 Zooming in a view port and in archive recordings
Observer allows you to zoom view ports in the Online monitor and in the Archive player.
Basically, you have two ways to zoom a view port or a recording in the Archive player:
6.5.1 Zooming with the mouse wheel
1. Just move the mouse pointer over a view port and turn the mouse wheel. The view port will zoom
accordingly.
2. You can move the zoomed area in a view port by dragging it with the mouse.
3. Use the mouse wheel again to zoom out.
6.5.2 Zooming by drawing a zoom rectangle
1. With the mouse draw a rectangle in a view port.
2. Click in this rectangle, which will cause the view port to zoom accordingly.
3. You can position the zoom by dragging the rectangle. You can also modify its size by turning the
mouse wheel.
4. Click outside the rectangle to return to normal (not zoomed) view.
5. You can remove the zoom rectangle by clicking into it with the mouse and pressing the Delete or
Backspace key. Alternatively, you can drag the rectangle outside of the view port to remove it.
You can also have multiple zooming rectangles per view port.
Page 59

NETAVIS Observer 4.6 User Manual (October 2015)
Page 59 of 204
Showing a zoomed view in another view port (Online monitor only)
1. Draw a zoom rectangle with the mouse.
2. Click into another view port. Now the zoomed area is shown in the other view port.
3. You can position the zoom by dragging the rectangle.
4. You can remove the zoom by clicking the rectangle with the mouse and pressing the Delete or
Backspace key. Alternatively, you can drag the rectangle outside of the view port to remove it.
Removing a rectangle will also remove the zoomed view from the other view port.
Please note: When PTZ control is enabled, any mouse actions are taken for PTZ control. In order to
control the view port zooming, hold down the CTRL key while using the mouse.
6.6 Manual recording control in the Online Monitor
In addition to programmed recordings, you can also manually start and stop continuous recordings
directly in the Online monitor. When manual recording control is set up, a recording button is shown in
camera view ports in the Online monitor.
6.6.1 Setting up manual recording control
To enable recording control, you must do 2 things:
Enable the manual recording camera access right for the user
Set up a continuous recording schedule for the camera. The continuous recording schedule
that is active at the time when the user pushes the manual recording button defines the format
of the recording. Therefore you can also have different manual recording formats for different
times in the day or week.
Enable the manual recording camera access right
Here is how to set the camera access right for manual recording (see 5.3 Setting camera access rights
on page 48 for a general description on how to set camera access rights):
1. Login as administrator user (or another user with the right to modify user data).
2. Choose User admin from the System administration menu. This opens the User admin
dialog.
3. Select the user or group for which you want to enable manual recording control.
4. Click the Next button twice to get to the Camera Access Rights dialog.
5. Select the camera or camera group for which you want to enable manual recording control.
6. Choose Modify selected user or group from the menu.
7. Enable the right Manual recording control from Online monitor by choosing Enabled from
the pop-up menu.
8. Push Save to save your changes.
Page 60
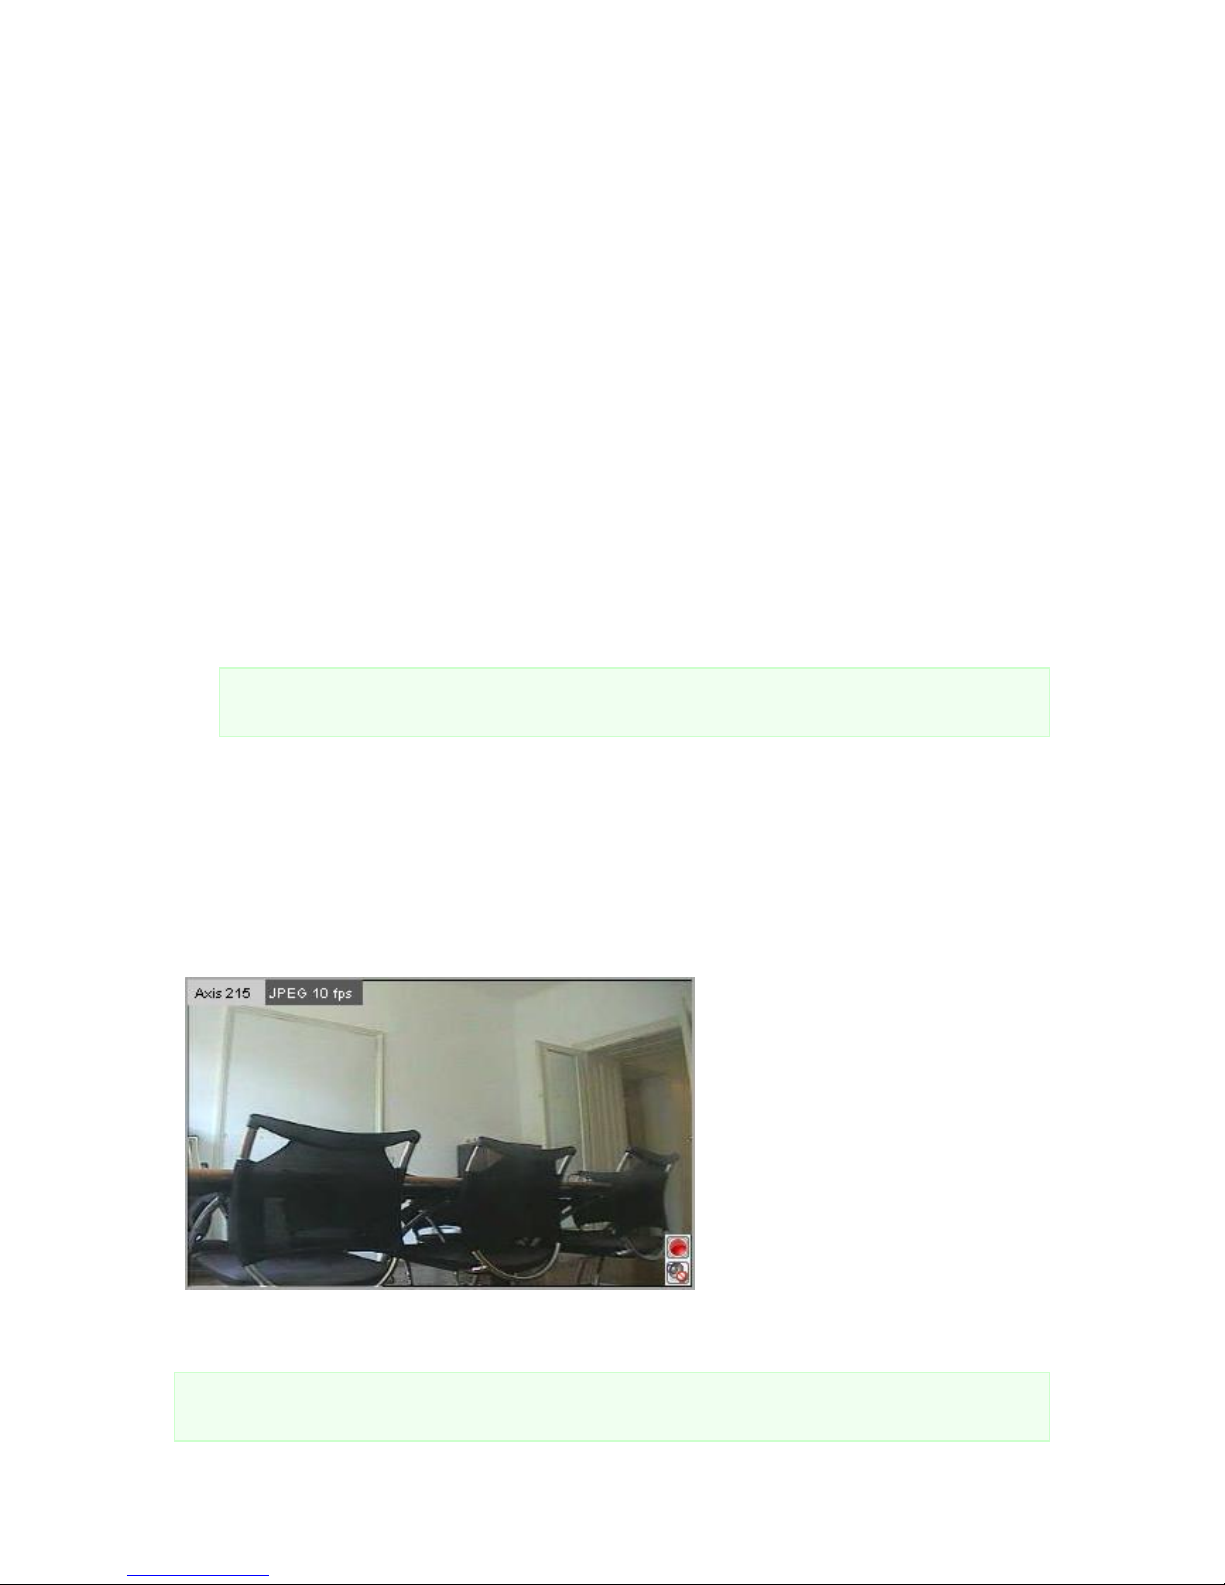
NETAVIS Observer 4.6 User Manual (October 2015)
Page 60 of 204
Set up a continuous recording schedule
In order to use manual recording control for a camera you have to define a continuous recording
schedule (please refer to 7.1.1 Programming continuous timed recordings on page 71 for a general
description of setting up schedules for continuous recordings):
1. Choose Camera admin from the System administration menu. This opens the Camera
admin dialog.
2. In the camera tree select the camera for which you want to set up the recording schedule.
3. At the bottom of the screen, click on the Next button twice. This takes you to the Scheduling
dialog. If you are setting up a new camera, this dialog will be quite empty.
4. In the menu select Modify selected camera or group.
5. Click the Add button to add a schedule slot to the Time Intervals list.
6. Click the Change button and choose Continuous recording.
Now the Scheduling dialog shows the settings for configuring continuous recording.
7. Now you can define the days and times for the recordings. You can activate individual days or,
with the All button, the whole week at once. Select hours and minutes from the popup matrix.
If you want that recording can only be started manually then make sure that the Enable
interval checkbox is disabled.
Note: When a user pushes the manual recording button in the Online monitor actually the
Enable interval checkbox is toggled. This causes the recording to either start ort stop.
8. Set all the recording options as described in 7.1.1 Programming continuous timed recordings on
page 71.
9. Click on Save to save your settings.
6.6.2 Manually controlling recordings in the Online monitor
When everything is set up as described above then for the enabled user and camera a manual
recording button is shown in any view port displaying the camera.
You can switch recording on and off by pushing the manual recording button. The recording state is
shown by the color (a strong red dot means recording is on, otherwise recording is off).
Please note: For times not covered by a continuous recording schedule no manual recording button
is shown.
Page 61

NETAVIS Observer 4.6 User Manual (October 2015)
Page 61 of 204
6.7 Working with round tours (the Smart guard™ function)
Observer allows you to make virtual round tours of views. You can define round tours that contain
certain views. When a tour is started, Observer walks you through all the views by automatically
showing up the views in the Online monitor. This is like a virtual patrol of a security guard (Smart
guard™ function).
6.7.1 Defining a round tour
Steps to add a new round tour:
1. In the Online monitor choose Round tours… from the view Control menu. Now the Round
tours dialog opens.
2. In the Round tours dialog push the button Add new round tour.
3. In the Tour name field enter the name of the round tour.
4. Now you can select a view from the Views list and push the button to include it in the tour.
By pushing the button you can remove a view from the tour. You reorder views in the tour by
pushing the Up and Down buttons.
Please note: You can have the same view several times at different locations in a round tour.
You can select multiple views in the Views list at once by holding the CTRL key while selecting
the views.
5. For each view you can set a Shuffle duration that determines, how long (in seconds) this view is
shown before Observer automatically changes to the next view in the tour. By pushing Set for
all you can set the same duration for all view in the round tour.
6. Push Save to save your changes and OK to leave the dialog.
Later on you can modify an existing round tour by opening the Round tours dialog and then choose
an existing round tour from the Round tours list and push Modify round tour.
A tour can be deleted by opening the Round tours dialog and then choose an existing round tour
from the Round tours list and push Delete round tour. Then you have to enter your password to
confirm the delete.
6.7.2 Activating round tours
After you have defined a round tour, a new Round tour selector appears in the Online monitor. To
activate the round tour, just choose its name from the Round tour selector. This activates the
automatic walkthrough all of the views in the round tour (Smart Guard™ function). The name of the
round tour now appears in green to show that it is active. You can stop the tour by choosing a view
from the View selector (the Round tour selector will change its color to normal to show that no tour
currently is active).
6.8 Copying views between users
If there are several users in a system it can be a lot of work to create views for each user individually. In
order to help, Observer offers the possibility to copy a selected view or all views (including all view
settings) of an administrator user to other users. It is important that the user who copies the views to
other users must have user administration rights (more specifically: „User admin: Access to User
administration“ and „User admin: Manipulate user data“).
Page 62
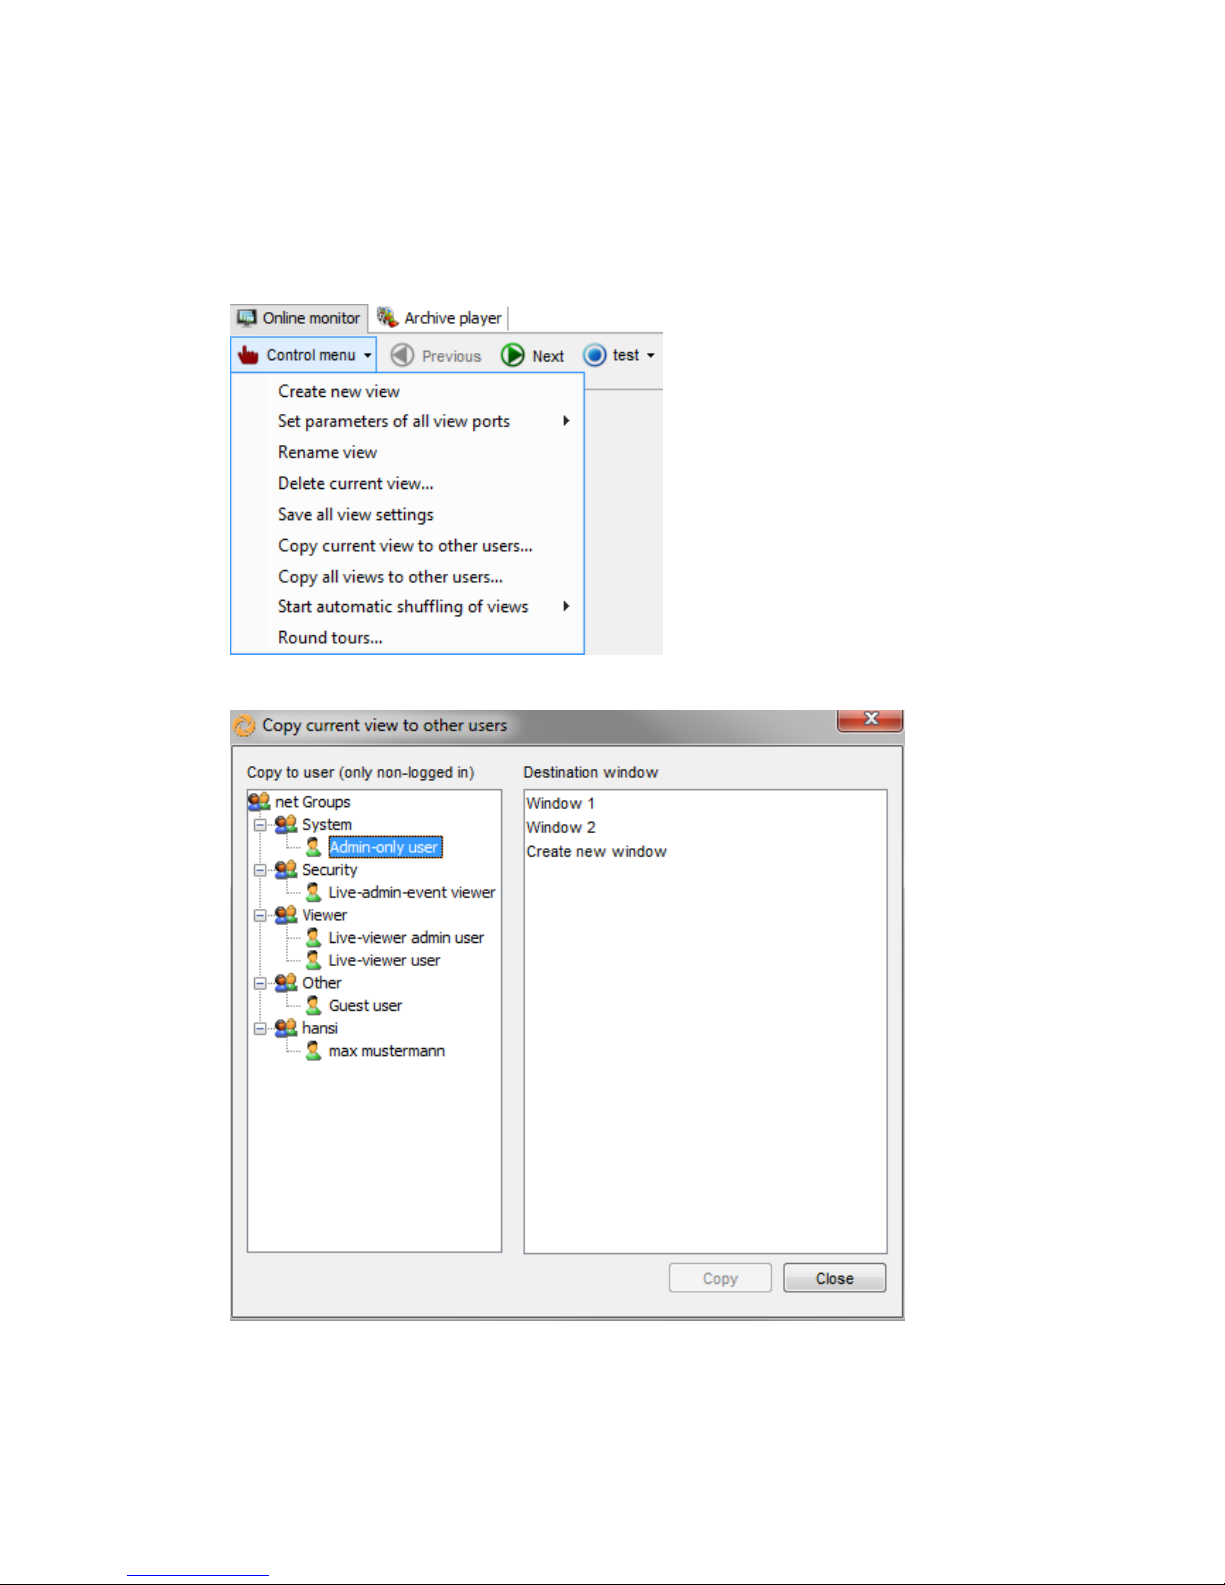
NETAVIS Observer 4.6 User Manual (October 2015)
Page 62 of 204
Please follow these steps:
1. Login as the user from whom you want to copy the view(s) and go to the Online monitor.
2. Create the view(s) you want to copy. Please note that only saved settings are copied.
3. Open the view you want to copy, open the view's Control menu and choose Copy current
view to other users…:
4. Now a user selection dialog opens:
5. Select the user you want to copy the current view to, whereby views can only be copied to
logged-out users and your own account. You can then choose one of the user's windows or
select Create new window as a target for the current view. After you have finished the selection
Page 63
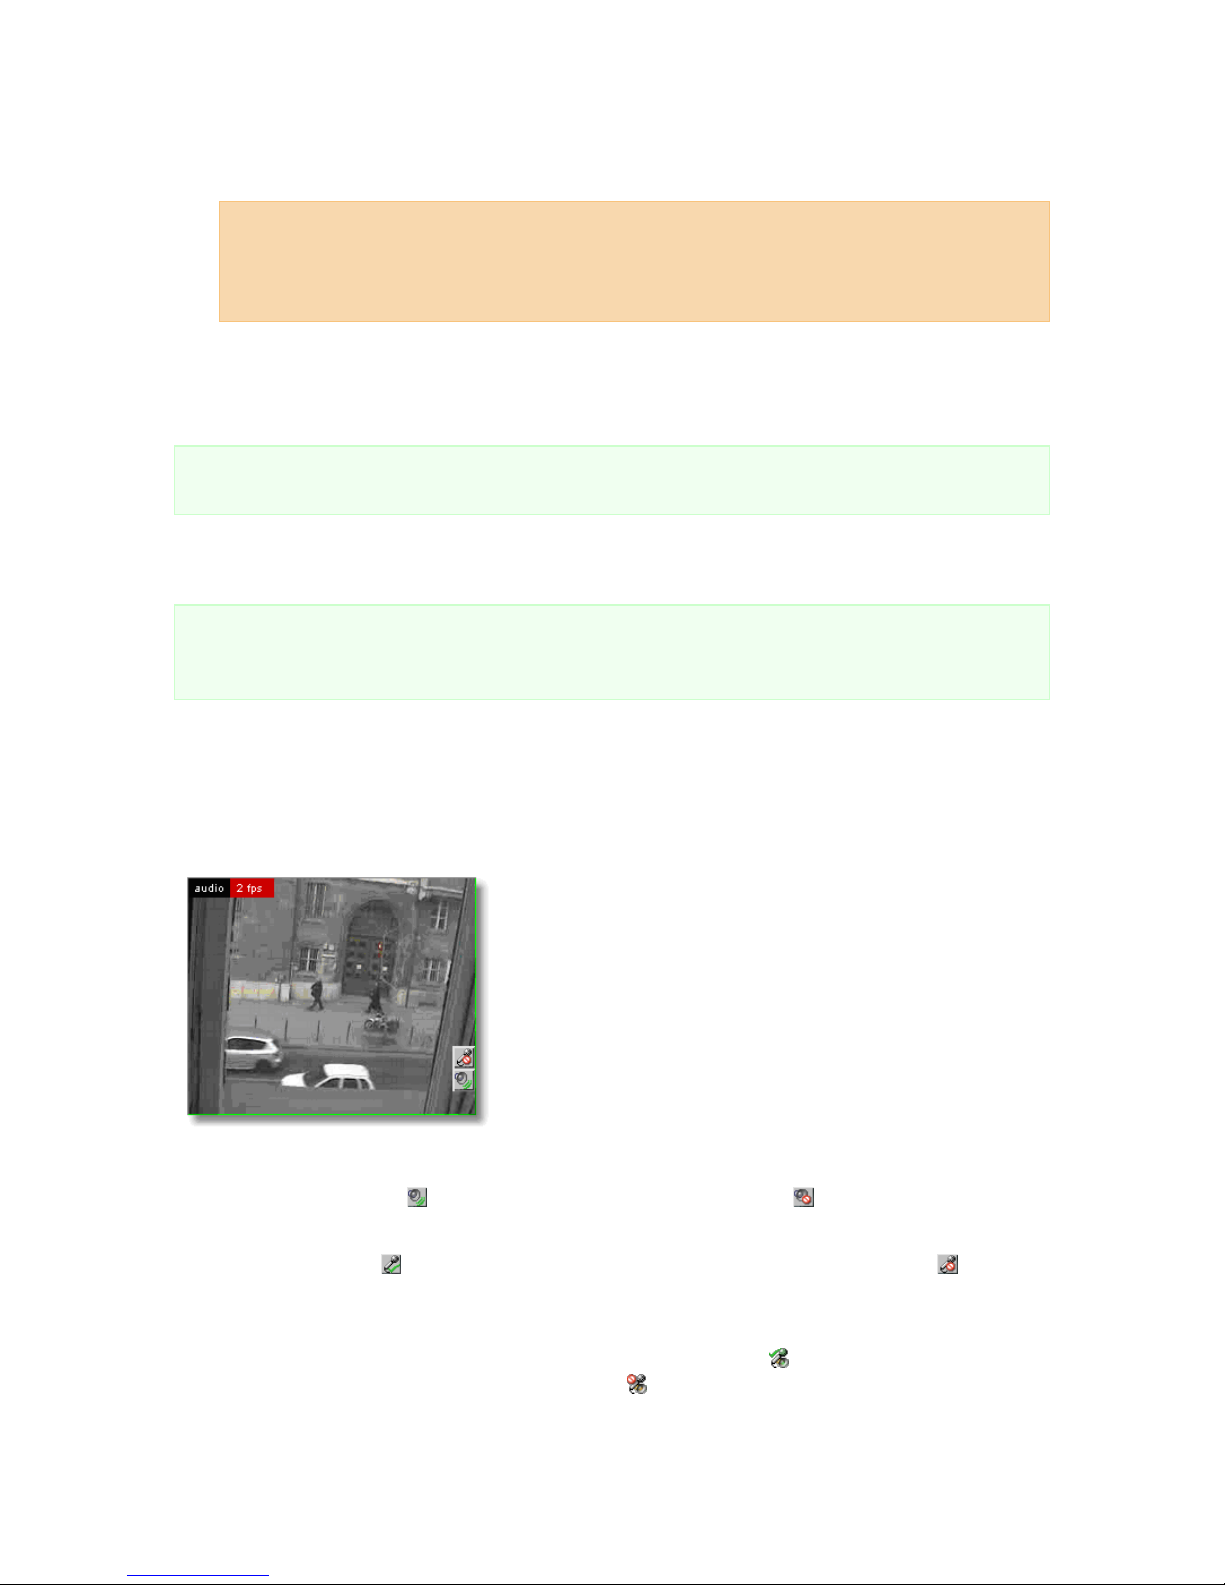
NETAVIS Observer 4.6 User Manual (October 2015)
Page 63 of 204
press the Copy button. Now the selected user receives a copy of the current view in the
designated window.
Hint: Multiple users can be selected by holding down the CTRL key while clicking on user names.
When selecting multiple users it is only possible to select Create new window as a target for
the current view. So if you want to copy one or all views to specific windows (as opposed to a
newly created window) of multiple users you have to copy them to each user individually.
6. The user who received the views has to log-in again in order for the changes to take effect.
You can also copy all views of the current user by choosing Copy all views to other users… from
the view's Control menu.
Please note: If the users already have views with the same name as the copied views, then the
existing views will be overwritten by the newly copied ones!
6.9 Working with MPEG cameras and audio (MPEG-4, H.264, and MxPEG)
Note: In the current version of Observer, MPEG and bidirectional audio is only supported by clients
running on MS Windows. For further details please refer to 2.1 Introduction to Observer clients on page
11.
Observer also supports MPEG cameras (MPEG-4, H.264, and MxPEG) with audio streaming (see also 4.2
Adding a new camera and setting basic properties on page 31).
If the camera allows MPEG streaming, you can select the MPEG streaming format from view port
control menu. Once the MPEG streaming is activated, additional MPEG controls appear on the view
port(s):
These controls allow you to see and modify Audio aspects:
Audio from the camera: indicates that audio from the camera is on. indicates that audio from
the camera is off. A click on the icon turns it on or off.
Audio to the camera: indicates that audio from your microphone to the camera is on. indicates
that audio from your microphone to the camera is off. A click on the icon turns it on or off.
If you have the Default settings in the Camera Admin set to Audio from and to share single
button then you will see only one control icon: Bidirectional Audio: indicates audio in both
directions is on (loudspeaker and microphone is on). indicates that audio in both directions is off
(loudspeaker and microphone is off).
Page 64

NETAVIS Observer 4.6 User Manual (October 2015)
Page 64 of 204
6.10 Dynamic View Control in Online Monitor
The use of dynamic views triggered by iCAT and motion detection events was significantly simplified
by the addition of a new configuration menu in Observer 4.5. Combined with the dynamic view control
feature, archive access within the Online Monitor view ports now allows operators to quickly view
event-triggered recordings without having to switch to the Archive. They are therefore able to keep an
eye on live camera-streams while reviewing critical events.
Hint: Aside of controlling views with iCAT and motion detection triggers, it is also possible to control
them with the Matrix view function (see 20.4 Matrix View function of the Online Monitor (VIP control) on
page 184 for more details).
6.10.1 Controlling views via iCAT events
Dynamic view configurations can be added to any of iCAT triggers such as motion detection (MD),
object tracking event trigger, sabotage detection, etc. Once the iCAT definition is activated, the
associated dynamic view is shown.
Here are the steps to control dynamic views via an iCAT definition:
1. Choose Video analysis (iCAT) from the System administration menu. This opens the Video
analysis (iCAT) dialog.
2. Select a camera and for the camera select an iCAT definition.
3. Choose Modify selected definition from the menu.
4. Click the button next to the Dynamic view action field where you are presented with three
options:
No action means that the Online Monitor's views are not changed. This is the default
option for all iCAT definitions.
Show camera's live stream in large view results in the live stream of the camera
which triggered the iCAT definition being shown in a large view. This option supports three
different modes:
o Current camera: The camera's live stream is shown on all connected clients.
o Camera-user pairs: A list of camera-user pairs can be configured which specifies
which cameras' large views are shown on the clients when the respective users are
connected.
o Camera-IP Address pairs: A list of camera-IP Address pairs can be configured
which specifies which cameras' large views are shown on the clients connected
from the respective IP Address.
Page 65
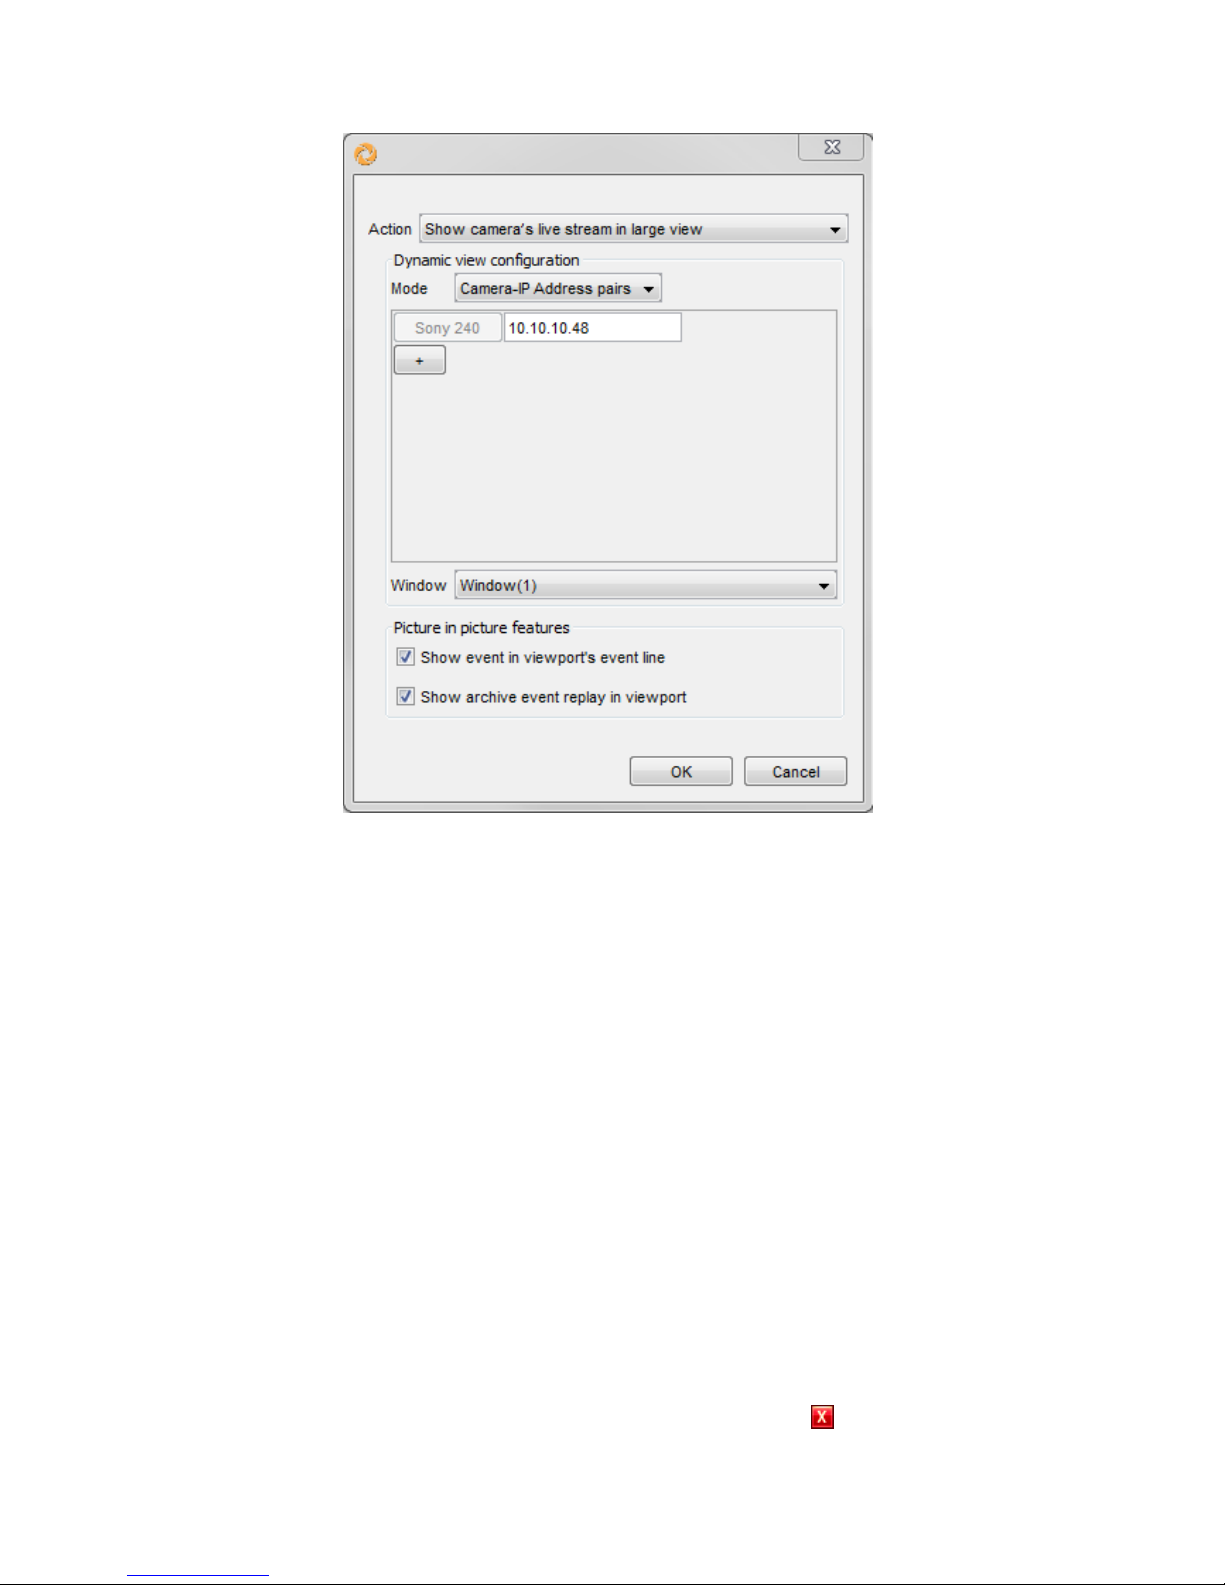
NETAVIS Observer 4.6 User Manual (October 2015)
Page 65 of 204
Additionally you can define in which Online Monitor Window the large view should be
shown. For configurations which concern multiple users the largest common subset of
available windows will be shown. With the Current camera mode only Window(1) is
supported.
Show live streams in view can be configured with Additional cameras, a selection of
Users, Windows, and Views (please note that view ports used for dynamic view
configurations should not be modified manually, e.g. by new adding cameras to them).
Multiple cameras and users can be selected (and deselected) by keeping the CTRL button
pressed. For single user configurations it is also possible to limit the feature to clients
connected from a certain IP address. Show live streams in view offers three different
modes:
o Replace oldest view port (first in, first out): The newest iCAT events are
always displayed in the "oldest" view ports (the view ports that stood there the
longest without a camera change). Thus it is possible to create a view where always
cameras with the newest events are displayed.
o Shift older view ports (from top left to bottom right): The newest iCAT events
are always displayed in the top left view port with all other camera views shifting
towards the bottom right. Cameras in the lower right view port are removed from
the view. Thus it is possible to create a view where cameras with the most recent
events are always displayed at the top left position.
o Insert into empty view ports: The newest iCAT events are always displayed in
empty view ports and each view port has a close button . When the user clicks
Page 66
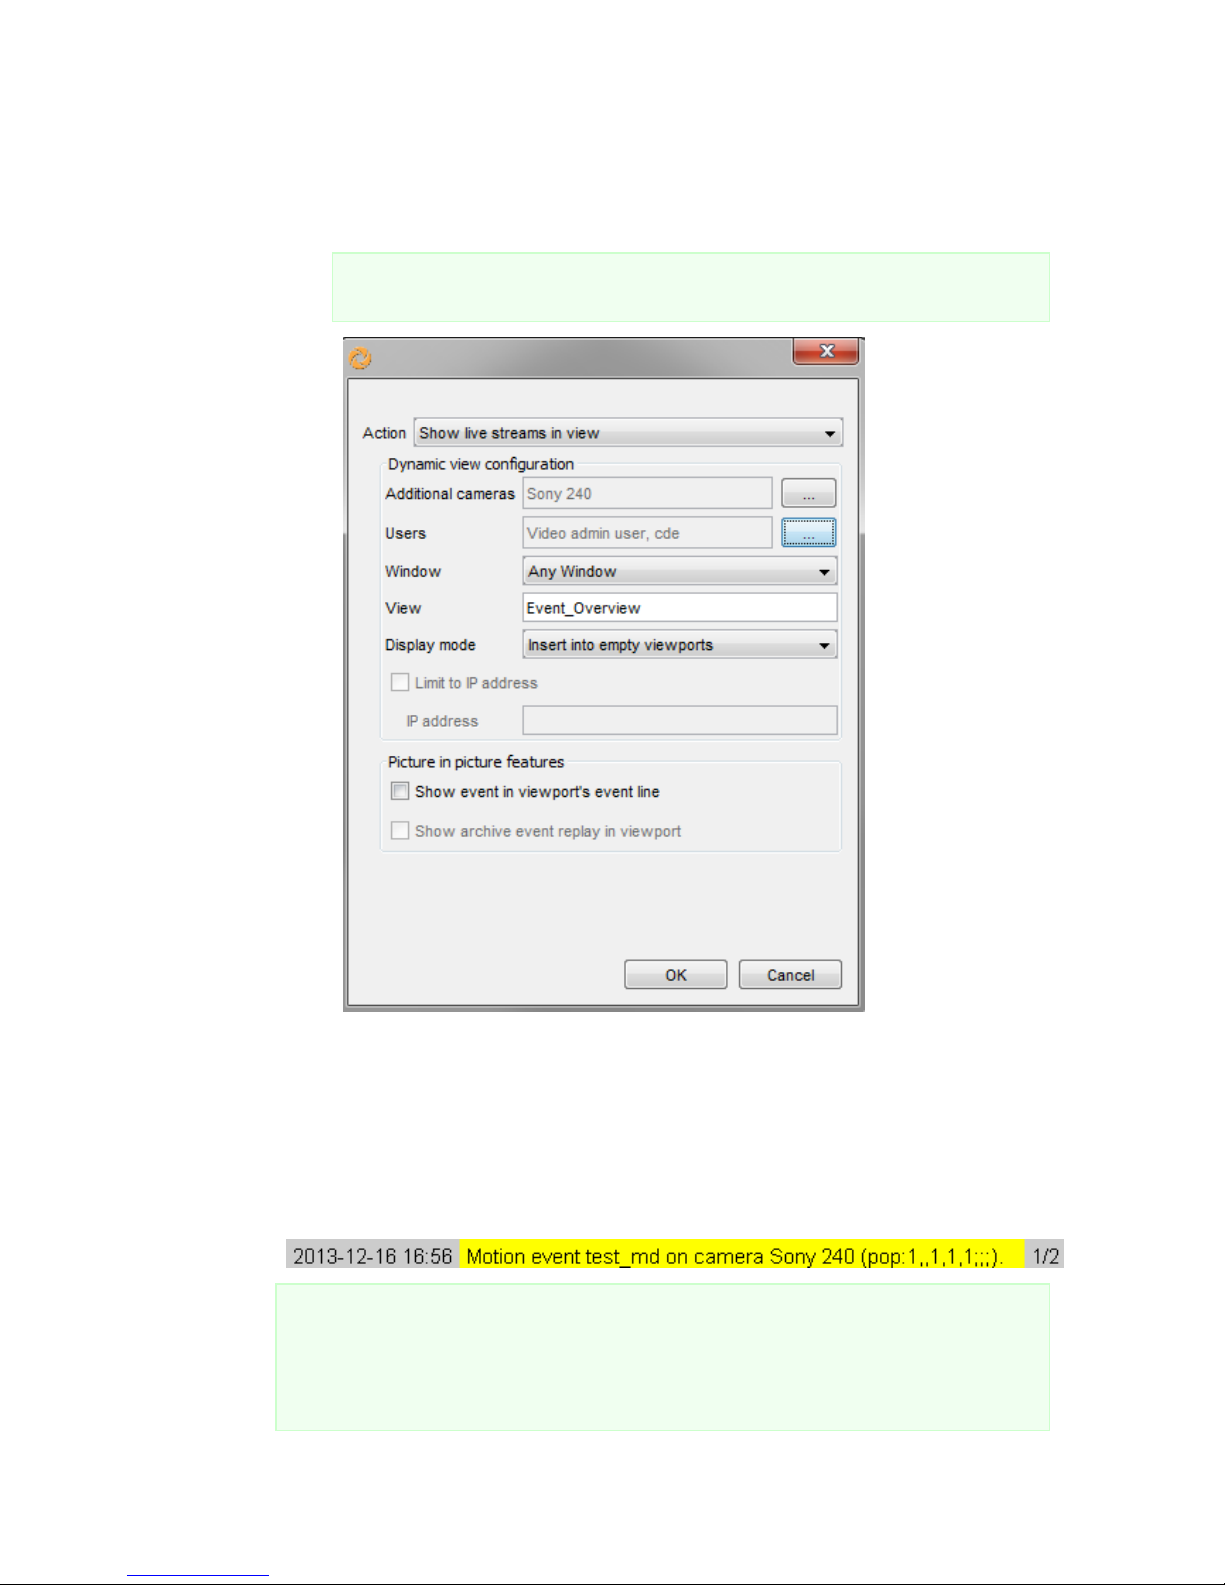
NETAVIS Observer 4.6 User Manual (October 2015)
Page 66 of 204
the close button, the cameras are removed from the view, freeing the view port for
another camera to be shown. Thus it is possible to create a view where cameras
with the most recent events are always displayed and stay there until they are
manually closed by the user.
Please note: When all view ports of the view are filled, no new cameras will be
shown until a view port is freed.
For the Show camera's live stream in large view and Show live streams in view options
there are also Picture in Picture features which can be enabled:
Show event in view port's event line: This option enables a list which keeps track of
the events which occurred in the view port. To navigate between the events turn the
mouse wheel up and down while hovering over the list at the bottom of the view port. By
double clicking on an event in the list the Event details dialog is shown, whereby the
Acknowledge and next, Previous, and Next buttons are disabled.
Please note: The background color of the event line is the Highlight color which has
been set for that iCAT or motion detection definition. As of NETAVIS Observer 4.5 and
similarly to the camera name label it is also possible to change the size (CTRL key + mouse
wheel up or down) and contrast (CTRL + Shift keys + mouse wheel up or down) of the
event list.
Page 67
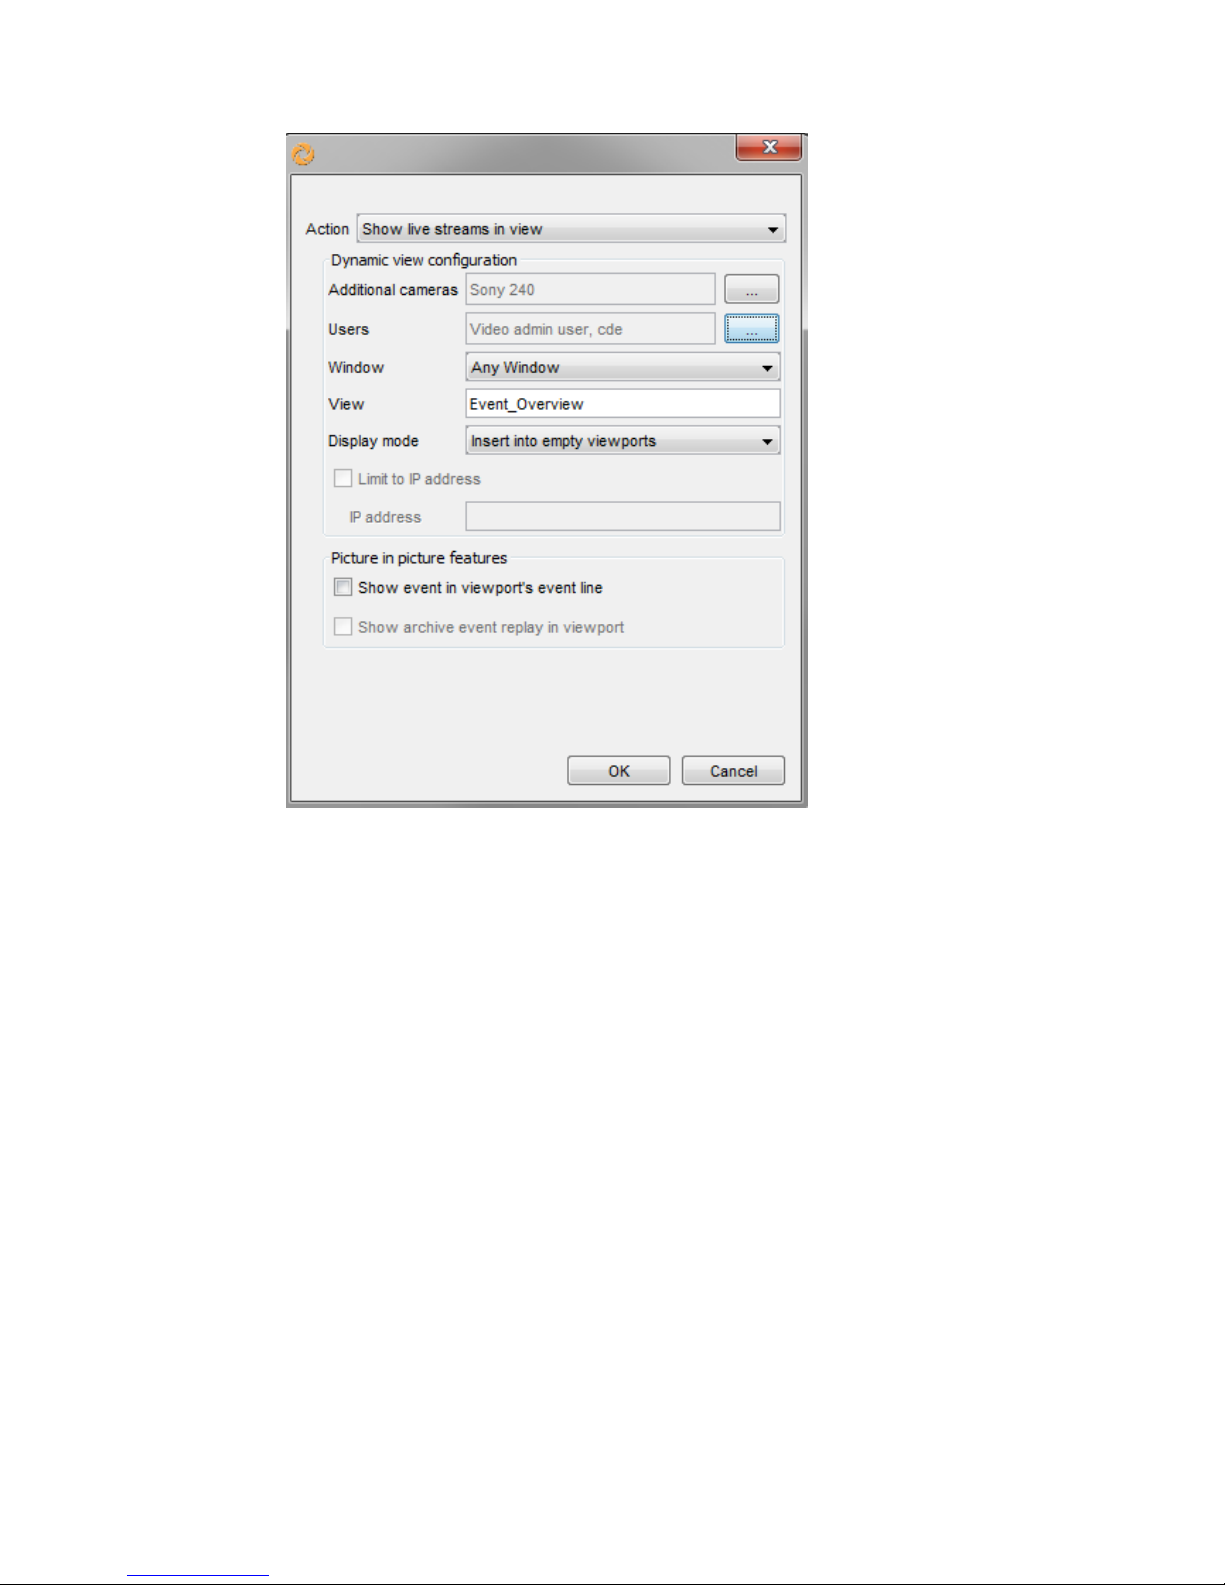
NETAVIS Observer 4.6 User Manual (October 2015)
Page 67 of 204
Show archive event replay in view port: This option enables Archive Access from
within the Online Monitor view port which contains the camera which triggered the iCAT
definition. It can only be used if the Show event in view port's event line option is
enabled.
Page 68
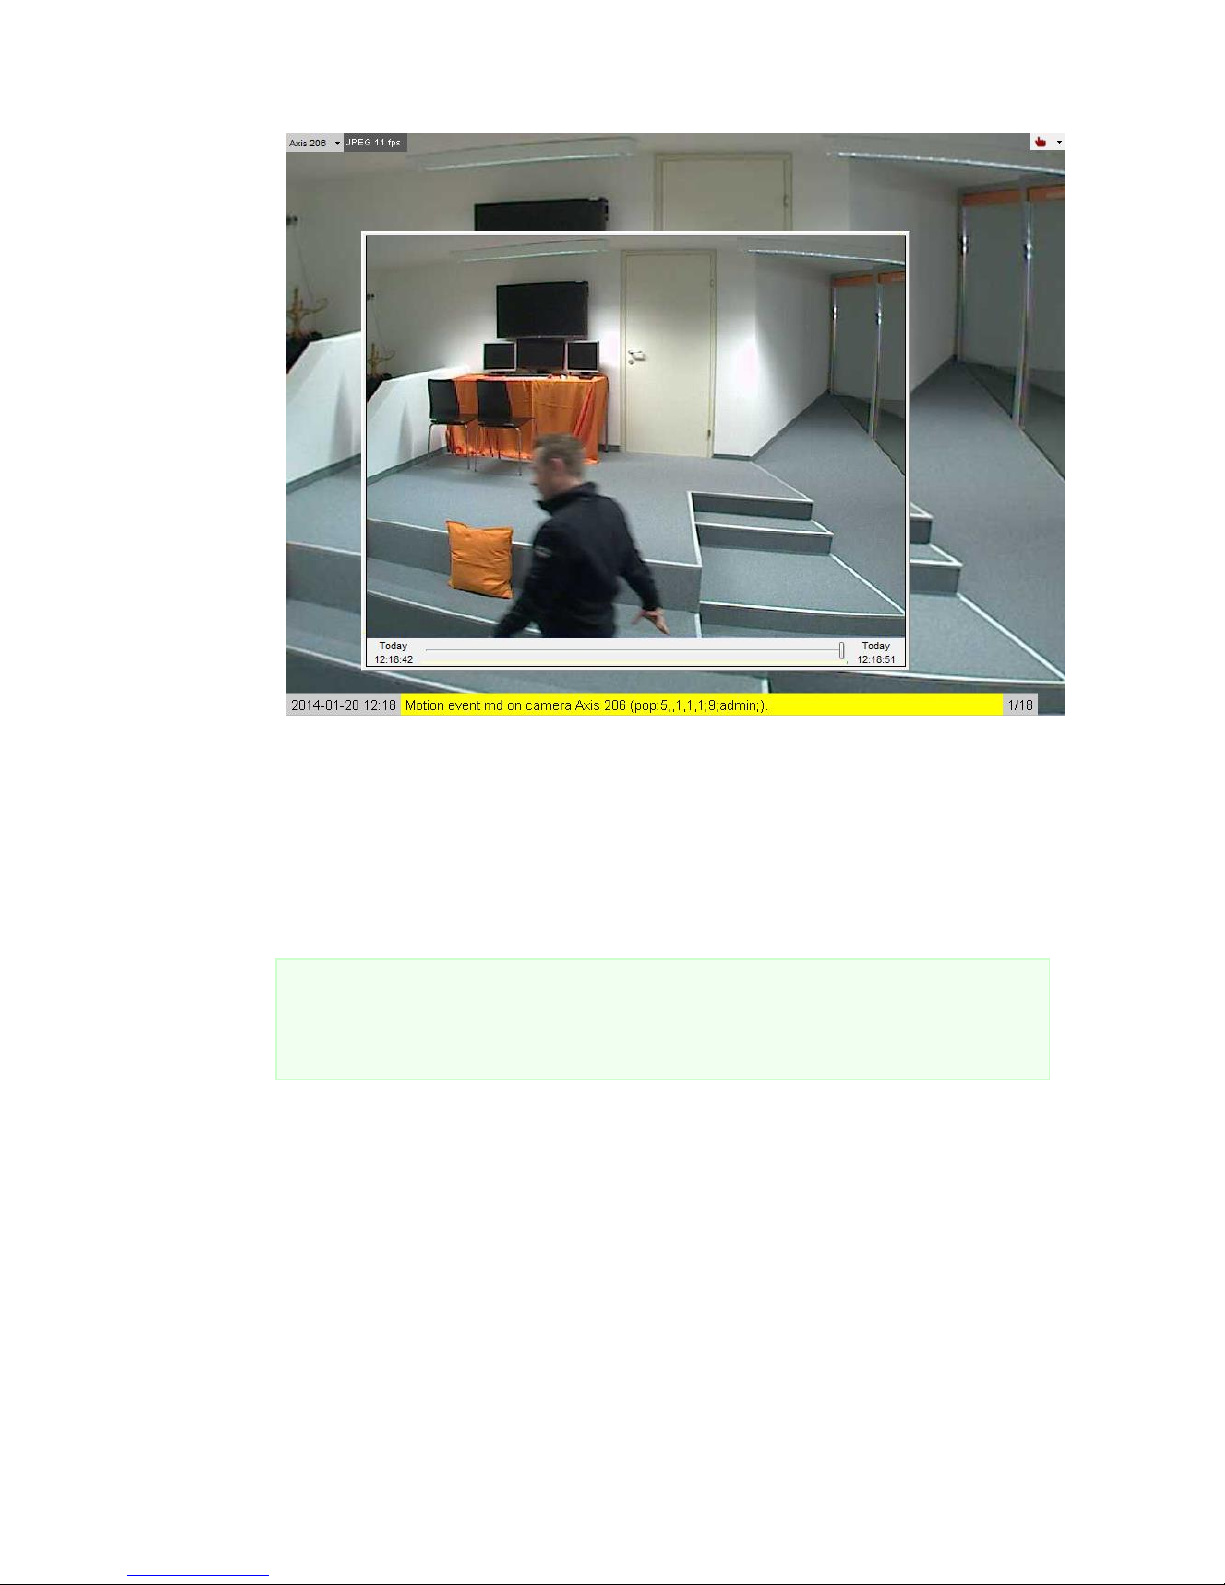
NETAVIS Observer 4.6 User Manual (October 2015)
Page 68 of 204
To watch the event you can either drag the timeslider to the corresponding position or
click on the preview window to watch 10 second segments of the recording.
The Archive Access window can be moved by pressing the CTRL key and dragging the
window with the mouse and it can be resized by pressing the CTRL key and turning the
mouse wheel.
The event line and archive replay window are automatically removed when all the
cameras in the corresponding view port are removed.
Please note: Until all the cameras are removed the event list and archive playback
window configuration in the corresponding view port stay the same as configured in the
definition of the iCAT or motion detection event which first triggered a video stream to be
shown in it.
5. Alternatively it is also possible - but not generally recommended - to use the Comment field to
add a dynamic view command to an iCAT definition.
pop: <mode>,<view-name>,<window-ID>,<viewport-eventline>,<viewport-archivereplay>; <additional-camera-IDs>; <user-names>; <IP-addresses>
where:
<mode> is one of:
1: shows the camera in a large view.
2: shows the camera and optional <additional-camera-IDs> in the view named <view-
name> (must be supplied). The cameras are placed in the "oldest" view ports (view ports
that stood there the longest without a camera change). Thus you can create a view where
always cameras with the newest events are displayed.
Page 69

NETAVIS Observer 4.6 User Manual (October 2015)
Page 69 of 204
3: shows the camera and optional <additional-camera-IDs> in the view named <view-
name> (must be supplied). The cameras are placed row-wise starting at the top left view
port. The cameras that were in these view port before are shifted to the right. Cameras at
the lower right corner of the view therefore are removed from the view. Thus you can
create a view where cameras with the most recent events are always displayed at the top
left position.
4: shows the camera and optional <additional-camera-IDs> in the view named <view-
name> (must be supplied). The cameras are placed in empty view ports. They have a
close button associated with them. When the user clicks the close button, the cameras are
removed from the view, freeing the view port for another camera to be shown.
Thus you can create a view where cameras with the most recent events are always
displayed and stay there until they are removed by the user. Please note: When all view
ports of the view are filled, no new cameras will be shown until a view port is freed.
5: similar to mode 1 it shows the camera in a large view. The optional <additional-
camera-IDs> are paired one-by-one with the <user-names>. This causes that these
additional cameras are shown in large view at the clients where the supplied users are
logged in.
6: similar to mode 1 it shows the camera in a large view. The optional <additional-
camera-IDs> are paired one-by-one with the in the <IP-addresses>. This causes that
these additional cameras are shown in large view at the supplied clients workstations.
<window-ID> defines the window which will be used
<viewport-eventline> defines whether the events will be shown in the view port's event line
whereby 0 disables this functionality and 1 enables it.
<viewport-archive-replay> defines whether the archive event replay is shown in the view port
whereby 0 disables this functionality and 1 enables it. This functionality can only be used if the
<viewport-eventline> option is enabled.
<additional-camera-IDs> is an optional comma-separated list of camera IDs which should be
shown in addition to the camera that triggered the event.
<user-names> is an optional comma-separated list of user names to notify. If not defined, then
all users are going to be notified.
<IP-addresses> is an optional comma-separated list of client workstation IP addresses to which
the notification is sent. If not defined then all connected workstations are going to be notified.
Examples of commands to be used in any iCAT comment field
pop:1;;;
shows a live view of the camera which triggered the event in all connected client sessions.
pop:2,my-view;3,4;;
shows live view of camera which triggered the event and the cameras with IDs 3 and 4 in the view
named "my-view" in all connected client sessions.
pop:3,my_fifo;3,4;christoph;192.168.7.12
Page 70

NETAVIS Observer 4.6 User Manual (October 2015)
Page 70 of 204
shows a live view of camera which triggered the event and the cameras with IDs 3 and 4 in the
view named "my_fifo" where the IP address of the client workstation is 192.168.7.12 and user
'christoph' is logged in.
pop:4,my_dynamic;3,4;;
shows live view of camera which triggered the event and the cameras with IDs 3 and 4 in the view
named "my_dynamic" in all connected client sessions.
6. Press the Save button.
Page 71

NETAVIS Observer 4.6 User Manual (October 2015)
Page 71 of 204
7 Working with archive recordings
This section shows you how to work with the Observer recording archive, particularly in the following
areas:
Programming archive recordings (timed or triggered by iCAT (video analytics) events)
Selection and playback of archive recordings
Please note: In order to work with archive recordings you need to have the appropriate user
privileges and camera access rights (for further details see 5.2 Setting general user privileges on page
45 and 5.3 Setting camera access rights on page 48).
7.1 Programming archive recordings
Two types of programming are available in Observer:
timed recording
recording on iCAT (video analysis) events like motion detection or people counting
To be able to program recordings, you need corresponding user privilege.
7.1.1 Programming continuous timed recordings
1. Choose Camera admin from the System administration menu. This opens the Camera
admin dialog.
2. In the camera tree select the camera for which you want to program archive recording. When you
select the camera (highlighted in light blue), its data are displayed in the Properties dialog at
the right side of the screen.
3. In the menu select Modify selected camera or group.
4. At the bottom of the screen, click on the Next button twice. This takes you to the Scheduling
dialog. If you are setting up a new camera, this dialog will be quite empty.
Note: Some fields and buttons are deactivated until you select Modify selected camera or
group in the menu and then they become modifiable. Also, the Time Intervals field is still
empty when you begin. Later it will contain one or more program slots for the selected camera.
5. Click the Add button to add a programming slot to the Time Intervals list.
Page 72
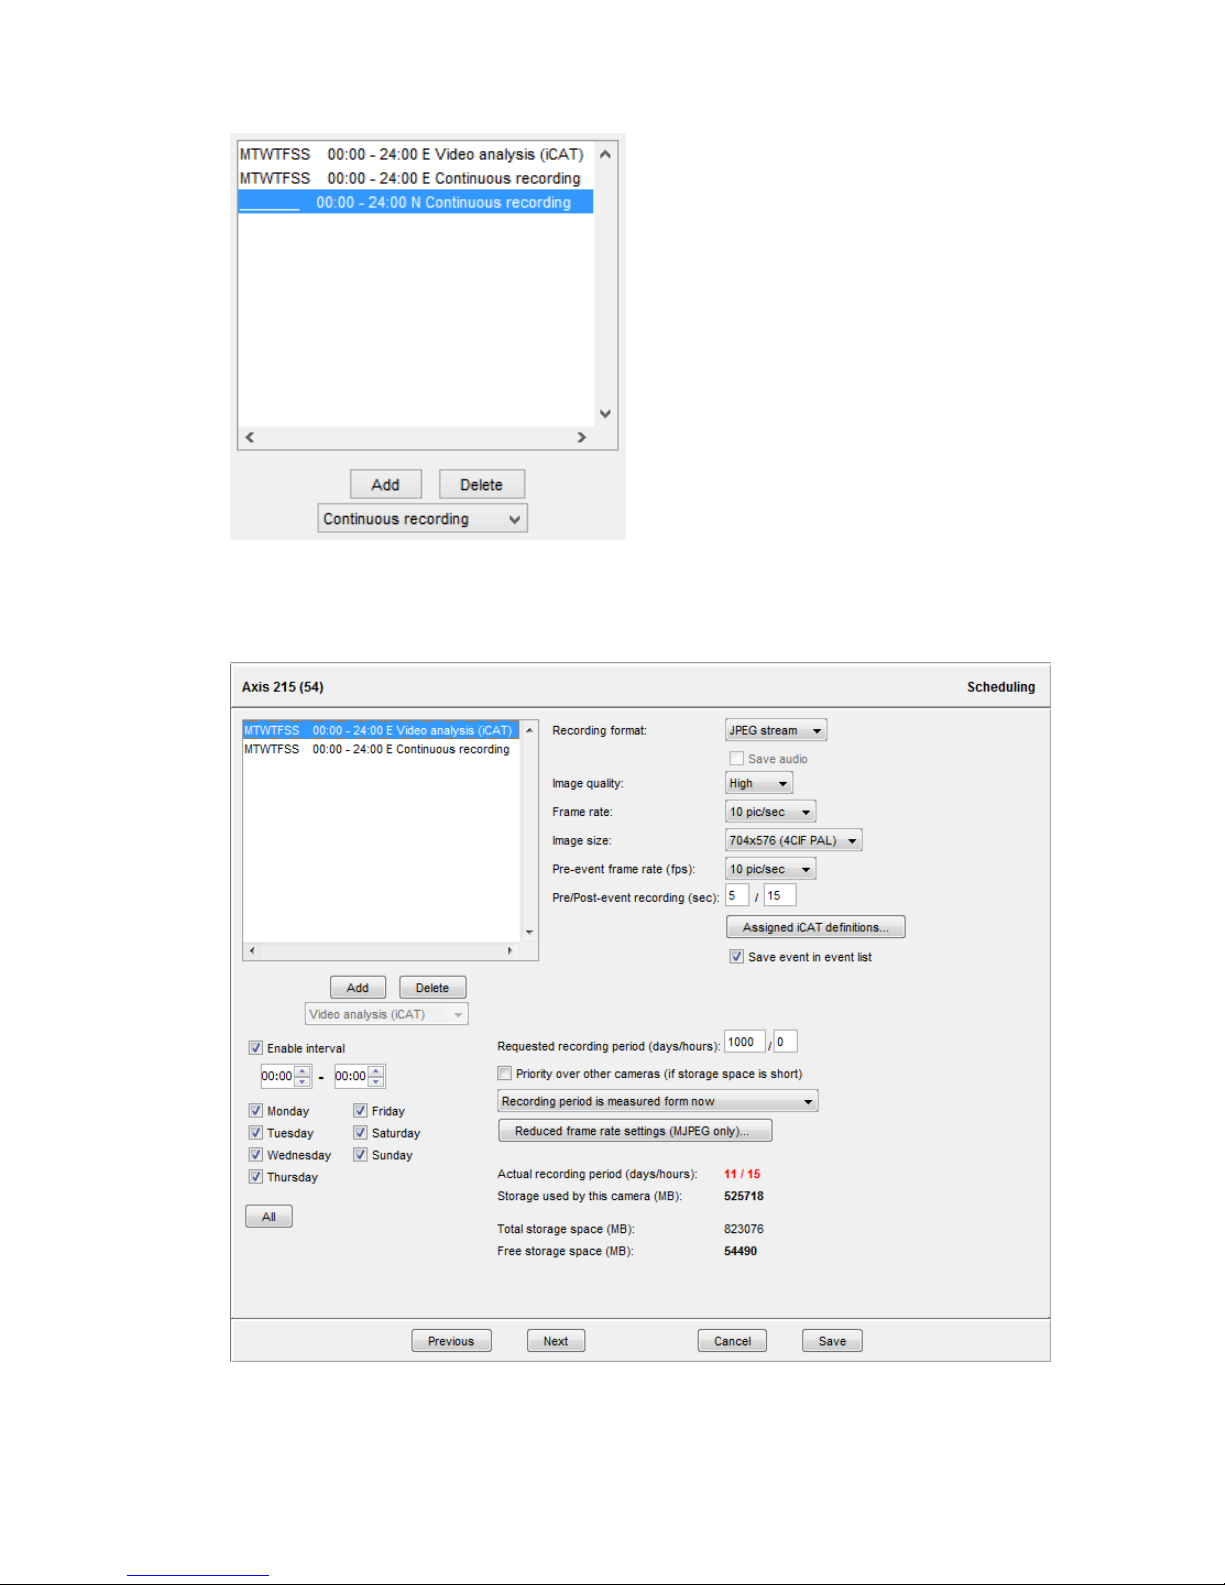
NETAVIS Observer 4.6 User Manual (October 2015)
Page 72 of 204
The new entry will be selected.
6. Click the Change button and choose Continuous recording.
Now the Scheduling dialog shows the settings for configuring continuous recording:
7. Now you can define the days and times for archive recordings. You can activate individual days
or, with the All button, the whole week at once. Select hours and minutes from the popup matrix.
Page 73

NETAVIS Observer 4.6 User Manual (October 2015)
Page 73 of 204
Please make sure that the Enable interval checkbox is marked, because only then are the
settings enabled and recording is started.
Note: If you want to record at different times on different days, you can create multiple recording
intervals. For each recording interval proceed as described here.
8. In addition to defining the weekdays and times, you need to specify the Recording format. If
your camera also supports multiple formats you have several choices (for details on streaming
formats please refer to 1.4 Video streaming methods and compression on page 7):
JPEG stream is also known as MJPEG, where the server stores sequences of JPEG
images.
MPEG-4 video for MPEG-4 video streams.
H.264 video for H.264 video streams.
MxPEG video for MxPEG video streams.
For the MPEG video formats you can additionally select Save audio.
When you choose any of the MPEG video formats then the video settings that are defined in the
camera’s Default settings will be taken for recording (4.2 Adding a new camera and setting basic
properties on page 31).
If you choose JPEG stream you can additionally set the Image quality, the Frame rate and
the Image size for the archive recording:
Set the values according to your needs. See 1.4.5 JPEG image sizes and storage requirements on
page 10 for details on images sizes, quality, and storage requirements.
Note: Some cameras are only capable of a single picture stream which will constrain the
possibility of recording in multiple formats and having different video stream settings in the
Online Monitor and the recording. Please refer to the document NETAVIS Observer Supported
Video Sources for information about supported cameras and their streaming capabilities.
9. Fill in the Requested recording period for this camera. This value defines how long Observer
will keep recordings. Recordings that are older than Requested recording period will be
automatically deleted by Observer (see also 7.1.4 Operation of the Observer dynamic storage
management on page 74).
You can also select Priority over other cameras (if storage space is short) to give this
camera priority over other cameras if the available storage space is too small for all requested
recordings of all cameras (for further details see 7.1.4 Operation of the Observer dynamic storage
management on page 74).
You can also define what the requested recording period refers to: either Recording period is
measured from now or Recording period is measured from youngest recording. There
can be quite a difference between these two choices for the following case: Assume a motion
detection-based recording that only triggers recording once every few weeks.
Additionally, you can see the Actual recording period (days/hours), the Storage used by
this camera (MB), the Total storage space (MB) which shows the overall storage space of the
server, and the Free storage space (MB) which is the available space for new recordings on this
server.
Page 74

NETAVIS Observer 4.6 User Manual (October 2015)
Page 74 of 204
10. Click on Save to save your settings. As soon as the scheduled time is reached recording is started
with these settings.
7.1.2 Scheduling video analysis (iCAT) operation and recording
For information on how to schedule video analysis (iCAT) operation and recording please refer to
section 15.3.15 Scheduling iCAT operation and recording on page 160.
7.1.3 Event-triggered recordings
The option Event-triggered recordings can be used to create schedules which control when
externally triggered events handled by Observer's Event Management System (EMS) are recorded.
7.1.4 Operation of the Observer dynamic storage management
In the Scheduling dialog you can specify the Requested recording period property that defines
how long recordings are to be kept by Observer. Any recordings that are older than the requested
recording period are automatically deleted as long as you do not manually protect them from deletion
(see 7.2.8 Protection of recordings against automatic deletion on page 80).
For cases like motion detection-based recording it can be very difficult if not impossible to estimate
the required storage space and therefore space for all requested recordings could be too short. To
help with this hopefully rare case, Observer uses an intelligent storage management process. This
process always tries to store all requested periods for all recorded cameras.
However, if there is not enough space available, the allocation process is doing two things:
It generates a system event once a day and sends an email / SMS to the Observer administrator
telling him that there is not enough space for all recordings.
It automatically truncates the recordings of cameras to allow a proportionally even distribution
of the available space among all cameras.
For some special cameras that have to record the requested storage period in any circumstances,
Observer offers the Priority over other cameras (if storage space is short) flag. If this flag is set
for a camera, Observer always tries to store the requested period for this camera and truncates other
cameras that do not have this flag set a little more. If there is more than 1 camera that has the flag set,
the storage management process tries to store all of those cameras.
Algorithm of the dynamic storage management process:
Fill-time-percentage (FTP) = 100 * Actual-recording-time / Requested-recording-time.
Observer tries to keep the FTP of all cameras of each of the two priority classes the same (high-priority
cameras and lower-priority cameras). First the algorithm tries to fully record the high-priority cameras
and then use what is left for the lower-priority ones, whereby all of those will reach the same FTP.
However, the low priority cameras can never go below an FTP of 10%. If the low priority cameras reach
a level of 10%, then the storage management process starts truncating the archives of the high priority
cameras as well. Anyway, this should never happen in a normal case and is only possible if the storage
space is totally insufficient for holding the programmed recordings.
Since the storage management process considers recording time and not recording space for
distributing the available space, it happens that the relatively small recording space of a camera with a
low recording frame rate is truncated in the same proportion like the relatively big recording space of
a camera with a high recording frame rate.
Page 75
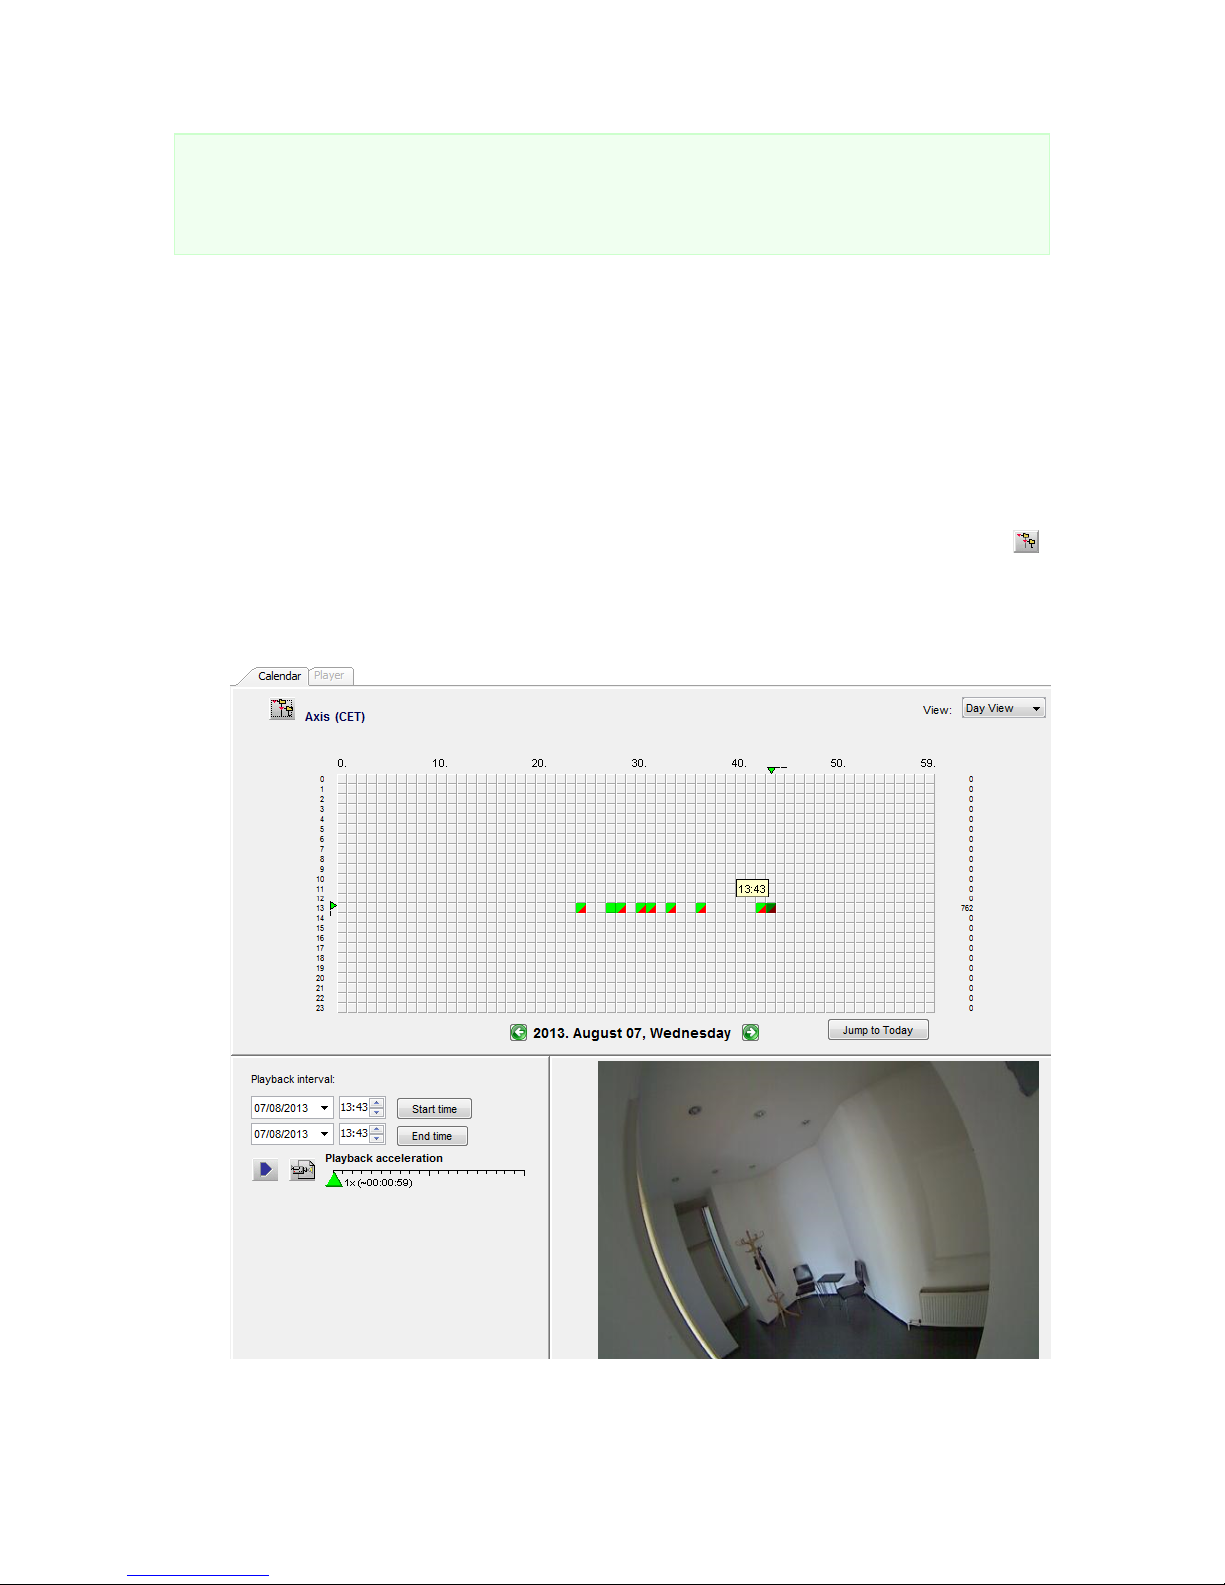
NETAVIS Observer 4.6 User Manual (October 2015)
Page 75 of 204
Caution: Please be careful when you set the Priority over other cameras flag since, if storage
space is short, Observer truncates the archives of all other cameras in favor of this camera. If available
storage space is much too short relative to the requested storage periods of all cameras, this can lead
to strongly truncated archives.
7.2 Playback of archive recordings
Observer features a multitude of powerful functions for working with archives.
7.2.1 Selecting the camera and the playback period
1. Go to the main window and choose the Archive player (if the Archive player is not available,
then perhaps it is disabled in the client preferences; see 2.4 Client multi-window and multi-screen
operation on page 20).
Either the Camera tree appears immediately or you have to push the Select camera button
:
2. Select the camera from the camera tree and push Select (you can also double click a camera or
drag it to the calendar view). An overview for the selected camera on the current day is displayed:
Page 76
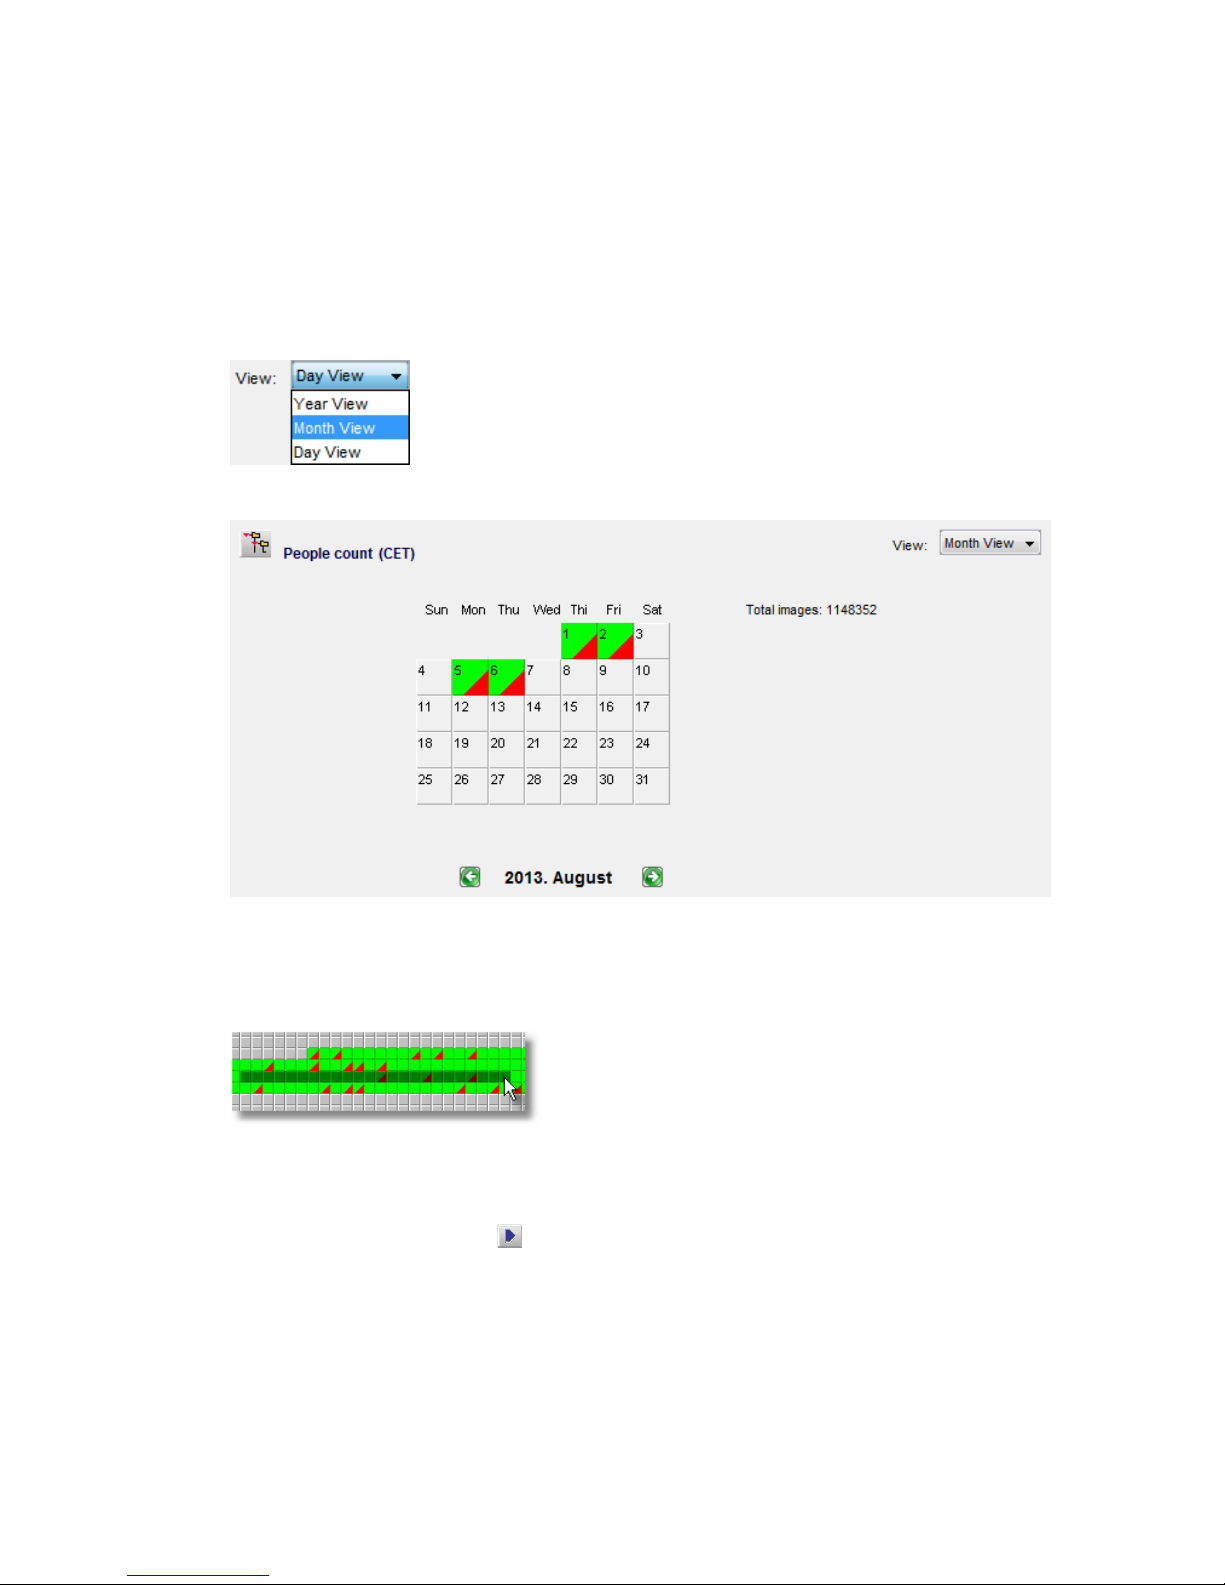
NETAVIS Observer 4.6 User Manual (October 2015)
Page 76 of 204
This one-day overview shows green blocks indicating minutes for which recordings have been
archived. A red corner in a block indicates that an event was triggered and an event recording
was started in that minute.
When you move the mouse pointer over a green block, then the first recorded frame of this
minute is displayed in the lower right corner of the window.
You can also switch to a monthly or an annual overview via the View button and its popup
menu.
Here is an example of a month view for the camera:
3. With the mouse select the time span of the archive that you want to play back. To do this press
the left mouse button at the start of the time range, then move the mouse pointer to the end of
the time range and then release the mouse button. The color of the selected time range changes
to dark green.
4. Also select the playback acceleration by moving the Playback acceleration slider (default
value is 1). At the slider you can see in parentheses how long the selected time will need for
playback at the selected playback acceleration.
5. Now click the Playback button . This brings you to the Player view and the images for the
selected time span are loaded from the server and then will be replayed with the specified
acceleration (you can cancel the loading process by pushing the Cancel button).
Page 77
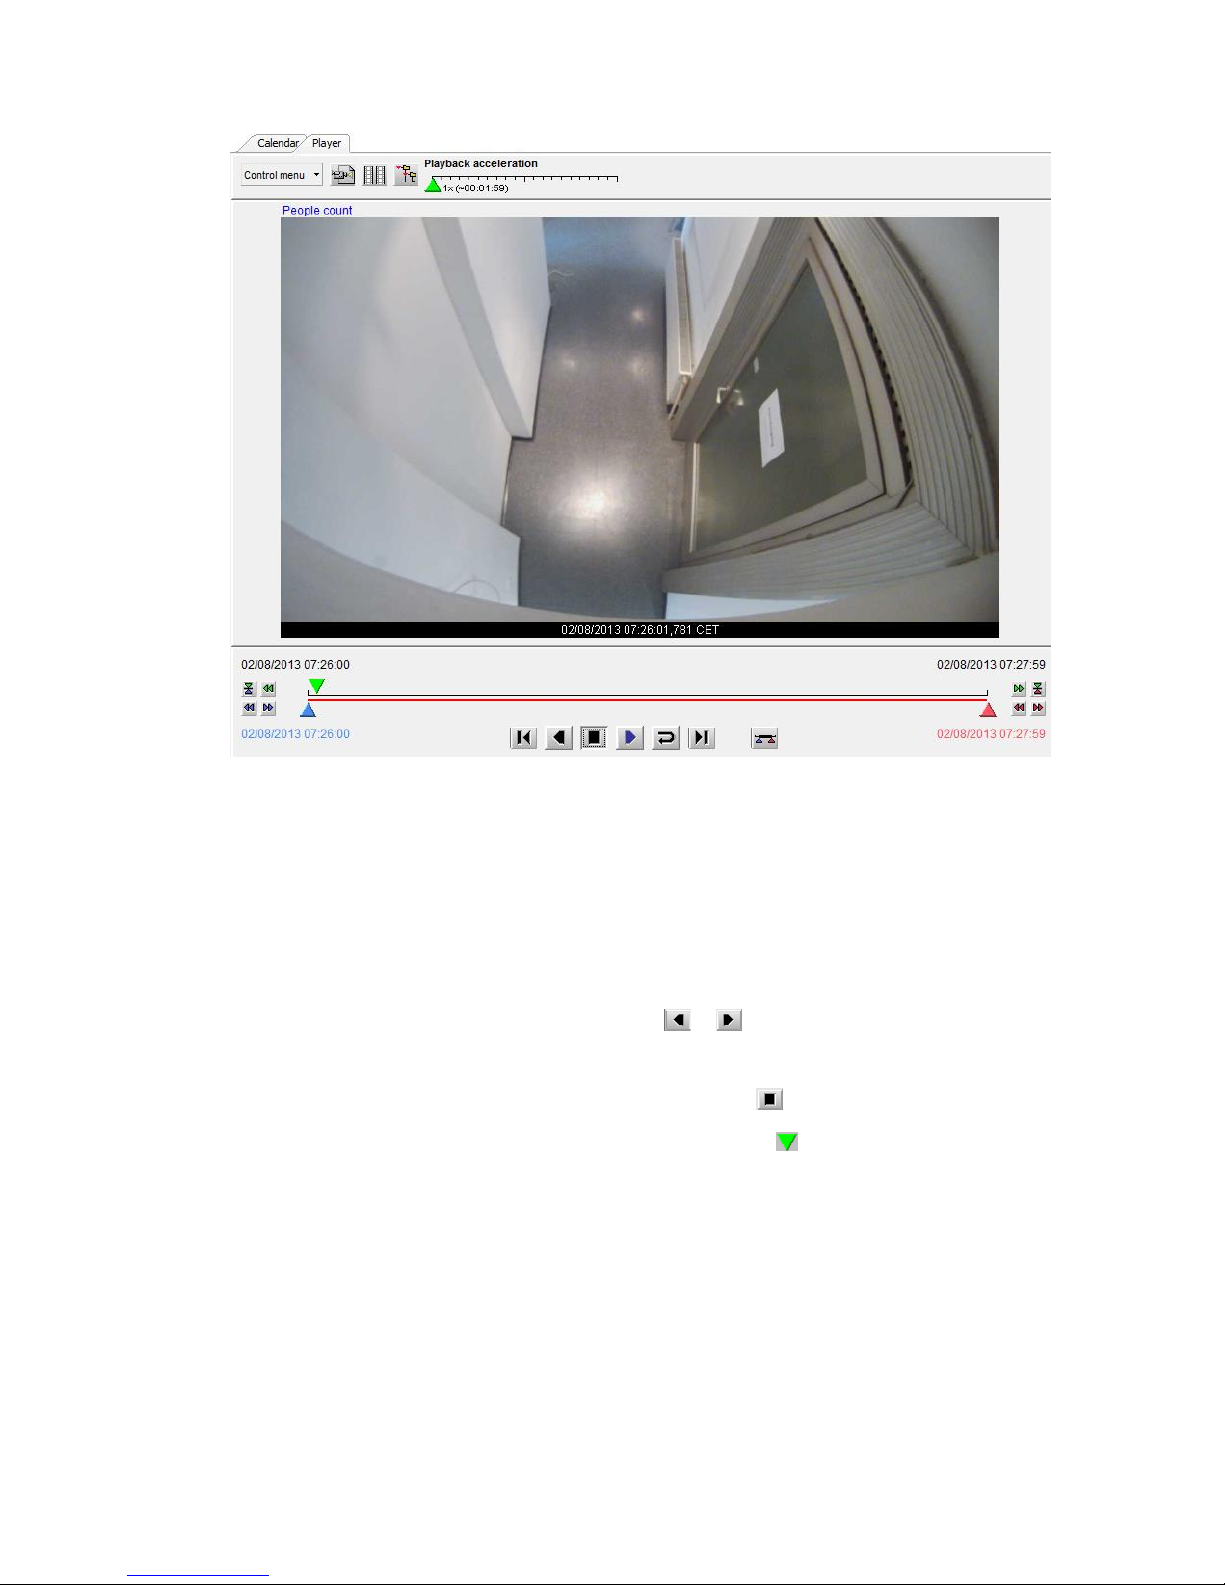
NETAVIS Observer 4.6 User Manual (October 2015)
Page 77 of 204
In the Playback view you have several possibilities:
Automatic or manual fast forward and rewind of recordings
Selection and playback of a time frame (time zooming)
Synchronous playback of recordings of up to 4 cameras
Export of individual images as well as the selected video sequence
7.2.2 Moving forward and back in the recording
Automatic playback: By clicking the Playback buttons or you can let the recording
automatically play forward or backwards. (Due to the archive storage mechanism backwards playback
might be a little jumpy with MPEG-4 and H.264 streams.) With the Playback Speed slider at the left of
the window you can vary the playback speed. Press the Stop button to end playback.
Manual playback: By clicking and moving the green Playback marker , you can control the
playback of images manually.
You can select the size of the playback by clicking the Original size button at the lower left of the
Player dialog. Here you have the possibility to choose from various sizes.
7.2.3 Zooming in a view port and in archive recordings
Observer allows you to zoom view ports in the Online monitor and in the Archive player.
Basically, you have two ways to zoom a view port or a recording in the Archive player:
Page 78
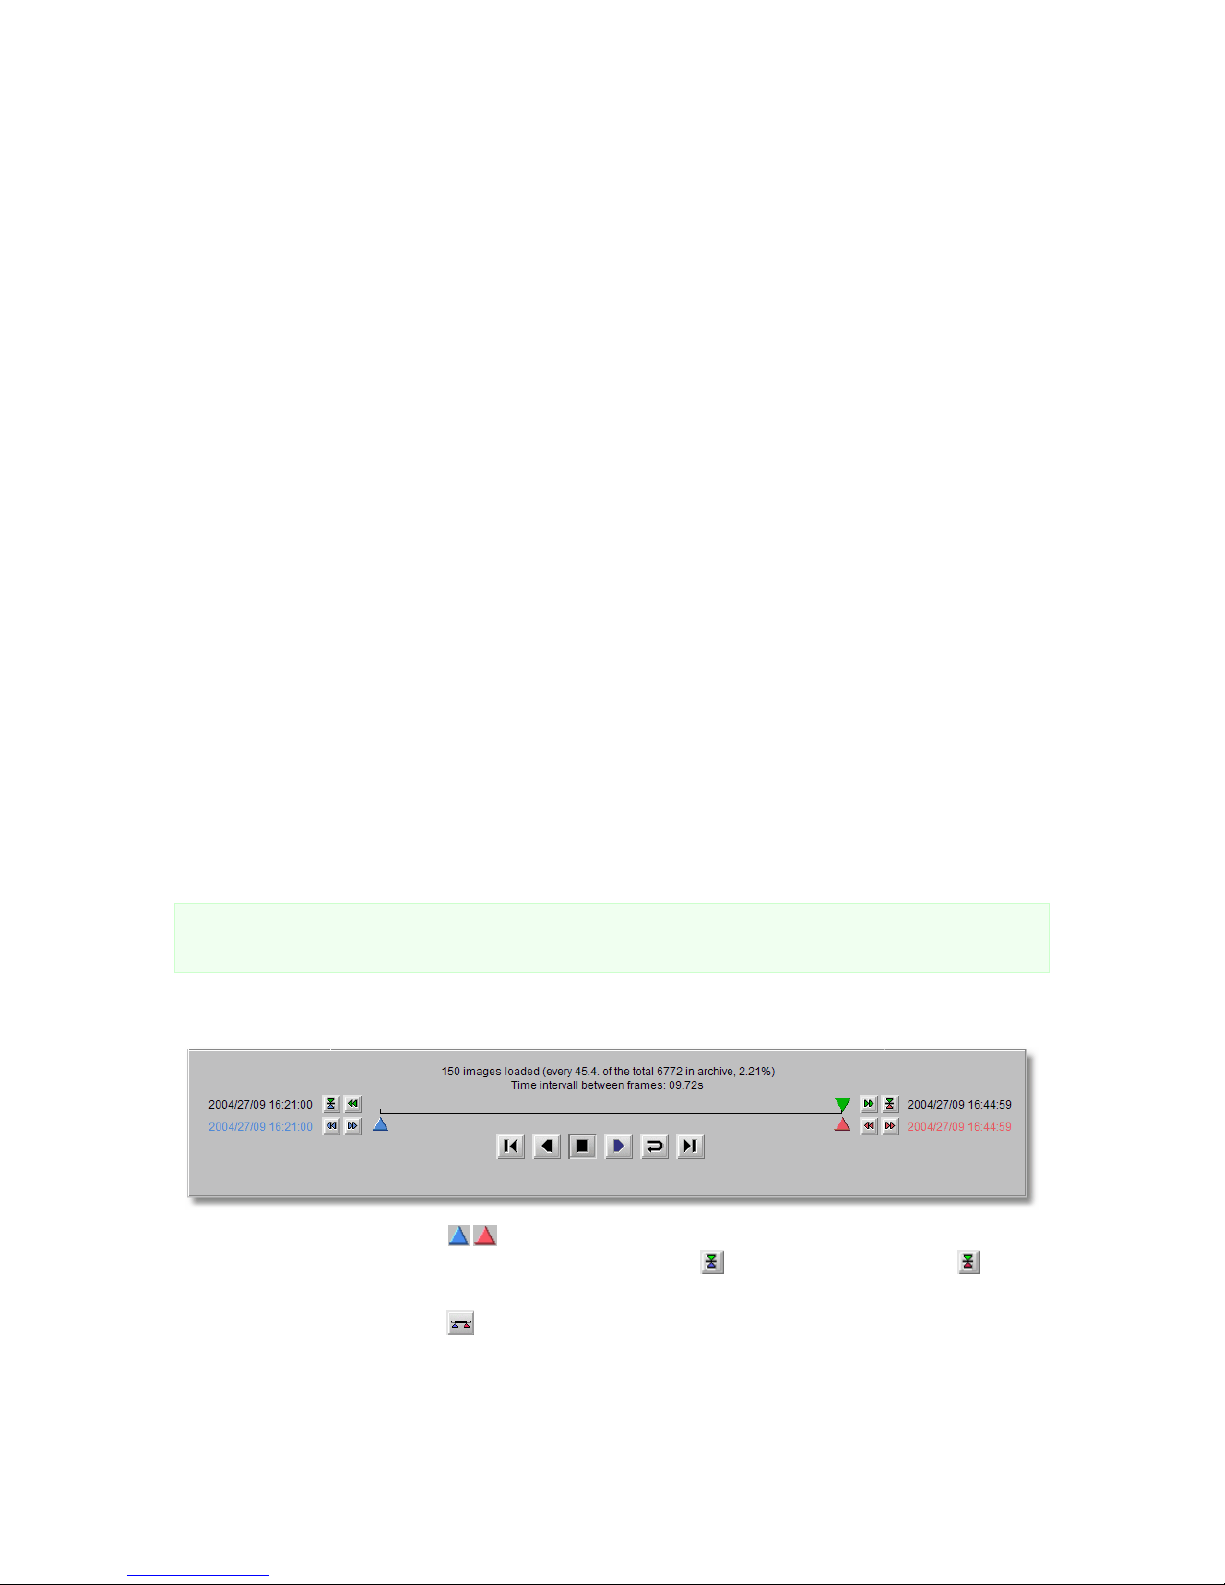
NETAVIS Observer 4.6 User Manual (October 2015)
Page 78 of 204
Zooming with the mouse wheel
1. Just move the mouse pointer over a view port and turn the mouse wheel. The view port will zoom
accordingly.
2. You can move the zoomed area in a view port by dragging it with the mouse.
3. Use the mouse wheel again to zoom out.
Zooming by drawing a zoom rectangle
1. With the mouse draw a rectangle in a view port.
2. Click in this rectangle, which will cause the view port to zoom accordingly.
3. You can position the zoom by dragging the rectangle. You can also modify its size by turning the
mouse wheel.
4. Click outside the rectangle to return to normal (not zoomed) view.
5. You can remove the zoom rectangle by clicking into it with the mouse and pressing the Delete or
Backspace key. Alternatively, you can drag the rectangle outside of the view port to remove it.
You can also have multiple zooming rectangles per view port.
Showing a zoomed view in another view port (Online monitor only)
1. Draw a zoom rectangle with the mouse.
2. Click into another view port. Now the zoomed area is shown in the other view port.
3. You can position the zoom by dragging the rectangle.
4. You can remove the zoom by clicking the rectangle with the mouse and pressing the Delete or
Backspace key. Alternatively, you can drag the rectangle outside of the view port to remove it.
Removing a rectangle will also remove the zoomed view from the other view port.
Please note: When PTZ control is enabled, any mouse actions are taken for PTZ control. In order to
control the view port zooming, hold down the CTRL key while using the mouse.
7.2.4 Playback of a time frame (time zooming)
1. The red and blue markers let you select a smaller time interval for detailed playback.
Alternatively, you can click the Set Blue Marker button or Set Red Marker button to set
the respective marker at the current position of the green Playback marker.
2. Click the Zoom in button to load and replay the time interval between the blue and red
markers.
Page 79
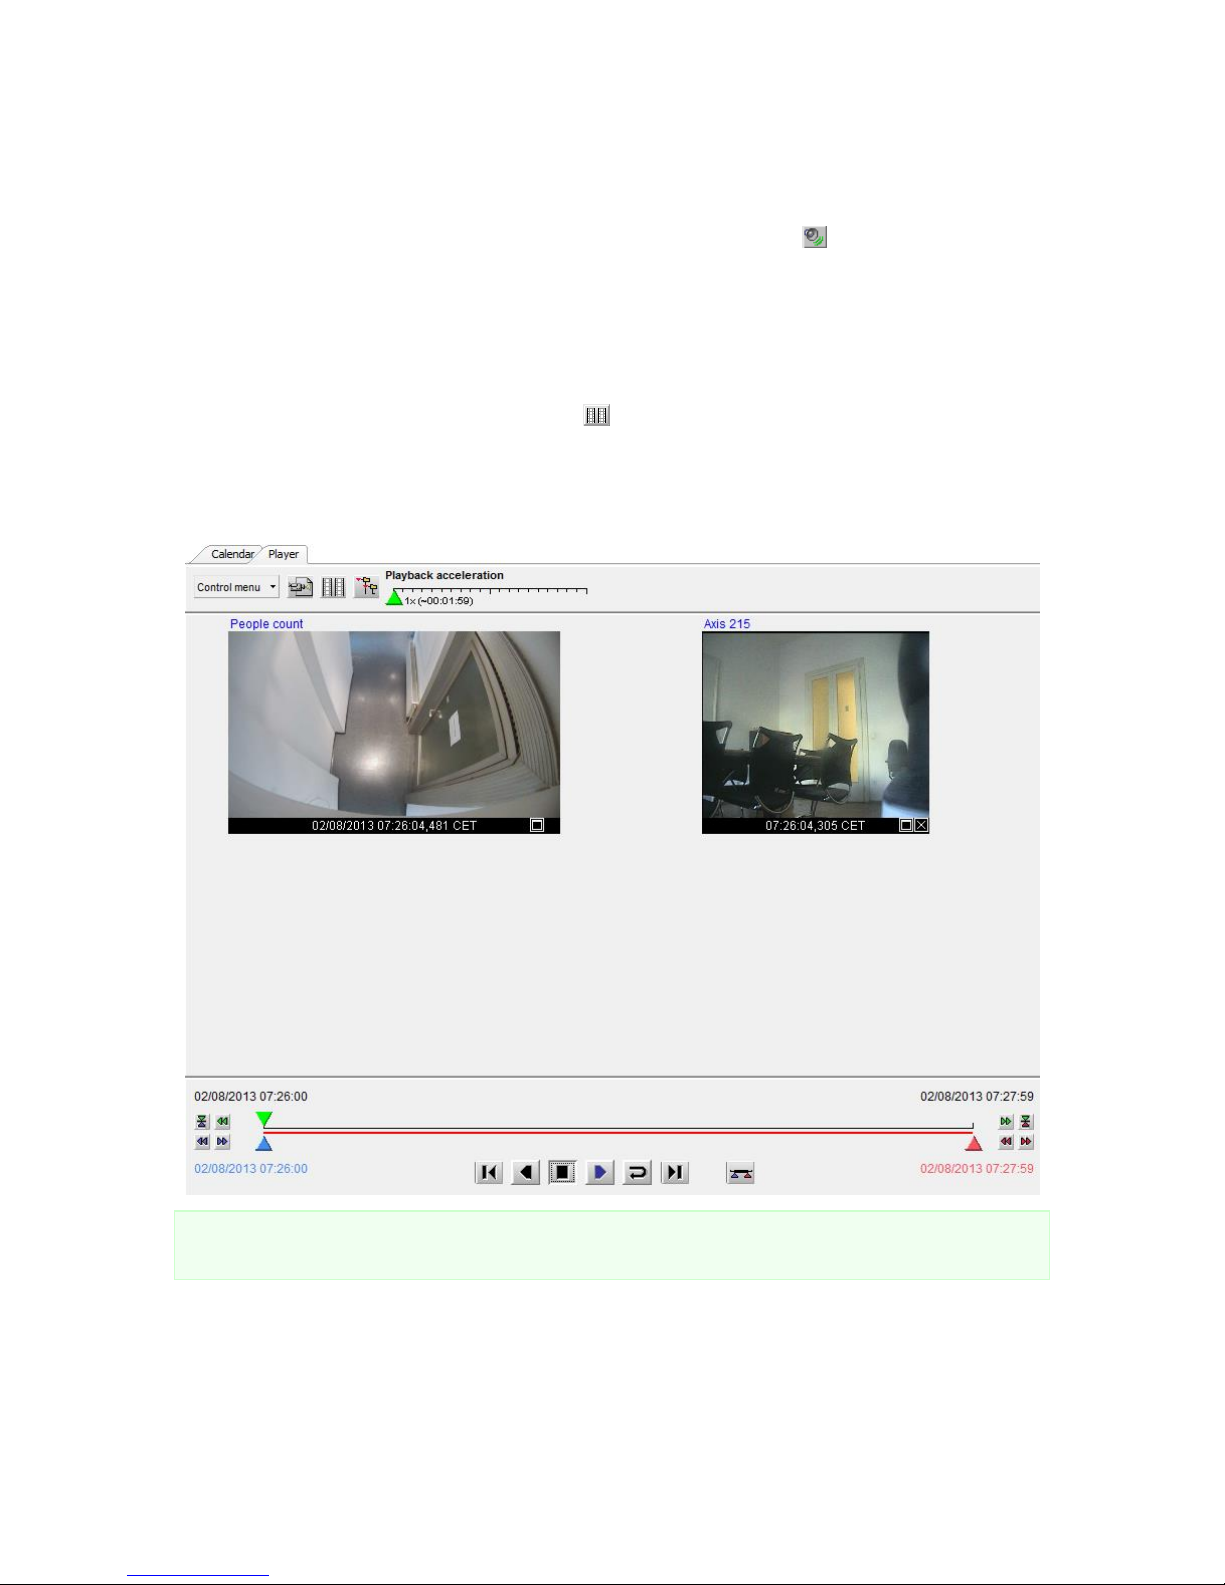
NETAVIS Observer 4.6 User Manual (October 2015)
Page 79 of 204
7.2.5 Playback with audio
If the recording also includes audio (i.e. the recording has been done with MPEG-4 or H.264 and with
Audio recording enabled), then you can decide whether you also want to replay audio. By default
Audio is switched on, when you replay. To toggle audio on or off, push the button in the Playback
view.
7.2.6 Synchronous playback of up to four recordings
1. Select the playback time frame for the first camera as described above. Then change to the
Player view.
2. Click the Synchronous Playback button , which opens the Camera tree, where you can
select the second camera for synchronous playback.
3. Repeat camera selection until you have up to 4 cameras for synchronous playback.
The following illustration shows synchronous playback of two cameras:
Note: Synchronous playback always loads one frame or GOP for each selected camera after each
other.
7.2.7 Displaying video analysis (iCAT) information for recordings
The iCAT submenu in the Control menu offers various options for displaying iCAT-related video
analysis information also for recordings. Please refer to 15.4 Working with iCAT on page 163 for further
information.
Page 80

NETAVIS Observer 4.6 User Manual (October 2015)
Page 80 of 204
7.2.8 Protection of recordings against automatic deletion
Normally Observer automatically deletes recordings that are older than the Requested recording
period in order to free space for new recordings. For cases where you want to keep certain scenes
longer than the requested recording period you can protect arbitrary periods against automatic
deletion. Here is how you can do that:
1. In the Archive go to the Calendar view and select a camera.
2. In the calendar select the period you want to protect against automatic deletion.
3. Press Protect selected images against deletion.
Now the color of the selected period in calendar turns to a different color which shows that the
images are protected.
To unprotect a protected period you must select this period in the Calendar view and Press
Unprotect selected images.
With the Day limit of remove protected archive option (see 11.2 Setting Observer server
parameters on page 110) it is possible to limit the time that these manually protected recordings are
stored. Afterwards they are deleted automatically.
Caution: Please be careful when using this feature. Unless you set the aforementioned Day limit of
remove protected archive option the protected recording periods will never be deleted
automatically by Observer. This means that the space will be locked as long as you keep them
protected.
7.3 Exporting recordings (images and video sequences)
Observer allows you to export individual images and video sequences in various formats:
JPEG: for single images
AVI DivX: for video sequences
SAFE: This is a proprietary format that stores the video together with the player in an executable
format (.exe) that can be run on MS Windows platforms. The file can be password protected and
you can export synchronous video sequences of up to 16 cameras simultaneously.
The following sections describe how you can export from the recording archive. In 9.2.2 Exporting
event-related recordings on page 97 you learn how to export recorded video sequences based on
events.
7.3.1 Exporting a single JPEG image (the current frame)
1. In the Archive, select a camera for the export.
2. In the Calendar select the time for exporting the image.
3. In the Player move to the picture you want to export and click the Export button to open
the Export dialog.
4. Choose Current image (JPEG) from Export format.
5. Enter a file name for the image to be saved.
6. Mark the first checkbox if you want to overwrite a file of the same name that might exist.
7. When you click OK a file dialog will be opened asking where on your client computer you to want
to save the file. Select the location and confirm.
Page 81

NETAVIS Observer 4.6 User Manual (October 2015)
Page 81 of 204
8. Now you can use the exported file.
7.3.2 Exporting a recording in AVI DivX format
1. In the Archive player, select a camera for the export.
2. In the Calendar select the time period for exporting.
3. In the Player view or in the Calendar view click the Export button to open the Export
dialog.
4. You have two AVI options for Export format:
AVI (all images): This exports a video sequence with all the frames of the currently
selected time frame (regardless of the Playback acceleration setting).
AVI (Subsampled movie): This exports the time-lapse playback with the settings of
the Playback acceleration slider. E.g. if you have selected a Playback acceleration
of 3, your exported file will be roughly a third of the size of an AVI (all images) export.
See also 7.2.1 Selecting the camera and the playback period on page 75.
5. Enter the file name of video to be exported.
6. Mark the first checkbox if you want to overwrite a file of the same name that might exist.
7. When you click OK, a file dialog will be opened asking where on your client computer you to
want to save the file. Once you select the location and confirm, a File download progress
dialog will show the state of the export. You can cancel the export anytime by pushing Cancel.
Note: To play back exported video sequences with Microsoft Media Player, you need the DivX codec.
You can download this for free from www.divx.com/divx.
7.3.3 Exporting a recording in SAFE format
1. In the Archive, select a camera for the export.
2. In the Calendar select the time period for exporting.
3. In the Player view or in the Calendar view click the Export button to open the Export
dialog.
4. Choose SAFE (All images) from Export format.
5. Enter the Filename for the video sequence to be exported. Check the Overwrite old file
checkbox if you want to overwrite a file with the same name.
6. Optionally you can create a Multi camera export (synchronous video sequences) by clicking on
the Select camera button . This opens the camera tree in which you can select multiple
cameras by holding the CTRL key while clicking on the cameras.
7. Enter an Export file label which should describe the exported scenes.
8. Optionally you may enter an Export file password (which needs to be confirmed by entering it
a second time in the text box below). This password is required when opening the exported file.
Caution: Do not forget this password because otherwise you cannot open the exported file.
9. When you click OK, a file dialog will be opened asking where on your client computer you to
want to save the file. Once you select the location and confirm, a File download progress
dialog will show the state of the export. You can cancel the export anytime by clicking Cancel.
10. The exported file is an executable for MS Windows 8/7/Vista/XP. Below you can find a screen of
the running SAFE Player:
Page 82
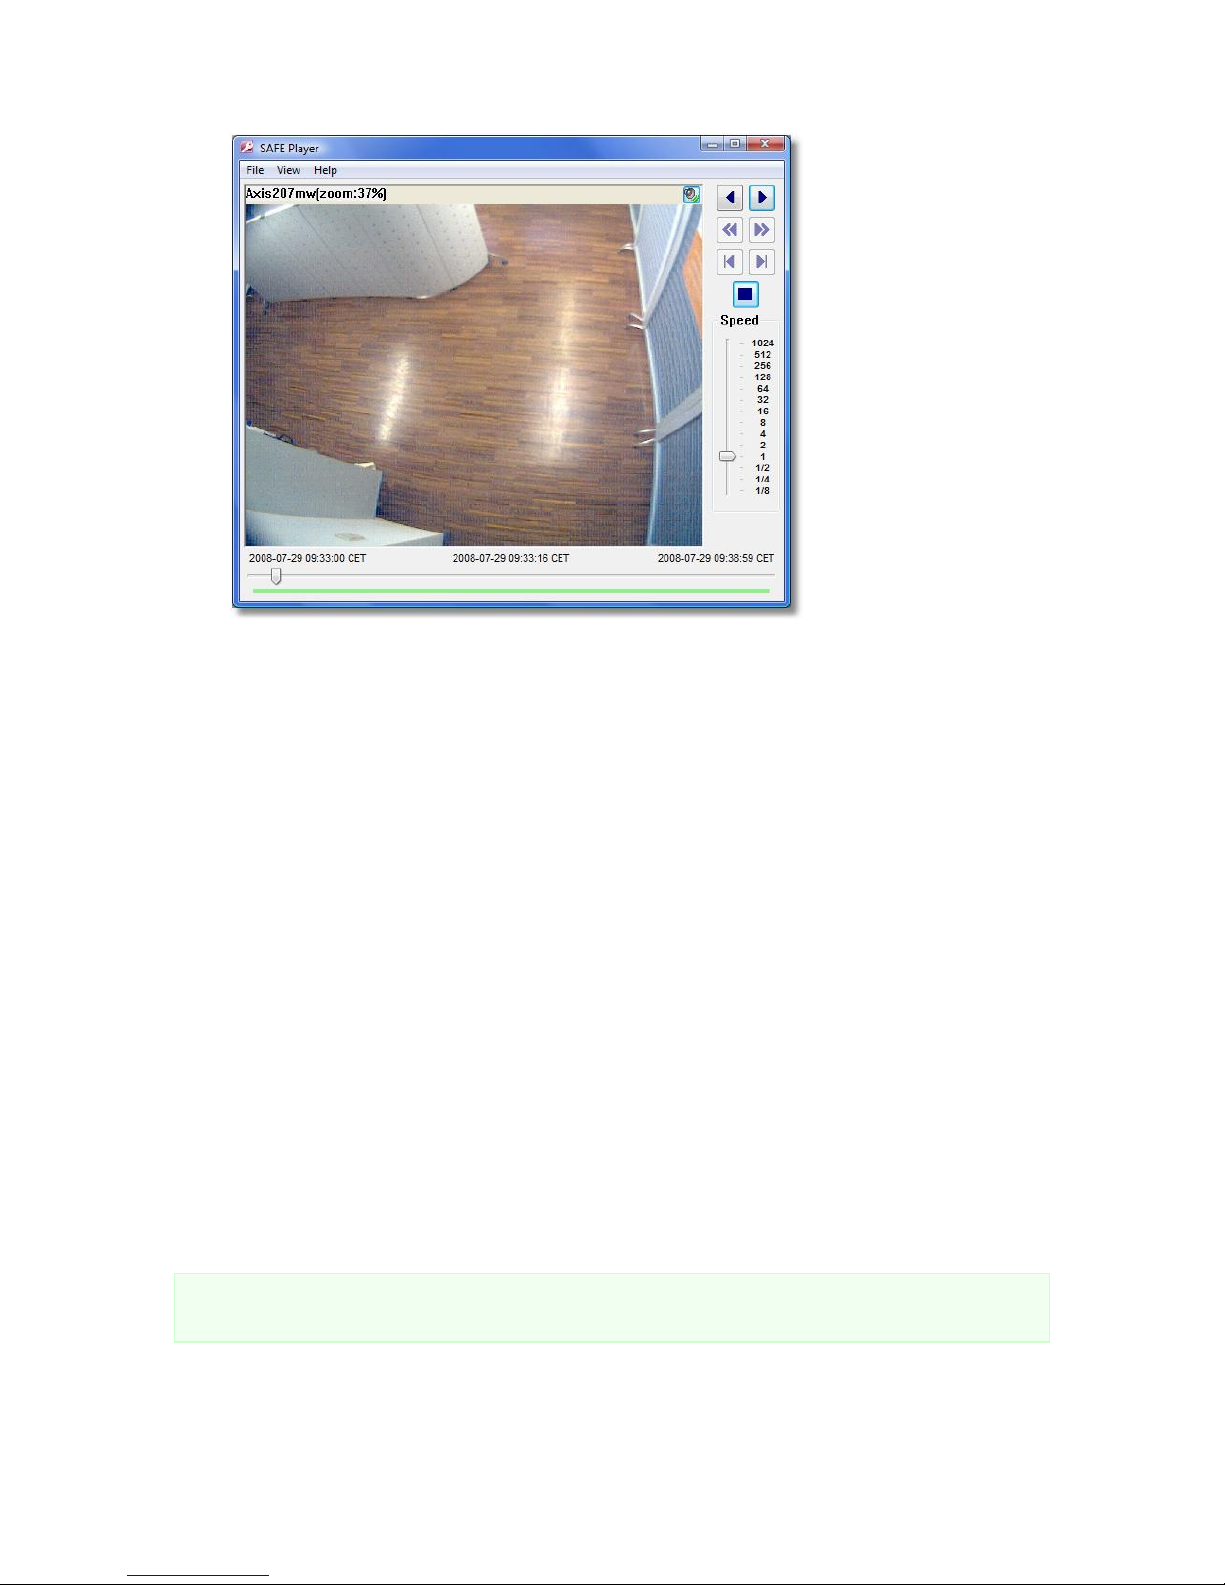
NETAVIS Observer 4.6 User Manual (October 2015)
Page 82 of 204
Zooming in exported SAFE video sequences
You can zoom into parts of the camera view by drawing a rectangle and then clicking in the rectangle.
You can drag a zoomed view with the mouse. Alternatively you can show the zoomed view in a
separate window by selecting View > Separate zoom window. You can also use the mouse wheel to
zoom in and out. See also 7.2.3 Zooming in a view port and in archive recordings on page 77.
Displaying iCAT information
The iCAT info display menu (accessible via a right mouse button click) offers various options for
displaying iCAT information. Please refer to 15.4 Working with iCAT on page 163 for further information.
Controlling playback
There are several ways to control the playback of the recording. Besides the Play backward and Play
forward buttons it is possible to go the Previous Frame / Next Frame and Jump to start / Jump
to end when the playback is paused. The Speed of the playback can be controlled with a slider and
ranges from 1/8th to 1024x.
7.4 Motion detection in archive recordings
Observer supports server-based motion detection not only for live camera streams but also in the
archived recordings. Here you find information about how to execute motion detection on recordings.
Please note: In this version, Observer supports archive motion detection only for MJPEG recordings
and not for recordings of other streaming formats (like MPEG-4 or H.264).
1. Go to the main window and choose the Archive player (if the Archive player is not available,
then perhaps it is disabled in the client preferences; see 2.4 Client multi-window and multi-screen
operation on page 20).
Page 83
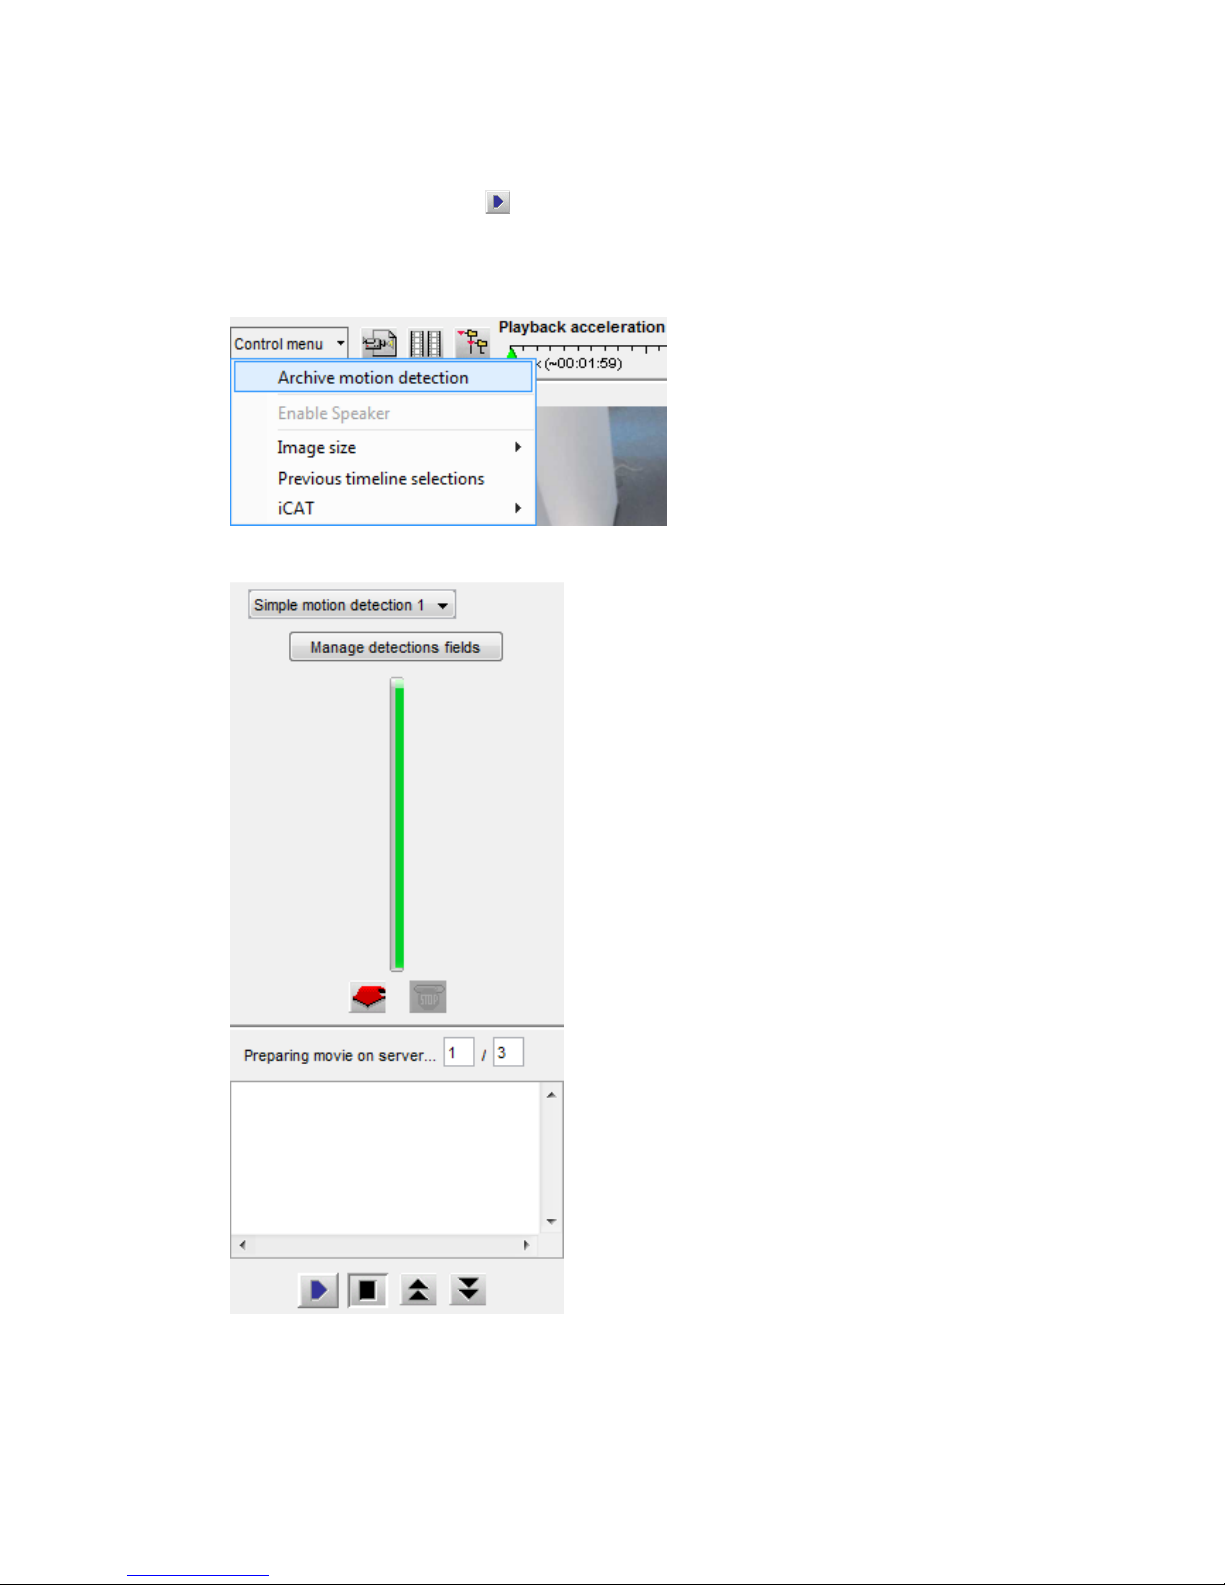
NETAVIS Observer 4.6 User Manual (October 2015)
Page 83 of 204
2. In the Calendar view of the Player select the camera and the timeframe for the motion
detection.
3. Push on the Playback button . This will load the images of the timeframe and replay the
recorded images.
4. In the Upper left corner of the Player view select Archive motion detection from the Control
menu:
Now the motion detection pane is opened on the left side in the Player view:
5. From the Detection field pop-up menu choose the motion detection field definition you want
to use for this motion detection. If you do not yet have a detection field defined or want to
change an existing definition, then you can push the Manage detection fields button to jump
to the Detection fields view in Administration. Please refer to 8.1.2 Basic configuration of server-
Page 84
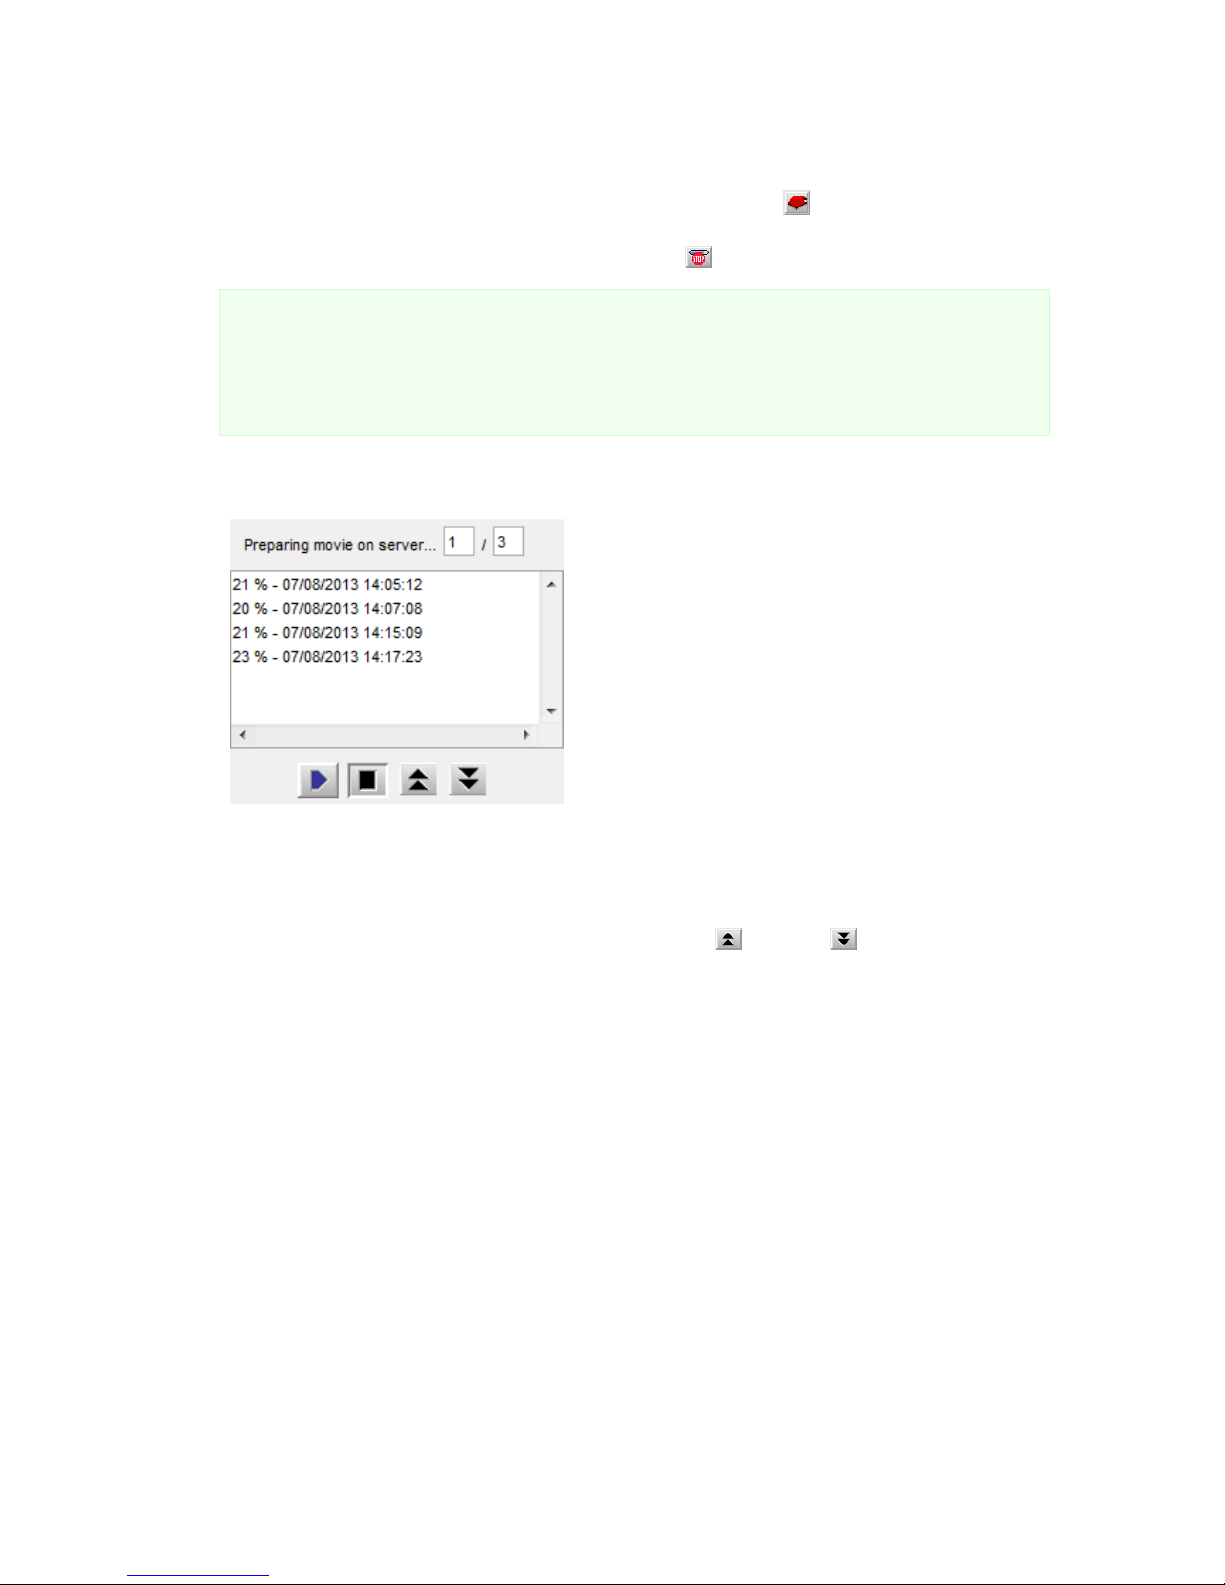
NETAVIS Observer 4.6 User Manual (October 2015)
Page 84 of 204
based motion detection on page 87 for details on how to setup detection fields.
Continuing here, we assume you have a correctly set up detection field definition.
6. To start the server-based motion detection Push the Start button .
You can see the progress of the motion detection at the progress bar. You can always stop a
running motion detection by pushing the Stop button .
Caution: Since the motion detection actually runs on the Observer server and can potentially
use up a lot of CPU resources, please be careful selecting the detection fields and also the time
period. Especially if you have selected a long time period in the Calendar the motion detection
can take a lot of time. As mentioned above, you can always stop a running archive motion
detection.
7. While the motion detection is running, the detected motions are displayed in the hit list sorted by
the time in which the motion occurred. In our example, we have 2 hits:
8. You can replay the events by just selecting the event with the mouse. The playback time before
and after the event can be defined by the Pre/Post event (sec) fields. You can change the
values according to your needs. Please note that there must be archived pre- and post-event
recordings available in order to be replayed.
9. You can step through the events by pushing the Previous and Next buttons.
7.5 External archive management (NEA)
7.5.1 Introduction to external archives (NEA)
Starting with release 4.4 Observer offers external archives (NEA) for portable archive recordings. Simply
connect an external storage device via eSATA to the server, then Observer can save video streams on
the external storage in addition to the main archive storage. Thus it executes a second (mirrored or
double) recording: recording on the external NEA device in addition to standard recording.
The external archive can then be carried and connected to another Observer server for replay and
analysis.
NEA also offers a swap function that allows the easy exchange of external storage devices during
active recording without additional user interaction; therefore no particular operator expertise is
needed for the exchange.
This chapter describes how you can manage removable storage devices (NEA devices) for external
video recording.
Page 85

NETAVIS Observer 4.6 User Manual (October 2015)
Page 85 of 204
Please note: The NEA recording on the external device is exactly the same as the standard recording
on the main storage (at least as long as there is enough space on the device). The same recording
algorithm is used for NEA as the main storage. This means when the NEA device is running out of
space the oldest recordings will be overwritten . For a detailed description of how Observer manages
recordings please refer to 7.1.4 Operation of the Observer dynamic storage management on page 74
Apart from the NEA management functions in the client, NEA storage devices can also be configured
and managed via the admin command line interface of Observer (see NETAVIS Observer Server
Installation and Administration). Some more advanced functions like the setup of swap management
for storage devices are accessible only in this interface.
7.5.2 Managing and accessing NEA storages
A user with the appropriate privileges can do the following with external NEA archives:
Initializing of storage devices and starting of NEA recordings as well as stopping of NEA
recordings and ejecting devices.
All of these functions are available in the NEA storage management dialog is accessible via
the System administration menu of the main window.
The user privilege "Recordings: Manage external archive devices (NEA)" is needed for accessing
the dialog. See 5.2 Setting general user privileges on page 45 on how to modify user privileges.
Replay NEA external archives in the Archive player.
The user privilege "Recordings: View external archive recordings (NEA)" is needed.
For an explanation and setup of automatic swap management of NEA device please refer to the
document NETAVIS Observer Server Installation and Administration.
Displaying the status of NEA storage devices
When a NEA storage device connected to the server you can view its status in the NEA storage
management dialog accessible from the System administration menu of the main window. The
dialog shows all connected NEA storage devices, their sizes and their Status:
Recording: recording is currently running on the device
Archive: a finished archive of the device can be accessed in the Archive player
Empty: the storage device is empty (but initialized)
Unformatted: the device must be initialized (formatted) first
Write error: the device can be accessed in the Archive player
Initializing a device and starting NEA recording
When a new storage device is connected to the server via an eSATA connector, then the device is
shown in the NEA storage management dialog accessible from the System administration menu
of the main window.
You can start NEA recording on the device by pushing the Initialize and start recording button.
A new device will automatically be initialized (formatted) for NEA before the recording starts. This
initialization is only executed once per device and it may take a while before it is finished. When
initialization is done, recording will start automatically. Next time, recording will start immediately
when you push the button.
Page 86
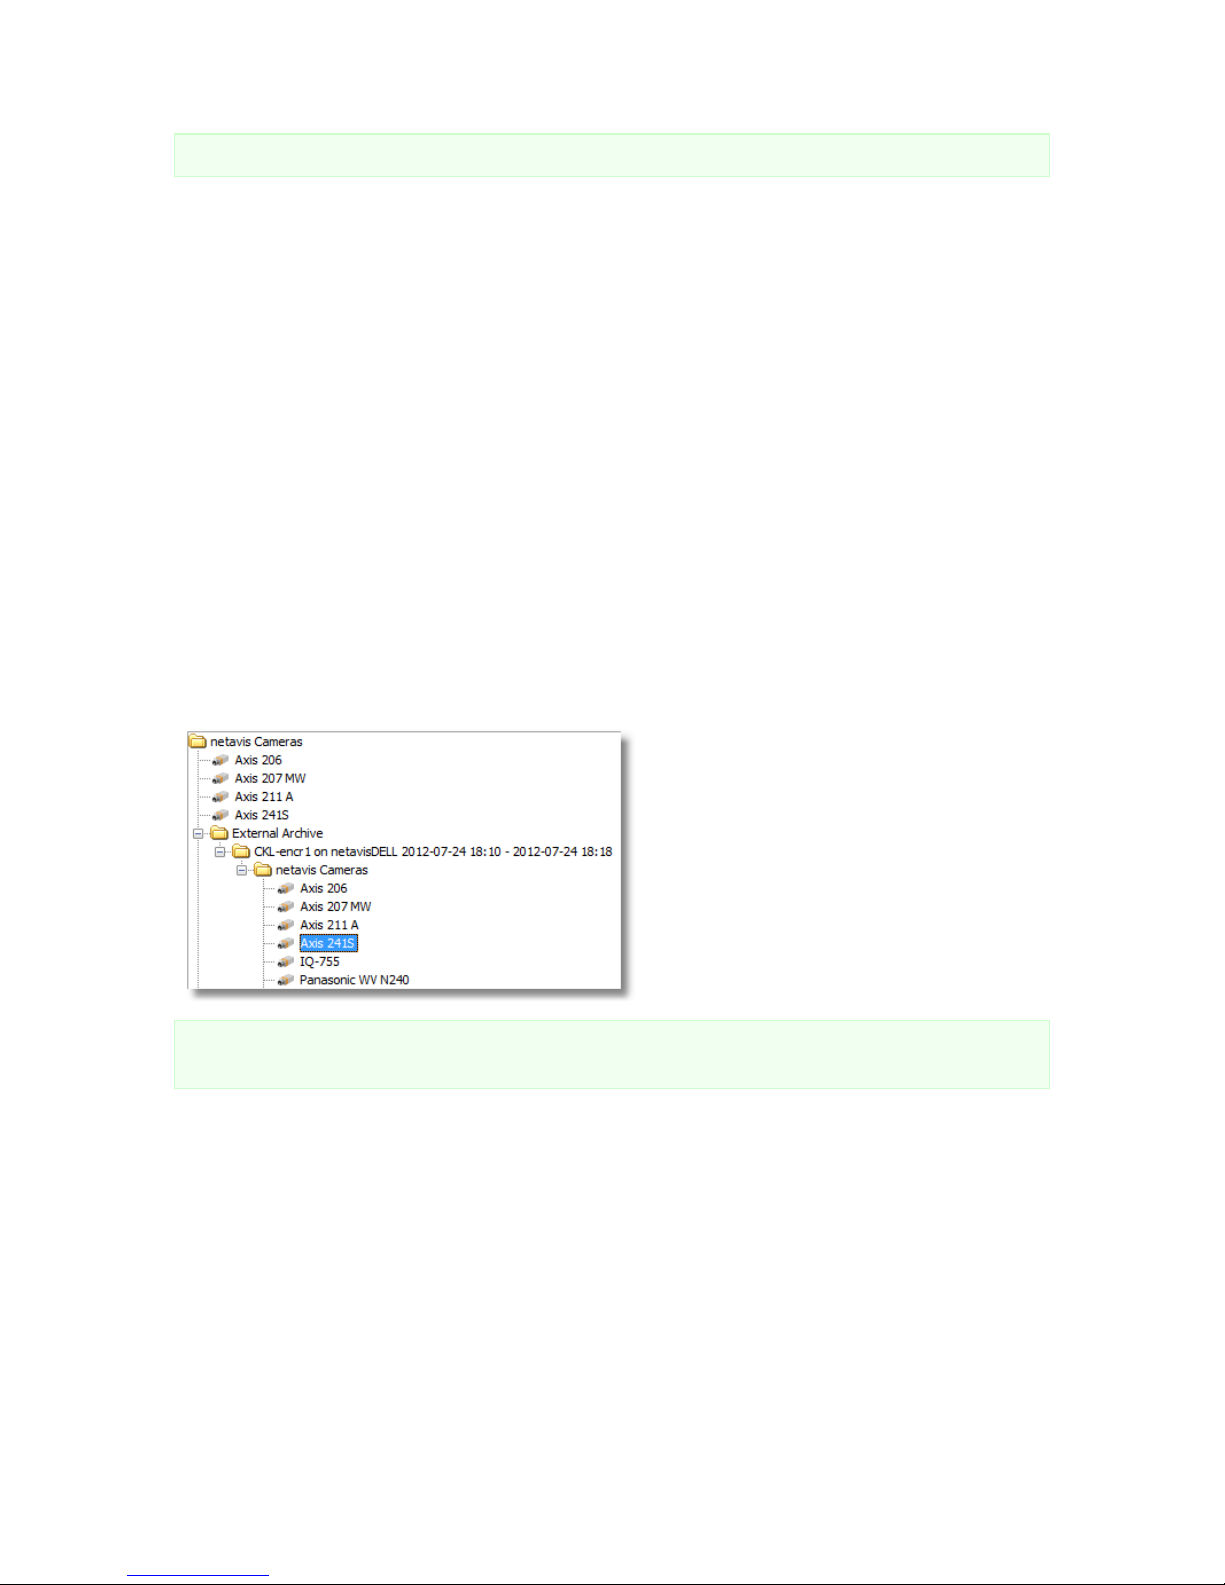
NETAVIS Observer 4.6 User Manual (October 2015)
Page 86 of 204
Please note: All data on a storage device will be deleted, when it is initialized for NEA.
Stopping NEA recording and/or ejecting a device
In the NEA storage management dialog accessible from the System administration menu of the
main window you can stop a NEA recording on the device by pushing the Stop/eject button.
When you push the button, all NEA recordings on the device will be stopped and the device will be
unmounted/ejected. A dialog will open and ask you to unplug the device before pushing OK.
If you leave the device connected when you push OK, the archive of the device will be shown again in
the camera tree of Archive player of users who have the appropriate privileges (see above). In such a
case you have to execute the command Stop/eject again before unplugging the device.
7.5.3 Accessing NEA archives at another Observer server
Any user with the appropriate privileges can play back NEA archives easily at any Observer by just
connecting the NEA storage device to the server.
The user privilege for accessing the NEA archives in the archive player is "Recordings: View external
archive recordings (NEA)".
In the Archive player of the client the NEA archive appears automatically in the camera tree under
the camera group External Archive:
Please note: There are some limitations on external NEA archives, like Archive motion detection is
not possible.
Page 87

NETAVIS Observer 4.6 User Manual (October 2015)
Page 87 of 204
8 Working with simple motion detection
Please note: Since release R1.12 Observer offers powerful video analysis functions with iCAT.
This chapter describes the simple motion detection features that were present before R1.12 and that
are now a part of the iCAT toolbox. Simple motion detection is based on a detection of changed pixels
between video frames while iCAT offers intelligent object detection and tracking. For more details on
iCAT refer to 15 Video analytics with iCAT on page 140.
Observer offers two mechanisms for simple motion detection:
Observer’s own server-based motion detection: The images are analyzed by the Observer
server. The advantage of this method is that it works with any camera, even old cameras. The
disadvantage might be that if there are many cameras that transfer their images to the server
for analysis, the bandwidth of the network could be burdened and also the server could be
overloaded.
In-camera motion detection: The images are analyzed in the camera and only when
detection occurs, an event and image data are sent to the Observer server that then stores the
event and the images in its archive. The advantage of this method is that the network and the
server are not burdened. The disadvantage is that it works only with special cameras, that offer
this feature and that the motion detection settings have to be programmed in the camera
directly.
8.1 Observer’s own server-based motion detection
The simple motion detection feature of Observer can recognize motion by detecting pixel changes
between video frames. Such a detection can then trigger the following predefined actions:
Entry of events in an Event list (optionally accompanied by an acoustic signal).
Changes in recording behavior (e.g. higher recording rate) if that has been programmed (see 7
Working with archive recordings on page 71).
Here you find the steps how to configure the parameters for simple motion detection.
8.1.1 Preparation
Before you begin to configure a motion detection definition, be sure that you have the necessary
authorization to make settings. If you are not sure, please ask your Observer administrator.
Please note: Motion detection for PTZ cameras is problematic since normal movement of the camera
will trigger a motion detection event.
8.1.2 Basic configuration of server-based motion detection
If you are not already running the Observer client application, open your Internet Explorer and log in to
your Observer server and your Observer system.
1. Choose Video analysis (iCAT) from the System administration menu. This opens the Video
analysis (iCAT) dialog.
Page 88
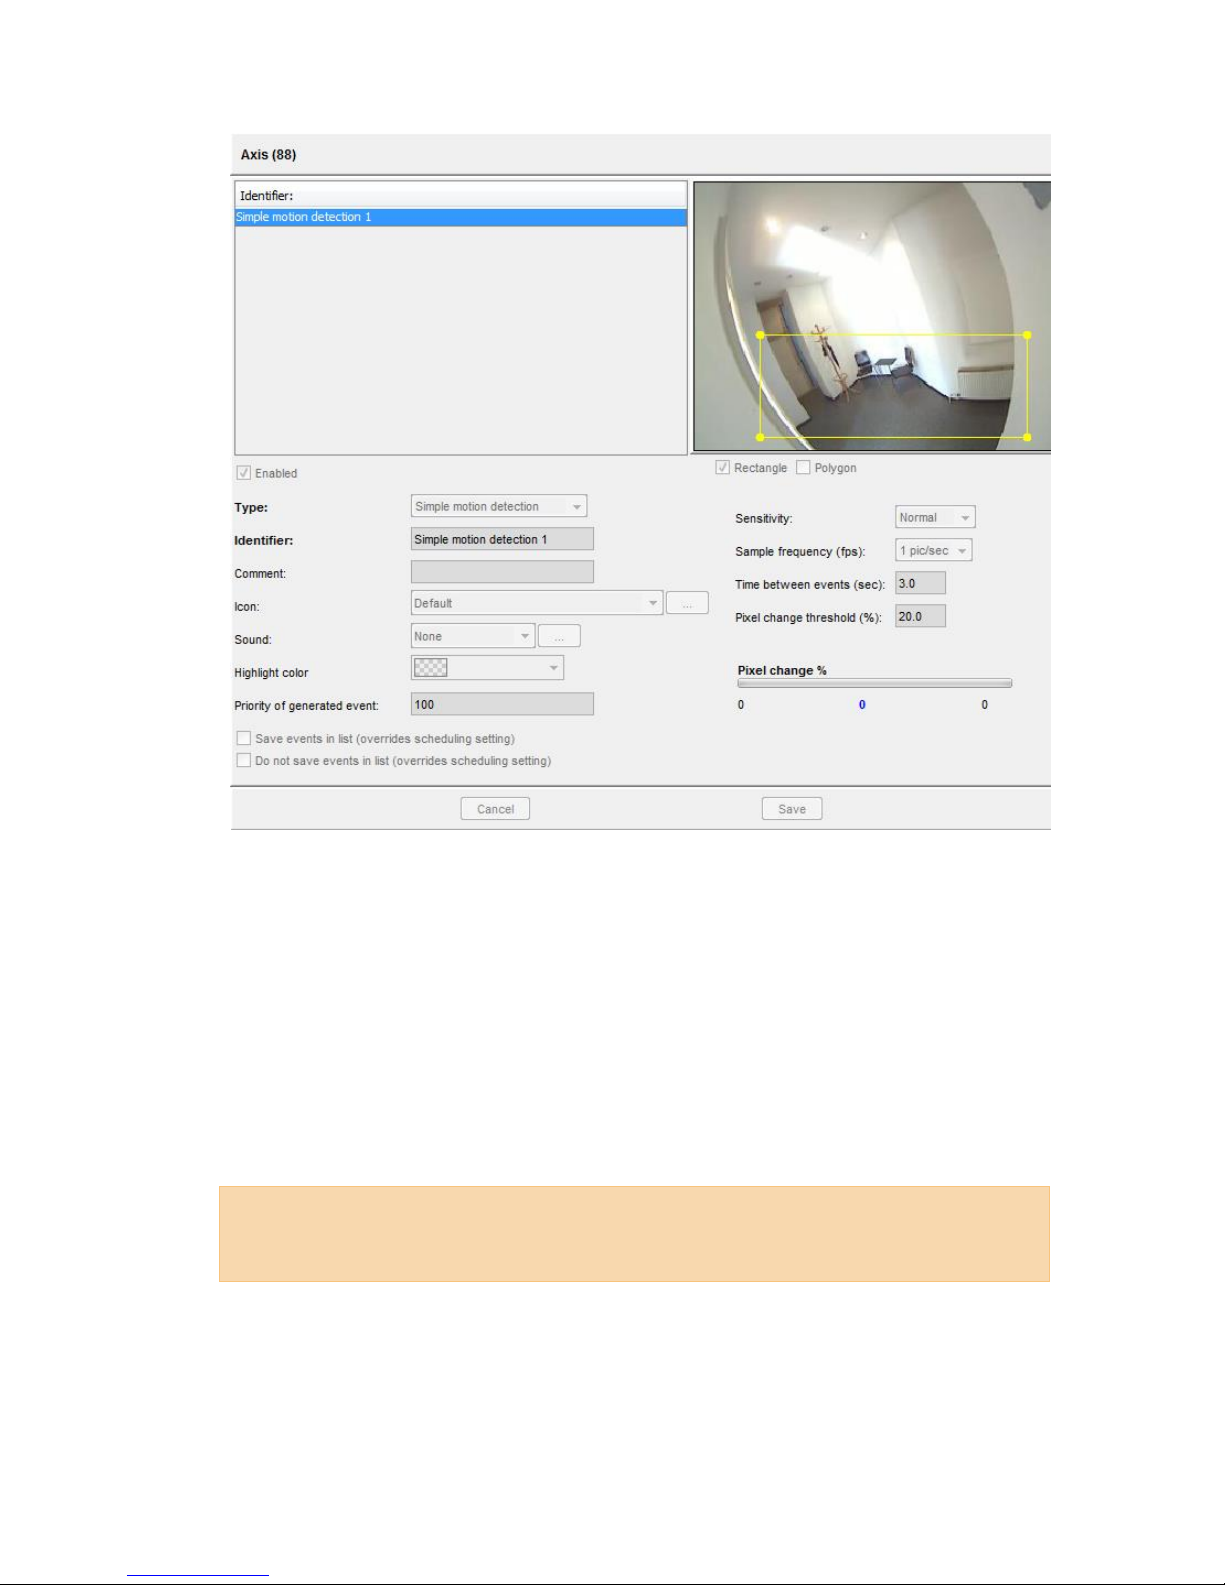
NETAVIS Observer 4.6 User Manual (October 2015)
Page 88 of 204
2. In the camera tree at the left, select the camera for which you want to create a motion detection
definition.
3. In the menu choose Add new definition.
4. From the Type menu chose Simple motion detection.
5. Select whether you want to create a Rectangle or a Polygon.
6. Use the mouse to draw a detection field in the preview area.
7. Mark the Enabled checkbox, otherwise the detection field is inactive and no detection can
occur. Actually, a detection field must also be assigned to an active motion detection schedule
(see below).
8. Assign a name for the field in the Identifier text box, e.g. “Movement”.
9. Optionally, you can enter a Comment which is shown in the event details.
Hint: You can also use the Comment field to configure certain views to be shown to one or
multiple users when a motion is detected. See 6.10 Dynamic View Control in Online Monitor on
page 64 for more information.
10. Usually the Sensitivity should be left at Normal. It defines how sensitive (or tolerant) the
detection algorithm is when detecting the change of pixels. Modify the setting only when you
want the algorithm to be more or less sensitive.
11. In the Sample frequency (fps) field you can specify how often the image is to be checked for
changes.
Page 89

NETAVIS Observer 4.6 User Manual (October 2015)
Page 89 of 204
12. In the Time between events (sec) field you can enter the minimum time that must elapse
before a following event is triggered. This helps to filter out repetitive events.
Minimum time (sec) = 3 means that, after one motion detection event has been triggered, at least
3 seconds must pass before another Motion Detection event can be generated.
13. In the Pixel change threshold (%) field you can define how many pixels in % must change so
that a detection event is triggered.
Pixel change (%) = 20 means that 20% of the pixels relative to the previous frame (detection
cycle) must change for a detection to be triggered.
14. Optionally you can define a specific event icon and sound for this definition: Click on the Icon
button to assign a symbol. This icon is displayed in the Event list to notify an operator when an
event related to this definition occurs.
Click on the Sound button to assign a specific sound to the definition. This sound is played when
a user notification event related to the definition occurs.
15. After you have entered all parameters for your definition, save it by clicking on the Save button.
16. If you have not yet scheduled a detection-based recording for this camera, you will be prompted
for whether you want to edit the scheduling now.
Click on the Yes button if you want to configure the scheduling now. Please refer to section 8.1.3
Scheduling motion detection on page 89.
Click No if you want to do that later.
Please note:
If you add a new iCAT definition, it will automatically be assigned to all iCAT schedules of the
camera. If you do not want that, you have to remove the assignment manually.
If a definition is not assigned to an active schedule then it will not be activated (no archive
recordings will be made and no events will be generated) although it has the Active option set.
8.1.3 Scheduling motion detection
The scheduling for simple motion detection is the same as for other iCAT definitions. Please refer to
15.3.15 Scheduling iCAT operation and recording on page 160.
8.1.4 Controlling PTZ cameras with motion detection events
It is possible to assign a sequence of PTZ positioning actions to each motion detection (MD) field
definition. Once the MD field gets active, the associated PTZ action is executed. PTZ actions can be
assigned to an MD field by appending the following sequence to the MD Identifier:
ptz:<CID>:<PresetName>:<WaitTime>:<PresetName>:<WaitTime>...
where:
<CID> is the ID of a PTZ camera (the ID is shown in Camera admin > Properties dialog next to the
camera name). If <CID> is 0, then the MD field's camera is controlled (MD and PTZ camera are the
same).
<PresetName> is the name of a preset position (as entered in the PTZ definitions).
<WaitTime> is the pause time in seconds starting from the time when the camera receives the
positioning event.
Page 90

NETAVIS Observer 4.6 User Manual (October 2015)
Page 90 of 204
There can be any number of "<PresetName>:<WaitTime>" pairs added.
Further MD-triggered PTZ actions are blocked as long as a sequence is running. However, control of
PTZ camera can be taken manually, then the automatic MD-triggered PTZ control is suspended until
the manual PTZ control is released.
For information on how to setup PTZ preset positions refer to 10 Working with PTZ cameras on page
101.
Example of an motion detection Identifier:
Door ptz:4:Door:10:HomePos:3
will on an MD event with the Identifier “Door” move the PTZ camera with ID 4 to the preset position
“Door”, wait 10 seconds and move the camera to the preset “HomePos” and wait another 3 seconds.
The overall positioning time therefore is app. 13 seconds. From then on the PTZ camera is open to
receive further MD-triggered PTZ positioning commands.
8.2 Motion detection in archive recordings
Observer supports server-based motion detection not only in live streams but also in archived
recordings. Please refer to 7.4 Motion detection in archive recordings on page 82.
8.3 In-camera motion detection
Several IP cameras and video servers support in-camera motion detection and upload (push) of eventtriggered images via FTP or HTTP to a video management system like Observer. Observer implements
a general mechanism to handle this feature.
This section describes how Observer supports in-camera motion detection and also how to configure
it in Observer.
Please note: Since the camera carries out the detection, the actual configuration and programming
must be done directly in the camera via the setup interface (e.g. parameters like detection settings,
image quality, speed, etc.). This can usually be done by connecting with a web browser to the camera
(by entering its IP address). Please refer to the latest NETAVIS Observer Supported Video Sources and
the camera’s user manual for further details.
8.3.1 How Observer supports in-camera motion detection
In the camera you define the various settings for the motion detection algorithm and for the
transmission of event images to the Observer server, which is done via FTP or HTTP ("push upload" by
the camera). Most cameras also support the transmission of pre- and post-event images. The
configuration of for these pre- and post-event images must also be done in the camera.
Observer is capable of doing these things in connection with in-camera motion detection:
Receive in-camera motion detection events from the camera and store these events in the
standard Observer Event database (these events can also be displayed in the Event list).
Receive pre- and/or post-event images from the camera (pushed by the camera) and
record these images in the standard Observer camera archive.
Page 91
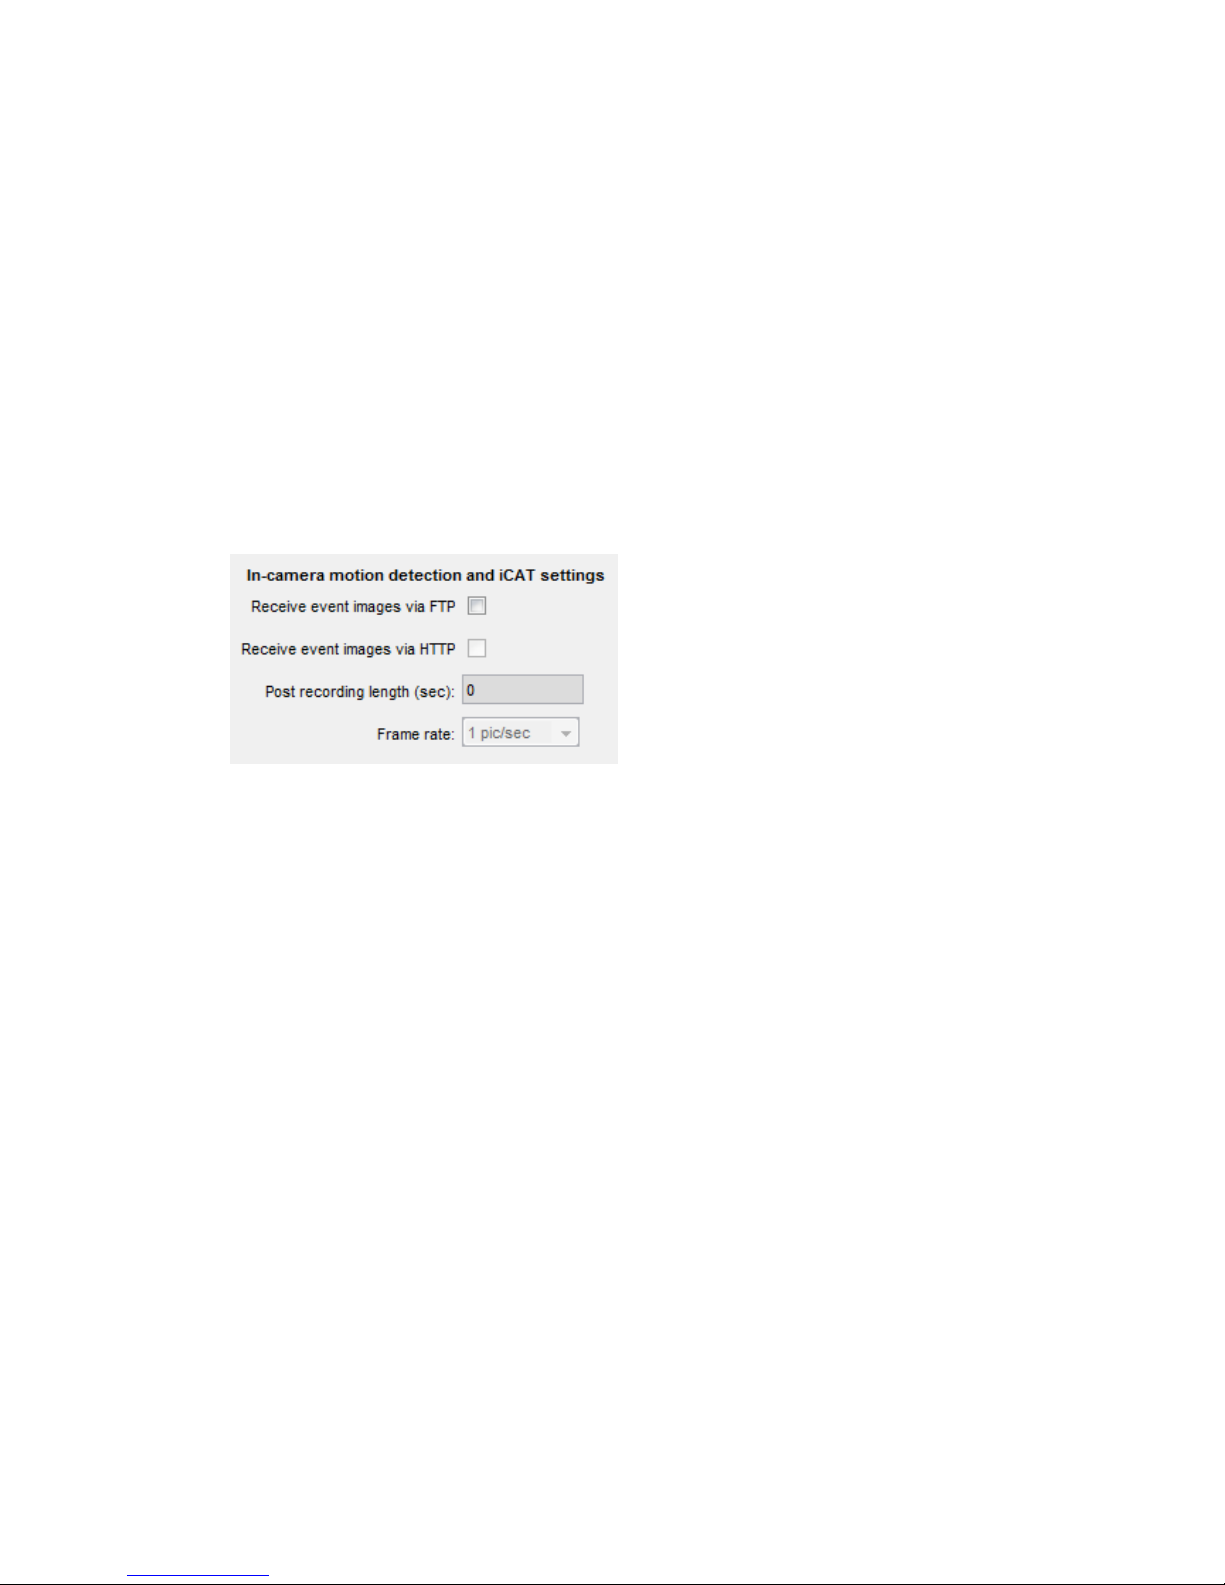
NETAVIS Observer 4.6 User Manual (October 2015)
Page 91 of 204
Optionally, with receiving an in-camera detection event, start a server-based post-event
recording of images and merging this recording with the in-camera event images pushed by
the camera. This server-based recording can have a much higher frame rate than the pictures
pushed by the camera. This allows a much better documentation of in-camera events.
8.3.2 Setting up in-camera motion detection
To configure Observer for in-camera motion detection follow these steps:
1. Choose Camera admin from the System administration menu. This opens the Camera
admin dialog.
Assuming that you have already defined the basic properties of the camera in Observer, select
the camera in the camera tree.
2. On the Properties dialog press the Next button at the bottom of the dialog until you reach the
Defaults settings dialog. Here you focus on the In-camera motion detection settings:
3. In the menu choose Modify selected camera or group.
4. Mark either Receive event images via FTP or …via HTTP depending on what your camera
supports. This tells Observer to receive in-camera events and images from the camera.
If you already have a defined an active server motion detection schedule for the camera, you will
get a dialog that tells you that having both, server and in-camera motion detection at the same
time is not possible. To continue you have to first disable the server-based motion detection
schedules in the Scheduling dialog and then you can continue here.
5. Optionally you can set the Post recording length (sec) that defines whether and for how long
the Observer server should record camera images in addition to receiving and storing the event
pictures pushed by the camera. As mentioned above, you could want to do that to record the
post-event images with a high frame rate. In such a case, set the Frame rate according to your
needs.
6. Now you also have to tell Observer, for how long it should keep the recorded event-images (both,
the ones pushed by the camera and the ones, additionally recorded by the server).
Press the Previous button at the bottom of the dialog until you reach the Scheduling dialog.
7. Below the Time intervals list push the Add button and then choose Camera MD (FTP/HTTP)
from the newly created Change pop-up menu.
8. In the field Requested recording period (days/hours) enter the values that fit your needs.
Optionally you can also mark the Priority over other cameras (if storage space is short)
checkbox. For further details about these recording parameters please refer to sections 7.1.1
Programming continuous timed recordings on page 71 and 7.1.4 Operation of the Observer
dynamic storage management on page 74.
9. Push the Save button to store your changes.
Page 92

NETAVIS Observer 4.6 User Manual (October 2015)
Page 92 of 204
10. Now you have to configure your camera for pushing the in-camera events and images to the
Observer server. Since the steps for doing that are very camera-specific, you must consult the
document NETAVIS Observer Supported Video Sources. To program the camera's detection
algorithm please consult its user manual.
Note: After setting up the camera, do not forget to check and set the date and time of the camera to
reflect your current time.
Page 93
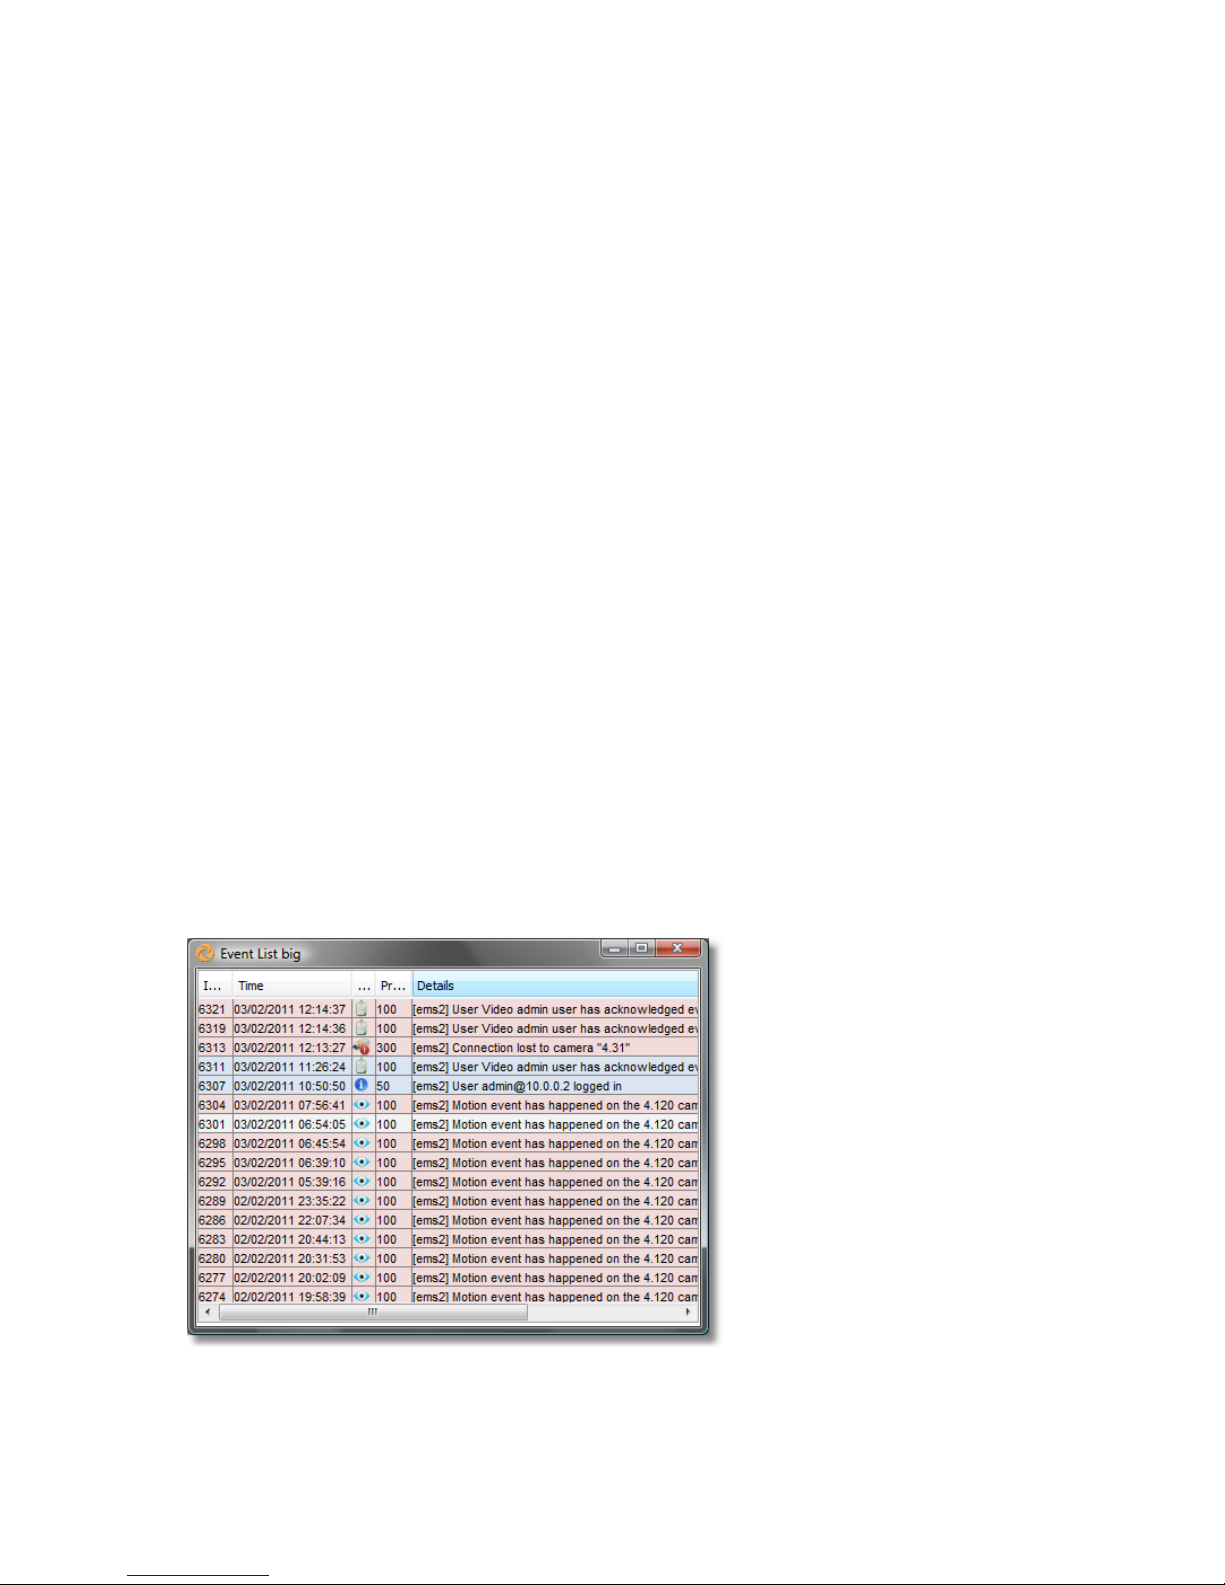
NETAVIS Observer 4.6 User Manual (October 2015)
Page 93 of 204
9 Handling events
Observer can record and display events of various types. These can be camera-related events like
video analytics events, archive access by a user, or camera failures, but also system-related events like
user logon and logoff.
Events are displayed in Event lists of the client and are stored in the central event database of the
server were they can also be queried. They have several properties that depend on the type of the
event.
Event priorities
All events also have an event priority that defines the relative importance of events. The default event
priority is 100. Informational events have a lower priority of 50, system and camera malfunction events
have a higher priority of 300. For events generated by video analytics triggers, you can specify
individual event priorities. Event lists can also be sorted according to priority.
User privileges for accessing and handling events
In the User admin under the System administration menu you can define for each user some basic
event handling privileges. For example whether user you can access events at all or what kinds of
system events are displayed at the users event list (see 5.2 Setting general user privileges on page 45).
The number of events stored in the database can be defined in the server parameters (see 11.2 Setting
Observer server parameters on page 110).
9.1 Event list and event details
The most recent events are displayed in the Event list:
Each client can have multiple event lists, for example, one that is sorted chronologically and another
one that is sorted according to event priorities. In the Client preferences you can configure for each
window's event list what columns are to be displayed, whether acknowledged events should stay in
Page 94
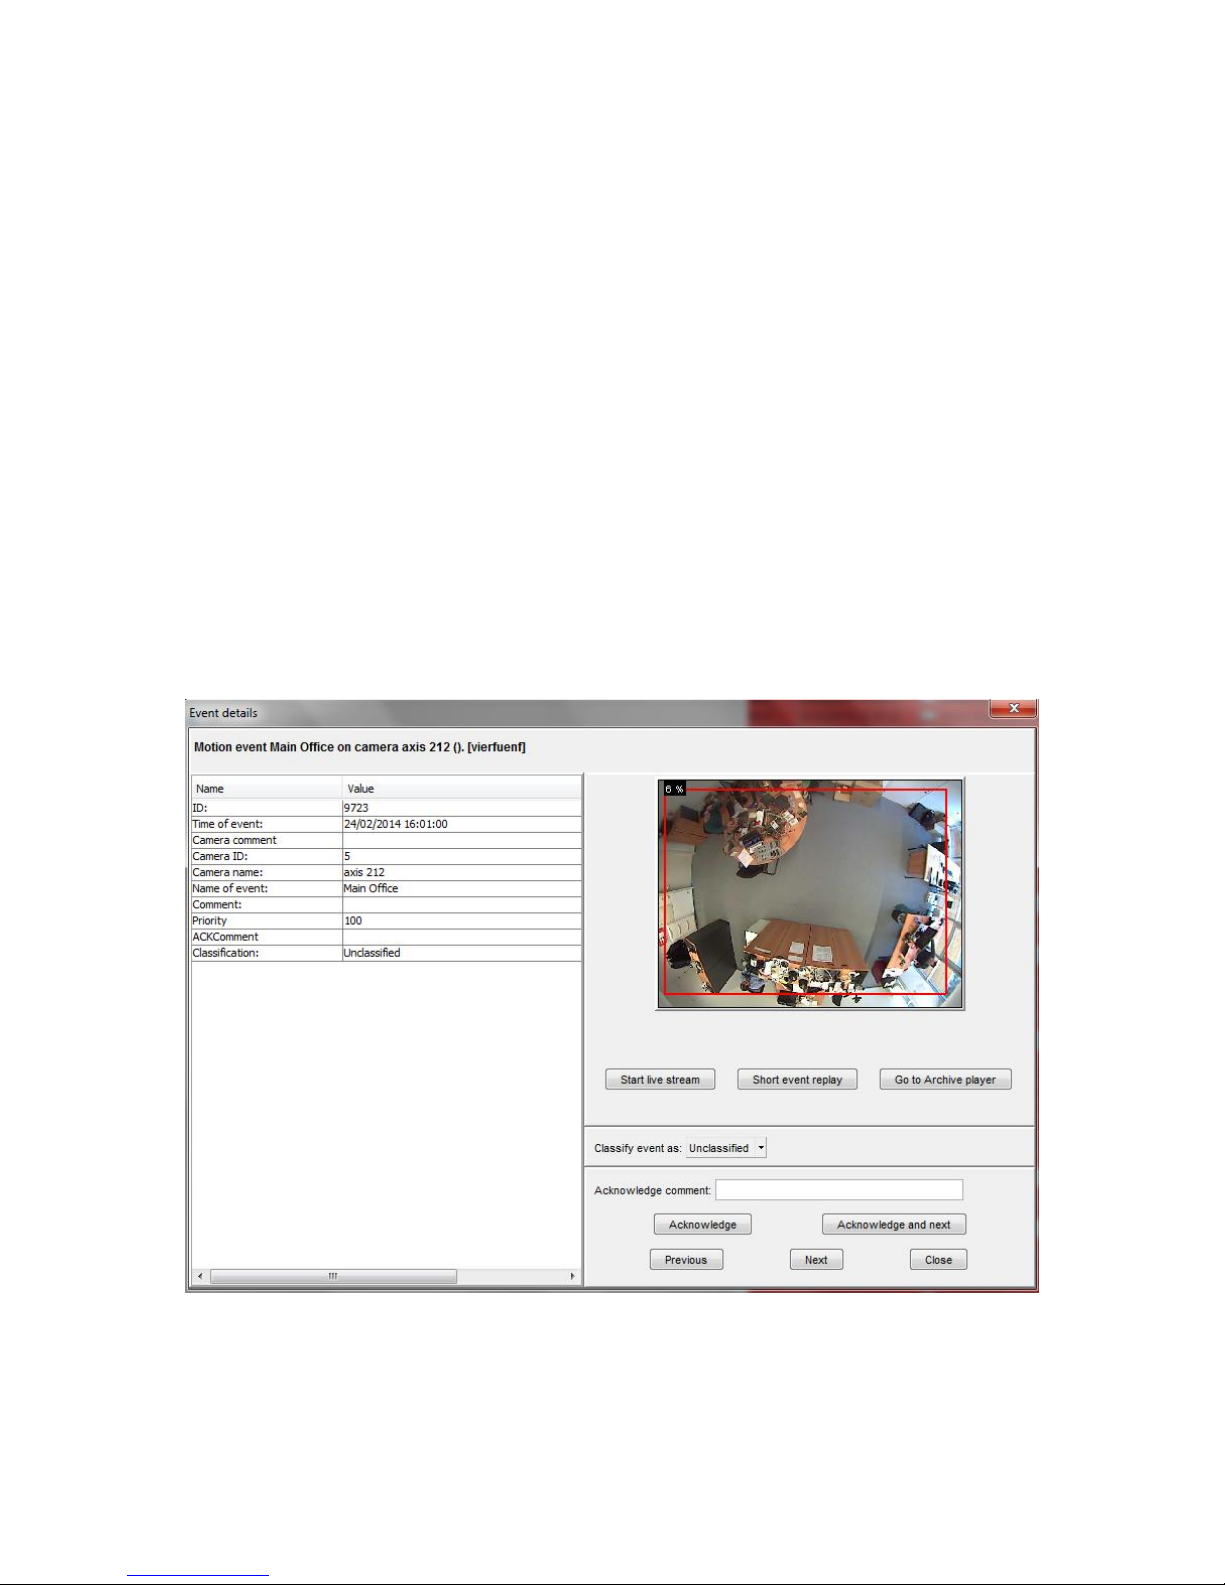
NETAVIS Observer 4.6 User Manual (October 2015)
Page 94 of 204
the list or should disappear automatically and other options (see 2.5 Client preferences on page 22 for
more details).
The position of the event lists inside client windows and further layout options can be defined as
described in 2.4 Client multi-window and multi-screen operation on page 20.
You can sort the event list according to column values by just clicking on the column title. Little arrows
after the title indicate the sorting order (ascending or descending). Clicking a column title again will
change the sorting order. For example, you can sort the list according to event priority by clicking on
the Priority column heading.
In an event list columns can be rearranged by clicking on a column title and dragging it with the
mouse to the new location.
Unseen events have a light red background color. As soon as an event has been opened in the Event
details dialog its background color changes to light grey. When an event is acknowledged, it usually
disappears from the event list. However, in the client preferences you can define whether
acknowledged events should be displayed in the event list. If so, they appear with a white background
color.
9.1.1 Event details
Double clicking on an event in the event list opens the Event details dialog.
The first line contains the event text. Further details of the event are listed at the left side of the dialog.
The exact contents of the event details depends on the event type, but you will at least find the exact
time when the event occurred and if it is camera-related then also the camera ID and name are shown.
Page 95

NETAVIS Observer 4.6 User Manual (October 2015)
Page 95 of 204
When you move the mouse over the camera preview area you will also see the video analytics object
markers and annotations related to the event trigger (as seen in the screenshot above).
The following options are available for users:
Start live stream: Starts live monitoring of the camera that triggered the event.
Short event replay: Starts a playback of the event recording that triggered the event (a replay
is only available if the camera has been configured to record the event).
Go to Archive player: Opens the Archive player and starts a playback of the event recording.
Classify event as: The event can be classified as Unclassified, Irrelevant, Valid (true), and
Invalid (false).
Acknowledge comment: This field can be used to add an optional comment related to the
acknowledgement of the event.
Acknowledge: Acknowledges the event and close the dialog.
Acknowledge and next: Acknowledges the event and loads the next event.
Previous: Loads the previous event.
Next: Loads the next event.
Close: Closes the dialog.
9.2 Searching in the event database
1. When you choose Event search... from the Events menu the Event search dialog appears.
2. Select the Time filter according to your needs whereby the options are either All records (no
time filter) or manually choosing a time interval.
3. You can further constrain the search by using Event filters for Event type, Camera name,
User name, or Event ID (from- to), and event-specific parameters and their values (e.g. the
event's classification). For some filters an appropriate dialog will open, e.g. the Event selection
dialog:
Page 96
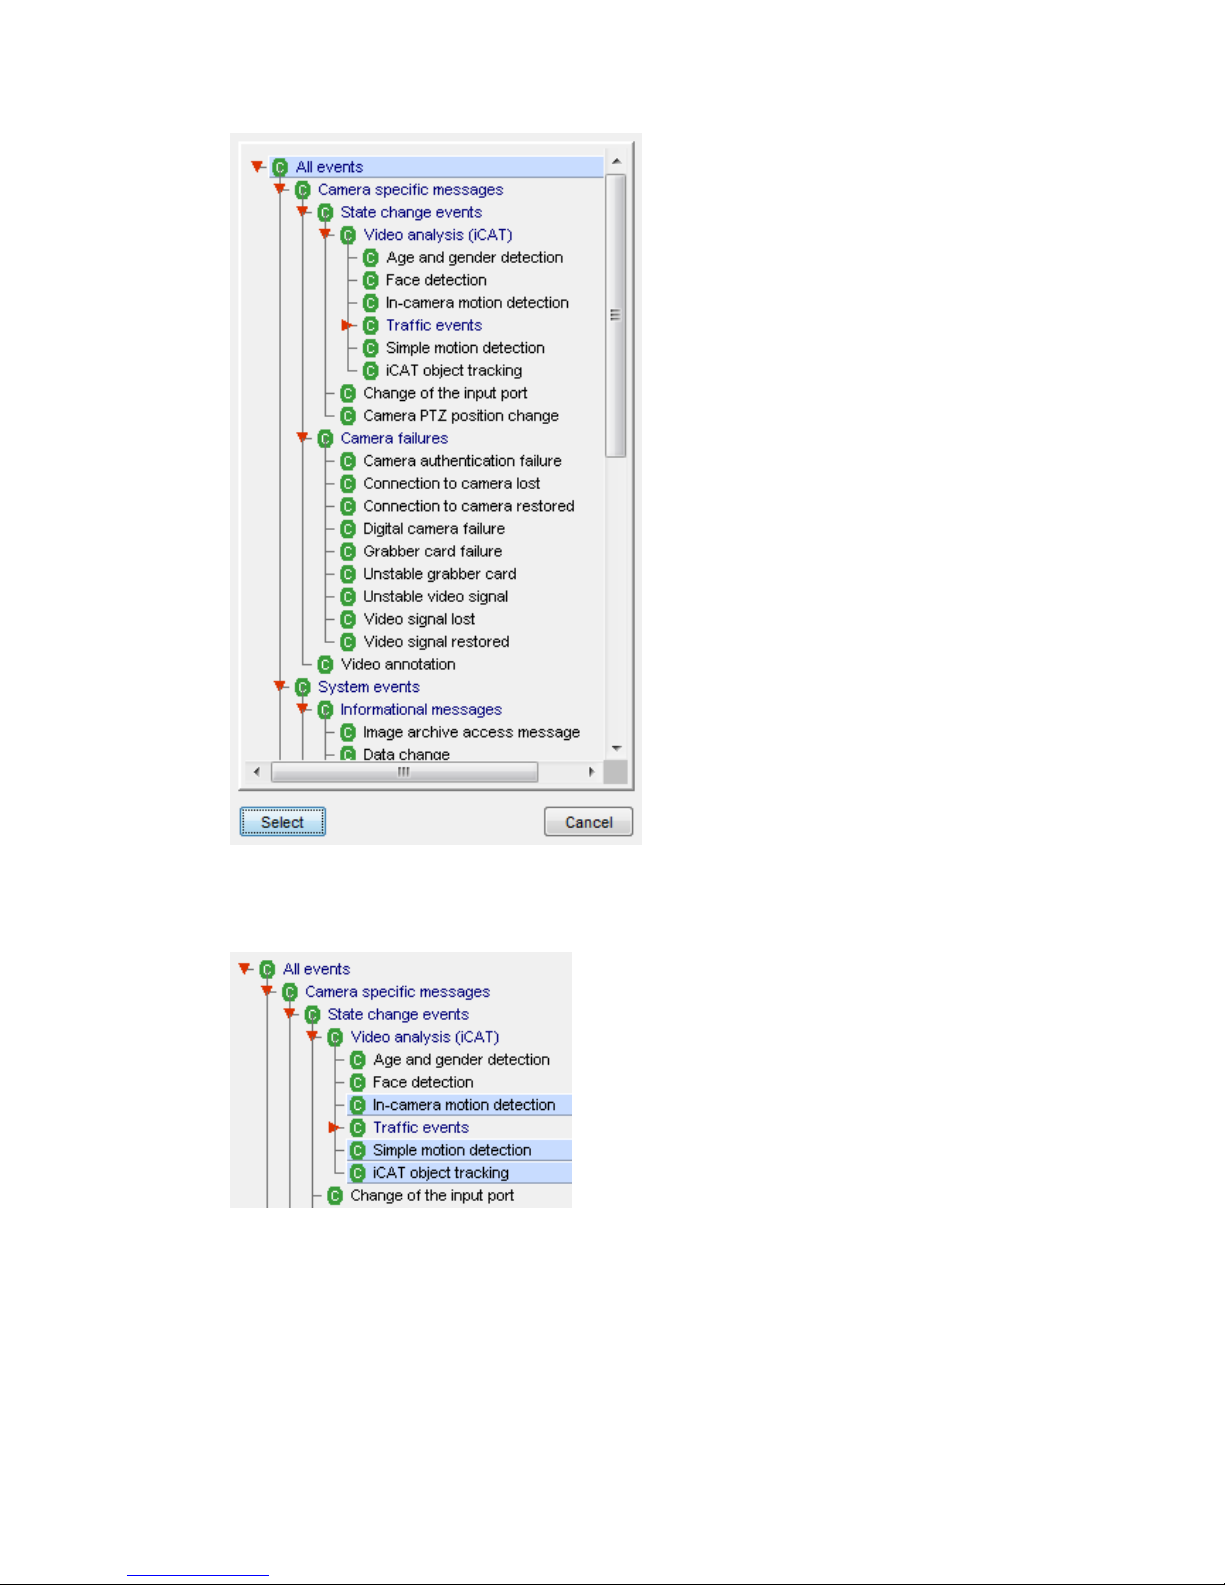
NETAVIS Observer 4.6 User Manual (October 2015)
Page 96 of 204
In each of the dialogs it is possible to make multiple selections. For example to search for the
event types In-camera motion detection, Simple motion detection, and iCAT object
tracking, hold down the CTRL key and select these event types with left mouse clicks:
You can also search for events which have been acknowledged or not acknowledged by
selecting the appropriate check box.
4. With the Number of records options you can also select how many search results should be
displayed.
5. After setting different search criteria and filters press the Search button to display the results.
By clicking the Next button you can step forward in the result list and with Previous button you
can step backwards.
Page 97
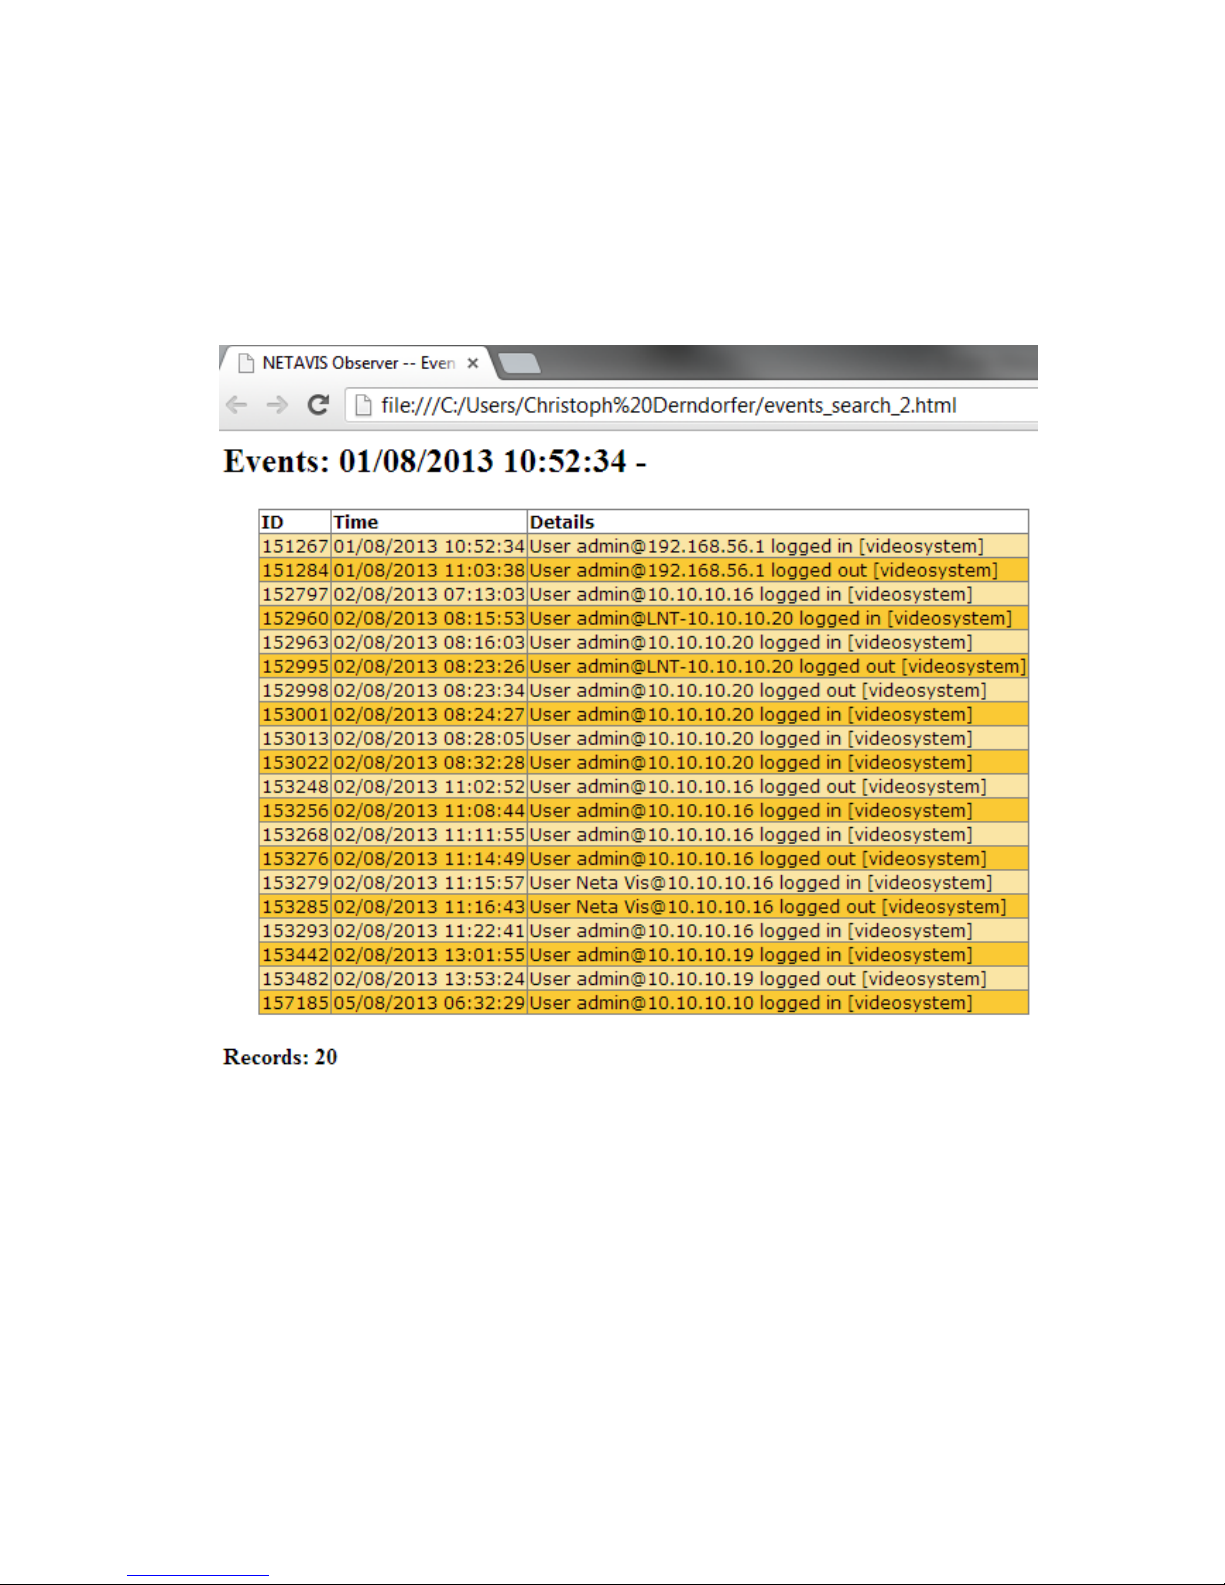
NETAVIS Observer 4.6 User Manual (October 2015)
Page 97 of 204
9.2.1 Saving results in an HTML file
You can export the search results to an HTML file:
1. In the Event search dialog press the HTML export... button, which opens an export dialog.
2. Enter a file name and choose whether you want to export only the events displayed in current
search list or all events matching the filter criteria.
3. Press Export. Now the file is created. You can open the file in a normal web browser:
9.2.2 Exporting event-related recordings
You can export event-related video recordings from the Event search dialog. For each event that has
recording associated a separate video file is created. The file name is composed of the event ID, date,
time, and event type. The export can be done in 2 formats: AVI (DivX) and SAFE (see also 7.3 Exporting
recordings (images and video sequences) on page 80).
Here is how you can do that:
1. In the Event search dialog press the Video export... button, which opens an export dialog.
2. Select the directory where the exported video files are to be stored and choose whether you want
to export only the events displayed in current search list or all events matching the filter criteria.
You can also supply the pre- and post-event time to be exported.
Page 98
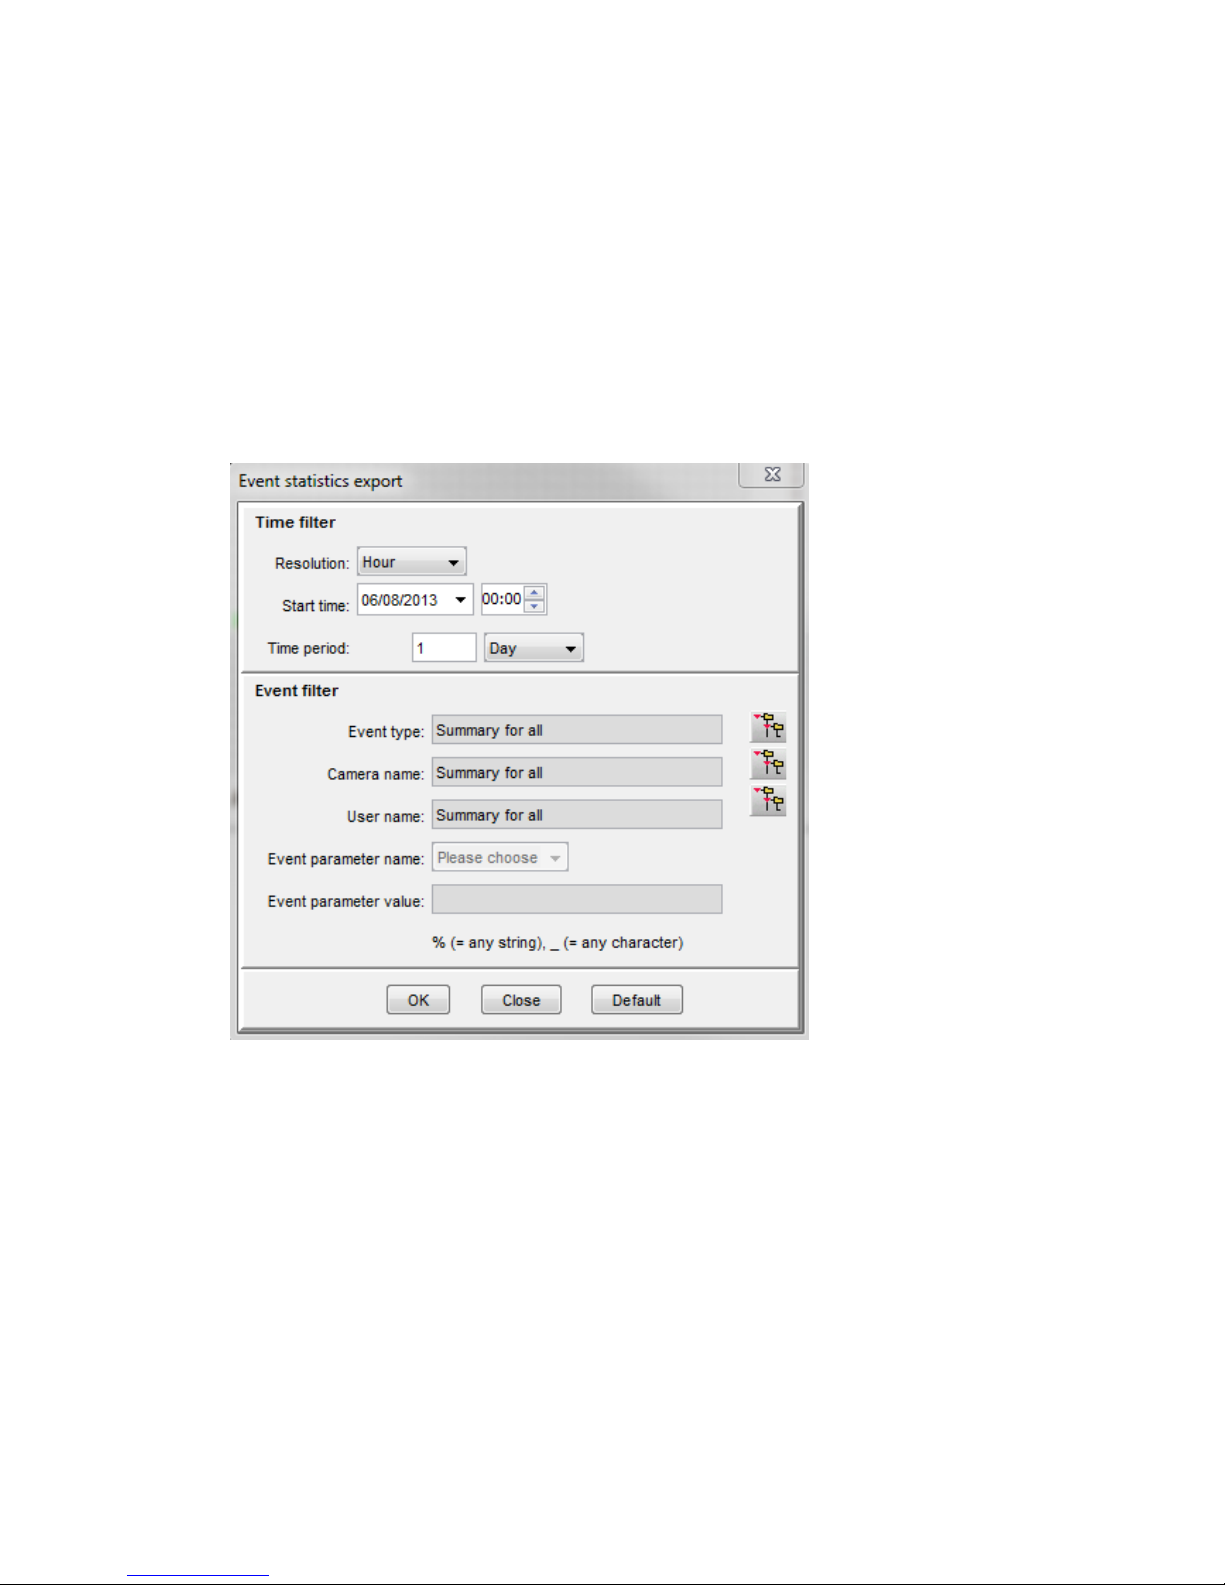
NETAVIS Observer 4.6 User Manual (October 2015)
Page 98 of 204
Select the video format.
3. Press Export. Now a separate video file is created for each event that has a recording. At the end a
summary dialog shows how many files have been create and what is their total size.
9.3 Generating an event statistics report
Observer allows you to create an event statistics report in MS Excel XLS format.
To create a statistics report file, follow these steps:
1. Choose Event statistics export... from the Events menu.This brings up the Event statistics
export dialog:
2. Select for which Start time, Time period and time Resolution you want to create the report.
Also you can filter according to Event type, Camera and User (multiple selection by holding
down the CTRL key while clicking is supported for all filters). If you do not select any values for
Event filter, then a summary statistic report will be created.
3. Press OK to start creating the report file. You will be prompted for a file name where the report
should be stored.
4. Open the created file in MS Excel. With the data, you can also create graphics like the following
one (motion detection statistics for one day):
Page 99
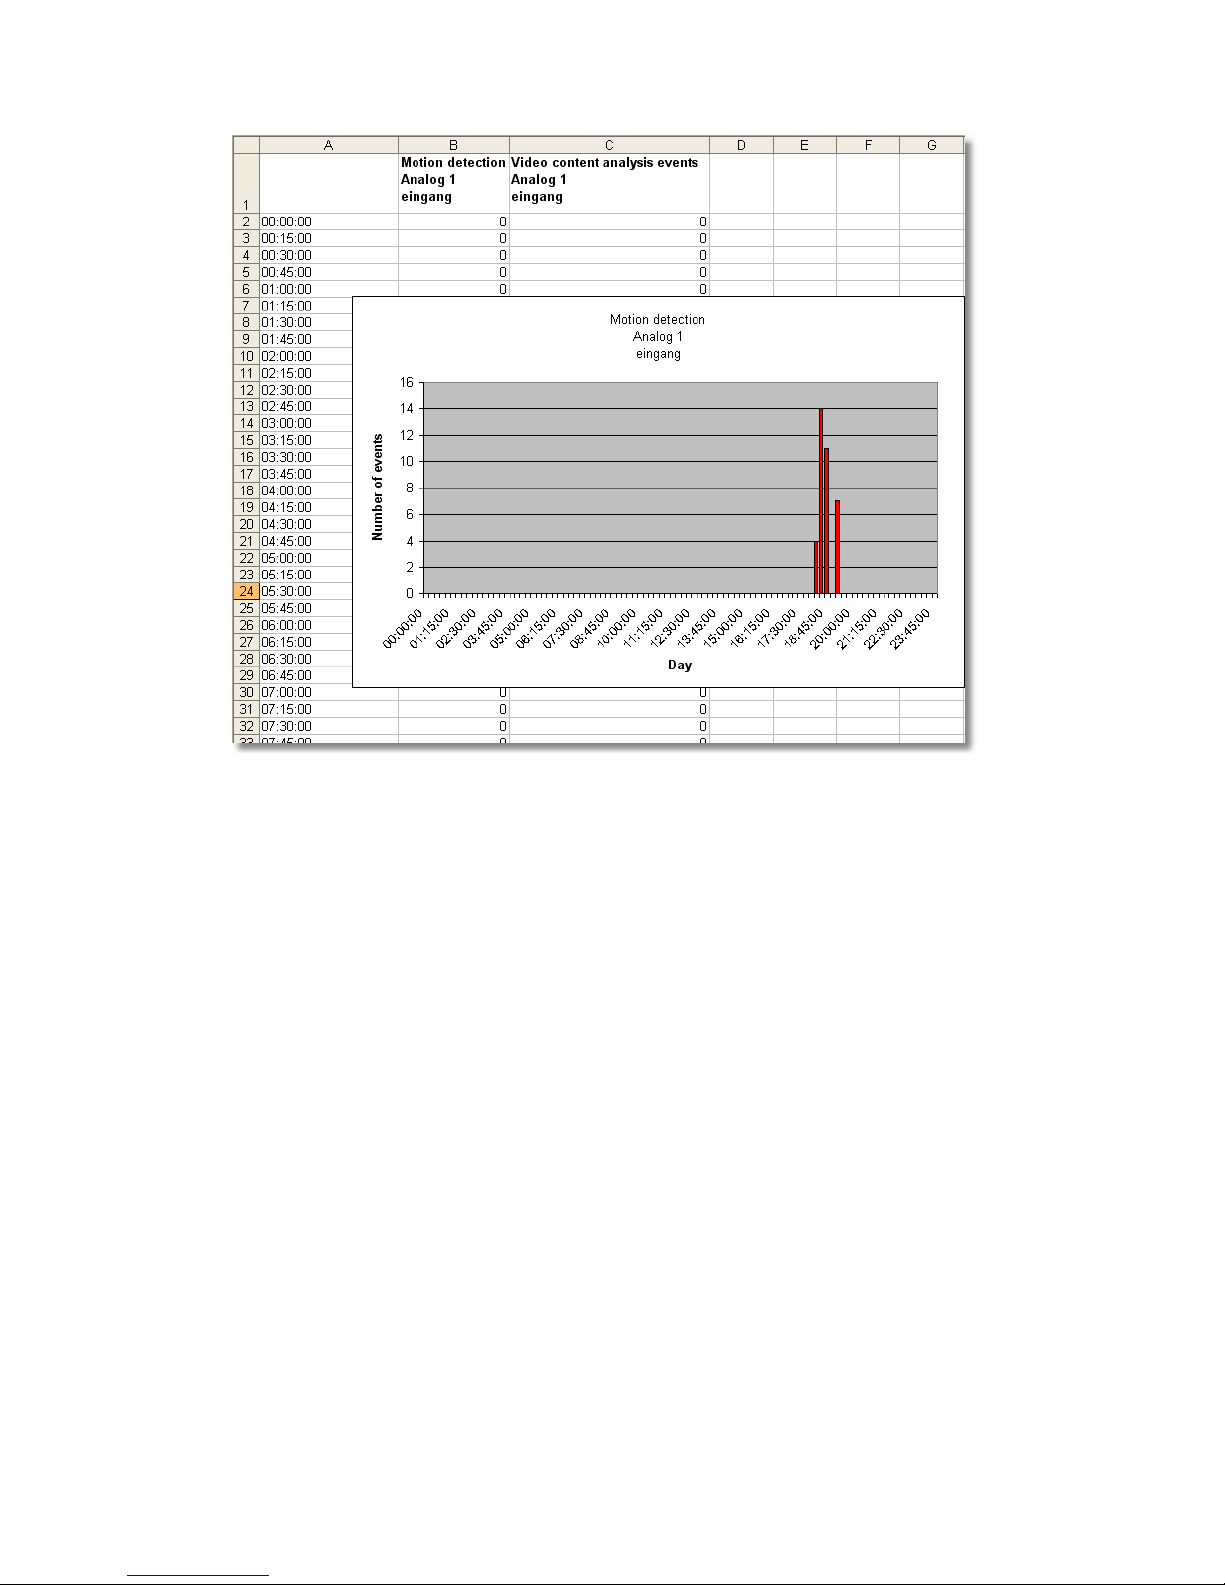
NETAVIS Observer 4.6 User Manual (October 2015)
Page 99 of 204
9.4 Receiving notification on events
Observer can be configured flexibly to notify users on various event types and by various channels.
The event types for defining notifications are:
System malfunction events (e.g. storage failures)
System information events (e.g. example user login and logout)
Camera-related events
o Camera malfunction events (e.g. camera is not accessible)
o Camera in-picture events (e.g. motion detection, video analytics object triggers)
The notification channels are:
Event list of the client
Email
SMS
For each of the above event types the notification channels can be enabled/disabled in the user
privileges and camera access rights (see 5.2 Setting general user privileges on page 45 for details on
how to define privileges and rights).
Please note that the notification channels can be defined on a user or on a group level. Likewise the
camera-related notifications can be defined on a camera or a camera group level.
Page 100

NETAVIS Observer 4.6 User Manual (October 2015)
Page 100 of 204
Please note: In order to receive emails, the email address must be correctly defined in the user
properties. Also the server must be correctly configured and must also have access to an email router
for sending emails. For receiving SMS an SMS sending device must be configured at the server. See
NETAVIS Observer Server Installation and Administration for details.
9.4.1 Receiving Email notification with alarm image on camera events
Here you learn how to set up email notification with alarm image on camera motion detection or
video analytics events:
1. In the User admin dialog select the user for which you want to define the email notification and
enter the correct email address (see 5.1 Creating a new user account on page 43).
2. Continue to the Camera access rights by pushing the Next button and then select the camera
or group for which you want to define the notification settings and enable the right Events:
Sending email about in-picture events (e.g. motion detection, video analysis).
If the user should also be informed about camera failures you can also enable Events: Sending
email about camera malfunction events (see 5.2 Setting general user privileges on page 45
and 5.3 Setting camera access rights on page 48
3. Define and enable a motion detection or iCAT definition (see 15.3 Setting up a camera for video
analytics with iCAT on page 144).
4. Check that the iCAT video analytics or motion detection definition has an active recording enabled
(either continuous or event-based). Please refer to 15.3.15 Scheduling iCAT operation and recording
on page 160.
5. Make sure that for the motion detection or iCAT definition the event generation is enabled (the
checkbox Save event in event list is marked in the Scheduling dialog) and that it is not
suppressed in the iCAT event definition itself.
When you have setup all these things the user should receive an email with an attached alarm image
on every event.
 Loading...