

Page 1
Replacing a wall-mounted thermostat
You can watch this installation at:
http://netatmo.com/video1
1
Page 2

Page 3
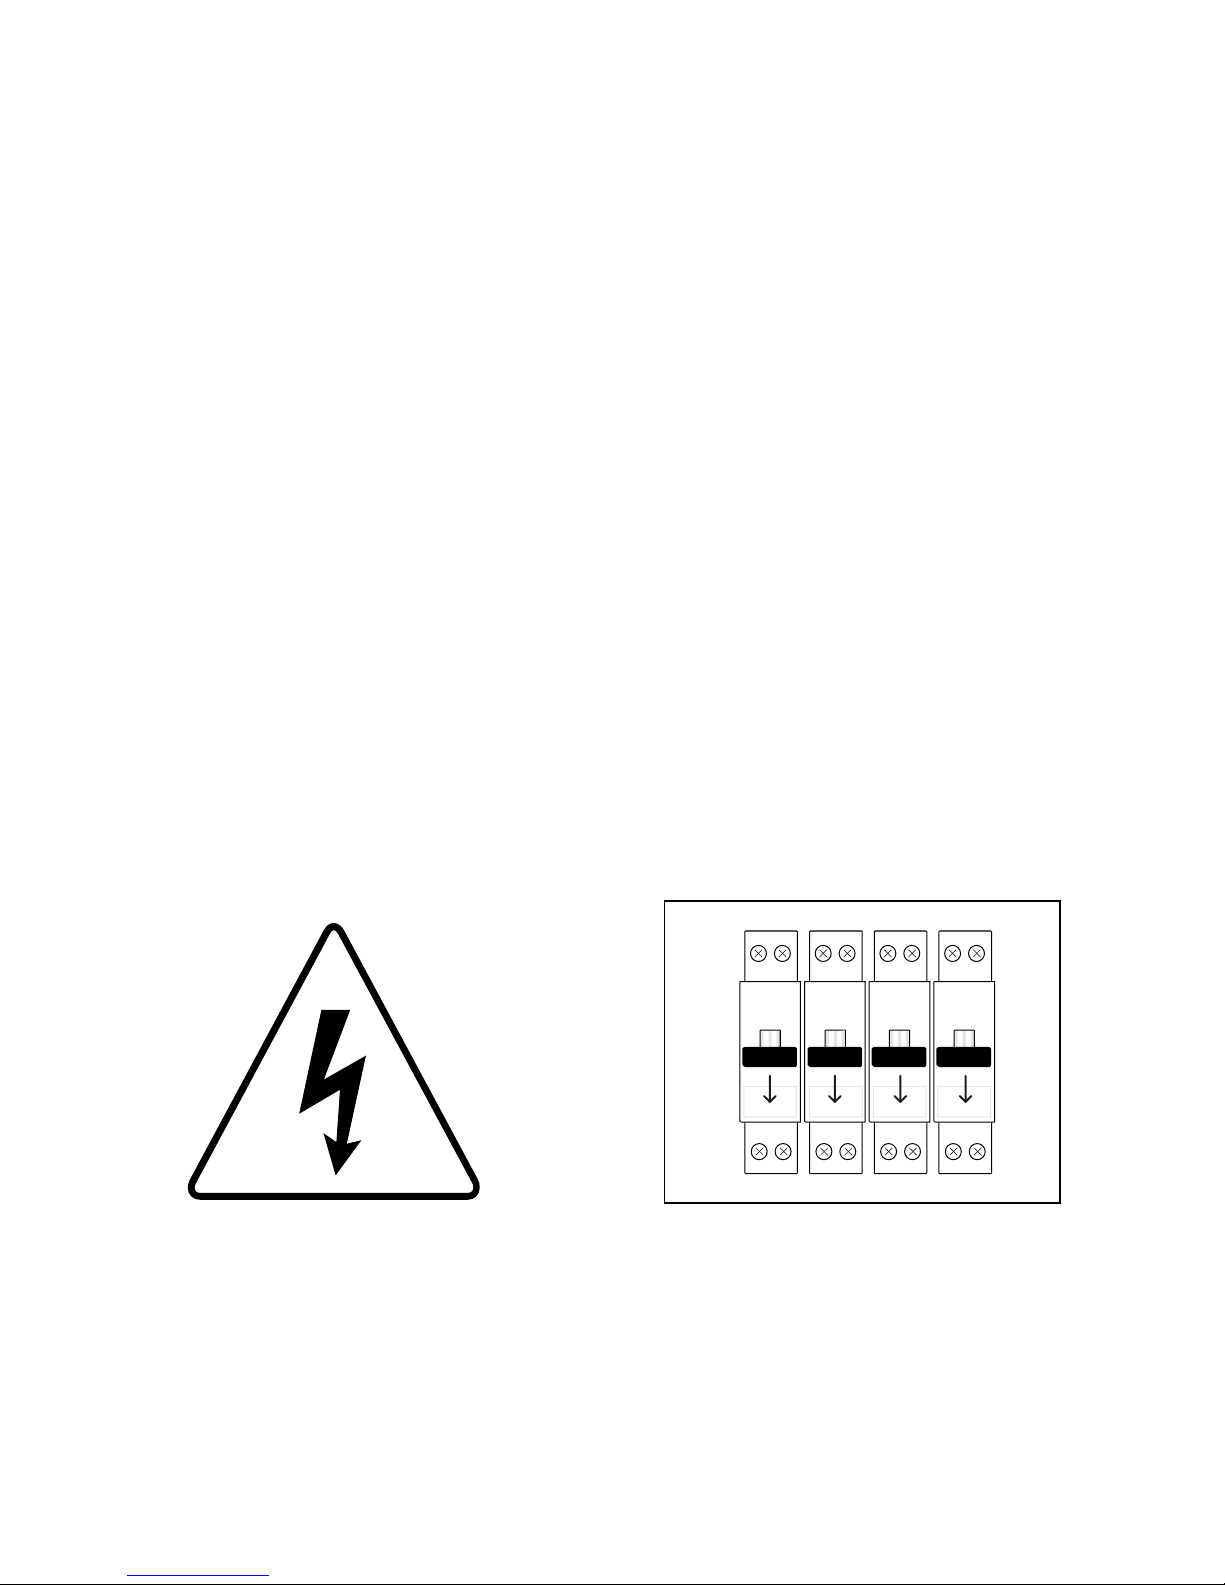
• Read these instructions carefully before starting the installation.
• The Netatmo Thermostat must be installed according to
applicable standards.
• Before any intervention, make sure power is turned off.
• The Netatmo Thermostat cannot control electric converters.
Warning!
Page 4
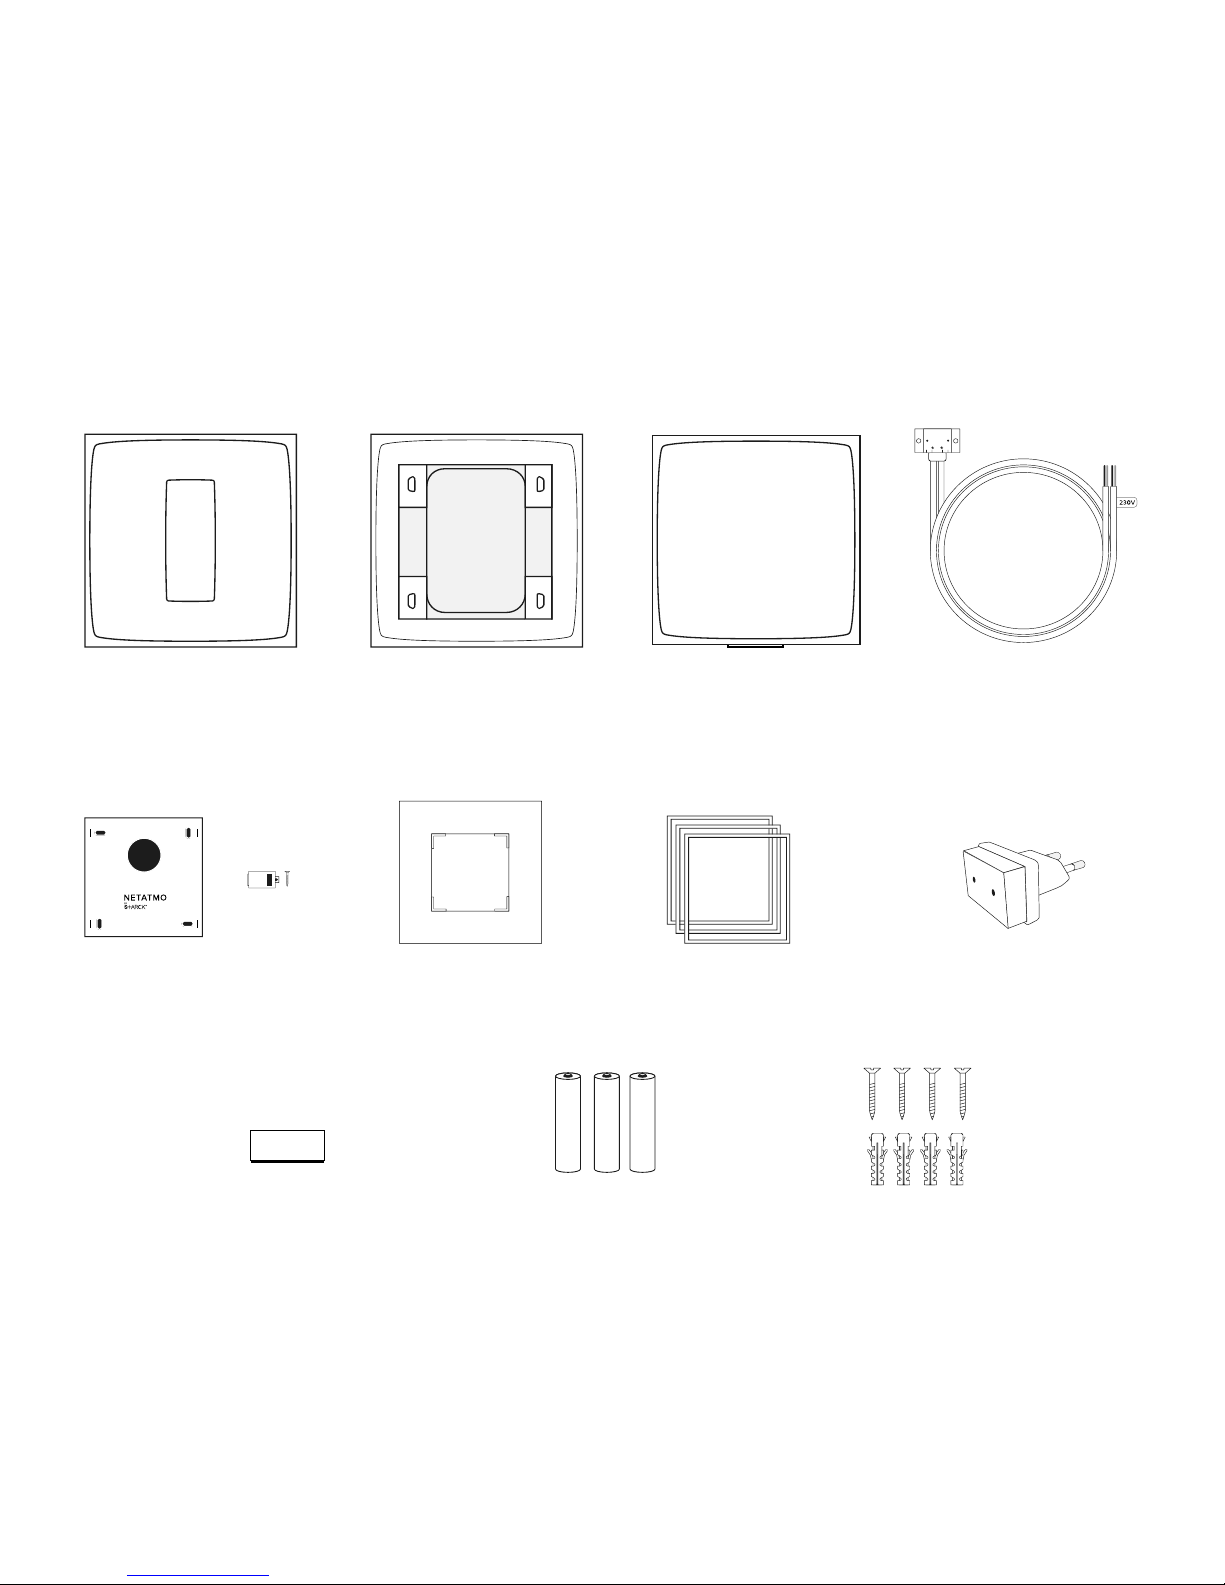
In the box
Color Adhesives
Power Plug
Thermostat Relay (Boiler adapter)*
(Mobile stand)*
* not used in this setup
Mounting Plate
+
Trim plate
3 AAA batteries 4 screws
4 screw anchors
(Tape)*
Page 5
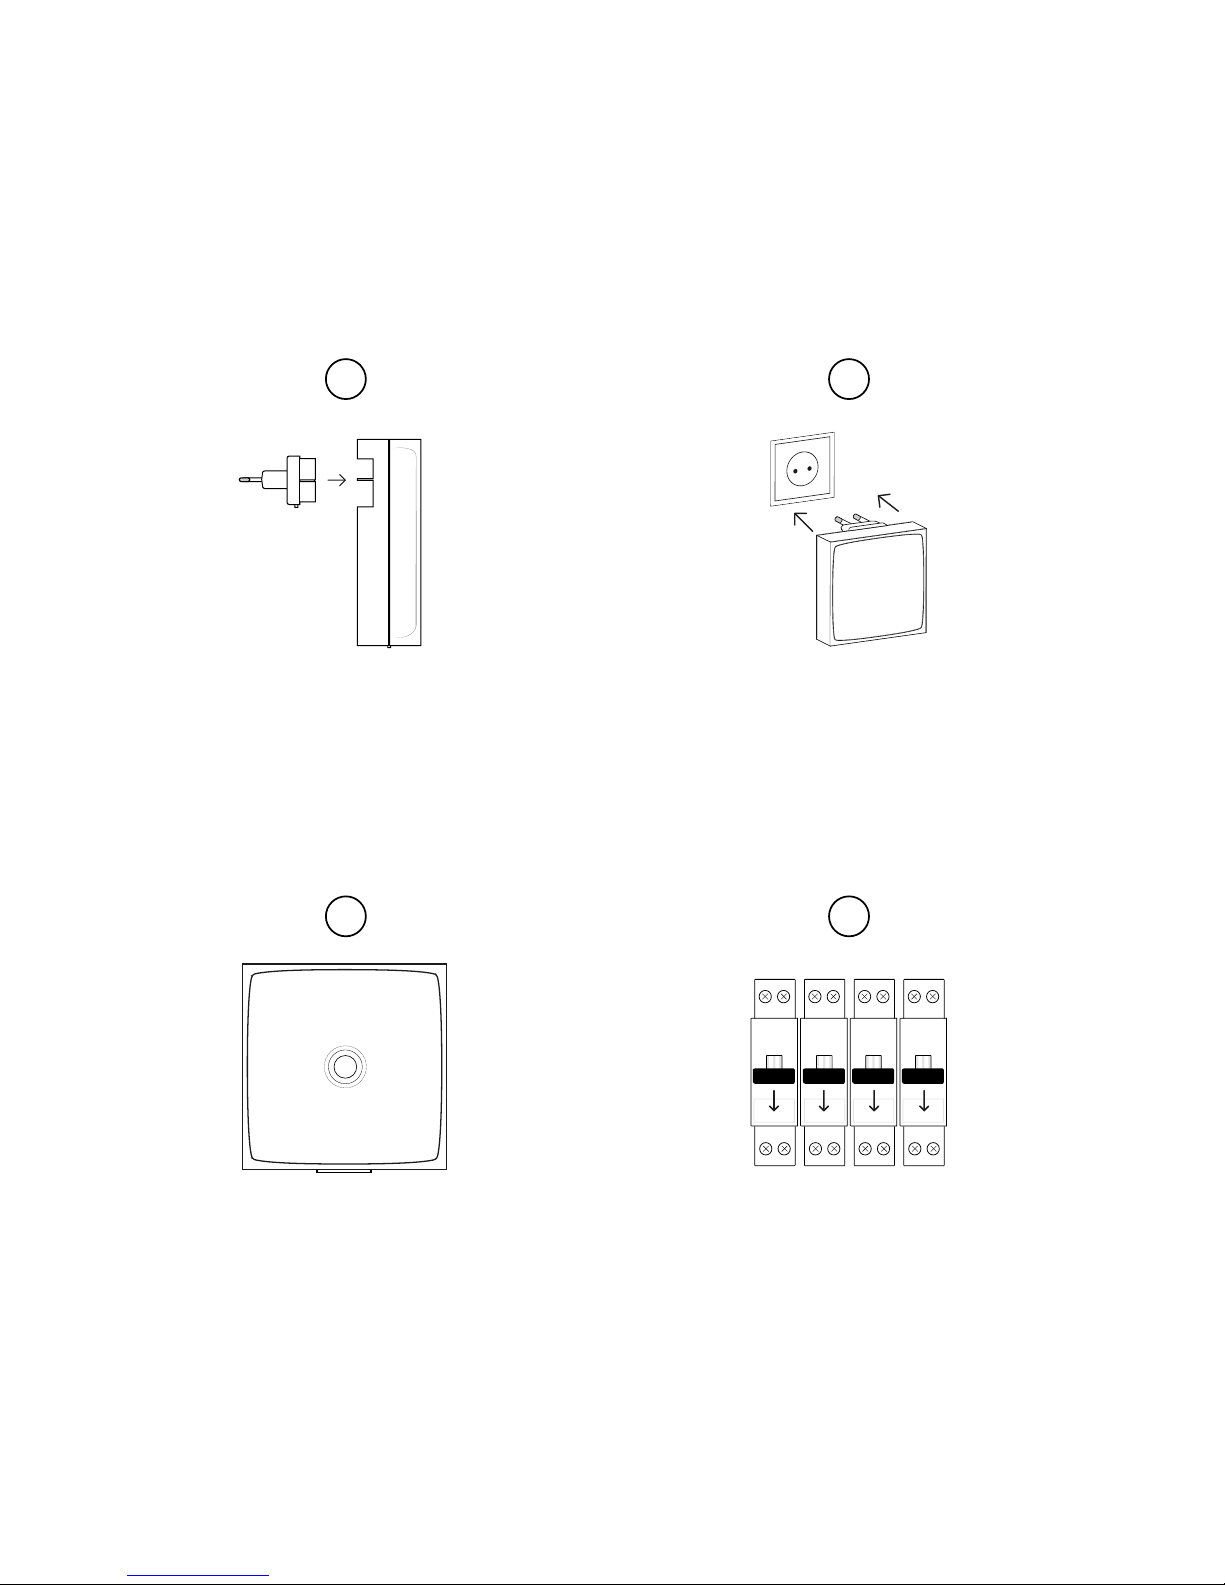
Relay
Plug the Power Plug
into the Relay.
Plug the Relay into a wall
socket in the same room
as your existing thermostat.
The Relay will blink white.
Switch o the power supply.
1
3
2
4
Page 6
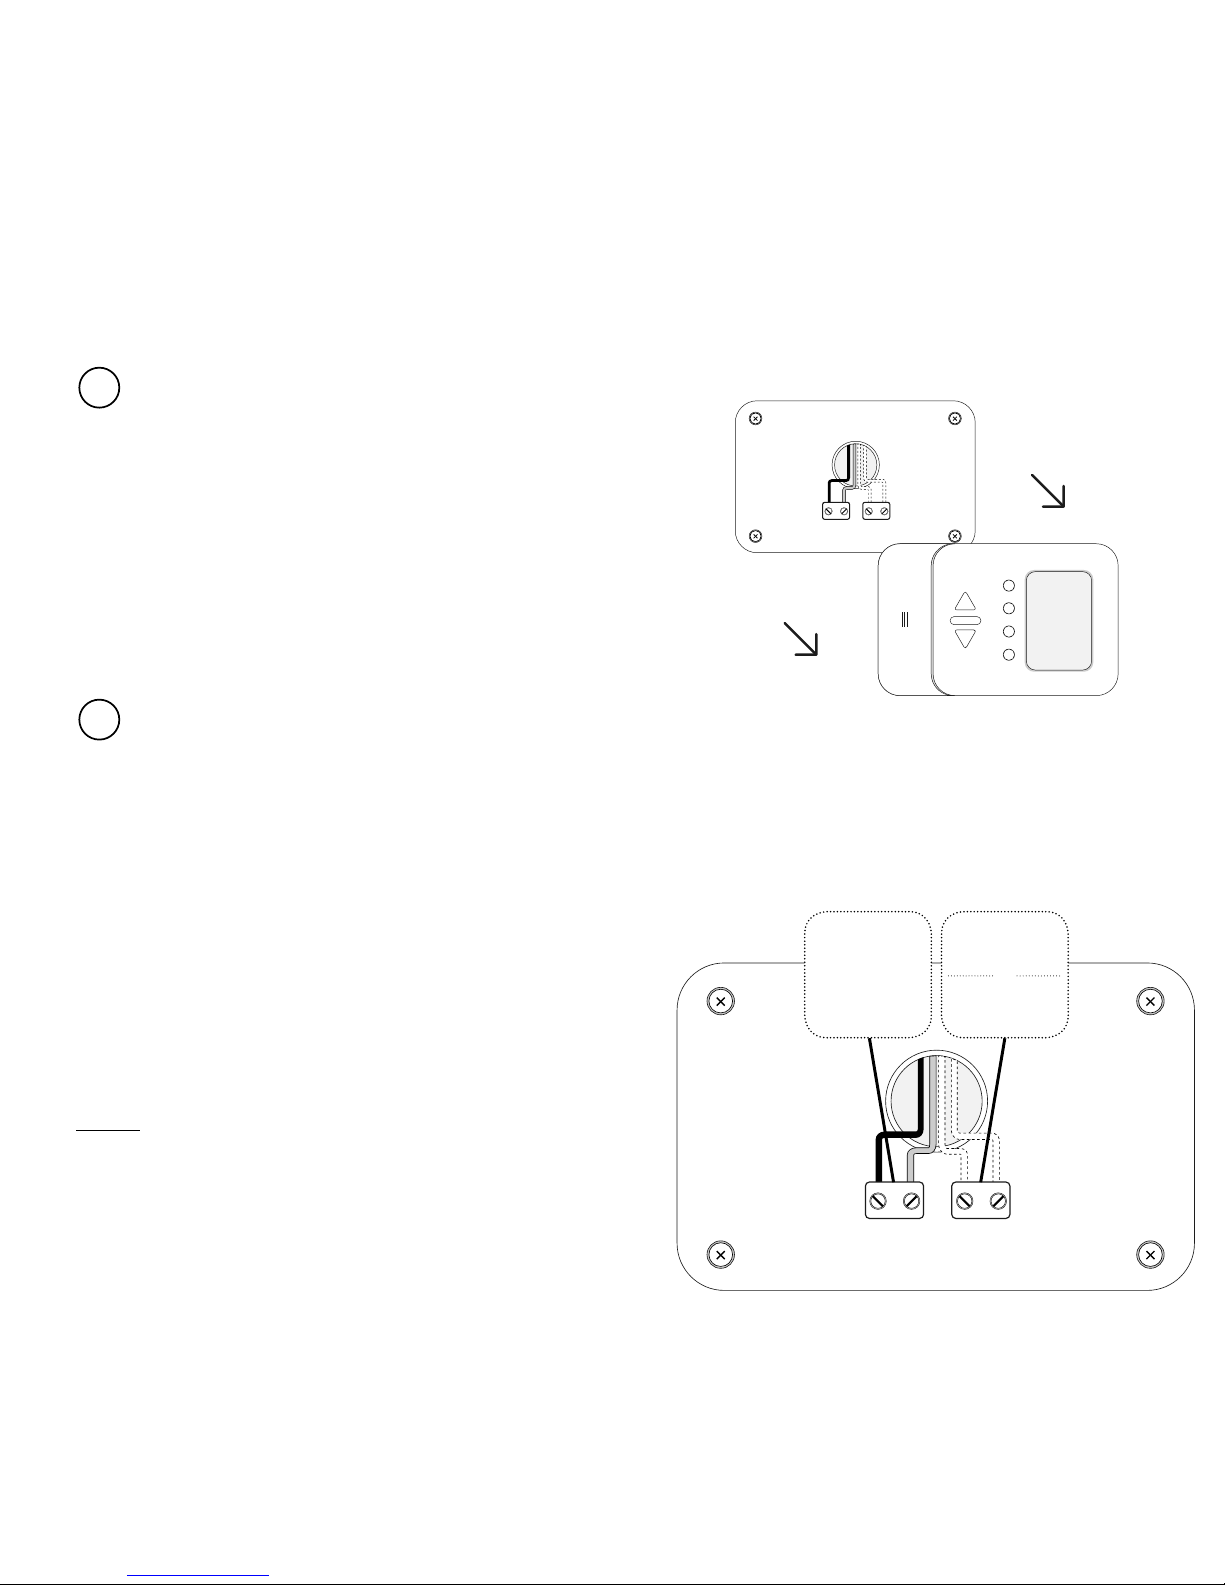
Identify
Remove the cover of your old
thermostat.
Take a picture of the wiring.
Power supply wires
Usually blue and
brown wires
Control wires
Usually black
or grey wires
- If there are only two wires, they are the
control wires and are useful in this setup.
- If there are more than two wires,
identify
the two control wires. They are usually
black or grey.
The wires can be identified as shown on
the following diagram
Note: If there are more than two wires, the
others are power supply wires and are
useless here. They are usually brown, blue,
green or yellow.
In doubt, please send a picture to
and our support team
will help you identify the right wires
P / N
L / N
or
COM / NO
1
2
Page 7
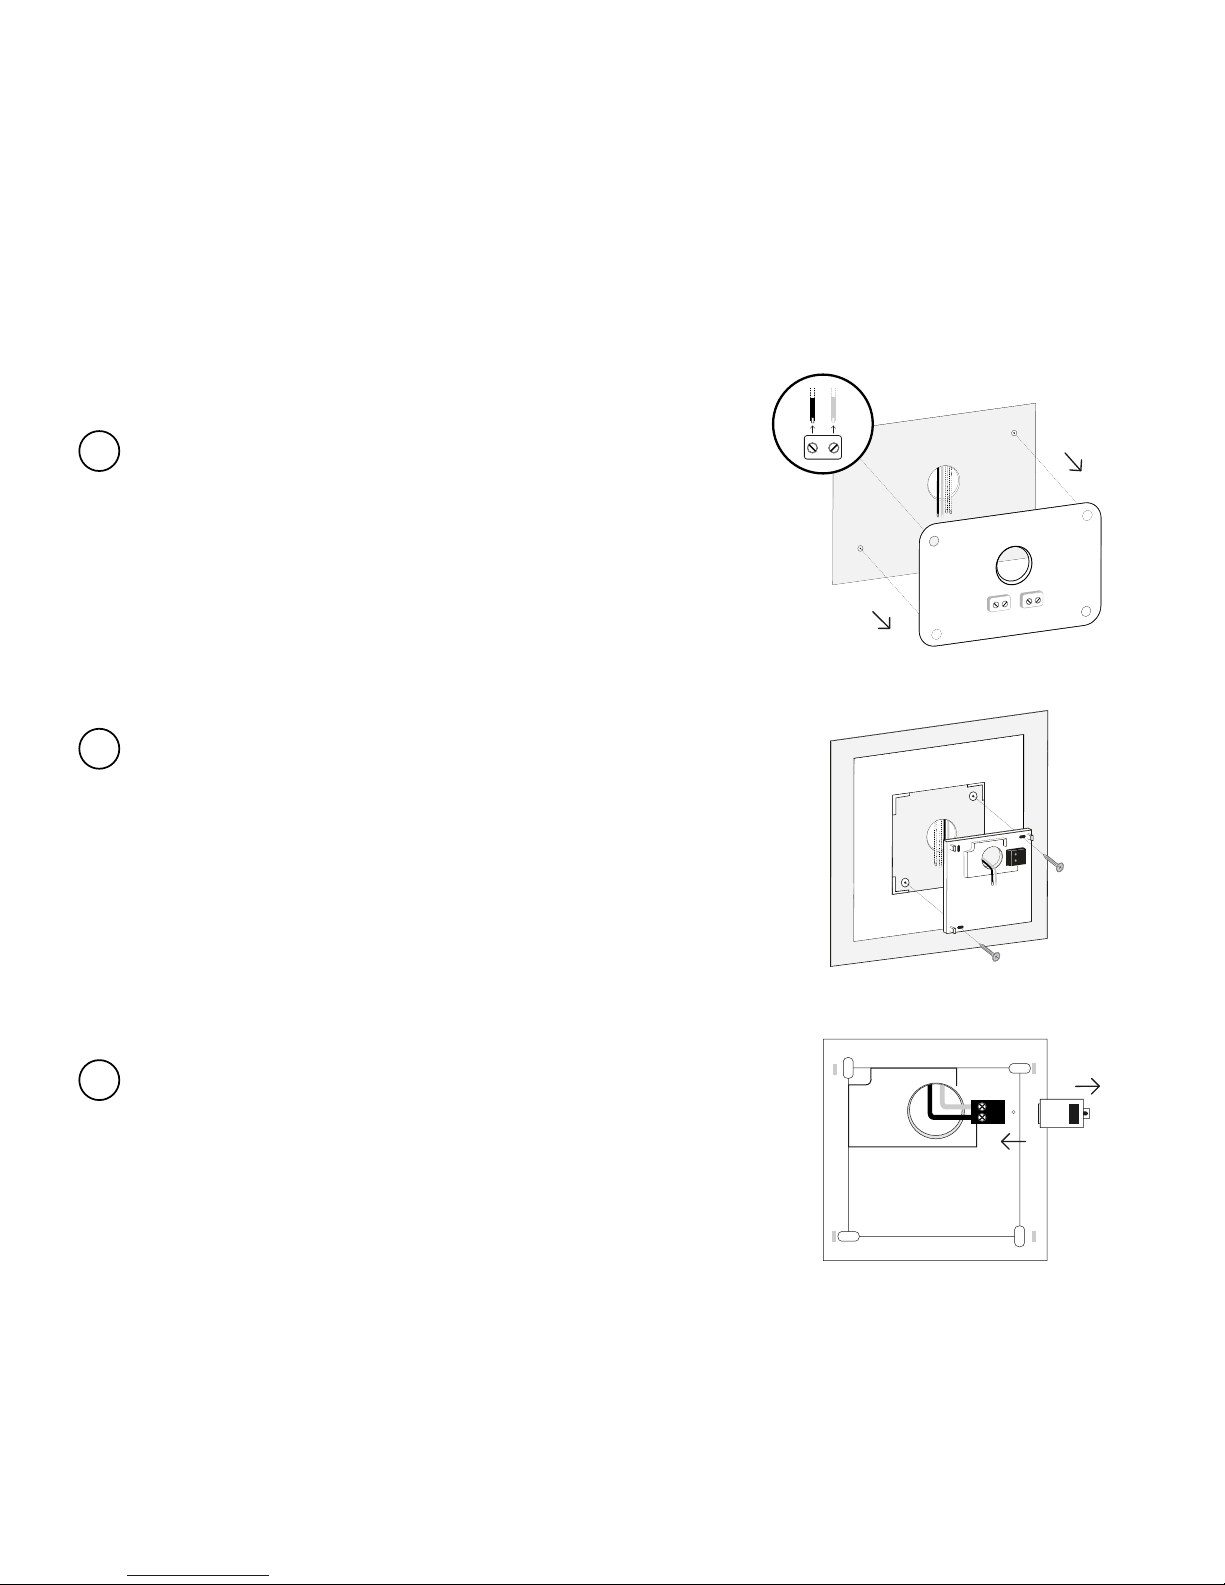
Replace
Disconnect your old thermostat.
Remove it from the wall.
Pass the wires through the Netatmo
mounting plate and screw the latter to the
wall.To hide potential scratches and holes
left behind, use the trim plate.
Screw the control wires previously identified
into the electrical terminals and insulate the
unused wires.
Place and screw the protection cover onto
the electrical terminals.
1
2
3
Page 8
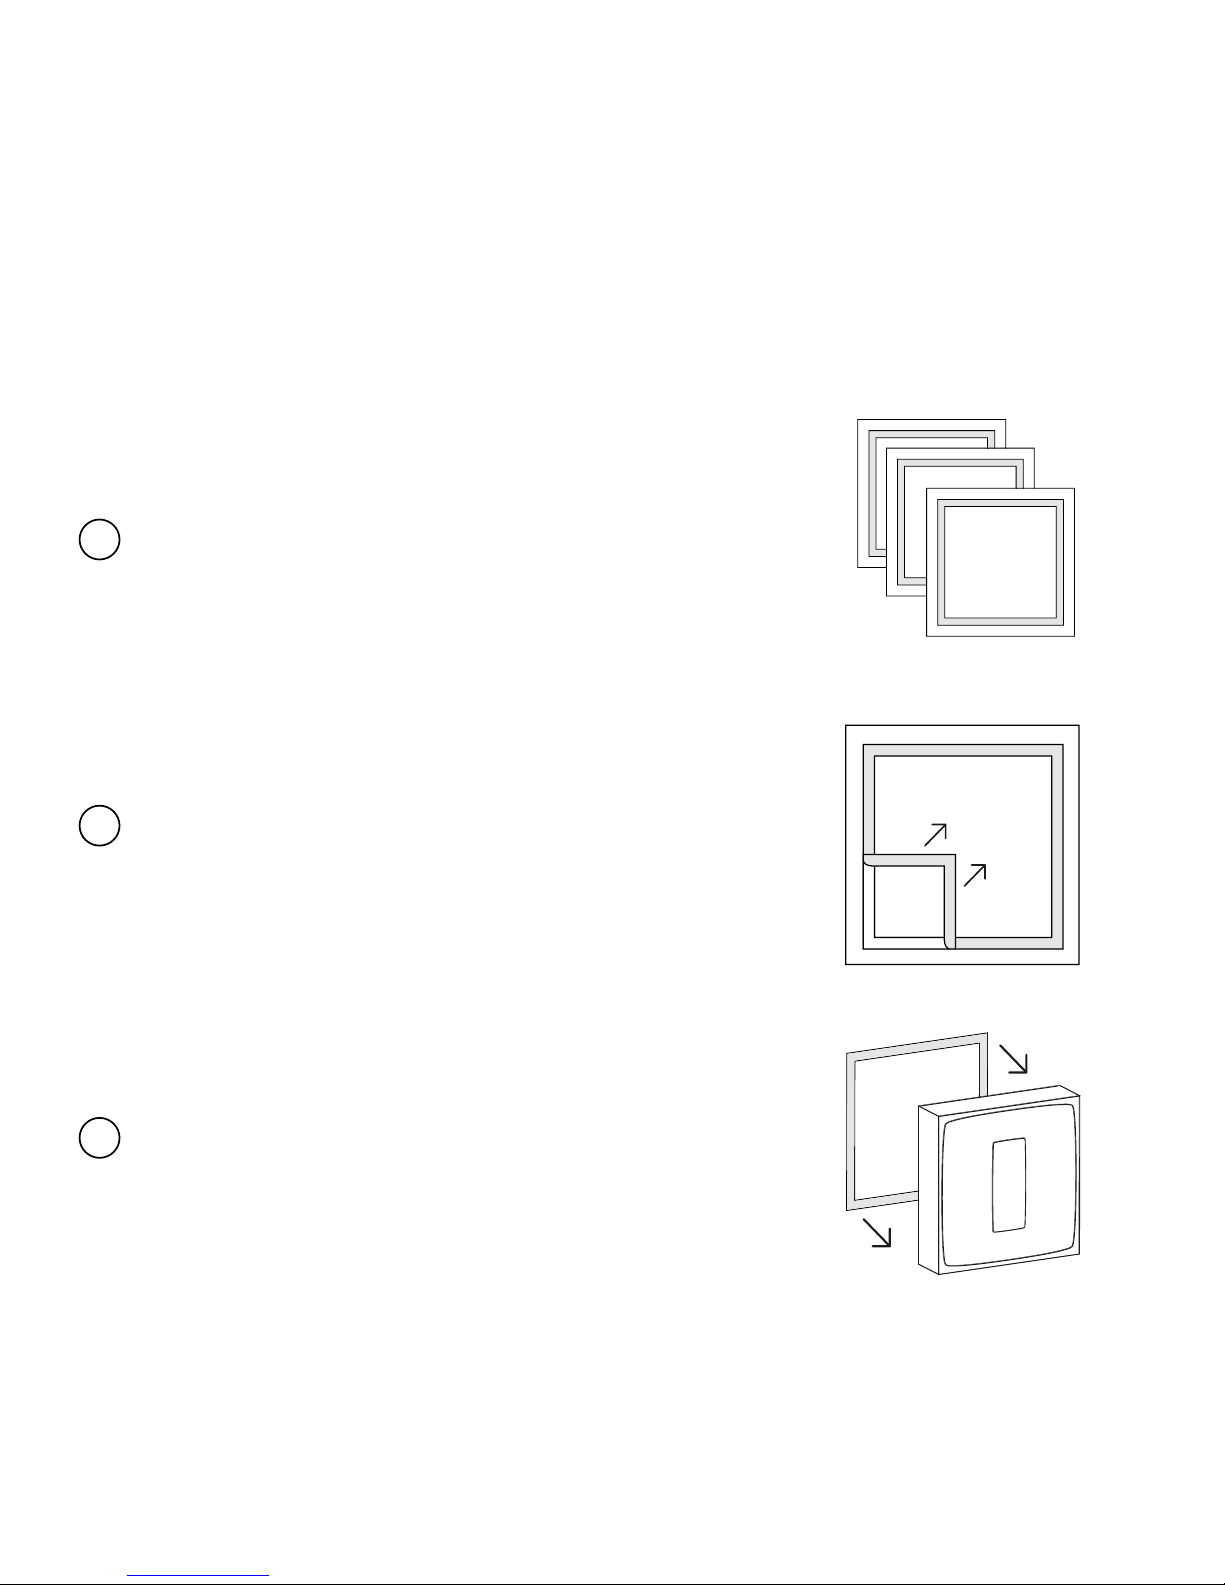
Customisation
You can choose to customize your
Thermostat by using one of the colour
adhesives.
Take o the outer frame of the adhesive.
Stick it on the back of your Thermostat.
1
2
3
Page 9
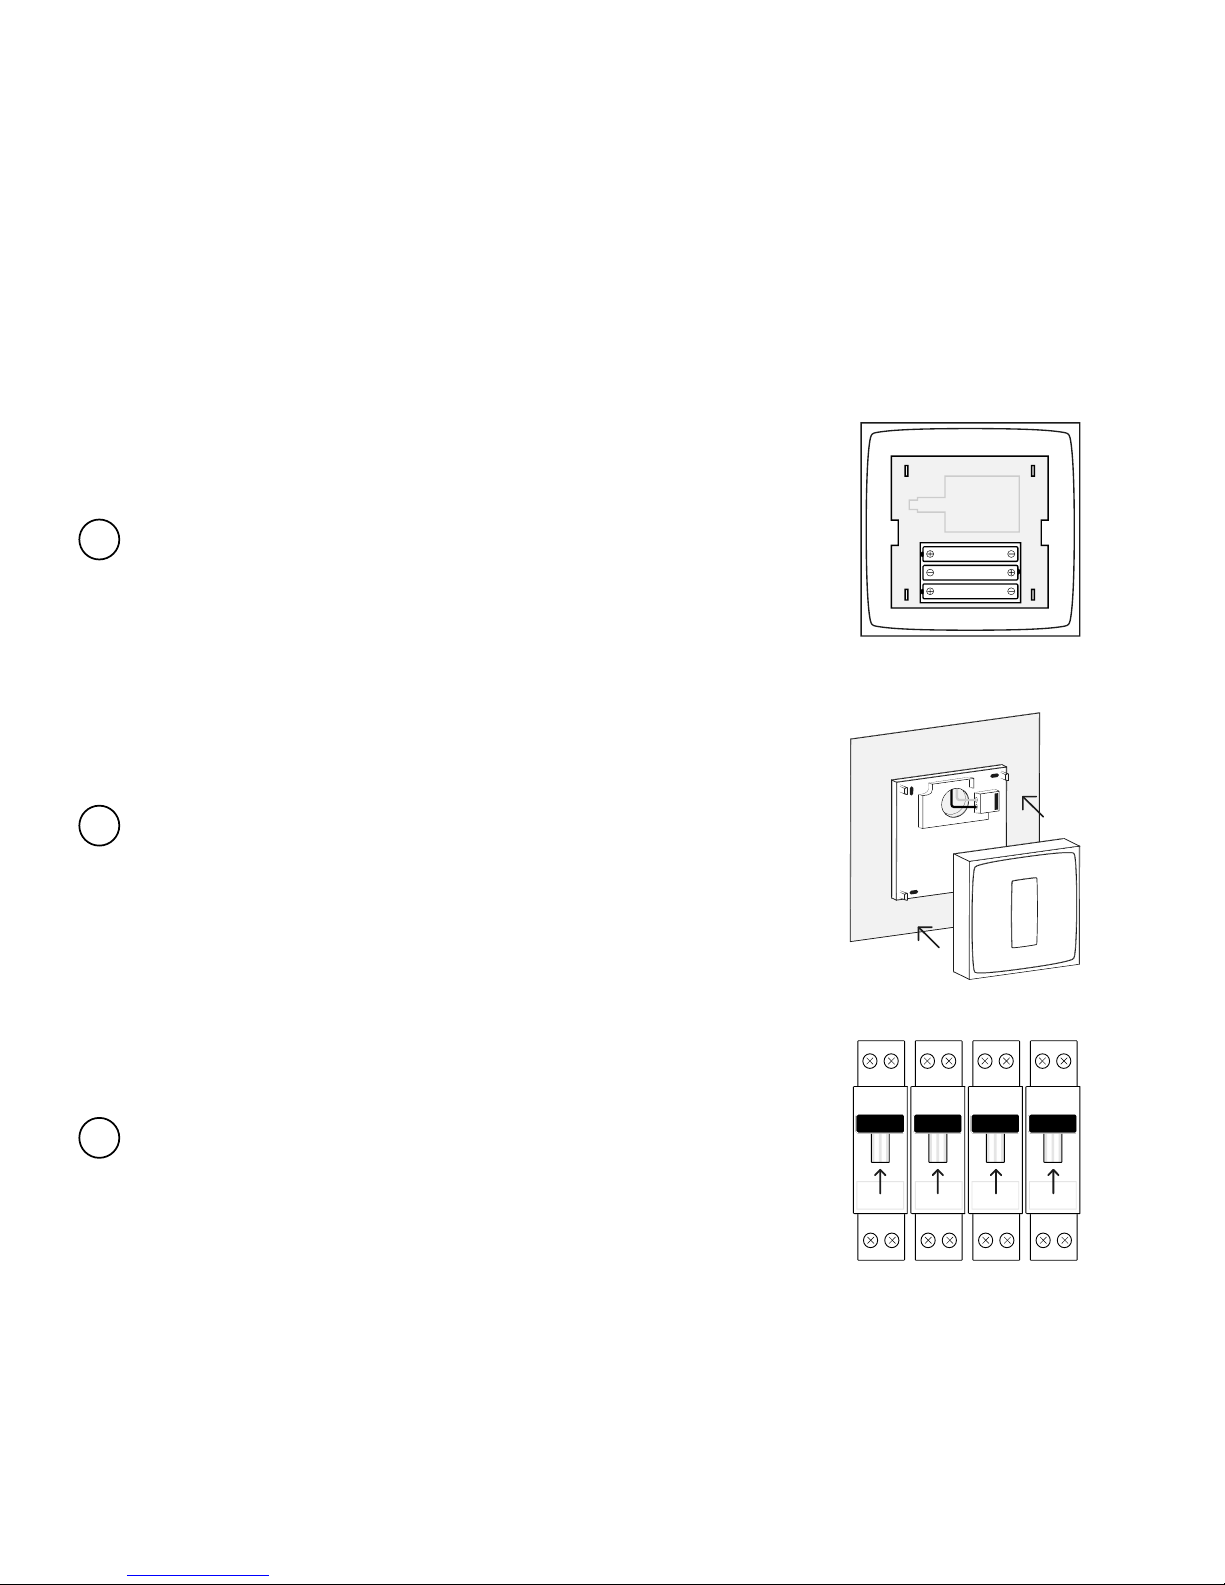
Insert the batteries in the Thermostat.
Set the Thermostat on the mounting plate.
Switch the power supply back on.
Thermostat
1
2
3
Page 10
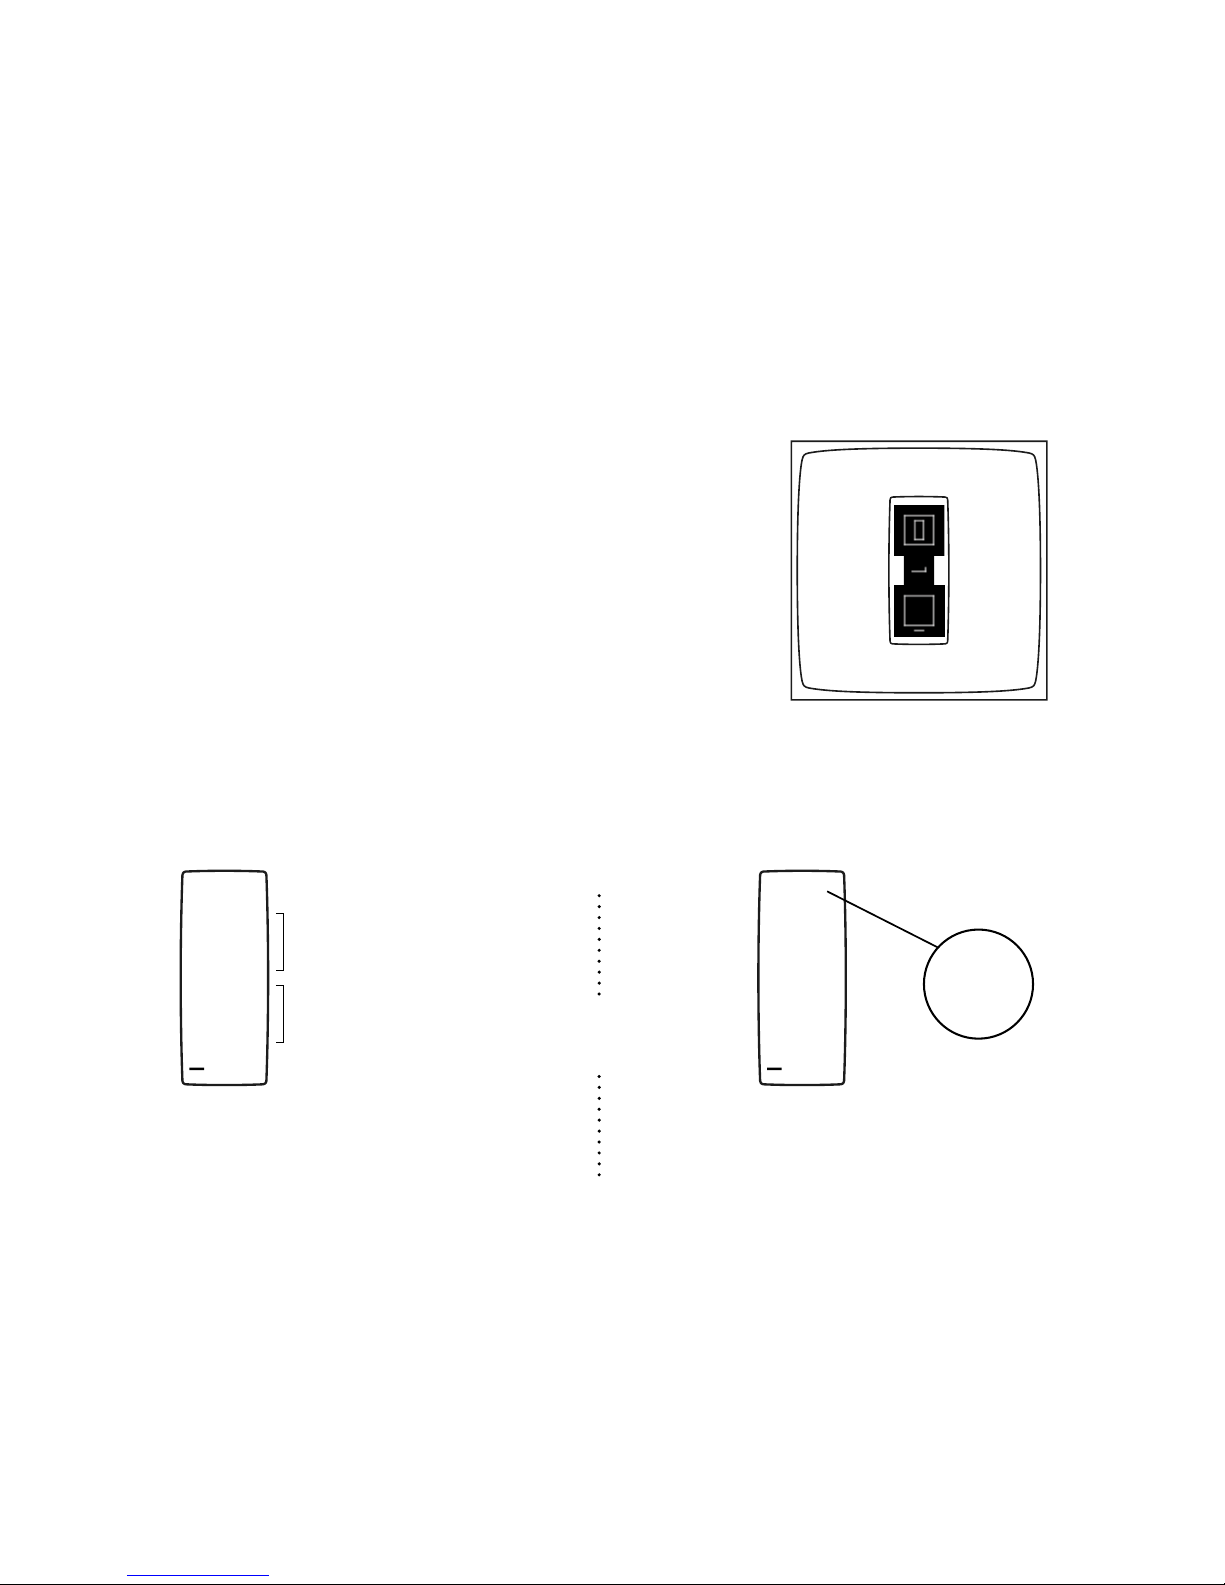
The Thermostat will display the start screen
and search for the Relay.
If the Thermostat has found the
Relay, it displays the desired
temperature and the room
temperature.
If the Thermostat hasn’t found the
Relay, it displays the «!» symbol.
In this case, move the relay closer to
the Thermostat and wait until the «!»
symbol disappears.
Thermostat
20
21
5
0
+
Measured temperature
Desired temperature
or
20
21
5
0
+
Page 11
Test
20
21
5
0
+
20
0
+
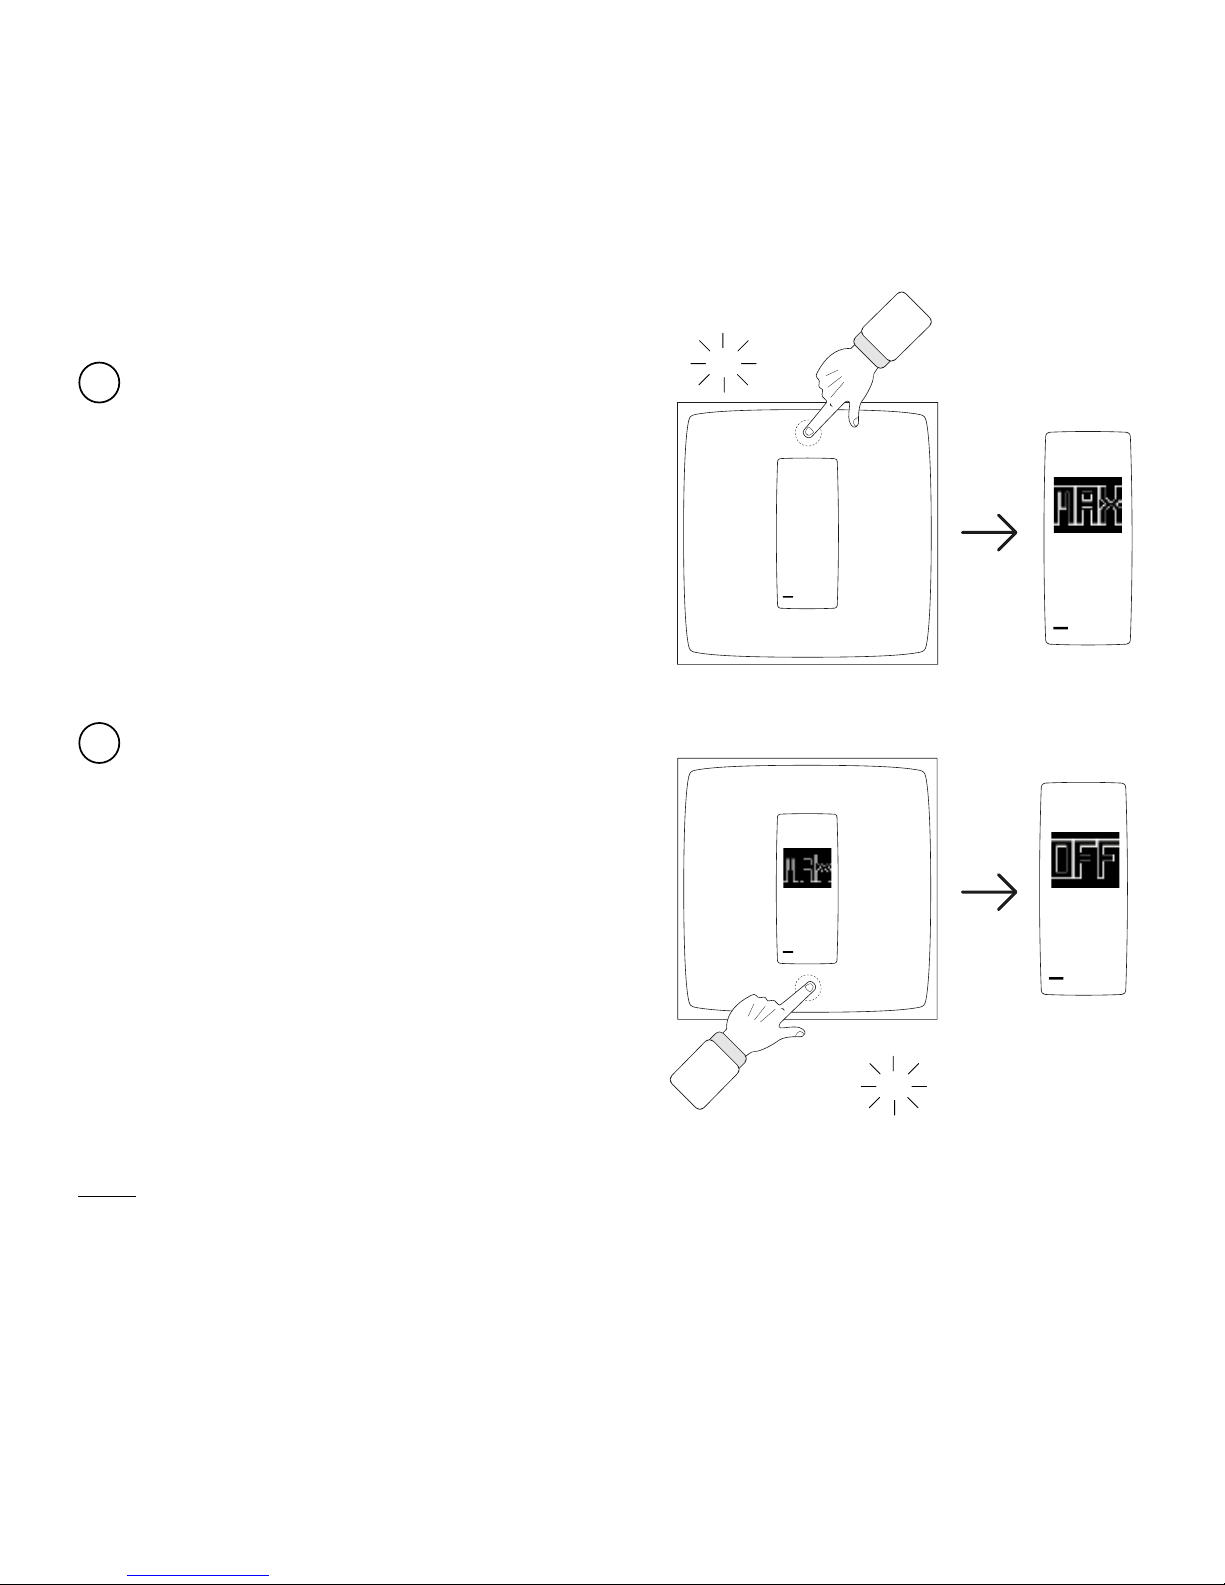
Push the top of the Thermostat until
it displays « MAX ».
The Thermostat switches
the boiler on.
Push the bottom of the Thermostat
until it displays « OFF ».
The Thermostat switches the boiler
o.
20
0
+
20
0
+
Note: If the Thermostat doesn’t switch on and o the boiler, the control wires have been incorrectly
wired. In this case, check your wiring using the picture of your old thermostat’s wiring to identify the right
control wires.
If the boiler does the opposite of what is described (for example, it switches OFF when the Thermostat
displays MAX), it means that you will have to change the polarity of the Thermostat. You can modify the
polarity in the advanced settings of the app once you will have finished the setup.
clic
clic
1
2
Page 12
To use your Thermostat from your smartphone or tablet, visit:
http://therm.netatmo.com
App
Smartphone / Tablettes
Page 13

Specifications
SIZE
Thermostat: 83 x 83 x 22 mm
DESIGN
Designed by Starck.
Translucent minimalist plexiglass cube.
5 interchangeable colours in the box.
SENSORS AND MEASUREMENTS
Temperature (measurement):
Ranges from : 0°C à 50°C
Accuracy: -/+ 0,1°C
Temperature (setpoint):
Ranges from: 5°C à 30°C
Incrément: 0.5°C
Unit: °C
E-INK DISPLAY
Energy ecient, longer battery life and
optimal readability.
FREE APP, LIFETIME SUPPORT
No subscription fee.
App available on the App Store,
Windows Phone Store and on
Google Play.
Free access to your online personal
dashboard.
Accessible from multiple devices.
WIRELESS SPECIFICATIONS
Wi-Fi 802.11 b/g/n compatible (2.4GHz).
Supported security: Open/WEP/WPA/
WPA2-personal (TKIP and AES).
Wireless connection between thermostat and
relay:
radio long range 100 m.
POWER AND BATTERIES
3 AAA batteries.
2 years battery life.
SETUP AND COMPATIBILITY
Compatible with gas, fuel, wood boilers
and heat pumps.
Switching current: max 4 A
Switching voltage: max 250 VAC
Switching power: max 120 W
HOMEKIT
Controlling HomeKit-enabled accessories away
from home requires an Apple TV (3rd generation
or later) with Apple TV software 7.0 or later and an
iPhone, iPad, or iPod touch with iOS 8.1 or later.
Page 14
M1-V7-EN
Complies with
IDA Standards
Canadian Compliance Statement
This device complies with Industry Canada license-exempt RSS standard(s).
Operation is subject to the following two conditions: (1) this device may not
cause interference, and (2) this device must accept any interference, including
interference that may cause undesired operation of the device.
Cet appareil est conforme aux normes CNR exemptes de licence d'Industrie
Canada. Le fonctionnement est soumis aux deux conditions suivantes: (1) cet
appareil ne doit pas provoquer d'interférences et (2) cet appareil doit accepter
toute interférence, y compris celles susceptibles de provoquer un fonctionnement
non souhaité de l'appareil.
This Class B digital apparatus complies with Canadian ICES-003.
Cet appareil numérique de la classe B est conforme à la norme NMB-003 du
Canada.
This device and its antenna(s) must not be co-located or operating in
conjunction with any other antenna or transmitter.
Cet appareil et son antenne (s) ne doit pas être co -localisés ou fonctionnant en
conjonction avec une autre antenne ou transmetteur.
Taiwan Wireless Statements
無線設備的警告聲明
本產品符合低功率電波輻射性電機管理辦法第〸二條、第〸四條等
條文規定:
1.經型式認證合格之低功率射頻電機,非經許可,公司、商號或使
用�均不得擅自變更頻率、加大功率或變更原設計之特性及功能。
2.低功率射頻電機之使用不得影�飛航安全及干擾合法通信;經發
現有干擾現象時,應立即停用,並改善至無干擾時方得繼續使用。
前項合法通信,指依電信法規定作業之無線電通信。
低功率射頻電機須忍受合法通信或工業、科學及醫療用電波輻射性
電機設備之干擾。
EU Declaration of Conformity
We, Netatmo, declare that this device is
in compliance with the essential requirements and other relevant provisions of
Directive 1999/5/EC.
Safety warnings
This device must be installed according
to the applicable norms. Use only with
supplied power plug adaptor and boiler
adaptor. This device is for indoor use
only.
Before inserting the batteries, check that
the contacts in the device and on the
batteries are clean, is necessary clean
them. Note the polarity (+/-) when inserting
the batteries. Do not throw the batteries
into a fire, short-circuit them or dismantle
them. Keep children away from batteries.
Seek medical attention immediately if a
battery is swallowed. Do not attempt to
repair the device yourself; customer
service is available. Any changes or
modifications to this unit not expressly
approved by the party responsible for
compliance could void the user’s authority
to operate the equipment. Thermostat and
relay insulation: class II devices. This
device is not intended for use by persons
(including children) with reduced physical,
sensory or mental capabilities, or lack of
experience and knowledge, unless they
have been given supervision or instruction concerning use of the appliance by a
person responsible for their safety.
Children should be supervised to ensure
that they do not play with the appliance.
Legal notice
Use of the HomeKit logo means that
an electronic accessory has been designed to connect specifically to iPod,
iPhone, or iPad, respectively, and has
been certified by the developer to meet
Apple performance standards. Apple is
not responsible for the operation of this
device or its compliance with safety and
regulatory standards.
Please note that the use of this accessory
with iPod, iPhone, or iPad may aect wireless performance.
Copyright Netatmo © 2016 All rights reserved. Reproduction and distribution prohibited without written authorization from Netatmo.
 Loading...