

Page 1
FLEXNET BARB CONNECTOR ASSEMBLY INSTRUCTIONS 1
FLEXNET
™
AND FLEXNET
™
HP
BARB CONNECTOR
ASSEMBLY INSTRUCTIONS
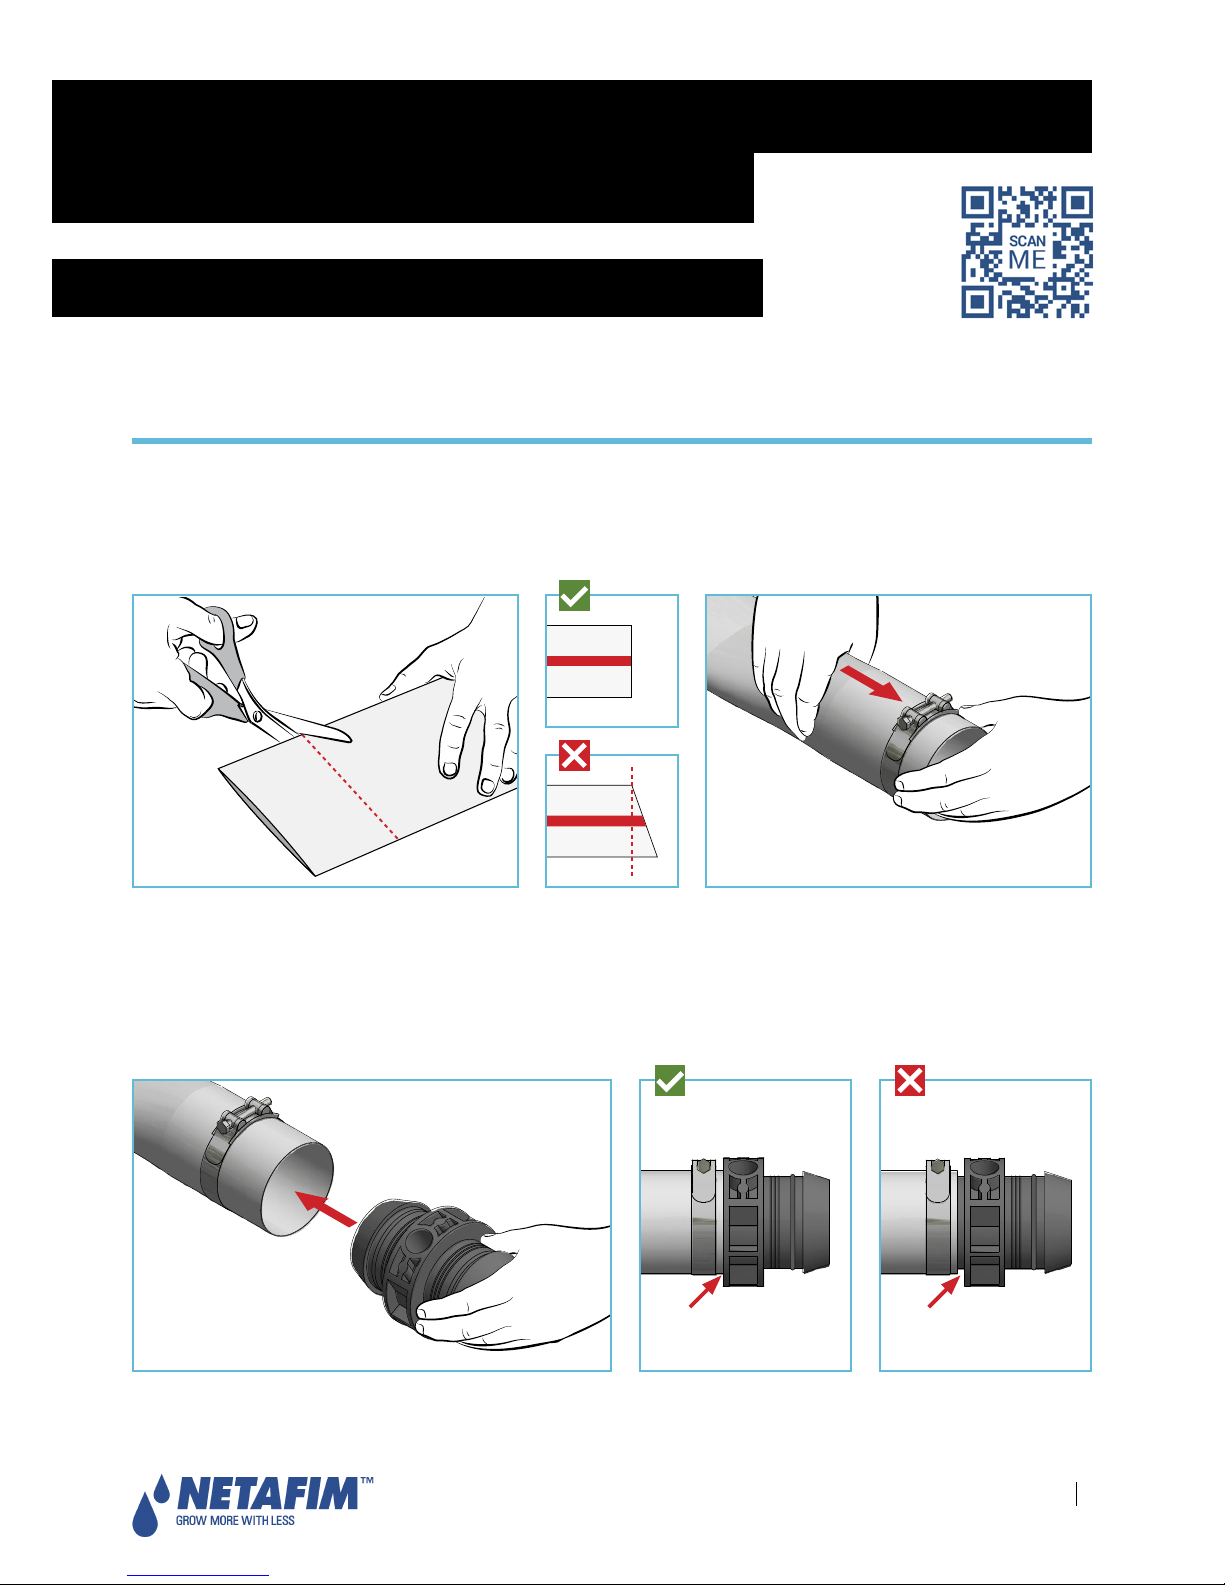
Connecting a barb connector. Size 2"; 3"; 4"
1.
Strictly ensure the pipe is
cut perfectly straight
during the cutting operation (
Fig. 1
).
When reconnecting a pipe to the connector, cut at least 1.5 cm (5/8") off the pipe end.
2.
Insert the metal clamp onto the pipe (
Fig. 2
).
3.
Make sure that the pipe inside surface is wet, so it will not stick to the rubber seal in the connector, and
move it from it's groove.
4.
Make sure that the pipe is
inserted all the way
to the connector’s shoulder (
Fig. 3a
).
5.
Make sure there is
no gap
between the metal clamp and the connector’s shoulder (
Fig. 3, 3a and 3b
).
No gap Gap
Fig. 1 Fig. 2
Fig. 3 Fig. 3a Fig. 3b
Page 2
FLEXNET BARB CONNECTOR ASSEMBLY INSTRUCTIONS 2
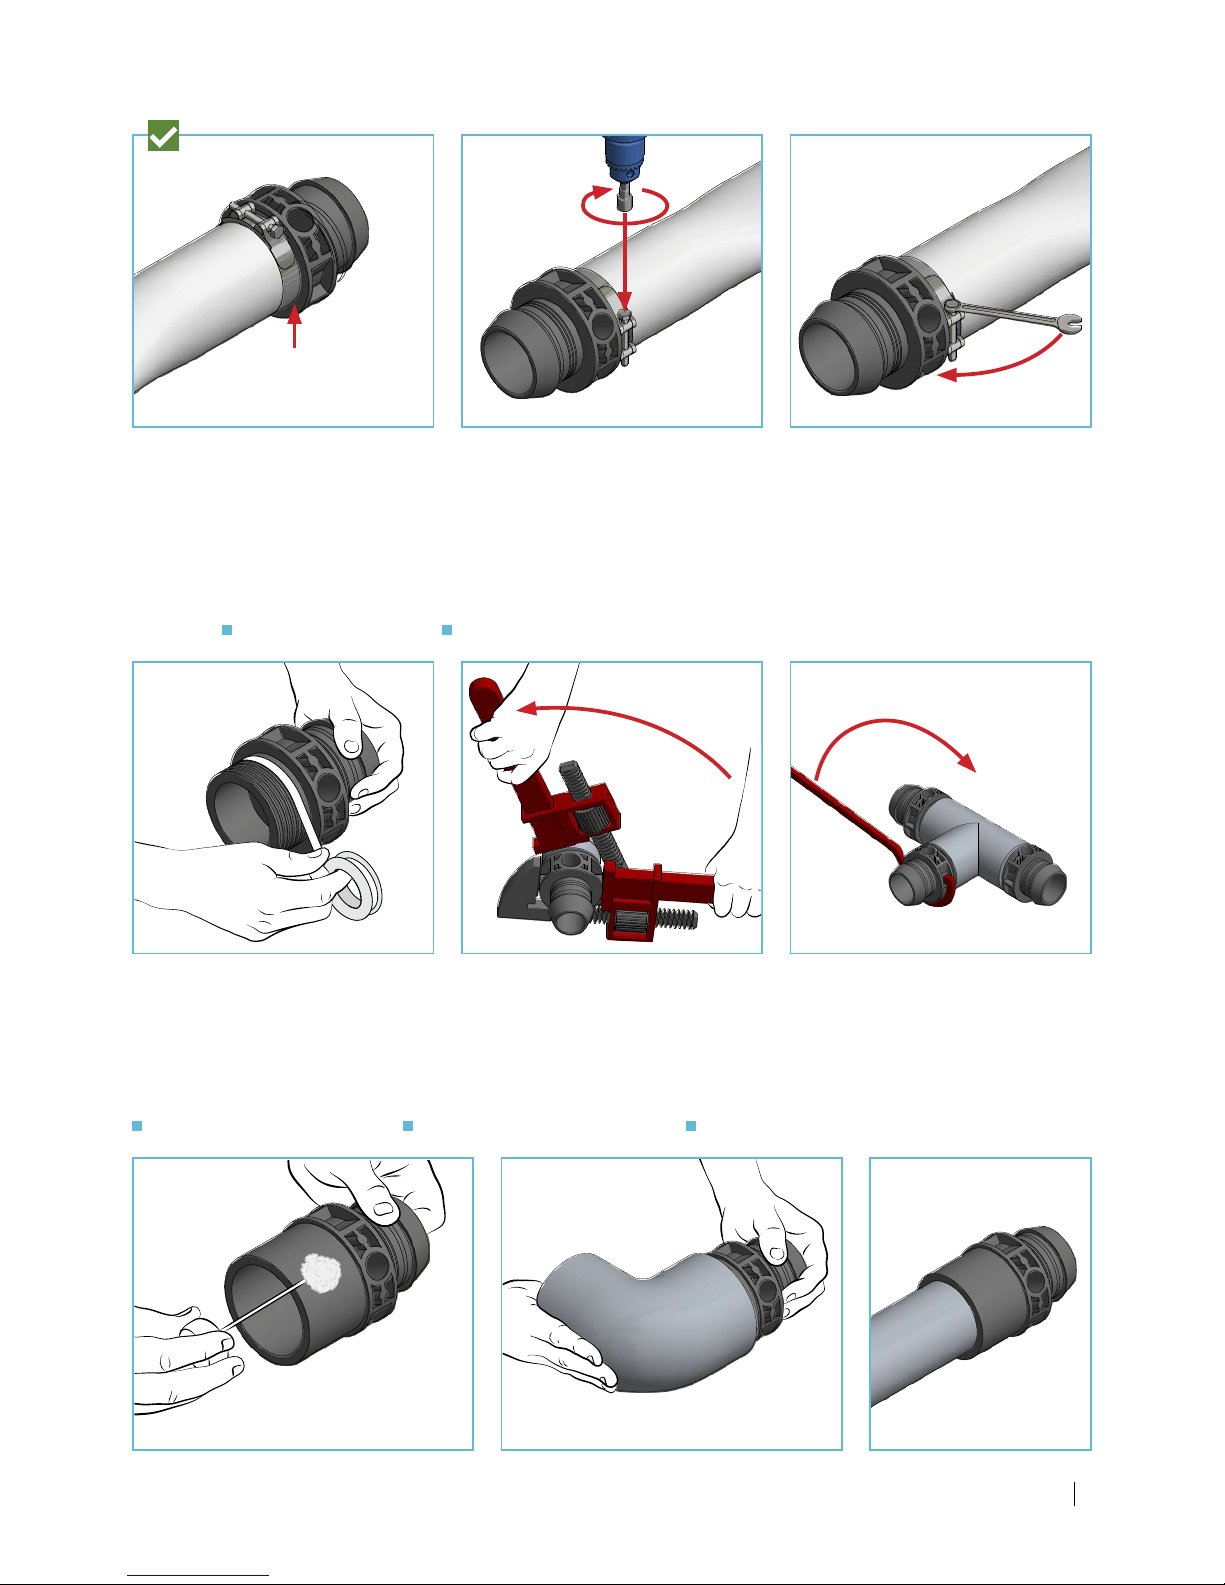
Connecting to fittings
Connecting a threaded adaptor
Apply teflon tape on the threads for sealing (
Fig. 7
).
Use a suitable key/wrench to tighten the thread (
Fig. 8 and 9
).
Key sizes
2“ Key size: 16-40 mm 3“and 4” Key size: 40-75 mm
6. Tighten forcefully (Fig. 6
).
Connecting a PVC cement adaptor
Glue the adaptor according to the PVC cement manufacturer's instructions. Netafim™ recommends using a
cleaning primer to ensure proper welding.
Sizes of PVC adaptors:
2“ ISO 63/50, ASTM 2”/1.5” 3“ - ISO 90/75, ASTM 3”/2.5” 4“ - Male ISO 110, ASTM Spigot 4”
Fig. 7 Fig. 8 Fig. 9
No gap
Fig. 4 Fig. 5 Fig. 6
Fig. 10 Fig. 11 Fig. 12
Page 3
FLEXNET BARB CONNECTOR ASSEMBLY INSTRUCTIONS 3
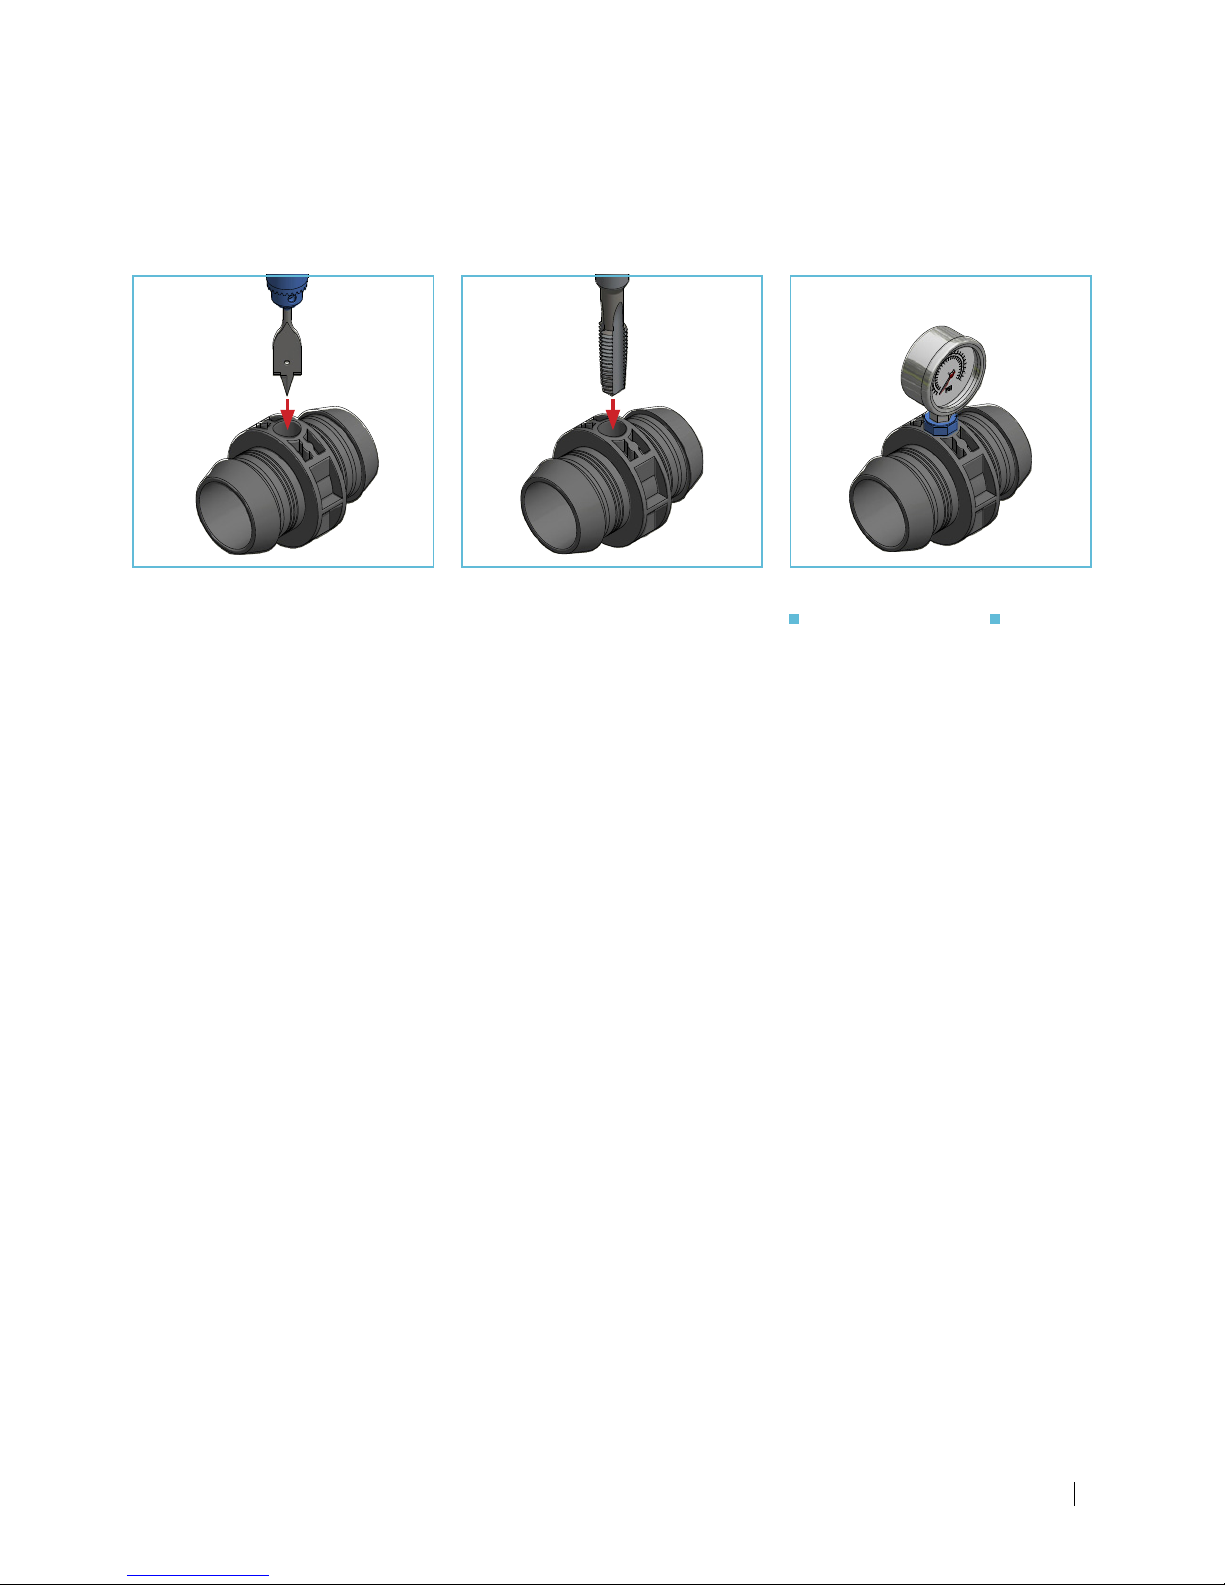
Branching a ½” thread
1.
Use a 18-19 mm (3/4") drill-bit to drill a hole at the designated place (
Fig. 13
).
2.
Use a BSP/NPT 1/2" tap to prepare the thread (
Fig. 14
).
3.
Connect the relevant accessory (apply Teflon tape) (
Fig. 15
).
If needed, retighten under water pressure.
Fig. 13 Fig. 14 Fig. 15
Netafim Tapping kits: Cat No.
45000-003162 and 45000-003185.
Other Possible uses:
Branching connector Air vent.
Page 4

FLEXNET BARB CONNECTOR ASSEMBLY INSTRUCTIONS 4
3.
Wet the connector and insert it into the pipe.
4.
Make sure that the pipe is
inserted all the way
to the connector’s shoulder.
5.
Make sure that the metal clamp is exactly above the rubber seal (
Fig. 4
).
6. Tighten forcefully (Fig. 8
).
No gap
Connecting a barb connector. Size 6"; 8"; 10"; 12"
1.
Strictly ensure the pipe is
cut perfectly straight
during the cutting operation.
When reconnecting a pipe to the connector, cut at least 1.5 cm (5/8") off the pipe end.
2.
Insert the metal clamp onto the pipe.
Fig. 1 Fig. 2
Fig. 6 Fig. 7 Fig. 8
Fig. 3 Fig. 4 Fig. 5
Page 5

FLEXNET BARB CONNECTOR ASSEMBLY INSTRUCTIONS 5
Connecting to PVC fittings
Sizes of PVC adaptors:
ASTM D-2466: 6"; 8"; 10"; 12" ISO 1452: 160 mm; 200 mm; 250 mm; 315 mm.
Connecting a PVC cement adaptor
Glue the adaptor according to the PVC cement manufacturer's instructions (
Fig. 9 and 10
).
Netafim™ recommends using a cleaning primer to ensure proper welding.
Coupling options
End cap Elbow
Fig. 11 Fig. 12
Fig. 9 Fig. 10
Page 6

FLEXNET BARB CONNECTOR ASSEMBLY INSTRUCTIONS 6
3.
Wet the connector and insert it into the pipe.
4.
Make sure that the pipe is
inserted all the way
to the connector’s shoulder.
5.
Make sure that one metal clamp is exactly above the rubber seal and the other exactly above the ribbed rim (Fig. 4
).
Fig. 1 Fig. 2
Connecting a high pressure barb connector
Size 6"; 8"
1.
Strictly ensure the pipe is
cut perfectly straight
during the cutting operation (
Fig. 1
).
When reconnecting a pipe to the connector, cut at least 5.0 cm (2") off the pipe end.
2.
Insert the 2 metal clamps onto the pipe (
Fig. 2
).
6. Tighten
both metal clamps
forcefully (Fig. 7 and 8
).
Fig. 6 Fig. 7
Fig. 4 Fig. 5
Fig. 8
Fig. 3
Page 7

FLEXNET BARB CONNECTOR ASSEMBLY INSTRUCTIONS 7
Connecting to PVC fittings
Sizes of PVC adaptors:
ASTM D-2466: 6"; 8" ISO 1452: 160 mm; 200 mm.
Connecting a PVC cement adaptor
Glue the adaptor according to the PVC cement manufacturer's instructions (
Fig. 9 and 10
).
Netafim™ recommends using a cleaning primer to ensure proper welding.
Coupling options
Fig. 9 Fig. 10
End cap Elbow
Fig. 11 Fig. 12
 Loading...