

Page 1
MP3 Player (C632) User’s Manual
Copyright
This manual contains content protected by copyright laws. All rights are reserved. No part of
this document may be used, reproduced, or/and stored in a database/retrieval system in any
form without prior written permission of Netac Technology Co., Ltd.
The information in this manual is subject to changing without notice. Please visit Netac
website http://www.netac.com to download the latest user's manual.
Patent Number: US 6829672, CN 99117225.6, CN 00114081.7
Introduction
Thanks for purchasing Netac MP3 Player. MP3 Player is a new type of portable digital
music player, perfectly combines digital music playing, recording, FM tuner and removable
hard disk, etc.
Features
l Support MP3, WMA music files
l Built-in FM tuner
l Lyric (LRC file) shows when music is playing
l Support MIC and FM recording
l Support A-B repeat
l Support multiple sound modes and playback modes
l User-defined the time of power off
l Flash Drive without driver installation (except on Windows 98/98SE)
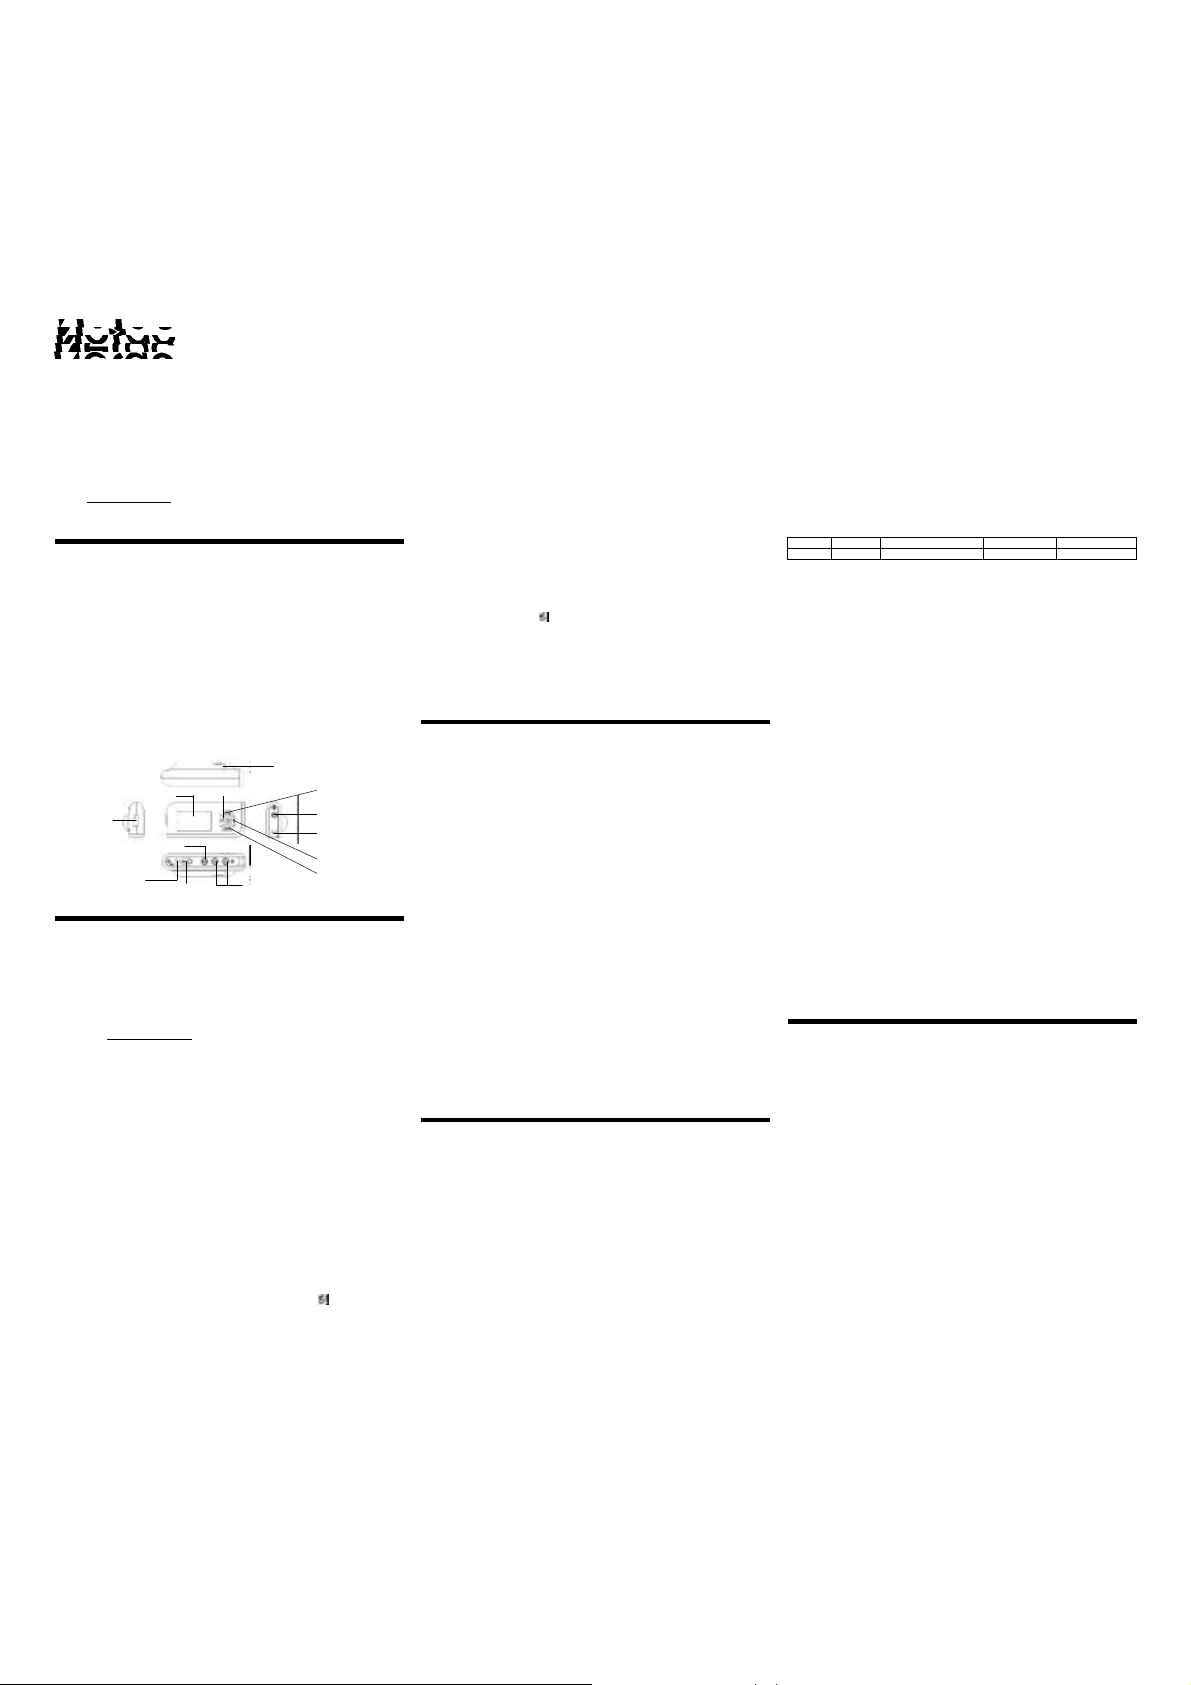
Parts and Controls
Battery Cover
Previous Button
LCD
Mini USB Port
REC Button
MIC
HOLD Switch
Usage on the Computer
MP3 Player Utilities Installation
Netac supplies you MP3 Player Utilities to ease your use of MP3 Player. MP3 Player
Utilities includes MP3 Player driver (Especially for users on Windows 98/98SE), MP3
Player Disk Tool (Format MP3 Player or make bootable/secure disk), MP3 Player Update
Tool (Update MP3 Player’s firmware), Sound Convert Tool (Convert the recorded ACT file
into WAV file and play MP3/WAV file in the computer). You can download MP3 Player
Utilities from http://www.netac.com for installation.
Note: The system would install the Installer 2.0 first (according to the prompts to finish) if
your system has not installed it on Windows 98/98SE.
Using MP3 Player with the Computer
1) Boot your computer, connect standard port of USB cable with the computer, mini port
with MP3 Player.
2) Windows 98/98SE/Me/2000/XP: Open “My Computer”, you would find a new icon
named “Removable Disk” representing MP3 Player.
Mac OS 9.x or above: A new icon named “NO_NAME” (“Untitled” on Mac OS 9.x) would
appear on the desktop of your computer representing MP3 Player.
Linux 2.4.2 or above: Enter the system by user ID “root” and input the command
“mount /dev/sda /mnt”. This command is to create a directory where MP3 Player will
be mounted.
Note: “sda” is an unfixed input item, please make relevant changes according to Linux operating
discipline.
3) Then you can copy, delete or edit data, just as on a traditional hard disk.
Safely Remove MP3 Player
Please refer to the following steps to remove MP3 Player after data transferred:
Windows 98/98SE: Unplug MP3 Player from USB port of the computer about 3 seconds
later after data transferring finished.
Windows Me/2000/XP (Windows 2000 as example): Click the icon at the taskbar with
the left key of mouse, click the prompt menu “Stop USB Mass Storage Device - Driver”,
and click “OK” in the pop-up window, then you can unplug MP3 Player safely.
Mac OS 9.x or above: Select the icon representing MP3 Player, click “File”, select “Exit NO
NAME”, then unplug MP3 Player from the computer. (Please drag MP3 Player icon into
Volume+/- Button
Play/Pause Button
Earphone Jack
Neck Strap Jack
Next Button
MODE Button
Trash, then unplug it on Mac OS 9.x.)
Linux 2.4.2 or above: Input the command “umount /mnt” before unplugging MP3 Player. The
“/mnt” directory is corresponding with the “/mnt” mentioned above.
Dual Zone (Normal & Secure Disk) & Bootable Function
MP3 Player supports dual zone (normal & secure disk) & bootable function. You can use
MP3 Player Utilites to format MP3 Player to secure or bootable disk. The steps are as the
following:
l Connect the MP3 Player with the computer. Run the MP3 Player Disk Tool by selecting
“Start -> Programs -> MP3 Player Utilities 1.47 -> MP3 Player Disk Tool”. Click to select
the “Partition and Encrypt” option, drag the scroll bar to select the size of secure partition.
You can also set the access username and password by selecting the check box of “Set
username and password”. Press “Start” button and follow the prompted message to
complete the process.
l You can also use this tool to format MP3 Player by choosing "Format" option. You can
choose from “Quick”, “Full” or “Low” format by selecting the radio button accordingly.
Making MP3 Player as a bootable disk is easy. Just select the “Make bootable disk”
check box in “Format” option, and press “Start” button to complete the process. You
can use MP3 Player as a bootable disk to rescue your system in emergency situation.
Note: w MP3 Player can only play files saved in normal disk.
w Under system Windows XP with SP2, if you don’t logon in with administrator
acount, after using secure disk, please refer to the following steps to unplug MP3
Player:
1) Click the icon , and click the pop-up menu “Stop USB Mass Storage
Device - Driver”, it would pop-up another menu prompting that you can’t stop
the storage device, click “OK”.
2) Refresh the system (press F5 or click the right button of the mouse, select
“refresh”).
3) Do as step 1) again, then you can unplug MP3 Player from the computer
safely.
Basic Operation
Keystroke Definition
Hold: The time of keystroke is about 2 seconds.
Press: The time of keystroke is less than 2 seconds.
HOLD
This function is used to prevent the buttons from being operated accidentally. Push the
HOLD switch to the direction of the arrow marked above it, all buttons are locked, if MP3
Player is connected with the computer, you can not copy data into MP3 Player because it is
writing protected. To release, please push the HOLD switch to the opposite direction. If the
HOLD switch is opened when power on, MP3 Player would power off automatically after
prompted the lock status.
Power On/Off
To power on/off MP3 Player, please hold Play/Pause button (except for recording and
recording pause status). When MP3 Player is in status except for playing\recording status
and non-USB mode, MP3 Player would power off automatically if there is no operation
during the time which is set in “SYS -> Power off -> Off time”. (Please refer to “SYS
(System Settings Mode)” for details.)
Main Menu
There are five modes in MP3 Player: MSC (Music Mode), REC (Recording Mode), RPL
(Recorded File Playing Mode), FM (FM Mode) and SYS (System Settings Mode). The
operations and settings would be introduced detailedly in this manual.
Keystroke Operations
Press Previous/Next button to select the mode, press MODE button to enter.
Tips: 1) Holding MODE button under each Mode to enter the main menu.
2) Under settings of each Mode, press Play/Pause button to return to the main
interface of the Mode, or MP3 Player would switch to the main interface of the Mode
automatically if there is no operation in 2 seconds.
MSC (Music Mode)
Select MSC in the main menu, press MODE button to enter.
Keystroke Operations
l Play/Pause: Press Play/Pause button to play/pause a track.
l Select Track: Press Previous/Next button to switch previous/next track.
l Rewind/Forward: Press Previous/Next button continuously to rewind/forward track
during playing. It will stop when rewind/forward to the beginning/ending of the track.
l Volume: Press Volume +/- button to turn up/down the volume.
Playing Settings
Keystroke Operations
l Press MODE button to enter the interface of playing settings when playing.
l Press Previous/Next button to select the item, press MODE button to enter.
l Press Previous/Next button to set the value of the selected item.
l Press MODE or Play/Pause button to confirm settings and return to the main
interface of MSC.
You can set the following items in the interface of playing settings:
1) Repeat: There are 7 repeat modes as Normal, Repeat One, Folder, Repeat Folder,
Repeat All, Random and Intro (Play the anterior 10 seconds of each track in current
folder orderly).
2) Equalizer: There are 7 EQ modes as Natural, Rock, Pop, Classic, Soft, Jazz and
DBB.
3) Tempo rate (Only supports MP3 file): Select different tempo rate (such as becoming
faster or slower) when playing, but the tune doesn’t be changed.
4) Replay
l Select “Replay” and press MODE button to enter the interface of replay.
l Press Next button to set A and B spot, then the track would be played between A and B
repeatedly. MP3 Player would exit “Replay” automatically when the repeated times
reach the replay times (refer to “Replay times” for details). You can set A and B spot
renewedly by pressing Previous button.
l Press Next button to enter “Follow” and “Contrast” status during A-B replaying
process.
l You can press REC button to enter A-B repeat mode facilely during playing.
Keystroke
First
Operations
Select A Spot
Tips: You can press MODE button to exit the “Replay” mode during the whole process
above.
5) Replay times: Set the replay times as 1~10.
6) Replay gap: Set the interval of replay as 1~10 seconds.
7) Exit: Select exit to return to the main interface of MSC.
Pause Settings
Keystroke Operations
The keystroke operations are the same as “Playing Settings”. Please pay attention: Press
MODE button to confirm settings and return to the main interface of MSC.
You can set the following items in the interface of pause settings:
1) Local folder: Select the playing folder, and play tracks of the selected folder.
Note: MP3 Player can only play 1 level folder (each folder only supports 99 tracks or
recorded files).
2) Delete file
l Select “Delete file”, and press MODE button to enter the interface.
l Press Previous/Next button to choose whether delete the playing track or not, press
MODE button to confirm and return to the main interface of MSC.
3) Del. all: Delete all files of current folder. The operations are as above.
Note: MSC (Music Mode), RPL (Recorded File Playing Mode) and FM (FM Mode) have the
deleting function. Under each Mode, the function can only delete the files correlated with the
current Mode. The LCD would display “No Files!” after deleted all files, and MP3 Player
would return to the main menu automatically.
4) Exit: Select “Exit” to return.
LRC Showing
MP3 Player would automatically search the lyric file (LRC format, you can make
by yourself, download from Internet, etc.) which name is the same as the current playing
track in the same folder. If there is lyric file matching with the playing track, hold MODE
button to enter the lyric displaying interface. The lyric shows with the track playing
synchronously. In the lyric displaying interface:
l Press MODE button can return to the main interface of MSC, and hold MODE button
can return to the main menu.
l Thumb the lyrics manually: Press Volume +/- button to thumb lyrics manually. The
lyric shows synchronously once stop thumbing manually.
REC (Recording Mode)
Please ensure MP3 Player is power enough to record.
You can use MP3 Player to record through MIC under REC. Press Previous/Next button to
select “REC” in the main menu. Press MODE button to enter the main interface of REC.
Note: The LCD would display “Disk Full!” if there is no space to save the new recorded file.
It would display “Over record” if there are 99 files in this folder.
Recording Settings
MP3 Player is getting ready for recording once entering the main interface of REC.
Keystroke Operations
The keystroke operations are the same as “Playing Settings”. Please pay attention: Press
MODE button to confirm settings and return to the main interface of REC.
You can set the following items in the interface of recording settings:
1) Local folder: Select the folder to save the recorded file.
2) REC type: You can select Fine REC, Long REC, Fine VOR, and Long VOR.
In type VOR, the recording can pause automatically if little voice recognized.
l It is suggested to use VOR when the noise is small.
l It is better to begin speak after MP3 Player has recorded for 5~6 seconds.
3) Exit: Select “Exit” to return to the main interface of REC.
Tips: There should be proper distance between MP3 Player and the voice source when
recording the voice from TV or sound box to get the best effect.
Recording
You can start recording after settings of recording finished.
1) Press Play/Pause or REC button to start recording.
2) Press Play/Pause or REC button to pause/resume during recording.
Second
Select B Spot, Enter Replay
Third
Enter Follow Status
Fourth
Enter Contrast Status
PN: UM05520103
Page 2
3) Under recording or recording pause status, hold Play/Pause or REC button to end
and save the recorded file, or hold MODE button to end and save the recorded file
and return to the main menu of MP3 Player.
4) All recorded files are played in “RPL (Recorded File Playing Mode)”.
Tips: If MP3 Player is not playing music/recorded files, you can begin recording by holding
REC button, the following operations are as above.
RPL (Recorded File Playing Mode)
Press Previous/Next button to select RPL in the main menu, press MODE button to enter
the main interface of RPL.
Basic Operations
The basic operations include play/pause, select the recorded file, forward/rewind, turn up/
down, please refer to “Basic Operations” of “MSC” for details.
Recorded File Playing Settings
Press MODE button to enter the interface of recorded file playing settings to set the following
items during playing: Repeat, Tempo rate, Replay. Please refer to “Playing Settings” of
“MSC” for details. (It doesn’t support “Follow” and “Contrast” in replay mode, and it can not
repeat automatically.)
Recorded File Pause Settings
Press MODE button to enter the interface of recorded file pause settings to set the following
items during the recorded file pause: Local folder, Delete file, Del. all. Please refer to “Pause
Settings” of “MSC” for details.
FM (FM Mode)
Press Previous/Next button to select FM in the main menu, press MODE button to enter the
main interface of FM to receive FM program.
Basic Operations
l Exit FM: Hold MODE button to exit FM and return to the main menu.
l Automatic Searching: Hold Previous/Next button, MP3 Player searches channel
ahead/backwards by 0.1MHz automatically. Press Previous/Next button to stop
automatic searching.
l Manual Searching: Press Previous/Next button to search channel ahead/backwards
by 0.1MHz manually in receiving status. (It is suggested to select manual searching
indoor.)
l Switch Channel: You can switch channel by pressing Play/Pause button in receiving
status if there is more than one channel saved.
l Volume: Press Volume +/- button to turn up/down the volume in receiving status.
Note: The earphone can be used as an antenna, connecting it with MP3 Player would make
better effect while searching channels.
FM Settings
1) Press MODE button to enter the interface of FM settings in receiving status.
2) Press Previous/Next button to select the item and press MODE button to confirm and
return to the main interface of FM after selected.
You can set the following items for the receiving program:
Items
Descriptions
MP3 Player can save and number for the searched channels, and this
number would be displayed on LCD.
Save
MP3 Player supports “Normal Band’ and “Japan Band”, and can save 20
channels for each band, i.e. it can save 40 channels aggregately.
Delete
Delete the channel you don’t want to save anymore.
Del. all
Delete all channels saved in MP3 Player.
Normal Band
Scope of frequency: 87MHz ~ 108MHz
Japan Band
Scope of frequency: 76MHz ~ 90MHz
You can record the FM program you are receiving. The recording steps are
as the following:
Fine REC
l Press MODE button to enter the interface of FM settings in
(32K, WAV
Format)
Long REC
(8K, ACT
Format)
Exit
receiving status.
l Select “Fine REC” or “Long REC”, then press MODE button to
enter the recording interface and begin recording.
l Press Play/Pause button to pause/resume recording as you want.
l Press MODE button to end and save the recorded file, and return
to the main interface of FM.
l Hold Play/Pause button to end and save the recorded file, and get
ready for next recording, or hold MODE button to end and save the
recorded file, and return to the main menu of MP3 Player.
The FM recorded file would be saved in the root directory of MP3 Player,
please select another directory to save the recorded file when there are 99
recorded files in the root directory.
Exit the interface of the FM settings and return to the main interface of FM.
SYS (System Settings Mode)
Press Previous/Next button to select SYS in the main menu. Press MODE button to enter
the main interface of SYS.
Keystroke Operations
1) Press Previous/Next button to select the item in the main interface of SYS.
2) After selected an item, press MODE button to enter.
3) Press Previous/Next button to select the value for the selected item.
4) Press MODE button to make the value of the selected item effective except for
Backlight, Light Color, Power off, and Contrast.
The brief introductions of each item are as the following:
Items
Record Time
Backlight
Light Color
Language
Power Off
Replay Mode
Contrast
Memory Info.
Firmware Version
Exit
Descriptions
Set the recording date and time of recorded files, press Volum e +/-
button to set year, month, day, hour, minute, second, and press
Previous button to turn down the value, Next to turn up.
Press Previous/Next button to set the continuous illumed time of
backlight when there is no operation before the backlight is turn off.
Set the backlight as colors light, red, green, yellow, blue, purple,
cyan and white.
Set the language as Simple Chinese, English, Traditional Chinese,
Japanese, Korean, French, German, Dutch, Italian, Portuguese and
Spanish.
Press Previous/Next button to select Off time and Sleep time.
Note: Sleep time is only effective one time once setting.
Set the working status of replay, select Manual replay or Auto replay
by pressing Prev ious/Next button.
Manual replay: Can not break sentences when A-B replaying.
Auto replay (Only supports MP 3 file): Can bre ak sentences
automatically.
Set the contrast of LCD: 1~16
Check the capacity of normal disk and the percentage of used in
normal disk.
Display the firmware version of MP3 Player.
Exit SYS interface.
Specifications
The actual useable capacity may not be identical as labeled.
Netac reserve the rights to make changes on any specification without prior notice.
Items
Dimension
Net Weight
LCD
USB Port
Power Supply
Record
MP3, WMA
FM Tuner
Files Format
Working Temperature
Language of display
Operating System
RMA Serv ice
1) Self check (Over 50% claimed fault can be fixed easily).
A) Please check the manual on our website http://www.netac.com to double-check
B) Please check if there is any latest update of software or firmware to your
C) If you didn’t purchase directly from Netac, please return the goods to the
Descriptions
78.5mm x 33.3mm x 21.1mm
26g approximately (Without Battery)
High definition array LCD with seven colors backlight
USB 1.1/1.0 or above
USB bus powered or one AAA alkaline battery
Fine REC: 32K, WAV format
Long REC: 8K, ACT format
Earphone Output
MP3 Bit Rate
WMA Bit Rate
Frequency Response
Total Harmonic Distortion
Radio Frequency Range
Preservable Stations
Earphone Output
MP3, WMA
-5°C ~ 40°C
Simplified Chinese, English, Traditional Chinese, Japanese, Korean,
French, German, Dutch, Italian, Portuguese and Spanish.
Windows 98/98SE/Me/2000/XP, Mac OS 9.x or above, Linux
2.4.2 or above
the failure symptoms you are facing.
product, especially format tools.
vendor where you purchased from for repair or replacement.
2 X 11mW @ 16ohm (TYP)
8Kbps ~ 320Kbps
8Kbps ~ 192Kbps
20Hz ~ 20KHz
<0.05%
76MHz ~ 90MHz / 87MHz ~ 108MHz
20 + 20
2 X 11mW @ 16ohm (TYP)
ANY PHYSICAL DAMAGE, MISUSAGE, OR UNAUTHORIZED DISASSEMBLING OF
ANY PART OF THE PRODUCTS WILL LEAD TO WARRANTY VOID. By default, the
product is only available for personal and office.
2) Obtain RMA (Return to Manufacturer Authorization) number from Netac (Only for
Authorized Dealers).
A) We send you a RMA Request Form by Email upon request.
B) Please fill in all related items, like items number, failure symptom(s), and purchase
date and invoice number on RMA Request Form, Email or Fax back to Netac.
C) Upon receiving the filled RMA Request Form, we will check the form and warranty
period. A RMA number will be issued within 2 working days.
D) Any RMA number is only valid for 14 days, other than that a new application
needs to be filled again.
ANY RETURN WITHOUT PRE-APPROVED RMA NUMBER WILL BE REJECT ED OR
DELAYED. IT IS A MUST-HAVE FOR ALL RETURN OR REPAIRING OR EXCHANGE OR
MISSING ISSUES.
3) How to send the defective product(s) to Netac?
The “Netac RMA Request Form” must NOT be enclosed in the RMA package sent to
Netac, but the RMA number is REQUIRED to be written on the top of the box when
you send it/them back. The defective product(s) sent to Netac without RMA number
will NOT be received, repaired and/or returned.
A) Netac doesn’t accept any collect shipment. All RMA shipment must be prepaid.
B) Don’t make any shipment until having the Shipping Instruction from Netac.
Please ask further advice from Netac Customer Service Dept. as bellow before
you send out the defective products.
4) Contact information
Email: [email protected]
Contact: Byele Yu, Alick Liu (Customer Service Dept.)
Contact phone: +86-755-26727573, 26994767
Business hour: 08:30 - 17:40 Beijing Time, Mon. - Fri.
Contact Netac
Netac Technology Co., Ltd.
6F, Incubator Building,
China Academy of Science & Tech Development,
No.1 High-tech South St.,
Shenzhen, China 518057
Tel: +86-755-26727800 (Switchboard)
+86-755-26727520, 26727510, 26727500 (Technical Support)
Fax: +86-755-26727610
Website: http://www.netac.com
Email: [email protected] (Sales)
 Loading...