

Page 1

PRO
The Net2Phone
Pro User’s Guide
Page 2

Trademark Acknowledgments
Windows95 and Windows98 are trademarks of Microsoft
Corporation.
Net2Phone Pro, N2P and Net2Phone are trademarks of
Net2Phone, Inc.
Linksys, NetSwitcher and other product or brand names are
trademarks or registered trademarks of their respective companies.
2001 by Net2Phone, Inc.
All Rights Reserved
The use, disclosure, modification, transfer or transmittal of this
work for any purpose, in any form, or by any means, without the
written permission Net2Phone is strictly forbidden.
Rev. 3.1 July 24, 2001
Disclaimer
The content of this manual is subject to change
without notice and should not be construed as a
commitment by Net2Phone. This manual is furnished
for informational use only and Net2phone assumes no
responsibility or liability for any errors or inaccuracies
that may appear herein.
Any Net2Phone services provided through this
Equipment are not intended to replace or be a
substitute for primary line voice services or Plain Old
Telephone Service ("POTS") and are not meant to
provide guaranteed Automatic Number Identification or
Automatic Location Information capabilities associated
with 911 or E911 services or to permit access to 411
directory assistance services. Net2Phone will not be
liable for any damages, expenses, liabilities, risks, or
harms arising out of or related to the Net2Phone
services provided through this Equipment.
Page 3

Table of Contents
1 WELCOME!................................................................................................1
PRODUCT DESCRIPTION...........................................................................1
NET2PHONE PRO FEATURES............................................................1
SYSTEM REQUIREMENTS.........................................................................2
CONTENTS OF Y OUR NET2PHONE PRO KIT ................................... 2
2 GETTING STARTED.................................................................................3
AN OVERVIEW OF THE NET2PHONE PRO BOX...............................3
SOME NETWORK (AND INTERNET) BASICS...........................................3
STATIC IP ADDRESSES.............................................................................4
DHCP IP ADDRESSES..............................................................................4
A PRACTICAL SOLUTION FOR NON OFFICE USE:...................................4
3 BASIC SETUP .........................................................................................5
CONNECTING Y OUR EQUIPMENT ........................................................... 5
4 CONFIGURING THE NET2PHONE PRO.............................................9
OBTAINING YOUR DHCP IP ADDRESS..................................................9
CONFIGURING Y OUR ACCOUNT NUMBER AND PIN............................ 9
THE CHANGE CONFIGURATION PAGE..................................................10
CONFIGURING YOUR NET2PHONE PRO TO WORK WITH A STATIC IP
ADDRESS ..............................................................................................11
5 USING THE NET2PHONE PRO..........................................................13
MAKING AN INTERNET PHONE CALL...................................................13
RECEIVING A CALL FROM ANOTHER NET2PHONE PRO UNIT.....13
USING THE SPEAKER PHONE FEATURE................................................13
USING THE REMOTE SOFTWARE U PGRADE FEATURE....................... 14
APPENDICES ...............................................................................................15
APPENDIX A – TROUBLESHOOTING.....................................................15
Setup problems.................................................................................15
Configuration problems..................................................................15
Calling problems..............................................................................16
APPENDIX B – TECH SUPPORT .............................................................18
APPENDIX C – FIREWALLS....................................................................19
APPENDIX D – CONFIGURING THE NET2PHONE PRO FROM A
PHONE KEYPAD...............................................................................20
APPENDIX E – TECHNICAL SPECIFICATIONS .......................................27
APPENDIX F – APPROVALS...................................................................28
Page 4

Page 5

Page
1
1 Welcome!
Congratulations on your purchase of the Net2Phone Pro
Router-Activated Internet Phone, powered by
Product Description
The Net2Phone Pro is an Internet telephone device that is a
supplement to your ordinary telephone. It works like a miniature
gateway-server PC to convert voice signals from your ordinary
telephone to VoIP (Voice Over Internet Protocol). It then uses
your existing broadband connection – DSL modem, cable
modem or Ethernet LAN – to send your calls over the Internet
using Net2Phone’s Broadband Service.
Since the calls bypass most of the PSTN (Public Switched
Telephone Network), the result is huge savings on your longdistance communications services.
Because the Net2Phone Pro uses your broadband
connection, another benefit is an always-on IP dial tone. That
means no waiting to place or receive calls; your Net2Phone
Pro is always ready.
The instructions in this User’s Guide will help you to connect and
configure your Net2Phone Pro device and DSL/cable router
for most types of service providers and equipment
configurations.
Net2Phone Pro Features
ANY- distance Outbound Calling
Use it to place local, long-distance or international calls to
anywhere in the world at reduced rates.
Graphic setup and configuration
Configures through a local or remote Web browser.
Uses ordinary existing telephone equipment
Works with any tone-dial phone intended for residential use.
1
Page 6

Page
2
Net2Phone Pro Ring
Set up the Net2Phone Pro to ring on incoming calls.
International Language Support
Configure the Net2Phone Pro to work in12 languages.
Remote Software Upgrade
Upgrade the Net2Phone Pro’s software to the latest
version remotely.
Speakerphone
Hands-free talking.
Internet Call-Waiting
With an Internet call in progress, you can st ill be notified of
other incoming calls to your conventional telephone.
Internet and Conventional Phone Line Access
Switch easily between Internet and conventional (PSTN)
calling to use both lines, if needed.
System Requirements
• Any PC hooked up to a LAN
• A web browser
• The Net2Phone Pro kit (see below)
• An ordinary residential tone-dial telephone
• Patch cables as required for your intended configuration
• Conventional telephone service is optional.
Contents of Your Net2Phone Pro Kit
• One Net2Phone Pro device
• One DC power supply and power cord
• One RJ-11 telephone cable
• One RJ-45 LAN patch cable
• The User’s Guide
Page 7
Page
3
2 Getting Started
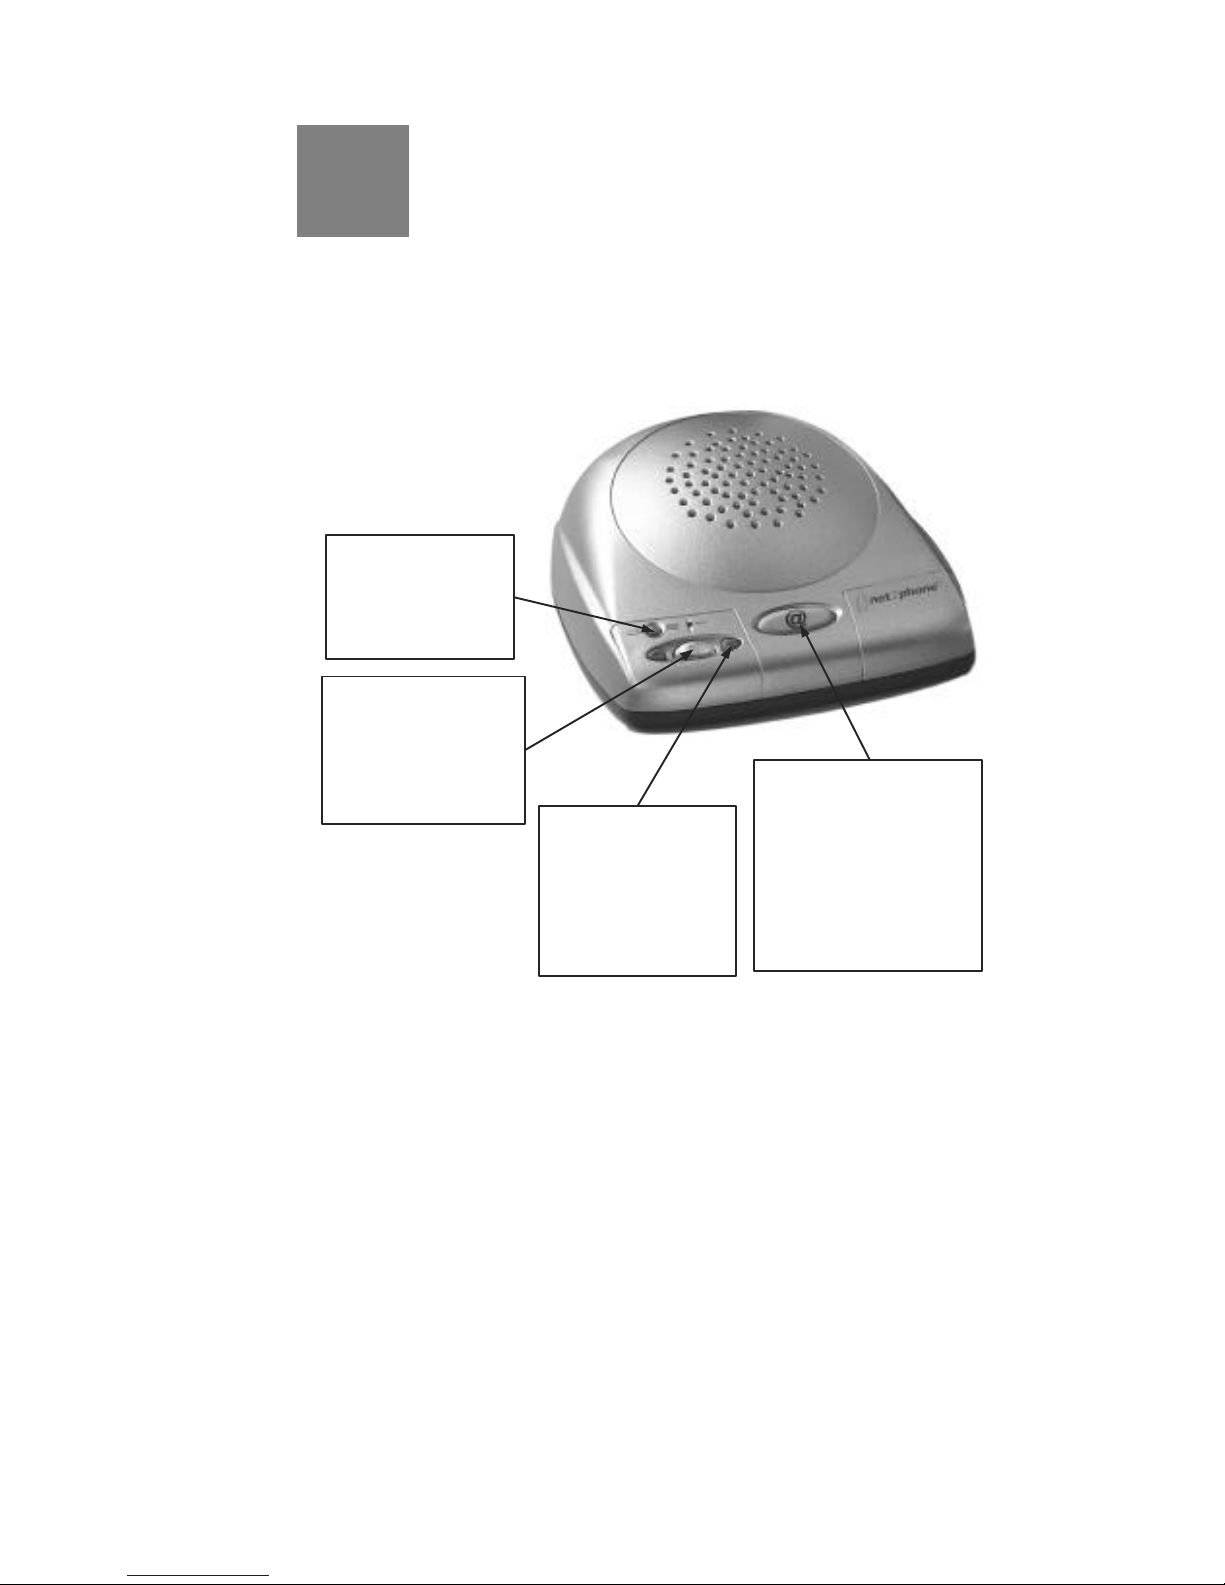
An Overview of the Net2Phone Pro unit
Volume Control
Buttons
Increases or decreases
the speakerphone and
telephone handset
volume.
Does not illuminate.
Config Free Button
Press twice to enter
Configuration mode.
Button is illuminated
when unit is READY.
@ Button
Press to deactivate Internet
connection.
Flashes during Internet
dialing or to alert you to
Internet congestion.
Flashes during setup if unit
cannot obtain an IP
address.
Speaker Button
Press for Speakerphone
function.
Button is illuminated
while in Speakerphone
mode.
Some Network (and Internet) Basics
Typically, your Net2Phone Pro will be hooked right into an
office LAN (Local Area Network) and therefore will obtain an IP
address via the LAN. If the network you are connected to has a
DHCP (Dynamic Host Configuration Protocol) server, it will
automatically assign an IP address to the Net2Phone Pro.
If your Net2Phone Pro is hooked into a LAN with a static IP,
you will have to assign it an IP address before you can configure
the system to work with the device.
2
Page 8

Page
4
Static IP addresses
If your Net2Phone Pro is not connected to a DHCP server,
you will need to assign the device a static IP address (one
single address that is always assigned to your box). Contact
your network administrator to get the designated address.
DHCP IP Addresses
If your Net2Phone Pro is connected to a LAN with a DHCP
server, simply connect the box and let the server assign it an IP
address. You can immediately begin to configure the
Net2Phone Pro.
A Practical Solution for non office use:
If you use the Net2Phone Pro in a home PC setting (not on a
network) without a DHCP server, the simplest and most
practical approach to obtaining the multiple IP addresses you
need while interfacing with varying ISP protocols is to employ a
DSL/cable router. Many SOHO (Small Office and Home Office)
networks already include a router. When installed between your
DSL/cable modem and your other system components, a router
appears to the WAN (Wide Area Network), i.e. your service
provider, as a single ordinary PC or “host”. But in your local
network, it acts like a DHCP server to provide the multiple
dynamic IP addresses you need for all your various broadband
devices.
The Linksys router is an example of a box that will accomplish
this, in essence creating a LAN for your PC.
To contact Linksys, visit their website at: http://www.linksys.com
Page 9

Page
5
Basic Setup
Connecting Your Equipment
As mentioned before, no single approach to network
configuration is likely to satisfy everyone’s needs. But following
the basic setup procedures in this chapter will help you to learn
about the issues and terminology you will need to understand in
order to complete your installation.
For this basic setup procedure, we will assume that you are a
current broadband subscriber, and you have multiple IP
addresses .
First, unpack your Net2Phone Pro product package and
verify its contents against the list in “Contents of Your
Net2Phone Pro Kit” on Page 2. If any items are missing,
please contact Net2Phone Pro Technical Support (see
Appendix B, Technical Support).
Now, let’s connect your Net2Phone Pro.
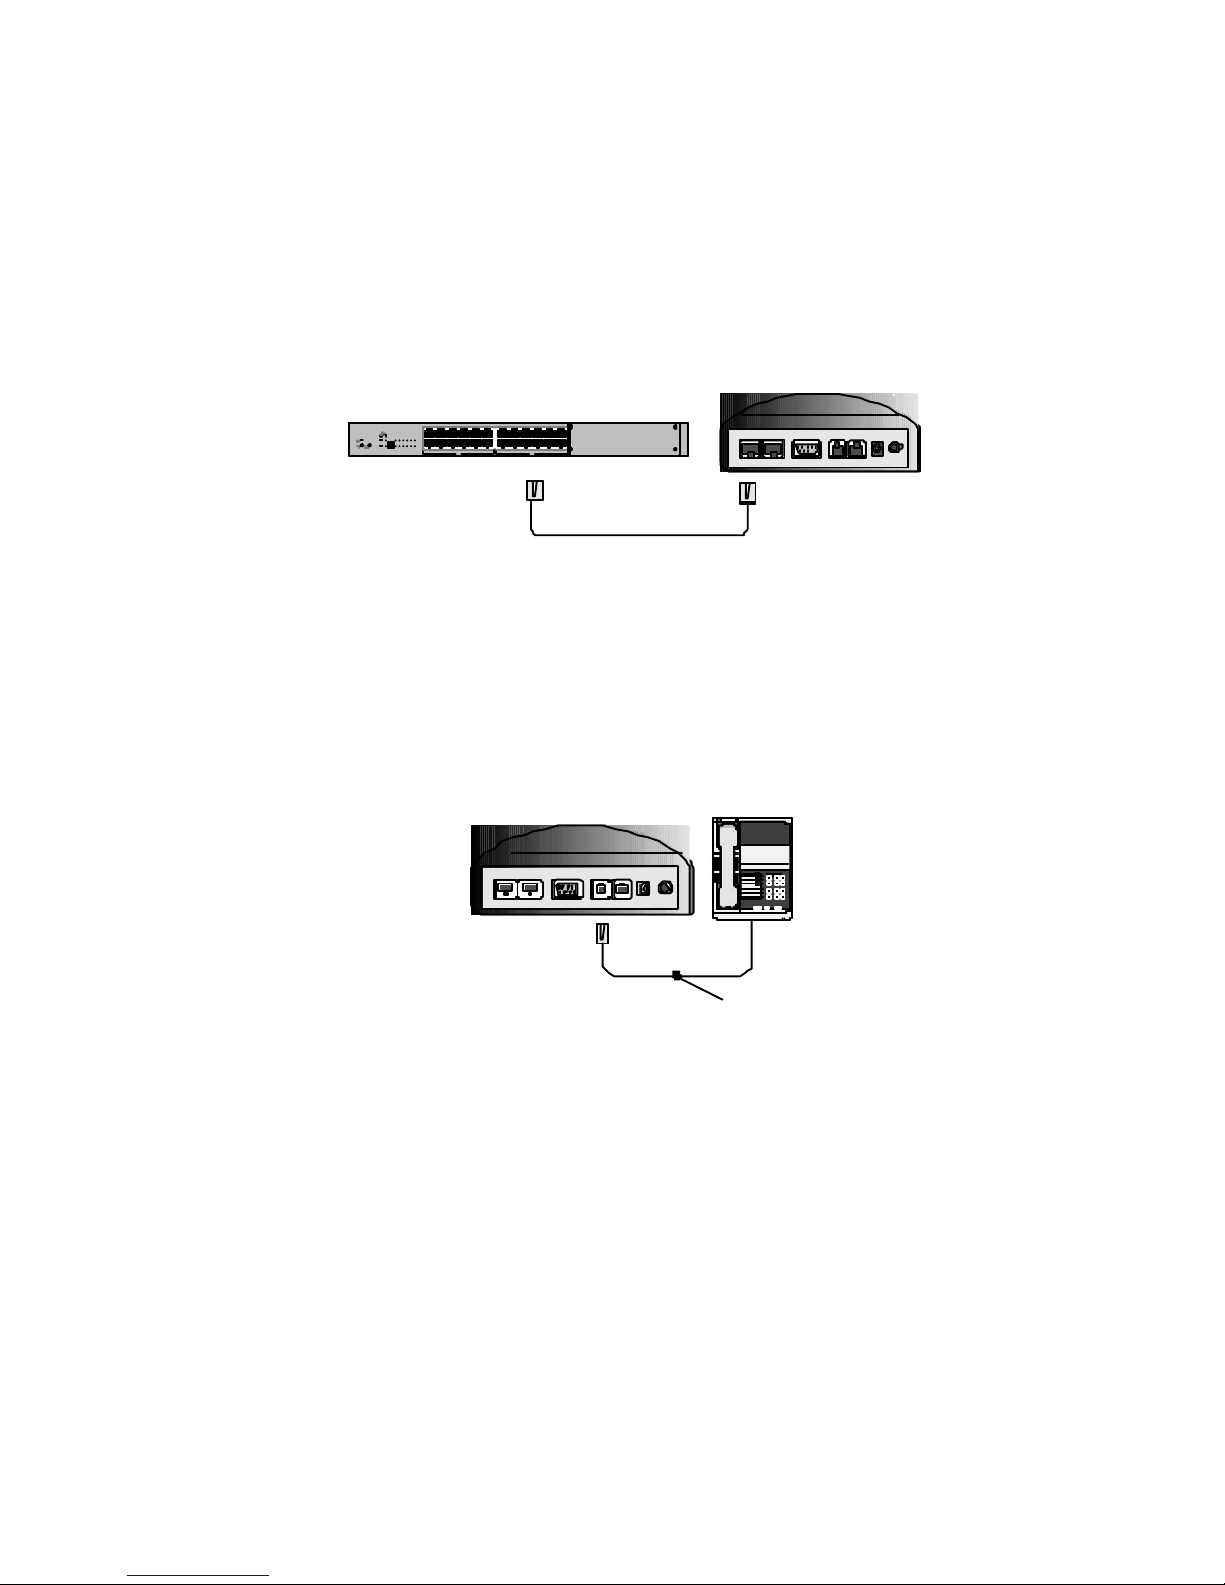
1. Connect the Net2Phone Pro to your Ethernet port :
a) Remove any cable that is plugged into the OUT port of
your Ethernet connection.
b) Plug one end of an Ethernet cable (Figure 2, next
page) into your LAN OUT port.
c) Plug the other end of the cable into the Ethernet IN port
on the rear of your Net2Phone Pro.
3
Net2Phone Pro
User’s Guide - Chapter 3, Basic
Ethernet Port
Net2Phone Pro
ETHERNE
IN
OUT
RS232 PHON
LINE
DC
ON/OF
Page 10
Page
6
2. Connect the Net2Phone Pro to your E thernet LAN
port.
Plug one end of the RJ-45 Ethernet cable into the OUT
port on the back of the Net2Phone Pro box, and the
other end into an Ethernet port on your LAN.
ETHERNET
INOUT
RS232 PHONE LINE DC
ON/OFF
RJ-45 ETHERNET CABLE
1 2 3 4 5 6
7 8 9 101112
A
B
12x
6 x
8 x
2 x
9 x
3 x
10x
4 x
11x
5 x
7x
1x
Ethernet
A
12 x
6x
8x2x9x3x10 x4x1 1x
5x
7x
1x
C
LAN port
Net2Phone
Pro
3. Connect your conventional telephone to the
Net2Phone Pro:
Plug the cable from your conventional telephone into
the PHONE jack on the back of your Net2Phone Pro
device.
TELEPHONE
1
2 3 45678 9 *8#
Net2Phone PRO
ETHERNE
IN
OUT
RS232
PHON
LINE
D
ON/OFF
TELEPHONE
CABLE
Page 11
Page
7
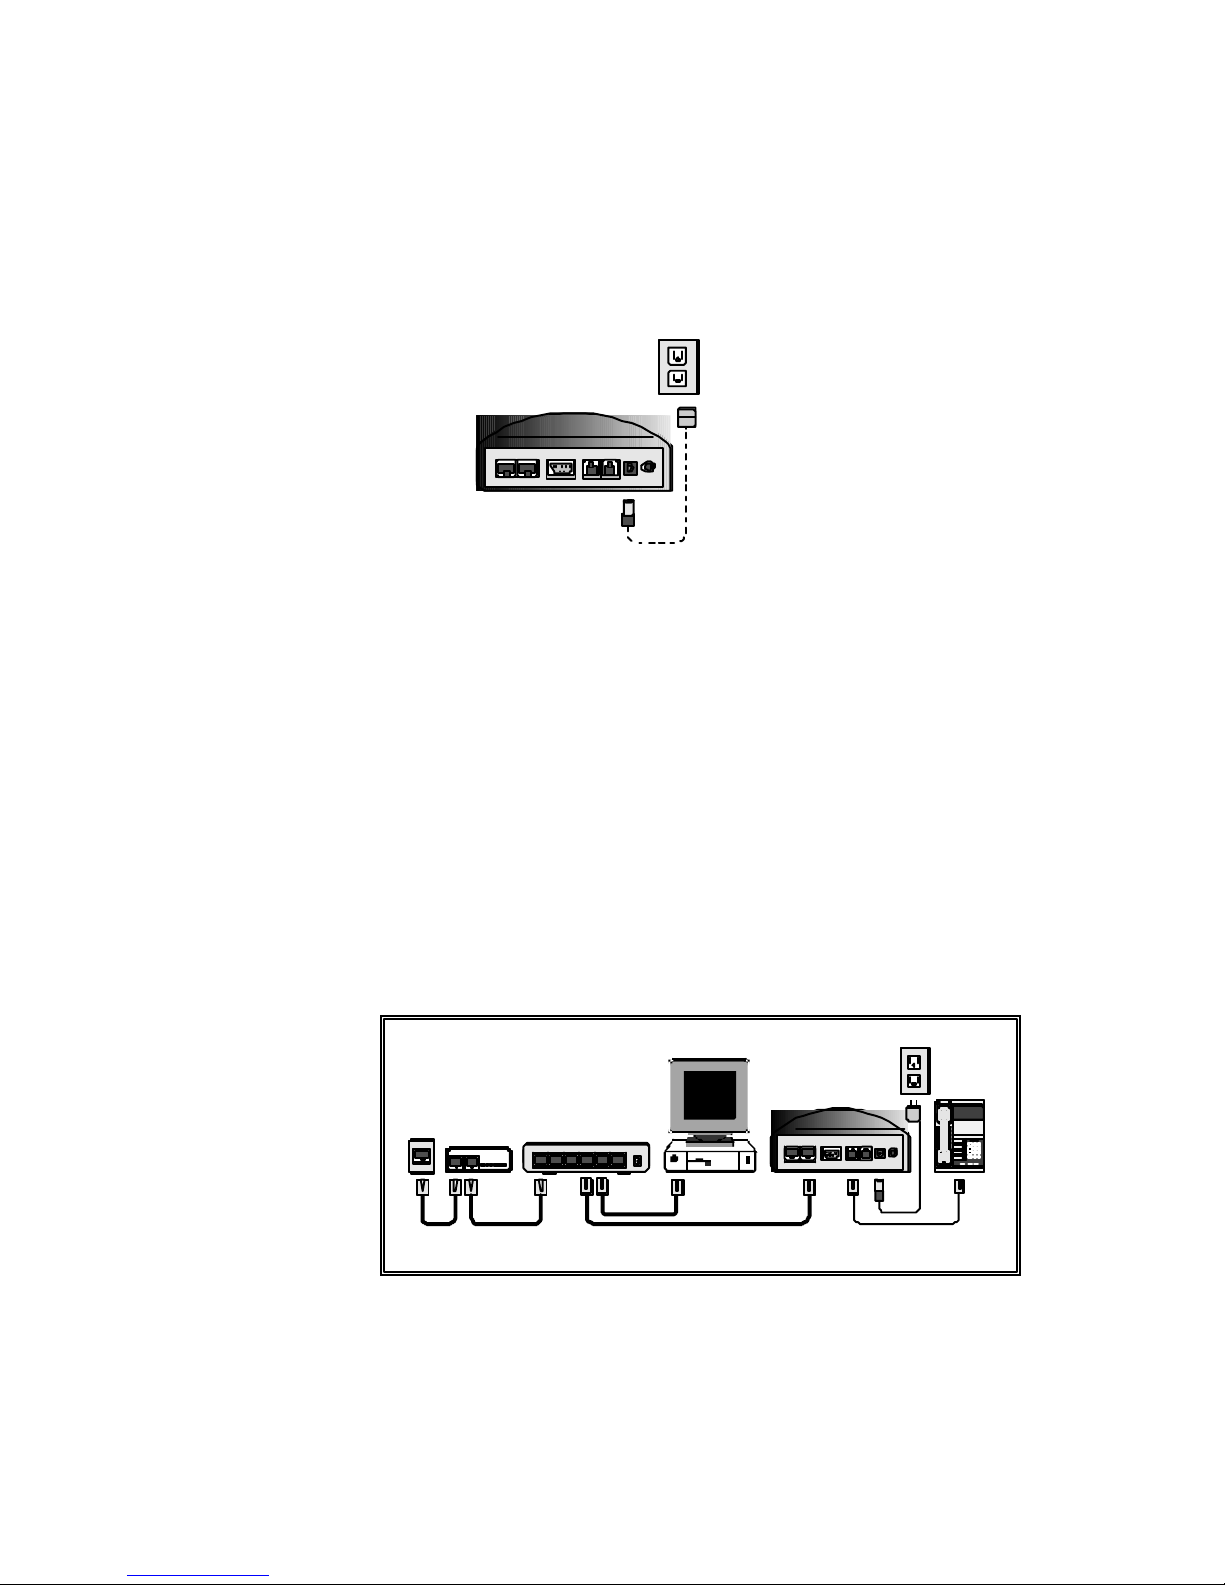
4. Connect the DC adapter to the Net2Phone Pro:
Plug the DC adapter into the DC In port on the back of
the Net2Phone Pro. Then plug the DC Adapter into
a power supply.
POWER SUPPLY
Net2Phone
PRO
ETHERNET
INOUT
RS232 PHONE LINE DC
ON/OFF
5. Power up the Net2Phone Pro:
a) Press the On/Off button in the rear of the unit to turn
on the power. The buttons should illuminate briefly,
followed after a few moments by three short beeps.
b) After approximately one minute, the config–FREE
button should be illuminated steadily without blinking.
6. If you’re connecting your Net2Phone Pro to a home
based PC with a router
If you’re not on a LAN and you have a router, your
configuration would then comply with the following
diagram:
1 2 3
4 5 6
7 8 9
*
8 #
POWER
SUPPLY
DSL/CABLE
MODEM
CABLE
OR DSL
SERVICE
PROVIDER
ETHERNET CABLES PHONE CABLE
RJ-45 RJ-11
ETHERNET
INOUT
RS232 PHONELINE DC
ON/OFF
PC
COMPUTER
RSCSTRRDTD CDTALK / DATATALK
IN OUT
DSL/CABLE
ROUTER
WAN Power4 3 2 1 Uplink
Net2Phone
Pro
Your hardware installation is complete. You are now ready to
configure your Net2Phone Pro and make your first phone
call.
Net2Phone Pro
User’s Guide - Chapter 3,
Page 12

Page
8
Page 13

Page
9
Configuring the
Net2Phone Pro
Obtaining your DHCP IP address
Once your Net2Phone Pro has been setup, you must now
obtain your IP address from the unit and enter that IP address in
your Web browser to configure it.
All you need to do before you can make a call is to enter the
Account Number and PIN you received from your Net2Phone
Pro reseller at the time of purchase. The easiest way to do this
is through your browser.
1. Get the Net2Phone Pro’s IP address:
a) Pick up your telephone handset and press the config–
FREE button twice. The Configuration Mode voice
prompt will respond, “Enter parameter code followed by
the pound key”. Get a pencil and paper and prepare to
write down the address.
b) Dial 2##. The voice prompt will respond, “You have
entered”, followed by four groups of from 1 to 3
numbers each (for example):
“192… 168… 17… 1…”
Configuring Your Account Number and PIN
a) Open your PC’s web browser and, in the address box,
type http:// followed by the 4 groups of numbers.
Separate the groups with periods, for example:
http://192.168.17.1
(Use the actual address as reported in Step 1 above)
The Password Page appears.
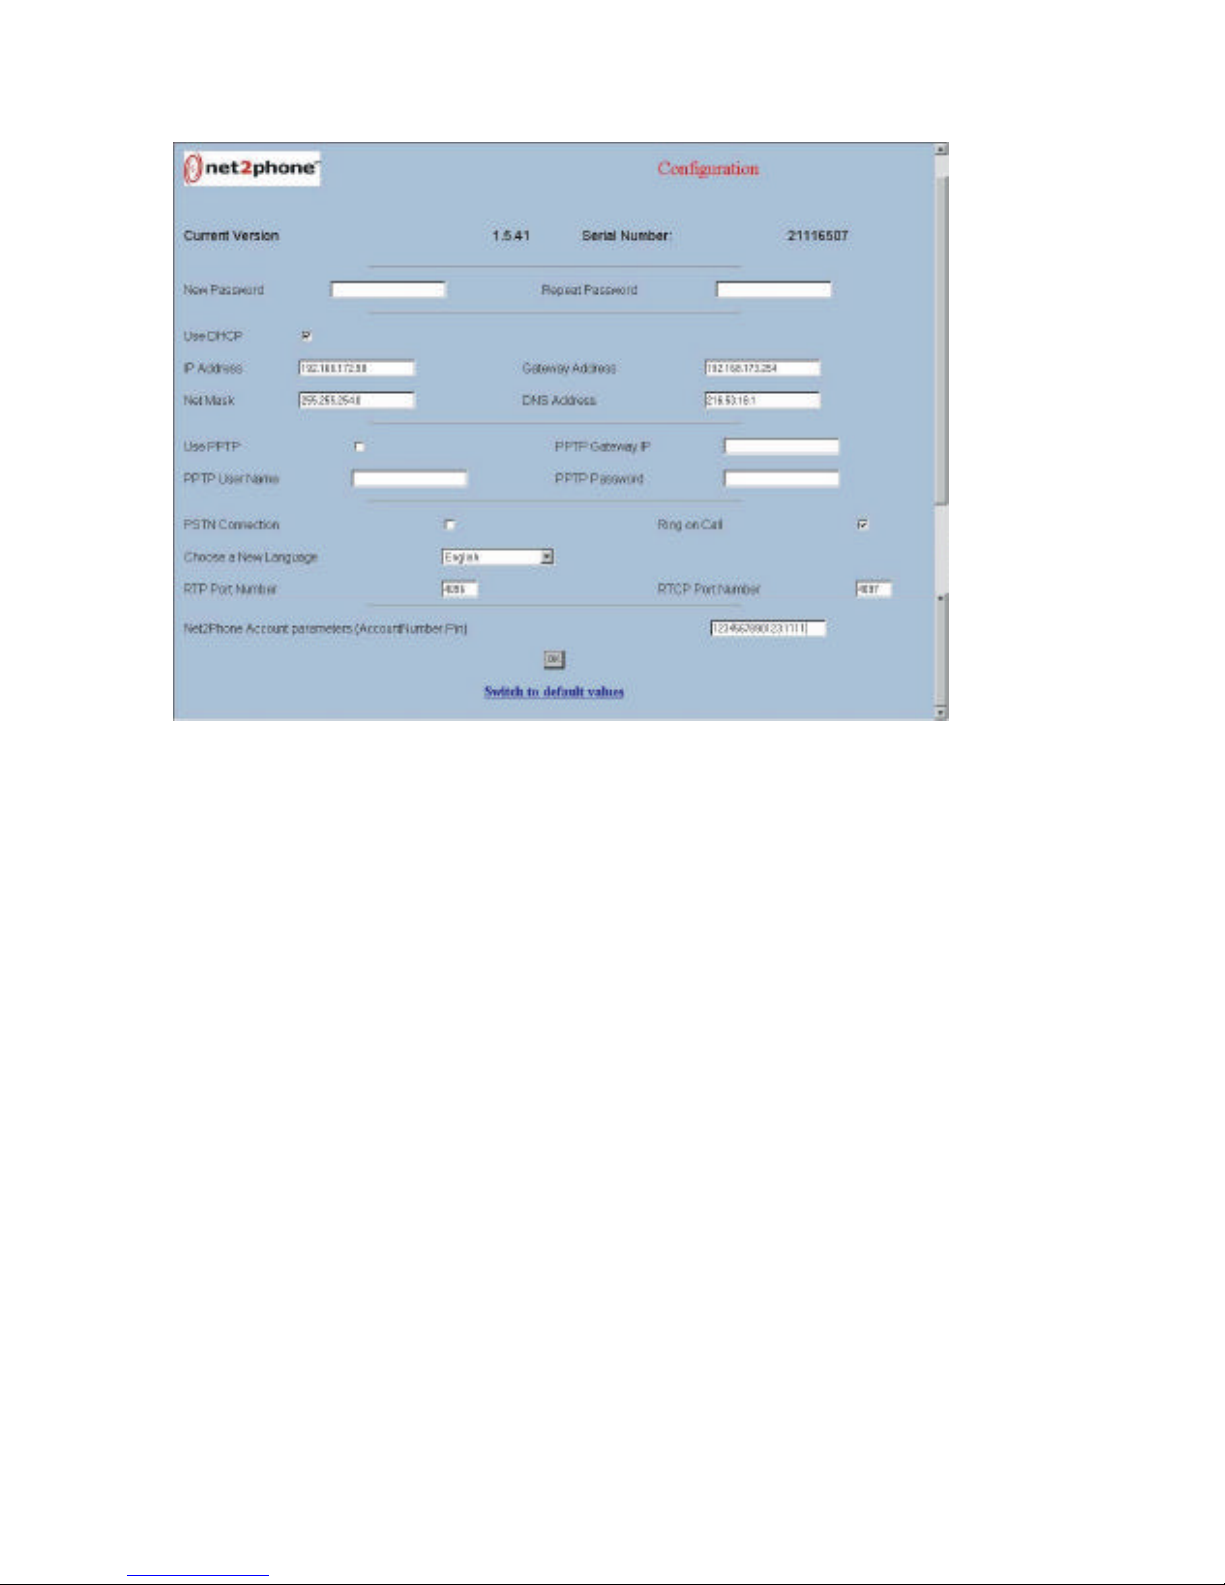
b) Enter the default password, n2p. The Net2Phone
Pro Current Configuration Pag e appears, displaying
the device’s current configuration values.
c) Click Modify Configuration.
The Change Configuration Page appears
4
Page 14
Page
10
d) In the Account Number Box, type in your account
number, a period, and then your PIN number.
e) Click OK.
The Change Configuration Page
This is a good time to look at some of the other features on the
Change Configuration Page.
1. The Current Version refers to the software in use. To
upgrade to the latest software version over the Internet,
simply press config-FREE twice, then 999#. The system
will then determine which version of the firmware you
have on the Net2Phone Pro, and if necessary,
download the newest version. This is discussed in more
detail on page 13.
2. Enter a New Password , if desired, to prevent
unauthorized entry to your Configuration Pages. Be sure
to save your new password in a safe place where you
can retrieve it when needed.
3. Note that Use DHCP is selected by default. All the IP
addresses displayed have been assigned by your router
and should not be changed.
NET2PHONE Pro
User’s Guide - Chapter 4,
Page 15

Page
11
4. Check Use PSTN Connection if you want your
Net2Phone Pro to default to the conventional
telephone line when you lift the handset.
5. Check Ring on Call if you want the Net2Phone Pro to
ring on incoming calls
6. The Net2Phone Pro can currently provide voice-
prompts in twelve different languages. If you want to
Choose a New Language, choose from the pull-down
menu
Do not select Switch to Default Values, or you will lose all your
selections and modifications.
When you are finished with the Change Configuration Page,
click OK and reboot the device. You are now ready to make
calls on your Net2Phone Pro.
Configuring your Net2Phone Pro to work
with a Static IP Address
If you are not using DHCP, and instead wish to configure your
Net2Phone Pro via a static IP, you will need to not only
obtain your IP Address from your network administrator, but
other information about your connection as well including your:
• Subnet mask address
• Gateway settings
• And DNS addresses
To begin to setting up your Net2Phone Pro for use with a static
IP address, you must first make sure that DHCP is set to “off.”
To do so, press the config-FREE button twice, and enter the
code 1#0#.
Once DHCP has been turned off, you must enter 2#, then the
static IP address assigned to your Net2Phone Pro from your
Network Administrator. For example, to set your static IP, you
would press:
“2# 192*168*176*20 # “ remember to end with a “#” sign to
indicate that you are finished entering the address.
Page 16

Page
12
After you have successfully entered the static IP address
designated to your Net2Phone Pro, you must now enter the
subnet mask associated with your Net2Phone Pro. To enter the
Subnet mask, press 3#, and then enter the Subnet mask
numbers. For example:
“3# 255*255*255*0 #” again, remember to end with a “#” sign to
indicate that you are finished entering the address.
Once the Subnet mask has been set, you can now connect to
the Net2Phone Pro via a web browser. Simply access your web
browser and enter in the static IP address. The Net2Phone Pro
will then connect to the configuration screen (after you enter
your password) and allows you to finish configuring the
Net2Phone Pro from the web browser. Once the web site has
been accessed, you must enter in the proper fields, the
Gateway address and DNS address given to you by your
network administrator.
Your Net2Phone Pro is now ready for use.
NET2PHONE Pro
User’s Guide - Chapter 4,
Page 17

Page
13
Using the
Net2Phone Pro
Making an Internet Phone Call
1. Make sure the config/FREE button is illuminated. Pick up
your telephone receiver and listen for a dial tone.
2. For both local and long distance calling, dial 1 and then
the telephone number of the person you want to call,
followed by the # key. For international calling, dial 011
followed by the country code, city code and local number,
followed by the # key.
3. The @ button will blink once while the call is being
connected. It will then remain lit, and you will hear the
other phone ringing.
4. Converse as usual. When you are finished talking, simply
hang up your phone.
Receiving a Call from another Net2Phone
Pro unit
You can call or receive a call from another Net2Phone Pro box
simply by pressing *72 on the keypad, and then entering the
virtual number (the Net2Phone account number) of the
Net2Phone Pro you will be calling. If receiving a call, your
phone will ring normally. Pick up the receiver and begin
conversing.
Using the Speaker Phone Feature
Whenever the telephone handset is off-hook, pressing the
Speaker button (see Figure 7, the Net2Phone Pro Control Panel
on Page 8) will activate the Speaker Phone Feature. Use the
Volume Control Keys to adjust the volume. Hanging up the
telephone cancels the Speaker Phone.
5
Page 18

Page
14
Using the Remote Software Upgrade Feature
After your Net2Phone Pro is configured, you can instruct it to
upgrade its software to the latest release, giving you access to
any new features that might be available. To begin the upgrade
process,
press the Config-FREE button twice to enter the configuration
mode, and then press 999#.
If your software is already current, your phone will ring after
about 5 minutes and you will be informed that no upgrade was
necessary. Otherwise, your phone will ring after about 15
minutes and you will be advise d that the upgrade was
successful.
NET2PHONE Pro
User’s Guide - Chapter 5, Using the
Page 19

Page
15
Appendices
Appendix A – Troubleshooting
Setup problems
• The phone cord does not fit into my wall-jack.
You received a Net2Phone Pro that was intended for use in
another country. Some countries, like UK, France,
Switzerland and Germany, require specific cords. Obtain
the appropriate adapter from your Net2Phone Pro reseller
or from a local phone equipment vendor.
• I connected my Net2Phone Pro to my DSL or cable
service provider’s jack but the unit doesn’t work.
You need to connect a DSL/cable modem between your
Net2Phone Pro and the service provider’s jack. See Figure
2 on Page 5.
Configuration problems
• I waited for two minutes after switching on the
Net2Phone Pro but didn’t hear any beeps and no
buttons are lit.
Check that the power supply is properly connected. Then
use the ON/OFF button on the rear to turn the power off
and on again.
Confirm with your service provider that your service sp eed
is 10 Mbps.
• The @ button or the @ and config–FREE buttons both
continue blinking after I switch on the unit, or I hear
“Server Connection Failed”.
Check your Ethernet cable. It should be connected to the
Ethernet IN receptacle on the back of the Net2Phone Pro.
Your Net2Phone Pro can’t connect to the network. Check to
see that DHCP is enabled or disabled as necessary and
that your IP addresses are correct.
Your provider may be using a firewall. See Appendix B,
Firewalls.
Page 20

Page
16
• I waited for two minutes after switching on the
Net2Phone Pro, heard a series of beeps, but I don’t
hear a dial tone on my telephone.
Check to see that your telephone is plugged into the
PHONE jack on the Net2Phone Pro as shown in Figure
3 on Page 6.
Check to see that the telephone option in setup, parameter
11#, is set to the default, “PSTN enabled”, value 0#.
• I pressed the config-FREE button twice and held down
the @ button for more than one second, but the
Net2Phone Pro doesn’t seem to enter configuration
mode.
Did you pick up the telephone handset? You must pick up
the telephone handset before you can enter the
configuration mode.
• When I try to enter configuration values with the
telephone, nothing happens.
Is your telephone set for pulse -dialing? The Net2Phone
Pro doesn’t work with a pulse -dial telephone.
Calling problems
• My Net2Phone Pro is connected to my DSL or cable
service and working properly with a static IP address.
But when I connect my PC to the Ethernet OUT port on
the back of my Net2Phone Pro, the PC doesn’t see the
network.
You have three alternatives:
a) Obtain a second IP address from your service provider,
and use the second address for your PC,
b) See if DHCP service is available from your provider, or
c) Install a router with DHCP enabled.
• My service provider uses DHCP IP addresses but I can’t
seem to make a call.
There are three possibilities:
a) Check that your DHCP is enabled (default
configuration); see Page 9, Entering an IP address
from your telephone keypad. Then reboot your
Net2Phone Pro and try again to make a call.
Remember that it takes several minutes for the
Net2Phone Pro to reinitialize.
Page 21

Page
17
b) If you are still unsuccessful, check your IP and
gateway addresses. See Page 21, Entering an IP
address manually.
c) Ask your DSL or cable providers if they are using a
firewall. See Page 25, Firewalls.
• I am using a router. I can place calls, but my
Net2Phone Pro either does not receive calls reliably,
or does not recei ve calls at all.
See if your router is configured for “connection on demand”.
In this case, the router is not connected to the network
unless a computer on your network initiates the connection.
Change the configuration on the router to make it
permanently active.
• During a call, I suddenly can’t hear the other party.
This is an indication of heavy Internet traffic. Wait for a
while to see if the transmission quality improves. If there is
no improvement after a few minutes, try the call again later.
• How do I find my static IP, gateway and subnet mask
addresses?
You can obtain this information from your DSL or cable
provider, or if you have a PC connected to your DSL/cable
modem and your service is functional, you can follow the
steps in Get the Net2Phone Pro’s IP address on Page 9.
Page 22

Page
18
Appendix B – Tech Support
For all tech support issues, current FAQ’s, and Net2Phone
product info please visit our Website at:
www.Net2Phone.com
Page 23

Page
19
Appendix C – Firewalls
If you are still unable to make a call, ask your BSP if they are
using a firewall. This is a system used by service providers to
block access by unauthorized users (hackers) to your computer
system or to the network.
If they are using a firewall, ask them if the following ports are
open:
port 8740 (TCP and UDP): signaling port for dialog between
two Net2Phone Pro’s
port 8738 (UDP): port used by the Net2Phone Pro to contact
the IPFinder
port 4096 (UDP): RTP port
port 4097 (UDP): RTCP port
port 8741 (UDP): caretaker port
port 80 (TCP): port used by Net2Phone Pro versions 1.0.21
and higher for upgrades
port 6801: doorma n port for n2p protocol
These are the default port settings on the Net2Phone Pro . If they
are not all open, and the provider can’t open them, ask for
their list of ports that currently are open and set those values
on the
Net2Phone Pro ’s Change Configuration page (Page 108).
After setting the parameters, re-boot your Net2Phone Pro by
cycling it off and on. Remember that it takes from one to three
minutes to finish re-initializing. Then check to see whether the
problem is resolved.
If problems persist, refer to Appendix A – Troubleshooting, or to
Appendix B – Technical Support.
Page 24

Page
20
Appendix D – Configuring the Net2Phone Pro from a
phone keypad
Deactivate or activate DHCP IP addressing
Note: The Net2Phone Pro is shipped with DHCP addressing
activated by default.
If you need to enter static IP addresses in the Net2Phone Pro and
are not able to browse its Configuration Page, you must
deactivate DHCP addressing and enter the static addresses
from a telephone keypad. Refer to Enter an IP address manually
on Page 21 before you begin.
(If you are able to browse your Net2Phone Pro ’s Change
Configuration page online, refer to Configuring your Net2Phone
Pro to work with a static IP address on Page 11).
To deactivate DHCP addressing from a telephone keypad:
1. Pick up your telephone receiver and press the
config-FREE button twice to enter the Configuration
Mode. The Configuration Mode will announce “Enter
parameter followed by the pound key”.
2. Press 1# on your phone keypad to select the DHCP
parameter, then 0# to deactivate it. When you hear the
voice prompt, press 1 to confirm.
3. Cycle the Net2Phone Pro ‘s power off and on to reboot
the unit.
You must now enter your static IP addresses. Follow the
directions on Page 21 in this Appendix to enter your static IP
addresses manually.
To reactivate DHCP addressing:
1. Pick up your telephone receiver and press the
config-FREE button twice to enter the Configuration
Mode.
2. Press 1# on your phone keypad, to select the DHCP
parameter, then 1# again to activate it. When you hear
the voice prompt, press 1 to confirm..
3. Cycle the Net2Phone Pro ‘s power off and on to reboot
the unit.
Your Net2Phone Pro will now obtain its IP address from a DHCP
server.
Page 25

Page
21
Enter an IP address manually
Note: The Net2Phone Pro is shipped with DHCP addressing
activated by default.
Before you start, you will need to know your static addresses:
your static IP address
your subnet mask address
your default gateway address (if present)
your DNS address (if present)
Proceed as follows:
1. Follow the directions on Page 20 to disable DHCP in your
Net2Phone Pro .
2. Each of your IP addresses is composed of four groups of
digits separated by periods ( . ).
a) To begin entering your IP address, press 2# to select the
IP address parameter.
b) Enter the address using ** (two stars) on your keypad to
replace each period.
c) After you finish entering the address, press # .
d) Then, when prompted, press 1 to confirm.
Example: to enter the IP address 123.21.31.12, dial:
123 ** 21 ** 31 ** 12 #
3. To enter your subnet mask address, press 3# and proceed
as above. If you make a mistake at any point, simply hang
up and start over.
4. When you finish entering your IP and subnet mask
addresses, hang up your telephone, turn off your Net2Phone
Pro , then turn it on again to reboot. Wait until you hear the
three log-on tones and the config-FREE button glows
steadily, which may take from one to three minutes.
5. Follow the directions on Page 9 to browse the Net2Phone
Pro ’s Change Configuration page.
6. On the Change Configuration page, enter your DNS and
gateway addresses, and your account number and PIN.
7. Click OK and reboot the Net2Phone Pro . Your Net2Phone Pro
should now be ready for use with a static IP address.
Appendix D – Configuring with a phone keypad
Page 26

Page
22
Configuring other parameters from the telephone
keypad
To configure your Net2Phone Pro with the telephone keypad
Enter the Configuration Mode
Pick up the handset and press the config-FREE button twice, or
press and hold the @ button for more than 2 seconds. The
Configuration Mode voice prompt will respond, “Enter
parameter code followed by the pound key.” Select the
parameter
Referring to the Parameters Table on the next page, dial in
the code corresponding to the parameter you want to
modify.
Example: to select the IP address parameter, press 2#
Hear and change the current parameter
To hear the selected parameter, press # again.
Example: to hear your IP address, press 2##
To change the value, dial in the new value and press #.
To confirm the new value, press 1; to check the value, press
2; to modify again press 3.
Leave the Configuration Mode
Hang up the receiver.
Appendix D – Configuring with a phone keypad
Page 27

Page
23
Parameters Table
Description
What to
dial for
phone
keypad
config
Default
setting
Comment
DHCP 1# 1
(DHCP
enabled)
Enables automatic
host configuration
using DHCP
protocol.
IP address 2# 169.254.1.2 Your Net2Phone
Pro‘s Internet
address.
Subnet Mask
address
3# 0.0.0.0 Internet address of
your subnet mask.
Network Gateway
address
4# 0.0.0.0 Internet address of
your network
gateway.
DNS address 5# 0.0.0.0 Internet address of
your domain name
server
Country code 6# 0 Country where your
Net2Phone Pro is
used.
Configuration
password
9# n2p Required when
configuring with
web browser. Must
be entered with
phone keypad.
Ring-on-call 10# 0
(no ring)
Makes your
Net2Phone Pro
ring, in addition to
your phone, when
receiving a call.
PSTN line 11# 1
(uses PSTN
line)
Allows your
Net2Phone Pro to
connect to an
analog phone line.
Firewall
parameters
100#
101#
102#
Protects service
provider from
unauthorized
access.
Firmware version 333# Firmware version of
your Net2Phone
Pro.
Hardware version 337# Hardware version
of your Net2Phone
Pro.
Upgrade 999# Automatically
upgrades your
Net2Phone Pro.
Appendix D – Configuring with a phone keypad
Page 28

Page
24
Description of parameters
1. DHCP (Phone keypad configuration: dial 1#)
The Net2Phone Pro is self-configuring when using DHCP
service, if DHCP is enabled.
Value 1 (default): DHCP enabled
Value 0: DHCP disabled
2. IP address (Phone keypad configuration: dial 2#)
Static (or “fixed”) addresses must be entered manually.
IP addresses consist of four groups of digits separated by
periods ( . ).
Replace each period with two star keys (**) when
entering values.
Default static IP address value: 169.254.1.2
3. Subnet mask address (Phone keypad configuration:
dial 3 #)
Similar to No. 2, above. Default value: 255.255.255.0
4. Network gateway address (Phone keypad
configuration: dial 4#)
Similar to No. 2, above. Default value: none
5. DNS address (Phone keypad configuration: dial 5#)
Similar to No. 2, above. Default value: none
6. Country code (Phone keypad configuration: dial 6#)
This is the dialing code for your country’s telephone
system. For example, the country code for the USA is 0.
Default value: 0
7. Configuration Password (Phone keypad
configuration: dial 9#)
A string of alphanumeric characters (numbers or letters)
used to protect your Net2Phone Pro configuration from
unauthorized access by web browsers.
For more information, see Appendix E – Changing the
configuration password with a telephone keypad.
Default value: n2p
Appendix D – Configuring with a phone keypad
Page 29

Page
25
8. Firewalls:
A system used by providers to protect their (and your) system
from unauthorized access.
sport (TCP and UDP): (dial 100#) Default value: 8740
rtpport (UDP): (dial 101#) Default value: 4096
rtcport (UDP): (dial 102#) Default value: 4097
Entering or changing passwords manually
A configuration password can consist of any group of alphanumeric characters (numbers and/or letters). Net2Phone Pro ‘s
default password is (lower case) n2p. If you changed it from the
configuration screen and have lost the new password, you can
enter a new one, in an emergency, using a telephone keypad.
When you enter a password this way, the characters you use
must be converted into “Hexadecimal” (Hex) code before they
are entered. In the Hex system, each letter or digit is
represented by a two-character pair. Note that the system is
case-sensitive; the codes are different for upper and lower case
letters.
When entering the codes from the phone keypad, each series of
numbers must be preceded by the * key, and must be followed
by a # key. To enter the password n2p using your telephone
keypad:
1. Pick up the handset and press the config-FREE button
twice, or press and hold the @ button for more than 1
second to enter the Configuration Menu. You will hear the
Configuration Menu voice prompt.
2. Dial 9# to access the password parameter.
3. Press # again to hear the current password.
4. Enter the passw ord as illustrated below and then dial 1,
when prompted, to confirm your entry.
For this password
n 2 p
Enter in Hex * 53 02 55 #
Appendix D – Configuring with a phone keypad
Page 30

Page
26
Example: to enter the password “N2P”, dial
*530255#
When you are ready to change your Configuration Password,
use the chart below to find the codes corresponding to the
characters in the password you plan to use.
Hexadecimal Character Conversion Chart
0 = 00 A = 10 K = 20 U=30 a=40 k = 50 u = 60 sp = 70 * = 80 > = 90
1 = 01 B = 11 L = 21 V=31 b=41 l = 51 v = 61 ! = 71 + = 81 ? = 91
2 = 02 C = 12 M = 22 W = 32 c = 42 m = 52 w = 62 << = 72 , = 82 [ = 92
3 = 03 D = 13 N = 23 X = 33 d = 43 n = 53 x = 63 # = 73 - = 83 \ = 93
4 = 04 E = 14 O = 24 Y = 34 e = 44 o = 54 y = 64 $ = 74 . = 84 ] = 94
5 = 05 F = 15 P = 25 Z = 35 f = 45 p = 55 z = 65 % = 75 / = 85 ^ = 95
6 = 06 G = 16 Q = 26
g = 46 q = 56 { = 66 & = 76 : = 86 _ = 96
7 = 07 H = 17 R = 27
h = 47 r = 57 | = 67 ‘ = 77 ; = 87 ` = 97
8 = 08 I = 18 S = 28
I = 48 s = 58 } = 68 ( = 78 < = 88 @ = 98
9 = 09 J = 19 T = 29
j = 49 t = 59 ~ = 69 ) = 79 = = 89
Appendix D – Configuring with a phone keypad
Page 31

Page
27
Appendix E – Technical specifications
General
AC adapter: AC 90-264 V; DC 12V, 800 mA
Power consumption: typically 6W, max. 9W
Environment temperature: 0 - 50o C
Internal EPROM Flash: 2 Mo
Internal DRAM: 4 Mo
Built-in speaker and microphone
Protocols
Vocal compression: B.723.1, G711
Address searching: IP-Finder™ protocol
DHCP
HTTP
Page 32

Page
28
Appendix F – Approvals
FCC Declaration of Conformity
Product name: Net2Phone Net2Phone Pro
FCC Rules: Tested to comply with FCC part 15, Class B
Operating environment: for home or office use
FCC Compliance Statement
This device complies with part 15 of the FCC Rules. Operation
is subject to the following two conditions: (1) This device may
not cause harmful interference, and (2) this device must accept
any interference received, including interference that may cause
undesired operation.
EC Declaration of Conformity
Net2Phone Pro complies with EN 60950 Standard for electrical
safety. The power supply must be reachable so that it can
easily be unplugged.
Net2Phone Pro complies with EN 55022 for electromagnetic
compatibility, and EN 50082/1.
Net2Phone Pro complies with EN 41003. It can be connected
to the public telephone network.
Important! Changes or modifications not expressly
approved by the manufacturer could void the user’s
authority to operate the equipment. Use with an
approved telephone set.
Party responsible for product compliance
Net2Phone, Inc.
520 Broad Street
Newark, NJ 07102
 Loading...