

Page 1

Nest Protect (Wired 120V ~ 60Hz)
Detects smoke and carbon monoxide (CO)
User’s Guide
ATTENTION: Please read carefully and save this user’s guide in a safe place.
1
Page 2

TABLE OF CONTENTS
Meet your Nest Protect . . . . . . . . . . . . . . . . . . . . . . . . . . . . . . . . . . . . . . . . . . . . . . . . . . . . . . . . . . . . . . . . . . . . . . . . . . . . . . . . . . . . . . . . . . . . . . . . . 3
Location in your home . . . . . . . . . . . . . . . . . . . . . . . . . . . . . . . . . . . . . . . . . . . . . . . . . . . . . . . . . . . . . . . . . . . . . . . . . . . . . . . . . . . . . . . . . . . . . . . . . . . 5
Placement on the ceiling or wall . . . . . . . . . . . . . . . . . . . . . . . . . . . . . . . . . . . . . . . . . . . . . . . . . . . . . . . . . . . . . . . . . . . . . . . . . . . . . . . . . . . . . . 6
Placement on a sloped ceiling . . . . . . . . . . . . . . . . . . . . . . . . . . . . . . . . . . . . . . . . . . . . . . . . . . . . . . . . . . . . . . . . . . . . . . . . . . . . . . . . . . . . . . . . 7
Setup and installation . . . . . . . . . . . . . . . . . . . . . . . . . . . . . . . . . . . . . . . . . . . . . . . . . . . . . . . . . . . . . . . . . . . . . . . . . . . . . . . . . . . . . . . . . . . . . . . . . . 8
Operating instructions . . . . . . . . . . . . . . . . . . . . . . . . . . . . . . . . . . . . . . . . . . . . . . . . . . . . . . . . . . . . . . . . . . . . . . . . . . . . . . . . . . . . . . . . . . . . . . . . . 12
Heads-Up and Emergency Alarms . . . . . . . . . . . . . . . . . . . . . . . . . . . . . . . . . . . . . . . . . . . . . . . . . . . . . . . . . . . . . . . . . . . . . . . . . . . . . . . . . .14
Testing Nest Protect . . . . . . . . . . . . . . . . . . . . . . . . . . . . . . . . . . . . . . . . . . . . . . . . . . . . . . . . . . . . . . . . . . . . . . . . . . . . . . . . . . . . . . . . . . . . . . . . . . . . 16
General maintenance . . . . . . . . . . . . . . . . . . . . . . . . . . . . . . . . . . . . . . . . . . . . . . . . . . . . . . . . . . . . . . . . . . . . . . . . . . . . . . . . . . . . . . . . . . . . . . . . . .17
Safety . . . . . . . . . . . . . . . . . . . . . . . . . . . . . . . . . . . . . . . . . . . . . . . . . . . . . . . . . . . . . . . . . . . . . . . . . . . . . . . . . . . . . . . . . . . . . . . . . . . . . . . . . . . . . . . . . . . . . . 19
Alarm limitations . . . . . . . . . . . . . . . . . . . . . . . . . . . . . . . . . . . . . . . . . . . . . . . . . . . . . . . . . . . . . . . . . . . . . . . . . . . . . . . . . . . . . . . . . . . . . . . . . . . . . 19
Installation code . . . . . . . . . . . . . . . . . . . . . . . . . . . . . . . . . . . . . . . . . . . . . . . . . . . . . . . . . . . . . . . . . . . . . . . . . . . . . . . . . . . . . . . . . . . . . . . . . . . . .21
AC installation warnings . . . . . . . . . . . . . . . . . . . . . . . . . . . . . . . . . . . . . . . . . . . . . . . . . . . . . . . . . . . . . . . . . . . . . . . . . . . . . . . . . . . . . . . . . . . . 22
Carbon monoxide (CO) precautions . . . . . . . . . . . . . . . . . . . . . . . . . . . . . . . . . . . . . . . . . . . . . . . . . . . . . . . . . . . . . . . . . . . . . . . . . . . . . .24
Fire safety precautions . . . . . . . . . . . . . . . . . . . . . . . . . . . . . . . . . . . . . . . . . . . . . . . . . . . . . . . . . . . . . . . . . . . . . . . . . . . . . . . . . . . . . . . . . . . . . 26
Federal Communications Commission (FCC) compliance . . . . . . . . . . . . . . . . . . . . . . . . . . . . . . . . . . . . . . . . . . . . . . . . . . 27
Mobile notifications . . . . . . . . . . . . . . . . . . . . . . . . . . . . . . . . . . . . . . . . . . . . . . . . . . . . . . . . . . . . . . . . . . . . . . . . . . . . . . . . . . . . . . . . . . . . . . . . .27
Limited Warranty . . . . . . . . . . . . . . . . . . . . . . . . . . . . . . . . . . . . . . . . . . . . . . . . . . . . . . . . . . . . . . . . . . . . . . . . . . . . . . . . . . . . . . . . . . . . . . . . . . . . . . . . 28
2
Page 3
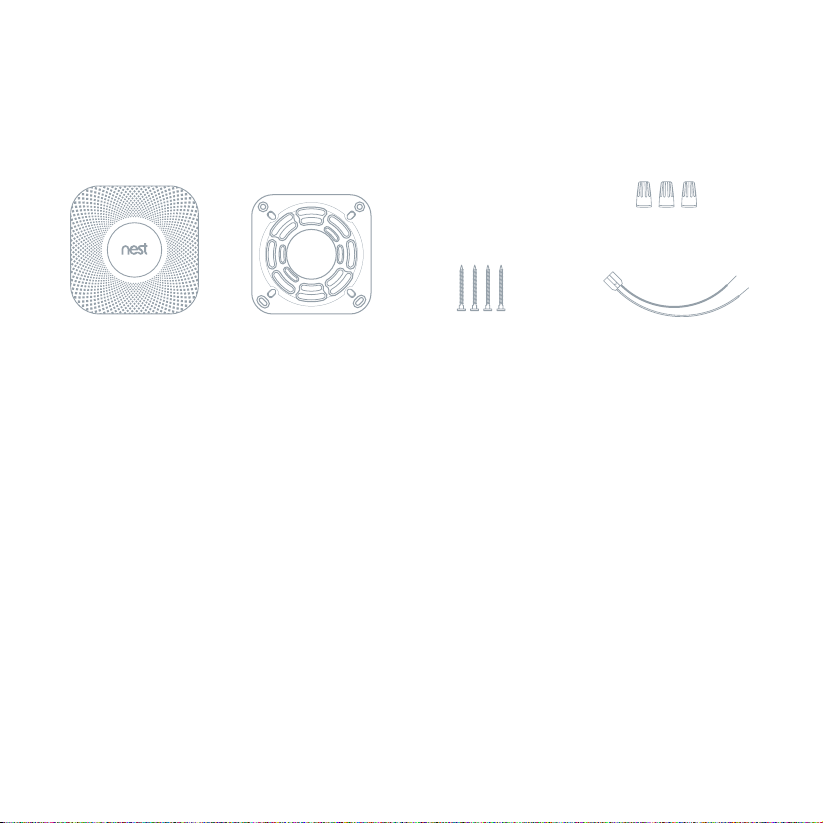
MEET YOUR NEST PROTECT
Inside the box you’ll find:
3 wire nuts
Nest Protect Backplate
Nest Protect is designed to detect smoke and carbon monoxide in a residential environment.
It has multiple sensors to help it understand what’s happening in your home and a photoelectric
sensor to detect slow, smoldering fires. Nest Protect can be used as a single station or multiple
station alarm.
This guide covers the installation of Nest Protect (Wired) - Model number O5C.
4 mounting screws
120V connector
REQUIREMENTS
Wi-Fi, an iOS or Android smartphone or tablet, and a free Nest Account are required for wireless
mobile notifications and software updates. During set up, Wi-Fi and a free Nest Account are
required for wireless interconnect and room naming. After all the Nest Protects in your home
are connected, they can communicate with each other without Wi-Fi.
3
Page 4
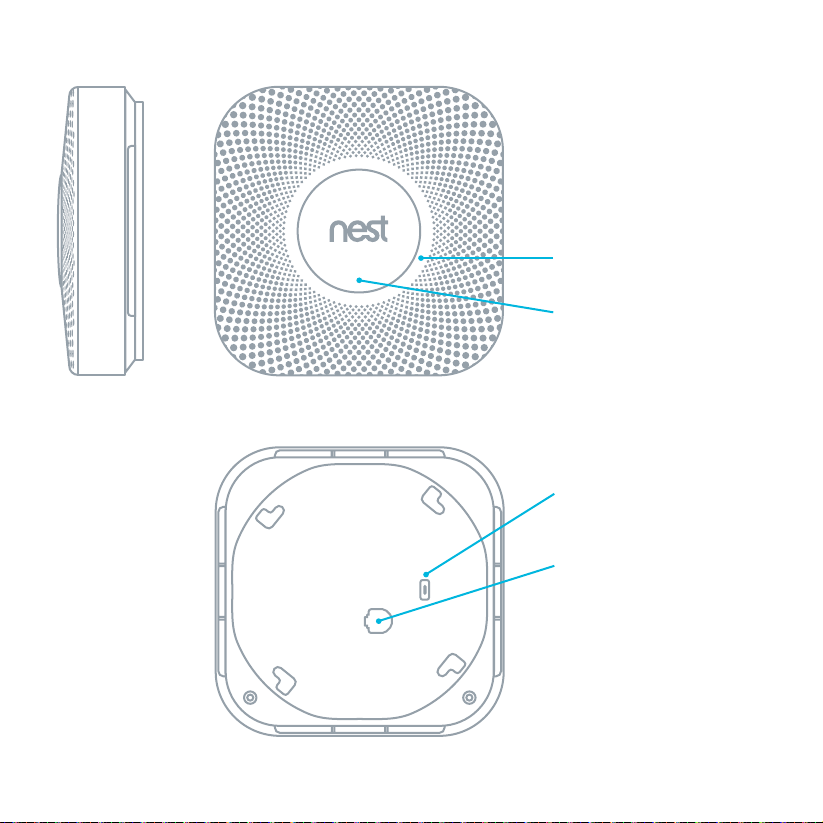
Horn enables Nest Protect
to alert you with a loud
emergency sound.
1.63"
(4 .1cm )
5.28"
(13.4 cm)
Speaker allows Nest Protect
to speak with a human voice.
Light ring changes
color to alert you.
Push the Nest button to
hush alarms and run a test.
Micro-USB connector
(not for normal use).
AC connector pins for the
120V connector.
Backup battery
compartment: 3 AA
Energizer® Ultimate
Lithium batteries (L91).
4
Page 5
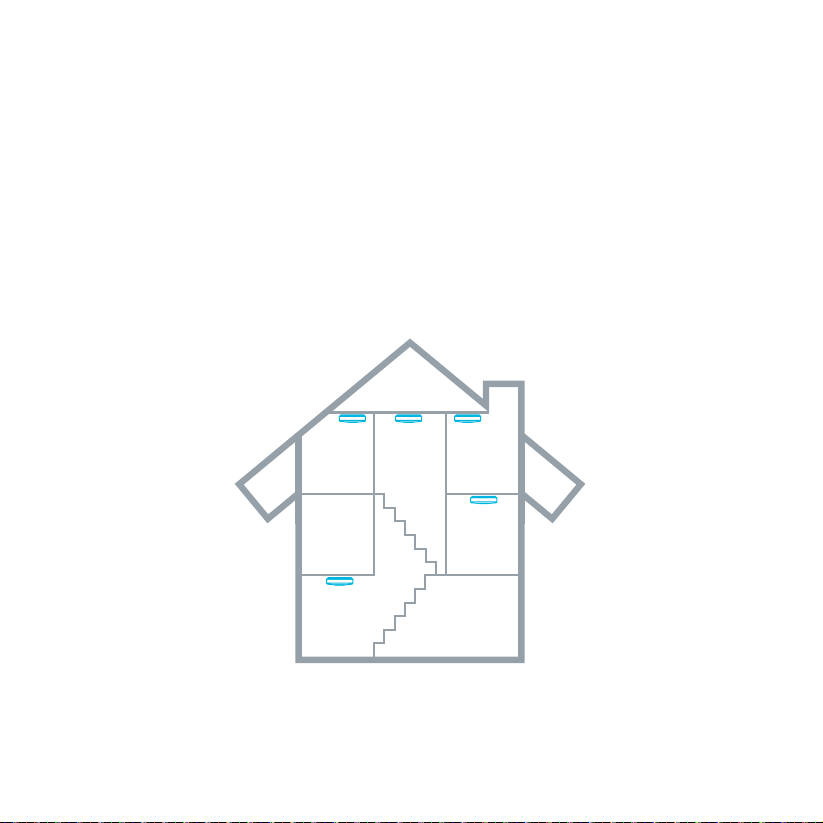
LOCATION IN YOUR HOME
The Natio nal Fire Protec tion Associati on recommends installing a s moke alarm in the foll owing areas:
• On every floor, including finished attics and basements.
• Inside and outside every sleeping area.
• At the top of the first-to-second floor stair way and on the basement ceiling near the entry
of the stairs.
• In homes with more than 1,000 square feet on one level, additional alarms may be required.
Nest Protect should be installed at least 10 ft (3 m) away from cooktops or cooking appliances.
Nest Protect should NOT be installed in unfinished attics or garages.
ATTIC
BEDROOM
KITCHEN
HALL
MASTER
BEDROOM
LIVING/
FAMILY
ROOM
GARAGEBASEMENT
5
Page 6
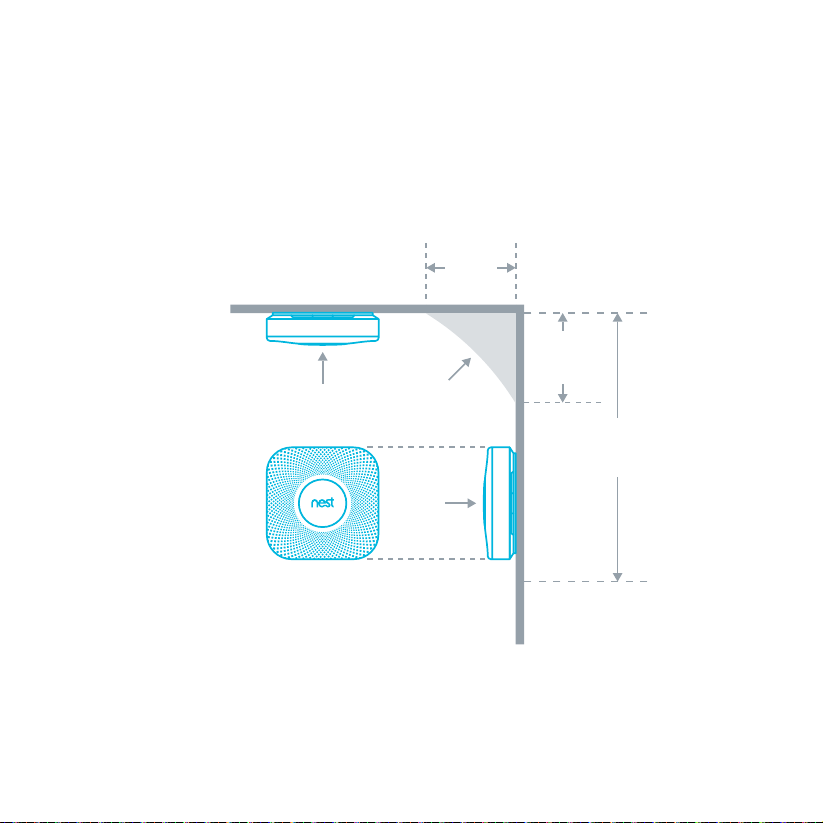
Maximum
WALL
IS UPRIGHT
PLACEMENT ON THE CEILING OR WALL
Installing on the ceiling is recommended. Mark where the screws will go using the base as a guide.
Make sure it’s at least 4 inches (10 cm) away from the wall.
4"
CEILING
BEST
HERE
(10cm)
Minimum
NOT IN
THIS AREA
4"
(10cm)
Minimum
12"
(30.5cm)
6
NEST LOGO
Figure 1
OKAY
HERE
SIDE
Page 7
NOT IN
cm)
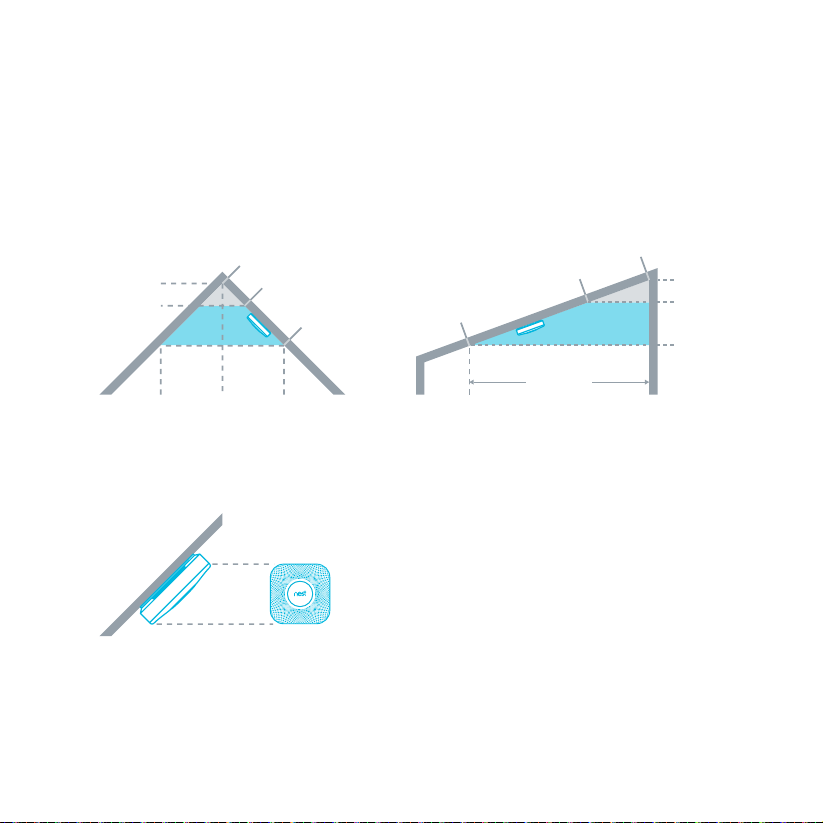
PLACEMENT ON A SLOPED CEILING
If you have a sloped, peaked or cathedral ceiling, Nest Protect should be 4 inches to 3 feet
(10 cm – 1 m) from the highest point.
NOT IN
"
4
(10cm)
3
(0.9 m)
Figure 2 Figure 3
Figure 4
THIS AREA
ANYWHERE IN
THIS AREA
'
3
(0.9 m)
'
NEST LOGO
IS UPRIGHT
ANYWHERE IN
THIS AREA
(0.9 m)
THIS AREA
'
3
(10
"
4
7
Page 8
SETUP AND INSTALLATION
(Professional installation recommended)
The installation of a smoke/CO alarm should
be made by a qualified technician, and all
wiring used to install this alarm should be
made in accordance with articles 210, and
300.3B of the National Electrical Code ANSI/
NFPA 70, NFPA 72, and/or applicable codes in
your local jurisdiction.
For a complete set of instructions and
warnings, refer to page 22.
Tip: Lay ev erythin g out on a table fo r an easy insta llation.
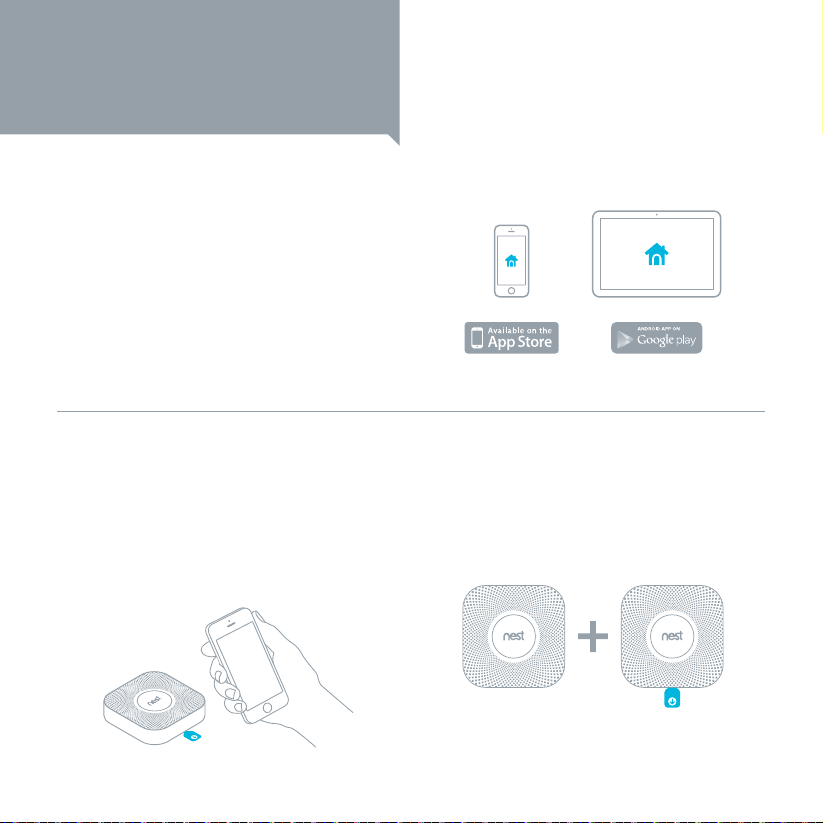
1. Get the Nest app
Before you install your Nest Protect on the
ceiling or wall, you’ll need to set it up with
the Nest app. Download the app from the
Apple App Store, Google Play or the Amazon
App Store and create a free Nest Account.
2. Set up Nest Protect with the
Nest app
The Nest app will guide you through each step:
scanning the Nest Protect QR code, connecting
it to the internet, and connecting it to other
Nest Protects in your home.
Watch the video at nest.com/installprotect
8
3. Have more Nest Protects?
The Nest app will ask you if you have additional
Nest Protects to set up. If so, it’ll take you
through a shorter setup. Make sure to keep
track of which Protects you’ve already set up
and where you’re going to install them.
Already Added New
Page 9
1
22
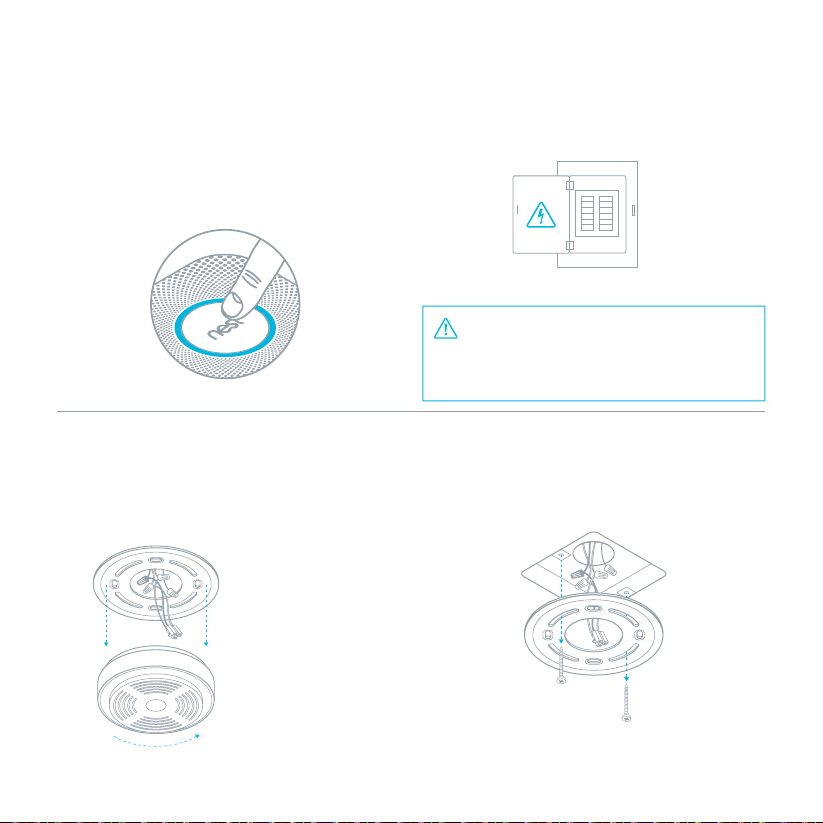
4. Test before you install
Once you’re done setting up all of your Nest
Protec ts, test they’re added to your Nest Account
by pushing the Nest but ton on one Nest Protect
and follow the instructions to test. If they’re all
added, every Nest Protect will speak up.
Now you can install them on the ceiling or wall.
5. Turn off power
Protect yourself and avoid blowing a fuse.
Switch off the correct circuit breaker or remove
the fuse from the fuse box.
Breaker box
WARNING
ELECTRICAL SHOCK HAZARD
Failure to turn off the power may result in
serious electrical shock, injury and death.
6. Remove your old smoke alarm
To prevent electrical shock, make sure the
green power light is of f on the alarm. You may
have to twist the alarm to release it. Carefully
remove it to prevent ceiling or wall damage.
Your old smoke
alarm might
make a really
loud noise when
you disconnect it.
7. Remove the old base
Unscrew the base plate from the electrical box.
Save the screws for later.
9
Page 10
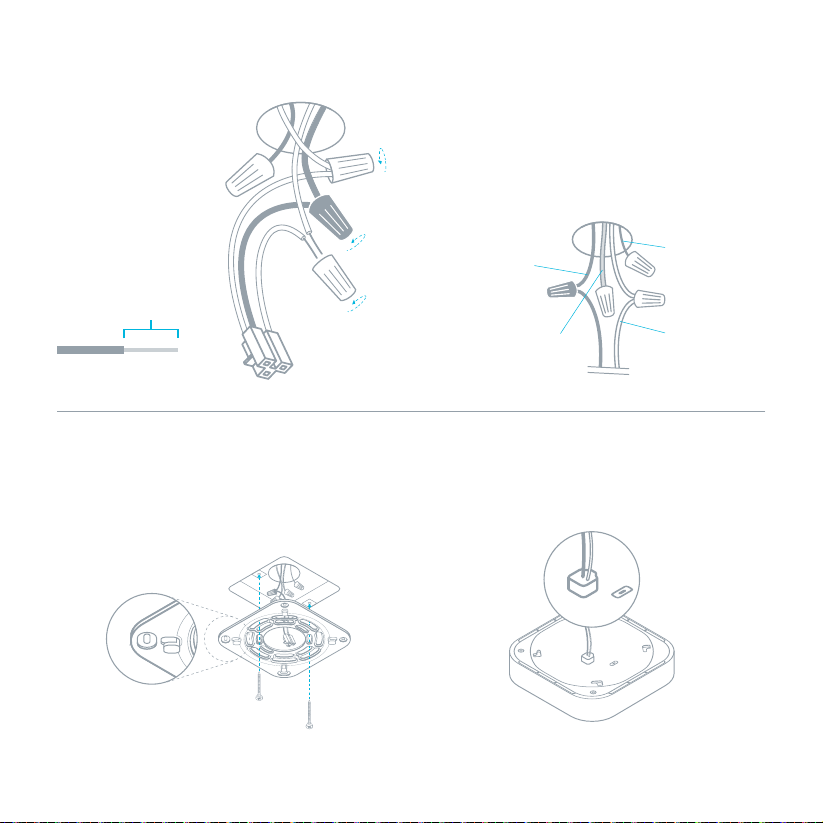
8. Remove the old connector
Unscrew the wire
nuts to detach the
120V connector
from your old
smoke alarm.
9. Attach the Nest 120V connector
Hold the white wire ends together, cap them
with a wire nut and twist clockwise until secure.
Do the same with the black wires. There’s no
need for the red/orange/yellow wire. Simply cap
it with a wire nut and twist until secure.
3/8”
The exposed wire
should be straight.
10. Install Nest Protect backplate
Screw the backplate to the existing electrical
box, reusing the existing screws. (Alternately,
you can screw the plate directly into the wall
orceiling with the Nest screws.)
Tabs face away from
the ceiling or wall.
10
Black:
Power line
Red/orange/yellow:
Interconnect
Bare copper
White:
Neutral line
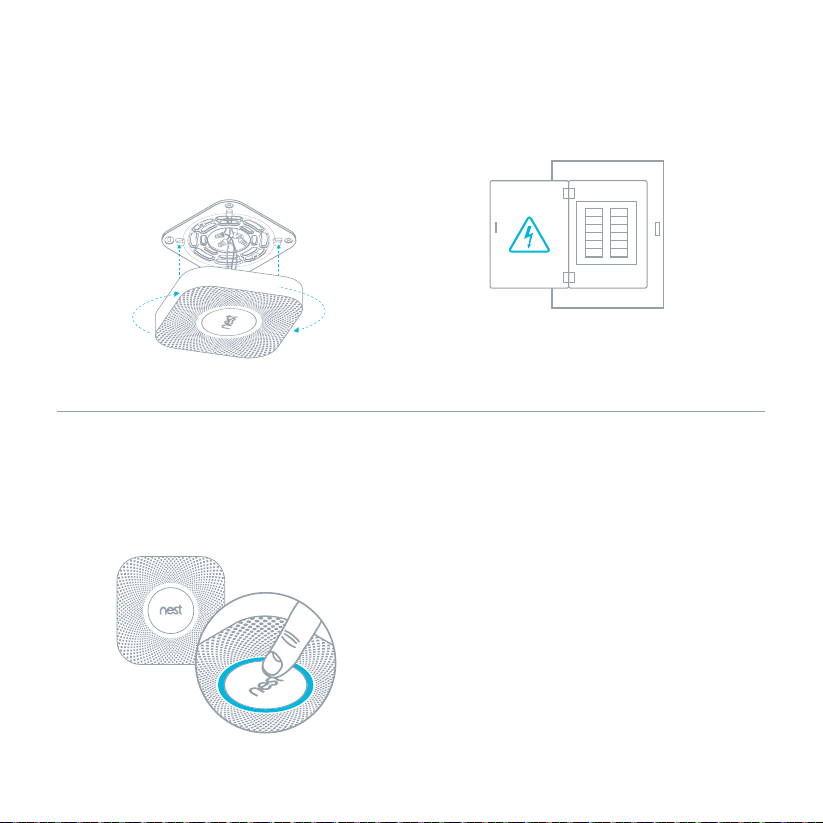
11. Connect power
Plug the 120V connector into the back of your
Nest Protect.
Page 11
22
12. Mount your Nest Protect
First, tuck any excess wiring into the electrical
box and push Nest Protect onto the backplate.
Give it a slight twist clockwise. It’ll CLICK
into place.
11
14. Press to test
Press the Nest button on one Nest Protect and
follow the spoken instructions to test.
They should all speak to you, confirming
that they’re in range of each other.
13. Switch power back on or replace
the fuse
Breaker box
11
Page 12
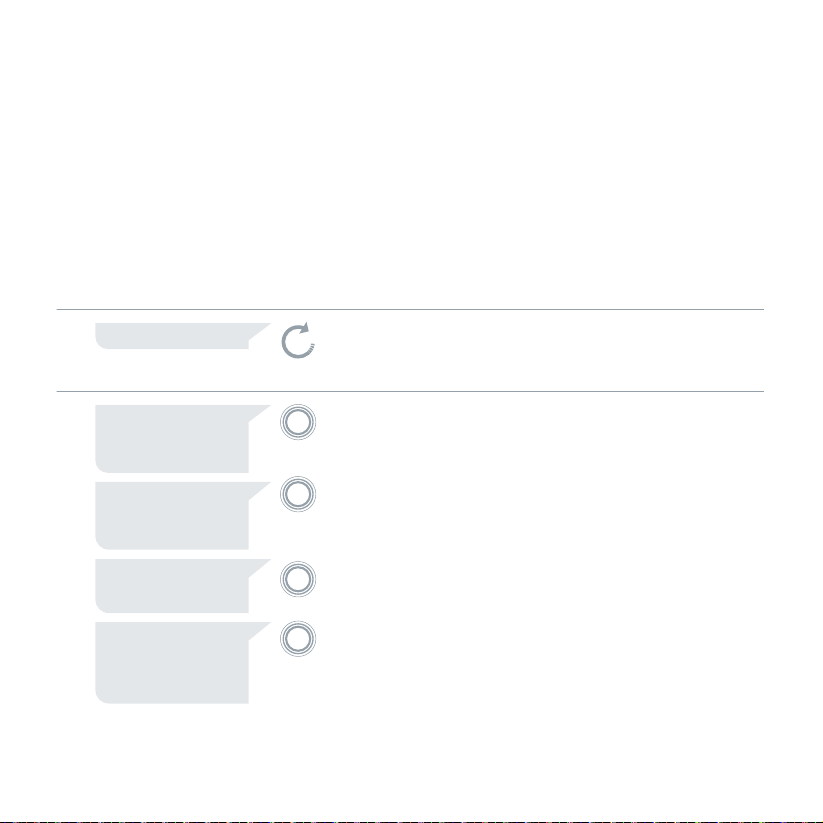
SETUPALERTS
WHAT YOU HEAR WHAT YOU SEE ON
WHAT IT MEANSWHAT TO DO
OPERATING INSTRUCTIONS
When the Nest Prote ct smoke and carbon monoxide (CO) alarm has something to say, it will speak to you
in words and colors instead of just beeping. It has two kinds of aler ts: Heads-Up and Emergency Alarms.
• Nest Protect can see smoke or carbon monoxide levels rising. So before it turns on an Emergency
Alarm, Nest Protect gives you a friendly spoken Heads-Up to warn you in advance. It pulses yellow
and speaks to you, telling you what and where the danger is.
• When smoke or carbon monoxide reach dangerous levels, Nest Protect tells you where the
emergency is and pulses red, in addition to making a loud alarm sound. This is an Emergency Alarm.
NEST PROTECT
“READY. PRESS TO TEST.”
BLUE rotates.
To setup or run a
manual test.
Press the Nest button.
Nest Protect will walk you
through next steps.
“HEADS-UP. THERE’S
SMOKE IN THE (ROOM
NAME). THE ALARM
MAY SOUND.”
“HEADS-UP. THERE’S
CARBON MONOXIDE IN
THE (ROOM NAME). THE
ALARM MAY SOUND.”
(ALARM SOUND)
“EMERGENCY. THERE’S
SMOKE IN (ROOM NAME).”
(ALARM SOUND)
“EMERGENCY. THERE’S
CARBON MONOXIDE IN
(ROOM NAME). MOVE TO
FRESH AIR NOW.”
12
YELLOW pulses.
YELLOW pulses.
RED pulses.
RED pulses.
Smoke levels are rising.
Carbon monoxide levels are
rising. This Heads-Up will
occur if carbon monoxide
levels stay at 70ppm for
60-240 minutes.
The smoke in the room has
reached emergency levels.
The carbon monoxide in
the room has now reached
emergency levels.
Stand under Nest Protect
and press the Nest button
to hush the alert. Then put
out the source of the smoke.
Stand under Nest Protect
and press the Nest button
to hush the alert. Open a
window or door to get fresh
air, then find the CO leak
and stop it
Get out of the
house immediately.
1) Operate reset/silence
button (NEST button).
2) Call your fire dept. or 911.
3) Move to fresh air.
4) Do not reenter the
premises until the
emergency services
tell you to. Refer to
page 25 for complete
instructions.
Page 13
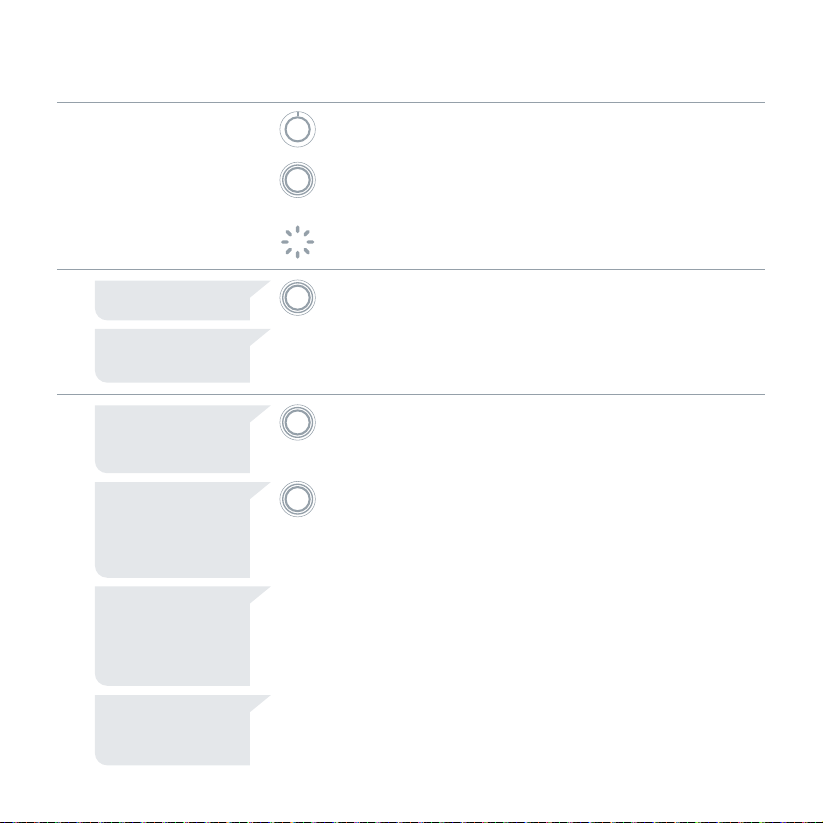
TROUBLE SIGNALS
e.
SILENCING
WHAT YOU HEAR WHAT YOU SEE ON
NEST PROTECT
WHAT IT MEANSWHAT TO DO
EVERY DAY
“SMOKE ALARM HAS
BEEN HUSHED.”
“CARBON MONOXIDE
ALARM HAS BEEN
HUSHED.”
“THE BATTERY IS LOW
IN THE (ROOM NAME).
REPLACE THE BATTERY
SOON.”
“THE BATTERY IS VERY
LOW IN THE (ROOM
NAME). REPLACE
THE BATTERY NOW.”
SINGLE CHIRP EVERY
60 SECONDS.
“THE SENSORS HAVE
FAILED IN THE (ROOM
NAME). REPLACE NEST
PROTECT NOW.”
SINGLE CHIRP EVERY
60 SECONDS.
GREEN light above
the Nest logo.
You turn off the room
lights for the night,
and the GREEN light
pulses once.
WHITE light. Pathlight lights your way at
YELLOW or
RED pulses.
YELLOW pulses.Low battery. Change the batteries
YELLOW pulses.Nest Protect batteries
Nest Protect is working.
The green light means
AC power is connected.
Nest Protect has tested
its sensors and batteries
to confirm they are
working correctly.
night as you pass under it.
You’ve hushed an alert.
Nest Protect will now keep
quiet, unless smoke or
carbon monoxide reaches
dangerous levels.
have been depleted.
It will chirp.
Nest Protect has tested
its sensors and there is
a problem. It will chirp.
Sleep well.
Make sure you’re safe and
have put out the source of
smoke or carbon monoxid
of Nest Protect soon.
Change the batteries
of Nest Protect now.
Clean with compressed
air. If the problem
persists, replace it.
“NEST PROTECT HAS
EXPIRED. REPLACE IT
NOW.” TWO CHIRPS
EVERY 60 SECONDS.
Nest Protect has expired
and reached its end of life.
Replace Nest Protect.
13
Page 14

HEADSUP AND EMERGENCY ALARMS
ALERTS
Nest Protect has two kinds of voice alerts:
Heads-Up and Emergency Alarms.
A Heads-Up is a friendly warning before
conditions get dangerous. Nest Protect
pulses yellow and tells you where smoke
or carbon monoxide is.
An Emergency Alarm occurs when smoke or
carbon monoxide reach dangerous levels.
Nest Protect pulses red, makes a loud alarm
sound and tells you what room the emergency
is in. The smoke alarm takes precedence when
carbon monoxide is also present.
WHICH ALERTS CAN BE SILENCED
• Heads-Up aler ts can be hushed by using the
Nest button.
• Emergency Alarms cannot be hushed by using
the Nest button if smoke reaches a critical level.
• Because there are many different types of
fires, you may experience an Emergency
Alarm without having first experienced a
Heads-Up alert. This means that dangerous
levels of smoke or CO occurred ex tremely
quickly and Nest Protect must sound the
EmergencyAlarm.
• Af ter the Nest Protects in your home are
connected to each other, whenever there’s
a Heads-Up or an Emergency Alarm in one
room, they will all tell you what and where the
danger is. So go to that room and press the
Nest but ton on the Nest Protect there to hush
every Nest Protect in the home. This will
ensure that you will identify the source of
the danger in thatroom.
14
Page 15

WIRELESS INTERCONNECT
Nest Protects connect wirelessly to each other
so that when one speaks, they all speak. That
means when one Nest Protect raises any kind
of alerts, ever y Nest Protect in the house will
tell you in which room the smoke or CO is in. For
example, if you’re in the bedroom and the alarm
goes off in the basement, the Nest Protect in
the bedroom will speak up and relay that alarm
so that you know where the danger is. To silence
the alert, go to that room and press the Nest
button on the Nest Protect there. That will hush
every Nest Protect in the house.
Nest Protect’s 120V connector does not have
a red/orange/yellow wire for interconnect as it
connects wirelessly. There’s no need to connect
any wire to the red/orange/yellow interconnect
wire from the ceiling/wall.
Nest Protects can typically communicate
with each other if they’re 50 ft (15m) apart
inside a home. Some features of a home may
reduce their range, including the number of
floors, number/size of rooms, furniture, type
of building material, suspended ceilings,
ductwork, large metallic appliances and
metal studs. This kind of inter ference can be
overcome by adding more Nest Protects that
can route wireless signals around obstructions.
Nest Protect - Batter y (model number 05A) and
Nest Protect - Wired 120V (model number 05C) are
compatible and can be interconnected wirelessly.
Nest Protect wireless interconnect will not
work with other products from other brands.
WARNING
• The range and proper operation of any
wireless device will vary depending on
its surroundings.
• Nest Protect alarms are not to
be used outdoors or to transmit
between buildings. The alarms
will not communicate properly in
those conditions.
• Metal objects and metallic wallpaper
may interfere with signals from wireless
alarms. Test your Nest Protects with
metal doors opened and closed.
PATHLIGHT
Usually Nest Protect has its light turned off,
but it will light your way as you walk underneath
it in the dark. You can enable or disable
Pathlight from the Nest Mobile app.
15
Page 16

TESTING NEST PROTECT
SELFMONITORING
Nest Protect continuously tests itself, so you
don’t have to wonder if it’s working.
When you turn out the lights for the night,
Nest Protect will glow green for a moment that means everything is working. If it glows
yellow, this means Nest Protect has detected
something wrong that needs your attention. Just
push the Nest button to hear its warning: either
the batteries are low, Wi-Fi has been down or
there is an issue with its sensors.
TEST NEST PROTECT MANUALLY
Regulations require a weekly manual test.
After installation, test Nest Protect by pressing
the Nest button twice. Before sounding the
alarm, Nest Protect will give you a countdown so
that you have time to move away from the alarm.
WARNING
DO NOT stand close to the alarm when
the horn is sounding. Exposure at close
range may be harmful to your hearing.
When testing, step away when horn
starts sounding.
Test procedure
• Press the Nest button twice to start a test.
• Nest Protect will say: “This is only a test. The
alarm may sound.”
• Once the Nest Protect you’ve tested has made
sure it’s working, it’ll tell you every thing’s okay.
If they are interconnected, every Nest Protect
will speak up in the house. Walk to each one to
make sure you hear them.
WARNING
• If the alarm ever fails to test correctly,
have it replaced immediately! If the alarm
is not working properly, it cannot alert you
to a problem.
• DO NOT use a match, cigarette or any other
makeshif t fire to test the smoke alarm.
• To test the CO alarm, NEVER use vehicle
exhaust! Exhaust may cause permanent
damage and voids your warranty.
• NEVER use an open flame of any kind to
test this alarm. You might accidentally
damage or set fire to the unit or to your
home. The built-in self test accurately
tests the unit’s operation as required by
Underwriters Laboratories, Inc. (UL).
16
Page 17

GENERAL MAINTENANCE
CLEANING YOUR NES T PROTECT
Like any photoelectric smoke alarm, Nest
Protect can get dusty. Do not clean it with
detergents or solvents (like Windex®) and do
not spray air fresheners, hair spray or other
aerosols near it. To dust Nest Protect:
• Remove it from th e wall or the ceiling.
• Unscrew the bat tery door.
• Pass a can of compressed air back and forth
across the entire backplate and alarm.
• Blow compressed air around the black circle
that says Nest. This is the smoke chamber.
Do not get water inside the alarm or paint over it.
RESETTING NEST PROTECT
You can reset Nest Protect to erase all your
settings and reset the wireless interconnection
between Nest Protects. You may want to do this
before you move to a new house.
You’ll need to press and hold the Nest button
on Nest Protect to erase its settings. Follow the
steps below for each Nest Protect you want to
reset. You can’t erase the settings on your Nest
Protect from the Nest app.
• Press and hold the Nest button. Nest will chime
and glow blue.
• Keep holding the button until Nest Protect says
its version number. Then release the button.
• Nest Protect will start a verbal countdown and
tell you it ’s erasing all settings. You can cancel by
pressing the Nest button during the countdown.
• Af ter a few seconds it will restart.
Your Nest Protect will still detect smoke and
carbon monoxide af ter being reset. You can see
complete instructions at nest.com/protect/reset
BACKUP BATTERY
In case of power outage, Nest Protect will use
its backup battery.
3 AA Energizer
®
Ultimate Lithium batteries (L91).
These backup batteries can be purchased at
your local retailer.
Nest Protect will let you know its backup
batteries are getting low before they need to
be replaced. Instead of lighting up green during
Nightly Promise, it’ll glow yellow. Once you
press the Nest button, Nest Protect will say,
“The batter y is low. Replace it soon.”
WARNING
Use only bat teries specified by Nest.
Use of a different battery model will
have a detrimental effect on the smoke
alarm operation.
Never disconnect a wired alarm to stop an
unwanted al arm (caused by cooking smoke,
etc.). Removing power disables the alarm
so it cannot sense smoke, and removes
your protection. Instead open a window or
fan the smoke away from the unit.
The backup battery cannot work until
you install the battery in the correct
position (Match “+” to “+” and “-” to “-”).
17
Page 18
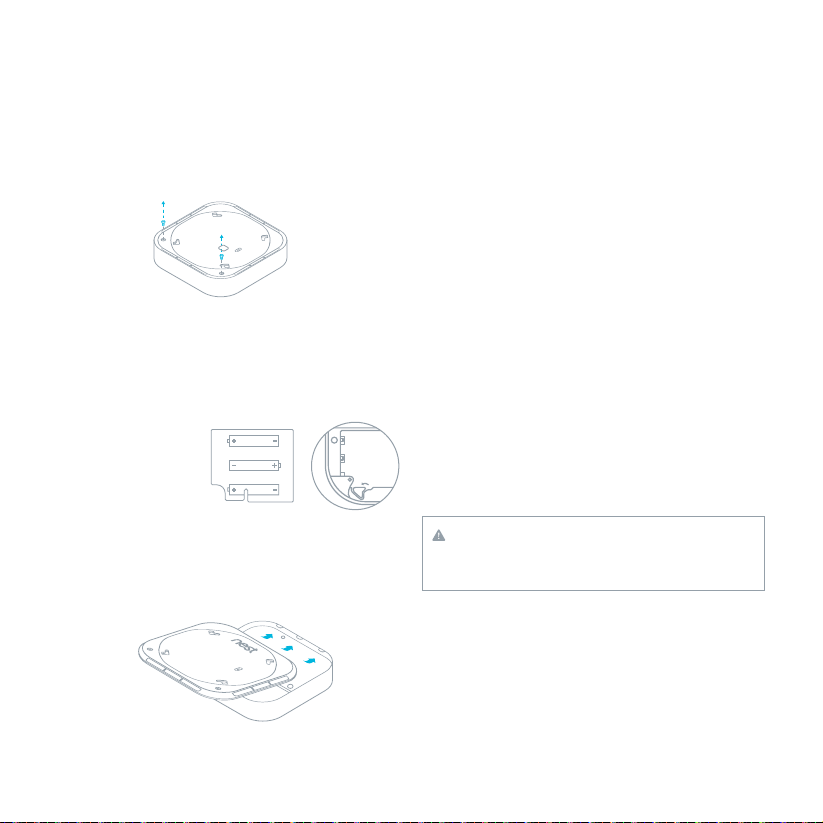
REPLACING THE BACKUP BATTERIES
1. Remove your Nest Protect from its backplate.
2. Using a Phillips screwdriver, unscrew the two
screws from the battery door on the back of
Nest Protect.
3. Replace the batteries. Make sure to use
Energizer Ultimate Lithium batteries and
install them in the right order. If you install
them out of order, you may not be able to
close the battery compartment.
1. First bat tery
2. Second battery
3. Third batter y. This
batt ery will push the
bracke t into place.
1
2
3
SERVICING
Step 1: Before sending Nest Protect for service,
visit nest.com/support
Step 2: If your Nest Protect needs servicing,
first contact our support team to get a
return number.
Step 3: Send it to
Nest Labs
(YOUR RETURN NUMBER)
4 East Stow Road
Marlton, NJ 08053 USA
RECYCLING AND DISPOSAL
Visit www.nest.com/recycle
EX PIRATION
Nest Protect has a limited life like any smoke/
CO alarm. Nest Protect lifetime is 7 years.
You will need to replace Nest Protect after
7 years with a brand new Nest Protect. Check
the date of replacement written on the back
of Nest Protect.
4. Reattach the battery door by sliding it into
the tabs located on the opposite side from
the batteries, replacing the screws and then
reattaching Nest Protect back to its base.
5. Press the Nest button to run a test.
18
WARNING
You’ll no longer be protected from smoke or
CO if you don’t replace your Nest Protect.
About two weeks before it expires, Nest
Protect will light up with a yellow light. Press
the Nest button and it will say, “Nest Protect
has expired. Replace it now.” Buy a new alarm
and recycle the expired one. Make sure you
test your new Nest Protect once it’s installed.
Page 19

SAFETY
ALARM LIMITATIONS
LIMITATIONS OF SMOKE ALARMS
Alarms reduce deaths resulting from home fires
worldwide. However smoke alarms can only
work if they are properly located, installed and
maintained, and if smoke reaches the alarms.
• Smoke alarms may not waken all individuals.
Make sure you create an escape plan and you
practice fire drills with all members of the family.
• Smoke alarms cannot work without power.
If they are powered by batteries, the smoke
alarms cannot work if the batteries are missing,
dead or disconnected. If they are wired, the
smoke alarms cannot work during a long power
outage and once the backup batter y is dead.
Nest Protect will warn you in advance when
batteries are running low so that you can
replace them.
• Smoke will not be able to reach smoke sensor
while the dust cover is in place. The dust cover
must be removed.
• Smoke alarms cannot detect fires if the smoke
does not reach the alarms. For example, if a
door is closed, smoke may not reach the smoke
alarm. This is why you should have a smoke
alarm in each bedroom and in the hallways as
bedroom doors may be closed at night.
• Smoke alarms may not be heard. Although
the smoke alarm comes with a loud horn of
85 decibels, it may not be heard if : 1) people
have consumed alcohol or drugs, 2) the alarm
is drowned by noise from stereo, TV, traffic, air
conditioner or other appliances, 3) residents
are hearing impaired or have high frequency
hearing loss associated with aging. Special
smoke alarms should be installed for those
who are hearing impaired.
19
Page 20

• This smoke alarm is not intended to
alert hearing impaired residents. Alarms
specifically designed for the hearing impaired,
which feature devices like flashing strobe
lights or low frequency devices are available to
alert the hearing impaired in case of fire.
• This smoke alarm alone is not a suitable
substitute for complete fire detection
systems in places housing many people—like
apartment buildings, condominiums, hotels,
motels, dormitories, hospitals, long-term
health care facilities, nursing homes, day care
facilities, or group homes of any kind—even if
they were once single-family homes. It is not a
suitable substitute for complete fire detection
systems in warehouses, industrial facilities,
commercial buildings, and special-purpose
non-residential buildings which require
special fire detection and alarm systems.
Depending on the building codes in your area,
this smoke alarm may be used to provide
additional protection in these facilities.
LIMITATIONS OF CARBON MONOXIDE CO ALARMS
• NEVER ignore your carbon monoxide alarm
if it alarms. Refer to “What to do in case of a
carbon monoxide alarm” for more information.
Failure to do so can result in injury or death.
• This CO alarm is designed for use inside
a single-family home or apar tment. It is
not meant to be used in common lobbies,
hallways, or basements of multi-family
buildings unless working CO alarms are also
installed in each family living unit. CO alarms
in common areas may not be heard from
inside individual family living units.
• This CO alarm alone is not a suitable
substitute for complete detection systems in
places which house many people, like hotels
or dormitories, unless a CO alarm is also
placed in each unit.
• DO NOT use this CO alarm in warehouses,
industrial or commercial buildings, specialpurpose non-residential buildings, or airplanes.
This CO alarm is specifically designed for
residential use, and may not provide adequate
protection in non-residential applications.
• Some individuals are more sensitive to CO
than others, including people with cardiac or
respiratory problems, infants, unborn babies,
pregnant mothers, or elderly people can be
more quickly and severely affected by CO.
Members of sensitive populations should
consult their doctors for advice on taking
additional precautions.
• The silence feature is for your convenience
only and will not correct a CO problem. Always
check your home for a potential problem after
any alarm. Failure to do so can result in injur y
ordeath.
20
Page 21

INSTALLATION CODE
THIS EQUIPMENT SHOULD BE INSTALLED IN
ACCORDANCE WITH THE NATIONAL FIRE
PROTECTION ASSOCIATION’S STANDARD 72
(National Fire Protection Association,
Batterymarch Park, Quincy, MA 02269).
NOTE: Specific requirements for Smoke Alarm
installation vary from state to state and from
region to region. Check with your local Fire
Depar tment for current requirements in your area.
WARNING
This product is intended for use in ordinar y
indoor locations of family living units. It
is not designed to measure compliance
with Occupational Safety and Health
Administration (OSHA) commercial or
industrial standards.
WHERE TO INSTALL YOUR SMOKE AL ARMS
For your information, the National Fire Alarm
and Signaling Code, NFPA 72, reads as follows:
“29.5.1 *Required Detection.”
“ *Where required by applicable laws, codes,
or standards for a specific type of occupancy,
approved single- and multiple-station smoke
alarms shall be installed as follows:
(1) *In all sleeping rooms and guest rooms
(2) *Outside of each sep arate dwelling unit sle eping
area, within 6.4 m (21 ft) of any door to a sleeping
room, the distanc e measured along a path of travel
(3) On every level of a dwelling unit,
including basements
(4) On every level of a residential board and care
occupancy (small facility), including basements
and excluding crawl spaces and unfinished attics
(5) *In the living area(s) of a guest suite
(6) In the living area(s) of a residential board and
care occupancy”
(Repri nted with pe rmission f rom NFPA 72®, Nationa l Fire Alarm
& Signal ing Code Cop yright © 2013 Nati onal Fire Pro tection
Asso ciation, Qu incy, MA 02269. Thi s reprinte d material is n ot the
complete and official position of the National Fire Protection
Asso ciation, on t he refere nced subjec t which is rep resente d only
by the st andard in it s entiret y.) (National F ire Alarm & Si gnaling
Code® a nd NFPA 72® are regi stered tr ademarks o f the Nationa l
Fire Pr otectio n Associat ion, Inc., Qui ncy, MA 02269.)
SMOKE DETECTION
Are more smoke alarms desirable?
The required number of smoke alarms might
not provide reliable early warning protection
for those areas separated by a door from
the areas protected by the required smoke
alarms. For this reason, the use of additional
smoke alarms for those areas for increased
protection is recommended. The additional
areas include the dining room, and hallways
not protected by the required smoke alarms.
The installation of smoke alarms in kitchens,
attics (finished or unfinished), or garages is
not normally recommended, because these
locations occasionally experience conditions
that can result in improper operation. As Nest
Protect is also a Carbon Monoxide alarm, it is
not recommended to install it in a furnace room
or a utility room if it contains a water heater or
a furnace. It should be 15-20 feet from these
appliances to avoid transient conditions and/or
perceived nuisance alarms.
21
Page 22

AC INSTALLATION WARNINGS
ELECTRICAL SHOCK HAZARD
• Turn off power to the area where you will install
this unit at the circuit breaker or fuse box
before beginning installation. Failure to turn
off the power before installation may result in
serious electrical shock, injury or death.
• Do not restore power until all alarms are
completely installed. Restoring power before
installation is complete may result in serious
electrical shock, injury or death.
• Turn off the power to the area where the
alarm is installed before removing it from
the mounting bracket. Failure to turn off the
power first may result in serious electrical
shock, injury or death.
• If any unit in the series does not alarm,
TURN OFF POWER and recheck connections.
If it does not alarm when you restore power,
replace it immediately.
• At tempting to disconnect the power connector
from the unit when the power is on may result
in electrical shock, serious injury or death.
• Failure to meet any of the above requirements
could damage the units and cause them to
malfunction, removing your protection.
• Improper wiring of the power connector or
the wiring leading to the power connector will
cause damage to the alarm and may lead to a
non-functioning alarm.
• This unit must be powered by a 24-hour,
120V AC pure sine wave, 60Hz circuit. Be sure
the circuit cannot be turned of f by a switch,
dimmer, or ground fault circuit interrupter.
Failure to connect this unit to a 24-hour
circuit may prevent it from providing
constant protection.
22
• The alarm cannot be operated from power
derived from a square wave, modified square
wave or modified sine wave, inverter. These
types of inverters are sometimes used to
supply power to the structure in off grid
installations, such as solar or wind derived
power sources. These power sources produce
high peak voltages that will damage the alarm
• Never disconnect the power from an AC
powered unit to stop an unwanted alarm.
Doing so will disable the unit and remove
your protection. In the case of a true
unwanted alarm open a window or fan the
smoke away from the unit. The alarm will
reset automatically when it returns to
normal operation.
• Improper wiring of the power connector or
the wiring leading to the power connector
will cause damage to the alarm and may lead
to a non-functioning alarm. You must test to
ensure proper installation.
WHERE NOT TO INSTALL YOUR SMOKE ALARMS
For best performance, AVOID installing a smoke
alarm in these areas:
• Where combustion particles are produced.
Burning material creates combustion
particles which could cause your smoke alarm
to go off unnecessarily. Areas to avoid include
poorly ventilated kitchens, garages, boats,
recreational vehicles, and furnace rooms.
Keep a smoke alarm at least 20 feet (6 m)
from from the source of combustion par ticles
(stove, furnace, water heater, space heater)
if possible. In areas where a 20-foot (6 m)
distance is not possible – in mobile, or smaller
Page 23

homes, for example – it is recommended
a smoke alarm to be placed as far from
these fuel-burning sources as possible. The
placement recommendations are intended
to keep a smoke detector at a reasonable
distance from a fuel-burning source, reducing
“unwanted” alarms. Unwanted alarms can
occur if a smoke alarm is placed directly next
to a fuel-burning source. Ventilate these areas
as much as possible.
• In air streams near kitchens. Air currents
can draw cooking smoke into the sensor of a
smoke alarm near the kitchen.
• In ver y damp, humid or steamy areas, or
directly near bathrooms with showers. Keep
a smoke alarm at least 10 feet (3 meters) away
from showers, saunas, dishwashers, etc.
• Where temperatures are regularly below
40˚F (4˚C) or above 100˚ F (38˚C) including
unheated buildings, outdoor rooms, porches,
or unfinished attics or basements.
• In ver y dusty, dirty, or greasy areas. Do not
install a smoke alarm directly over the stove or
range. Clean a laundry room unit frequently to
keep it free of dust or lint.
• Ne ar fresh air vents , ceiling fans, o r in very draf ty
areas. Drafts can blow smoke away from a smoke
alarm, pr eventing it from re aching the sensor.
• In insect infes ted areas. Insects can
clog openings to the sensor and cause
unwanted alarms.
• Less than 12 inches (30.48 cm) away from
fluorescent lights. Electrical “noise” can
interfere with the sensor.
• In “dead air” spaces. “Dead air” spaces may
prevent smoke from reaching a smoke alarm.
WHERE NOT TO INSTALL YOUR CO ALARMS
• Keep carbon monoxide alarm at least 5 ft (1.5 m)
away from any cooking appliance including
stovetop, oven, microwave, etc.
• This alarm should not be installed in locations
where the normal ambient temperature is
below 40°F (4.4°C) or exceeds 100°F (37.8°C).
EXAMPLES OF WHEN YOUR SMOKE AL ARM
MAY NOT BE EFFEC TIVE
Your alarm may not be effective in protecting
against fire in certain cases:
• Smoking in bed
• Leaving children unsupervised
• Cleaning with flammable liquids, like gasoline.
• When someone’s clothes have caught on fire
• Fires where the smoke is prevented from
reaching the alarm due to a closed door or
other obstruction
• Incendiary fires where the fire grows so rapidly
that an occupant can’t get out, evenwith
alarms in proper locations
23
Page 24
CARBON MONOXIDE CO PRECAUTIONS
WHAT IS CARBON MONOXIDE?
Carbon Monoxide (CO) is an invisible, odorless,
tasteless gas produced when fuels do not burn
completely, or are exposed to heat (usually fire).
These fuels include: wood, coal, charcoal, oil
natural gas, gasoline, kerosene, and propane.
Common appliances are often sources of
CO. such as oil or gas burning furnaces, gas
ovens, wood-burning fireplaces, and charcoal
grills. If they are not properly maintained, are
improperly ventilated or malfunction, CO levels
can rise quickly. CO is a real danger now that
homes are more energy efficient. “Air-tight”
homes with added insulation, sealed windows,
and other weatherproofing can “trap” CO inside.
Electrical appliances typically do not produce CO.
The Nest Protect CO sensor meets the alarm
response time requirements of the American
National Standard ANSI/UL 2034. Standard
alarm times are as follows:
• At 70 PPM, the unit must alarm within
60-240 minutes.
• At 150 PPM, the unit must alarm within
10-50 minutes.
• At 400PPM, the unit must alarm within
4 to 15 minutes.
WARNING
This carbon monoxide alarm is designed
to detec t carbon monoxide from
any source of combustion. It is NOT
designed to detec t any other gas.
WARNING
The alarm only indicates the presence
of carbon monoxide gas at the sensor.
Carbon monoxide gas may be present
inother areas.
Individuals with certain medical problems should
consider using detection devices with lower COHb
alarming capabilities and consider warning
device s which provide audible and visual signals for
carbon monoxide concentrations under 30 ppm.
SYMPTOMS OF CO POISONING
The following symptoms are related to CARBON
MONOXIDE POISONING and are to be discussed
with ALL members of the household:
• Mild Exposure: Slight headache, nausea,
vomiting, fatigue (often described as
‘Flu-like’ symptoms).
• Medium Exposure: Severe throbbing headache,
drowsiness, confusion, fast heart rate.
• Ex treme Exposure: Unconsciousness,
convulsions, cardiorespiratory failure, death.
• Many cases of reported CARBON MONOXIDE
POISONING indicate that while victims are
aware they are not well, they become so
disoriented they are unable to save themselves
by either exiting the building or calling for
assistance. Young children and household
petsare typically the first affected.
24
Page 25
WHAT TO DO IN CASE OF A CARBON
MONOXIDEALARM
WARNING
Actuation of your CO alarm indicates the
presence of carbon monoxide (CO) which
can KILL YOU.
If alarm signal sounds:
1) Operate reset/silence button
(Press NEST button);
2) Call your emergency services [fire dept. or 911];
PHONE NUMBER:
3) Immediately move to fresh air – outdoors or
by an open door/window. Do a head count to
check that all persons are accounted for. Do
not reenter the premises nor move away from
the open door/window until the emergency
services responders have arrived, the
premises have been aired out, and your alarm
remains in its normal condition.
4) After following steps 1 – 3, if your alarm
reactivates within a 24 hour period, repeat steps
1 – 3 and call a qualified appliance technician
PHONE NUMBER:
to investigate for sources of CO from fuel
burning equipment and appliances, and
inspectfor proper operation of this equipment.
If problems are identified during this inspec tion
have the equipment ser viced immediately. Note
any combustion equipment not inspected by
the technician and consult the manufacturers’
instructions, or contact the manufacturers
directly, for more information about CO safety
and this equipment. Make sure that motor
vehicles ar e not, and have not been, operating in
an attached garage or adjacent to the residence.
This information is available as a label provided
in the box. Stick it in a spot where everyone can
see it, like the refrigerator.
THE FOLLOWING CONDITIONS CAN RESULT IN
TRANSIENT CO SITUATIONS
1. Excessive spillage or reverse venting of fuel
burning appliances caused by:
I) Outdoor ambient conditions such as wind
direction and/or velocity, including high
gusts of wind; heavy air in the vent pipes
(cold/humid air with extended periods
between cycles).
II) Negative pressure differential resulting
from the use of exhaust fans.
III) Simultaneous operation of several fuel
burning appliances competing for limited
internal air.
IV) Vent pipe connection vibrating loose from
clothes dryers, furnaces, or water heaters.
V) Obstructions in or unconventional vent pipe
designs which amplif y the above situations.
2. Extended operation of unvented fuel burning
devices (range, oven, fireplace, etc.).
3. Temperature inversions which can trap
exhaust gases near the ground.
4. Car idling in an open or closed attached
garage, or near a home.
5. NEVER bring a charcoal grill inside and
ALWAYS operate a portable generator
outside, a safe distance from the house,
and well away from windows.
25
Page 26

FIRE SAFETY PRECAUTIONS
CREATE AN ESCAPE PLAN TO PRACTICE
Be prepared when your smoke/CO al arm sounds its
alarm. De velop a family escap e plan, discuss it with
all household members, and practice it regularly.
• Make sure everyone is familiar with the sound
of your smoke/CO alarm and explain what the
sound means.
• Determine T WO exits from each room and have
an escape route to the outside from each exit.
• Teach all the members in your household to
check doors for heat with the back of your
hand before opening them, and to use the
alternate exit if the door is hot. Make sure
they do not open the door if it is hot.
• Teach household members to crawl along the
floor to av oid dangerous smoke, f umes and gases.
• Determine a safe m eeting place for all household
members to regroup at outside the building.
PRACTICE FIRE SAFETY
Practice your escape plan at least twice a year,
making sure that ever yone is involved – from kids
to grandparents. Practice the escape plan with
children, including holding one at night when they
are sleeping. If children or others do not wake up to
the sound of the smoke ala rm, or if there are infants
or family members with mobilit y limitations, make
sure that someone is assigned to help them for the
fire drill and in the event of an emergency.
Current studies have shown smoke alarms may
not awaken all sleeping individuals, and that it is
the responsibility of individuals in the household
that are capable of assisting others to provide
assistance to those who may not be awakened by
the alarm s ound, or to those who may b e incapable
of safely evacuating the area unassisted.
26
WHAT TO DO IN CASE OF FIRE
• Get out now.
• Don’t panic; stay calm.
• Operate your safety plan as previously planned.
• Alert small children in the home and those who
may need extra assistance.
• Leave the building as quickly as possible. Touch
doors with the back of your hand and make
sure they are not hot before opening them.
Use an alternate exit, if necessary. In case of
smoke, crawl along the floor, and DO NOT stop
to collect anything. Close the doors behind you.
• Meet at a pre-arranged meeting place outside
the building.
• Once outside, do a head count, and call the
fire department.
• DO NOT reenter the house, unless a fire
official says it’s safe to reenter.
CALIFORNIA STATE FIRE MARSHAL
As stated by the California State Fire Marshal
“Early warning fire detection is best achieved by
the installation of fire detection equipment in
all rooms and areas of the household as follows:
A smoke alarm installed in each separate
sleeping area (in the vicinity of, but outside of
the bedrooms), and heat or smoke detectors
in the living rooms, dining rooms, bedrooms,
kitchens, hallways, attics, furnace rooms,
closets, utilit y and storage rooms, basements
and attached garages”.
Page 27
FEDERAL COMMUNICATIONS
COMMISSION FCC COMPLIANCE
This equipment has been tested and found
to comply with the limits for a Class B digital
device, pursuant to part 15 of the FCC
Rules. These limits are designed to provide
reasonable protection against harmful
interference in a residential installation.
This equipment generates, uses and can
radiate radio frequency energy and, if not
installed and used in accordance with the
instructions, may cause harmful interference
to radio communications. However, there is
no guarantee that interference will not occur
in a particular installation. If this equipment
does cause harmful interference to radio or
television reception, which can be determined
by turning the equipment off and on, the user is
encouraged to tr y to correct the interference by
one or more of the following measures:
• Reorient or relocate the receiving antenna.
• Increase the separation between the
equipment and receiver.
• Connect the equipment into an outlet on
a circuit different from that to which the
receiver is connected.
• Consult the dealer or an experienced radio/TV
technician for help.
This device complies with par t 15 of FCC rules.
Operat ion is subject to the fo llowing two conditions:
1. This device may not cause harmful
interference.
2. This device must accept any interference
received, including interference that may
cause undesired operation.
Change or modifications that are not expressly
approved by the manufacturer could void the
user’s authority to operate the equipment.
RF EXPOSURE INFORMATION:
This equipment complies with FCC radiation
exposure limits set forth for an uncontrolled
environment. In order to avoid the possibility
of exceeding the FCC radio frequency exposure
limits, human proximity to the antenna shall not
be less than 20cm during normal operation.
MOBILE NOTIFICATIONS
WARNING
Nest Protect smartphone and tablet
notifications require a functional Wi-Fi
connection. They’re only as reliable as
your home’s Wi-Fi network and aren’t a
substitute for a third party emergency
monitoring service.
This use r’s guide and th e product s described h erein are
copyr ighted, wit h all rights r eserved . Under these c opyright
laws, n o part of this in stallat ion guide may be c opied for us e
without the written consent of Nest.
Nest Labs. 90 0 Hansen Way. Palo Alto, CA 94304
27
Page 28

Nest Labs, Inc.
Limited Warranty
Nest Protect
Smoke + Carbon
Monoxide Alarm
28
IMPOR TANT INFORMATION A BOUT YOUR RIG HTS AND
OBLIGATIONS, AS WELL AS LIMITATIONS AND EXCLUSIONS
THAT MAY APPLY TO YOU.
YOUR RIGH TS AND THIS LIMI TED WARRA NTY
This Lim ited Warran ty gives yo u specific le gal rights. You m ay
also hav e other legal r ights that v ary by sta te, provinc e or
jurisd iction. The d isclaimer s, exclusio ns, and limit ations of
liability under this Limited Warranty will not apply to the extent
prohib ited by appli cable law. For a f ull descrip tion of your le gal
right s you should re fer to the law s applicabl e in your jurisdi ction
and you ma y wish to cont act a rele vant consu mer adviso ry ser vice.
1. WHAT THIS LIMIT ED WARRA NTY COV ERS; PERIO D OF COVER AGE
Nest L abs, Inc. (“Ne st Labs”), 9 00 Hansen Way, Pal o Alto,
Calif ornia USA, w arrants to t he owner of the e nclosed pr oduct
that th e product co ntained in t his box (“Prod uct”) will b e free
from de fects in ma terials and w orkmanshi p for a period o f
two (2) ye ars (or one (1) year for Fa ctory Re furbished P roducts)
from th e date of deliv ery follo wing the orig inal retail p urchase
(the “War ranty Pe riod”). If the P roduct fai ls to confor m to this
Limite d Warrant y during the War ranty Per iod, Nest L abs will,
at its s ole discret ion, either (a ) repair or rep lace any def ective
Produ ct or compon ent; or (b) acc ept the retur n of the Produ ct
and ref und the money a ctually pa id by the origin al purchase r
for the P roduct. Re pair or repl acement may b e made with a
new or re furbished p roduct or c omponent s, at Nest La bs’ sole
discretion. If the Product or a component incorporated within
it is no lo nger availab le, Nest Lab s may replac e the Produc t
with a sim ilar produc t of similar f unction, at N est Labs’ s ole
discr etion. This is y our sole and exc lusive rem edy for bre ach
of this Li mited Warra nty. Any Pro duct that ha s either bee n
repair ed or repla ced under thi s Limited War ranty will b e
cover ed by the term s of this Limite d Warrant y for the longe r
of ninet y (90) days fr om the date of de livery or t he remaining
Warranty Period. This Limited Warranty is transferable from
the ori ginal purcha ser to subse quent owner s, but the Warr anty
Perio d will not be ex tended in dur ation or exp anded in cove rage
for any su ch transfe r.
2. TOTAL SATIS FACTION RE TURN POLIC Y
If you are t he original p urchaser o f the Produc t and you are
not sat isfied with t his Product f or any reaso n, you may ret urn
it in its o riginal con dition with in thirty (30 ) days of the orig inal
purch ase and rece ive a full ref und.
3. WARRA NTY COND ITIONS; HOW T O GET SERVIC E IF YOU WANT
TO CLA IM UNDER THIS LI MITED WARRA NTY
Befor e being able to c laim under th is Limited War ranty, the
owner of t he Product m ust (a) notif y Nest La bs of the inten tion
to clai m by visiting ne st.com/su pport dur ing the Warran ty
Page 29

Perio d and providi ng a descript ion of the alle ged failure,
and (b) co mply with Nes t Labs’ retu rn shipping in structio ns.
Nest L abs will have no w arranty o bligation s with respe ct to a
retur ned Produc t if it deter mines, in its r easonabl e discretio n
after examination of the returned Product, that the Product
is an Inel igible Produ ct (defined be low). Nest Lab s will bear
all cos ts of retur n shipping to own er and will reim burse any
shippin g costs inc urred by the ow ner, except wit h respect t o any
Inelig ible Produc t, for which ow ner will bear a ll shipping co sts.
4. WHAT THIS L IMITED WARR ANTY DOE S NOT COVER
This warranty does not cover the following (collectively
“Inelig ible Produc ts”): Produ cts marke d as “sample” or s old “AS
IS”; or Pro ducts that h ave been subj ect to: (a) modi fications,
alterations, tampering, or improper maintenance or repairs;
(b) handl ing, stora ge, install ation, tes ting, or use n ot in
accordance with the User’s Guide or other instructions
provi ded by Nest L abs; (c) abuse or mi suse of the Pro duct; (d)
breakdowns, fluctuations, or interruptions in electric power or
the tele communic ations net work; or (e) Act s of God, inclu ding
lightn ing, flood, to rnado, ear thquake, or h urricane. T his
warra nty does no t cover cons umable par ts, includi ng batter ies,
unless d amage is due to d efects in m aterials or w orkmanshi p
of the Pr oduct, or so ftware (e ven if packa ged or sold wit h the
produ ct). Nest La bs recomm ends that you u se only autho rized
service providers for maintenance or repair. Unauthorized
use of th e Product or s oftwar e can impair the P roduct ‘s
perf ormance an d may invalida te this Limite d Warrant y.
5. DISCL AIMER OF WARR ANTIES
EXCEP T AS STATED ABOVE IN THIS L IMITED WARRA NTY,
AND TO THE M AXIMUM EX TENT PERMIT TED BY APPLI CABLE
LAW, NEST L ABS DISCL AIMS ALL E XPRESS, IMPLI ED, AND
STATUTORY WARRANTIES AND CONDITIONS WITH RESPECT
TO THE PRO DUCT, INCLUDING THE IM PLIED WARRAN TIES
OF MERCHANTABILITY, AND FITNESS FOR A PARTICULAR
PURPO SE. TO THE MAX IMUM EXTE NT PERMITTE D BY
APPLIC ABLE LAW, NEST L ABS ALS O LIMITS THE DUR ATION OF
ANY IMPL IED WARRANTI ES OR CONDITION S TO THE DURATION
OF THIS LIMI TED WARRANT Y.
6. LIMITATION OF D AMAGES
IN ADDIT ION TO THE ABOVE WA RRANT Y DISCLAIME RS, IN NO
EVEN T WILL NEST LAB S BE LIABLE FO R ANY CONSEQUE NTIAL,
INCIDENTAL, EXEMPLARY, OR SPECIAL DAMAGES, INCLUDING
ANY DAM AGES FOR LOST DATA OR LOS T PROFITS, A RISING
FROM OR REL ATING TO THIS LIMI TED WARRANT Y OR THE
PRODU CT, AND NEST LAB S’ TOTAL CUMULATI VE LIABILIT Y
ARISING F ROM OR RELATED TO T HIS LIMITED WARR ANTY OR
THE PROD UCT WILL NOT E XCEED THE AMOUNT AC TUALLY PAID
FOR THE PR ODUCT BY THE ORI GINAL PURCH ASER.
7. LIMITATION OF LIABILITY
THE NEST L ABS ONLINE SER VICES (“SERV ICES”) PROVI DE
YOU INFORMATION (“PRODUCT INFORMATION”) REGARDING
YOUR NEST PRODUC TS OR OTHER PERIPHERALS CONNEC TED
TO YOUR PRODUCTS (“PRODUCT PERIPHERALS”). THE TYPE
OF PRODUCT PERIP HERALS THAT MAY BE CONNECTED
TO YOUR PRO DUCT MAY CHANG E FROM TIME TO TIME.
WITHOUT LIMI TING THE GENERALIT Y OF THE DISCLAIMERS
ABOVE , ALL PRODUC T INFORMATION IS PRO VIDED FOR YOUR
CONVE NIENCE,“AS IS”, AND “AS AVAILABL E”. NEST LABS D OES
NOT REPRE SENT, WARRANT, OR GUAR ANTEE THAT PRO DUCT
INFORMATI ON WILL BE AVAILAB LE, ACCURATE, O R RELIABLE
OR THAT PROD UCT INFORMATIO N OR USE OF THE SERVI CES
OR PRODU CT WILL PROVI DE SAFET Y IN YOUR HOME. YOU
USE ALL PR ODUCT INFORM ATION, THE SERVI CES, AND THE
PRODU CT AT YOUR OWN DISCRE TION AND RISK. Y OU WILL BE
SOLELY RESP ONSIBLE FOR (A ND NEST LABS D ISCLAIMS) A NY
AND ALL LO SS, LIABIL ITY, OR DAMAGES , INCLUDING TO YOUR
WIRING, FIXTURES, ELECTRICTY, HOME, PRODUCT, PRODUCT
PERIPHERAL S, COMPUTER, MOBILE DE VICE, AND ALL OTHER
ITEMS AND P ETS IN YOUR HOME , RESULTING FROM YOUR U SE
OF THE PRODUCT INFORMATION, SERVICES, OR PRODUCT.
PRODU CT INFORMATION PR OVIDED BY THE SERV ICES IS
NOT INTEND ED AS A SUBSTIT UTE FOR DIREC T MEANS OF
OBTAINING THE INFORMATION. FOR EXAMPLE, A NOTIFICATION
PROVID ED THROUGH THE SER VICE IS NOT INT ENDED AS
A SUBST ITUTE FOR AUD IBLE AND VISIBL E INDICATIONS IN
THE HOME AN D ON THE PRODUC T, NOR FOR A THIR D PARTY
MONITOR ING SERVICE TH AT MONITORS AL ARM STATE.
8. VARIATION S THAT MIGHT APPLY TO TH IS LIMITED WARR ANTY
Some jur isdictio ns do not allow li mitations o n how long an
implied warranty lasts or exclusions/limitations on incidental
or cons equential d amages, so s ome of the limi tations se t out
above m ay not apply to yo u.
64-30-0013-ES
29
Page 30

Page 31

 Loading...