

Page 1

Professional Digital Video Recorders
u s e r ’ s M a n ual
This manual covers models:
Pro 16/2
Pro 12/2
Pro 8/2
Pro 4/2
Pro 4/1
Before installing and using this unit, please read this manual carefully and be sure to keep it handy for later reference.
Page 2

PRO SERIES DVR User’s Guide
2
About this Manual
This manual is designed to assist customers in using their new PRO SERIES Digital Video Recorder.
Information in this document has been carefully checked for accuracy; however, no guarantee is given as to
the correctness of the contents. The information contained in this document is subject to change without
notice.
Edition
First Edition, August 30, 2005 by NESS SECURITY PRODUCTS PTY LTD
Copyright
This publication contains information that is protected by copyright. No part of it may be reproduced,
transmitted, transcribed, stored in a retrieval system, or translated into any language without permission
from the copyright holders.
Copyright © 2002
All rights reserved
Regulations
♦ CE
♦
C-Tick
Page 3

PRO SERIES DVR User’s Guide
3
Warning
It is essential that only the supplied power cord be used.
You are cautioned that changes or modifications not expressly approved by the party responsible for
compliance could void your authority to operate the equipment.
Maintenance
Follow these steps and you will increase the working lifetime of your PRO SERIES DVR. You will also
reduce the chance of damage to your Digital Video Recorder and personal injury to yourself.
1. Make sure the Digital Video Recorder is turned off before unplugging it.
2. When possible, use a high-quality electrical surge power board or outlet to protect your Digital
Video Recorder. It is also a good idea to unplug your Digital Video Recorder when it is not in
use.
3. Do not use the Digital Video Recorder in a dusty or dirty work area. Dust can cause
contamination of the unit, which can result in malfunction or damage.
4. Clean your Digital Video Recorder exterior casing occasionally with a soft cloth. If you use a
cleanser, make sure that it is only mild detergent. Never use solvents like thinner or benzene,
or abrasive cleansers because these may damage the cabinet. Make sure that the Digital
Video Recorder's power is off when you clean it.
5. Remember to clean your display at regular intervals. Spray window cleanser onto a soft cloth
and then wipe the display. Do not spray the cleanser directly onto the display.
Safety Instructions
Digital Video Recorder
1. Follow all warnings and instructions m arked on the Digital Video Recorder.
2. Do not operate your Digital Video Recorder near a source of heat or in direct sunlight.
3. Do not use the Digital Video Recorder in a potentially flammable work area.
4. Do not use your Digital Video Recorder on a n unstable work ing surface. This will prev ent your
Digital Video Recorder from falling or being knocked over and damaged.
5. Do not store objects on the top of your Digital Video Recorder. Do not exert pressure on the
Digital Video Recorder.
6. Do not use the Digital Video Recorder near water or other liquids, or in rainy/moist situations.
If liquid enters into your Digital Video Recorder, turn it off and return it to your dealer for
inspection.
7. Do not place the Digital Video Recorder on an unstable cart, stand, or table: The Digital Video
Recorder may fall, causing serious damage to the Digital Video Recorder.
8. Never push objects of any kind into the slots of the Digital Video Recorder cabinet as this may
cause serious damage. The risk of dangerous high voltage contact with internal parts could
result in electrical shock or fire.
9. Unplug the DVR from the power outlet before any major cleaning. Do not spray liquid cleaners
or aerosol cleaners directly onto the DVR. Use a damp cloth for cleaning.
10. Do not attempt to service the Digital Video Recorder yourself. Unplug this product from mains
power and refer all servicing to an authorized dealer.
Page 4

PRO SERIES DVR User’s Guide
4
11. An authorized dealer with manufacturer-approved components must perform replacement of
any component. Unauthorized substitutions may cause a safety hazards and void the warranty.
Power
1. This electronic device must be connected to an approved regulated power outlet, voltage as
indicated on the power input must be observed before connection.
2. This Digital Video Recorder is shipped with its own A C adapter. Do not use the Digital Vide o
Recorder with a different adapter.
3. Do not allow anything to rest on the power cord. Do not place the Digital Video Recorder
where people will walk on the cord.
4. When you disconnect cords, remember to pull them by the plugs and not by the cords
themselves. This will prevent damage to the cords, plugs, ports, and jacks.
5. If an extension cord is used with this Digital Video Recorder, make sure that the total ampere
ratings of the products plugged into the extension cord do not exceed the extension cord’s
ampere rating. Also, make sure that the total current of all products plugged into the wall outlet
does not exceed 15 amperes.
Page 5

PRO SERIES DVR User’s Guide
5
Table of Contents
Chapter 1 6
Digital Video Recorder Introduction......................................................6
Chapter 2 12
Getting Started......................................................................................12
Chapter 3 19
Quick Guide to Icons on the Main Screen..........................................19
Chapter 4 25
Configuring the Cameras.....................................................................25
Chapter 5 30
Schedule Recording.............................................................................30
Chapter 6 39
Account Settings ..................................................................................39
Chapter 7 43
System Settings....................................................................................43
Chapter 8 52
Alarm Settings.......................................................................................52
Chapter 9 62
Alarm Log..............................................................................................62
Chapter 10 64
User Log ................................................................................................64
Chapter 11 66
Configuring General Purpose I/O........................................................66
Chapter 12 68
Pan Tilt Zoom........................................................................................68
Chapter 13 74
Playback ................................................................................................74
Chapter 14 87
Printing ..................................................................................................87
Chapter 15 92
Remote Surveillance.............................................................................92
Appendix A 117
Pro Series software probe function ..................................................117
Appendix B 124
Troubleshooting..................................................................................124
Appendix C 128
Configuring Activex............................................................................128
Appendix D 131
Page 6

PRO SERIES DVR User’s Guide
6
Chapter 1
D
IGITAL VIDEO RECORDER INTRODUCTION
Your new PRO SERIES Digital Video Recorder features the most innovative advances in
CCTV Digital Video Recording technology.
The PRO SERIES Digital Video Recorder has built-in software compression technology
for streaming video in Real Time per camera channel / input for viewing and recording.
Designed for stable high performance with Embedded Linux Operating Software and
enhanced IDE (Intelligent Drive Electronics) hard disk drive (HDD) provide you with extra
processing power for handling complex graphics. For maximum expandability, your
Digital Video Recorder features a standard LAN (Local Area Network) module, allowing
you to connect a computer system or workstation to monitor activity from afar. Also
featured is a built a 7-in1 card reader for image backup all models, CD-RW burner
included standard in the Pro 8/2, Pro 16/2 for easy video copying/archiving and an 4
input/output alarm card all models.
Page 7

PRO SERIES DVR User’s Guide
7
Unpacking the PRO SERIES DVR
The PRO SERIES DVR comes securely packaged in a sturdy cardboard shipping
carton. Upon receiving your DVR, open the carton and carefully remove the contents. If
anything is missing or damaged, please contact your dealer immediately. The shipping
carton should contain the following it:
•
The PRO SERIES Digital Video Recorder
•
A Power Cord
• This User Guide
• A Mouse
•
A Keyboard
Do not throw the packaging materials away. You may need them later to transport or
ship the DVR safely and to avoid transport damage occurring.
Opening and Closing Front Doors
PRO SERIES DVR 8/2 & 16/2 models.
At the front of the Digital Video Recorder, you will find two doors with a retaining latch in
the middle, which cover the hard disk drive cage and connectors respectively. Make sure
these doors are in a closed position when the Digital Video Recorder is installed and in
operation.
To open the doors follow these steps:
1. Turn the knob anti-clockwise. The latch will unclick and the door can be opened.
2.
To close the Digital Video Recorder front doors, return the doors to their closed position
and turn the knob clock-wise.
Optional Devices
To further enhance the utility of your Digital Video Recorder, there are several optional
products available:
• Removable HDD Tray
• An Alarm Module (only available from the Digital Video Recorder Manufacturer)
•
Exchangeable IDE Hard Disk Drive
Page 8

PRO SERIES DVR User’s Guide
8
Identifying External Components
Please refer to the text and diagrams below to identify all external components and accessories of
the Digital Video Recorder.
PRO 4CH CHANNEL 120Gb HDD
Front View
Figure 1-1: Front View of the DVR
Rear View
Please refer to
Figure 1-2
and the descriptions that follow to identify the
components on the rear side of the Digital Video Recorder.
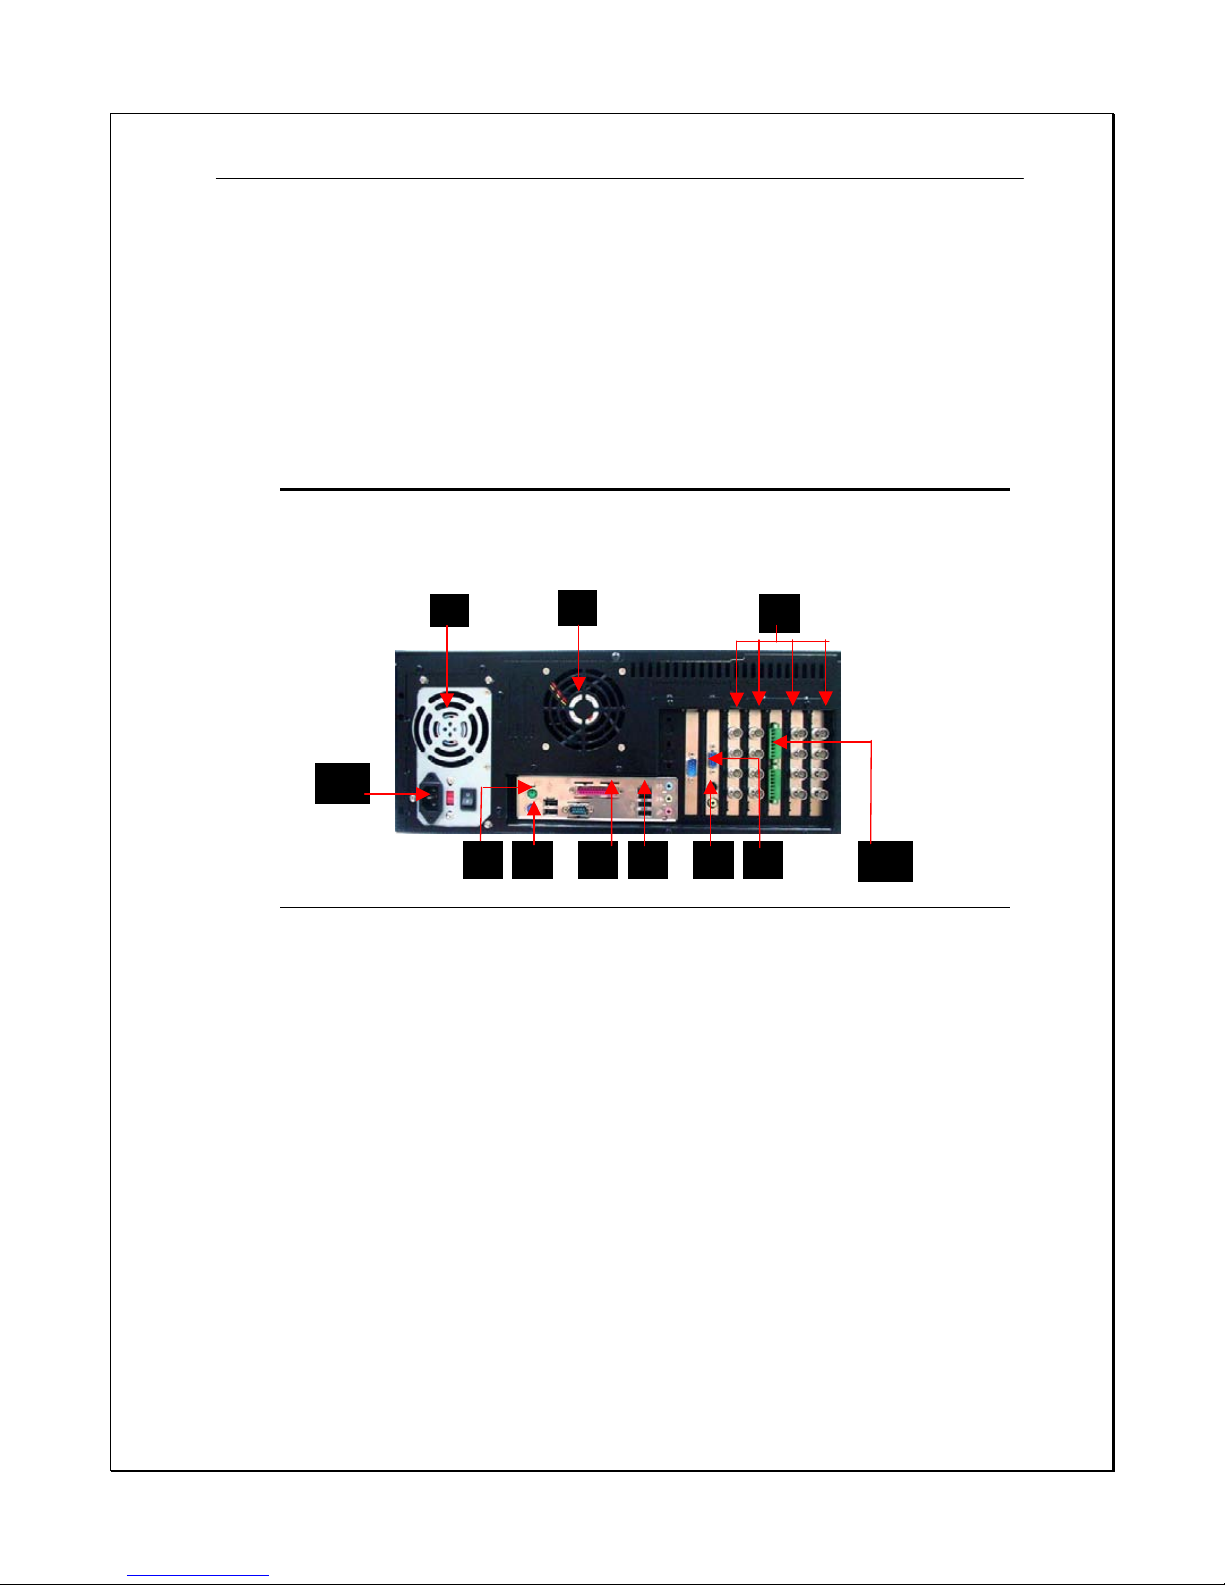
Figure 1-2: Rear View of the Digital Video Recorder
Camera BNC Inputs
4in/4out IO
VGA Output
System Fan
Power Input
Mouse
Keyboard
Power Voltage Switch
Power button
LAN Port
USB
Port
Page 9

PRO SERIES DVR User’s Guide
9
PRO 8/2 DVR + CD-RW(4U) , PRO 16/2 DVR + CD-RW(4U)
Front View
Figure 1-3: Front View of the DVR (4U)
1. Doors
The system is completely enclosed. Opening the doors will reveal the CD-RW, hard disk drive bays
and Smart Memory Card reader 7-1.
Front Inside View
Please refer to Figure 1-4 and the descriptions that follow to identify the
components on the front side of the digital video recorder.
Figure 1-4: Front Inside View of the Digital Video Recorder
1.
Removable HDD Tray
The metal HDD trays enable a secure fit for the HDD and the air ventilation holes in front
provide HDD airflow cooling.
2. HDD Lock
This lock uses a dedicated key to open and close the HDD tray. Using an inappropriate
key will cause the HDD to malfunction
1
HDD Tray
4
6
5
CD-RW
HDD Lock
HDD LED Indicators
Card Reader Power Button
7
Cooling Fan
Page 10
PRO SERIES DVR User’s Guide
10
3. HDD LED Indicators
The Red LED light indicates that the HDD is being accessed. The Green LED indicates
the HDD is powered on.
4. Card Reader
To connect to storage devices including Compact Flash, Smart Media, Memory Stick,
Secure Digital, Multi Media, IBM Micro Drive and PCMCIA-ATA card for back-up purpose
5. CD-RW
For back-up purpose
6.
Power Button
Press the button to turn the Digital Video Recorder on or the opposite to turn it off.
Rear View
Please refer to
Figure 1-5
and the descriptions that follow to identify the
components on the rear side of the Digital Video Recorder.
f
Figure 1-6: Rear View of Digital Video Recorder
1.
Power Fan
This is the main cooling fan for the power supply.
2. System Ventilation Fan
This fan generates ventilation for the entire system.
3. BNC Camera Input
Use these four BNC camera inputs cards to connect 16 NTSC or PAL compatible
cameras.
4. Ethernet LAN Port
Use an RJ-45 LAN cable to connect to a LAN or Internet.
5. VGA Display Por t
This port is used to connect an external monitor (CRT) or TFT.
6.
S-Video Port
This port is used to connect an external CCTV Monitor or TV
7. Printer Port
This port is used to connect a printer to the DVR.
8.
PS/2 Keyboard Port
This port connects a PS/2 compatible keyboard.
9. PS/2 Mouse Port
This port connects a PS/2 compatible mouse.
1
2
3
4 56
8
9 11 7
10
Page 11

PRO SERIES DVR User’s Guide
11
10. Power Cord Socket
This socket is used to connect the power cord to the power outlet.
11.
DI/DO – Alarm input-output module
4in, 4out relay for multiple Dry contact closure alarm input and multiple relay output for
external alarm device connections.
---------------------------------------------------------------------------------------------------
Additional:
1. Voltage Switch
Support auto Voltage Switch of 110/240V
2. RS-232 Port
Connection to an external modem for remote access, alarm transmission or RS-232
to RS-485 converter to control a Speed Dome Camera.
3. USB Port
This socket is used to connect the USB devices for the use of data output
4. Speaker
Audio Out connection for alarm messages.
Preparing the Digital Video Recorder for Operation
To prepare your Digital Video Recorder for operation, you should first connect all
peripheral devices. Make sure the digital video recorder is turned off before any
device is connected.
Page 12

PRO SERIES DVR User’s Guide
12
Chapter 2
G
ETTING STARTED
This chapter explains what you need to do after turning on your Digital Video Recorder.
Experienced Digital Video Recorder users may skip this chapter if necessary while using
the rest of the manual merely as a reference.
Powering Up the Digital Video Recorder for the First Time
To connect the Digital Video Recorder to the Power outlet, please refer to
Figure 2-
1
and the following instructions:
1. Attach the cameras to the BNC outputs at the back of the DVR.
2. Connect a TFT LCD Monitor or CRT Monitor to the VGA Input
3. Connect a RJ-45 LAN cable to the Ethernet LAN Card
4. Connect a printer to the Printer Port
5. Connect a keyboard & Mouse to their respective PS/2 Ports
6.
Power cords differ from region to region. Use the correct power cord based on your
region.
7.
Check the Voltage Switch so that it matches your region’s requirements.
8. Connect one end of the power cord to the electrical outlet and the other to the Digital
Video Recorder.
Figure 2-1: Connecting the Power Cord
9. Power up the DVR by pressing the Power switch at the rear of the DVR
Page 13
PRO SERIES DVR User’s Guide
13
Once the boot process is complete, the Digital Video Recorder will display the
cameras attached (See Figure 2-3). You will automatically be able to see all
cameras connected. If a “ No Signal “ screen is displayed this means that the
respective camera is not operating correctly, please check all connections, power
supplies and the camera for the Video output fault.
Page 14

PRO SERIES DVR User’s Guide
14
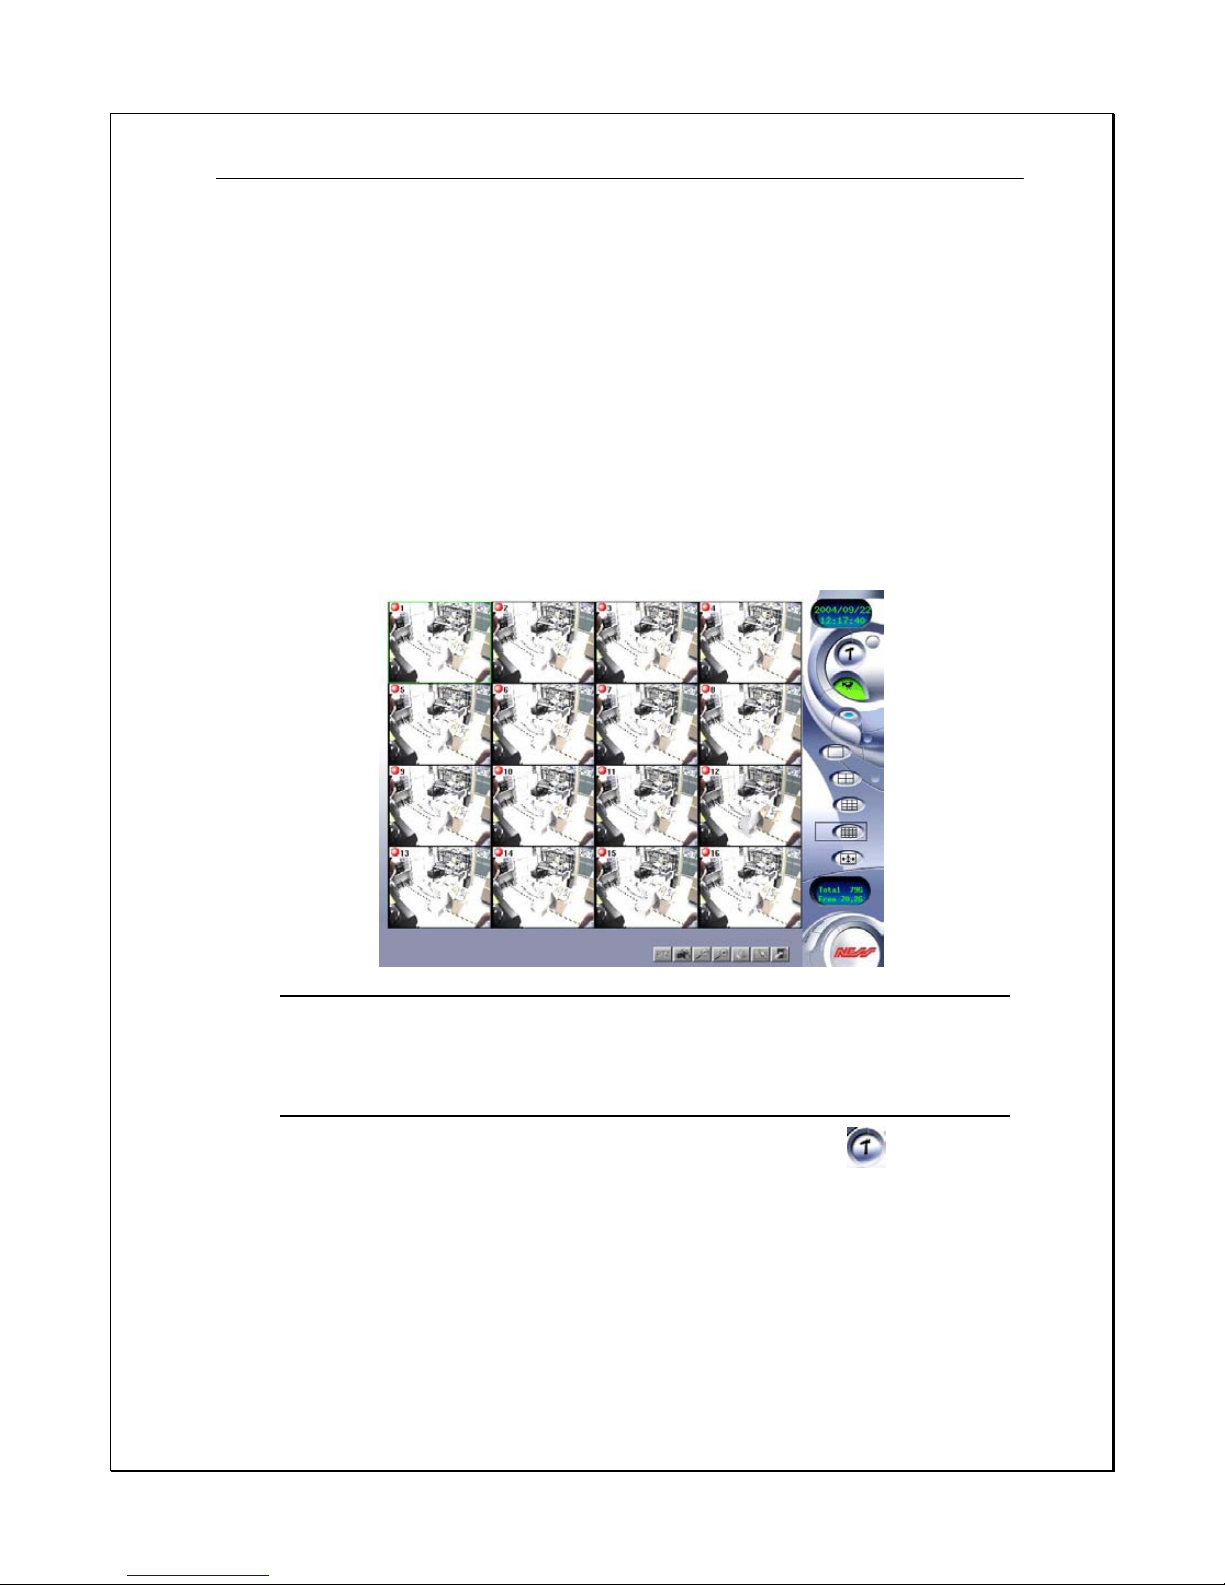
Figure 2-2: The first viewable screen (Main Screen)
The first viewable screen shows the cameras connected and also gives users’ a
first glance at the GUI (Graphical User Interface). The viewable screen takes up
75% of the screen while the controls are to the right of the viewable cameras.
Page 15

PRO SERIES DVR User’s Guide
15
Understanding the PRO SERIES DVR Main Screen
When starting the Digital Video Recorder for the first time, please ensure that you
understand all of the DVR’s icons before moving on. Here is an explanation of all
of the icons on the main screen.
Right Hand Toolbar
Figure 2-3: Right-side Toolbar
1.
Day/Month/Year Time Indicator
This displays the date/Month/Year and Time in digital format.
2. Settings Icon
Clicking this icon will place users in the Settings Menu.
3. Playback Icon
Clicking this icon will place you in the Playback Menu.
4.
Log-on Icon
Clicking this icon will display a Log-on screen.
5. Single View Icon
Clicking this icon will place you in Single view m ode.
6. Quad View Icon
Clicking this icon will display four camera images.
7. 9 – Camera Viewable Icon
Clicking this icon will display nine camera images.
8.
16 – Camera Viewable Icon
Clicking this icon will display sixteen camera images.
9. Expandable Icon
Clicking this icon will expand the viewable camera image.
10. Used & Remaining HDD Space Indicator
This displays how much HDD space has been utilized and how much space is remaining
on the available HDD.
Bottom Toolbar
Day/Month/Year Time Indicato
r
Settings Icon
Playback Icon
Logon Icon
Single View Icon
Quad View Icon
9-Camera Viewable Icon
16-Camera Viewable Icon
Expandable Icon
Used & Remaining HDD Space
Indicator
Page 16

PRO SERIES DVR User’s Guide
16
Figure 2-4: Bottom Toolbar
1. Exit Icon
Clicking this icon exits to the Main Screen (without camera view).
2.
Drawing Icon
Clicking this icon will allow users to draw a specified motion detection frame in the viewing
camera area.
3.
Erase Icon
Clicking this icon will remove the specified motion detection frame.
4. Zoom-in Icon
Clicking this icon will zoom-in on the selected camera.
5. Zoom-out Icon
Clicking this icon will zoom-out on the selected camera
6. Snapshot Icon
Clicking this icon will take a single picture of the camera and save it into the database for
printing.
7.
PTZ Icon
Clicking this icon will allow users to view more icons that will help in controlling the PTZ
camera more effectively.
Page 17

PRO SERIES DVR User’s Guide
17
Logging on to and shutting down the PRO SERIES DVR
When starting the Digital Video Recorder for the first time, the system will have
“Admin” rights. Administration rights are available to the “Supervisor”. At t his
stage the “accounts” database is empty so users will have to enter the Logon
using administrative rights. Creating users to access the DVR will be explained
later under “Creating Users”. However, in order to enter the configuration panel
and all other configuration settings you must perform the following:
Logging On
1.
Step 1: Click the Logon Icon. --------------------------------------------------------
2. Step 2: Under Username type in or select “admin” (default), under Password type in
“admin” (default).
Figure 2-5: Entering the default Username & Password
3.
Step 3: Click “Login”.
Figure2-6: Logging into the system
Once administration users logon they will see the screen below
Page 18

PRO SERIES DVR User’s Guide
18
Figure 2-7: The Main Settings and Programming screen
Shutting down the system
The PRO SERIES DVR is quite a versatile and easy to use Digital Recorder. It is
easy to Logon, Logoff and Shutdown. In order to shutdown the DVR follow these
few steps:
1. Step 1:Click the Logon Icon. -----------------------------------------------------------
2.
Step 2: Click the “Shutdown” icon
Figure 2-8: Shutting down the system
After shutting down the system, the product version number of the system will be shown on
the top of right of the screen, for example, v3.1.2
Page 19
PRO SERIES DVR User’s Guide
19
Chapter 3
Q
UICK GUIDE TO ICONS ON THE MAIN SCREEN
This chapter explains the quick access icons on the main screen. Some of these icon
functions will be explained in depth later on in the manual. The Main Screen is the
central hub of your PRO SERIES Digital Video Recorder. If you point your mouse over
any of the icons a sub note will appear explaining what that icon does. Once you have
started the Digital Video Recorder icons to the right of the main viewable area will give
you access to different parts of the digital video recorder. The following brief description
explains how to enter those different screens.
Figure 3-1: The Main GUI Screen
Settings Panel
1.
Step 1: Click the settings icon on the right-side toolbar……………….
2. Step 2: View all configuration windows [Cams, Schedule, Account, System, Alarm,
Alarm Log, User Log, DIO, PTZ].
Page 20

PRO SERIES DVR User’s Guide
20
Figure 3-2: The Settings Main Screen “ example shown “
Clicking on separate “
windows
” will display different settings for the PRO
SERIES DVR. The first window is the Camera screen (as shown above). See the
chapter on “Configuring your ¹” much later in this manual.
Playback Panel
1. Step 1: Click the playback icon on the right-side toolbar………………….
2.
Step 2: View the database of videos under the Playback Screen. Click on a selected file
and play the recorded data. (The red circle indicates the playback window & video
images).
Page 21

PRO SERIES DVR User’s Guide
21
Figure 3-3: The Playback Screen
Clicking on separate “files” within the playback folder will display prerecorded
data from its hard drive. The first window is the database log. See the chapter on
“
Viewing Playback images on your PRO SERIES DVR
” much later in this
manual.
Single View Camera Screen
1.
Step 1: Click the single view camera icon on the right-side toolbar…
2. Step 2: Select a camera from the main screen and click the Single View Camera mode.
The image will expand to single view mode (As shown below)
Figure 3-4: The Single Camera View Screen
Page 22

PRO SERIES DVR User’s Guide
22
Another way to view Single-mode Camera view is by clicking on a single camera
within the Main Screen. Double-clicking that image several times will expand it to
Single-mode camera view.
Quad Camera View Screen
1.
Step 1: Click the quad view camera icon on the right-side toolbar…
2. Step 2: The screen will display four cameras in one screen. If the system has 16 cameras,
this view can be configured to display four camera viewpoints at 6-second intervals.
Figure 3-5: The Quad Camera View Screen
Depending how your system is configured, the DVR can be configured to display
four separate cameras at 6-second intervals. This can be configured in the main
Settings Panel. This will be covered later in this manual.
9 – Camera View Screen
1. Step 1: Click the 9 - Camera view icon on the right-side toolbar…….
2.
Step 2: The screen will display nine cameras in one screen. If the system has 16
cameras, this view can be configured to display nine different camera viewpoints at 6second intervals.
Page 23

PRO SERIES DVR User’s Guide
23
Figure 3-6: The Nine-Camera View Screen
Depending how your system is configured, the DVR can be configured to display
nine separate cameras at 6-second intervals. This can be configured in the main
Settings Panel. This will be covered later in this manual.
16 – Camera View Screen (only for PRO 16/2 DVR + CD-RW(4U))
1. Step 1: Click the 16 - Camera view icon on the right-side toolbar…….
2.
Step 2: The screen will display sixteen cameras in one screen.
Figure 3-7: The Sixteen-Camera View Screen
Page 24

PRO SERIES DVR User’s Guide
24
Full Screen Mode
3. Step 1: Click the Full Screen view icon on the right-side toolbar….
4.
Step 2: The screen will display all or the selected cameras connected to the DVR in Full
Screen Mode. If the system has 16 cameras, sixteen cameras will occupy the entire
screen.
Figure 3-8: The Full-Screen Camera View Screen
Depending how your system is configured, the PRO SERIES DVR can be
configured to display one to sixteen cameras in Full Screen Mode. This can be
configured in the main Settings Panel. This will be covered later in this manual.
Page 25

PRO SERIES DVR User’s Guide
25
Chapter 4
C
ONFIGURING THE CAMERAS
This chapter explains how to setup and configure the cameras connected to your PRO
SERIES digital video recorder. Once you have connected all the cameras to your DVR,
you need to enter “Setup” to configure each individual camera. Here users can set the
camera information shown on-screen, set the background colours, adjust the lighting of
each camera, set the image format and resolution, change the image quality, frame rate,
and adjust the motion detection zones.
Camera Settings
To change each camera settings for the DVR follow these instructions:
1.
Click the “Setup” icon on the Main Screen…………………………….
2.
Click the “diamond” icon for the camera you want to configure………
3.
The small window under the camera selection will then display the selected camera in
Real-Time mode.
Figure 4-1: Main Camera Settings Window
Page 26

PRO SERIES DVR User’s Guide
26
Naming Came r a s
•
Under “Cam Info” click into the camera-naming field, type in name. Tick Cam On/Off to
display or disable the characters. (Max 8 characters)
Figure 4-2: Camera Naming Field
Setting Recording Mode
•
Under “REC Mode” select one of three options:
i. No Recording (Motion Detection Recording Only)
ii. Recording (Continuous Fulltime Recording)
iii. Scheduled (Time/Date Scheduled Recording Only)
Figure 4-3: Recording Selection Field
Adding Colour for Text & Text Background
4.
Tick the “Display Status” checkbox to change the Text Colour and Background Colour.
i. For Text Colour users can choose to have text in Black, Red, Green, Blue,
White
ii. For Background Colour users can choose to have
Black, Red, Green, Blue
,
White
Page 27
PRO SERIES DVR User’s Guide
27
Figure 4-4: Camera Text & Background Colour Icons
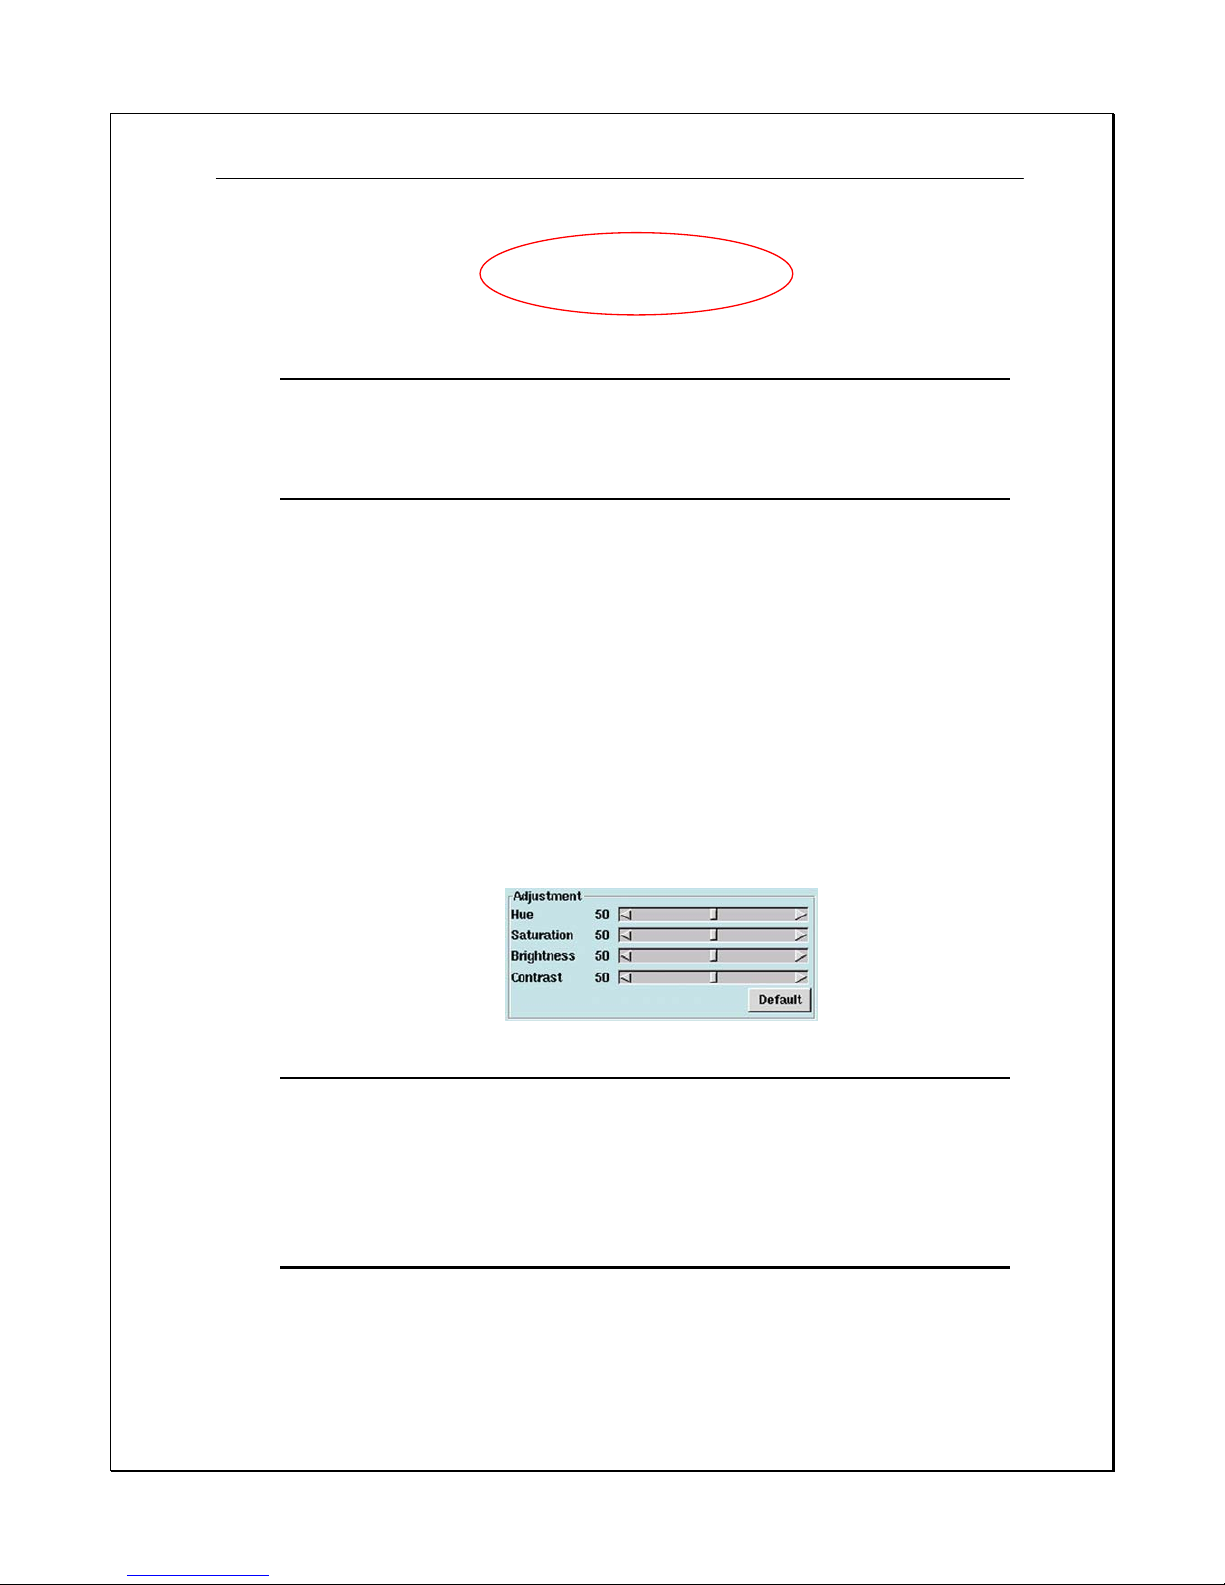
Adjusting Picture Quality
• Under “Adjustment” users can use the slide bar to set various settings for
i. “Hue” - Is the attribute of colours that permits them to be classed as red, yellow,
green, blue.
ii. “Saturation” – Is the degree of difference from the achromatic light-source of
colour intensity.
iii. “Brightness” – Is the attribute of light-source by which emitted light is ordered
continuously from light to dark.
iv. “Contrast” – Is to compare or appraise in respect to differences
While changes are made the camera image is automatically updated. To return to previous
settings click on “Default”
Figure 4-5: Camera Colour Contrasting
Setting Image Format
•
Under “
Image Format
” selections:
i. “NTSC”: Three settings - (160x120, 320x240, or 640x480).
Page 28

PRO SERIES DVR User’s Guide
28
ii. “PAL”: Three Settings - (176x144, 352x288, or 704x576)
Figure 4-6: Image Format Selection Field
Setting Recording Quality
Under “Recording Quality”, there are four choices: Low, Medium, High and Best. Low
produces highly compressed low image quality and Best offers high image quality.
Here you can select the quality and frame rate of each camera.
Figure 4-7: Recording Quality and Frame Rate (FPS) Frame Per Second.
Setting Motion Detection
•
Under “Motion Detection” users can select:
i. Sensitivity – To set the sensitivity relative to the motion detection zone (from 1
to 5). The higher the value, the more sensitive the detection will be.
ii. Differentia - A Pulse Count
factor that distinguishes differences among images
within a given time.
Up to six different Motion Detection Zones can be created in one camera view.
Page 29

PRO SERIES DVR User’s Guide
29
Figure 4-8: Motion Detection Area ( Zone )
• Click on “Draw Area”, : to draw a motion detection frame in the camera scene,
just click-hold and draw a frame-sized window over the desired area for motion detection.
Repeat this and draw up to six individual zones into the camera scene to create effective
detection zones. Avoid nuisance false alarm objects such as, busy roadways, flickering TV,
VGA monitors, shrubs, trees, and any object that is movable by drafts and wind or
mechanical movement.
•
Click on “Stop”
. After you have finished drawing to hide all zones. To show all
zones click on “ Draw Area”
.
•
To cancel current motion detection settings click “Clear Area”
.
to erase all the frames one by one.
•
When all settings are complete click on “Apply”
and then “OK”
to save all settings. (The screen will return to main screen)
Page 30

PRO SERIES DVR User’s Guide
30
Chapter 5
S
CHEDULE RECORDING
This chapter explains how to set schedule recording times for each camera connected to
your PRO SERIES digital video recorder. Each camera can be configured to record at
different times. There are four choices: Once, Daily, Weekly, and Monthly. Recording
under different modes will affect the overall capacity of your Digital Video Recorder.
Schedule your recordings according to your requirements.
Schedule Settings
Once the PRO SERIES DVR is in record mode, various scheduling times must be
set for each camera according to the option chosen. Follow these instructions to
configure scheduling:
1. Click on the “Setup” icon on the Main Screen…………………………….
2. Click on the “Schedule” Tab
Figure 5-1: Schedule Tab Window
3.
Under REC Mode (Recording Mode), there are four choices:
i. Once – Provides a recording option for a period of time (Month/Day/Year,
Page 31

PRO SERIES DVR User’s Guide
31
Hr./Min)
Figure 5-2: Record Mode Selection Bar (Once)
ii. Daily – Provides a recording option for Hours and Minutes.
Figure 5-3: Record Mode Selection Bar (Daily)
iii. Weekly – Provides a recording option set date (Sun. through Sat.) and time for
recording every week.
Page 32

PRO SERIES DVR User’s Guide
32
Figure 5-4: Weekly Schedule Settings
iv.
Monthly
– Provides a recording option that allows users to set date and time for
recording every month
Page 33

PRO SERIES DVR User’s Guide
33
Figure 5-5: Monthly Schedule Settings
4. After you have selected the record mode and option, choose the camera to be assigned in
any combination.
5. Click on the “Add” button. The relative information will be shown in the schedule
recording list
6. If you wish to delete a particular entry. Select the entry and the Delete button.
7.
If you wish to modify a particular entry. Select the entry and the Modify button.
8.
If you wish to delete all entries, click the “Del All” button.
9. Click “Apply” , and “OK” to confirm your changes. The screen will return to
viewer mode.
“Once” Only Scheduling
Page 34

PRO SERIES DVR User’s Guide
34
Scheduling the Digital Video Recorder to record using the “Once” option gives
users the choice to set the Day, Month, and Year, and then select a particular
time for that date. The benefit is to create individual times for different cameras
giving users the freedom to choose activate cameras at different times. This can
be for PTZ, Dome cameras, and normal cameras.
1.
Select the “Once” option
Figure 5-6: Selecting Record Mode
2.
Select the number of the camera you wish to configure.
3.
Select the recording duration.
Figure 5-7: Duration Selection
4. Click “Add”
Daily Scheduling
Choosing the “Daily” scheduling mode to set a particular period for recording
each day.
1. Select the “Daily” option
The “Once” option
Select cameras
Page 35

PRO SERIES DVR User’s Guide
35
Figure 5-8: Selecting Record
Mode
2.
Select the camera you wish to configure.
3.
Select the recording duration
Figure 5-9: Duration Selection
4. Click “Add”
Weekly Scheduling
Choosing the “
Weekly
” scheduling mode, the user can set the desired day for
recording every week, and then select a particular time for that date.
1. Select the “Weekly” option
The “Daily” option
Select cameras
Page 36

PRO SERIES DVR User’s Guide
36
Figure 5-10: Selecting Record Mode
2.
Select the camera you wish to configure.
3.
Select the day of the week for recording
4.
Select the recording duration.
Figure 5-11: Duration Selection
5.
Click “Add”
The “Weekly” option
Select
cameras
Page 37

PRO SERIES DVR User’s Guide
37
Monthly Scheduling
Choosing the “Monthly” scheduling mode, the user can set the desired date for
recording every month, and then select a particular time for that date.
1.
Select the “
Monthly
” option
Figure 5-12: Selecting Record Mode
2. Select the camera you wish to configure.
3. Select the recording duration.
Figure 5-13: Duration Selection
4. Click “Add”
The “Monthly” option
Select cameras
Page 38

PRO SERIES DVR User’s Guide
38
Modifying Scheduled times
To modify the schedule, you should click on the selected item from the Rec lists
to change the record mode and record option, then click on the “Modify” button.
.
Deleting Schedule Settings
Deleting recorded data will permanently delete information from the hard disk
drive thus to free-up disk space.
1. Select the recorded scheduled period with care.
Figure 5-14: Delete Schedule Settings
2. Click the
delete
button
To Delete All
3. Click the “
Del all”
icon
.
Page 39

PRO SERIES DVR User’s Guide
39
Chapter 6
A
CCOUNT SETTINGS
The Account Settings area allows the administrator of the PRO SERIES DVR to add
users to the system. There are two types of users, one with Supervisory (or
Administrative) powers, and the other is Normal. A Normal user does not have
supervisory powers and is limited to certain user ability of the PRO SERIES DVR
system. The administrator of the PRO SERIES DVR system can giv e users local &
remote access and can allow users only to access certain cameras. Follow these
few steps to create and configure user access to the PRO SERIES DVR system.
1.
Click on the “Setup” icon on the Main Screen…………………………….
2.
Click on the “Account” Tab
Figure 6-1: Account Tab Window
Page 40

PRO SERIES DVR User’s Guide
40
3. Enter the name of the user followed by a specified password.
4.
Enter the password once again in the ”ReType” field to reconfirm.
Figure 6-2: Name, Password & Confirmation Field
5.
Click the checkbox next to “ Enable” to select the user’s type and authority.
6.
Select “ Supervisor “ to give a user total control over the DVR or “ Normal” to limit the
user’s access.
Click
Enter the name of the user followed by a
Specified password
Page 41

PRO SERIES DVR User’s Guide
41
Figure 6-3: Authority Selection Field
7. The “Access Permissions” must be selected following the creation of each "Normal" user.
8. Click the checkbox next to “Local” to give the user local access to the DVR host. (Local
access means users are able to access the DVR directly.)
9.
Click the checkbox next to “Remote” to give the user remote access. (Remote access
means users are able to access the DVR over the local LAN or Internet.) Select which
cameras you would like the user to access by clicking the checkbox next to the camera
number.
10. Select “Password can be set from remote” to enable users to change their username and
password through a browser over the LAN or Internet.
11.
Select “Allow config from remote” to enable users to change their system configuration
through a browser over the LAN or Internet.
12.
Click “Allow Playback” to enable users to playback the recording files.
13.
Click “Allow Control PTZ” to enable users to control PTZ cameras.
14.
Select a checkbox to mark a given camera as available to the user being created or
modified. This function is primarily ut ilized to restrict a given user's ability to monitor
specific areas.
15.
Then click the “Add” button. The DVR will be add the user to the list with the
selected authority.
Figure 6-4 Local, Remote and Accessible camera Selection
To Modify User Settings
Page 42

PRO SERIES DVR User’s Guide
42
1. Select the user.
2.
Make the changes in the Main Account Panel
3.
Click “
Modify
” button
4. Click “Apply” , then “OK” to confirm changes
Figure 6-5: Modifying User Settings
To Delete Users
1. Select the user
2. Click “delete”
3.
Click “Apply” , then “OK” to confirm the cha n ges
Page 43

PRO SERIES DVR User’s Guide
43
Chapter 7
S
YSTEM SETTINGS
The System Settings Panel is for naming and setting basic configurations for the
DVR. These very important settings will ensure that the DVR system may be
correctly viewed both locally and remotely. Incorrect system configuration may result
in abnormal operation and could make tech support more complex and time
consuming. Follow these steps to set up your DVR.
1. Click the “Setup” icon on the Main Screen…………………………….
2. Click the “System” T a b
Figure: 7-1: System Menu
Page 44

PRO SERIES DVR User’s Guide
44
3. Type in a name for the DVR host (up to 32 letters) for the purpose of machine
identification when sending an email alarm.
4. Enter an IP address, Subnet Mask, and depress the LAN “diamond” to
activate the “
Default Router
”. Type in the
Default Router
(Gateway) that your
Administrator assigned you.
5. Click “
Apply
” , and “OK”
Page 45

PRO SERIES DVR User’s Guide
45
Modem Dialup
DVR users can choose modem dial-up for connecting to a telephone line.
Windows users can also dialup (using PPP) to DVR for remote monitoring.
To set up modem dial-up:
1. Check the ”Dialup” in the Internet field and enter the ”TEL No.” (The
phone no. of ISP), “Account” and Password” (your account and password
from ISP).
2. Click the ”Dial” button to test the dial-up procedure. If it is successful,
the ”Disconnect” field will revert to the IP assigned by ISP. This will be
finished when the connection is idle for 30 seconds, the connection will
then be disconnected by the system automatically and the “IP” field will
revert to “Disconnect”.
3. If the DVR will use a dialup modem for e-mail delivery, the Network
connection would disconnected by the system automatically (idle for 30
seconds) when sending out the alert e-mail.
Figure 7-2: Modem Dial-up settings
Page 46

PRO SERIES DVR User’s Guide
46
Printer Setup
Please refer to Chapter 14
Backup Config.
In this section: you are able to perform a back up copy of the system
configuration files, this greatly aids in the reprogramming of the DVR in the event
of failure occurring or if the system requires to be set back to Factory Default due
to unknown Admin password entry. The configuration files may also be recopied
to allow quick setup of multi-DVR systems and supports a variety of userselectable back-up devices, CD-RW or Memory Card.
1. Click on “Backup Config”…
2. The list of back-up device selection to Export will be displayed.
Figure 7-3: Back up devices selection
3. Select the desired back-up device
4. Click “OK”…..
Restoring settings from the Back-up device
The DVR system can restore the system configuration settings from the back-up
device. The system supports different (user-selectable) back-up devices.
Figure 7-4: Restore devices selection
1. Click on “Restore Config”. ……..
2. The list of back-up device selection to Export will be displayed.
3. Select the device required.
Card Reader
Backup
Internal / External
CD-RW backup
Page 47

PRO SERIES DVR User’s Guide
47
4. then click “OK” …….
Setting the System Clock
The
System Clock
is automatically adjusted according to the sy stem BIOS. If the
system crashes or becomes faulty then it would be necessary to change the
system clock. After the changes are made click “
Apply
”, then “OK”
Figure 7-5: System Clock Settings
Other Settings
Recycle Recording
This field gives users three options. The first one “
Recycle Rec
” applies to
freeing up space or deleting some space during the recording process. When the
hard disk drive is full an alarm will be triggered indicating that the system disk is
full. However, if the system has “
Recycle Rec
” enabled the system will continue
to record over old video data, thus replacing previously recorded data.
1. Click the “System” Tab
2.
Under “
Others
” click the checkbox next to “
Recycle Rec
”
Figure 7-6: Recycle Rec
3. Click “
Apply
”, then “OK” to activate the changes.
Auto Login
A second option is to give the administrator and other users “
Auto Login
” status
when the system is started. Users with this status do not have to enter a
username and password every time they log in.
1.
Click the “
System
” Tab.
2. Under “
Others
” click the checkbox next to “
Auto Login
”.
Page 48

PRO SERIES DVR User’s Guide
48
3. Select the user account you want to give “
Auto Login
” status to.
Figure 7-7: Auto Login Fi eld
4. Click “
Apply
” , then “OK” .
Cam Auto Switch
___________________________________________________
The third option under “
Others
” makes it possible to view different cameras
automatically. When the DVR is in Single View Mode, Quad View Mode, 9
Camera or 16 Camera Mode, it will automatically show different cameras at sixsecond intervals.
1. Click the “
System
” Tab
2. Under “Others” click the checkbox next to “Cam Auto Switch”.
3.
Click “
Apply
”, then “OK” to activate the operation.
Figure 7-8: Cam Auto Switch Settings
Minimize Video Size
___________________________________________________
Minimizing the video size allows the DVR System to save more hard disk space,
but the system performance will likely be somewhat degraded due to additional
processing requirements associated with the video compression algorithms.
1. Click the ”
System
” settings tab
Page 49

PRO SERIES DVR User’s Guide
49
2. Under the “
Others
” item click ”
Minimize Video Size
”
3. Click ”
Apply
”, then “OK” to activate the setting.
Figure 7-9: Minimize Video Size Settings
Number P Frames after I Frame
The “
Number P Frames afte r I Fr am e
” setting refers to the manner in which
MPEG-4 compression will be implemented by the DVR system. An “I” frame is
the initial full frame of video information for any given scene, while a “P” frame
consists only of the incremental changes necessary to form the next frame,
rather than an entire new frame. The greater the number of P frames after each I
frame, the more space will be saved on the hard disk, but the more computation
will be needed to uncompress the video for playback. To use this setting:
1. Click the ”
system
” settings tab
2. Under the “
Others
” item, adjust the ”
Number P Frames after I Frame
”
setting (29 is the default setting)
3. Click “
Apply
”, then “OK” to apply the change
Figure 7-10: Number P Frames after I Frame Settings
Use of the “
Number P Frames after I Frame
” function will influence
1. The quality of the video
2. Space used on the hard disk
3. The speed of data transmission
Page 50

PRO SERIES DVR User’s Guide
50
When the P frame function is set to a value higher than the default setting, for
every clip of video, less I Frames are sent, so the quality of the image will be
normal, but transmission occurs more quickly and disk space is saved; on the
contrary, when the P Frame function is set to a value lower than the default
setting, more I frames are sent, and the quality of the image will be high, using
more disk space and transmitting more slowly, so users should set this function
according to their specific requirements. Possible P Frame setting values range
from 0-60.
Enable telnet
The “Enable telnet” setting refers to start or stop the telnet domain. The default
setting allow user to login DVR system from remote site using telnet utility (for
maintenance). For security consideration, user can disable this function as
following:
1.click the “
System
” tab.
2.under the “
Others
” item, uncheck the “
Enable telnet
”
3.Click “
Apply
”, then “OK” to apply the change.
Figure 7-11: Enable telnet Settings
Limit out bandwidth
Users can restrict the total network outbound bandwidth as following:
1.click the “
System
” tab.
2.under the “
Others
” item, adjust the outbound bandwidth (64K Bit is the default
setting).
3.Click “Apply”, then “OK” to apply the change.
Figure 7-12: Limit out bandwidth Settings
Page 51

PRO SERIES DVR User’s Guide
51
New HD format
Support file system for video recording onto a Hard Drive. The Pro Series DVR
system provides selection of FAT or ext3 HD formatting.
The default setting
ext3
is highly efficient and more stable than FAT and not
recommended to be changed and left as default ext3.
FAT formatting is generally used in Windows based video systems and for the
purpose of system integration is available in this section of the configuration..
1.click the “System” tab
2.under the
“Others
” item, select the suitable file system for your new HD.
3.Click “
Apply
”, then “OK” to apply the change.
Figure 7-13: New HD format Settings
Virtual Server IP Setting
If the DVR is only provided with one legal IP, and besides the DVR host, there
are also some other applications (such as internal on-line computers of a
company, the network server, the ftp server, the e-mail server…) that should be
used through Internet connections, or there are several DVR hosts providing
service outwards, then a Virtual Server should be an ideal solution. Virtual Server
allows multiple applications to share one legal IP, by assigning various
application requirements respectively to the internal virtual IP of the company.
Basically, functions and setups of a Virtual Server are different depending on the
machine types. So, please refer to the User’s Guide for the Virtual Server you
purchased. As for the DVR host, you’re only required to enter a legal external IP
address in the Virtual Server IP Field on the screen. For access the DVR requires
three TCP ports on a Virtual Server to be opened the default ports are 80, 9090
and 9192.
Example:
Network Environment (consult your IT Manager before starting)
Static IP 211.23.141.2
Network of the company 192.168.1*
Interior Netmask of the company 255.255.255.0
Default Router IP of the company 192.168.1.1
Page 52

PRO SERIES DVR User’s Guide
52
DNS Server 192.168.1.2
DVR Host Setting Mode (Virtual IP: 192.168.1.3):
IP: 192.168.1.3
Netmask: 255.255.255
DNS Server: 192.168.1.2
Default Router: 192.168.1.1
Virtual Server IP: 211.23.141.2
With the above settings complete, connect through a browser to
http://211.23.141.2/
, this will connect to the Host with the virtual IP address
http://192.168.1.3/
.
Figure 7-14: Virtual Server Port Settings
Chapter 8
ALARM SETTINGS
The Alarm Settings area allows the administrator of the PRO SERIES DVR to set
alarms for a number of functions. The most important is setting alarms for motion
detection on different cameras. This is a complex task so in order to understand this
area please read over this part carefully. There are also alarms for disk failure, and
disk capacity. Users have options to relay alarms to a number of devices. Take a
look at the detailed description below to understand alarm settings.
Setting Motion Detection on each camera can be configured under the first screen
(Cam). However, users may not be aware when motion detection is triggered.
Therefore, under “Alarms”, periods of time can be setup so as to trigger an alarm
when motion is sensed.
There are four areas of configuration:
General, Camera, Enable-Trigger Period, and Alarm Triggering Device.
1. Click the Alarm Tab
Page 53

PRO SERIES DVR User’s Guide
53
2. The first Field “
General
” refers to setting the interval time for alarm
triggering, and at what frame rate.
Figure 8-1: Alarm Tab
3. The second field gives users the option to select the “
Camera
. “ or other
alarm settings.
Figure 8-2: Camera Settings
4. The third field is to select a “Trigger Period”
5. Click the checkbox next to “
Enable
”, under “
Trigger Period
” select
“
Enable
” again and enter the period of time required.
Figure 8-3: Trigger Period Field
2.
Then select one of the
Triggering Devices
from the “
tab
” windows
below.
Page 54

PRO SERIES DVR User’s Guide
54
Figure 8-5: Tab Window Selection
Alarm Record Triggering
Alarm Record Triggering provides event triggered video evidence and normally
reacts with accelerated frame rate recording; therefore it is important the correct
FPS is set to achieve the desired frame rate for capture. The following shows
how to use Record Alarm:
1. Click the
Alarm
Tab
2. From “General” select the “Duration” for motion detection triggering and
click the checkbox next to “
Motion Rec.
” (See Figure 8-5) to select the
frame speed for motion detection.
Figure 8-5: General Field
3. Select the
Camera
to configure.
Figure 8-6: Camera Settings
4. Select the first “ Enable” field for 24-hour recording reaction or select the
Trigger Period “ Enable “ field for record duration only and set the record
duration period for reaction.
Page 55

PRO SERIES DVR User’s Guide
55
Figure 8-7: Trigger Period
5.
Click “
Add
”
6.
Click “
Apply
” , then “OK” to activate.
Alarm Sound triggering
Alarms can be assigned to Sounds, follow the instructions below to set Alarm
Sounds.
1.
Click the
Alarm
Tab first.
2. Select the “
Camera
”
3. Tick off the entire “
Enable
” field first, then select “
Enable
” under “
Trigger
Period
”
4. Click the “Sound” Tab.
Figure 8-8: Sound Tab
5.
Click on the “ Select” button to choose an alarm sound from the sound list
window.
Page 56

PRO SERIES DVR User’s Guide
56
Figure 8-9: Sound Selection Window
6. Choose a .wav file from the above window and click “
OK
”
7. Select how many times you would like to repeat the alarm sound
(up to 10 times)
Figure 8-10: Select Repeated playback of sound
8. Then click “
Add
” ,
9. Click“Apply” , and “OK”
Alarm Message triggering
Page 57

PRO SERIES DVR User’s Guide
57
Alarm Pop –Up Screen Messages when enabled will show a message on GUI at
the time of detecting alarm and details of the alarm. Follow the instructions below
to set Alarm Message.
1.
Click the
Alarm
Tab
2. Select the “
Camera
“ (see Figure 8-6).
3. Select a “
Trigger Period
” (see Figure 8-7).
4. Click the “
Message
” Tab
Figure 8-11: Message Tab
5. Then click “
Add
” , the window below will show “
Message
”
6. Click “
Apply
” , and “OK”
For example: once this function is enabled and Motion Detection is enabled on
that particular camera, a pop-up screen will appear (as below) to warn users that
the DVR has detected motion.
Page 58

PRO SERIES DVR User’s Guide
58
Figure 8-12: Message pop-up warning
7. The users may click the “OK” button.
8. To Delete this function, click the “Del” button.
9.
Users will be prompted to confirm. Click “OK”
Figure 8-13: Message Confirming Window
Alarm Email triggering
Alarm Email triggering provides a text notice and video file by email at the time of
detecting alarm. Follow the instructions below.
1.
Click the
Alarm
Tab
2. Select the “
Camera
” (see Figure 8-6)
3. Select a “
Trigger Period
” (see Figure 8-7)
4. Click the “Email” Tab
Figure 8-14: Email Tab
5.
Setup the email addr ess to “
Mail to
” and “cc” , set up “
Send x secs
video
” for the seconds of video to be attached and sent.
In addition, enable the icon in front of the “
Attach playback program”
to
send the video playback decoder program.
6. Then click “
Add
” , “
Apply
” , and “OK”
Page 59

PRO SERIES DVR User’s Guide
59
IMPORTANT: please ensure all Internet and Email servers are functional and
enabled before setting up Alarm Emails.
Alarm Voice Triggering
Optional external 56K modem required COM Port 1
Alarm Voice provides a preprogrammed voice message upon alarm trigger to a
mobile or landline phone through the modem connection.
Follow the instructions below to set Alarm Voice.
1.
Click the
Alarm
Tab to select the “
Camera
”
2.
Select a “
Trigger Period
” (see Figure 8-7)
3. Click the “
Voice
” Tab any type in the “
Telephone Number
”
4. “
Delay
” seconds means how many seconds you’d like to delay before the
Alarm Voice is sent, and 1 to 10 seconds may be sent (see picture below).
5.
“Repeat Times” is used to set the times you’d like to trigger the alarm, and
1 to 10 times can be set (see picture below)
Figure 8-15: Voice Tab
6.
Then click “
Add
” , the window below will show “
Voice
” with the
selections made.
7. Click “
Apply
” , and “OK”
Page 60

PRO SERIES DVR User’s Guide
60
Alarm Fax Triggering
-----------
Modem required.
Alarm Fax will fax a warning message and pictures on alarm trigger. Follow these
instructions to set Alarm Fax:
1.
Click the
Alarm
Tab
2. Select the “
Camera
” (see Figure 8-6)
3. Select a “
Trigger Period
” (see Figure 8-7)
4. Click the “Fax” Tab
Figure 8-16: Fax Tab
5. Type in the “
Fax Number
”
6. Choose from the “
Send
” drop-down list how many pictures you would like
to fax, 1 to 30 pictures may be chosen
7. Then click “Add” , the window below will show “Fax” with the
selections made.
8.
Click “
Apply
” , and “OK”
Alarm Relay Output Triggering
Alarm Relay Output, activate the relay output port at the time of detecting the
alarm. Follow these instructions to set the Output Port.
1. Click the
Alarm
Tab
2. Select the “
Camera
” (see Figure 8-6)
3. Select a “ Trigger Period” (see Figure 8-7)
4.
Click the “
Output Port
” Tab
Page 61

PRO SERIES DVR User’s Guide
61
Figure 8-17: Output Port Tab
5.
Select an Output Port; each output port nu mber has a relative camera
number.
6. Tick off “
Enable/Disable
” the icon with a tick is “
Enable
”
Figure 8-18: Output Port Field
7. Select the “Delay Trigger”, with the unit of seconds, the delay time may
be set from 0 to 999 seconds.
8.
Under the “
Active Duration
” there are 0 to 999 seconds to choose. The
setting of 0 second means permanent triggering.
9. Then click “
Add
” , the window below will show “
Output Port
” with
the selections made.
10. Click “
Apply
” , and “OK”
Tick off to
“Enable/Disable”
The Delay Trigger
The Active Duration
Note!
An external standard 56K modem is required to transmit
alarm pager trigger, Alarm voice trigger or fax trigger
functions.
Page 62

PRO SERIES DVR User’s Guide
62
Chapter 9
A
LARM LOG
& S
CREEN NOTIFICATION
When an alarm associated to a camera occurs, the surrounding border to the
camera video display will flash Red on the Main GUI.
The Alarm Log provides the administrator of the PRO SERIES DVR to monitor all
alarms that were triggered. This database tells the administrator which cameras setoff the alarm, at what time the alarm was triggered and provides a description of
what happened. The log is simple and allows the administrator only two options: (a)
to delete a single log, (b) to delete all log files. Follow the next few steps to achieve
this:
Deleting a Log
1.
Click the “
Alarm Log
” Tab
Figure 9-1: Alarm Log
2.
Select the file you wish to delete
Figure 9-2: Selection File
3. Click “
delete
” button.
4. A confirmation pop-up screen will appear asking to reconfirm
(see Figure 9-3 below)
Page 63

PRO SERIES DVR User’s Guide
63
Figure 9-3: Confirmation Window
5. Click “
Confirm
” to continue or “
Cancel
” to restart
6. Click “
Apply
” , then “OK” to complete the task
Deleting all Logs
1. Click the “Alarm Log” Tab
Figure 9-4: Alarm Log
2. Click “
Del all
”
3. A confirmation pop-up screen will appear asking to reconfirm
(see Figure 9-5 below)
Figure 9-5: Confirmation Window
4. Click “
Confirm
” to continue or “
Cancel
” to restart
5. Click “
Apply
”, then “OK” to complete the task.
Page 64

PRO SERIES DVR User’s Guide
64
Chapter 10
U
SER LOG
The User Log provides the administrator of the DVR to monitor all users that have
accessed the DVR. This database tells the administrator who accesses the system,
from where they accessed the system (local or remote), when they logged on, how
long users were logged on, and (if the connection was remote) what was the IP
address. This is only a log and the information cannot be cleared or changed.
Information in this log can only be deleted or the entire log file can be deleted.
Follow these few steps to delete files.
Deleting a Log
1. Click the “User Log” Tab
Figure 10-1: User Log
2. Select the file you wish to delete
Figure 10-2: Selection File
3.
Click “
Del
”
4.
A confirmation pop-up screen will appear asking to reconfirm (see Figure
10-3 below)
Figure 10-3: Confirmation Window
5. Click “
Confirm
” to continue or “
Cancel
” to restart
6. Click “
Apply
” , then “OK” to complete the task
Deleting all Logs
Page 65

PRO SERIES DVR User’s Guide
65
1. Click the “
User Log
” Tab
Figure 10-4: User Log
2. Click “Del all”
3. A confirmation pop-up screen will appear asking to reconfirm (see Figure
10-5 below)
Figure 10-5: Confirmation Window
4. Click “Confirm” to continue or “Cancel” to restart
5.
Click “
Apply
”, then “OK” to complete the task.
Page 66

PRO SERIES DVR User’s Guide
66
Chapter 11
C
ONFIGURING GENERAL PURPOSE INPUTS
- O
UTPUTS
The GPIO provides connections to multiple Alarm Inputs and Dry contact closure
Outputs. (All models come standard fitted with a 4-in-out alarm I/O). Optional I/O
ports can be added to max 16-in-out module making system integration easy and
fuss free.
Figure 11-1: GPIO Window
Page 67

PRO SERIES DVR User’s Guide
67
Input Settings
Every camera has a corresponding GPIO connection to an alarm input.
Depending on their attributes, the inputs can be set to Normal Open (NO) or
Normal Closed (NC) according to integration requirements. Individual delay timer
periods can be set, so that the interval time of the DVR alarm inputs can be
started when the sensors are triggered.
Figure 11-2: DI Field
Output Settings
The DVR is able to provide 16-relay outputs for external sensor connections and
can be set to active ON or active OFF. Application requirements.
The GPIO ports are optional products.
Figure 11-3: DO Field
Page 68

PRO SERIES DVR User’s Guide
68
Chapter 12
P
AN TILT ZOOM
Pan Tilt Zoom (PTZ) provides the administrator of the PRO SERIES DVR to
configure and monitor all PTZ cameras that are connected to the DVR. The PRO
SERIES DVR can be configured with many PTZ cameras. Currently, the system
doesn’t have pre-configured PTZ camera support. Please consult your dealer for
more information on how best to configure your system with leading PTZ camera
providers. This chapter shows users how to configure a PTZ camera that is
compatible with the PRO SERIES DVR. Let’s take a look at the PTZ “window” in
more detail.
Click the
PTZ
Tab
Figure 12-1: PTZ Tab
On the left side of the window you will see a live view from your PTZ camera.
This allows you to configure and see a “live” feed so you can adjust the system to
your requirements.
1. Select the “PTZ” camera to configure.
Page 69

PRO SERIES DVR User’s Guide
69
Figure 12-2: Camera Selection
Using the Dome controls to the bottom left of the “PTZ” window users can
configure their PTZ cameras to move left
, right , up , and down
. This can be done using the control keys as illustrated below.
Figure 12-3: Dome Settings & Dome Controls
To maneuver the PTZ camera at different speeds click the drop-down list next to
“
Speed
”. Users can set the speed range from 1 – 8. If you are not familiar with
this system or using a PTZ camera please consult your dealer for advice.
Focus
When connecting a PTZ camera to your PRO SERIES digital video recorder you
have the option to focus in on the picture. Use
to focus-in, to focus-out,
and
to have the camera be automatically adjusted.
Zoom
Page 70

PRO SERIES DVR User’s Guide
70
When connecting a PTZ camera to your PRO SERIES digital video recorder you
have the option to zoom in and out on the picture. Use
to zoom-in, or use
to zoom-out.
Iris
When connecting a PTZ camera to your PRO SERIES digital video recorder you
have the option to open the Iris and close the Iris on the camera. Use
to
make the iris close, or use
to make the iris open.
Preset Setup
The PRO SERIES digital video recorder gives you 128 preset functions. For each
preset function users can adjust the speed and time of the camera.
1.
Click the
“Preset”
to set the serial number (from 0 to 128:
0 means NULL, that is NO MOTION).
2.
Set the Speed of the PTZ camera (range from 0 to 7), and then
adjust the Dome direction.
Figure 12-4: Dome Speed controller
3.
Using the icons
to Focus- in, Focus-out, or Auto focus
the lens.
Figure 12-5: Fo cus Controller
4. Zoom-in & Zoom-out to adjust the picture.
Page 71

PRO SERIES DVR User’s Guide
71
Figure 12-6: Zoom controls
5.
Set the
Iris
controls accordingly or use
“Auto”
adjust
.
Figure 12-7: Iris Controls
6.
Click the
“Speed”
(range from 1 degree per second to 255
degrees per second) and
“Time”
(range from 0 to 255 seconds)
from their respective drop-down lists to do adjustments, to preset
speed and time for the PTZ camera at that preset point..
Figure 12-8 Preset functions
7.
Once complete click
“Save”
to complete.
8.
To view any of the preset point camera pictures at a later time, just
appoint a number in “
Preset
” field
Grouping Pres et
The PRO SERIES Digital Video Recorder gives users the option to set up to 128
presets. Of the 128 presets, preset 1 to 4 make up Group one, preset 5 to 8
make up Group Two, preset 9 to 12 make up Group Three and preset 13 to 16
make up Group Four. The rest presets are only used to view pictures on
particular directions conveniently.
The main purpose of Group preset is to use all presets to layout the Group to be
controlled before starting automatic presets in Auto Pan Mode.
Present point
Page 72

PRO SERIES DVR User’s Guide
72
When the Group of presets are complete, follow the instructions to
circumnavigate the PTZ cameras according to the presets in the groups:
1.
Create all the presets in the groups.
2.
Choose the number of your desired group (Group 1, Group 2, Group 3
and Group 4) under the Pan Group.
3.
Click “Set Group”
button.
4.
Click “ Auto Pan” then the PTZ cameras will begin to circumnavigate
according to the presets in the group.
Figure 12-9: Pan Group
Example:
Setting Group 1 = >
Choose Group 1, and click “
Set Group
” button.
Function: To operate presets 1 to 4 automatically in the mode of “Auto Pan”
Setting Group 1 and Group 2 =>
Choose Group 1 and Group 2, and click
“
Set Group
” button.
Function:
To operate presets 1 to 8 in the mode of “Auto Pan”
Setting Group 1, Group 2 and Group 3 =>
Choose Group 1, Group 2, and
Group 3, then click “
Set Group
” button.
Function: To operate presets 1 to 12 in the mode of “Auto Pan”
Setting Group 2, Group 3 and Group 4=>
Choose Group 2, Group 3, and
Group 4, then click “
Set Group
” button.
Function: To operate presets 5 to 16 in the mode of “Auto Pan”
Deleting a Preset
Page 73

PRO SERIES DVR User’s Guide
73
Follow these instructions to delete a preset.
Click
Clear Preset
to delete all presets.
Speed Dome type
PRO SERIES DVR supports the below brand, please choose from the following icon:
CD-55 (Min King)
CD-55H (Min King)
CD-56 (Min King)
CD65 (Min King)
Lilin
DynaColor
Hsintek
MD Nicecam
Megasys
Neon
Neno T
Pelco D
Star
Note: Different Speed Dome models have different functionality; please refer
to the user guide of the Speed Dome you wish to connect.
Page 74

PRO SERIES DVR User’s Guide
74
Chapter 13
P
LAYBACK
Playback
allows a user to view recorded history video data, as the system is
recording, in live view mode and remotely. Other features within “Playback” are:
Blur, Snapshot, Export, Tag, File, Alarm, Fast Forward, Slow Motion, Reverse
Play & Rewind
. All these features are covered later in this chapter. Lets first take a
look at how we can review playback.
To view
Playback
click the “
playback
” icon………………………………
A pop-up database will appear giving you the choice of selecting a file, selecting the
date, searching, or by checking the list. At the bottom of the screen you will notice a
set of icons. These icons will help later when using the playback image.
Bottom Toolbar
Figure 13-1: Playback Screen
Pop-up D
atabase
Page 75

PRO SERIES DVR User’s Guide
75
Understanding the Recorded database
The Pop-up database is the first start to viewing playback images. There are
many aspects to the database. Lets take a closer look.
Figure 13-2: Pop-up Database Screen
1. Calendar Search:
Clicking the
calendar button
allows users to
select the date by which they want to search.
2.
Time Search:
Clicking the
Time Search
button allows users to
select a specific time they would like to view.
3. Camera Search: Select the camera you want to view playback
images.
4.
Search Button:
Click the search button to search for a file.
5.
List Button:
Click this button to display a list of the recorded
database.
6. Open: Click here to view a file.
7. Cancel Button:
Cancel any action.
8.
Reset Button:
Click this button to reset any functions.
Understanding the Bottom Toolbar
The Bottom Toolbar appears only when you click the playback icon. Before a
recorded file is clicked, the bottom toolbar will be disabled. Once a recorded file
is selected the icons are enabled and can be used. Lets view what each icon
means.
Figure 13-3: Bottom Toolbar
Time search
Page 76

PRO SERIES DVR User’s Guide
76
Click this icon to exit playback.
Click the directional icons to move the playback images up, down, left, or right.
Click this icon to remove blur, sharpen or define the image.
Click this icon to take a snapshot, save it or export a recorded image.
Click this icon to save an image.
Click this icon to tag a certain section of the recorded file. Once tagged you can go back to
the relevant place when reviewing again.
Click this quick reference icon to search by date, time, or camera.
Click this icon to view all recorded material that was triggered by an alarm.
Click this icon to review the previous image.
Click this icon to rewind play
Click this icon to pause play
Click this icon to play the file
Click this icon to slow forward the clip: press once to go forward in speed of 1/2, press
twice in speed of 1/4, press three times in speed of 1/6
Click this icon to fast forward the clip, and the optional speeds are 1x, 2x, 4x, 6x, 8x, and
10x. Press once to play at the speed of 2x, press twice at speed of 4x….
Click this icon to jump to the next section of the clip. If the current file has been played just
in half, then you can press this icon once to jump to the end of this section; press it the
second time to jump to the beginning of the next clip (on the same camera); if the current
clip has reached the end, press this icon to jump directly to the beginning of the next clip
(on the same camera)
Viewing Playback by Camera
To view a recorded file from a particular camera follow the next few steps
1.
To view
Playback
click the “
playback
”
icon………………………
Pop-up Database
Page 77

PRO SERIES DVR User’s Guide
77
Bottom Toolbar
Figure 13-4: Playback Screen
2.
Select a date and time from the calendar
Figure 13-5: Calendar & Camera Selection
3. Select a camera
4.
Click Search , List , to show all the clips.
5. Then the recorded database will be listed on the screen (if the
camera is defined with a name, the name will appear in the field of
“
Description
”
Page 78

PRO SERIES DVR User’s Guide
78
Figure 13-6: Camera Database
6. Choose the recorded clip to play
Figure 13-7: Camera Selection
7. Double-click the selection or click “ Open”. The selected file will
appear in front of the Main Screen
Figure 13-8 Recorded playback data
8.
Click “
play
” from the Bottom Toolbar
9. Double-click the image to enlarge
Page 79

PRO SERIES DVR User’s Guide
79
Figure 13-9: Enlarged Image
10.
Double-click the image again to enlarge
Figure 13-10: Full-size Playback image
11.
To reduce the size or go back to the original size, just click the
right mouse button.
Page 80

PRO SERIES DVR User’s Guide
80
Playback from the other devices
To view the recorded data from other devices:
Click the icon of “Other Path”,
the “select record files” appears:
Figure 13-10-1 Playback from other devices
USB
: Playback from a connected media device with saved data. USB HDD or
USB handy drive, Memory Stick (Please note that the USB device should be
connected to DVR before powering on)
Neighbor: Playback recorded data stored on a server hard drive through a
Network connection, LAN, WAN, Direct connect.
Floppy (FDD):
Playback recorded data from a floppy drive.
CDROM
: Playback recorded data from the external USB CD-RW.
Page 81

PRO SERIES DVR User’s Guide
81
Alarm Recorded Playback
To view alarm triggered playback images
• Click the alarm icon
• A database of alarm triggered playback files will appear (Alarm Log)
Figure 13-11: Alarm Log
• Please select the file you want from the alarm video log. Double-click it.
Or click “
Open
”. The selected clip will appear on the Main screen.
• Click play
to view the clip.
Figure 13-12: Alarm Triggered File
Page 82

PRO SERIES DVR User’s Guide
82
Tagging recorded data
After opening a file, an important section of the video can be tagged for later
reference and archiving. While watching the video frames, the tagged section can
be operated like this.
1. Click the “Tag” . Button to enter the window
Figure 13-13: Tag field
2. Type in the Tag name first.
3. Click “ Insert” button, the information about the camera, Tag time,
Description (the camera name) will be added to the system
automatically and then be listed.
Figure 13-14: Tagged frame
4.
The particular clip is then saved and can be searched and viewed
for later reference by means of tag. And the camera number and
the time is in sync with the tag
5. Then a mark will appear at the left bottom of the tagged screen
(see the image).
Page 83

PRO SERIES DVR User’s Guide
83
Figure 13-15: Tagged Clip
Exporting a Clip
While viewing playback data, if you wish to export a section of one clip to save in
addition, do as follows:
1. Click on this icon
. The following image will appear:
Figure 13-16: Export image
2. The image highlights the hours, minutes, and seconds. Use the dropdown list to select the time frame you would like to export. Click
Next
to
continue
3. The DVR then asks you to choose the media and the place you’d like to
export the clip to and the name of the clip. Once complete, click “OK” to
confirm.
Page 84

PRO SERIES DVR User’s Guide
84
Figure 13-17: Export Clip
Smoothing an Image
The smoothness and sharpness of an image can be adjusted in the DVR. When
an image is unclear it is important to clarify the image more clearly.
Figure 13-18: Sharpen Image
•
Open the recorded image
• Click on this icon
to blur the image.
•
Click on this icon
to sharpen the image
* The blur Icon and the Sharpen Icon is at the same position, only one of them
will appear at the same time, When Blur Icon appears, you can use it to blur the
image; while Sharpen Icon appears, you can use it to sharpen the image.
Page 85

PRO SERIES DVR User’s Guide
85
Figure 13-19: Blur Image
Moving playback frames
While viewing several playback screens, the entire screen or background screen
may be unclear. The directional icons can be used to move each playback video
to different parts of the screen. Click on the separate directions to position your
video in the right place.
See the images below that demonstrate this function.
Figure 13-20: Viewing more than one playback clip
Page 86

PRO SERIES DVR User’s Guide
86
Figure 13-21: More than one playback image
Page 87

PRO SERIES DVR User’s Guide
87
Chapter 14
P
RINTING
One of the unique features of the PRO SERIES is its ability to print still images.
Printing images from your digital video recorder can clarify certain factors you
cannot see from an image on your monitor. The PRO SERIES DVR accepts
many forms of printers. Please consult your dealer to see what printers are
compatible with the PRO SERIES DVR.
Configuring your Printer
Follow these few easy steps to setup print function.
1.
Click the “
Setup
” icon on the Main Screen
…………………………….
2. Click the “System” T a b
Figure: 14-1: System Tab
3.
Click the
Printer Setup
icon
4. The next screen will give a list of printers that the DVR accepts.
Page 88

PRO SERIES DVR User’s Guide
88
Figure 14-2: Printer Configuration
5. Select your
Printer Type
, choose the
Paper Size, to
set the size of paper,
and “
Resolution “
to set the resolution, and then “
Colour depth/Unprint
Mode” to set the colours (for colour printers).
6. Click
OK
.
7. A pop-up screen will appear prompting you to print a test page
Figure 14-3: Printer Test Page
8.
Click
Confirm
to continue. View your printed material.
Page 89

PRO SERIES DVR User’s Guide
89
Printing an image
1. Click the Playback” icon………………………………
A pop-up database will appear giving you the choice of selecting a file, selecting the
date, searching, or by checking the list. At the bottom of the screen you will notice a
set of icons. These icons will help later when using the playback image.
Pop-up Database
Bottom Toolbar
Figure 14-4: The Playback Screen
2. Select a date and time from the calendar
Figure 14-5: Calendar & Camera Selection
Page 90

PRO SERIES DVR User’s Guide
90
3. Select a camera
4. Click
Search
,
List
, or
Open
5. The database for that camera will open
Figure 14-6: Camera Database
6.
Select the date and time to view the clip.
Figure 14-7: Camera Selection
7. Double-click the selection or click “ Open” The selected clip will
appear in front of the Main Screen
Page 91

PRO SERIES DVR User’s Guide
91
Figure 14-8: Recorded playba ck data
8. Click “
play
” from the Bottom Toolbar
9.
Click the
“Snapshot”
icon, and a new window will appear to show
the image that has been taken.
(Before taking a snapshot, press the “ pause “ button to freeze the
picture)
10. Click the “
Export
” from the Bottom Toolbar to print the image.
11. If the print is successful, a new window will appear to give you a
notice. Click “
Confirm
” to view the printed data.
Page 92

PRO SERIES DVR User’s Guide
92
Chapter 15
R
EMOTE SURVEILLANCE
The PRO SERIES DVR offers up-to-date IT technology standards and places
itself in a unique bracket of excellence. The PRO SERIES DVR provides users
with the capability to view live, and recorded data remotely. Currently many
systems can support network capability but not many can support the same
functions like the PRO SERIES DVR. All functions available on the local system
can be operated from a browser remotely. Once you have setup the local LAN
and Internet functionality from the System Window you are able to easily and
conveniently view material from your digital video recorder remotely. Let’s take a
closer look at what happens when you want to view data remotely.
1. Click on the
Configuration
icon from the Main Screen
2. Click the
System
Tab
Figure 15-1: System Tab Screen for LAN identification
3.
Identify your IP address
4. Open your browser
Page 93

PRO SERIES DVR User’s Guide
93
Figure 15-2: Browser IE.
5. In the address field enter the IP address
6.
Hit
Enter.
The remote window will appear.
Figure 15-3: Browser Window
7. Under
Name
enter
admin
8. Under
Password
enter
admin
(The default password)
Page 94

PRO SERIES DVR User’s Guide
94
9. Click
Login
10. The next screen is the main
Remote Browser Screen
Figure 15-4: The Main Remote Surveillance Screen
The Main Remote Surveillance Screen has four parts to it. They are Monitor,
Playback, Setup
, and
Logout
.
• Monitor
– Click this area to preview still images and monitoring live
images and video.
• Playback
– Click this area to view playback-recorded data.
• Setup
–This part has 8 kinds of remote setting functions:
Camera,
Schedule, Account, System, Alarm, Alarm Log, User Log and GPIO
• Logout
– Click this area to close all operations and return to the DVR
remote login screen.
Lets go over each section one-by-one in more detail.
Page 95

PRO SERIES DVR User’s Guide
95
Monitoring
1. Click
Monitor
Once you have clicked on
Monitor
a new screen will appear previewing all
cameras connected to your PRO SERIES digital video recorder. These are static
images taken from each camera.
Figure 15-5: Remote Monitor Screen- Remote Monitoring
Each camera view has a checkbox, with the cameras name or identification
(depending on how you configured the local machine)
2. Click the “
Clean All
” link to view disable all camera connections
3. Click the checkbox next to a particular camera to view a live feed
4. Click Monitor to view that particular camera.
5. Click as many checkboxes as you wish (or as many cameras that are
connected to your machine)
6. Click
Select All
to view all cameras remotely
Page 96

PRO SERIES DVR User’s Guide
96
Single Remote View
Figure 15-6: Single Remote View
Quad Remote View
Figure 15-7: Quad Remote View
Page 97

PRO SERIES DVR User’s Guide
97
6-Camera Remote View
Figure 15-8: 6-Camera Remote View
12-Camera Remote View
Figure 15-9: 12-Camera Remote View
Depending on the speed of your LAN or Internet connection, the viewing quality
will change. Faster connections means better viewing capability.
Configuring Setup Remotely
The functions for setup remotely are exactly the same as they are locally. Lets
take a closer look.
Page 98

PRO SERIES DVR User’s Guide
98
1. On the Main Remote Screen click
Setup
Figure 15-10: Main Remote Screen for Setup
2. The first screen is the
Camera
setup browser window
Figure 15-11: The Remote Camera Configuration Screen
All remote functionality is similarly setup as the local machine. The only
difference is the way the interface looks. On the left side of the main viewing area
are the links to all the setup functions. Clicking on each of them will link you to
the respective functions. Select a camera and various other parameters from the
drop-down list.
Setup Link
Page 99

PRO SERIES DVR User’s Guide
99
3. Click the
Schedule
link to view the Remote Schedule Settings
Figure 15-12: Remote Schedule Screen
The remote schedule screen is divided into various parts for easy configuration.
Select the
recording mode
, and
cameras
to start the configuration.
Figure 15-13: Remote Scheduling
4. Select the “
date
” icon. A pop-up calendar will appear.
Page 100

PRO SERIES DVR User’s Guide
100
Figure 15-14: Remote Calendar scheduling
5. Click “
Add
” to activate the settings. Once you have completed all
schedule settings you can view a log of all changes.
Figure 15-15: Remote Schedule Log
 Loading...