

Page 1
1
User’s manual
Page 2
1. The use of the light __
• The light is designed for mounting on a standard accessory shoe
of the video camera, camcorder, DSLR camera or as
a free-standing illuminator.
2. Power options __
• The light can be powered from a battery or other DC source
(any voltage in the range of 6V - 16V).
• The light is protected from damage when installed in reverse
polarity voltage.
3. Operation and features __
Page 3

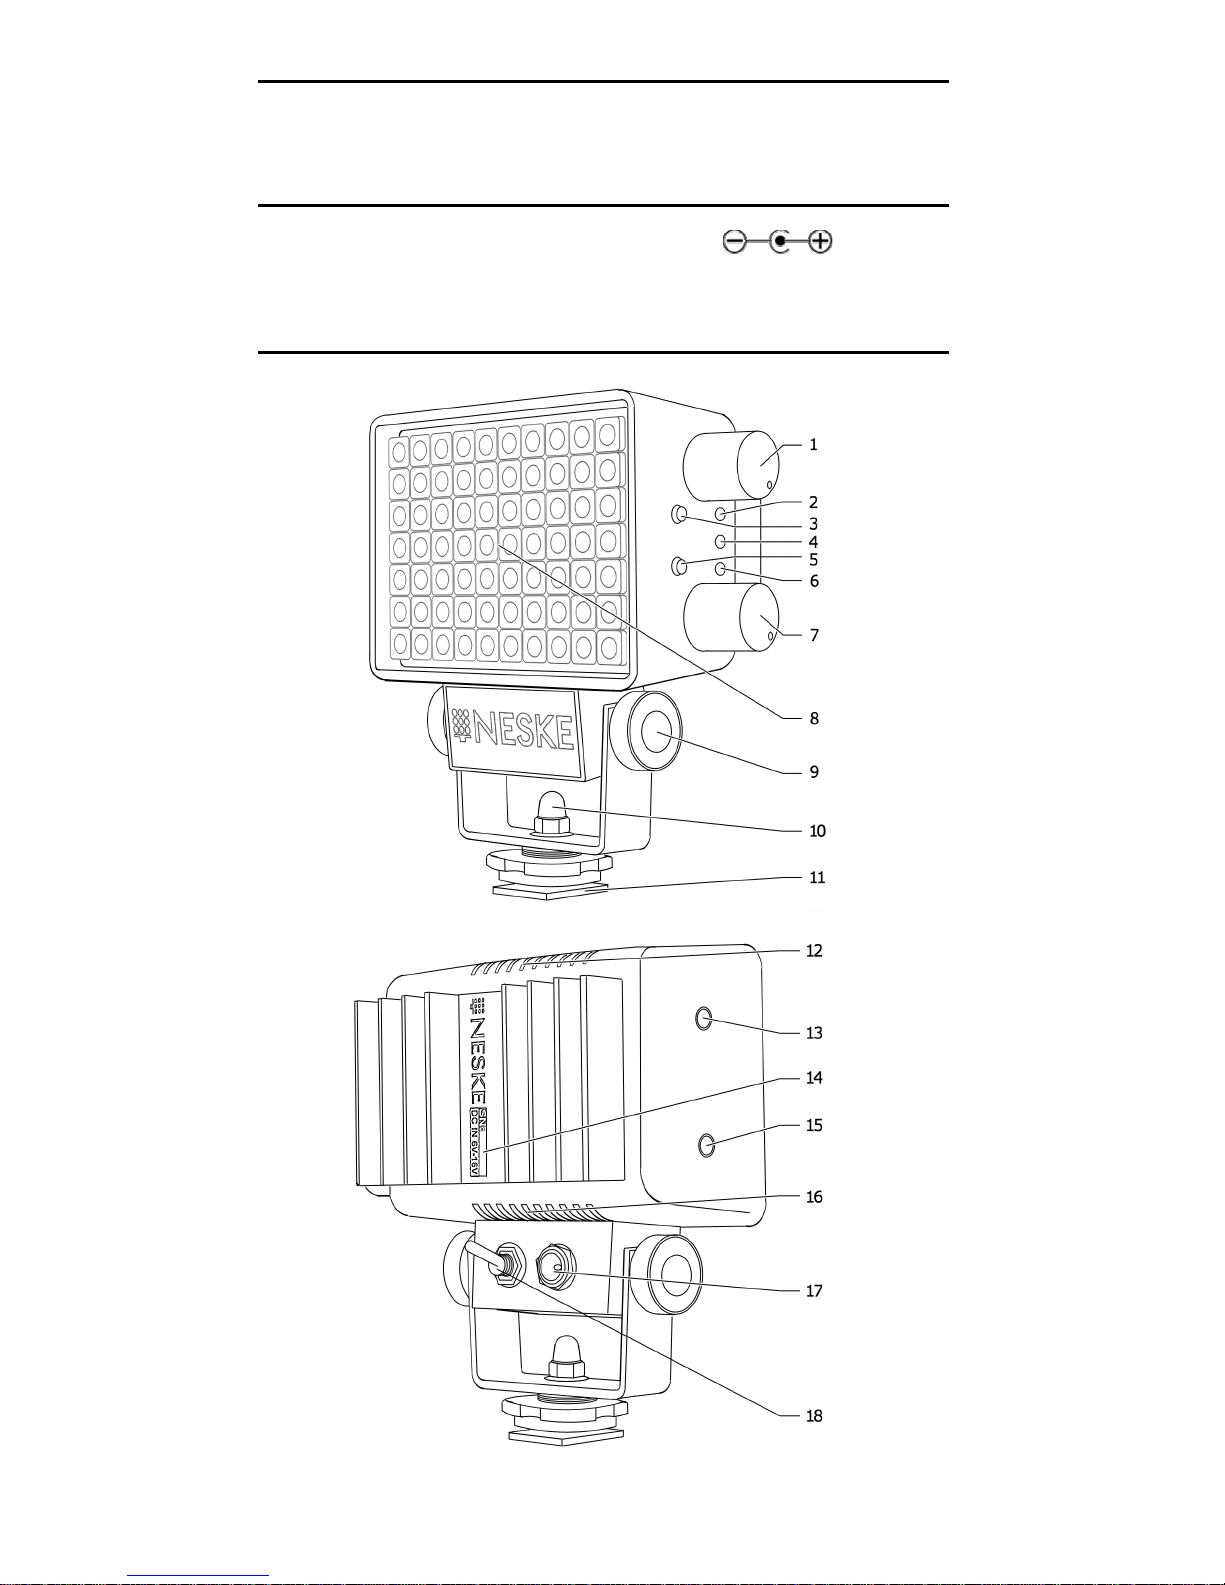
1. Color temperature dial
2. LED memory indicator (read/write)
3. Memory button
4. LED Mode II indicator (peak)
5. Mode II switch
6. LED Mode II indicator (active)
7. Dimmer dial
8. Light panel
9. Angle lock
10. Pressure nut
11. Shoe
12. Ventilation holes
13. External color temperature controller input
14. Serial number
15. External brightness controller input
16. Ventilating holes
17. Power socket
18. Power switch
4. Using the connectors __
• In cameras with LCD placed near the hot shoe, so as not to block
the opening of the display, remove the pressure nut (Fig. 10) and
put the same shoe into the provided hole in the connector of the
battery adapter, or use a small connector contained in the set.
• When using the light on the DSLR camera so as not to block
the viewfinder put the same shoe in the right hole or loosen the
pressure nut (Fig. 10) and turn the connector of the battery adapter
by 90° (so that the battery adapter was placed on the side of the
lamp, by the external controller inputs).
NOTE: After you made adjustments, tighten back the pressure nut.
5. Smooth brightness adjustment __
• Setting the dimmer dial to "minimum" reduces power consumption
to zero (there is no the need to use switch after every shot to turn
off the light).
• The light does not flicker in the whole range of adjustment.
6. Variable color temperature___________ _
• Smooth adjustment within the range of 3000K-7000K
7. Digital color temperature memory _
• Built-in microprocessor allows you to save any color temperature
in the memory bank.
• To call the program just shortly press the button (indicated by a
yellow LED lights up). Another short press of the button brings
the manual adjustment of color temperature (indicated by the
yellow LED goes off).
• To save any new setting, set the color dial to the desired color
temperature, and then hold the memory button for 1.5 s (indicated
by the yellow LED flashes).
• The used type of microprocessor will maintain the settings in
memory even when power is removed.
• The memory is storing only the color temperature - brightness can
be still adjusted by the dimmer dial.
• The memory function is available in mode I only.
• When performing an invalid operation fault is indicated by the
corresponding LED.
Page 4
8. Two modes of luminance_____ _____ ___
• In mode I when adjusting color, brightness varies linearly,
whereas in the mode II - logarithmically (so its constant value
is maintained).
• To maintain a constant brightness in mode II, set the dimmer
dial around 75%. The red LED indicates being outside the scope of
constant luminance.
• Mode II activity is indicated by a green LED.
• Mode selection does not change the color dial function.
• The change of the characteristics applies only to the luminance
parameter.
9. Contraindications_ _
• Do not connect a higher voltage than specified.
• Do not block ventilation holes.
• There is no incentive to connect remote controllers NRC-03
with power on.
• Do not wash the housing with alcohol or other solvents.
In the case of water damage, disconnect the power, and do not turn
on until dry.
10. External brightness/color controller_ _
• To connect the external controllers remove the rubber plugs from
the sockets.
• When connecting the controller, light should be turned off (with
a switch) or disconnected from the power source - otherwise there
is a possibility of damaging the lamp.
• After connecting the external controller, the corresponding internal
dial becomes inactive (when the NRC-03 is connected, the
adjustment can be done only by using the controller).
• The LED in the NRC-03 controller when connected to the brightness
control input lights green. When connected to
the color temperature input lights red.
• You can connect two NRC-03 controllers or use just one.
11. Battery charge status ___
NOTE
• Battery charge status works only with 7,2V-7,4V rated voltage
Li-Ion batteries.
• Connecting higher voltage will damage the charge status.
• The status indicates while pressing the button on the back of
the battery adapter.
SIGNAL MEANING
All the red LEDs are blinking
The battery is charged to
dangerously high voltage
(unsafe to the battery)
All the red LEDs lit continuously 100% battery charge
Three red LEDs lit continuously 80% battery charge
Two red LEDs lit continuously 60% battery charge
One red LED lit continuously 40% battery charge
None of the red LEDs lit
About 20% battery charge
(time to change the battery)
One (the lowest) red LED blinks
Too low battery voltage
(unsafe to the battery)
Page 5

12. Specifications _
Variable color temperature: 3000K - 7000K
Dimmer: 0% - 100%
Angle of light beam: 100°
Frame coverage (16:9): full
Color temperature memory: 1 bank
Luminance characteristics: 2 modes
Amount of light sources: 280
Light source durability: to 50 000 h
Equivalent to a tungsten light:
- mixed 50/50 90 W
- warm white 40 W
- cold white 50 W
Luminance from 2ft (0,6m) distance:
- mixed 50/50 2380 Lx
- warm white 1035 Lx
- cold white 1345 Lx
Luminance from 1m distance:
- mixed 50/50 990 Lx
- warm white 430 Lx
- cold white 560 Lx
Luminance from 4ft (1,2m) distance:
- mixed 50/50 690 Lx
- warm white 305 Lx
- cold white 385 Lx
Luminance from 6ft (1,8m) distance:
- mixed 50/50 260 Lx
- warm white 125 Lx
- cold white 135 Lx
Maximum current draw at 6V 2,9 A
Energy conversion efficiency: ~ 95%
NRC-03 range: do 25 m
Voltage: 6V - 16V
Lamp holder: tiltable
Size: 3,5x2,5x2,0 in (90x65x50 mm)
Weight: 0,5 lbs (230g)
Page 6

1
www.neske.eu
[email protected]
 Loading...