

Page 1
SERVICE MANUAL
COFFEE MACHINES
PRODIGIO C70 / D70
PRODIGIO&MILK C75 / D75
Version 1.0 en, 12.02.2016
Page 2

Prodigio service manual Version 1.0 en
2
CONTENTS
1 General safety notes .........................................................................................6
2 Main components...............................................................................................7
2.1 Overview - Prodigio&milk coffee machine.......................................................... 7
2.1.1 Overview - milk frother (Aero 3)................................................................8
2.2 Interior view of coffee machine .......................................................................... 9
2.3 Interior view of swivel arm................................................................................ 10
2.4 Fluid system..................................................................................................... 11
3 Technical data...................................................................................................12
3.1 Rating plates.................................................................................................... 12
3.1.1 Example of brand specific rating plate.................................................. ..12
3.1.2 Examples of country specific rating plates..............................................12
3.1.3 Rating plate details (example) ................................................................13
3.2 Technical specifications.................................................................................... 14
3.2.1 Coffee machines.....................................................................................14
3.2.2 Milk frother (Prodigio&milk)...................................... ... ... .... ... ... ... ............16
3.2.3 Dimensions, weight and size ..................................................................17
4 Operation............................................................................................................18
4.1 General information..................... ... .......................................... .... ... ... ... ... .... ... . 18
4.2 Status indications............................................................................................. 18
4.2.1 Status indication of coffee machine ........................................................18
4.2.2 Status indication of milk frother...............................................................19
4.3 Machine modes........................... ... .... ... ... ... .... ... ... .......................................... . 20
4.3.1 Machine modes of coffee machine .........................................................20
4.3.2 Machine modes of milk frother................................................................22
4.4 Nespresso App (application software) ........................ .... ... .............................. 22
4.4.1 Prerequisites...........................................................................................22
4.4.2 Pairing smartphone or tablet with coffee machine..................................23
4.4.3 Nespresso App - coffee machine setup..................................................26
4.4.4 Nespresso App - machine page overview ..............................................27
4.4.5 Nespresso App - coffee brewing management.......................................27
4.4.6 Nespresso App - machine management.................................................28
4.4.7 Nespresso App - capsule stock management ........................................29
4.4.8 Nespresso App - water management .....................................................30
4.4.9 Nespresso App - troubleshooting tips.....................................................30
4.5 Empty water system....................... .... ... ... .......................................... ... ... .... ... . 31
5 Maintenance......................................................................................................32
5.1 Descaling ....................... ... .... ... .......................................... .............................. 32
5.1.1 Descaling procedure................................................ ... ... .........................32
5.2 Cleaning procedure for coffee machine ........................................................... 34
5.3 Cleaning procedure for milk frother.......................................... .... ... ... ... ... .... ... . 35
6 Troubleshooting ...............................................................................................36
6.1 Check list for coffee machine................................................ ... .... ... ... ... ... .... ... . 36
Page 3

Version 1.0 en Prodigio service manual
3
6.2 Check list for milk frother ................................................................................. 38
6.3 Machine error code table...................... .... ... ... ... ... .... ... .................................... 39
7Repairs................................................................................................................ 40
7.1 Safety instructions ........................................................................................... 40
7.2 Repair and mounting tips................................................................................. 40
7.3 Tools and accessories ..................................................................................... 41
7.4 General disassembly ......................................... ... .......................................... . 42
7.4.1 Prepare coffee machine for disassembly................................................42
7.4.2 Remove outlet cover............................................................................... 43
7.4.3 Remove front cover ................................................................................44
7.4.4 Remove cover ........................................................................................ 45
7.4.5 Remove blind..........................................................................................47
7.4.6 Remove drop stop .................................................................................. 48
7.4.7 Remove MMI board and light guides...................................................... 49
7.4.8 Remove lever and light barrier ...............................................................50
7.4.9 Remove print cover ................................................................................ 51
7.4.10Remove pivot bottom, water tank connector and power cable...............52
7.4.11Remove pivot bottom, water tank connector, power cable and
Otter connector (Prodigio&milk).............................................................. 54
7.4.12Remove electronic module (main PCB).................................................. 59
7.4.13Remove main board and flowmeter........................................................ 60
7.4.14Remove high pressure tube ...................................................................62
7.4.15Remove pump ........................................................................................63
7.4.16Remove brewing unit..............................................................................64
7.4.17Disassemble brewing unit drive..............................................................67
7.4.18Remove thermoblock from capsule cage ...............................................69
7.5 Wiring diagrams - Prodigio coffee machine................. .................................... 70
7.5.1 Wiring diagram 220 V - 240 V IEC .................... ... ... .... ... ... ... .... ... ... ... ... .. 70
7.5.2 Wiring diagram 120 V UL (USA / Canada)........................................ ... .. 71
7.5.3 Wiring diagram 127 V IEC (Brazil)..... ... ... ... .... ........................................ 72
7.5.4 Wiring diagram 127 V IEC (Mexico) ..................................... .... ... ... ... ... .. 73
7.5.5 Wiring diagram 110 V IEC (Taiwan)........................................................74
7.5.6 Wiring diagram 100 V IEC (Japan)......................................................... 75
7.6 Wiring diagrams - Prodigio&milk coffee machine ........................................... . 76
7.6.1 Wiring diagram 220 V - 240 V IEC .................... ... ... .... ... ... ... .... ... ... ... ... .. 76
7.6.2 Wiring diagram 120 V UL (USA / Canada)........................................ ... .. 77
7.6.3 Wiring diagram 127 V IEC (Brazil)..... ... ... ... .... ........................................ 78
7.6.4 Wiring diagram 127 V IEC (Mexico) ..................................... .... ... ... ... ... .. 79
7.6.5 Wiring diagram 110 V IEC (Taiwan)........................................................80
8 Function tests...................................................................................................81
8.1 Safety instructions ........................................................................................... 81
8.2 Required equipment ........................................................................................ 81
8.2.1 Overview.................................................................................................81
8.3 Measure coffee temperature . .......................................... ... .............................. 82
8.4 Tightness and leakage checks........................................................................ 83
8.4.1 Preparations ...........................................................................................83
8.4.2 Test run................................................................................................... 84
8.5 Milk frother tests (Prodigio&milk)..................................................................... 85
Page 4

Prodigio service manual Version 1.0 en
4
8.5.1 Measure hot milk temperature................. ... ... ... .... ... ... ... .... ... ... ...............85
8.5.2 Measure milk froth ratio ..........................................................................85
8.6 Protective earth (PE) continuity test................................................................. 86
8.6.1 What is the protective earth continuity test about? .................................86
8.6.2 General...................................................................................................86
8.6.3 Test sequence.........................................................................................87
8.6.4 What to do if the protective earth continuity test fails..............................88
8.7 Protective insulation test .......... ... ... .... ... ... ... .... ......................................... .... ... . 89
8.7.1 What is the protective insulation test about? ..........................................89
8.7.2 General...................................................................................................89
8.7.3 Test sequence.........................................................................................90
8.7.4 What to do if the insulation test fails .............................. .... .....................92
9 Explosion drawings and parts lists.............................................................93
9.1 Explosion drawings C70.................................................. ... ... ... ........................ 93
9.2 Explosion drawings D70.................................................. ... ... ... ........................ 96
9.3 Explosion drawings C75.................................................. ... ... ... ........................ 99
9.4 Explosion drawings D75................................................................................. 102
9.5 Spare parts list................................................................................................ 105
10 Glossary of abbreviations...........................................................................109
11 Notes .................................................................................................................110
Page 5
Version 1.0 en Prodigio service manual
5
PREFACE
The purpose of this service manual is to provide the service personnel with all necessary
information with regards to correct handling, maintenance and repair of the Prodigio
coffee machines.
This manual should be used by the technicians as a valuable aid to guarantee the
permanent readiness for use of the machines. In order to t ake full advantage of all the
functions, it is absolutely necessary to follow the instructions in this manual.
Only use original spare parts from your official supplier for maintenance and repair work.
Spare parts lists and exploded drawings are subject to change. To obtain the last
version, please contact your official spare parts supplier.
Visit the Nespresso technical website periodically to check for upgr ades, technical modifications, counter measures etc. for these coffee machines:
https://business.nespresso.com
CONTENT UPDATES
Version 0.1
• First draft version of service manual for proofreading, in English only.
Version 0.2
• Updated service manual version for translation, in English only.
• Nespresso App description added.
Version 1.0
• First released service manual version.
Please keep this
manual together with
the corresponding service
documentation. This way
you are assured to have
the necessary information.
Access is restricted
and can be obtained
by asking your Nespresso
technical contact person.
Page 6
Prodigio service manual Version 1.0 en
6
GENERAL SAFETY NOTES
1 GENERAL SAFETY NOTES
The repair of these machines can only be performed by Nespresso approved af ter-sales
centers and technicians, using suitable tools and original spare parts and taking into
account the national safety regulations.
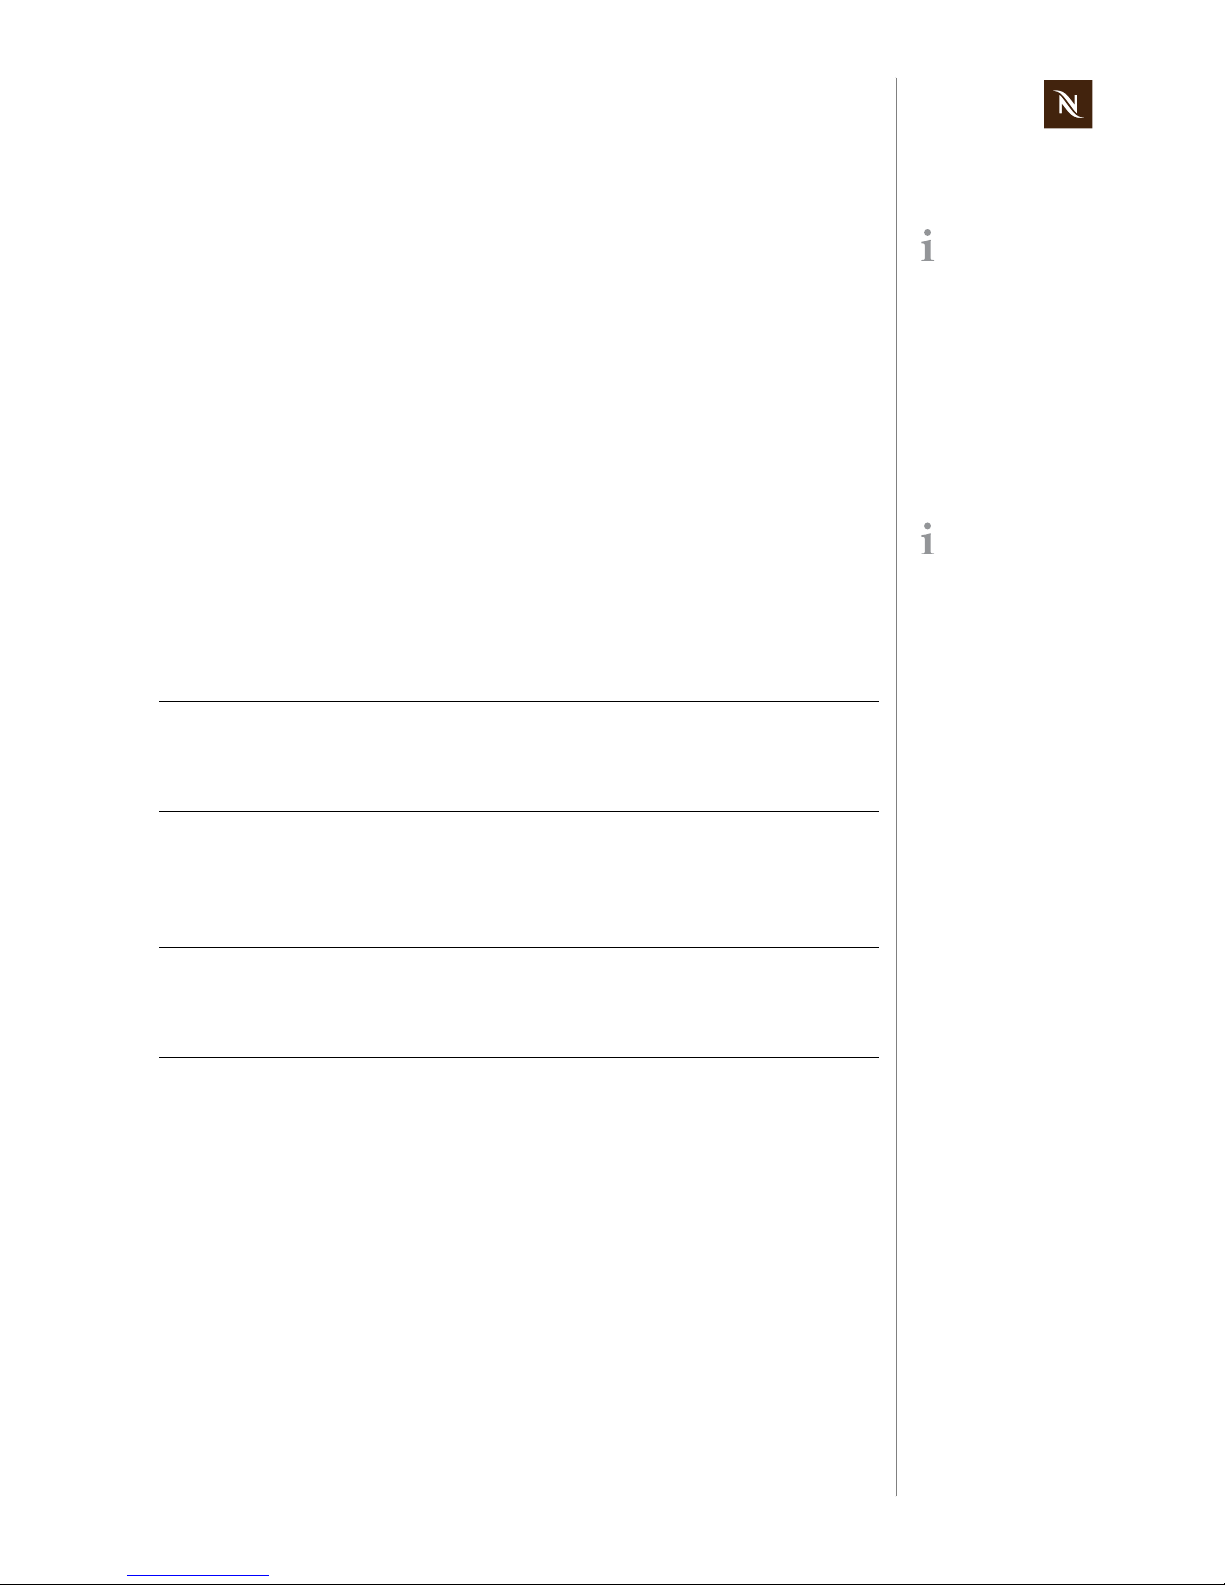
As an additional safety measure, the use of a residual current device (RCD), also called
a ground fault circuit interrupter (GFCI), in the repair centre is highly recommended.
Risk of fatal electrical shock and fire!
Mains voltage inside the coffee machine.
• Unplug appliance before cleaning.
• Never clean wet or immerse plug, cord or appliance in any fluid.
• Disconnect the mains plug before disassembly - the appliance must
be free of voltage.
This device does
not protect against
electrical shock due to
contact with both circuit
conductors.
Example illustrations
of typical devices.
Use a GFCI with a trip
level of 4 - 6 mA (USA)
resp. a RCD with a trip level
of 15 - 30 mA (Europe).
A trip level above 30 mA
provides only very limited
protection against harm
from an electric shock.
1) RCD protected socket-outlet
2) Plug-in RCD unit
3) GFCI socket
4) Plug-in GFCI
Danger of burns!
Hot parts and water under pressure inside the coffee machine
(particularly in the thermoblock).
• Let coffee machine cool down before cleaning or disassembly.
1
2
RESET
TEST
RESET
TEST
3
4
Page 7
Version 1.0 en Prodigio service manual
7
MAIN COMPONENTS
2 MAIN COMPONENTS
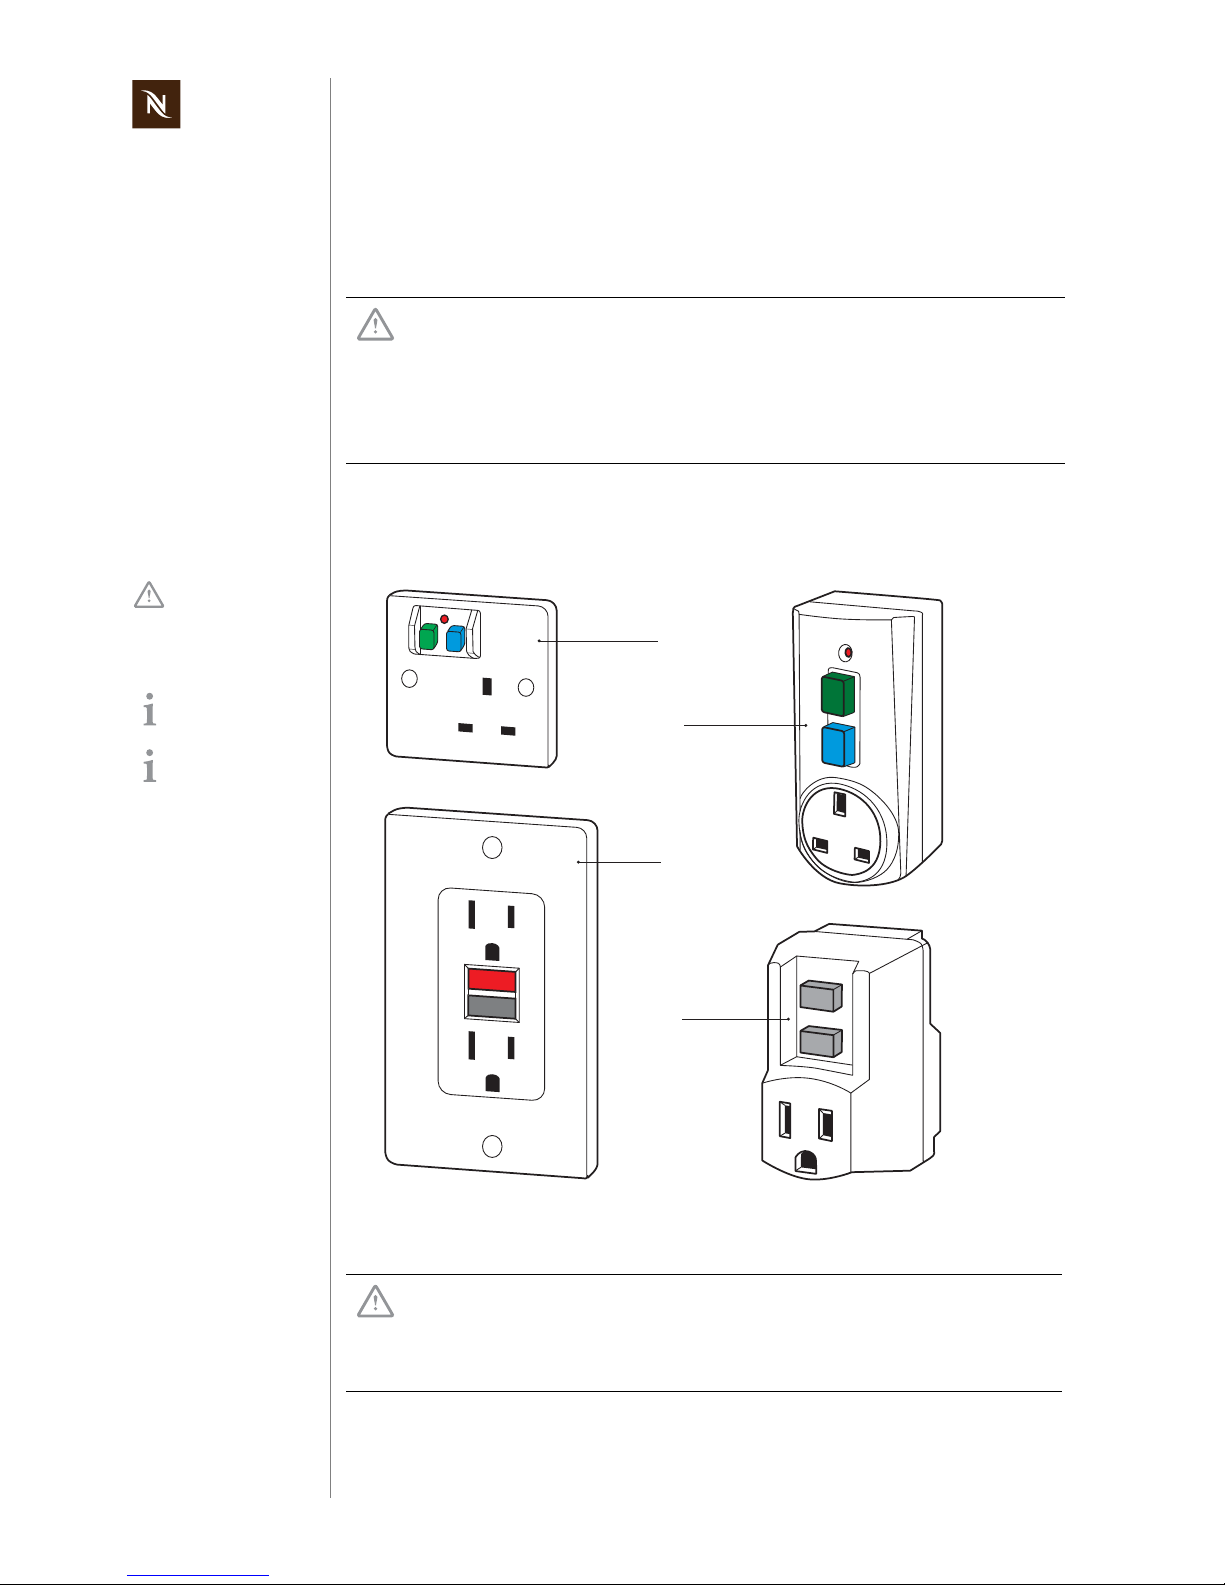
2.1 Overview - Prodigio&milk coffee machine
The coffee buttons (2, 3, 4) and the Nespresso logo (7) are backlighted in white.
The swivel arm version (13) of the Prodigio can be rotated by 180 degrees, while the
version of the Prodigio&milk can be rotated by 90 degrees only.
A magnet fixing holds the water tank (14) on the swivel arm (13) securely.
The maintenance unit consists of the parts 8 - 11. A position switch monitors the used
capsule container (8) and drip tray (11) in the coffee machine.
A light barrier detects a jammed used capsule or a full resp. missing cap sule cont ainer (8).
1) Maintenance light, orange
2) Lungo coffee button, 110 ml / 3.7 oz
3) Espresso coffee button, 40 ml / 1.35 oz
4) Ristretto coffee button, 25 ml / 0.84 oz
5) Slider for capsule insertion cover
6) Capsule insertion slot
7) Nespresso logo, backlighted
8) Used capsule container
9) Drip grid
10) Removable cup support
11) Drip tray
12) Coffee outlet
13) Swivel arm for water tank and milk
frother (only for Prodigio&milk)
14) Water tank
15) Water tank lid
16) Milk frother
2
3
4
5
8
9
16
10
11
6
12
14
13
15
1
7
Page 8
Prodigio service manual Version 1.0 en
8
MAIN COMPONENTS
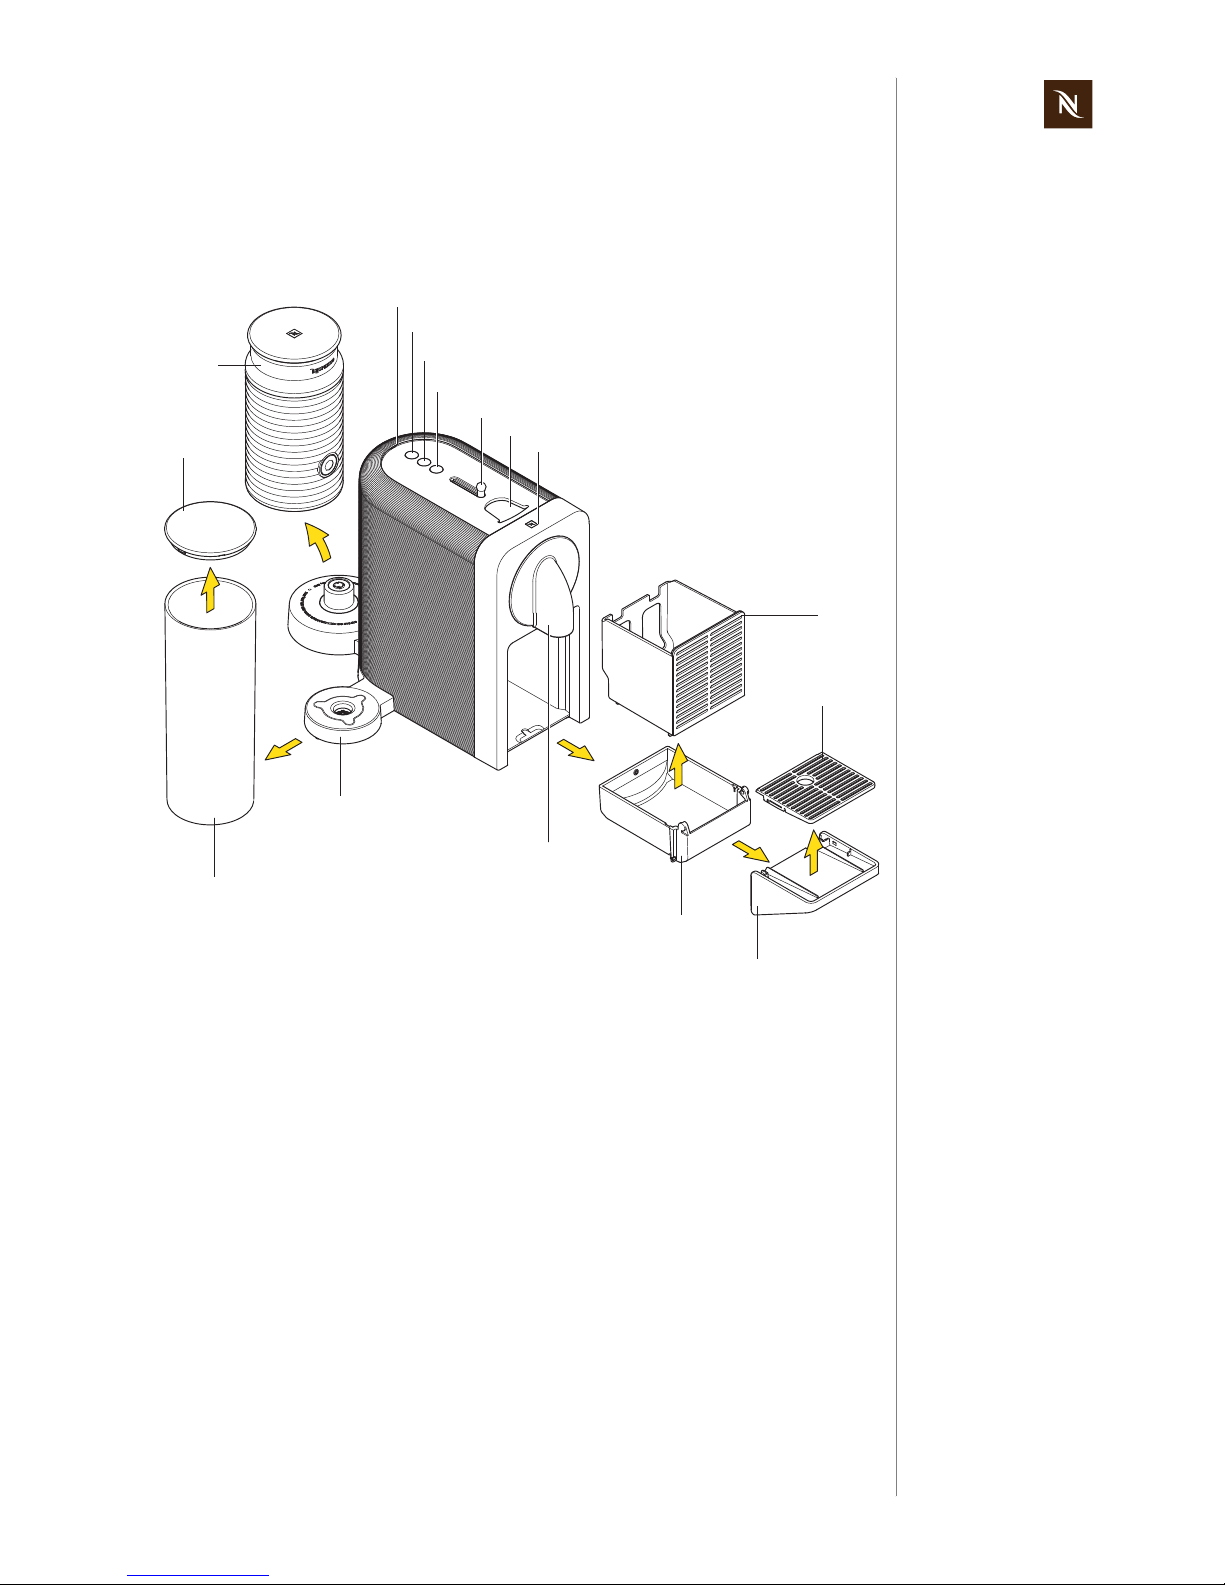
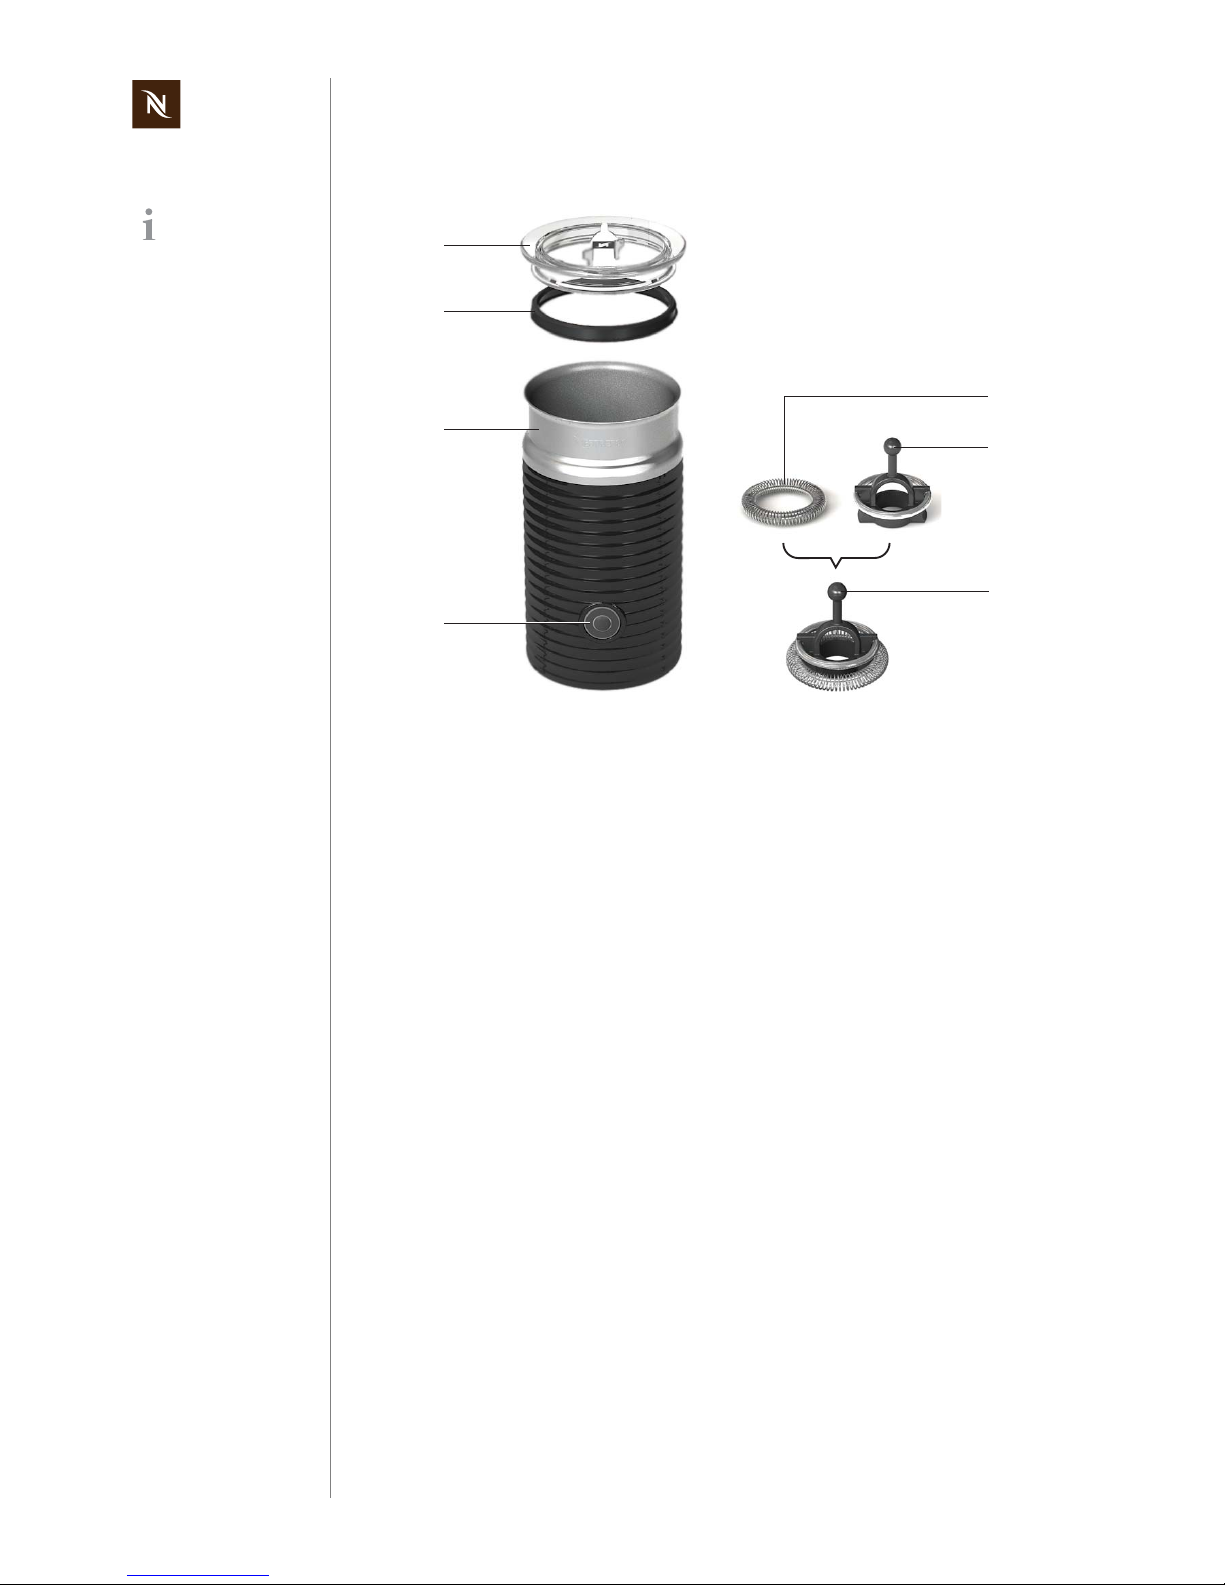
2.1.1 Overview - milk frother (Aero 3)
The lid (1) has a holding fixture for the frothing spring (5).
The inside of the jug (3)
- has level marks for hot milk and milk foam preparation,
- is surface-coated for easy cleaning.
The milk frother is
part of the coffee
machine Prodigio&milk.
1) Lid
2) Seal
3) Jug
4) Start/stop button
5) Frothing spring (for milk froth only)
6) Mixer for hot milk
7) Spring whisk for milk foam
1
2
3
4
5
6
7
Page 9
Version 1.0 en Prodigio service manual
9
MAIN COMPONENTS
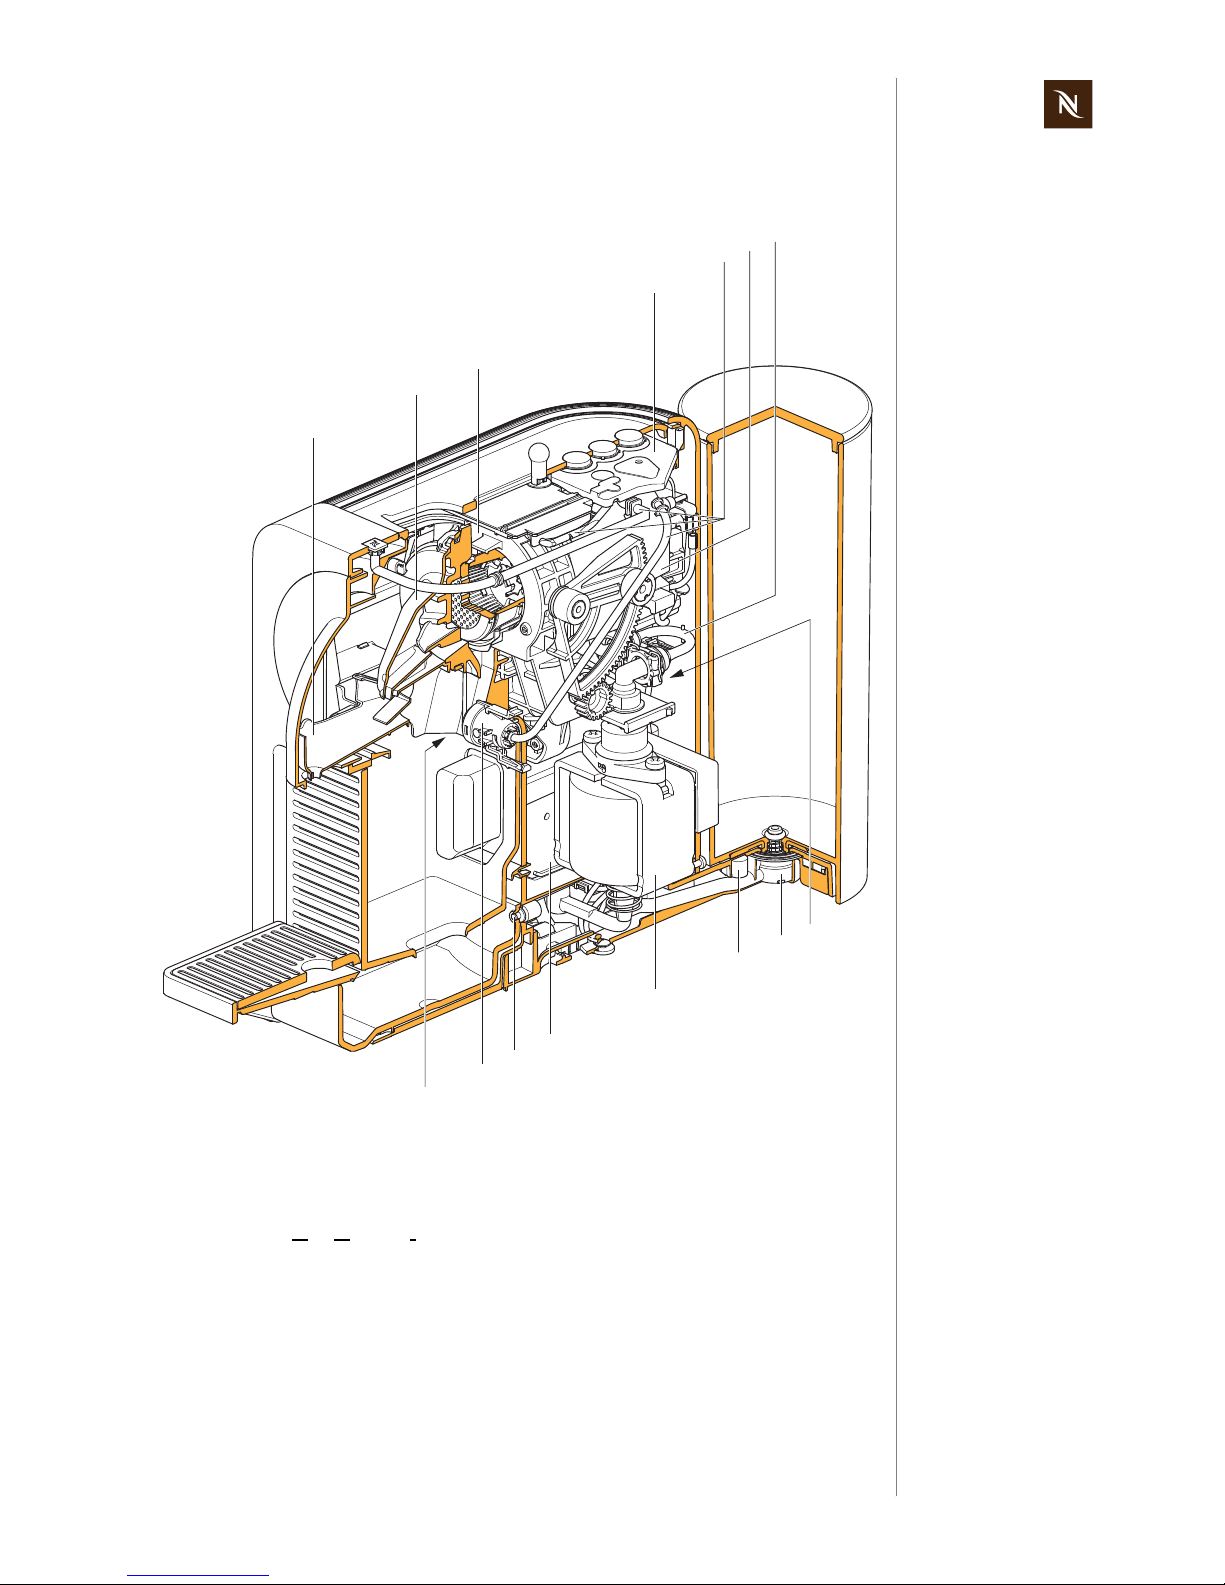
2.2 Interior view of coffee machine
1) Drop stop
2) Steam cover
3) Brewing unit
4) MMI board (M
en Machine Interface)
with reinforced silicone keypad
5) Light guides
6) Thermoblock
7) High pressure connector
8) Motor
9) Water tank connector
10) Magnet fixing for water tank
(3 permanent magnets)
11) Pump
12) Electronic module with flowmeter
13) Magnet fixing for drip tray
14) Light barrier
15) Position switch for used capsule container
11
4
15
13
10
9
12
1
2
3
14
5
6
7
8
Page 10
Prodigio service manual Version 1.0 en
10
MAIN COMPONENTS
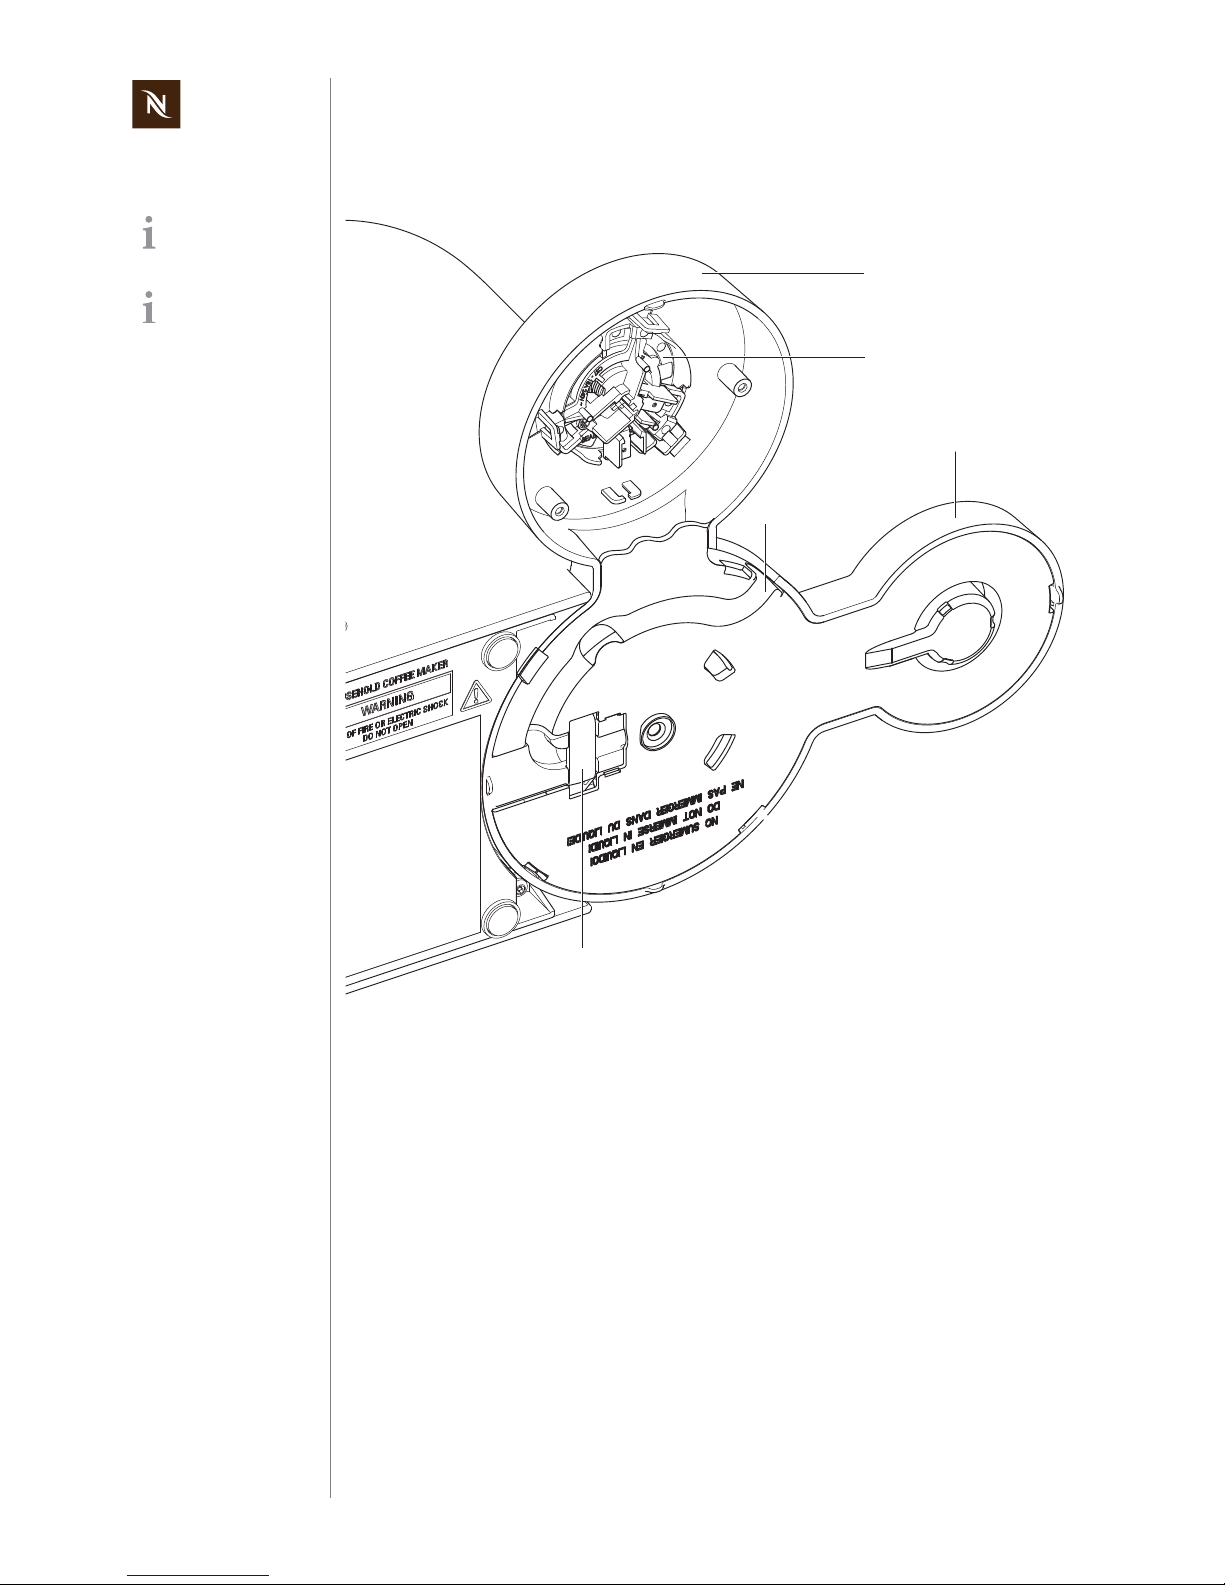
2.3 Interior view of swivel arm
Swivel arm of
Prodigio&milk - view
from below.
Beside the special
swivel arm, the two
coffee machine types have
the same internal design.
1) Support for milk frother
2) Otter connector for milk frother
3) Support for water tank
4) Cable duct for power cord
5) Cable strain relief
2
5
1
3
4
Page 11
Version 1.0 en Prodigio service manual
11
MAIN COMPONENTS
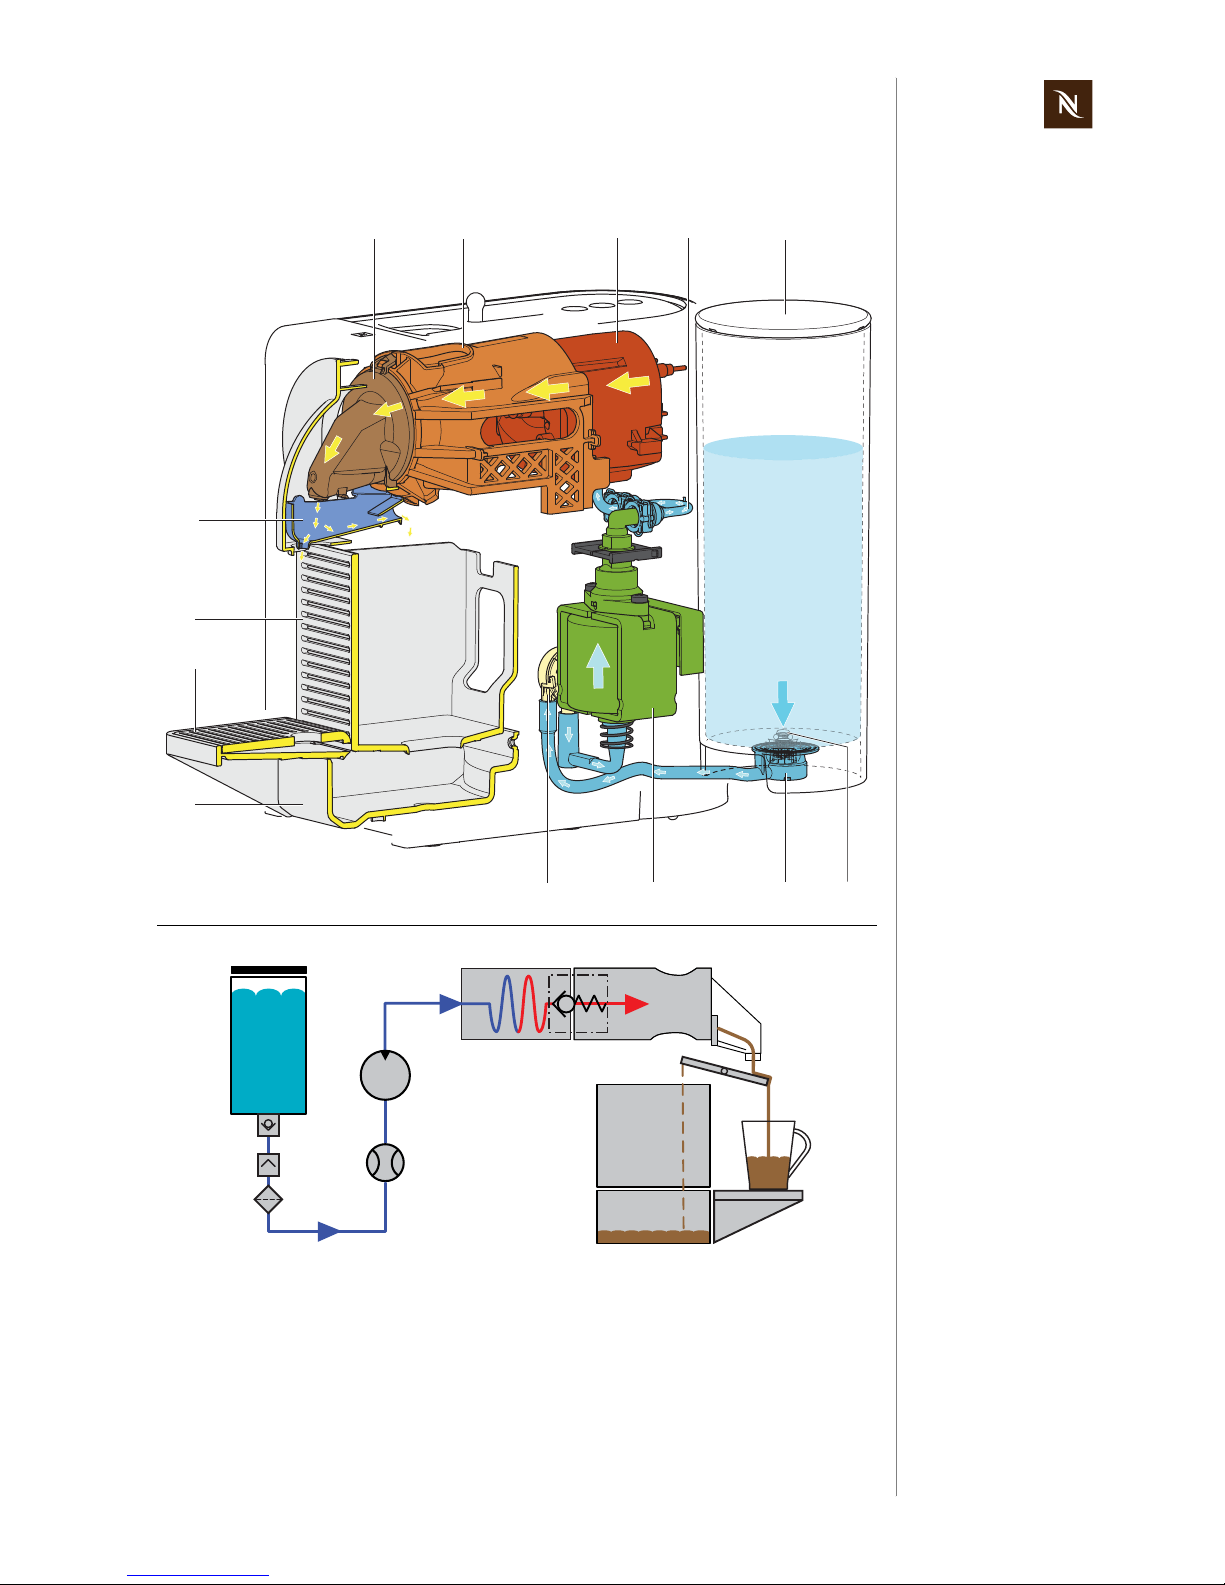
2.4 Fluid system
1) Coffee outlet
2) Brewing unit
3) Thermoblock
4) High pressure connector
5) Water tank
6) Water tank valve
7) Water tank connector with filter
8) Pump
9) Flowmeter
10) Drip tray
11) Cup support
12) Used capsule container
13) Drop stop
13
8
5
3
21
12
10
11
4
7
9
6
BU
TB
WT
FM
6
8
9
3
1
12
10
11
4
25
7
13
Page 12
Prodigio service manual Version 1.0 en
12
TECHNICAL DATA
3 TECHNICAL DATA
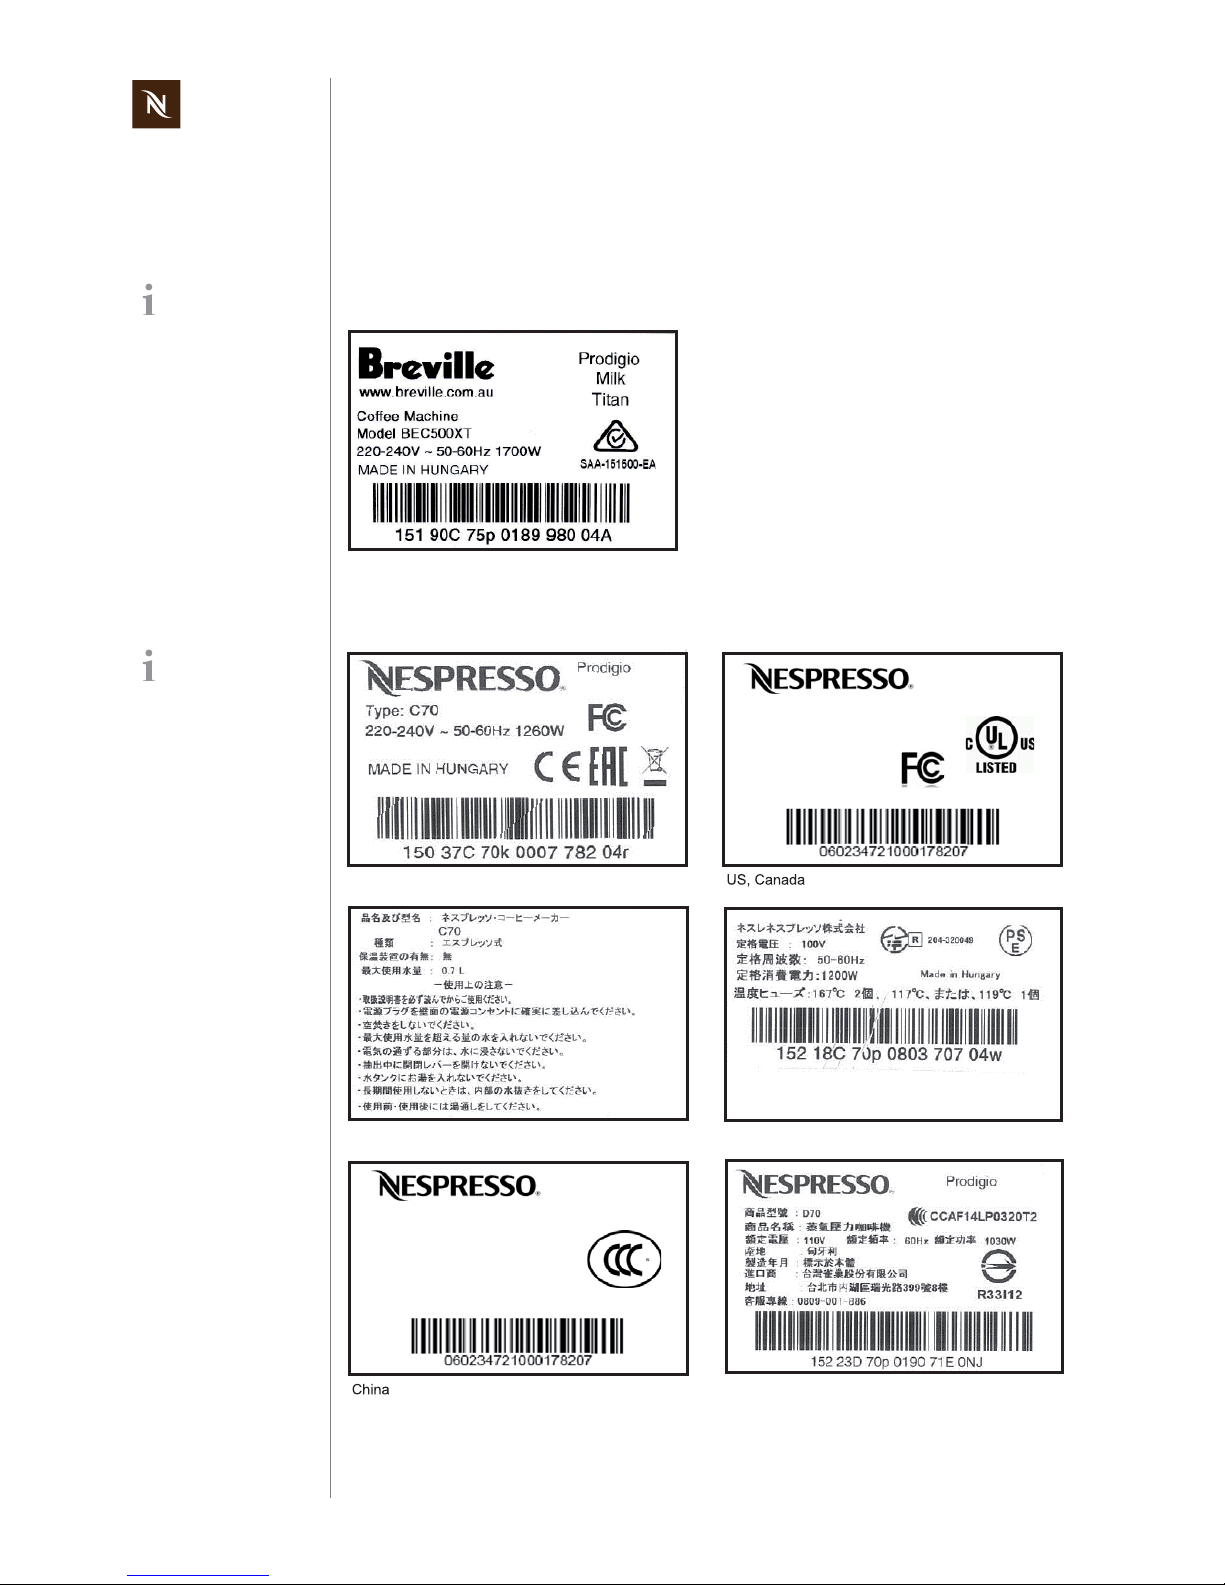
3.1 Rating plates
3.1.1 Example of brand specific rating plate
3.1.2 Examples of country specific rating plates
The rating plate can
be found at the bottom of the coffee machine.
A
ustralia
This overview shows
examples for various
countries and is subject to
alterations.
Prodigio
Type: D70
HOUSEHOLD COFFEE MAKER
MACHINE A CAFÉ POUR LA MAISON
120 V~ 60 Hz 1160 W
MADE IN HUNGARY
FABRIQUÉ EN HONGRIE
4SM3
ṏရྡ⛠䠖ၲᮘ
ᆺྕ䠖C70
桅ᐃ䓝⌳ཬ桅ᐃ根⋡䠖220 V~ 50 Hz
桅ᐃ弻ධຌ⋡䠖1150 W
ไ㐀ၟ䠖Flextronics International Kft.
୰ᅜ༊௦⌮ၟ䠖ி㞛ᕡዉ᪁ὴ⣴ၲ᭷㝈බྖ
MADE IN HUNGARY ∳ไ㐀
Prodigio
Europe
Japan (two-piece rating plate)
Japan
Taiwan
Page 13
Version 1.0 en Prodigio service manual
13
TECHNICAL DATA
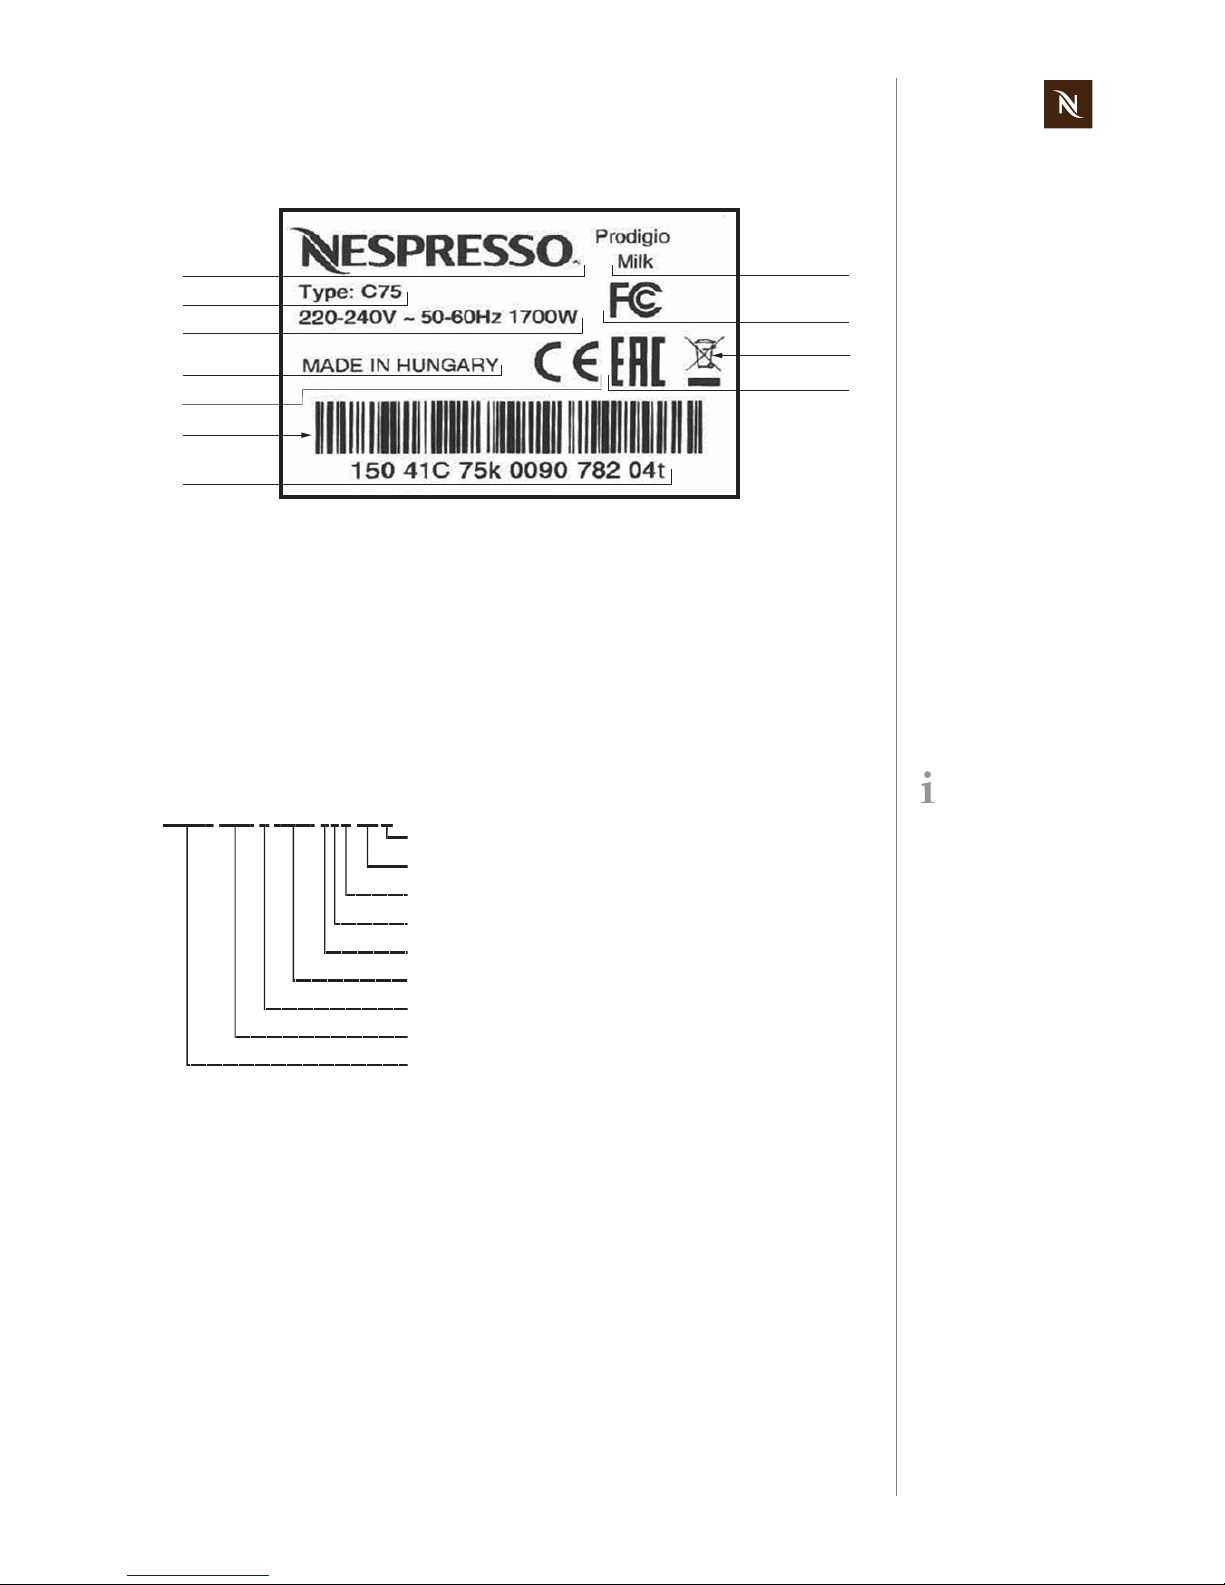
3.1.3 Rating plate details (example)
Decoding the alphanumeric serial number
Example:
1) Brand name
2) Machine type
3) Voltage and power rating
4) Place of manufacture
5) Sign of conformity (CE)
6) Bar code
7) Serial number
8) Machine name
9) FCC approval
10) Special disposal icon
(do not dispose with ordinary waste)
1 1) Eurasian conformity mark
1
2
3
7
8
10
9
4
5
11
6
By decoding the date
of production and
machine type, the coffee
machine can be identified
exactly.
Checksum
Color version
Type of mains plug
Mains voltage
Distributing partner
Incremental number per production day
Manufacturing plant
Manufacturer designation of the machine type (C75)
15041 ... Date of production
(15 = year 2015, 041 = forty-first day of the year)
15041 C75 k 0090 782 04 t
Page 14

Prodigio service manual Version 1.0 en
14
TECHNICAL DATA
3.2 Technical specifications
3.2.1 Coffee machines
Mains voltage ranges
Prodigio coffee machine
Europe, RU, AU, CN, KR, SG, HK, ME, ZA, IL, BR, AR................ 220-240 V, 50/60 Hz
USA, Canada ........................................................................................120 V, 50/60 Hz
BR, MX..................................................................................................127 V, 50/60 Hz
Japan.................................................................................................... 100 V, 50/60 Hz
Taiwan....................................................................................................... 110 V, 60 Hz
Prodigio&milk coffee machine
Europe, RU, AU, CN, KR, SG, HK, ME, ZA, IL, BR, AR................ 220-240 V, 50/60 Hz
USA, Canada ........................................................................................120 V, 50/60 Hz
BR, MX.......................................................................................................127 V, 60 Hz
BR, KR .......................................................................................................220 V, 60 Hz
CN.................. .... ... ... .......................................... ... .....................................220 V, 50 Hz
Power consumption
Prodigio coffee machine
220-240 V mains voltage......................................................................approx. 1’260 W
100/110/120/127 V mains voltage.........................................................1’160 - 1’370 W
Prodigio&milk coffee machine
220-240 V mains voltage......................................................................approx. 1’700 W
100/110/120/127 V mains voltage........................................................approx. 1’900 W
Power consumption of coffee machine main components
(for all voltages and frequencies)
Thermoblock...................................................................................................... 1’200 W
Pump......................................................................................................................60 W
Milk frother (Prodigio&milk).........................................................................410 - 490 W
Energy consumption (CECED / FEA 2009 method)
Prodigio coffee machine
Energy efficiency class level ..............................................................................A - 40%
Daily energy consumption....................................................................................76 Wh
Annual energy consumption...............................................................................28 kWh
EuP ... Energy using
Products
See commission regulation
no. 1275/2008 of the European Union.
Approvals UL and FCC for USA and Canada, CE, PSE, EAC, Ctick,
CCC, KTL, SPRING, SASO, SABS, ISI, IRAM, NOM
EuP standard The coffee machine is EuP 2013 compliant
Page 15

Version 1.0 en Prodigio service manual
15
TECHNICAL DATA
Prodigio&milk coffee machine
Energy efficiency class level..............................................................................A - 40%
Daily energy consumption....................................................................................89 Wh
Annual energy consumption .............................................................................. 33 kWh
Pump
Pump pressure
- Max. permissible.................................................................................... 20 bar ± 3 bar
- During coffee preparation (depending on the type of coffee)........................ 9 - 16 bar
Capacities
Water tank...................................................................................................approx. 0.8 l
Drip tray water capacity................................................................................min. 100 ml
Capsule container.......................................................................... approx. 10 capsules
Volume of prepared coffee
- factory settings
Small cup "Ristretto" ................................................................................... 25 ml (±7%)
Small cup "Espresso".................................................................................. 40 ml (±7%)
Large cup "Lungo"..................................... ... ... .... ... ... ... ... .... ... ... ... .... ... ... ... . 110 ml (±7%)
- customer settings
Programmable setting range.........................................................................20 - 200 ml
Environmental conditions
Operating temperature.............. ... ... ... .... ..+ 5 °C up to + 45 °C (+ 41 °F up to + 113 °F)
Storage temperature.................................. - 25 °C up to + 65 °C (- 13 °F up to 149 °F)
Altitude............................................................................up to 2’500 m above sea level
Humidity................................................................................................... no restrictions
Various data
Preheating time....................................................................................... approx. 25 sec
Automatic shut off time.................................................................after 9 min of non-use
Safety temperature (electronically controlled)........................................120 °C (248 °F)
Safety temperature (thermal cut-off)......................................................167 °C (333 °F)
Coffee temperature at outlet ...........................................86 °C ± 3 °C (187 °F ± 5,4 °F)
Descaling temperature.................................................................setting 70 °C (158 °F)
Advised water tank
capacity to avoid
spilling.
Page 16

Prodigio service manual Version 1.0 en
16
TECHNICAL DATA
3.2.2 Milk frother (Prodigio&milk)
Mains voltage
EU ............................................................................................... 220-240 V / 50-60 Hz
US/CA ..........................................................................................120-127 V / 50-60 Hz
AU ..................................................................................................... 240-260 V / 50 Hz
The milk frother
- is available in 3 different models, depending on above mains voltage ranges,
- has to match the mains voltage range of the associated coffee machine.
Capacity
Hot milk ...................................................................................................... max. 240 ml
Hot/cold milk for milk froth...........................................................................max. 130 ml
Performance data
Preparation times
(with full, semi-skimmed or skimmed milk at 8 °-10 °C fridge temperature)
Hot milk froth (120 ml)..... ... ... ... ... .... ... ... ........................................................50 - 80 sec
Cold milk froth (120 ml) .................................................................................60 - 80 sec
Hot milk (240 ml) .......................................................................................120 - 180 sec
Temperature
Hot milk .............................................................................................+ 60 °C to + 70 °C
Foam milk..........................................................................................+ 60 °C to + 70 °C
If replacing a defect
milk frother, check
mains voltage range.
Page 17
Version 1.0 en Prodigio service manual
17
TECHNICAL DATA
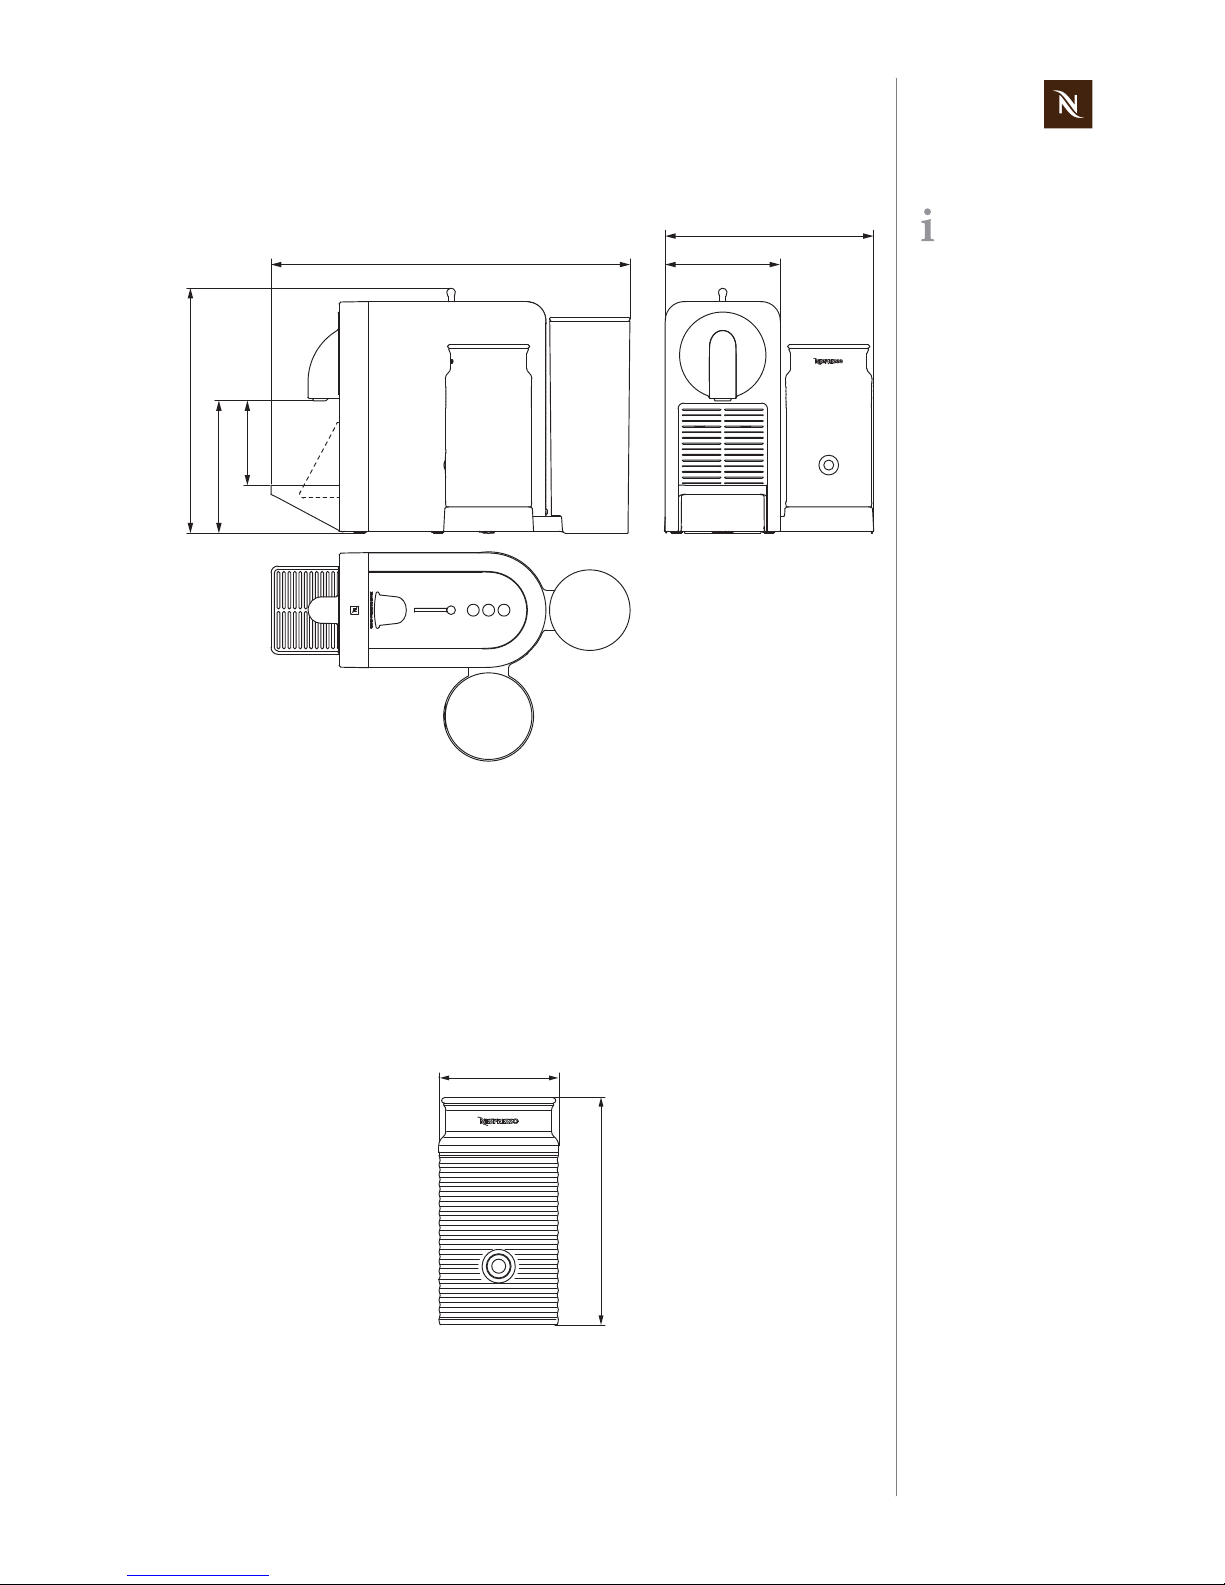
3.2.3 Dimensions, weight and size
Prodigio dimensions (length x width x height)......................... 374 x 119.5 x 255.3 mm
Prodigio&milk dimensions (length x width x height)................ 374 x 218.4 x 255.3 mm
Distance drip grid - coffee outlet: .............................................88 mm (Espresso mode)
Distance bottom - coffee outlet: .......................................... 138 mm (Macchiato mode)
Power cable length ...................... ... ... .. min. 0.8 m (depending on national regulations)
Prodigio weight (without water).............................................. ... ... .... ...........approx. 3 kg
Prodigio&milk weight (without water).................................................. ... .....approx. 4 kg
Milk frother
Dimensions of jug cpl. (diameter x height)................................................ 91 x 170 mm
Whisk for foam (diameter x height).............................................................. 33 x 32 mm
Weight (with whisk)............................................................................................... 0.7 kg
Dimensions in [mm].
119.5374
88
138
255.3
218.4
Ø
91
170
Page 18
Prodigio service manual Version 1.0 en
18
OPERATION
4 OPERATION
4.1 General information
For an overview of operational controls see “Main components” on page 7.
For basic operation of the machine such as preparing a coffee and other related infor-
mation, refer to the user manual.
4.2 Status indications
4.2.1 Status indication of coffee machine
According to the following table the status of the coffee machine is shown by
- light signals of the 3 coffee buttons Lungo, Espresso and Ristretto (white LEDs)
- maintenance light (M-light, orange LED)
- Nespresso logo backlight (N-light, white LED)
Machine status Lungo Espresso Ristretto M-light N-light
Off or standby
Off Off Off Off Off
Heating up
Blinking, 1 Hz Blinking, 1 Hz Blinking, 1 Hz — —
Ready
On On On — —
Brewing coffee
One coffee button is blinking, 1 Hz — —
Pre-order active
Programming
coffee cup size
Special functions
Programming
cup size confirmation for
-Lungo
Off On, 0.5 sec On, 0.5 sec — —
- Espresso
On, 0.5 sec Off On, 0.5 sec — —
- Ristretto
On, 0.5 sec On, 0.5 sec Off — —
Descaling ready,
pump on/off
Blinking, 2 Hz Blinking, 2 Hz Blinking, 2 Hz On —
Emptying
confirmation
Off On, 0.5 sec Off On —
Emptying
running
Off Off Off On —
Switch standby
time to 30 min
Off On, 3 x 0.5 sec Off Off —
- to 9 min
Off On, 0.5 sec Off Off —
Reset to factory
settings
On, 2 sec On, 2 sec On, 2 sec On, 2 sec On, 2 sec
Nespresso App. related
First pairing
Off Off Off Off Blinking,
3 x 0.5 sec
Low capsule
stock
————On
Page 19
Version 1.0 en Prodigio service manual
19
OPERATION
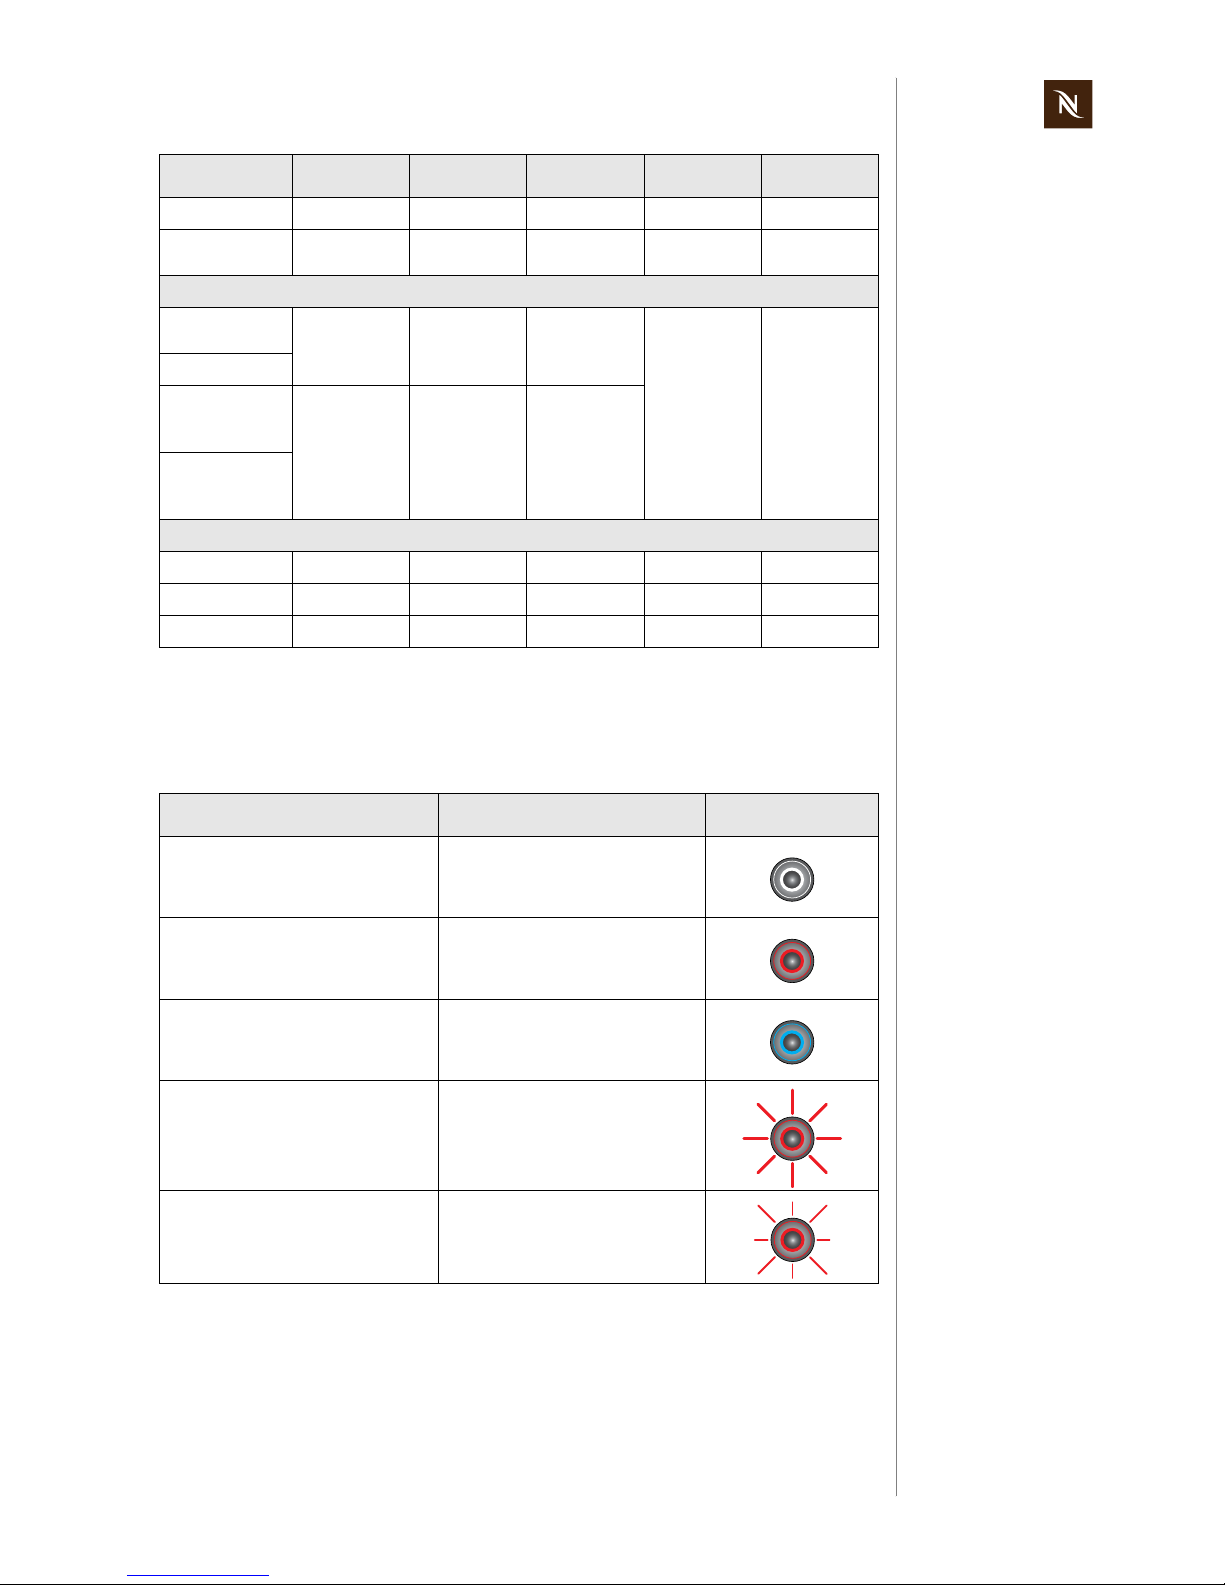
4.2.2 Status indication of milk frother
The operating button with its red/blue backlight shows the status of the milk frother
according to the following table:
Software update
Off Off Off Off Blinking, 2 Hz
Device identification
————Blinking,
5 x 0.5 sec
User intervention required
Notification descaling needed
———On—
Out of water
Capsule con-
tainer full or
removed
Off Off Off
Obstacle detection (capsule
ejection)
Errors
Invalid user input
— — — Blinking , 3 x —
Overheating
Blinking, 1 Hz Blinking, 1 Hz Blinking, 1 Hz On —
Device error
— — — Blinking, 2 Hz —
Machine status State events Operating button
Off Backlight off
On - hot milk preparation Red backlight on
On - cold milk froth preparation Blue backlight on
Failure/malfunction
(e.g. overheating because of bu r nt
milk, too less or no milk)
Blinking red backlight
(1 Hz, 0.5 sec on, 0.5 sec off)
Failure: milk frother has wrong
mains voltage range
Fast blinking red backlight
(2 Hz, 0.25 sec on, 0.25 sec off
Machine status Lungo Espresso Ristretto M-light N-light
Page 20
Prodigio service manual Version 1.0 en
20
OPERATION
4.3 Machine modes
4.3.1 Machine modes of coffee machine
This table helps to understan d the operating modes of the Prodigio coffee machine:
This table also contains the keying
sequences for
- volume programming
- descaling
- water system emptying
- resetting
- changing the automatic
switch off time.
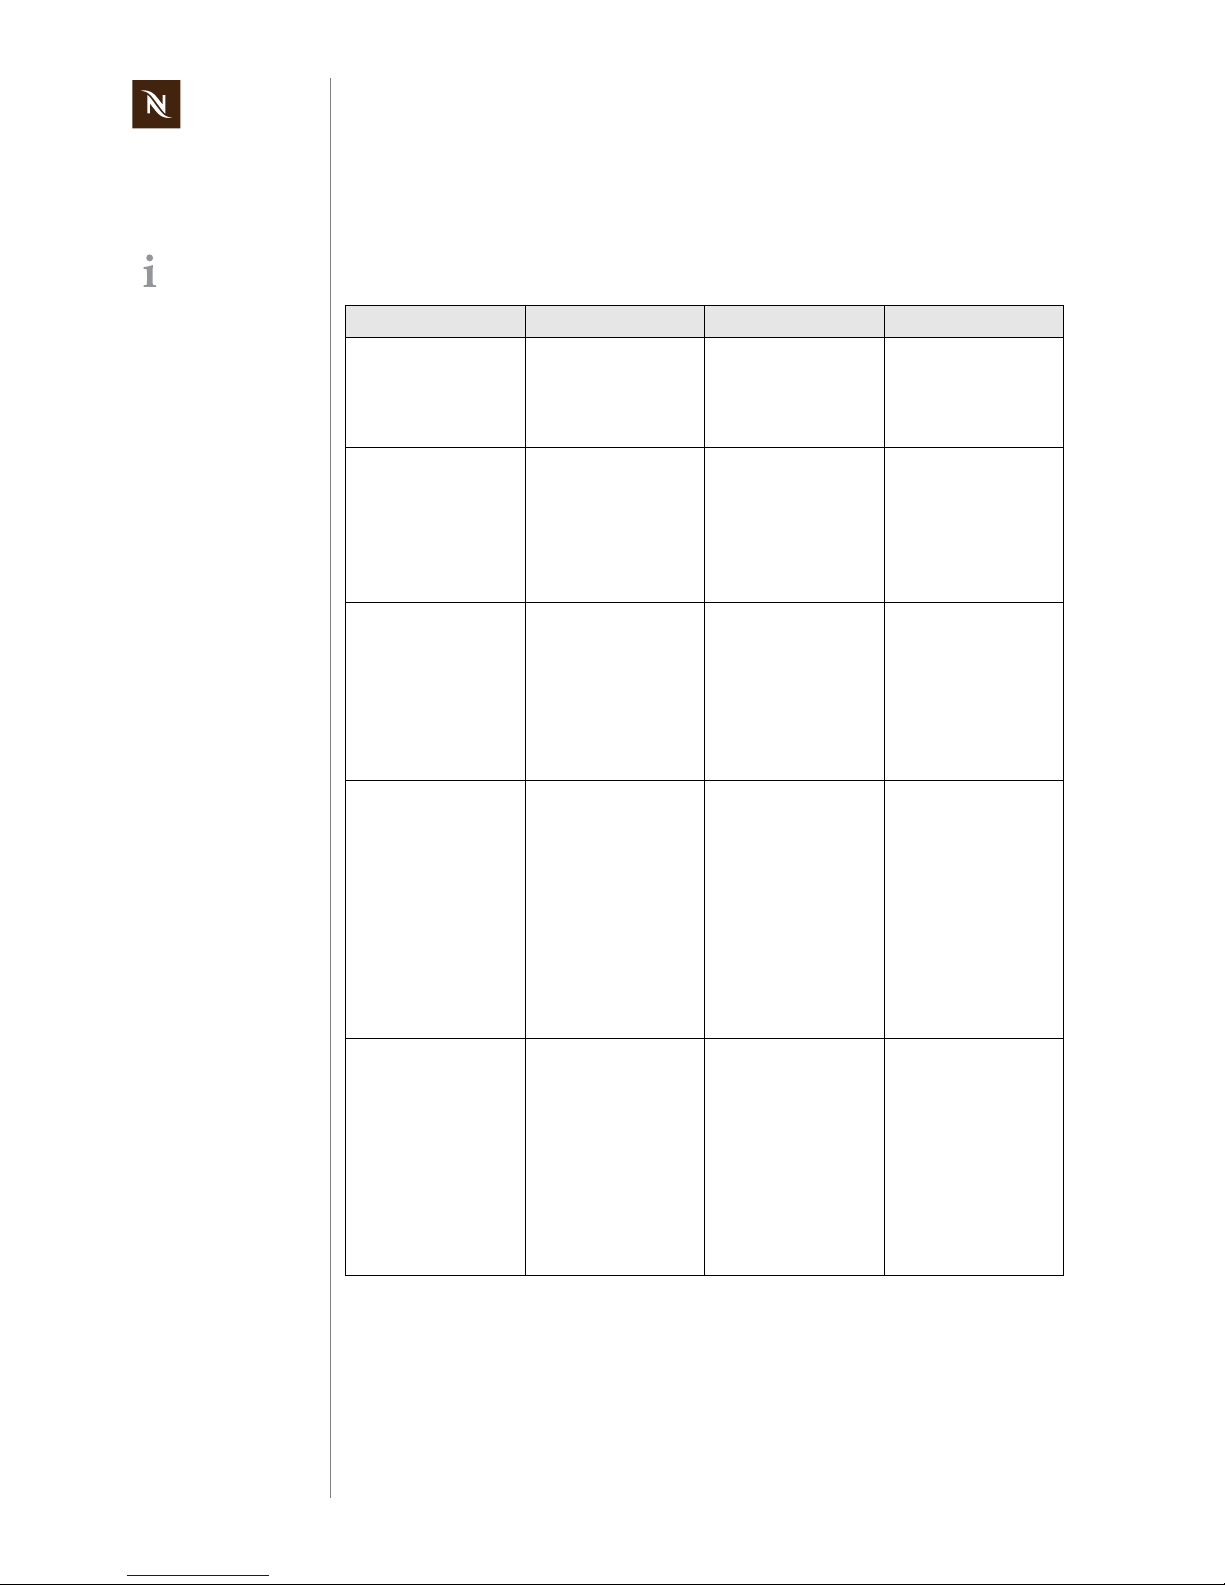
Machine mode Enter mode Actions Exit mode
1 Heat up mode
Every time after switching on machine
Heat up thermoblock to
ready temperature 90
°C within 30 sec without overshooting target
temperature
e.g. switching off
machine
2 Self test mode
Every time after switching on machine
Tests:
• NTC short circuit
• NTC connected
• Checks if thermoblock reaches ready
temperature within
2 min after switch on
e.g. switching off
machine
3 Ready mode
• After heat up and self
test mode was ok
• After brewing or
volume brewing
coffee
• After reset mode
• After leaving
descaling mode
Keep thermoblock
temperature at 90 °C
e.g. switching off
machine
4a Brewing mode
4b Volume brewing
mode (programming cup size)
Brewing mode:
• Press and release
any coffee button
Programming mode:
• Open and close the
slider
• Press and hold any
coffee button for
more than 3 sec
• Press and release
any coffee button
when machine is in
brewing mode or
automatic exit given
by the flowmeter
• Release corresponding coffee
button when
machine is in
programming mode
• Switch off machine
5 Descaling mode
• Switch on the
machine and wait
until ready
• Press and hold all
three coffee buttons
for at least 6 sec until
confirmation with a
beep.
• Regulate temperature to 70 °C (after
pump was started)
• Stop and start pump
with any coffee
button, no volume
brewing in descaling
mode
• Press and hold all
three coffee buttons
for at least 6 sec until
confirmation with a
beep.
Note: When machine is
switched off during any
descaling mode, then it
goes to descaling
mode ready state after
next switch on.
Page 21
Version 1.0 en Prodigio service manual
21
OPERATION
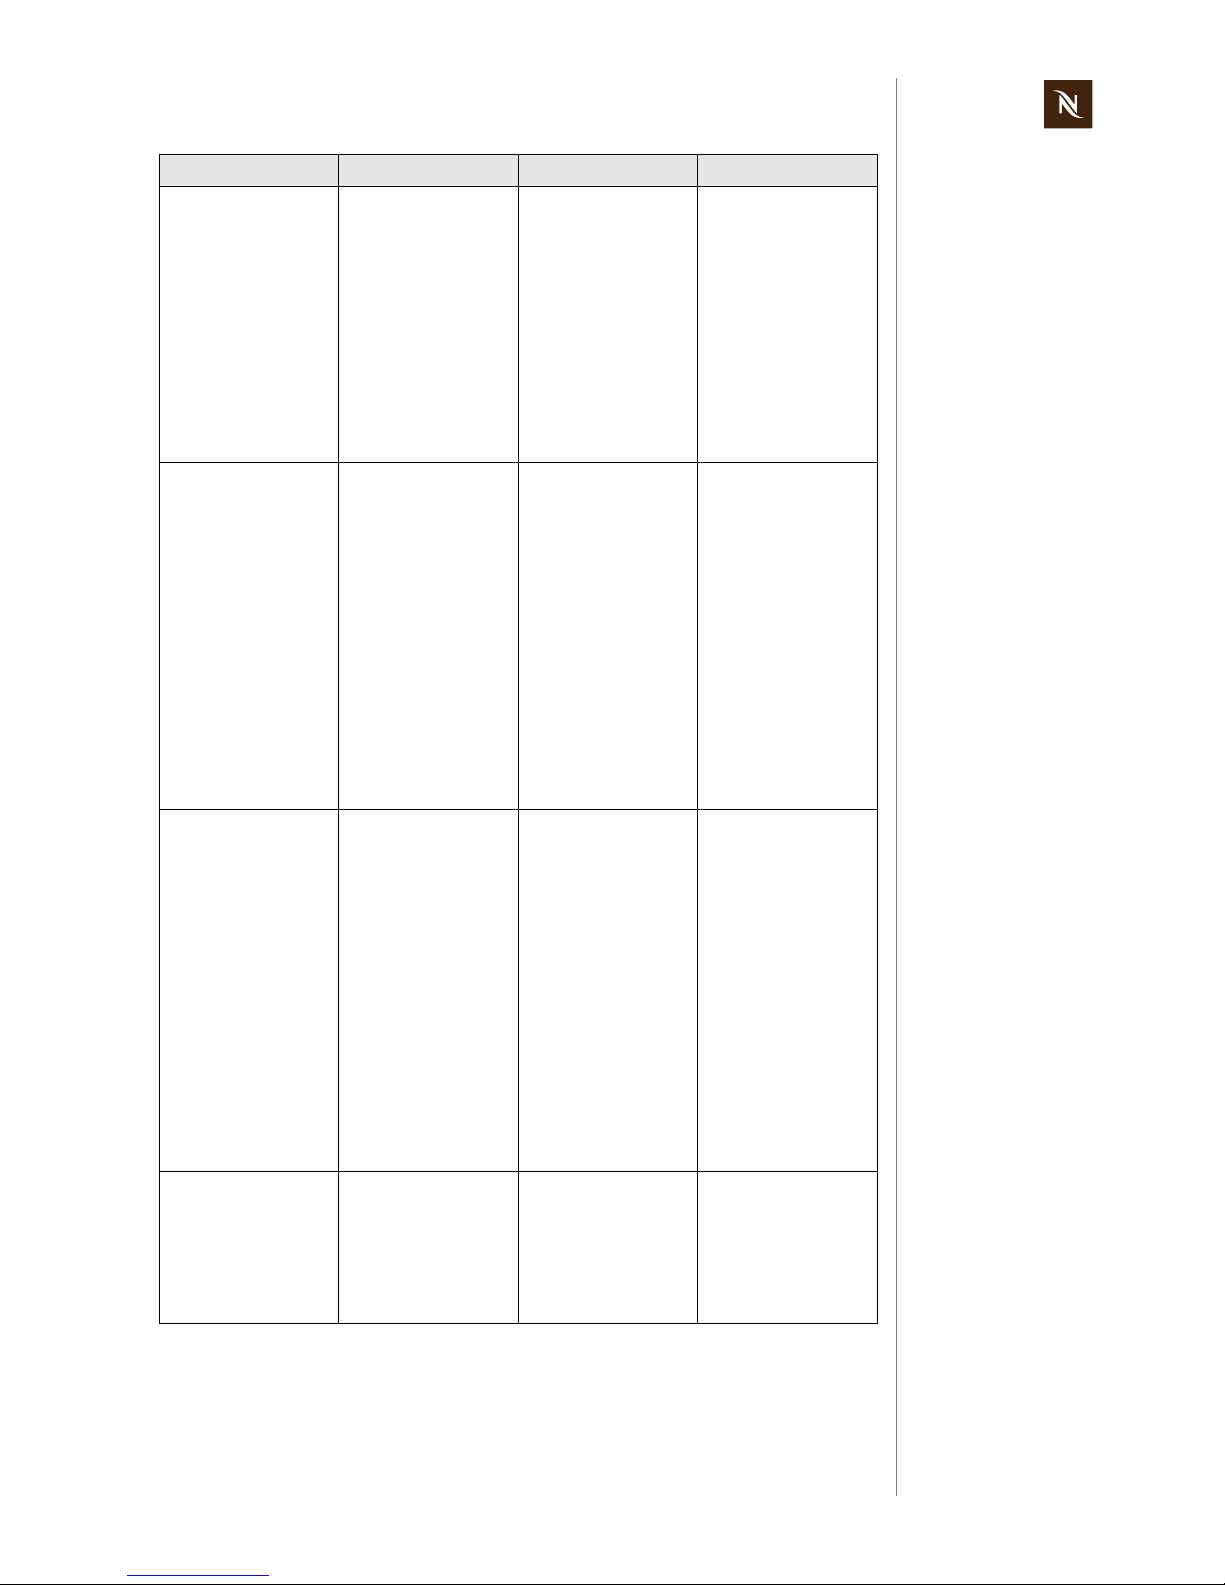
6 Emptying mode
(evaporing)
• When slider is open
press and hold the
Ristretto and Lungo
coffee buttons
together for at least
6 sec. The other
coffee button flashes
for confirmation.
• Close the slider to
start the procedure.
1) Start pump
2) Heat up thermoblock to 105 °C
(100% power)
3) Stop pump wh e n
thermoblock temperature of 105 °C
is reached
4) Switch off thermoblock
5) Switch off machine
6) Block machine for
10 min
Switch off machine
7 Resetting mode
• Swi tch off machine.
• Press and hold the
Espresso and Lungo
coffee buttons
together for at least
4sec.
• Reset programmed
volumes to factory
settings (Ristretto
25ml, Espresso
40ml, Lungo 110ml)
• Reset automatic off
mode to 9 min.
• Reset water hard-
ness to "hard".
• Reset capsule
counter and
descaling counter
• Cancel pairing with
Nespresso App.
device
• Activate Bluetooth
®
Proceeds with self test
mode automatically
8 Auto switch off mode
(factory setting of 9 min
can be changed to
30 min)
• Automatica lly after a
certain period of nonuse.
• Manually at any time
by pressing Lungo
and Espresso coffee
buttons together for
more
than 3 sec
.
• Change automatic
OFF mode between
9 and 30 minutes:
Ensure machine is
turned off.
Press and hold Lungo
and Ristretto coffee
buttons together for
at least 3 sec.
• Switch off machine
after 9 min resp.
30 min if no coffee is
brewed or 9 min
resp. 30 min after
last brewed coffee
9 Failure mode
Automatically by following failures:
a) NTC short circuit
b) NTC not connected
c) Heat up too slow
d) Motor short circuit
e) Motor not connected
Machine indicates failure with blinking maintenance light as long as
the failure is present
When failure is fixed
Machine mode Enter mode Actions Exit mode
Page 22

Prodigio service manual Version 1.0 en
22
OPERATION
4.3.2 Machine modes of milk frother
The following table helps to understand the operating modes of the milk frother:
4.4 Nespresso App (application software)
The MMI PCB of the coffee machine is equipped with a Bluetooth® LE (low energy)
module that can establish a wireless connection to a smartphone or tablet.
A special application software (app) is necessary to enable the dat a exchange between
the devices.
The new, of ficial Nespresso App extends the functionality of the Prodigio coffee machine
with:
• Capsule stock management
- Out-of-stock notification
- Automatic counter update after capsule purchase
• Remote and programmed brewing
• Alerts notifications
- Capsule container full
- Capsule blocked
- Water tank empty
• Maintenance notifications
- Descaling
- Machine Errors
• Tutorials
4.4.1 Prerequisites
Smartphone / tablet
Compatible smartphones or tablets with Apple iOS 8.1 or newer:
- iPhone 4S and newer
- iPad 3rd Generation and newer
- iPad mini
- iPod touch 5th Generation and newer
Compatible smartphones or tab lets with Android op erating system version 5.0 or ne wer
and Bluetooth
®
Smart functionality:
- Galaxy S3 / S4 / S4 mini/ S5
- Nexus 5 / 6
Machine mode Enter mode Actions Exit mode
1 Hot milk / milk
froth preparation
Press start button briefly
Start button lights up red.
Milk is heated and mixed.
Automatic switch-off
after preparation
2 Cold milk froth
preparation
Keep start button pressed
for approx. 2 sec
Start button lights up blue.
Milk is mixed only.
Automatic switch-off
after preparation
Check compatibility
of other smartphones
or tablets on this website:
www.nespresso.com/prodigio
Page 23
Version 1.0 en Prodigio service manual
23
OPERATION
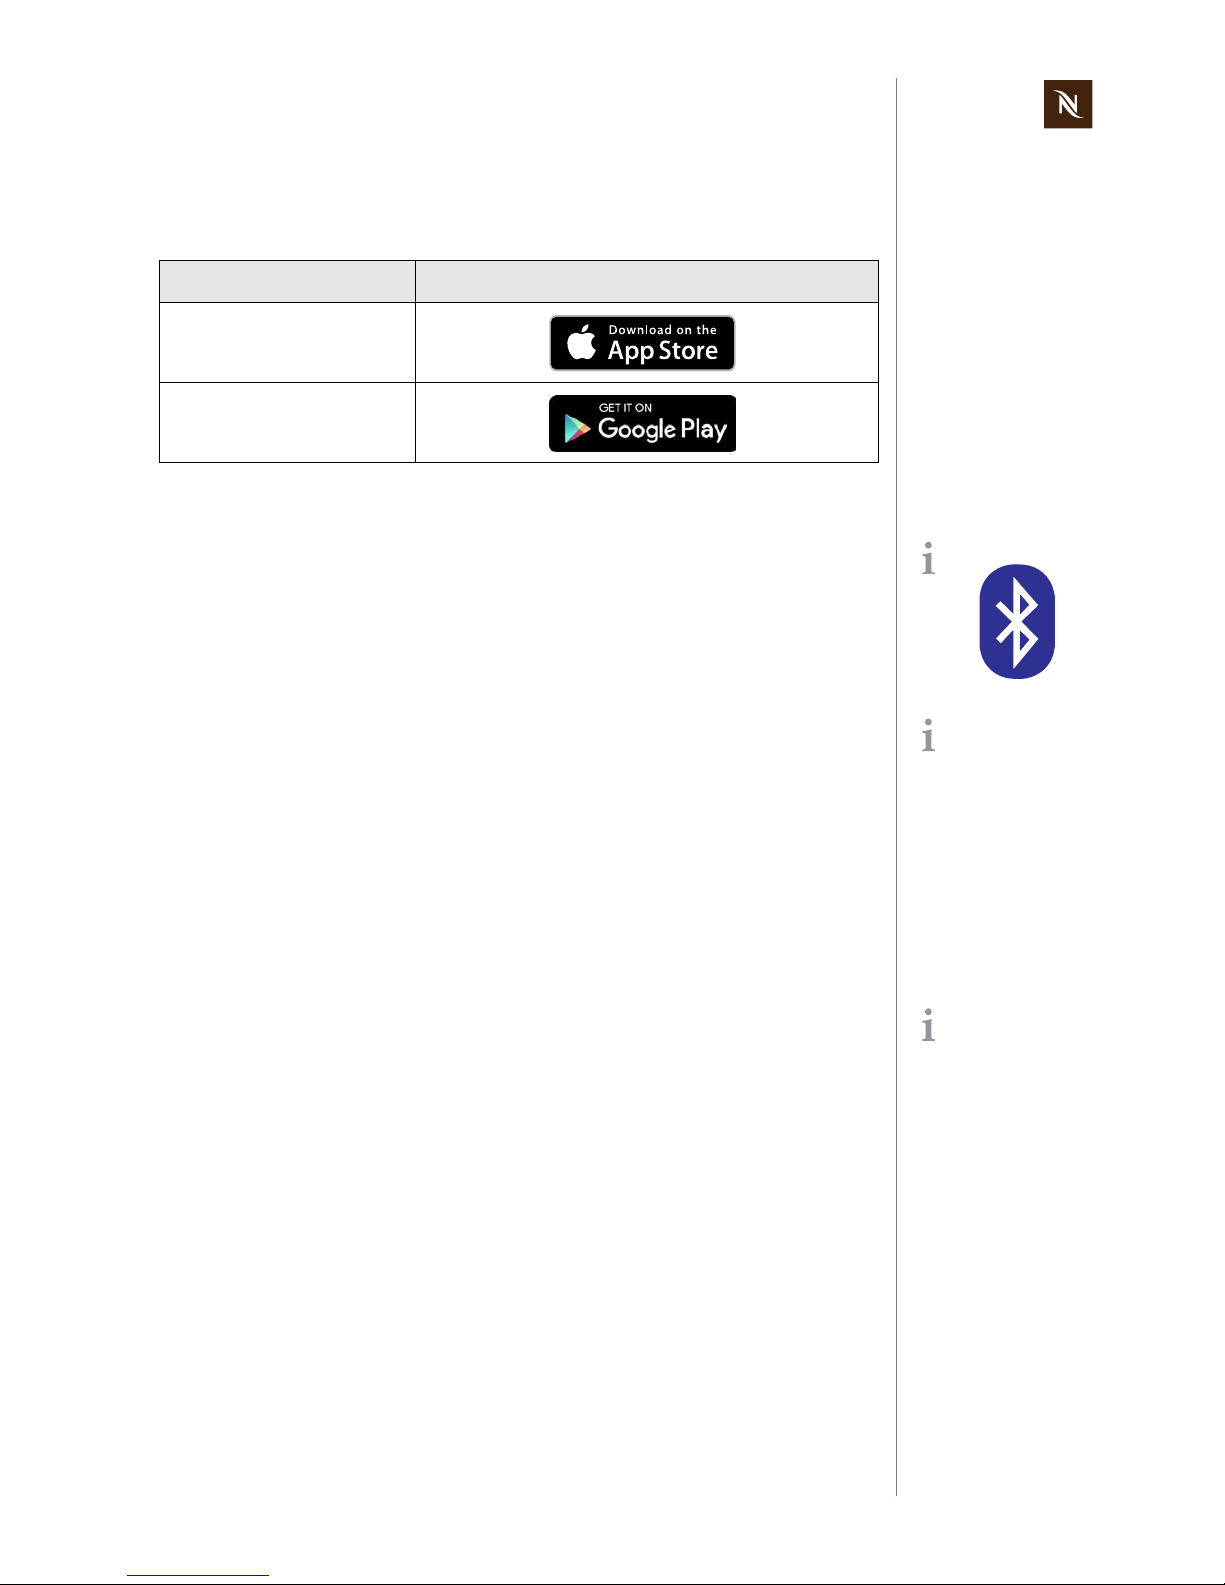
Nespresso App
Download the official Nespresso App version free of charge on your smartphone or
tablet depending on the operating system:
Check Bluetooth® function
• Check that Bluetooth® is enabled on the smartphone or tablet. Look for the Bluetooth
®
symbol on top of the screen or check settings.
• Make sure that the coffee machine is switched on a nd in re ady mode. Th en sear ch
for a Bluetooth
®
device with a compatible smartphone or tablet and ch eck if the
Prodigio coffee machine appears on the Bluetooth
®
devices screen.
If the coffee machine cannot be detected as a Bluetooth
®
device
- the Bluetooth
®
function is deactivated
- or the machine is already paired with a device (fixed CMID).
In both cases a reset of the coffee machine is necessary:
• Switch off machine.
• Press and hold the Espresso and Lungo buttons together for at least 4 sec.
• All the buttons will turn on for 2 sec. as a confirmation.
4.4.2 Pairing smartphone or tablet with coffee machine
Pairing is necessary to link the coffee machine to the smartphone or ta blet resp. the
Nespresso App.
The CMID (client machine identification) of the smar tp h one or tablet and th e ser ia l
number of the coffee machine are used for identification.
Operating system Store
Apple iOS
Android
Bluetooth® symbol:
It is possible to deactivate the Bluetooth
®
function of the coffee
machine with the following
procedure:
Press simultaneously Ristretto and Espresso buttons and remove the plug
from the mains.
A reset of the coffee
machine enables the Bluetooth
®
function again.
Beside the pairing of
2 Bluetooth
®
devices,
multiple pairing is also possible:
• Pair 1 coffee machine
with several Bluetooth
®
devices (same NNSA
account).
• Pair 2 coffee machines
with the same Bluetooth
®
device.
Page 24
Prodigio service manual Version 1.0 en
24
OPERATION
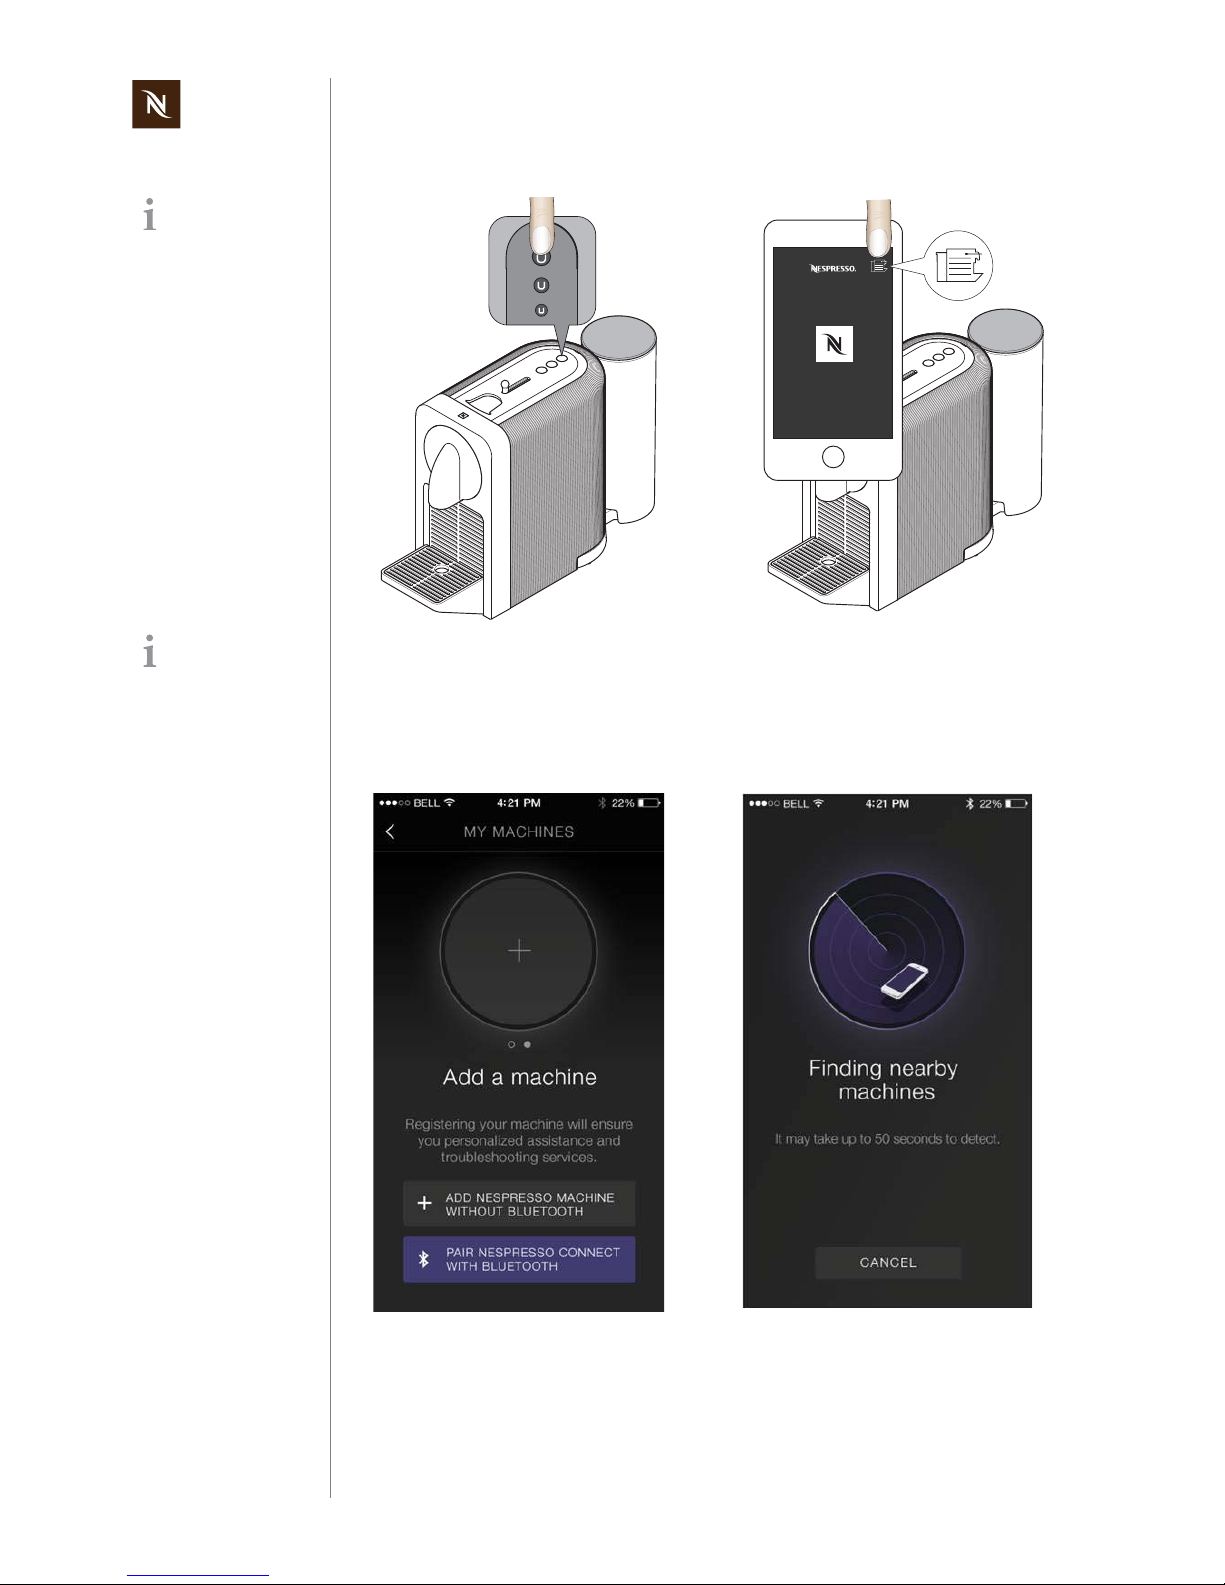
Pairing procedure
Nespresso App illus-
trations are either
symbolic or subject to
change depending on the
app version.
Even better, touch
coffee machine with
smartphone or tablet.
Pairing is not possible if the
distance between the two
devices is too big!
1) Switch on coffee machine by pressing
any coffee button.
2) Wait until lights stop blinking and
machine is in ready mode.
3) Hold a compatible smartphone or tablet in close proximity to the coffee
machine.
4) Launch Nespresso App on smartphone or tablet.
5) Touch machine icon.
6) Start search for coffee machine by
touching the Bluetooth
®
symbol.
7) Wait until coffee machine is detected.
Page 25
Version 1.0 en Prodigio service manual
25
OPERATION
If pairing has failed
• Make sure the smartphone or tablet is in close enough proximity to the coffee
machine.
• Charge up the smartphone or tablet before pairing. Its smart power management
may turn off Bluetooth
®
if the battery level is too low.
• Make sure not to turn on any microwave close to the machine during pairing.
• Maintain a sufficient distance to devices that can interfere with the pairing process
such as a Wi-Fi/WLAN router.
Special advice for service technician
If a customer’s coffee machine was paired in the re pair center (e .g. for troubleshootin g):
• Reset settings after pairing.
• Reset settings of Nespresso App after use and before sending back the machine to
the customer. Otherwise it is not possible for the customer to pair the coffee
machine.
• Advice customer to pair the coffee machine agai n at home and to check and ad just
the settings.
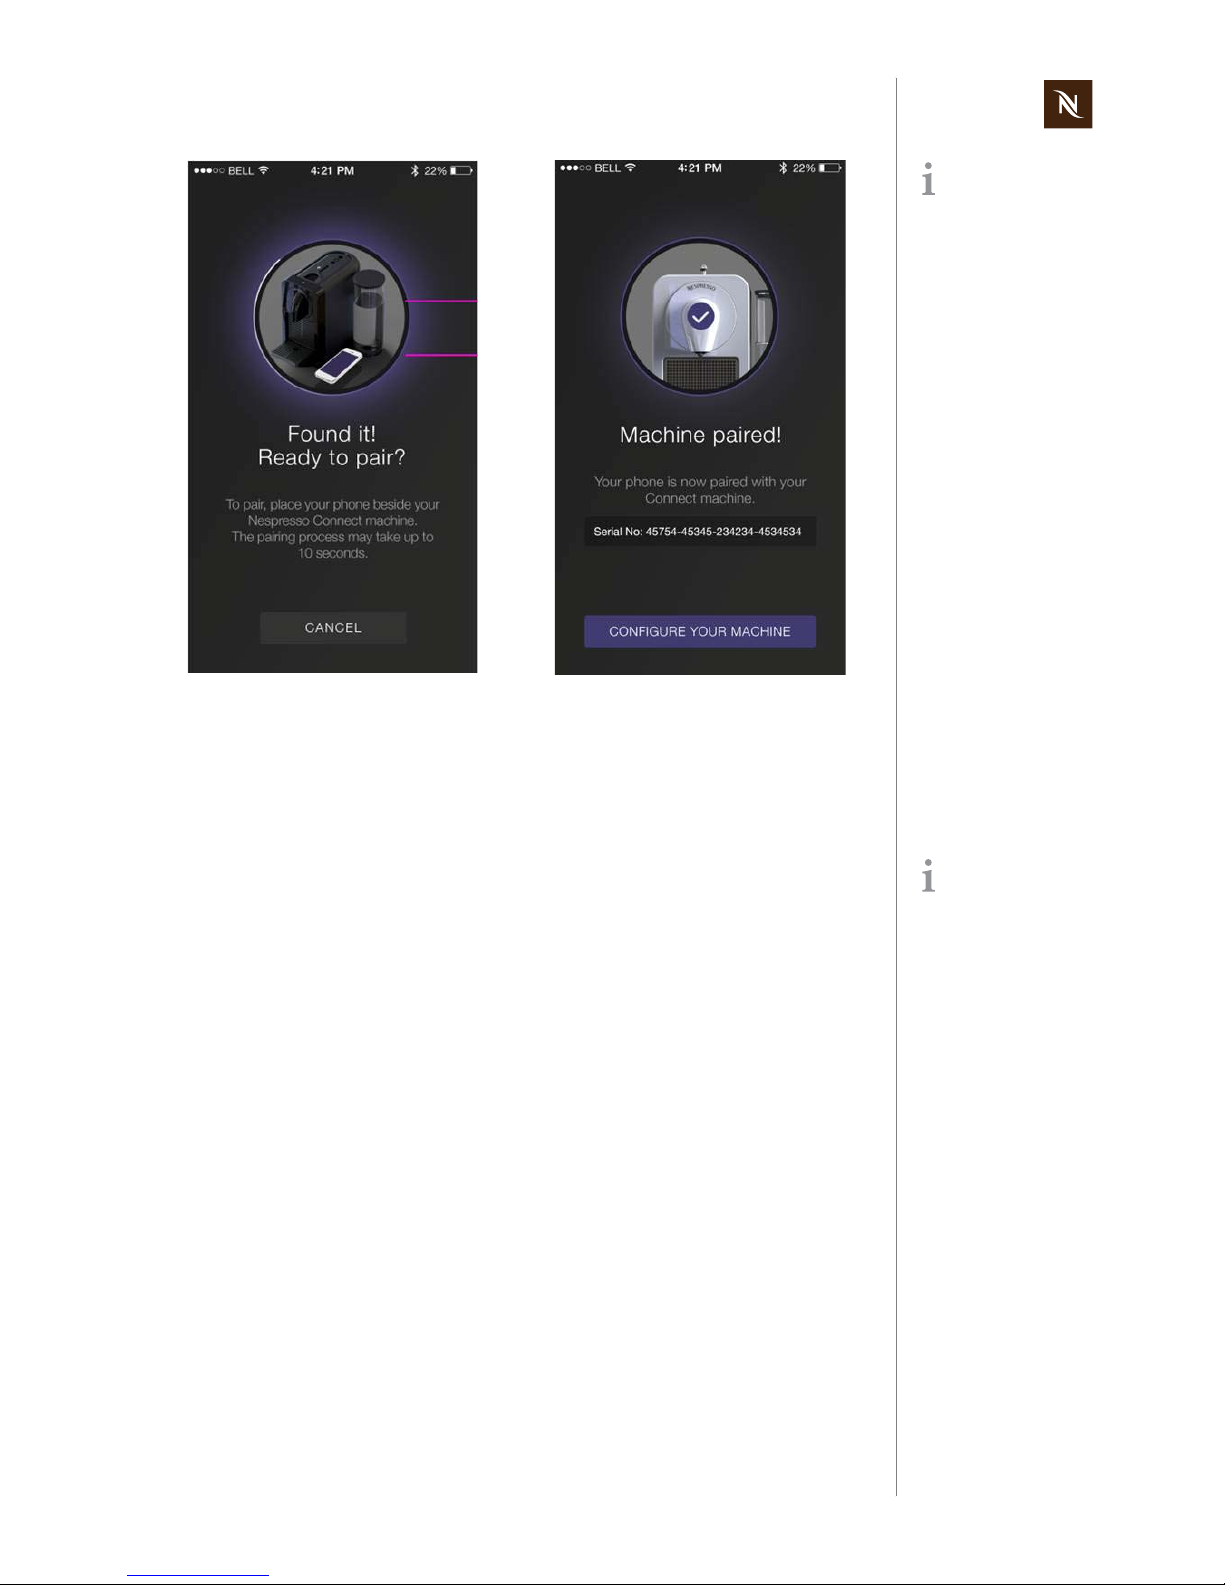
Multiple devices can
be connected to the
Prodigio coffee machine
only if using a unique
Nespresso club members
number (NNSA account).
8) Ensure the smartphone or tablet is
placed next to the coffee machine during pairing.
9) Pairing takes place automatically.
10) When the pairing is completed, the
Nespresso logo on the front of the coffee machine will blink 3 times.
The Bluetooth® mod-
ule of the coffee
machine is situated at the
top, beside the coffee buttons.
Page 26

Prodigio service manual Version 1.0 en
26
OPERATION
4.4.3 Nespresso App - coffee machine setup
If the water hardness
test is omitted, level 5
(very hard water) is used as
default setting.
1) Enter name for coffee machine. 2) Use a test strip to determine the local
water hardness.
3) Select appropriate level. 4) Set the capsule counter.
Page 27
Version 1.0 en Prodigio service manual
27
OPERATION
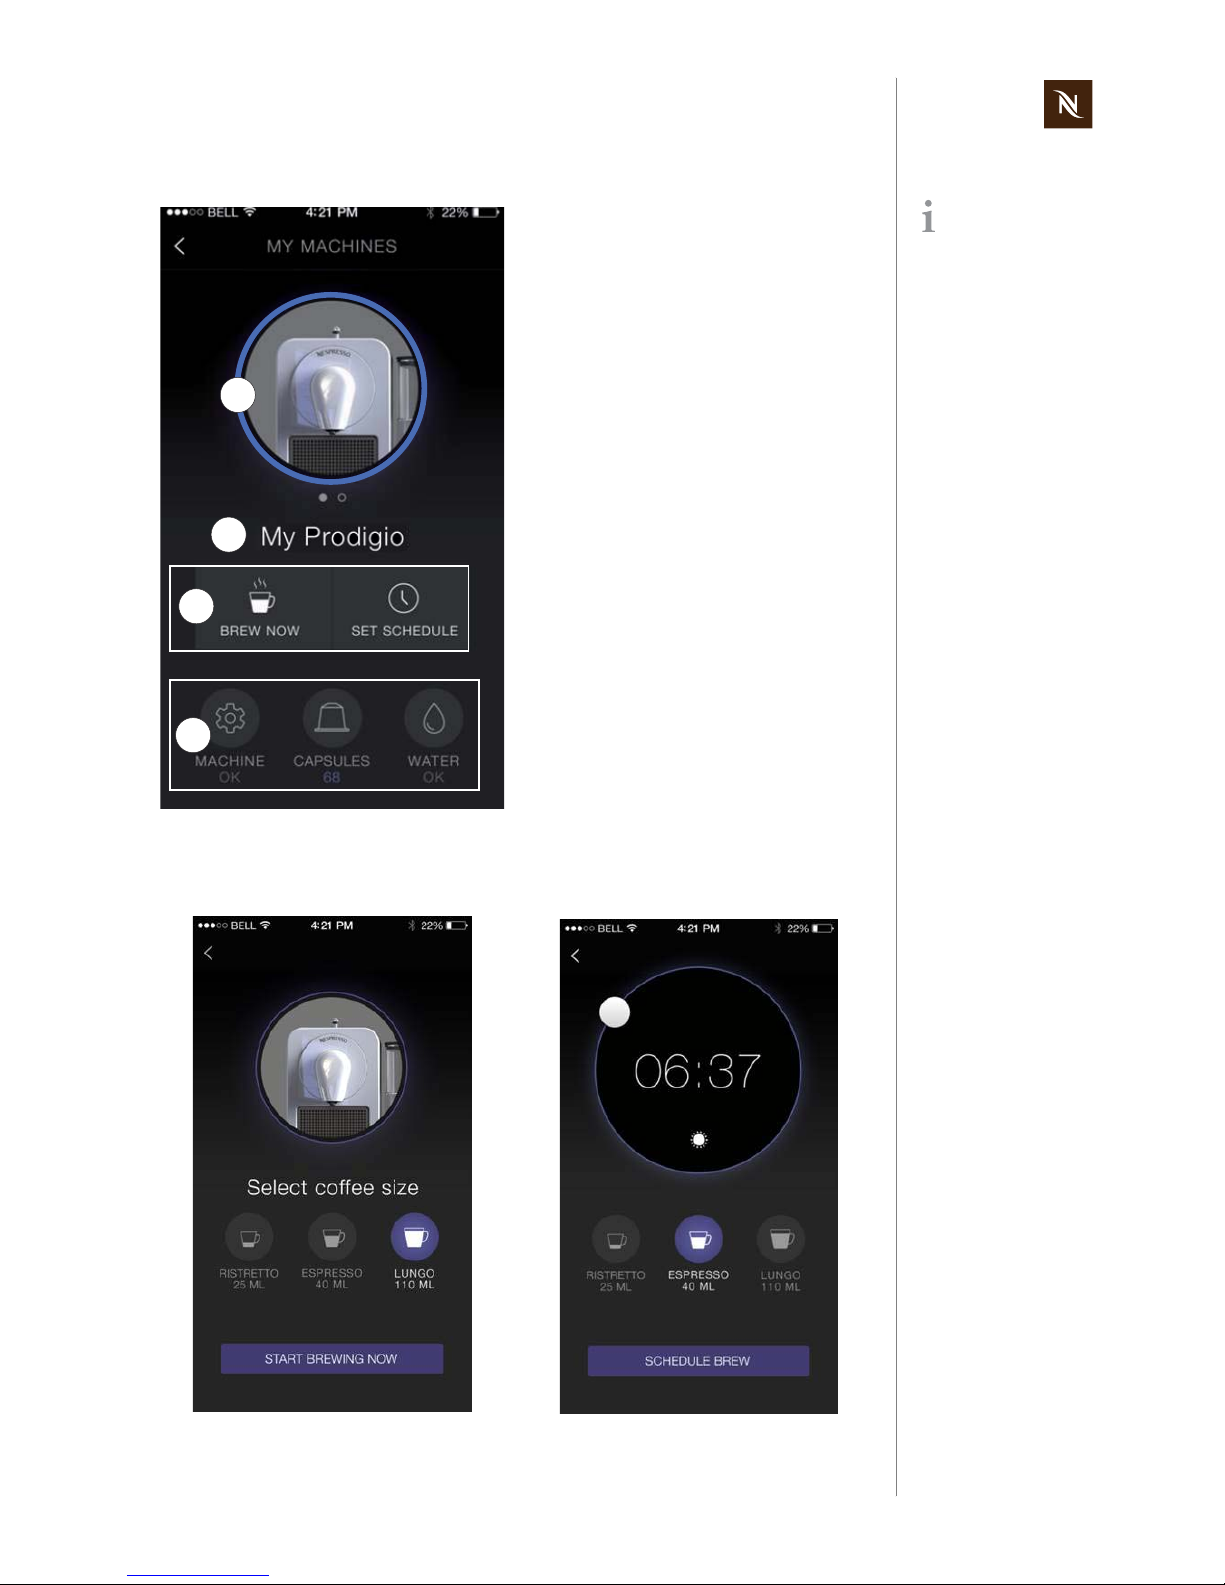
4.4.4 Nespresso App - machine page overview
4.4.5 Nespresso App - coffee brewing management
Touch the desired brewing menu icon on the machine page: Brew now / Set schedule
After multiple pairing,
different machine pictures can appear in the
machine menu.
1) Machine menu with
- corresponding machine picture
- ring showing overall machine status
(blue ... ok, orange ... problem,
error)
2) Individual machine name
3) Brewing menu
•Brew now
• Set schedule for coffee preparation
4) Status menu
• Machine
• Capsules
•Water
2
3
4
1
Page 28

Prodigio service manual Version 1.0 en
28
OPERATION
4.4.6 Nespresso App - machine management
Touch machine icon at the bottom of the machine page to display this submenu:
Touch desired submenu on machine management page for more information:
Example if machine status is ok (blue ring
around machine picture).
Example if machine status is not ok
(orange ring around machine picture).
Use the error code for
troubleshooting. Refer
to error code table on page
39.
Example of an error message.
Page 29

Version 1.0 en Prodigio service manual
29
OPERATION
Unpairing submenu
4.4.7 Nespresso App - capsule stock management
Touch capsule icon at the bottom of the machine page to display this submenu:
Caution!
In case of an unpairing, all setup s and specifications will be lost and the
coffee machine will be reset to factory settings.
1) Capsule stock management with
- stock status
- automatic adjustment
- manual adjustment
2) Change settings
3) Ordering portal
• Order history
• New order
2
3
1
Page 30

Prodigio service manual Version 1.0 en
30
OPERATION
4.4.8 Nespresso App - water management
Touch water drop icon at the bottom of the machine page to display this submenu:
4.4.9 Nespresso App - troubleshooting tips
1) Water tank management with
- message if customer needs to refill
the water tank
- no water alert
2) Descaling submenu with
- warning message before threshold
for descaling is reached
- link to descaling tutorial
3) Water hardness submenu
• Adjustment of water hardness level
Problem Remedy
The Nespresso App does not start.
Check internet connection of smartphone or tablet.
No orders or customer information about
capsule consumption are communicated to
Nespresso by the app.
Machine icon is missing on start screen of the
Nespresso App.
A flag icon appears instead of the machine
icon.
The services of the Nespresso App are not available in the current country.
Touch flag icon and select another country.
A programmed coffee preparation was not
executed
The command was not sent to the coffee
machine.
Touching the arrow in the top left corner of the
screen does not program the machine.
Press "Back to My Machine" and retry.
Someone has interacted with the coffee machine
manually or reprogrammed the machine with the
Nespresso app.
2
3
1
Page 31

Version 1.0 en Prodigio service manual
31
OPERATION
4.5 Empty water system
After every operation, some water (max. 25 ml / 0.85 oz) remains in the coffee machine.
Therefore the water system must be emptied
- if the coffee machine will not be used for a long time
- as an antifreeze measure
- for repairs and shipment.
After this procedure,
the coffee machine
will not be ready for approx.
10 min (until the thermoblock cools down to
below 100 °C).
Danger of scalding!
Very hot steam and water drops spray out of the coffee outlet.
• Do not reach under coffee outlet.
• Maintain a safe distance to the coffee outlet.
1) Remove the water tank.
2) Place a container under the coffee
outlet.
3) Close an open slider.
4) Press and hold the Ristretto and
Lungo coffee buttons together for at
least 6 sec.
The Espresso coffee button flashes
for confirmation.
5) Emptying process starts. Machine
turns to Off mode automatically when
empty.
6) Remove and empty the container.
Page 32

Prodigio service manual Version 1.0 en
32
MAINTENANCE
5 MAINTENANCE
5.1 Descaling
Descaling frequency based on water hardness:
5.1.1 Descaling procedure
Only use Nespresso descaler (5034) or Nespresso descaling kit
(3035/CBU-2)
– never use vinegar!
Descaler can damage casing and surfac e s.
Immediately clean drops of descaling solution.
The water hardness
can be adjusted any
time with the Nespresso
App.
Estimated cup capac-
ity: 40 ml / 1.35 oz
fH: French water hardness
dH: German water hardness
CaCO3 (Calcium Carbonate) in mg/l: American
water hardness
Water hardness
Test strip Level °fH °dH CaCO
3
Descaling after
0 < 5 < 3 < 50mg/l 4’000 cups
1 > 7 > 4 > 70 mg/l 3’000 cups
2 > 13 > 7 > 130 mg/l 2’000 cups
3 > 25 > 14 > 250 mg/l 1’500 cups
4 > 38 > 21 > 380 mg/l 1’000 cups
Observe the safety
instructions on the
descaler package.
Duration of descaling
procedure: approxi-
mately 15 minutes
1) Empty the drip tray and the used
capsule container.
2) Fill the water tank with 1 unit of
Nespresso descaling liquid and add
0.5 l /17 oz of water.
0.5 l
Use a container with a
capacity of min. 0.6 l /
20 oz.
3) Re-insert water tank and place a container under the coffee outlet.
4) To enter the descaling mode, press
and hold the 3 coffee buttons for at
least 6 sec.
A short beep sounds for confirmation
and the coffee buttons start blinking.
Page 33

Version 1.0 en Prodigio service manual
33
MAINTENANCE
The brewing unit stays
closed until the end of
the descaling mode.
5) Close an open slider.
6) Press any coffee button to start descaling.
Machine stops when water tank is
empty.
7) Refill the water tank with the used descaling solution collected in the container.
8) When ready, press any coffee button
to repeat the procedure. Machine
stops when water tank is empty.
9) Empty and rinse water tank, capsule
container and drip tray thoroughly.
10) Fill water tank with potable water.
11) Re-insert water tank.
12) Press any coffee button to rinse the
machine. Machine stops when water
tank is empty.
13) To exit the descaling mode, press and
hold the 3 coffee buttons for at least
6sec.
A short beep sounds for confirmation.
Page 34

Prodigio service manual Version 1.0 en
34
MAINTENANCE
5.2 Cleaning procedure for coffee machine
Risk of fatal electrical shock and fire!
Never clean wet or immerse plug, cord or appliance in any fluid.
Unplug appliance and let it cool down to avoid burns.
Risk of damage!
The lenses of the light barrier and the water tank can be scratched.
The surfaces of coffee machine and accessories are not abrasion-proof.
Do not use any strong or abrasive cleaning agent or solvent cleaner.
Do not use a brush to clean the water tank.
Do not put any part in a dishwasher.
Only use a damp cloth or sponge and a mild cleaning agent if necessary.
1) Empty maintenance unit (capsule
container and drip tray) daily.
2) Rinse and clean parts thoroughly if
dirty and wipe them dry with a soft
cloth.
3) Clean both lenses of the light barrier
inside the capsule ejection chute with
a clean, soft, slightly damp cloth.
4) Then clean area of maintenance unit.
Page 35

Version 1.0 en Prodigio service manual
35
MAINTENANCE
5.3 Cleaning procedure for milk frother
5) Rinse water tank and wipe dry with a
soft cloth.
6) Clean the coffee outlet regularl y with a
damp cloth.
Risk of damage!
The inside of the jug is coated for easy cleaning.
Never use brushes and/or cleaning agents that contain abrasive or
aggressive, chemical components resp. solvents.
Do not put any part in a dishwasher.
Use only a damp cloth and a mild cleaning agent if necessary.
Keep Otter connec-
tors dry (on swivel
arm and at underside of
milk frother).
The milk frother is
water-proof.
1) Remove milk frother from swivel arm.
2) Remove lid and whisk.
3) Remove seal from lid.
4) Rinse and clean milk frother together
with whisk, lid and seal.
5) Clean outside of milk frother with a
damp cloth if necessary.
Page 36

Prodigio service manual Version 1.0 en
36
TROUBLESHOOTING
6 TROUBLESHOOTING
6.1 Check list for coffee machine
After an initial inspec -
tion in accordance
with this check list, errors
are quickly found and corrected with the appropriate
measure.
Therefore, adhere to the
sequence of the check list.
Repair every occurring error
and work the check list
through until it is completed.
Check Error symptoms
Measure /
repair work
Further measures /
repair work
1 Check the coffee
machine for visible damage
1.1 Housing parts broken or damaged
YES - replace housing parts if
necessary
NO - continue
1.2 Power cord damaged
YES - replace power cord
NO - connect power cord of
machine to the mains and continue
2 Check mechani-
cal components
2.1 Cup support with
capsule container
and drip tray does
not remain in fitting
position
YES - check if drip tray has its
metallic plate for magnetic
mounting
NO - continue
NO - replace drip tray
2.2 Slider malfunction
YES - slider does not close or
open properly
NO - continue
YES - empty the capsule container
YES - check that no capsule is
blocked inside the machine
NO - replace slider unit
2.3 Capsule is not
ejected correctly
YES - replace brewing unit
NO - continue
3 Fill water tank 3.1 Water tank leaks
YES - replace water tank
NO - continue
4 Plug in machine to
perform automatic self test
4.1 Coffee machine is
not working
(does not function)
a) YES - power cord is okay
(loose connection)
YES - continue
NO - replace power cord
b) YES - pump works (press a
coffee button)
YES - continue with point d)
NO - continue with point c)
c) YES - all three coffee buttons are working
YES - replace pump
NO - replace electronic device
(main PCB) and/or touch pad
PCB (MMI PCB).
d) YES - fine wire fuses or triac
on thermoblock defective
YES - replace thermoblock
NO - continue
e) YES - wiring is okay
NO - continue with point 4.2
YES - replace main PCB (see
page 59)
NO - replace defective cables
4.2 Maintenance light
(orange) is blinking
with 2 Hz
YES - thermoblock is hot
NO - self test ok - continue with
point 4.3
YES - check / replace MMI
PCB (see page 49) and main
PCB (see page 59)
NO - replace thermoblock,
check / replace MMI PCB and
main PCB
4.3 Maintenance light
(orange) permanently lit
YES - capsule container full or
capsule ejection chute blocked
NO - continue
YES - empty capsule container
or remove obstacle
NO - clean lenses of light barrier (see page 34)
Page 37

Version 1.0 en Prodigio service manual
37
TROUBLESHOOTING
5 Test Bluetooth®
function
5.1 Pairing the
machine with a
compatible device
and Nespresso
App. does not work
a) YES - compatible device
with Nespresso App. has Bluetooth
®
mode activated and is
placed within a distance of
10 cm / 4 inch to the coffee
machine.
YES - continue
NO - try again and place compatible device with Nespresso
App. next to coffee machine
b) YES - Bluetooth
®
mode of
coffee machine switched off
YES - Reset coffee machine
(see page 21)
NO - Replace MMI board (see
page 49)
c) YES - pairing not possible
after replacement of MMI PCB
and main PCB
YES - retrieve machine serial
number from an original PCB of
the coffee machine.
5.2 Retrieve error code
with Nespresso
App
YES - check error code table
and begin with repair
NO - continue
(see page 39)
6 Rinse coffee
machine
6.1 No water at coffee
outlet
YES - a) water system is empty
YES - fill the water system
NO - continue
YES - b) coffee machine is calcified
NO - continue
YES - descale coffee machine
(see page 32)
YES - c) pyramide plate
blocked
YES - replace brewing unit
NO - continue
YES - d) flowmeter blocked YES - clean or replace flowme-
ter
NO - continue
YES - e) pump cannot produce
sufficient water pressure
YES - replace pump
NO - continue
7 Measure coffee
temperature during coffee preparation (see page
82)
7.1 Temperature is too
low (below 83°C)
YES - descale coffee machine
(see page 32)
NO - continue
7.2 Temperature too
high (over 89 °C)
YES - replace thermoblock
NO - continue with point 8
8 Check for leakage
and sufficient flow
rate
8.1 Hose connections
leak
YES - replace high pressure
connector
NO - continue
8.2 Brewing unit leaks
YES - replace brewing unit
NO - continue
8.3 Rate of flow not
within standard
range (60-120ml in
30 sec)
YES - coffee machine is calcified
NO - continue with point 9
YES - descale coffee machine
(see page 32)
NO - replace pump
9
Descale coffee
machine
(if necessary)
9.1 Coffee machine is
calcified
YES - descale coffee machine
(see page 32)
NO - continue with point 10
10 Check water tank
contents after descaling and rinsing
10.1 Particles of calcium and rust visible in water
YES - descale and rinse coffee
machine again to clean water
circuit
(see page 32)
NO - continue
YES - inform customer to descale coffee machine periodically and to use the specified
descaling product only.
10 Final cleaning
(see page 34)
No errors found according to
check list?
YES - for more information
please contact Nespresso
Service Division
End of check list
Check Error symptoms
Measure /
repair work
Further measures /
repair work
Page 38

Prodigio service manual Version 1.0 en
38
TROUBLESHOOTING
6.2 Check list for milk frother
The milk frother is part
of the Prodigio&milk
coffee machine.
Check Error symptoms
Measure /
repair work
Further measures /
repair work
1 Check milk frother
and accessory for
visible damage
1.1 Lid/seal broken or
damaged
YES - replace lid/seal
NO - continue
1.3 Whisk broken or
damaged
YES - replace whisk or spring
NO - continue
4 Place milk frother
on swivel arm
connector.
Attach whisk.
Plug in coffee
machine.
Press start button
briefly (hot milk
preparation).
4.1 Milk frother is not
working (does not
function)
YES - a) coffee machine is
heating up
YES - continue
NO - continue with check list for
coffee machine
YES - b) connector on swivel
arm is ok (test it with another
milk frother)
YES - replace milk frother
NO - replace connector on
swivel arm (see page 54)
4.2 Abnormal noise
during preparation
YES - replace milk frother
NO - continue
4.3 Milk frother does
not switch off automatically
YES - replace milk frother
NO - continue
4.4 Inside of jug stays
cold
YES - replace milk frother
NO - continue
5 Press start button
for at least 2 sec
(cold milk preparation)
5.1 Start button is not
backlighted in blue
YES - replace milk frother
6 Final cleaning
(see page 35)
No errors found according to
check list?
YES - for more information
please contact Nespresso
Service Division
End of check list
Page 39

Version 1.0 en Prodigio service manual
39
TROUBLESHOOTING
6.3 Machine error code table
Use the Nespresso
App to get an error
code for troubleshooting
(see page 28).
This error code table
is for machine errors
only. See Nespresso technical website for a complete table.
Error code Machine error / error level Description
1001
Electronic malfunction / serious error
SPI communication error during firmware update or
serious electronic component failure
Upp voltage observation:
input short to ground or to V
DD
Upp voltage observation error
1002
General malfunction / serious error RESET state timeout
1003
Heating-up not complete / serious error Thermoblock timeout during heatup
1004
Heating-up not working / serious error No reaction from thermoblock
1005
Motor malfunction / serious error
Motor BU current input short to V
DD
Motor BU current input error
Motor moving BU timeout after direction has been
reversed
Motor moving BU timeout while moving to end posi-
tion the first time
Current measurement error
Voltage measurement error
1006
Pump overheat / safety timeout The pump may overheat when brewing too many
coffees in a row. This error is due to an overheat
prevention mechanism. Wait a few minutes before
brewing the next coffee.
1007
Inappropriate temperature detected /
serious error
The thermoblock temperature is too high. Wait a few
minutes before brewing the next coffee. Repair if
error continues.
1008
Temperature sensor malfunction / serious error
NTC1200 short to ground
NTC1200 short to V
DD
NTC measurement error
1009
Capsules container full or not present /
harmless error.
Brewing while capsules container is full or not
present. The machines’ capsule container is not well
placed in the machine or the capsules container
capacity is exceeded. The same detector is used to
handle both cases.
End of machine error code table
Page 40

Prodigio service manual Version 1.0 en
40
REPAIRS
7 REPAIRS
These repair instructions
- are based on exploded drawings with position numbers combined with repair and
mounting tips,
- presuppose basic knowledge in repairing Nespresso coffee machines.
7.1 Safety instructions
7.2 Repair and mounting tips
These general advices are completed with specific repair tips in this chapter.
Additional information
The Prodigio coffee machine is shown for general repair procedures while the
Prodigio&milk coffee machine is shown solely for the repair resp. replacement of the
swivel arm with the Otter connector.
For components not mentioned in this repair chapter, refer to the chapter "Explosion
drawings and parts lists" on page 93.
Snap connections
Parts of the case and component s of the cof f ee machine a re connected scre wless with
latches.
When loosening these latches, proceed with care and patience to avoid
causing any damage.
Designation of spare parts
The components in the following illustrations are indexed with position numbers.
See separate spare parts list for corresponding spare part numbers.
Electrostatic discharge (ESD) protection
The service technician must observe basic ESD protection measures when installing a
new MMI board or electronic module.
Risk of fatal electrical shock!
Mains voltage inside the coffee machine.
Disconnect the mains plug before disassembly - the coffee machine
must be free of voltage.
Danger of burns!
Hot parts and water under pressure inside the coffee machine
(thermoblock in particular).
Let coffee machine cool down before disassembly.
Only use original spare p arts from your official su pplier for maintenance
and repair work.
Position numbers are
subject to change
without notice.
Page 41

Version 1.0 en Prodigio service manual
41
REPAIRS
Wiring arrangement
Random changes in the wiring arrangement of the wired model version during a repair
can cause
- electromagnetic interferences,
- squeezed wires,
- insulation defects due to contact with hot parts,
- insulation problems if low and high voltage wires are not separated,
- interference with and damage to electronics.
Protective measures:
• Refer to wiring diagram when reconnecting cables and wires.
Residual water
• If it is necessary to pull off hoses, hold ready a small receptacle and a towel to collect
and wipe away leaking water.
• A special procedure is necessary to empty the fluid system of the coffee machine for
repair or shipment (refer to "Empty water system" on page 31).
7.3 Tools and accessories
With the following assortment of tools, all repairs described can be made:
A bit holder with
appropriate bits can
also be used.
1) Torx screwdriver TX10 with safety pin
2) Torx screwdriver TX20
3) Flat blade screwdriver e.g. no. 01
(3.5 mm blade width)
4) Pointed pliers
5) Side cutting pliers
6) Receptacle and towel to catch and
wipe away leaking water
1
TX 10
3.5 mm
4
5
3
TX 20
2
Page 42

Prodigio service manual Version 1.0 en
42
REPAIRS
7.4 General disassembly
This subchapter shows all necessary disassembly steps to gain access to the main
assembly (slider unit, brewing unit, thermoblock, pump and electronic device).
7.4.1 Prepare coffee machine for disassembly
1. Check and remove any capsule from the brewing unit. Close the slider.
2. Empty the water system if hoses have to be detached for repair (see “Empty water
system” on page 31).
3. Disconnect power plug and let coffee machine cool down.
4. Remove all detachable parts from coffee machine:
Drip tray with cup support and drip grid, used capsule cont ainer , water t ank with lid
and milk frother (Prodigio&milk only).
1
3
4
Close brewing unit if
drop stop (7) has to
be removed (see page 47).
Page 43

Version 1.0 en Prodigio service manual
43
REPAIRS
7.4.2 Remove outlet cover
• Press up outlet cover (8) and pull it out from front cover (64).
64
8
Page 44

Prodigio service manual Version 1.0 en
44
REPAIRS
7.4.3 Remove front cover
• Reach into circular opening and release 2 latches of front cover (encircled).
• Swing out front cover (64) at the bottom until it touches the drop stop (7).
• Press up drop stop and continue swivelling the front cover (6 4) until the 2 hinges on
its top are released.
Assembly hint
• Insert both hinges on top of front cover (64) into counterparts on blind (2) first.
• Then swivel front cover downwards over drop stop (7) and snap it into place.
2
64
7
Take care not to
scratch the surface
and keep the front cover at
a safe place.
Page 45

Version 1.0 en Prodigio service manual
45
REPAIRS
7.4.4 Remove cover
• Loosen 1 screw (40, Torx screw TX10 with safety pin) at the rear side of the cover
(1) - see detail.
• Loosen 2 screws (15, Torx screws TX10 with safety pin) on underside of chassis (6).
15
6
40
1
Page 46

Prodigio service manual Version 1.0 en
46
REPAIRS
• At the bottom of the cover (1): Push both sides away from chassis (6).
• Then push cover to the rear and upwards.
6
1
If the cover (1) is only
pushed backwards, 2
of its ribs (encircled) will
break.
Page 47

Version 1.0 en Prodigio service manual
47
REPAIRS
7.4.5 Remove blind
1. Release 4 latches (2 on each side) with screwdriver and remove blind (2) from print
cover (5).
Assembly checkpoint
• Check functionality of slider (73) if print cover (5) was removed subsequently.
5
2
73
57
Take care no to damage the light guide
(57).
Page 48

Prodigio service manual Version 1.0 en
48
REPAIRS
7.4.6 Remove drop stop
• Press drop stop (7) together by hand to release pivots.
• Push drop stop underneath steam cover (34).
T o dismantle the drop
stop, the brewing unit
must be closed.
Use a a cordless drill
driver connected to
the motor to close the unit
or, before dismantling the
machine, start a coffee
without a capsule and
remove the power plug during extraction.
7
34
Page 49

Version 1.0 en Prodigio service manual
49
REPAIRS
7.4.7 Remove MMI board and light guides
1. Remove light guide (60) from MMI board (3) and light guide rack (63).
2. Remove second light guide (60) on other side of machine (not shown).
3. Unplug flat cable from electronic module (81).
4. Remove MMI board (3) together with silicon keypad (54).
.A replacement PCB (MMI PCB or main PCB) has no stored machine serial number
but will retrieve it from the other original PCB after switching on the coffee machine.
Assembly checkpoints
• Use ESD protection measures when installing a new MMI board (3).
• Check that flat cable is inserted in slot on print cover (5) - see red circle.
• In case MMI PCB and main PCB have to be replaced together:
• Replace first PCB only.
• Plug in and switch on coffee machine. Wait for a sho rt time.
• Then switch off and unplug coffee machine.
• Continue with repair and replace second PCB.
• Check if pairing is still possible after repair.
81
54 + 3
60
60
60
5
63
Handle with care!
Light guide connectors on MMI board and
chassis are fragile.
Caution - Nespresso App can be locked!
Do not replace MMI PCB together with main PCB at once. Otherwise the
machine serial number, stored on the original PCBs, will be lost and
pairing resp. using the Nespresso App is not possible anymore.
Page 50

Prodigio service manual Version 1.0 en
50
REPAIRS
7.4.8 Remove lever and light barrier
• Remove spring (68).
• Remove lever (67) - see upper detail:
• Press latch (circled in red) against lever and turn lever clockwise.
• Pull out lever.
• Remove light guide rack (63) together with lens (62) - see lower detail:
• Release 2 latches of light guide rack.
• Insert a finger in capsule ejection chute and press it against the lens to push out
the light guide rack.
• Lever lens (62) out of light guide rack (63) with a small screwdr iver.
• Remove second light guide rack (63) and lens (62) on opposite side of coffee
machine the same way.
68
63
62
67
63
62
Handle with care!
Do not scratch new
lenses.
Page 51

Version 1.0 en Prodigio service manual
51
REPAIRS
7.4.9 Remove print cover
1. Check position of ratchets (4) for reassembly.
2. Release 4 latches (2 on each side) with screwdrive r an d re m ov e pr int cove r (5)
from chassis (6).
3. Remove light guides (56, 57, 58) from print cover if necessary.
Assembly checkpoint
• Align ratchets (4) on print cover (5) before assembly.
4
5
6
57
56 58
Handle with care!
Ratchets (4) can drop
from the print cover and get
lost.
Incorrect positioned
ratchets (4) will block
the slider in the blind (2).
Page 52

Prodigio service manual Version 1.0 en
52
REPAIRS
7.4.10 Remove pivot bottom, water tank connector and
power cable
• Release 5 clips on pivot bottom (19) with a screwdriver.
• Remove pivot bottom from pivot top (17).
• Remove water tank connector (20) from pivot bottom and pull off it s hose from flow-
meter (22) in electronic module.
20
19
17
22
Page 53

Version 1.0 en Prodigio service manual
53
REPAIRS
• If necessary turn pivot top (17) to gain access to the cable bracket (18).
• Remove the cable bracket (18) with a screwdriver.
• To remove the connection cable (48):
• Unplug both insulated angled Faston receptacles with the help of a screwdriver
or pointed pliers from electronic module (see lower detail).
• Unplug Faston receptacle of protective earth cable from thermoblock (35) - see
upper detail.
Assembly checkpoint
• Never re-use a damaged connection cable (48).
Do not try to remove
the cable bracket (18)
from the underside of the
coffee machine. The cable
bracket will then probably
be destroyed.
The cable bracket is
hooked at one side.
Place screwdriver like
shown in detail.
18
17
The cable bracket
(18) is under tension.
Therefore, fix the cable
bracket with your finger
when unlatching it.
48
35
Caution - fragile
insulation on Faston receptacles.
Handle with care if connection cable (48) is to be
re-used.
Page 54

Prodigio service manual Version 1.0 en
54
REPAIRS
7.4.1 1 Remove pivot bottom, water tank connector , power
cable and Otter connector (Prodigio&milk)
• Loosen 3 screws (TX10 torx screws) from pivot bottom milk (19).
• Release 5 clips on pivot bottom milk (19) with a screwdriver.
19
19
Page 55

Version 1.0 en Prodigio service manual
55
REPAIRS
• Remove pivot bottom milk (19) from pivot top milk (17).
• Remove water tank connector (20) from pivot bottom milk and pull off its hose from
flowmeter (22) in electronic module.
• Remove cable bracket (18) - see procedure on page 53.
20
19
17
22
18
Page 56

Prodigio service manual Version 1.0 en
56
REPAIRS
• Remove connection cable (48):
• Unplug both insulated angled Faston receptacles with the help of a screwdriver
or pointed pliers from electronic module (82).
• Unplug Faston receptacle of protective earth cable from thermoblock (35).
82
48
Caution - fragile
insulation on Faston receptacles.
Handle with care if connection cable (48) is to be
re-used.
35
Page 57

Version 1.0 en Prodigio service manual
57
REPAIRS
• Remove 3 small Faston receptacles from Otter connector on pivot top milk (17).
• Remove Otter connector by releasing 3 latches.
17
Latches will break if
not unlocked very
carefully!
Page 58

Prodigio service manual Version 1.0 en
58
REPAIRS
Assembly checkpoints
• Use marked cable guide to lay wires to Otter connector.
• Check wiring of Otter connector.
L
N
PE
Page 59

Version 1.0 en Prodigio service manual
59
REPAIRS
7.4.12 Remove electronic module (main PCB)
• Remove isolation cover (29) from pump (30).
• Unplug both Faston receptacles from pump terminal (see below).
• Pull off low pressure tube (32) from flowmeter (22) - see below.
• See detail: Press in locking wedge on electronic front cover ( 81) with a screwdriver
and pull out electronic module.
• Unplug cable connectors from electronic module (if not already done):
- DC motor connector (38),
- thermoblock (35): NTC / Triac signal connector, 2 Faston receptacles
- flat cable (50) to MMI board (3).
29
81
30
For pump removal,
refer to page 63.
81
50
22
38
35
32
30
48
Page 60

Prodigio service manual Version 1.0 en
60
REPAIRS
Assembly checkpoints
• Never re-use damaged cables.
• The flat cable connector (50) is fragile. Check orientation of connector before inse rting.
7.4.13 Remove main board and flowmeter
• Open 4 clips with a screwdriver and dismantle front cover (81) and back cover (82)
of electronic module.
.A replacement PCB (MMI PCB or main PCB) has no stored machine serial number
but will retrieve it from the other original PCB after switching on the coffee machine.
Use ESD protection
measures when handling main board (23).
Caution - Nespresso App. can be locked!
Do not replace main PCB together with MMI PCB at once. Otherwise the
machine serial number, stored on the original PCBs, will be lost and
pairing resp. using the Nespresso App. is not possible anymore.
82
23
81
Page 61

Version 1.0 en Prodigio service manual
61
REPAIRS
• Press together flowmeter clips (see detail) and remove flowmeter (22) from main
board (23).
Assembly checkpoints
• Never re-use a flowmeter (22). Always assemble a new flowmeter.
• In case main PCB and MMI PCB have to be replaced together:
• Replace first PCB only.
• Plug in and switch on coffee machine. Wait for a sho rt time.
• Then switch off and unplug coffee machine.
• Continue with repair and replace second PCB.
• Check if pairing is still possible after repair.
• When assembling electronic module, check orientation of back cover (82) to main
PCB (23) and front cover (81).
22
23
The flowmeter clips
get damaged during
disassembly.
81
82
23
If back cover (82) is
mounted upside
down it will block the swivel
arm.
Page 62

Prodigio service manual Version 1.0 en
62
REPAIRS
7.4.14 Remove high pressure tube
• Remove the high pressure tube (27) by cutting through both connector clips (26).
Assembly checkpoint
• Make sure that both connector clips (26) are mounted correctly.
26
27
26
Page 63

Version 1.0 en Prodigio service manual
63
REPAIRS
7.4.15 Remove pump
• Remove isolation cover (29) from pump (30).
• Unplug both Faston receptacles from pump terminal.
• Remove high pressure tube (see page 62).
• Pull pump support (49) out of guides in chassis (6).
• Lift pump (30) and pull of f low pressure hose (32) together with pump su pport spring
(31).
49
30
29
32
31
6
The first 2 disassem-
bly steps are already
done if the electronic module has been removed.
Page 64

Prodigio service manual Version 1.0 en
64
REPAIRS
7.4.16 Remove brewing unit
Prerequisites:
• Drop stop (7) is removed (see page 47).
• The brewing unit is open.
The brewing unit housing (33) is fixed with 4 latches in the chassis (6).
Front view of chassis
(6).
6
Use the illustration as
reference to locate
the 4 latches in the coffee
machine.
Page 65

Version 1.0 en Prodigio service manual
65
REPAIRS
• Press thermoblock (35) upwards with one hand.
• Insert screw driver in gap beside motor.
• Swivel screwdriver to release latch with a clicking sound.
• Release marked latch with screwdriver carefully.
• Swivel thermoblock upwards as far as possible.
Rear view.
35
Push thermoblock
upwards until both
latches at the motor are
released.
Page 66

Prodigio service manual Version 1.0 en
66
REPAIRS
• Move thermoblock (35) gently back and forth to release the upper 2 latches. If
necessary use a screwdriver to release the latches.
• Remove brewing unit housing (33) with thermoblock (35) from chassis (6).
35
33
35
Push brewing unit to
the backside and
upwards at the same time.
Page 67

Version 1.0 en Prodigio service manual
67
REPAIRS
7.4.17 Disassemble brewing unit drive
• Release marked clip with a screwdriver and remove steam cover (3 4) from brewing
unit housing (33).
• Lift up brewing unit housing (33) from thermoblock (35) and capsule cage (38).
34
33
The brewing unit
must be open completely i.e. the guides are at
the rear and vertically positioned.
33
35
In case of problems
turn worm gear till
end stop.
Page 68

Prodigio service manual Version 1.0 en
68
REPAIRS
• Remove bush bearings (X), gear lever left (41) and gear lever right (47) from capsule
cage (38).
Assembly checkpoints
• Note the correct mounting position for gear lever right (47) and gear lever left (41).
X
47
X
41
38
right side
left side okleft side not ok
left side not ok
41
47
Page 69

Version 1.0 en Prodigio service manual
69
REPAIRS
7.4.18 Remove thermoblock from capsule cage
• Loosen 2 screws (39, M3 socket screw) to remove thermoblock (35) from capsule
cage (38).
• Remove thermoblock sleeve (36) and O-ring (3 7).
37
38
35
36
39
Page 70

Version 1.0 en Prodigio service manual
81
FUNCTION TESTS
8 FUNCTION TESTS
8.1 Safety instructions
Some function tests are performed with an energized, partly opened coffee machine.
8.2 Required equipment
8.2.1 Overview
Danger of electrocution!
Mains voltage inside the coffee machine.
Do not touch any live part while performing tests.
Danger of burns!
Hot parts and water under pressure inside the coffee machine.
Do not touch any hot parts while checking for leakages!
Always wear protective goggles.
Symbolic illustration
of function test equipment.
1) Electronic thermometer
2) Timer
3) Measuring cup
4) T est e quipment for protective earth continuity test and protective insulation test
5) Flashlight
2
1
3
5
4
MEASURE
LOCK/STOP
COMP
L
IGHT
0
Ω
ADJ
REL
H
O
LD
T
1
T
2
T
1
←
T
2
°
C
/
°
F
MAX
MIN
1
T2 T1
Page 71

Prodigio service manual Version 1.0 en
82
FUNCTION TESTS
8.3 Measure coffee temperature
1) Start coffee machine.
2) Place a measuring cup on cup support.
3) Preheat coffee outlet with hot water:
•
P
ress Lungo button or close slide
r.
• Wait 10 sec.
• Press button again to stop or open
slider.
4) Empty measuring cup and place it
back on cup support.
5) Insert capsule (Cosi is best suited).
6) Press Lungo button again.
7) Wait until measuring cup contains
20 ml of coffee.
8) Then measure the coffee temperature
approx. 5-10 mm under the coffee outlet.
The coffee temperature should be
86 °C ± 3 °C (187 °F ± 5.4 °F).
1
2
10 sec
3
4
6
5
7
8
5 - 10 mm
R
E
L
H
O
LD
T1
T
2
T1
←
T2
°
C
/
°
F
MA
X
MI
N
1
T2 T1
Page 72

Version 1.0 en Prodigio service manual
83
FUNCTION TESTS
8.4 Tightness and leakage checks
This test must be performed:
- each time a part of the water circuit has been removed or replaced
- to confirm the tightness of the water circuit under pressure.
8.4.1 Preparations
Dangerous mains voltage inside the coffee machine!
Do not touch any parts under voltage while checking for leakages!
Dangerous hot parts under pressure inside the coffee machine!
Do not touch any hot/pressurized parts while checking for leakages!
Always wear protective goggles.
The prepared capsule
will not be perforated
by the blades and blocks the
water flow through the capsule cage.
1) Prepare a capsule for the tightness
and leakage checks: squash capsule
by pressing the top with the thumb.
2) Remove cover according to
"General disassembly" on page 42.
3) Fill water tank and place it on its arm.
4) Connect machine to mains.
5) Turn machine ON by either pushing
the slider or pressing any coffee button. The machine heats up.
1
4
3
5
Page 73

Prodigio service manual Version 1.0 en
84
FUNCTION TESTS
8.4.2 Test run
Do not run the
pump for more
than 30 sec.
If machine stops dur-
ing test, simply press
the Lungo coffee button
again.
6) Press the Lungo coffee button.
7) Completely open the slider and insert
the prepared capsule.
8) Close the slider.
The pump starts to build up a pressure
of approx. 20 bar.
7
6
8
30 sec. max
Always wear protective goggles
during the test.
Note on point 9: A few
drops of leakage can
also appear if the capsule is
not tight
. In this case redo
test with another capsule.
9) Check tightness of extraction chamber
(drops or leakage).
10) Check connections under pressure for
audible and visible leaks.
Pay special attention to the high pressure connector.
9
10
Let machine cool
down, i
f capsule is
blocked in the
capsule compartment. Wait 10 to 15 min
until the pressure in the
brewing unit has dropped.
Then open slider and
remove blocked capsule.
1 1) Insert capsule container with drip tray
and attach cup support.
12) Press Lungo coffee button to stop
pump and eject capsule.
13) Proceed with repair if needed or reassemble top cover.
12
11
Page 74

Version 1.0 en Prodigio service manual
85
FUNCTION TESTS
8.5 Milk frother tests (Prodigio&milk)
Prerequisite
Use newly opened UHT, full fat or semi-skimmed milk at fridge temperature (+ 8 °C till
+ 10 °C) for the following tests only.
8.5.1 Measure hot milk temperature
• Prepare 240 ml hot milk in milk frother (use mixer without spring).
• Measure temperature immediately after preparation in jug.
The milk temperature should be between + 60 °C and + 70 °C (140 °F till 158 °F).
8.5.2 Measure milk froth ratio
• Prepare cold milk froth out of 120 ml milk in milk frother (use whisk with spring).
• Empty content of milk frother into measuring beaker.
• Determine the ratio x [%] of milk froth to liquid milk with following formula:
Approximate values:
direct after preparation..................................................................................x = 250%
60 sec after preparation.................................................................................x = 190%
T
he disregard of this
specification can
affect the measuring results
.
Spattered milk
may cause burns.
Only use milk
frother with lid.
RE
L
HO
LD
T
1
T
2
T
1
←
T2
°C
/
°F
M
A
X
M
I
N
1
T2 T1
H2
H1
x
H2 H1–
H1
---------------------
100×=
Page 75

Prodigio service manual Version 1.0 en
86
FUNCTION TESTS
8.6 Protective earth (PE) continuity test
8.6.1 What is the protective earth continuity test about?
This test is only necessary
- for class 1 equipment (three-wire power cord with protective earth)
- after a repair whenever a general disassembly was performed.
Therefore all Prodigio models have to be tested after general disassembly, except
country-specific models (USA, Canada, Mexico and Japan) without a protective earth
connection (refer to "Wiring diagrams - Prodigio coffee machine" on page 70 and
following).
8.6.2 General
Legal regulation
In case of a repair/modification of the coffe e machine, the rep air centre is bound by law
to protect the user/consumer by
- restoring the regular condition of the appliance and
- performing the mandatory tests according to applicable national regulations (e.g.
DIN VDE 0701) or international regulations (e.g. EN/IEC 60335-1 “Safety of household and similar electrical appliances”)
Description
Protective earth continuity measurements are made between t he protective earth terminal
of the power plug and the casing of the thermoblock and milk frot her (P rodigio&milk only).
This test assures that
- the ground (earth) connection does not have an interruption between the power plug
and the thermoblock
- the permissible ground resistance is less than 0.3 Ohms (with a test current of
200 mA DC).
Test equipment
Special test equipment is needed that complies with the regulations to perform protective earth continuity measurements. Detailed requirements and tolerances must be verified by your local authorities or measurement supplier in any case.
Test report
For legal reasons a repair or test report should be prepared and filed with following information
- customer (name, address)
- type and serial number of coffee machine
- date of repair/test(s)
- performed test(s)/measuring value(s)
- used test equipment
-signature
Ask Nespresso for
recommendations
about test equipment.
Page 76

Version 1.0 en Prodigio service manual
87
FUNCTION TESTS
8.6.3 Test sequence
This test sequence is
only an example and
has to be adapted to applicable national standards
and regulations.
Danger of electrocution!
Do not plug in the coffee machine during the protective earth continuity
test.
Read and observe safety instructions in user ma nual of test equipment .
Symbolic illustration
of test equipment.
1) Connect black measuring cable to
ground pin of power plug with an alligator clip (example shown: Swiss
power plug).
2) Switch on test equipment and select
protective earth continuity test.
MEASUR
E
L
O
CK/
STOP
CO
M
P
LI
G
HT
0Ω ADJ
By looking into the
capsule ejection slot
form below, the screw head
is visible on the right-hand
side. There is a conductive
connection between screw
head and thermoblock.
3) Remove water tank.
4) Remove maintenance unit.
5) Open slider.
6) Insert tip of red test probe up into capsule ejection chute and touch screw
head on the right-hand side.
7) Press "measure" button and read off
displayed resistance.
The resistance must be lower than
0.3 Ohm.
8) Fill in measured value in a test report.
4
5
3
7
MEASUR
E
L
O
CK/
STOP
CO
M
P
LI
G
HT
0Ω ADJ
0
.
2
15 Ohm
T
est passed
6
Page 77

Prodigio service manual Version 1.0 en
88
FUNCTION TESTS
8.6.4 What to do if the protective earth continuity test fails
• Check/measure ground wire connection of power cord; replace if necessary.
• Check/measure ground connection terminal on thermoblock. Retighten terminal
screw if necessary.
• Milk frother (Prodigio&milk): Clean ground contact on milk frother. Measure resistance between ground contact and jug of milk frother. Replace milk frother if necessary.
Do not damage
inside coating of
milk frother jug
with the probe tip.
Milk frother test (Prodigio&milk):
1) Touc h upper metallic part of milk
frother with red test probe.
2) Press "measure" button and read off
displayed resistance.
3) Repeat measurement on another
metallic spot of milk frother for verification.
The resistance must be lower than
0.3 Ohm.
4) Fill in measured value in a test report.
1.
2.
MEASUR
E
L
OCK/
STOP
CO
M
P
LI
G
HT
0Ω ADJ
0
.
2
15 Ohm
T
est passed
Page 78

Version 1.0 en Prodigio service manual
89
FUNCTION TESTS
8.7 Protective insulation test
8.7.1 What is the protective insulation test about?
This test is necessary
- for class 1 and 2 equipment (with/without protective earth)
- after a repair whenever a general disassembly was performed.
8.7.2 General
Legal regulation
In case of a repair/modification of the coffee machine, the repair centre is bound by law
to protect the user/consumer by
- restoring the regular condition of the appliance and
- performing the mandatory tests according to applicable national regulations (e.g.
DIN VDE 0701) or international regulations (e.g. EN/IEC 60335-1 “ Safet y of hou sehold and similar electrical appliances”).
Description
The insulation test
- assures that wiring and insulation of the coffee machine fulfil the normative requirements after a repair,
- rates the insulation capability of the coffee machine,
- is a very dangerous test because of a high test voltage (500 V DC).
For the insulation test, phase and neutral wire are shunted at the power plug. Then a
test voltage is applied between phase/neutral a nd selected p art s of the cof fee machine .
Test equipment
Special test equipment is needed that complies with the r egulations to perform insulation
and withstanding voltage tests. Detailed requirements and tolerances must be verified
with your local authorities or measurement supplier in any case.
Ideally the test equipment has a national power socket for testing, so that the coffee
machine can plugged in directly. Otherwise a special shunt is necessary to connect the
phase and neutral pin of the coffee machine’s power plug.
Test report
For legal reasons a repair or test report should be prepared and filed with following information
- customer (name, address)
- type and serial number of coffee machine
- date of repair/test(s)
- performed test(s)/measuring value(s), test points
- used test equipment
-signature
Perform the protec-
tive earth (PE) continuity test at first, if it is mandatory.
Ask Nespresso for
recommendations
about test equipment.
Page 79

Prodigio service manual Version 1.0 en
90
FUNCTION TESTS
8.7.3 Test sequence
Danger of electrical shock/short circuit!
Do not plug in the coffee machine during insulation test.
Danger of electrical shock!
Do not touch tip of test probes.
Do not touch metallic parts of coffee machine during test.
Read and observe safety instructions in user manual of test equipmen t.
This test sequence is
only an example and
has to be adapted to applicable national standards
and regulations.
Use a short circuit
plug or special alligator clips etc. as substitute
for this test adapter.
1) Connect the phase and neutral pin of
the power plug together with a test
adapter (procured by the repair
centre).
2) Connect the black measuring cable to
the test adapter (see image).
Symbolic illustration
of test equipment.
3) Switch on test equipment and select
an insulation test voltage of 500 V DC.
MEASUR
E
L
OCK/
STOP
CO
M
P
LI
G
HT
0Ω ADJ
Some test equipment
displays test passed
or failed instead of the insulation resistance.
4) Touch magnet at rear panel inside of
coffee machine with red test probe.
5) Press "measure" button.
6) Read off displayed insulation resistance or test result.
The insulation resistance must
always be higher than 300 kOhm
(300,000 Ohm).
4
5
Test passed
Page 80

Version 1.0 en Prodigio service manual
91
FUNCTION TESTS
By looking into the
capsule ejection slot
form below, the screw head
is visible on the right-hand
side. There is a conductive
connection between this
screw head and the thermoblock.
7) Touch slider with red test probe.
8) Press "measure" button.
9) Read off displayed insulation resistance or test result.
10) Insert tip of red test probe up into capsule ejection chute and touch screw
head on the right-hand side.
11) Press "measure" button.
12) Read off displayed insulation resistance or test result.
13) Touch ground pin of power plug with
red test probe.
14) Press "measure" button.
15) Read off displayed insulation resistance or test result.
The insulation resistance must be
always higher than 300 kOhm
(300’000 Ohm).
16) Switch off test equipment or continue
with special tests for Prodigio&milk
coffee machine.
17) Short red with black test probe to
make sure that test voltage is discharged.
18) Fill in results in a test report.
Special tests for Prodigio&milk coffee
machine:
1) Remove milk frother from swivel arm.
2) Insert red test probe in central opening
of Otter connector (ground connection).
3) Press "measure" button.
4) Read off displayed insulation resistance or test result.
The insulation resistance must
always be higher than 300 kOhm
(300,000 Ohm).
Test passed
10
7
13
8,11,14
2.
4.
3.
Test passed
Page 81

Prodigio service manual Version 1.0 en
92
FUNCTION TESTS
8.7.4 What to do if the insulation test fails
• Assume that the coffee machine is defect after a failed insulation test.
• Check thermoblock, especially connections.
• Check temperature sensor (NTC).
• Check wiring and locate fault. After fault clearance proceed with troubleshooting
check list (see page 36).
• In case of doubt an insulation test on the milk frother alone can be carried out:
• Remove milk frother from swivel arm.
• T ouch phase and neutral cont act spring at its bottom with one test probe succes-
sively and the metallic upper part of the jug with the other test probe.
• If insulation test fails, replace milk frother.
Do not damage
inside coating of
milk frother jug
with the probe tip.
5) Place milk frother back on Otter connector.
6) Touc h upper metallic part of milk
frother with red test probe.
7) Press "measure" button.
8) Read off displayed insulation resistance or test result.
The insulation resistance must be
always higher than 300 kOhm
(300’000 Ohm).
9) Switch off test equipment.
10) Short red with black test probe to
make sure that test voltage is discharged.
11) Fill in results in a test report.
Risk of damage!
A sparkover can damage the electronic device etc.
7.
MEASUR
E
L
O
CK/
STOP
CO
M
P
LI
G
HT
0Ω ADJ
0
.
2
15 Ohm
T
est passed
6.
5.
8.
Page 82

Version 1.0 en Prodigio service manual
105
EXPLOSION DRAWINGS AND PARTS LISTS
9.5 Spare parts list
Pos. No. Part No. Component Remark
1 NES-46210-SP Cover
4 NES-46223-SP Ratchet
5 NES-46200-SP Print Cover
6 NES-46111-SP Chassis w Magnet Chassis with Magnet
7 NES-46230-SP Drop Stop
8 NES-46213-4-SP Outlet Cover C Painted Titanium and Laser
Engraved
8 NES-46243-4-SP Outlet Cover D Painted Silver and Laser
Engraved
9 NES-95313 Capsule Container C IXEF
9 NES-95314 Capsule Container D IXEF
10 NES-95324 Drip Tray with Pin and Cup Support
Stop
11 NES-95322 Drip Grid C
11 NES-95323 Drip Grid D
12 NES-95321 Cup Support
12 NES-95316 Prodigio Cup Support Delonghi
12 NES-95318 Prodigio Cup Support Krups
12 NES-95315 Prodigio Cup Support Breville
12 NES-95320 Prodigio Cup Support Turmix
12 NES-95317 Prodigio Cup Support Koenig
12 NES-95319 Prodigio Cup Support Magimix
13 NES-29247-SP Water Guiding
14 NES-29905-SP Elastic Stop
15 NES-29903-SP PT Li Screw In6rd 30x12
16 NES-29246-SP Rubber Foot
17 NES-46120-1-SP Pivot Top 65 with Magnets
17 NES-46120-2-SP Pivot Top 75 with Magnets
17 NES-46120-3-SP Pivot Top UL with Magnets
17 NES-46125-1-SP Pivot Top Milk 65 with Magnets
17 NES-46125-2-SP Pivot Top Milk 85 with Magnets
17 NES-46125-3-SP Pivot Top Milk UL with Magnets
18 NES-29504-SP Cable Bracket
19 NES-46204-SP Pivot Bottom 65
19 NES-46217-SP Pivot Bottom 75
19 NES-46218-SP Pivot Bottom UL
19 NES-46255-SP Pivot Bottom Milk
19 NES-46256-SP Pivot Bottom Milk UL
20 NES-29400-SP Low Pressure Connector WT
21 NES-18280-SP Filter
22 NES-17002-SP Flowmeter FM PCB
24 NES-93939 Water Tank (without Lid) with new Plastic Ferrite Disc
25 NES-95325 Water Tank Lid
Page 83

Prodigio service manual Version 1.0 en
106
EXPLOSION DRAWINGS AND PARTS LISTS
26 NES-29924-SP Connector Clip
27 NES-29145-SP High Pressure Connector Assem-
bly
28 NES-29907-SP O-Ring 3.4 x 1.9 mm
29 NES-29241-SP Pump Isolation
30 NES-300330-1-SP Pump EN4FM 220-240V
30 NES-300330-2-SP Pump EN4FM 120V UL
30 NES-300330-3-SP Pump EN4FM 100-110V
30 NES-300330-4-SP Pump EN4FM 120-127V IEC
31 NES-29238-SP Pump Support Spring
32 NES-29401-SP Low Pressure Connector Pump
33 NES-29123-SP BU Housing with Pyramide Plate
34 NES-29301-SP Steam Cover
35 NES-29143-1-SP TB Assembled 220-240V TB+Triac assembled
35 NES-29143-2-SP TB Assembled 120V UL TB+Triac assembled
35 NES-29143-3-SP TB Assembled 100V TB+Triac assembled
35 NES-29143-4-SP TB Assembled 120V IEC TB+Triac assembled
36 NES-29242-SP TB Sleeve
37 NES-29908-SP O-Ring Seal TB Tube
38 NES-34120-02-SP Capsule Cage with Motor UMILK Assembled with Blade +
Capsule Cage Assy . + Motor
+ Worm Gear
39 NES-29902-SP Li Screw In6rd M3x20
40 NES-46222-SP Cover Screw
41 NES-29124-52-SP Gear Lever Left Assembly with Slide Bearing
42 NES-29915-SP OTTER Connector
43 NES-93272 Aeroccino 3-Milkfrother (SP 240)
43 NES-93269 Aeroccino 3-Milkfrother (SP 220)
43 NES-93268 Aeroccino 3-Milkfrother (SP 120)
44 NES-29307-SP Gear Wheel
45 NES-29910-SP Circlip D = 7 mm
47 NES-29125-52-SP Gear Lever Right Assembly with Slide Bearing
48 NES-29509-1-SP Connection Cable EU compl.
assembled
48 NES-29509-2-SP Connection Cable CH compl.
assembled
48 NES-29509-3-SP Connection Cable UK compl.
assembled
48 NES-29509-4-SP Connection Cable AU compl.
assembled
48 NES-29509-5-SP Connection Cable IL compl.
assembled
48 NES-29509-6-SP Connection Cable AR compl.
assembled
48 NES-29509-7-SP Connection Cable ZA compl.
assembled
Pos. No. Part No. Component Remark
Page 84

Version 1.0 en Prodigio service manual
107
EXPLOSION DRAWINGS AND PARTS LISTS
48 NES-29509-8-SP Connection Cable KR compl.
assembled
48 NES-29509-9-SP Connection Cable CL compl.
assembled
48 NES-29509-10-SP Connection Cable CN compl.
assembled
48 NES-29510-SP Connection Cable UL compl.
assembled
48 NES-29513-SP Connection Cable JP compl.
assembled
48 NES-29512-SP Connection Cable BR compl.
assembled
48 NES-29511-SP Connection Cable TW compl.
assembled
48 NES-34530-1-SP Connection Cable EU compl.
assembled
48 NES-34530-2-SP Connection Cable CH compl.
assembled
48 NES-34530-3-SP Connection Cable UK compl.
assembled
48 NES-34530-4-SP Connection Cable AU compl.
assembled
48 NES-34530-5-SP Connection Cable IL compl.
assembled
48 NES-34530-6-SP Connection Cable AR compl.
assembled
48 NES-34530-7-SP Connection Cable ZA compl.
assembled
48 NES-34530-8-SP Connection Cable KR compl.
assembled
48 NES-34530-9-SP Connection Cable CL compl.
assembled
48 NES-34530-11-SP Connection Cabl e SG compl.
assembled
48 NES-34531-1-SP Connection Cable BR compl.
127V W label
48 NES-34531-2-SP Connection Cable BR compl.
220V W label
48 NES-34534-SP Connection Cable UL compl.
assembled
49 NES-29402-SP Pump Support
51 NES-29147-SP Spring Packet
53 NES-46132-SP Light Guides (LG) Including LG Front Light / 2 x
LG Capsule Container / LG
Slider Close / Maintenance
LG
54 NES-46561-SP Keymat MMI
61 NES-46558-SP Cover Front Light
Laser Engraved
62 NES-46559-SP Lens
63 NES-46227-SP Light Guide Rack
Pos. No. Part No. Component Remark
Page 85

Prodigio service manual Version 1.0 en
108
EXPLOSION DRAWINGS AND PARTS LISTS
64 NES-46212-4-SP Front Cover Painted Titanium
64 NES-46212-3-SP Front Cover Painted Aluminium
67 NES-46226-SP Lever
68 NES-46228-SP Spring
70 NES-AZ140-00853-SPCup Support Stop
83 NES-46070-1-SP Electronic Device 220V-240V Including PCB / Electronic
Front /Electronic Back / FM
83 NES-46070-2-SP Electronic Device 100V-127V Including PCB / Electronic
Front /Electronic Back / FM
84 NES-93270 Aeroccino 3 - Whisk
86 NES-461 17-SP Blind Assembly Blind / Slider / Washer guide
/Washer / Screw / Spring
Packet
87 NES-46131-SP Touch Pad PCB with Cable MMI PCB + Touch Pad
Cable
88 NES-506142 Low Pressure Connector for
Water Tank with Filter
89 NES-93271 Aeroccino 3-Lid with seal
NES-432068-
2007E-1-SP
Box Handle
NES-46095-SP Water Hardness Sticker
NES-46093-SP Outer Box
NES-432068-
200D0-1-SP
Outer Box Connect Milk
Prodigio User Manual Nespresso Zone 1 / 2 / 3
Prodigio User Manual Delonghi
Prodigio Milk User Manual
Nespresso
Zone 1 / 2 / 3
Prodigio Milk User Manual
Breville
Prodigio Milk User Manual
Delonghi
Prodigio Quick Start Guide
Pos. No. Part No. Component Remark
Page 86

Version 1.0 en Prodigio service manual
109
GLOSSARY OF ABBREVIATIONS
1 0 GLOSSARY OF ABBREVIATIONS
Term Description
App A pplication software
BT Bluetooth
BU Brewing unit
CE "Conformité Européenne", meaning European Conformity
CMID Client machine identification
DC Direct current
EUP Energy using products
ESD Electrostatic discharge
FCC Federal Communications Commission
FM Flow meter
GFCI Ground fault circuit interrupter
LED Light emitting diode
LG Light guide
MMI Man machine interface
NTC
Negative Temperature Coefficient
A NTC sensor is used for temperature measurement on the thermoblock
OS Operating system
PCB Printed circuit board
RCD Residual current device
SPI Serial peripheral interface
TB Thermoblock
TX Torx
WT Water tank
Page 87

Prodigio service manual Version 1.0 en
110
NOTES
11 NOTES
Page 88

Version 1.0 en Prodigio service manual
111
NOTES
Page 89

112
NOTES
Prodigio service manual Version 1.0 en
 Loading...