

Nescafe C70, D70, PRODIGIO, PRODIGIO MILK, D75 Service Manual
...
SERVICE MANUAL
COFFEE MACHINES
PRODIGIO C70 / D70
PRODIGIO&MILK C75 / D75
Version 1.0 en, 12.02.2016

Prodigio service manual Version 1.0 en
2
CONTENTS
1 General safety notes .........................................................................................6
2 Main components...............................................................................................7
2.1 Overview - Prodigio&milk coffee machine.......................................................... 7
2.1.1 Overview - milk frother (Aero 3)................................................................8
2.2 Interior view of coffee machine .......................................................................... 9
2.3 Interior view of swivel arm................................................................................ 10
2.4 Fluid system..................................................................................................... 11
3 Technical data...................................................................................................12
3.1 Rating plates.................................................................................................... 12
3.1.1 Example of brand specific rating plate.................................................. ..12
3.1.2 Examples of country specific rating plates..............................................12
3.1.3 Rating plate details (example) ................................................................13
3.2 Technical specifications.................................................................................... 14
3.2.1 Coffee machines.....................................................................................14
3.2.2 Milk frother (Prodigio&milk)...................................... ... ... .... ... ... ... ............16
3.2.3 Dimensions, weight and size ..................................................................17
4 Operation............................................................................................................18
4.1 General information..................... ... .......................................... .... ... ... ... ... .... ... . 18
4.2 Status indications............................................................................................. 18
4.2.1 Status indication of coffee machine ........................................................18
4.2.2 Status indication of milk frother...............................................................19
4.3 Machine modes........................... ... .... ... ... ... .... ... ... .......................................... . 20
4.3.1 Machine modes of coffee machine .........................................................20
4.3.2 Machine modes of milk frother................................................................22
4.4 Nespresso App (application software) ........................ .... ... .............................. 22
4.4.1 Prerequisites...........................................................................................22
4.4.2 Pairing smartphone or tablet with coffee machine..................................23
4.4.3 Nespresso App - coffee machine setup..................................................26
4.4.4 Nespresso App - machine page overview ..............................................27
4.4.5 Nespresso App - coffee brewing management.......................................27
4.4.6 Nespresso App - machine management.................................................28
4.4.7 Nespresso App - capsule stock management ........................................29
4.4.8 Nespresso App - water management .....................................................30
4.4.9 Nespresso App - troubleshooting tips.....................................................30
4.5 Empty water system....................... .... ... ... .......................................... ... ... .... ... . 31
5 Maintenance......................................................................................................32
5.1 Descaling ....................... ... .... ... .......................................... .............................. 32
5.1.1 Descaling procedure................................................ ... ... .........................32
5.2 Cleaning procedure for coffee machine ........................................................... 34
5.3 Cleaning procedure for milk frother.......................................... .... ... ... ... ... .... ... . 35
6 Troubleshooting ...............................................................................................36
6.1 Check list for coffee machine................................................ ... .... ... ... ... ... .... ... . 36

Version 1.0 en Prodigio service manual
3
6.2 Check list for milk frother ................................................................................. 38
6.3 Machine error code table...................... .... ... ... ... ... .... ... .................................... 39
7Repairs................................................................................................................ 40
7.1 Safety instructions ........................................................................................... 40
7.2 Repair and mounting tips................................................................................. 40
7.3 Tools and accessories ..................................................................................... 41
7.4 General disassembly ......................................... ... .......................................... . 42
7.4.1 Prepare coffee machine for disassembly................................................42
7.4.2 Remove outlet cover............................................................................... 43
7.4.3 Remove front cover ................................................................................44
7.4.4 Remove cover ........................................................................................ 45
7.4.5 Remove blind..........................................................................................47
7.4.6 Remove drop stop .................................................................................. 48
7.4.7 Remove MMI board and light guides...................................................... 49
7.4.8 Remove lever and light barrier ...............................................................50
7.4.9 Remove print cover ................................................................................ 51
7.4.10Remove pivot bottom, water tank connector and power cable...............52
7.4.11Remove pivot bottom, water tank connector, power cable and
Otter connector (Prodigio&milk).............................................................. 54
7.4.12Remove electronic module (main PCB).................................................. 59
7.4.13Remove main board and flowmeter........................................................ 60
7.4.14Remove high pressure tube ...................................................................62
7.4.15Remove pump ........................................................................................63
7.4.16Remove brewing unit..............................................................................64
7.4.17Disassemble brewing unit drive..............................................................67
7.4.18Remove thermoblock from capsule cage ...............................................69
7.5 Wiring diagrams - Prodigio coffee machine................. .................................... 70
7.5.1 Wiring diagram 220 V - 240 V IEC .................... ... ... .... ... ... ... .... ... ... ... ... .. 70
7.5.2 Wiring diagram 120 V UL (USA / Canada)........................................ ... .. 71
7.5.3 Wiring diagram 127 V IEC (Brazil)..... ... ... ... .... ........................................ 72
7.5.4 Wiring diagram 127 V IEC (Mexico) ..................................... .... ... ... ... ... .. 73
7.5.5 Wiring diagram 110 V IEC (Taiwan)........................................................74
7.5.6 Wiring diagram 100 V IEC (Japan)......................................................... 75
7.6 Wiring diagrams - Prodigio&milk coffee machine ........................................... . 76
7.6.1 Wiring diagram 220 V - 240 V IEC .................... ... ... .... ... ... ... .... ... ... ... ... .. 76
7.6.2 Wiring diagram 120 V UL (USA / Canada)........................................ ... .. 77
7.6.3 Wiring diagram 127 V IEC (Brazil)..... ... ... ... .... ........................................ 78
7.6.4 Wiring diagram 127 V IEC (Mexico) ..................................... .... ... ... ... ... .. 79
7.6.5 Wiring diagram 110 V IEC (Taiwan)........................................................80
8 Function tests...................................................................................................81
8.1 Safety instructions ........................................................................................... 81
8.2 Required equipment ........................................................................................ 81
8.2.1 Overview.................................................................................................81
8.3 Measure coffee temperature . .......................................... ... .............................. 82
8.4 Tightness and leakage checks........................................................................ 83
8.4.1 Preparations ...........................................................................................83
8.4.2 Test run................................................................................................... 84
8.5 Milk frother tests (Prodigio&milk)..................................................................... 85

Prodigio service manual Version 1.0 en
4
8.5.1 Measure hot milk temperature................. ... ... ... .... ... ... ... .... ... ... ...............85
8.5.2 Measure milk froth ratio ..........................................................................85
8.6 Protective earth (PE) continuity test................................................................. 86
8.6.1 What is the protective earth continuity test about? .................................86
8.6.2 General...................................................................................................86
8.6.3 Test sequence.........................................................................................87
8.6.4 What to do if the protective earth continuity test fails..............................88
8.7 Protective insulation test .......... ... ... .... ... ... ... .... ......................................... .... ... . 89
8.7.1 What is the protective insulation test about? ..........................................89
8.7.2 General...................................................................................................89
8.7.3 Test sequence.........................................................................................90
8.7.4 What to do if the insulation test fails .............................. .... .....................92
9 Explosion drawings and parts lists.............................................................93
9.1 Explosion drawings C70.................................................. ... ... ... ........................ 93
9.2 Explosion drawings D70.................................................. ... ... ... ........................ 96
9.3 Explosion drawings C75.................................................. ... ... ... ........................ 99
9.4 Explosion drawings D75................................................................................. 102
9.5 Spare parts list................................................................................................ 105
10 Glossary of abbreviations...........................................................................109
11 Notes .................................................................................................................110
Version 1.0 en Prodigio service manual
5
PREFACE
The purpose of this service manual is to provide the service personnel with all necessary
information with regards to correct handling, maintenance and repair of the Prodigio
coffee machines.
This manual should be used by the technicians as a valuable aid to guarantee the
permanent readiness for use of the machines. In order to t ake full advantage of all the
functions, it is absolutely necessary to follow the instructions in this manual.
Only use original spare parts from your official supplier for maintenance and repair work.
Spare parts lists and exploded drawings are subject to change. To obtain the last
version, please contact your official spare parts supplier.
Visit the Nespresso technical website periodically to check for upgr ades, technical modifications, counter measures etc. for these coffee machines:
https://business.nespresso.com
CONTENT UPDATES
Version 0.1
• First draft version of service manual for proofreading, in English only.
Version 0.2
• Updated service manual version for translation, in English only.
• Nespresso App description added.
Version 1.0
• First released service manual version.
Please keep this
manual together with
the corresponding service
documentation. This way
you are assured to have
the necessary information.
Access is restricted
and can be obtained
by asking your Nespresso
technical contact person.
Prodigio service manual Version 1.0 en
6
GENERAL SAFETY NOTES
1 GENERAL SAFETY NOTES
The repair of these machines can only be performed by Nespresso approved af ter-sales
centers and technicians, using suitable tools and original spare parts and taking into
account the national safety regulations.
As an additional safety measure, the use of a residual current device (RCD), also called
a ground fault circuit interrupter (GFCI), in the repair centre is highly recommended.
Risk of fatal electrical shock and fire!
Mains voltage inside the coffee machine.
• Unplug appliance before cleaning.
• Never clean wet or immerse plug, cord or appliance in any fluid.
• Disconnect the mains plug before disassembly - the appliance must
be free of voltage.
This device does
not protect against
electrical shock due to
contact with both circuit
conductors.
Example illustrations
of typical devices.
Use a GFCI with a trip
level of 4 - 6 mA (USA)
resp. a RCD with a trip level
of 15 - 30 mA (Europe).
A trip level above 30 mA
provides only very limited
protection against harm
from an electric shock.
1) RCD protected socket-outlet
2) Plug-in RCD unit
3) GFCI socket
4) Plug-in GFCI
Danger of burns!
Hot parts and water under pressure inside the coffee machine
(particularly in the thermoblock).
• Let coffee machine cool down before cleaning or disassembly.
1
2
RESET
TEST
RESET
TEST
3
4
Version 1.0 en Prodigio service manual
7
MAIN COMPONENTS
2 MAIN COMPONENTS
2.1 Overview - Prodigio&milk coffee machine
The coffee buttons (2, 3, 4) and the Nespresso logo (7) are backlighted in white.
The swivel arm version (13) of the Prodigio can be rotated by 180 degrees, while the
version of the Prodigio&milk can be rotated by 90 degrees only.
A magnet fixing holds the water tank (14) on the swivel arm (13) securely.
The maintenance unit consists of the parts 8 - 11. A position switch monitors the used
capsule container (8) and drip tray (11) in the coffee machine.
A light barrier detects a jammed used capsule or a full resp. missing cap sule cont ainer (8).
1) Maintenance light, orange
2) Lungo coffee button, 110 ml / 3.7 oz
3) Espresso coffee button, 40 ml / 1.35 oz
4) Ristretto coffee button, 25 ml / 0.84 oz
5) Slider for capsule insertion cover
6) Capsule insertion slot
7) Nespresso logo, backlighted
8) Used capsule container
9) Drip grid
10) Removable cup support
11) Drip tray
12) Coffee outlet
13) Swivel arm for water tank and milk
frother (only for Prodigio&milk)
14) Water tank
15) Water tank lid
16) Milk frother
2
3
4
5
8
9
16
10
11
6
12
14
13
15
1
7
Prodigio service manual Version 1.0 en
8
MAIN COMPONENTS
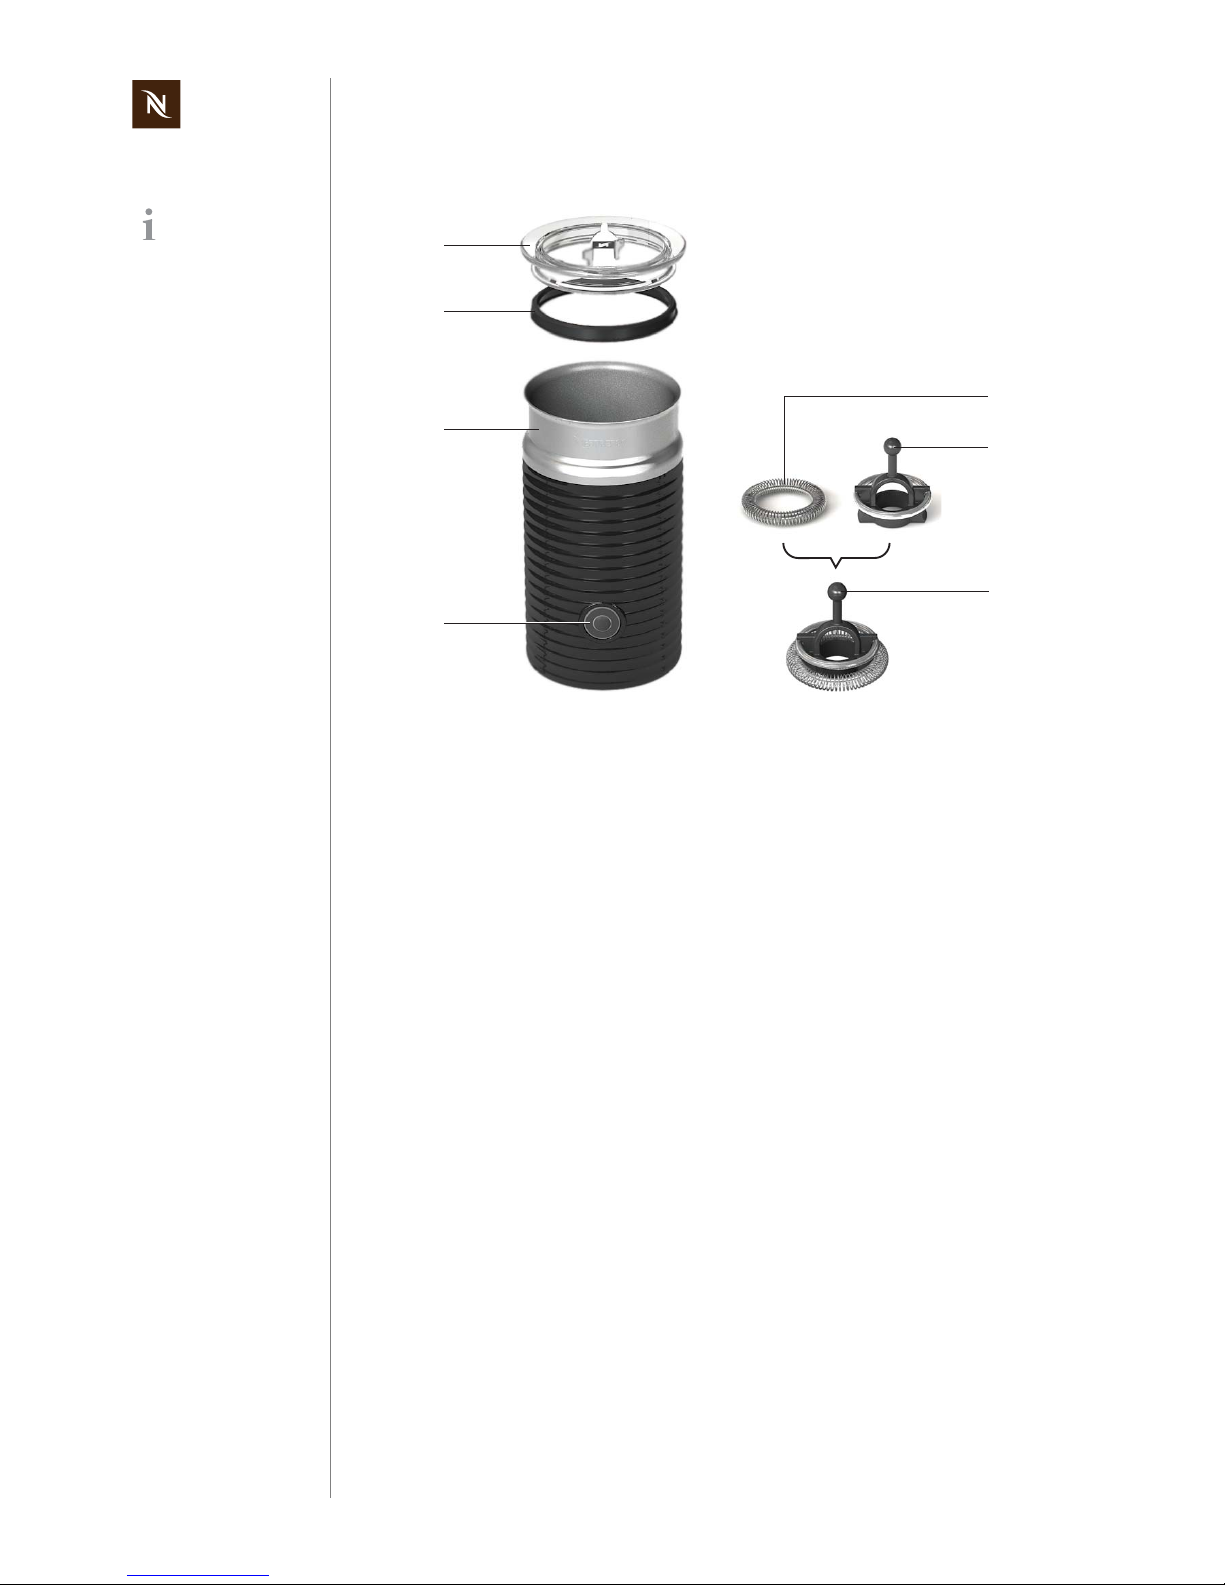
2.1.1 Overview - milk frother (Aero 3)
The lid (1) has a holding fixture for the frothing spring (5).
The inside of the jug (3)
- has level marks for hot milk and milk foam preparation,
- is surface-coated for easy cleaning.
The milk frother is
part of the coffee
machine Prodigio&milk.
1) Lid
2) Seal
3) Jug
4) Start/stop button
5) Frothing spring (for milk froth only)
6) Mixer for hot milk
7) Spring whisk for milk foam
1
2
3
4
5
6
7
Version 1.0 en Prodigio service manual
9
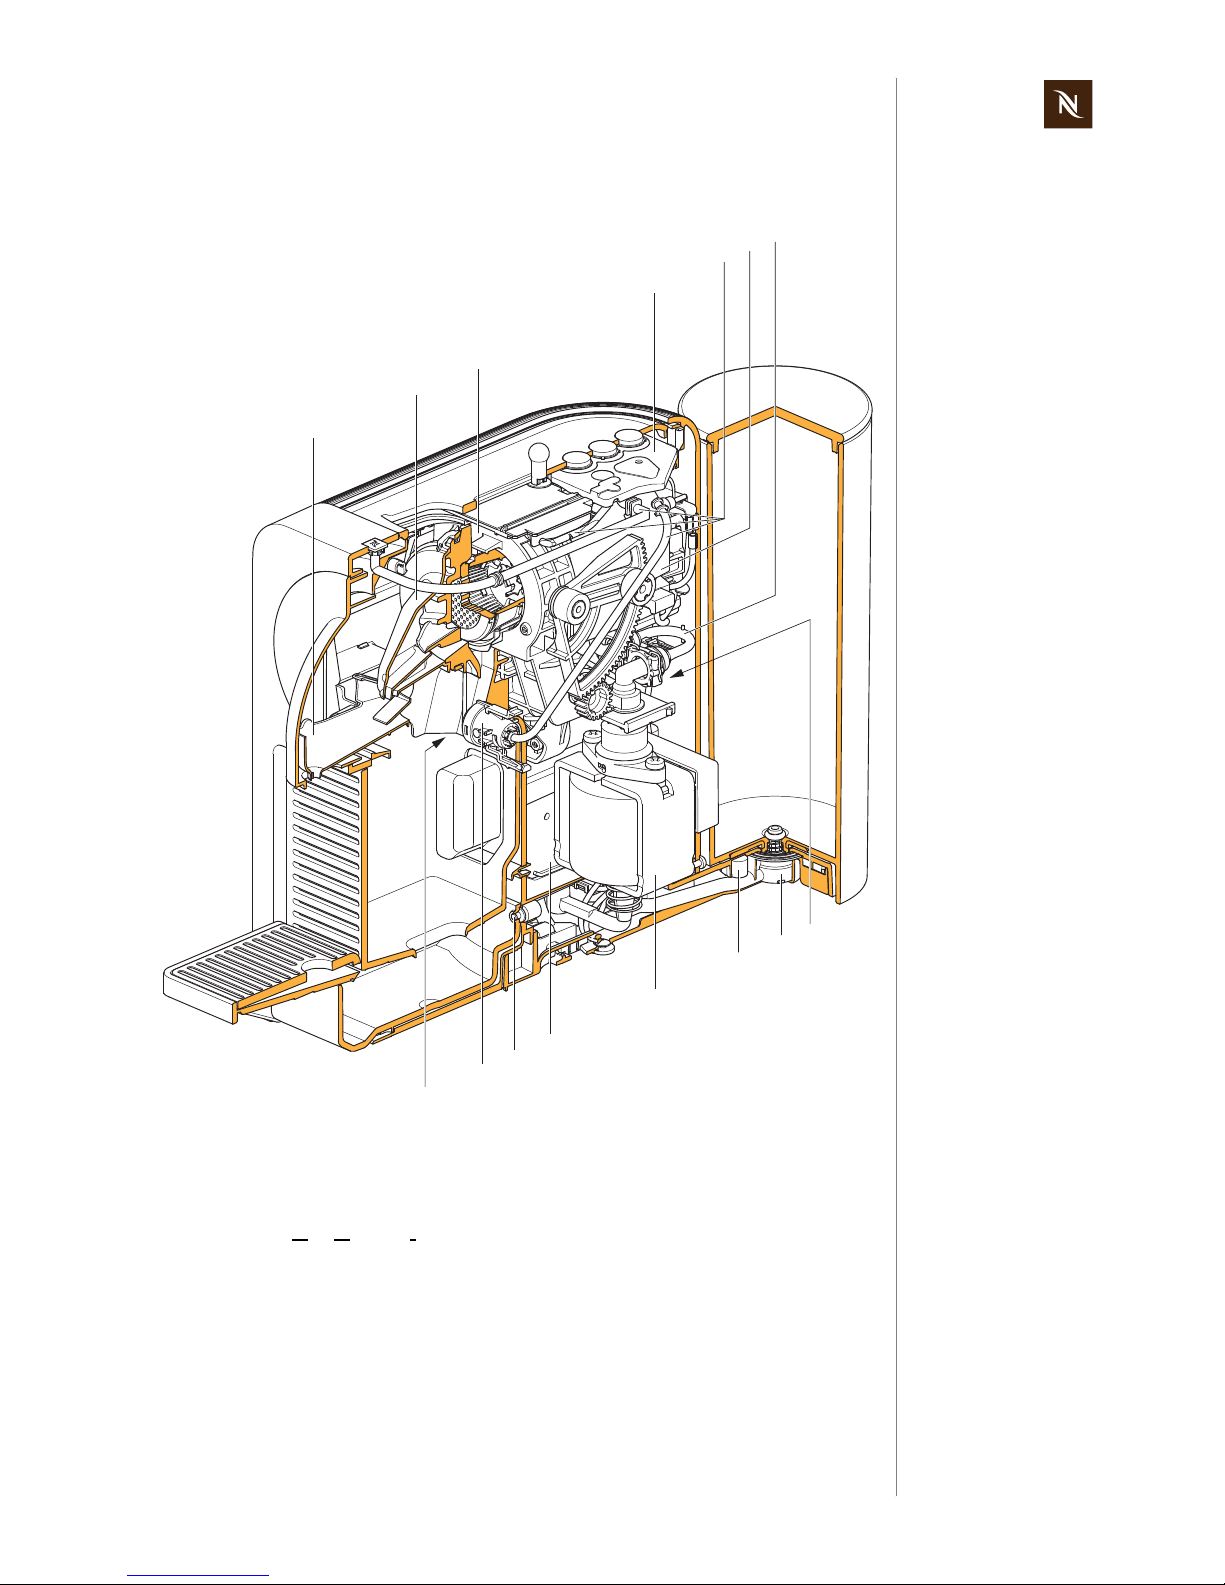
MAIN COMPONENTS
2.2 Interior view of coffee machine
1) Drop stop
2) Steam cover
3) Brewing unit
4) MMI board (M
en Machine Interface)
with reinforced silicone keypad
5) Light guides
6) Thermoblock
7) High pressure connector
8) Motor
9) Water tank connector
10) Magnet fixing for water tank
(3 permanent magnets)
11) Pump
12) Electronic module with flowmeter
13) Magnet fixing for drip tray
14) Light barrier
15) Position switch for used capsule container
11
4
15
13
10
9
12
1
2
3
14
5
6
7
8
Prodigio service manual Version 1.0 en
10
MAIN COMPONENTS
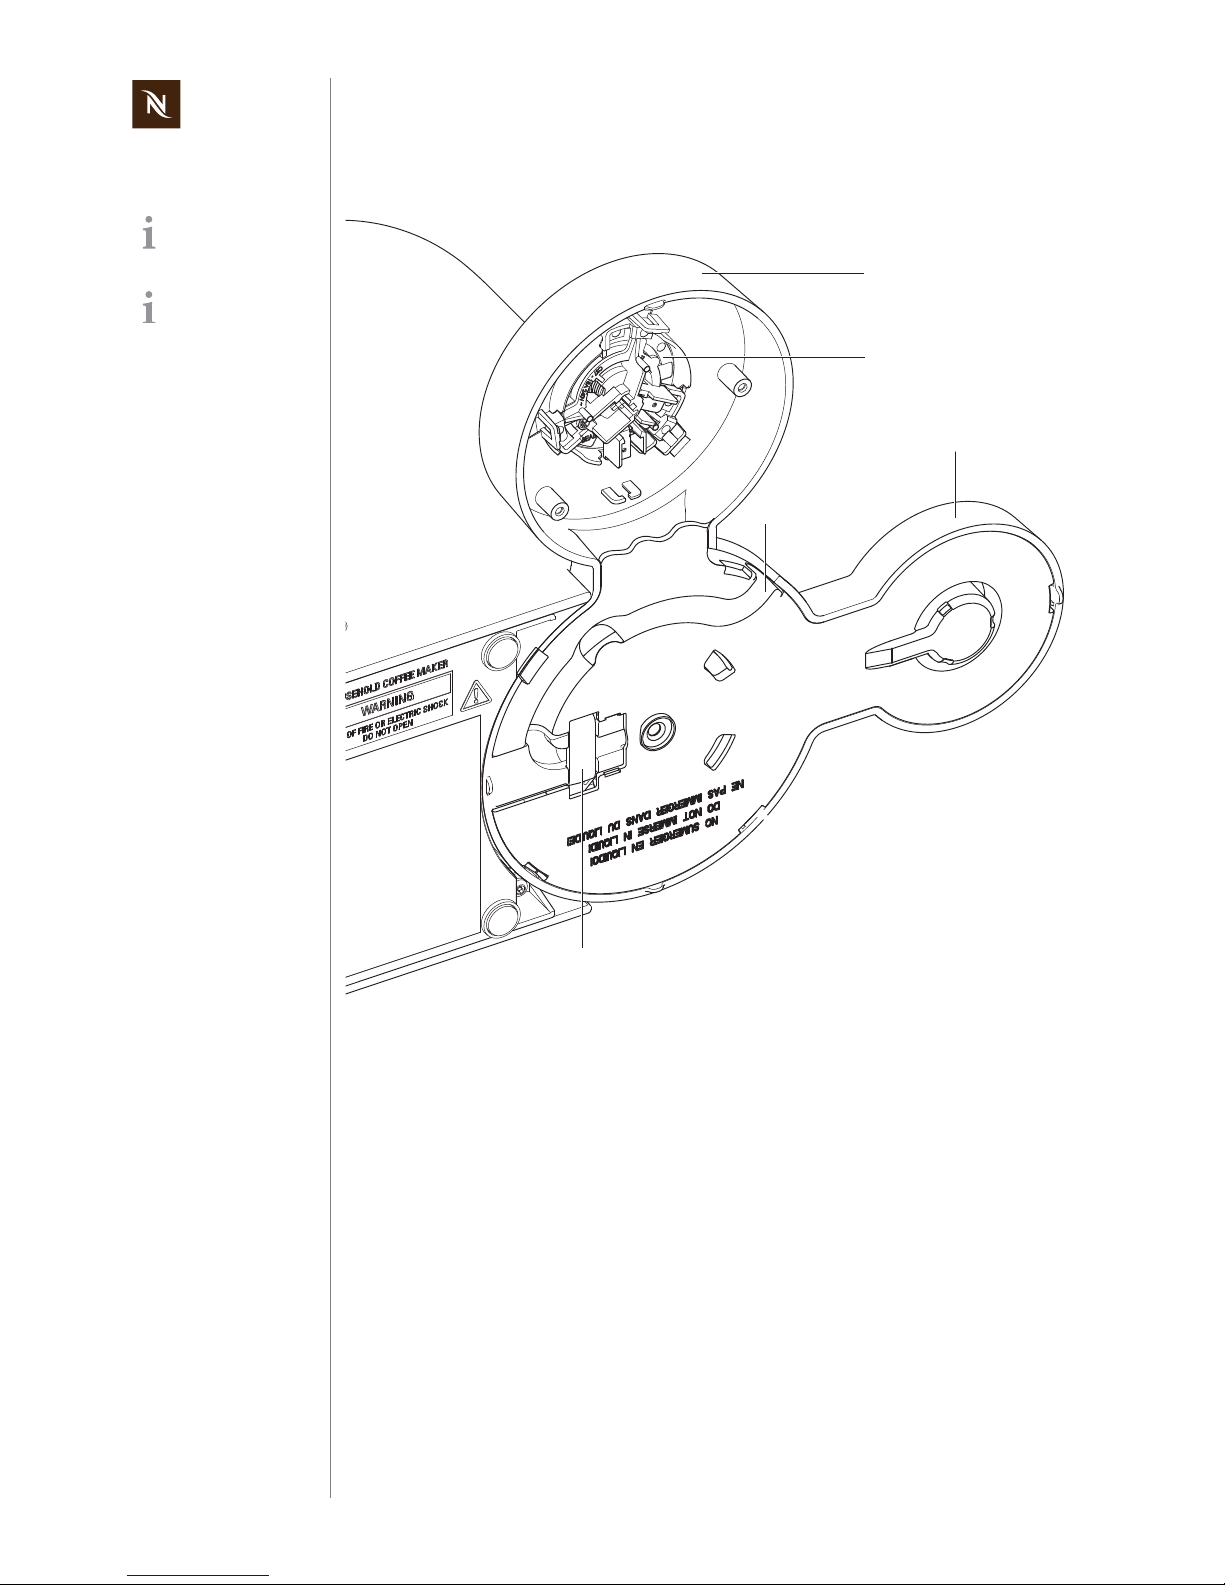
2.3 Interior view of swivel arm
Swivel arm of
Prodigio&milk - view
from below.
Beside the special
swivel arm, the two
coffee machine types have
the same internal design.
1) Support for milk frother
2) Otter connector for milk frother
3) Support for water tank
4) Cable duct for power cord
5) Cable strain relief
2
5
1
3
4
Version 1.0 en Prodigio service manual
11
MAIN COMPONENTS
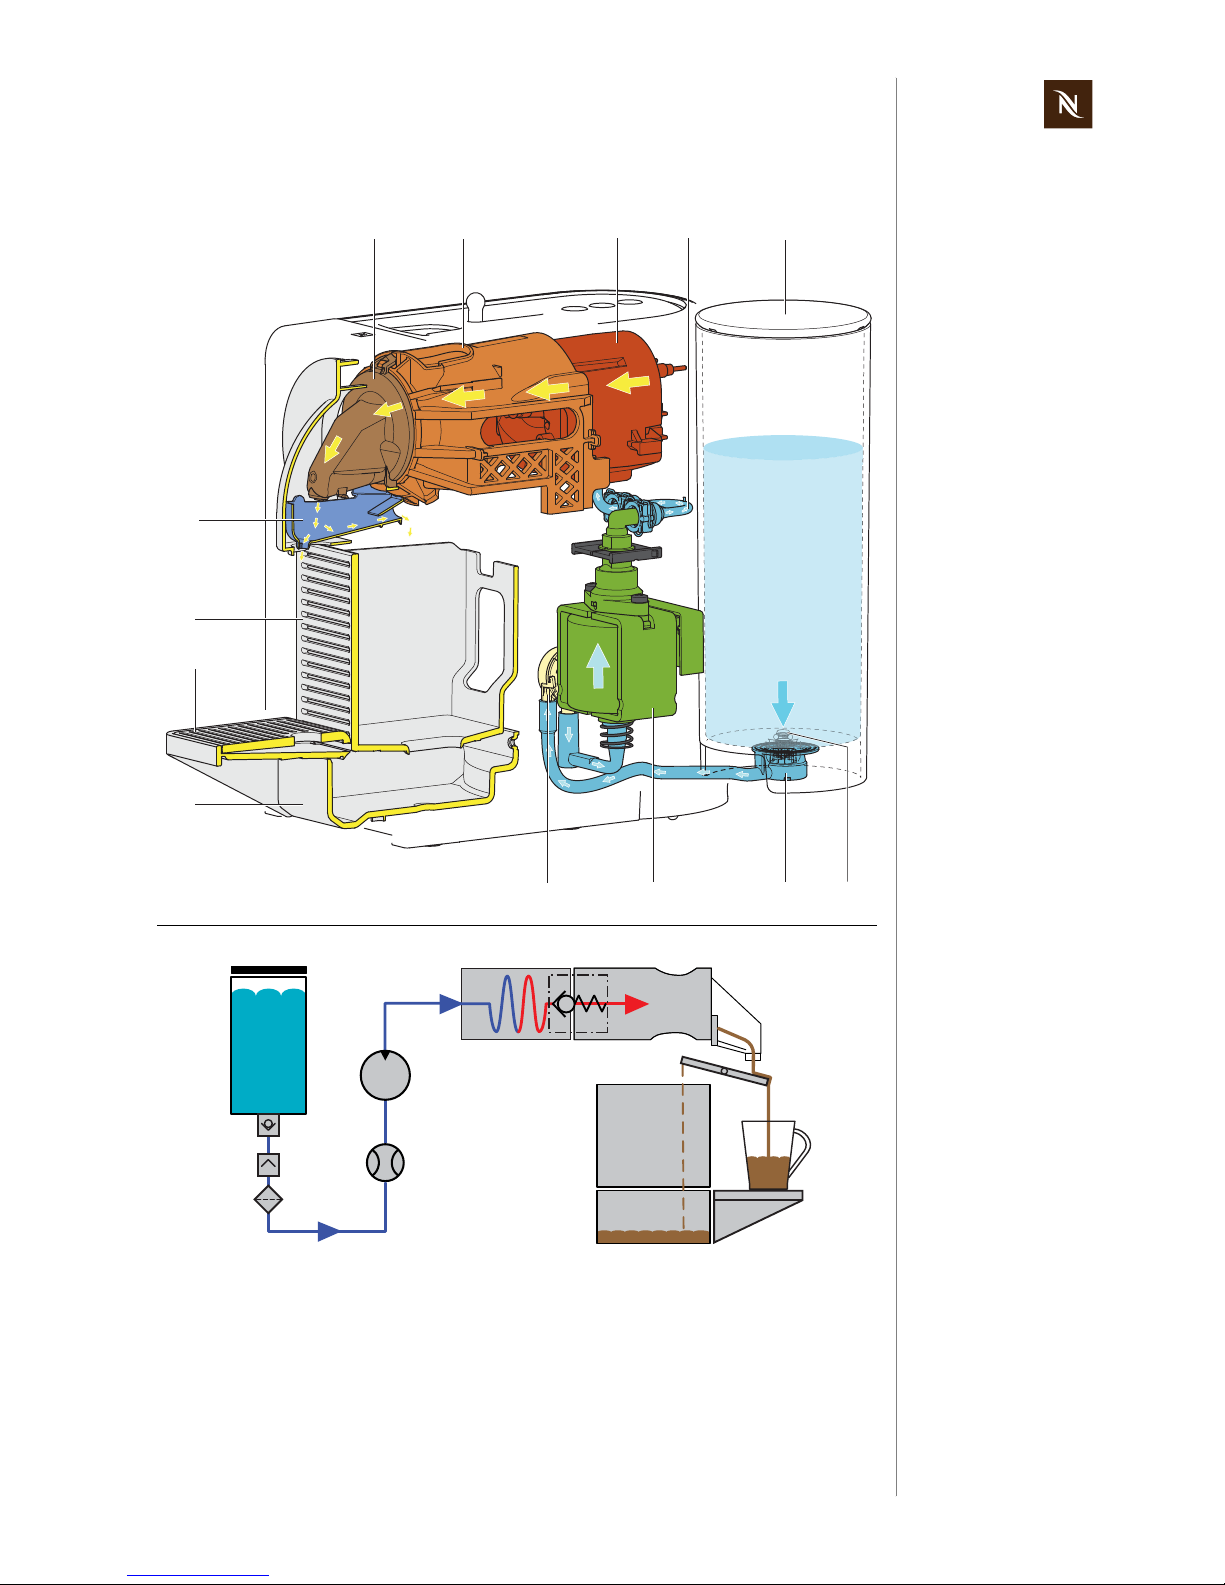
2.4 Fluid system
1) Coffee outlet
2) Brewing unit
3) Thermoblock
4) High pressure connector
5) Water tank
6) Water tank valve
7) Water tank connector with filter
8) Pump
9) Flowmeter
10) Drip tray
11) Cup support
12) Used capsule container
13) Drop stop
13
8
5
3
21
12
10
11
4
7
9
6
BU
TB
WT
FM
6
8
9
3
1
12
10
11
4
25
7
13
Prodigio service manual Version 1.0 en
12
TECHNICAL DATA
3 TECHNICAL DATA
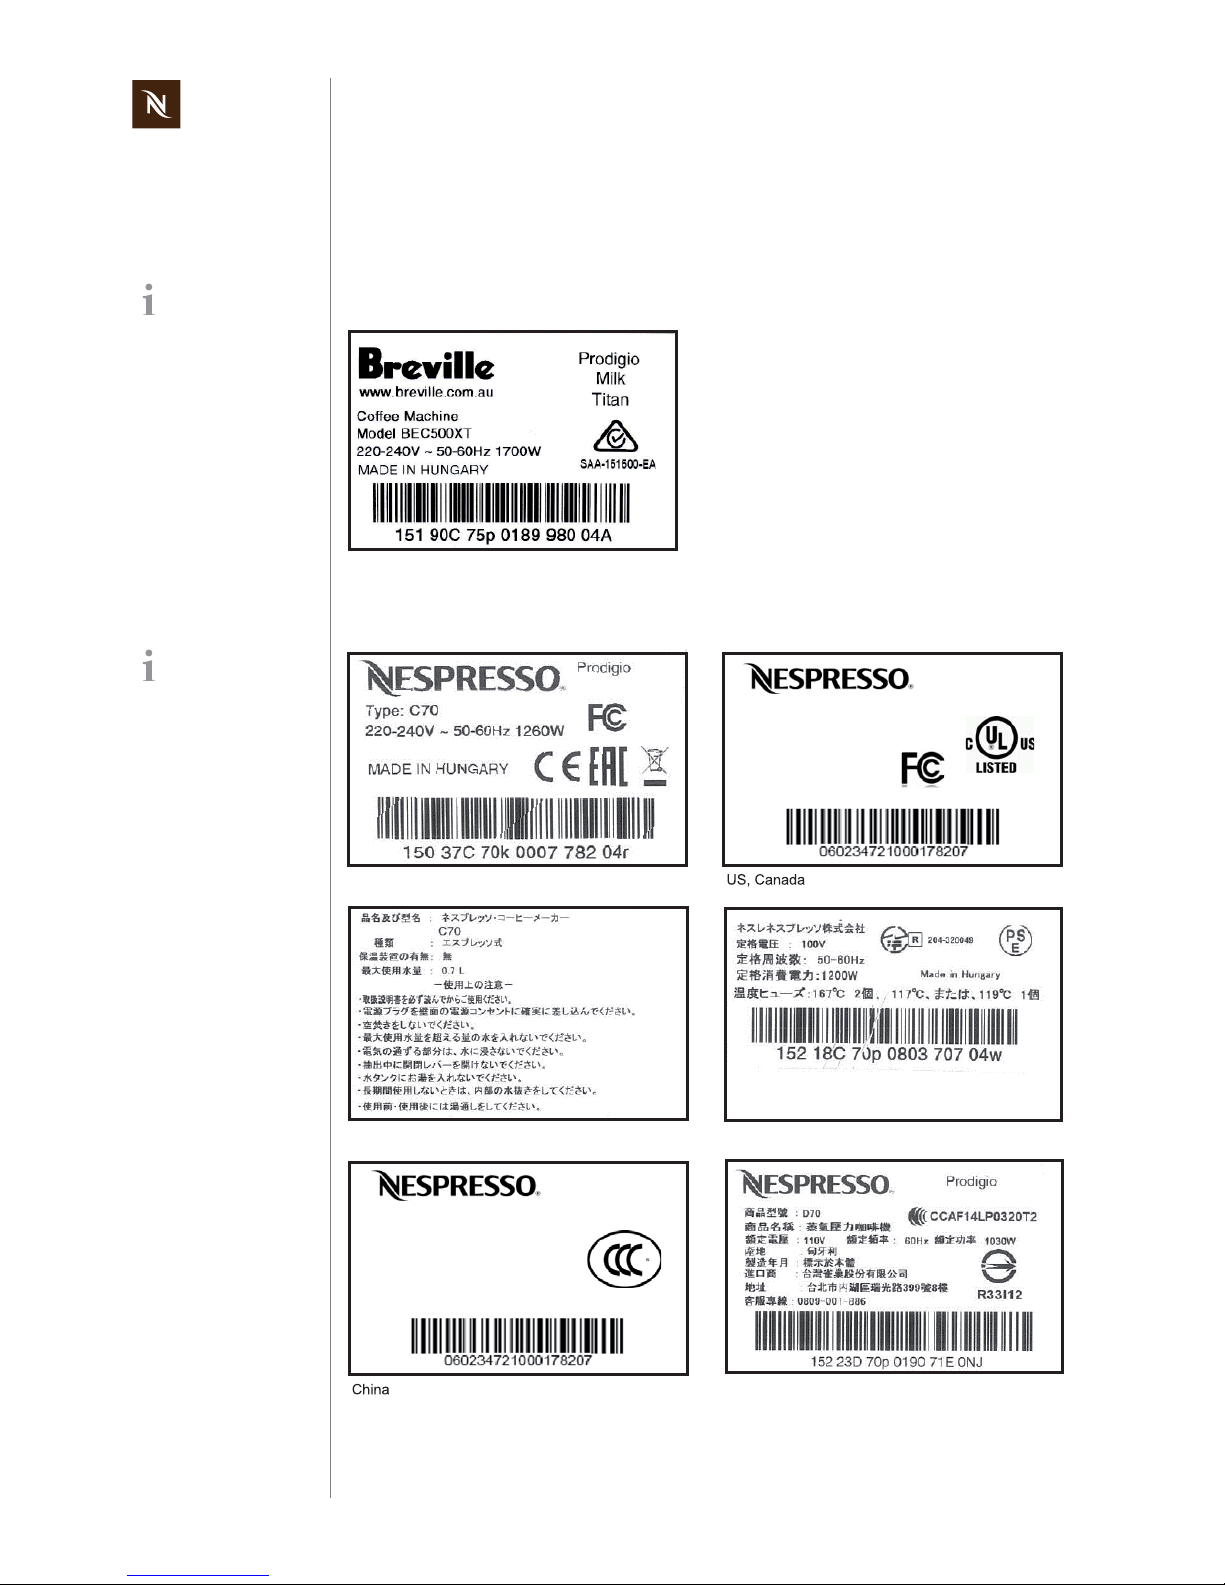
3.1 Rating plates
3.1.1 Example of brand specific rating plate
3.1.2 Examples of country specific rating plates
The rating plate can
be found at the bottom of the coffee machine.
A
ustralia
This overview shows
examples for various
countries and is subject to
alterations.
Prodigio
Type: D70
HOUSEHOLD COFFEE MAKER
MACHINE A CAFÉ POUR LA MAISON
120 V~ 60 Hz 1160 W
MADE IN HUNGARY
FABRIQUÉ EN HONGRIE
4SM3
ṏရྡ⛠䠖ၲᮘ
ᆺྕ䠖C70
桅ᐃ䓝⌳ཬ桅ᐃ根⋡䠖220 V~ 50 Hz
桅ᐃ弻ධຌ⋡䠖1150 W
ไ㐀ၟ䠖Flextronics International Kft.
୰ᅜ༊௦⌮ၟ䠖ி㞛ᕡዉ᪁ὴ⣴ၲ᭷㝈බྖ
MADE IN HUNGARY ∳ไ㐀
Prodigio
Europe
Japan (two-piece rating plate)
Japan
Taiwan
Version 1.0 en Prodigio service manual
13
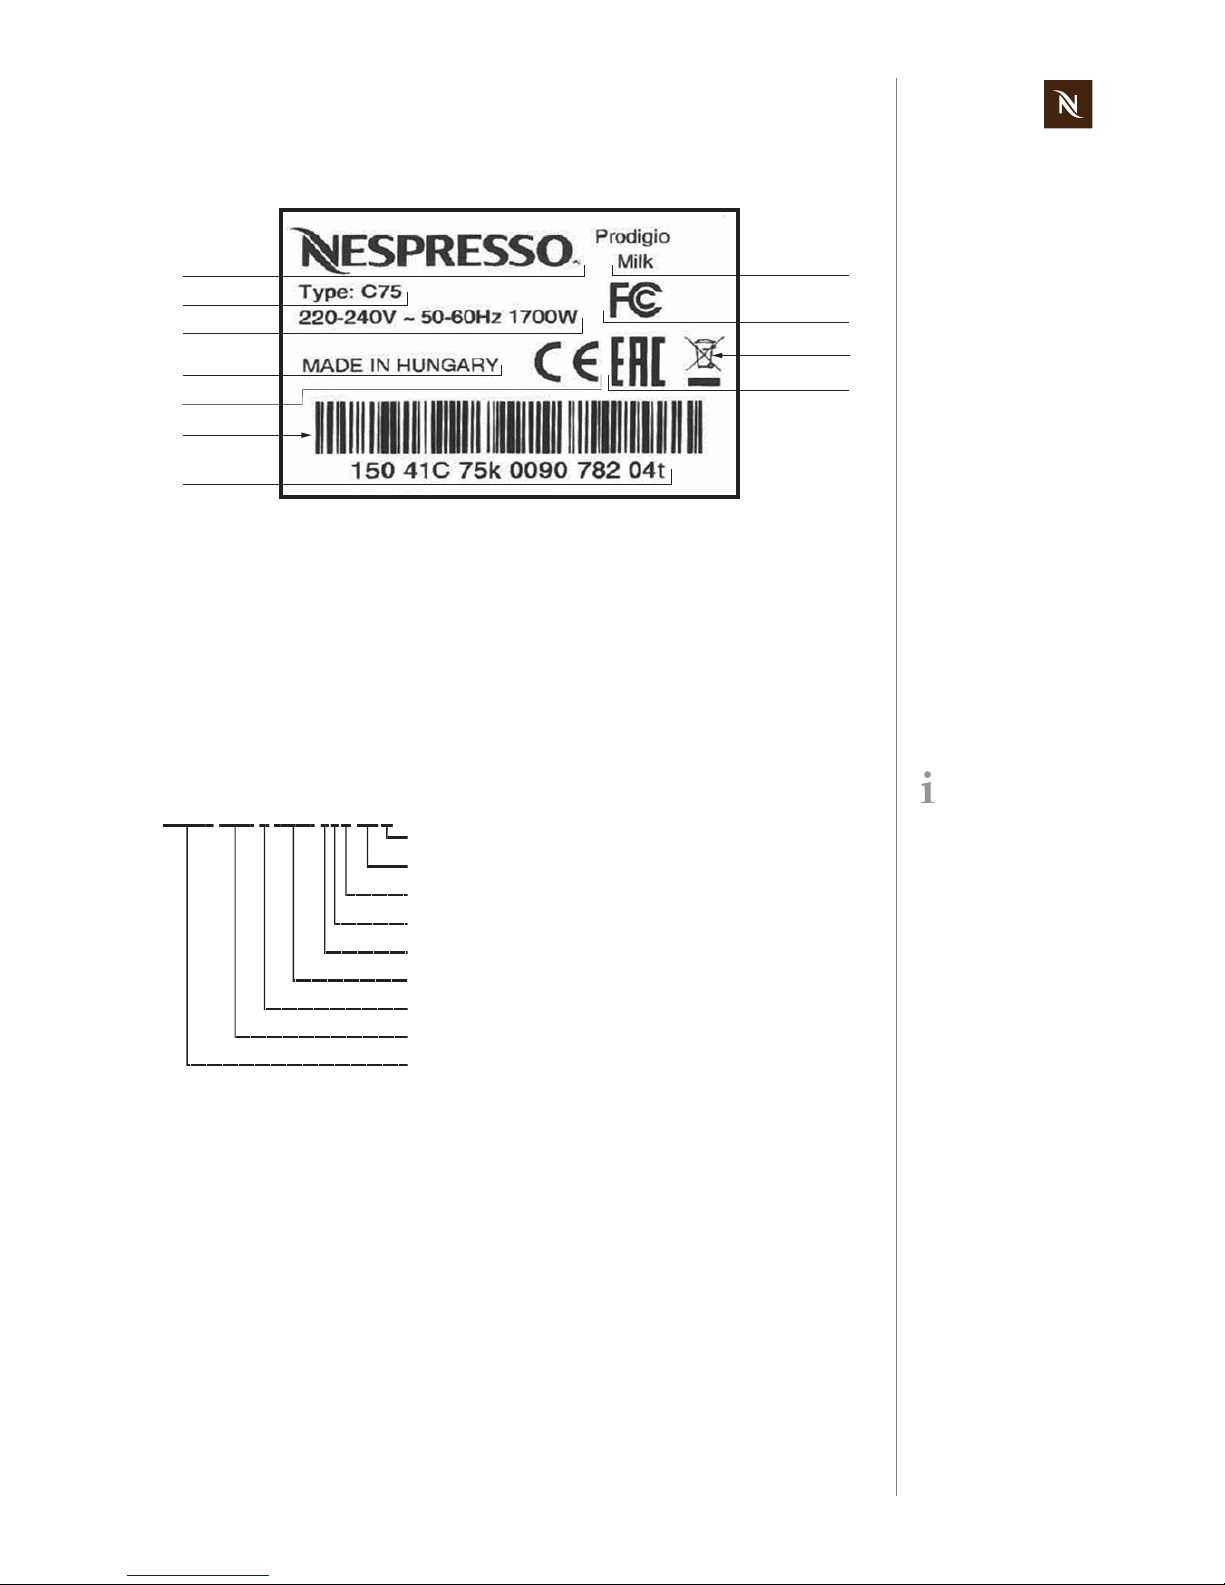
TECHNICAL DATA
3.1.3 Rating plate details (example)
Decoding the alphanumeric serial number
Example:
1) Brand name
2) Machine type
3) Voltage and power rating
4) Place of manufacture
5) Sign of conformity (CE)
6) Bar code
7) Serial number
8) Machine name
9) FCC approval
10) Special disposal icon
(do not dispose with ordinary waste)
1 1) Eurasian conformity mark
1
2
3
7
8
10
9
4
5
11
6
By decoding the date
of production and
machine type, the coffee
machine can be identified
exactly.
Checksum
Color version
Type of mains plug
Mains voltage
Distributing partner
Incremental number per production day
Manufacturing plant
Manufacturer designation of the machine type (C75)
15041 ... Date of production
(15 = year 2015, 041 = forty-first day of the year)
15041 C75 k 0090 782 04 t

Prodigio service manual Version 1.0 en
14
TECHNICAL DATA
3.2 Technical specifications
3.2.1 Coffee machines
Mains voltage ranges
Prodigio coffee machine
Europe, RU, AU, CN, KR, SG, HK, ME, ZA, IL, BR, AR................ 220-240 V, 50/60 Hz
USA, Canada ........................................................................................120 V, 50/60 Hz
BR, MX..................................................................................................127 V, 50/60 Hz
Japan.................................................................................................... 100 V, 50/60 Hz
Taiwan....................................................................................................... 110 V, 60 Hz
Prodigio&milk coffee machine
Europe, RU, AU, CN, KR, SG, HK, ME, ZA, IL, BR, AR................ 220-240 V, 50/60 Hz
USA, Canada ........................................................................................120 V, 50/60 Hz
BR, MX.......................................................................................................127 V, 60 Hz
BR, KR .......................................................................................................220 V, 60 Hz
CN.................. .... ... ... .......................................... ... .....................................220 V, 50 Hz
Power consumption
Prodigio coffee machine
220-240 V mains voltage......................................................................approx. 1’260 W
100/110/120/127 V mains voltage.........................................................1’160 - 1’370 W
Prodigio&milk coffee machine
220-240 V mains voltage......................................................................approx. 1’700 W
100/110/120/127 V mains voltage........................................................approx. 1’900 W
Power consumption of coffee machine main components
(for all voltages and frequencies)
Thermoblock...................................................................................................... 1’200 W
Pump......................................................................................................................60 W
Milk frother (Prodigio&milk).........................................................................410 - 490 W
Energy consumption (CECED / FEA 2009 method)
Prodigio coffee machine
Energy efficiency class level ..............................................................................A - 40%
Daily energy consumption....................................................................................76 Wh
Annual energy consumption...............................................................................28 kWh
EuP ... Energy using
Products
See commission regulation
no. 1275/2008 of the European Union.
Approvals UL and FCC for USA and Canada, CE, PSE, EAC, Ctick,
CCC, KTL, SPRING, SASO, SABS, ISI, IRAM, NOM
EuP standard The coffee machine is EuP 2013 compliant

Version 1.0 en Prodigio service manual
15
TECHNICAL DATA
Prodigio&milk coffee machine
Energy efficiency class level..............................................................................A - 40%
Daily energy consumption....................................................................................89 Wh
Annual energy consumption .............................................................................. 33 kWh
Pump
Pump pressure
- Max. permissible.................................................................................... 20 bar ± 3 bar
- During coffee preparation (depending on the type of coffee)........................ 9 - 16 bar
Capacities
Water tank...................................................................................................approx. 0.8 l
Drip tray water capacity................................................................................min. 100 ml
Capsule container.......................................................................... approx. 10 capsules
Volume of prepared coffee
- factory settings
Small cup "Ristretto" ................................................................................... 25 ml (±7%)
Small cup "Espresso".................................................................................. 40 ml (±7%)
Large cup "Lungo"..................................... ... ... .... ... ... ... ... .... ... ... ... .... ... ... ... . 110 ml (±7%)
- customer settings
Programmable setting range.........................................................................20 - 200 ml
Environmental conditions
Operating temperature.............. ... ... ... .... ..+ 5 °C up to + 45 °C (+ 41 °F up to + 113 °F)
Storage temperature.................................. - 25 °C up to + 65 °C (- 13 °F up to 149 °F)
Altitude............................................................................up to 2’500 m above sea level
Humidity................................................................................................... no restrictions
Various data
Preheating time....................................................................................... approx. 25 sec
Automatic shut off time.................................................................after 9 min of non-use
Safety temperature (electronically controlled)........................................120 °C (248 °F)
Safety temperature (thermal cut-off)......................................................167 °C (333 °F)
Coffee temperature at outlet ...........................................86 °C ± 3 °C (187 °F ± 5,4 °F)
Descaling temperature.................................................................setting 70 °C (158 °F)
Advised water tank
capacity to avoid
spilling.

Prodigio service manual Version 1.0 en
16
TECHNICAL DATA
3.2.2 Milk frother (Prodigio&milk)
Mains voltage
EU ............................................................................................... 220-240 V / 50-60 Hz
US/CA ..........................................................................................120-127 V / 50-60 Hz
AU ..................................................................................................... 240-260 V / 50 Hz
The milk frother
- is available in 3 different models, depending on above mains voltage ranges,
- has to match the mains voltage range of the associated coffee machine.
Capacity
Hot milk ...................................................................................................... max. 240 ml
Hot/cold milk for milk froth...........................................................................max. 130 ml
Performance data
Preparation times
(with full, semi-skimmed or skimmed milk at 8 °-10 °C fridge temperature)
Hot milk froth (120 ml)..... ... ... ... ... .... ... ... ........................................................50 - 80 sec
Cold milk froth (120 ml) .................................................................................60 - 80 sec
Hot milk (240 ml) .......................................................................................120 - 180 sec
Temperature
Hot milk .............................................................................................+ 60 °C to + 70 °C
Foam milk..........................................................................................+ 60 °C to + 70 °C
If replacing a defect
milk frother, check
mains voltage range.
Version 1.0 en Prodigio service manual
17
TECHNICAL DATA
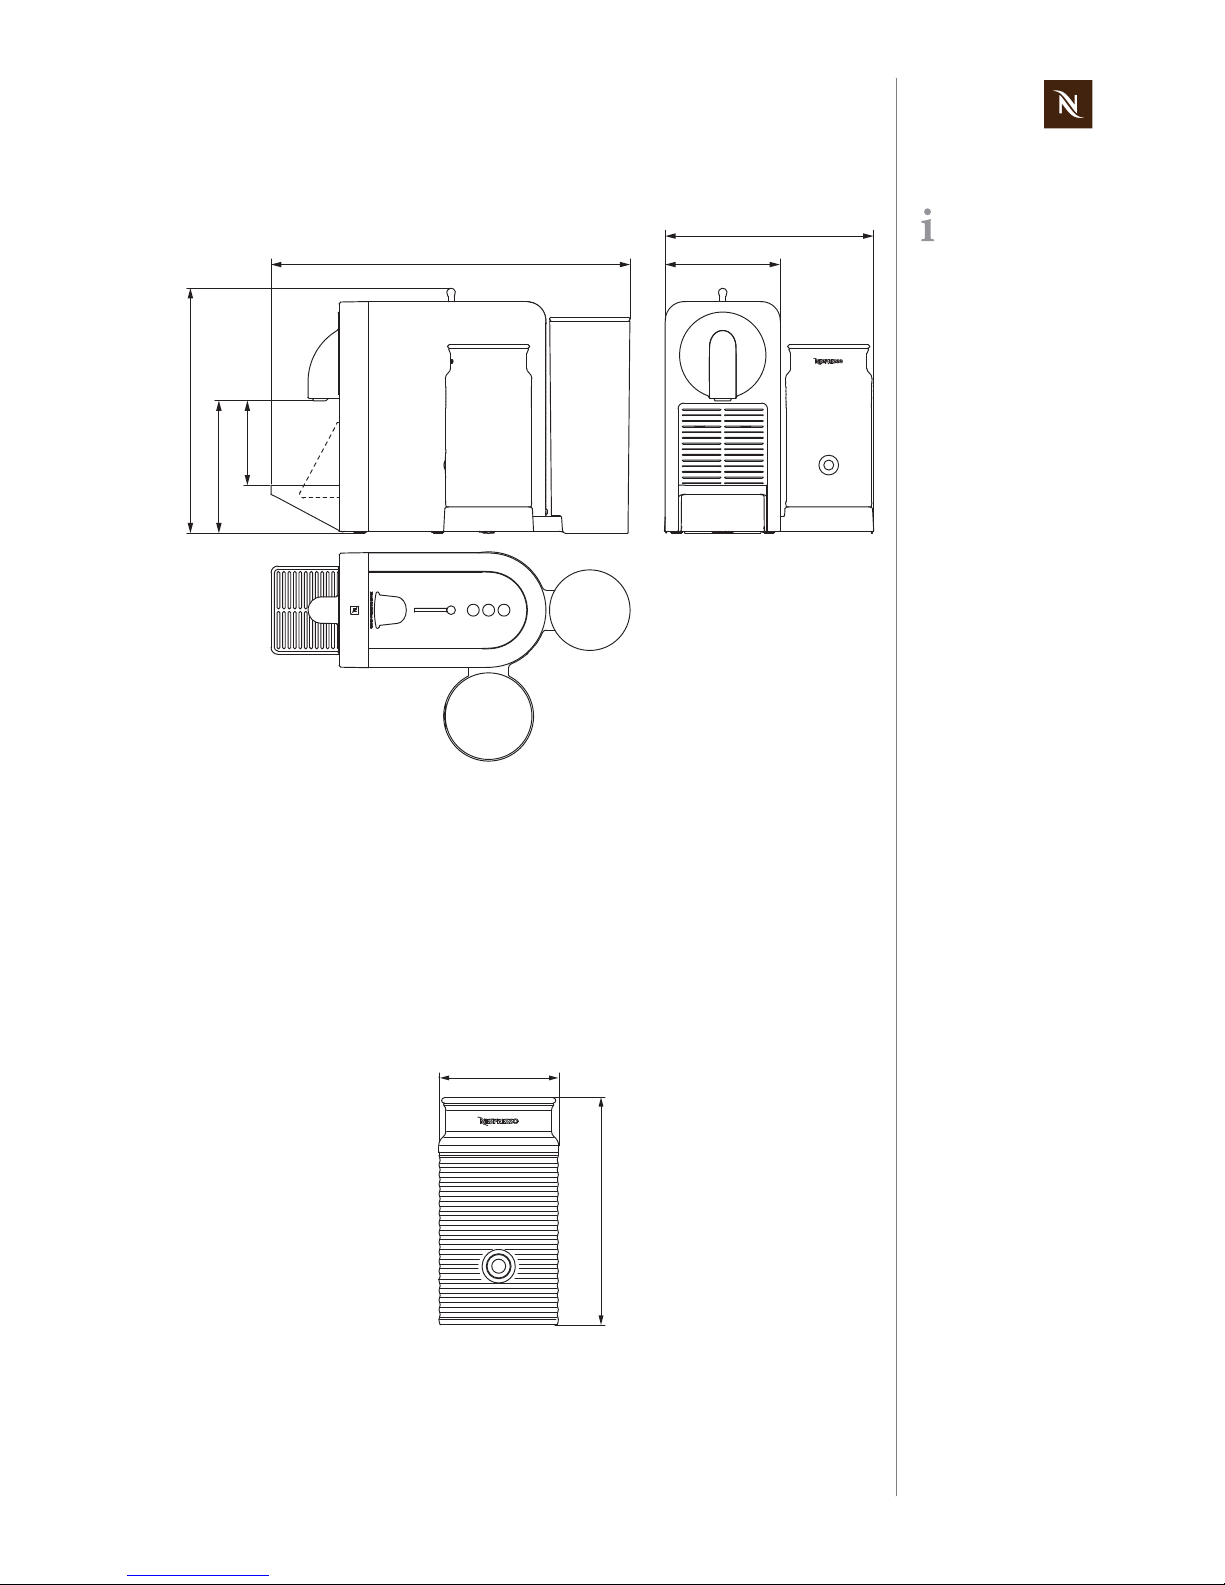
3.2.3 Dimensions, weight and size
Prodigio dimensions (length x width x height)......................... 374 x 119.5 x 255.3 mm
Prodigio&milk dimensions (length x width x height)................ 374 x 218.4 x 255.3 mm
Distance drip grid - coffee outlet: .............................................88 mm (Espresso mode)
Distance bottom - coffee outlet: .......................................... 138 mm (Macchiato mode)
Power cable length ...................... ... ... .. min. 0.8 m (depending on national regulations)
Prodigio weight (without water).............................................. ... ... .... ...........approx. 3 kg
Prodigio&milk weight (without water).................................................. ... .....approx. 4 kg
Milk frother
Dimensions of jug cpl. (diameter x height)................................................ 91 x 170 mm
Whisk for foam (diameter x height).............................................................. 33 x 32 mm
Weight (with whisk)............................................................................................... 0.7 kg
Dimensions in [mm].
119.5374
88
138
255.3
218.4
Ø
91
170
Prodigio service manual Version 1.0 en
18
OPERATION
4 OPERATION
4.1 General information
For an overview of operational controls see “Main components” on page 7.
For basic operation of the machine such as preparing a coffee and other related infor-
mation, refer to the user manual.
4.2 Status indications
4.2.1 Status indication of coffee machine
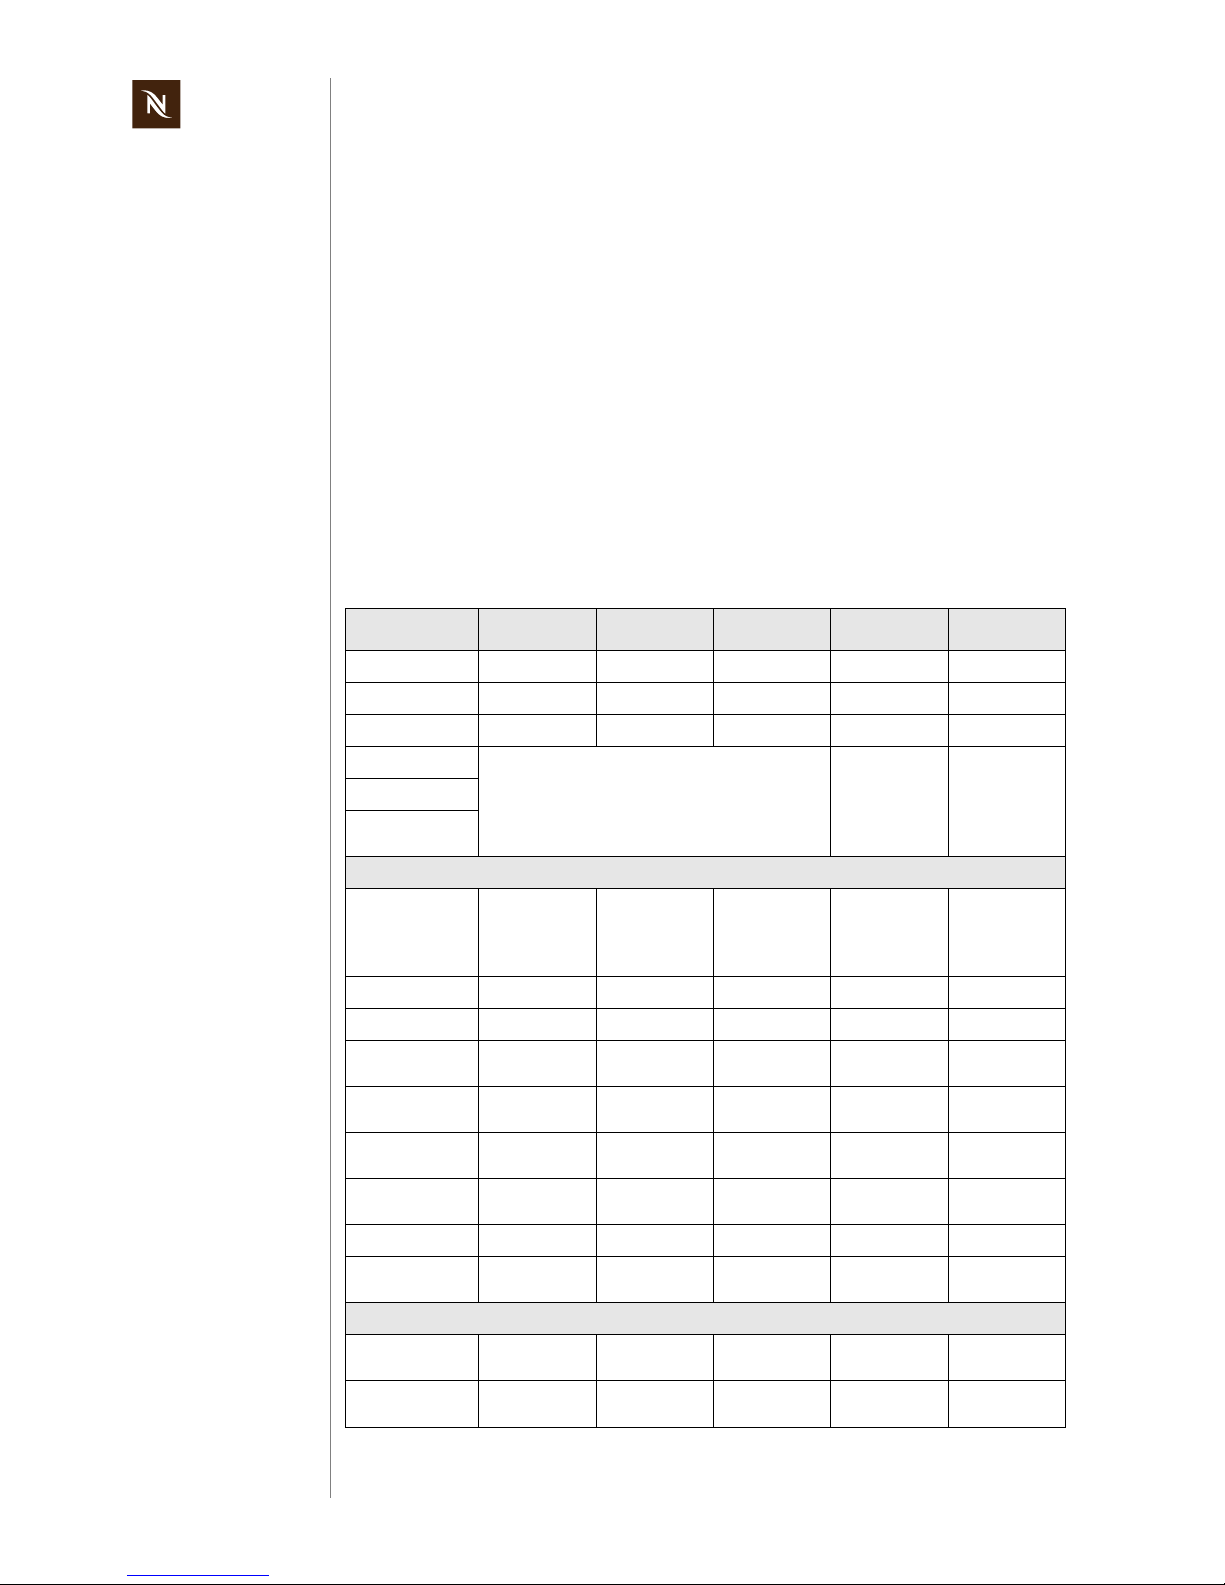
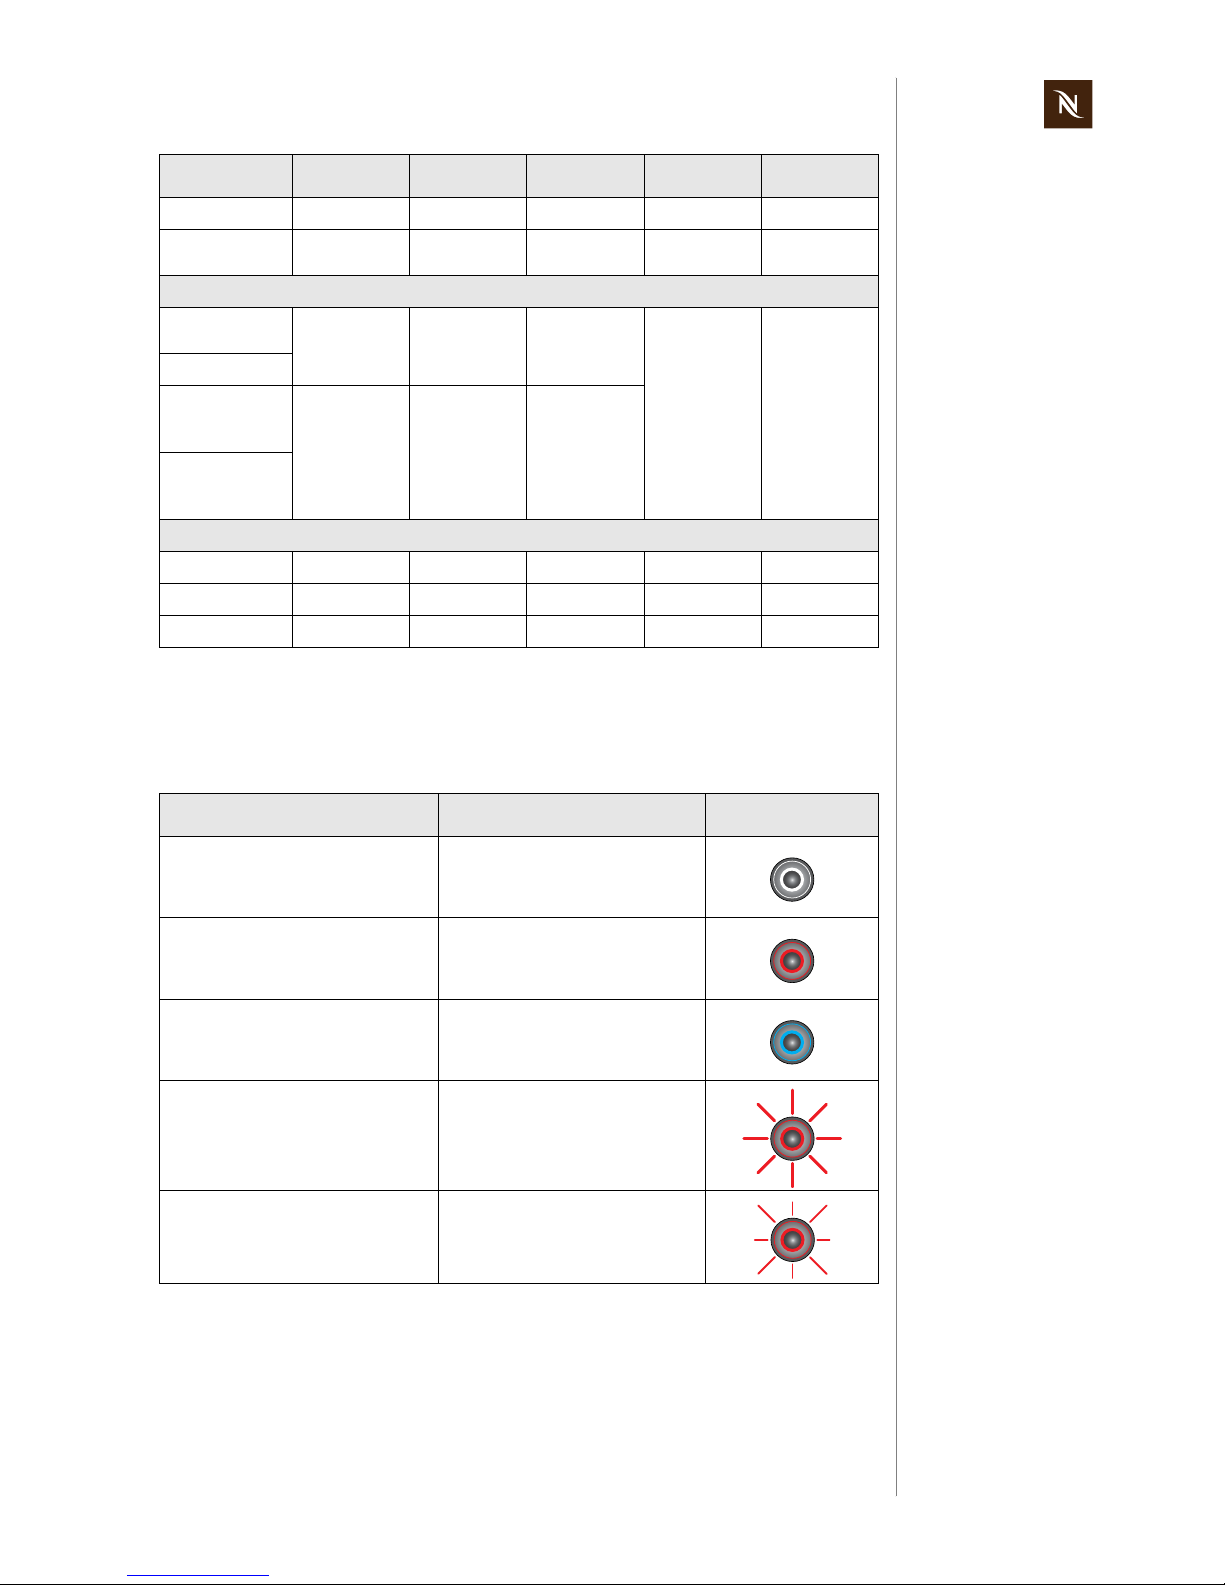
According to the following table the status of the coffee machine is shown by
- light signals of the 3 coffee buttons Lungo, Espresso and Ristretto (white LEDs)
- maintenance light (M-light, orange LED)
- Nespresso logo backlight (N-light, white LED)
Machine status Lungo Espresso Ristretto M-light N-light
Off or standby
Off Off Off Off Off
Heating up
Blinking, 1 Hz Blinking, 1 Hz Blinking, 1 Hz — —
Ready
On On On — —
Brewing coffee
One coffee button is blinking, 1 Hz — —
Pre-order active
Programming
coffee cup size
Special functions
Programming
cup size confirmation for
-Lungo
Off On, 0.5 sec On, 0.5 sec — —
- Espresso
On, 0.5 sec Off On, 0.5 sec — —
- Ristretto
On, 0.5 sec On, 0.5 sec Off — —
Descaling ready,
pump on/off
Blinking, 2 Hz Blinking, 2 Hz Blinking, 2 Hz On —
Emptying
confirmation
Off On, 0.5 sec Off On —
Emptying
running
Off Off Off On —
Switch standby
time to 30 min
Off On, 3 x 0.5 sec Off Off —
- to 9 min
Off On, 0.5 sec Off Off —
Reset to factory
settings
On, 2 sec On, 2 sec On, 2 sec On, 2 sec On, 2 sec
Nespresso App. related
First pairing
Off Off Off Off Blinking,
3 x 0.5 sec
Low capsule
stock
————On
Version 1.0 en Prodigio service manual
19
OPERATION
4.2.2 Status indication of milk frother
The operating button with its red/blue backlight shows the status of the milk frother
according to the following table:
Software update
Off Off Off Off Blinking, 2 Hz
Device identification
————Blinking,
5 x 0.5 sec
User intervention required
Notification descaling needed
———On—
Out of water
Capsule con-
tainer full or
removed
Off Off Off
Obstacle detection (capsule
ejection)
Errors
Invalid user input
— — — Blinking , 3 x —
Overheating
Blinking, 1 Hz Blinking, 1 Hz Blinking, 1 Hz On —
Device error
— — — Blinking, 2 Hz —
Machine status State events Operating button
Off Backlight off
On - hot milk preparation Red backlight on
On - cold milk froth preparation Blue backlight on
Failure/malfunction
(e.g. overheating because of bu r nt
milk, too less or no milk)
Blinking red backlight
(1 Hz, 0.5 sec on, 0.5 sec off)
Failure: milk frother has wrong
mains voltage range
Fast blinking red backlight
(2 Hz, 0.25 sec on, 0.25 sec off
Machine status Lungo Espresso Ristretto M-light N-light
Prodigio service manual Version 1.0 en
20
OPERATION
4.3 Machine modes
4.3.1 Machine modes of coffee machine
This table helps to understan d the operating modes of the Prodigio coffee machine:
This table also contains the keying
sequences for
- volume programming
- descaling
- water system emptying
- resetting
- changing the automatic
switch off time.
Machine mode Enter mode Actions Exit mode
1 Heat up mode
Every time after switching on machine
Heat up thermoblock to
ready temperature 90
°C within 30 sec without overshooting target
temperature
e.g. switching off
machine
2 Self test mode
Every time after switching on machine
Tests:
• NTC short circuit
• NTC connected
• Checks if thermoblock reaches ready
temperature within
2 min after switch on
e.g. switching off
machine
3 Ready mode
• After heat up and self
test mode was ok
• After brewing or
volume brewing
coffee
• After reset mode
• After leaving
descaling mode
Keep thermoblock
temperature at 90 °C
e.g. switching off
machine
4a Brewing mode
4b Volume brewing
mode (programming cup size)
Brewing mode:
• Press and release
any coffee button
Programming mode:
• Open and close the
slider
• Press and hold any
coffee button for
more than 3 sec
• Press and release
any coffee button
when machine is in
brewing mode or
automatic exit given
by the flowmeter
• Release corresponding coffee
button when
machine is in
programming mode
• Switch off machine
5 Descaling mode
• Switch on the
machine and wait
until ready
• Press and hold all
three coffee buttons
for at least 6 sec until
confirmation with a
beep.
• Regulate temperature to 70 °C (after
pump was started)
• Stop and start pump
with any coffee
button, no volume
brewing in descaling
mode
• Press and hold all
three coffee buttons
for at least 6 sec until
confirmation with a
beep.
Note: When machine is
switched off during any
descaling mode, then it
goes to descaling
mode ready state after
next switch on.
Version 1.0 en Prodigio service manual
21
OPERATION
6 Emptying mode
(evaporing)
• When slider is open
press and hold the
Ristretto and Lungo
coffee buttons
together for at least
6 sec. The other
coffee button flashes
for confirmation.
• Close the slider to
start the procedure.
1) Start pump
2) Heat up thermoblock to 105 °C
(100% power)
3) Stop pump wh e n
thermoblock temperature of 105 °C
is reached
4) Switch off thermoblock
5) Switch off machine
6) Block machine for
10 min
Switch off machine
7 Resetting mode
• Swi tch off machine.
• Press and hold the
Espresso and Lungo
coffee buttons
together for at least
4sec.
• Reset programmed
volumes to factory
settings (Ristretto
25ml, Espresso
40ml, Lungo 110ml)
• Reset automatic off
mode to 9 min.
• Reset water hard-
ness to "hard".
• Reset capsule
counter and
descaling counter
• Cancel pairing with
Nespresso App.
device
• Activate Bluetooth
®
Proceeds with self test
mode automatically
8 Auto switch off mode
(factory setting of 9 min
can be changed to
30 min)
• Automatica lly after a
certain period of nonuse.
• Manually at any time
by pressing Lungo
and Espresso coffee
buttons together for
more
than 3 sec
.
• Change automatic
OFF mode between
9 and 30 minutes:
Ensure machine is
turned off.
Press and hold Lungo
and Ristretto coffee
buttons together for
at least 3 sec.
• Switch off machine
after 9 min resp.
30 min if no coffee is
brewed or 9 min
resp. 30 min after
last brewed coffee
9 Failure mode
Automatically by following failures:
a) NTC short circuit
b) NTC not connected
c) Heat up too slow
d) Motor short circuit
e) Motor not connected
Machine indicates failure with blinking maintenance light as long as
the failure is present
When failure is fixed
Machine mode Enter mode Actions Exit mode

Prodigio service manual Version 1.0 en
22
OPERATION
4.3.2 Machine modes of milk frother
The following table helps to understand the operating modes of the milk frother:
4.4 Nespresso App (application software)
The MMI PCB of the coffee machine is equipped with a Bluetooth® LE (low energy)
module that can establish a wireless connection to a smartphone or tablet.
A special application software (app) is necessary to enable the dat a exchange between
the devices.
The new, of ficial Nespresso App extends the functionality of the Prodigio coffee machine
with:
• Capsule stock management
- Out-of-stock notification
- Automatic counter update after capsule purchase
• Remote and programmed brewing
• Alerts notifications
- Capsule container full
- Capsule blocked
- Water tank empty
• Maintenance notifications
- Descaling
- Machine Errors
• Tutorials
4.4.1 Prerequisites
Smartphone / tablet
Compatible smartphones or tablets with Apple iOS 8.1 or newer:
- iPhone 4S and newer
- iPad 3rd Generation and newer
- iPad mini
- iPod touch 5th Generation and newer
Compatible smartphones or tab lets with Android op erating system version 5.0 or ne wer
and Bluetooth
®
Smart functionality:
- Galaxy S3 / S4 / S4 mini/ S5
- Nexus 5 / 6
Machine mode Enter mode Actions Exit mode
1 Hot milk / milk
froth preparation
Press start button briefly
Start button lights up red.
Milk is heated and mixed.
Automatic switch-off
after preparation
2 Cold milk froth
preparation
Keep start button pressed
for approx. 2 sec
Start button lights up blue.
Milk is mixed only.
Automatic switch-off
after preparation
Check compatibility
of other smartphones
or tablets on this website:
www.nespresso.com/prodigio
Version 1.0 en Prodigio service manual
23
OPERATION
Nespresso App
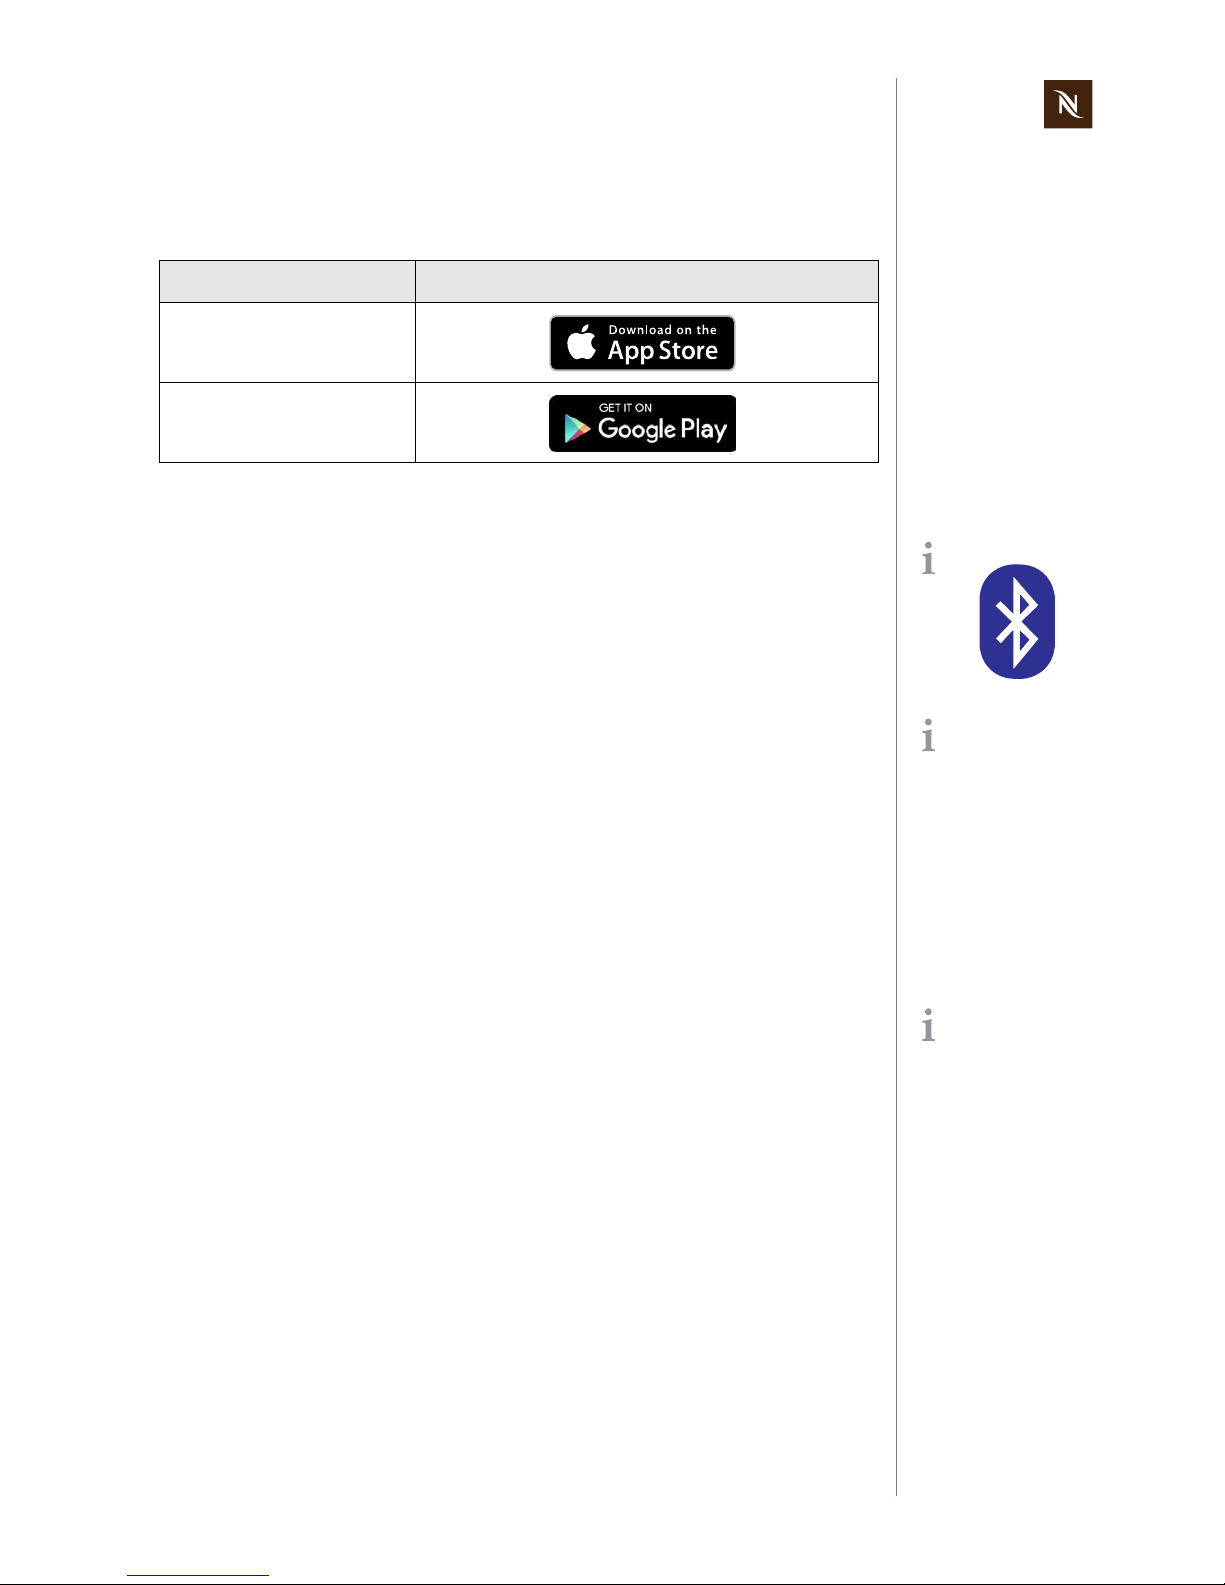
Download the official Nespresso App version free of charge on your smartphone or
tablet depending on the operating system:
Check Bluetooth® function
• Check that Bluetooth® is enabled on the smartphone or tablet. Look for the Bluetooth
®
symbol on top of the screen or check settings.
• Make sure that the coffee machine is switched on a nd in re ady mode. Th en sear ch
for a Bluetooth
®
device with a compatible smartphone or tablet and ch eck if the
Prodigio coffee machine appears on the Bluetooth
®
devices screen.
If the coffee machine cannot be detected as a Bluetooth
®
device
- the Bluetooth
®
function is deactivated
- or the machine is already paired with a device (fixed CMID).
In both cases a reset of the coffee machine is necessary:
• Switch off machine.
• Press and hold the Espresso and Lungo buttons together for at least 4 sec.
• All the buttons will turn on for 2 sec. as a confirmation.
4.4.2 Pairing smartphone or tablet with coffee machine
Pairing is necessary to link the coffee machine to the smartphone or ta blet resp. the
Nespresso App.
The CMID (client machine identification) of the smar tp h one or tablet and th e ser ia l
number of the coffee machine are used for identification.
Operating system Store
Apple iOS
Android
Bluetooth® symbol:
It is possible to deactivate the Bluetooth
®
function of the coffee
machine with the following
procedure:
Press simultaneously Ristretto and Espresso buttons and remove the plug
from the mains.
A reset of the coffee
machine enables the Bluetooth
®
function again.
Beside the pairing of
2 Bluetooth
®
devices,
multiple pairing is also possible:
• Pair 1 coffee machine
with several Bluetooth
®
devices (same NNSA
account).
• Pair 2 coffee machines
with the same Bluetooth
®
device.
Prodigio service manual Version 1.0 en
24
OPERATION
Pairing procedure
Nespresso App illus-
trations are either
symbolic or subject to
change depending on the
app version.
Even better, touch
coffee machine with
smartphone or tablet.
Pairing is not possible if the
distance between the two
devices is too big!
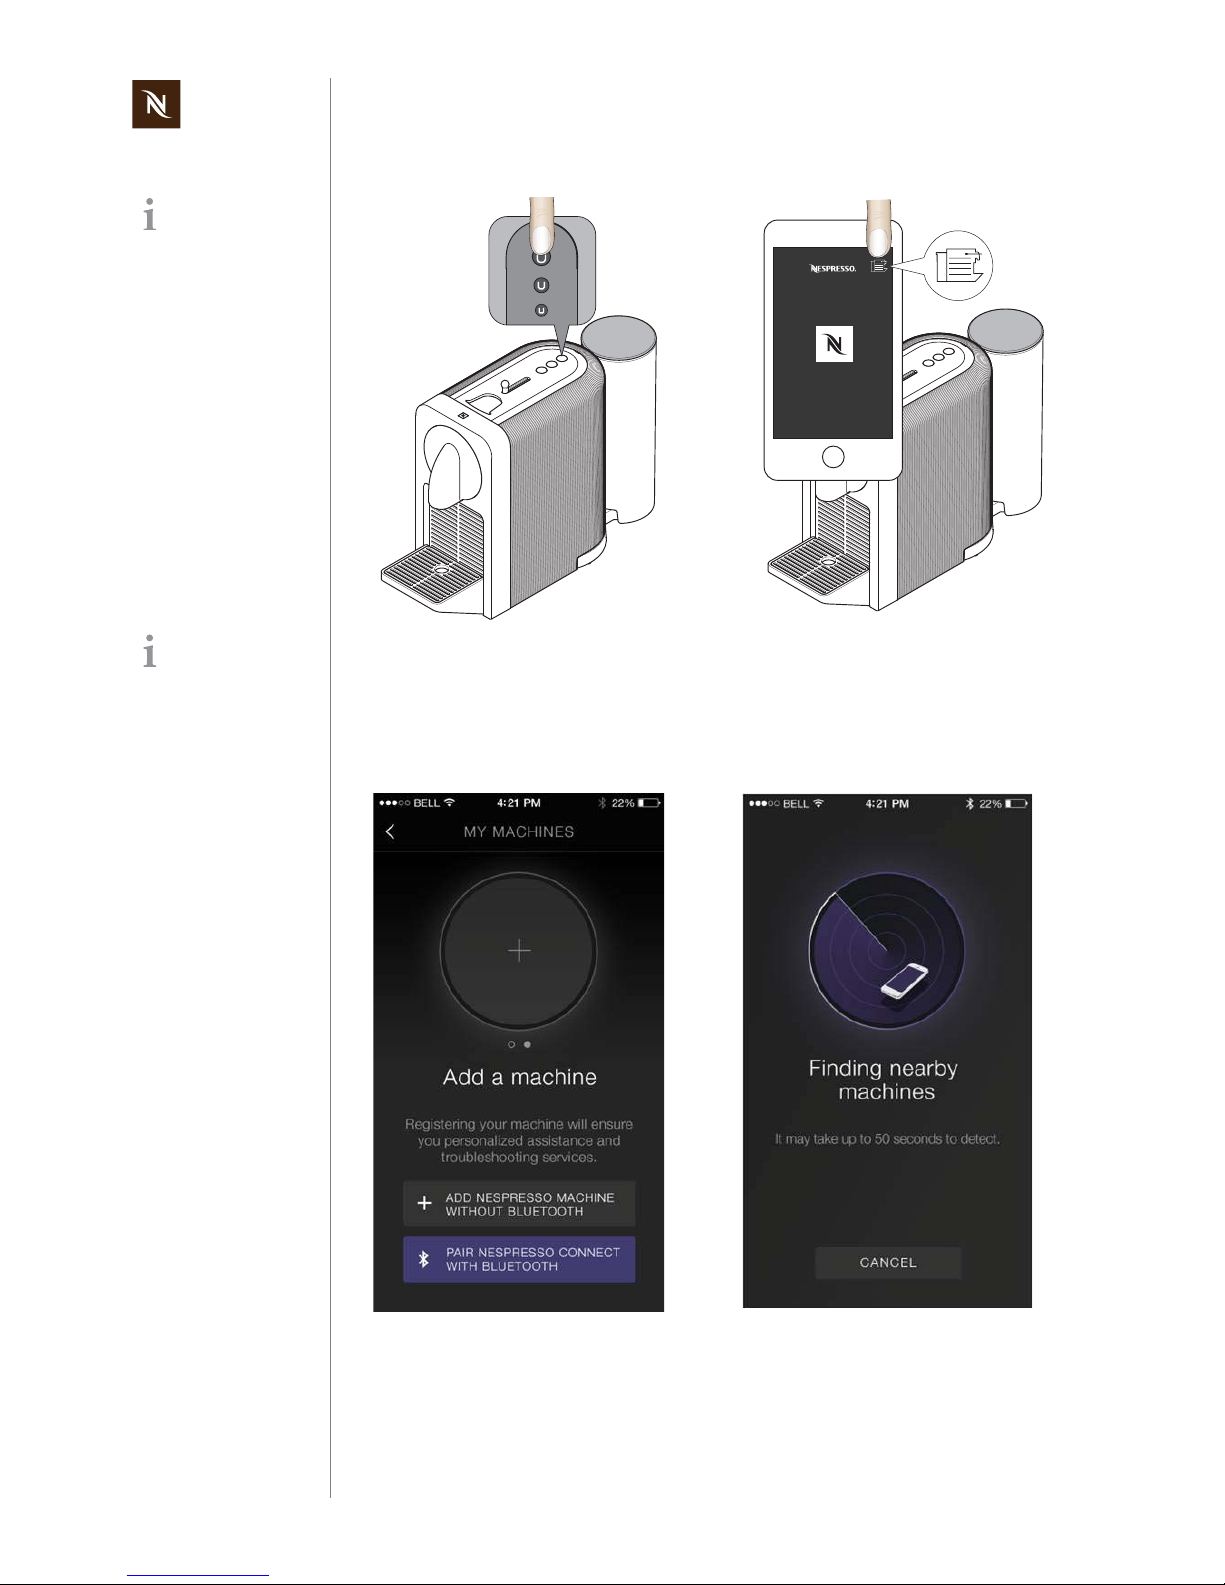
1) Switch on coffee machine by pressing
any coffee button.
2) Wait until lights stop blinking and
machine is in ready mode.
3) Hold a compatible smartphone or tablet in close proximity to the coffee
machine.
4) Launch Nespresso App on smartphone or tablet.
5) Touch machine icon.
6) Start search for coffee machine by
touching the Bluetooth
®
symbol.
7) Wait until coffee machine is detected.
Version 1.0 en Prodigio service manual
25
OPERATION
If pairing has failed
• Make sure the smartphone or tablet is in close enough proximity to the coffee
machine.
• Charge up the smartphone or tablet before pairing. Its smart power management
may turn off Bluetooth
®
if the battery level is too low.
• Make sure not to turn on any microwave close to the machine during pairing.
• Maintain a sufficient distance to devices that can interfere with the pairing process
such as a Wi-Fi/WLAN router.
Special advice for service technician
If a customer’s coffee machine was paired in the re pair center (e .g. for troubleshootin g):
• Reset settings after pairing.
• Reset settings of Nespresso App after use and before sending back the machine to
the customer. Otherwise it is not possible for the customer to pair the coffee
machine.
• Advice customer to pair the coffee machine agai n at home and to check and ad just
the settings.
Multiple devices can
be connected to the
Prodigio coffee machine
only if using a unique
Nespresso club members
number (NNSA account).
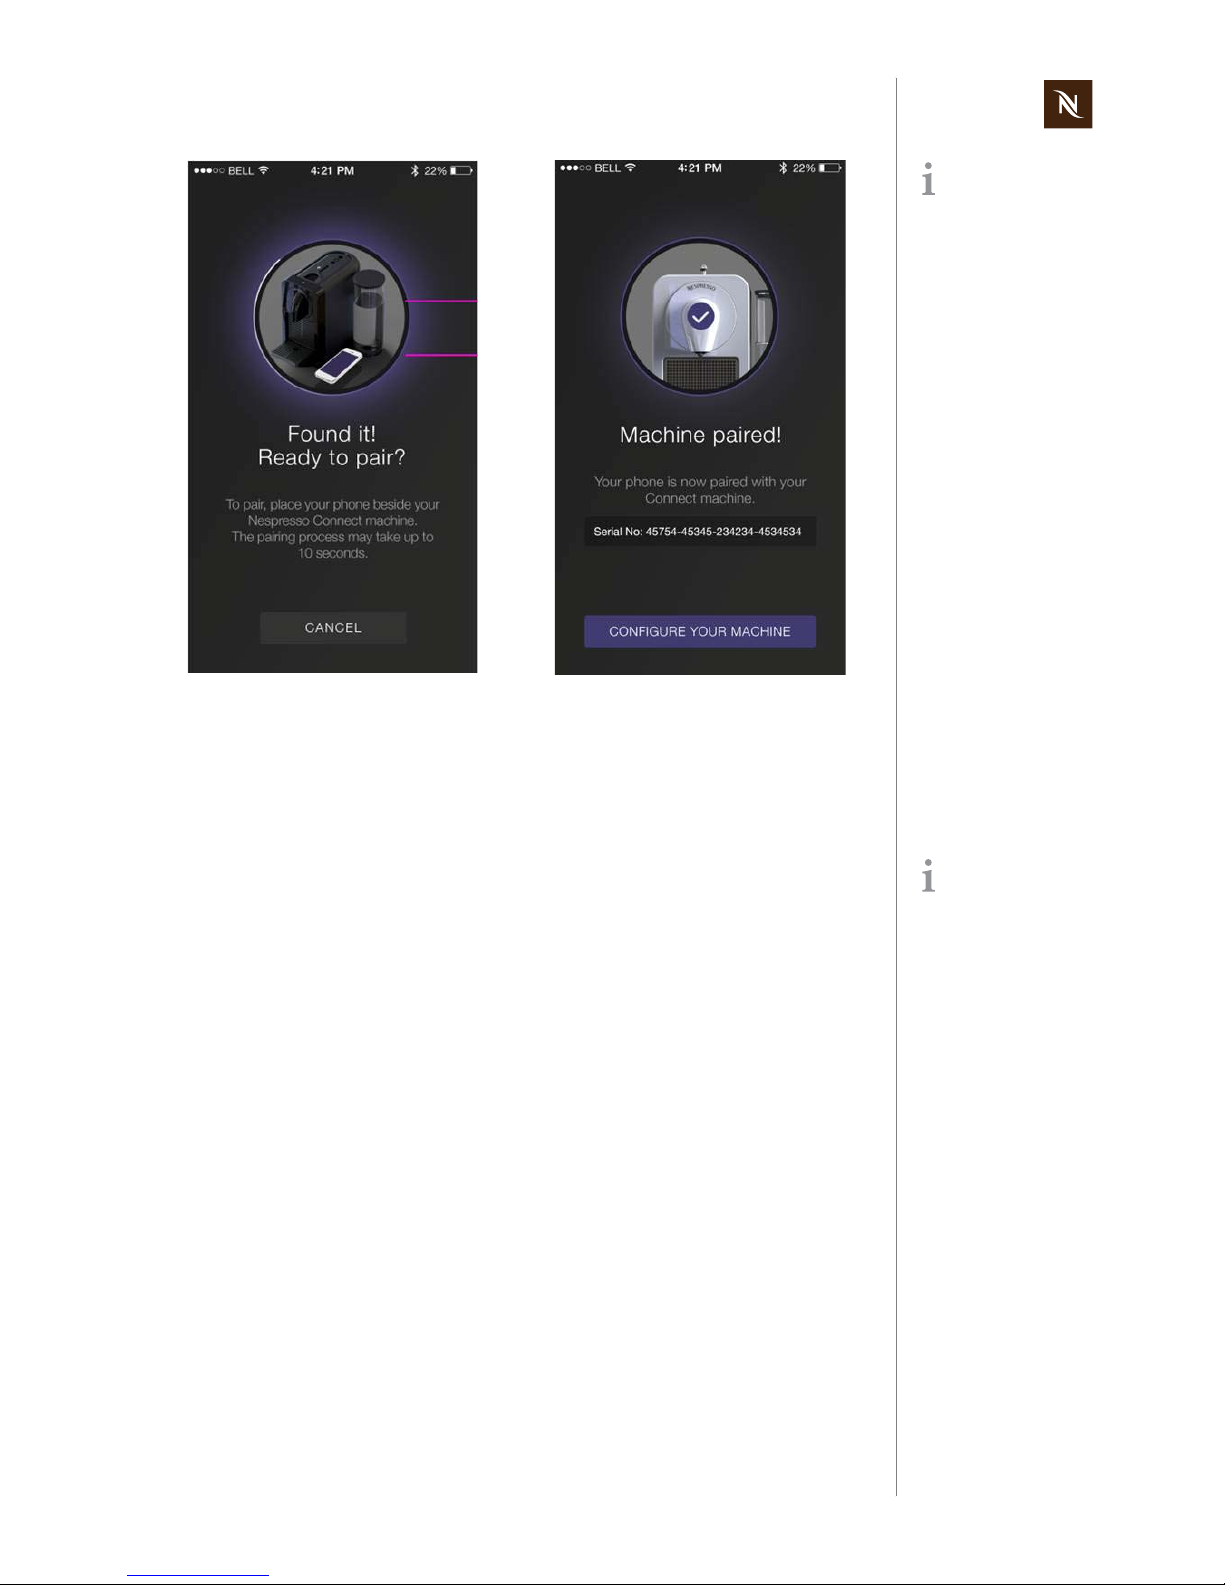
8) Ensure the smartphone or tablet is
placed next to the coffee machine during pairing.
9) Pairing takes place automatically.
10) When the pairing is completed, the
Nespresso logo on the front of the coffee machine will blink 3 times.
The Bluetooth® mod-
ule of the coffee
machine is situated at the
top, beside the coffee buttons.

Prodigio service manual Version 1.0 en
26
OPERATION
4.4.3 Nespresso App - coffee machine setup
If the water hardness
test is omitted, level 5
(very hard water) is used as
default setting.
1) Enter name for coffee machine. 2) Use a test strip to determine the local
water hardness.
3) Select appropriate level. 4) Set the capsule counter.
Version 1.0 en Prodigio service manual
27
OPERATION
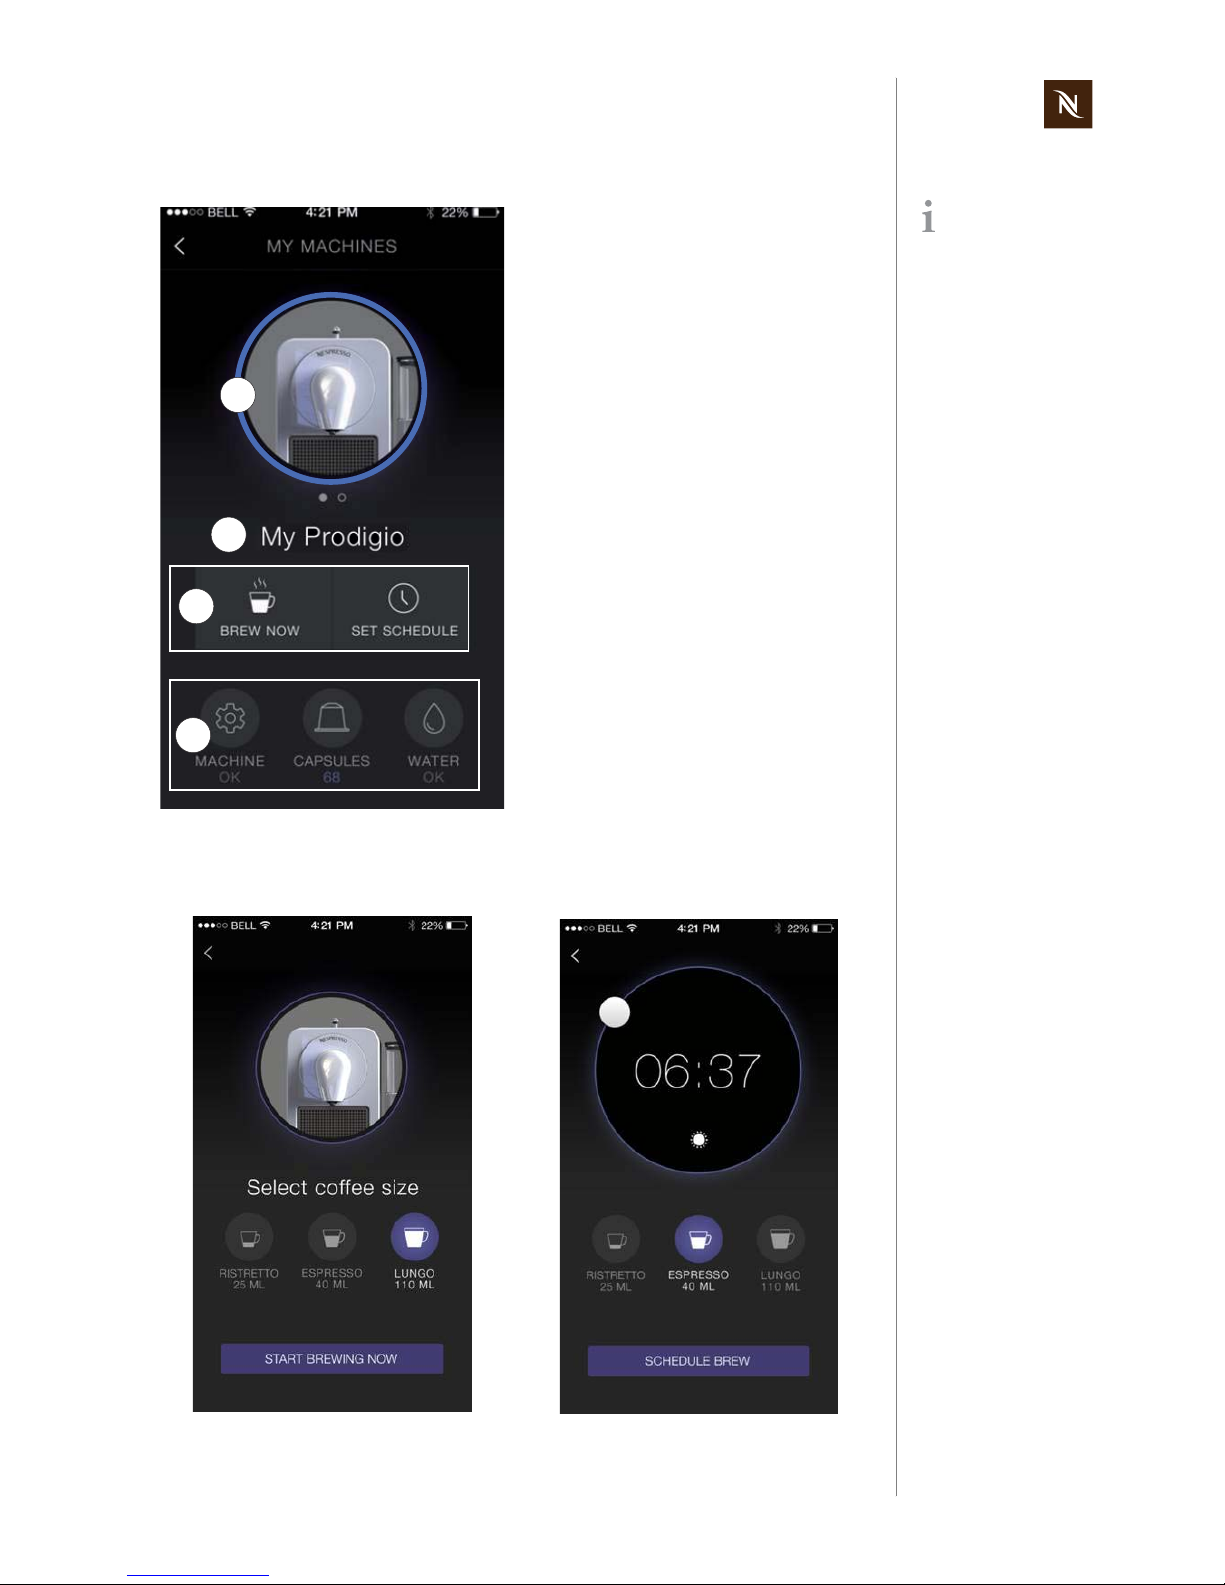
4.4.4 Nespresso App - machine page overview
4.4.5 Nespresso App - coffee brewing management
Touch the desired brewing menu icon on the machine page: Brew now / Set schedule
After multiple pairing,
different machine pictures can appear in the
machine menu.
1) Machine menu with
- corresponding machine picture
- ring showing overall machine status
(blue ... ok, orange ... problem,
error)
2) Individual machine name
3) Brewing menu
•Brew now
• Set schedule for coffee preparation
4) Status menu
• Machine
• Capsules
•Water
2
3
4
1
 Loading...