

Page 1
Navigation mirror
User manual
NS R- N4 3
Page 2

Table of contents
Chapter one: Product introduction . . . . . . . . . . . . . . . . . . . . . . . 1
Main feature . . . . . . . . . . . . . . . . . . . . . . . . . . . . . . . . . . . . . . . . 1
Specification . . . . . . . . . . . . . . . . . . . . . . . . . . . . . . . . . . . . . . . . 1
Package . . . . . . . . . . . . . . . . . . . . . . . . . . . . . . . . . . . . . . . . . . . . 1
Product introduction . . . . . . . . . . . . . . . . . . . . . . . . . . . . . . . . . . 2
Chapter two: Installation and wiring . . . . . . . . . . . . . . . . . . . . . . . . . 3
How to install GPS mirror . . . . . . . . . . . . . . . . . . . . . . . . . . . . . . 3
How to wiring . . . . . . . . . . . . . . . . . . . . . . . . . . . . . . . . . . . . . . . 4
Micro SD card . . . . . . . . . . . . . . . . . . . . . . . . . . . . . . . . . . . . . . . 5
Chapter three: Adjustable guide line . . . . . . . . . . . . . . . . . . . . . . . . . 5
About guide line . . . . . . . . . . . . . . . . . . . . . . . . . . . . . . . . . . . . . 5
What the regular guide line is . . . . . . . . . . . . . . . . . . . . . . . . . . . 6
How to adjust the guide line . . . . . . . . . . . . . . . . . . . . . . . . . . . . 6
Chapter four: Primary function . . . . . . . . . . . . . . . . . . . . . . . . . . . . . 7
The main interface. . . . . . . . . . . . . . . . . . . . . . . . . . . . . . . . . . 7
Navigation Functions and features . . . . . . . . . . . . . . . . . . . . . . . 8
Video operation interface . . . . . . . . . . . . . . . . . . . . . . . . . . . . . . 8
Audio player operation interface . . . . . . . . . . . . . . . . . . . . . . . . 10
Photo viewer operation interface . . . . . . . . . . . . . . . . . . . . . . . 11
E-book reader interface and operation . . . . . . . . . . . . . . . . . . . 13
Volume adjust . . . . . . . . . . . . . . . . . . . . . . . . . . . . . . . . . . . . . . 15
Unit conversion . . . . . . . . . . . . . . . . . . . . . . . . . . . . . . . . . . . . . 15
Screen calibration . . . . . . . . . . . . . . . . . . . . . . . . . . . . . . . . . . . 15
Language setting . . . . . . . . . . . . . . . . . . . . . . . . . . . . . . . . . . . . 16
Navigation path . . . . . . . . . . . . . . . . . . . . . . . . . . . . . . . . . . . . . 16
Default set . . . . . . . . . . . . . . . . . . . . . . . . . . . . . . . . . . . . . . . . . 16
Chapter five :Troubleshooting Guide . . . . . . . . . . . . . . . . . . . . . . . . 17
Introduction
Adjustable guide line
Primary function
Specification
CP U
MS B2531 A RM cortex A7 8 00 MH z
Flash
128M B
Memory 128M B
Temperat ure
o o
Opera ng Temp erature: 0 C to 60 C
o o
Sto rage Tempe rature: -20 C to 60 C
Working humidity range
45% to 80% RH
Storage humidity tange
30% to 90% RH
Atmospheric pressure 86KPa to 106Kpa
GPS Cold start : <42s ; hot start < 3s(in the open area)
Micro SD Card
The Maximum capacity of Micro SD card supported to 32GB
Main features
Opera ng system : Microso window CE 6.0.
4.3 Inch ultra-high bri ght nes s display with resoluo n of 48 0×272 pixe ls.
Built- in sp eaker, volume a dju sta ble .
Automac fa de- out hotkeys and touch -sc ree n opera on.
Built- in sensive GPS antenna.
The navigaon soware runs from the Micro SD card directly.
Back-up camera display and adjustable gu ide l ine
Automaca lly brightnes s adj ust men t
The box contains the following accessories, please confirm:
● Rearview mirror GPS navigator
● Micro SD card
● Wire harness
● User's manual
● Car bracket
For the items listed above, please confirm the actual products. If any damage,
Please contact with the distributor or the agent as soon as possible.
Package
Please read this use r’s manu al ca refull y
Chapter one: Introduction
1
Trou bleshoo ting
Guide
Installation and wiring
Page 3
3
2
Product intruction
Installation and wiring
Adjustable guide line
Primary function
Remove the original mirror
1 2
Different cars have different brackets, depending on your vehicle make
and manufacturer.
There are many methods for removing the original rear-view mirror, however
please don’t force the mirror off the bracket. The manufacturer will not be
responsible for damage caused to your vehicle as a result of installation of this
mirror monitor.
1
5
3
4 6
2
Install GPS mirror monitor on the base
Chapter two: Installation and wiring
How to install GPS Mirror
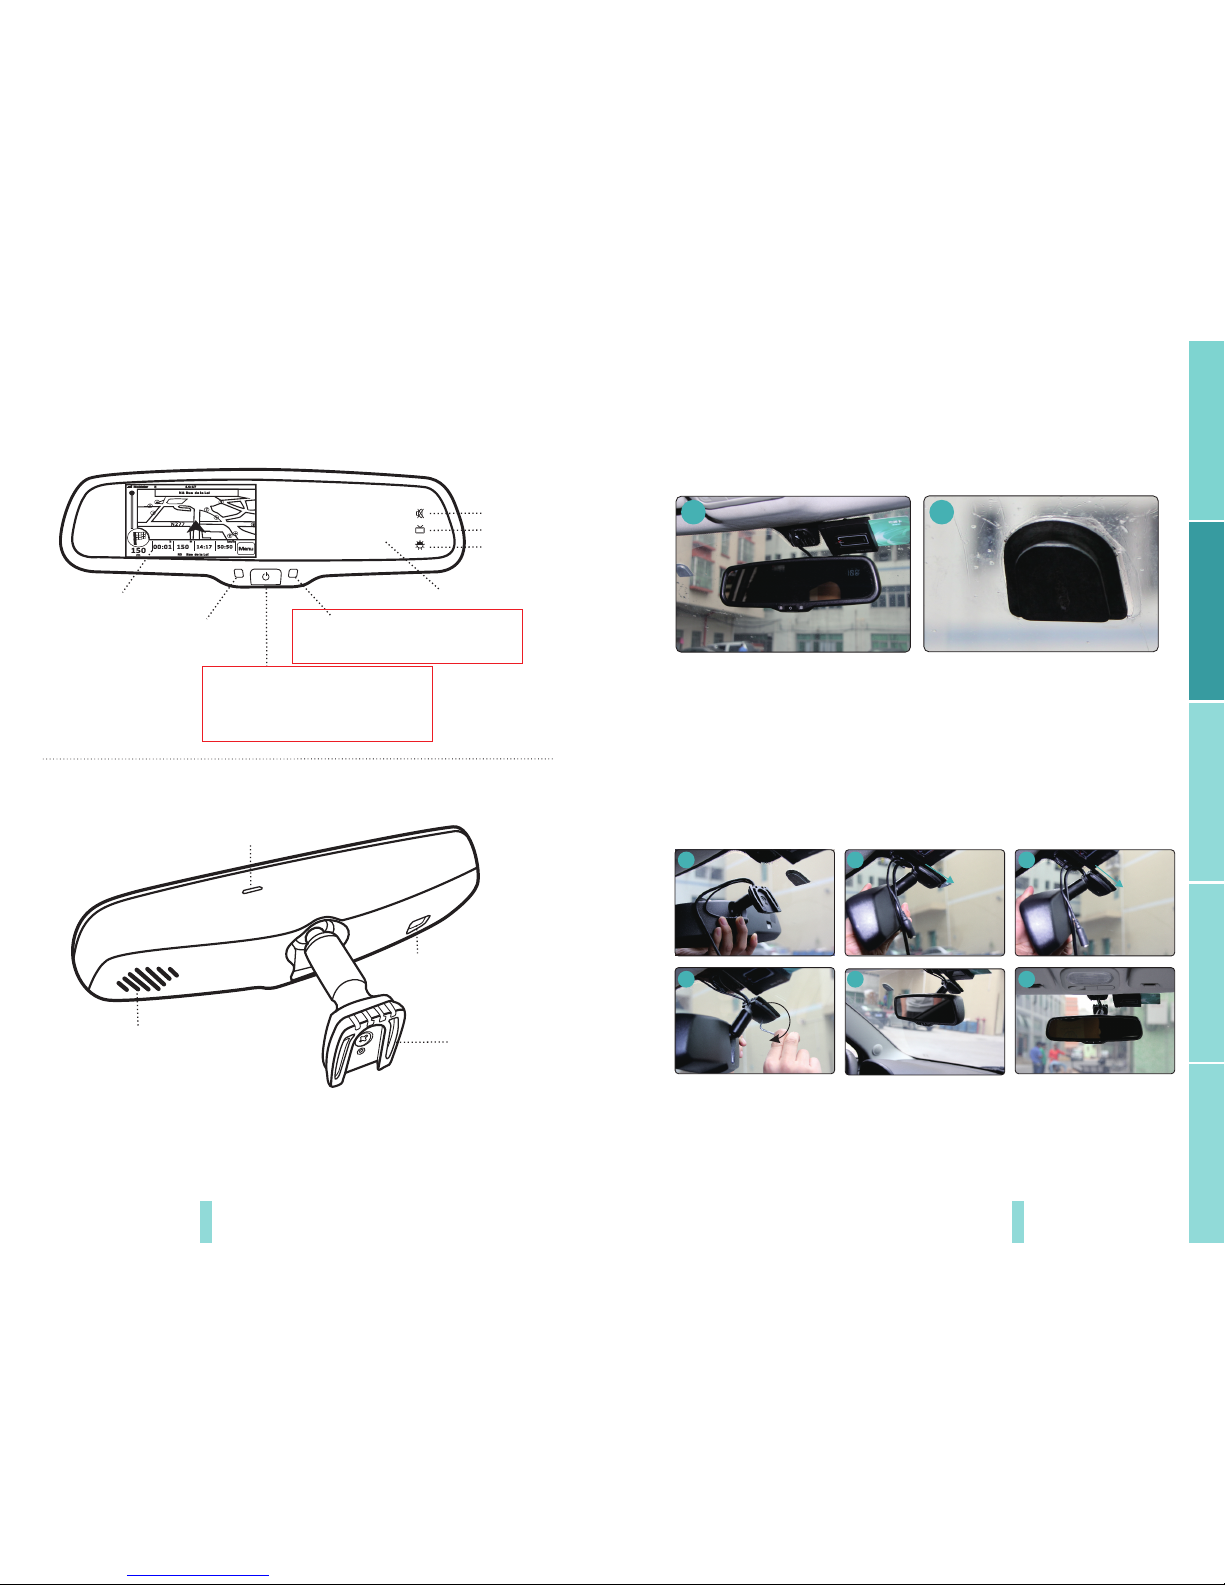
Power on LED (solid)
When screen is on, short press is to
back to main menu.
When screen is off, short press is to
turn on the screen and back to main menu.
Ambient light sensor
4.3 inch TFT LCD screen
Mute
Video switch
Screen on/off
Long press: restart the device
High reflection glass
Micro SD card slot
Bracket
Speaker
Light sensor
Product introduction
Trou bleshoo ting
Guide
When m irror i s mute, t he indi cator is r ed.
When v ideo is i nput, i t is yell ow. Apart f rom tho se
two st ates, th e indic ator is gr een.
Power Button
Page 4
5
4
Product intruction
Adjustable guide line
Primary function
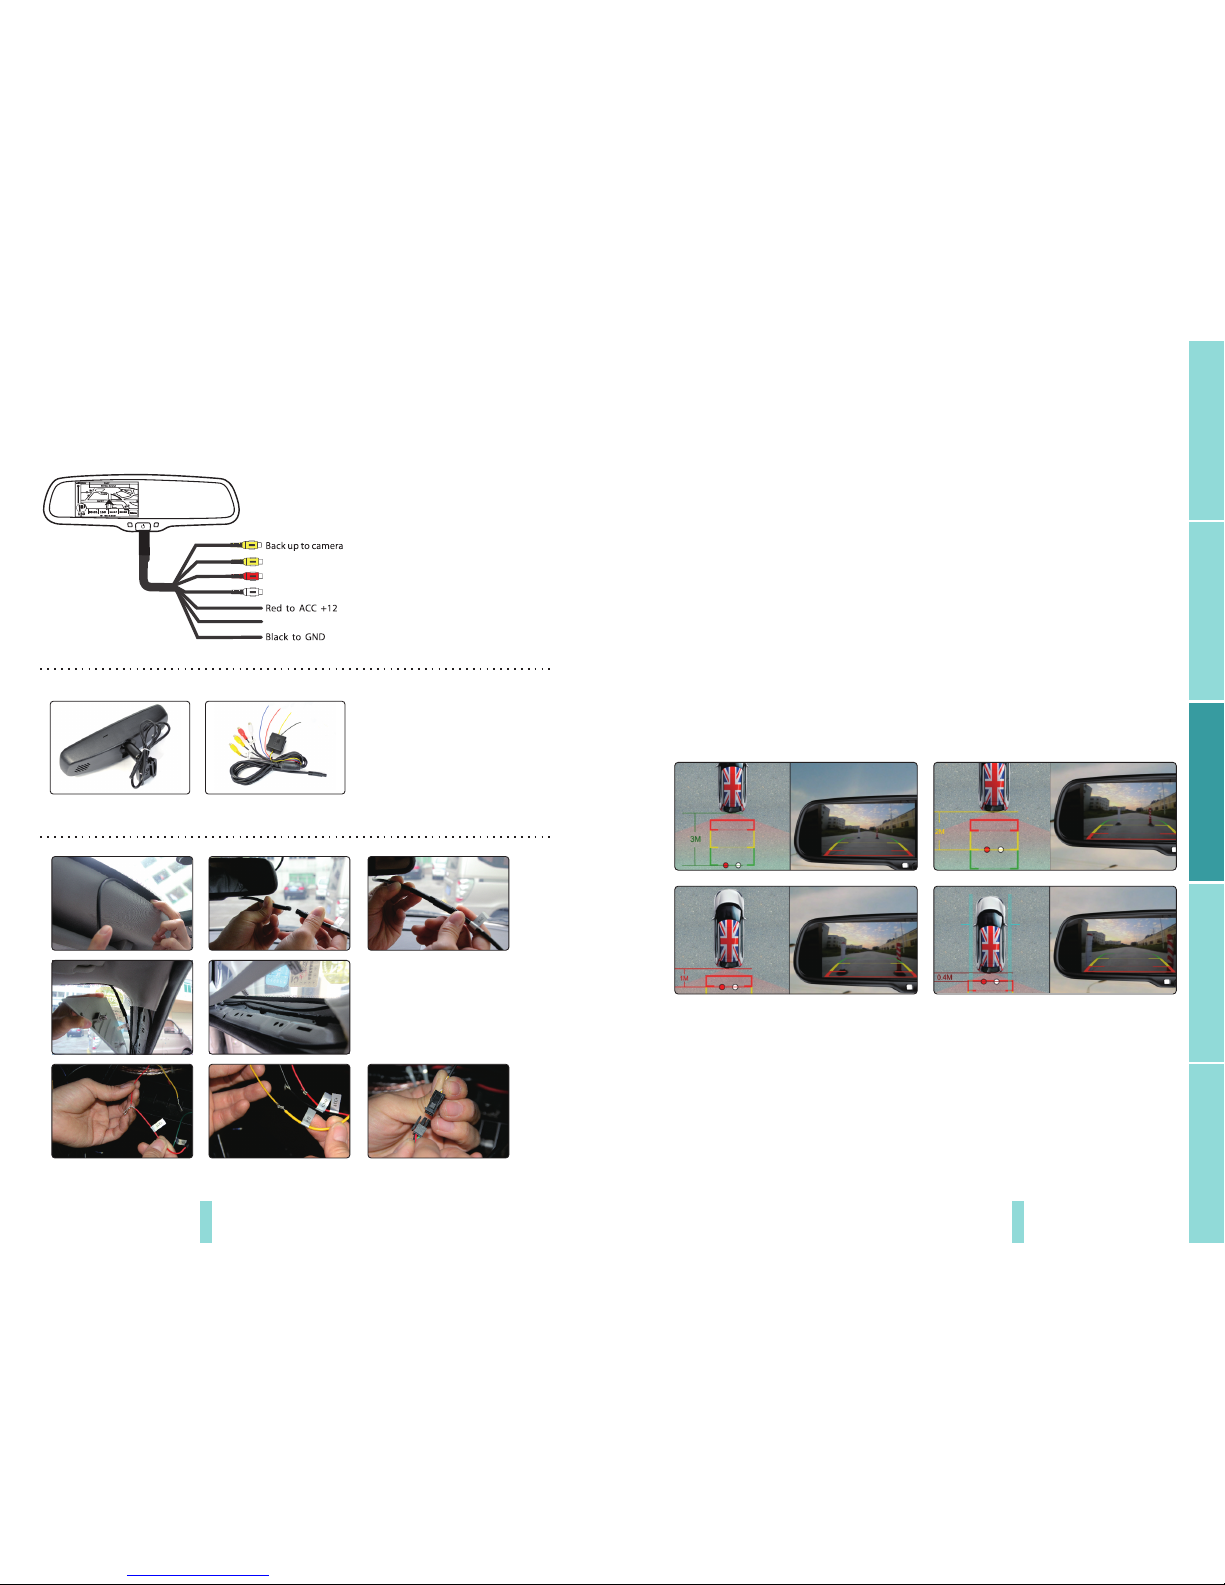
After the mirror is mounted, you need to run the cable along the roof lining and
down the pillar so you can connect to Power and the rear view camera
Video in
Blue Mute Wire
Right sound output
Left sound output
How to wire
GPS rearview mirror monitor
GPS mirror monitor cable
Camera(Not Included)
8
9
The Micro SD car d contains th e navigation sof tware, map .
Note:
Please do not take out the Micro SD card when the system is on. When
inserting the Micro SD card pay attention to the right derection. If you
insert the card improperly, you will damage the Micro SD card.
Micro SD card
Genera lly, to help dri vers estimate the distance fro m obstac les , there are
three li nes for refere nce -red , yel low a nd green. Those t hree lin es ar e
displayed o n the monitor when car is reversi ng. The green line is 3m f rom t he
back of car and the yellow li ne is 2 m. The distan t red l ine i s 1m from th e
backside of car while the c los ed re d line is 0.4m. Bot h refe ren ce lines on the
lef t and right shoul d leave 0.2m sp ace f rom t he ca r.
20C M20C M
Chapter Three: Adjustable guide line
About guide line
Trou bleshoo ting
Guide
Installation and wiring
Page 5
7
6
Reg ula r guide line is fixed. But in stallation sites of came ras are differ ent a s
wel l as ca r size. Th e fixed gu ide l ine is not accurate enough for drivers.
There wi ll be a great difference bet wee n regula r and f ixe d gui de li nes and
car 's re al gu ide lines, e spe cially when camera is mounted on the left or
right side of car backsid e. It m ay cause a cci dents.
How to adjust the guide line
According to the site of standard reference line, we can put reference objects
such as desks in the back area of car. Compared with the marked reference
objects, we can adjust the sites and angle of two guide lines displayed on the
monitor. You will get the accurate and safety guide lines once they coincide with
the reference objects.
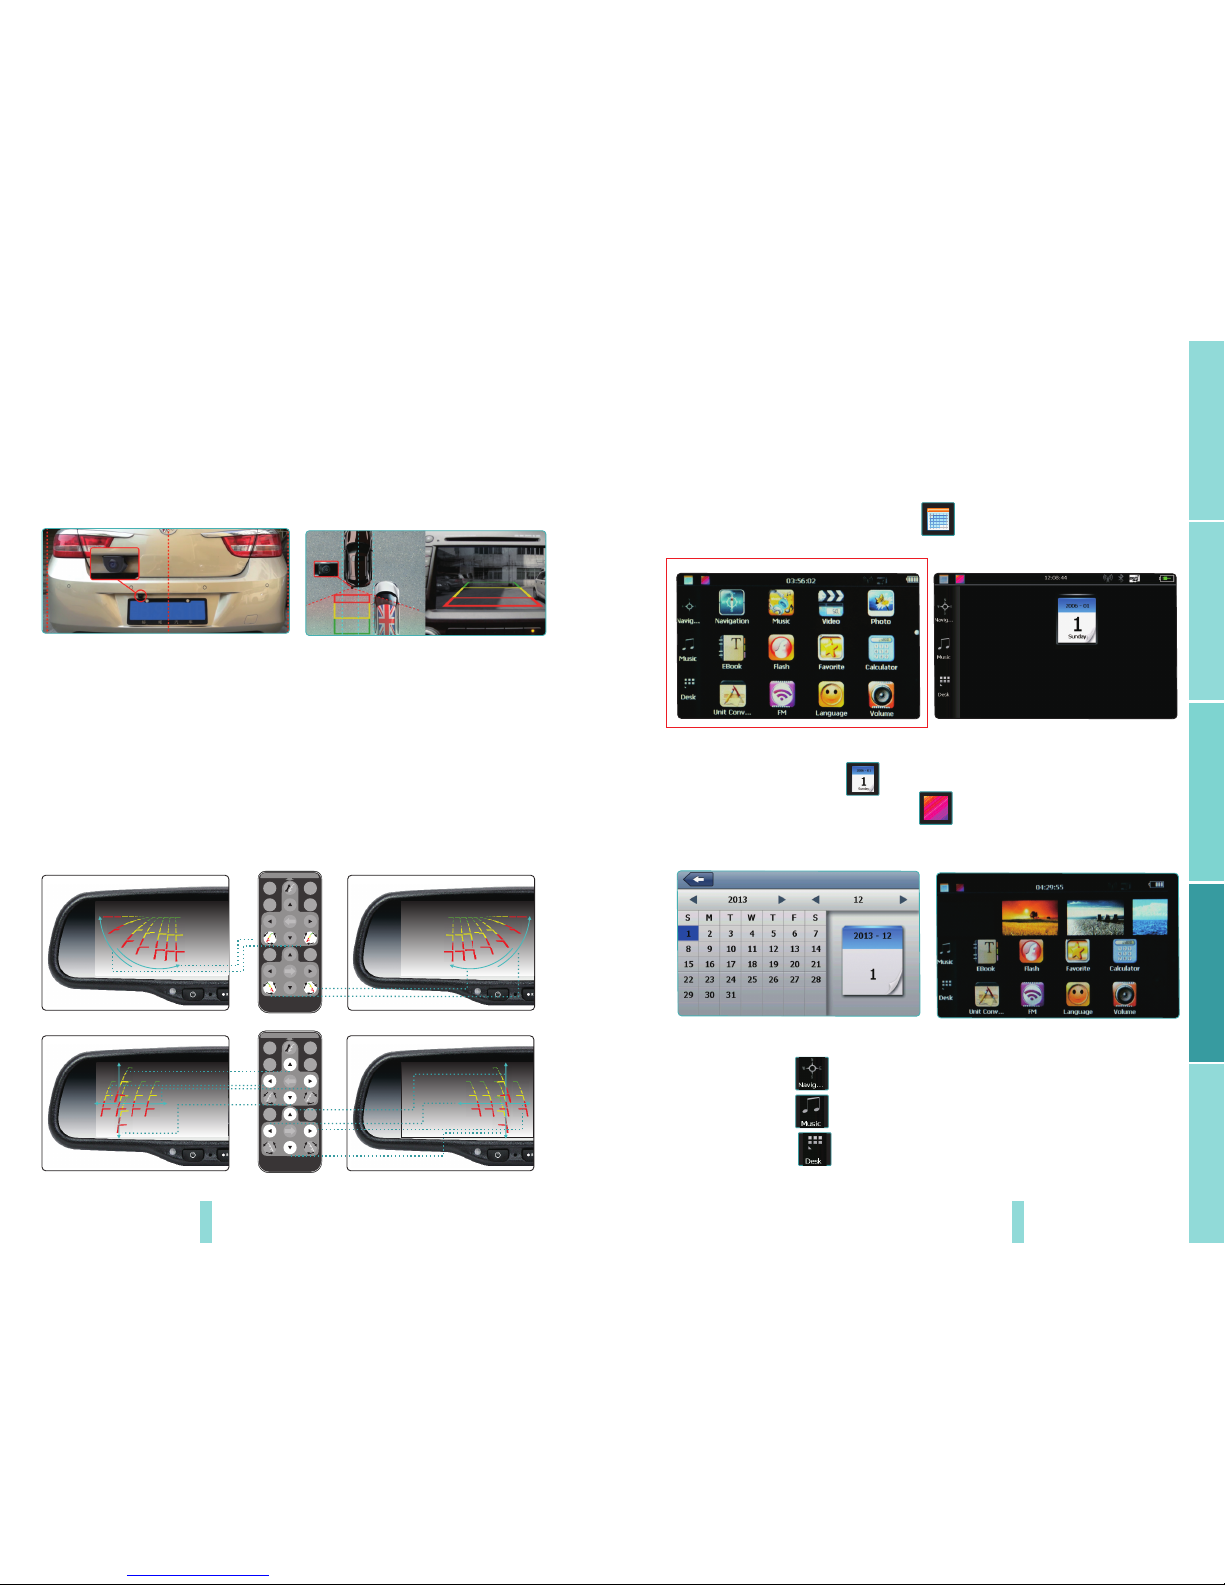
Long press seng buon is to enter into “guide line adjustment” mode. The
upper half of the remote is to adjust le guide line while the boom half of the
remote is to adjust the right one. The up, down, le and right buons are to
adjust the locaon of guide lines. The clockwise rotaon contra rotaon buons
are to adjust the angle of guide lines. It is easy to operate and calibrate.
What the regular guide line is
POWER
LEFT
RIGHT
Check Surrounding for safety
Long press to set guide line
MENU UP
REC
DOWNMODE
POWER
LEFT
RIGHT
Check Surrounding for safety
Long press to set guide line
MENU UP
REC
DOWNMODE
Leg uidel ine rota on Rig htguid eline rota on
Leg uidel ine move Rig htguid eline m ove
Product intruction
Adjustable guide line
Primary function
Chapter Four : Primary Function
The main interface
Main menu
4-1
Click the top le corner of the interface Desktop display the date, show in
Figure 4-2
Double-click the date icon enter the date seng interface, show in figure
4-3
4-2
4-3
Click the top le corner of the interface change the desktop display
background , show in figure 4-4
4-4
Click the le buon quick access to navigaon map
Click the le buon open audio player
Click the le buon rapid deployment desktop applicaon
Trou bleshoo ting
Guide
Installation and wiring
Page 6
Funcons
Navigaon
Video player
Photo viewer
E-book
Audio player
Seng
Provide navigaon service
Support ASF, AVI, WMV, 3GP, MP4 and FLV format. Support
progress adjust, pause and full screen play
Support JPG,BMP and PNG format. Support photo rotate,
enlarge/reduce pictures, automac play and so on
Text format: txt. Support pag
e selecon
Audio format: WMA, Mp3. Support random playing,
sequenal playing, repeat playing, pause, previous/next, volume
Brightness, Volume, Languages, Power, Time, System, Default,
GPS Info, Navipath.
Navigation functions and features
Please see User G uid e PDF s tored on t he su pplied Micro S D Card.
Or to d own load, plea se go to
htt p:/ /ndrive.com/sites/defaul t/files/ UG_V 11_ PND.pdf
9
8
Product intruction
Adjustable guide line
Primary function
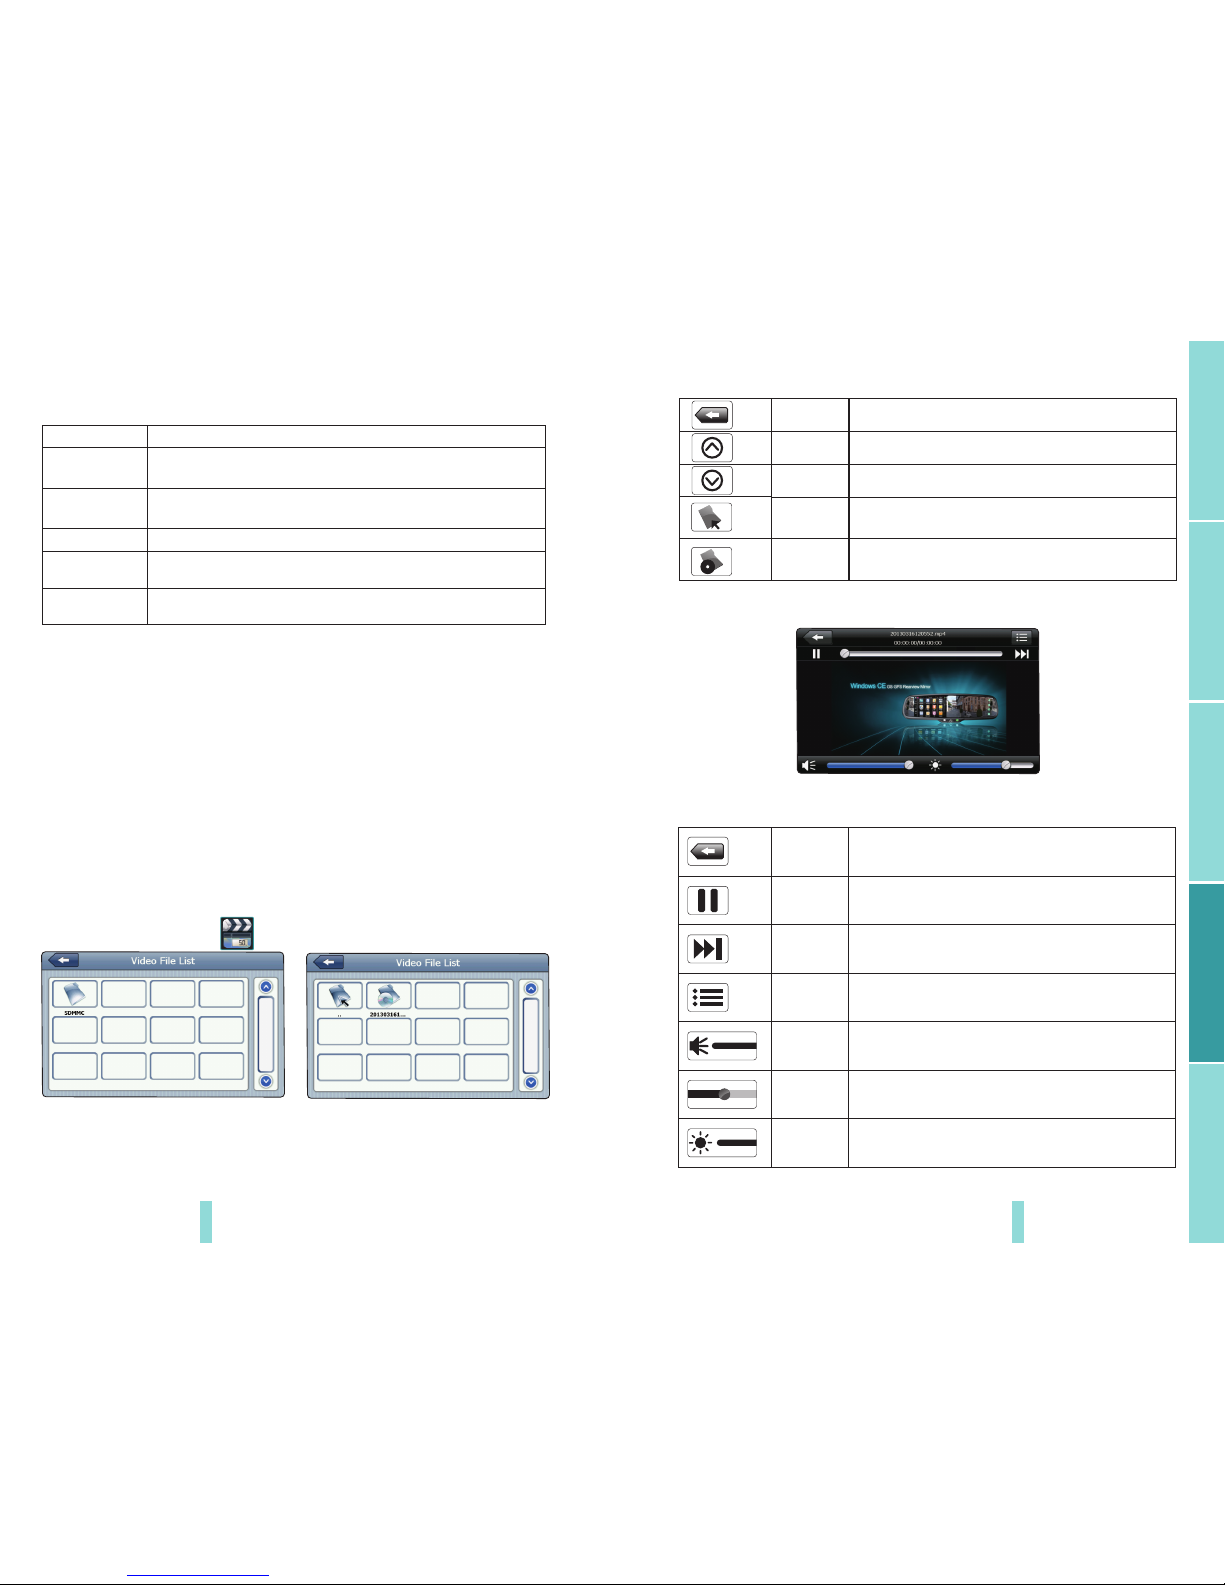
Video operation Interface
Functions and features
Support ASF, AVI, WMV, 3GP, MP4 and FLV
Support full-screen playing, progress choosing and file selecting.
Before using the Video player, please copy your video file(ASF, AVI, WMV, 3GP,
MP4 and F LV) to any folder
Operation:
Single click the Video button to enter the video file list as the picture 4-5
4-5 4-6
Brightness
adjust
Playing
progress
Vid eo
fol der
name
Video folder name
Vid eo
name
Show vid eo na me
Choose the video to enter the playing interface as 4-7
4-7
Adjust brightness with stylus while moving toward
le and right.
Single click volume. It shows volume is decreased
when it shi toward le. While volume is increase
when it is shied toward right.
Single click and shi to video file list, and then
choose your favorite video.
Adjust the playing progress by slide the progress
bar; go le for backwards, go right for forwards.
It shows stop playing. Single click will connue
to play.
Click to close the video list;
P lay next video.
Close
Play
Next
File list
Volume
Close
Last
next
Single click to close current file.
Show last page
Show next page
Trou bleshoo ting
Guide
Installation and wiring
Page 7
11
10
Product intruction
Adjustable guide line
Primary function
Play
interface
Full screen play. Double click to return normal
play status.
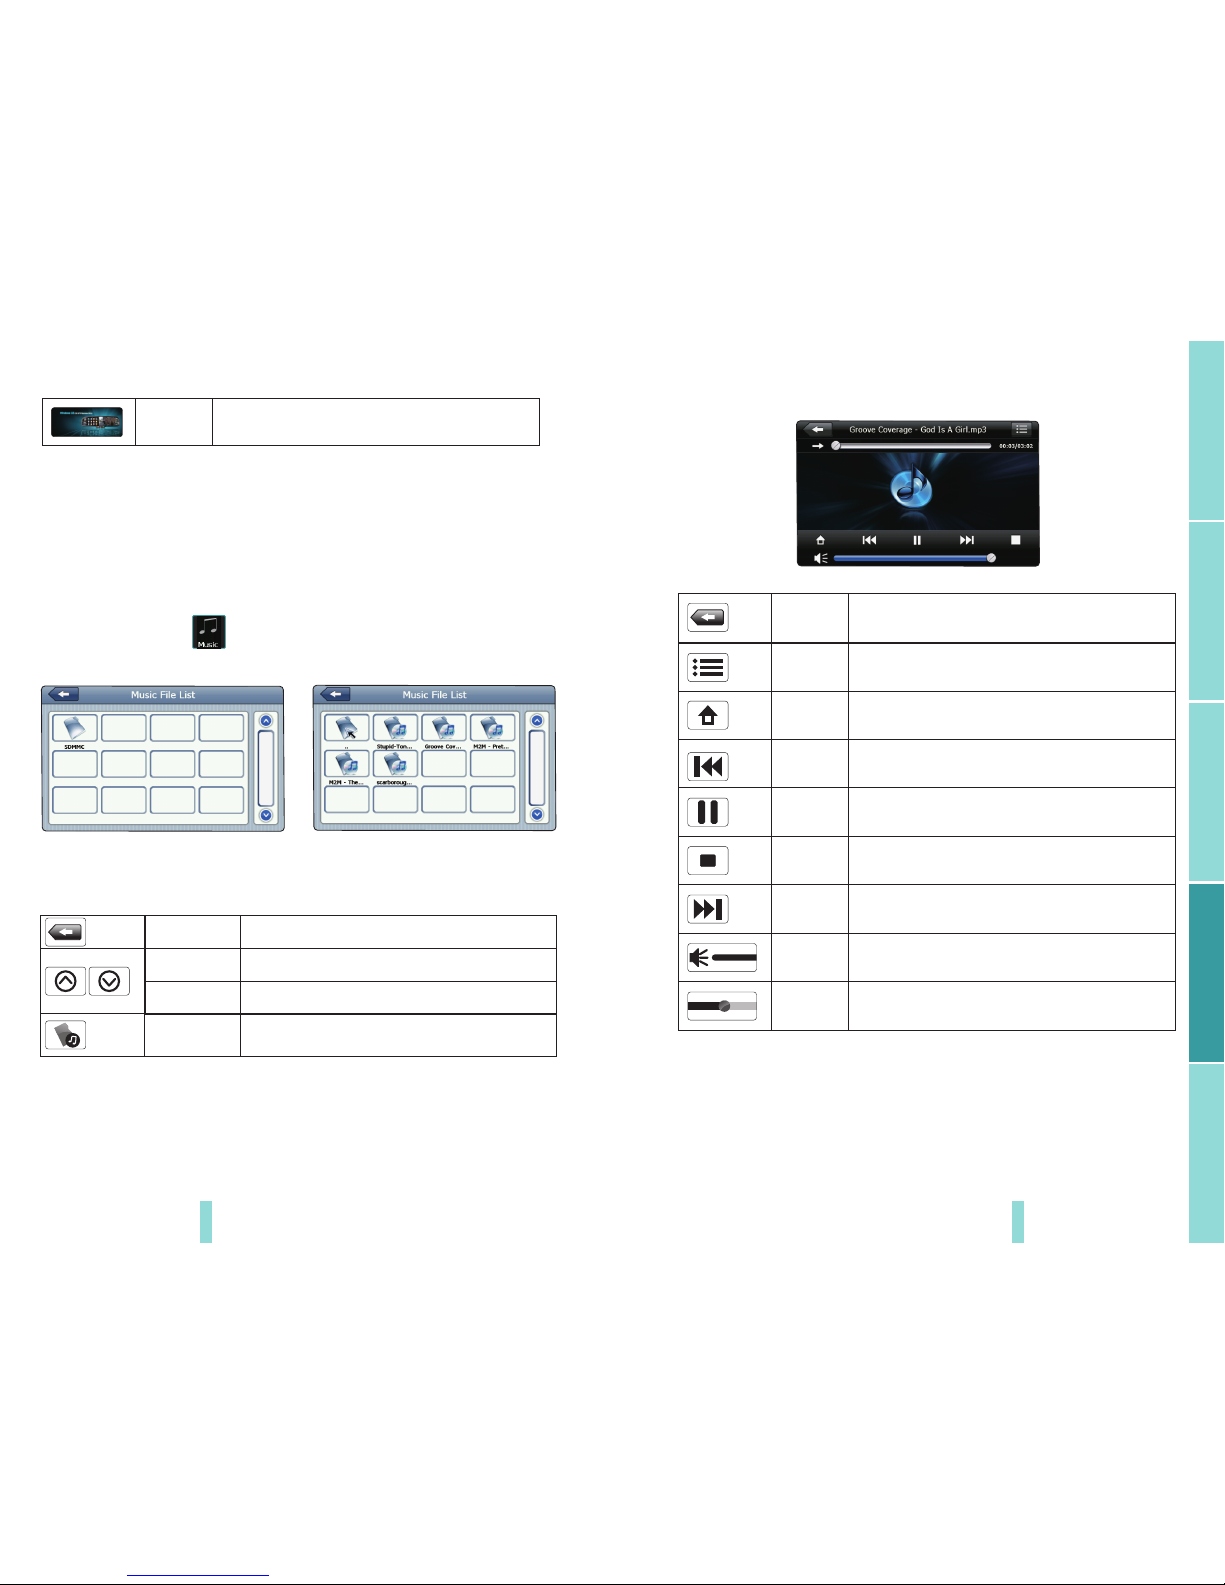
Audio player operaon interface
Funcons and features
The audio player supports MP3 and WA V format, you could set the playing sequence
as you wish. Before using the audio player, please copy the files to any folder.
Operaon method
Single click th e bu on to e nter Mus ic fil e list as
4- 8
4- 8 4- 9
Close
Last
Next
Close current file
Show last page
Show next page
Song name
Show song nam e
Funcon in str ucon
Choose the song t o enter th e playin g interface as 4-1 0
4- 10
Playing
progress
Adjust volume. It shows volume is decreased when
it shi toward le. While volume is increase when
it is shied toward right.
To play and pause, single click to pause, click
again to play connuously
Single click to close the audio player
Close
Play / pause
Volume
Play the previous song
Pre vio us
song
Single click to stop playing
Stop
Play the next song
Single click to display the play list, and choose your
favorite
Open the
play list
Home page Home page
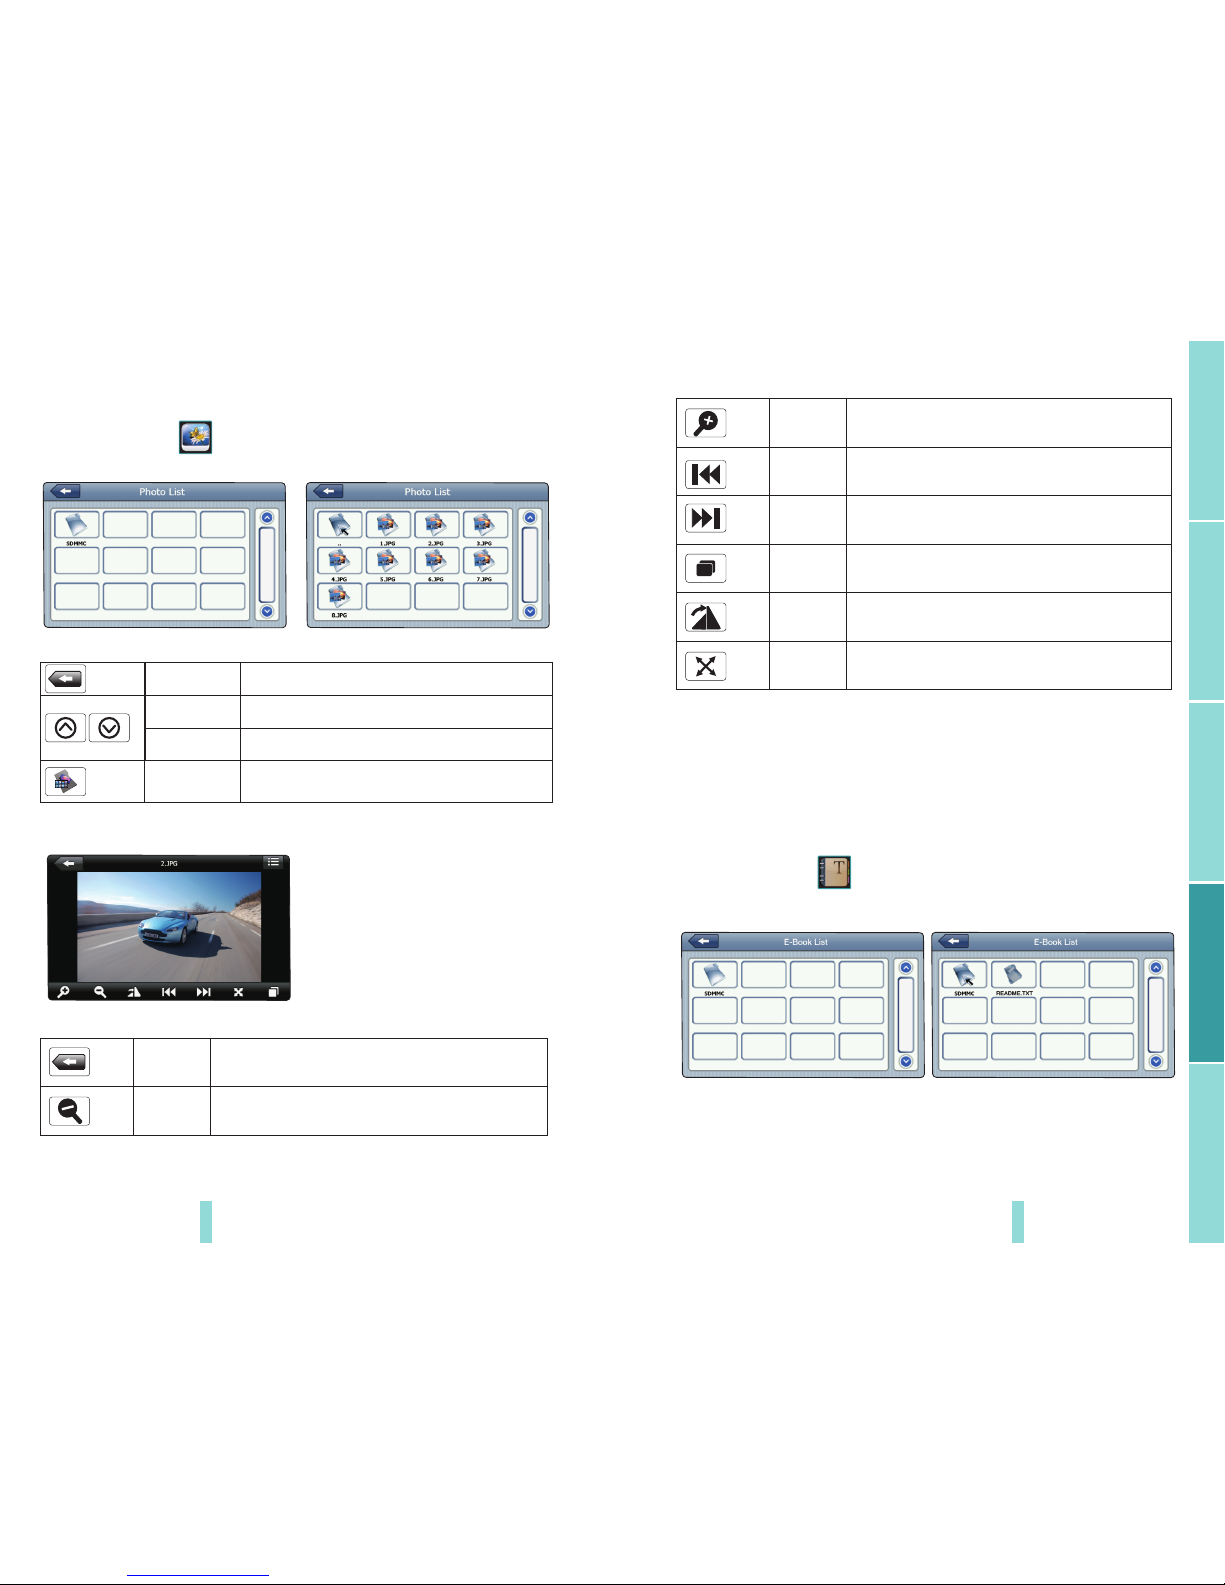
Photo viewer operaon interface
Funcons and features
Supports JPG ,BMP and PNG
Support picture rotate, picture enlarge/reduce and automac play.
Before using the photo viewer, please copy your photos to any folder.
Trou bleshoo ting
Guide
Installation and wiring
Adjust the playing progress by slide the progress
bar; go le for backwards, go right for forwards.
song
Next
Page 8
13
12
Product intruction
Adjustable guide line
Primary function
Operaon method
Single click the buon to open the photo list as picture 4-11
4- 11 4- 12
Close
Last
next
Close the photo list
Show last page
Show next page
Flie
Single click to enter the photo file
Choose the picture to enter play interface as 4-13
4- 13
Close Click to close the viewer
Red uce
Enlarge Enlarge current picture in proporon
Previous Show the previous picture
Reduce current picture in proporon
Next Show the next picture
File list
Single click and shi to video file list, and then
favorite picture
Rotate Click to rotate the picture by 90 degree
Automac
Play
Play all the pictures as a slide show in full screen
from the current picture
E-book reader interface and operaon
Funcons and features
Support TXT
Support turning over page, page browse, and file choosing.
Before using e-book funcon, please copy your TXT file and save it to any folder.
Operaon
Single click the buon to enter E-book list as 4-14.
4- 14 4- 15
Trou bleshoo ting
Guide
Installation and wiring
Page 9
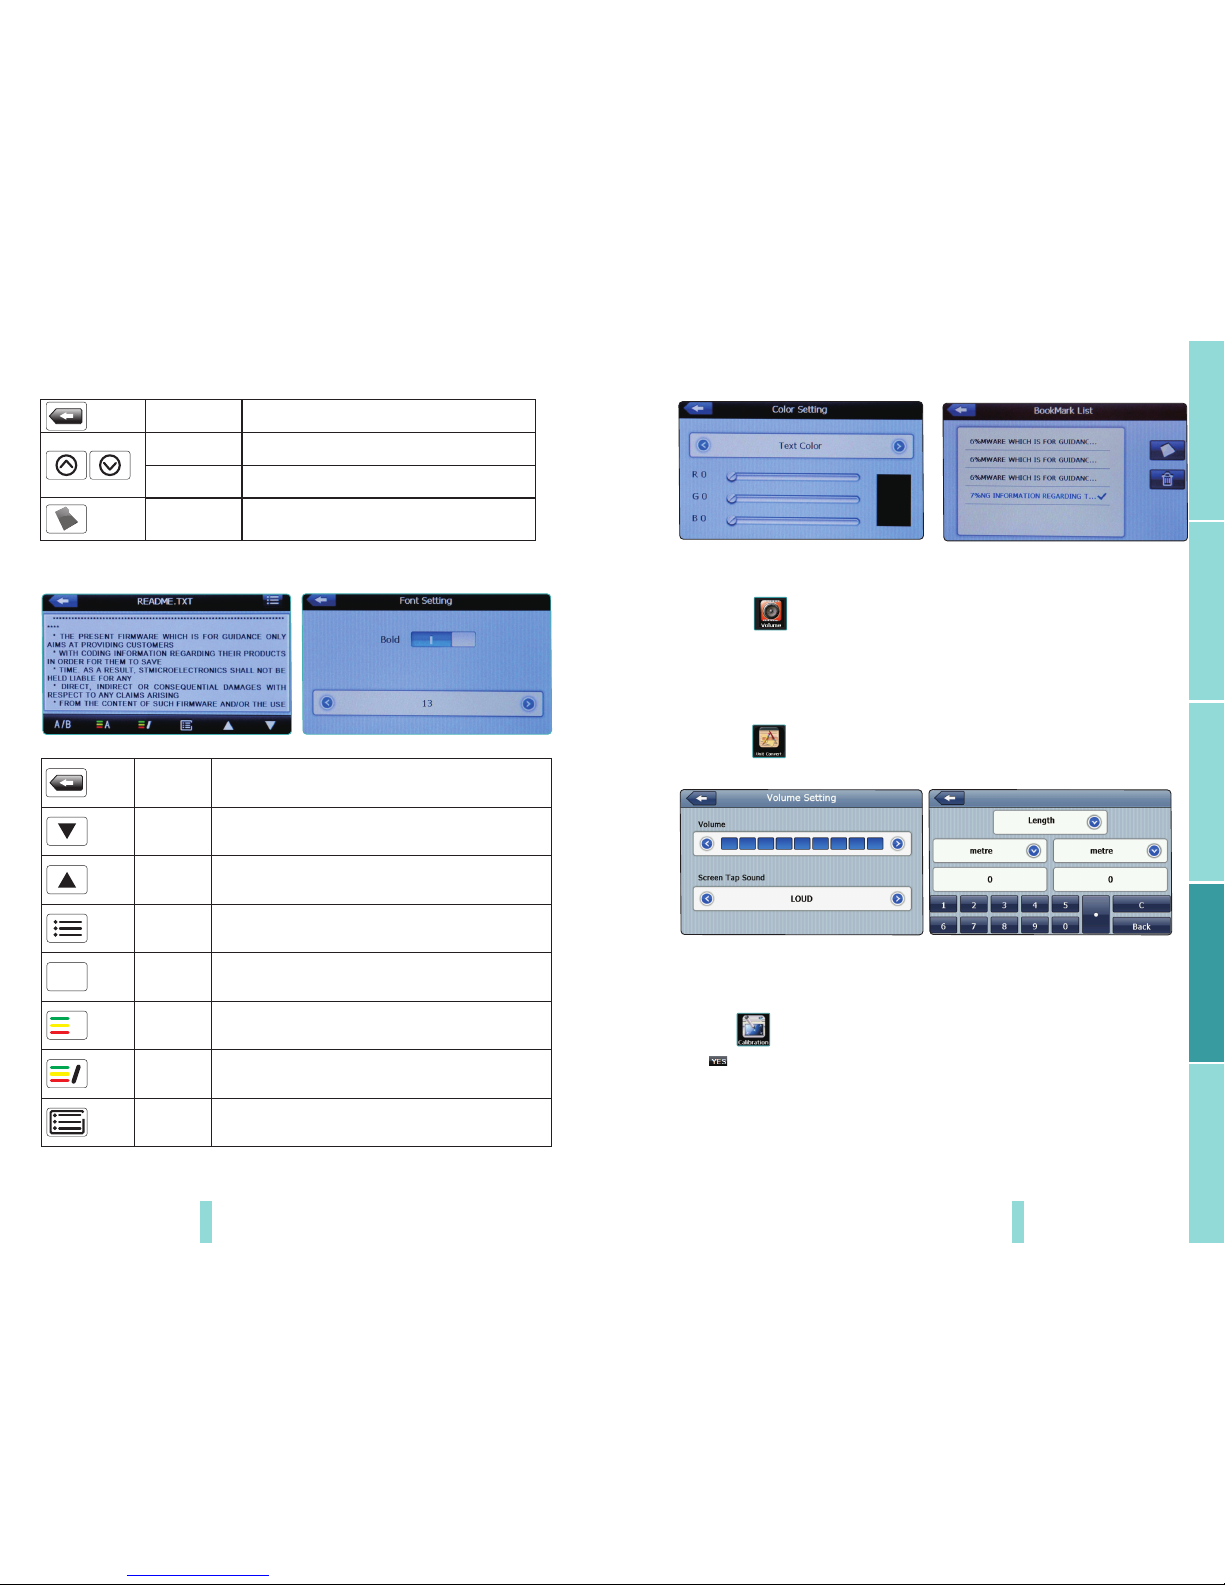
Close
Last
next
Close the current file
Show last page
Show next page
Name of file
Show name of the file
15
14
Product intruction
Adjustable guide line
Primary function
Choose file name to enter e-book reader as 4-16.
4- 16
Single click and close e-b ook read er
Rea d las t pag e
Rea d next page
Single click to enter E-book list to choose
favorite book
As 4-17
As 4-18
Add book
mark
Bookmarks page/l ocatio n of op en document.
As 4-19
A/B
A
Open book
mark list
Close
lase page
next page
file
font set
color set
4- 17
4- 18 4- 19
Volume adjustment
Single click to open the volume adjustment interface as shown 4-20
“Volume adjustment” includes:
Speaker volume adjustment.
“Screen click tone” seng.
4- 20
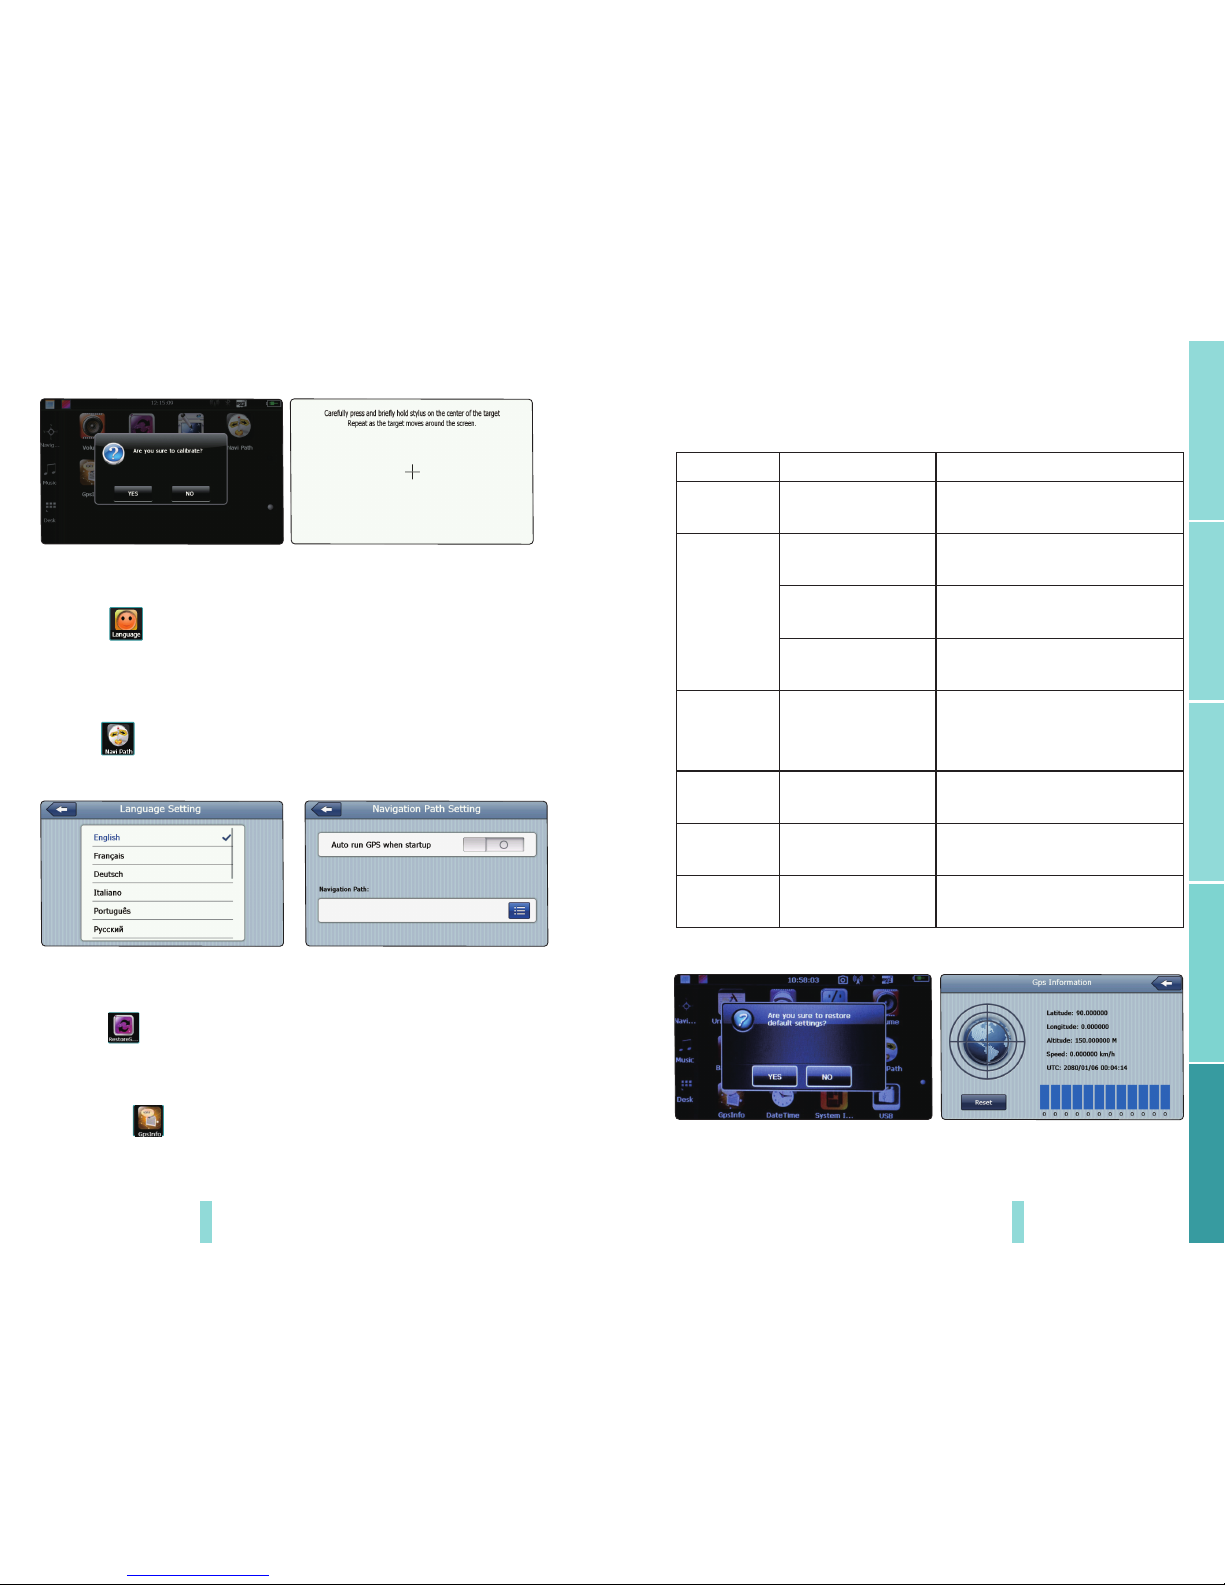
Screen calibraon
Click the to enter the screen calibraon as 4-22
Click it will move from in the sequence of the center, le up, le down, right
down and right up ll the calibraon succeed, then click anywhere on the
screen to save the calibraon and exit to the main interface automacally. If not
save the informaon, please wait 30 seconds and it will exit from current
interface automacally.
4- 20
Unit conversion
Single click into Unit conversion interface as shown 4-21
4- 21
Trou bleshoo ting
Guide
Installation and wiring
Page 10
4- 22
4- 23
17
16
Product intruction
Adjustable guide line
Primary function
Language seng
Single click to open the language settings interface as shown4-24,Language
settings including System prompt language selection.
Single click language column to choose language
Navigaon path
Click the set the interface into navigation path , set the default navigation
paths as shown in Figure 4-25.
4- 25
Default set
Single click to enter the default setting as 4-26:
GPS informaon
Single click the button and enter GPS information interface as 4-27
4- 26 4- 27
4- 24
Chapter Five: Troubleshooting Guide
Problem
Reason
Solution
Can not display
clearly
The back light is
not bright enough
Adjust the back light
No response
when clicking
the button
without sound
The touch-screen
is not calibrated
Calibrate the touch-screen
The volume in gps
unit is at the lowest
condition
Increase the volume
The volume in map
is at the lowest
condition
Increase the volume
No GPS signal
There is interference signal
around that meets the
frequency of GPS signal.
Please drive away from the area where
all GPS devices cannot receive signal.
The map date
is lost
Received the signal
slowly
Wait a moment when start the
navigation page
The system gets
stuck
Too many applications
running
Press the button “R” or “power”
reset the device
Can not read
Micro SD card
Did not insert in a right
direction change an
other Micro SD card
Restart the product The GPS not
support some low speed Micro SD card
Trou bleshoo ting
Guide
Installation and wiring
 Loading...