

Page 1
0
1
N
E
R
I
&
H
U
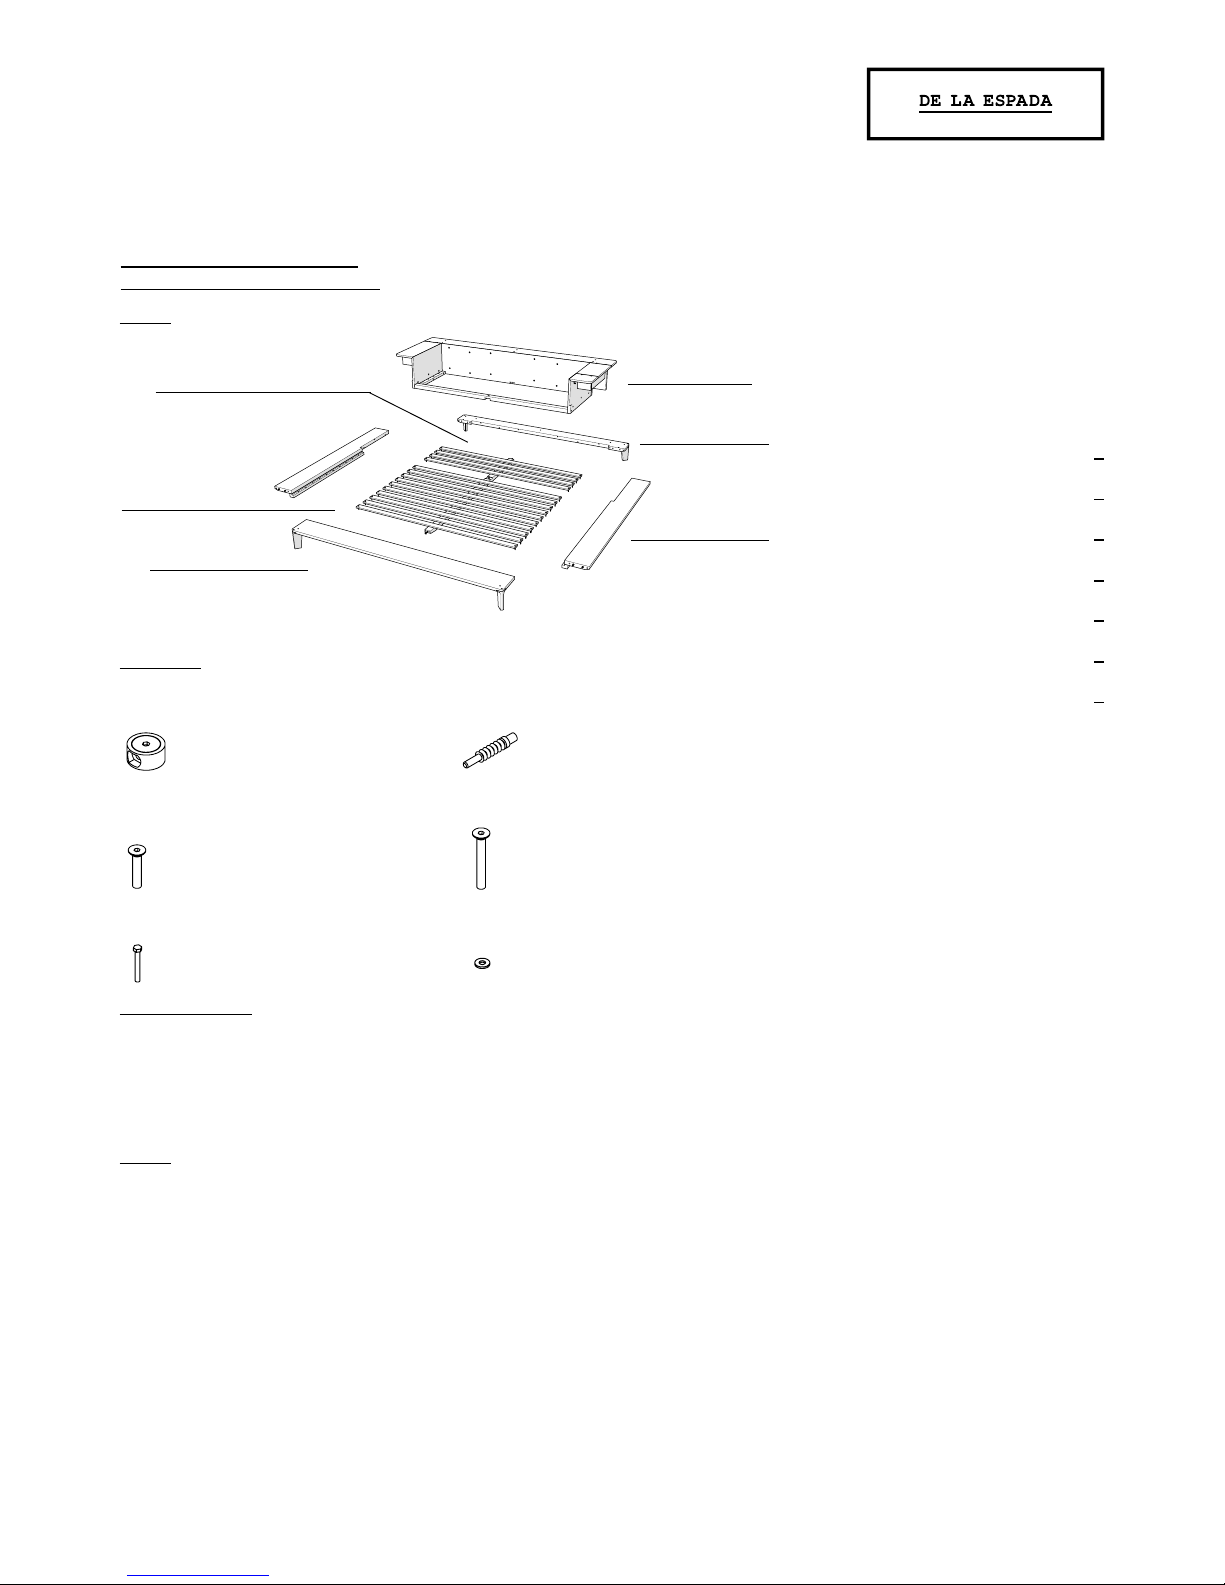
PARTS
HARDWARE
(8x) Universal connector (8x) M8x40 Metal dowel
(13x) M8x45 bolts (2x) M8x60 bolts
(26x) M5x45 bolts (26x) M5x45 washers
YOU WILL NEED
-8mm socket/ratchet set OR cordless drill with the appropriate
attachment
-Phillips head screwdriver
-6mm and 5mm Allen Key
-The help of a friend
NOTES
NOTE 1: Be certain that all assembly is carried out on a at
and stable surface. This will ensure a good nal result.
Reverse the steps to disassemble the piece.
NOTE 2: Your furniture arrives packed in numerous layers that
protect it during transport. It is important that you remove
the packaging carefully to avoid damaging your furniture. Refer
to our information sheet “Unpacking Your Furniture” for further
details.
NOTE 3: Great care is required when assembling our products .
Use blankets to soften the assembly surface - hard surfaces
such as wood or stone ooring may damage the furniture if in
direct contact.
NOTE 4: We advise that assembly and disassembly of De La Espada
furniture is undertaken by a minimum of 2 people.
ASSEMBLY INSTRUCTIONS
PLATFORM BED BY NERI&HU
SALES@DEL AESPADA.CO M
DELAESPADA.COM
1x Headboard
with arms
1x Headboard
beam
1x Central beam
2x Side beams
13x Timber slats
(14 for Cal King)
1x Footboard
Page 2
0
2
N
E
R
I
&
H
U
ASSEMBLY INSTRUCTIONS CONTINUED
PLATFORM BED
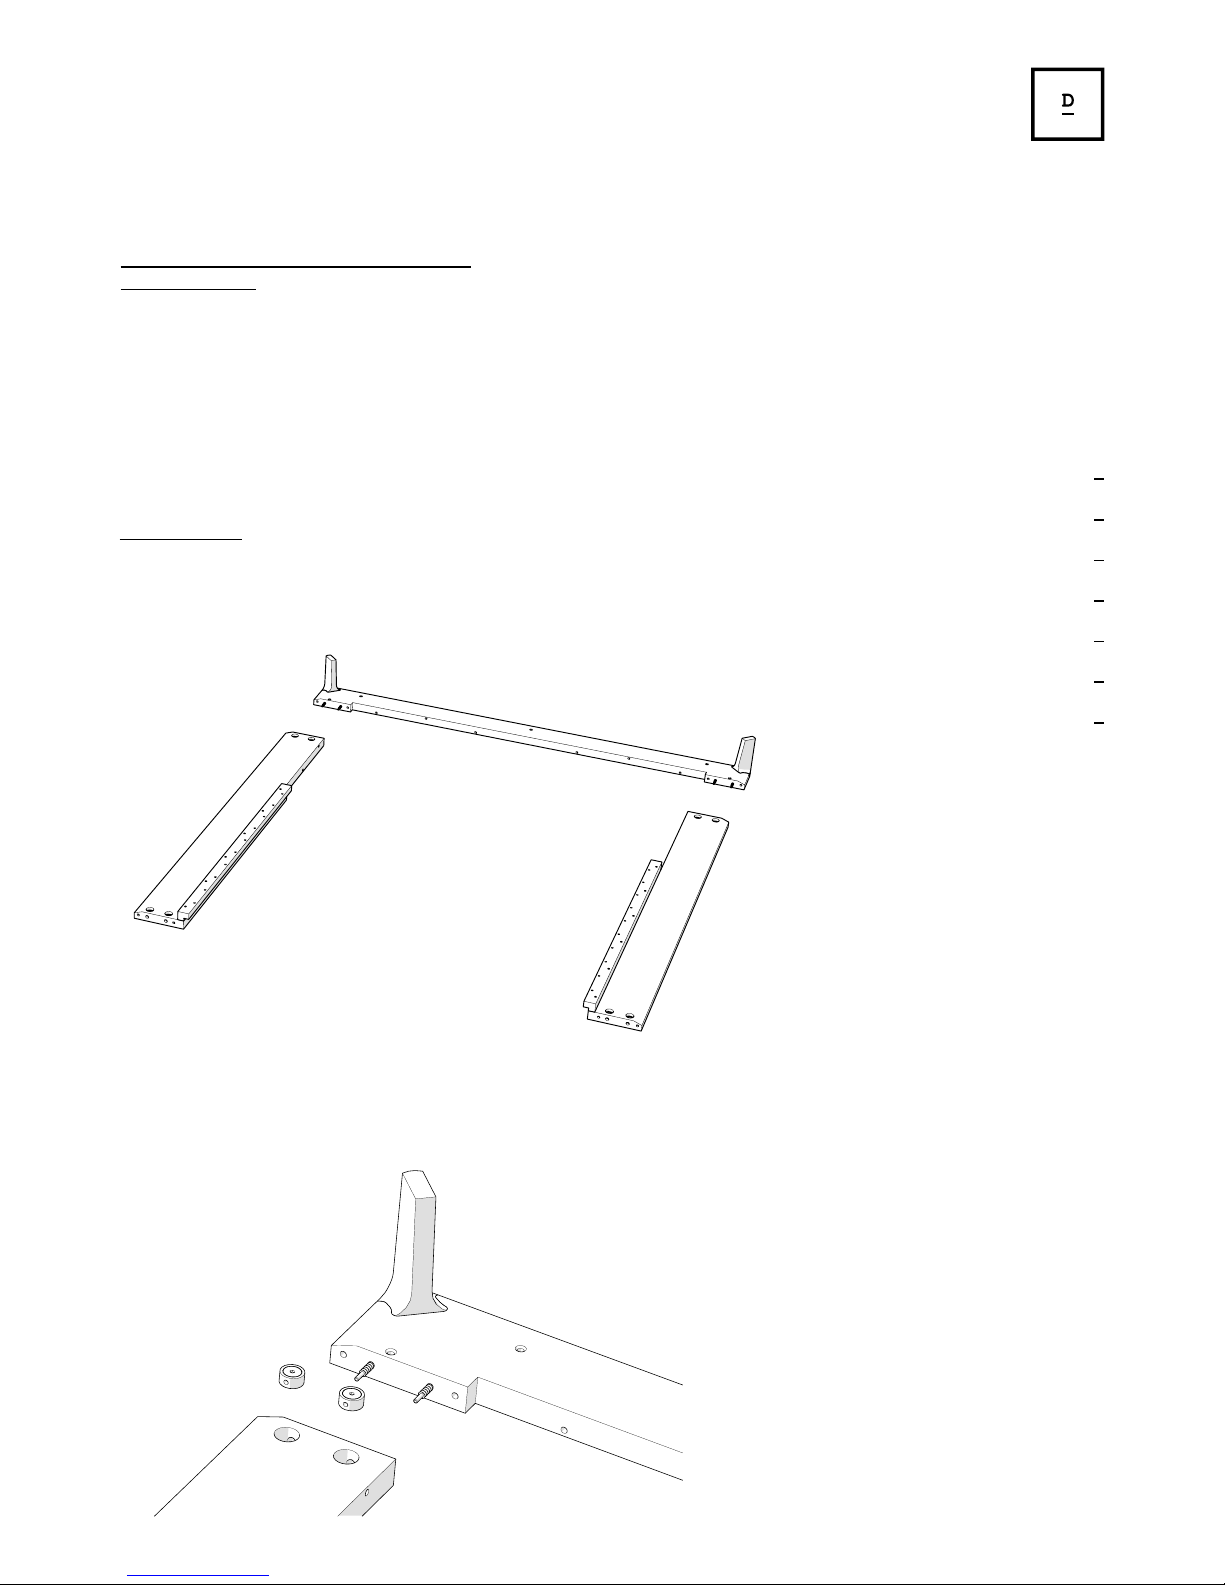
1. ATTACH SIDEBEAMS TO HEADBOARD BEAM
a)Unpack components and lay them face down on the oor, so they
are in the correct orientation. Check for number markings.
SALES@DEL AESPADA.CO M
DELAESPADA.COM
NOTE 5: When screwing in bolts, tighten well, but be sure
NOT TO OVERTIGHTEN. This can cause the thread to strip thus
resulting in a poor connection.
NOTE 6: All mating parts are numbered so they correspond to
the appropriate part around the frame of the bed. you will
ensure the best possible t if all parts are mated with the
corresponding numbered parts. While you work, be sure all
connections are ush with no gaps.
INSTRUCTIONS
b)Insert metal dowels into the pre-drilled holes in the head-
board beam, and insert Univeral Connectors into the pre-drilled
holes in the sidebeams. Feed the metal dowels through the Universal Connectors and tighten with a 6mm Allen Key.
Page 3
0
3
N
E
R
I
&
H
U
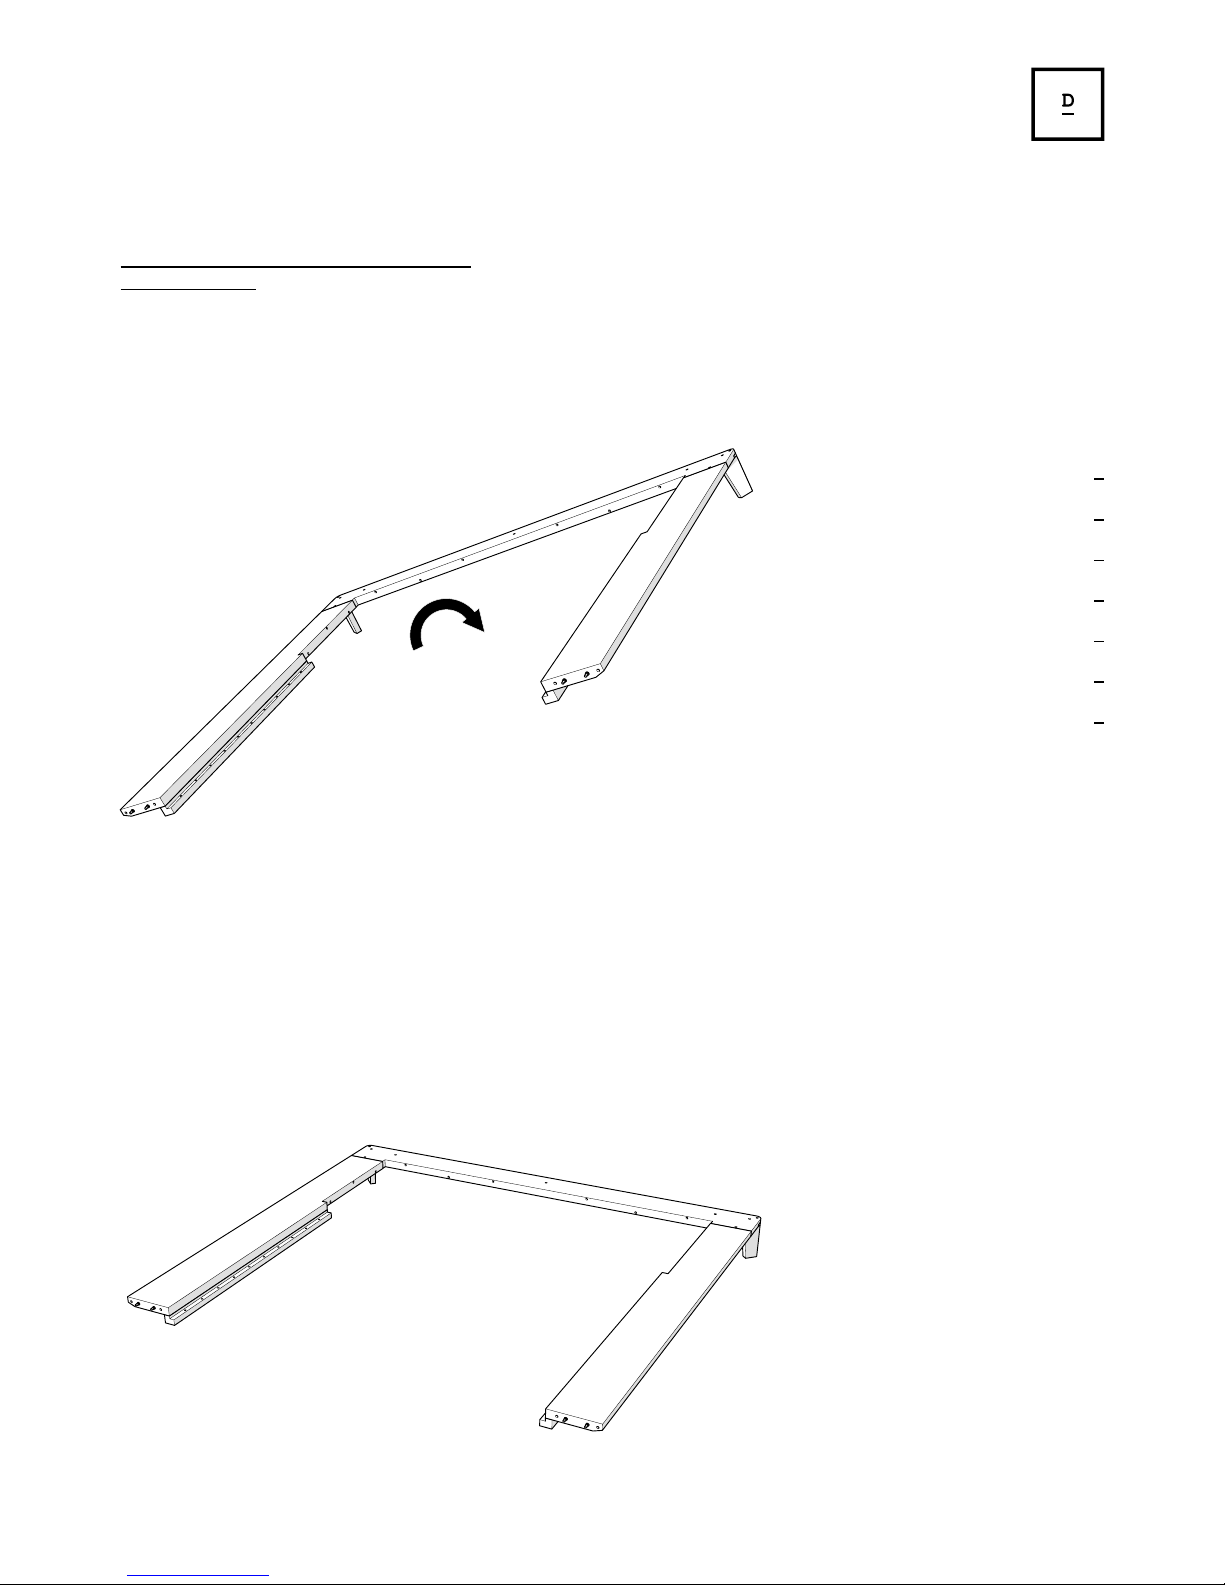
2. TURN THE FRAME INTO ITS NATURAL UPRIGHT POSITION
a) Turn the frame over into its natural position with the help
of a friend. Be certain not to rest the frame on any individual
leg whilst turning.
ASSEMBLY INSTRUCTIONS CONTINUED
PLATFORM BED
SALES@DEL AESPADA.CO M
DELAESPADA.COM
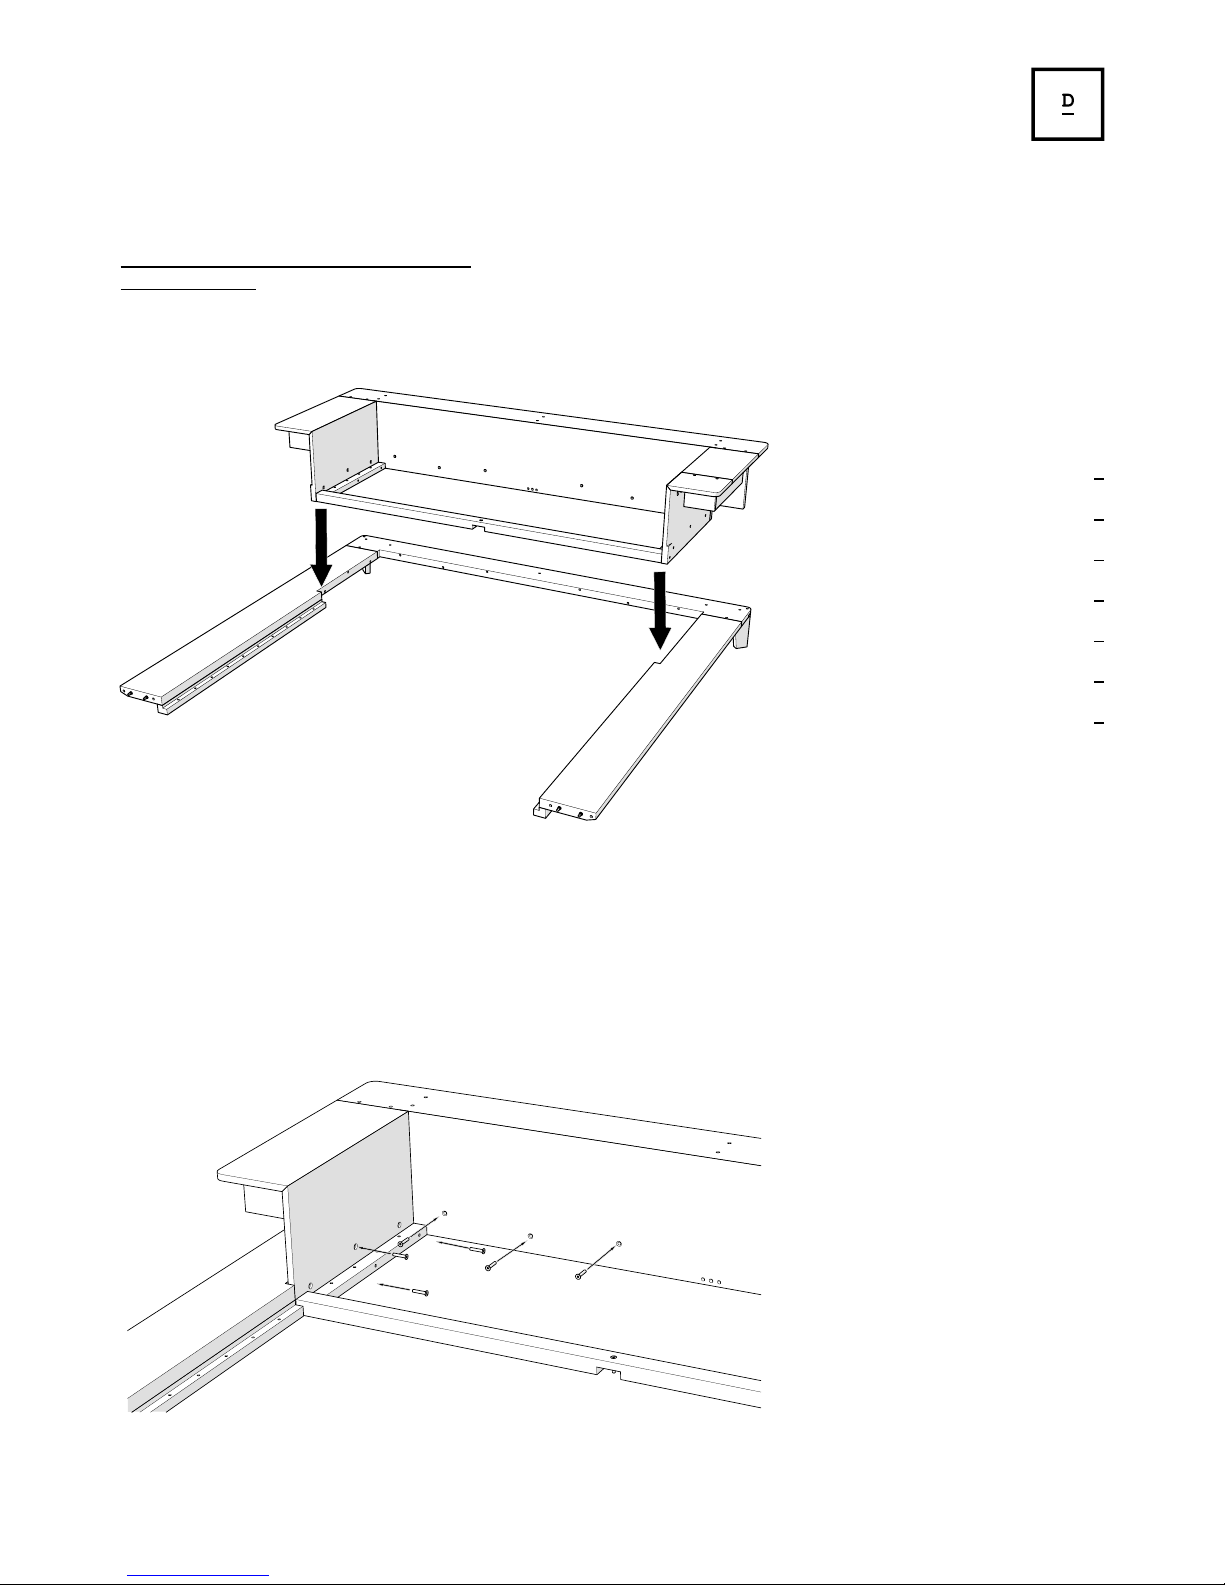
3. ATTACH THE HEADBOARD WITH ARMS TO THE FRAME
a) Locate the cutouts in the sidebeams where the headboard with
arms will be placed.
Page 4
0
4
N
E
R
I
&
H
U
ASSEMBLY INSTRUCTIONS CONTINUED
PLATFORM BED
b)Insert the headboard with arms into the frame.
SALES@DEL AESPADA.CO M
DELAESPADA.COM
c) Insert M8x45 bolts into the 12 relevant pre-drilled holes in
the headboard with arms. Tighten with an Allen Key.
Page 5
0
5
N
E
R
I
&
H
U
ASSEMBLY INSTRUCTIONS CONTINUED
PLATFORM BED
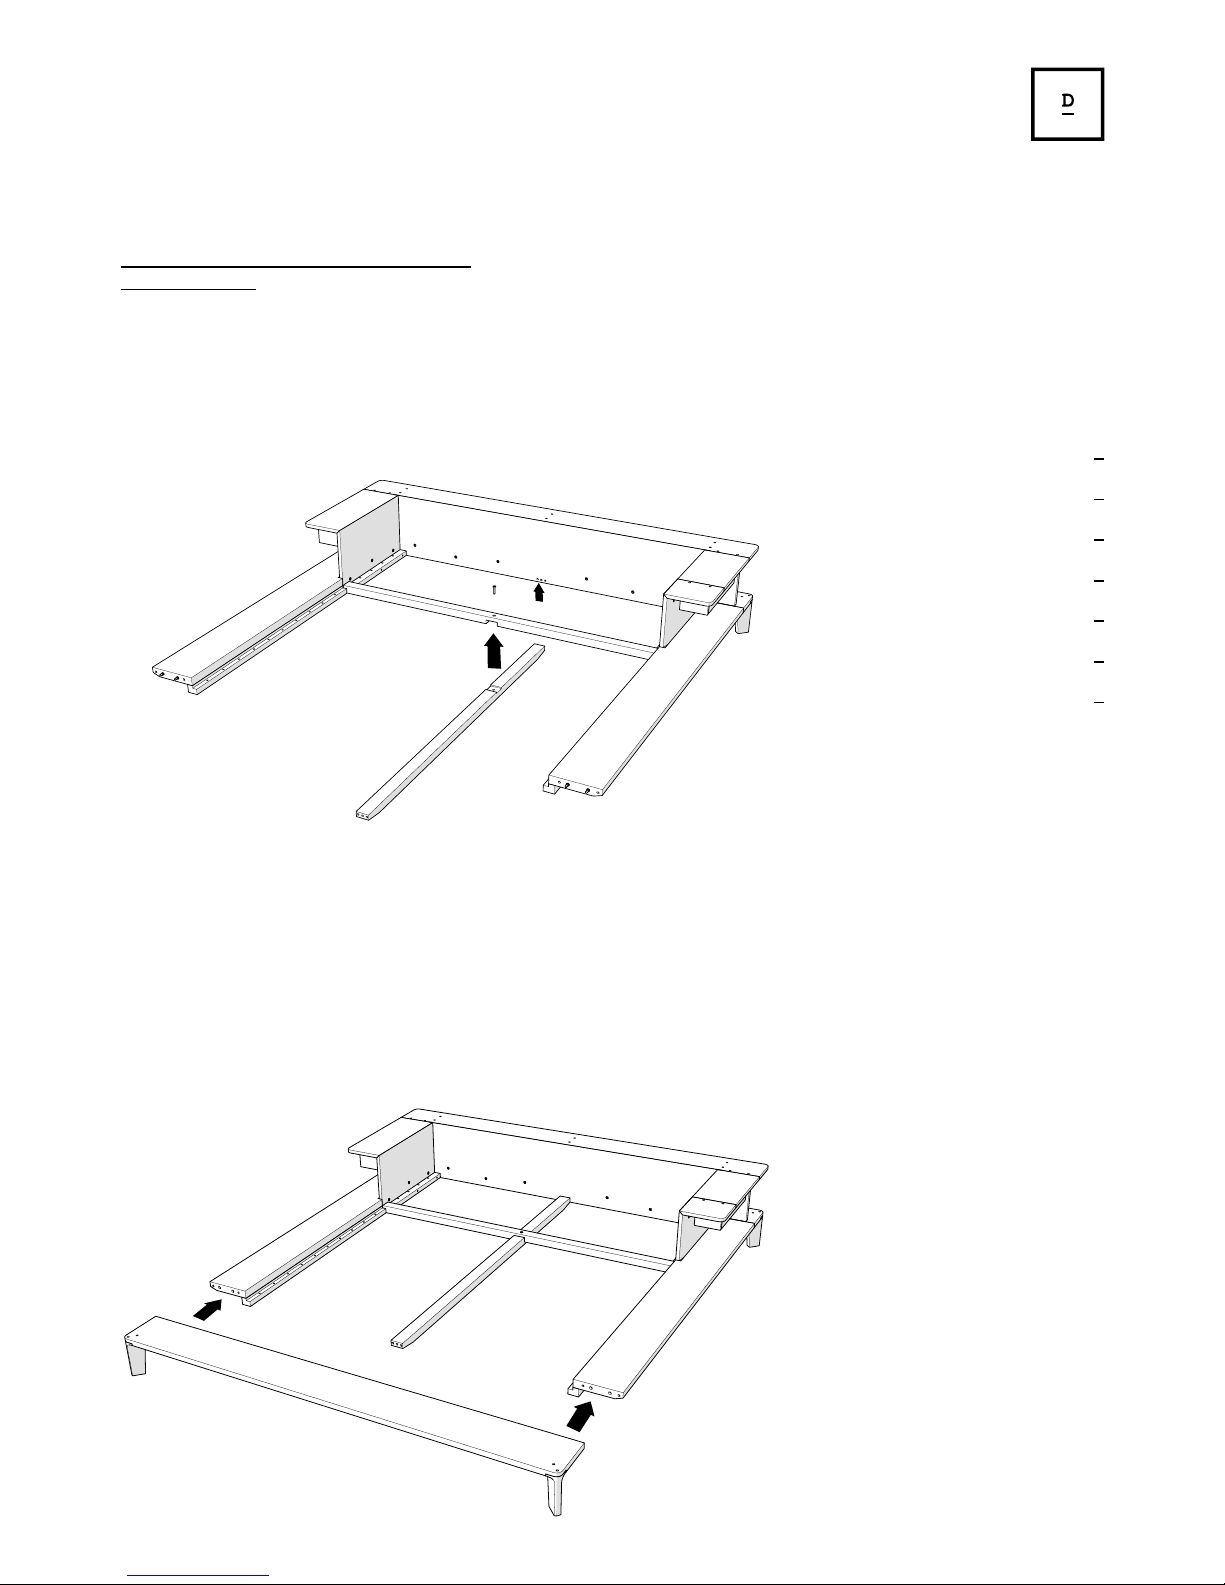
4. ATTACH CENTRAL BEAM
a) Place the central beam on the underside of the frame, tting
it into the cutout in the base of the headboard with arms. Insert a M8x45 bolt into the base of the headboard with arms and
into the central beam as below. Tighten with an Allen Key.
SALES@DEL AESPADA.CO M
DELAESPADA.COM
5. ATTACH FOOTBOARD
a) Insert metal dowels into the pre-drilled holes in the foot-
board, and insert Univeral Connectors into the pre-drilled
holes in the sidebeams. Feed the metal dowels through the Uni-
versal Connectors, while feeding the dowels in the central beam
through the corresponding holes in the footboard. Tighten the
Universal Connectors with a 6mm Allen Key.
Page 6
0
6
N
E
R
I
&
H
U
ASSEMBLY INSTRUCTIONS CONTINUED
PLATFORM BED
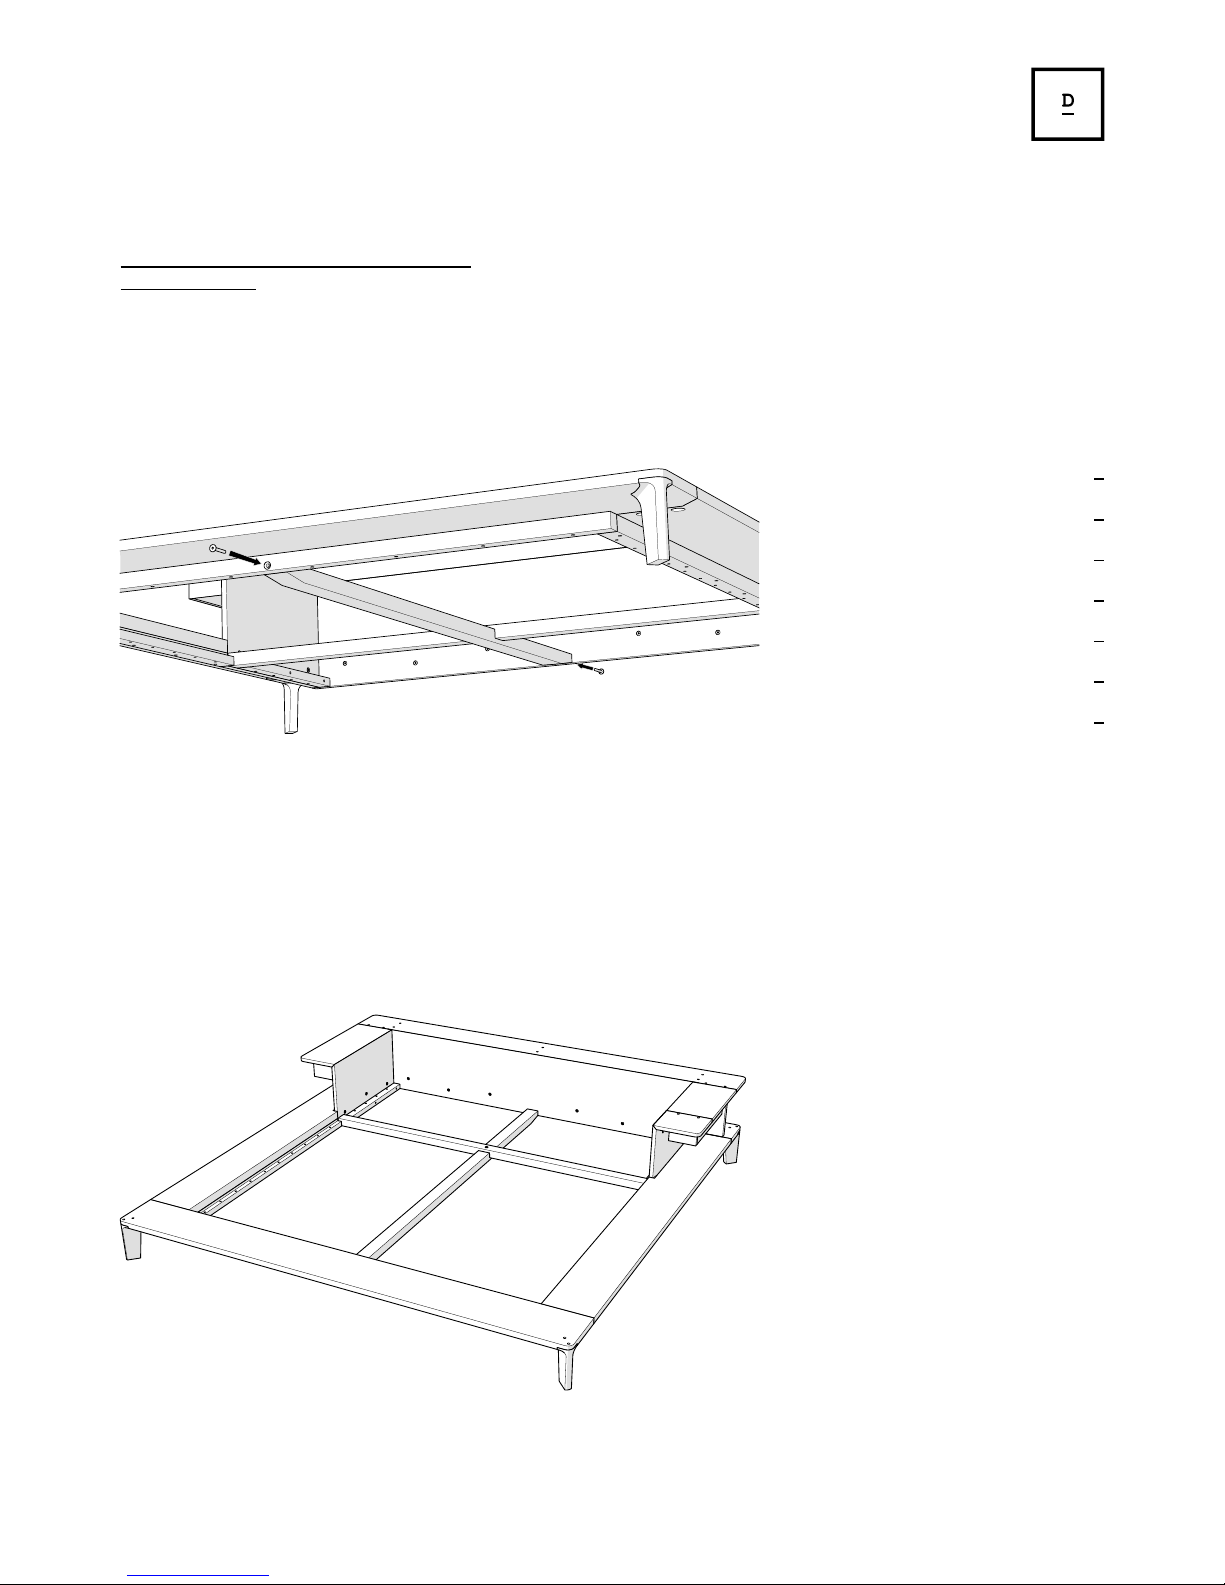
b) Make sure the central beam is aligned with the holes in the
footboard and headboard beam. Insert an M8x60 bolt into the end
of each, and tighten with an Allen Key.
SALES@DEL AESPADA.CO M
DELAESPADA.COM
c) The frame should now look like this.
Page 7
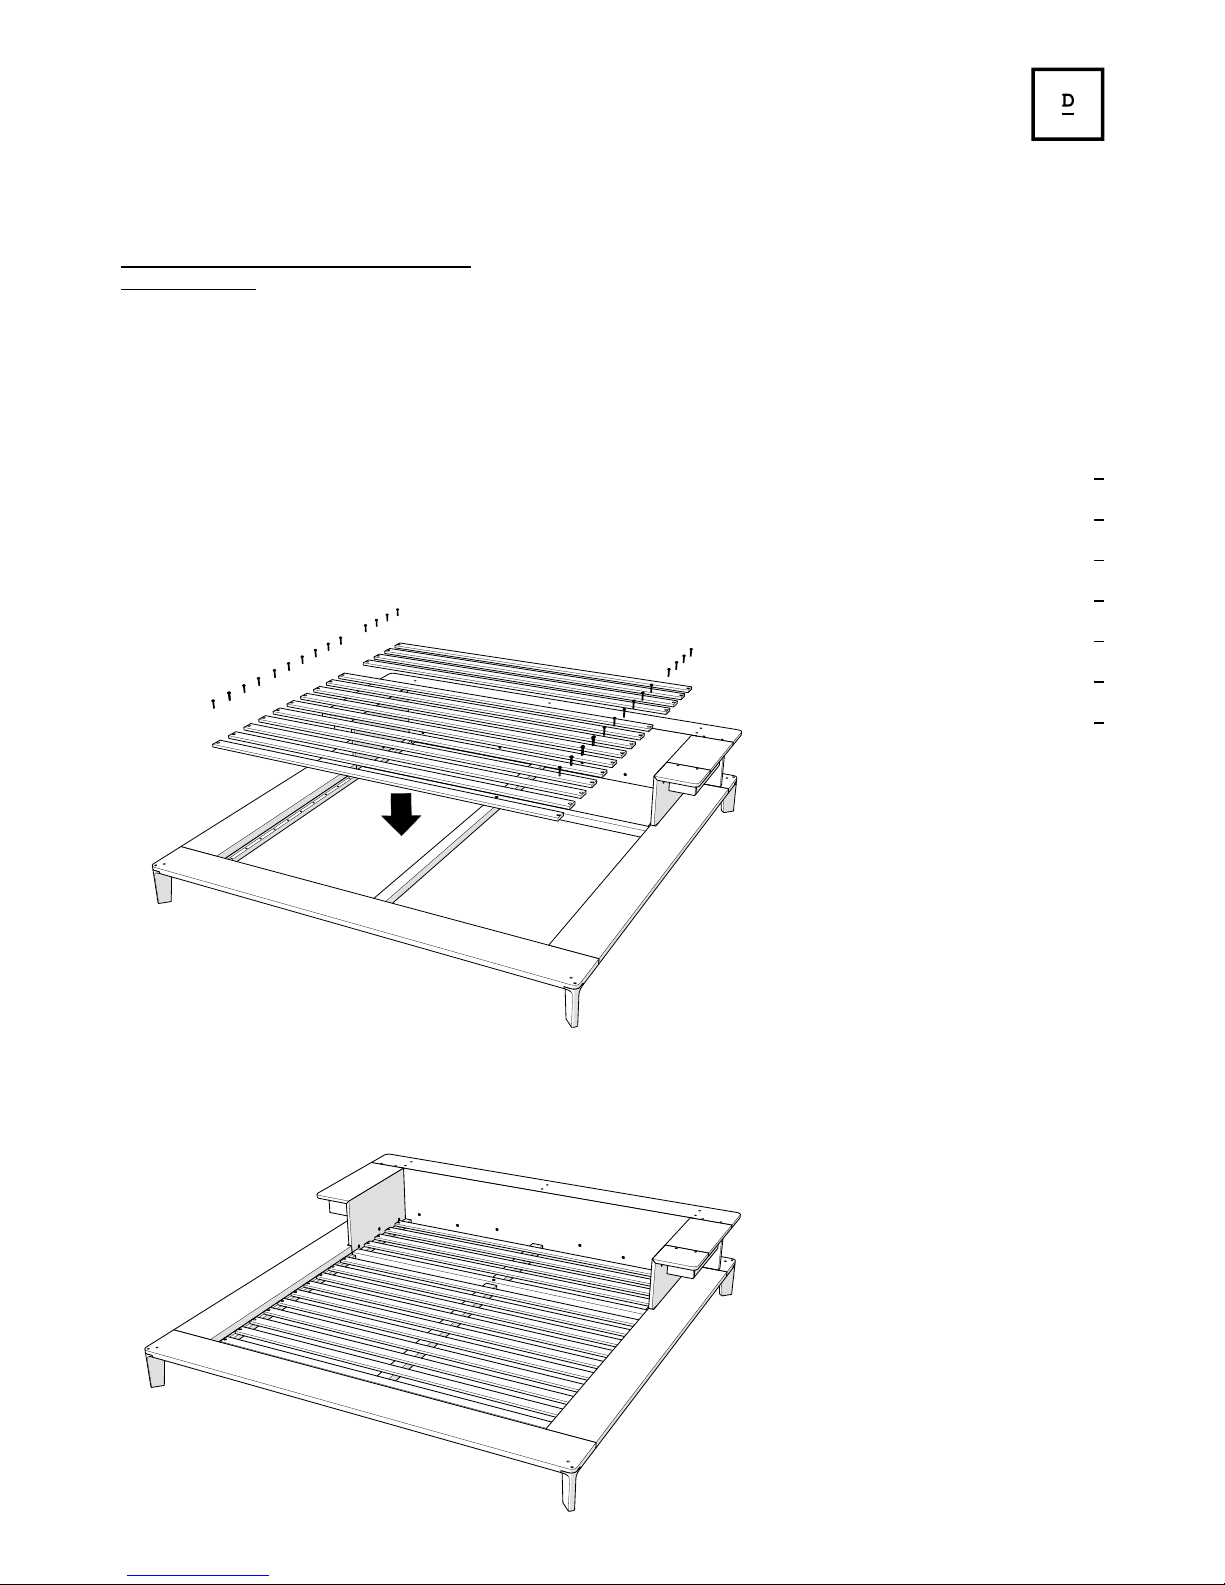
6. ATTACH THE TIMBER SLATS TO THE PLATFORM BASE
a) Space out the bed slats so they are aligned with the
corresponding holes on the timber lip on the inner face of
the side beams. The underside of the each slat has a threaded
sleeve xed inside. If the sleeve drops out, there are spares
you can use. The top of each slat has a recess for the washer.
b) Place a washer in the recess of each slat and insert an
M5x45 bolt through the slat and into the sidebeam. Using a
cordless drill or socket set, tighten the bolts. Tighten the
slats well, so they are not wobbly, but be very careful not to
overtighten.
0
7
N
E
R
I
&
H
U
ASSEMBLY INSTRUCTIONS CONTINUED
PLATFORM BED
c) Assembly is now complete and bed is ready to receive a
mattress.
SALES@DEL AESPADA.CO M
DELAESPADA.COM
 Loading...