

Neptune MAH5500B, MAH55FL Technical Information
Neptune Front Load Washer
⎯⎯
⎯Technical Information
⎯⎯
MAH5500B*, MAH55FL*
• Due to possibility of personal injury or property damage, always contact an authorized technician
for servicing or repair of this unit.
• Refer to Service Manual 16010061 for detailed installation, operating, testing, troubleshooting, and
disassembly instructions.
CAUTION
!
All safety information must be followed as provided in Service Manual 16010061.
.
To avoid risk of electrical shock, personal injury or death; disconnect power to washer before servicing, unless
testing requires power.
Leaking
• Make sure supply hose connections are not
leaking. Check for rubber gasket damage due to
overtightening.
• Make sure end of drain hose is correctly inserted
and secured to drain facility.
• Avoid overloading which can push the door
partially open.
• Check internal hose connections
• Check tub cover. Remove, reposition and reinstall
the tub cover seal. Seal seam must be at the
top of the tub cover.
Display Lights Up When Door Opened
• This is normal behavior.
No Tumble
• Washer does not tumble for the first 30 seconds
after the door has been opened for safety purposes.
• Fabric cycles such as DELICATES and HAND
WASH only tumble for a few seconds every 30
seconds.
• Check for loose connections at machine control
board, motor control board and motor.
• Perform Motor and Motor Control Test.
• Washer does not tumble during some drains and
rinse fills.
!
WARNING
Noisy
• Clothes washer should be leveled properly as
outlined in installation instructions.
• Weak floors can cause vibration and walking.
• Check for loose lower front bracket
• Be sure rubber feet are installed on leveling legs.
• Check that the leveling leg lock nuts are
tightened.
• If complaint is a high-pitched noise during fill then
disconnect supply hoses and clean screens.
• Check for proper spring placement of outer tub
support springs.
• Check strut operation.
Tub is completely full of suds
• Run the clothes washer through another complete
cycle using cold water and no more detergent.
• Reduce detergent amount for that specific load size
and soil level. Towel loads have a minimal amount
of soil present and typically create more suds.
• Use high efficiency or low sudsing detergent
specially formulated for front load washers.
• Check for restricted drain system.
• Check for loose wire connections at control board
and pump.
• Check to see if belt fell off motor and pulley.
• Perform Motor and Motor Control Test.
No Water Fill
• Check to make sure water supply turned on fully.
• Normal water level is only 2.5 to 5 inches inside
the spinner.
• Check for kinks in inlet hoses.
• Check for clogged inlet screens.
• Visually check hot and cold separately at
dispenser for proper flows.
• Go to No Fill Test page 6.
16025861 1 December 2004
©2004 Maytag Services
Wet Clothes
• Very small clothes loads can cause unbalances
add additional towels.
• Excessive suds may have been present. Check
for diagnostic code 16.
• Check unbalance harness connections at all
switches and at Control Board.

Troubleshooting
!
To avoid risk of electrical shock, personal injury, or death, disconnect power to washer before servicing,
unless testing requires it.
• Check for restricted drain system.
• Perform Motor and Motor Control Test.
Will Not Lock
• Door not all the way closed.
• Check electrical connections at lock assembly and
machine control board. Go to Door Lock Test.
Will Not Unlock
• Unplug and reconnect the power cord and wait 2
minutes to see if machine unlocks.
• Check for door locked switch circuit to be closed
at machine control. (See board input/output chart)
• Check to make sure belt has not fallen off.
• Check for loose electrical connections at door lock
and at machine control board.
• Perform Motor and Motor Control Test.
Will Not Start
• Plug cord into live electrical outlet.
• Check fuse or reset circuit breaker.
• Push the START/PAUSE button to start the clothes
washer.
• Close door and push the START/PAUSE button to
start the clothes washer. START/PAUSE LED
should change from flashing to on continuously.
• Check to see if the washer is in a pause or soak
period in the cycle. Wait briefly and it may start.
• Check for restricted drain system.
Will Not Drain
• Check for restricted drain system.
• Check low and high water levels. Go to No Fill test
• Check for 120 VAC at the pump when a spin cycle
is selected.
Wrong Water Temperature
• Too Hot/Too Cold; since this product uses a low
amount of water, the board regulates the incoming flow to temper the actual temperature of the
water in the tub. This may appear to be
significantly warmer/cooler than expected.
WARNING
• Are both faucets on fully?
• Make sure temperature selection is correct.
• Make sure hoses are connected to correct
faucets and inlet connections. Flush water line
before filling washer.
• Check the water heater. It should be set to
deliver a minimum 120°F (49°C) hot water at the
tap. Also check water heater capacity and
recovery rate.
• If the water heater is located a long distance from
washer, water line may need to be purged prior to
starting wash cycle.
• Disconnect inlet hoses and clean screens.
• This washer can sense if the fill hoses have been
reversed between hot and cold. If the fill hoses on
the washer were previously installed incorrectly
and then corrected, the washer will need to be
run through a Hot / Cold cycle. If not resolved,
check for proper resistance on the water valve
thermistor. (See board input/output chart)
Codes Displayed On Console
If owner observes codes on display, see table
below.
Sd = Suds: Machine has detected high level of
suds. The machine will alter its cycle for
this situation. Use an HE detergent or cut
down on the amount of detergent slightly.
This can be more likely on towel loads,
consider HE detergent especially for these
loads.
do = Door is Open: The door of the machine is
open. Please make sure door is fully closed
before starting cycle.
December 2004 2 16025861
©2004 Maytag Services
Continued on next page..........
Troubleshooting
!
WARNING
To avoid risk of electrical shock, personal injury, or death, disconnect power to washer before servicing,
unless testing requires it.
CONSUMER CODES: Cont'd
od = Open the Door: The door has not been
opened since the end of the last cycle. As a
safety check the door must be opened at the
completion of every cycle.
nF = No fill: the machine has tried to fill but cannot.
See No Water Fill.
PF = Power failure: power to the machine has been
lost during the last cycle. This may occur on
start up of a new machine due to factory
testing.
LO = Locked: Door is locked (failed to unlock) - the
machine has repeatedly tried to unlock but
cannot. Push door closed to make sure
nothing from the inside is pressing against
the door which make keep it from unlocking.
FL = Failed to lock: the machine has repeatedly
tried to lock the door but cannot. Make sure
the door is shut completely
nd = No drain - the machine has tried to drain but
retnEoT
syeKsserP
lamroN
eerFelknirW
kciuQ
nipStseTnipSkciuQesuaP/tratS
lioSthgiL
setacileD
esniR
kaoserP
Membrane Pad Check Test
While in service mode, pressing the wrinkle free
key will start a membrane pad switch check.
laicepS
noitcnuF/tseT
rotoMswohS
euqroT
bmeM
kcehC
tseT
yalpsiD
rebmuN
elcyC
tseT
sedoC
daPenar
nwoDemiTtsaF
s
erawtfoS
noisiveR
ecivreSkciuQ
tuptuOdraoB
citsongaiD
cannot.
Lr = Locked Rotor: the machine has repeatedly
tried to turn the motor but cannot.
The membrane check involves turning all the embedded LED lights on the membrane pad except
for the wrinkle free key. All the LEDs can be
System Diagnostics
SERVICE MODE
The service mode provides service personnel the
ability to verify the operation of the washing machine.
toggled by pressing the key associated with the
LED. At any point, if there are 10 minutes of inactivity, then this test will exit. Press the off key twice
within 30 seconds to cancel test.
The service mode can be entered in the middle of
any wash cycle. While in the service mode, the
servicer can start a variety of special service tests.
Fast Time Down Test
While in service mode, pressing the quick key
will advance the program to the next wash cycle.
Accessing Service Mode:
Pressing down the delicates and heavy soil keys for
3 seconds places the machine in the service mode.
Motor speed will be displayed when started. To exit
Service Mode, press delicates and heavy soil keys
for 3 seconds again. The following table lists the
various tests available while in the Service Mode,
which can be accessed by pressing the following
keys:
tixEoT
noitcnuF
esuaP/tratS
ro.ces5tiaW
eciwtffOsserp
esuaP/tratS
esuaP/tratS
esuaP/tratS
esua
P/tratS
esuaP/tratS
16025861 3 December 2004
©2004 Maytag Services

Troubleshooting
!
To avoid risk of electrical shock, personal injury, or death, disconnect power to washer before servicing,
unless testing requires it.
WARNING
Quick Service Cycle
foegatS
elcyChsaW
kaoserPkaoserPfodnE
hsaW
niarD/nipSehTfopetSyrevE
nipS
esniResniRfodnE
Quick Spin Test
While in service mode, the pressing of spin key shall
start the washer in the quick spin mode.
The following Quick Spin test steps are as follows:
1) Lock the door.
2) Spin to 350 rpm and hold for 6 seconds.
3) Spin to 550 rpm and hold for 6 seconds.
4) Spin to 600 rpm and hold for 6 seconds.
5) Spin to 650 rpm and hold for 6 seconds.
6) Spin to 800 rpm and hold for 6 seconds.
If the Spin key is pressed again during the Quick Spin
test, the current speed will be held indefinitely. Pressing the Spin key again will allow the quick test to
proceed as listed above.
When the washer is in the Service Mode, the speed
will be displayed as a two digit number or a letter/
number.
oTsecnavdA
fosetuniM5yrevE
emiThsaW
eliforP
While in service mode, pressing the delicates key
will start a quick service cycle. This will be a quick
check of all systems.
The following steps will be followed.
1. Energize the cold and bleach water valves. Fill to
Low level, then turn bleach and cold off.
2. Energize the hot and fabric softener water valves. Fill
to high level, then turn all valves off.
3. Lock the door.
4. Tumble using 7/3 tumble pattern for 12 sec.
5. Turn the drain on.
6. Spin to 800 RPM using default rates.
7. End spin and coast down.
8. Unlock the door when the RPM is zero.
9. Display a ‘PA’ (Passed) on continuously for 10 seconds if no diagnostic codes were logged during this
test.
The up arrow if pressed will advance to the next step.
The right most dot will be turned on as an indication
of failure and stay on until quick service cycle test
has reached the end. Any diagnostic code logged
during this test will result in failure of the test, but will
not necessarily stop the test. While in quick service
cycle, the pressing of the hand wash will suspend
the machine at this step for 30 minutes until the
Hand Wash key is pressed again. All LED’s will
flash on and off while the cycle is suspended, or on
hold.
Motor Drive System
To check the system, check the board for proper
output to the motor control. Performing a board
output test does this. Then perform the Motor
Control Board Output Test.
egnaRdeepSdeyalpsiD
mpr99-0)a
mpr999-001)b
December 2004 4 16025861
©2004 Maytag Services
01/deepS
Motor Control Board Output Test
1. Disconnect power to the washer.
)lautca(99-0
2. Remove the front panel and pull the JP4 Connector
from the motor control board.
3. Reconnect the washer power cord to supply
voltage. Make sure the door is closed.
4. Press delicates and heavy soil keys for 3 sec-
onds to activate Service Mode.
Troubleshooting
!
To avoid risk of electrical shock, personal injury, or death, disconnect power to washer before servicing,
unless testing requires it.
5. Access Board Output Test by touching the rinse
key to activate.
6. The door must be locked to access Motor Con-
trol Board Output Test. To lock the door press
max extract. Press max extract again stop the
door lock output test once the door is locked.
7. Press stain cycle to start the motor control
output test. This will send 120VAC to the motor
control board. The motor control will immediately
execute a test routine and the motor should run,
rotating the spinner at 50 rpm.
8. If motor does not run;
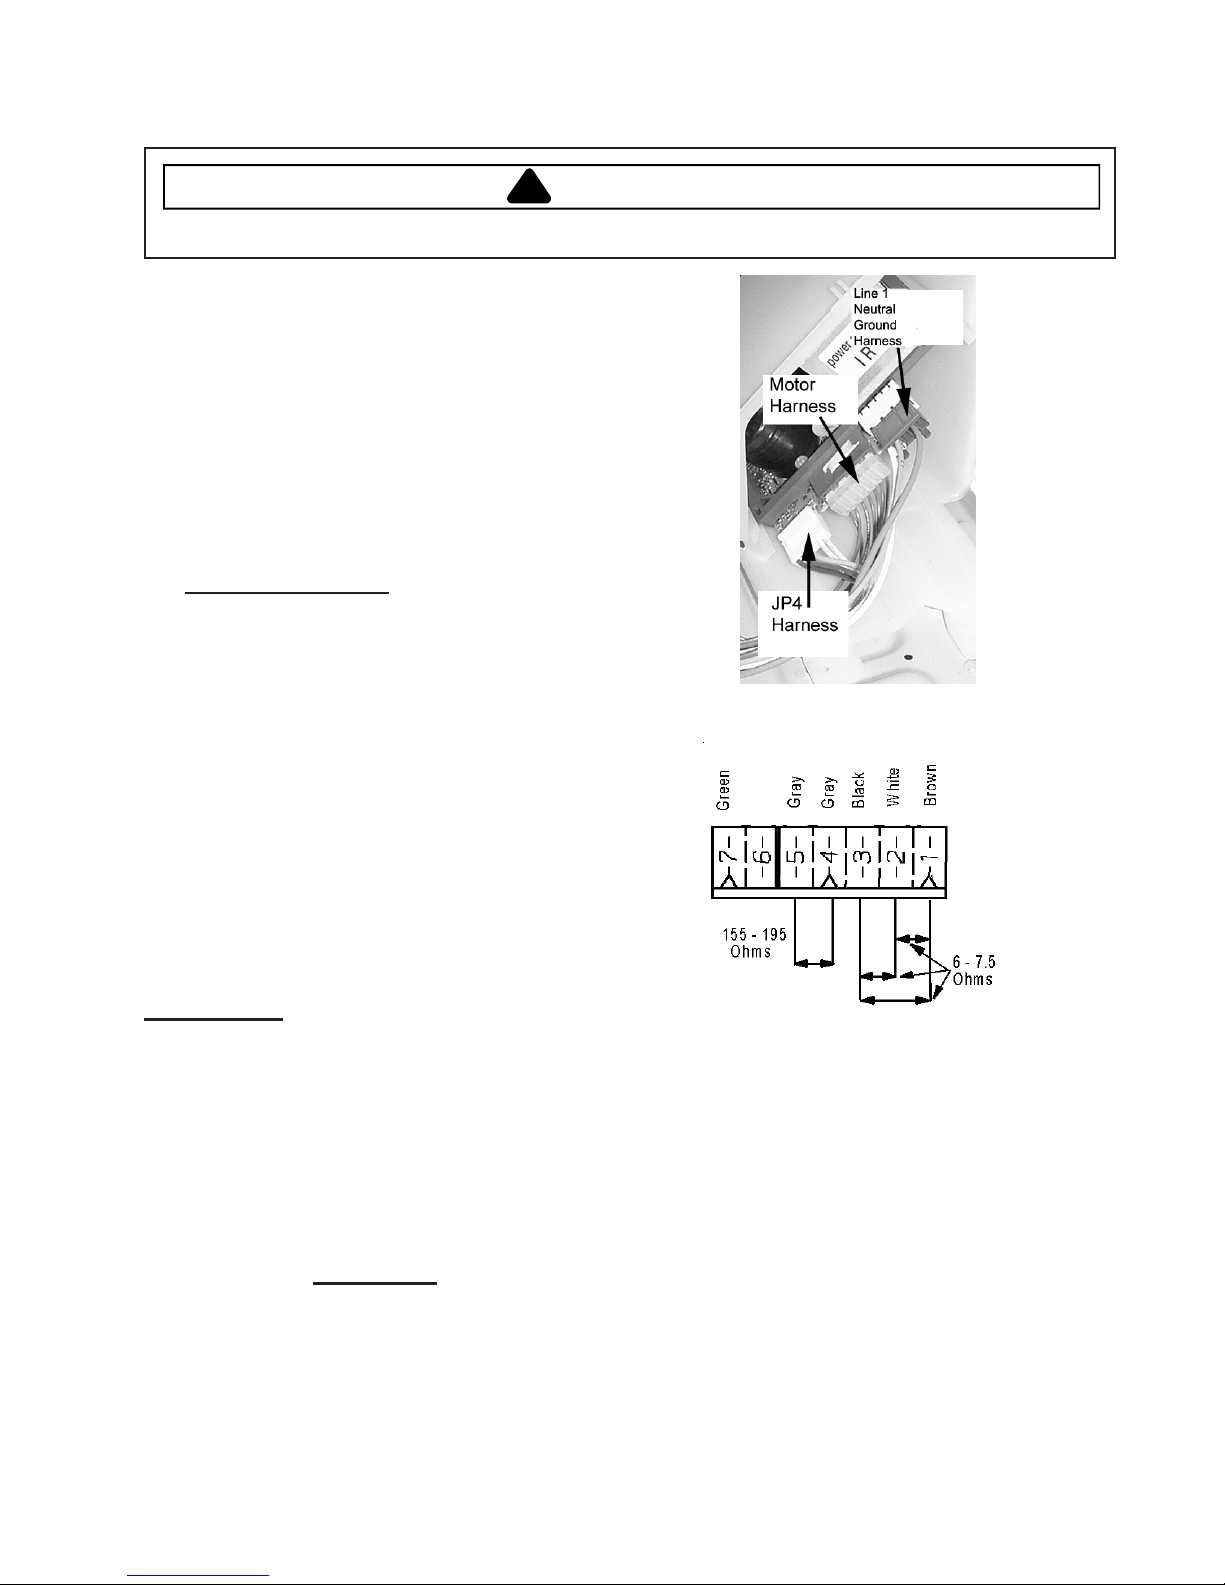
• Check for 120 VAC at the motor control board harness. See Figure 1.
If voltage is present, then problem lies with the
motor and motor control system.
• Check for loose electrical connections at mo-
tor and motor control board.
• Check phase windings of the motor. See Fig-
ure 2. If motor windings are good, replace the
motor control board.
WARNING
Figure 1
Motor Control Board/JP4 Connector
If voltage is not present;
• Check loose electrical connections at machine
control board or broken wires in harness.
• Check door actuator switch and related wiring.
Door Lock Test
Placing the washer into the Service Mode and
manually locking and unlocking the
door mechanism through the control panel can
verify the door lock. Note: The relay on the control
board for the door unlock mechanism is disabled if
the motor control board indicates the spinner speed
is > 7 RPM.
1. Place the washer into Service Mode. (See
Service Mode)
2. Advance to the Board Output Test and press
max extract to lock the door. A lock signal
will be sent to the solenoid every second for 10
seconds. If the door does not lock; use a
voltmeter, look for 120VAC, 60 millisecond
pulse to the locking solenoid.
Figure 2– Schematic – Motor Harness
3. If signal is present, then the door lock sole-
noid is bad and the door lock mechanism must
be replaced. (Assuming the door was fully
closed.) To stop the signal, press max extract
again.
4. If signal is not present, check electrical
connections at switch or at control board.
Check for proper outputs from the control board
at Conn P1(1) and Neutral leg of power cord. If
voltage is present, fix electrical connections or
change wire harness. If no voltage is found, go
to P8(4) and Neutral on power cord to verify
120VAC coming into the board. If voltage is not
present check the door actuator switch. (make
sure door is closed.) If voltage is present,
change machine control board.
16025861 5 December 2004
©2004 Maytag Services
 Loading...