

Page 1
1
Page 2
2
3
Page 3

PL INSTRUKCJA ORYGINALNA (OBSŁUGI) .........................4
EN TRANSLATION (USER) MANUAL .....................................9
DE ÜBERSETZUNG (BENUTZERHANDBUCH)....................14
RU РУКОВОДСТВО ПО ПЕРЕВОДУ (ПОЛЬЗОВАТЕЛЯ) ..19
HU FORDÍTÁSI (FELHASZNÁLÓI) KÉZIKÖNYV ..................24
RO MANUAL DE TRADUCERE (UTILIZATOR) ....................29
UA ПОСІБНИК З ПЕРЕКЛАДУ (КОРИСТУВАЧА) ...............34
SK PREKLAD (POUŽÍVATEĽSKEJ) PRÍRUČKY ..................39
Page 4
4
PL
INSTRUKCJA ORYGINALNA (OBSŁUGI)
Nagrzewnica olejowa
90-086
UWAGA: PRZED PRZYSTĄPIENIEM DO UŻYTKOWANIA
SPRZĘTU NALEŻY UWAŻNIE PRZECZYTAĆ NINIEJSZĄ
INSTRUKCJĘ I ZACHOWAĆ JĄ DO DALSZEGO
WYKORZYSTANIA. OSOBY, KTÓRE NIE PRZECZYTAŁY
INSTRUKCJI NIE POWINNY PRZEPROWADZAĆ MONTAŻU,
REGULACJI LUB OBSŁUGIWAĆ URZĄDZENIA.
TEN PRODUKT JEST ODPOWIEDNI TYLKO DO
SPORADYCZNEGO UŻYTKU LUB DO STOSOWANIA W
DOBRZE IZOLOWANYCH POMIESZCZENIACH
SZCZEGÓŁOWE PRZEPISY BEZPIECZEŃSTWA
UWAGA!
Należy uważnie przeczytać instrukcję obsługi, stosować się do
ostrzeżeń i warunków bezpieczeństwa w niej zawartych.
Urządzenie zostało zaprojektowane do bezpiecznej pracy.
Niemniej jednak: instalacja, konserwacja i obsługa urządzenia
może być niebezpieczna. Przestrzeganie poniższych procedur
zmniejsza ryzyko wystąpienia pożaru, porażenia prądem,
obrażeń ciała oraz skróci czas instalacji urządzenia
UWAGA! Nagrzewnica nie jest przeznaczona do użytku
domowego ani rekreacyjnego.
● Używaj tylko w dobrze wentylowanych pomieszczeniach i z
dala od materiałów palnych
● NIE stosować do ogrzewania pomieszczeń mieszkalnych w
budynkach mieszkalnych. Przy zastosowaniu do użytku w
budynkach użyteczności publicznej, patrz przepisy krajowe.
● To urządzenie może być używane przez dzieci w wieku od 8
lat i starsze oraz osoby o ograniczonych zdolnościach
fizycznych, sensorycznych lub umysłowych lub bez
doświadczenia i wiedzy, o ile są one pod nadzorem lub zostały
poinstruowane na tematy dotyczące korzystania z urządzenia w
bezpieczny sposób i rozumieją związane z tym zagrożenia.
Dzieci nie mogą bawić się urządzeniem.
Dzieci bez nadzoru nie mogą czyścić ani konserwować
urządzenia.
OSTRZEŻENIE: Aby uniknąć przegrzania, nie przykrywaj
grzejnika.
● Dzieci poniżej 3 roku życia nie powinny przebywać w pobliżu
urządzenia, chyba że są pod stałym nadzorem.
● Dzieci w wieku od 3 lat do 8 lat mogą włączać / wyłączać
urządzenie tylko pod warunkiem, że zostało umieszczone lub
zainstalowane w przewidzianym dla niego normalnym położeniu
roboczym i otrzymały nadzór lub zostały poinstruowane
dotyczące korzystania z urządzenia w bezpieczny sposób i
zrozumieć związane z tym zagrożenia. Dzieci w wieku od 3 lat
do 8 lat nie mogą podłączać, regulować i czyścić urządzenia ani
wykonywać czynności konserwacyjnych.
UWAGA ! - niektóre części tego urządzenia mogą się bardzo
nagrzewać i powodować oparzenia. Szczególną uwagę należy
zwrócić na dzieci i osoby wymagające szczególnej troski.
● Wszelkie czynności serwisowe muszą być wykonywane przez
wykwalifikowany serwis.
● Nagrzewnica wykorzystuje powietrze (tlen) w obszarze gdzie
jest używana. Należy zapewnić wymaganą wentylację do
zapewnienia odpowiedniego spalania.
● Nie przechowywać ani nie używać benzyny ani innych
łatwopalnych oparów i płynów w pobliżu tego ani żadnego
innego urządzenia!
● Niebezpieczeństwo pożaru, oparzenia, uduszenia i wybuchu.
Trzymać stałe materiały palne, takie jak materiały budowlane,
papier lub karton, w bezpiecznej odległości od nagrzewnicy,
zalecane w instrukcji. Nigdy nie używaj nagrzewnicy w
przestrzeniach, które mogą zawierać substancje lotne lub
powietrzne, lub produktów takich jak benzyna, rozpuszczalniki,
rozcieńczalnik do farb, cząsteczki pyłu lub nieznane chemiczne
substancje.
● Nagrzewnice z wtryskiem bezpośrednim mogą spowodować
zatrucie tlenkiem węgla (CO) w przypadku nieprawidłowego
użytku, co może prowadzić do śmierci.
● Nieprzestrzeganie środków ostrożności i instrukcji
przedstawionych w instrukcji tego grzejnika może spowodować
śmierć, poważne obrażenia ciała oraz utratę mienia lub
uszkodzenia w wyniku zagrożenia pożarem, wybuchem,
oparzeniami, uduszeniem, poważnymi obrażeniami ciała,
tlenkiem węgla oraz zatruciem. Tylko osoby, które mogą
zrozumieć i przestrzegać instrukcji, powinny używać lub
serwisować ten grzejnik. Jeśli potrzebujesz pomocy lub
informacji o nagrzewnicy, takich jak instrukcja obsługi, etykiety
itp. Skontaktuj się z producentem.
● Instalacja elektryczna, do której jest podłączone urządzenie,
musi być zgodna z obowiązującym prawem. Instalacja wymaga
różnicowoprądowego wyłącznika napięcia (RCCB) w głównej
płytce rozdzielczej elektrycznej.
● Odłącz urządzenie przed wykonaniem jakichkolwiek czynności
konserwacyjnych.
● Zawsze sprawdź przewód zasilający przed użyciem
urządzenia. Nie może być zgięty, naciągnięty, rozciągnięty ani w
żaden sposób uszkodzony.
● Przewód zasilający może być wymieniony wyłącznie przez
wykwalifikowany personel. Należy używać oryginalnego
przewodu zasilającego wyłącznie w odpowiedniej klasie
ochrony.
● Przedni wylot jest bardzo gorący podczas pracy. Nie dotykać!
Niebezpieczeństwo oparzenia.
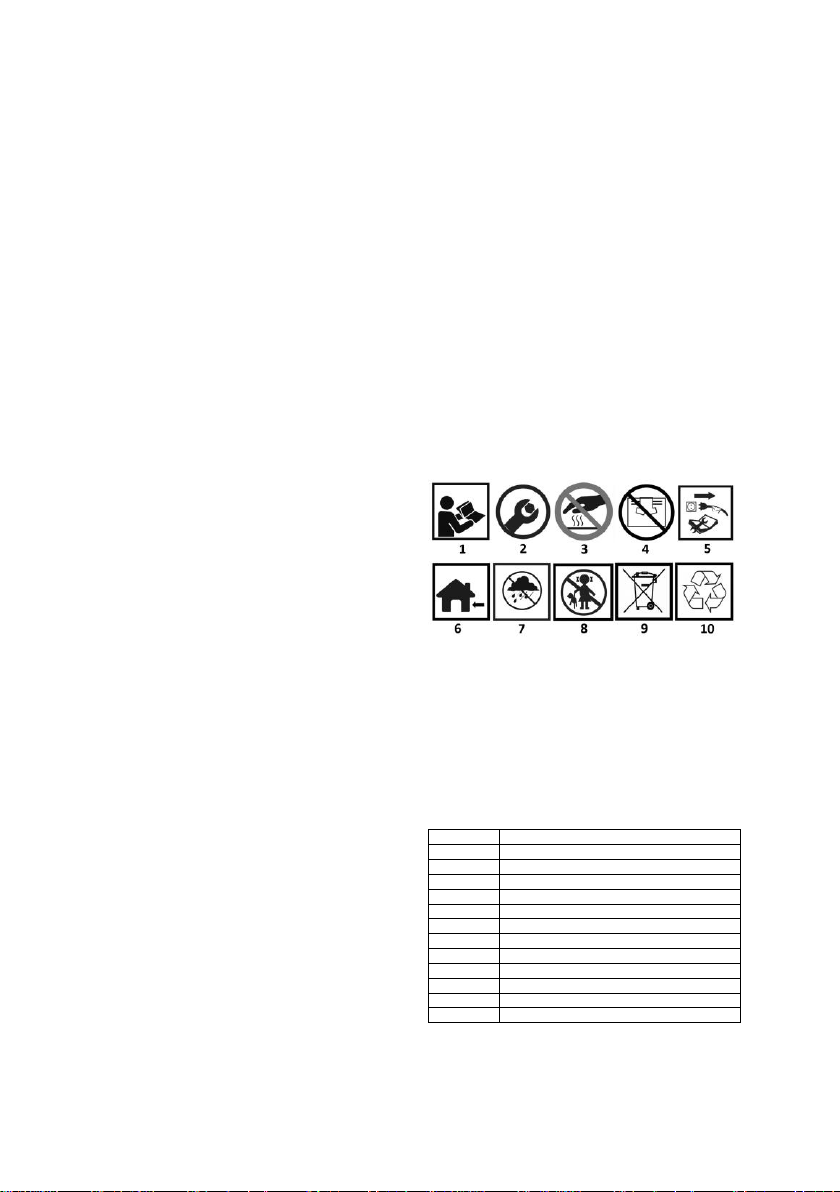
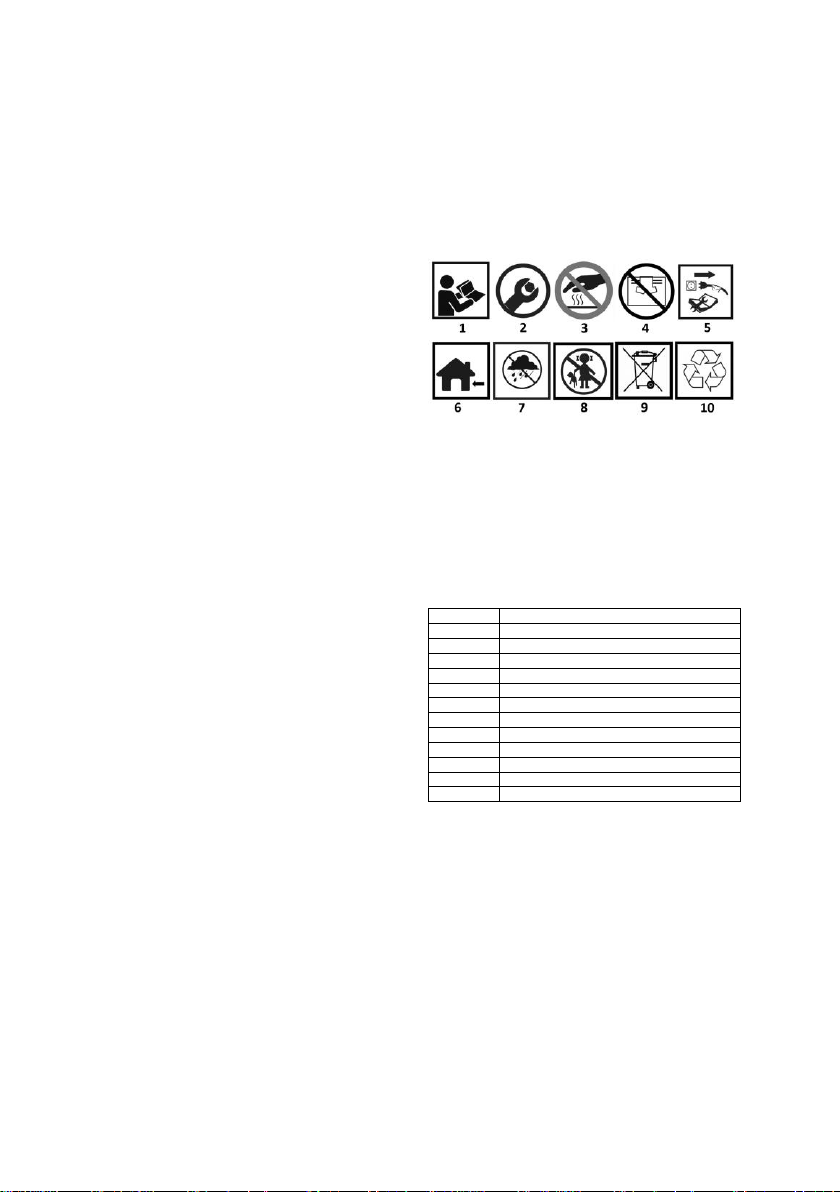
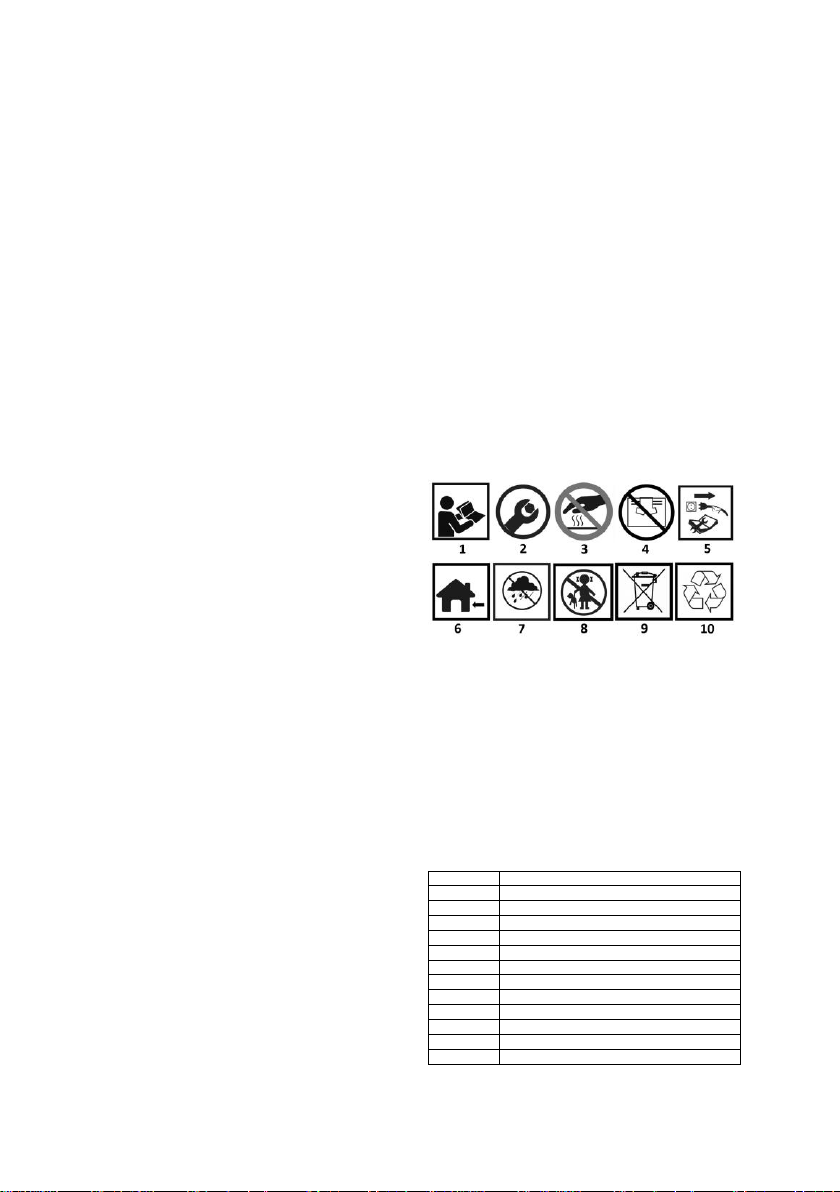
PIKTOGRAMY I OSTRZEŻENIA
1. Przeczytaj instrukcję obsługi, przestrzegaj
ostrzeżeń i warunków bezpieczeństwa w niej zawartych!
2. Wymaga montażu
3. Gorący element
4. Nie zakrywać otworów wlotowych i wylotowych
5. Odłączyć przed naprawą lub konserwacją
6. Do stosowania wewnątrz pomieszczeń
7. Chronić przed deszczem
8. Chronić przed dziećmi
9. Nie wyrzucać z odpadami domowymi
10. Podlega recyklingowi
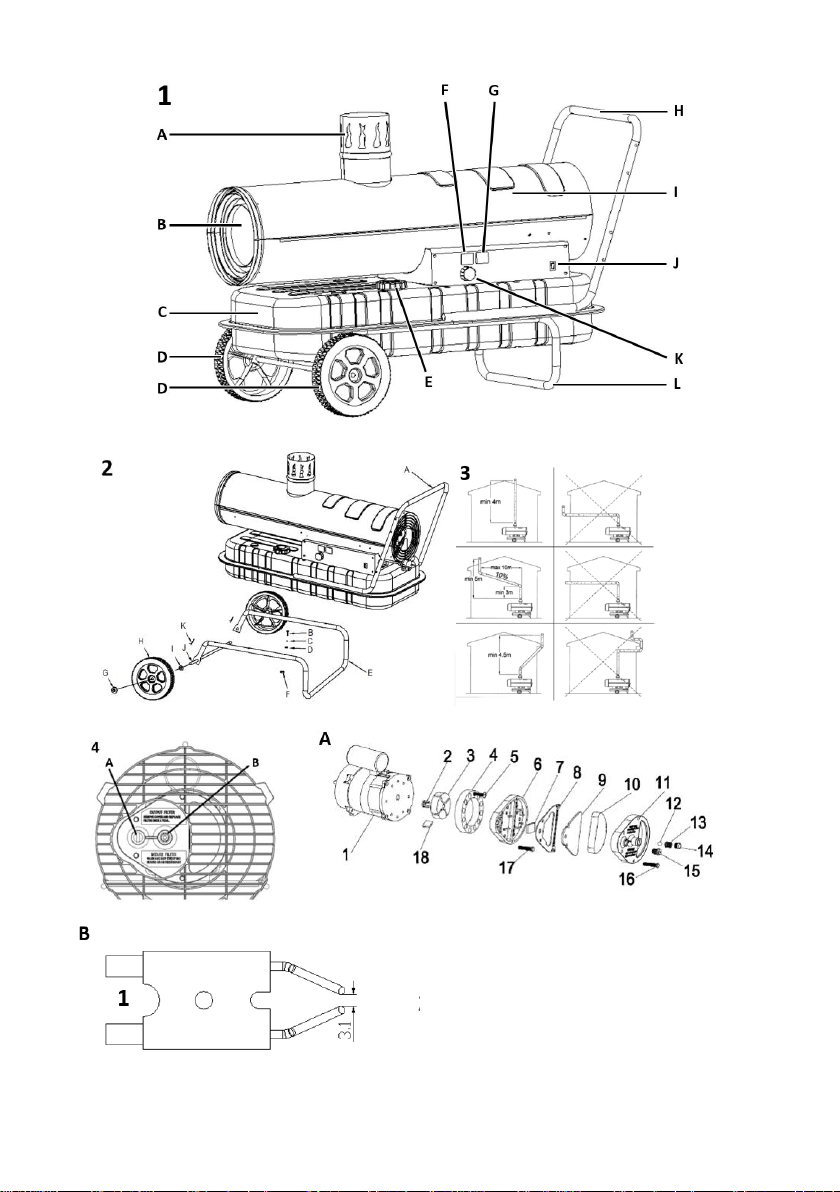
OPIS ELEMENTÓW GRAFICZNYCH
Rys 1
Opis A Komin na spaliny
B
Otwór wylotowy gorącego powietrza
C
Zbiornik na paliwo
D
Koła transportowe
E
Korek wlewu paliwa do zbiornika
F
Wyświetlacz
G
Wyświetlacz temperatury otoczenia
H
Rękojeść transportowa
I
Komora spalania
J
Pokrętło regulacji temperatury
K
Włącznik główny
L
Podpora nagrzewnicy
INSTRUKCJA MONTAŻU
Wyjmij grzejnik z kartonu. Jeśli urządzenie jest w jakikolwiek
sposób uszkodzone, nie używaj go i skontaktuj się ze
sprzedawcą.
Page 5

5
Aby zmontować grzejnik, należy postępować w następujący
sposób:
1. Włożyć oś koła rys. 2J do odpowiedniego otworu konstrukcji
podpory rys. 2E, włożyć zawleczkę rys. 2K do odpowiednich
otworów; założyć podkładkę rys. 2H po obu stronach wału,
nasunąć koło rys. 2I na oś koła rys. 2J, nakręcić nakrętkę rys.
2G.
2. Umieścić korpus nagrzewnicy na konstrukcji podpory rys. 2E,
upewnij się, że otwory montażowe pokrywają się z otworami
urządzenia.
3. Za pomocą śruby rys. 2B, podkładki sprężynującej rys. 2C,
podkładki zwykłej rys. 2D i nakrętek, zamocuj konstrukcję
podpory rys. 2E do uchwytu zbiornika.
Instrukcja instalacji
Ustaw grzejnik na płaskiej, równej, niepalnej, twardej
powierzchni.
Nagrzewnice z wtryskiem bezpośrednim są przeznaczone do
użytku w otwartych przestrzeniach zewnętrznych lub w dobrze
wentylowanych pomieszczeniach wewnętrznych. Do użytku w
pomieszczeniach należy zapewnić stałe otwory wentylacyjne o
powierzchni co najmniej 25 cm² / kW, równo rozmieszczone
między podłogą a sufitem, co najmniej 250 cm².
UWAGA! Minimalny rozmiar otworu wentylacyjnego 320cm²
• Instaluj grzejnik tylko w normalnej pozycji poziomej.
• Nie ustawiaj grzejnika w pobliżu ścian, narożników lub niskich
sufitów.
• Nie umieszczaj grzejnika poniżej gniazdka.
• Nie umieszczaj grzejnika na poruszających się pojazdach ani
w miejscach, w których może się przewrócić.
• Grzejnik należy trzymać z dala od materiałów łatwopalnych,
wybuchowych lub powodujących korozję.
• Ustawić grzejnik z dala od zasłon lub podobnych materiałów,
które mogłyby blokować wlot i wylot powietrza.
• Nigdy nie blokuj ani nie ograniczaj wlotu i wylotu powietrza z
jakiegokolwiek powodu.
• Przewód zasilający należy trzymać z dala od źródeł ciepła,
ostrych krawędzi, tnących i ruchomych części.
• Nie wystawiać bezpośrednio na działanie warunków
atmosferycznych lub nadmiernej wilgoci.
• Nie umieszczaj grzejnika w bezpośrednim sąsiedztwie wanny,
prysznica lub basenu.
• Należy przestrzegać ogólnych i specjalnych przepisów
przeciwpożarowych obowiązujących we wszystkich
obszarach zastosowań. W każdym przypadku należy
zapewnić następujące minimalne odstępy bezpieczeństwa od
materiałów lub przedmiotów w otoczeniu grzejnika:
• Bok nagrzewnicy: 0,6 m
• Strona wlotu powietrza: 1 m
• Góra: 1,5 m
• Strona wylotu gorącego powietrza: 3 m
• Podłogi i sufity w miejscu pracy nagrzewnicy muszą być
wykonane z materiałów ognioodpornych.
• Nie podłączać grzejników bezpośrednio do kanałów
powietrznych.
INSTALACJA KOMINOWA NAGRZEWNICY
Nagrzewnica jest wyposażona w komin do odprowadzania
spalin. Na rys. 3 pokazano sposób prawidłowego montażu
komina odprowadzającego spaliny z nagrzewnicy (lewa strona
rysunku). Po prawej stronie rysunku sposoby jakie sposoby
montażu komina są niedozwolone.
UWAGA!
Bezwzględnie należy stosować się do pokazanych zasad
konstruowania kominów, długości rur, kątów łączenia
poszczególnych odcinków rur.
• Nie wolno łączyć rur pod kątem prostym 90° ani pod
mniejszym kątem niż 90° - gdyż utrudnia to a nawet
uniemożliwia wydostawanie się spalin.
• Należy bezwzględnie przestrzegać minimalnych długości
odcinków rur
INSTRUKCJA UŻYTKOWANIA
Uruchomienie
• Napełnij zbiornik czystym paliwem. Używaj tylko oleju
napędowego lub nafty.
• Wskaźnik poziomu paliwa w górnej części zbiornika umożliwia
sprawdzenie poziomu paliwa
• Podłącz wtyczkę przewodu zasilającego do uziemionego
układu zasilania 230 V 50 Hz.
UWAGA! Uziemienie jest obowiązkowe.
• Po zakończeniu powyższego „rozruchu” w lewym oknie
wyświetlacza pojawi się „-”, a w prawym oknie wyświetlona
zostanie wartość temperatury otoczenia.
• Przesuń włącznik do pozycji „I”.
• Domyślne ustawienie temperatury to 20 stopni Celsjusza, co
zostanie pokazane w lewym okienku wyświetlacza.
• Jeśli temperatura otoczenia jest niższa od temperatury
domyślnej, elektrody zaczynają iskrzyć, po 7 sekundach
włącza się nagrzewnica.
• Jeśli temperatura otoczenia jest wyższa niż temperatura
domyślna, należy ustawić pokrętło termostatu na żądaną
temperaturę, elektrody zaczną iskrzyć, po 7 sekundach
włącza się nagrzewnica.
ROZRUCH NA ZIMNO:
Aby uruchomić nagrzewnicę w niskiej temperaturze należy
utrzymywać otwór odpowietrzający rys. 4B zamknięty palcem
podczas zapłonu, aby ułatwić rozruch.
NIEPRAWIDŁOWA PRACA:
W przypadku nieprawidłowego działania (brak płomienia,
zmniejszony przepływ powietrza, złe spalanie, itp.) nagrzewnica
wyłącza się a na wyświetlaczu pojawi się kod TRYBU
BLOKADY.
RĘCZNY RESET
Jeśli nagrzewnica jest w trybie blokady, sprawdź i usuń
przyczynę blokady przed ponownym uruchomieniem
nagrzewnicy. Aby zresetować urządzenie, należy ustawić
przełącznik rys. 1J WŁ. / WYŁ. W pozycji „0”, a następnie
ponownie na pozycję „I”. W przypadku powtarzającej się awarii
wezwać serwis techniczny. Obracanie pokrętła termostatu NIE
spowoduje zresetowania grzejnika.
WYŁĄCZANIE
• Ustaw przełącznik w pozycji „WYŁ.” 0. Faza po zakończeniu
wentylacji spowoduje schłodzenie komory spalania przez 90
sekund. Odłącz urządzenie, jeśli nie jest używane przez
dłuższy czas.
• Nigdy nie odłączaj grzejnika od zasilania, aby zatrzymać go
podczas pracy. Zawsze pozwól, aby sekwencja chłodzenia
została zakończona, w przeciwnym razie ciepło resztkowe
może uszkodzić elementy wewnętrzne.
• Nie przykrywaj grzejnika. Nie blokuj wlotu i wylotu powietrza.
• Wylot grzejnika jest bardzo gorący podczas pracy i po użyciu.
Nie dotykać! W razie potrzeby użyj osobistego wyposażenia
ochronnego.
• Należy pilnować, aby dzieci nie bawiły się urządzeniem, a
przebywając w pobliżu były pod nadzorem.
• Urządzenie nie jest przeznaczone do użytku przez osoby (w
tym dzieci) o ograniczonych zdolnościach fizycznych,
sensorycznych lub umysłowych lub bez doświadczenia i
wiedzy.
• Odłącz grzejnik przed jego przenoszeniem. Nigdy nie ciągnij
za przewód, aby odłączyć lub przesunąć urządzenie.
• Nie pozostawiaj grzejnika bez nadzoru podczas użytkowania.
• Nigdy nie używaj urządzenia mokrymi rękami lub gdy grzejnik
lub przewód zasilający są mokre.
• Jeśli przewód zasilający jest uszkodzony, musi zostać
wymieniony przez producenta, serwisanta lub podobnie
wykwalifikowaną osobę.
Czyszczenie, konserwacja i przechowywanie
• Regularnie przecieraj obudowę miękką gąbką lub szmatką.
Do bardzo zabrudzonych części użyj gąbki zwilżonej letnią
wodą i łagodnym detergentem, a następnie osusz czystą
szmatką.
• Wlot powietrza i wentylator należy chronić przed kurzem i
brudem. Aby wyczyścić części wewnętrzne, delikatnie
Page 6

6
przedmuchaj sprężonym powietrzem przez wlot.
• Regularnie sprawdzaj przewód zasilający: jeśli jest zużyty,
pęknięty lub uszkodzony, zleć wymianę serwisowi
technicznemu.
• Przed schowaniem grzejnika upewnij się, że jest idealnie
schłodzony i suchy. Przykryj urządzenie plastikową torbą,
włóż do opakowania i przechowuj w suchym, wentylowanym
miejscu.
• Przed rozpoczęciem jakichkolwiek czynności
konserwacyjnych wyłącz urządzenie, odłącz i pozwól
nagrzewnicy ostygnąć przez co najmniej 15 minut.
• Nie podejmuj samodzielnych prób naprawy elektrycznej. Jeśli
nagrzewnica wymaga serwisu lub naprawy, skontaktuj się z
wykwalifikowanym technikiem.
• Nie używaj uszkodzonego urządzenia, jeśli wykwalifikowany
technik nie sprawdził go i nie naprawił.
• Podczas czyszczenia upewnij się, że woda nie dostała się do
urządzenia.
• Nie otwieraj obudowy, aby wyczyścić części wewnętrzne. Nie
rozpylaj wody do grzejnika.
• Nigdy nie używaj rozpuszczalników, benzyny, toluenu i
podobnych agresywnych chemikaliów do czyszczenia
grzejnika.
• Do czyszczenia nagrzewnicy nie wolno używać
rozpuszczalników, benzyny, toluenu ani podobnych
agresywnych substancji chemicznych.
• Kontrole wykonywane WYŁĄCZNIE przez
WYKWALIFIKOWANY PERSONEL są zalecane przed
każdym sezonowym użyciem:
• Ostrożnie odkręć dyszę z łącznika dyszy. Przedmuchaj
sprężonym powietrzem przez otwór dyszy, aby uwolnić ją od
brudu. W razie potrzeby wymienić dyszę.
CZYSZCZENIE, KONSERWACJA I PRZECHOWYWANIE
• Obudowę należy regularnie przecierać miękką gąbką lub
szmatką. W przypadku bardzo zabrudzonych części należy
użyć gąbki zwilżonej letnią wodą i łagodnym detergentem, a
następnie osuszyć czystą szmatką.
• Wlot powietrza i wentylator powinny być wolne od kurzu i
brudu. Aby wyczyścić wewnętrzne części, delikatnie
przedmuchaj wlot powietrza sprężonym powietrzem.
• Regularnie sprawdzaj przewód zasilający: jeśli jest zużyty,
pęknięty lub uszkodzony, zleć jego wymianę serwisowi
technicznemu.
• Przed przechowywaniem grzejnika należy upewnić się, że jest
on idealnie chłodny i suchy. Urządzenie należy przykryć
plastikową torbą, umieścić w opakowaniu i przechowywać w
suchym, wentylowanym miejscu.
DYSZA
Ostrożnie odkręć dyszę od złącza dyszy. Przedmuchaj dyszę
sprężonym powietrzem, aby usunąć z niej zanieczyszczenia. W
razie potrzeby wymień dyszę.
FILTRY POWIETRZA
Oczyść filtry powietrza. Zdejmij pokrywę końcową filtra rys. A11,
umyj filtr wlotu powietrza rys. A10 lekkim detergentem i
dokładnie osusz przed ponownym zamontowaniem. Raz w roku
wymień filtr dopływu powietrza rys. A9.
ELEKTRODY ZAPŁONOWE
Należy regularnie oczyszczać, regulować i w razie potrzeby
wymienić elektrodę zapłonową. Prawidłowe odstępy między
elektrodami patrz rys. B1 i rys. B2 (wymiary podane w mm).
REGULACJA CIŚNIENIA SPRĘŻARKI
UWAGA! Ciśnienie sprężarki jest ustawione fabrycznie może być
sprawdzane i regulowane wyłącznie przez wykwalifikowanych
techników. Manipulowanie przy urządzeniu może być
niebezpieczne.
Zdejmij nasadkę manometru rys. 4A. Podłącz manometr do
portu pomiaru ciśnienia na tylnej osłonie. Uruchom nagrzewnicę
i odczytaj wartość ciśnienia powietrza. W razie potrzeby
wyreguluj ciśnienie do prawidłowej wartości, obracając śrubę
regulacyjną zgodnie z ruchem wskazówek zegara, aby
zwiększyć, przeciwnie do ruchu wskazówek zegara, aby
zmniejszyć ciśnienie.
INSTALACJA NA DUŻYCH WYSOKOŚCIACH:
Ze względu na mniejszą ilość tlenu w odniesieniu do instalacji na
dużych wysokościach na poziomie morza, może być konieczne
zmniejszenie ciśnienia sprężarki rys. 4A. Regulacja tego
ustawienia może być konieczna do utrzymania dobrego spalania
z powodu braku tlenu.
ROZWIĄZYWANIE PROBLEMÓW
PROBLEM
PRZYCZYNA
ROZWIĄZANIE
Silnik nie
uruchamia
się
Błąd E1
wyświetlany
na ekranie
Brak zasilania lub zbyt
niskie napięcie
Sprawdź przewód
zasilający i
napięcie
Sprawdź
bezpiecznik i
wymień w razie
potrzeby
Wadliwy lub
uszkodzony przewód
zasilający
Sprawdź i wymień
w razie potrzeby
Wadliwy silnik /
kondensator
Sprawdź i wymień
w razie potrzeby
Urządzenie jest
zablokowane z powodu
wcześniejszego
przegrzania
Wykryj przyczynę
przegrzania
Wyłącz
urządzenie
Sprawdź wlot i
wylot powietrza
Poczekaj kilka
minut i uruchom
ponownie
urządzenie
Błąd E2
wyświetlany
na ekranie
Czujnik temperatury
jest uszkodzony lub
złącze czujnika
temperatury jest
poluzowane
Sprawdź i
wymień, jeśli to
konieczne, sondę
temperatury
Sprawdź iw razie
potrzeby wymień
płytkę drukowaną
Silnik
pracuje, ale
grzałka nie
zapala się i
po krótkim
czasie
wyłącza się
Błąd E1
wyświetlany
na ekranie
Pusty zbiornik paliwa,
brudne lub niewłaściwe
paliwo
Usuń złe lub
brudne paliwo
Napełnij zbiornik
czystym olejem
napędowym lub
naftą
Zatkany filtr paliwa
Wyczyść lub
wymień filtr paliwa
Wycieki powietrza w
przewodzie olejowym
Sprawdzić węże,
dokręć
połączenia, w
razie potrzeby
wymień przewody
Zatkana dysza palnika
Oczyścić dyszę
przedmuchując
sprężonym
powietrzem, w
razie potrzeby
wymienić
Lepkość paliwa wzrosła
w niskiej temperaturze
Zmieszaj olej
napędowy z 1020% nafty
Z wylotu
spalin
wydostają
się płomienie
Błąd E1
wyświetlany
na ekranie
Niewystarczający
dopływ powietrza do
komory spalania
Sprawdź wlot
powietrza,
wentylator, silnik
Za wysokie ciśnienie
sprężarki
Sprawdź ciśnienie
powietrza,
wyreguluj w razie
potrzeby *
Page 7
7
Nagrzewnica
zatrzymuje
się podczas
pracy
Temperatura
otoczenia
wyświetlana
na ekranie
Osiągnięto temperaturę
pokojową ustawioną na
termostacie pokojowym
Normalna
operacja
Aby rozpocząć,
obróć pokrętło
regulacji
temperatury
zgodnie z ruchem
wskazówek
zegara na wyższą
wartość
Nagrzewnica
zatrzymuje
się podczas
pracy
Błąd E1
wyświetlany
na ekranie
Awaria płomienia
Sprawdź i usuń
przyczynę (y)
nieprawidłowego
działania
Aby zresetować,
ustaw przełącznik
On / Off na 0, a
następnie na I.
Wezwać serwis
techniczny, jeśli
problem nie ustąpi
Złe spalanie
Zmniejszony przepływ
powietrza
Przegrzanie
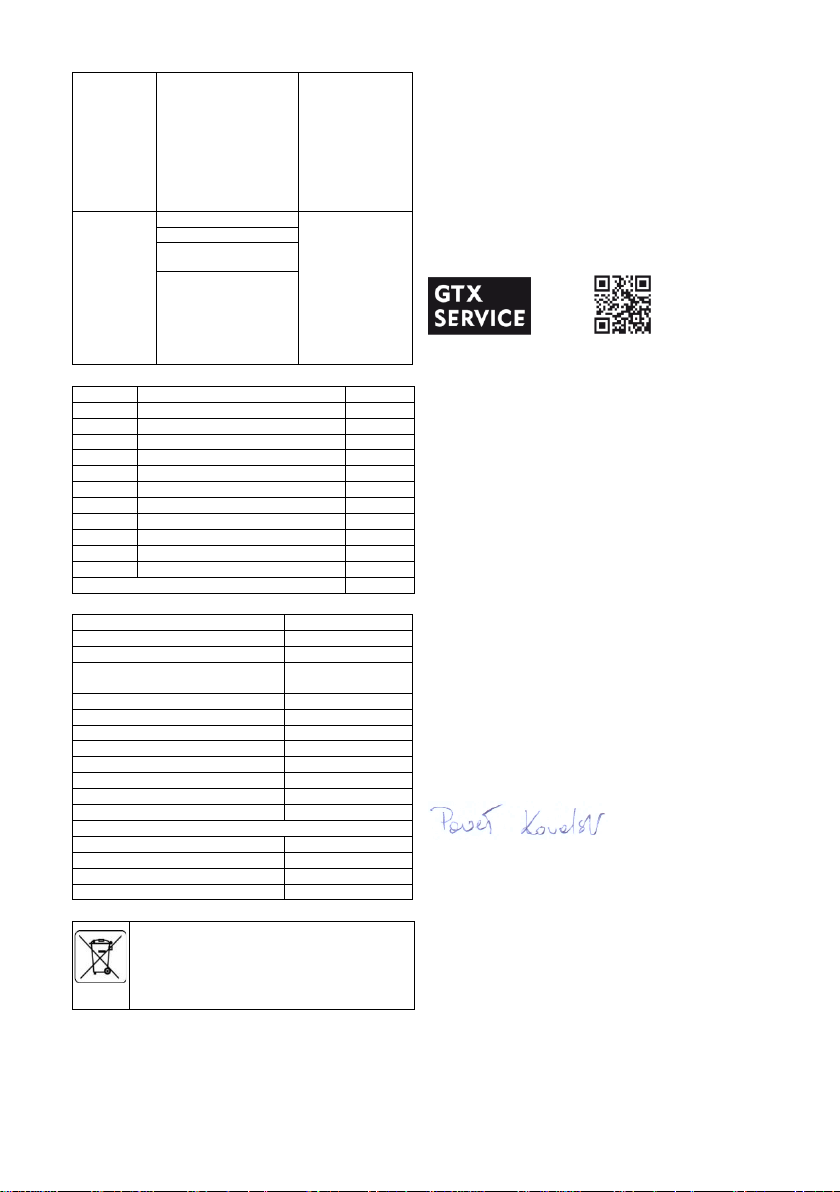
ZAWARTOŚĆ ZESTAWU
Pos.
Opis
Ilość A Uchwyt
1
B
Wkręty
6 lub 8
C
Podkładka sprężynująca
6 lub 8
D
Podkładka
6 lub 8
E
Konstrukcja rękojeści
1 F Nakrętka M5
6 lub 8
G
Nakrętka M12
2 H Podkładka ø12
2 I Koła
2
J
Wałek do kół
1
K
Zawleczka
2
Nagrzewnica zespolona z bakiem na paliwo
1 szt.
Dane znamionowe
Model
90-086
Moc cieplna [kW] *
20
Przepływ powietrza [m³/h]
600
Typ paliwa
Olej napędowy
/Diesel
Zużycie paliwa [kg/h]
1.65
Napięcie zasilania [V/Hz]
230V AC 50Hz
Obszar grzewczy
150~200 m²
Stopień ochrony IP
IPX4
Klasa ochronności
I
Natężenie prądu [A]
1.1
Moc elektryczna [W]
230
Wartość bezpiecznika
T3.15A
Wymiary
Waga netto (kg)
21,3
Pojemność zbiornika (l)
38
Czas pracy (h)
~23
Rok produkcji
2023
OCHRONA ŚRODOWISKA
Produktów zasilanych elektrycznie nie należy wyrzucać wraz z
domowymi odpadkami, lecz oddać je do utylizacji w
odpowiednich zakładach. Informacji na temat utylizacji udzieli
sprzedawca produktu lub miejscowe władze. Zużyty sprzęt
elektryczny i elektroniczny zawiera substancje nieobojętne dla
środowiska naturalnego. Sprzęt nie poddany recyclingowi
stanowi potencjalne zagrożenie dla środowiska i zdrowia ludzi.
„Grupa Topex Spółka z ograniczoną odpowiedzialnością” Spółka komandytowa
z siedzibą w Warszawie, ul. Pograniczna 2/4 (dalej: „Grupa Topex”) informuje, iż
wszelkie prawa autorskie do treści niniejszej instrukcji (dalej: „Instrukcja”), w tym
m.in. jej tekstu, zamieszczonych fotografii, schematów, rysunków, a także jej
kompozycji, należą wyłącznie do Grupy Topex i podlegają ochronie prawnej
zgodnie z ustawą z dnia 4 lutego 1994 roku, o prawie autorskim i prawach
pokrewnych (tj. Dz. U. 2006 Nr 90 Poz 631 z późn. zm.). Kopiowanie,
przetwarzanie, publikowanie, modyfikowanie w celach komercyjnych całości
Instrukcji jak i poszczególnych jej elementów, bez zgody Grupy Topex wyrażonej
na piśmie, jest surowo zabronione i może spowodować pociągnięcie do
odpowiedzialności cywilnej i karnej.
GWARANCJA I SERWIS
Warunki gwarancji oraz opis postępowania w przypadku
reklamacji zawarte są w załączonej Karcie Gwarancyjnej.
Serwis Centralny GTX Service Sp. z o.o. Sp.k. ul.
Pograniczna 2/4 tel. +48 22 364 53 50
02-285 Warszawa e-mail [email protected]
Sieć Punktów Serwisowych do napraw gwarancyjnych i
pogwarancyjnych dostępna na platformie internetowej
gtxservice.pl
Zeskanuj QR kod i wejdź na gtxservice.pl
Deklaracja zgodności UE
Producent: Grupa Topex Sp. Z o.o. Sp.k., ul. Pograniczna 2/4
02-285 Warszawa
Wyrób: Nagrzewnica olejowa
Model: 90-086
Nazwa handlowa: NEO TOOLS
Numer seryjny: 00001 ÷ 99999
Niniejsza deklaracja zgodności wydana zostaje na wyłączną
odpowiedzialność producenta.
Opisany wyżej wyrób jest zgodny z następującymi dokumentami:
Dyrektywa Niskonapięciowa 2014/35/UE
Dyrektywa o Kompatybilności Elektromagnetycznej
2014/30/UE
Dyrektywa RoHS 2011/65/UE zmieniona Dyrektywą
2015/863/UE
Rozporządzenie (UE) 626/2011 uzupełniające dyrektywę
2010/30/EU
Rozporządzenie (UE) 2015/1188 implementujące dyrektywę
2009/125/WE
Oraz spełnia wymagania norm:
EN 60335-1:2012+A11+A13+A1+A14+A2; EN 60335-2102:2016; EN 62233:2008;
EN IEC 55014-1:2021; EN IEC 55014-2:2021;
EN IEC 61000-3-2:2019+A1; EN 61000-3-3:2013+A1+A2;
EN IEC 63000:2018
Nazwisko i adres osoby mającej miejsce zamieszkania lub siedzibę
w UE upoważnionej do przygotowania dokumentacji technicznej:
Podpisano w imieniu:
Grupa Topex Sp. Z o.o. Sp.k.
Ul. Pograniczna 2/4
02-285 Warszawa
Paweł Kowalski
Pełnomocnik ds. jakości firmy GRUPA TOPEX
Warszawa, 2023-06-19
Page 8
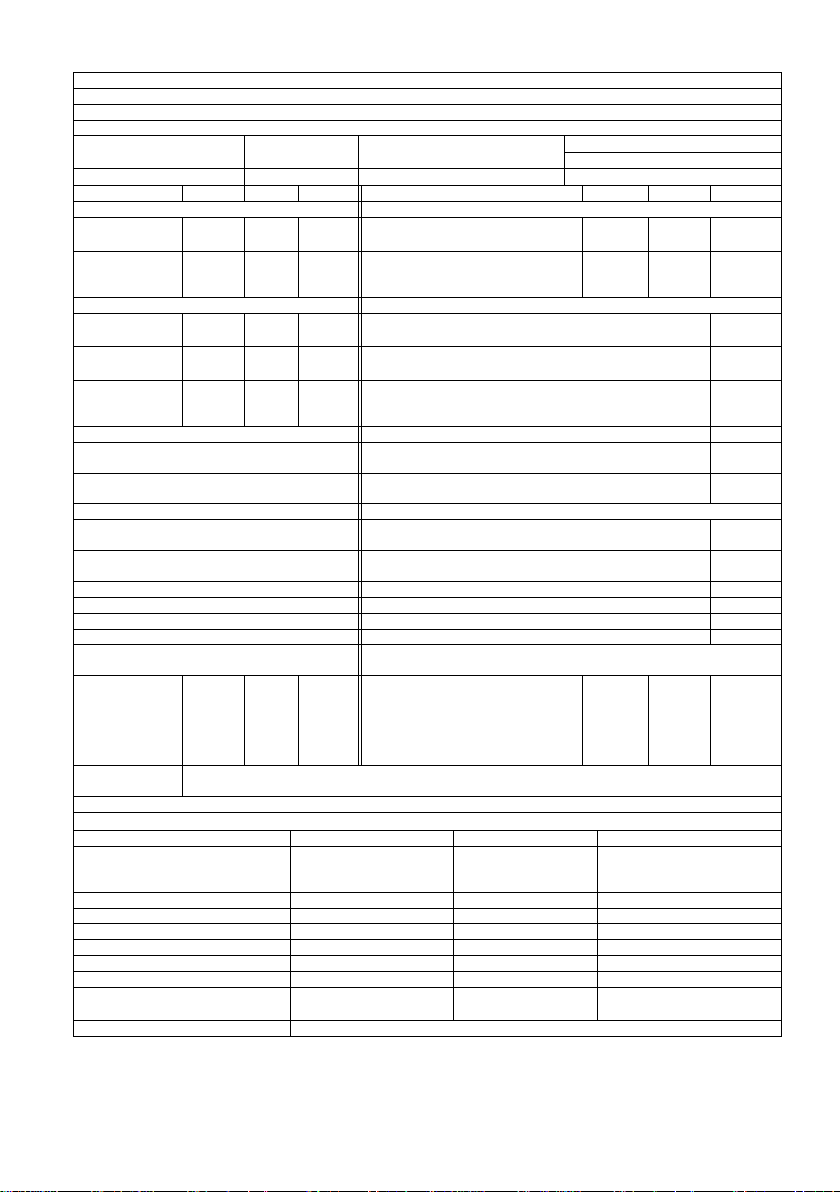
8
Identyfikator modelu: 90-086
Funkcja ogrzewania pośredni ego: [nie]
Znamionowa moc cieplna: 20(kW)
Pośrednia moc cieplna: nie dotyczy (kW)
Paliwo
Emisje z ogrzewania pomieszczeń (*)
NOx
Wybierz rodzaj paliwa
[paliwo ciekłe]
Nafta oczyszczona
79[mg/ kWh
input
] (GCV)
Parametr
Symbol
Wartość
Jednostka Item
Symbol
Wartość
Jednostka
Moc cieplna
Przydatna wydajność (NCV)
Nominalna moc
cieplna P
nom
20 kW
Sprawność użytkowa przy nominalnej
mocy cieplnej
η
th,nom
100 %
Minimalna moc
cieplna
(orientacyjna)
P
min
N/A kW
Efektywność użytkowa przy minimalnej
mocy cieplnej (orientacyjna)
η
th,min
N/A %
Dodatkowe zużycie energii elektrycznej
Rodzaj mocy cieplnej / regulacja temperatury w pomieszczeniu (wybierz jedną)
Przy nominalnej
mocy cieplnej
el
max
0,002 kW
Jednostopniowa moc cieplna, brak regulacji temperatury w
pomieszczeniu
[nie]
Przy minimalnej
mocy cieplnej
el
min
N/A kW
Dwa lub więcej stopni ręcznych, bez regulacji temperatury w
pomieszczeniu
[nie]
W trybie
czuwania
elSB N/A kW
z mechaniczną regulacją temperatury w pomieszczeniu za pomocą
termostatu
[nie]
z elektroniczną regulacją temperatury w pomieszczeniu
[tak]
z elektroniczną regulacją temperatury w pomieszczeniu i zegarem
dziennym
[nie]
z elektroniczną regulacją temperatury w pomieszczeniu plus zegar
tygodniowy
[nie]
Inne opcje sterowania (możliwe wielokrotne wybory)
regulacja temperatury w pomieszczeniu z wykrywaniem
obecności
[nie]
Regulacja temperatury w pomieszczeniu z wykrywaniem
otwartego okna
[nie]
z opcją zdalnego sterowania
[nie]
z adaptacyjną kontrolą startu
[nie]
z ograniczeniem czasu pracy
[nie]
z czujnikiem czarnej żarówki
[nie]
Zapotrzebowanie na moc stałego płomienia
pilotującego
Zapotrzebowani
e na moc
płomienia
pilotującego
(jeśli
odpowiedni)
P
pilot
0
kW
Dane kontaktowe
Grupa Topex Sp. z o.o. Sp.k.
Ul. Pograniczna 2/4, 02-285 Warszawa
(*) NOx = Tlenki azotu
Sezonowa efektywność energetyczna ogrzewania pomieszczeń ηS
Pozycja
Symbol
Wartość
Jednostka
Sezonowa efektywność energetyczna
ogrzewania pomieszczeń w trybie
aktywnym
η
S,on
100
%
Współczynnik korygujący (F1)
/ 0 %
Współczynnik korygujący (F2)
/ 7 %
Współczynnik korygujący (F3)
/ 0 %
Współczynnik korygujący (F4)
/ 0 %
Współczynnik korygujący (F5)
/ 0 %
Współczynnik etykiety biomasy
BLF 1 /
Sezonowa efektywność energetyczna
ogrzewania pomieszczeń ηS
ηS
97
%
Klasy efektywności energetycznej
A
Page 9
9
EN
TRANSLATION (USER) MANUAL
Oil heater
90-086
NOTE: BEFORE USING THE EQUIPMENT, PLEASE READ
THIS MANUAL CAREFULLY AND KEEP IT FOR FUTURE
REFERENCE. PERSONS WHO HAVE NOT READ THE
INSTRUCTIONS SHOULD NOT CARRY OUT ASSEMBLY,
ADJUSTMENT OR OPERATION OF THE EQUIPMENT.
THIS PRODUCT IS SUITABLE ONLY FOR OCCASIONAL USE
OR FOR USE IN WELL INSULATED AREAS
SPECIFIC SAFETY PROVISIONS
NOTE!
Read the operating instructions carefully, follow the warnings
and safety conditions contained therein. The appliance has been
designed for safe operation. Nevertheless: installation,
maintenance and operation of the appliance can be dangerous.
Following the following procedures will reduce the risk of fire,
electric shock, injury and will reduce the installation time of the
appliance
NOTE: The heater is not intended for domestic or recreational
use.
● Use only in well-ventilated areas and away from combustible
materials
● DO NOT use for space heating in residential buildings. For use
in public buildings, see national regulations.
● This appliance may be used by children aged 8 years and older
and persons with limited physical, sensory or mental abilities or
without experience and knowledge, provided they are supervised
or have been instructed on the topics of using the appliance in a
safe manner and understand the risks involved. Children must
not play with the appliance.
Children must not clean or maintain the appliance without
supervision.
WARNING: To avoid overheating, do not cover the heater.
● Children under 3 years of age should not be allowed near the
appliance unless under constant supervision.
● Children between the ages of 3 years and 8 years may only
switch the appliance on/off provided it has been placed or
installed in its normal operating position and they have received
supervision or have been instructed in the safe use of the
appliance and understand the risks involved. Children between
the ages of 3 and 8 years may not connect, adjust or clean the
appliance or carry out maintenance operations.
CAUTION ! - some parts of this appliance may become very hot
and cause burns. Special attention should be paid to children
and vulnerable persons.
● All servicing must be carried out by a qualified service provider.
● The heater uses air (oxygen) in the area where it is used. The
required ventilation must be provided to ensure adequate
combustion.
● Do not store or use petrol or other flammable vapours or
liquids in the vicinity of this or any other appliance!
● Danger of fire, burns, suffocation and explosion. Keep solid
combustible materials, such as building materials, paper or
cardboard, at a safe distance from the heater as recommended
in the instructions. Never use the heater in spaces that may
contain volatile or airborne substances, or products such as
petrol, solvents, paint thinner, dust particles or unknown
chemical substances.
● Direct-injection heaters can cause carbon monoxide (CO)
poisoning if used incorrectly, which can lead to death.
● Failure to follow the precautions and instructions outlined in the
instructions for this heater can result in death, serious injury and
loss of property or damage due to the hazards of fire, explosion,
burns, suffocation, serious injury, carbon monoxide and
poisoning. Only persons who can understand and follow the
instructions should use or service this heater. If you need
assistance or information about the heater, such as operating
instructions, labels, etc. Contact the manufacturer.
● The electrical installation to which the appliance is connected
must comply with current legislation. The installation requires a
residual current circuit breaker (RCCB) in the main electrical
distribution board.
● Unplug the unit before performing any maintenance.
● Always check the power cord before using the device. It must
not be bent, stretched, stretched or damaged in any way.
● The power cord must only be replaced by qualified personnel.
Only use the original power cord with the appropriate protection
class.
● The front outlet is very hot during operation. Do not touch!
Danger of burns.
PICTOGRAMS AND WARNINGS
1. Read the operating instructions, observe the
warnings and safety conditions contained therein!
2. Requires assembly
3. Hot element
4. Do not cover inlet and outlet openings
5. Disconnect before repair or maintenance
6. For indoor use
7. Protect from rain
8. Keep out of reach of children
9. Do not dispose of with household waste
10. Recyclable
DESCRIPTION OF THE GRAPHIC ELEMENTS
Fig 1
Description
A
Exhaust stack
B
Hot air outlet
C
Fuel tank
D
Transport wheels
E
Tank filler cap
F
Display
G
Ambient temperature display
H
Transport handle
I
Combustion chamber
J
Temperature control knob
K
Main switch
L
Heater support
ASSEMBLY INSTRUCTIONS
Remove the heater from the carton. If the unit is damaged in any
way, do not use it and contact your dealer.
To assemble the radiator, proceed as follows:
Insert the wheel axle fig. 2J into the corresponding hole of the
support structure fig. 2E, insert the pin fig. 2K into the
corresponding holes; insert the washer fig. 2H on both sides of
the shaft, slide the wheel fig. 2I onto the wheel axle fig. 2J, screw
on the nut fig. 2G.
2. place the heater body on the support structure fig. 2E, make
sure that the mounting holes coincide with those of the unit.
3. using bolt fig. 2B, spring washer fig. 2C, plain washer fig. 2D
and nuts, fix the support structure fig. 2E to the tank holder.
Installation instructions
Place the heater on a flat, level, non-combustible, hard surface.
Direct injection heaters are designed for use in open outdoor
spaces or in well-ventilated indoor spaces. For indoor use,
permanent ventilation openings of at least 25 cm² / kW must be
provided, evenly spaced between floor and ceiling, at least 250
cm².
Page 10

10
ATTENTION! Minimum ventilation opening size 320cm²
• Only install the heater in the normal horizontal position.
• Do not place the heater near walls, corners or low ceilings.
• Do not place the heater below the socket.
• Do not place the heater on moving vehicles or where it may
tip over.
• Keep the heater away from flammable, explosive or corrosive
materials.
• Position the heater away from curtains or similar materials that
could block the air inlet and outlet.
• Never block or restrict the air inlet and outlet for any reason.
• Keep the power cable away from heat sources, sharp edges,
cutting and moving parts.
• Do not expose directly to the weather or excessive moisture.
• Do not place the heater in the immediate vicinity of a bath,
shower or swimming pool.
• The general and special fire regulations applicable to all areas
of application must be observed. In any case, the following
minimum safety distances from materials or objects in the
vicinity of the heater must be ensured:
• Heater side: 0.6 m
• Air inlet side: 1 m
• Top: 1.5 m
• Hot air outlet side: 3 m
• Floors and ceilings in the working area of the heater must be
made of fire-resistant materials.
• Do not connect radiators directly to air ducts.
CHIMNEY INSTALLATION OF THE HEATER
The heater is fitted with a chimney for the discharge of the flue
gases. Fig. 3 shows how to correctly install the chimney for flue
gases from the heater (left side of the drawing). On the right side
of the figure, the ways in which the chimney must not be installed.
NOTE!
It is imperative to follow the rules shown for the
construction of chimneys, pipe lengths, angles of
connection of individual pipe sections.
• Pipes must not be connected at a right angle of 90° or less
than 90° - as this makes it difficult or even impossible for the
flue gases to escape.
• Minimum pipe lengths must be strictly observed
INSTRUCTIONS FOR USE
Launch
• Fill the tank with clean fuel. Use only diesel or paraffin.
• A fuel level gauge on the top of the tank makes it possible to
check the fuel level
• Connect the plug of the power cable to a grounded 230 V 50
Hz power supply.
NOTE: Earthing is mandatory.
• Once the above 'start-up' has been completed, a '-' will appear
in the left-hand display window and the ambient temperature
value will be displayed in the right-hand window.
• Slide the switch to the "I" position.
• The default temperature setting is 20 degrees Celsius, which
will be shown in the left-hand display window.
• If the ambient temperature is below the default temperature,
the electrodes start sparking, after 7 seconds the heater is
switched on.
• If the ambient temperature is higher than the default
temperature, set the thermostat knob to the desired
temperature, the electrodes will start sparking, after 7 seconds
the heater turns on.
COLD START:
To start the heater at a low temperature, keep the air vent Fig.
4B closed with a finger during ignition to facilitate starting.
ABNORMAL OPERATION:
In the event of a malfunction (no flame, reduced airflow, poor
combustion, etc.), the heater shuts down and the BLOCK MODE
code appears on the display.
MANUAL RESET
If the heater is in lockout mode, check and remove the cause of
the lockout before restarting the heater. To reset the unit, set the
Figure 1J switch ON. / OFF. In position "0" and then again to
position "I". In the event of a repeated failure, call the technical
service. Turning the thermostat knob will NOT reset the heater.
DISCLAIMER
• Set the switch to the "OFF" position. 0. The post-ventilation
phase will cool the combustion chamber for 90 seconds.
Unplug the appliance if it is not used for a long time.
• Never disconnect the heater from the power supply to stop it
during operation. Always allow the cooling sequence to
complete, otherwise residual heat can damage internal
components.
• Do not cover the heater. Do not block the air inlet and outlet.
• The heater outlet is very hot during operation and after use.
Do not touch! Use personal protective equipment if necessary.
• Ensure that children do not play with the appliance and that
they are supervised when in the vicinity.
• The appliance is not intended for use by persons (including
children) with limited physical, sensory or mental abilities or
without experience and knowledge.
• Disconnect the heater before moving it. Never pull on the cord
to disconnect or move the unit.
• Do not leave the heater unattended during use.
• Never use the appliance with wet hands or when the heater or
power cord is wet.
• If the power cable is damaged, it must be replaced by the
manufacturer, a service technician or a similarly qualified
person.
Cleaning, maintenance and storage
• Regularly wipe the housing with a soft sponge or cloth. For
very dirty parts, use a sponge moistened with lukewarm water
and a mild detergent, then dry with a clean cloth.
• Protect the air intake and fan from dust and dirt. To clean the
internal parts, gently blow compressed air through the inlet.
• Check the power cable regularly: if it is worn, cracked or
damaged, have it replaced by a technical service.
• Make sure the heater is perfectly cool and dry before storing
it. Cover the unit with a plastic bag, put it in its packaging and
store it in a dry, ventilated place.
• Turn the unit off, unplug and allow the heater to cool for at
least 15 minutes before carrying out any maintenance.
• Do not attempt electrical repairs yourself. If your heater
requires service or repair, contact a qualified technician.
• Do not use a defective appliance unless a qualified technician
has checked and repaired it.
• When cleaning, make sure that no water enters the unit.
• Do not open the housing to clean the internal parts. Do not
spray water into the heater.
• Never use solvents, petrol, toluene or similar aggressive
chemicals to clean the heater.
• Solvents, petrol, toluene or similar aggressive chemicals must
not be used to clean the heater.
• Inspections carried out ONLY by QUALIFIED PERSONNEL
are recommended before each seasonal use:
• Carefully unscrew the nozzle from the nozzle connector. Blow
through the nozzle opening with compressed air to free it from
dirt. Replace the nozzle if necessary.
CLEANING, MAINTENANCE AND STORAGE
• The housing should be wiped regularly with a soft sponge or
cloth. For very dirty parts, use a sponge moistened with
lukewarm water and a mild detergent, then dry with a clean
cloth.
• The air intake and fan should be free of dust and dirt. To clean
the internal parts, gently blow out the air inlet with compressed
air.
• Check the power cable regularly: if it is worn, cracked or
damaged, have it replaced by a technical service.
• Before storing the heater, make sure it is perfectly cool and
dry. The unit should be covered with a plastic bag, placed in
its packaging and stored in a dry, ventilated place.
DYSZA
Page 11

11
Carefully unscrew the nozzle from the nozzle connector. Blow
out the nozzle with compressed air to remove debris from the
nozzle. Replace the nozzle if necessary.
AIR FILTERS
Clean the air filters. Remove the filter end cap fig. A11, wash the
air inlet filter fig. A10 with a light detergent and dry thoroughly
before refitting. Replace the air inlet filter fig. A9 once a year.
IGNITION ELECTRODES
The ignition electrode must be regularly cleaned, adjusted and,
if necessary, replaced. For correct electrode spacing, see Fig.
B1 and Fig. B2 (dimensions given in mm).
COMPRESSOR PRESSURE CONTROL
CAUTION: The compressor pressure is factory-set and can only
be checked and adjusted by qualified technicians. Manipulation
of the unit can be dangerous.
Remove the pressure gauge cap fig. 4A. Connect the pressure
gauge to the pressure measuring port on the rear cover. Start the
heater and read the air pressure value. If necessary, adjust the
pressure to the correct value by turning the adjustment screw
clockwise to increase, counterclockwise to decrease the
pressure.
INSTALLATION AT GREAT HEIGHTS:
Due to the lower amount of oxygen for installations at high
altitudes at sea level, it may be necessary to reduce the
compressor pressure Fig. 4A. Adjustment of this setting may be
necessary to maintain good combustion due to the lack of
oxygen.
PROBLEM SOLVING
PROBLEM
CAUSE
SOLUTION
Engine does
not start
Error E1
displayed on
screen
No power supply or too
low a voltage
Check power
cable and voltage
Check fuse and
replace if
necessary
Faulty or damaged
power cable
Check and
replace as
necessary
Defective motor /
capacitor
Check and
replace as
necessary
Unit is blocked due to
previous overheating
Detect the cause
of overheating
Switch off the
device
Check air inlet and
outlet
Wait a few
minutes and
restart the device
Error E2
displayed on
screen
The temperature sensor
is defective or the
temperature sensor
connector is loose
Check and
replace, if
necessary, the
temperature probe
Check the circuit
board and replace
if necessary
The engine
is running,
but the
heater does
not ignite
and after a
Empty fuel tank, dirty or
incorrect fuel
Remove bad or
dirty fuel
Fill the tank with
clean diesel or
paraffin
Clogged fuel filter
Clean or replace
the fuel filter
short time it
shuts down
Error E1
displayed on
screen
Air leaks in the oil line
Check hoses,
tighten
connections,
replace hoses if
necessary
Clogged burner nozzle
Clean nozzle by
blowing with
compressed air,
replace if
necessary
Fuel viscosity increased
at low temperature
Mix diesel fuel
with 10-20%
paraffin
Flames
coming out
of the
exhaust
outlet
Error E1
displayed on
screen
Insufficient air supply to
combustion chamber
Check air intake,
fan, motor
Compressor pressure
too high
Check air
pressure, adjust if
necessary *.
Heater stops
during
operation
Ambient
temperature
displayed on
the screen
The room temperature
set on the room
thermostat has been
reached
Normal operation
To start, turn the
temperature
control knob
clockwise to a
higher value
Heater stops
during
operation
Error E1
displayed on
screen
Flame failure
Check and
eliminate the
cause(s) of the
malfunction
To reset, set the
On / Off switch to
0 and then to I.
Call technical
service if the
problem persists
Poor combustion
Reduced airflow
Overheating
CONTENTS OF THE KIT
Pos.
Description
Quantity
A
Handle 1 B
Screws
6 or 8
C
Spring washer
6 or 8
D
Pad
6 or 8
E
Handle design
1 F Nut M5
6 or 8
G
Nut M12 2 H
Washer ø12
2 I Wheels 2 J
Wheel roller
1 K Pin 2 Combination heater with fuel tank
1 pc.
Rated data
Model
90-086
Thermal power [kW] *
20
Airflow [m³/h]
600
Fuel type
Diesel / Diesel
Fuel consumption [kg/h]
1.65
Supply voltage [V/Hz]
230V AC 50Hz
Heating area
150~200 m²
IP degree of protection
IPX4
Protection class
I
Current intensity [A]
1.1
Electrical power [W]
230
Fuse value
T3.15A
Dimensions
Net weight (kg)
21,3
Page 12
12
Tank capacity (l)
38
Operating time (h)
~23
Year of production
2023
ENVIRONMENTAL PROTECTION
Electrically-powered products should not be disposed of with
household waste, but should be taken to appropriate facilities for
disposal. Contact your product dealer or local authority for
information on disposal. Waste electrical and electronic
equipment contains substances that are not environmentally
friendly. Equipment that is not recycled poses a potential risk to
the environment and human health.
"Grupa Topex Spółka z ograniczoną odpowiedzialnością" Spółka komandytowa
with its registered office in Warsaw, ul. Pograniczna 2/4 (hereinafter: "Grupa
Topex") informs that all copyrights to the content of this manual (hereinafter:
"Manual"), including, among others. Its text, photographs, diagrams, drawings, as
well as its composition, belong exclusively to Grupa Topex and are subject to
legal protection under the Act of 4 February 1994 on Copyright and Related
Rights (Journal of Laws 2006 No. 90 Poz. 631, as amended). Copying,
processing, publishing, modification for commercial purposes of the entire
Manual and its individual elements, without the consent of Grupa Topex
expressed in writing, is strictly prohibited and may result in civil and criminal
liability.
EU Declaration of Conformity
Manufacturer: Grupa Topex Sp. z o.o. Sp.k., Pograniczna 2/4 02-
285 Warszawa
Product: Oil heater
Model: 90-086
Trade name: NEO TOOLS
Serial number: 00001 ÷ 99999
This declaration of conformity is issued under the sole
responsibility of the manufacturer.
The product described above complies with the following documents:
Low Voltage Directive 2014/35/EU
Electromagnetic Compatibility Directive 2014/30/EU
RoHS Directive 2011/65/EU as amended by Directive
2015/863/EU
Regulation (EU) 626/2011 supplementing Directive 2010/30/EU
Regulation (EU) 2015/1188 implementing Directive
2009/125/EC
And meets the requirements of the standards:
EN 60335-1:2012+A11+A13+A1+A14+A2; EN 60335-2102:2016; EN 62233:2008;
EN IEC 55014-1:2021; EN IEC 55014-2:2021;
EN IEC 61000-3-2:2019+A1; EN 61000-3-3:2013+A1+A2;
EN IEC 63000:2018
Name and address of the EU resident person authorised to prepare
the technical dossier:
Signed on behalf of:
Grupa Topex Sp. z o.o. Sp.k.
2/4 Pograniczna Street
02-285 Warsaw
Paweł Kowalski
TOPEX GROUP Quality Officer
Warsaw, 2023-06-19
Page 13
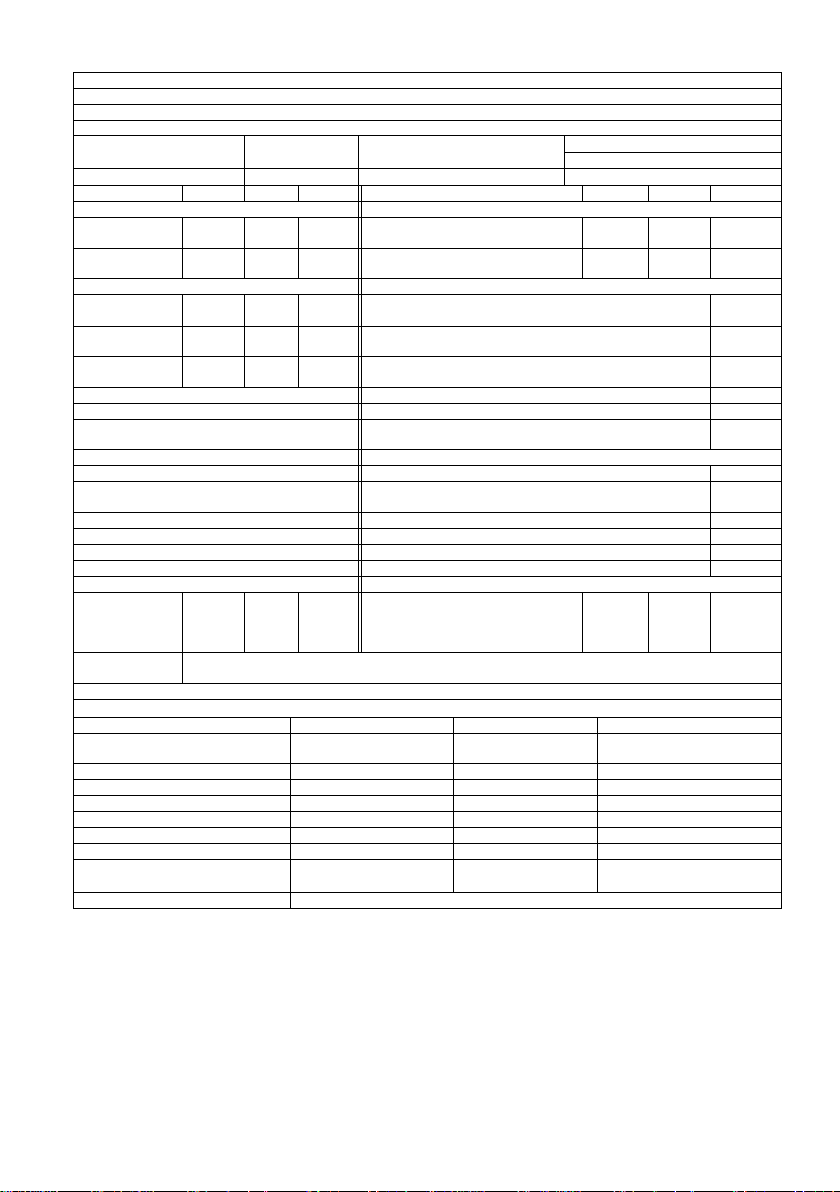
13
Model ID: 90-086
Indirect heating function: [no].
Rated thermal output: 20(kW)
Indirect heat output: not applicable (kW)
Fuel
Emissions from space heating (*)
NOx
Select fuel type
[liquid fuel].
Purified paraffin
79[mg/
kWhinput
] (GCV)
Parameter
Symbol
Value
Unit
Item
Symbol
Value
Unit
Thermal power
Useful capacity (NCV)
Nominal heat
output Pnom 20 kW
Utility efficiency at nominal heat output
ηth,nom
100 %
Minimum heat
output (indicative)
Pmin N/A kW
Utility efficiency at minimum heat output
(indicative)
ηth,min
N/A %
Additional electricity consumption
Type of heat output / room temperature control (select one)
At nominal heat
output elmax 0,002 kW
Single-stage heat output, no room temperature control
[no].
With minimum
heat output
elmin N/A kW
Two or more manual stages, no room temperature control
[no]. In standby mode
elSB
N/A kW
with mechanical room temperature control via thermostat
[no].
with electronic room temperature control
[yes].
with electronic room temperature control and daylight saving timer
[no].
with electronic room temperature control plus weekly timer
[no].
Other control options (multiple choices possible)
room temperature control with presence detection
[no].
Room temperature control with open window detection
[no].
with remote control option
[no].
with adaptive launch control
[no].
with reduced working hours
[no].
with black bulb sensor
[no].
Constant pilot flame power requirement
Pilot flame
power
requirement (if
appropriate)
Ppilot
0
kW
Contact details
Grupa Topex Sp. z o.o. Sp.k.
Ul. Pograniczna 2/4, 02-285 Warsaw
(*) NOx = Oxides of nitrogen
Seasonal energy efficiency of space heating ηS
Position
Symbol
Value
Unit
Seasonal energy efficiency of space
heating in active mode
ηS,on 100
%
Correction coefficient (F1)
/ 0 %
Correction coefficient (F2)
/ 7 %
Correction coefficient (F3)
/ 0 %
Correction coefficient (F4)
/ 0 %
Correction coefficient (F5)
/ 0 %
Biomass label factor
BLF 1 /
Seasonal energy efficiency of space
heating ηS
ηS 97
%
Energy efficiency classes
A
Page 14
14
DE
ÜBERSETZUNG (BENUTZERHANDBUCH)
Ölheizung
90-086
HINWEIS: BEVOR SIE DAS GERÄT BENUTZEN, LESEN SIE
BITTE DIESE ANLEITUNG SORGFÄLTIG DURCH UND
BEWAHREN SIE SIE ZUM NACHSCHLAGEN AUF.
PERSONEN, DIE DIE ANLEITUNG NICHT GELESEN HABEN,
DÜRFEN DAS GERÄT NICHT ZUSAMMENBAUEN,
EINSTELLEN ODER BEDIENEN.
DIESES PRODUKT IST NUR FÜR DEN GELEGENTLICHEN
GEBRAUCH ODER FÜR DIE VERWENDUNG IN GUT
ISOLIERTEN RÄUMEN GEEIGNET
BESONDERE SICHERHEITSBESTIMMUNGEN
HINWEIS!
Lesen Sie die Bedienungsanleitung sorgfältig durch, beachten
Sie die darin enthaltenen Warnhinweise und
Sicherheitsvorschriften. Das Gerät wurde für einen sicheren
Betrieb konzipiert. Dennoch: Installation, Wartung und Betrieb
des Geräts können gefährlich sein. Wenn Sie die folgenden
Verfahren befolgen, verringern Sie die Gefahr von Bränden,
Stromschlägen und Verletzungen und verkürzen die
Installationszeit des Geräts
HINWEIS: Das Heizgerät ist nicht für den Gebrauch im
Haushalt oder in der Freizeit bestimmt.
● Nur in gut belüfteten Bereichen und entfernt von brennbaren
Materialien verwenden
● NICHT für die Raumheizung in Wohngebäuden verwenden.
Für die Verwendung in öffentlichen Gebäuden, siehe nationale
Vorschriften.
Dieses Gerät kann von Kindern ab 8 Jahren und darüber sowie
von Personen mit eingeschränkten physischen, sensorischen
oder geistigen Fähigkeiten oder ohne Erfahrung und Wissen
benutzt werden, wenn sie beaufsichtigt oder bezüglich des
sicheren Gebrauchs des Geräts unterwiesen wurden und die
daraus resultierenden Gefahren verstehen. Kinder dürfen nicht
mit dem Gerät spielen.
Kinder dürfen das Gerät nicht ohne Aufsicht reinigen oder
warten.
WARNUNG: Um eine Überhitzung zu vermeiden, darf das
Heizgerät nicht abgedeckt werden.
● Kinder unter 3 Jahren sollten sich nur unter ständiger Aufsicht
in der Nähe des Geräts aufhalten.
Kinder zwischen 3 und 8 Jahren dürfen das Gerät nur dann einund ausschalten, wenn es in seiner normalen Betriebsposition
aufgestellt oder installiert wurde und sie beaufsichtigt werden
oder in der sicheren Verwendung des Geräts unterwiesen
wurden und die damit verbundenen Risiken verstehen. Kinder im
Alter von 3 bis 8 Jahren dürfen das Gerät nicht anschließen,
einstellen, reinigen oder Wartungsarbeiten durchführen.
VORSICHT ! - einige teile dieses gerätes können sehr heiß
werden und verbrennungen verursachen. Besondere Vorsicht ist
bei Kindern und gefährdeten Personen geboten.
● Alle Wartungsarbeiten müssen von einem qualifizierten
Dienstleister durchgeführt werden.
● Das Heizgerät verbraucht Luft (Sauerstoff) in dem Bereich, in
dem es verwendet wird. Um eine ausreichende Verbrennung zu
gewährleisten, muss für die erforderliche Belüftung gesorgt
werden.
● Lagern oder verwenden Sie kein Benzin oder andere
brennbare Dämpfe oder Flüssigkeiten in der Nähe dieses oder
eines anderen Geräts!
● Brand-, Verbrennungs-, Erstickungs- und Explosionsgefahr.
Halten Sie feste brennbare Materialien wie Baumaterialien,
Papier oder Pappe in einem sicheren Abstand zum Heizgerät,
wie in der Anleitung empfohlen. Verwenden Sie das Heizgerät
niemals in Räumen, die flüchtige oder in der Luft befindliche
Stoffe oder Produkte wie Benzin, Lösungsmittel, Farbverdünner,
Staubpartikel oder unbekannte chemische Substanzen
enthalten können.
● Heizgeräte mit Direkteinspritzung können bei
unsachgemäßem Gebrauch Kohlenmonoxidvergiftungen (CO)
verursachen, die zum Tod führen können.
● Die Nichtbeachtung der Vorsichtsmaßnahmen und
Anweisungen in der Anleitung für dieses Heizgerät kann zum
Tod, zu schweren Verletzungen und zum Verlust von Eigentum
oder zu Schäden aufgrund der Gefahren von Feuer, Explosion,
Verbrennungen, Erstickung, schweren Verletzungen,
Kohlenmonoxid und Vergiftung führen. Nur Personen, die die
Anweisungen verstehen und befolgen können, sollten dieses
Heizgerät benutzen oder warten. Wenn Sie Hilfe oder
Informationen über das Heizgerät benötigen, z. B.
Betriebsanleitungen, Aufkleber usw. Wenden Sie sich an den
Hersteller.
Die Elektroinstallation, an die das Gerät angeschlossen wird,
muss den geltenden Vorschriften entsprechen. Die Installation
erfordert einen Fehlerstrom-Schutzschalter (RCCB) in der
Hauptstromverteilung.
● Ziehen Sie den Netzstecker des Geräts, bevor Sie
Wartungsarbeiten durchführen.
Überprüfen Sie vor der Verwendung des Geräts immer das
Netzkabel. Es darf nicht geknickt, gedehnt, gestreckt oder in
irgendeiner Weise beschädigt werden.
● Das Netzkabel darf nur von qualifiziertem Personal
ausgetauscht werden. Verwenden Sie nur das OriginalNetzkabel mit der entsprechenden Schutzklasse.
● Der vordere Auslass ist während des Betriebs sehr heiß. Nicht
berühren! Es besteht Verbrennungsgefahr.
PIKTOGRAMME UND WARNHINWEISE
1. Lesen Sie die Betriebsanleitung, beachten Sie die
darin enthaltenen Warnhinweise und Sicherheitsvorschriften!
2. Erfordert Montage
3. Heißes Element
4. Einlass- und Auslassöffnungen dürfen nicht
abgedeckt werden.
5. Trennen Sie die Verbindung vor der Reparatur
oder Wartung
6. Für die Verwendung in Innenräumen
7. Vor Regen schützen
8. Außerhalb der Reichweite von Kindern
aufbewahren
9. Nicht über den Hausmüll entsorgen
10. Wiederverwertbar
BESCHREIBUNG DER GRAFISCHEN ELEMENTE
Abb. 1
Beschreibung
A
Abgaskamin
B
Heißluftauslass
C
Kraftstofftank
D
Transport-Räder
E
Tankeinfülldeckel
F
Anzeige
G
Anzeige der Umgebungstemperatur
H
Transportgriff
I
Verbrennungskammer
J
Temperaturregelknopf
K
Hauptschalter
L
Heizungsunterstützung
MONTAGEANLEITUNG
Page 15

15
Nehmen Sie das Heizgerät aus dem Karton. Wenn das Gerät in
irgendeiner Weise beschädigt ist, verwenden Sie es nicht und
wenden Sie sich an Ihren Händler.
Um den Heizkörper zu montieren, gehen Sie wie folgt vor:
• Die Radachse Abb. 2J in das entsprechende Loch der
Trägerstruktur Abb. 2E einführen, den Bolzen Abb. 2K in die
entsprechenden Löcher einführen; die Unterlegscheibe Abb.
2H auf beiden Seiten der Welle einsetzen, das Rad Abb. 2I
auf die Radachse Abb. 2J schieben, die Mutter Abb. 2G
aufschrauben.
• Den Heizkörper auf die Trägerstruktur (Abb. 2E) setzen und
darauf achten, dass die Befestigungslöcher mit denen des
Geräts übereinstimmen.
• Mit der Schraube Abb. 2B, der Federscheibe Abb. 2C, der
Unterlegscheibe Abb. 2D und den Muttern wird die
Stützkonstruktion Abb. 2E am Tankhalter befestigt.
Anweisungen zum Einbau
Stellen Sie das Heizgerät auf eine flache, ebene, nicht
brennbare, harte Oberfläche.
Heizgeräte mit Direkteinspritzung sind für die Verwendung im
Freien oder in gut belüfteten Innenräumen vorgesehen. Für die
Verwendung in Innenräumen müssen permanente
Lüftungsöffnungen von mindestens 25 cm² / kW vorgesehen
werden, die in gleichmäßigen Abständen zwischen Boden und
Decke liegen, mindestens 250 cm².
ACHTUNG! Mindestgröße der Lüftungsöffnung 320cm²
• Bauen Sie das Heizgerät nur in normaler horizontaler Lage
ein.
• Stellen Sie das Heizgerät nicht in der Nähe von Wänden,
Ecken oder niedrigen Decken auf.
• Stellen Sie das Heizgerät nicht unter die Steckdose.
• Stellen Sie das Heizgerät nicht auf fahrende Fahrzeuge oder
an Stellen, an denen es umkippen könnte.
• Halten Sie das Heizgerät von brennbaren, explosiven oder
ätzenden Materialien fern.
• Stellen Sie das Heizgerät nicht in der Nähe von Vorhängen
oder ähnlichen Materialien auf, die den Luftein- und -auslass
blockieren könnten.
• Blockieren oder drosseln Sie auf keinen Fall den Luftein- und
-auslass.
• Halten Sie das Netzkabel von Wärmequellen, scharfen
Kanten, schneidenden und beweglichen Teilen fern.
• Setzen Sie das Gerät nicht direkt der Witterung oder
übermäßiger Feuchtigkeit aus.
• Stellen Sie das Heizgerät nicht in unmittelbarer Nähe einer
Badewanne, einer Dusche oder eines Schwimmbeckens auf.
• Die für alle Einsatzbereiche geltenden allgemeinen und
speziellen Brandschutzvorschriften sind zu beachten. In
jedem Fall müssen die folgenden Mindestsicherheitsabstände
zu Materialien oder Gegenständen in der Nähe des
Heizgerätes eingehalten werden:
• Heizungsseite: 0,6 m
• Lufteintrittsseite: 1 m
• Oberseite: 1,5 m
• Heißluftauslassseite: 3 m
• Böden und Decken im Arbeitsbereich des Heizgeräts müssen
aus feuerfesten Materialien bestehen.
• Schließen Sie Heizkörper nicht direkt an Luftkanäle an.
EINBAU DES SCHORNSTEINS DER HEIZUNG
Das Heizgerät ist mit einem Schornstein für die Ableitung der
Rauchgase ausgestattet. Abb. 3 zeigt, wie der Schornstein für
die Abgase des Heizgeräts korrekt installiert werden muss (linke
Seite der Zeichnung). Auf der rechten Seite der Abbildung ist
dargestellt, auf welche Weise der Schornstein nicht installiert
werden darf.
HINWEIS!
Die dargestellten Regeln für die Konstruktion von
Schornsteinen, Rohrlängen und Anschlusswinkeln der
einzelnen Rohrabschnitte sind unbedingt zu beachten.
• Die Rohre dürfen nicht im rechten Winkel von 90° oder
weniger als 90° angeschlossen werden, da dies den Abzug
der Rauchgase erschwert oder gar unmöglich macht.
• Die Mindestlänge der Rohre muss strikt eingehalten werden.
GEBRAUCHSANWEISUNG
Start
• Füllen Sie den Tank mit sauberem Kraftstoff. Verwenden Sie
nur Diesel oder Paraffin.
• Eine Füllstandsanzeige an der Oberseite des Tanks
ermöglicht die Kontrolle des Kraftstoffstands
• Schließen Sie den Stecker des Netzkabels an eine geerdete
230-V-50-Hz-Stromversorgung an.
HINWEIS: Die Erdung ist obligatorisch.
• Sobald die oben beschriebene "Inbetriebnahme"
abgeschlossen ist, erscheint ein "-" im linken Anzeigefenster
und der Wert der Umgebungstemperatur wird im rechten
Fenster angezeigt.
• Schieben Sie den Schalter auf die Position "I".
• Die Standardeinstellung für die Temperatur ist 20 Grad
Celsius, die im linken Anzeigefenster angezeigt wird.
• Liegt die Umgebungstemperatur unter der voreingestellten
Temperatur, beginnen die Elektroden zu funken, nach 7
Sekunden schaltet sich die Heizung ein.
• Wenn die Umgebungstemperatur höher ist als die
voreingestellte Temperatur, stellen Sie den Thermostatknopf
auf die gewünschte Temperatur, die Elektroden beginnen zu
funken, nach 7 Sekunden schaltet sich die Heizung ein.
COLD START:
Um das Heizgerät bei niedriger Temperatur zu starten, halten
Sie die Entlüftungsöffnung Abb. 4B während der Zündung mit
einem Finger geschlossen, um den Start zu erleichtern.
ANORMALER BETRIEB:
Im Falle einer Störung (keine Flamme, verminderter Luftstrom,
schlechte Verbrennung usw.) schaltet sich das Heizgerät ab und
der Code BLOCK MODE erscheint auf dem Display.
MANUELLER RESET
Befindet sich das Heizgerät im Sperrmodus, ist die Ursache der
Sperrung zu prüfen und zu beseitigen, bevor das Heizgerät
wieder in Betrieb genommen wird. Um das Gerät
zurückzusetzen, stellen Sie den Schalter in Abbildung 1J auf
ON. / AUS. in die Position "0" und dann wieder in die Position
"I". Im Falle eines wiederholten Ausfalls den technischen
Kundendienst anrufen. Durch Drehen des Thermostatknopfes
wird das Heizgerät NICHT zurückgesetzt.
HAFTUNGSAUSSCHLUSS
• Stellen Sie den Schalter auf die Position "OFF". 0 Die
Nachlüftungsphase kühlt die Brennkammer 90 Sekunden lang
ab. Ziehen Sie den Netzstecker, wenn das Gerät längere Zeit
nicht benutzt wird.
• Trennen Sie das Heizgerät niemals von der Stromversorgung,
um es während des Betriebs abzuschalten. Lassen Sie den
Abkühlvorgang immer vollständig ablaufen, da sonst die
Restwärme die internen Komponenten beschädigen kann.
• Decken Sie das Heizgerät nicht ab. Die Luftein- und -auslässe
dürfen nicht blockiert werden.
• Die Steckdose des Heizgeräts ist während des Betriebs und
nach dem Gebrauch sehr heiß. Nicht berühren! Verwenden
Sie gegebenenfalls eine persönliche Schutzausrüstung.
• Achten Sie darauf, dass Kinder nicht mit dem Gerät spielen
und dass sie beaufsichtigt werden, wenn sie sich in der Nähe
befinden.
• Das Gerät ist nicht dafür bestimmt, durch Personen
(einschließlich Kinder) mit eingeschränkten physischen,
sensorischen oder geistigen Fähigkeiten oder ohne Erfahrung
und Kenntnisse benutzt zu werden.
• Trennen Sie das Heizgerät vom Stromnetz, bevor Sie es
bewegen. Ziehen Sie niemals am Kabel, um das Gerät
auszustecken oder zu bewegen.
• Lassen Sie das Heizgerät während des Betriebs nicht
unbeaufsichtigt.
• Verwenden Sie das Gerät niemals mit nassen Händen oder
wenn das Heizgerät oder das Netzkabel nass ist.
• Wenn das Netzkabel beschädigt ist, muss es durch den
Page 16

16
Hersteller, einen Servicetechniker oder eine ähnlich
qualifizierte Person ersetzt werden.
Reinigung, Wartung und Lagerung
• Wischen Sie das Gehäuse regelmäßig mit einem weichen
Schwamm oder Tuch ab. Verwenden Sie für stark
verschmutzte Teile einen mit lauwarmem Wasser und einem
milden Reinigungsmittel angefeuchteten Schwamm und
trocknen Sie ihn anschließend mit einem sauberen Tuch.
• Schützen Sie den Lufteinlass und das Gebläse vor Staub und
Schmutz. Blasen Sie zur Reinigung der Innenteile vorsichtig
Druckluft durch den Einlass.
• Überprüfen Sie das Netzkabel regelmäßig: Wenn es
abgenutzt, gerissen oder beschädigt ist, lassen Sie es durch
einen technischen Dienst ersetzen.
• Vergewissern Sie sich, dass das Heizgerät vollkommen kühl
und trocken ist, bevor Sie es lagern. Decken Sie das Gerät mit
einer Plastiktüte ab, legen Sie es in die Verpackung und
lagern Sie es an einem trockenen, belüfteten Ort.
• Schalten Sie das Gerät aus, ziehen Sie den Netzstecker und
lassen Sie das Heizgerät mindestens 15 Minuten lang
abkühlen, bevor Sie Wartungsarbeiten durchführen.
• Versuchen Sie nicht, elektrische Reparaturen selbst
durchzuführen. Wenn Ihr Heizgerät gewartet oder repariert
werden muss, wenden Sie sich an einen qualifizierten
Techniker.
• Benutzen Sie ein defektes Gerät nicht, bevor es nicht von
einem qualifizierten Techniker überprüft und repariert worden
ist.
• Achten Sie bei der Reinigung darauf, dass kein Wasser in das
Gerät eindringt.
• Öffnen Sie das Gehäuse nicht, um die Innenteile zu reinigen.
Spritzen Sie kein Wasser in das Heizgerät.
• Verwenden Sie zur Reinigung des Heizgeräts niemals
Lösungsmittel, Benzin, Toluol oder ähnliche aggressive
Chemikalien.
• Lösungsmittel, Benzin, Toluol oder ähnliche aggressive
Chemikalien dürfen zur Reinigung des Heizgeräts nicht
verwendet werden.
• Es wird empfohlen, die Inspektion vor jeder saisonalen
Nutzung NUR von QUALIFIZIERTEM PERSONAL
durchführen zu lassen:
• Schrauben Sie die Düse vorsichtig vom Düsenanschluss ab.
Blasen Sie die Düsenöffnung mit Druckluft durch, um sie von
Schmutz zu befreien. Tauschen Sie die Düse bei Bedarf aus.
REINIGUNG, WARTUNG UND LAGERUNG
• Das Gehäuse sollte regelmäßig mit einem weichen Schwamm
oder Tuch abgewischt werden. Verwenden Sie für stark
verschmutzte Teile einen mit lauwarmem Wasser und einem
milden Reinigungsmittel angefeuchteten Schwamm und
trocknen Sie es anschließend mit einem sauberen Tuch ab.
• Der Lufteinlass und das Gebläse sollten frei von Staub und
Schmutz sein. Um die inneren Teile zu reinigen, blasen Sie
den Lufteinlass vorsichtig mit Druckluft aus.
• Überprüfen Sie das Netzkabel regelmäßig: Wenn es
abgenutzt, gerissen oder beschädigt ist, lassen Sie es durch
einen technischen Dienst ersetzen.
• Bevor Sie das Gerät einlagern, vergewissern Sie sich, dass
es vollkommen kühl und trocken ist. Das Gerät sollte mit einer
Plastiktüte abgedeckt, in die Verpackung gelegt und an einem
trockenen, belüfteten Ort gelagert werden.
DYSZA
Schrauben Sie die Düse vorsichtig vom Düsenanschluss ab.
Blasen Sie die Düse mit Druckluft aus, um Verunreinigungen aus
der Düse zu entfernen. Ersetzen Sie die Düse, falls erforderlich.
LUFTFILTER
Reinigen Sie die Luftfilter. Entfernen Sie die Filterendkappe Abb.
A11, waschen Sie den Lufteinlassfilter Abb. A10 mit einem
leichten Reinigungsmittel und trocknen Sie ihn vor dem
Wiedereinbau gründlich ab. Wechseln Sie den Lufteinlassfilter
Abb. A9 einmal im Jahr auswechseln.
ZÜNDELEKTRODEN
Die Zündelektrode muss regelmäßig gereinigt, eingestellt und
gegebenenfalls ausgetauscht werden. Für den richtigen Abstand
der Elektroden siehe Abb. B1 und Abb. B2 (Maße in mm).
KOMPRESSORDRUCKREGELUNG
ACHTUNG: Der Kompressordruck ist werkseitig eingestellt und
darf nur von qualifizierten Technikern überprüft und eingestellt
werden. Manipulationen am Gerät können gefährlich sein.
Entfernen Sie die Manometerkappe (Abb. 4A). Schließen Sie
das Manometer an den Druckmessanschluss an der hinteren
Abdeckung an. Starten Sie das Heizgerät und lesen Sie den
Luftdruckwert ab. Falls erforderlich, den Druck auf den richtigen
Wert einstellen, indem die Einstellschraube im Uhrzeigersinn
gedreht wird, um den Druck zu erhöhen, und gegen den
Uhrzeigersinn, um ihn zu verringern.
INSTALLATION IN GROSSER HÖHE:
Aufgrund der geringeren Sauerstoffmenge bei Anlagen in
großen Höhen auf Meereshöhe kann es erforderlich sein, den
Kompressordruck zu verringern (Abb. 4A). Eine Anpassung
dieser Einstellung kann erforderlich sein, um eine gute
Verbrennung aufgrund des Sauerstoffmangels zu gewährleisten.
PROBLEMBEHEBUNG
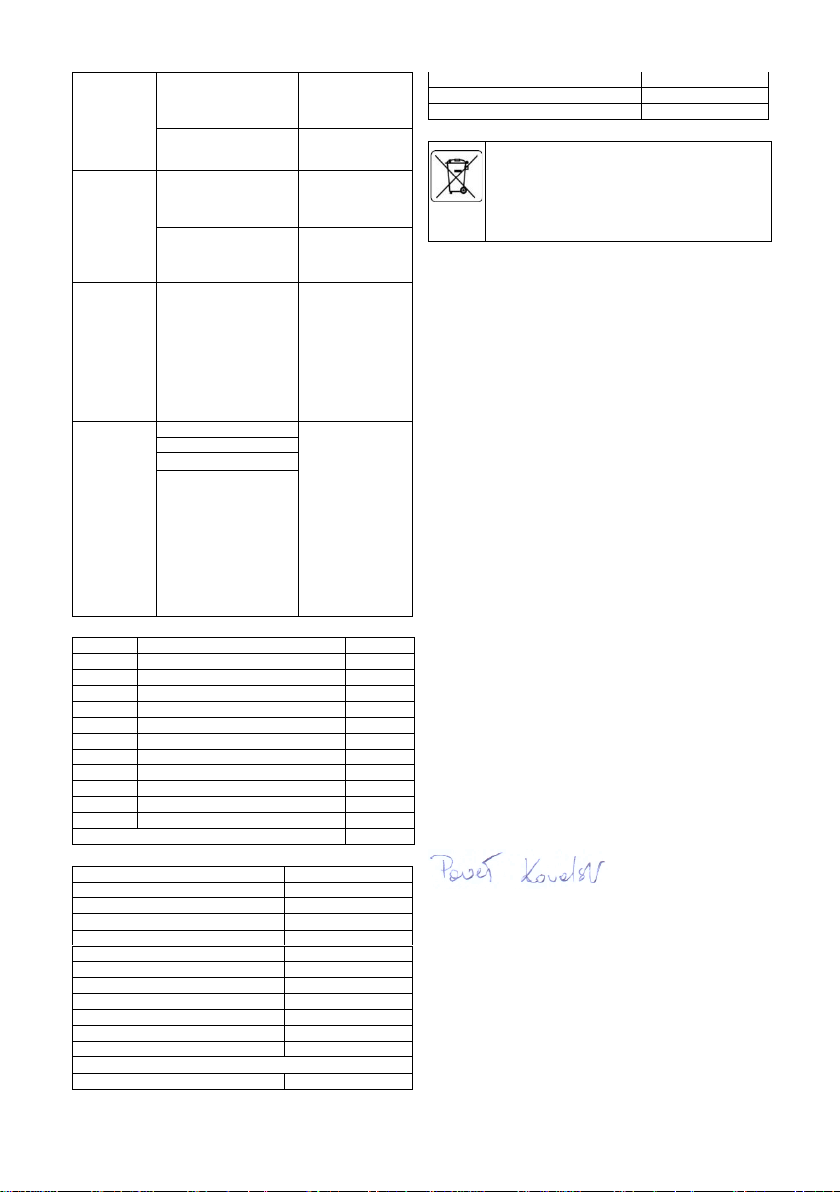
PROBLEM
CAUSE
LÖSUNG
Motor springt
nicht an
Fehler E1
wird auf dem
Bildschirm
angezeigt
Keine Stromversorgung
oder zu niedrige
Spannung
Netzkabel und
Spannung prüfen
Sicherung prüfen
und ggf. ersetzen
Fehlerhaftes oder
beschädigtes Netzkabel
Prüfen und ggf.
ersetzen
Defekter
Motor/Kondensator
Prüfen und ggf.
ersetzen
Das Gerät ist aufgrund
einer früheren
Überhitzung blockiert
Erkennen Sie die
Ursache der
Überhitzung
Schalten Sie das
Gerät aus
Lufteinlass und auslass prüfen
Warten Sie ein
paar Minuten und
starten Sie das
Gerät neu.
Fehler E2
wird auf dem
Bildschirm
angezeigt
Der Temperatursensor
ist defekt oder der
Stecker des
Temperatursensors ist
lose
Prüfen Sie den
Temperaturfühler
und tauschen Sie
ihn ggf. aus.
Prüfen Sie die
Platine und
tauschen Sie sie
ggf. aus.
Der Motor
läuft, aber
die Heizung
zündet nicht
und schaltet
sich nach
kurzer Zeit
ab
Fehler E1
wird auf dem
Bildschirm
angezeigt
Leerer Kraftstofftank,
verschmutzter oder
falscher Kraftstoff
Schlechten oder
verschmutzten
Kraftstoff
entfernen
Füllen Sie den
Tank mit
sauberem Diesel
oder Paraffin
Verstopfter
Kraftstofffilter
Reinigen oder
ersetzen Sie den
Kraftstofffilter
Luftlecks in der
Ölleitung
Schläuche prüfen,
Anschlüsse
festziehen, ggf.
Schläuche
ersetzen
Page 17
17
Verstopfte Brennerdüse
Düse durch
Ausblasen mit
Druckluft reinigen,
ggf. ersetzen
Erhöhte
Kraftstoffviskosität bei
niedrigen Temperaturen
Dieselkraftstoff mit
10-20% Paraffin
mischen
Flammen,
die aus dem
Auspuff
austreten
Fehler E1
wird auf dem
Bildschirm
angezeigt
Unzureichende
Luftzufuhr zur
Brennkammer
Lufteinlass,
Gebläse, Motor
prüfen
Kompressordruck zu
hoch
Luftdruck prüfen,
ggf. einstellen *.
Heizgerät
stoppt
während des
Betriebs
Anzeige der
Umgebungst
emperatur
auf dem
Bildschirm
Die am
Raumthermostat
eingestellte
Raumtemperatur ist
erreicht
Normaler Betrieb
Zum Starten
drehen Sie den
Temperaturregler
im Uhrzeigersinn
auf einen höheren
Wert.
Heizgerät
stoppt
während des
Betriebs
Fehler E1
wird auf dem
Bildschirm
angezeigt
Flammenausfall
Prüfen und
beseitigen Sie die
Ursache(n) der
Störung
Zum Zurücksetzen
stellen Sie den
Ein/Aus-Schalter
auf 0 und dann
auf I.
Rufen Sie den
technischen
Kundendienst an,
wenn das Problem
weiterhin besteht.
Schlechte Verbrennung
Reduzierter Luftstrom
Überhitzung
INHALT DES KITS
Pos.
Beschreibung
Menge
A
Handgriff
1
B
Schrauben
6 oder 8
C
Federscheibe
6 oder 8
D
Pad
6 oder 8
E
Design des Griffs
1 F Mutter M5
6 oder 8
G
Mutter M12
2 H Unterlegscheibe ø12
2 I Räder 2 J
Radwalze 1 K
Stift 2 Kombinationsheizgerät mit Brennstofftank
1 Stk.
Nenndaten
Modell
90-086
Thermische Leistung [kW] *
20
Luftstrom [m³/h]
600
Kraftstofftyp
Diesel / Diesel
Kraftstoffverbrauch [kg/h]
1.65
Versorgungsspannung [V/Hz]
230V AC 50Hz
Heizungsbereich
150~200 m²
IP-Schutzgrad
IPX4
Schutzklasse
I
Stromstärke [A]
1.1
Elektrische Leistung [W]
230
Wert der Sicherungen
T3.15A
Abmessungen
Nettogewicht (kg)
21,3
Tankinhalt (l)
38
Betriebszeit (h)
~23
Jahr der Herstellung
2023
SCHUTZ DER UMWELT
Elektrisch betriebene Produkte dürfen nicht mit dem Hausmüll
entsorgt werden, sondern müssen einer geeigneten Einrichtung
zur Entsorgung zugeführt werden. Wenden Sie sich an Ihren
Händler oder die örtlichen Behörden, um Informationen zur
Entsorgung zu erhalten. Elektro- und Elektronik-Altgeräte
enthalten Stoffe, die nicht umweltverträglich sind. Geräte, die
nicht recycelt werden, stellen eine potenzielle Gefahr für die
Umwelt und die menschliche Gesundheit dar.
"Grupa Topex Spółka z ograniczoną odpowiedzialnością". Spółka komandytowa
mit Sitz in Warschau, ul. Pograniczna 2/4 (im Folgenden: "Grupa Topex") teilt mit,
dass alle Urheberrechte am Inhalt dieses Handbuchs (im Folgenden:
"Handbuch"), einschließlich, unter anderem. Der Text, die Fotografien, die
Diagramme, die Zeichnungen sowie die Zusammensetzung des Handbuchs
gehören ausschließlich der Grupa Topex und unterliegen dem rechtlichen Schutz
gemäß dem Gesetz vom 4. Februar 1994 über das Urheberrecht und verwandte
Rechte (Gesetzblatt 2006 Nr. 90 Poz. 631, in der geänderten Fassung). Das
Kopieren, Verarbeiten, Veröffentlichen, Verändern des gesamten Handbuchs
und seiner einzelnen Elemente zu kommerziellen Zwecken ist ohne schriftliche
Zustimmung von Grupa Topex strengstens verboten und kann zivil- und
strafrechtliche Folgen haben.
EU-Konformitätserklärung
Hersteller: Grupa Topex Sp. z o.o. Sp.k., Pograniczna 2/4 02-285
Warszawa
Produkt: Ölerhitzer
Modell: 90-086
Handelsname: NEO TOOLS
Seriennummer: 00001 ÷ 99999
Diese Konformitätserklärung wird unter der alleinigen
Verantwortung des Herstellers ausgestellt.
Das oben beschriebene Produkt entspricht den folgenden Dokumenten:
Niederspannungsrichtlinie 2014/35/EU
Richtlinie 2014/30/EU über die elektromagnetische
Verträglichkeit
RoHS-Richtlinie 2011/65/EU, geändert durch Richtlinie
2015/863/EU
Verordnung (EU) 626/2011 zur Ergänzung der Richtlinie
2010/30/EU
Verordnung (EU) 2015/1188 zur Durchführung der Richtlinie
2009/125/EG
Und erfüllt die Anforderungen der Normen:
EN 60335-1:2012+A11+A13+A1+A14+A2; EN 60335-2102:2016; EN 62233:2008;
EN IEC 55014-1:2021; EN IEC 55014-2:2021;
EN IEC 61000-3-2:2019+A1; EN 61000-3-3:2013+A1+A2;
EN IEC 63000:2018
Name und Anschrift der in der EU ansässigen Person, die zur
Erstellung des technischen Dossiers befugt ist:
Unterzeichnet im Namen von:
Grupa Topex Sp. z o.o. Sp.k.
2/4 Pograniczna Straße
02-285 Warschau
Paweł Kowalski
TOPEX GROUP Qualitätsbeauftragter
Warschau, 2023-06-19
Page 18
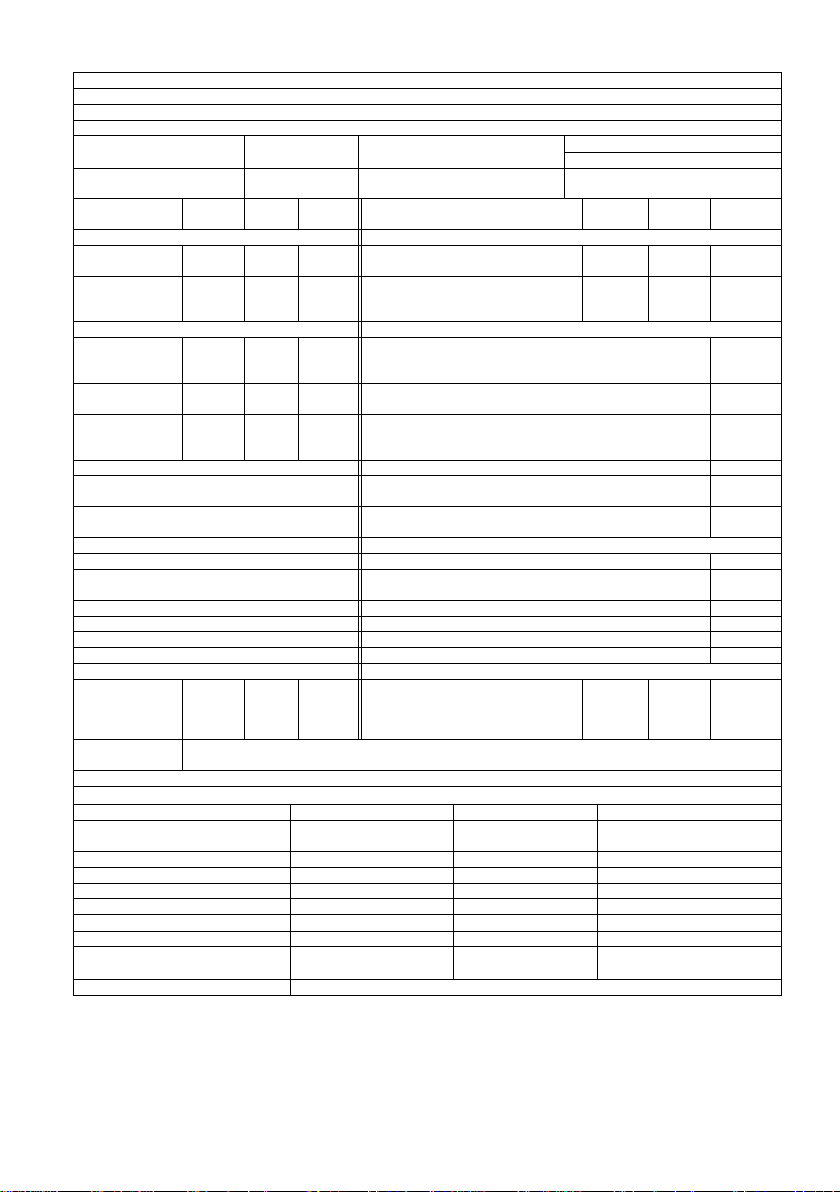
18
Modell-ID: 90-086
Indirekte Heizfunktion: [nein].
Thermische Nennleistung: 20(kW)
Indirekte Heizleistung: nicht anwendbar (kW)
Kraftstoff
Emissionen aus der Raumheizung (*)
NOx
Kraftstoffart wählen
[flüssiger
Kraftstoff].
Gereinigtes Paraffin
79[
mg/kWhinput
] (GCV)
Parameter
Symbol
Wert
Einheit Artik
el
Symbol
Wert
Einheit
Wärmekraft
Nutzinhalt (NCV)
Nennwärmeleistun
g Pnom 20 kW
Nutzungsgrad bei Nennwärmeleistung
ηth,nom
100 %
Minimale
Heizleistung
(indikativ)
Pmin K.A. kW
Nutzungsgrad bei minimaler Heizleistung
(indikativ)
ηth,min
K.A. %
Zusätzlicher Stromverbrauch
Art der Heizleistung/Raumtemperaturregelung (wählen Sie eine aus)
Bei
Nennwärmeleistun
g
elmax 0,002 kW
Einstufige Heizleistung, keine Raumtemperaturregelung
[nein].
Mit minimaler
Heizleistung
elmin K.A. kW
Zwei oder mehr manuelle Stufen, keine
Raumtemperaturregelung
[nein].
Im StandbyModus
elSB
K.A. kW
mit mechanischer Raumtemperaturregelung über Thermostat
[nein].
mit elektronischer Raumtemperaturregelung
[ja].
mit elektronischer Raumtemperaturregelung und Zeitschaltuhr für die
Sommerzeit
[nein].
mit elektronischer Raumtemperaturregelung und Wochenzeitschaltuhr
[nein].
Andere Kontrollmöglichkei ten (Mehrfachausw ahl möglich)
Raumtemperaturregelung mit Anwesenheitserkennung
[nein].
Raumtemperaturregelung mit Erkennung offener Fenster
[nein].
mit Fernsteuerungsoption
[nein].
mit adaptiver Startkontrolle
[nein].
mit verkürzten Arbeitszeiten
[nein].
mit schwarzem Glühbirnensensor
[nein].
Konstanter Leistungsbedarf der Zündflamme
Leistungsbedarf
der Zündflamme
(falls
angemessen)
Ppilot
0
kW
Kontaktangaben
Grupa Topex Sp. z o.o. Sp.k.
Ul. Pograniczna 2/4, 02-285 Warschau
(*) NOx = Stickoxide
Saisonaler Energiewirkungsgrad der Raumheizung
ηS
Position
Symbol
Wert
Einheit
Saisonale Energieeffizienz der
Raumheizung im aktiven Modus
ηS,on 100
%
Berichtigungskoeffizient (F1)
/ 0 %
Berichtigungskoeffizient (F2)
/ 7 %
Berichtigungskoeffizient (F3)
/ 0 %
Berichtigungskoeffizient (F4)
/ 0 %
Berichtigungskoeffizient (F5)
/ 0 %
Biomasse-Labelfaktor
BLF 1 /
Saisonaler Energiewirkungsgrad der
Raumheizung
ηS
ηS 97
%
Energieeffizienzklassen
A
Page 19
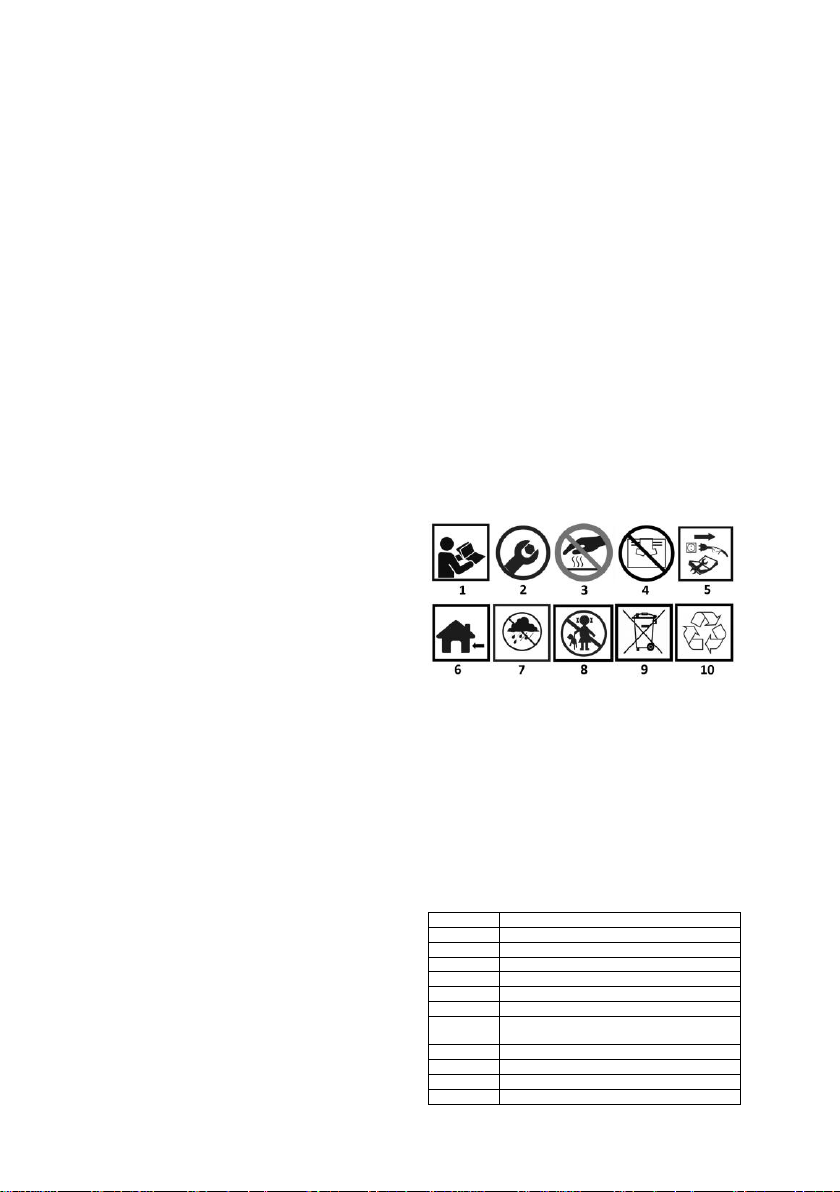
19
RU
РУКОВОДСТВО ПО ПЕРЕВОДУ (ПОЛЬЗОВАТЕЛЯ)
Масляный обогреватель
90-086
ПРИМЕЧАНИЕ: ПЕРЕД ИСПОЛЬЗОВАНИЕМ
ОБОРУДОВАНИЯ ВНИМАТЕЛЬНО ПРОЧИТАЙТЕ ДАННОЕ
РУКОВОДСТВО И СОХРАНИТЕ ЕГО ДЛЯ ДАЛЬНЕЙШЕГО
ИСПОЛЬЗОВАНИЯ. ЛИЦАМ, НЕ ПРОЧИТАВШИМ ДАННОЕ
РУКОВОДСТВО, ЗАПРЕЩАЕТСЯ ВЫПОЛНЯТЬ МОНТАЖ,
НАСТРОЙКУ ИЛИ ЭКСПЛУАТАЦИЮ ОБОРУДОВАНИЯ.
ДАННЫЙ ПРОДУКТ ПОДХОДИТ ТОЛЬКО ДЛЯ
ПЕРИОДИЧЕСКОГО ИСПОЛЬЗОВАНИЯ ИЛИ ДЛЯ
ИСПОЛЬЗОВАНИЯ В ХОРОШО ИЗОЛИРОВАННЫХ
ПОМЕЩЕНИЯХ
ОСОБЫЕ ПОЛОЖЕНИЯ ПО ТЕХНИКЕ БЕЗОПАСНОСТИ
ВНИМАНИЕ!
Внимательно прочитайте инструкцию по эксплуатации,
соблюдайте содержащиеся в ней предупреждения и
условия безопасности. Прибор был разработан для
безопасной эксплуатации. Тем не менее: установка,
обслуживание и эксплуатация прибора могут быть
опасными. Соблюдение следующих процедур снизит риск
возгорания, поражения электрическим током, травм и
сократит время установки прибора
ПРИМЕЧАНИЕ: Нагреватель не предназначен для
бытового или рекреационного использования.
● Использовать только в хорошо проветриваемых
помещениях и вдали от горючих материалов
● НЕ используйте для отопления помещений в жилых домах.
Для использования в общественных зданиях см.
национальные правила.
● Данным прибором могут пользоваться дети в возрасте от
8 лет и старше, а также лица с ограниченными физическими,
сенсорными или умственными способностями или не
имеющие опыта и знаний, при условии, что они находятся
под присмотром или проинструктированы по вопросам
безопасного использования прибора и понимают связанные
с этим риски. Дети не должны играть с прибором.
Дети не должны чистить или обслуживать прибор без
присмотра.
ПРЕДУПРЕЖДЕНИЕ: Во избежание перегрева не
накрывайте нагреватель.
● Дети младше 3 лет не должны находиться рядом с
прибором, если они не находятся под постоянным
присмотром.
● Дети в возрасте от 3 до 8 лет могут включать/выключать
прибор только при условии, что он установлен в нормальное
рабочее положение и за ними осуществляется надзор или
они проинструктированы о безопасном использовании
прибора и понимают связанные с этим риски. Детям в
возрасте от 3 до 8 лет запрещается подключать,
регулировать или чистить прибор, а также выполнять
операции по техническому обслуживанию.
ВНИМАНИЕ! - некоторые части этого прибора могут сильно
нагреваться и вызывать ожоги. Особое внимание следует
уделять детям и уязвимым лицам.
● Все обслуживание должно выполняться
квалифицированным специалистом.
● Обогреватель использует воздух (кислород) в зоне его
использования. Для обеспечения достаточного горения
необходимо обеспечить требуемую вентиляцию.
● Не храните и не используйте бензин или другие
легковоспламеняющиеся пары или жидкости вблизи этого
или любого другого прибора!
● Опасность пожара, ожогов, удушья и взрыва. Держите
твердые горючие материалы, такие как строительные
материалы, бумага или картон, на безопасном расстоянии
от обогревателя в соответствии с рекомендациями
инструкции. Никогда не используйте обогреватель в
помещениях, где могут содержаться летучие или
переносимые по воздуху вещества или продукты, такие как
бензин, растворители, растворитель для краски, частицы
пыли или неизвестные химические вещества.
● Нагреватели прямого впрыска при неправильном
использовании могут вызвать отравление угарным газом
(CO), что может привести к смерти.
● Несоблюдение мер предосторожности и указаний,
изложенных в инструкции к данному обогревателю, может
привести к смерти, серьезным травмам и потере имущества
или ущербу из-за опасности пожара, взрыва, ожогов,
удушья, серьезных травм, угарного газа и отравления.
Только лица, способные понять и следовать инструкциям,
должны использовать или обслуживать этот обогреватель.
Если вам нужна помощь или информация о нагревателе,
например, инструкции по эксплуатации, этикетки и т.д.
свяжитесь с производителем.
● Электропроводка, к которой подключен прибор, должна
соответствовать действующему законодательству. Для
установки требуется автоматический выключатель
остаточного тока (RCCB) в главном электрическом
распределительном щите.
● Перед выполнением любого технического обслуживания
отключите устройство от сети.
● Всегда проверяйте шнур питания перед использованием
устройства. Он не должен быть согнут, растянут, натянут или
каким-либо образом поврежден.
● Замена шнура питания должна производиться только
квалифицированным персоналом. Используйте только
оригинальный шнур питания с соответствующим классом
защиты.
● Во время работы передняя розетка сильно нагревается.
Не прикасайтесь! Опасность ожогов.
ПИКТОГРАММЫ И ПРЕДУПРЕЖДЕНИЯ
1. Прочтите инструкцию по эксплуатации,
соблюдайте содержащиеся в ней предупреждения и
условия безопасности!
2. Требуется сборка
3. Горячий элемент
4. Не закрывайте впускные и выпускные
отверстия
5. Отсоедините перед ремонтом или
обслуживанием
6. Для использования внутри помещений
7. Защита от дождя
8. Хранить в недоступном для детей месте
9. Не выбрасывать вместе с бытовыми отходами
10. Переработка
ОПИСАНИЕ ГРАФИЧЕСКИХ ЭЛЕМЕНТОВ
Рис 1
Описание
A
Выхлопная труба
B
Выход горячего воздуха
C
Топливный бак
D
Транспортировочные колеса
E
Крышка заливной горловины бака
F
Дисплей
G
Отображение температуры
окружающей среды
H
Ручка для переноски
I
Камера сгорания
J
Ручка управления температурой
K
Главный выключатель
Page 20

20
L
Поддержка нагревателя
ИНСТРУКЦИИ ПО СБОРКЕ
Извлеките нагреватель из коробки. Если прибор каким-либо
образом поврежден, не используйте его и обратитесь к
дилеру.
Чтобы собрать радиатор, выполните следующие
действия:
1.Вставьте ось колеса рис. 2J в соответствующее отверстие
опорной конструкции рис. 2E, вставьте штифт рис. 2K в
соответствующие отверстия; вставьте шайбу рис. 2H с
обеих сторон вала, наденьте колесо рис. 2I на ось колеса
рис. 2J, закрутите гайку рис. 2G.
2. установите корпус нагревателя на опорную конструкцию
рис. 2E, убедитесь, что монтажные отверстия совпадают с
отверстиями блока.
3. с помощью болта рис. 2B, пружинной шайбы рис. 2C,
плоской шайбы рис. 2D и гаек закрепите опорную
конструкцию рис. 2E на держателе бака.
Инструкции по установке
Установите обогреватель на плоскую, ровную, негорючую,
твердую поверхность.
Нагреватели с прямым впрыском предназначены для
использования на открытых открытых площадках или в
хорошо проветриваемых закрытых помещениях. Для
использования внутри помещений необходимо
предусмотреть постоянные вентиляционные отверстия
площадью не менее 25 см² / кВт, равномерно
расположенные между полом и потолком, площадью не
менее 250 см².
ВНИМАНИЕ! Минимальный размер вентиляционного
отверстия 320 см²
• Устанавливайте нагреватель только в обычном
горизонтальном положении.
• Не устанавливайте обогреватель вблизи стен, углов или
низких потолков.
• Не размещайте нагреватель ниже розетки.
• Не ставьте обогреватель на движущиеся транспортные
средства или в местах, где он может опрокинуться.
• Держите обогреватель вдали от легковоспламеняющихся,
взрывоопасных или коррозийных материалов.
• Располагайте обогреватель вдали от занавесок или
подобных материалов, которые могут перекрыть вход и
выход воздуха.
• Никогда не блокируйте и не ограничивайте впуск и выпуск
воздуха по какой-либо причине.
• Держите кабель питания вдали от источников тепла,
острых кромок, режущих и движущихся частей.
• Не подвергать прямому воздействию погодных условий
или чрезмерной влаги.
• Не устанавливайте обогреватель в непосредственной
близости от ванны, душа или бассейна.
• Необходимо соблюдать общие и специальные правила
пожарной безопасности, применимые ко всем областям
применения. В любом случае необходимо обеспечить
следующие минимальные безопасные расстояния от
материалов или предметов вблизи обогревателя:
• Сторона нагревателя: 0,6 м
• Сторона впуска воздуха: 1 м
• Верх: 1,5 м
• Сторона выхода горячего воздуха: 3 м
• Полы и потолки в рабочей зоне обогревателя должны
быть выполнены из огнестойких материалов.
• Не подключайте радиаторы непосредственно к
воздуховодам.
МОНТАЖ ДЫМОХОДА ПЕЧИ
Печь оснащена дымоходом для отвода дымовых газов. На
рис. 3 показано, как правильно установить дымоход для
отвода дымовых газов от печи (левая сторона рисунка). В
правой части рисунка указаны способы, при которых
дымоход устанавливать нельзя.
ВНИМАНИЕ!
Обязательно соблюдайте приведенные правила
строительства дымоходов, длины труб, углов
соединения отдельных секций труб.
• Трубы нельзя соединять под прямым углом 90° или менее
90° - это затрудняет или даже делает невозможным выход
дымовых газов.
• Минимальная длина труб должна строго соблюдаться
ИНСТРУКЦИИ ПО ПРИМЕНЕНИЮ
Запуск
• Заполните бак чистым топливом. Используйте только
дизельное топливо или парафин.
• Указатель уровня топлива в верхней части бака позволяет
проверить уровень топлива
• Подключите вилку кабеля питания к заземленному
источнику питания 230 В 50 Гц.
ПРИМЕЧАНИЕ: Заземление обязательно.
• После завершения вышеуказанного "запуска" в левом
окне дисплея появится символ "-", а в правом окне будет
отображаться значение температуры окружающей среды.
• Переведите переключатель в положение "I".
• По умолчанию установлена температура 20 градусов
Цельсия, которая будет отображаться в левом окне
дисплея.
• Если температура окружающей среды ниже температуры
по умолчанию, электроды начинают искрить, через 7
секунд включается нагреватель.
• Если температура окружающей среды выше температуры
по умолчанию, установите ручку термостата на желаемую
температуру, электроды начнут искрить, через 7 секунд
нагреватель включится.
ХОЛОДНЫЙ СТАРТ:
Чтобы запустить нагреватель при низкой температуре, во
время зажигания держите вентиляционное отверстие рис.
4B закрытым пальцем, чтобы облегчить запуск.
НЕНОРМАЛЬНАЯ РАБОТА:
В случае неисправности (отсутствие пламени, снижение
потока воздуха, плохое сгорание и т.д.) нагреватель
отключается, а на дисплее появляется код BLOCK MODE.
РУЧНОЙ СБРОС
Если нагреватель находится в режиме блокировки,
проверьте и устраните причину блокировки перед
перезапуском нагревателя. Чтобы перезапустить
устройство, установите переключатель ON (ВКЛ.) / OFF
(ВЫКЛ.) на рис. 1J. / ВЫКЛ. в положение "0", а затем снова
в положение "I". В случае повторного сбоя вызовите
техническую службу. Поворот ручки термостата НЕ
приведет к перезапуску нагревателя.
ДИСКЛАЙМЕР
• Установите переключатель в положение "OFF". 0. Фаза
поствентиляции будет охлаждать камеру сгорания в
течение 90 секунд. Отключите прибор от сети, если он не
используется в течение длительного времени.
• Никогда не отсоединяйте нагреватель от источника
питания, чтобы остановить его во время работы. Всегда
позволяйте последовательности охлаждения
завершиться, иначе остаточное тепло может повредить
внутренние компоненты.
• Не накрывайте нагреватель. Не блокируйте вход и выход
воздуха.
• Во время работы и после использования розетка
нагревателя очень горячая. Не прикасайтесь! При
необходимости используйте средства индивидуальной
защиты.
• Следите за тем, чтобы дети не играли с прибором и
находились вблизи него под присмотром.
• Прибор не предназначен для использования лицами
(включая детей) с ограниченными физическими,
сенсорными или умственными способностями или без
опыта и знаний.
• Отключите нагреватель перед его перемещением.
Никогда не тяните за шнур, чтобы отсоединить или
Page 21

21
переместить прибор.
• Не оставляйте обогреватель без присмотра во время
использования.
• Никогда не пользуйтесь прибором мокрыми руками или
если нагреватель или шнур питания мокрые.
• Если кабель питания поврежден, он должен быть заменен
производителем, техником по обслуживанию или
специалистом с аналогичной квалификацией.
Уборка, обслуживание и хранение
• Регулярно протирайте корпус мягкой губкой или тканью.
Для очень грязных деталей используйте губку, смоченную
теплой водой с мягким моющим средством, затем вытрите
насухо чистой тканью.
• Защищайте воздухозаборник и вентилятор от пыли и
грязи. Для очистки внутренних деталей осторожно
продуйте сжатый воздух через входное отверстие.
• Регулярно проверяйте кабель питания: если он изношен,
потрескался или поврежден, обратитесь в технический
сервис для его замены.
• Перед хранением обогревателя убедитесь, что он
совершенно холодный и сухой. Накройте прибор
полиэтиленовым пакетом, положите его в упаковку и
храните в сухом, проветриваемом месте.
• Выключите прибор, выньте вилку из розетки и дайте
нагревателю остыть в течение не менее 15 минут перед
выполнением любого технического обслуживания.
• Не пытайтесь самостоятельно ремонтировать
электрооборудование. Если вашему обогревателю
требуется обслуживание или ремонт, обратитесь к
квалифицированному специалисту.
• Не используйте неисправный прибор, пока
квалифицированный специалист не проверит и не
отремонтирует его.
• При очистке следите за тем, чтобы вода не попадала
внутрь устройства.
• Не открывайте корпус для очистки внутренних деталей.
Не распыляйте воду в нагреватель.
• Никогда не используйте для очистки нагревателя
растворители, бензин, толуол или подобные агрессивные
химические вещества.
• Для очистки нагревателя нельзя использовать
растворители, бензин, толуол или подобные агрессивные
химические вещества.
• Перед каждым сезонным использованием рекомендуется
проводить проверки, выполняемые ТОЛЬКО
КВАЛИФИЦИРОВАННЫМ ПЕРСОНАЛОМ:
• Осторожно открутите сопло от разъема сопла. Продуйте
отверстие сопла сжатым воздухом, чтобы очистить его от
грязи. При необходимости замените насадку.
ОЧИСТКА, ОБСЛУЖИВАНИЕ И ХРАНЕНИЕ
• Корпус следует регулярно протирать мягкой губкой или
тканью. Для очень грязных деталей используйте губку,
смоченную теплой водой с мягким моющим средством,
затем вытрите насухо чистой тканью.
• Воздухозаборник и вентилятор должны быть очищены от
пыли и грязи. Для очистки внутренних деталей осторожно
продуйте воздухозаборник сжатым воздухом.
• Регулярно проверяйте кабель питания: если он изношен,
потрескался или поврежден, обратитесь в технический
сервис для его замены.
• Перед хранением обогревателя убедитесь, что он
абсолютно прохладный и сухой. Прибор следует накрыть
полиэтиленовым пакетом, поместить в упаковку и хранить
в сухом, проветриваемом месте.
DYSZA
Осторожно открутите сопло от разъема сопла. Продуйте
сопло сжатым воздухом, чтобы удалить из него мусор. При
необходимости замените сопло.
ВОЗДУШНЫЕ ФИЛЬТРЫ
Очистите воздушные фильтры. Снимите торцевую крышку
фильтра рис. A11, промойте впускной воздушный фильтр
рис. A10 с легким моющим средством и тщательно
высушите перед установкой на место. Заменяйте впускной
фильтр рис. A9 один раз в год.
ЗАПАЛЬНЫЕ ЭЛЕКТРОДЫ
Электрод для розжига необходимо регулярно чистить,
регулировать и, при необходимости, заменять. Правильное
расстояние между электродами см. на рис. B1 и рис. B2
(размеры указаны в мм).
КОНТРОЛЬ ДАВЛЕНИЯ КОМПРЕССОРА
ВНИМАНИЕ: Давление компрессора установлено на заводеизготовителе и может проверяться и регулироваться только
квалифицированным техническим персоналом.
Манипуляции с устройством могут быть опасны.
Снимите крышку манометра рис. 4A. Подсоедините
манометр к отверстию для измерения давления на задней
крышке. Запустите нагреватель и прочитайте значение
давления воздуха. При необходимости отрегулируйте
давление до нужного значения, вращая регулировочный
винт по часовой стрелке для увеличения и против часовой
стрелки для уменьшения давления.
УСТАНОВКА НА БОЛЬШОЙ ВЫСОТЕ:
Из-за меньшего количества кислорода для установок на
больших высотах на уровне моря может потребоваться
уменьшить давление компрессора Рис. 4A. Регулировка
этой настройки может потребоваться для поддержания
хорошего сгорания из-за недостатка кислорода.
РЕШЕНИЕ ПРОБЛЕМ
ПРОБЛЕМА
ПРИЧИНА
РЕШЕНИЕ
Двигатель
не
запускается
На экране
отображает
ся ошибка
E1
Отсутствие питания
или слишком низкое
напряжение
Проверьте
кабель питания и
напряжение
Проверьте
предохранитель
и при
необходимости
замените его
Неисправный или
поврежденный кабель
питания
Проверьте и
замените при
необходимости
Неисправный
двигатель /
конденсатор
Проверьте и
замените при
необходимости
Устройство
заблокировано из-за
предыдущего
перегрева
Определите
причину
перегрева
Выключите
устройство
Проверьте впуск
и выпуск воздуха
Подождите
несколько минут
и перезагрузите
устройство
На экране
отображает
ся ошибка
E2
Неисправен датчик
температуры или
ослаблен разъем
датчика температуры
Проверьте и
замените, если
необходимо,
температурный
зонд
Проверьте
печатную плату и
при
необходимости
замените ее
Page 22
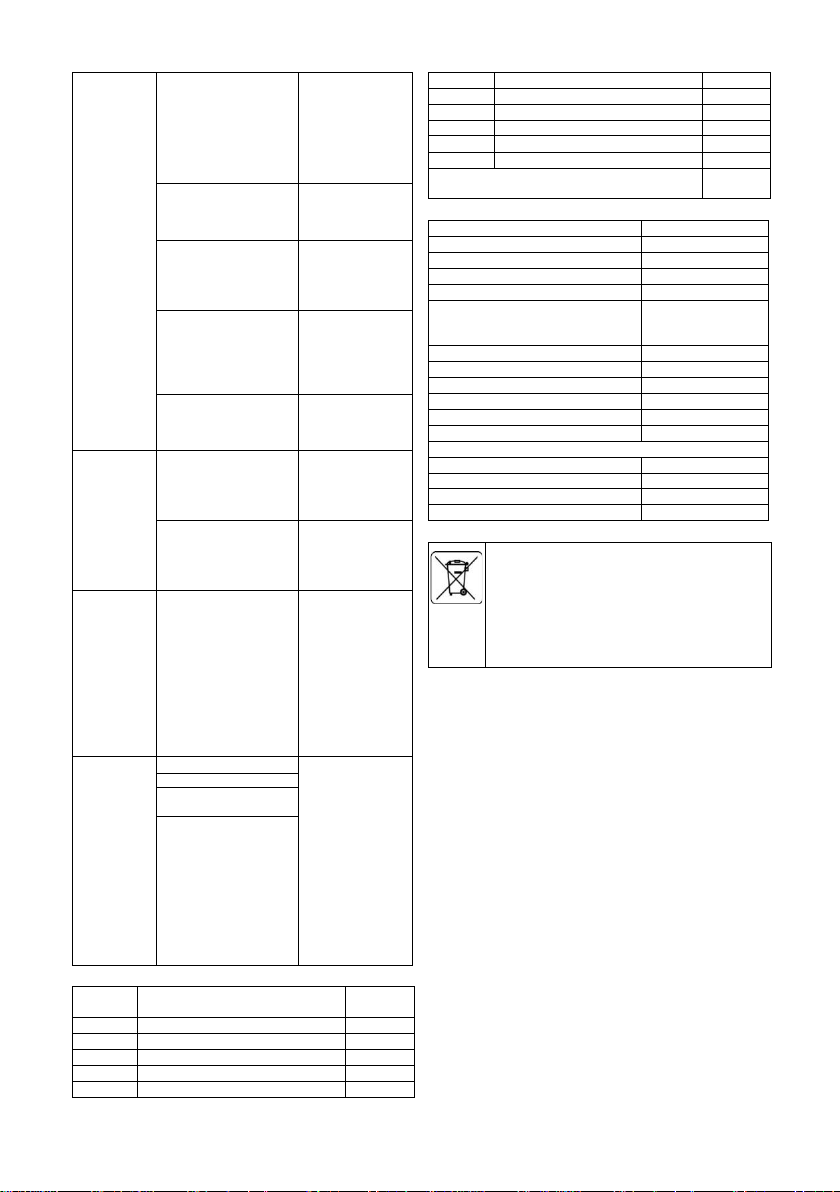
22
Двигатель
работает,
но
нагреватель
не
зажигается
и через
некоторое
время
отключаетс
я
На экране
отображает
ся ошибка
E1
Пустой топливный
бак, грязное или
неправильное топливо
Удалите плохое
или загрязненное
топливо
Заполните бак
чистым
дизельным
топливом или
парафином
Засоренный
топливный фильтр
Очистите или
замените
топливный
фильтр
Утечка воздуха в
масляной магистрали
Проверьте
шланги, затяните
соединения, при
необходимости
замените шланги
Засорение форсунки
горелки
Очистите сопло,
продув его
сжатым
воздухом, при
необходимости
замените.
Повышение вязкости
топлива при низкой
температуре
Смешайте
дизельное
топливо с 10-20%
парафина
Пламя,
выходящее
из
выхлопной
трубы
На экране
отображает
ся ошибка
E1
Недостаточная
подача воздуха в
камеру сгорания
Проверьте
воздухозаборник,
вентилятор,
двигатель
Слишком высокое
давление
компрессора
Проверьте
давление
воздуха, при
необходимости
отрегулируйте *.
Остановка
нагревателя
во время
работы
Температур
а
окружающе
й среды,
отображаем
ая на
экране
Достигнута комнатная
температура,
установленная на
комнатном термостате
Нормальная
работа
Для начала
поверните ручку
регулировки
температуры по
часовой стрелке
на более
высокое
значение
Остановка
нагревателя
во время
работы
На экране
отображает
ся ошибка
E1
Отказ пламени
Проверьте и
устраните
причину
(причины)
неисправности
Для сброса
установите
переключатель
Вкл/Выкл на 0, а
затем на I.
Вызовите
техническую
службу, если
проблема
сохраняется
Плохое сгорание
Снижение воздушного
потока
Перегрев
СОДЕРЖИМОЕ КОМПЛЕКТА
Поз.
Описание
Количес
тво A Ручка 1 B
Винты
6 или 8
C
Пружинная шайба
6 или 8
D
Pad
6 или 8
E
Конструкция рукоятки
1 F Гайка M5
6 или 8
G
Гайка M12
2 H Шайба ø12
2 I Колеса 2 J
Колесный ролик
1 K Pin
2
Комбинированный нагреватель с топливным
баком
1 шт.
Номинальные данные
Модель
90-086
Тепловая мощность [кВт] *
20
Воздушный поток [м³/ч]
600
Вид топлива
Дизель / Diesel
Расход топлива [кг/ч]
1.65
Напряжение питания [В/Гц]
230 В
переменного тока
50 Гц
Площадь обогрева
150~200 m²
Степень защиты IP
IPX4
Класс защиты
I
Сила тока [A]
1.1
Электрическая мощность [Вт]
230
Значение предохранителя
T3.15A
Размеры
Вес нетто (кг)
21,3
Емкость резервуара (л)
38
Время работы (ч)
~23
Год производства
2023
ОХРАНА ОКРУЖАЮЩЕЙ СРЕДЫ
Изделия с электрическим приводом не следует
выбрасывать вместе с бытовыми отходами, их следует
сдавать на соответствующие предприятия для утилизации.
За информацией об у тилизации обращайтесь к продавцу
изделия или в местные органы власти. Отходы
электрического и электронного оборудования содержат
вещества, которые не являются экологически безопасными.
Оборудование, которое не перерабатывается,
представляет потенциальный риск для окружающей среды
и здоровья человека.
"Группа Topex Spółka z ograniczoną odpowiedzialnością" Spółka komandytowa
с юридическим адресом в Варшаве, ул. Pograniczna 2/4 (далее: "Grupa
Topex") сообщает, что все авторские права на содержание данного
руководства (далее: "Руководство"), включая, среди прочего. его текст,
фотографии, диаграммы, рисунки, а также его состав, принадлежат
исключительно компании Grupa Topex и подлежат правовой охране в
соответствии с Законом от 4 февраля 1994 года об авторском праве и
смежных правах (Законодательный вестник 2006 года № 90 поз. 631, с
изменениями). Копирование, обработка, публикация, изменение в
коммерческих целях всего Руководства и его отдельных элементов без
согласия компании Grupa Topex, выраженного в письменной форме, строго
запрещено и может привести к гражданской и уголовной ответственности.
Page 23
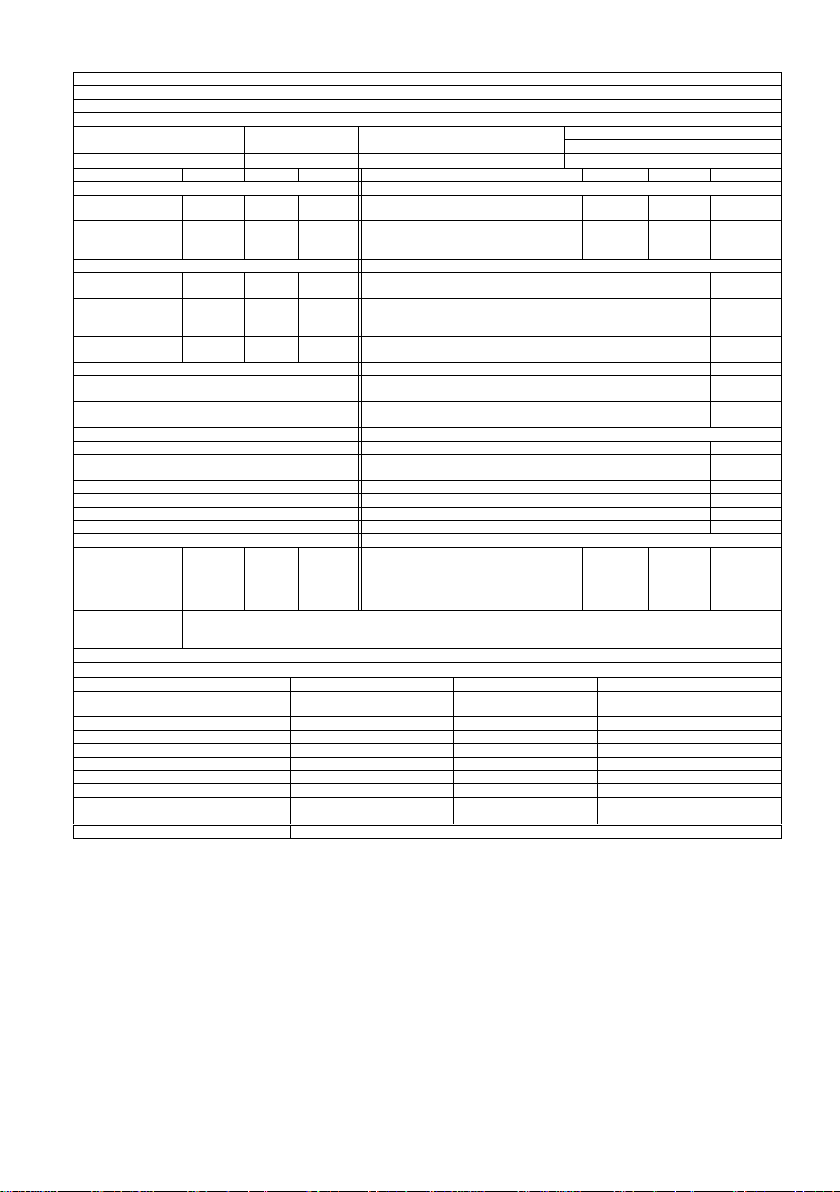
23
ID модели: 90-086
Функция кос венного нагрева: [нет].
Номинальная тепловая мощность: 20(кВт)
Мощность кос венного нагрева: не применимо (кВт)
Топливо
Выбросы от отопления помещений (*)
NOx
Выберите тип топлива
[жидкое то пливо].
Очищенный парафин
79[
мг/квинпут
] (GCV)
Параметр
Символ
Значение
Единица Пункт
Символ
Значение
Единица
Тепловая энергия
Полезная емкость (NCV)
Номинальная
тепловая мощность
Пном 20 кВт
Коммунальная эффективность при
номинальной тепловой мощности
ηth,nom 100 %
Минимальная
тепловая мощность
(ориентировочно)
Pmin Н/Д кВт
Коммунальная эффективность при
минимальной тепловой мощности
(ориентировочно)
ηth,min Н/Д %
Дополнительное потребление электроэнергии
Тип тепловой мощности / контроля температуры в помещении (выберите один)
При номинальной
тепловой мощности
elmax 0,002 кВт
Одноступенчатая тепловая мощность, без контроля температуры в
помещении
[нет].
С минимальной
тепловой
мощностью
элмин Н/Д кВт
Две или более ручных ступеней, без контроля температуры в
помещении
[нет].
В режиме ожи дания
elSB
Н/Д кВт
с механическим регулированием температуры в помещении с помощью
термостата
[нет].
с электронным контролем температуры в помещении
[да].
с электронным контролем комнатной температуры и таймером экономии
дневного света
[нет].
с электронным контролем комнатной температуры и недельным таймером
[нет].
Другие варианты управ ления (возможен мно жественный выбор)
контроль комнатной температуры с обнаружением присутствия
[нет].
Контроль комнатной температуры с обнаружением открытого окна
[нет].
с возможностью дистанционного управления
[нет].
с адаптивным управлением запуском
[нет].
с сокращенным рабочим днем
[нет].
с датчиком с черной лампой
[нет].
Постоянная потребность в мощности пилотного пламени
Необходимая
мощность
пламени пилота
(если
подходящий)
Ppilot
0
кВт
Контактная
информация
Grupa Topex Sp. z o.o. Sp.k.
Ул. Пограничная 2/4, 02-285 Варшава
(*) NOx = Окислы азота
Сезонная энергоэффективность отопления помещений
ηS
Позиция
Символ
Значение
Единица
Сезонная энергоэффективность отопления
помещений в активном режиме
ηS,on
100
%
Коэффициент коррекции (F1)
/ 0 %
Коэффициент коррекции (F2)
/ 7 %
Коэффициент коррекции (F3)
/ 0 %
Коэффициент коррекции (F4)
/ 0 %
Коэффициент коррекции (F5)
/ 0 %
Коэффициент маркировки биомассы
BLF 1 /
Сезонная энергоэффективность отопления
помещений
ηS
ηS
97
%
Классы энергоэффективности
A
Page 24
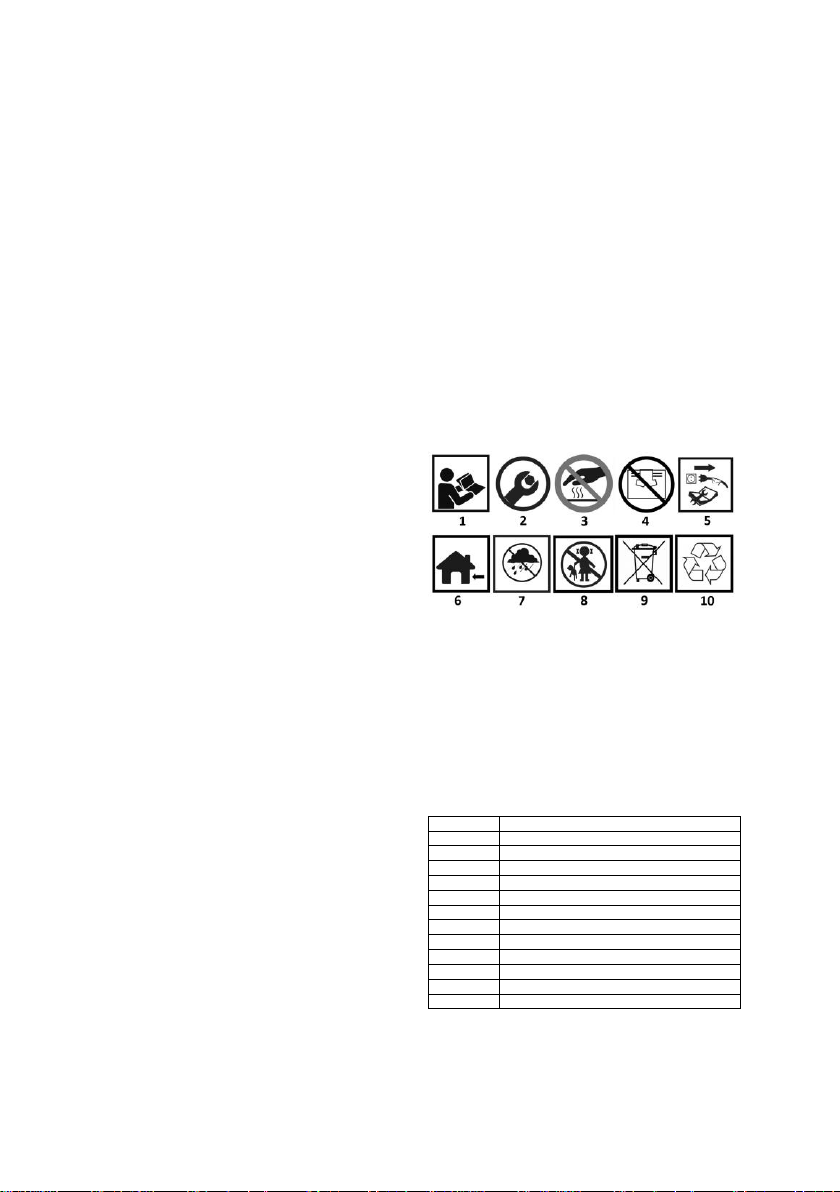
24
HU
FORDÍTÁSI (FELHASZNÁLÓI) KÉZIKÖNYV
Olajfűtés
90-086
MEGJEGYZÉS: A BERENDEZÉS HASZNÁLATA ELŐTT
KÉRJÜK, OLVASSA EL FIGYELMESEN EZT A KÉZIKÖNYVET,
ÉS ŐRIZZE MEG A KÉSŐBBI HASZNÁLATRA. AZOK A
SZEMÉLYEK, AKIK NEM OLVASTÁK EL A HASZNÁLATI
UTASÍTÁST, NEM VÉGEZHETIK A BERENDEZÉS
ÖSSZESZERELÉSÉT, BEÁLLÍTÁSÁT VAGY
MŰKÖDTETÉSÉT.
EZ A TERMÉK CSAK ALKALMI HASZNÁLATRA VAGY JÓL
SZIGETELT HELYISÉGEKBEN VALÓ HASZNÁLATRA
ALKALMAS.
KÜLÖNLEGES BIZTONSÁGI RENDELKEZÉSEK
MEGJEGYZÉS!
Olvassa el figyelmesen a használati utasítást, kövesse az abban
foglalt figyelmeztetéseket és biztonsági feltételeket. A
készüléket biztonságos működésre tervezték. Mindazonáltal: a
készülék telepítése, karbantartása és üzemeltetése veszélyes
lehet. A következő eljárások betartása csökkenti a tűz, az
áramütés, a sérülés veszélyét, és csökkenti a készülék telepítési
idejét
MEGJEGYZÉS: A fűtőberendezés nem háztartási vagy
szabadidős használatra készült.
● Csak jól szellőző helyiségekben és éghető anyagoktól távol
használja.
● NEM használható lakóépületekben helyiségek fűtésére.
Középületekben történő használatra vonatkozóan lásd a
nemzeti előírásokat.
● Ezt a készüléket 8 éves vagy idősebb gyermekek, valamint
korlátozott fizikai, érzékszervi vagy szellemi képességekkel
rendelkező, illetve tapasztalat és ismeretek nélküli személyek is
használhatják, feltéve, hogy felügyelet alatt állnak, vagy
eligazítást kaptak a készülék biztonságos használatának
témakörében, és megértették az ezzel járó kockázatokat. A
gyermekek nem játszhatnak a készülékkel.
Gyermekek felügyelet nélkül nem tisztíthatják vagy
karbantarthatják a készüléket.
FIGYELMEZTETÉS: A túlmelegedés elkerülése érdekében ne
takarja le a fűtőberendezést.
● 3 év alatti gyermekek csak állandó felügyelet mellett
tartózkodhatnak a készülék közelében.
● A 3 és 8 év közötti gyermekek csak akkor kapcsolhatják be/ki
a készüléket, ha a készüléket a szokásos működési helyzetbe
helyezték vagy szerelték, és felügyeletet kaptak, vagy kioktatták
őket a készülék biztonságos használatáról, és megértették a
vele járó kockázatokat. A 3 és 8 év közötti gyermekek nem
csatlakoztathatják, nem állíthatják be, nem tisztíthatják a
készüléket, és nem végezhetnek karbantartási műveleteket.
FIGYELEM ! - a készülék egyes részei nagyon felforrósodhatnak
és égési sérüléseket okozhatnak. Különös figyelmet kell fordítani
a gyermekekre és a veszélyeztetett személyekre.
● Minden szervizelést csak szakképzett szervizszolgáltató
végezhet.
● A fűtőberendezés levegőt (oxigént) használ azon a területen,
ahol használják. A megfelelő égés biztosítása érdekében
biztosítani kell a szükséges szellőzést.
● Ne tároljon vagy használjon benzint vagy más gyúlékony
gőzöket vagy folyadékokat ennek vagy bármely más
készüléknek a közelében!
● Tűz-, égési, fulladás- és robbanásveszély. Tartsa a szilárd
éghető anyagokat, például építőanyagokat, papírt vagy kartont a
fűtőberendezéstől biztonságos távolságban a használati
utasításban javasoltak szerint. Soha ne használja a
fűtőberendezést olyan helyiségekben, amelyekben illékony vagy
levegőben terjedő anyagok, illetve termékek, például benzin,
oldószerek, festékhígító, porszemcsék vagy ismeretlen vegyi
anyagok lehetnek.
● A közvetlen befecskendezésű fűtőberendezések helytelen
használat esetén szén-monoxid (CO) mérgezést okozhatnak,
ami halálhoz vezethet.
● A fűtőberendezés használati utasításában foglalt
óvintézkedések és utasítások be nem tartása a tűz, robbanás,
égési sérülések, fulladás, súlyos sérülés, súlyos sérülés, szénmonoxid és mérgezés veszélye miatt halálhoz, súlyos
sérüléshez és vagyonvesztéshez vagy kárhoz vezethet. Ezt a
fűtőberendezést csak olyan személyek használhatják vagy
szervizelhetik, akik megértik és követik az utasításokat. Ha
segítségre vagy információra van szüksége a fűtőberendezéssel
kapcsolatban, például használati utasításra, címkékre stb.
Forduljon a gyártóhoz.
● Az elektromos berendezésnek, amelyhez a készüléket
csatlakoztatják, meg kell felelnie a hatályos jogszabályoknak. A
telepítéshez a főelosztóban egy hibásáramú megszakító
(RCCB) szükséges.
● Bármilyen karbantartás előtt húzza ki a készüléket a
hálózatból.
● A készülék használata előtt mindig ellenőrizze a tápkábelt.
Nem szabad meghajlítani, megnyújtani, kifeszíteni vagy
bármilyen módon megsérülni.
● A tápkábelt csak szakképzett személyzet cserélheti ki. Csak a
megfelelő védelmi osztályú eredeti tápkábelt használja.
● Az elülső kivezetés nagyon forró működés közben. Ne érintse
meg! Égési sérülések veszélye.
PIKTOGRAMOK ÉS FIGYELMEZTETÉSEK
1. Olvassa el a használati utasítást, tartsa be az
abban foglalt figyelmeztetéseket és biztonsági feltételeket!
2. Összeszerelést igényel
3. Forró elem
4. Ne takarja le a be- és kimeneti nyílásokat
5. Javítás vagy karbantartás előtt válassza le a
csatlakozót
6. Beltéri használatra
7. Véd az esőtől
8. Gyermekektől elzárva tartandó
9. Ne dobja ki a háztartási hulladékkal együtt
10. Újrahasznosítható
A GRAFIKAI ELEMEK LEÍRÁSA
1. ábra
Leírás A Kipufogócső
B
Forró levegő kivezetése
C
Üzemanyagtartály
D
Szállító kerekek
E
Tartály töltőfedél
F
Megjelenítés
G
Környezeti hőmérséklet kijelző
H
Szállítási fogantyú
I
Tűzhely
J
Hőmérsékletszabályozó gomb
K
Főkapcsoló
L
Fűtőberendezés támogatása
ÖSSZESZERELÉSI ÚTMUTATÓ
Vegye ki a fűtőberendezést a dobozból. Ha a készülék bármilyen
módon megsérült, ne használja, és forduljon a kereskedőhöz.
A radiátor összeszereléséhez a következőképpen járjon el:
Page 25

25
1.Helyezze a 2J ábrán látható keréktengelyt a 2E ábrán látható
tartószerkezet megfelelő furatába, helyezze a 2K ábrán látható
csapot a megfelelő furatokba; helyezze be a 2H ábrán látható
alátétet a tengely mindkét oldalára, csúsztassa a 2I ábrán látható
kereket a 2J ábrán látható keréktengelyre, csavarja fel a 2G
ábrán látható anyát.
2. Helyezze a fűtőtestet a 2E ábrán látható tartószerkezetre,
ügyeljen arra, hogy a rögzítőfuratok egybeessenek a készülék
furataival.
3. A 2B ábra szerinti csavar, a 2C ábra szerinti rugós alátét, a
2D ábra szerinti sima alátét és az anyák segítségével rögzítse a
2E ábra szerinti tartószerkezetet a tartálytartóhoz.
Telepítési utasítások
Helyezze a fűtőberendezést sík, vízszintes, nem éghető,
kemény felületre.
A közvetlen befecskendezésű fűtőberendezéseket nyitott kültéri
vagy jól szellőző beltéri helyiségekben történő használatra
tervezték. Beltéri használat esetén legalább 25 cm² / kW állandó
szellőzőnyílásokat kell biztosítani, egyenletes távolságra a padló
és a mennyezet között, legalább 250 cm².
FIGYELEM! Minimális szellőzőnyílás mérete 320cm²
• A fűtőtestet csak normál vízszintes helyzetben szerelje fel.
• Ne helyezze a fűtőberendezést falak, sarkok vagy alacsony
mennyezetek közelébe.
• Ne helyezze a fűtőtestet az aljzat alá.
• Ne helyezze a fűtőberendezést mozgó járművekre vagy olyan
helyre, ahol felborulhat.
• Tartsa a fűtőberendezést gyúlékony, robbanásveszélyes vagy
maró anyagoktól távol.
• Helyezze a fűtőberendezést olyan függönyöktől vagy hasonló
anyagoktól távol, amelyek elzárhatják a levegő be- és
kimeneti nyílását.
• Soha ne zárja el vagy korlátozza a levegő be- és kimeneti
nyílását semmilyen okból.
• Tartsa a tápkábelt távol a hőforrásoktól, éles szélektől, vágó
és mozgó részektől.
• Ne tegye ki közvetlenül az időjárásnak vagy a túlzott
nedvességnek.
• Ne helyezze a fűtőberendezést kád, zuhanyzó vagy
úszómedence közvetlen közelébe.
• Az összes alkalmazási területre vonatkozó általános és
speciális tűzvédelmi előírásokat be kell tartani. Minden
esetben biztosítani kell a következő minimális biztonsági
távolságokat a fűtőberendezés közelében lévő anyagoktól
vagy tárgyaktól:
• Fűtőoldal: 0,6 m
• Légbeszívó oldal: 1 m
• Felső: 1,5 m
• Forró levegő kilépő oldala: 3 m
• A fűtőberendezés munkaterületén a padlónak és a
mennyezetnek tűzálló anyagból kell készülnie.
• Ne csatlakoztassa a radiátorokat közvetlenül a
légcsatornákhoz.
A FŰTŐBERENDEZÉS KÉMÉNYBEÉPÍTÉSE
A fűtőberendezés kéményt tartalmaz a füstgázok elvezetésére.
A 3. ábra mutatja, hogyan kell helyesen felszerelni a
fűtőberendezés füstgázainak kéményét (a rajz bal oldala). Az
ábra jobb oldalán azok a módok, amelyeken a kéményt nem
szabad felszerelni.
MEGJEGYZÉS!
Feltétlenül be kell tartani a kémények építésére, a
csőhosszra, az egyes csőszakaszok csatlakozási szögére
vonatkozó szabályokat.
• A csöveket nem szabad 90°-os derékszögben vagy 90°-nál
kisebb szögben összekötni, mivel ez megnehezíti vagy akár
lehetetlenné teszi a füstgázok távozását.
• A minimális csőhosszúságokat szigorúan be kell tartani
HASZNÁLATI UTASÍTÁS
Indítsa el a oldalt.
• Töltse fel a tartályt tiszta üzemanyaggal. Csak gázolajat vagy
paraffint használjon.
• A tartály tetején lévő üzemanyagszint-mérő lehetővé teszi az
üzemanyagszint ellenőrzését.
• Csatlakoztassa a tápkábel dugóját egy földelt 230 V 50 Hz-es
tápegységhez.
MEGJEGYZÉS: A földelés kötelező.
• A fenti "indítás" befejezése után a bal oldali kijelzőablakban
egy "-" jelenik meg, a jobb oldali ablakban pedig a környezeti
hőmérséklet értéke jelenik meg.
• Csúsztassa a kapcsolót "I" állásba.
• Az alapértelmezett hőmérséklet-beállítás 20 Celsius-fok,
amely a bal oldali kijelzőablakban jelenik meg.
• Ha a környezeti hőmérséklet az alapértelmezett hőmérséklet
alatt van, az elektródák szikrázni kezdenek, 7 másodperc
múlva a fűtés bekapcsol.
• Ha a környezeti hőmérséklet magasabb, mint az
alapértelmezett hőmérséklet, állítsa a termosztátgombot a
kívánt hőmérsékletre, az elektródák szikrázni kezdenek, 7
másodperc múlva a fűtőtest bekapcsol.
COLD START:
A fűtőberendezés alacsony hőmérsékleten történő indításához
tartsa a 4B ábra szerinti szellőzőnyílást ujjával zárva a gyújtás
alatt, hogy megkönnyítse az indítást.
RENDELLENES MŰKÖDÉS:
Meghibásodás esetén (nincs láng, csökkent légáramlás, rossz
égés stb.) a fűtőberendezés leáll, és a kijelzőn megjelenik a
BLOCK MODE kód.
MANUÁLIS VISSZÁLLÍTÁS
Ha a fűtőberendezés lockout üzemmódban van, ellenőrizze és
szüntesse meg a lockout okát, mielőtt újraindítja a
fűtőberendezést. A készülék újraindításához állítsa az 1J ábra
kapcsolót ON-ra. / OFF. "0" állásba, majd ismét "I" állásba.
Ismételt meghibásodás esetén hívja a műszaki szolgálatot. A
termosztát gombjának elforgatásával NEM lehet a
fűtőberendezést visszaállítani.
DISCLAIMER
• Állítsa a kapcsolót "OFF" állásba. 0. Az utószellőztetési fázis
90 másodpercig hűti az égéstermet. Húzza ki a készüléket, ha
hosszabb ideig nem használja.
• Soha ne válassza le a fűtőberendezést a tápegységről, hogy
működés közben leállítsa. Mindig hagyja, hogy a hűtési
folyamat befejeződjön, különben a maradék hő károsíthatja a
belső alkatrészeket.
• Ne takarja le a fűtőberendezést. Ne zárja el a levegő be- és
kimeneti nyílását.
• A fűtőberendezés kimeneti nyílása működés közben és
használat után nagyon forró. Ne érintse meg! Szükség esetén
használjon egyéni védőfelszerelést.
• Gondoskodjon arról, hogy a gyermekek ne játsszanak a
készülékkel, és hogy felügyelet alatt legyenek, amikor a
készülék közelében tartózkodnak.
• A készüléket nem olyan személyek (beleértve a gyermekeket
is) általi használatra szánják, akik korlátozott fizikai,
érzékszervi vagy szellemi képességekkel rendelkeznek, vagy
akiknek nincs tapasztalatuk és tudásuk.
• A fűtőberendezést mozgatás előtt húzza ki. Soha ne húzza
meg a kábelt a készülék leválasztásához vagy
mozgatásához.
• Ne hagyja felügyelet nélkül a fűtőberendezést használat
közben.
• Soha ne használja a készüléket nedves kézzel, illetve ha a
fűtőtest vagy a tápkábel nedves.
• Ha a tápkábel megsérül, azt a gyártónak, szerviztechnikusnak
vagy hasonlóan képzett személynek kell kicserélnie.
Tisztítás, karbantartás és tárolás
• Rendszeresen törölje át a készülékházat puha szivaccsal
vagy ruhával. A nagyon piszkos részek esetében használjon
langyos vízzel és enyhe tisztítószerrel megnedvesített
szivacsot, majd tiszta ruhával szárítsa meg.
• Védje a légbeömlőnyílást és a ventilátort a portól és a
szennyeződésektől. A belső alkatrészek tisztításához
óvatosan fújjon sűrített levegőt a bemeneti nyíláson keresztül.
Page 26

26
• Rendszeresen ellenőrizze a tápkábelt: ha elkopott, megrepedt
vagy sérült, cseréltesse ki műszaki szervizben.
• Tárolás előtt győződjön meg róla, hogy a fűtőtest tökéletesen
hűvös és száraz. Fedje le a készüléket egy műanyag
zacskóval, tegye a csomagolásába, és tárolja száraz,
szellőztetett helyen.
• Kapcsolja ki a készüléket, húzza ki a konnektorból, és hagyja
a fűtőberendezést legalább 15 percig hűlni, mielőtt bármilyen
karbantartási munkát elvégezne.
• Ne próbálkozzon saját maga elektromos javítással. Ha a
fűtőberendezés szervizelést vagy javítást igényel, forduljon
szakképzett szakemberhez.
• Ne használja a meghibásodott készüléket, hacsak egy
szakképzett szakember nem ellenőrizte és javította meg.
• Tisztításkor ügyeljen arra, hogy a készülékbe ne kerüljön víz.
• A belső alkatrészek tisztításához ne nyissa ki a
készülékházat. Ne spricceljen vizet a fűtőberendezésbe.
• Soha ne használjon oldószert, benzint, toluolt vagy hasonló
agresszív vegyszereket a fűtőberendezés tisztításához.
• A fűtőtest tisztításához nem szabad oldószereket, benzint,
toluolt vagy hasonló agresszív vegyszereket használni.
• KIZÁRÓLAG KÉPESÍTETT SZEMÉLY által végzett ellenőrzés
ajánlott minden szezonális használat előtt:
• Óvatosan csavarja ki a fúvókát a fúvókacsatlakozóból. Fújja
át a fúvóka nyílását sűrített levegővel, hogy megszabadítsa a
szennyeződésektől. Szükség esetén cserélje ki a fúvókát.
TISZTÍTÁS, KARBANTARTÁS ÉS TÁROLÁS
• A készülékházat rendszeresen törölje át puha szivaccsal vagy
ruhával. A nagyon piszkos részeknél használjon langyos
vízzel és enyhe tisztítószerrel megnedvesített szivacsot, majd
tiszta ruhával szárítsa meg.
• A légbeömlőnek és a ventilátornak por- és
szennyeződésmentesnek kell lennie. A belső részek
tisztításához óvatosan fújja ki sűrített levegővel a
légbeömlőnyílást.
• Rendszeresen ellenőrizze a tápkábelt: ha elkopott, megrepedt
vagy sérült, cseréltesse ki műszaki szervizben.
• A fűtőtest tárolása előtt győződjön meg róla, hogy tökéletesen
hűvös és száraz. A készüléket műanyag zacskóval le kell
fedni, a csomagolásába kell helyezni, és száraz, szellőztetett
helyen kell tárolni.
DYSZA
Óvatosan csavarja ki a fúvókát a fúvókacsatlakozóból. Fújja ki a
fúvókát sűrített levegővel, hogy eltávolítsa a törm eléket a
fúvókából. Szükség esetén cserélje ki a fúvókát.
LÉGSZŰRŐK
Tisztítsa meg a légszűrőket. Távolítsa el a szűrő végsapkáját,
ábra. A11, mossa ki a légbeszívó szűrőt, ábra. A10 enyhe
mosószerrel, és a visszahelyezés előtt alaposan szárítsa meg.
Cserélje ki a légbeszívó szűrőt, ábra. A9 évente egyszer.
GYÚJTÓELEKTRÓDÁK
A gyújtóelektródát rendszeresen tisztítani, beállítani és szükség
esetén cserélni kell. Az elektródák helyes távolságát lásd a B1.
és B2. ábrán (a méretek mm-ben vannak megadva).
KOMPRESSZORNYOMÁS-SZABÁLYOZÁS
FIGYELEM: A kompresszornyomás gyárilag be van állítva, és
csak szakképzett szakemberek ellenőrizhetik és állíthatják be. A
készülék manipulálása veszélyes lehet.
Távolítsa el a nyomásmérő sapkáját (4A ábra). Csatlakoztassa
a nyomásmérőt a hátsó burkolaton lévő nyomásmérő nyíláshoz.
Indítsa be a fűtőberendezést, és olvassa le a légnyomás értékét.
Ha szükséges, állítsa be a nyomást a megfelelő értékre a
beállítási csavarnak az óramutató járásával megegyező irányba
történő elforgatásával a nyomás növeléséhez, az óramutató
járásával ellentétes irányba történő elforgatásával a nyomás
csökkentéséhez.
TELEPÍTÉS NAGY MAGASSÁGOKBAN:
A tengerszint feletti magasságban lévő berendezéseknél a
tengerszintnél kisebb oxigénmennyiség miatt szükség lehet a
kompresszornyomás csökkentésére 4A. ábra. Az oxigénhiány
miatt a jó égés fenntartásához szükség lehet ennek a
beállításnak a módosítására.
PROBLÉMAMEGOLDÁS
PROBLÉMA
CAUSE
MEGOLDÁS
A motor nem
indul
E1 hiba
jelenik meg
a képernyőn
Nincs tápegység vagy
túl alacsony a
feszültség
Ellenőrizze a
tápkábelt és a
feszültséget
Ellenőrizze a
biztosítékot, és
szükség esetén
cserélje ki
Hibás vagy sérült
tápkábel
Ellenőrizze és
szükség szerint
cserélje ki
Hibás motor /
kondenzátor
Ellenőrizze és
szükség szerint
cserélje ki
A készülék korábbi
túlmelegedés miatt
blokkolva van
A túlmelegedés
okának felderítése
Kapcsolja ki a
készüléket
Ellenőrizze a
levegő be- és
kimeneti nyílását
Várjon néhány
percet, és indítsa
újra a készüléket.
E2 hiba
jelenik meg
a képernyőn
A hőmérséklet-érzékelő
meghibásodott vagy a
hőmérséklet-érzékelő
csatlakozója meglazult.
Ellenőrizze és
szükség esetén
cserélje ki a
hőmérsékletmérő
szondát.
Ellenőrizze az
áramköri lapot, és
szükség esetén
cserélje ki
A motor jár,
de a fűtés
nem gyullad
be, és rövid
idő után
leáll.
E1 hiba
jelenik meg
a képernyőn
Üres üzemanyagtartály,
piszkos vagy nem
megfelelő üzemanyag
Távolítsa el a
rossz vagy
szennyezett
üzemanyagot
Töltse fel a tartályt
tiszta gázolajjal
vagy paraffinnal.
Eltömődött
üzemanyagszűrő
Tisztítsa meg
vagy cserélje ki az
üzemanyagszűrőt
Levegőszivárgás az
olajvezetékben
Ellenőrizze a
tömlőket, húzza
meg a
csatlakozásokat,
szükség esetén
cserélje ki a
tömlőket.
Eltömődött égőfúvóka
A fúvókát sűrített
levegővel fújva
tisztítsa meg,
szükség esetén
cserélje ki.
Az üzemanyag
viszkozitása alacsony
hőmérsékleten
megnövekedett
Keverje össze a
dízelüzemanyagot
10-20%
paraffinnal.
Lángok a
kipufogónyíl
ásból
Az égéstér elégtelen
levegőellátása
Ellenőrizze a
légbeszívást, a
ventilátort, a
motort
Page 27
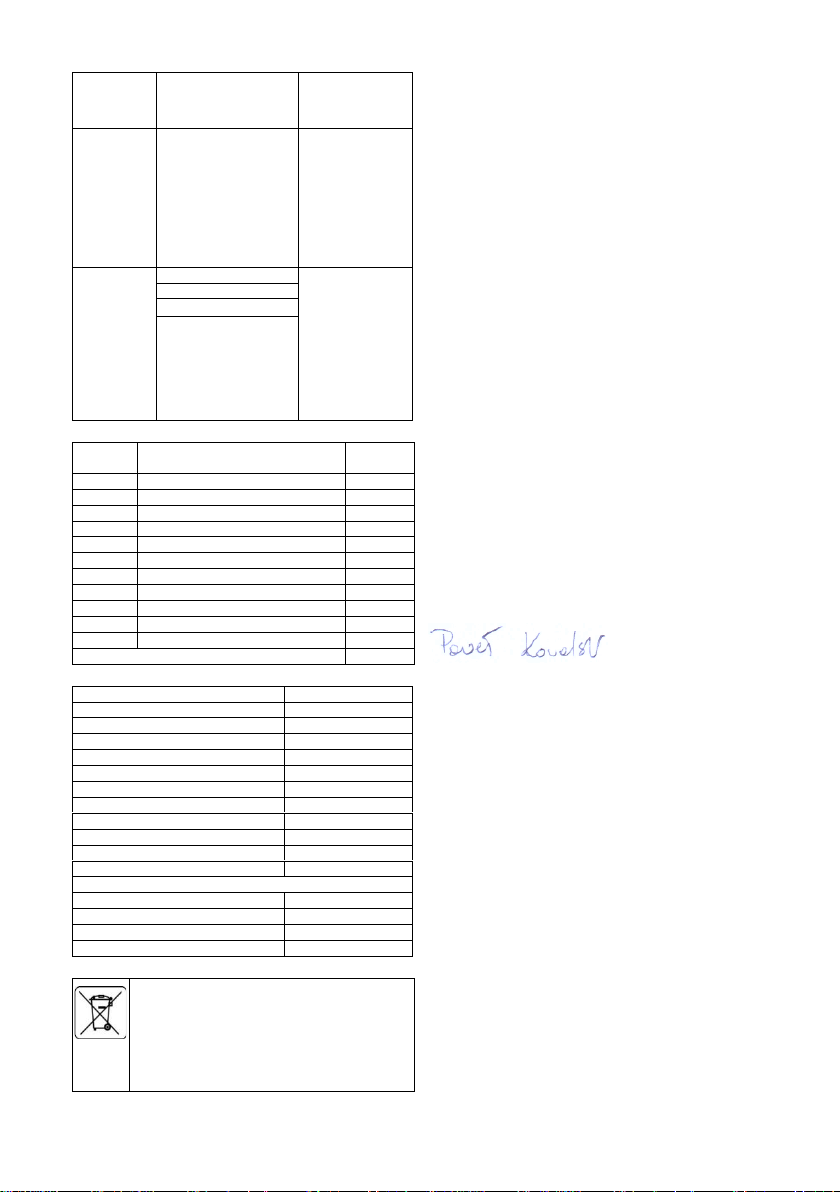
27
E1 hiba
jelenik meg
a képernyőn
Túl magas
kompresszornyomás
Ellenőrizze a
légnyomást,
szükség esetén
állítsa be *.
A fűtés leáll
működés
közben
A képernyőn
megjelenő
környezeti
hőmérséklet
A szobahőmérséklet
elérte a
szobahőszabályzóval
beállított
szobahőmérsékletet.
Normál működés
A kezdéshez
fordítsa a
hőmérsékletszabá
lyozó gombot az
óramutató
járásával
megegyezően
magasabb
értékre.
A fűtés leáll
működés
közben
E1 hiba
jelenik meg
a képernyőn
Lánghiba
Ellenőrizze és
szüntesse meg a
hiba okát (okait).
A visszaállításhoz
állítsa a
be/kikapcsolót 0-
ra, majd I-re.
Hívja a műszaki
szolgálatot, ha a
probléma
továbbra is fennáll
Rossz égés
Csökkentett légáramlás
Túlmelegedés
A KÉSZLET TARTALMA
Pos.
Leírás
Mennyis
ég A Fogantyú 1 B
Csavarok
6 vagy 8
C
Rugós alátét
6 vagy 8
D
Pad
6 vagy 8
E
Fogantyú kialakítása
1 F M5 anya
6 vagy 8
G
M12-es anya
2 H ø12 alátét 2 I
Kerekek 2 J
Kerékgörgő
1 K Pin 2 Kombinált fűtőberendezés üzemanyagtartállyal
1 db.
Névleges adatok
Modell
90-086
Hőteljesítmény [kW] *
20
Légáramlás [m³/h]
600
Üzemanyag típusa
Dízel / Diesel
Üzemanyag-fogyasztás [kg/h]
1.65
Tápfeszültség [V/Hz]
230V AC 50Hz
Fűtési terület
150~200 m²
IP védelmi fok
IPX4
Védelmi osztály
I
Áramerősség [A]
1.1
Elektromos teljesítmény [W]
230
Biztosító értéke
T3.15A
Méretek
Nettó súly (kg)
21,3
Tartály kapacitása (l)
38
Működési idő (h)
~23
A gyártás éve
2023
KÖRNYEZETVÉDELEM
Az elektromos meghajtású termékeket nem szabad a háztartási
hulladékkal együtt ártalmatlanítani, hanem megfelelő
létesítményekbe kell vinni ártalmatlanításra. Az
ártalmatlanítással kapcsolatos információkért forduljon a termék
kereskedőjéhez vagy a helyi hatósághoz. Az elektromos és
elektronikus berendezések hulladékai olyan anyagokat
tartalmaznak, amelyek nem környezetbarátok. Az
újrahasznosításra nem kerülő berendezések potenciális
veszélyt jelentenek a környezetre és az emberi egészségre.
"Grupa Topex Spółka z ograniczoną odpowiedzialnością" Spółka komandytowa,
székhelye Varsó, ul. Pograniczna 2/4 (a továbbiakban: "Grupa Topex")
tájékoztat, hogy a jelen kézikönyv (a továbbiakban: "kézikönyv") tartalmának
valamennyi szerzői joga, beleértve többek között. A kézikönyv szövege,
fényképei, ábrái, rajzai, valamint a kézikönyv összetétele kizárólag a Grupa
Topex tulajdonát képezik, és a szerzői és szomszédos jogokról szóló, 1994.
február 4-i törvény (a 2006. évi 90. sz. Poz. 631. sz. törvénycikk, módosított
változat) értelmében jogi védelem alatt állnak. A kézikönyv egészének és egyes
elemeinek másolása, feldolgozása, közzététele, kereskedelmi célú módosítása a
Grupa Topex írásban kifejezett hozzájárulása nélkül szigorúan tilos, és polgári és
büntetőjogi felelősségre vonást vonhat maga után.
EU-megfelelőségi nyilatkozat
Gyártó: Sp. z o.o. Sp.k., Pograniczna 2/4 02-285 Warszawa
Termék: Olajfűtés
Modell: 90-086
Kereskedelmi név: NEO TOOLS
Sorozatszám: 00001 ÷ 99999
Ezt a megfelelőségi nyilatkozatot a gyártó kizárólagos felelőssége
mellett adjuk ki.
A fent leírt termék megfelel a következő dokumentumoknak:
2014/35/EU kisfeszültségű irányelv
Elektromágneses összeférhetőségi irányelv 2014/30/EU
A 2015/863/EU irányelvvel módosított 2011/65/EU RoHS
irányelv
A 2010/30/EU irányelvet kiegészítő 626/2011/EU rendelet
A 2009/125/EK irányelv végrehajtásáról szóló (EU) 2015/1188
rendelet
És megfelel a szabványok követelményeinek:
EN 60335-1:2012+A11+A13+A1+A14+A2; EN 60335-2102:2016; EN 62233:2008;
EN IEC 55014-1:2021; EN IEC 55014-2:2021;
EN IEC 61000-3-2:2019+A1; EN 61000-3-3:2013+A1+A2;
EN IEC 63000:2018
A műszaki dokumentáció elkészítésére jogosult, az EU-ban
illetőséggel rendelkező személy neve és címe:
Aláírva a következők nevében:
Grupa Topex Sp. z o.o. Sp.k.
2/4 Pograniczna utca
02-285 Varsó
Paweł Kowalski
TOPEX GROUP minőségügyi tisztviselő
Varsó, 2023-06-19
Page 28
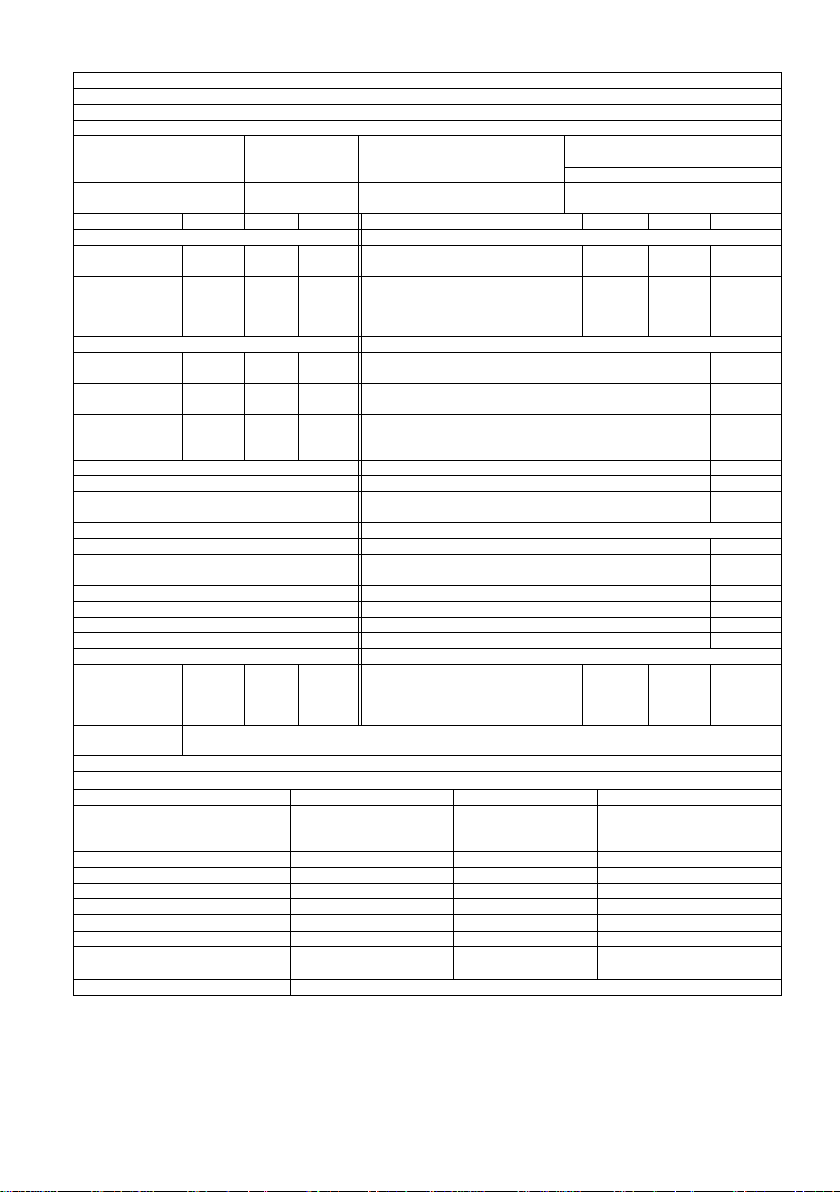
28
Modell azonosító: 90-086
Közvetett fűtési funkció: [nem].
Névleges hőteljesítmény: 20(kW)
Közvetett hőteljesítmény: nem alkalmazható (kW)
Üzemanyag
A helyiségek fűtéséből származó kibocsátás
(*)
NOx
Üzemanyagtípus kiválasztása
[folyékony
üzemanyag].
Tisztított paraffin
79[mg/
kWhinput
] (GCV)
Paraméter
Szimbólum
Érték
Egység Tétel
Szimbólum
Érték
Egység
Termikus energia
Hasznos kapacitás (NCV)
Névleges
hőteljesítmény
Pnom 20 kW
Hasznosítási hatásfok névleges
hőteljesítmény mellett
ηth,nom
100 %
Minimális
hőteljesítmény
(tájékoztató
jellegű)
Pmin N/A kW
Hasznossági hatásfok minimális
hőteljesítmény mellett (tájékoztató
jellegű)
ηth,min
N/A %
További villamosenergia-fogyasztás
Hőfokszabályozás / helyiséghőmérséklet-szabályozás típusa (válasszon egyet)
Névleges
hőteljesítménynél
elmax 0,002 kW
Egyfokozatú fűtési teljesítmény, nincs szobahőmérsékletszabályozás
[nem].
Minimális
hőteljesítménnyel
elmin N/A kW
Két vagy több kézi fokozat, szobahőmérséklet-szabályozás
nélkül [nem].
Készenléti
üzemmódban
elSB
N/A kW
mechanikus szobahőmérséklet-szabályozással termosztáttal
[nem].
elektronikus szobahőmérséklet-szabályozással
[igen].
elektronikus szobahőmérséklet-szabályozással és nyári időzítővel
[nem].
elektronikus szobahőmérséklet-szabályozással és heti időzítővel
[nem].
Egyéb vezér lési lehetőségek (több lehetőség közül lehet választani)
szobahőmérséklet-szabályozás jelenlétérzékeléssel
[nem].
Szobahőmérséklet-szabályozás nyitott ablak érzékeléssel
[nem].
távirányítóval
[nem].
adaptív indításvezérléssel
[nem].
csökkentett munkaidővel
[nem].
fekete izzós érzékelővel
[nem].
Állandó gyújtóláng teljesítményigény
Gyújtóláng
teljesítményigén
ye (ha
megfelelő)
Ppilot
0
kW
Elérhetőségek
Grupa Topex Sp. z o.o. Sp.k.
Ul. Pograniczna 2/4, 02-285 Varsó
(*) NOx = nitrogén-oxidok
A helyiségek fűtésének szezonális energiahatékonysága ηS
Pozíció
Szimbólum
Érték
Egység
A helyiségek fűtésének szezonális
energiahatékonysága aktív
üzemmódban
ηS,on 100
%
Korrekciós együttható (F1)
/ 0 %
Korrekciós együttható (F2)
/ 7 %
Korrekciós együttható (F3)
/ 0 %
Korrekciós együttható (F4)
/ 0 %
Korrekciós együttható (F5)
/ 0 %
Biomassza címke tényező
BLF 1 /
A helyiségek fűtésének szezonális
energiahatékonysága ηS
ηS 97
%
Energiahatékonysági osztályok
A
Page 29
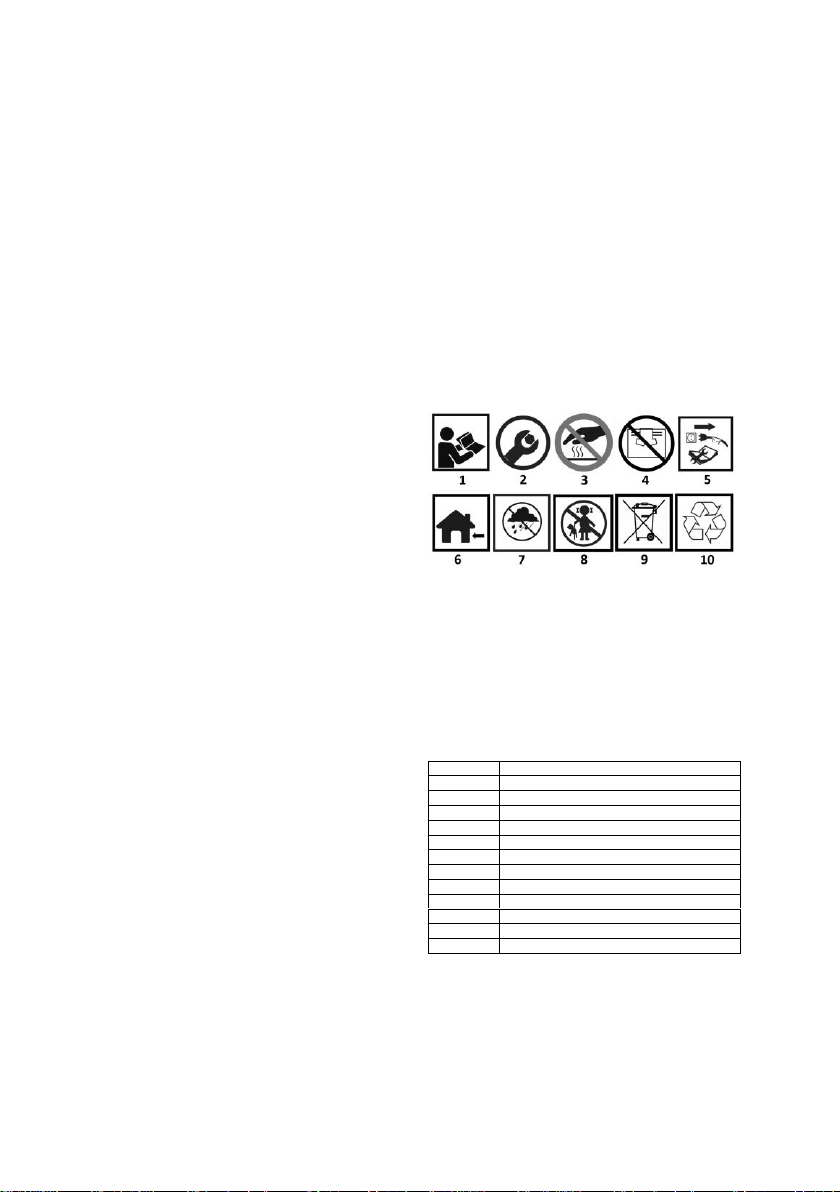
29
RO
MANUAL DE TRADUCERE (UTILIZATOR)
Încălzitor de ulei
90-086
NOTĂ: ÎNAINTE DE A UTILIZA ECHIPAMENTUL, VĂ RUGĂM
SĂ CITIȚI CU ATENȚIE ACEST MANUAL ȘI SĂ-L PĂSTRAȚI
PENTRU REFERINȚE ULTERIOARE. PERSOANELE CARE NU
AU CITIT INSTRUCȚIUNILE NU TREBUIE SĂ EFECTUEZE
ASAMBLAREA, REGLAREA SAU OPERAREA
ECHIPAMENTULUI.
ACEST PRODUS ESTE ADECVAT DOAR PENTRU UTILIZARE
OCAZIONALĂ SAU PENTRU UTILIZARE ÎN ZONE BINE
IZOLATE
DISPOZIȚII SPECIFICE DE SIGURANȚĂ
NOTĂ!
Citiți cu atenție instrucțiunile de utilizare, respectați
avertismentele și condițiile de siguranță cuprinse în acestea.
Aparatul a fost proiectat pentru o funcționare sigură. Cu toate
acestea: instalarea, întreținerea și funcționarea aparatului pot fi
periculoase. Respectarea următoarelor proceduri va reduce
riscul de incendiu, electrocutare, rănire și va reduce timpul de
instalare a aparatului
NOTĂ: Încălzitorul nu este destinat utilizării în scopuri casnice
sau recreative.
● Utilizați numai în zone bine ventilate și departe de materiale
combustibile.
● NU utilizați pentru încălzirea spațiilor în clădiri rezidențiale.
Pentru utilizarea în clădiri publice, consultați reglementările
naționale.
● Acest aparat poate fi utilizat de copii cu vârsta de 8 ani și mai
mult și de persoane cu abilități fizice, senzoriale sau mentale
limitate sau fără experiență și cunoștințe, cu condiția ca acestea
să fie supravegheate sau să fi fost instruite cu privire la
subiectele legate de utilizarea aparatului în condiții de siguranță
și să înțeleagă riscurile implicate. Copiii nu trebuie să se joace
cu aparatul.
Copiii nu trebuie să curețe sau să întrețină aparatul fără
supraveghere.
AVERTISMENT: Pentru a evita supraîncălzirea, nu acoperiți
încălzitorul.
● Copiii cu vârsta sub 3 ani nu ar trebui să fie lăsați în apropierea
aparatului decât sub supraveghere permanentă.
● Copiii cu vârste cuprinse între 3 și 8 ani pot porni/opri aparatul
numai dacă acesta a fost plasat sau instalat în poziția normală
de funcționare și dacă au fost supravegheați sau instruiți cu
privire la utilizarea în siguranță a aparatului și înțeleg riscurile
implicate. Copiii cu vârste cuprinse între 3 și 8 ani nu au voie să
conecteze, să regleze sau să curețe aparatul sau să efectueze
operațiuni de întreținere.
ATENȚIE ! - unele părți ale acestui aparat pot deveni foarte
fierbinți și pot provoca arsuri. Trebuie acordată o atenție specială
copiilor și persoanelor vulnerabile.
● Toate lucrările de întreținere trebuie efectuate de un furnizor
de servicii calificat.
● Încălzitorul folosește aer (oxigen) în zona în care este utilizat.
Trebuie asigurată ventilația necesară pentru a asigura o ardere
adecvată.
● Nu depozitați și nu utilizați benzină sau alți vapori sau lichide
inflamabile în apropierea acestui aparat sau a oricărui alt
aparat!
● Pericol de incendiu, arsuri, sufocare și explozie. Păstrați
materialele combustibile solide, cum ar fi materialele de
construcție, hârtia sau cartonul, la o distanță de siguranță față de
încălzitor, conform recomandărilor din instrucțiuni. Nu utilizați
niciodată încălzitorul în spații care pot conține substanțe volatile
sau în suspensie în aer, sau produse precum benzină, solvenți,
diluant pentru vopsele, particule de praf sau substanțe chimice
necunoscute.
● Încălzitoarele cu injecție directă pot provoca otrăvirea cu
monoxid de carbon (CO) dacă sunt utilizate incorect, ceea ce
poate duce la deces.
● Nerespectarea măsurilor de precauție și a instrucțiunilor
prezentate în instrucțiunile acestui încălzitor poate duce la
deces, vătămări grave și pierderi de bunuri sau daune din cauza
pericolelor de incendiu, explozie, arsuri, sufocare, vătămări
grave, monoxid de carbon și otrăvire. Numai persoanele care pot
înțelege și respecta instrucțiunile trebuie să utilizeze sau să
întrețină acest încălzitor. Dacă aveți nevoie de asistență sau de
informații despre încălzitor, cum ar fi instrucțiuni de funcționare,
etichete etc. contactați producătorul.
● Instalația electrică la care este conectat aparatul trebuie să fie
conformă cu legislația în vigoare. Instalația necesită un
întrerupător de curent rezidual (RCCB) în tabloul principal de
distribuție electrică.
● Scoateți unitatea din priză înainte de a efectua orice operațiune
de întreținere.
● Verificați întotdeauna cablul de alimentare înainte de a utiliza
dispozitivul. Acesta nu trebuie să fie îndoit, întins, întins sau
deteriorat în vreun fel.
● Cablul de alimentare trebuie înlocuit numai de către personal
calificat. Utilizați numai cablul de alimentare original cu clasa de
protecție corespunzătoare.
● Ieșirea frontală este foarte fierbinte în timpul funcționării. Nu
atingeți! Pericol de arsuri.
PICTOGRAME ȘI AVERTISMENTE
1. Citiți instrucțiunile de utilizare, respectați
avertismentele și condițiile de siguranță cuprinse în acestea!
2. Necesită asamblare
3. Element cald
4. Nu acoperiți orificiile de intrare și de ieșire
5. Deconectați înainte de reparații sau întreținere
6. Pentru utilizare în interior
7. Protejați de ploaie
8. A nu se păstra la îndemâna copiilor
9. A nu se elimina împreună cu deșeurile menajere
10. Reciclabil
DESCRIEREA ELEMENTELOR GRAFICE
Fig. 1
Descriere
A
Coș de evacuare
B
Ieșire de aer cald
C
Rezervor de combustibil
D
Roți de transport
E
Capacul de umplere a rezervorului
F
Afișare
G
Afișarea temperaturii ambiante
H
Mâner de transport
I
Camera de ardere
J
Butonul de control al temperaturii
K
Întrerupător principal
L
Suport pentru încălzitor
INSTRUCȚIUNI DE ASAMBLARE
Scoateți încălzitorul din cutie. Dacă aparatul este deteriorat în
vreun fel, nu-l utilizați și contactați dealerul dumneavoastră.
Pentru a asambla radiatorul, procedați după cum urmează:
1.Introduceți axul roții fig. 2J în orificiul corespunzător al
structurii de susținere fig. 2E, introduceți știftul fig. 2K în
orificiile corespunzătoare; introduceți șaiba fig. 2H pe ambele
părți ale arborelui, glisați roata fig. 2I pe axul roții fig. 2J,
înșurubați piulița fig. 2G.
Page 30

30
2. așezați corpul încălzitorului pe structura de susținere fig. 2E,
asigurați-vă că găurile de montare coincid cu cele ale aparatului.
3. Cu ajutorul șurubului fig. 2B, al șaibei elastice fig. 2C, al șaibei
simple fig. 2D și al piulițelor, fixați structura de susținere fig. 2E
pe suportul rezervorului.
Instrucțiuni de instalare
Așezați încălzitorul pe o suprafață plană, nivelată, incombustibilă
și tare.
Încălzitoarele cu injecție directă sunt concepute pentru a fi
utilizate în spații deschise în aer liber sau în spații interioare bine
ventilate. Pentru utilizarea în interior, trebuie prevăzute
deschideri de ventilație permanente de cel puțin 25 cm² / kW,
spațiate uniform între podea și tavan, de cel puțin 250 cm².
ATENȚIE! Dimensiunea minimă a deschiderii de ventilație
320cm²
• Instalați încălzitorul numai în poziția orizontală normală.
• Nu așezați aparatul de încălzire în apropierea pereților,
colțurilor sau tavanelor joase.
• Nu așezați încălzitorul sub priză.
• Nu așezați aparatul de încălzire pe vehicule în mișcare sau în
locuri în care se poate răsturna.
• Păstrați aparatul de încălzire departe de materiale inflamabile,
explozive sau corozive.
• Poziționați încălzitorul departe de perdele sau materiale
similare care ar putea bloca intrarea și ieșirea aerului.
• Nu blocați sau restricționați niciodată intrarea și ieșirea de aer
pentru niciun motiv.
• Țineți cablul de alimentare la distanță de surse de căldură,
margini ascuțite, piese tăioase și în mișcare.
• Nu expuneți direct la intemperii sau la umiditate excesivă.
• Nu amplasați încălzitorul în imediata apropiere a unei băi,
dușuri sau piscine.
• Trebuie respectate reglementările generale și speciale privind
incendiile aplicabile în toate domeniile de aplicare. În orice
caz, trebuie asigurate următoarele distanțe minime de
siguranță față de materialele sau obiectele din apropierea
încălzitorului:
• Partea de încălzire: 0,6 m
• Partea de intrare a aerului: 1 m
• Partea superioară: 1,5 m
• Latura de ieșire a aerului cald: 3 m
• Podelele și plafoanele din zona de lucru a încălzitorului trebuie
să fie realizate din materiale rezistente la foc.
• Nu conectați radiatoarele direct la conductele de aer.
INSTALAREA COȘULUI DE FUM AL ÎNCĂLZITORULUI
Încălzitorul este prevăzut cu un coș de fum pentru evacuarea
gazelor de ardere. Fig. 3 arată cum se instalează corect coșul
de fum pentru evacuarea gazelor de ardere de la încălzitor
(partea stângă a desenului). În partea dreaptă a figurii, modurile
în care nu trebuie instalat coșul de fum.
NOTĂ!
Este imperativ să se respecte regulile indicate pentru
construcția coșurilor, lungimile țevilor, unghiurile de
racordare a secțiunilor individuale de țevi.
• Țevile nu trebuie să fie conectate la un unghi drept de 90° sau
mai mic de 90° - deoarece acest lucru face dificilă sau chiar
imposibilă evacuarea gazelor de ardere.
• Trebuie respectate cu strictețe lungimile minime ale țevilor
INSTRUCȚIUNI DE UTILIZARE
Lansare
• Umpleți rezervorul cu combustibil curat. Folosiți numai
motorină sau parafină.
• Un indicator de nivel al combustibilului în partea superioară a
rezervorului permite verificarea nivelului de combustibil.
• Conectați fișa cablului de alimentare la o sursă de alimentare
de 230 V 50 Hz cu împământare.
NOTĂ: Legarea la pământ este obligatorie.
• După ce "pornirea" de mai sus a fost finalizată, în fereastra
din stânga a ecranului va apărea un "-", iar în fereastra din
dreapta va fi afișată valoarea temperaturii ambiante.
• Glisați comutatorul în poziția "I".
• Setarea implicită a temperaturii este de 20 de grade Celsius,
care va fi afișată în fereastra din stânga.
• Dacă temperatura ambiantă este sub temperatura implicită,
electrozii încep să scânteieze, iar după 7 secunde încălzitorul
este pornit.
• Dacă temperatura ambiantă este mai mare decât temperatura
implicită, setați butonul termostatului la temperatura dorită,
electrozii vor începe să scânteieze, după 7 secunde
încălzitorul se pornește.
START LA RECE:
Pentru a porni aparatul de încălzire la o temperatură scăzută,
mențineți ventilul de aer Fig. 4B închis cu un deget în timpul
aprinderii pentru a facilita pornirea.
FUNCȚIONARE ANORMALĂ:
În cazul unei funcționări defectuoase (lipsa flăcării, flux de aer
redus, ardere slabă etc.), încălzitorul se oprește, iar pe afișaj
apare codul BLOCK MODE.
RESETARE MANUALĂ
Dacă încălzitorul se află în modul de blocare, verificați și
înlăturați cauza blocării înainte de a reporni încălzitorul. Pentru a
reseta unitatea, setați comutatorul Figura 1J pe ON. / OFF. în
poziția "0" și apoi din nou în poziția "I". În cazul unei defecțiuni
repetate, apelați la serviciul tehnic. Rotirea butonului
termostatului NU va reseta încălzitorul.
DISCLAIMER
• Așezați comutatorul în poziția "OFF". 0. Faza de post-
ventilație va răci camera de ardere timp de 90 de secunde.
Scoateți aparatul din priză dacă nu este utilizat pentru o
perioadă lungă de timp.
• Nu deconectați niciodată încălzitorul de la sursa de alimentare
pentru a-l opri în timpul funcționării. Permiteți întotdeauna
finalizarea secvenței de răcire, în caz contrar căldura
reziduală poate deteriora componentele interne.
• Nu acoperiți încălzitorul. Nu blocați intrarea și ieșirea aerului.
• Ieșirea încălzitorului este foarte fierbinte în timpul funcționării
și după utilizare. Nu atingeți! Folosiți echipament de protecție
personală dacă este necesar.
• Asigurați-vă că copiii nu se joacă cu aparatul și că aceștia sunt
supravegheați atunci când se află în apropiere.
• Aparatul nu este destinat utilizării de către persoane (inclusiv
copii) cu abilități fizice, senzoriale sau mentale limitate sau
fără experiență și cunoștințe.
• Deconectați încălzitorul înainte de a-l muta. Nu trageți
niciodată de cablu pentru a deconecta sau a muta unitatea.
• Nu lăsați aparatul de încălzire nesupravegheat în timpul
utilizării.
• Nu folosiți niciodată aparatul cu mâinile ude sau atunci când
încălzitorul sau cablul de alimentare este ud.
• În cazul în care cablul de alimentare este deteriorat, acesta
trebuie înlocuit de către producător, de către un tehnician de
service sau de către o persoană cu calificare similară.
Curățare, întreținere și depozitare
• Ștergeți periodic carcasa cu un burete sau o cârpă moale.
Pentru piesele foarte murdare, utilizați un burete umezit cu
apă călduță și un detergent ușor, apoi uscați cu o cârpă
curată.
• Protejați admisia de aer și ventilatorul de praf și murdărie.
Pentru a curăța componentele interne, suflați ușor aer
comprimat prin admisie.
• Verificați periodic cablul de alimentare: dacă este uzat, crăpat
sau deteriorat, solicitați înlocuirea lui de către un serviciu
tehnic.
• Asigurați-vă că aparatul de încălzire este perfect rece și uscat
înainte de a-l depozita. Acoperiți aparatul cu o pungă de
plastic, puneți-l în ambalajul său și depozitați-l într-un loc
uscat și aerisit.
• Opriți aparatul, scoateți-l din priză și lăsați încălzitorul să se
răcească timp de cel puțin 15 minute înainte de a efectua orice
operațiune de întreținere.
• Nu încercați să efectuați singuri reparații electrice. Dacă
Page 31

31
aparatul de încălzire necesită service sau reparații, contactați
un tehnician calificat.
• Nu utilizați un aparat defect decât dacă un tehnician calificat
l-a verificat și reparat.
• Când curățați, asigurați-vă că nu intră apă în aparat.
• Nu deschideți carcasa pentru a curăța componentele interne.
Nu pulverizați apă în interiorul încălzitorului.
• Nu utilizați niciodată solvenți, benzină, toluen sau substanțe
chimice agresive similare pentru a curăța încălzitorul.
• Pentru curățarea încălzitorului nu trebuie să se utilizeze
solvenți, benzină, toluen sau substanțe chimice agresive
similare.
• Se recomandă inspecții efectuate NUMAI de către
PERSONAL CALIFICAT înainte de fiecare utilizare sezonieră:
• Deșurubați cu grijă duza din conectorul de duză. Suflați prin
orificiul duzei cu aer comprimat pentru a o elibera de murdărie.
Înlocuiți duza dacă este necesar.
CURĂȚARE, ÎNTREȚINERE ȘI DEPOZITARE
• Carcasa trebuie ștearsă în mod regulat cu un burete sau o
cârpă moale. Pentru piesele foarte murdare, utilizați un burete
umezit cu apă călduță și un detergent ușor, apoi uscați-l cu o
cârpă curată.
• Priza de aer și ventilatorul trebuie să fie libere de praf și
murdărie. Pentru a curăța părțile interne, suflați ușor cu aer
comprimat în afara intrării de aer.
• Verificați periodic cablul de alimentare: dacă este uzat, crăpat
sau deteriorat, solicitați înlocuirea lui de către un serviciu
tehnic.
• Înainte de a depozita aparatul de încălzire, asigurați-vă că
acesta este perfect rece și uscat. Aparatul trebuie acoperit cu
o pungă de plastic, plasat în ambalajul său și depozitat într-un
loc uscat și ventilat.
DYSZA
Deșurubați cu grijă duza din conectorul duzei. Suflați duza cu aer
comprimat pentru a îndepărta resturile din duză. Înlocuiți duza
dacă este necesar.
FILTRE DE AER
Curățați filtrele de aer. Îndepărtați capacul de capăt al filtrului fig.
A11, spălați filtrul de admisie a aerului fig. A10 cu un detergent
ușor și uscați-l bine înainte de a-l monta din nou. Înlocuiți filtrul
de admisie a aerului fig. A9 o dată pe an.
ELECTROZI DE APRINDERE
Electrodul de aprindere trebuie curățat, reglat și, dacă este
necesar, înlocuit în mod regulat. Pentru spațierea corectă a
electrozilor, consultați Fig. B1 și Fig. B2 (dimensiunile indicate
în mm).
CONTROLUL PRESIUNII COMPRESORULUI
ATENȚIE: Presiunea compresorului este setată din fabrică și
poate fi verificată și reglată numai de către tehnicieni calificați.
Manipularea unității poate fi periculoasă.
Îndepărtați capacul manometrului de presiune, fig. 4A. Conectați
manometrul la orificiul de măsurare a presiunii de pe capacul din
spate. Porniți încălzitorul și citiți valoarea presiunii aerului. Dacă
este necesar, reglați presiunea la valoarea corectă prin rotirea
șurubului de reglare în sensul acelor de ceasornic pentru a
crește, în sens invers acelor de ceasornic pentru a reduce
presiunea.
INSTALARE LA ÎNĂLȚIMI MARI:
Din cauza cantității mai mici de oxigen pentru instalațiile la
altitudini mari la nivelul mării, poate fi necesară reducerea
presiunii compresorului Fig. 4A. Reglarea acestei setări poate fi
necesară pentru a menține o combustie bună din cauza lipsei de
oxigen.
REZOLVAREA PROBLEMELOR
PROBLEMĂ
CAUZĂ
SOLUȚIE
Motorul nu
pornește
Nu există sursă de
alimentare sau
Verificați cablul de
alimentare și
tensiunea
Eroare E1
afișată pe
ecran
tensiunea este prea
mică
Verificați siguranța
și înlocuiți-o dacă
este necesar
Cablu de alimentare
defect sau deteriorat
Verificați și
înlocuiți dacă este
necesar
Motor defect /
condensator defect
Verificați și
înlocuiți dacă este
necesar
Unitatea este blocată
din cauza supraîncălzirii
anterioare
Detectați cauza
supraîncălzirii
Opriți dispozitivul
Verificați intrarea
și ieșirea aerului
Așteptați câteva
minute și reporniți
dispozitivul
Eroare E2
afișată pe
ecran
Senzorul de
temperatură este defect
sau conectorul
senzorului de
temperatură este slăbit
Verificați și
înlocuiți, dacă este
necesar, sonda de
temperatură
Verificați placa de
circuite și înlocuițio dacă este
necesar
Motorul
funcționează
, dar
încălzirea nu
se aprinde și
după un timp
scurt se
oprește
Eroare E1
afișată pe
ecran
Rezervor de
combustibil gol,
combustibil murdar sau
incorect
Îndepărtați
combustibilul
stricat sau murdar
Umpleți rezervorul
cu motorină sau
parafină curată
Filtru de combustibil
înfundat
Curățați sau
înlocuiți filtrul de
combustibil
Scurgeri de aer în
conducta de ulei
Verificați
furtunurile,
strângeți
conexiunile,
înlocuiți furtunurile
dacă este
necesar.
Duza arzătorului
înfundată
Curățați duza prin
suflare cu aer
comprimat,
înlocuiți-o dacă
este necesar.
Vâscozitatea
combustibilului a
crescut la temperaturi
scăzute
Se amestecă
motorina cu 10-
20% parafină
Flăcări care
ies din gura
de evacuare
Eroare E1
afișată pe
ecran
Alimentarea insuficientă
cu aer a camerei de
ardere
Verificați admisia
de aer,
ventilatorul,
motorul
Presiunea
compresorului este
prea mare
Verificați
presiunea aerului,
ajustați-o dacă
este necesar *.
Încălzitorul
se oprește în
timpul
funcționării
Temperatura
ambiantă
afișată pe
ecran
A fost atinsă
temperatura camerei
setată pe termostatul
de cameră
Funcționare
normală
Pentru a începe,
rotiți butonul de
control al
temperaturii în
sensul acelor de
ceasornic la o
valoare mai mare
Încălzitorul
se oprește în
Eșecul flăcării
Verificați și
eliminați cauza
Combustie slabă
Page 32
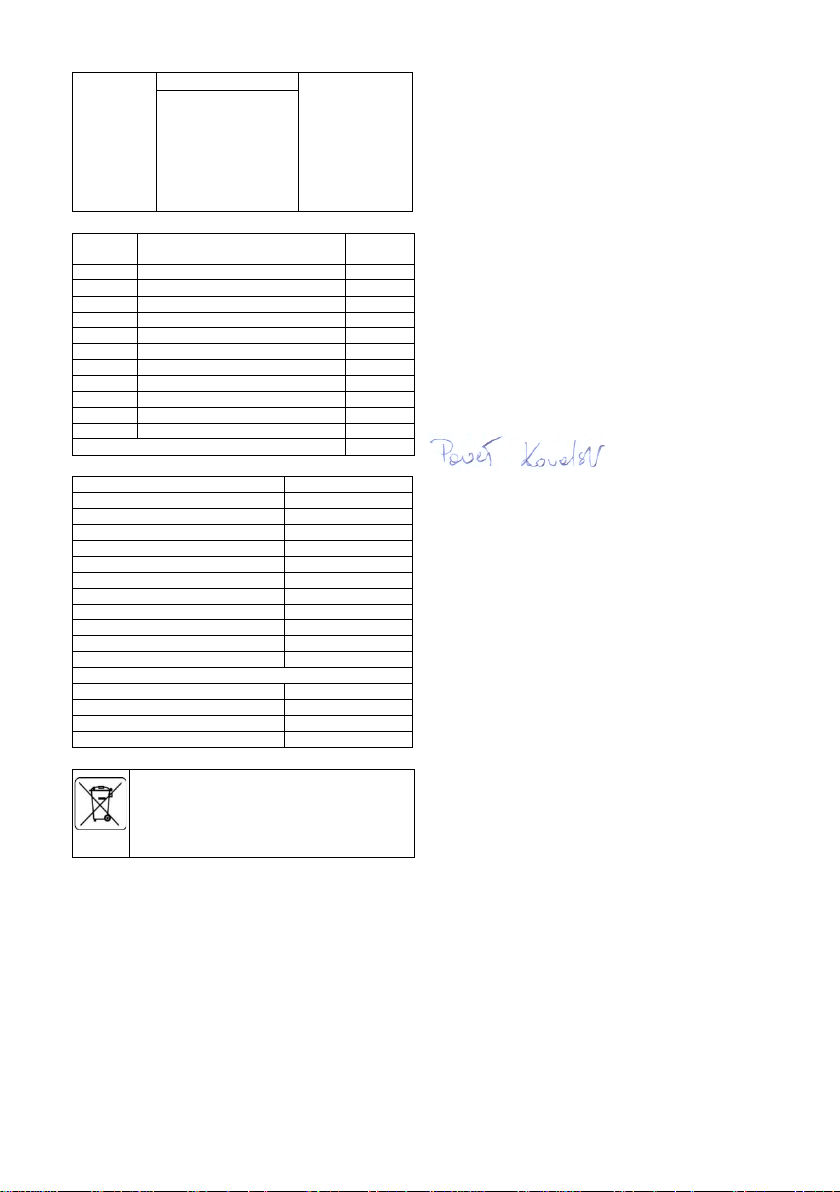
32
timpul
funcționării
Eroare E1
afișată pe
ecran
Flux de aer redus
(cauzele)
funcționării
defectuoase
Pentru a reseta,
setați comutatorul
Pornit/Oprit la 0 și
apoi la I.
Apelați la serviciul
tehnic dacă
problema persistă
Supraîncălzire
CONȚINUTUL KITULUI
Pos.
Descriere
Cantitat
e A Mâner
1
B
Șuruburi
6 sau 8
C
Șaibă de primăvară
6 sau 8
D
Pad
6 sau 8
E
Designul mânerului
1 F Piuliță M5
6 sau 8
G
Piuliță M12
2 H Șaibă ø12 2 I
Roți 2 J
Role de roți
1 K Pin 2 Încălzitor combinat cu rezervor de combustibil
1 buc.
Date nominale
Model
90-086
Putere termică [kW] *
20
Debitul de aer [m³/h]
600
Tipul de combustibil
Diesel / Diesel
Consumul de combustibil [kg/h]
1.65
Tensiunea de alimentare [V/Hz]
230V AC 50Hz
Zona de încălzire
150~200 m²
Grad de protecție IP
IPX4
Clasa de protecție
I
Intensitatea curentului [A]
1.1
Putere electrică [W]
230
Valoarea siguranței
T3.15A
Dimensiuni
Greutate netă (kg)
21,3
Capacitatea rezervorului (l)
38
Timp de funcționare (h)
~23
Anul de producție
2023
PROTECȚIA MEDIULUI
Produsele cu alimentare electrică nu trebuie aruncate împreună
cu deșeurile menajere, ci trebuie duse la instalații adecvate
pentru a fi eliminate. Contactați distribuitorul produsului s au
autoritatea locală pentru informații privind eliminarea. Deșeurile
de echipamente electrice și electronice conțin substanțe care nu
sunt ecologice. Echipamentele care nu sunt reciclate prezintă
un risc potențial pentru mediu și sănătatea umană.
"Grupa Topex Spółka z ograniczoną odpowiedzialnością" Spółka komandytowa
cu sediul social în Varșovia, ul. Pograniczna 2/4 (denumită în continuare: "Grupa
Topex") informează că toate drepturile de autor asupra conținutului acestui
manual (denumit în continuare: "Manualul"), inclusiv, printre altele. textul său,
fotografiile, diagramele, desenele, precum și compoziția sa, aparțin exclusiv
Grupa Topex și fac obiectul protecției juridice în temeiul Legii din 4 februarie 1994
privind drepturile de autor și drepturile conexe (Jurnalul Oficial 2006 nr. 90 Poz.
631, cu modificările ulterioare). Copierea, prelucrarea, publicarea, modificarea în
scopuri comerciale a întregului Manual și a elementelor sale individuale, fără
acordul Grupa Topex exprimat în scris, este strict interzisă ș i poate atrage
răspunderea civilă și penală.
Declarația de conformitate UE
Producător: Grupa Topex Sp. z o.o. Sp.k., Pograniczna 2/4 02-
285 Warszawa
Produs: Încălzitor de ulei
Model: 90-086
Denumire comercială: NEO TOOLS
Număr de serie: 00001 ÷ 99999
Prezenta declarație de conformitate este emisă pe răspunderea
exclusivă a producătorului.
Produsul descris mai sus este în conformitate cu următoarele documente:
Directiva privind joasă tensiune 2014/35/UE
Directiva 2014/30/UE privind compatibilitatea
electromagnetică
Directiva RoHS 2011/65/UE, astfel cum a fost modificată prin
Directiva 2015/863/UE.
Regulamentul (UE) nr. 626/2011 de completare a Directivei
2010/30/UE
Regulamentul (UE) 2015/1188 de punere în aplicare a
Directivei 2009/125/CE
Și îndeplinește cerințele standardelor:
EN 60335-1:2012+A11+A13+A1+A14+A2; EN 60335-2102:2016; EN 62233:2008;
EN IEC 55014-1:2021; EN IEC 55014-2:2021;
EN IEC 61000-3-2:2019+A1; EN 61000-3-3:2013+A1+A2;
EN IEC 63000:2018
Numele și adresa persoanei rezidente în UE autorizate să
întocmească dosarul tehnic:
Semnat în numele:
Grupa Topex Sp. z o.o. Sp.k.
Strada Pograniczna nr. 2/4
02-285 Varșovia
Paweł Kowalski
TOPEX GROUP Responsabil cu calitatea
Varșovia, 2023-06-19
Page 33
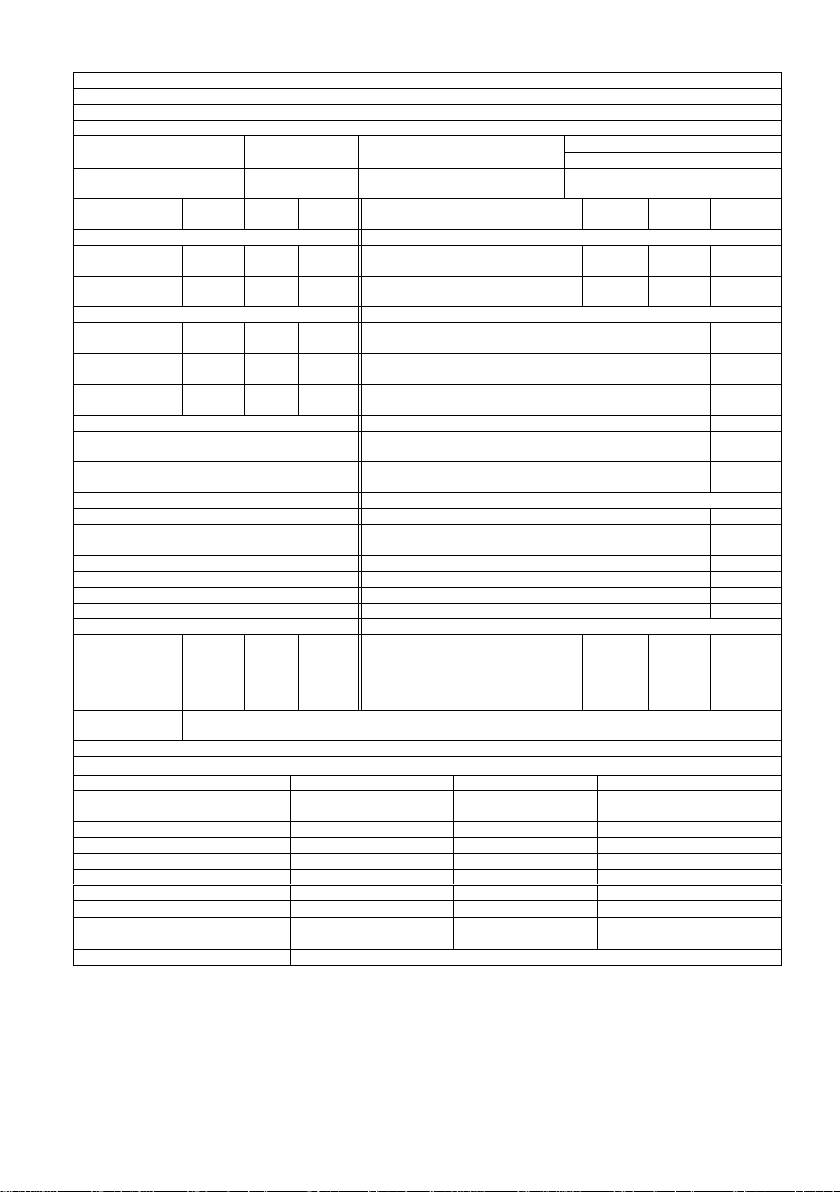
33
Model ID: 90-086
Funcția de încălzi re indirectă: [nu].
Putere termică nominală: 20(kW)
Putere termică indi rectă: nu este cazul (kW)
Combustibil
Emisii provenite din încălzirea spațiilor (*)
NOx
Selectați tipul de combustibil
[combustibil
lichid].
Parafină purificată
79[
mg/kWhinput
] (GCV)
Parametru
Simbol
Valoare
Unitatea Artic
olul
Simbol
Valoare
Unitatea
Energie termică
Capacitate utilă (NCV)
Putere termică
nominală
Pnom 20 kW
Eficiența utilității la puterea termică
nominală
ηth,nom
100 %
Puterea termică
minimă (indicativă)
Pmin N/A kW
Eficiența utilității la puterea termică
minimă (indicativ)
ηth,min
N/A %
Consum suplimentar de energie electrică
Tipul de ieșire a căldurii / controlul temperaturii camerei (selectați unul)
La puterea termică
nominală
elmax 0,002 kW
Ieșire de căldură cu o singură treaptă, fără control al
temperaturii camerei
[nu].
Cu putere termică
minimă
elmin N/A kW
Două sau mai multe etape manuale, fără control al temperaturii
camerei
[nu]. În modul standby
elSB
N/A kW
cu control mecanic al temperaturii camerei prin termostat
[nu].
cu control electronic al temperaturii camerei
[da].
cu control electronic al temperaturii camerei și temporizator de
economisire a luminii de zi
[nu].
cu control electronic al temperaturii camerei și cronometru săptămânal
[nu].
Alte opțiuni de control (sunt posibile mai multe opțiuni)
controlul temperaturii camerei cu detectare a prezenței
[nu].
Controlul temperaturii camerei cu detectarea ferestrei deschise
[nu].
cu opțiune de telecomandă
[nu].
cu control adaptiv al lansării
[nu].
cu program de lucru redus
[nu].
cu senzor cu bec negru
[nu].
Cerință de putere constantă a flăcării pilot
Puterea
necesară pentru
flacăra pilotului
(dacă
corespunzătoare)
Ppilot
0
kW
Detalii de contact
Grupa Topex Sp. z o.o. Sp.k.
Ul. Pograniczna 2/4, 02-285 Varșovia
(*) NOx = oxizi de azot
Eficiența energetică sezonieră a încălzirii spațiilor ηS
Poziția
Simbol
Valoare
Unitatea
Eficiența energetică sezonieră a
încălzirii spațiilor în regim activ
ηS,on 100
%
Coeficientul de corecție (F1)
/ 0 %
Coeficientul de corecție (F2)
/ 7 %
Coeficientul de corecție (F3)
/ 0 %
Coeficientul de corecție (F4)
/ 0 %
Coeficientul de corecție (F5)
/ 0 %
Factorul de etichetare a biomasei
BLF 1 /
Eficiența energetică sezonieră a
încălzirii spațiilor ηS
ηS 97
%
Clase de eficiență energetică
A
Page 34
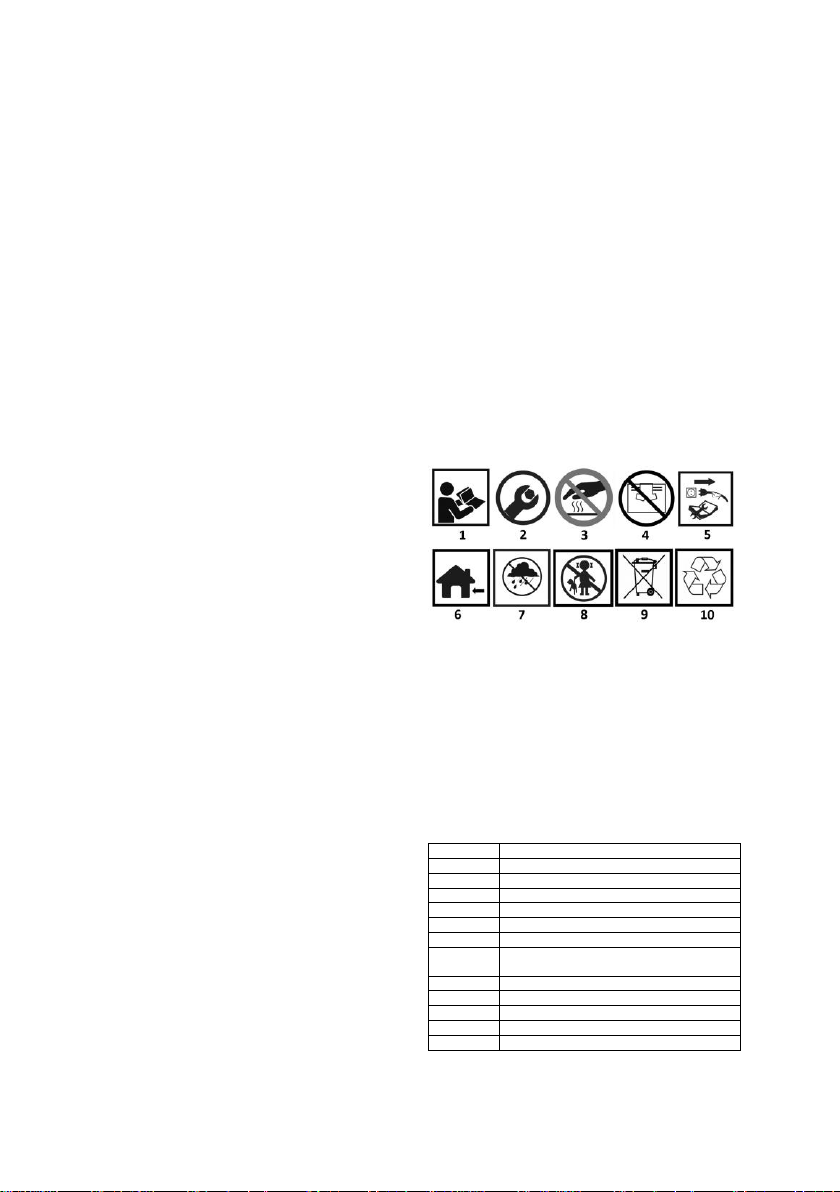
34
UA
ПОСІБНИК З ПЕРЕКЛАДУ (КОРИСТУВАЧА)
Масляний обігрівач
90-086
ПРИМІТКА: ПЕРЕД ВИКОРИСТАННЯМ ОБЛАДНАННЯ
УВАЖНО ПРОЧИТАЙТЕ ЦЮ ІНСТРУКЦІЮ ТА ЗБЕРЕЖІТЬ ЇЇ
ДЛЯ ПОДАЛЬШОГО ВИКОРИСТАННЯ. ОСОБИ, ЯКІ НЕ
ПРОЧИТАЛИ ІНСТРУКЦІЮ, НЕ ПОВИННІ ВИКОНУВАТИ
МОНТАЖ, НАЛАГОДЖЕННЯ АБО ЕКСПЛУАТАЦІЮ
ОБЛАДНАННЯ.
ЦЕЙ ВИРІБ ПІДХОДИТЬ ЛИШЕ ДЛЯ ЕПІЗОДИЧНОГО
ВИКОРИСТАННЯ АБО ДЛЯ ВИКОРИСТАННЯ В ДОБРЕ
ІЗОЛЬОВАНИХ ПРИМІЩЕННЯХ
КОНКРЕТНІ ЗАХОДИ БЕЗПЕКИ
УВАГА!
Уважно прочитайте інструкцію з експлуатації, дотримуйтесь
наведених у ній попереджень і правил техніки безпеки.
Прилад сконструйовано для безпечної експлуатації. Тим не
менш: встановлення, обслуговування та експлуатація
приладу можуть бути небезпечними. Дотримання наведених
нижче процедур зменшить ризик виникнення пожежі,
ураження електричним струмом, травм і скоротить час
встановлення приладу
ПРИМІТКА: Обігрівач не призначений для побутового або
рекреаційного використання.
Використовувати тільки в добре провітрюваних приміщеннях
і подалі від горючих матеріалів
НЕ використовувати для обігріву приміщень у житлових
будинках. Для використання в громадських будівлях див.
національні норми.
Цей прилад можуть використовувати діти віком від 8 років і
старше, а також особи з обмеженими фізичними,
сенсорними або розумовими здібностями або без досвіду і
знань за умови, що вони перебувають під наглядом або були
проінструктовані щодо безпечного використання приладу і
розуміють пов'язані з цим ризики. Діти не повинні гратися з
приладом.
Діти не повинні чистити або обслуговувати прилад без
нагляду.
ПОПЕРЕДЖЕННЯ: Щоб уникнути перегріву, не накривайте
нагрівач.
Дітей віком до 3 років не можна підпускати до приладу, якщо
вони не перебувають під постійним наглядом.
Дітям віком від 3 до 8 років дозволяється вмикати/вимикати
прилад лише за умови, що він розміщений або встановлений
у звичайному робочому положенні, знаходиться під
наглядом або проінструктований щодо безпечного
використання приладу та усвідомлює пов'язані з цим ризики.
Діти віком від 3 до 8 років не мають права підключати,
регулювати, чистити прилад або виконувати операції з
технічного обслуговування.
УВАГА! - деякі частини цього приладу можуть сильно
нагріватися і спричинити опіки. Особливу увагу слід
приділяти дітям та вразливим особам.
● Все обслуговування повинно здійснюватися
кваліфікованим постачальником послуг.
Обігрівач використовує повітря (кисень) у приміщенні, де він
використовується. Для забезпечення належного горіння
повинна бути забезпечена необхідна вентиляція.
Не зберігайте та не використовуйте бензин або інші
легкозаймисті пари чи рідини поблизу цього або будь-якого
іншого приладу!
Небезпека пожежі, опіків, задухи та вибуху. Тримайте тверді
горючі матеріали, такі як будівельні матеріали, папір або
картон, на безпечній відстані від обігрівача, як
рекомендовано в інструкції. Ніколи не використовуйте
обігрівач у приміщеннях, які можуть містити леткі речовини
або продукти, що містяться в повітрі, такі як бензин,
розчинники, розчинник для фарби, частинки пилу або
невідомі хімічні речовини.
Опалювачі з прямим впорскуванням при неправильному
використанні можуть спричинити отруєння чадним газом
(CO), що може призвести до смерті.
Недотримання запобіжних заходів та інструкцій, викладених
в інструкції до цього обігрівача, може призвести до смерті,
серйозних травм і втрати майна або пошкодження через
небезпеку пожежі, вибуху, опіків, удушення, серйозних
травм, отруєння чадним газом та отруєння. Використовувати
або обслуговувати цей обігрівач повинні тільки особи, які
можуть розуміти і дотримуватися інструкцій. Якщо вам
потрібна допомога або інформація про обігрівач, наприклад,
інструкція з експлуатації, етикетки тощо. Зверніться до
виробника.
Електроустановка, до якої підключається прилад, повинна
відповідати чинному законодавству. Установка вимагає
наявності автоматичного вимикача захисного відключення
(ПЗВ) в головному електричному розподільчому щиті.
Перед виконанням будь-якого технічного обслуговування
відключіть пристрій від мережі.
Завжди перевіряйте шнур живлення перед використанням
пристрою. Він не повинен бути зігнутим, розтягнутим,
розтягнутим або пошкодженим будь-яким чином.
Заміну шнура живлення повинен виконувати лише
кваліфікований персонал. Використовуйте тільки
оригінальний шнур живлення з відповідним класом захисту.
● Під час роботи передня панель дуже гаряча. Не
торкайтеся! Небезпека опіків.
ПІКТОГРАМИ ТА ПОПЕРЕДЖЕННЯ
1. Прочитайте інструкцію з експлуатації,
дотримуйтесь наведених у ній попереджень і правил техніки
безпеки!
2. Потребує монтажу
3. Гарячий елемент
4. Не закривайте вхідні та вихідні отвори
5. Від'єднайте перед ремонтом або технічним
обслуговуванням
6. Для використання в приміщенні
7. Захищати від дощу
8. Зберігати в недоступному для дітей місці
9. Не викидати разом з побутовими відходами
10. Придатний для вторинної переробки
ОПИС ГРАФІЧНИХ ЕЛЕМЕНТІВ
Рис 1
Опис A Витяжна труба
B
Вихід гарячого повітря
C
Паливний бак
D
Транспортні колеса
E
Кришка заливної горловини бака
F
Дисплей
G
Відображення температури
навколишнього середовища
H
Ручка для транспортування
I
Камера згоряння
J
Ручка регулювання температури
K
Головний вимикач
L
Опора обігрівача
ІНСТРУКЦІЯ З МОНТАЖУ
Page 35

35
Вийміть обігрівач з коробки. Якщо пристрій пошкоджено
будь-яким чином, не використовуйте його та зверніться до
дилера.
Щоб зібрати радіатор, виконайте наступні дії:
1.Вставте вісь колеса рис. 2J у відповідний отвір опорної
конструкції рис. 2E, вставте штифт рис. 2K у відповідні
отвори; вставте шайбу рис. 2H з обох боків вала, надіньте
колесо рис. 2I на вісь колеса рис. 2J, закрутіть гайку рис. 2G.
2. покласти корпус обігрівача на опорну конструкцію рис. 2E,
переконатися, що монтажні отвори збігаються з отворами на
приладі.
3. за допомогою болта рис. 2B, пружинної шайби рис. 2C,
плоскої шайби рис. 2D і гайок закріпіть опорну конструкцію
рис. 2E на тримачі бака.
Інструкція з монтажу
Встановіть обігрівач на рівній, твердій, негорючій поверхні.
Нагрівачі прямого нагнітання призначені для використання
на відкритих відкритих майданчиках або в добре
провітрюваних приміщеннях. Для використання в приміщенні
необхідно передбачити постійні вентиляційні отвори площею
не менше 25 см² / кВт, рівномірно розташовані між підлогою
і стелею, площею не менше 250 см².
УВАГА! Мінімальний розмір вентиляційного отвору 320
см²
• Встановлюйте обігрівач лише у звичайному
горизонтальному положенні.
• Не розміщуйте обігрівач біля стін, кутів або низьких стель.
• Не розміщуйте обігрівач під розеткою.
• Не розміщуйте обігрівач на транспортних засобах, що
рухаються, або там, де він може перекинутися.
• Тримайте обігрівач подалі від легкозаймистих,
вибухонебезпечних або корозійних матеріалів.
• Розташовуйте обігрівач подалі від штор або подібних
матеріалів, які можуть заблокувати вхід і вихід повітря.
• Ніколи не блокуйте і не обмежуйте вхід і вихід повітря з
будь-якої причини.
• Тримайте кабель живлення подалі від джерел тепла,
гострих країв, ріжучих і рухомих частин.
• Не піддавайте впливу погодних умов або надмірної
вологи.
• Не розміщуйте обігрівач у безпосередній близькості від
ванни, душу або басейну.
• Необхідно дотримуватися загальних і спеціальних
протипожежних правил, що застосовуються у всіх сферах
використання. У будь-якому випадку необхідно
забезпечити такі мінімальні безпечні відстані від
матеріалів або предметів, що знаходяться поблизу
обігрівача:
• Сторона обігрівача: 0,6 м
• Сторона входу повітря: 1 м
• Висота: 1,5 м
• Сторона виходу гарячого повітря: 3 м
• Підлога і стеля в робочій зоні обігрівача повинні бути
виконані з вогнетривких матеріалів.
• Не підключайте радіатори безпосередньо до
повітропроводів.
МОНТАЖ ДИМОХОДУ ОПАЛЮВАЛЬНОГО ПРИЛАДУ
Опалювальний прилад оснащений димоходом для
відведення димових газів. На рис. 3 показано, як правильно
встановити димохід для відведення димових газів від
опалювального приладу (ліва частина малюнка). У правій
частині малюнка показано, як не можна встановлювати
димохід.
УВАГА!
Обов'язково слід дотримуватися наведених правил
будівництва димоходів, довжини труб, к утів з'єднання
окремих ділянок труб.
• Труби не можна з'єднувати під прямим кутом 90° або
менше 90° - це ускладнює або навіть унеможливлює
відведення димових газів.
• Необхідно суворо дотримуватися мінімальної довжини
труб
ІНСТРУКЦІЯ ІЗ ЗАСТОСУВАННЯ
Запуск
• Заправляйте бак чистим пальним. Використовуйте тільки
дизель або парафін.
• Покажчик рівня пального у верхній частині бака дозволяє
перевіряти рівень пального
• Підключіть вилку кабелю живлення до заземленого
джерела живлення 230 В 50 Гц.
ПРИМІТКА: Заземлення є обов'язковим.
• Після завершення вищезазначеного "запуску" у лівому
вікні дисплея з'явиться знак "-", а у правому вікні
відобразиться значення температури навколишнього
середовища.
• Переведіть перемикач в положення "I".
• За замовчуванням встановлено температуру 20 градусів
за Цельсієм, яка буде показана у лівому вікні дисплея.
• Якщо температура навколишнього середовища нижче
температури за замовчуванням, електроди починають
іскрити, через 7 секунд нагрівач вмикається.
• Якщо температура навколишнього середовища вища за
температуру за замовчуванням, встановіть ручку
терморегулятора на потрібну температуру, електроди
почнуть іскрити, через 7 секунд нагрівач увімкнеться.
ХОЛОДНИЙ СТАРТ:
Щоб запустити обігрівач при низькій температурі, під час
запалювання тримайте вентиляційний отвір Рис. 4B
закритим пальцем, щоб полегшити запуск.
НЕНОРМАЛЬНА РОБОТА:
У разі несправності (відсутність полум'я, зменшення потоку
повітря, погане горіння тощо) обігрівач вимикається, а на
дисплеї з'являється код BLOCK MODE (БЛОКУВАННЯ).
РУЧНЕ СКИДАННЯ
Якщо обігрівач перебуває в режимі блокування, перевірте та
усуньте причину блокування перед перезапуском обігрівача.
Щоб перезапустити пристрій, встановіть перемикач на
малюнку 1J у положення ON. / OFF. У положення "0", а
потім знову в положення "I". У разі повторного збою
зверніться до технічної служби. Поворот ручки термостата
НЕ перезавантажує обігрівач.
ВІДМОВА ВІД ВІДПОВІДАЛЬНОСТІ
• Встановіть перемикач у положення "OFF". 0. фаза пост-
вентиляції охолоджує камеру згоряння протягом 90
секунд. Якщо прилад не використовується протягом
тривалого часу, відключіть його від мережі.
• Ніколи не відключайте обігрівач від джерела живлення,
щоб зупинити його під час роботи. Завжди чекайте
завершення процесу охолодження, інакше залишкове
тепло може пошкодити внутрішні компоненти.
• Не накривайте обігрівач. Не перекривайте вхід і вихід
повітря.
• Вихідний отвір нагрівача дуже гарячий під час роботи та
після використання. Не торкайтеся! За необхідності
використовуйте засоби індивідуального захисту.
• Переконайтеся, що діти не граються з приладом і що вони
перебувають під наглядом, коли знаходяться поблизу
нього.
• Прилад не призначений для використання особами
(включаючи дітей) з обмеженими фізичними, сенсорними
або розумовими здібностями або особами, які не мають
досвіду і знань.
• Перед переміщенням відключіть обігрівач від мережі.
Ніколи не тягніть за шнур, щоб відключити або
перемістити пристрій.
• Не залишайте обігрівач без нагляду під час використання.
• Ніколи не використовуйте прилад мокрими руками, а
також коли нагрівач або шнур живлення мокрі.
• Якщо кабель живлення пошкоджено, його повинен
замінити виробник, сервісний технік або особа з
аналогічною кваліфікацією.
Очищення, обслуговування та зберігання
Page 36

36
• Регулярно протирайте корпус м'якою губкою або
тканиною. Для дуже забруднених частин використовуйте
губку, змочену теплою водою з м'яким миючим засобом, а
потім витріть насухо чистою ганчіркою.
• Захищайте повітрозабірник і вентилятор від пилу та бруду.
Щоб очистити внутрішні деталі, обережно продуйте їх
стисненим повітрям через вхідний отвір.
• Регулярно перевіряйте кабель живлення: якщо він
зношений, потрісканий або пошкоджений, зверніться до
технічної служби для його заміни.
• Перед тим, як зберігати обігрівач, переконайтеся, що він
абсолютно прохолодний і сухий. Накрийте пристрій
поліетиленовим пакетом, покладіть його в упаковку і
зберігайте в сухому провітрюваному місці.
• Вимкніть пристрій, витягніть вилку з розетки і дайте
обігрівачу охолонути принаймні 15 хвилин, перш ніж
виконувати будь-яке технічне обслуговування.
• Не намагайтеся самостійно ремонтувати
електрообладнання. Якщо ваш обігрівач потребує
обслуговування або ремонту, зверніться до
кваліфікованого фахівця.
• Не використовуйте несправний прилад, якщо його не
перевірив і не відремонтував кваліфікований фахівець.
• Під час чищення переконайтеся, що вода не потрапляє
всередину пристрою.
• Не відкривайте корпус для очищення внутрішніх частин.
Не розпилюйте воду на нагрівач.
• Ніколи не використовуйте розчинники, бензин, толуол або
подібні агресивні хімічні речовини для очищення
обігрівача.
• Для очищення обігрівача не можна використовувати
розчинники, бензин, толуол або подібні агресивні хімічні
речовини.
• Перед кожним сезонним використанням рекомендується
проводити перевірки ТІЛЬКИ КВАЛІФІКОВАНИМ
ПЕРСОНАЛОМ:
• Обережно відкрутіть насадку від роз'єму насадки.
Продуйте отвір сопла стисненим повітрям, щоб очистити
його від бруду. За потреби замініть насадку.
ПРИБИРАННЯ, ОБСЛУГОВУВАННЯ ТА ЗБЕРІГАННЯ
• Корпус слід регулярно протирати м'якою губкою або
тканиною. Для дуже забруднених частин використовуйте
губку, змочену теплою водою з м'яким миючим засобом, а
потім витріть чистою ганчіркою.
• Повітрозабірник і вентилятор повинні бути чистими від
пилу та бруду. Для очищення внутрішніх частин обережно
продуйте повітрозабірник стисненим повітрям.
• Регулярно перевіряйте кабель живлення: якщо він
зношений, потрісканий або пошкоджений, зверніться до
технічної служби для його заміни.
• Перед тим, як зберігати обігрівач, переконайтеся, що він
ідеально прохолодний і сухий. Прилад слід накрити
поліетиленовим пакетом, помістити в упаковку і зберігати
в сухому, провітрюваному місці.
DYSZA
Обережно відкрутіть насадку від роз'єму. Продуйте насадку
стисненим повітрям, щоб видалити з неї сміття. За потреби
замініть насадку.
ПОВІТРЯНІ ФІЛЬТРИ
Очистіть повітряні фільтри. Зніміть торцеву кришку фільтра
мал. A11, промийте вхідний повітряний фільтр мал. A10
легким миючим засобом і ретельно висушіть перед
встановленням. Замінюйте вхідний повітряний фільтр рис.
A9 раз на рік.
ЕЛЕКТРОДИ ЗАПАЛЮВАННЯ
Запалювальний електрод необхідно регулярно чистити,
регулювати і, за необхідності, замінювати. Правильну
відстань між електродами див. на мал. B1 і мал. B2 (розміри
вказані в мм).
КОНТРОЛЬ ТИСКУ КОМПРЕСОРА
УВАГА: Тиск компресора встановлюється на заводівиробнику і може бути перевірений і відрегульований тільки
кваліфікованим технічним персоналом. Самостійні
маніпуляції з пристроєм можуть бути небезпечними.
Зніміть кришку манометра, рис. 4A. Підключіть манометр до
отвору для вимірювання тиску на задній кришці. Увімкніть
обігрівач і зчитайте значення тиску повітря. При необхідності
відрегулюйте тиск до потрібного значення, обертаючи
регулювальний гвинт за годинниковою стрілкою для
збільшення, проти годинникової стрілки - для зменшення
тиску.
ВСТАНОВЛЕННЯ НА ВЕЛИКІЙ ВИСОТІ:
Через меншу кількість кисню для установок на великих
висотах над рівнем моря може знадобитися зменшити тиск
компресора, рис. 4А. Регулювання цього параметра може
бути необхідним для підтримання хорошого горіння через
нестачу кисню.
ВИРІШЕННЯ ПРОБЛЕМ
ПРОБЛЕМА
ПРИЧИНА
РІШЕННЯ
Двигун не
запускаєтьс
я
На екрані
відображаєт
ься помилка
E1
Відсутність
електроживлення або
занадто низька
напруга
Перевірте кабель
живлення та
напругу
Перевірте
запобіжник і за
потреби замініть
його
Несправний або
пошкоджений кабель
живлення
Перевірте та
замініть за
необхідності
Несправний двигун /
конденсатор
Перевірте та
замініть за
необхідності
Пристрій заблоковано
через попереднє
перегрівання
Визначте
причину
перегріву
Вимкніть
пристрій
Перевірте вхід і
вихід повітря
Зачекайте кілька
хвилин і
перезавантажте
пристрій
На екрані
відображаєт
ься помилка
E2
Датчик температури
несправний або роз'єм
датчика температури
ослаблений
Перевірте та
замініть, за
необхідності,
температурний
датчик
Перевірте
друковану плату
та за потреби
замініть її
Двигун
працює, але
обігрівач не
запалюєтьс
я і через
деякий час
вимикаєтьс
я
На екрані
відображаєт
Порожній паливний
бак, брудне або
неправильне паливо
Видалення
неякісного або
брудного
пального
Наповніть бак
чистим
дизельним
паливом або
парафіном
Забитий паливний
фільтр
Очистіть або
замініть
паливний фільтр
Page 37
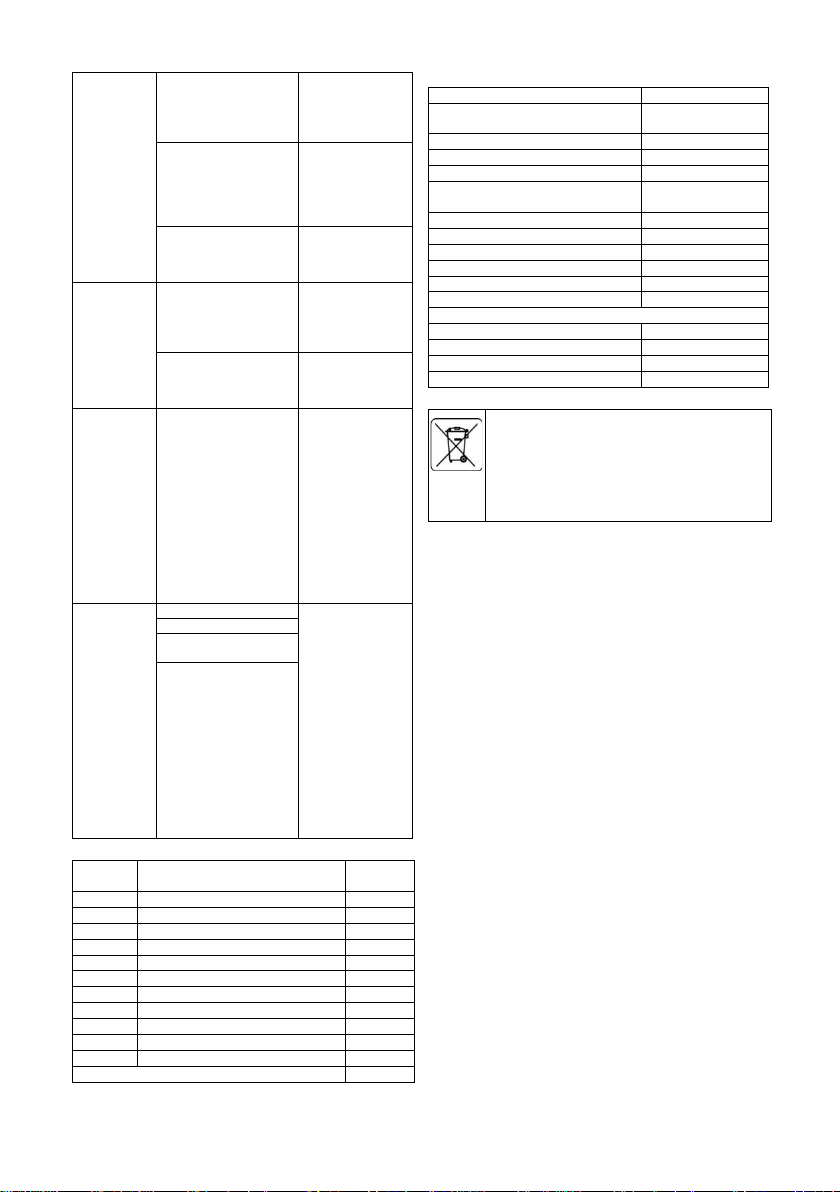
37
ься помилка
E1
Витоки повітря в
масляній магістралі
Перевірте
шланги, затягніть
з'єднання, за
потреби замініть
шланги
Забите сопло
пальника
Очистіть сопло,
продувши його
стисненим
повітрям, при
необхідності
замініть
Збільшення в'язкості
палива при низькій
температурі
Змішайте
дизельне паливо
з 10-20%
парафіну
Полум'я, що
виходить з
вихлопного
отвору
На екрані
відображаєт
ься помилка
E1
Недостатня подача
повітря в камеру
згоряння
Перевірте
повітрозабірник,
вентилятор,
двигун
Занадто високий тиск
компресора
Перевірте тиск
повітря, при
необхідності
відрегулюйте*.
Нагрівач
зупиняється
під час
роботи
Температур
а
навколишнь
ого
середовища
, що
відображаєт
ься на
екрані
Досягнуто кімнатної
температури,
встановленої на
кімнатному термостаті
Нормальна
робота
Для початку
поверніть ручку
регулювання
температури за
годинниковою
стрілкою на
більшу величину
Нагрівач
зупиняється
під час
роботи
На екрані
відображаєт
ься помилка
E1
Відсутність полум'я
Перевірте та
усуньте
причину(и)
несправності
Щоб скинути
налаштування,
встановіть
перемикач
Увімкнення/Вимк
нення в
положення 0, а
потім в
положення I.
Якщо проблема
не зникає,
зверніться до
технічної служби
Погане горіння
Зменшення потоку
повітря
Перегрів
ВМІСТ НАБОРУ
Пос.
Опис
Кількіст
ь A Ручка. 1 B
Гвинти
6 або 8
C
Пружинна шайба
6 або 8
D
Подушечка
6 або 8
E
Дизайн ручки
1 F Гайка М5
6 або 8
G
Гайка М12
2 H Шайба ø12
2 I Колеса
2
J
Колісний ролик
1
K
Шпилька
2
Комбінований обігрівач з паливним баком
1 шт.
Номінальні дані
Модель
90-086
Теплова потужність [кВт]* *
Теплова потужність [кВт] *
20
Повітряний потік [м³/год]
600
Тип палива
Дизель / Дизель
Витрата пального [кг/год]
1.65
Напруга живлення [В/Гц]
230 В змінного
струму 50 Гц
Зона обігріву
150~200 m²
Ступінь захисту IP
IPX4
Клас захисту
I
Сила струму [А]
1.1
Електрична потужність [Вт]
230
Значення запобіжника
T3.15A
Розміри
Вага нетто (кг)
21,3
Ємність бака (л)
38
Час роботи (год)
~23
Рік випуску
2023
ЗАХИСТ НАВКОЛИШНЬОГО СЕРЕДОВИЩА
Вироби з електричним живленням не можна викидати разом
із побутовими відходами, їх слід передавати у відповідні
центри для утилізації. Для отримання інформації про
утилізацію зверніться до продавця виробу або місцевої
влади. Відпрацьоване електричне та електронне
обладнання містить речовини, які не є екологічно
безпечними. Обладнання, яке не переробляється,
становить потенційний ризик для навколишнього
середовища та здоров'я людей.
"Grupa Topex Spółka z ograniczoną odpowiedzialnością" Spółka komandytowa
з місцезнаходженням у Варшаві, ul. Погранична 2/4 (далі - "Група Topex")
повідомляє, що всі авторські права на зміст цього посібника (далі "Посібник"), включаючи, серед іншого, його текст, фотографії, схеми та
діаграми, належать Групі Topex. Його текст, фотографії, схеми, малюнки, а
також його композиція належать виключно Grupa Topex і підлягають
правовому захисту відповідно до Закону від 4 лютого 1994 р. "Про авторське
право і суміжні права" (Законодавчий вісник 2006 р . № 90 Poz. 631, з
наступними змінами і доповненнями). Копіювання, обробка, публікація,
модифікація з комерційною метою всього Посібника або його окремих
елементів без письмової згоди Grupa Topex суворо заборонено і може
призвести до цивільної та кримінальної відповідальності.
Page 38
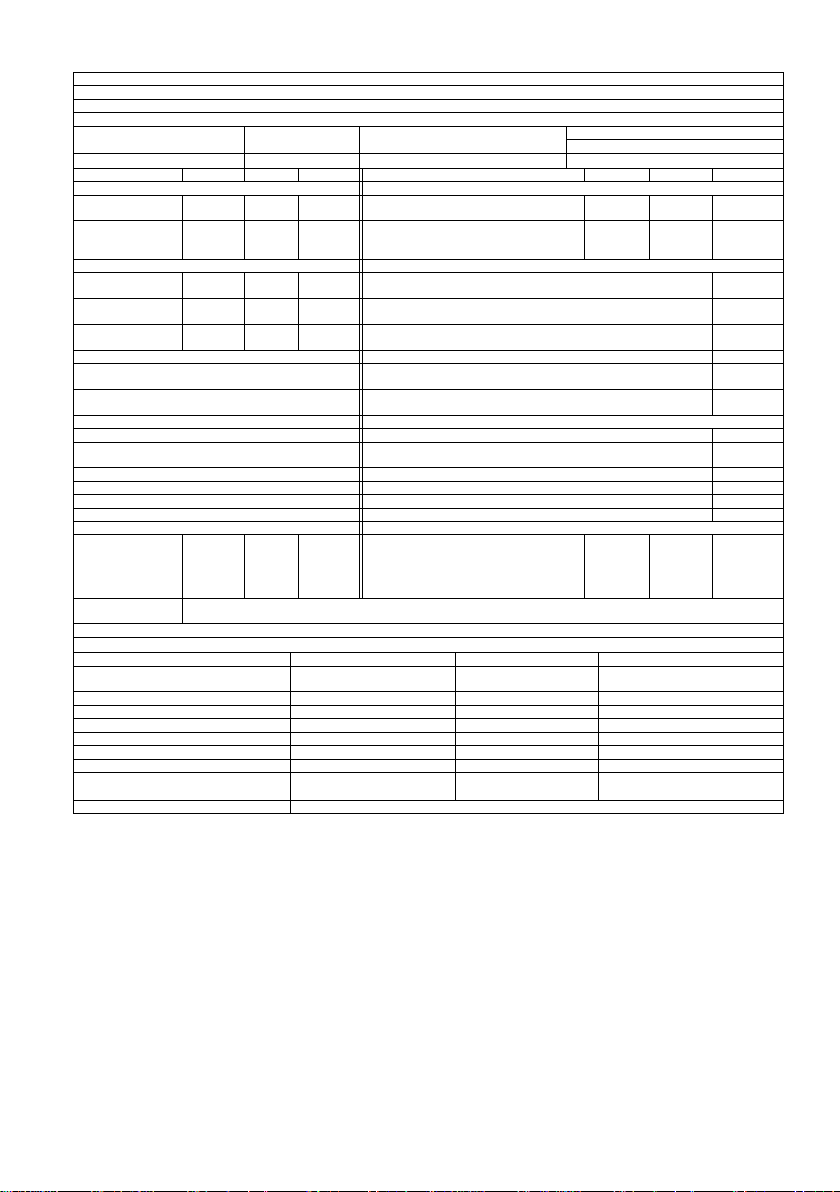
38
Ідентифікатор моделі: 90-086
Функція непр ямого нагріву: [немає].
Номінальна теплова потужність: 20 (кВт )
Непряма теплова потужність: не застосовується (кВт)
Паливо
Викиди від опалення приміщень (*)
NOx
Виберіть тип палива
[рідке паливо ].
Очищений пара фін
79[
мг/кВт-год
] (GCV) (GCV)
Параметр
Символ
Значення
Одиниця Пункт
Символ
Значення
Одиниця
Теплова енергія
Корисна ємність (NCV)
Номінальна теплова
потужність
Pnom 20 кВт
Комунальна ефективність при номінальній
тепловій потужності
ηth,nom 100 %
Мінімальна теплова
потужність
(орієнтовна)
Pmin Н/Д кВт
Комунальна ефективність при мінімальній
тепловій потужності (орієнтовна)
ηth,min Н/Д %
Додаткове споживання електроенергії
Тип теплової потужності / регулювання температури в приміщенні (оберіть один)
При номінальній
тепловій потужності
elmax 0,002 кВт
Одноступенева теплова потужність, без регулювання температури в
приміщенні
[Ні.]
З мінімальною
тепловою потужністю
елмін Н/Д кВт
Дві або більше ручних ступені, без регулювання температури в
приміщенні
[Ні.] У режимі о чікування
elSB
Н/Д кВт
з механічним регулюванням температури в приміщенні за допомогою термостата
[Ні.]
з електронним регулюванням температури в приміщенні
[Так.]
з електронним регулюванням температури в приміщенні та таймером переходу
на літній час
[Ні.]
з електронним регулюванням температури в приміщенні та тижневим таймером
[Ні.]
Інші варіан ти управління (мо жливо кілька варіантів)
контроль температури в приміщенні з датчиком присутності
[Ні.]
Регулювання температури в приміщенні з виявленням відчиненого вікна
[Ні.]
з можливістю дистанційного керування
[Ні.]
з адаптивним контролем запуску
[Ні.]
зі скороченим робочим днем
[Ні.]
з датчиком чорної лампочки
[Ні.]
Постійна потреба в потужності пілотного полум'я
Вимоги до
потужності
пілотного полум'я
(якщо
доречно)
Ppilot
0
кВт
Контактні дані
Grupa Topex Sp. z o.o. Sp.k.
Ul. Pograniczna 2/4, 02-285 Warsaw
(*) NOx = Оксиди азоту
Сезонна енергоефективність опалення приміщень
ηS
Посада
Символ
Значення
Одиниця
Сезонна енергоефективність опалення
приміщень в активному режимі
ηS,on
100
%
Поправочний коефіцієнт (F1)
/ 0 %
Поправочний коефіцієнт (F2)
/ 7 %
Поправочний коефіцієнт (F3)
/ 0 %
Поправочний коефіцієнт (F4)
/ 0 %
Поправочний коефіцієнт (F5)
/ 0 %
Коефіцієнт мітки біомаси
BLF 1 /
Сезонна енергоефективність опалення
приміщень
ηS
ηS
97
%
Класи енергоефективності
A
Page 39
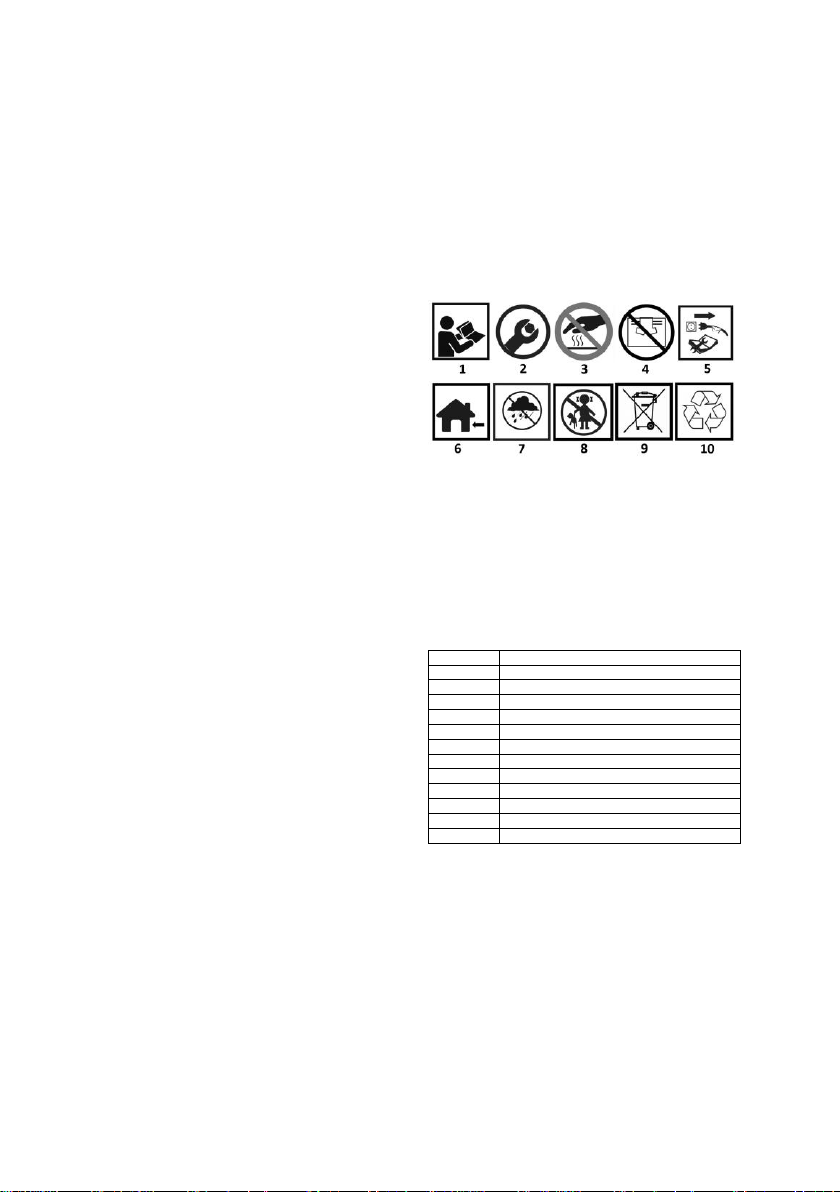
39
SK
PREKLAD (POUŽÍVATEĽSKEJ) PRÍRUČKY
Olejový ohrievač
90-086
POZNÁMKA: PRED POUŽITÍM ZARIADENIA SI POZORNE
PREČÍTAJTE TENTO NÁVOD A USCHOVAJTE SI HO PRE
BUDÚCE POUŽITIE. OSOBY, KTORÉ SI NÁVOD
NEPREČÍTALI, BY NEMALI VYKONÁVAŤ MONTÁŽ,
NASTAVENIE ALEBO PREVÁDZKU ZARIADENIA.
TENTO VÝROBOK JE VHODNÝ LEN NA PRÍLEŽITOSTNÉ
POUŽITIE ALEBO NA POUŽITIE V DOBRE IZOLOVANÝCH
PRIESTOROCH
OSOBITNÉ BEZPEČNOSTNÉ USTANOVENIA
POZOR!
Pozorne si prečítajte návod na obsluhu, dodržiavajte v ňom
uvedené upozornenia a bezpečnostné podmienky. Spotrebič bol
navrhnutý na bezpečnú prevádzku. Napriek tomu: inštalácia,
údržba a prevádzka spotrebiča môžu byť nebezpečné.
Dodržiavanie nasledujúcich postupov zníži riziko požiaru, úrazu
elektrickým prúdom, zranenia a skráti čas inštalácie spotrebiča
POZNÁMKA: Ohrievač nie je určený na domáce alebo
rekreačné použitie.
● Používajte len v dobre vetraných priestoroch a mimo horľavých
materiálov
● NEPOUŽÍVAJTE na vykurovanie priestorov v obytných
budovách. Pre použitie vo verejných budovách si pozrite
národné predpisy.
● Tento spotrebič môžu používať deti od 8 rokov a osoby s
obmedzenými fyzickými, zmyslovými alebo mentálnymi
schopnosťami alebo bez skúseností a znalostí, ak sú pod
dohľadom alebo boli poučené o témach bezpečného používania
spotrebiča a rozumejú príslušným rizikám. Deti sa so
spotrebičom nesmú hrať.
Deti nesmú čistiť ani udržiavať spotrebič bez dozoru.
VAROVANIE: Aby ste zabránili prehriatiu, ohrievač
nezakrývajte.
● Deti mladšie ako 3 roky by nemali byť v blízkosti spotrebiča,
pokiaľ nie sú pod stálym dohľadom.
● Deti vo veku od 3 do 8 rokov môžu zapínať/vypínať spotrebič
len za predpokladu, že je umiestnený alebo nainštalovaný v
normálnej prevádzkovej polohe a že sú pod dohľadom alebo boli
poučené o bezpečnom používaní spotrebiča a rozumejú
príslušným rizikám. Deti vo veku od 3 do 8 rokov nesmú
spotrebič pripájať, nastavovať, čistiť ani vykonávať údržbu.
POZOR! - niektoré časti tohto spotrebiča môžu byť veľmi horúce
a spôsobiť popáleniny. Osobitnú pozornosť treba venovať deťom
a zraniteľným osobám.
● Všetok servis musí vykonávať kvalifikovaný servisný
pracovník.
● Ohrievač využíva vzduch (kyslík) v oblasti, kde sa používa. Na
zabezpečenie dostatočného spaľovania je potrebné zabezpečiť
potrebné vetranie.
● V blízkosti tohto ani iného spotrebiča neskladujte ani
nepoužívajte benzín alebo iné horľavé výpary alebo kvapaliny!
● Nebezpečenstvo požiaru, popálenín, udusenia a výbuchu.
Pevné horľavé materiály, ako sú stavebné materiály, papier
alebo lepenka, udržiavajte v bezpečnej vzdialenosti od ohrievača
podľa odporúčaní v návode. Ohrievač nikdy nepoužívajte v
priestoroch, ktoré môžu obsahovať prchavé alebo vo vzduchu sa
šíriace látky alebo produkty, ako sú benzín, rozpúšťadlá, riedidlá,
prachové častice alebo neznáme chemické látky.
● Ohrievače s priamym vstrekovaním môžu pri nesprávnom
používaní spôsobiť otravu oxidom uhoľnatým (CO), ktorá môže
viesť k smrti.
● Nedodržanie bezpečnostných opatrení a pokynov uvedených
v návode na používanie tohto ohrievača môže mať za následok
smrť, vážne zranenie a stratu majetku alebo škodu v dôsledku
nebezpečenstva požiaru, výbuchu, popálenín, udusenia,
vážneho zranenia, oxidu uhoľnatého a otravy. Tento ohrievač by
mali používať alebo vykonávať jeho servis len osoby, ktoré
rozumejú pokynom a riadia sa nimi. Ak potrebujete pomoc alebo
informácie o ohrievači, ako sú návody na obsluhu, štítky atď.
Obráťte sa na výrobcu.
● Elektrická inštalácia, ku ktorej je spotrebič pripojený, musí byť
v súlade s platnou legislatívou. Inštalácia vyžaduje istič
zvyškového prúdu (RCCB) v hlavnom elektrickom rozvádzači.
● Pred vykonaním akejkoľvek údržby odpojte zariadenie od
elektrickej siete.
● Pred použitím zariadenia vždy skontrolujte napájací kábel.
Nesmie byť ohnutý, natiahnutý, roztiahnutý alebo akokoľvek
poškodený.
● Napájací kábel smie vymieňať len kvalifikovaný personál.
Používajte iba originálny napájací kábel s príslušnou triedou
ochrany.
● Predný výstup je počas prevádzky veľmi horúci. Nedotýkajte
sa jej! Hrozí nebezpečenstvo popálenia.
PIKTOGRAMY A VÝSTRAHY
1. Prečítajte si návod na obsluhu, dodržiavajte v ňom
uvedené upozornenia a bezpečnostné podmienky!
2. Vyžaduje montáž
3. Horúci prvok
4. Nezakrývajte vstupné a výstupné otvory
5. Odpojenie pred opravou alebo údržbou
6. Na použitie v interiéri
7. Ochrana pred dažďom
8. Uchovávajte mimo dosahu detí
9. Nevyhadzujte spolu s domovým odpadom
10. Recyklovateľné
OPIS GRAFICKÝCH PRVKOV
Obr. 1
Popis A Výfukový komín
B
Výstup horúceho vzduchu
C
Palivová nádrž
D
Prepravné kolesá
E
Uzáver plniacej nádrže
F
Zobrazenie
G
Zobrazenie okolitej teploty
H
Prepravná rukoväť
I
Spaľovacia komora
J
Ovládací gombík teploty
K
Hlavný vypínač
L
Podpora ohrievača
NÁVOD NA MONTÁŽ
Vyberte ohrievač z kartónu. Ak je zariadenie akýmkoľvek
spôsobom poškodené, nepoužívajte ho a kontaktujte svojho
predajcu.
Pri montáži chladiča postupujte takto:
1.Vložte os kolesa obr. 2J do príslušného otvoru nosnej
konštrukcie obr. 2E, do príslušných otvorov vložte čap obr. 2K;
na obe strany hriadeľa vložte podložku obr. 2H, nasaďte koleso
obr. 2I na os kolesa obr. 2J, naskrutkujte maticu obr. 2G.
2. Umiestnite teleso ohrievača na nosnú konštrukciu obr. 2E,
uistite sa, že montážne otvory sa zhodujú s montážnymi otvormi
jednotky.
3. Pomocou skrutky obr. 2B, pružnej podložky obr. 2C, hladkej
podložky obr. 2D a matíc pripevnite nosnú konštrukciu obr. 2E k
držiaku nádrže.
Inštalačné pokyny
Ohrievač umiestnite na rovný, rovný, nehorľavý a pevný povrch.
Page 40

40
Ohrievače s priamym vstrekovaním sú určené na použitie v
otvorených vonkajších priestoroch alebo v dobre vetraných
vnútorných priestoroch. Pri použití vo vnútorných priestoroch je
potrebné zabezpečiť trvalé vetracie otvory s plochou najmenej
25 cm² / kW, rovnomerne rozmiestnené medzi podlahou a
stropom, najmenej 250 cm².
POZOR! Minimálna veľkosť vetracieho otvoru 320 cm²
• Ohrievač inštalujte len v normálnej vodorovnej polohe.
• Ohrievač neumiestňujte v blízkosti stien, rohov alebo nízkych
stropov.
• Ohrievač neumiestňujte pod zásuvku.
• Ohrievač neumiestňujte na pohybujúce sa vozidlá alebo na
miesta, kde by sa mohol prevrátiť.
• Ohrievač uchovávajte mimo dosahu horľavých, výbušných
alebo korozívnych materiálov.
• Ohrievač umiestnite mimo záclon alebo podobných
materiálov, ktoré by mohli blokovať prívod a odvod vzduchu.
• Prívod a odvod vzduchu nikdy z akéhokoľvek dôvodu
neblokujte ani neobmedzujte.
• Napájací kábel uchovávajte mimo dosahu zdrojov tepla,
ostrých hrán, rezných a pohyblivých častí.
• Nevystavujte ho priamo poveternostným vplyvom alebo
nadmernej vlhkosti.
• Ohrievač neumiestňujte do bezprostrednej blízkosti vane,
sprchy alebo bazéna.
• Musia sa dodržiavať všeobecné a osobitné požiarne predpisy
platné pre všetky oblasti použitia. V každom prípade sa musia
dodržať nasledujúce minimálne bezpečnostné vzdialenosti od
materiálov alebo predmetov v blízkosti ohrievača:
• Strana ohrievača: 0,6 m
• Strana prívodu vzduchu: 1 m
• Vrchná časť: 1,5 m
• Strana výstupu horúceho vzduchu: 3 m
• Podlahy a stropy v pracovnom priestore ohrievača musia byť
vyrobené z ohňovzdorných materiálov.
• Radiátory nepripájajte priamo na vzduchové kanály.
INŠTALÁCIA KOMÍNA OHRIEVAČA
Ohrievač je vybavený komínom na odvod spalín. Na obr. 3 je
znázornená správna inštalácia komína na odvod spalín z
ohrievača (ľavá strana nákresu). Na pravej strane obrázku sú
spôsoby, pri ktorých sa komín nesmie inštalovať.
POZOR!
Je nevyhnutné dodržiavať uvedené pravidlá pre konštrukciu
komínov, dĺžky potrubia, uhly napojenia jednotlivých
úsekov potrubia.
• Potrubia sa nesmú spájať pod pravým uhlom 90° alebo pod
uhlom menším ako 90°, pretože to sťažuje alebo dokonca
znemožňuje únik spalín.
• Minimálne dĺžky potrubia sa musia prísne dodržiavať
NÁVOD NA POUŽITIE
Spustite stránku
• Nádrž naplňte čistým palivom. Používajte len naftu alebo
parafín.
• Hladinomer na hornej časti palivovej nádrže umožňuje
kontrolovať hladinu paliva
• Zástrčku napájacieho kábla pripojte k uzemnenému zdroju
napájania 230 V 50 Hz.
POZNÁMKA: Uzemnenie je povinné.
• Po dokončení vyššie uvedeného "spustenia" sa v ľavom okne
displeja zobrazí "-" a v pravom okne sa zobrazí hodnota
teploty okolia.
• Posuňte prepínač do polohy "I".
• Predvolené nastavenie teploty je 20 stupňov Celzia, ktoré sa
zobrazí v ľavom okne displeja.
• Ak je teplota okolia nižšia ako predvolená teplota, elektródy
začnú iskriť, po 7 sekundách sa zapne ohrievač.
• Ak je teplota okolia vyššia ako predvolená teplota, nastavte
gombík termostatu na požadovanú teplotu, elektródy začnú
iskriť, po 7 sekundách sa ohrievač zapne.
STUDENÝ ŠTART:
Ak chcete ohrievač spustiť pri nízkej teplote, počas zapaľovania
držte vetrací otvor obr. 4B zatvorený prstom, aby ste uľahčili
štartovanie.
ABNORMÁLNA PREVÁDZKA:
V prípade poruchy (žiadny plameň, znížené prúdenie vzduchu,
zlé spaľovanie atď.) sa ohrievač vypne a na displeji sa zobrazí
kód BLOCK MODE.
MANUÁLNY RESET
Ak je ohrievač v režime blokovania, pred opätovným spustením
ohrievača skontrolujte a odstráňte príčinu blokovania. Ak chcete
zariadenie resetovať, nastavte spínač na obrázku 1J do polohy
ON. / OFF. Do polohy "0" a potom opäť do polohy "I". V prípade
opakovanej poruchy zavolajte technický servis. Otočením
gombíka termostatu sa ohrievač NERESETUJE.
VYHLÁSENIE
• Prepínač nastavte do polohy "OFF". 0. Fáza po ukončení
ventilácie bude chladiť spaľovaciu komoru počas 90 sekúnd.
Ak sa spotrebič dlhší čas nepoužíva, odpojte ho zo zásuvky.
• Nikdy neodpájajte ohrievač od elektrickej siete, aby ste ho
zastavili počas prevádzky. Vždy nechajte dokončiť postup
chladenia, inak môže zvyškové teplo poškodiť vnútorné
komponenty.
• Nezakrývajte ohrievač. Neblokujte prívod a odvod vzduchu.
• Výstup ohrievača je počas prevádzky a po použití veľmi
horúci. Nedotýkajte sa ho! V prípade potreby použite osobné
ochranné prostriedky.
• Zabezpečte, aby sa deti so spotrebičom nehrali a aby boli v
jeho blízkosti pod dozorom.
• Spotrebič nie je určený na používanie osobami (vrátane detí)
s obmedzenými fyzickými, zmyslovými alebo duševnými
schopnosťami alebo bez skúseností a znalostí.
• Pred premiestnením odpojte ohrievač. Nikdy neťahajte za
kábel, aby ste zariadenie odpojili alebo premiestnili.
• Počas používania nenechávajte ohrievač bez dozoru.
• Nikdy nepoužívajte spotrebič s mokrými rukami alebo keď je
ohrievač alebo napájací kábel mokrý.
• Ak je napájací kábel poškodený, musí ho vymeniť výrobca,
servisný technik alebo podobne kvalifikovaná osoba.
Čistenie, údržba a skladovanie
• Kryt pravidelne utierajte mäkkou špongiou alebo handričkou.
Na veľmi znečistené časti použite špongiu navlhčenú vlažnou
vodou a jemným čistiacim prostriedkom, potom ju osušte
čistou handričkou.
• Prívod vzduchu a ventilátor chráňte pred prachom a
nečistotami. Ak chcete vyčistiť vnútorné časti, jemne
prefúknite stlačený vzduch cez vstupný otvor.
• Pravidelne kontrolujte napájací kábel: ak je opotrebovaný,
prasknutý alebo poškodený, nechajte ho vymeniť v
technickom servise.
• Pred uskladnením ohrievača sa uistite, že je dokonale chladný
a suchý. Prístroj zakryte plastovým vreckom, vložte ho do
obalu a uložte na suchom, vetranom mieste.
• Pred vykonaním akejkoľvek údržby vypnite zariadenie,
odpojte ho od elektrickej siete a nechajte ohrievač aspoň 15
minút vychladnúť.
• Nepokúšajte sa sami opravovať elektrické zariadenia. Ak
ohrievač vyžaduje servis alebo opravu, obráťte sa na
kvalifikovaného technika.
• Poškodený spotrebič nepoužívajte, pokiaľ ho neskontroloval
a neopravil kvalifikovaný technik.
• Pri čistení dbajte na to, aby sa do zariadenia nedostala voda.
• Neotvárajte kryt, aby ste vyčistili vnútorné časti. Nestriekajte
vodu do ohrievača.
• Na čistenie ohrievača nikdy nepoužívajte rozpúšťadlá,
benzín, toluén alebo podobné agresívne chemikálie.
• Na čistenie ohrievača sa nesmú používať rozpúšťadlá,
benzín, toluén alebo podobné agresívne chemikálie.
• Pred každým sezónnym použitím sa odporúčajú kontroly
vykonávané len kvalifikovaným personálom:
• Opatrne odskrutkujte trysku z konektora trysky. Prefúknite
Page 41

41
otvor dýzy stlačeným vzduchom, aby ste ju zbavili nečistôt. V
prípade potreby dýzu vymeňte.
ČISTENIE, ÚDRŽBA A SKLADOVANIE
• Kryt by sa mal pravidelne utierať mäkkou špongiou alebo
handričkou. Na veľmi znečistené časti použite špongiu
navlhčenú vlažnou vodou a jemným čistiacim prostriedkom,
potom ju osušte čistou handričkou.
• Prívod vzduchu a ventilátor by mali byť zbavené prachu a
nečistôt. Ak chcete vyčistiť vnútorné časti, jemne vyfúknite
prívod vzduchu stlačeným vzduchom.
• Pravidelne kontrolujte napájací kábel: ak je opotrebovaný,
prasknutý alebo poškodený, nechajte ho vymeniť v
technickom servise.
• Pred uskladnením ohrievača sa uistite, že je dokonale chladný
a suchý. Prístroj by mal byť zakrytý plastovým vreckom,
vložený do obalu a uložený na suchom, vetranom mieste.
DYSZA
Opatrne odskrutkujte trysku z konektora trysky. Trysku vyfúknite
stlačeným vzduchom, aby ste z nej ods tránili nečistoty. V
prípade potreby dýzu vymeňte.
VZDUCHOVÉ FILTRE
Vyčistite vzduchové filtre. Odstráňte koncovú krytku filtra obr.
A11, umyte vstupný vzduchový filter obr. A10 ľahkým čistiacim
prostriedkom a pred opätovnou montážou ho dôkladne vysušte.
Vymeňte vstupný vzduchový filter obr. A9 raz ročne.
ZAPAĽOVACIE ELEKTRÓDY
Zapaľovacia elektróda sa musí pravidelne čistiť, nastavovať a v
prípade potreby vymeniť. Správne rozmiestnenie elektród
nájdete na obr. B1 a obr. B2 (rozmery sú uvedené v mm).
REGULÁCIA TLAKU KOMPRESORA
UPOZORNENIE: Tlak kompresora je nastavený z výroby a môže
ho kontrolovať a nastavovať len kvalifikovaný technik.
Manipulácia s jednotkou môže byť nebezpečná.
Odstráňte kryt manometra obr. 4A. Pripojte manometer k otvoru
na meranie tlaku na zadnom kryte. Spustite ohrievač a odčítajte
hodnotu tlaku vzduchu. V prípade potreby nastavte tlak na
správnu hodnotu otáčaním nastavovacej skrutky v smere
hodinových ručičiek na zvýšenie, proti smeru hodinových
ručičiek na zníženie tlaku.
INŠTALÁCIA VO VEĽKÝCH VÝŠKACH:
Z dôvodu nižšieho množstva kyslíka pre zariadenia vo veľkých
nadmorských výškach na úrovni mora môže byť potrebné znížiť
tlak kompresora Obr. 4A. Úprava tohto nastavenia môže byť
potrebná na zachovanie dobrého spaľovania z dôvodu
nedostatku kyslíka.
RIEŠENIE PROBLÉMOV
PROBLÉM
PRÍČINA
RIEŠENIE
Motor sa
nenaštartuje
Na
obrazovke
sa zobrazí
chyba E1
Žiadne napájanie alebo
príliš nízke napätie
Skontrolujte
napájací kábel a
napätie
Skontrolujte
poistku a v
prípade potreby ju
vymeňte
Chybný alebo
poškodený napájací
kábel
Kontrola a
prípadná výmena
Chybný motor /
kondenzátor
Kontrola a
prípadná výmena
Jednotka je
zablokovaná z dôvodu
predchádzajúceho
prehriatia
Zistenie príčiny
prehriatia
Vypnutie
zariadenia
Skontrolujte
prívod a odvod
vzduchu
Počkajte niekoľko
minút a reštartujte
zariadenie
Na
obrazovke
sa zobrazí
chyba E2
Snímač teploty je
poškodený alebo je
uvoľnený konektor
snímača teploty
Skontrolujte a v
prípade potreby
vymeňte teplotnú
sondu
Skontrolujte dosku
plošných spojov a
v prípade potreby
ju vymeňte
Motor beží,
ale kúrenie
sa nezapáli
a po krátkom
čase sa
vypne
Na
obrazovke
sa zobrazí
chyba E1
Prázdna palivová
nádrž, znečistené alebo
nesprávne palivo
Odstráňte zlé
alebo znečistené
palivo
Naplňte nádrž
čistou naftou
alebo parafínom
Upchatý palivový filter
Vyčistite alebo
vymeňte palivový
filter
Úniky vzduchu v
olejovom potrubí
Skontrolujte
hadice, dotiahnite
spoje, v prípade
potreby hadice
vymeňte
Upchatá dýza horáka
Vyčistite trysku
fúkaním
stlačeným
vzduchom, v
prípade potreby ju
vymeňte
Zvýšená viskozita
paliva pri nízkych
teplotách
Zmiešajte naftu s
10-20 % parafínu
Plamene
vychádzajúc
e z výfuku
Na
obrazovke
sa zobrazí
chyba E1
Nedostatočný prívod
vzduchu do spaľovacej
komory
Skontrolujte
prívod vzduchu,
ventilátor, motor
Príliš vysoký tlak
kompresora
Skontrolujte tlak
vzduchu, v
prípade potreby
ho upravte *.
Ohrievač sa
počas
prevádzky
zastaví
Okolitá
teplota
zobrazená
na displeji
Dosiahla sa izbová
teplota nastavená na
izbovom termostate
Normálna
prevádzka
Ak chcete začať,
otočte ovládačom
teploty v smere
hodinových
ručičiek na vyššiu
hodnotu
Ohrievač sa
počas
prevádzky
zastaví
Na
obrazovke
sa zobrazí
chyba E1
Zlyhanie plameňa
Skontrolujte a
odstráňte príčinu(y) poruchy
Ak chcete
resetovať,
nastavte prepínač
zapnutia/vypnutia
na 0 a potom na I.
Ak problém
pretrváva,
zavolajte
technický servis
Slabé spaľovanie
Znížené prúdenie
vzduchu
Prehriatie
OBSAH SÚPRAVY
Page 42
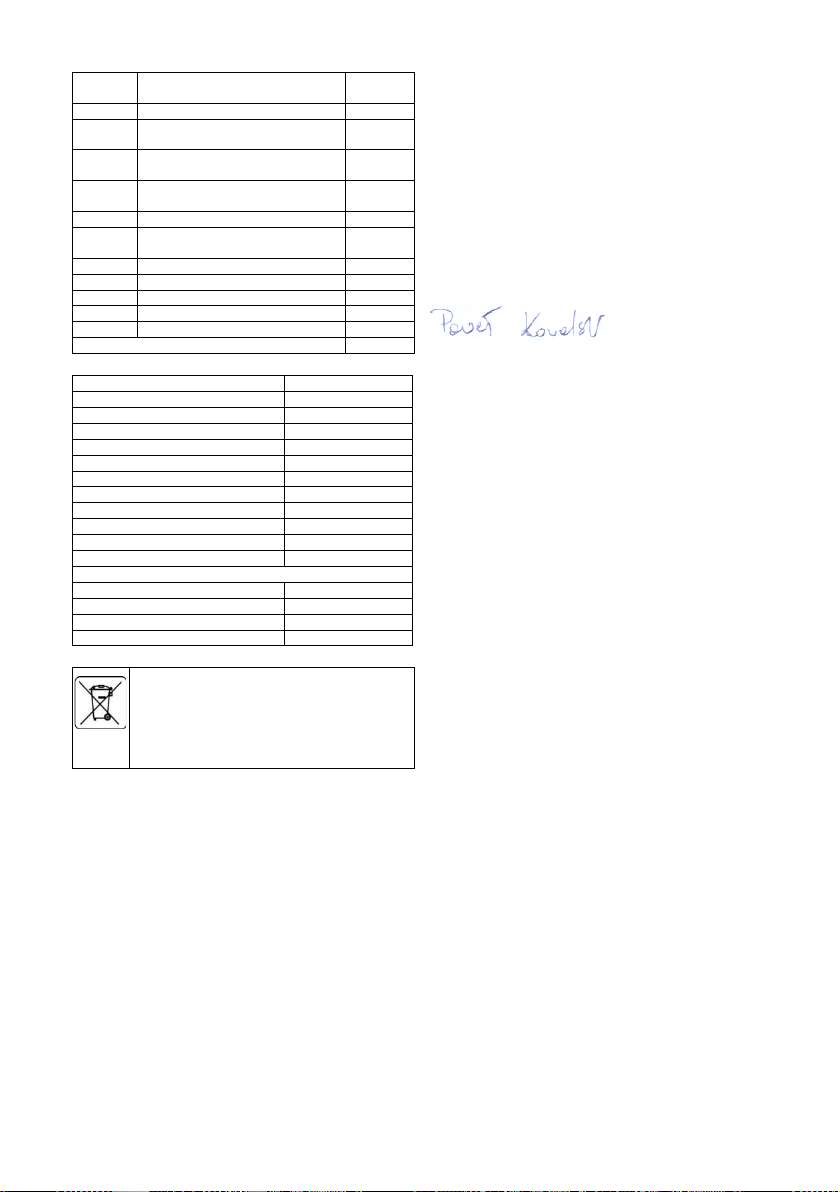
42
Poz.
Popis
Množstv
o A Rukoväť
1
B
Skrutky
6 alebo 8 C
Pružinová podložka
6 alebo 8 D
Podložka
6 alebo
8 E Konštrukcia rukoväte
1
F
Matica M5
6 alebo
8 G Matica M12
2 H Podložka ø12
2 I Kolesá 2 J
Kolieskový valec
1 K Pin
2
Kombinovaný ohrievač s palivovou nádržou
1 ks.
Hodnotené údaje
Model
90-086
Tepelný výkon [kW] *
20
Prietok vzduchu [m³/h]
600
Typ paliva
Diesel / Diesel
Spotreba paliva [kg/h]
1.65
Napájacie napätie [V/Hz]
230V AC 50Hz
Vykurovacia oblasť
150~200 m²
Stupeň ochrany IP
IPX4
Trieda ochrany
I
Intenzita prúdu [A]
1.1
Elektrický výkon [W]
230
Hodnota poistky
T3.15A
Rozmery
Čistá hmotnosť (kg)
21,3
Objem nádrže (l)
38
Prevádzkový čas (h)
~23
Rok výroby
2023
OCHRANA ŽIVOTNÉHO PROSTREDIA
Elektricky poháňané výrobky by sa nemali likvidovať spolu s
domovým odpadom, ale mali by sa odniesť do príslušných
zariadení na likvidáciu. Informácie o likvidácii vám poskytne
predajca výrobku alebo miestny úrad. Odpad z elektrických a
elektronických zariadení obsahuje látky, ktoré nie sú š etrné k
životnému prostrediu. Zariadenia, ktoré nie sú recyklované,
predstavujú potenciálne riziko pre životné prostredie a ľudské
zdravie.
"Grupa Topex Spółka z ograniczoną odpowiedzialnością" Spółka komandytowa
so sídlom vo Varšave, ul. Pograniczna 2/4 (ďalej len "Grupa Topex") oznamuje,
že všetky autorské práva k obsahu tejto príručky (ďalej len "príručka"), vrátane,
okrem iného. Jeho text, fotografie, schémy, nákresy, ako aj jeho kompozícia
patria výlučne spoločnosti Grupa Topex a podliehajú právnej ochrane podľa
zákona zo 4. februára 1994 o autorskom práve a súvisiacich právach (Zbierka
zákonov 2006 č. 90 poz. 631 v znení neskorších predpisov). Kopírovanie,
spracovanie, zverejňovanie, úprava na komerčné účely celého manuálu a jeho
jednotlivých prvkov bez písomného súhlasu spoločnosti Grupa Topex je prísne
zakázané a môže mať za následok občianskoprávnu a trestnoprávnu
zodpovednosť.
Vyhlásenie o zhode EÚ
Výrobca: Sp.k., Pograniczna 2/4 02-285 Warszawa
Výrobok: Olejový ohrievač
Model: 90-086
Obchodný názov: NEO TOOLS
Sériové číslo: 00001 ÷ 99999
Toto vyhlásenie o zhode sa vydáva na výhradnú zodpovednosť
výrobcu.
Opísaný výrobok je v súlade s týmito dokumentmi:
Smernica o nízkom napätí 2014/35/EÚ
Smernica 2014/30/EÚ o elektromagnetickej kompatibilite
Smernica RoHS 2011/65/EÚ v znení smernice 2015/863/EÚ
Nariadenie (EÚ) č. 626/2011, ktorým sa dopĺňa smernica
2010/30/EÚ
Nariadenie (EÚ) 2015/1188, ktorým sa vykonáva smernica
2009/125/ES
A spĺňa požiadavky noriem:
EN 60335-1:2012+A11+A13+A1+A14+A2; EN 60335-2102:2016; EN 62233:2008;
EN IEC 55014-1:2021; EN IEC 55014-2:2021;
EN IEC 61000-3-2:2019+A1; EN 61000-3-3:2013+A1+A2;
EN IEC 63000:2018
Meno a adresa osoby so sídlom v EÚ, ktorá je oprávnená
vypracovať technickú dokumentáciu:
Podpísané v mene:
Grupa Topex Sp. z o.o. Sp.k.
Ulica Pograniczna 2/4
02-285 Varšava
Paweł Kowalski
Pracovník pre kvalitu spoločnosti TOPEX GROUP
Varšava, 2023-06-19
Page 43
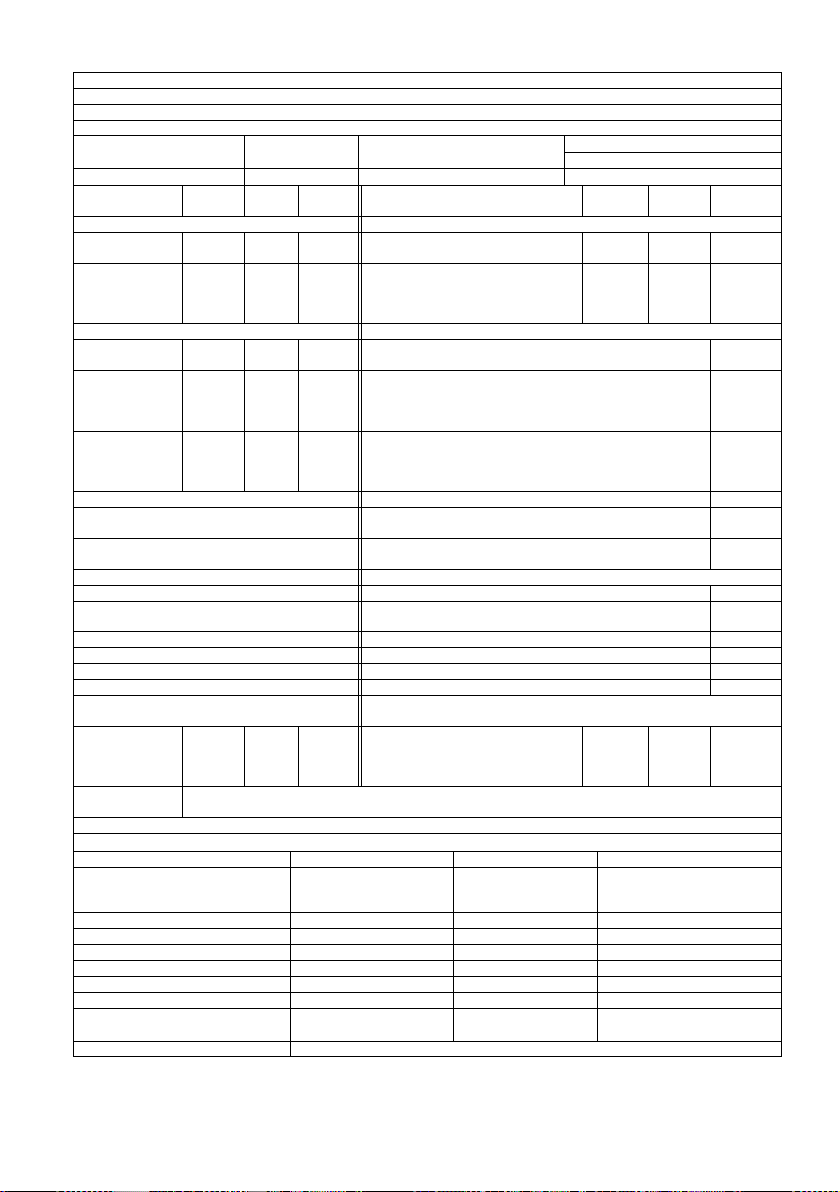
43
ID modelu: 90-086
Funkcia nepriameho ohrevu: [nie].
Menovitý tepelný výkon: 20 (kW)
Nepriamy tepelný výkon: nepoužije sa (kW)
Palivo
Emisie z vykurovania priestorov (*)
NOx
Vyberte typ paliva
[kvapalné palivo].
Purifikovaný parafín
79 [
mg/kWhinput
] (GCV)
Parameter
Symbol
Hodnota
Jednotka Polož
ka
Symbol
Hodnota
Jednotka
Tepelná energia
Užitočná kapacita (NCV)
Menovitý tepelný
výkon Pnom 20 kW
Úžitková účinnosť pri menovitom
tepelnom výkone
ηth,nom
100 %
Minimálny tepelný
výkon (orientačný)
Pmin NEUPL
ATŇUJ
E SA
kW
Úžitková účinnosť pri minimálnom
tepelnom výkone (orientačne)
ηth,min
NEUPLA
TŇUJE
SA
%
Dodatočná spotreba elektrickej energie
Typ tepelného výkonu/regulácie teploty v miestnosti (vyberte jeden)
Pri menovitom
tepelnom výkone
elmax 0,002 kW
Jednostupňový tepelný výkon, bez regulácie teploty v
miestnosti
[nie].
S minimálnym
tepelným výkonom
elmin NEUPL
ATŇUJ
E SA
kW
Dva alebo viac manuálnych stupňov, bez regulácie teploty v
miestnosti
[nie]. V pohotovostnom
režime
elSB
NEUPL
ATŇUJ
E SA
kW
s mechanickou reguláciou teploty v miestnosti pomocou termostatu
[nie].
s elektronickou reguláciou teploty v miestnosti
[áno].
s elektronickou reguláciou teploty v miestnosti a časovačom úspory
denného svetla
[nie].
s elektronickou reguláciou izbovej teploty a týždenným časovačom
[nie].
Ďalšie možnosti ovládania (je možné vybrať si z viacerých možností)
regulácia teploty v miestnosti s detekciou prítomnosti
[nie].
Regulácia izbovej teploty s detekciou otvoreného okna
[nie].
s možnosťou diaľkového ovládania
[nie].
s adaptívnym riadením štartu
[nie].
so skráteným pracovným časom
[nie].
so senzorom čiernej žiarovky
[nie].
Konštantná požiadavka na výkon pilotného
plameňa
Požiadavka na
výkon pilotného
plameňa (ak
vhodné)
Ppilot
0
kW
Kontaktné údaje
Grupa Topex Sp. z o.o. Sp.k.
Ul. Pograniczna 2/4, 02-285 Varšava
(*) NOx = oxidy dusíka
Sezónna energetická účinnosť vykurovania priestoru ηS
Pozícia
Symbol
Hodnota
Jednotka
Sezónna energetická účinnosť
vykurovania priestorov v aktívnom
režime
ηS,on 100
%
Korekčný koeficient (F1)
/ 0 %
Korekčný koeficient (F2)
/ 7 %
Korekčný koeficient (F3)
/ 0 %
Korekčný koeficient (F4)
/ 0 %
Korekčný koeficient (F5)
/ 0 %
Faktor označovania biomasy
BLF 1 /
Sezónna energetická účinnosť
vykurovania priestoru ηS
ηS 97
%
Triedy energetickej účinnosti
A
 Loading...