

Page 1
4140881S/B
25/06/2008
ORIG0222-1
USER'S GUIDE
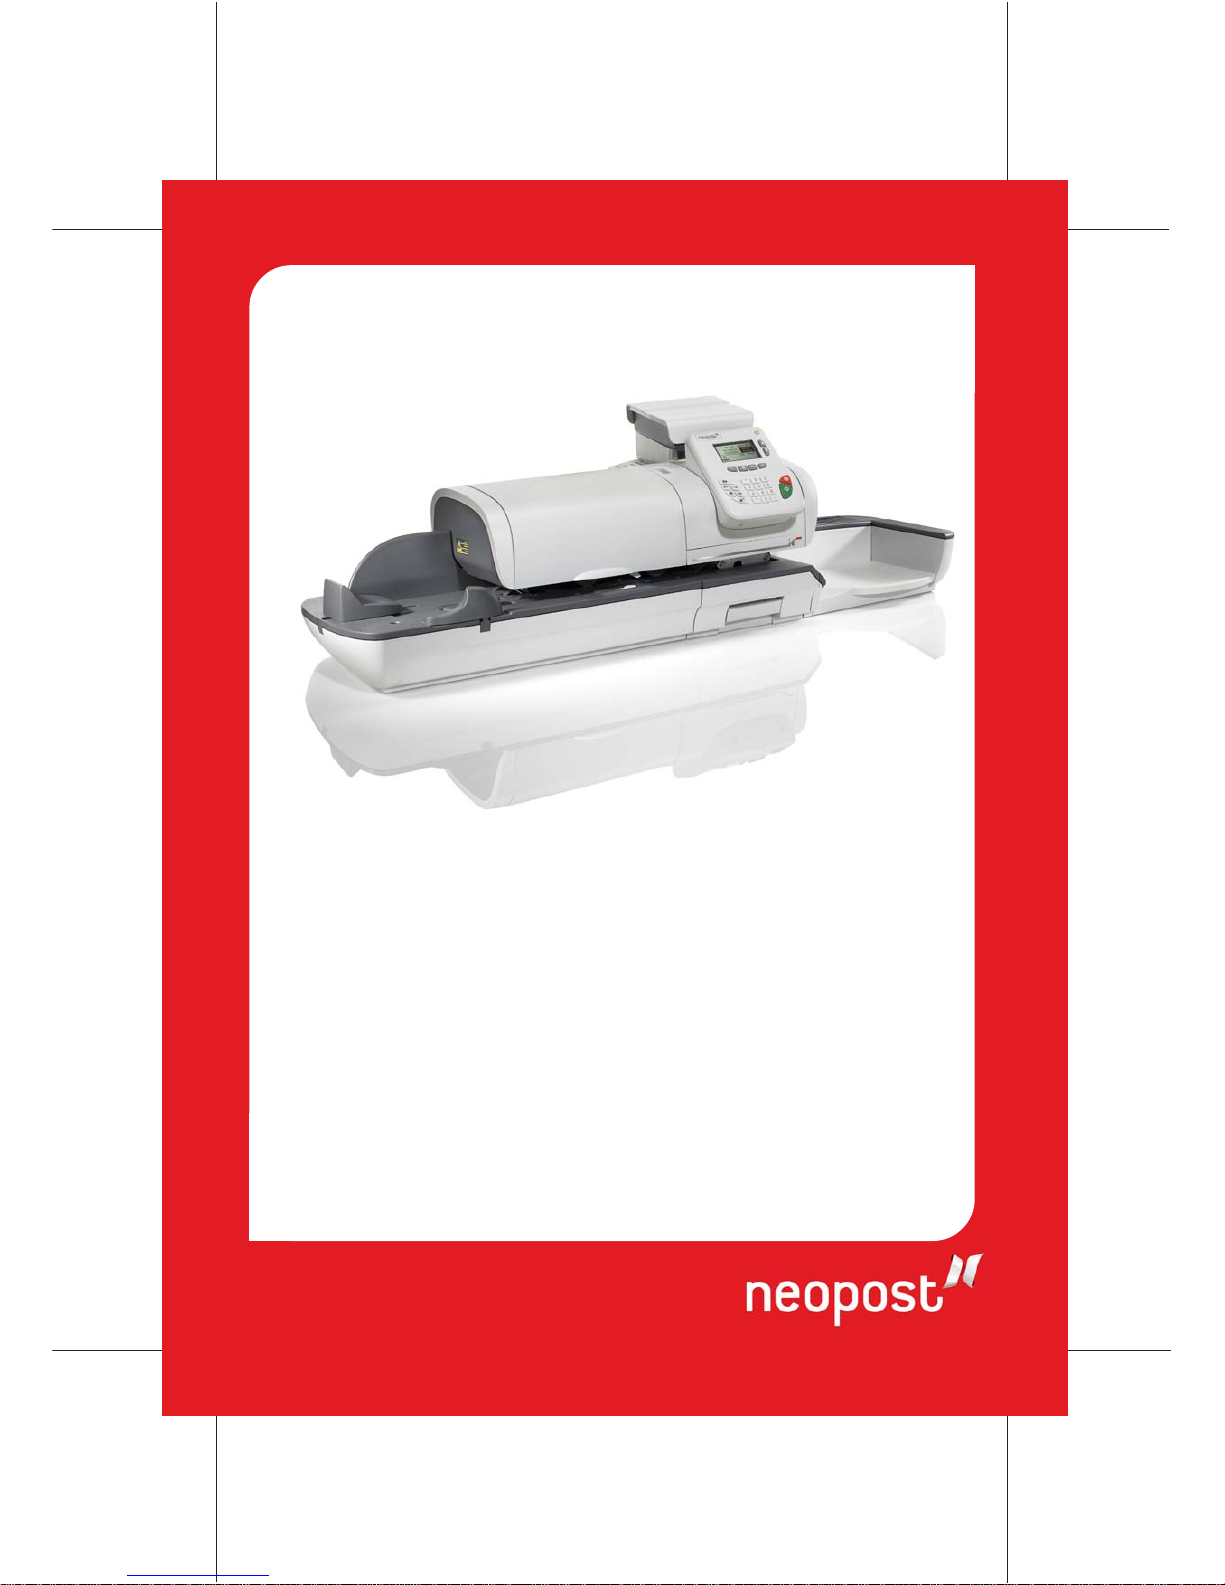
IS-430
FRANKING MACHINE
Page 2
4140881S/B
25/06/2008
ORIG0222-2
CONTROL PANEL DESCRIPTION INSIDE
CONTACTING NEOPOST
Contact Neopost for further assistance if you have problems
in operating the machine:
Tel: 0845 880 0000
Page 3
4140881S/B
25/06/2008
ORIG0222-3
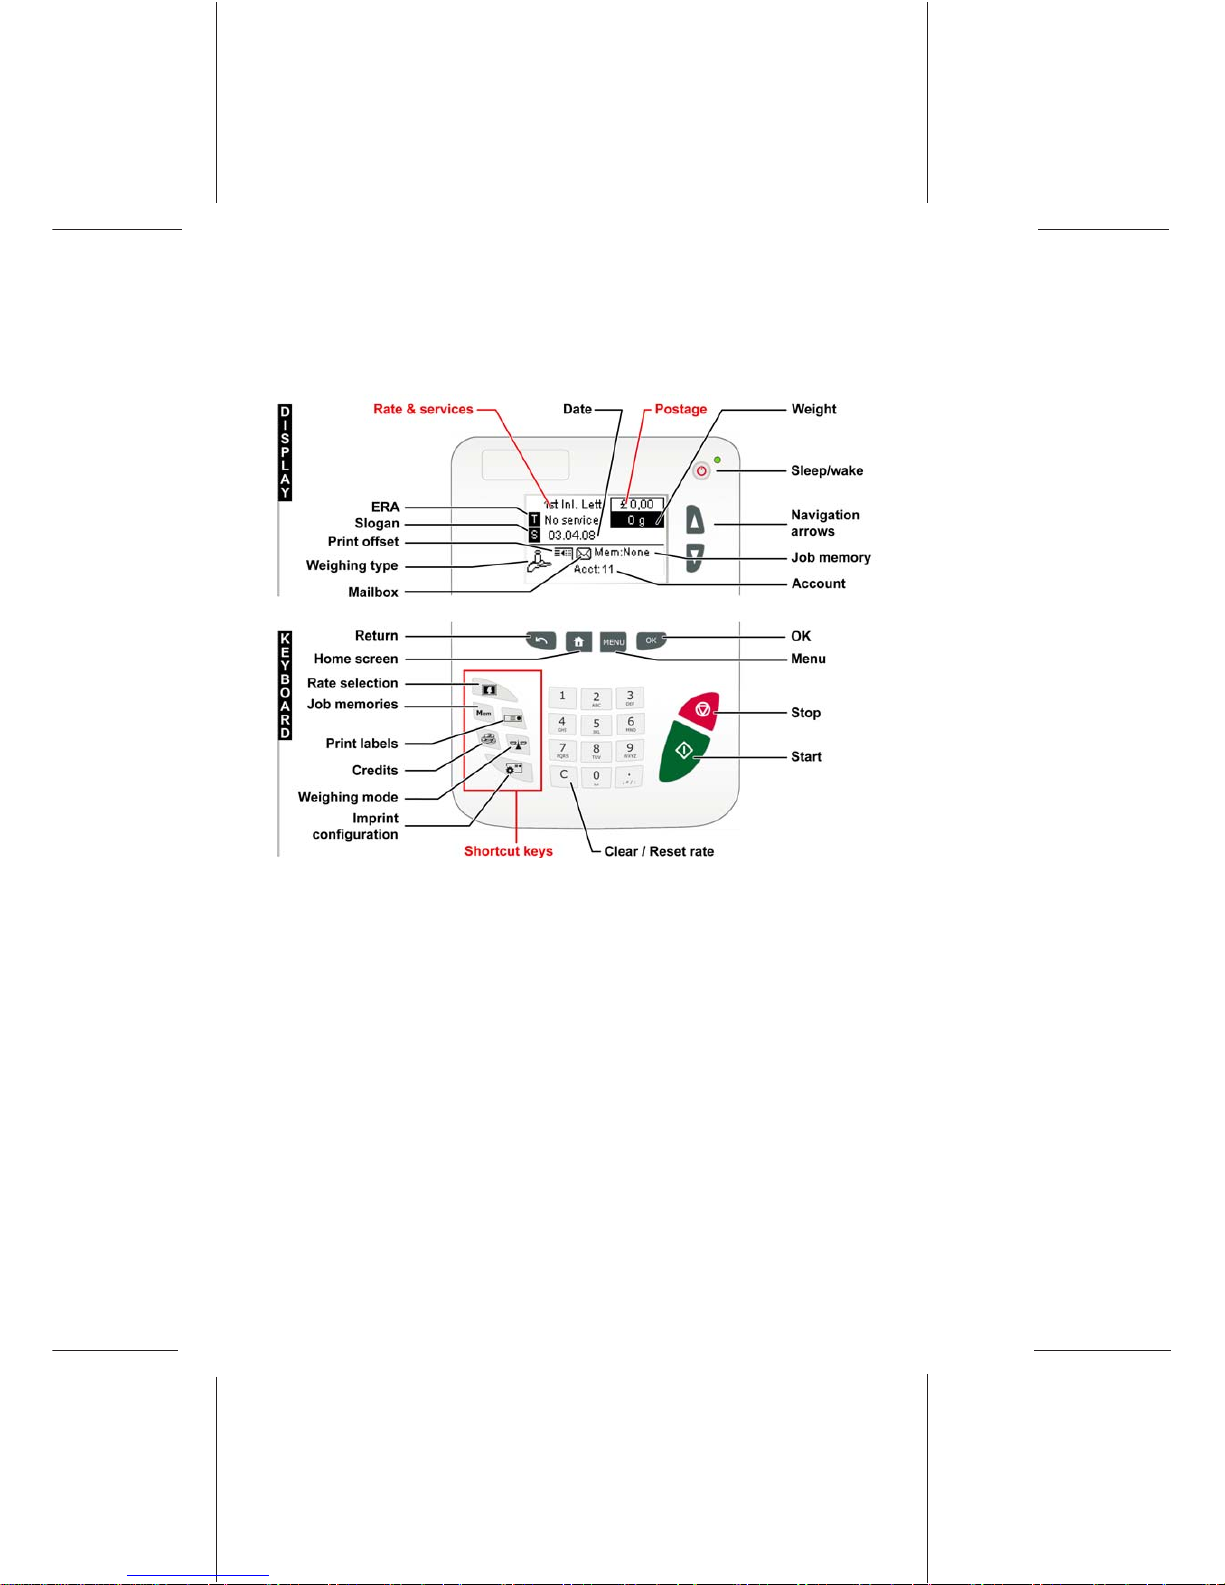
CONTROL PANEL
(see manual section 2.3)
Page 4
4140881S/B
25/06/2008
ORIG0222-4
4140881S/B - 25/06/2008
Page 5
Table of Contents
1 Read this First 1
1.1 What you will Find in this Manual........................................3
1.2 Safety Requirements...........................................................5
1.3 Environmental Conditions ...................................................9
2 Meet your Mailing System 11
2.1 System Layout ..................................................................13
2.2 Connections ......................................................................15
2.3 Control Panel Layout.........................................................17
2.4 Power Management ..........................................................19
2.5 Mail Specifications ............................................................20
3 Processing Mail 23
3.1 Choosing a Type of Imprint...............................................25
3.2 Preparing and Starting your Work Session.......................27
3.3 Running [Normal] Mail.......................................................34
3.4 Running [PPI] Mail ............................................................41
3.5 Running [Received] Mail ...................................................46
3.6 Running [Pass through] Mail.............................................48
3.7 Settings Details .................................................................51
3.8 Complementary Operations ..............................................64
4 Money Operations 67
4.1 Overview ...........................................................................69
4.2 Managing Credits ..............................................................70
4.3 Unlocking the Meter (Audit)...............................................72
5 Managing Accounts and Access Rights 73
5.1 Accounting and Access Rights Overview..........................75
5.2 Choosing an ' Account Mode'............................................76
5.3 Guidelines to Implementing an 'Account Mode' ................77
5.4 Selecting an 'Account Mode'.............................................80
5.5 Managing the Accounts.....................................................81
6 Reports 87
6.1 Report Overview ...............................................................89
6.2 Issuing a Report ................................................................91
6.3 Counter Data.....................................................................92
6.4 System Data......................................................................94
6.5 Credit/recredit Data ...........................................................97
6.6 Account Data.....................................................................99
DELTA2_UK.book Page 1 Vendredi, 27. juin 2008 11:47 11
Page 6
7 Online Services 101
7.1 Online Services Overview............................................... 103
7.2 Connecting to Online Services........................................104
7.3 Uploading Statistics ........................................................ 108
7.4 System Online Services.................................................. 109
7.5 Updating System Software .............................................110
8 Configuring your Mailing System 113
8.1 Settings Overview...........................................................115
8.2 Logging in / out as the Supervisor ..................................116
8.3 Changing the Display Language.....................................118
8.4 Enabling/Disabling Sounds.............................................119
8.5 Adjusting Display Contrast..............................................120
8.6 System Time-outs and Settings......................................121
8.7 Crediting Warnings and PIN Code..................................123
8.8 Weighing Settings...........................................................125
8.9 Imprint Default Settings...................................................130
8.10 Job memories .................................................................135
8.11 Connection Settings........................................................138
9 Options and Updates 141
9.1 Options and Updates Process ........................................ 143
9.2 Managing Options...........................................................144
9.3 Managing Slogans ..........................................................146
9.4 Managing ERAs..............................................................148
9.5 Managing Rates..............................................................150
9.6 Managing Prepaid Imprints (PPI)....................................151
9.7 Using the Mailbox ...........................................................153
10 Maintaining your Mailing System 155
10.1 Maintaining the Ink Cartridge .......................................... 157
10.2 Filling and Adjusting the Feeder Sealer..........................163
10.3 Cleaning the Mail Path ....................................................164
10.4 Running the Installation Wizard ...................................... 167
11 Troubleshooting 169
11.1 Paper Jamming ...............................................................171
11.2 LabelJamming................................................................. 175
11.3 Weighing Problems .........................................................176
11.4 Diagnostics and System Data......................................... 177
12 Specifications 181
12.1 General Specifications ....................................................183
12.2 Operating Specifications .................................................184
Index 185
DELTA2_UK.book Page 2 Vendredi, 27. juin 2008 11:47 11
Page 7
Read this First
This section contains important information about safety precautions and environmental recommendations to operate your equipment in the best possible
conditions.
1.1 What you will Find in this Manual ........................3
1.2 Safety Requirements.............................................5
How to Disconnect your Mailing System........................................8
1.3 Environmental Conditions.....................................9
1 Read this First
DELTA2_UK.book Page 1 Vendredi, 27. juin 2008 11:47 11
Page 8
Read this First
2
1
DELTA2_UK.book Page 2 Vendredi, 27. juin 2008 11:47 11
Page 9
Read this First
3
1
What you will Find in this Manual
1.1 What you will Find in this Manual
Section 1: Read this First
Make sure your have read and fully understood the Safety requirements
in this section. This section also includes a list of acronyms and symbols
used in the manual.
Section 2: Meet your Mailing System
System features, reference descriptions of elements and controls, mail format and how to power your mailing system off.
Section 3: Processing Mail
How you can process mail using the mailing system: choosing a type of task,
weighing, selecting a rate, sealing your mail, running batches, etc.
Section 4: Money Operations
How you can load Credits into your mailing system to enable postage printing.
Section 5: Managing Accounts and Access Rights
How you can change accounts as a user, or set up accounts and control
access to the mailing system as the supervisor.
Section 6: Reports
How you can generate and print out reports for the mailing system usage,
credits usage, account usage, etc.
Section 7: Online Services
How you can use your mailing system for online postal services and connect
your machine for upgrades.
Section 8: Configuring your Mailing System
All the parameters of your mailing system you can set up as user (temporary
settings) or supervisor (default settings).
Section 9: Options and Updates
How to update/upgrade your system and the imprint elements (ERAs, slogan...).
Section 10: Maintaining your Mailing System
How to maintain or change the ink cartridge and other system components.
Section 11: Troubleshooting
What to do when a problem occurs: jamming, bad sealing, poor printing etc.
DELTA2_UK.book Page 3 Vendredi, 27. juin 2008 11:47 11
Page 10
Read this First
4
1
Symbols
This manual uses the symbols listed below.
Glossary
This manual uses the acronyms listed below.
Section 12: Specifications
Detailed capabilities of your mailing system.
This symbol... Indicates...
WARNING: indicates a human safety hazard.
ATTENTION: brings to your attention a risk for equipment or
mail that could result from an action you may perform.
NOTE: remark that explains different cases or specificities.
TIP: advice to help you save time when processing your mail.
SUPERVISOR: indicates that you have to log in as supervisor
(using the supervisor PIN) to perform the procedure. Postage
functions of the mailing system are not accessible in this mode.
Acronym Description
ALD Automatic Label Dispenser
Credit Remaining credits
ERA External Return Address
ID IDentification
LAN Local Area Network: link between computers
PC Personal Computer
PIN Personal Identification Number
Tote Spent credits
WP Weighing Platform (scale)
DELTA2_UK.book Page 4 Vendredi, 27. juin 2008 11:47 11
Page 11
Read this First
5
1
Safety Requirements
Power Connection
Before connection, check whether the mailing system is suitable for the local AC
power voltage; refer to the type plates at the back of the pieces of equipment.
• Use a socket outlet located close to the equipment and easily accessible. As the
power supply cord is the equipment disconnecting device, do not route the power
cord between pieces of furniture or over sharp edges.
• Avoid using outlets controlled by wall switches or shared by other equipment.
• Make sure there is no strain on the power supply cord.
1.2 Safety Requirements
THIS EQUIPMENT MUST BE EARTHED
• Only connect the power plug to a socket outlet provided with a
protective earth contact.
• To reduce the risk of fire, use only the power cord supplied with
the mailing system.
• Do not use earth adaptors.
• Do not use this product on a wet floor or near water.
• In case of liquid spillage, disconnect the power cord from the
wall plug and proceed to cleaning.
DELTA2_UK.book Page 5 Vendredi, 27. juin 2008 11:47 11
Page 12
Read this First
6
1
General Safety
• Before using your mailing system, thoroughly read the operating instructions.
• To reduce the risk of fire, electric shock and injury to persons, follow normal and
basic safety precautions for office equipment when using your mailing system.
• To avoid equipment damage, only use approved supplies (inks, labels,
cleaners...).
Follow the additional safety precautions below:
• Do not place lighted candles, cigarettes, cigars, etc. on the mailing system.
• When removing jammed material, avoid using too much force to prevent personal
injury and damaging equipment.
• When lifting covers, wait for all parts to stop moving before placing hands near
feeder path or printhead.
• To prevent overheating do not block the equipment ventilation openings or try to
stop the power supply fans.
• Do not remove bolted covers as they enclose hazardous parts that should only be
accessed by a Service Representative.
The mailing system contains moving parts. Keep fingers, long
hair, jewelry, neck ties, loose clothing away from the mail path at
all times.
DELTA2_UK.book Page 6 Vendredi, 27. juin 2008 11:47 11
Page 13
Read this First
7
1
Telephone and LAN Connections
Your mailing system uses a telephone line to connect to the postal services and to
your customer online services.
You may also use a LAN to connect the mailing system to a mail accounting software
on a separate PC.
Follow the additional precautions below:
• Avoid using equipment during an electrical storm; there may be a risk of electrical
shock from lightning.
• Do not install telephone jacks or LAN connectors in wet locations.
• Disconnect the telephone or LAN cord from the wall before removing equipment.
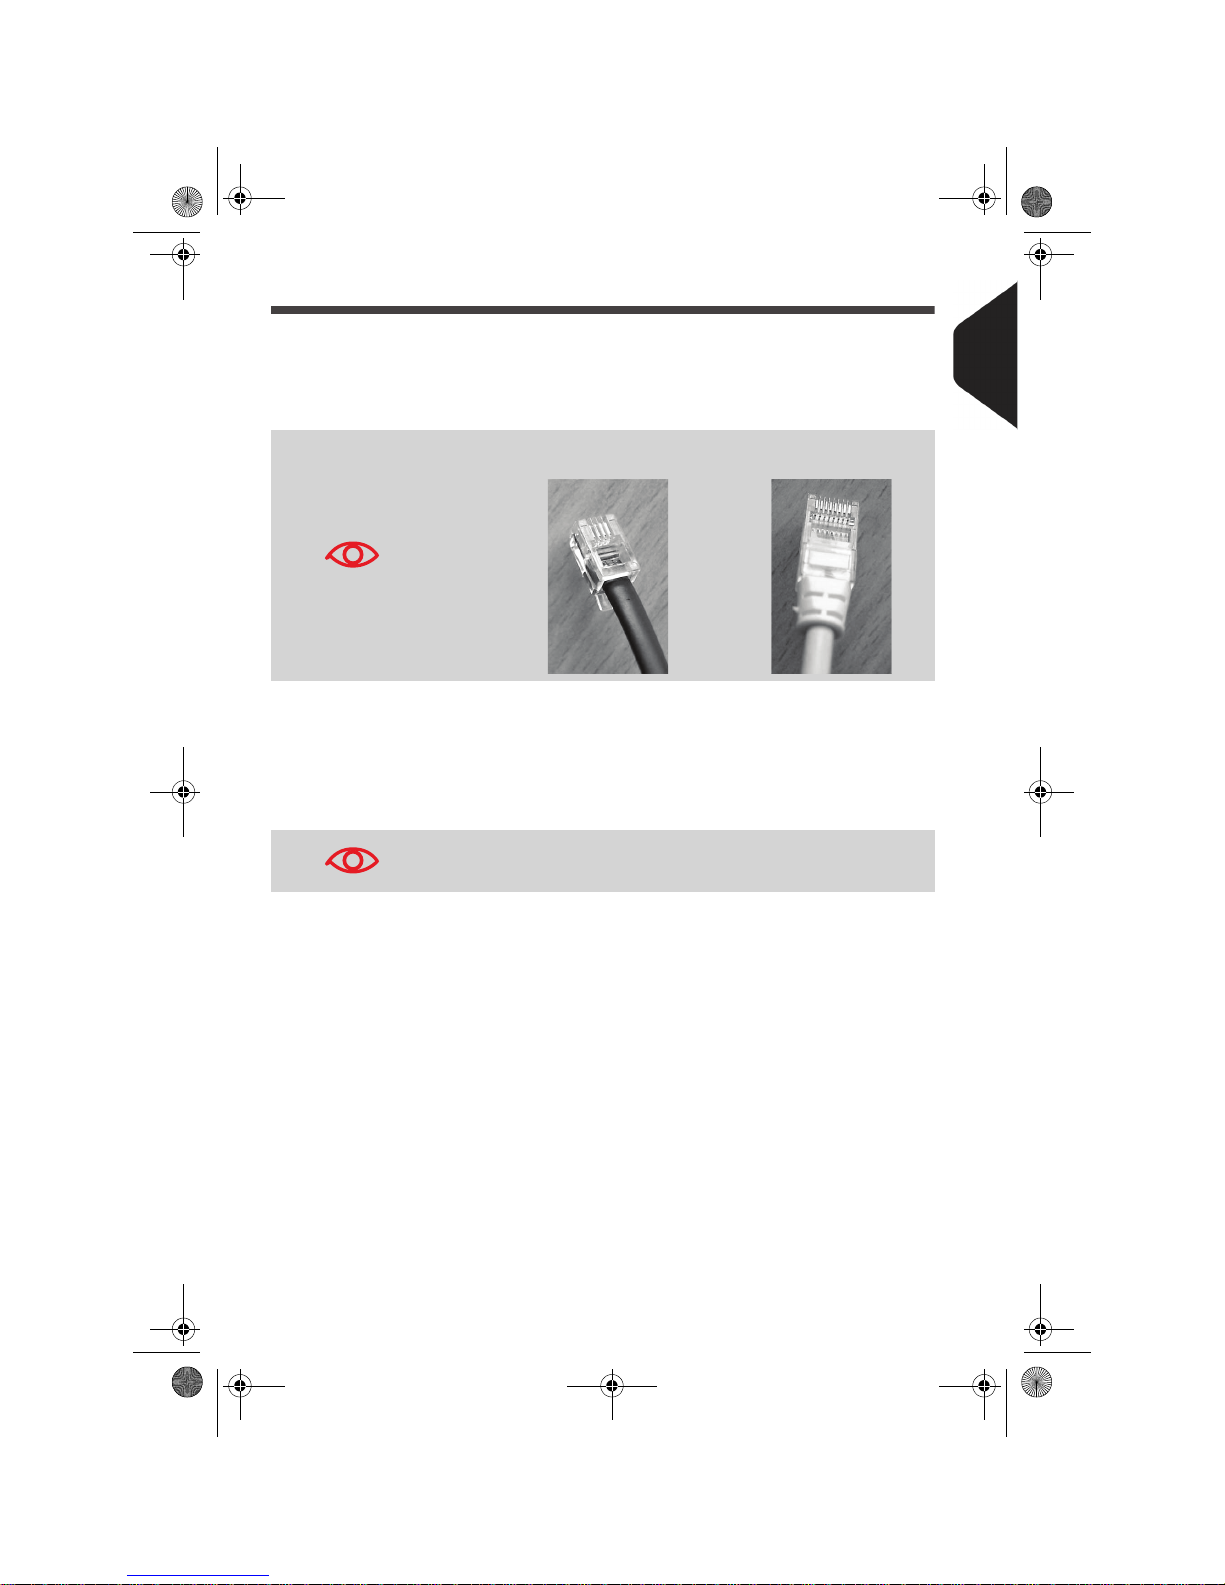
To prevent damage to equipment, do not confuse telephone jacks
that connect to the modem and LAN connectors that are bigger:
Phone (4 pins) LAN (8 pins)
To reduce the risk of fire, only connect the modem to the tele-
phone line using supplied cable (see Specifications p.181).
DELTA2_UK.book Page 7 Vendredi, 27. juin 2008 11:47 11
Page 14
Read this First
8
1
Disconnecting your Mailing System
How to Disconnect your Mailing System
How to Disconnect your
Mailing System
The power supply cord is the equipment disconnecting device.
1 First switch the mailing system to Sleep mode (see How to
Turn the Mailing System to 'Sleep' Mode p.19) if there is no
emergency.
2 Unplug the power cord from the wall plug.
3 If present, unplug the LAN cable and the telephone cord
from their sockets as they may still be energized.
Unplugging the power cord only when the mailing system is in
Sleep mode avoids keeping the ink cartridge in an unprotected
position where the ink may dry out and become unusable.
DELTA2_UK.book Page 8 Vendredi, 27. juin 2008 11:47 11
Page 15
Read this First
9
1
Environmental Conditions
Temperature and Relative Humidity
Your mailing system should only be operated in the following conditions:
Weighing accuracy
1.3 Environmental Conditions
Temperature range 50°F - 104°F
Relative humidity 80% max. without condensation
To obtain the best weighing results, use a solid and steady
table:
• Far from any door
• Far from any fan.
DELTA2_UK.book Page 9 Vendredi, 27. juin 2008 11:47 11
Page 16
Read this First
10
1
DELTA2_UK.book Page 10 Vendredi, 27. juin 2008 11:47 11
Page 17
Meet your Mailing System
Get to know your mailing system in this section.
2.1 System Layout..................................................... 13
2.2 Connections ........................................................ 15
2.3 Control Panel Layout .......................................... 17
2.4 Power Management........................................... 19
How to Turn the Mailing System to 'Sleep' Mode ........................19
2.5 Mail Specifications............................................. 20
2 Meet your Mailing
System
DELTA2_UK.book Page 11 Vendredi, 27. juin 2008 11:47 11
Page 18
Meet your Mailing System
12
2
DELTA2_UK.book Page 12 Vendredi, 27. juin 2008 11:47 11
Page 19
Meet your Mailing System
13
2
System Layout
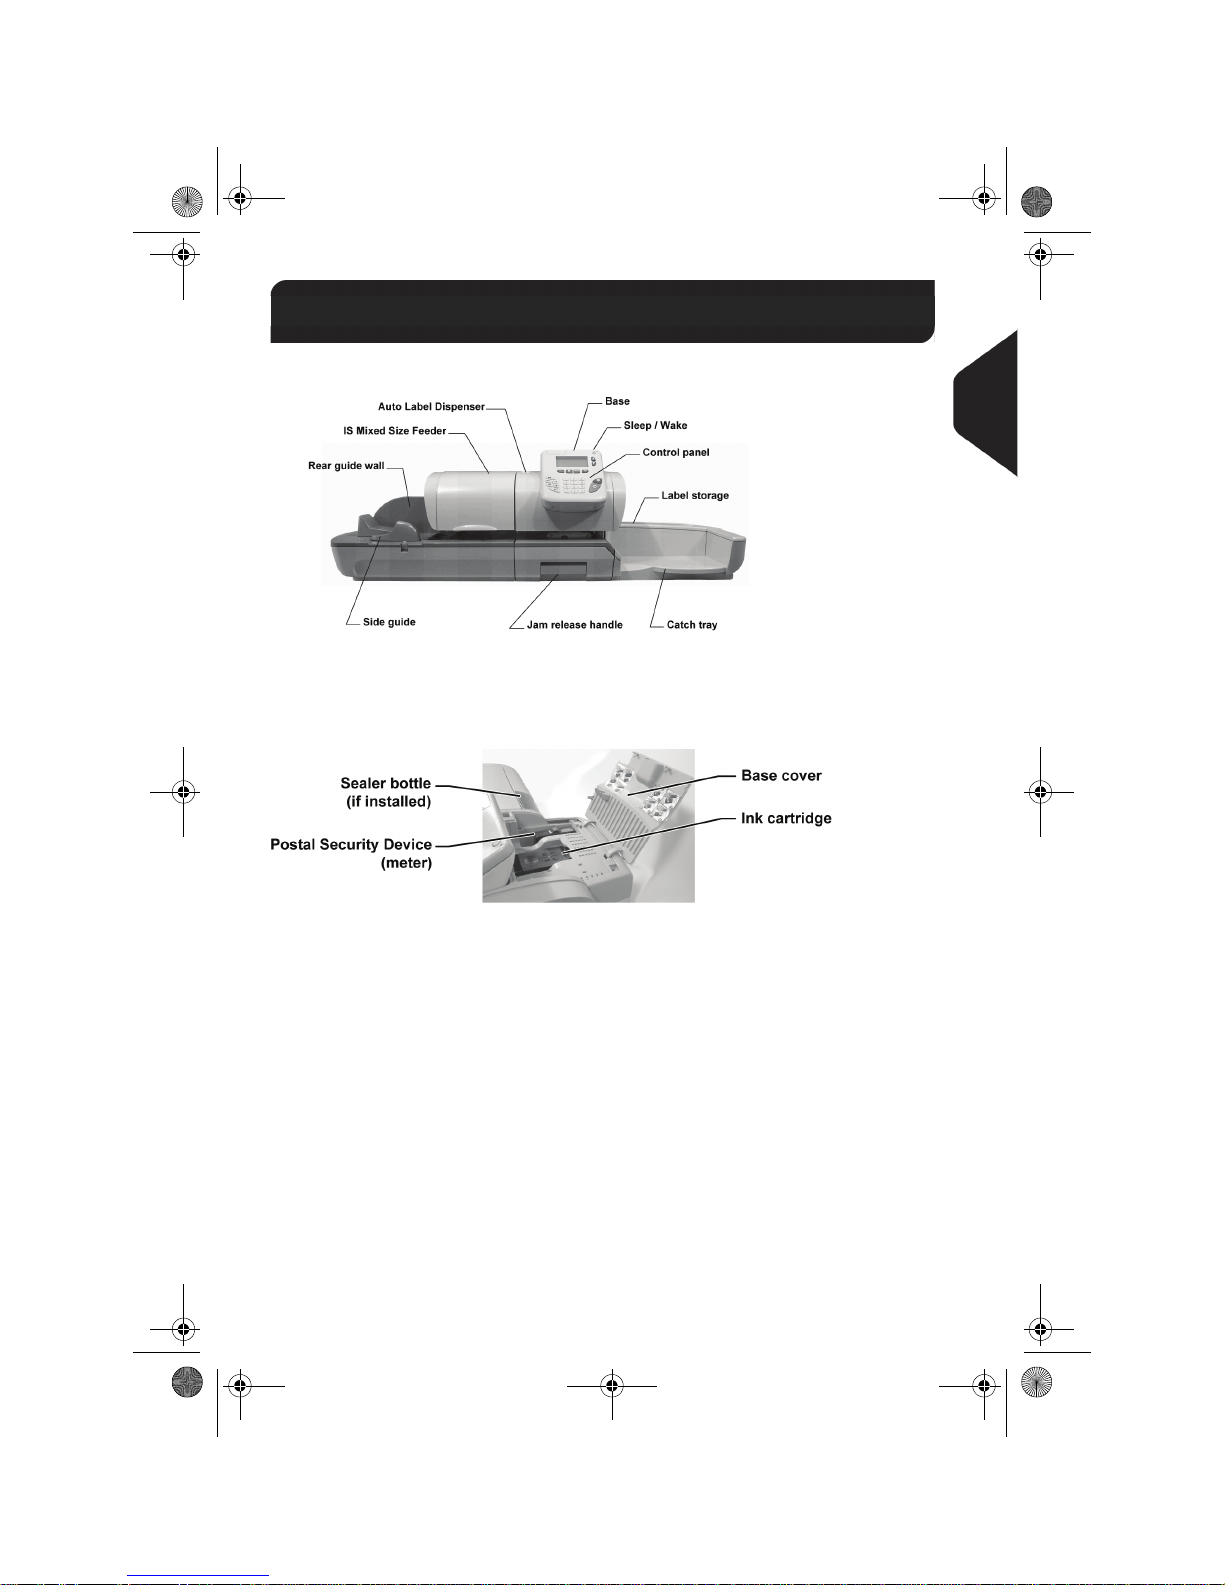
Figure 1 : Mailing system with Auto-feeder
Figure 2 : Base internal details
2.1 System Layout
DELTA2_UK.book Page 13 Vendredi, 27. juin 2008 11:47 11
Page 20
Meet your Mailing System
14
2
Table 1 : Mailing system layout
Auto label dispenser Contains labels to be printed.
Base Prints envelopes (or labels) and controls the mailing
system.
Catch tray Receives mail pieces after processing.
Control panel Allows you to control the mailing system.
Hopper Beginning of mail transport path.
Ink cartridge Prints the imprints and contains ink.
Jam release handle Allows you to remove jammed envelopes or labels.
Label storage Use this slot to store labels horizontally.
Postal Security Device
(Meter)
Manages postage.
Rear guide-wall Guides envelopes into the feeder.
Sealer bottle Provides water to seal envelopes (optional).
Side guide Holds large envelopes in place for feeding.
User guide receptacle Stores this User Guide.
Weighing platform Measures weight of mail pieces.
DELTA2_UK.book Page 14 Vendredi, 27. juin 2008 11:47 11
Page 21
Meet your Mailing System
15
2
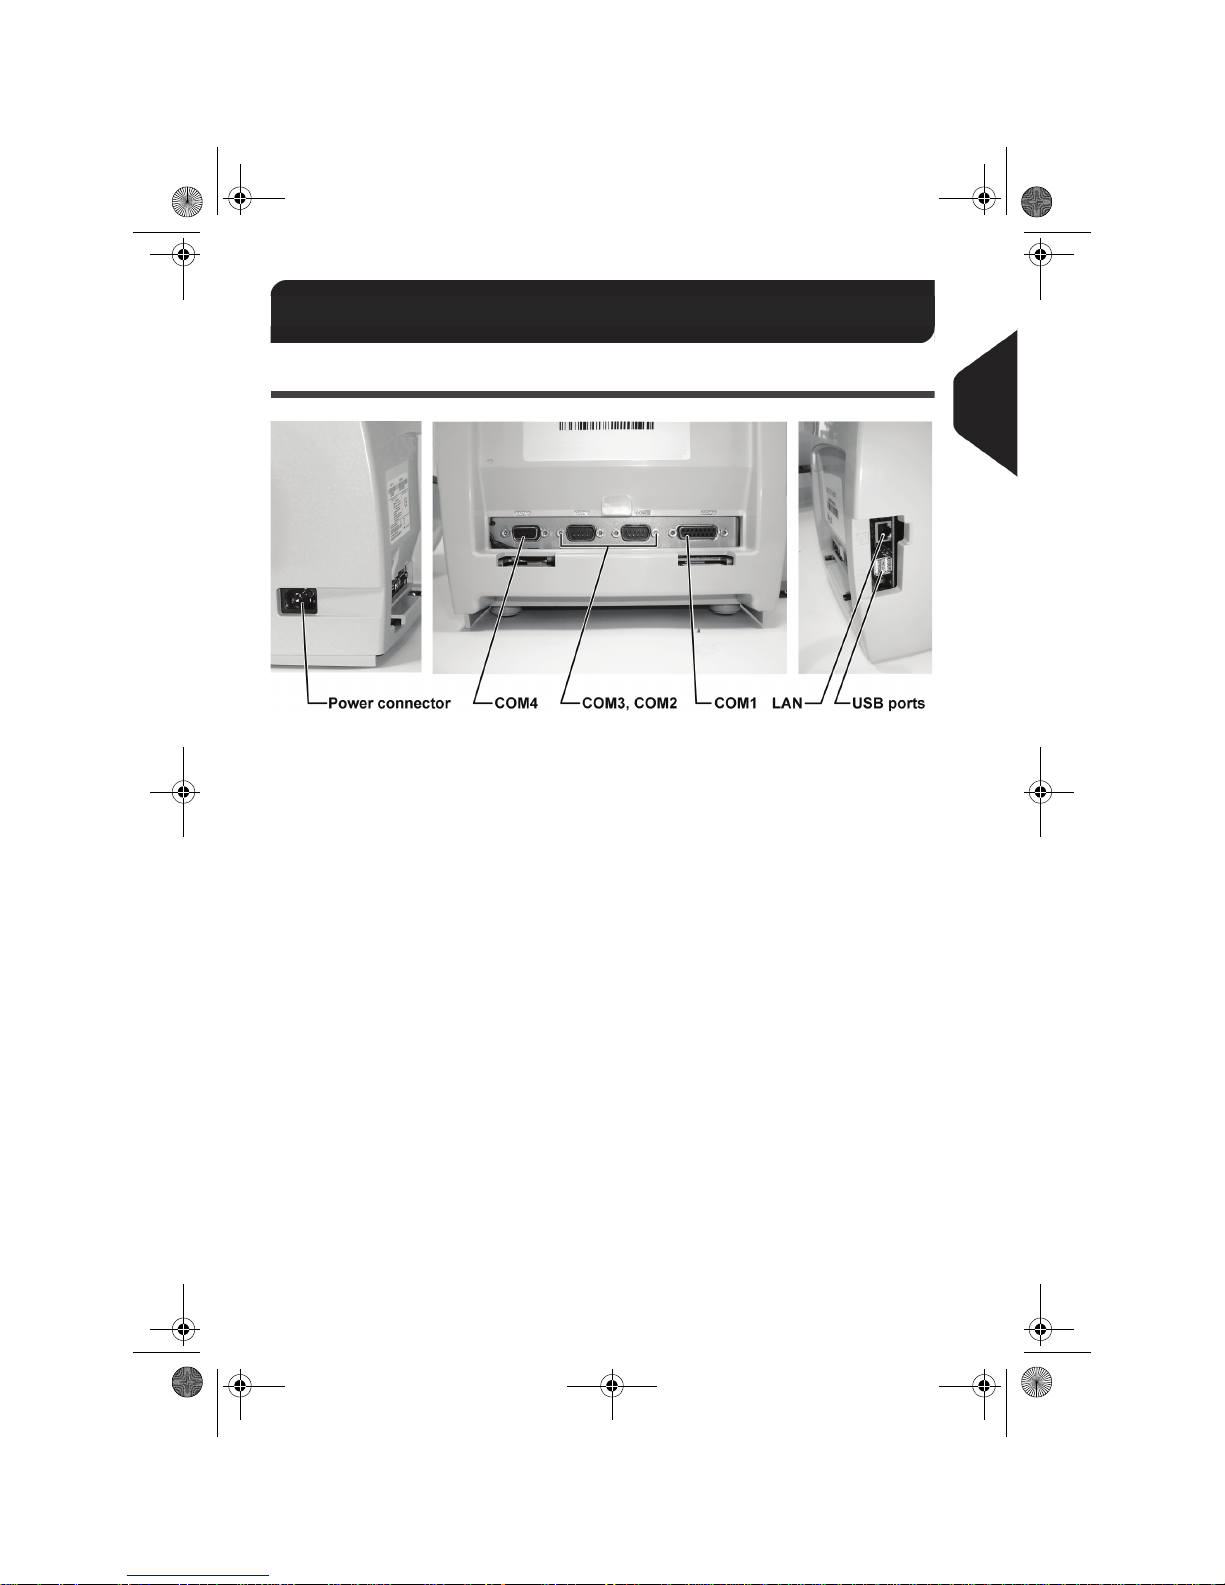
Connections
Rear Connectors
Figure 3 : Base rear connectors
COM1 To mixed feeder or dynamic scale
COM2/3 To weighing platform
COM4 (future use)
LAN To accounting software on a PC
USB To modem, printer or USB memory device
2.2 Connections
DELTA2_UK.book Page 15 Vendredi, 27. juin 2008 11:47 11
Page 22
Meet your Mailing System
16
2
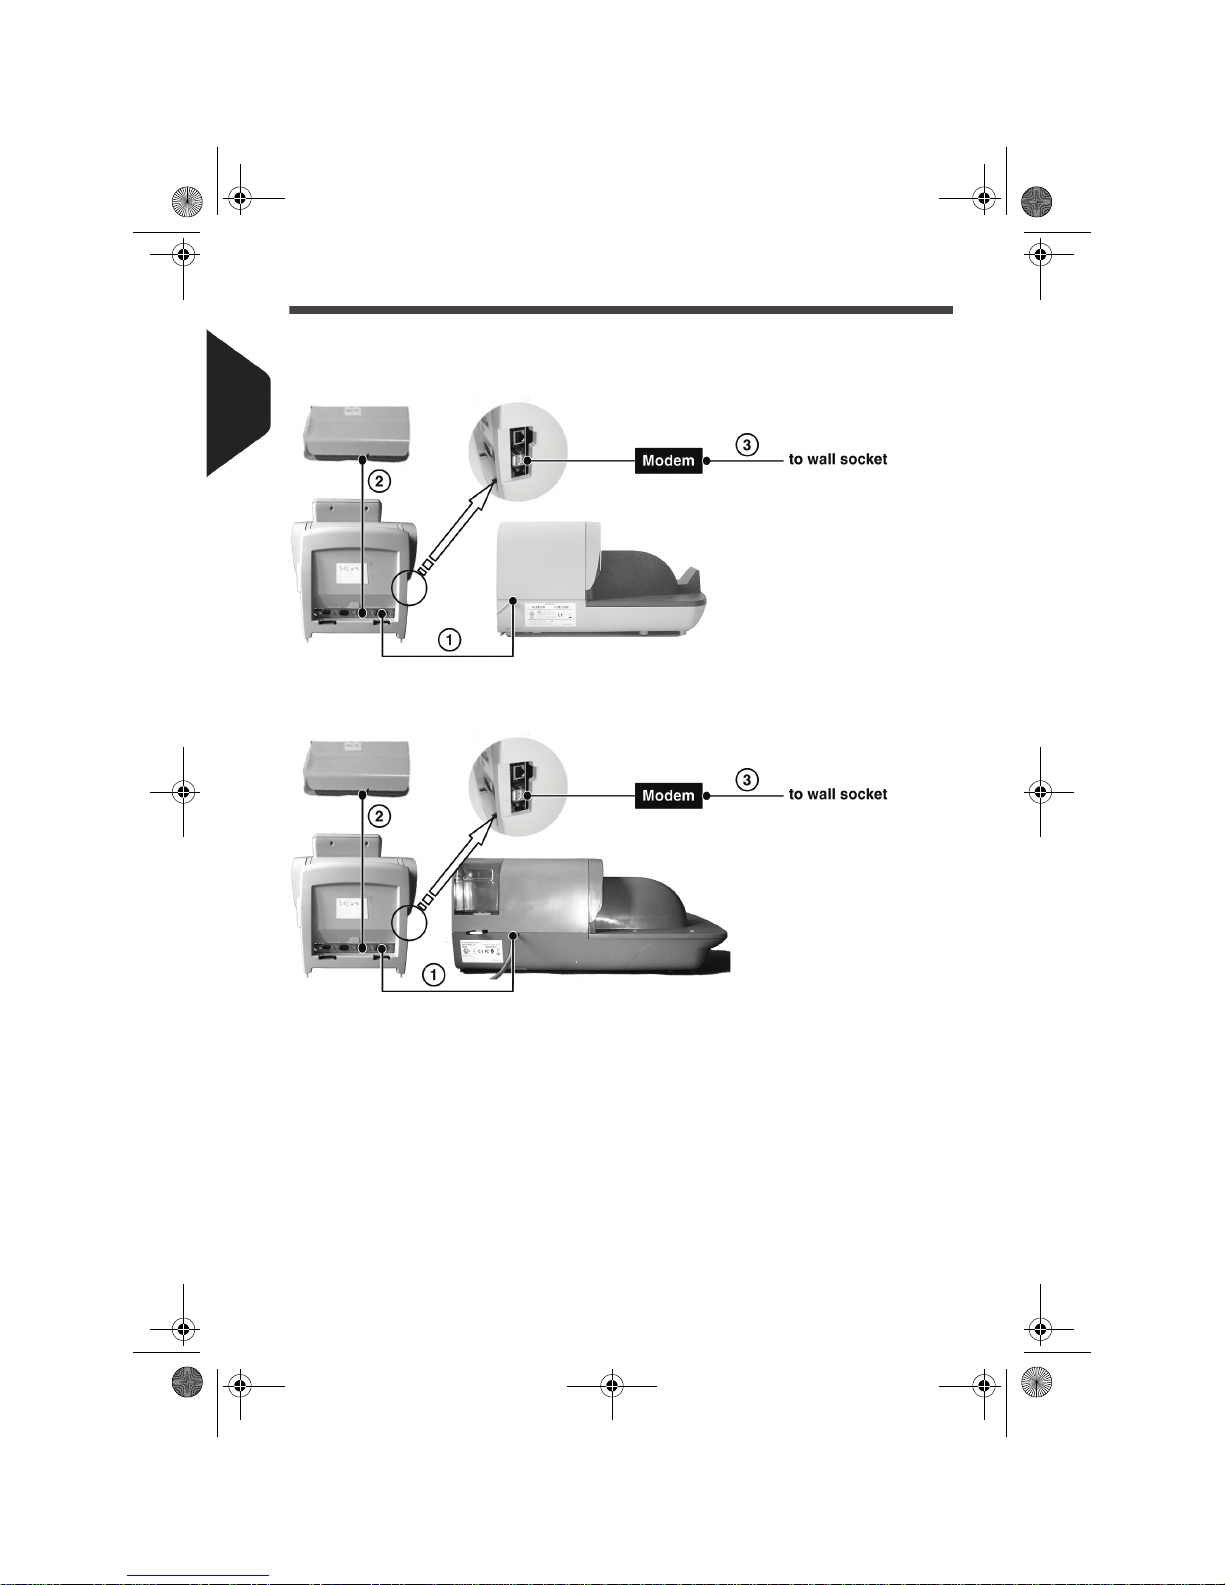
Connection Diagrams
(without sealer)
(with sealer)
1 Feeder to Base
2 Base to Weighing Platform
3 Telephone cable
DELTA2_UK.book Page 16 Vendredi, 27. juin 2008 11:47 11
Page 23
Meet your Mailing System
17
2
Control Panel Layout
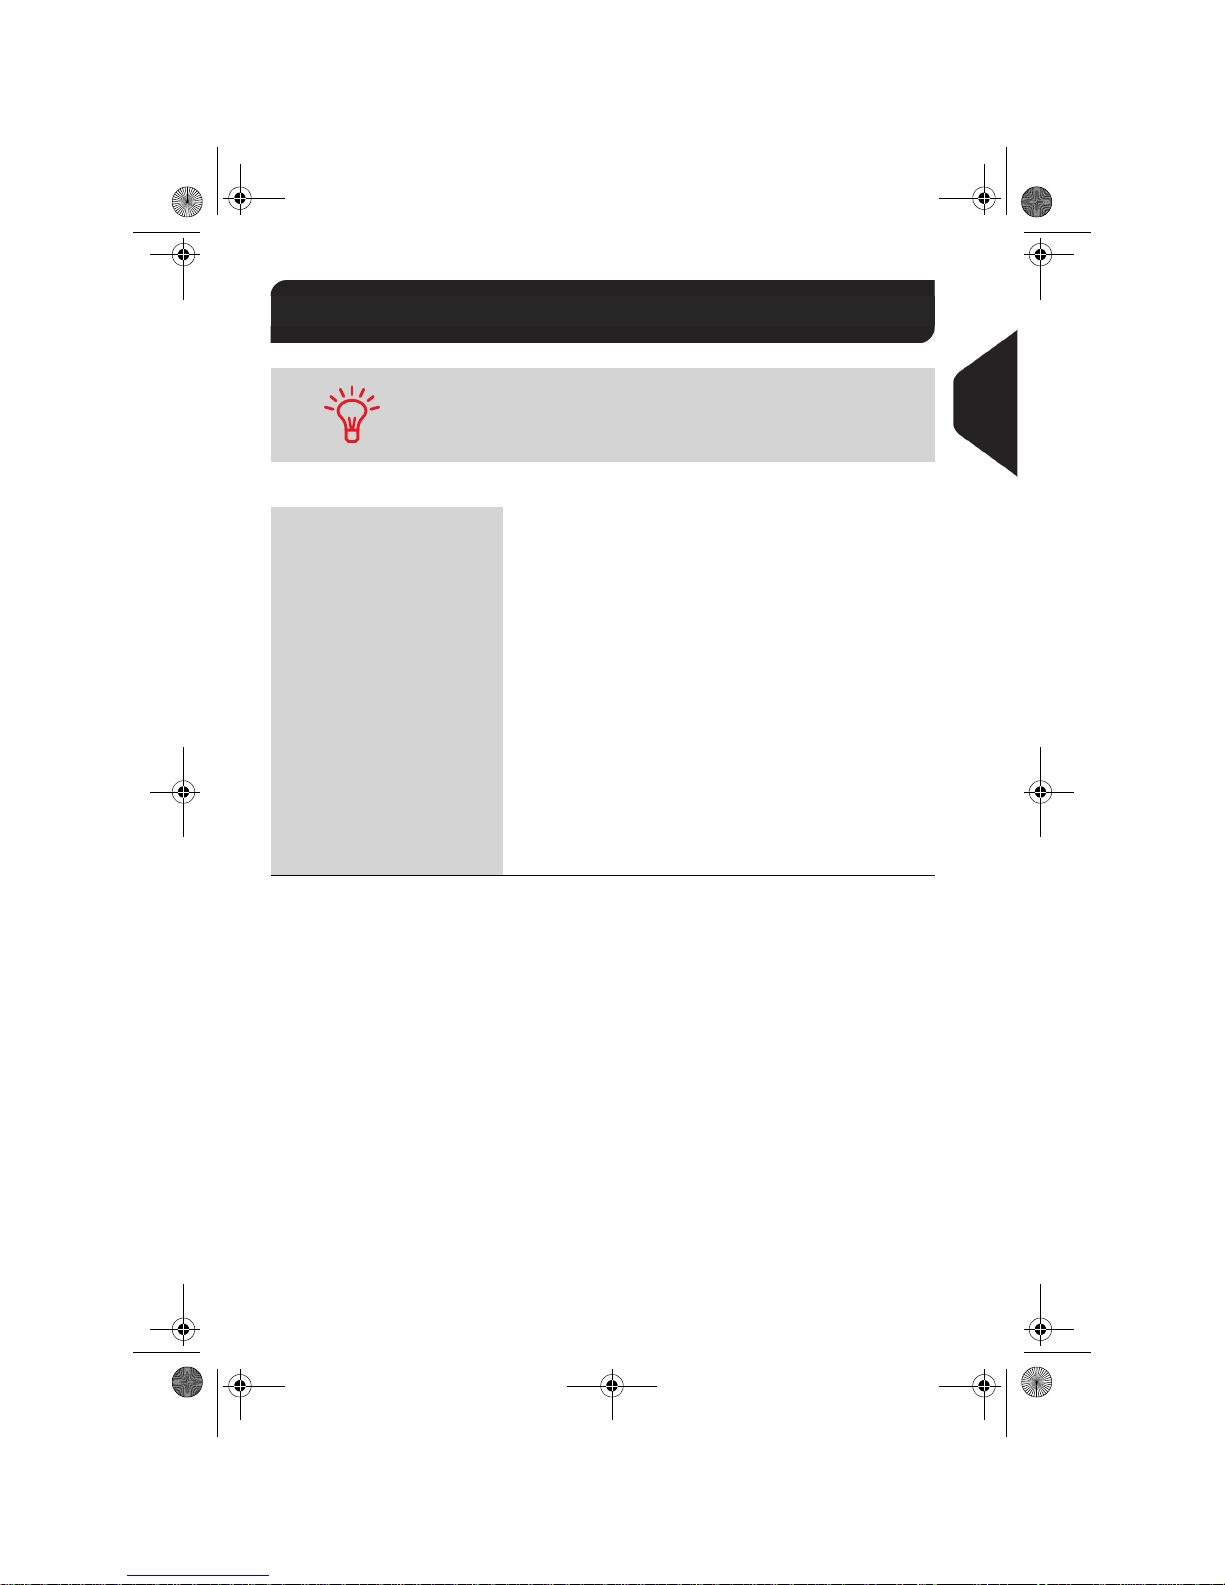
Table 2 : Screen layout
2.3 Control Panel Layout
See control panel layout on flap of the cover of the manual.
Account Displays account currently selected.
Date Displays the date that will be printed.
ERA Indicates that an ERA will be printed when present.
Job memory Displays selected job memory when applicable.
Mailbox Indicates unread messages in user's message box.
Postage Indicates the amount to be printed.
Print offset Indicates the printing offset status (imprint position shif-
ting for thick envelopes).
Rate and services Indicates the current rate and services selected.
Slogan Indicates that a slogan will be printed.
Weighing type Current weighing method.
Weight Current weight used to calculate postage.
DELTA2_UK.book Page 17 Vendredi, 27. juin 2008 11:47 11
Page 24
Meet your Mailing System
18
2
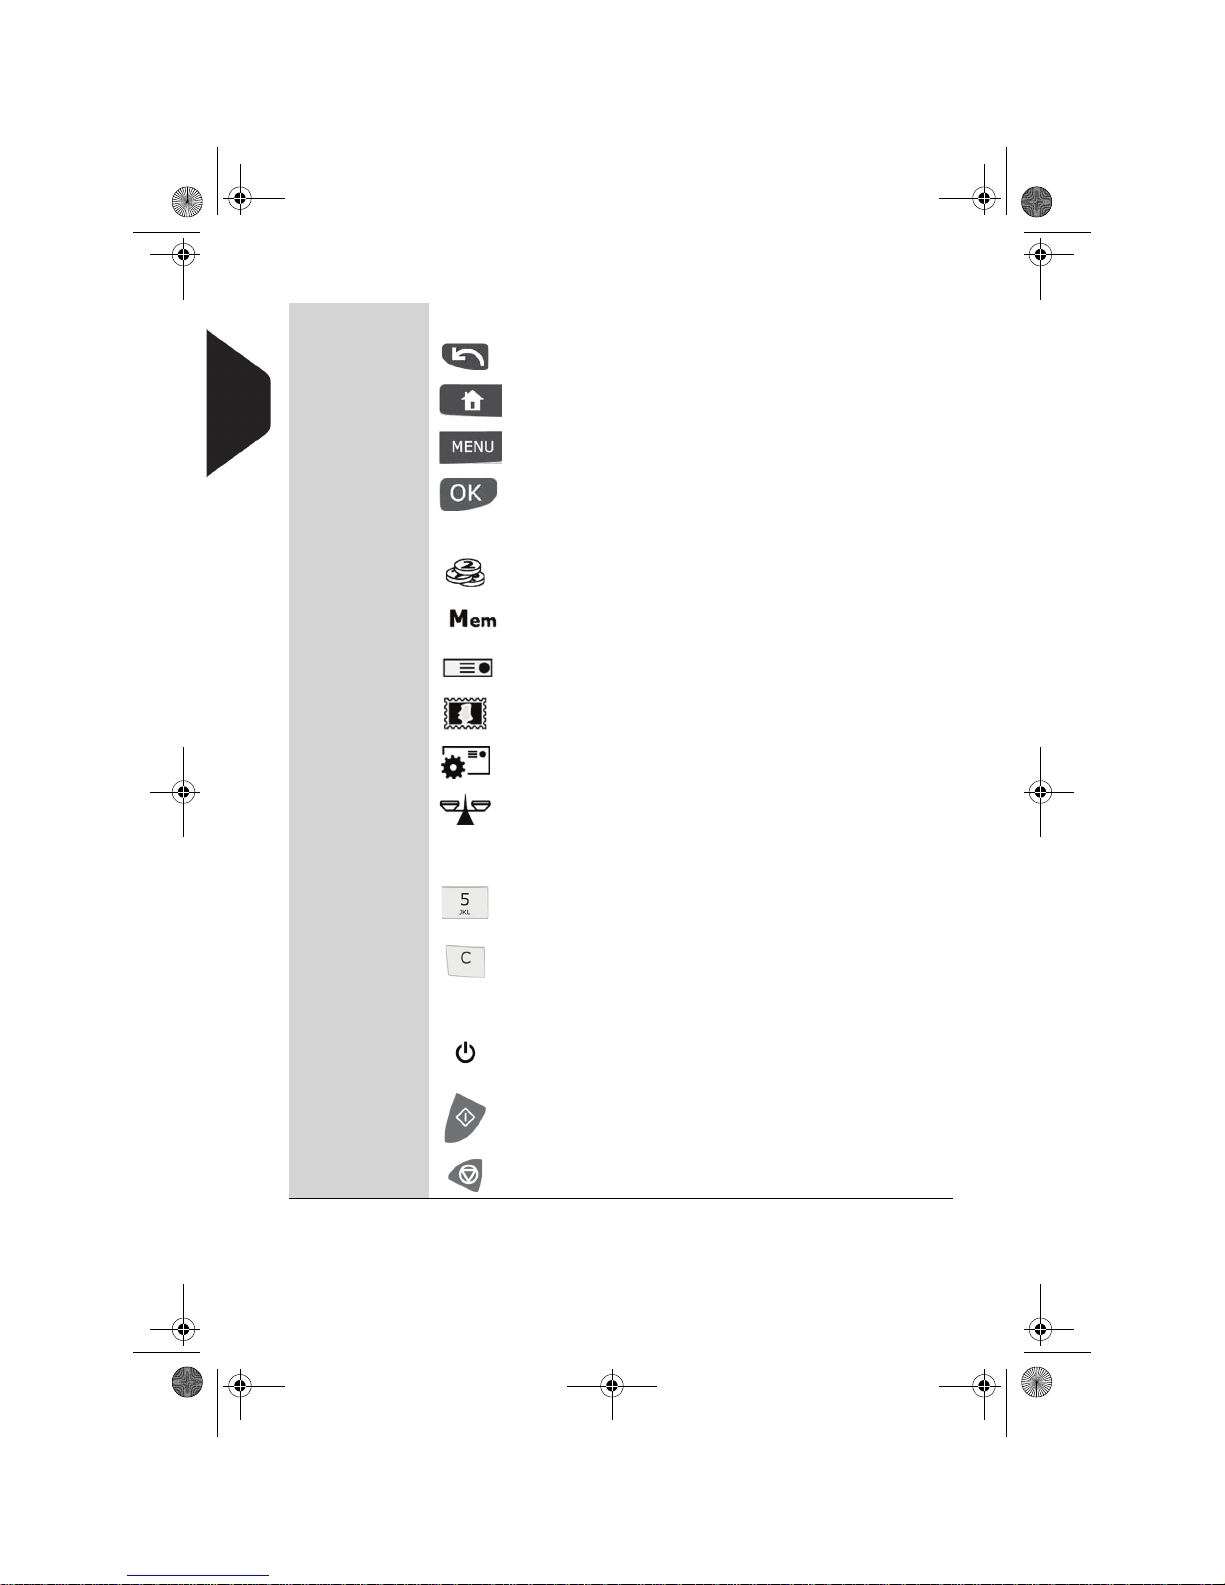
Table 3 : Keys and shortcuts
NAVIGATION KEYS
Return Goes back to the previous screen.
Home screen Displays the current type of imprint (type of task).
Menu Accesses the settings menu.
OK Validates an action or selection.
SHORTCUT KEYS
Credits Accesses credits management.
Job memories
Accesses preset imprint and account memories. These
presets are managed by the supervisor.
Print labels Switches to label printing (instead of envelopes).
Rate selection Displays the rate selection screen.
Imprint confi-
guration
Accesses the type of imprint selection and imprint set up
screens.
Weighing
mode
Opens the weighing type selection menu (Standard weighing, Differential weighing, Manual weight entry...)
KEYPAD
Alphanumeric
keys
Allows the entry of amounts or weights, the selection of
numbered menu options or to type texts (press a key
several times to display all possible characters).
Clear / Reset
rate
Clears keypad entries or, from the home screen, resets
rate to default.
START / STOP KEYS
Sleep/wake
Wakes the mailing system or turns it to 'Sleep' mode. The
light indicates the system state (green = awake, amber =
asleep).
Start Starts printing.
Stop
Stops printing and all mechanical activity (motors) in the
mailing system.
DELTA2_UK.book Page 18 Vendredi, 27. juin 2008 11:47 11
Page 25
Meet your Mailing System
19
2
Power Management
Energy Star® Compliance
Office equipment is generally powered on 24 hours a day, so power management
features are important for saving energy and are an easy way to reduce air pollution.
Your mailing system is an Energy Star
®
qualified mailing system that automatically
goes into a low-power 'Sleep' mode after a period of inactivity.
The period is set to 20 minutes by default.
Spending a large portion of time in low-power mode not only saves energy but helps
your equipment run cooler and last longer.
' Sleep' Mode
You can also turn the mailing system to 'Sleep' mode manually.
How to Turn the Mailing System to 'Sleep' Mode
How to Turn the
Mailing System
to 'Sleep' Mode
1 Press (at the top right corner of the control panel).
The light located next to the key indicates:
¾ Green: the mailing system is awake and ready for use.
¾ Amber: the mailing system is in Sleep mode.
2.4 Power Management
To change the period of time after which the mailing system swit-
ches to 'Sleep' mode, see How to Change System Time-outs
p.122.
DELTA2_UK.book Page 19 Vendredi, 27. juin 2008 11:47 11
Page 26
Meet your Mailing System
20
2
Mail Specifications
Base Characteristics
Envelope Dimensions
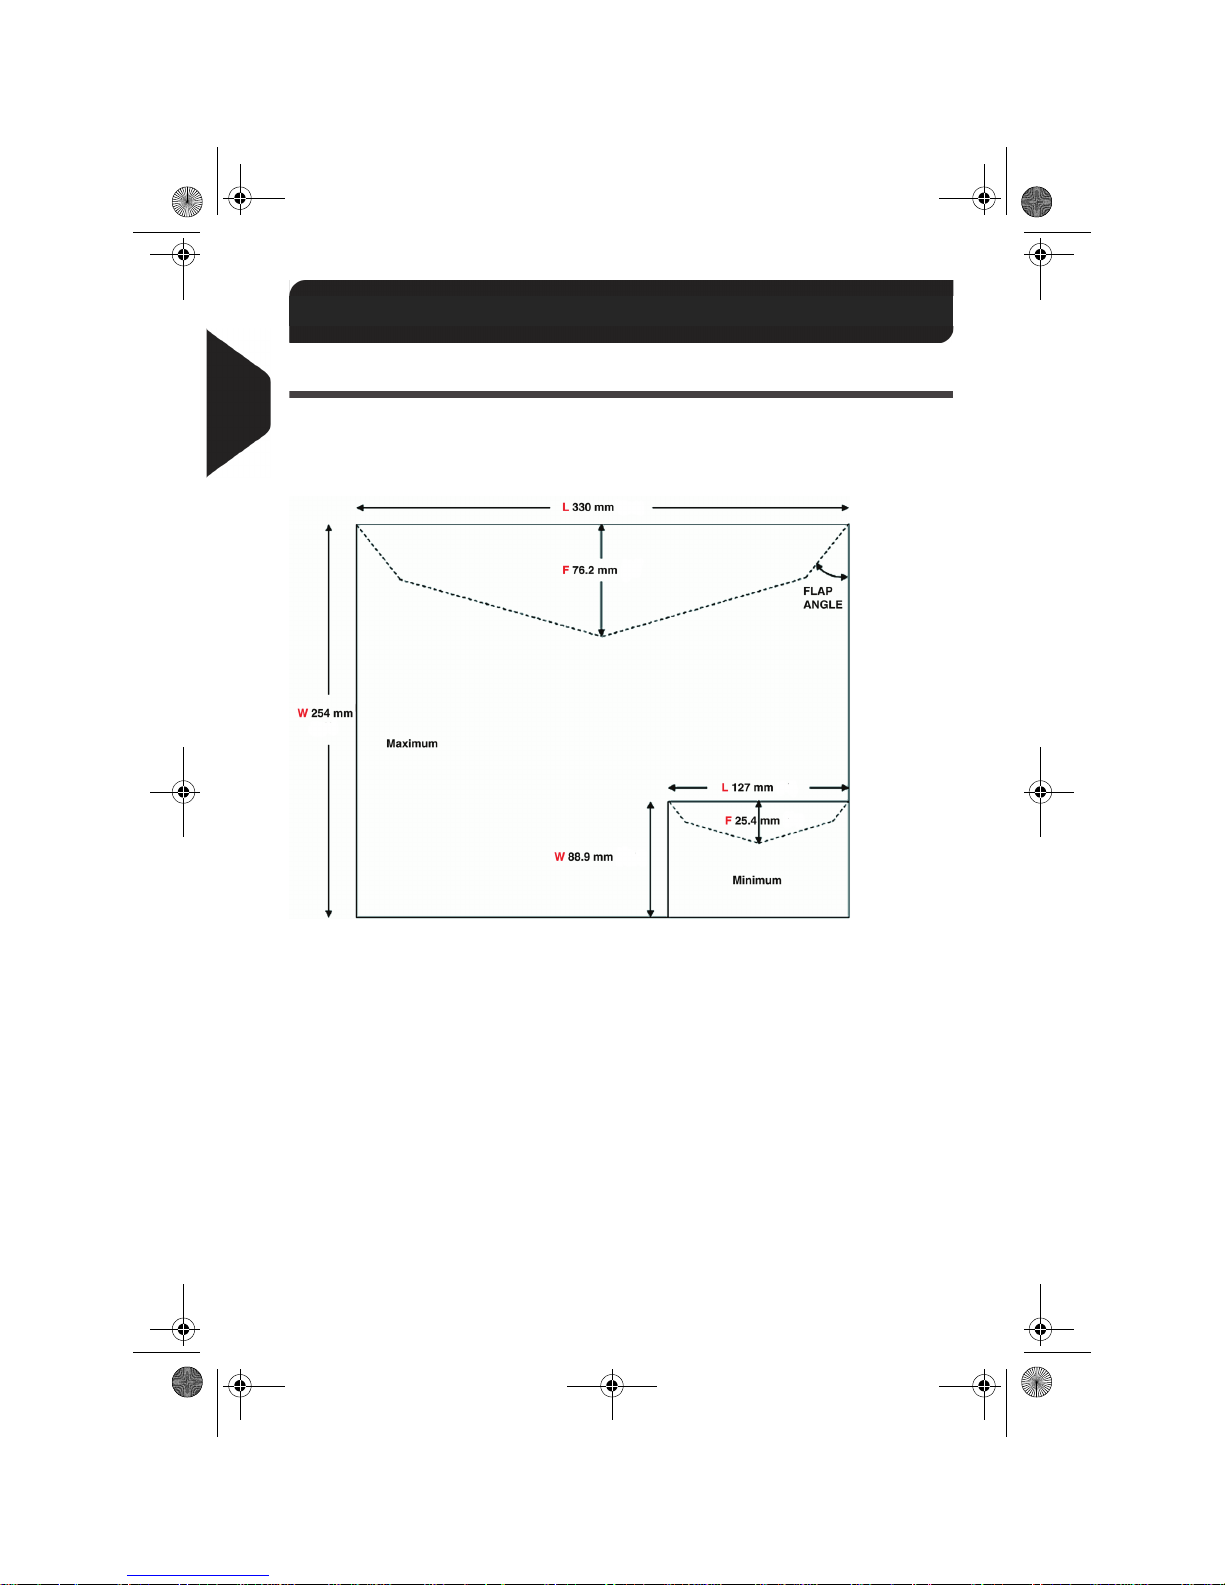
Your mailing system can handle envelope and flap sizes as illustrated below.
Figure 4 : Mailing specifications
Note: illustration is not on scale.
Flap angle: 19° min. / 60° max.
Envelope Weight
Envelope Thickness
2.5 Mail Specifications
Min2.83 g Max 907 g
Min 0.2 mm Max16 mm
DELTA2_UK.book Page 20 Vendredi, 27. juin 2008 11:47 11
Page 27
Meet your Mailing System
21
2
Feeder
See also
• How to Use the Feeder p.32.
Envelope Stack
Envelope Thickness
With optional sealer:
Min weight 2.83g
Max weight 953g
Max height 101.6mm
The feeder cannot handle nested envelopes.
Max with sealer OFF 12.7 mm Max with sealer ON 9.52 mm
DELTA2_UK.book Page 21 Vendredi, 27. juin 2008 11:47 11
Page 28
Meet your Mailing System
22
2
DELTA2_UK.book Page 22 Vendredi, 27. juin 2008 11:47 11
Page 29
Processing Mail
This section describes how you can run mail: choosing a type of imprint, selecting
a rate and weighing method, activating sealing and so on, depending on the type
of process you need to apply to your mail.
3.1 Choosing a Type of Imprint ............................... 25
3.2 Preparing and Starting your Work Session ........27
How to Sort Mail...........................................................................28
How to Log in and Start a Work Session .....................................29
How to Change the Current 'Type of Imprint'...............................30
How to Use the Feeder ................................................................32
3.3 Running [Normal] Mail....................................... 34
How to Apply Normal Postage (Settings).....................................34
How to Apply Normal Postage (Running Mail).............................37
3.4 Running [PPI] Mail .............................................. 41
How to Process PPI Mail (Settings).............................................41
How to Process PPI Postage (Running Mail) ..............................42
3.5 Running [Received] Mail .................................... 46
How to Process Received Mail (Settings)....................................46
How to Process Received Mail (Running Mail)............................47
3.6 Running [Pass through] Mail ............................. 48
How to Process Mail without Printing (Settings) ..........................48
How to Process Mail without Printing (Running Mail) ..................50
3.7 Settings Details ................................................... 51
How to Change Accounts ...........................................................51
How to Select a Rate ..................................................................52
How to Enter Postage Manually...................................................53
How to Select a PPI ....................................................................54
How to Change the Weighing Type ............................................57
How to Enter Weight Manually.....................................................58
How to Change the Date on the Imprint ......................................59
How to Add (or Cancel) an ERA on the Imprint ..........................60
How to Add (or Cancel) a Slogan on the Imprint ........................61
How to Move the Imprint (Print Offset) ........................................61
How to Use a Job Memory ..........................................................62
3.8 Complementary Operations .............................. 64
How to Stop the Run Process......................................................64
How to Reset Batch Counters .....................................................64
3 Processing Mail
DELTA2_UK.book Page 23 Vendredi, 27. juin 2008 11:47 11
Page 30
Processing Mail
24
3
How to Fill the Auto Label-Dispenser...........................................65
DELTA2_UK.book Page 24 Vendredi, 27. juin 2008 11:47 11
Page 31
Processing Mail
25
3
Choosing a Type of Imprint
Introducing the 'Type of imprint'
To process mail, you must first choose a 'Type of imprint' that corresponds to the type
of process you want to apply to your mail: printing postage for different rates, use
prepaid imprints, printing 'Received' and the date, etc.
For each 'Type of imprint' you select, the mailing system displays all the parameters
- and only those parameters - that concern the type of process you want to apply.
Home Screen and Configuration Menu
Each type of imprint is associated to:
• A specific Home screen that displays current parameters (weight, postage...)
• A specific Configuration menu that allows you to set the imprint parameters.
3.1 Choosing a Type of Imprint
To directly gain access to the configuration menu of the type of
imprint, press on the control panel.
Shortcut keys are available on the front panel of your machine.
Using them saves you many key strikes to reach rate selection,
Job memories, weighing modes, imprint customizing, credits status...
DELTA2_UK.book Page 25 Vendredi, 27. juin 2008 11:47 11
Page 32
Processing Mail
26
3
Types of Process and Types of Imprint
The table below indicates the type of imprint to choose, depending on the type of
process you want to apply to each set of mail.
The column on the right indicates, for each type of imprint, the parameters you can
set before running mail.
If you do not set any parameter, the mailing system uses default values.
See also
• To set default values as supervisor: see Configuring your Mailing System p.113.
Type of process Type of imprint Parameters to run mail
Apply postage to
outgoing mail
[Normal]
•
Rate
• Weight
• Date format
• ERA (optional)
• Slogan (optional)
• Print offset (optional)
Send Prepaid mail [PPI]
• Pre-paid imprint
• ERA (optional)
• Slogan (optional)
• Print offset (optional)
Print 'Received' or the
date on incoming mail
[Received]
•
Print date and/or 'Received'
• Print offset (optional)
Seal
or count envelopes
without printing
[Pass through]
•
(None)
The machine selects [Normal] type of imprint at start up by
default.
DELTA2_UK.book Page 26 Vendredi, 27. juin 2008 11:47 11
Page 33
Processing Mail
27
3
Preparing and Starting your Work Session
In this section
This section recommends a list of preparation steps to help you running your mail efficiently.
Mail preparation involves:
• Sorting mail by type and task, to make processing faster (p.28)
• Logging into the system to start a work session (p.29)
• Selecting the Type of imprint that corresponds to each set of mail (p.30)
• Checking additional issues concerning your machine: ink level, credits... (p.31).
This section also describes how to use the mailing system automatic feeder (p.32).
3.2 Preparing and Starting your Work
Session
DELTA2_UK.book Page 27 Vendredi, 27. juin 2008 11:47 11
Page 34
Processing Mail
28
3
Sorting Mail by Type and by Task
To save time, sort your mail in groups that have similar characteristics.
This will prevent you having to change the imprint parameters too often and allow you
to fully benefit from the automatic features of your mailing system, particularly differential weighing or dynamic scale options that allow you to process mail much
quicker.
This will prevent you having to change the imprint parameters too often and allow you
to fully benefit from the automatic features of your mailing system, particularly differential weighing option that allows you to process mail much quicker.
Follow the procedure below to split your mail in different stacks.
How to Sort Mail
How to Sort Mail
Put the mail in different stacks according to the characteristics
and in the order that follows:
1 Type of process to apply
See table p.26:
¾ Outgoing mail
Normal postage with different rates or services
Prepaid mail
¾ Incoming mail
¾ Sealing only or counting.
2 Separate envelopes to seal from other mail pieces.
3 Account to use
(only if you have to select an account at logging in)
4 Rate and/or services to apply
5 Physical characteristics
Separate mail pieces that exceed the weight, size or
thickness allowed in the machine mail path.
See Mail Specifications p.20.
6 Sort each stack by size.
DELTA2_UK.book Page 28 Vendredi, 27. juin 2008 11:47 11
Page 35
Processing Mail
29
3
Turning Machine On and Starting a Work Session
Turning the machine on starts a work session on the mailing system.
At start-up, depending on supervisor settings:
• The access to the machine may be free
• You may have to enter a PIN code
• You may have to select an account.
Your work session ends when the system returns to 'Sleep' mode.
See also
• To change accounts when a session is already opened, see Changing Accounts
p.51.
• To choose the policy for accounting and access control as supervisor, see Ma-
naging Accounts and Access Rights p.73.
• How to Turn the Mailing System to 'Sleep' Mode p.19.
How to Log in and Start a Work Session
How to Log in
and Start a Work
Session
To log in as user:
1 Press to wake the system up.
The system may display one of the following screens:
¾ Home screen [Normal]. In that case, you are logged in, no
other step is required.
¾ Login screen
¾ Account screen
2 On the Login screen, enter your operator PIN code.
3 On the Account screen, select your account as follows.
¾ Use up and down arrows (use double arrows to scroll list)
and press [OK] to validate, or:
The Home screen [Normal] screen is displayed. Your work
session begins.
Find your account quicker: instead of using up and down arrows,
type the account number.
To type letters instead of figures using the keypad, press the corresponding key several times in a row as on a mobile phone.
DELTA2_UK.book Page 29 Vendredi, 27. juin 2008 11:47 11
Page 36
Processing Mail
30
3
Selecting the Type of Imprint
For each stack of mail you have sorted (see p.28), select the type of imprint you need
to process your mail as follows.
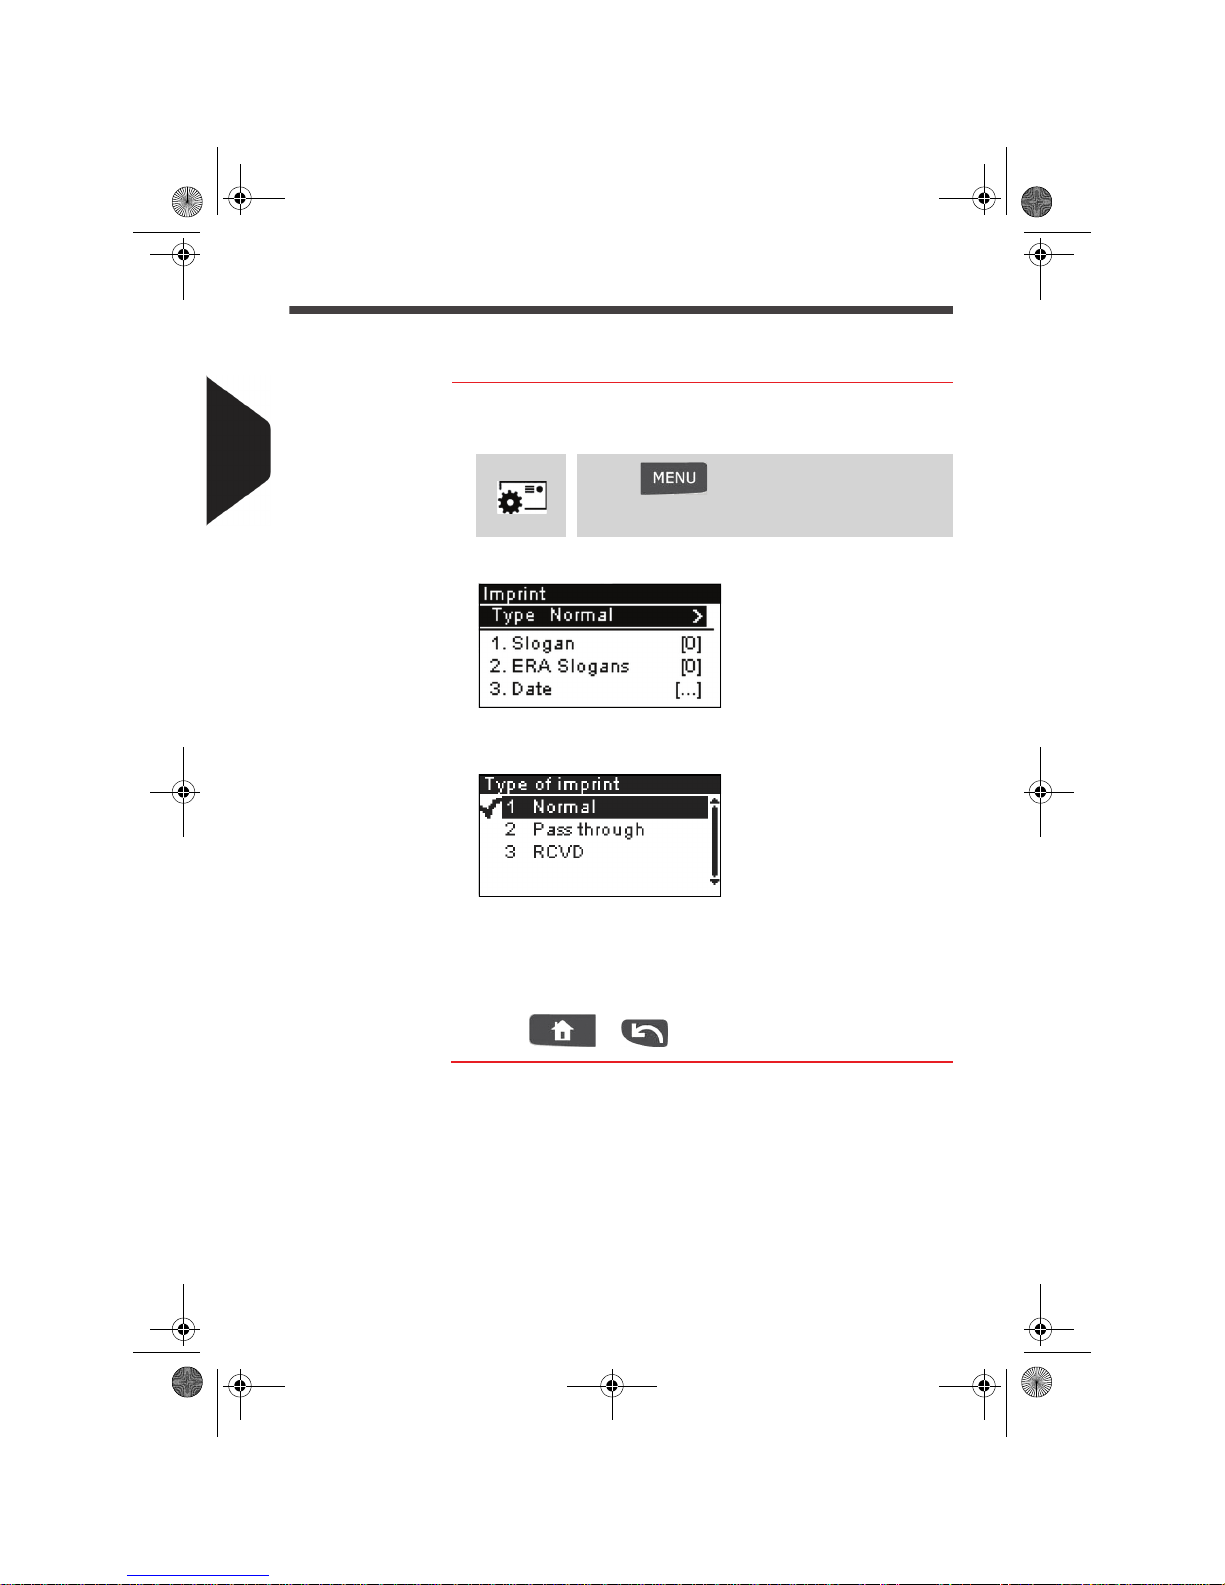
How to Change the Current 'Type of Imprint'
How to Change
the Current 'Type
of Imprint'
Once you are logged in as user:
1 Either:
The Imprint screen is displayed.
2 Select > Type and press [OK].
The Type of imprint screen is displayed.
3 Select the type of imprint in the list and press [OK].
The Imprint screen is updated and displays the menu items
that allow you to modify the imprint parameters.
4 Press or to return to the home screen.
Press
or
Press and type 1 or select the path:
> Imprint
DELTA2_UK.book Page 30 Vendredi, 27. juin 2008 11:47 11
Page 37
Processing Mail
31
3
Checking Machine State
The list below raises questions to answer from time to time to ensure your work will
not be interrupted during a run to change the ink cartridge, add credits into the
machine, etc.
Table 1 : Machine check list
Question... How to answer
Are the mailing system credits
sufficient to complete your
postage session?
Look at the credits counter at the bottom of the
screen, or:
Press and type
1 to check credits balance.
To add credits, see How to Add Credits to the
Meter p.71.
Do you need to clear the batch
counter?
Clear batch counters if you intend to issue a report
on the mail run you are about to start (see Batch
Data Report p.92).
See How to Reset Batch Counters p.64.
Is the sealing/moistening
device properly filled?
(if installed)
For sealing while printing the envelopes.
Is the scale properly zeroed or
tared?
Before laying envelope(s) on the weighing plat-
form, your home screen should display 0g. If _ g is
displayed, perform a 'rezero' of the WP.
See How to Rezero the Weighing Platform p.126.
Are labels in place in the ALD?
(if you plan to print on tape)
See How to Fill the Auto Label-Dispenser p.65.
Is there enough ink in the cartridge?
To display the level of ink in the printing headset,
see How to Display Ink Level and Cartridg e Data
p.158.
You can be warned when the available credits get below a preset
value (see How to Set the Low-Credits Threshold p.123).
DELTA2_UK.book Page 31 Vendredi, 27. juin 2008 11:47 11
Page 38
Processing Mail
32
3
Using the Feeder
The procedure below describes how to place a stack of mail pieces at the mail path
entrance.
Depending on the weighing method you will choose to run mail, you may have to
insert the envelopes one by one or to put a stack of envelopes on the hopper.
You may set envelopes to portrait feed.
How to Use the Feeder
How to Use the
Feeder
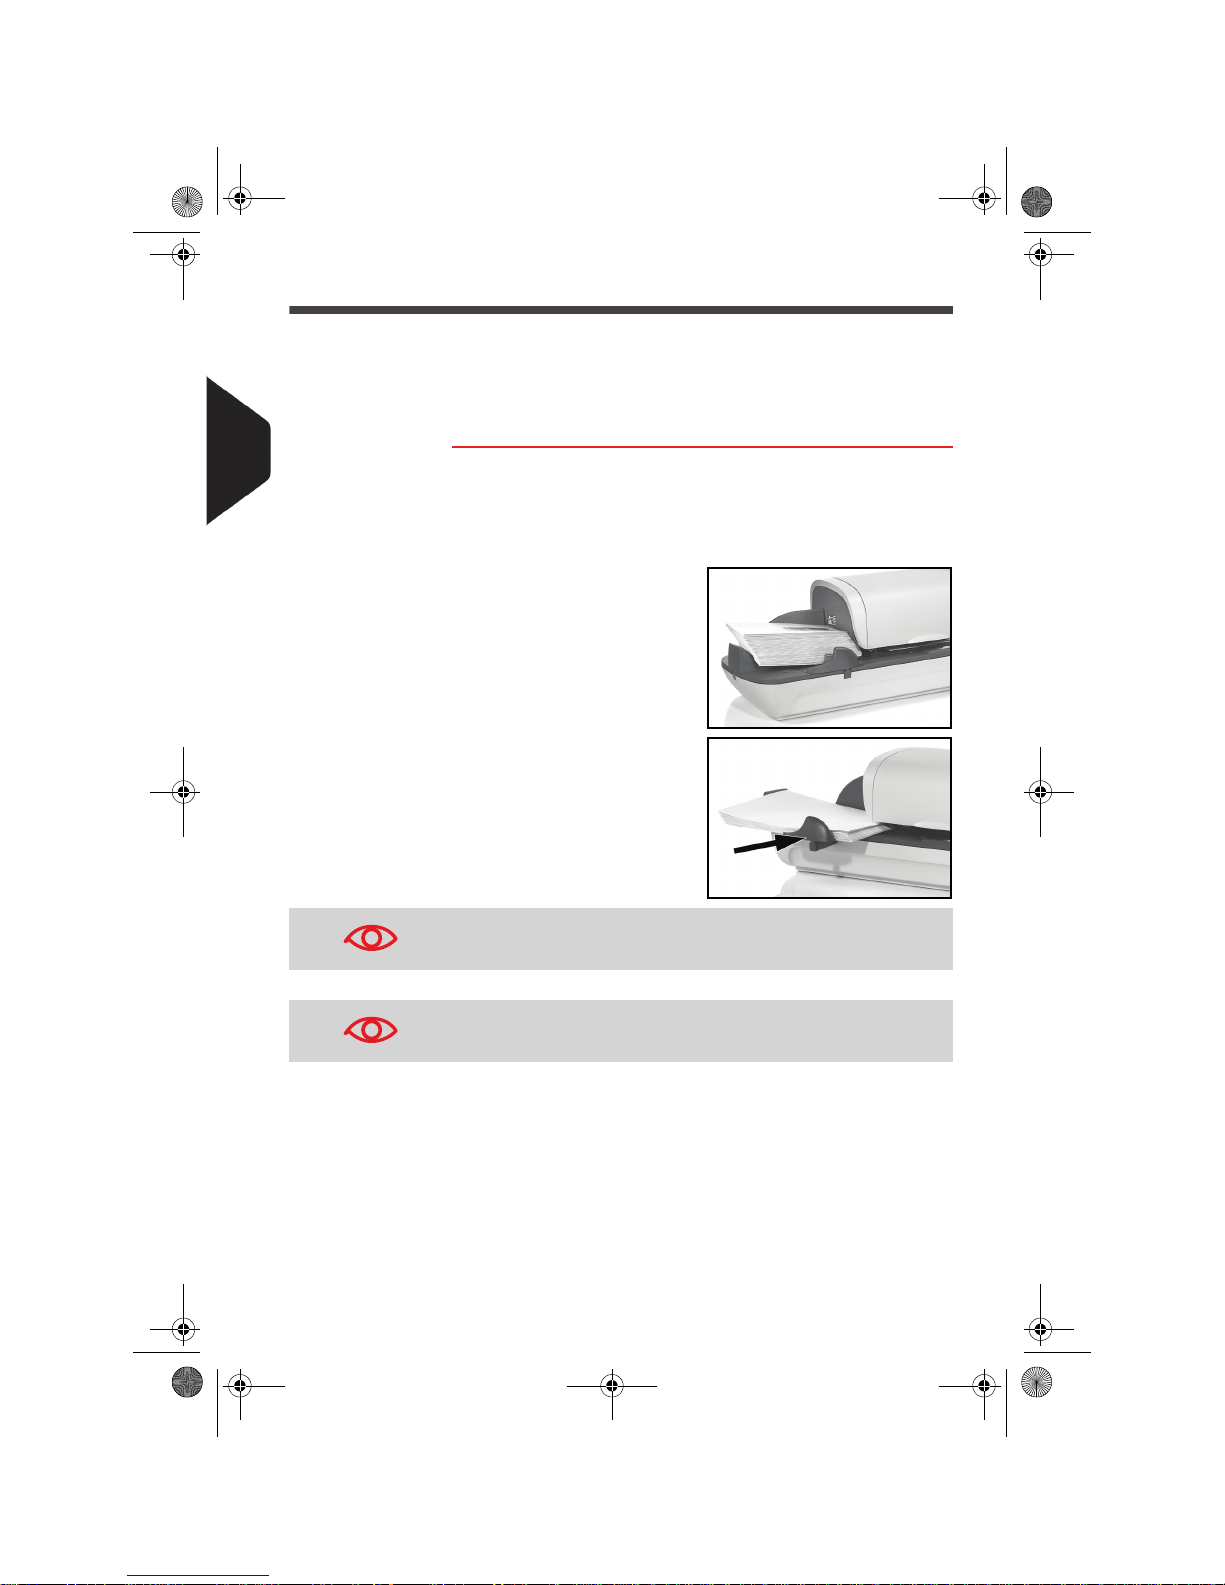
Taking a stack of mail pieces:
1 Fan the envelopes to separate them.
2 Bevel the edge of the stack.
3
Place the envelopes on
the hopper, their upper
edge resting against the
rear guide.
4
Adjust the side guide for
large envelopes. To
adjust the guide, push it
gently to rest against the
envelopes, without
pressing.
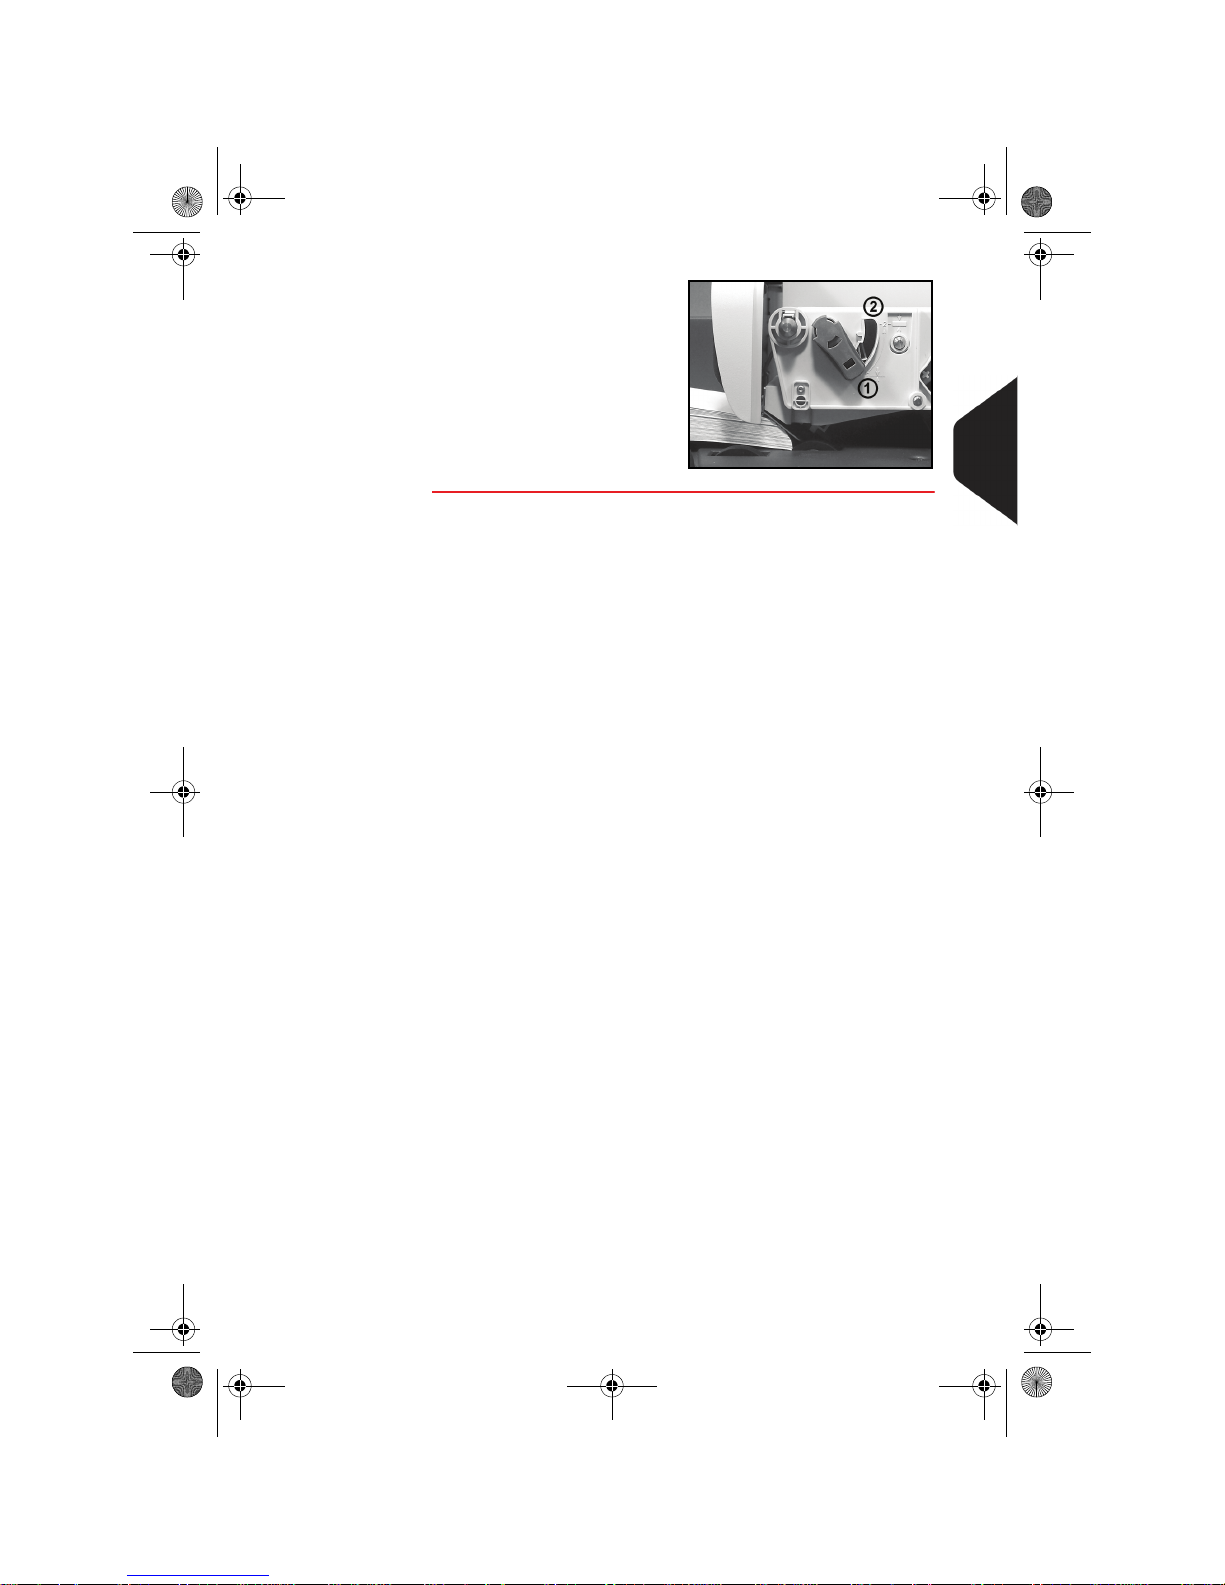
Thickness setting:
For thin or thick envelopes, you may have to adjust the thickness
setting of the feeder.
1 Open feeder cover.
Flap envelopes: close each flap separately (nested flaps are not
supported).
Do not try to seal self-adhesive envelopes.
Close them before feeding.
DELTA2_UK.book Page 32 Vendredi, 27. juin 2008 11:47 11
Page 39
Processing Mail
33
3
2
Change lever position:
¾ 1 for thin envelopes
¾ 2 for thick envelopes.
3 Close feeder cover.
DELTA2_UK.book Page 33 Vendredi, 27. juin 2008 11:47 11
Page 40
Processing Mail
34
3
Running [Normal] Mail
In this Section
This section describes the parameter settings and mail handling sequences for the
mail processes that use the [Normal] type of imprint, to apply postage using different
rates.
See also
• About the use of other 'types of imprint', see Choosing a Type of Imprint p.25.
Applying Normal Postage
Sequence of Settings
The procedure below outlines steps in a recommended sequence to process mail.
• As mail requirements differ from day to day, some of the settings may not be ne-
cessary, or their order may vary
• You must begin with selecting the Type of imprint to gain access to the corres-
ponding parameters and be able to run mail.
How to Apply Normal Postage (Settings)
How to Apply
Normal Postage
(Settings)
Compulsory settings:
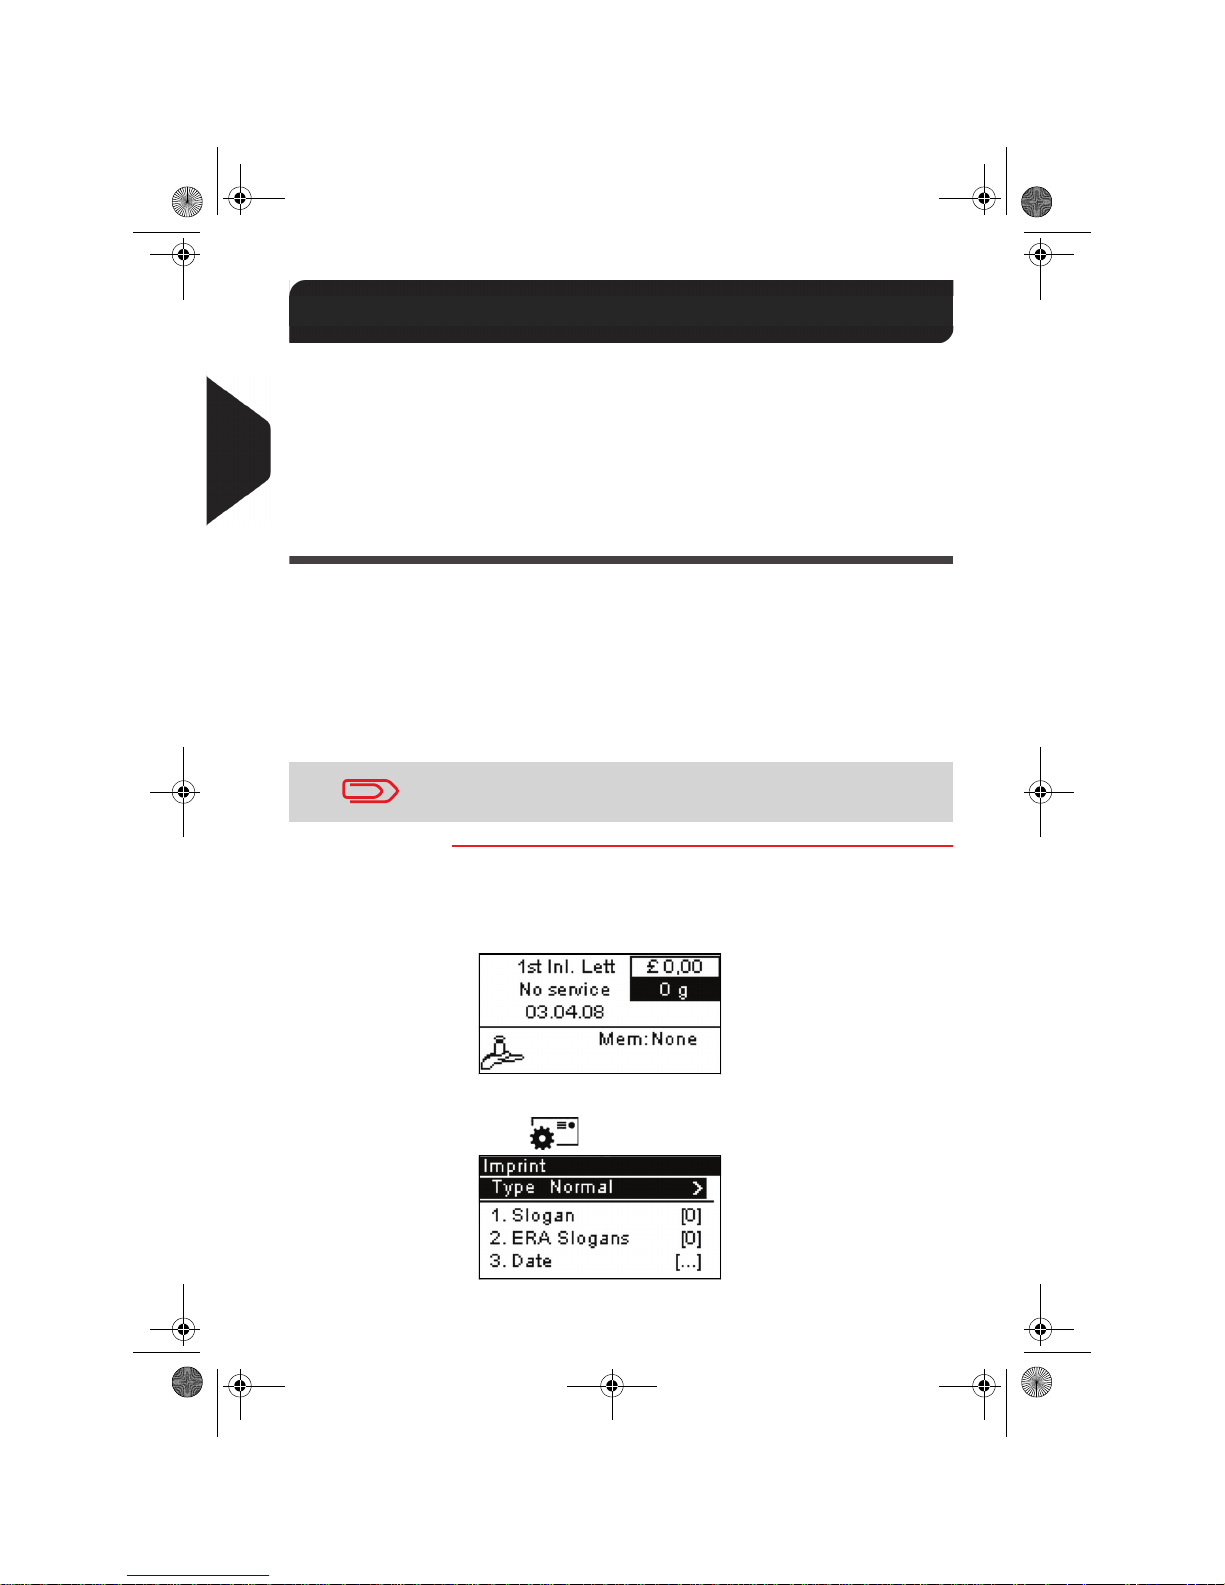
1 Make sure you are on the home screen of the [Normal]
type of imprint. The home screen indicates weight, postage
and currently selected rate as illustrated below.
2 Check or change the type of imprint.
Press to access the Imprint screen:
The type of imprint is indicated on line 2 of the screen.
3.3 Running [Normal] Mail
Make sure you have already completed the preparation steps
mentioned in Preparing and Starting your Work Session p.27.
DELTA2_UK.book Page 34 Vendredi, 27. juin 2008 11:47 11
Page 41
Processing Mail
35
3
To change the type of imprint, select the Type line, press
[OK] and then select [Normal] in the Type of imprint screen,
and press [OK].
Additionally, you can configure imprint elements from
the Imprint screen as follows:
¾ Check or change the slogan selection:
Select Slogan and then select a slogan (or None) in the
Slogan list screen. For more details, see How to Add (or
Cancel) a Slogan on the Imprint p.61.
¾ Add or change the ERA:
Select ERA and then select an ERA (or None) in the ERA list
screen. For more details, see How to Add (or Cancel) an ERA
on the Imprint p.60.
¾ Check or change the date:
Select Date and then select a date option in the Date
advance screen. Select No date advance for printing the
Normal date. For more details, see How to Change the Date
on the Imprint p.59.
Press or to return to the home screen.
3 Select a rate and add services.
Press to open the Rate selection screen.
To select an option in the screen:
¾ Highlight the option using the arrow keys and
¾ Then always press to validate your selection.
DELTA2_UK.book Page 35 Vendredi, 27. juin 2008 11:47 11
Page 42
Processing Mail
36
3
¾ Type a rate number to select a rate or display new options
¾ Press 8 to select the Rate wizard and choose rate options
in lists.
For more details, see Selecting a Rate p.51.
4 Select a weighing type (if you did not enter any amount)
Depending on the quantity and type of mail you have to
process, you can choose an efficient weighing method that
uses the weighing platform to save time: see Choosing a
Weighing Type p.55.
To change the current weighing method, press and
select a weighing type in the Weighing type screen.
For more details, see How to Change the Weighing Type
p.57.
You can also apply the optional setting(s):
1 Move the imprint away from the envelope edge for thick
envelopes: see How to Move the Imprint (Print Offset) p.61.
2 Close envelopes using the feeder sealer : see Using the
Sealing Function p.63.
You are now ready to print.
You may also enter the postage amount manually: on the home
screen, type directly the first figure of the amount using the keypad. For more details, see How to Enter Postage Manually p.53.
To set the imprint quickly, consider using Job memories. The
memories store imprint characteristics together with rates and, if
activated, accounts. See Using Job Memories p.62.
DELTA2_UK.book Page 36 Vendredi, 27. juin 2008 11:47 11
Page 43
Processing Mail
37
3
Running Mail
To run mail, follow the procedure below after you have completed the steps in Sequence of Settings p.34.
The way you will handle mail mainly depends on the weighing method you have
chosen. The weighing method is indicated by the icon in the Weighing type zone of
the screen. For more information, see Details on the Weighing Types p.56.
How to Apply Normal Postage (Running Mail)
How to Apply
Normal Postage
(Running Mail)
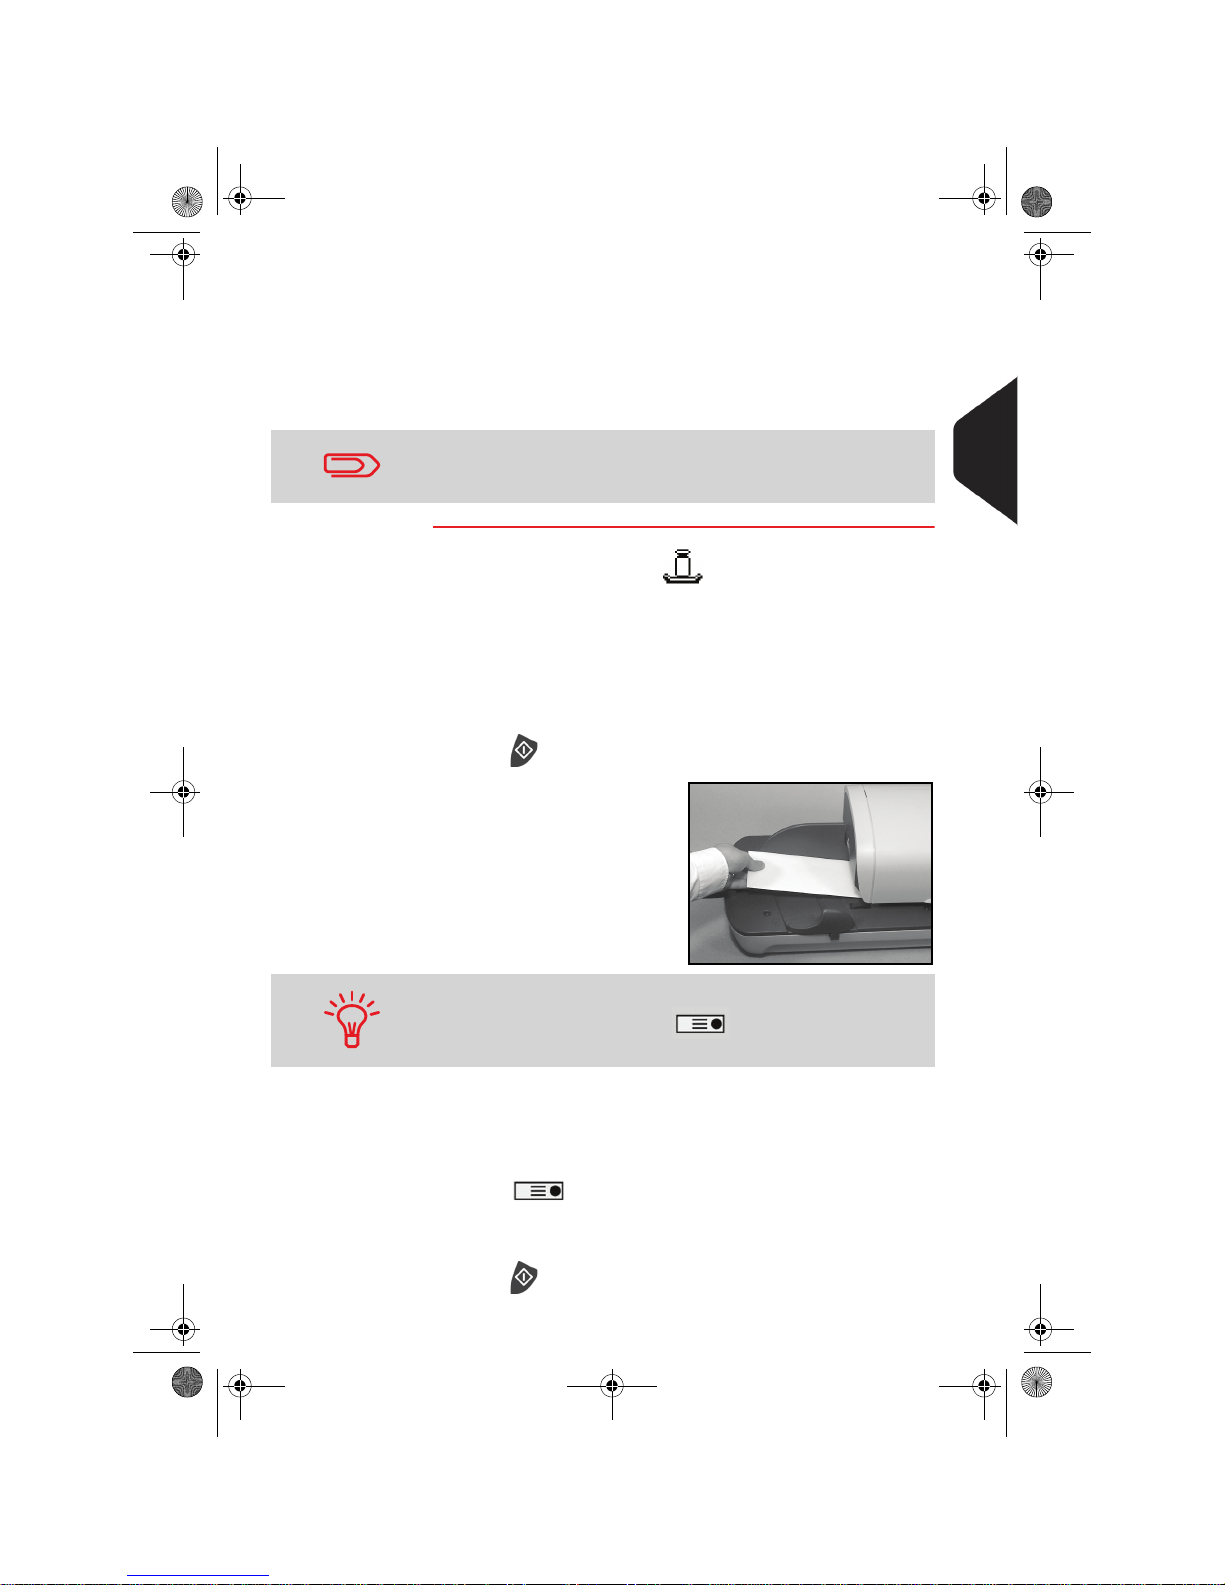
In Normal weighing mode ( )
From the [Normal] home screen, to print postage directly on mail
pieces:
1 Put the mail piece on the Weighing Platform.
The weight of the mail piece is displayed in the Weight area
of the screen and the postage amount is updated.
2 Press . The system motors start running.
3
Withdraw the envelope
from the WP and insert it
into the mail path against
the rear-guide wall, side
to be printed facing
upwards.
The mailing system applies postage and the mail piece (or
label) is sent to the catch tray.
Otherwise, if you want to print several identical labels:
1 Press and enter the number of labels.
Make sure the labels are available in the label dispenser (see
Filling the Label Dispenser p.65).
2 Press to print the labels.
If you need to change the current account before applying pos-
tage (on account-enabled configurations), see How to Change
Accounts p.51.
If mail piece is bigger than mail path maximum thickness (see
Mail Specifications p.20), press to print a label. The label
is printed at once.
DELTA2_UK.book Page 37 Vendredi, 27. juin 2008 11:47 11
Page 44
Processing Mail
38
3
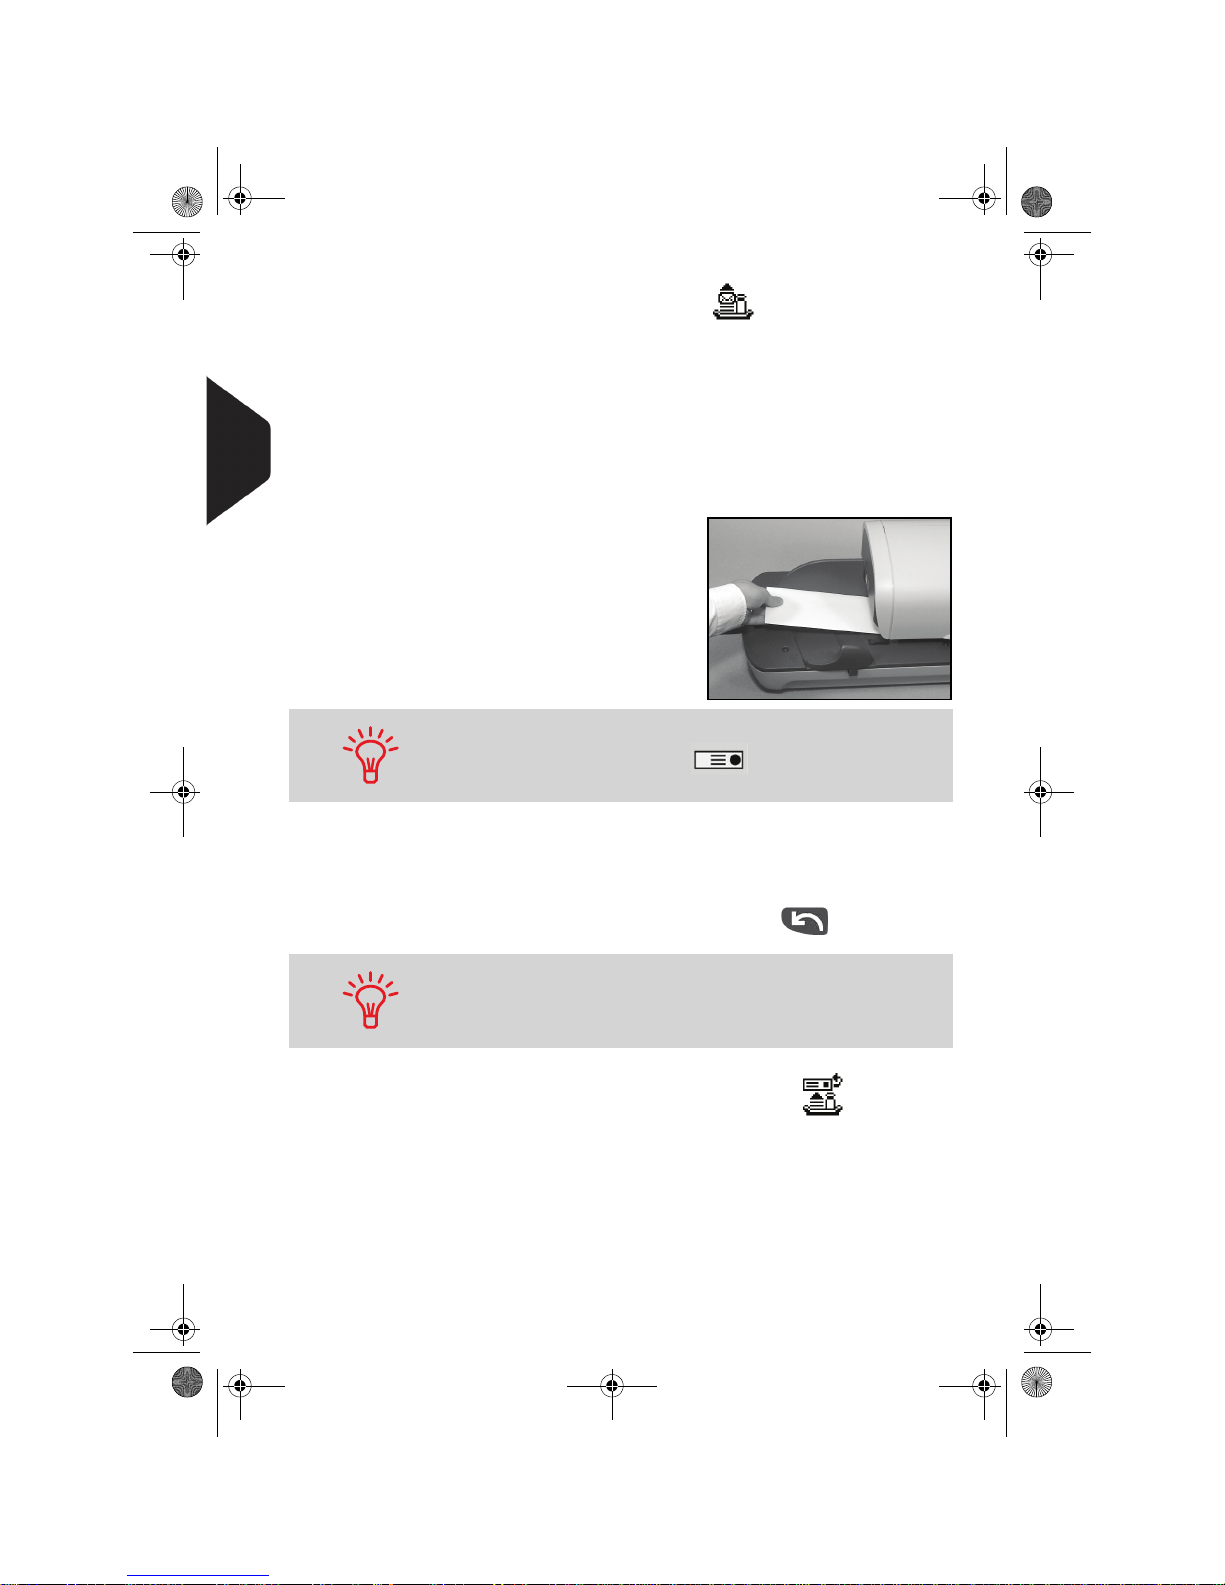
In Differential weighing mode ( )
From the [Normal] home screen, to print postage on mail pieces:
1 Place the pile of mail you want to process on the weighing
platform, and then follow the instructions on the screen or the
steps below.
2 Withdraw the first mail piece from the top of the stack. The
mailing system displays weight and postage on the home
screen and starts motors automatically.
3
To print the imprint,
insert the mail piece into
the base against the
rear-guide wall, side to
be printed facing
upwards.
The mailing system applies postage and the mail piece (or
label) is sent to the catch tray.
4 Repeat previous step of each piece of mail.
To quit the process at any time, press .
In Differential weighing auto-label mode ( )
From the [Normal] home screen, to print postage on mail pieces:
1 Place the pile of mail you want to process on the weighing
platform, and then follow the instructions on the screen or the
steps below.
2 Withdraw the first mail piece from the top of the stack. The
mailing system displays weight and postage on the home
screen, starts motors and prints the label automatically.
If mail piece is bigger than mail path maximum thickness (see
Mail Specifications p.20), press to print a label. The label
is printed at once.
When you remove the last object from the WP, the mailing system asks if you want to print it. You can answer Yes or No. This
allows you to use a mail basket without having to declare a tare
on the WP.
DELTA2_UK.book Page 38 Vendredi, 27. juin 2008 11:47 11
Page 45
Processing Mail
39
3
3 Repeat previous step of each piece of mail.
To quit the process at any time, press .
If you inadvertently remove more than one item from the WP,
replace removed items on WP before weight stabilization to
avoid printing label (about 1.5 seconds).
When you remove the last object from the WP, the mailing system asks if you want to print it. You can answer Yes or No. This
allows you to use a mail basket without having to declare a tare
on the WP.
DELTA2_UK.book Page 39 Vendredi, 27. juin 2008 11:47 11
Page 46
Processing Mail
40
3
In other modes (Manual weight entry , No weight
source)
From the [Normal] home screen, to print postage on mail pieces:
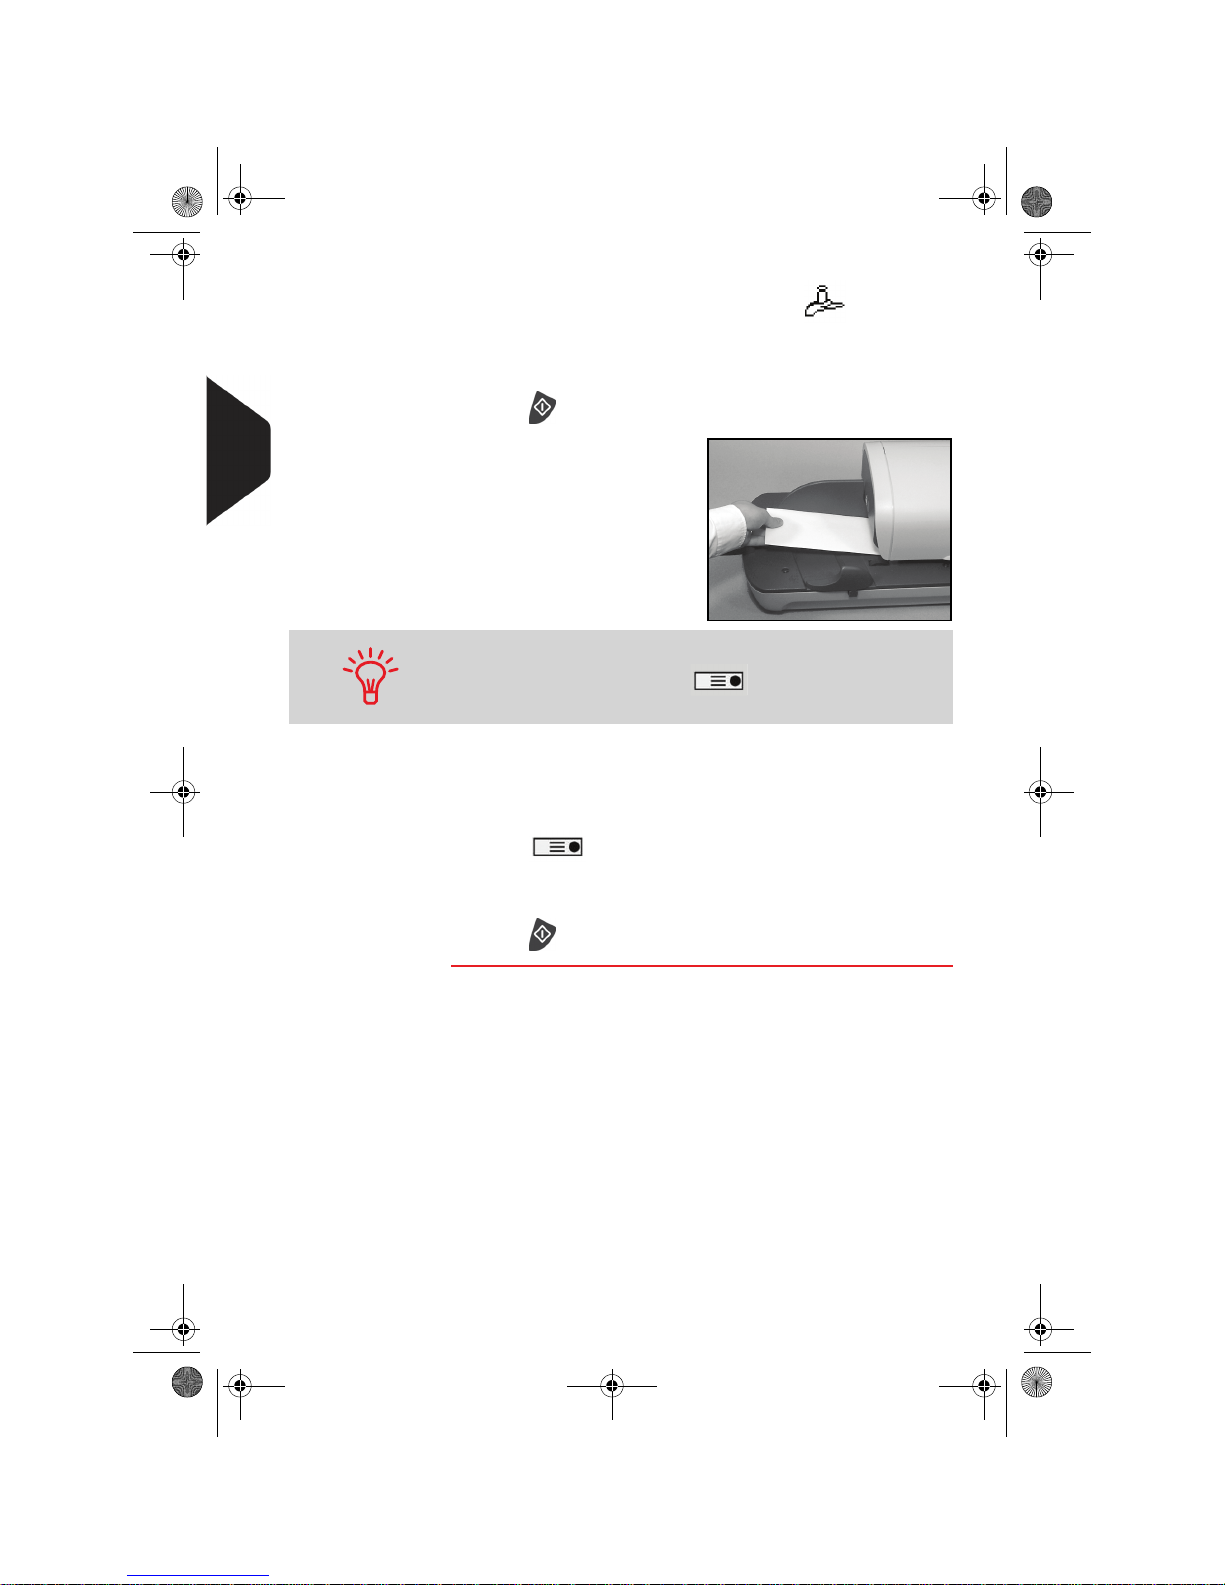
1 Press . System motors start running.
2
Insert the mail piece into
the mail path against the
rear-guide wall, side to
be printed facing
upwards.
The mailing system applies postage and the mail piece (or
label) is sent to the catch tray.
Otherwise, if you want to print several identical labels:
1 Press and enter the number of labels.
Make sure the labels are available in the label dispenser (see
Filling the Label Dispenser p.65).
2 Press to print the labels.
If mail piece is bigger than mail path maximum thickness (see
Mail Specifications p.20), press to print a label. The label
is printed at once.
DELTA2_UK.book Page 40 Vendredi, 27. juin 2008 11:47 11
Page 47
Processing Mail
41
3
Running [PPI] Mail
In this Section
This section describes the parameter settings and mail handling sequences for the
mail processes that use the [PPI] type of imprint.
See also
• To choose the type of imprint to use for each type of mail, see Choosing a Type of
Imprint p.25).
Sequence of Settings
The procedure below outlines steps in a recommended sequence to process mail.
• As mail requirements differ from day to day, some of the settings may not be ne-
cessary, or their order may vary
• You must begin with the type of imprint selection step to gain access to the corres-
ponding parameters and be able to run mail.
How to Process PPI Mail (Settings)
How to Process
PPI Mail
(Settings)
Compulsory settings:
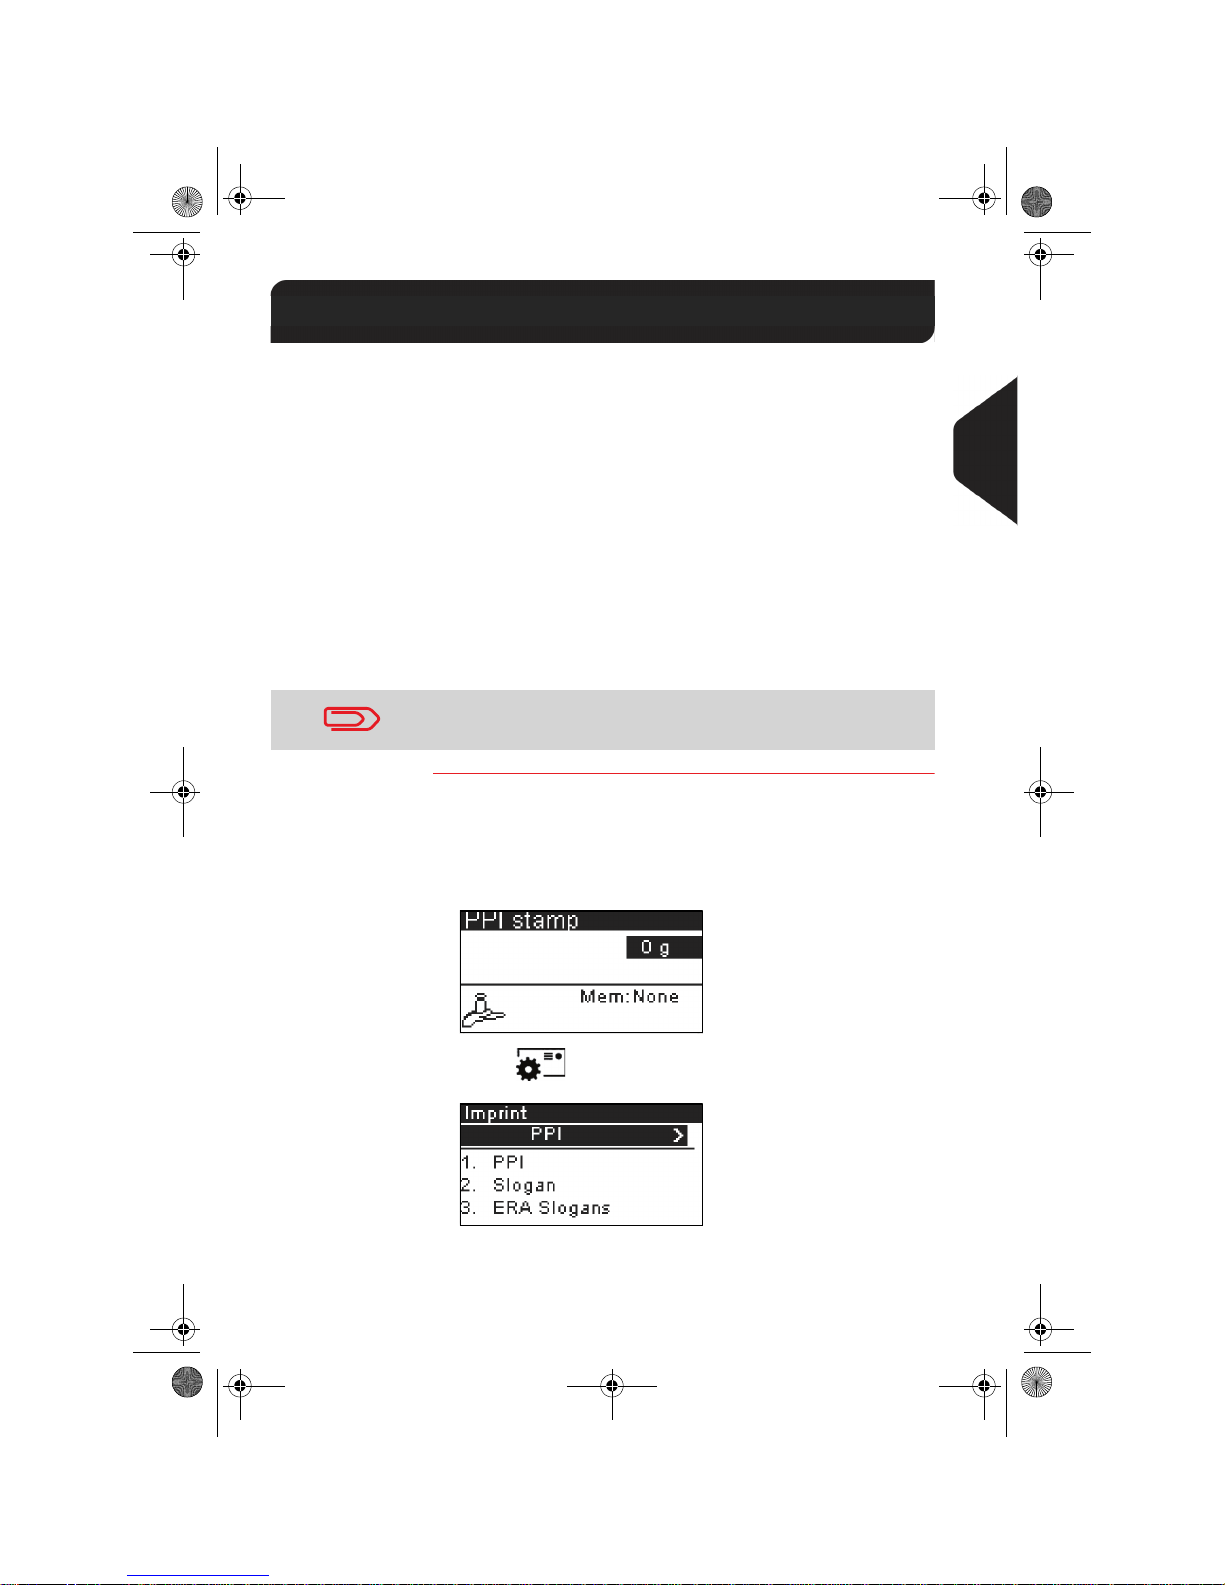
1 Check that you are in the [PPI] type of imprint.
If not, see section Selecting the Type of Imprint p.30.
[Normal] home screen indicates weight and postage as illustrated below.
2 Press to access the imprint configuration menu
and perform the settings that follow.
3 Select the PPI to use. See Selecting a Prepaid Imprint (PPI)
p.54.
3.4 Running [PPI] Mail
Make sure you have already completed the preparation steps
mentioned in Preparing and Starting your Work Session p.27.
DELTA2_UK.book Page 41 Vendredi, 27. juin 2008 11:47 11
Page 48
Processing Mail
42
3
4 Select a weighing type (if you did not enter any amount)
Depending on the quantity and type of mail you have to
process, you can choose an efficient weighing method that
uses the weighing platform to save time: see Choosing a
Weighing Type p.55.
To change the current weighing method, press and
select a weighing type in the Weighing type screen.
For more details, see How to Change the Weighing Type
p.57.
You can also apply the optional setting(s):
You can add a slogan or an ERA to the imprint, shift the imprint
position for envelopes with a steep edge (print offset), and use
the sealer (if installed). To do so:
1 See Configuring the Imprint p.59.
2 See Using the Sealing Function p.63.
Running Mail
To run mail, follow the procedure below after you have completed the sequence in
How to Process PPI Mail (Settings) p.41.
How to Process PPI Postage (Running Mail)
How to Process
PPI Postage
(Running Mail)
In Normal weighing mode ( )
From the [Normal] home screen, to print postage directly on mail
pieces:
1 Put the mail piece on the Weighing Platform.
The weight of the mail piece is displayed in the Weight area
of the screen and the postage amount is updated.
2 Press . The system motors start running.
To set the imprint quickly, consider using Job memories. The Job
memories store imprint characteristics together with rates and, if
active, accounts. See Using Job Memories p.62.
DELTA2_UK.book Page 42 Vendredi, 27. juin 2008 11:47 11
Page 49
Processing Mail
43
3
3
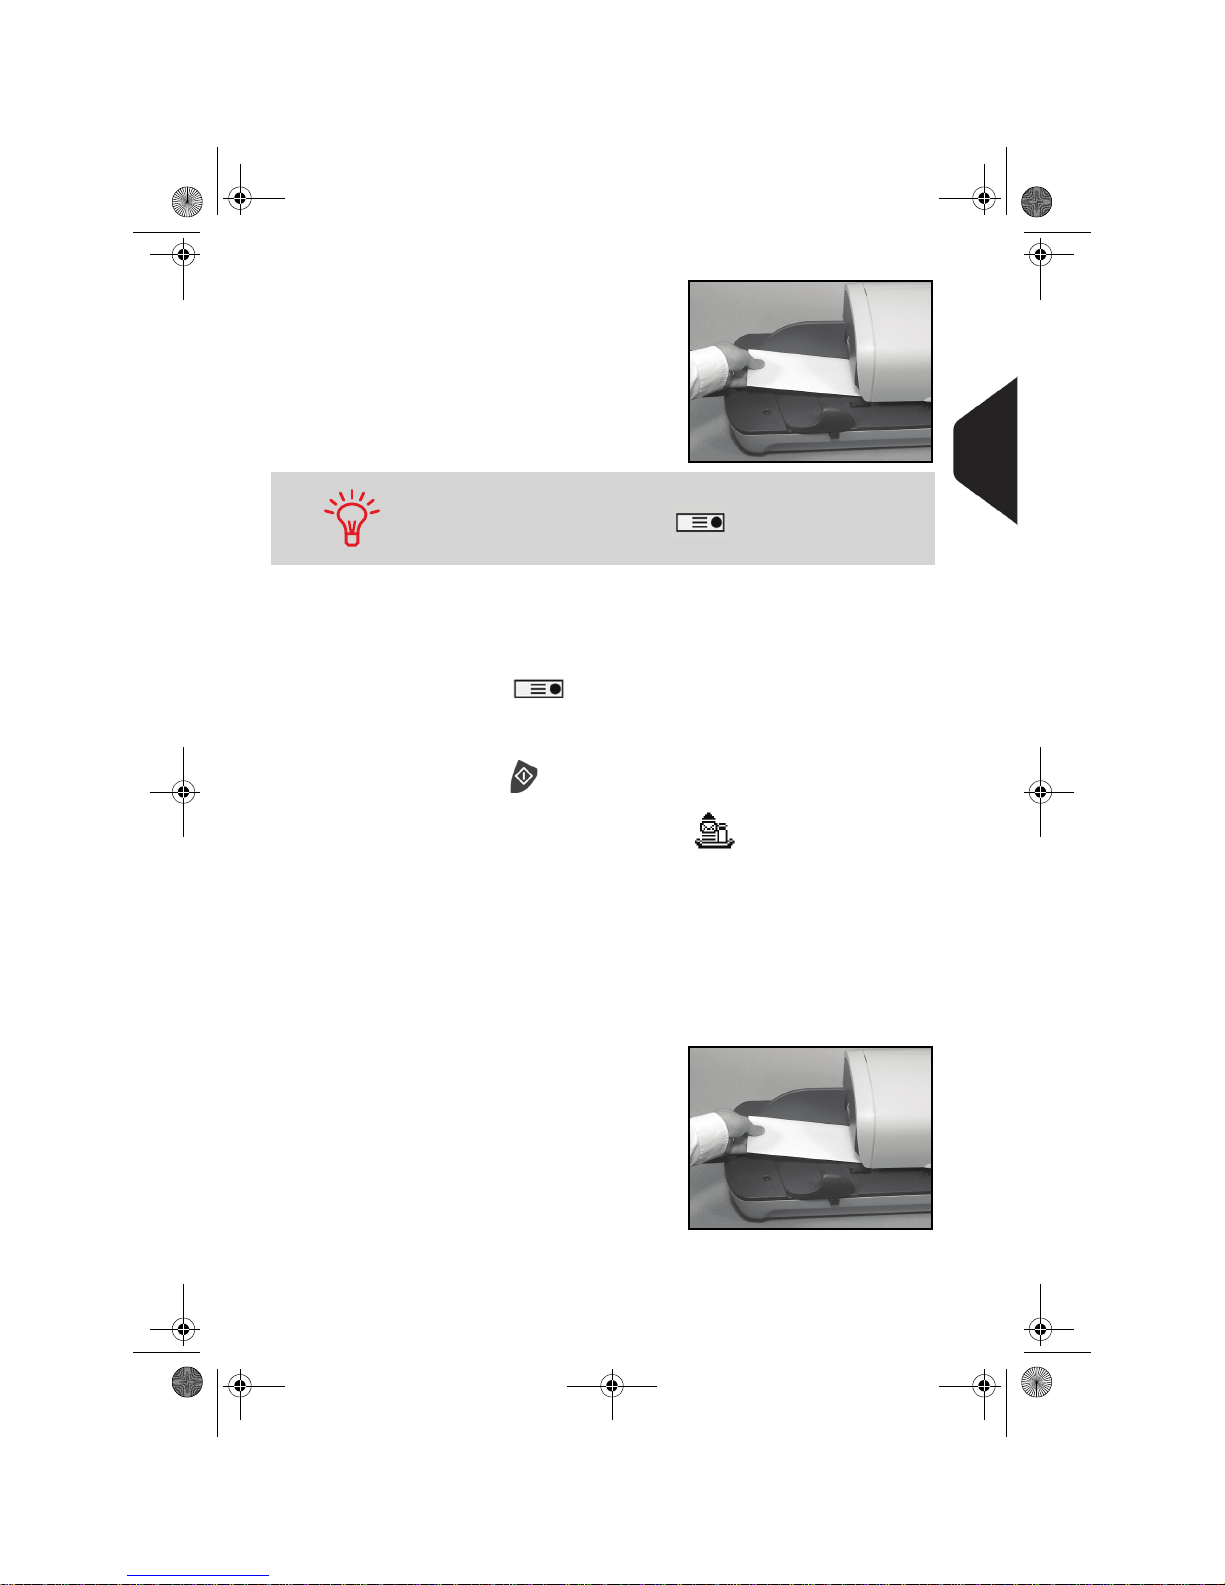
Withdraw the envelope
from the WP and insert it
into the mail path against
the rear-guide wall, side
to be printed facing
upwards.
The mailing system applies postage and the mail piece (or
label) is sent to the catch tray.
Otherwise, if you want to print several identical labels:
1 Press and enter the number of labels.
Make sure the labels are available in the label dispenser (see
Filling the Label Dispenser p.65).
2 Press to print the labels.
In Differential weighing mode ( )
From the [Normal] home screen, to print postage on mail pieces:
1 Place the pile of mail you want to process on the weighing
platform, and then follow the instructions on the screen or the
steps below.
2 Withdraw the first mail piece from the top of the stack. The
mailing system displays weight and postage on the home
screen and starts motors automatically.
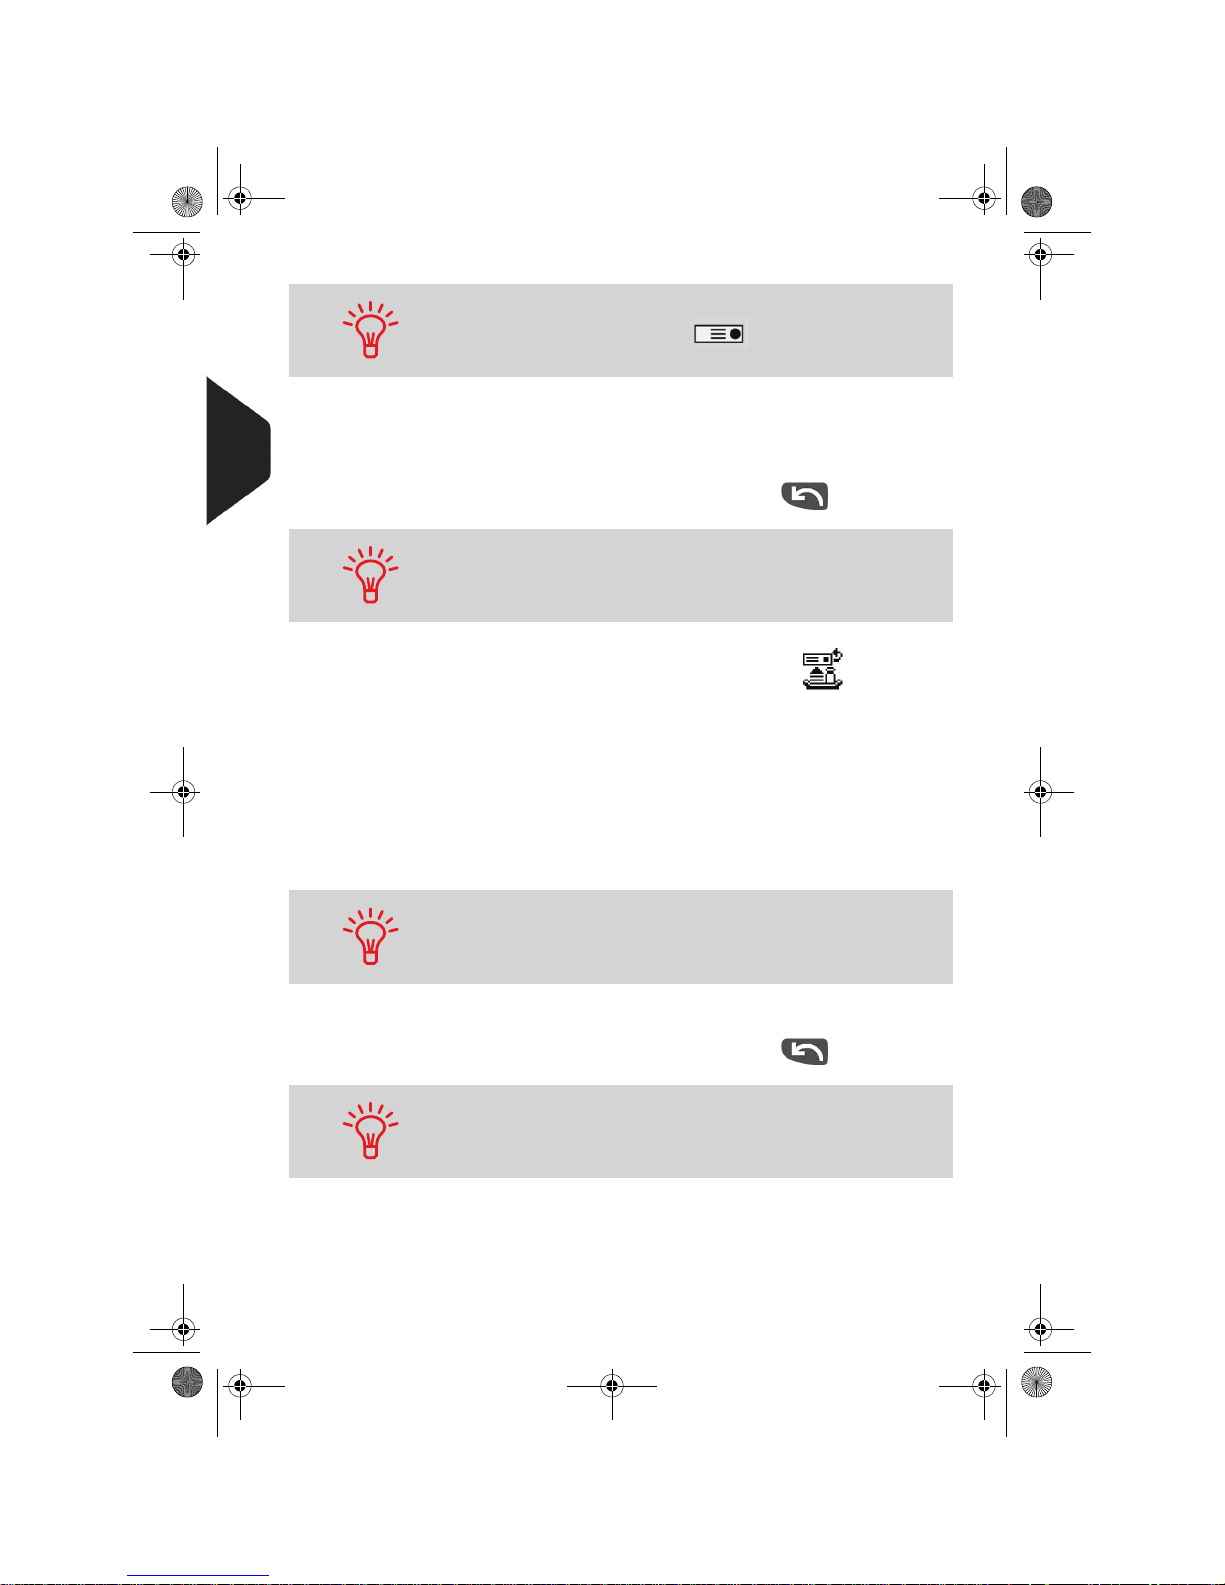
3
To print the imprint,
insert the mail piece into
the base against the
rear-guide wall, side to
be printed facing
upwards.
If mail piece is bigger than mail path maximum thickness (see
Mail Specifications p.20), press to print a label. The label
is printed at once.
DELTA2_UK.book Page 43 Vendredi, 27. juin 2008 11:47 11
Page 50
Processing Mail
44
3
The mailing system applies postage and the mail piece (or
label) is sent to the catch tray.
4 Repeat previous step of each piece of mail.
To quit the process at any time, press .
In Differential weighing auto-label mode ( )
From the [Normal] home screen, to print postage on mail pieces:
1 Place the pile of mail you want to process on the weighing
platform, and then follow the instructions on the screen or the
steps below.
2 Withdraw the first mail piece from the top of the stack. The
mailing system displays weight and postage on the home
screen, starts motors and prints the label automatically.
3 Repeat previous step of each piece of mail.
To quit the process at any time, press .
If mail piece is bigger than mail path maximum thickness (see
Mail Specifications p.20), press to print a label. The label
is printed at once.
When you remove the last object from the WP, the mailing system asks if you want to print it. You can answer Yes or No. This
allows you to use a mail basket without having to declare a tare
on the WP.
If you inadvertently remove more than one item from the WP,
replace removed items on WP before weight stabilization to
avoid printing label (about 1.5 seconds).
When you remove the last object from the WP, the mailing system asks if you want to print it. You can answer Yes or No. This
allows you to use a mail basket without having to declare a tare
on the WP.
DELTA2_UK.book Page 44 Vendredi, 27. juin 2008 11:47 11
Page 51
Processing Mail
45
3
In other modes (Manual weight entry , No weight
source)
From the [Normal] home screen, to print postage on mail pieces:
1 Press . System motors start running.
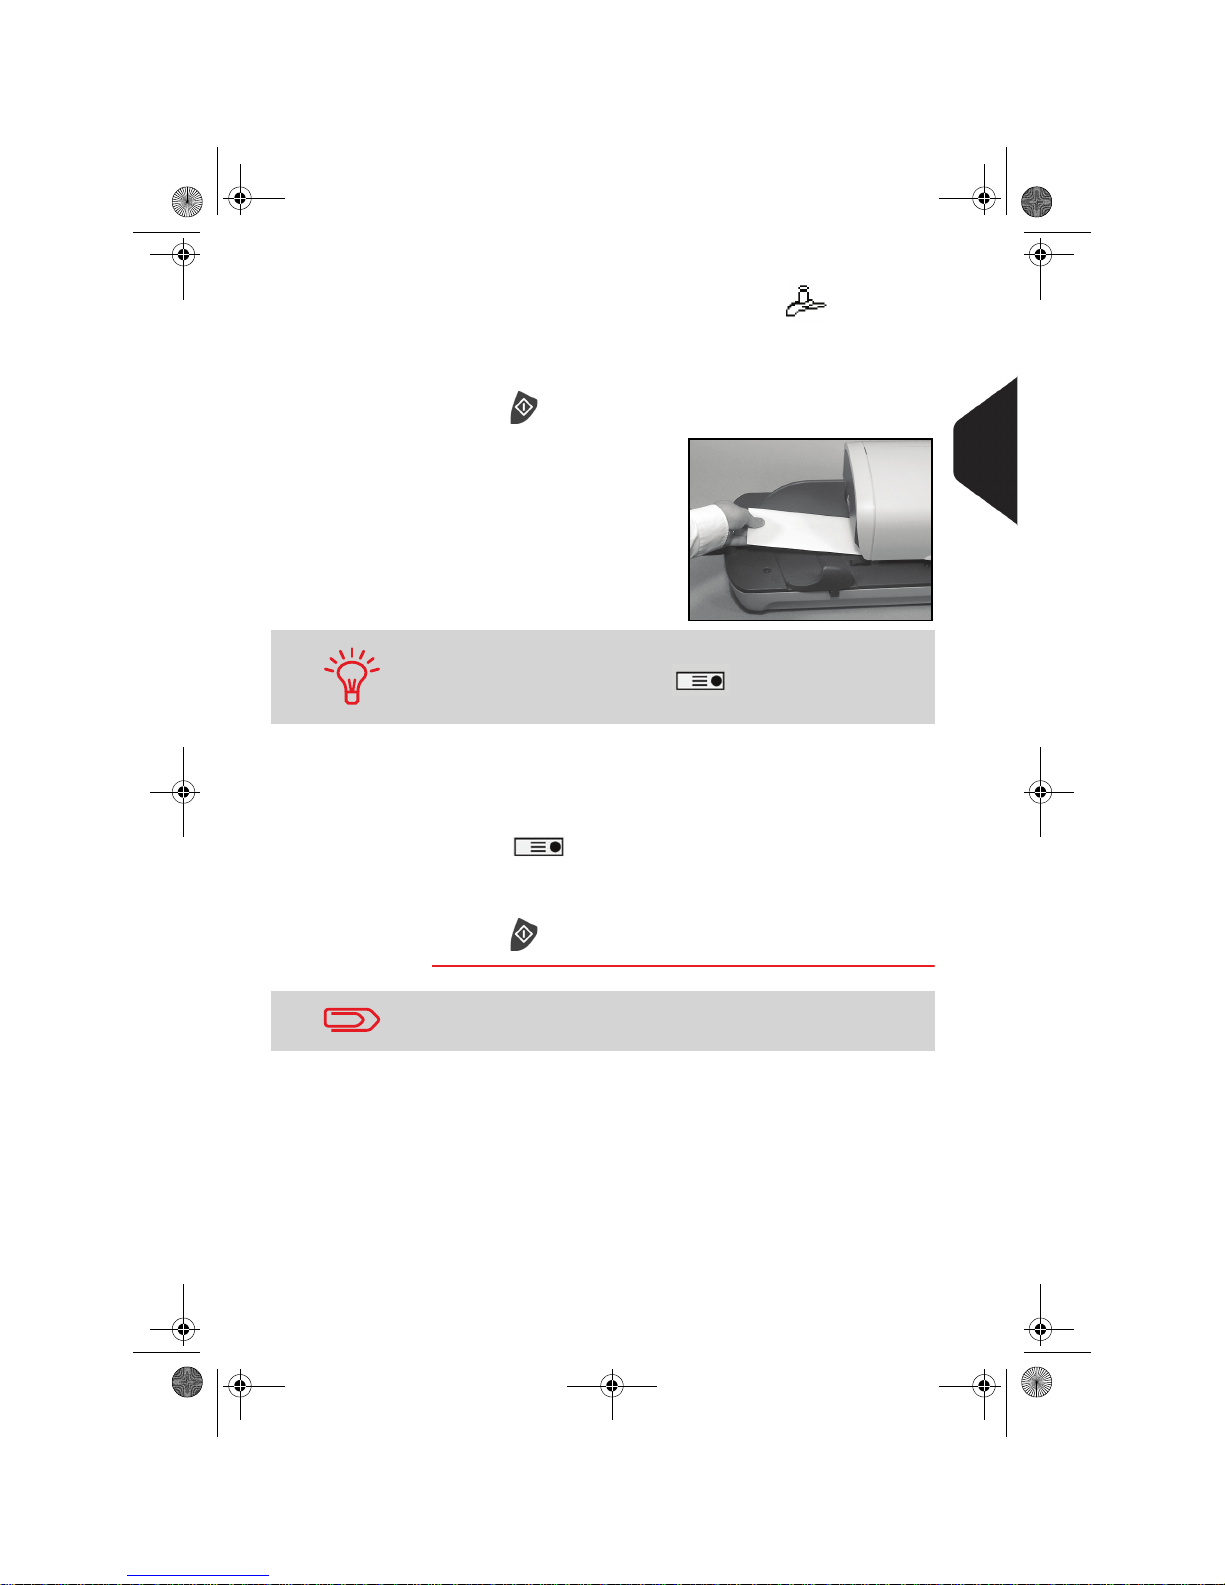
2
Insert the mail piece into
the mail path against the
rear-guide wall, side to
be printed facing
upwards.
The mailing system applies postage and the mail piece (or
label) is sent to the catch tray.
Otherwise, if you want to print several identical labels:
1 Press and enter the number of labels.
Make sure the labels are available in the label dispenser (see
Filling the Label Dispenser p.65).
2 Press to print the labels.
If mail piece is bigger than mail path maximum thickness (see
Mail Specifications p.20), press to print a label. The label
is printed at once.
When using sealer, collect mail piece stack and put stack aside to
let seal liquid dry.
DELTA2_UK.book Page 45 Vendredi, 27. juin 2008 11:47 11
Page 52
Processing Mail
46
3
Running [Received] Mail
In this Section
This section describes the parameter settings and mail handling sequences for mail
processes that use the [Received] type of imprint, to:
• Print the date on received mail, and/or
• Print 'Received' on received mail.
See also
• To choose the type of imprint to use for each type of mail process, see Choosing
a Type of Imprint p.25).
Sequence of Settings
The procedure below outlines steps in a recommended sequence to process mail.
You must begin with selecting the Type of imprint to gain access to the corresponding
parameters and be able to run mail.
How to Process Received Mail (Settings)
How to Process
Received Mail
(Settings)
Compulsory settings:
1 Make sure you are on the home screen of the [Received]
type of imprint.
The type of imprint is indicated at the top of the home screen
as illustrated.
2 Check or change the type of imprint.
Press to access the imprint screen:
The type of imprint is indicated on line 2 of the screen.
To change the type of imprint, select the Type line, press
[OK] and then select [RCVD] in the Type of imprint screen
and press [OK].
Additionally, you can configure the printed elements
from the Imprint screen as follows:
3.5 Running [Received] Mail
Make sure you have completed the preparation steps mentioned
in Preparing and Starting your Work Session p.27.
To select an option in the screen:
¾ Highlight the option using the arrow keys and
¾ Then always press to validate your selection.
DELTA2_UK.book Page 46 Vendredi, 27. juin 2008 11:47 11
Page 53
Processing Mail
47
3
¾ Activate or deactivate printing the date
¾ Activate or deactivate printing ' Received'.
Select the option to change and press [OK]. The screen indicates the current status of the options.
Press or to return to the home screen.
You can also apply this optional setting:
1 Move the imprint away from the envelope edge for thick
envelopes: see How to Move the Imprint (Print Offset) p.61.
You are now ready to print.
Running Mail
To run mail, follow the procedure below after you have completed the steps in Sequence of Settings p.46.
How to Process Received Mail (Running Mail)
How to Process
Received Mail
(Running Mail)
On the [Received] home screen:
1 Press . System motors start running.
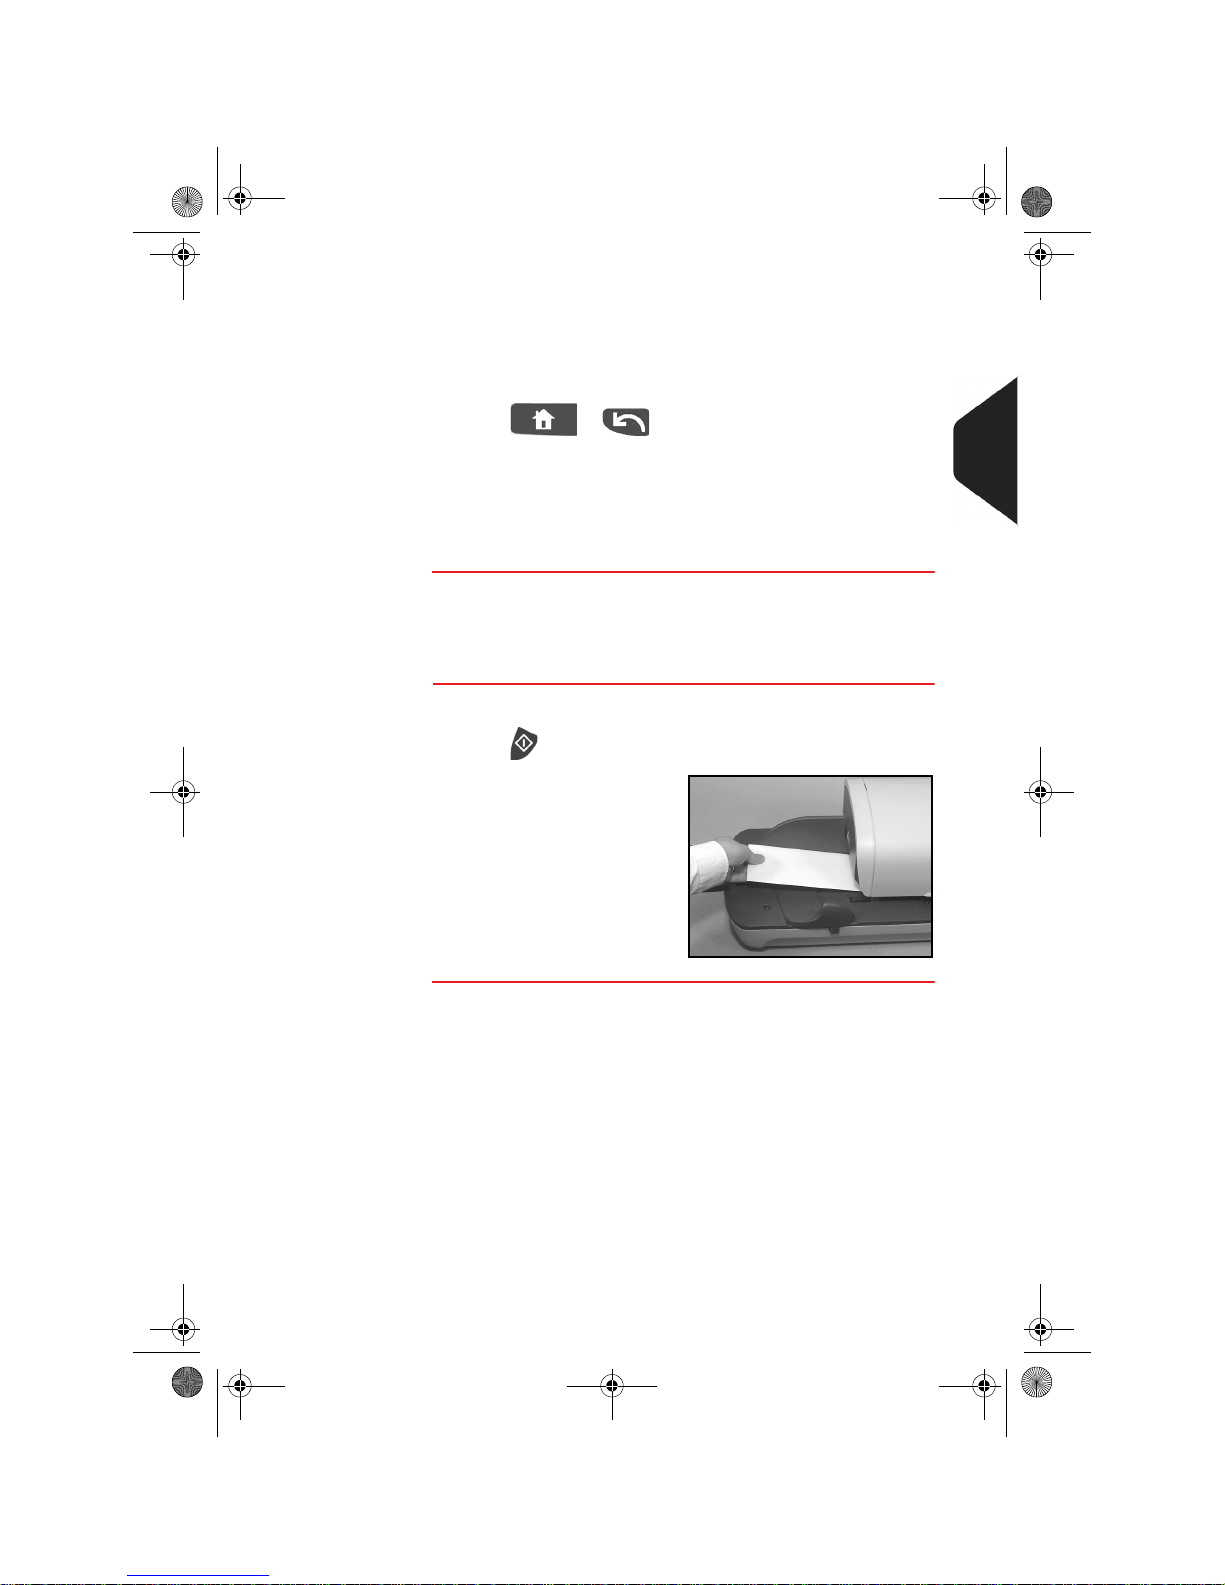
2
Insert the mail piece into
the mail path against the
rear-guide wall, side to
be printed facing
upwards.
The mailing system
applies the imprint and
the mail piece is sent to
the catch tray.
DELTA2_UK.book Page 47 Vendredi, 27. juin 2008 11:47 11
Page 54
Processing Mail
48
3
Running [Pass through] Mail
This section describes the parameter settings and mail handling sequence for mail
processes that use the [Pass through] type of imprint, to:
• Seal envelopes, using the auto-feeder (if installed)
• Only convey mail, for counting or testing purposes.
See also
• To choose the type of imprint to use for each type of mail process, see Choosing
a Type of Imprint p.25).
Sequence of Settings
The procedure below outlines steps in a recommended sequence to process mail.
You must begin with selecting the Type of imprint to gain access to the corresponding
parameters and be able to run mail.
How to Process Mail without Printing (Settings)
How to Process
Mail without
Printing
(Settings)
Main setting:
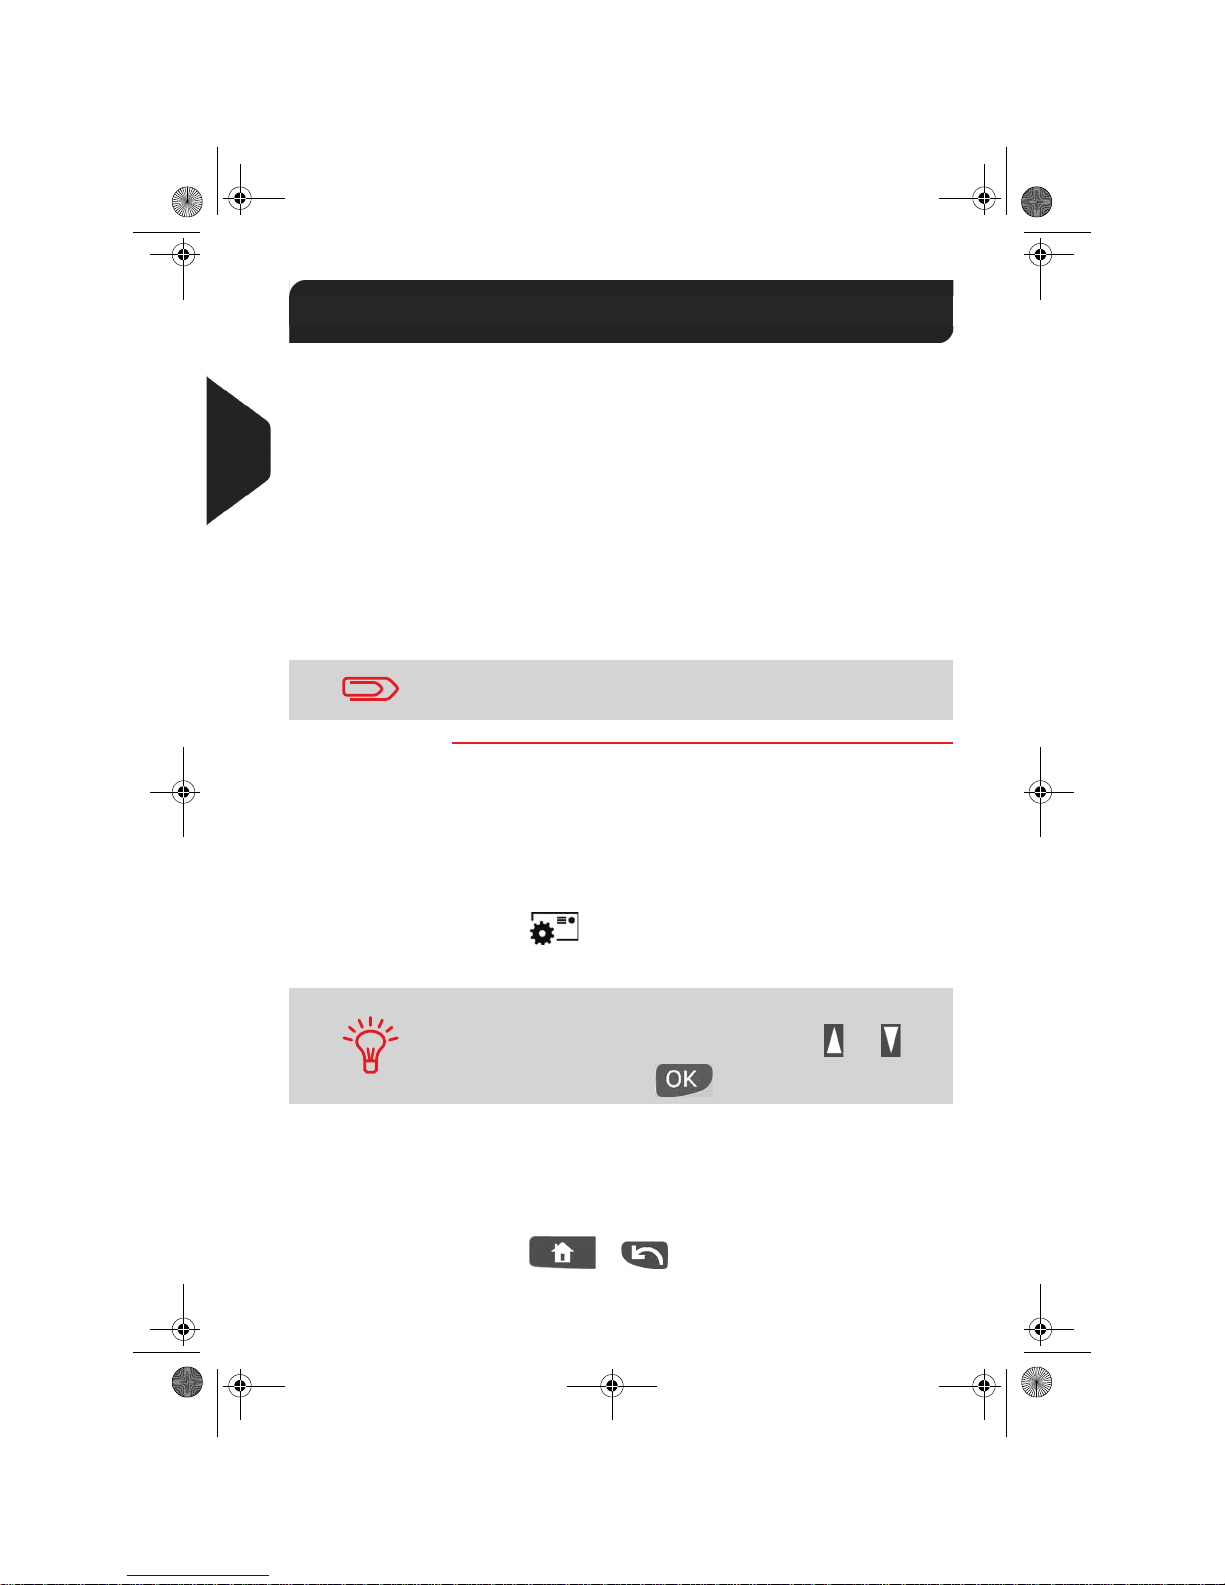
1 Make sure you are on the home screen of the [Pass
through] type of imprint.
The type of imprint is indicated at the top of the home screen
as illustrated.
2 Check or change the type of imprint:
Press to access the Imprint screen:
The type of imprint is indicated on line 2 of the screen.
To change the type of imprint, select the Type line, press
[OK] and then select [Pass through] in the Type of imprint
screen and press [OK].
No other parameter is required to run mail in this mode.
Press or to return to the home screen.
3.6 Running [Pass through] Mail
Make sure you have completed the preparation steps mentioned
in Preparing and Starting your Work Session p.27.
To select an option in the screen:
¾ Highlight the option using the arrow keys and
¾ Then always press to validate your selection.
DELTA2_UK.book Page 48 Vendredi, 27. juin 2008 11:47 11
Page 55
Processing Mail
49
3
You can also apply this optional setting:
1 Close envelopes using the feeder sealer: see Using the
Sealing Function p.63.
You are now ready to process mail.
DELTA2_UK.book Page 49 Vendredi, 27. juin 2008 11:47 11
Page 56
Processing Mail
50
3
Running Mail
To run mail, follow the procedure below after you have completed the steps in Sequence of Settings p.48).
How to Process Mail without Printing (Running Mail)
How to Process
Mail without
Printing (Running
Mail)
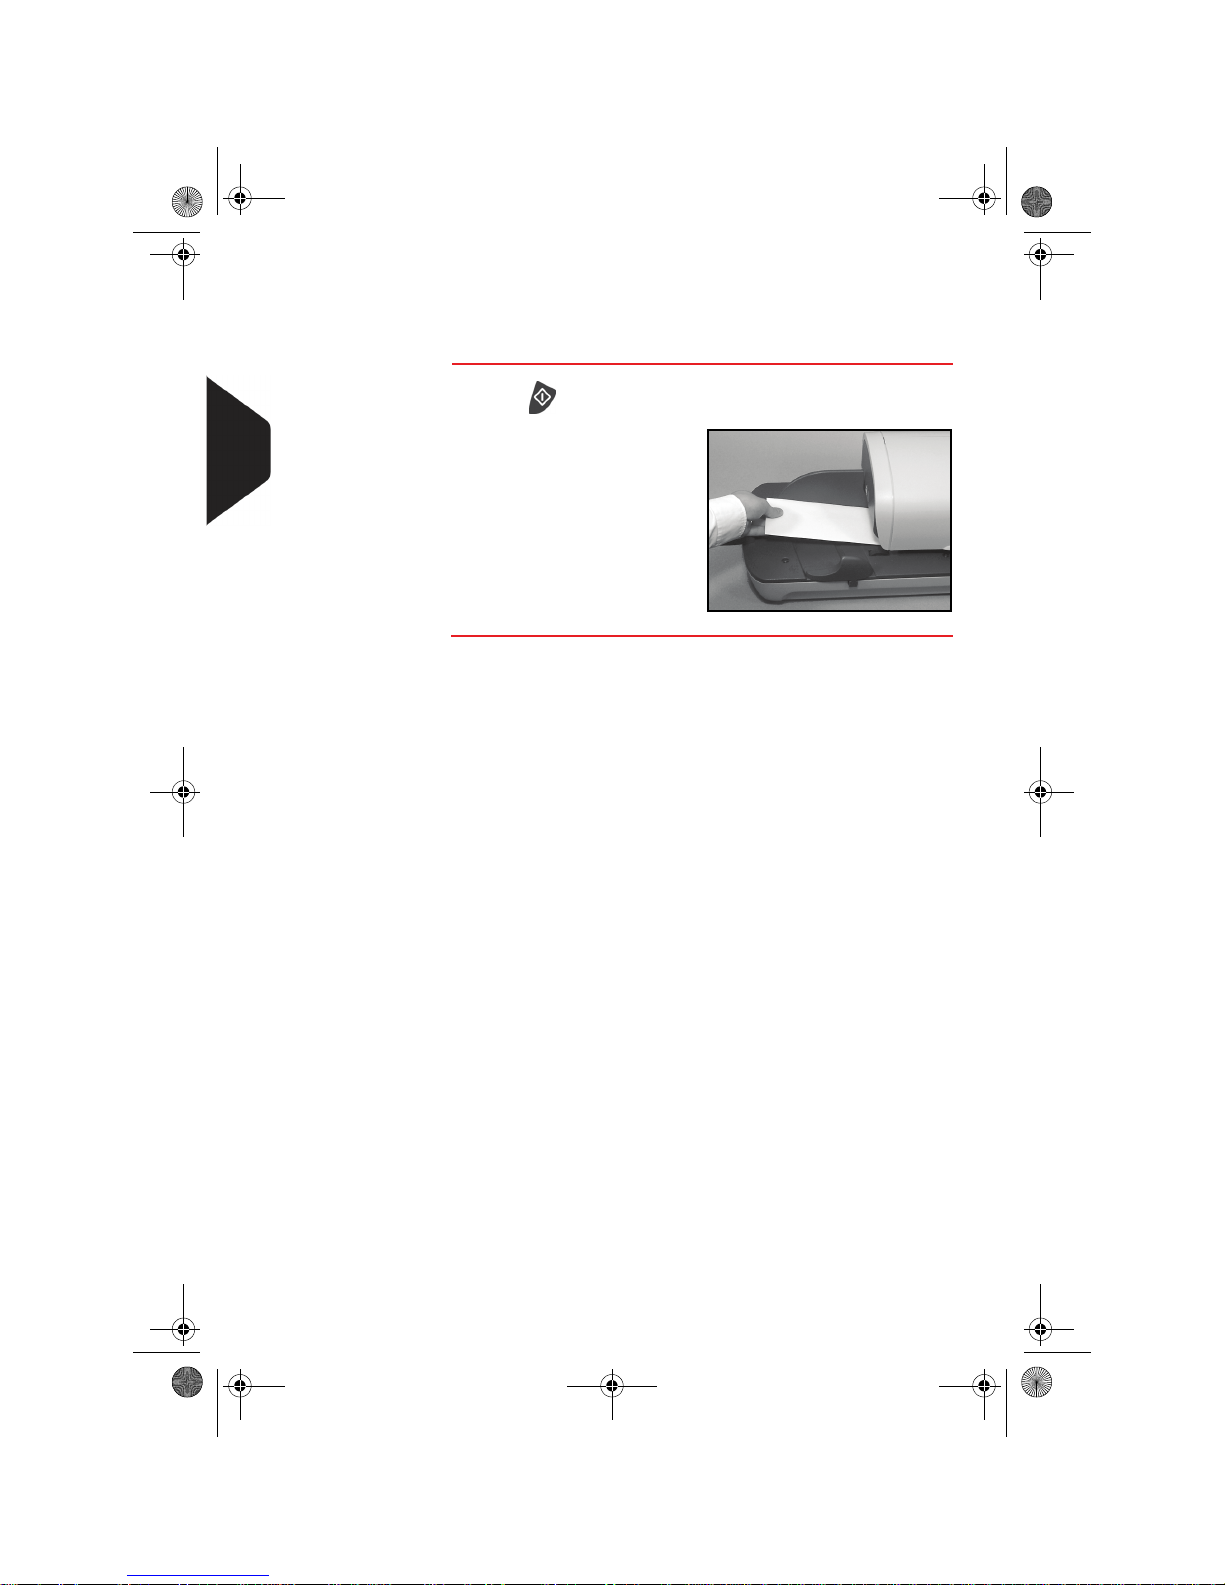
1 Press . System motors start running.
2
Insert the mail piece(s)
into the mail path against
the rear-guide wall, side
to be printed facing
upwards (see How to
Use the Feeder p.32).
DELTA2_UK.book Page 50 Vendredi, 27. juin 2008 11:47 11
Page 57
Processing Mail
51
3
Settings Details
Changing Accounts
To process a set of mail pieces using another account, change the account as follows.
How to Change Accounts
How to Change
Accounts
To change accounts:
1 As user:
The list of accounts you can charge is displayed.
2 Select the account you want to use and press [OK].
3 Press to return to the home screen. The current
account number is displayed.
Selecting a Rate
Selecting a Rate to Calculate Postage
Selecting a rate allows the mailing system to calculate the postage amount when the
mail piece weight is available, either from a weighing device or, for a big parcel,
entered manually (see How to Enter Weight Manually p.58).
The system provides you several ways to select a rate:
• Using a shortcut list in the form of a scale dashboard
• Using a wizard that asks you to choose class, destination, format and services in
complete lists of options.
3.7 Settings Details
Press and type 5 or select the path:
> Account
On the home screen, press to select the default rate and
refresh weight.
DELTA2_UK.book Page 51 Vendredi, 27. juin 2008 11:47 11
Page 58
Processing Mail
52
3
How to Select a Rate
How to Select a
Rate
To select a rate:
1 Either:
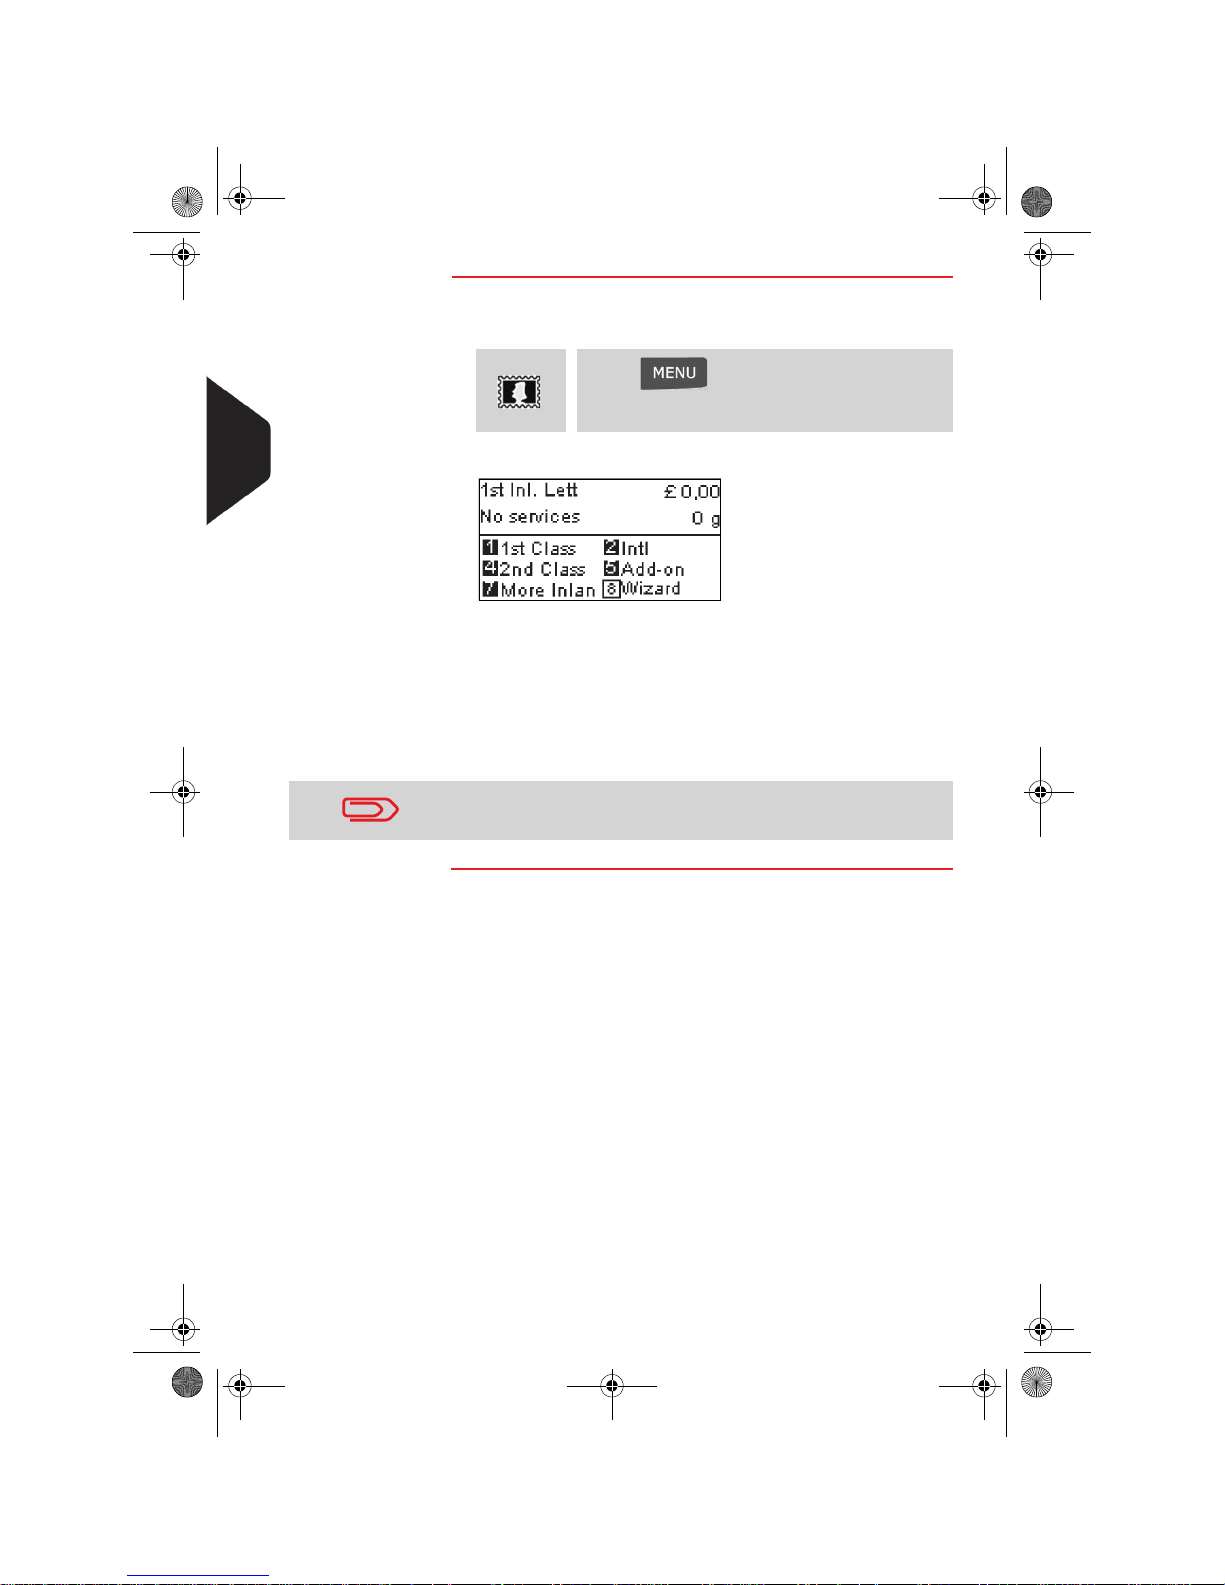
The Rate selection screen is displayed.
2 On that screen, you can:
¾ Type a rate number 1 to 7 to select a rate or display rate
options
¾ Press 8 to select the Rate wizard.
3 Follow the instructions on screen and, once you have chosen
the rate and services, press [OK] to validate your selection.
Press
or
Press and type 4 or select the path:
> Rate selection
Postage displayed on the screen is zero as long as the weight is
not known (= zero).
DELTA2_UK.book Page 52 Vendredi, 27. juin 2008 11:47 11
Page 59
Processing Mail
53
3
Entering Postage Manually
To enter the postage amount manually, follow the procedure below.
How to Enter Postage Manually
How to Enter
Postage Manually
On the home screen:
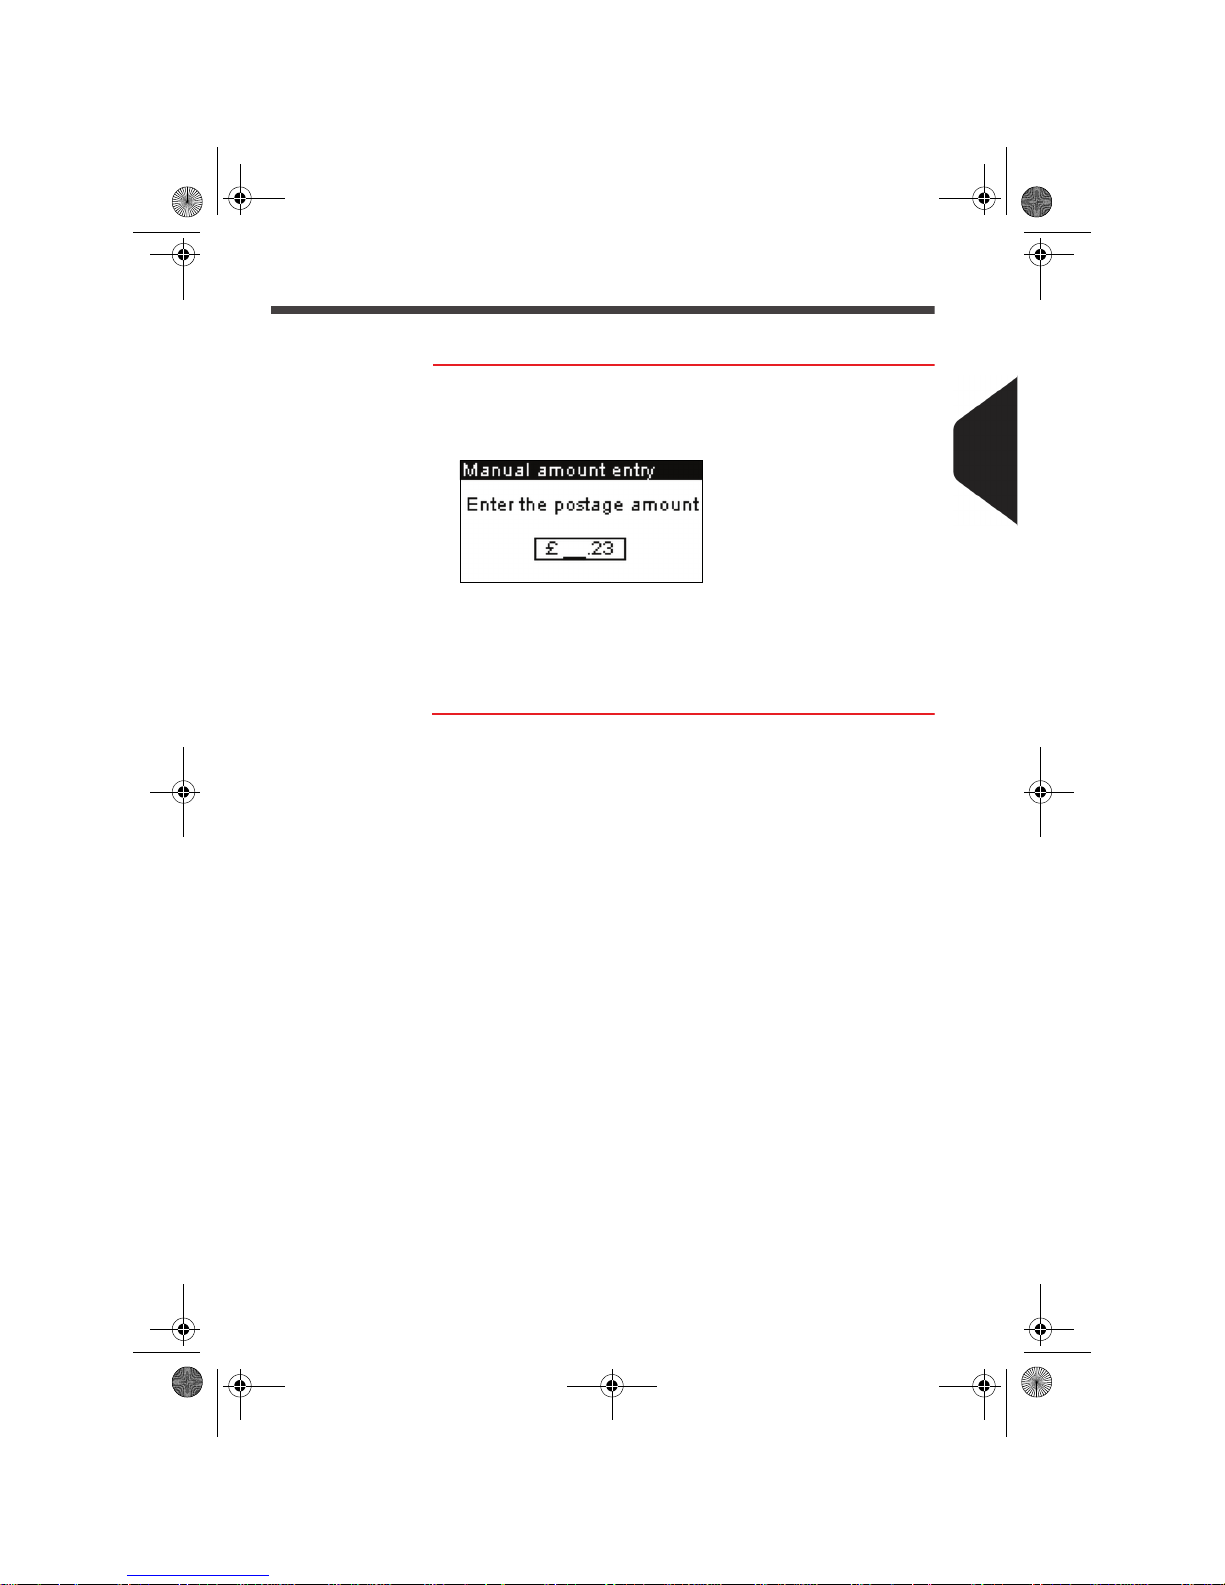
1 Type directly the first figure of the amount using the keypad.
The Manual amount entry screen appears.
2 Complete the amount.
3 Press [OK].
The amount is displayed in the Postage area of the home
screen.
DELTA2_UK.book Page 53 Vendredi, 27. juin 2008 11:47 11
Page 60
Processing Mail
54
3
Selecting a Prepaid Imprint (PPI)
You can select the PPI to use in a list.
See also
• How to Change the Default PPI p.131.
• Managing Prepaid Imprints (PPI) p.151.
How to Select a PPI
How to Select a
PPI
To select a PPI:
1 As user:
and then select > PPI number.
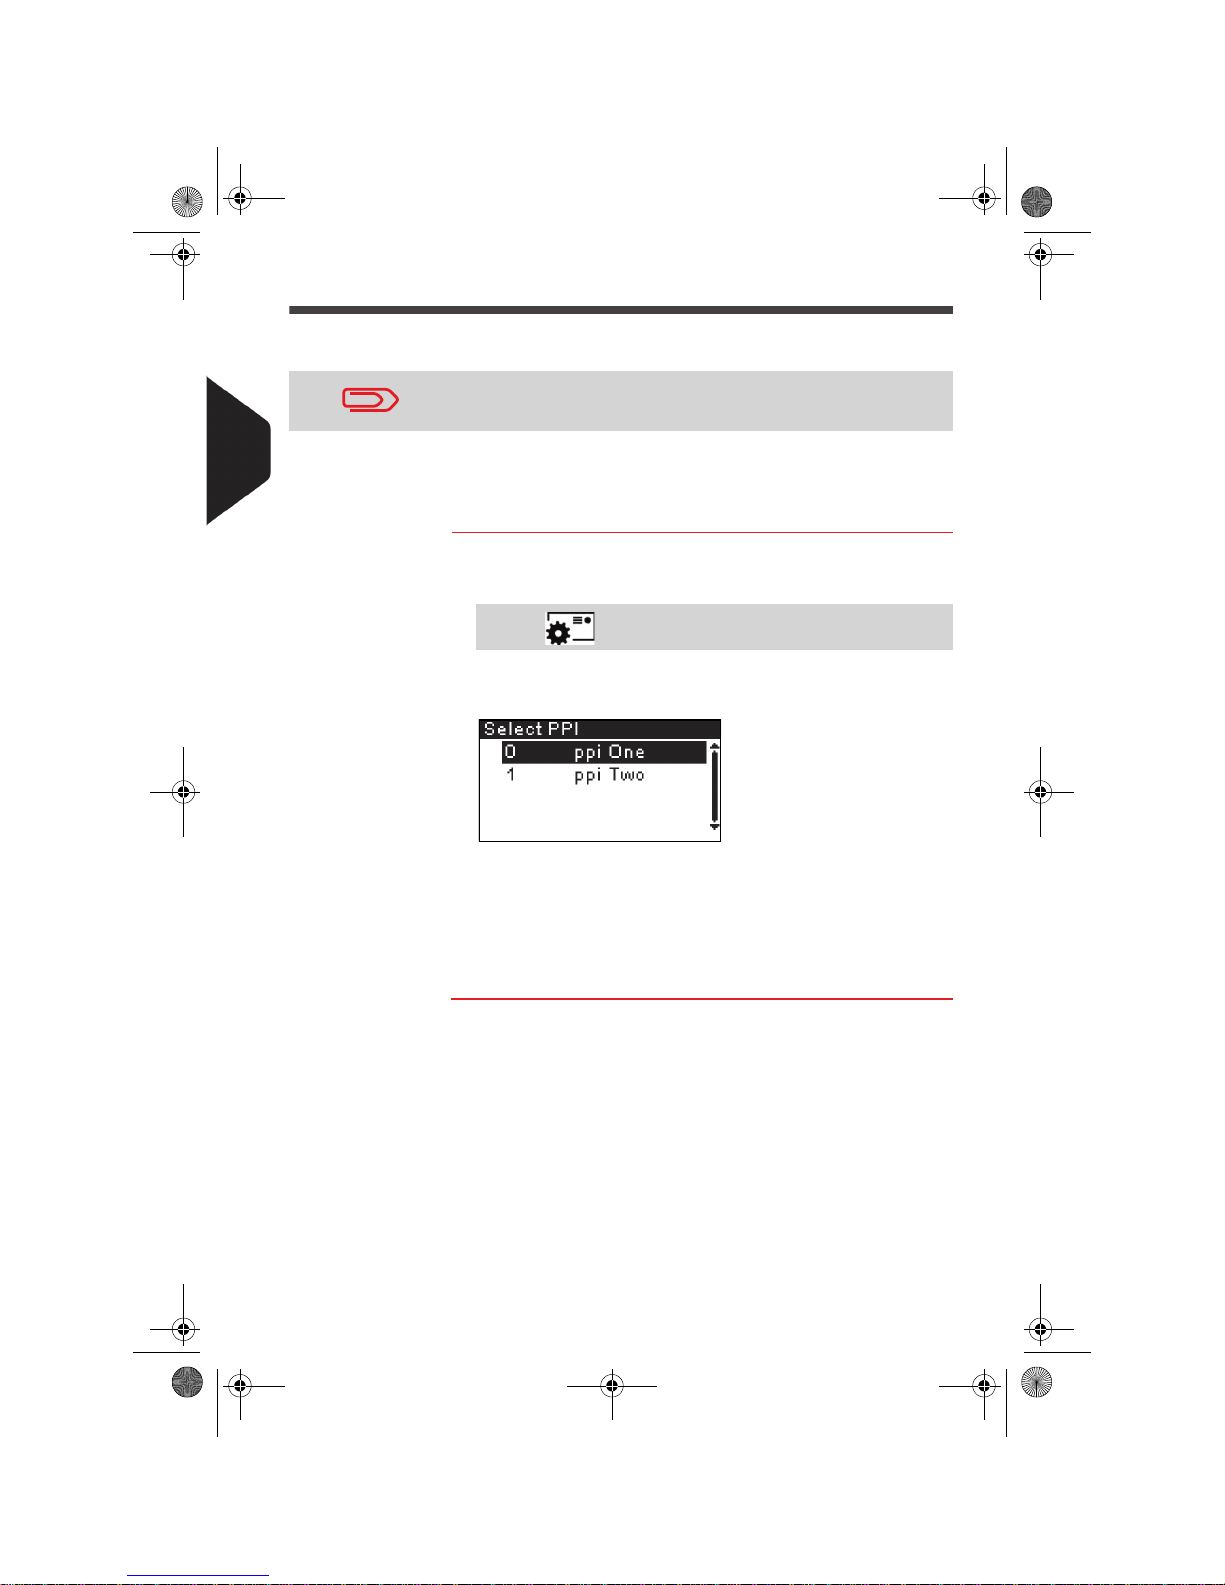
The Select PPI screen is displayed.
2 To select a PPI on that screen, you can:
¾ Type the PPI number
¾ Select the PPI using the arrows.
3 Press [OK] to validate your selection and return to the Imprint
screen.
When selecting the PPI type of imprint, a default PPI is automatically selected.
Press on the keyboard
DELTA2_UK.book Page 54 Vendredi, 27. juin 2008 11:47 11
Page 61
Processing Mail
55
3
Choosing a Weighing Type
Depending on the accessories and features your mailing system is equipped with,
several weighing methods are available.
You can also enter the weight manually if you know it: see How to Enter Weight Ma-
nually p.58.
Choosing a Weighing Type
Depending on the type of mail you want to process, choose a weighing method according to the recommendations in the table below.
The Weighing type icon on the screen indicates the selected source that provides
the weight of the mail piece to the system.
For weighing... Select the method...
Items one by one
• Normal weighing
Items stacked on the Weighing Platform
•
Differential weighing
Items exceeding WP capacity (see Specifications p.181)
• Manual weight
The recommendations in the table apply to items processed with
the same rate. If the rates are different within a stack of mail pieces, the dynamic weighing methods cannot be used. Make different stacks for each rate.
DELTA2_UK.book Page 55 Vendredi, 27. juin 2008 11:47 11
Page 62
Processing Mail
56
3
Details on the Weighing Types
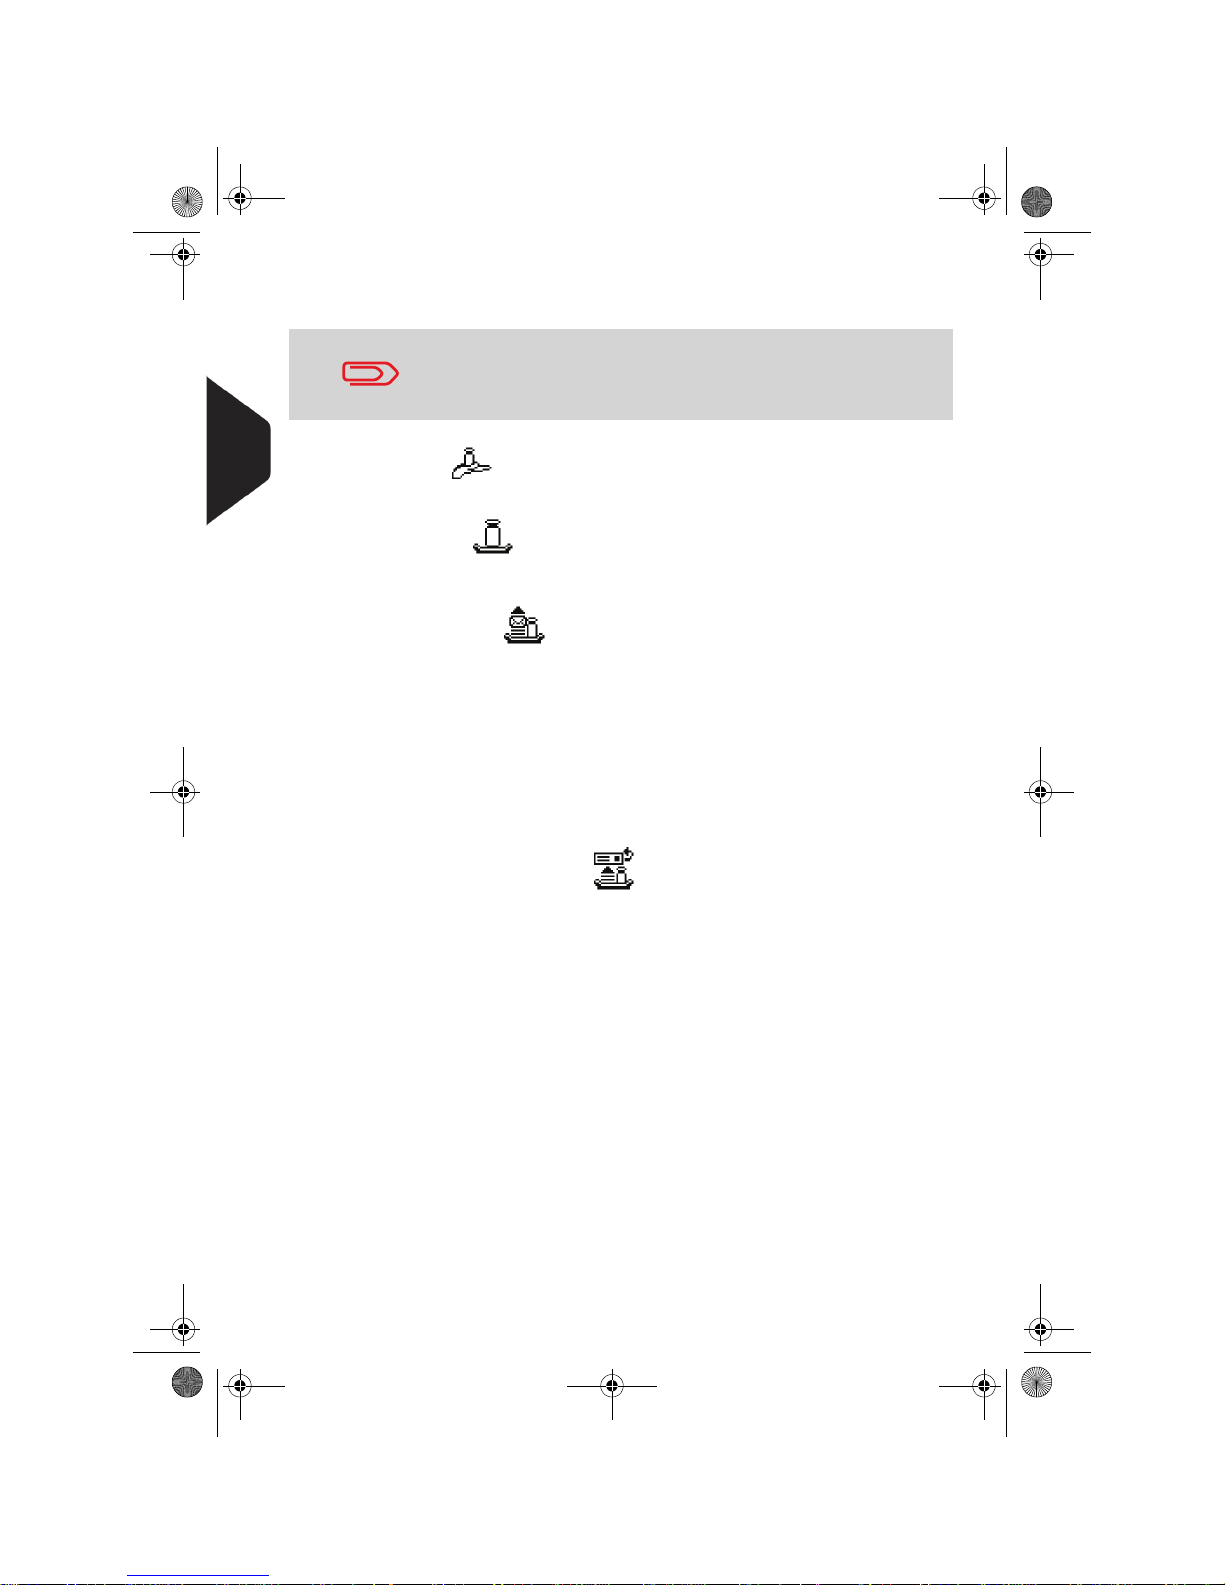
• Manual Weight ()
In this mode, you enter the weight manually. See p.58).
• Normal Weighing ()
In this mode, you manually and successively put each mail piece on the Weighing
Platform, and then put the mail piece into the mail path (or print a label).
• Differential Weighing ()
This mode speeds up the weighing process and increases your efficiency: you put
all the mail pieces together on the Weighing Platform, then remove the pieces one
by one and put them into the mail path. The mailing system calculates postage and
prints the mail piece automatically.
This mode speeds up the weighing process and increases your efficiency: you put
all the mail pieces together on the Weighing Platform, then remove the pieces one
by one and put them into the mail path. The mailing system calculates postage and
prints the mail piece automatically.
You can leave all the mail pieces in a tray on the Weighing Platform: the mailing
system will ask you to confirm printing for the last item removed (the tray).
• Differential Weighing auto-label ()
This mode is identical to Differential weighing except that the system automatically prints on labels.
All weighing options listed below may not be available in your
mailing system. Check with your customer service how you can
easily add weighing features to your mailing system, via online
services.
DELTA2_UK.book Page 56 Vendredi, 27. juin 2008 11:47 11
Page 63
Processing Mail
57
3
Changing the Weighing Type
At start up, the default weighing type is active.
See also
• To change the default weighing type as supervisor, see How to Change the Default
Weighing Type p.125.
To change the weighing type according to the type of process you want to run (see
Choosing a Weighing Type p.55), follow the procedure below.
How to Change the Weighing Type
How to Change
the Weighing
Type
To change the weighing type from the home screen:
1 Either:
The Weighing type screen is displayed.
2 Select the weighing type.
Press
or
Press and type 2.2 or select the
path:
> Batch settings > Weighing type
The options actually displayed in the screen depend on the weighing devices that are connected to your mailing system and on
features that are activated.
If you select the option Automatic label, make sure the Auto-
Label Dispenser is properly filled with labels. See How to Fill the
Auto Label-Dispenser p.65.
DELTA2_UK.book Page 57 Vendredi, 27. juin 2008 11:47 11
Page 64
Processing Mail
58
3
Entering Weight Manually
You may have to enter the weight manually, if a mail piece overruns the weighing capabilities of all your weighing devices.
In that case, you will typically also choose to print the postage on a label to stick onto
the mail piece.
How to Enter Weight Manually
How to Enter
Weight Manually
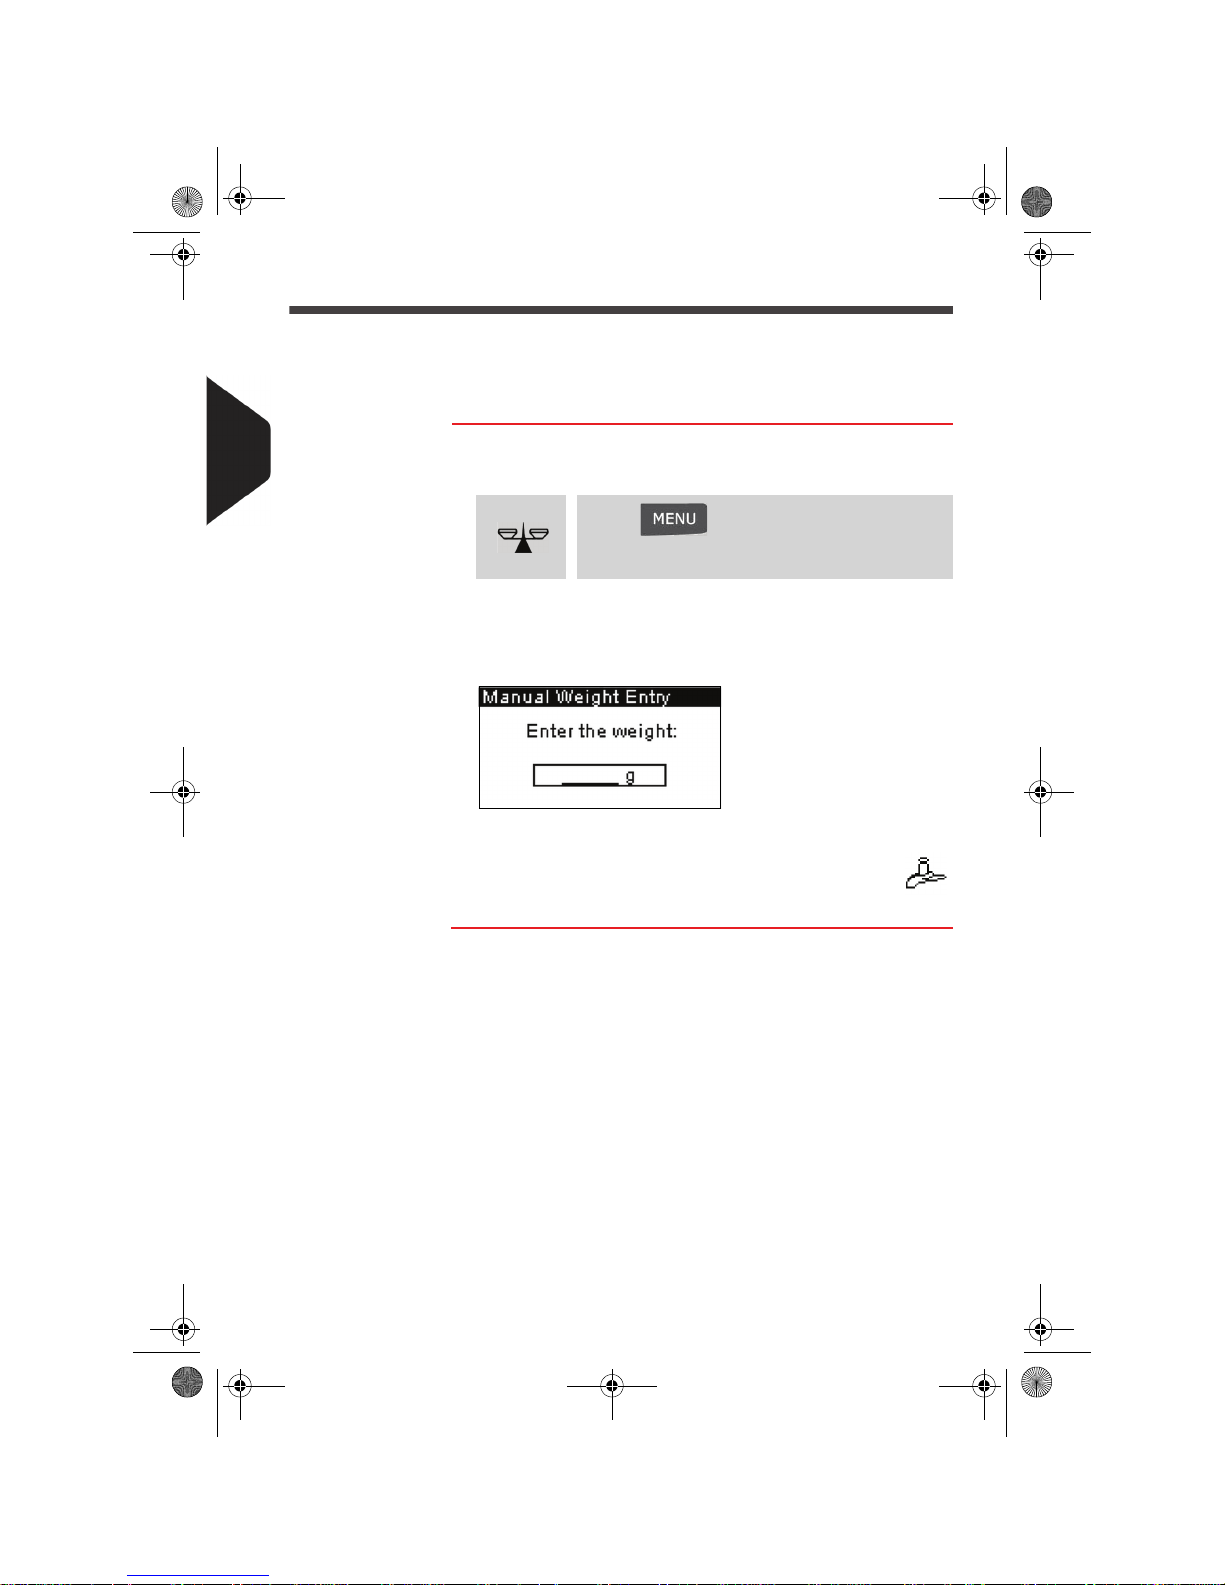
To enter the weight manually from the home screen:
1 Either:
The Weighing type screen is displayed.
2 Select Manual weight entry (or type 1).
The Manual weight entry screen is displayed.
3 Enter the weight (in g ) and press [OK] to validate.
The home screen displays the Manual weight icon ( )
and the weight entered.
Press
or
Press and type 2.2 or select the
path:
> Batch settings > Weigh ing type
DELTA2_UK.book Page 58 Vendredi, 27. juin 2008 11:47 11
Page 65
Processing Mail
59
3
Configuring the Imprint
Depending on the current type of imprint, you can modify the elements printed on mail
pieces as follows:
• Changing printed date
• Adding a pre-recorded slogan at the left of the imprint
• Adding a pre-recorded ERA at the left of the imprint
• Moving the imprint away from the right edge of the envelope.
See also
• How to Change the Current 'Type of Imprint' p.30
• Types of Process and Types of Imprint p.26.
Changing Imprint Date
The Date Advance function allows you to change the date printed on the mail pieces.
How to Change the Date on the Imprint
How to Change
the Date on the
Imprint
To change the date that will be printed:
1 Either:
The Imprint screen is displayed.
2 Select > Date and press [OK] (or type 3).
The Date advance screen is displayed.
3 On the Date advance screen, you can configure the printed
date as follows:
¾ To choose another day, select the corresponding item in
the list.
The icon indicates the current selection.
4 Press [OK] to apply changes and return to the configuration
menu.
The mailing system can automatically change the date at fixed
hours every day or skip non-working days. See How to Set the
Automatic Date Advance Time p.133.
Press
or
Press and type 1 or select the path:
> Imprint
DELTA2_UK.book Page 59 Vendredi, 27. juin 2008 11:47 11
Page 66
Processing Mail
60
3
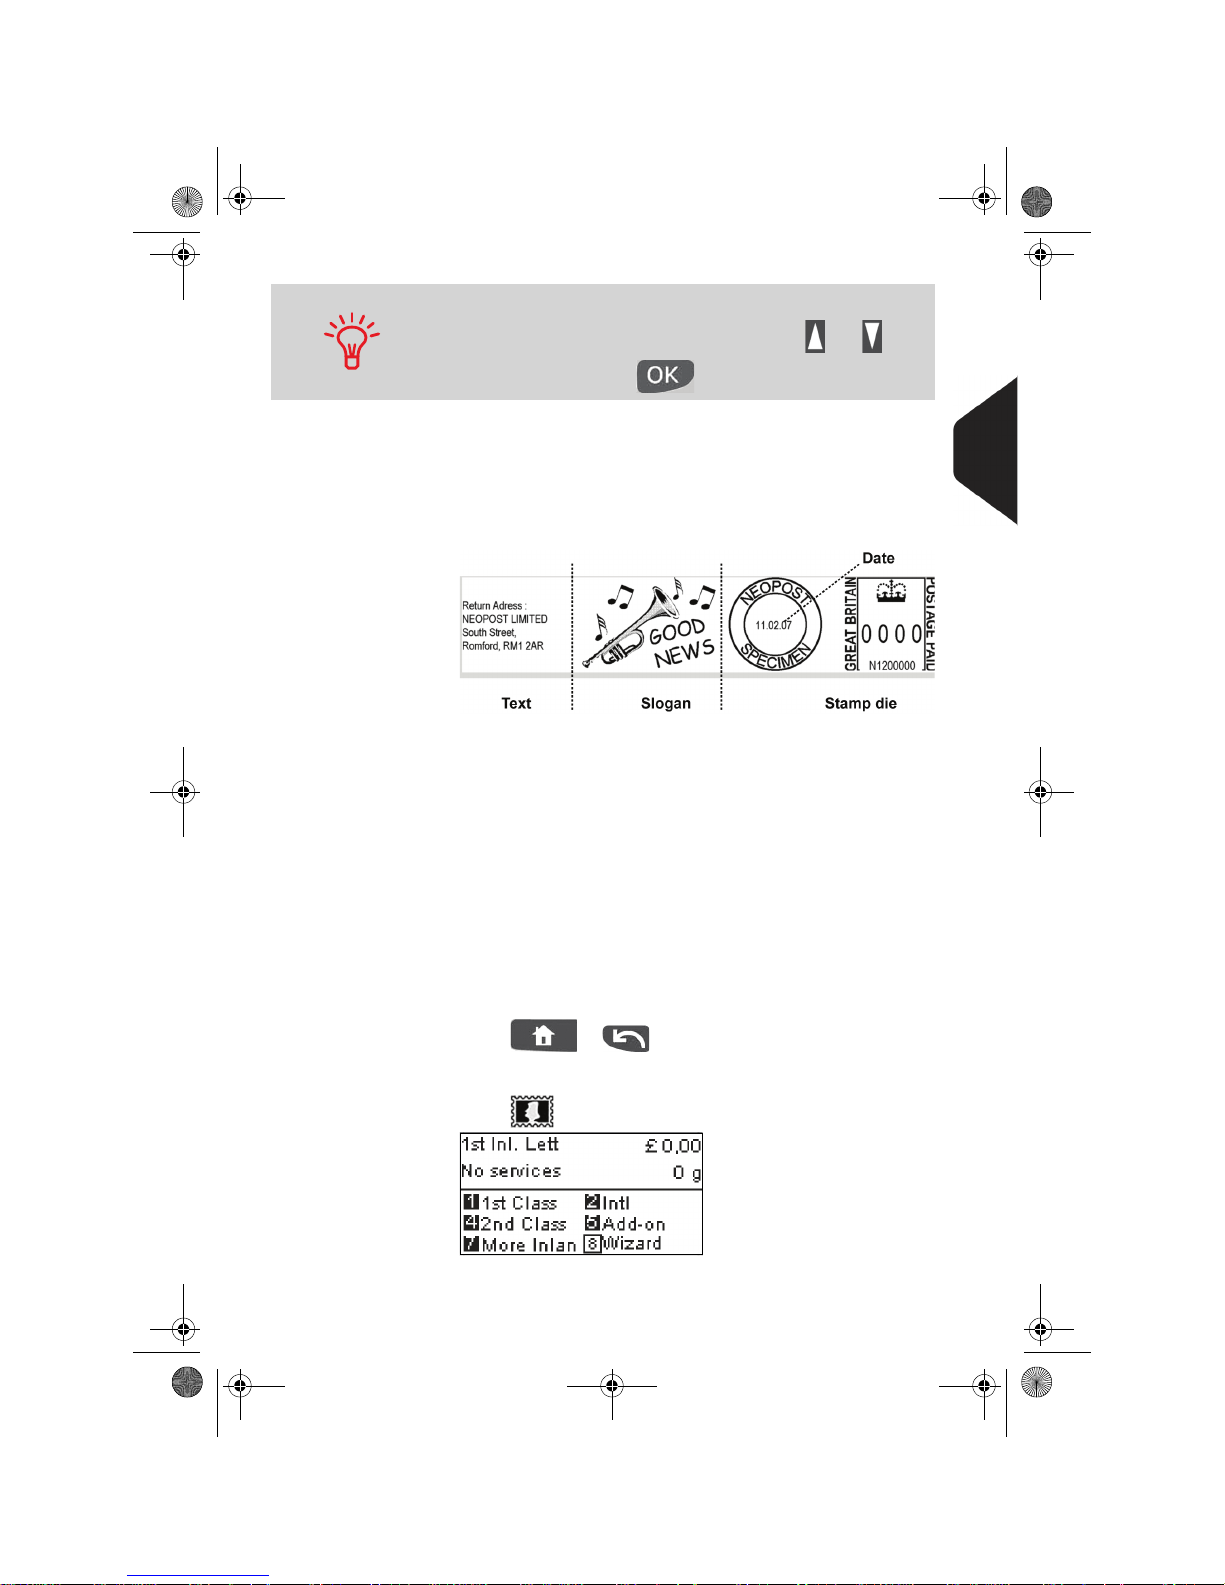
Adding an ERA and Slogan to the Imprint
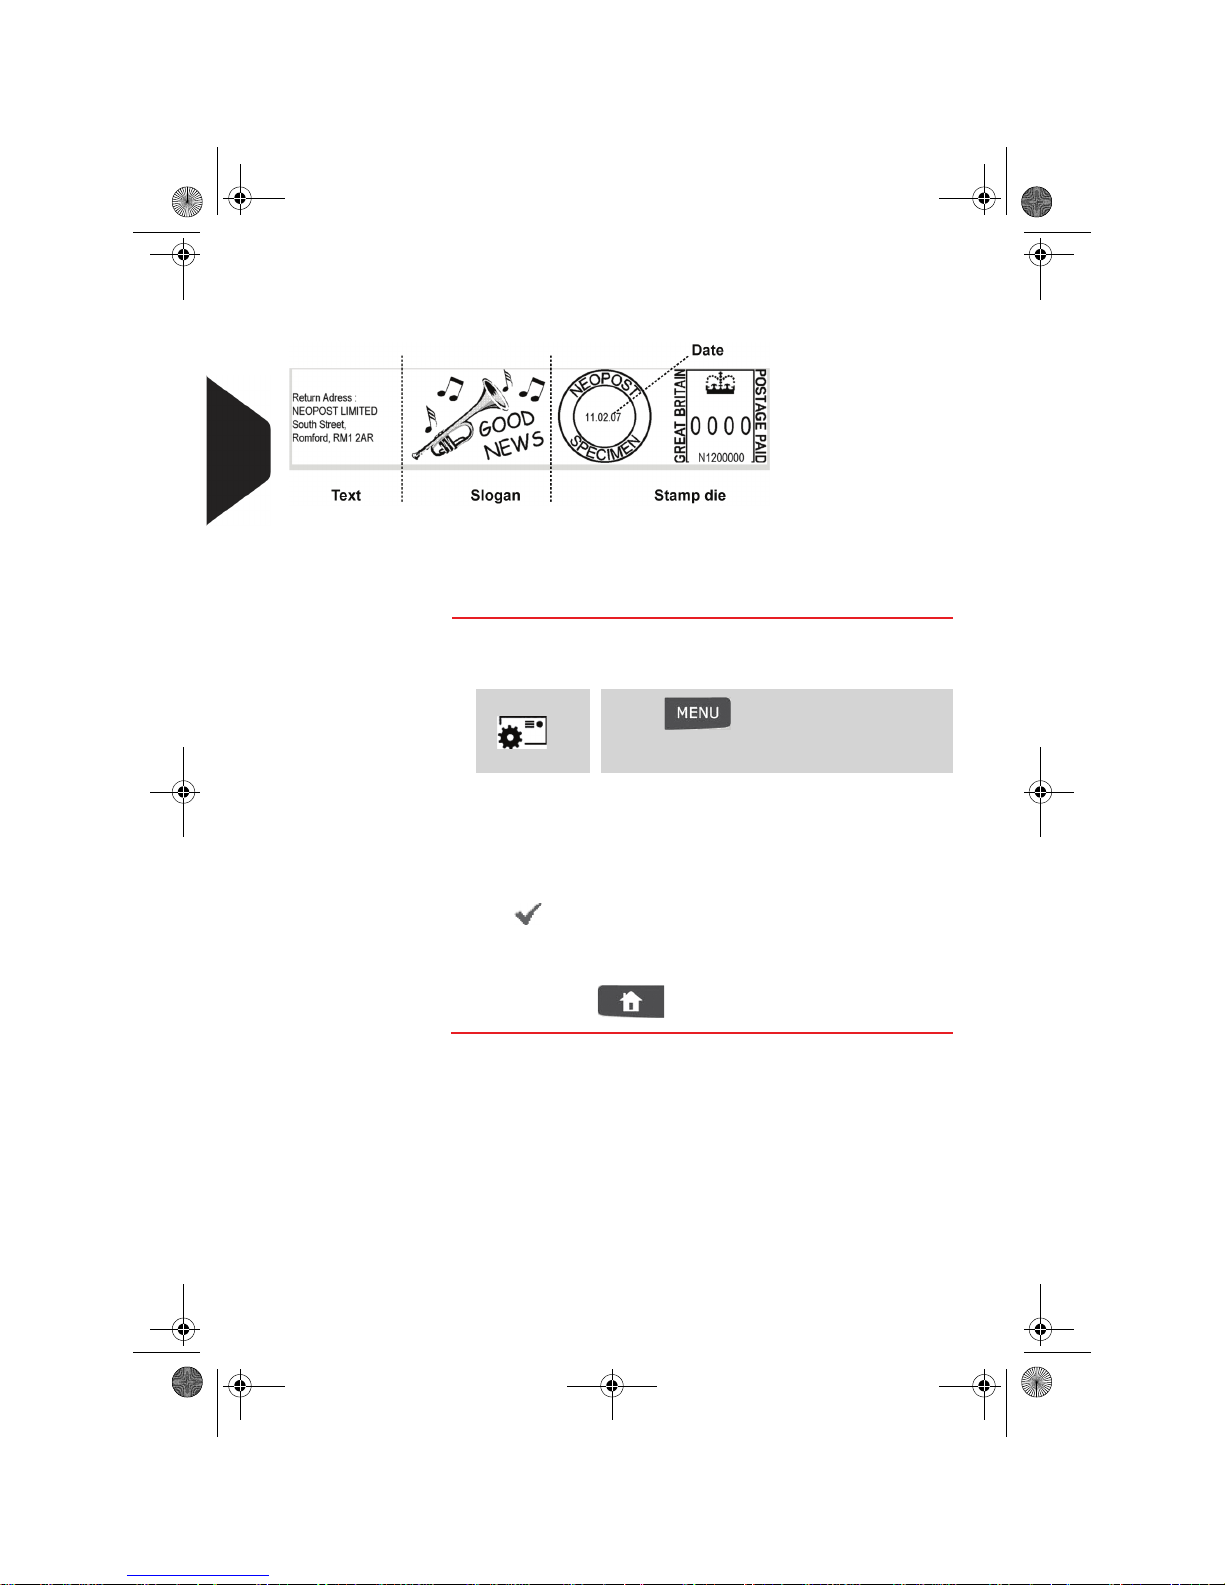
You can add an ERA and/or a slogan to the imprint, as illustrated below.
Figure 1 : Elements of an imprint
See also
• The supervisor manages the lists of the available ERAs and slogan. See Ma-
naging ERAs p.148 and Managing Slogans p.146.
How to Add (or Cancel) an ERA on the Imprint
How to Add (or
Cancel) an ERA
on the Imprint
To add an ERA to the imprint, or to cancel the ERA:
1 Either:
2 Select > ERA and press [OK] (or type 2).
The Select ERA screen is displayed.
3 Select the desired ERA in the list or None for printing no
ERA.
The icon indicates the current selection.
4 Press [OK] to validate your selection.
The imprint screen is displayed with updated parameters
(home screen: ).
Press
or
Press and type 1 or select the
path:
> Imprint
DELTA2_UK.book Page 60 Vendredi, 27. juin 2008 11:47 11
Page 67
Processing Mail
61
3
How to Add (or Cancel) a Slogan on the Impri nt
How to Add (or
Cancel) a Slogan
on the Imprint
To add a slogan to the imprint or cancel the slogan:
1 Either:
2 Select > Slogan and press [OK] (or type 1).
The Select slogan screen is displayed.
3 Select the slogan in the list or select None for printing no
slogan.
The icon indicates the current selection.
4 Press [OK] to validate your selection.
The Imprint screen is displayed with updated parameters
(home screen: ).
Moving the Imprint (Print Offset)
On thick envelopes with pitched sides, apply a print offset to move the imprint away
from the edge of the envelope.
How to Move the Imprint (Print Offset)
How to Move the
Imprint (Print
Offset)
To add an offset to the imprint position:
1 As user:
The Print offset screen is displayed.
2 Select the offset and press [OK] to validate.
Press
or
Press and type 1 or select the path:
> Imprint
Royal Mail requires blue ink to be used when franking letters eligible for the Cleanmail Advance discount (using CMA slogan).
Press and type 2.1 or select the path:
> Batch settings > Print offset
DELTA2_UK.book Page 61 Vendredi, 27. juin 2008 11:47 11
Page 68
Processing Mail
62
3
Using Job Memories
The Job memories allow you to set the rate, slogan and date mode in one shot,
using memorized imprint configurations.
In account-activated configurations, Job memories include accounts, allowing you to
associate rates to accounts.
See also
• To prepare Job memories as supervisor, see Job memories p.135.
How to Use a Job Memory
How to Use a
Job Memory
To use an imprint memory:
1 Either:
The Job memories list is displayed.
2 Select a Job memory in the list.
3 Press [OK] to validate and apply memory parameters.
The Mem zone of the home screen displays the current Job
memory.
If your mail requires different settings such as specific postal rate
(1st class - registered...) + slogan + department to charge, then
the Job memories are the solution: all your settings are stored in a
single memory. Just press imprint memory key instead of multiple
navigation to select all the required elements. Highly recommended for repetitive tasks.
Press
or
Press and type 3 or select the path:
> Job memories
DELTA2_UK.book Page 62 Vendredi, 27. juin 2008 11:47 11
Page 69
Processing Mail
63
3
Using the Sealing Function
Auto Feeder Sealer
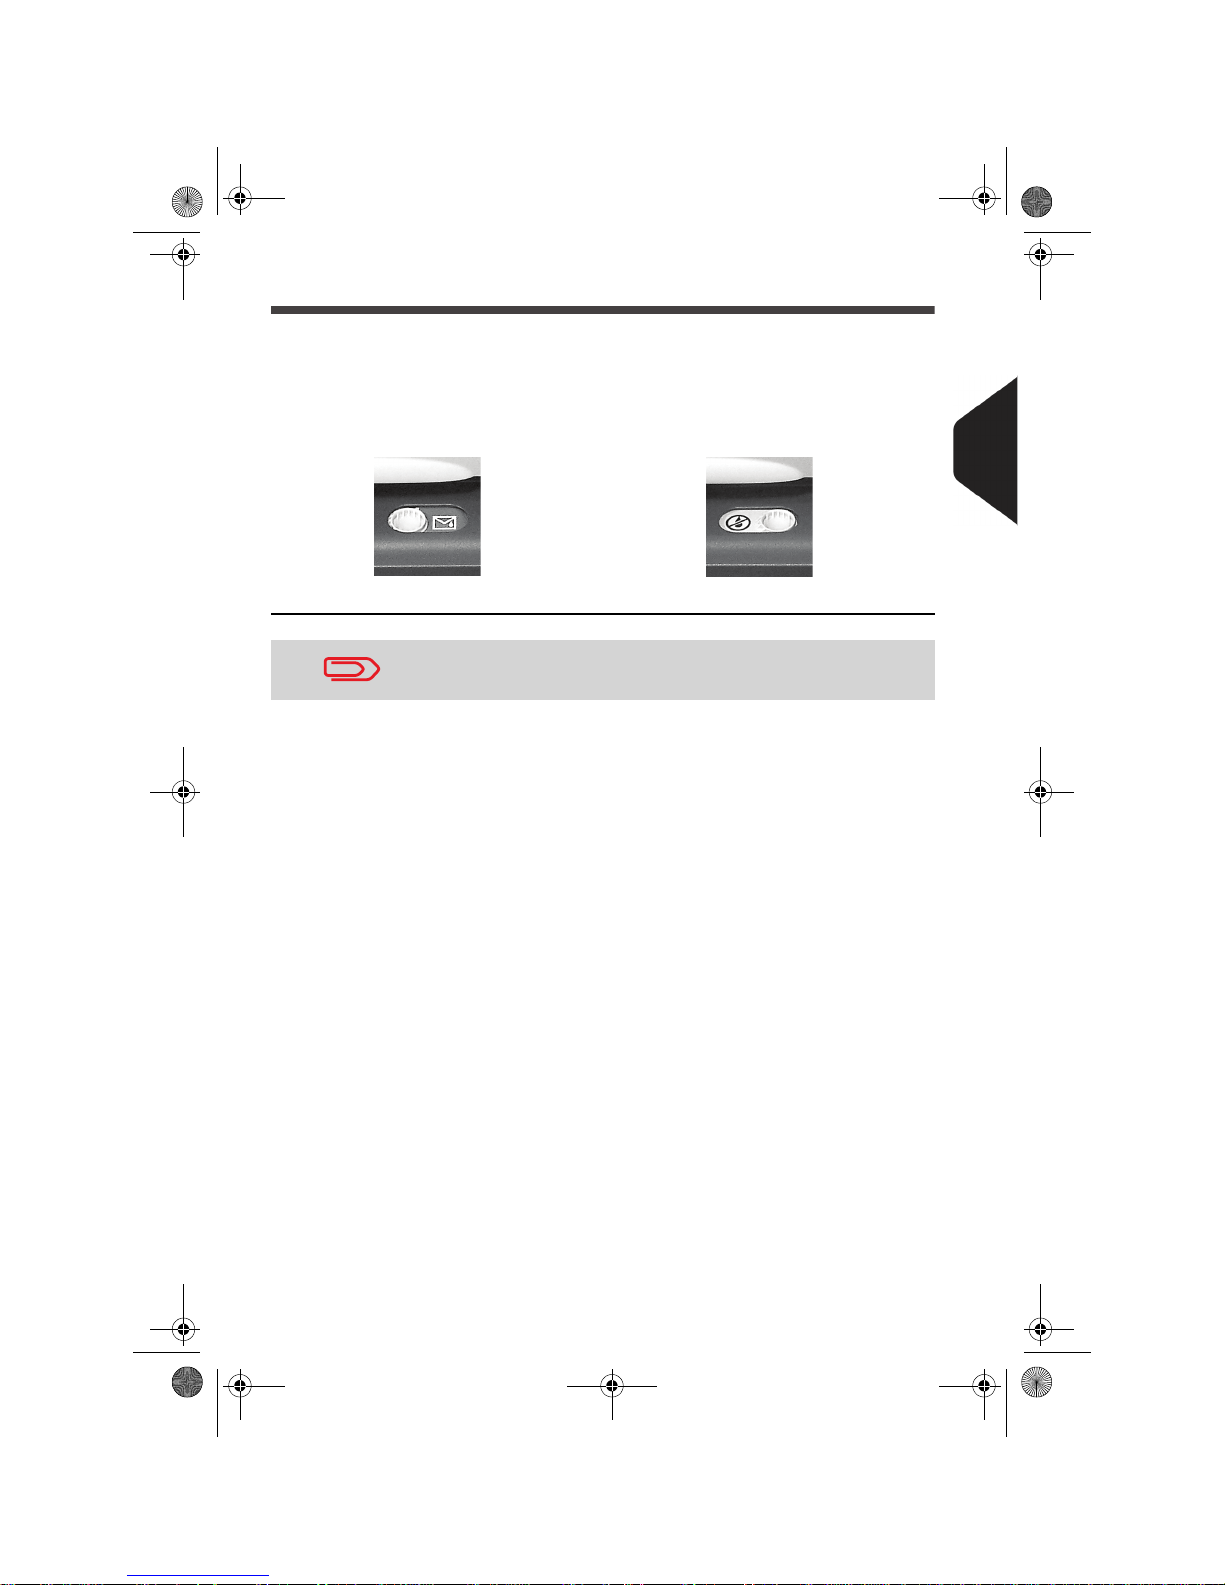
If equipped with a sealer, your Auto Feeder can seal envelopes while printing
postage.
Move the cursor at the front of the feeder right or left to change the moistener state:
Moistener ON Moistener OFF
Do not insert envelopes already sealed in the feeder when sealing
is ON: the envelopes might jam.
DELTA2_UK.book Page 63 Vendredi, 27. juin 2008 11:47 11
Page 70
Processing Mail
64
3
Complementary Operations
Stopping Runs
If you want to stop motors of the machine in emergency:
How to Stop the Run Process
How to Stop the
Run Process
To stop the run process immediately:
1 Press .
Using Batch Counters
The counters allow you to issue reports on the activity since the last counter reset.
How to Reset Batch Counters
How to Reset
Batch Counters
To reset a counter:
1 As user:
2 Select the counter you want to reset and press [OK].
3.8 Complementary Operations
To produce reports associated to counters, see Reports p.87.
Press and type 2.3 or select the path:
> Batch settings > Start batch counters
DELTA2_UK.book Page 64 Vendredi, 27. juin 2008 11:47 11
Page 71
Processing Mail
65
3
Filling the Label Dispenser
How to Fill the Auto Label-Dispenser
How to Fill the
Auto Label-Dispenser
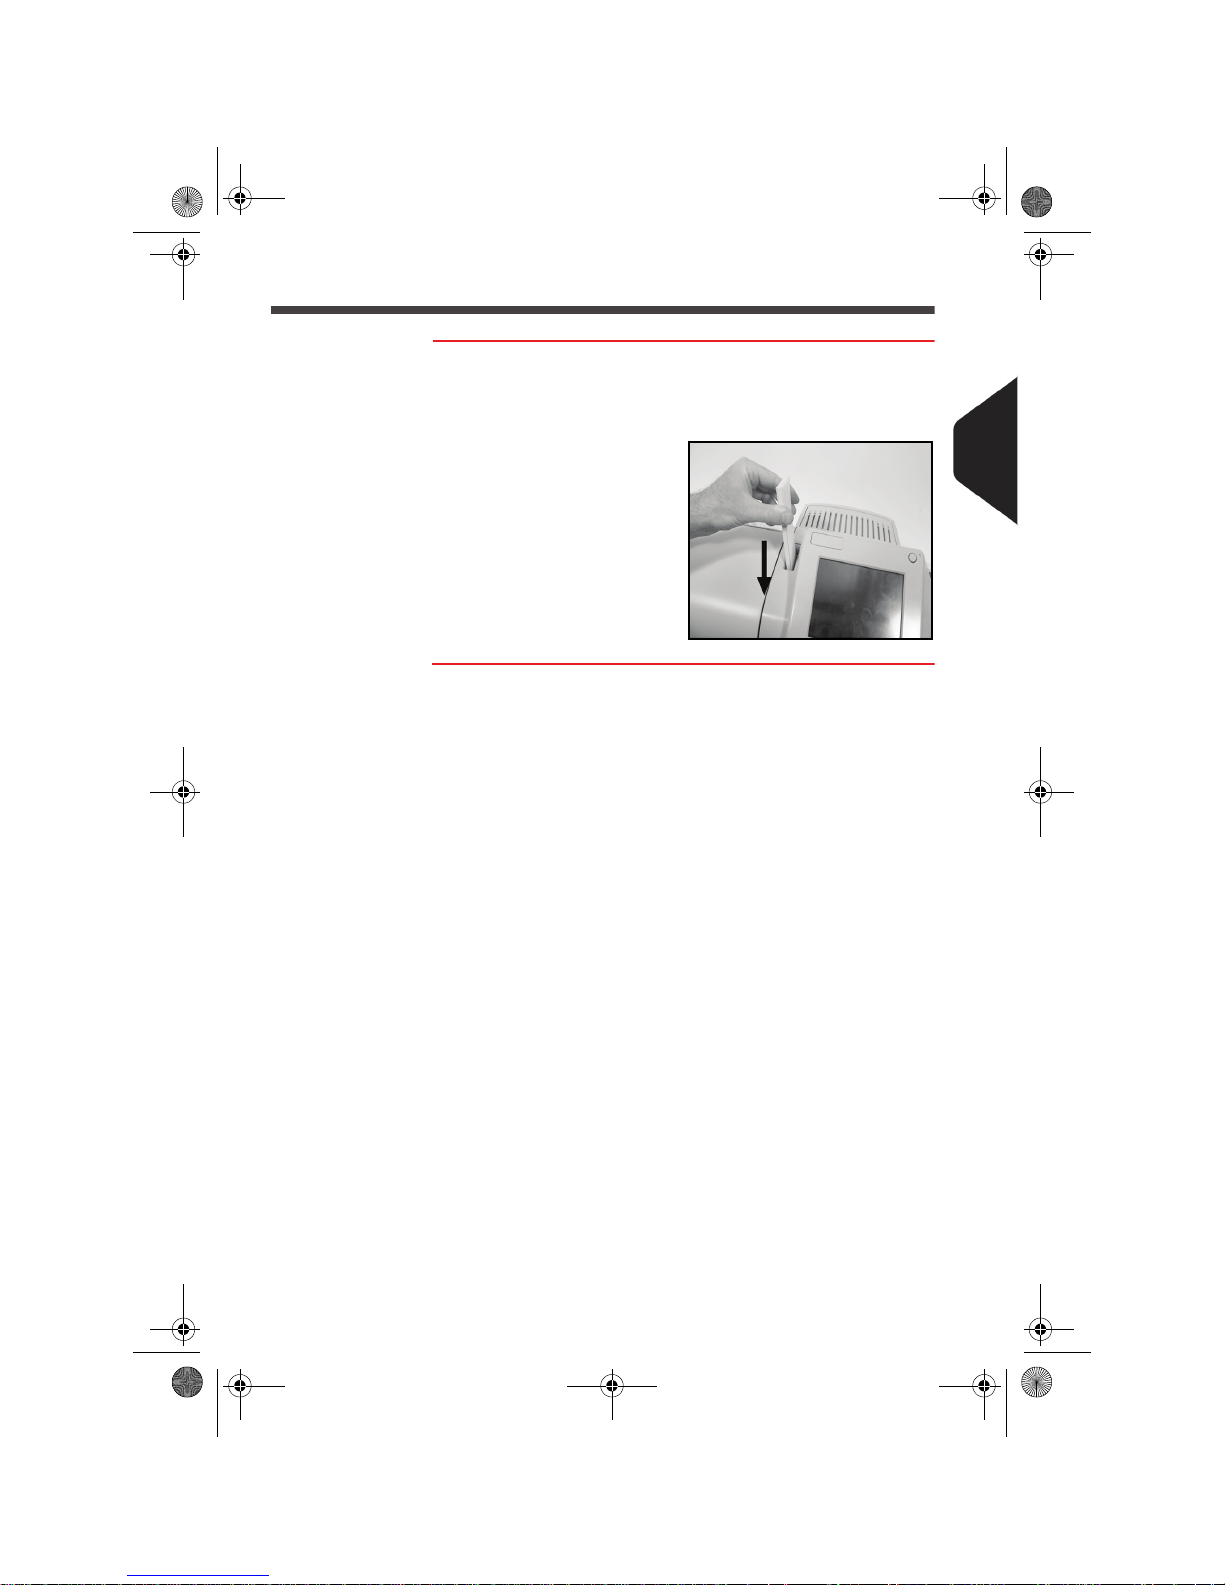
To fill the Auto Label-Dispenser:
1 Stack the labels and insert them in the dispenser, face to
print on the right-hand side and peel-off tab on the left.
2
Push the block of labels
down until you feel the
click.
DELTA2_UK.book Page 65 Vendredi, 27. juin 2008 11:47 11
Page 72
Processing Mail
66
3
DELTA2_UK.book Page 66 Vendredi, 27. juin 2008 11:47 11
Page 73
Money Operations
This section describes how you can load and manage money in your mailing
system to allow postage operations.
4.1 Overview............................................................ 69
4.2 Managing Credits ...............................................70
How to Check the Meter Credits..................................................70
How to Add Credits to the Meter..................................................71
4.3 Unlocking the Meter (Audit)................................72
How to Unlock the Meter (Audit) ..................................................72
4 Money Operations
DELTA2_UK.book Page 67 Vendredi, 27. juin 2008 11:47 11
Page 74
Money Operations
68
4
DELTA2_UK.book Page 68 Vendredi, 27. juin 2008 11:47 11
Page 75
Money Operations
69
4
Overview
The Postal Security Device (Meter)
The meter, located in the base, handles the credits (or money) in your mailing system.
The meter performs all necessary operations to comply with the postal standards. To
do so, regular connections to the Postal Services are necessary.
Managing Credits
As user, you can carry out the following operations dealing with credits in your mailing
system:
• Check the available credits in the meter
• Add credits to the meter.
The crediting operations trigger a connection of the mailing system to Postal Services
through the telephone line.
Tracking Credits
You can issue reports on the use of the credits as all mailing operations involving
postage are recorded in the mailing system.
To issue reports, see Reports p.87.
4.1 Overview
Check that your mailing system is connected to a telephone line
(see Connections p.15) and that the connection is properly configured (see Connection Settings p.138).
DELTA2_UK.book Page 69 Vendredi, 27. juin 2008 11:47 11
Page 76
Money Operations
70
4
Managing Credits
Checking Credits
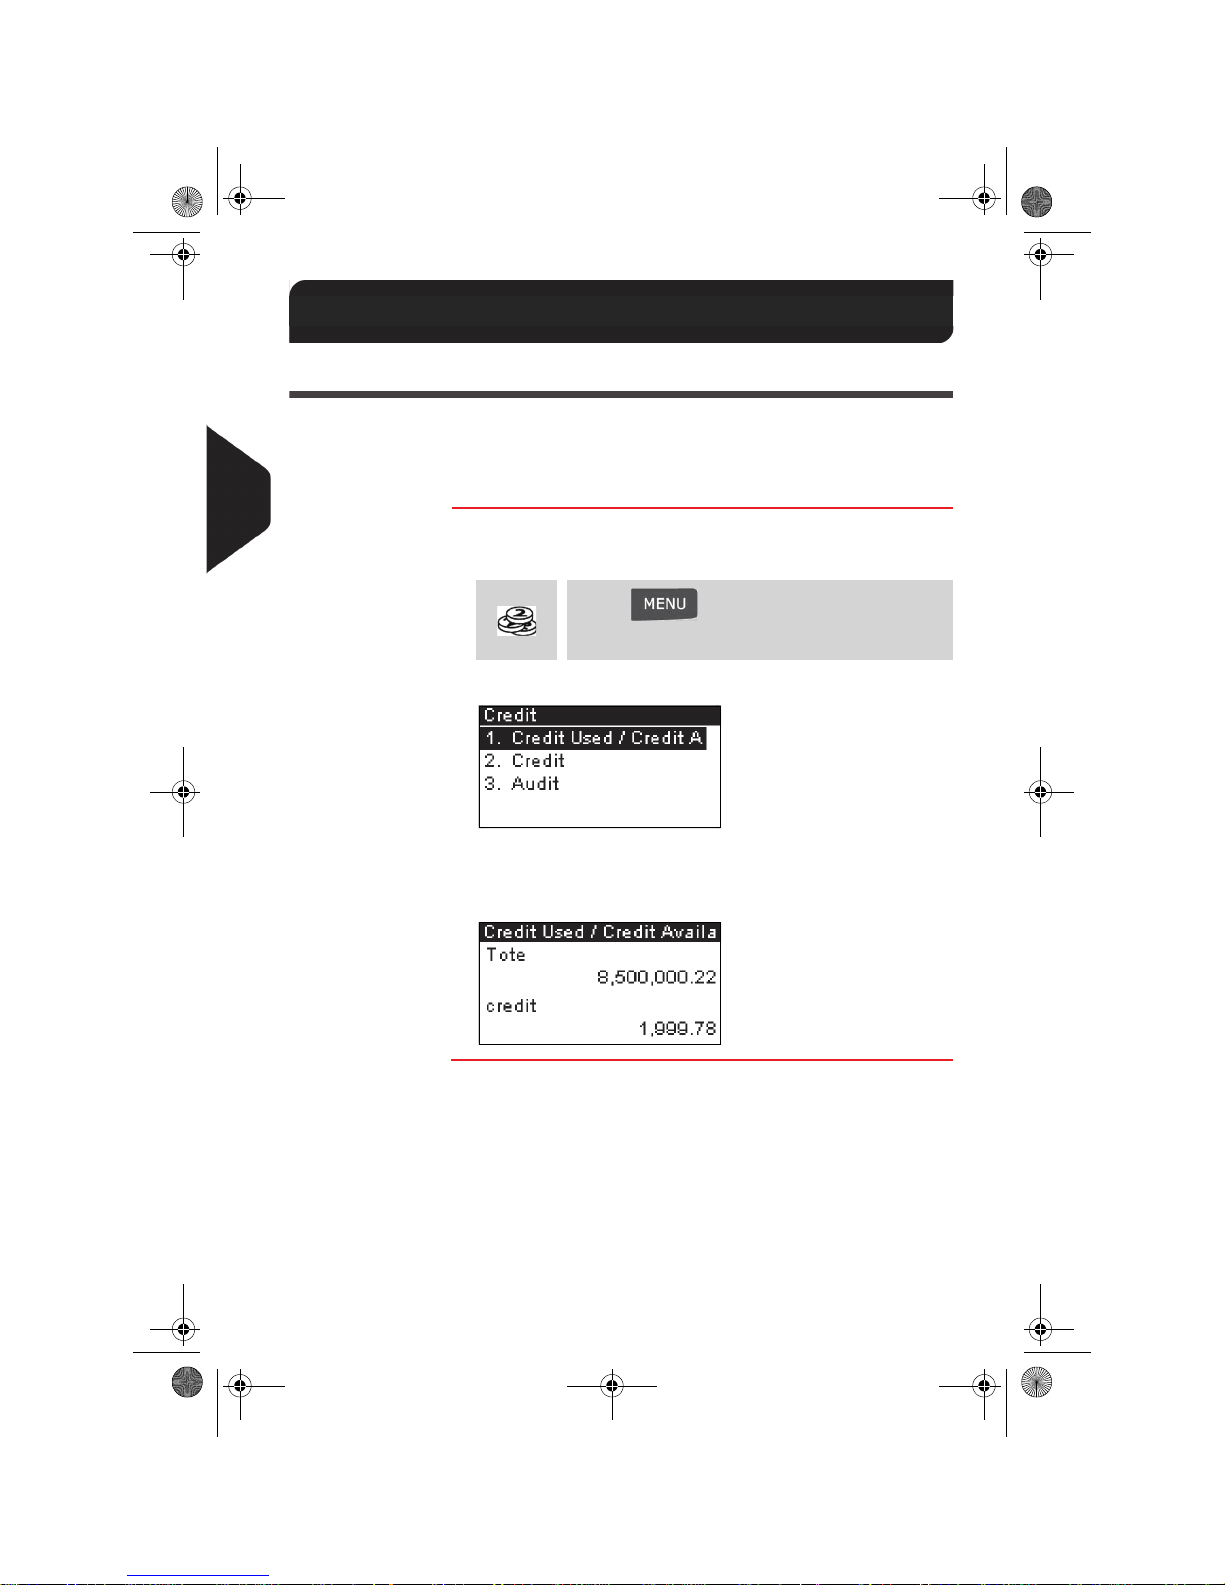
You can check the total money used for postage and the remaining credits in the
meter at any time, and particularly before mailing sessions, to check that the credits
are sufficient to complete your current task.
Use the procedure below to display remaining credits.
How to Check the Meter Credits
How to Check
the Meter Credits
To check the credits in the machine:
1 Either:
The Credits menu is displayed.
2 Select the menu path:
> Credits used / Credits available (or type
1).
The screen displays the current amounts.
4.2 Managing Credits
Press
or
Press and type 7 or select the path:
> My credits
DELTA2_UK.book Page 70 Vendredi, 27. juin 2008 11:47 11
Page 77
Money Operations
71
4
Adding Credits
You can add credits to the mailing system by indicating an amount to add. The mailing
system then connects to the Postal Services and validates the operation.
See also
• As supervisor, you can set the mailing system to ask for a PIN code for crediting:
see How to Set / Cancel a Crediting PIN Code p.124.
How to Add Credits to the Meter
How to Add
Credits to the
Meter
To add credits to the meter:
1 Either:
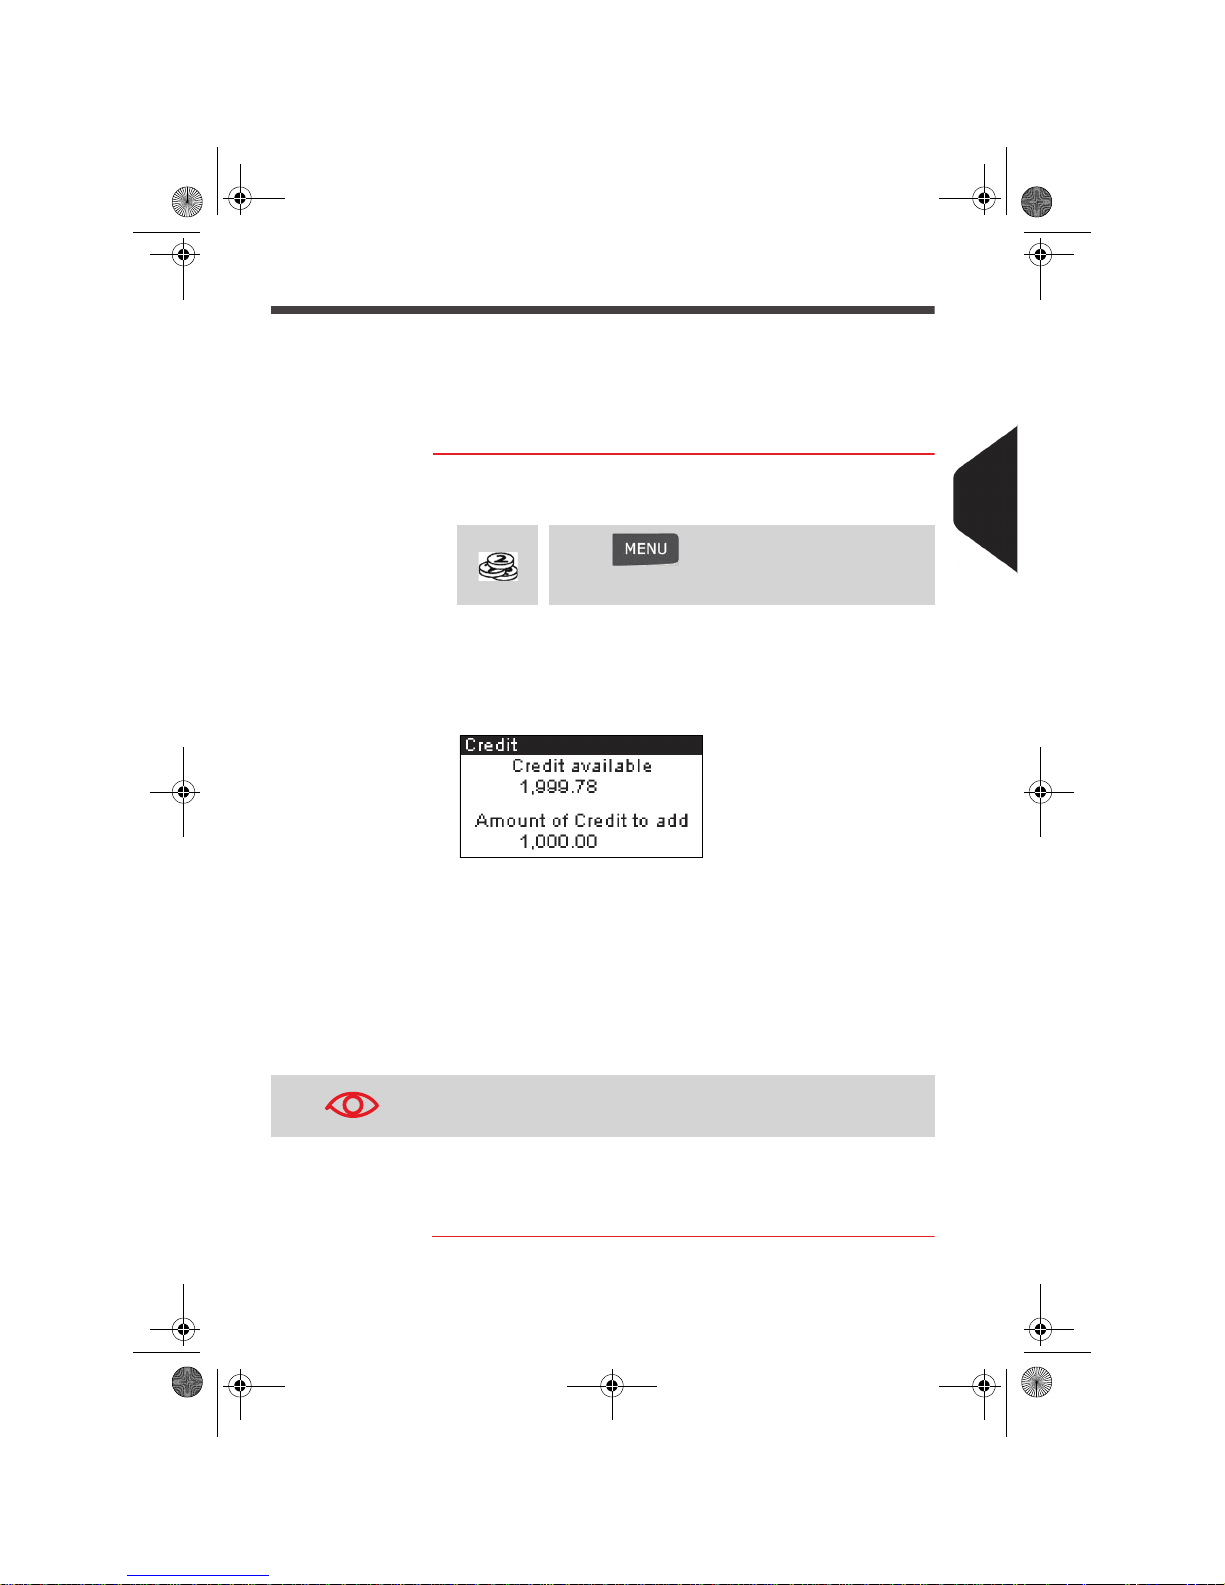
2 Select > Credit (or type 2).
3 If the system asks for a PIN code, enter the code using the
keypad and press [OK].
The Credit screen is displayed.
By default, the system proposes the value of the previous
crediting operation.
4 Enter the amount to add using the keypad and press [OK] to
start the connection to the Postal Server.
If the crediting process is successful, the system displays a
successful message.
If crediting fails, the system displays a failure message and
the value that you may actually add, depending on your
postal account balance.
5 You can open the Credits used / Credits available screen to
check the new values (see How to Check the Meter Credits
p.70).
Press
or
Press and type 7 or select the path:
> My credits
In the case of a communication error, the amount previously entered cannot be changed.
DELTA2_UK.book Page 71 Vendredi, 27. juin 2008 11:47 11
Page 78
Money Operations
72
4
Unlocking the Meter (Audit)
After a long period of inactivity, the postage functions may be automatically deactivated to protect your credits.
In this case, you have to perform a connection to the Postal Services to unlock the
meter.
How to Unlock the Meter (Audit)
How to Unlock
the Meter (Audit)
To unlock the meter and manually connect to the Postal
Services:
1 Either:
2 Select > Audit (or type 3).
The system asks for confirmation.
3 Press [OK] to connect to the Postal Services.
If the audit is successful, the system displays a successful
message.
If the audit fails, the system displays a failure message explaining the cause of the error. Try to correct the cause and
retry.
4.3 Unlocking the Meter (Audit)
You can use the Audit function to set mailing system time after
Daylight Saving Time transitions, as connections to Postal Services sets mailing system time and date.
Press
or
Press and type 7 or select the path:
> My credits
DELTA2_UK.book Page 72 Vendredi, 27. juin 2008 11:47 11
Page 79
Managing Accounts and Access Rights
This section describes how you can manage accounts as supervisor to track the
postage credits usage and/or set access rights to the mailing system.
5.1 Accounting and Access Rights Overview............75
5.2 Choosing an ' Account Mode' ............................76
5.3 Guidelines to Implementing an 'Account Mode' 77
How to Change the Shared PIN Code .................................78
5.4 Selecting an 'Account Mode'............................. 80
How to Display and Change the 'Account Mode' .................80
5.5 Managing the Accounts ..................................... 81
How to Create an Account ...................................................82
How to View / Edit Account Parameters ...............................83
How to Activate / Deactivate an Account .............................83
How to Delete an Account ....................................................84
How to Issue the Account List Report ..................................85
5 Managing Accounts and
Access Rights
DELTA2_UK.book Page 73 Vendredi, 27. juin 2008 11:47 11
Page 80
Managing Accounts and Access Rights
74
5
DELTA2_UK.book Page 74 Vendredi, 27. juin 2008 11:47 11
Page 81
Managing Accounts and Access Rights
75
5
Accounting and Access Rights Overview
Postage Tracking and Access Control
Your mailing system includes functions that allow you to implement the following security and accounting requirements:
• Track the usage that is made of postage: the Accounts function
• Control the access of the users to the machine: the Access Control function.
You can activate these two functions independently. If both are activated, you can, to
better compartmentalize the expenses, allocate each user certain accounts only.
The Accounts Function
Activating the Accounts function in the mailing system is a convenient way to track
postage expenses by, for example, associating accounts to departments in your organization (Marketing, Sales, etc.) or to different companies, if the mailing system is
shared.
When the Accounts function is activated, the currently selected account is charged
each time the user applies postage to mail.
Then you can issue reports on each account usage (for information about reports, see
Reports p.87).
Accounts from the User's Perspective
If the Accounts function is activated, users of the mailing system have to select an
account when starting their work session.
Afterwards, the user can change the account to charge according to the mail that has
to be processed.
The Access Control Function
As supervisor, you can set the mailing system to ask for a PIN code when a user
wakes up the machine to start a session.
This allows you to protect the machine and restrict the usage of its credits.
The different access control policies you can implement as supervisor are:
• No PIN code: access to the machine is free
• Unique system PIN code: users enter the PIN code to access the machine.
5.1 Accounting and Access Rights
Overview
DELTA2_UK.book Page 75 Vendredi, 27. juin 2008 11:47 11
Page 82
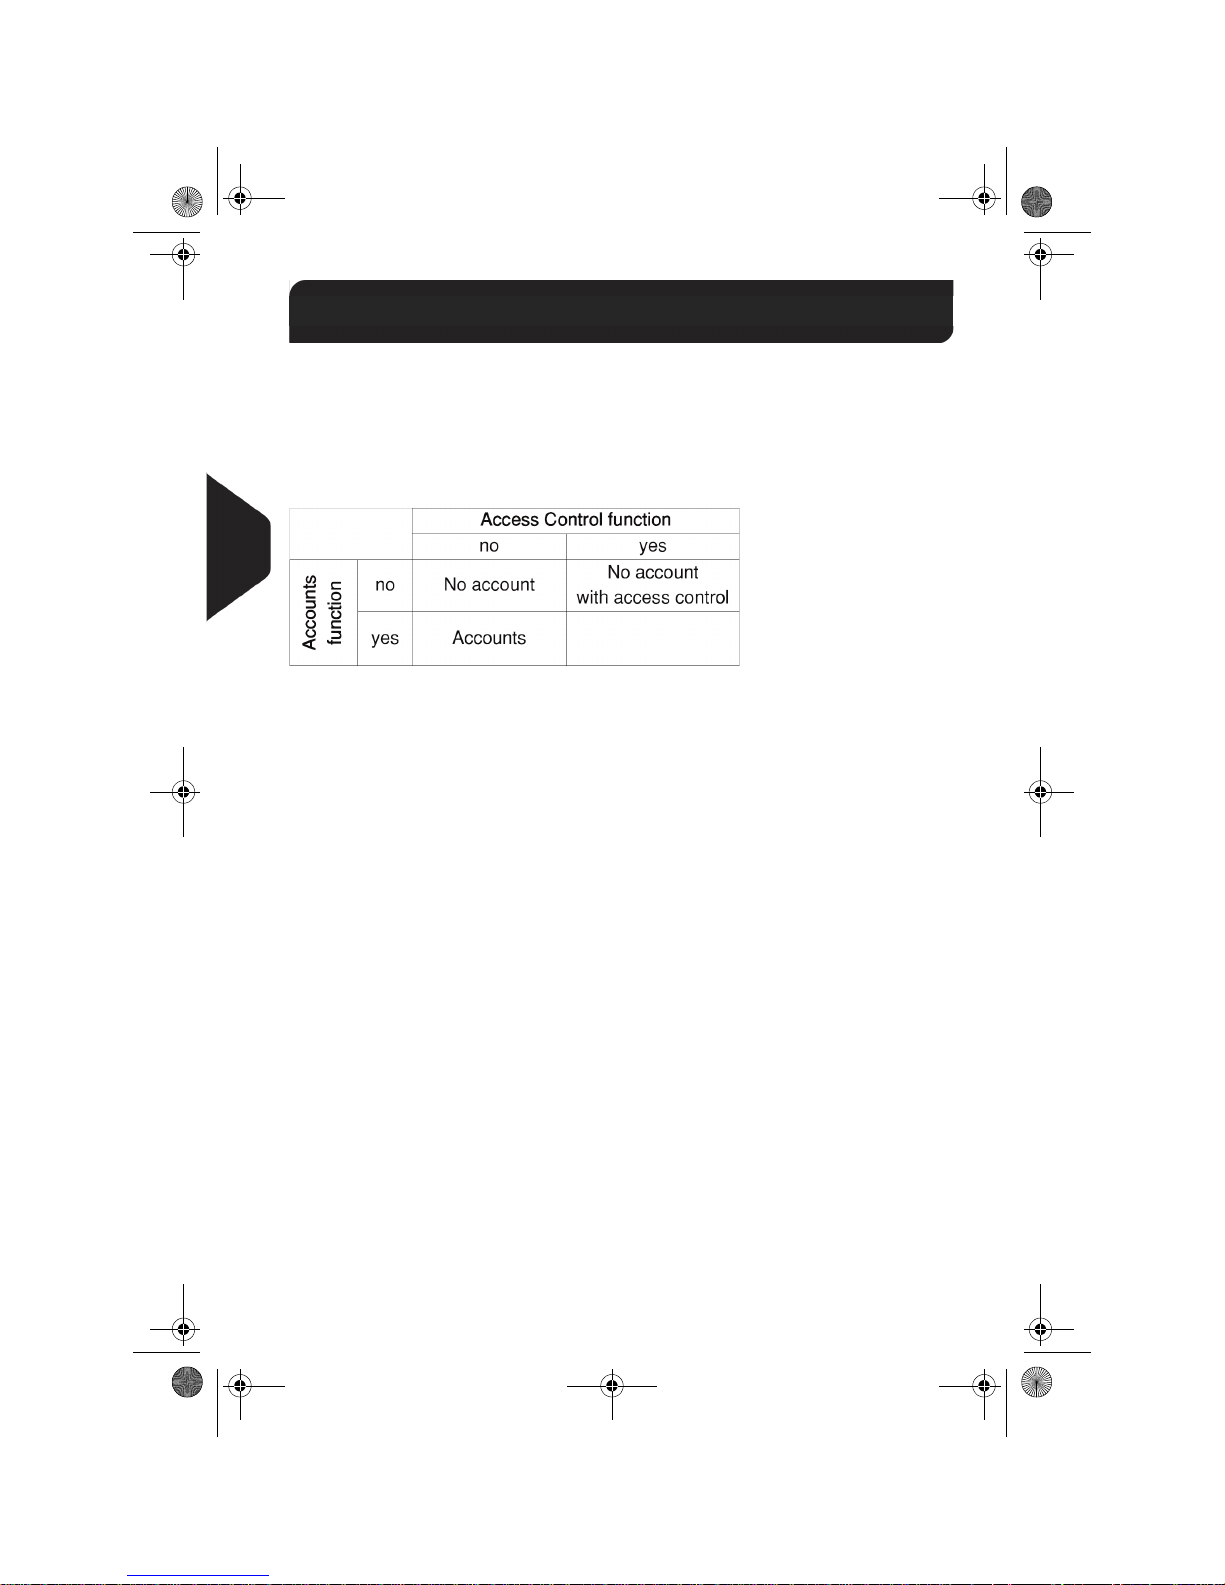
Managing Accounts and Access Rights
76
5
Choosing an ' Account Mode'
Introducing the 'Account Modes'
In your mailing system, a single 'Account mode' allows you to set up both the Ac-
counts and the Access control functions (see Accounting and Access Rights
Overview p.75).
The table below indicates which 'Account mode' corresponds to the Access control
and Accounts functions activation.
Figure 1 : Account modes
5.2 Choosing an ' Account Mode'
DELTA2_UK.book Page 76 Vendredi, 27. juin 2008 11:47 11
Page 83
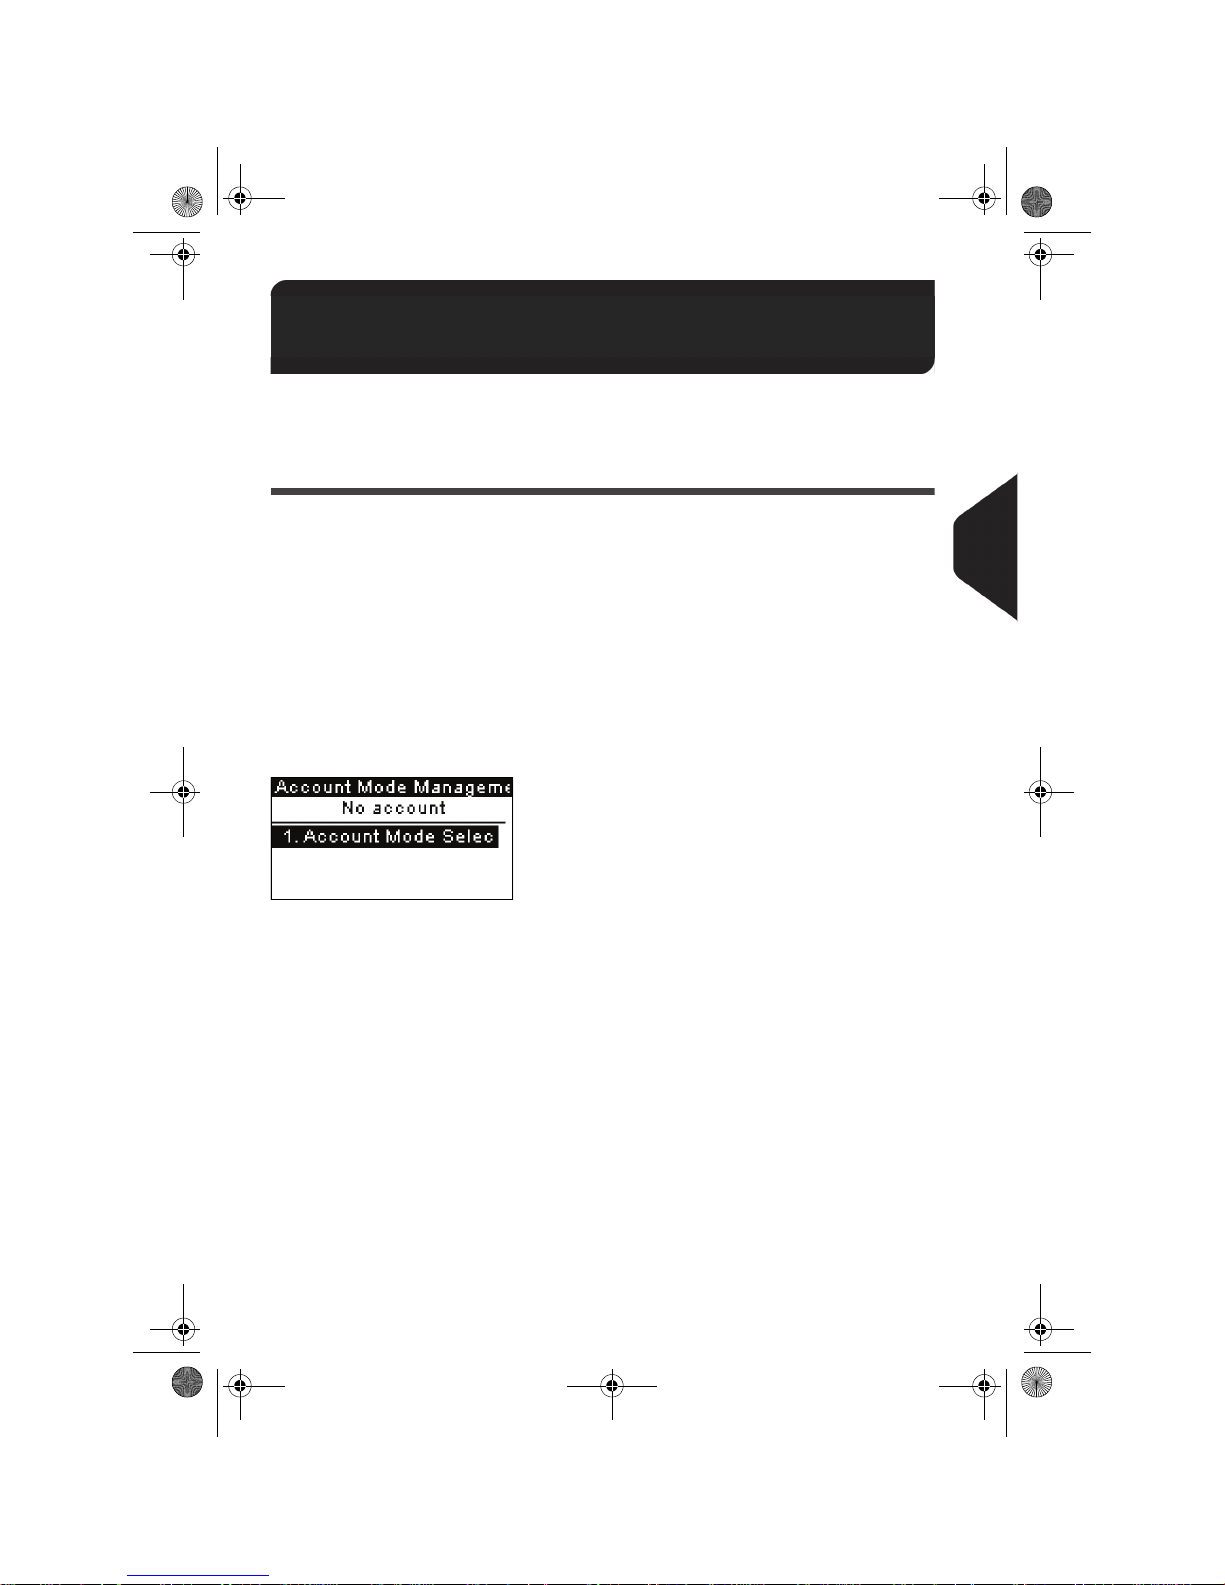
Managing Accounts and Access Rights
77
5
Guidelines to Implementing an 'Acco unt Mode'
See also
• Choosing an ' Account Mode' p.76.
Implementing the ' No account' Mode
The 'No account' mode provides users with free access to the machine (self-service
type).
This is the default mode in the machine.
Process for Implementation
To implement the 'No account' mode:
• Follow the procedure How to Display and Change the 'Account Mode' p.80 and
select the 'No account' mode.
'No Account' Mode Management Menu
In No account mode:
No other setting is necessary for the 'No account' mode.
5.3 Guidelines to Implementing an
'Account Mode'
DELTA2_UK.book Page 77 Vendredi, 27. juin 2008 11:47 11
Page 84
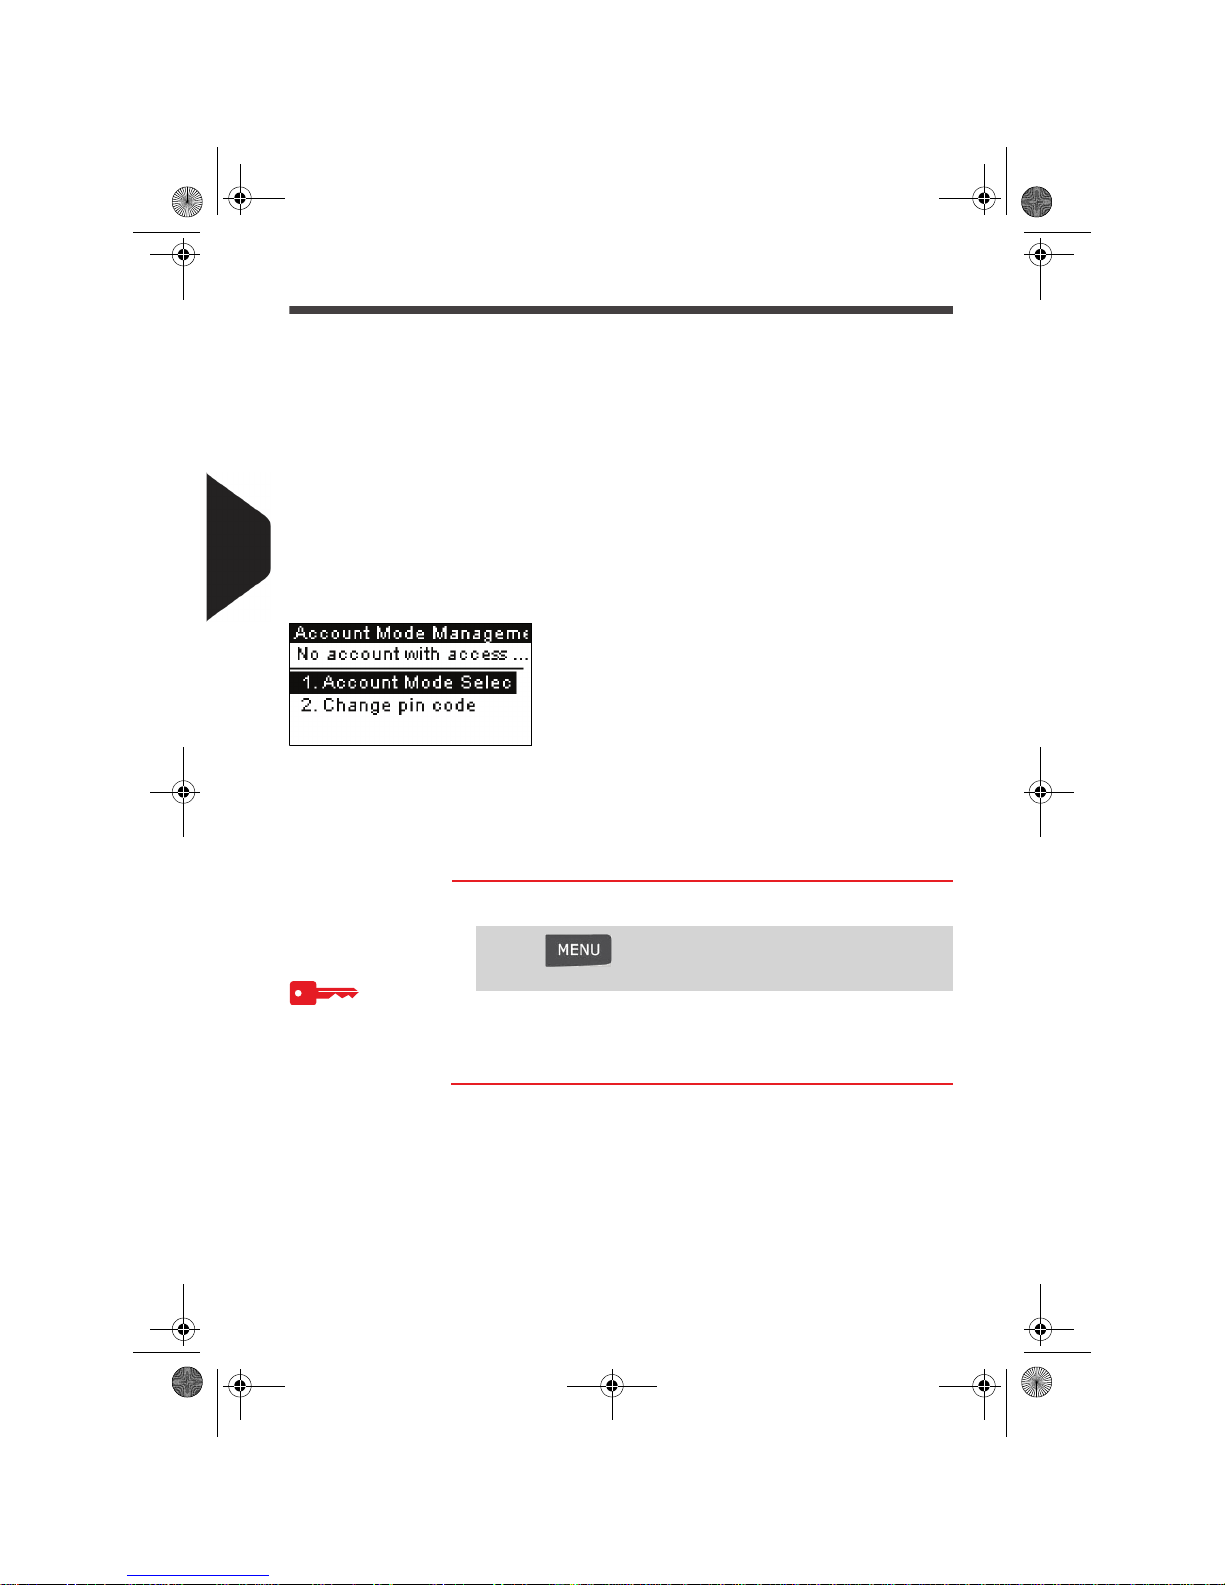
Managing Accounts and Access Rights
78
5
Implementing the ' No account with access control' Mode
In 'No account with access control' mode, users have to type a shared PIN code to
gain access to the machine.
Process for Implementation
To implement the 'No account with access control' mode:
1 Follow the procedure How to Display and Change the 'Account Mode' p.80 and
select the 'No account with access control' mode.
2 In the procedure, enter the 4 digits shared PIN code the users will have to enter at
log in.
'No account with access control' Mode Management Menu
In No Account with access control mode:
The menu allows you to change the shared PIN code.
Changing the Shared PIN Code
Afterwards, you may need to change the shared user PIN code.
How to Change the Shared PIN Code
How to Change
the Shared PIN
Code
1 As supervisor (see How to Log in as Supervisor p.116):
The PIN code screen is displayed.
2 Enter the new PIN code and press [OK].
Press and type 5.2 or select the path:
> Account Management > Change PIN code
DELTA2_UK.book Page 78 Vendredi, 27. juin 2008 11:47 11
Page 85
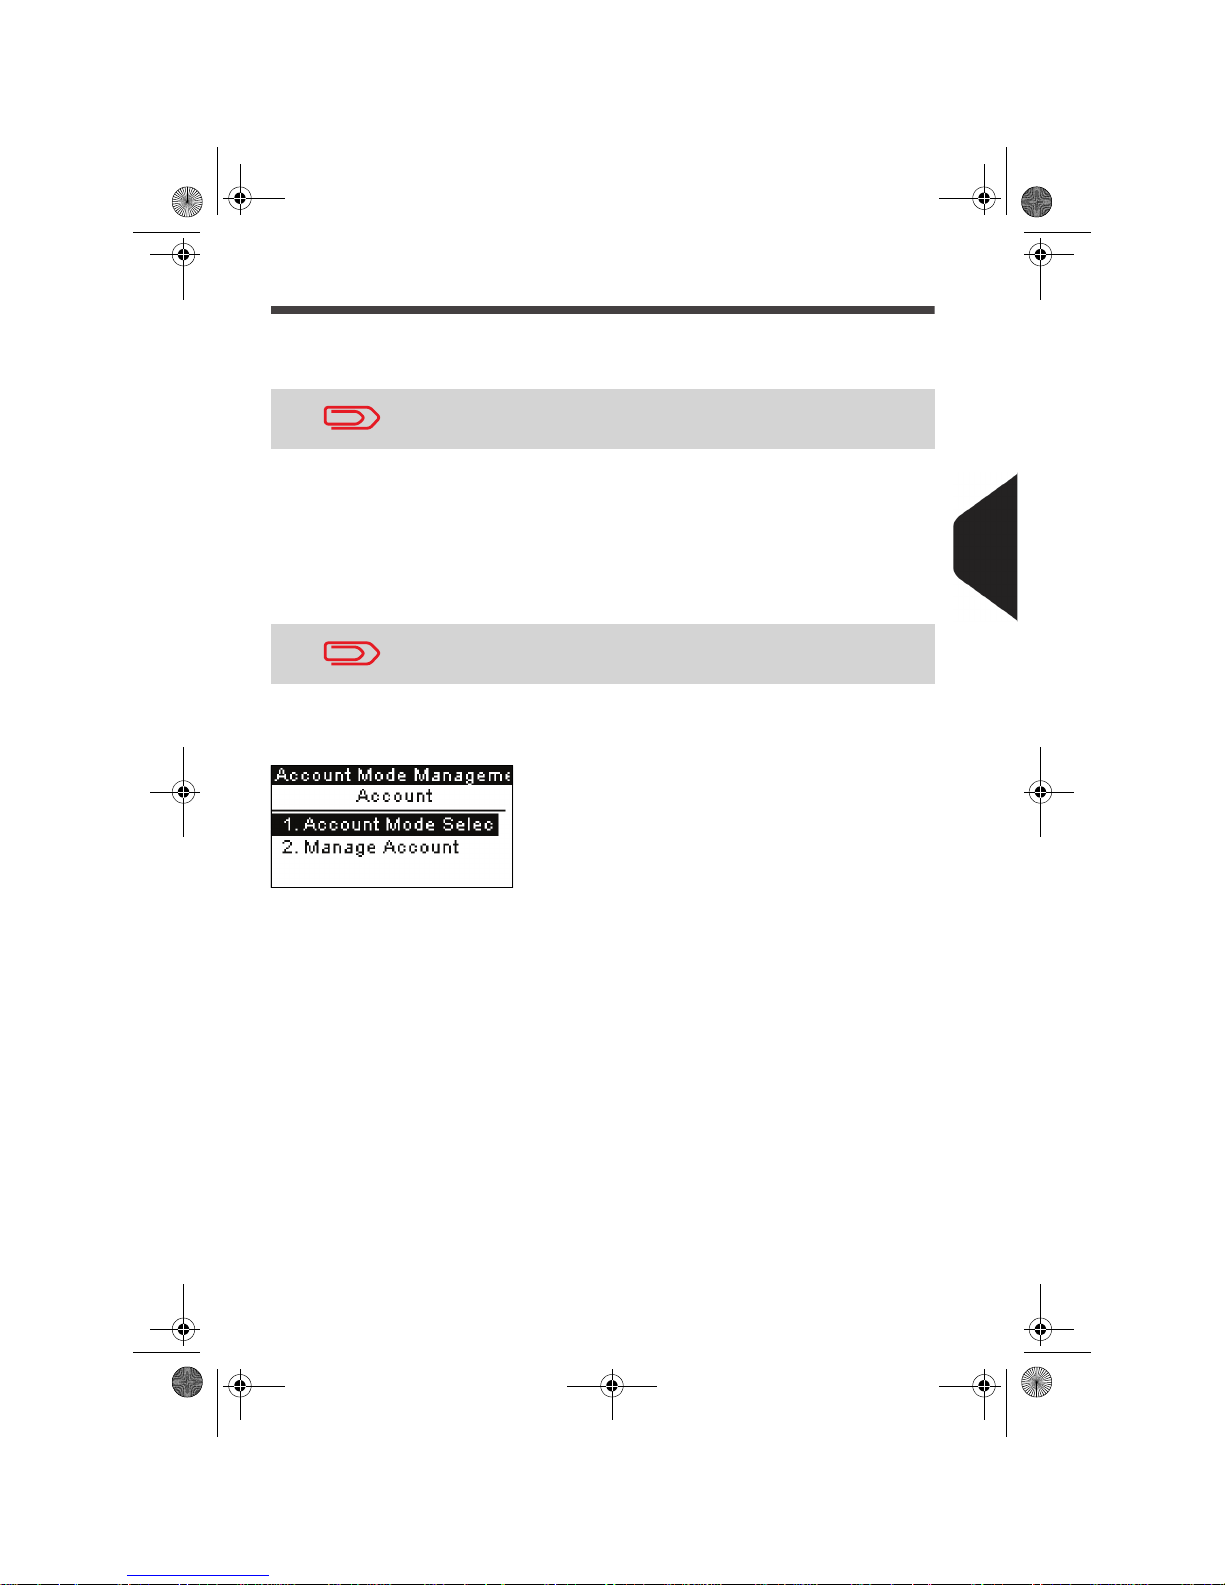
Managing Accounts and Access Rights
79
5
Implementing the ' Accounts' mode
In 'Accounts' mode, users have to select an account when starting a work session.
They can change accounts at any time, depending on the mail they have to process.
Process for Implementation
To implement the 'Accounts' mode:
1 Follow the procedure How to Display and Change the 'Account Mode' p.80 and
select the 'Accounts' mode.
2 Create accounts as indicated in How to Create an Account p.82.
'Accounts' Mode Management Menu
In Accounts mode:
The menu allows you to manage the accounts.
See also
• To add, modify or delete accounts, see Managing the Accounts p.81.
If only one account is available, the mailing system automatically
selects it at start up.
When you activate the 'Accounts' mode, the system create an
account by default.
DELTA2_UK.book Page 79 Vendredi, 27. juin 2008 11:47 11
Page 86
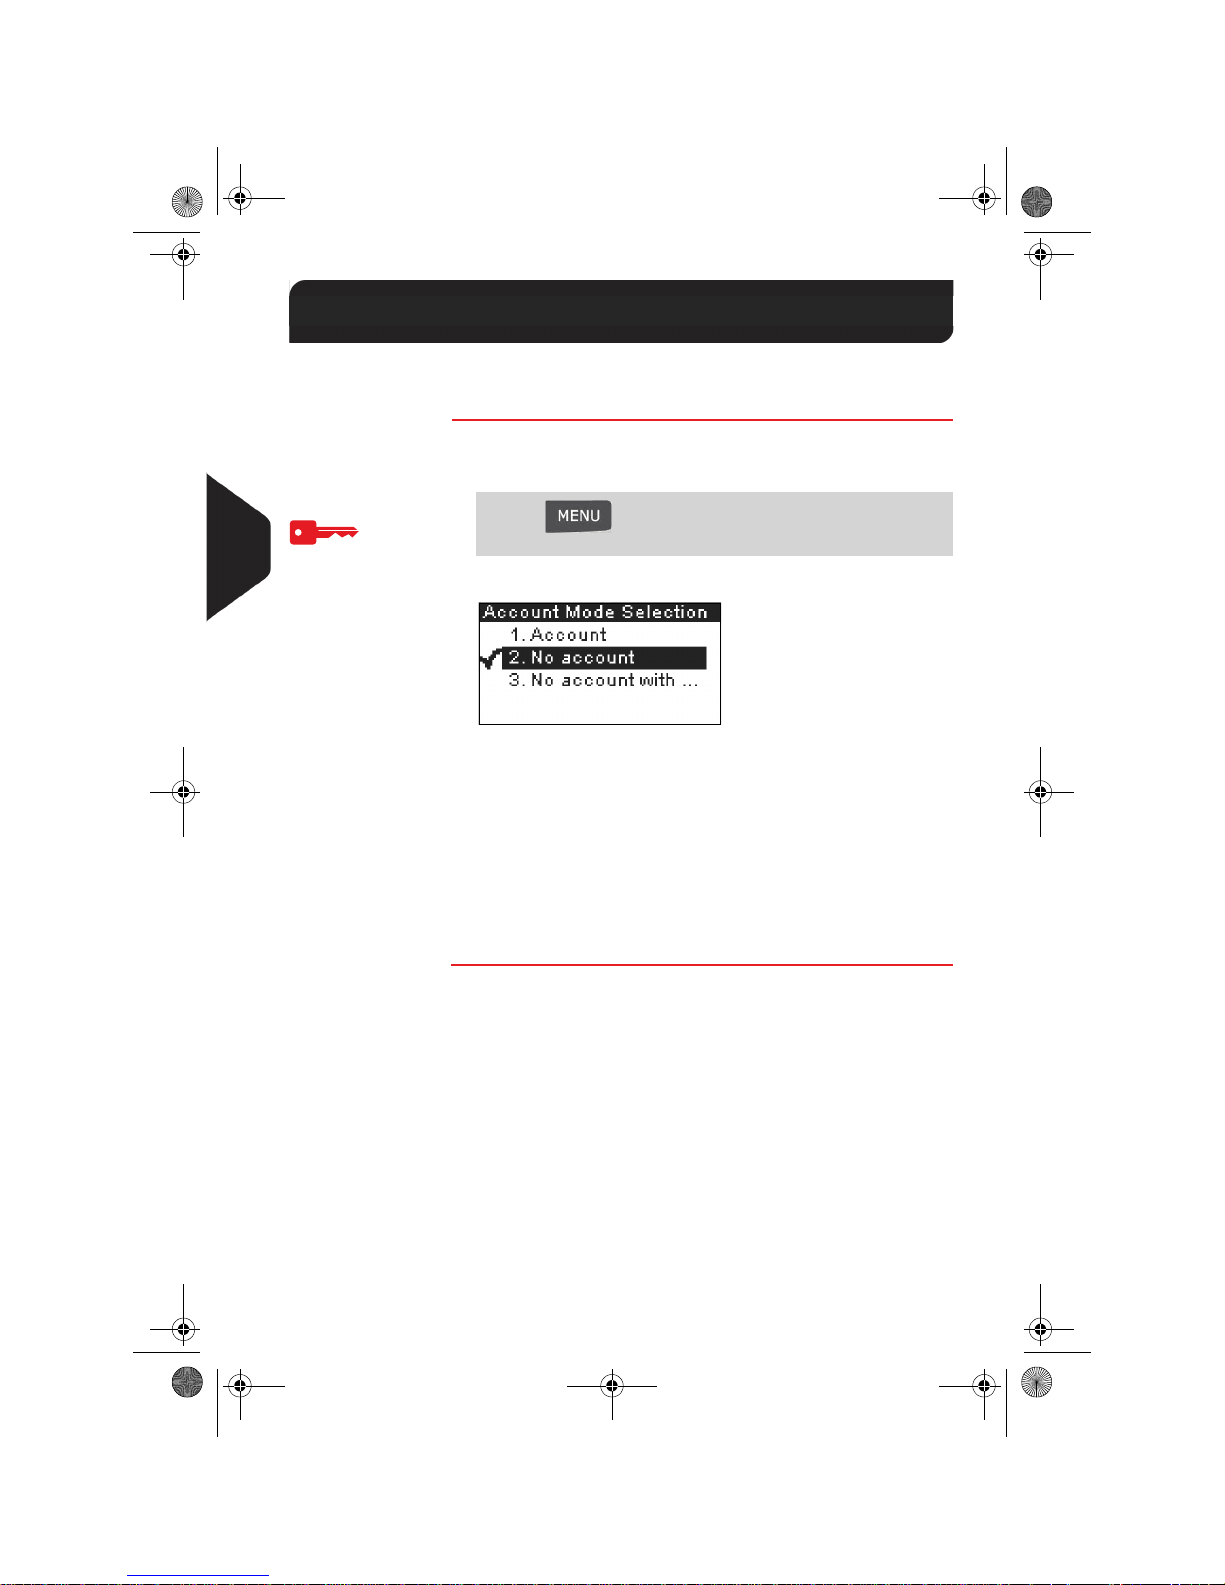
Managing Accounts and Access Rights
80
5
Selecting an 'Account Mode'
See also
• Guidelines to Implementing an 'Account Mode' p.77.
How to Display and Change the 'Account Mode'
How to Display
and Change the
'Account Mode'
To display and change the 'Account mode':
1 As supervisor (see How to Log in as Supervisor p.116):
The Account Mode Selection screen is displayed.
In the screen, the current 'Account mode' is selected.
2 Select another 'Account mode'.
The system asks for a confirmation.
3 Press [OK] to confirm.
4 If required, enter the PIN code and press [OK].
The mailing system confirms that the 'Account mode' has
been changed.
5.4 Selecting an 'Account Mode'
Press and type 5.1 or select the path:
> Account management > Account mode selection
DELTA2_UK.book Page 80 Vendredi, 27. juin 2008 11:47 11
Page 87
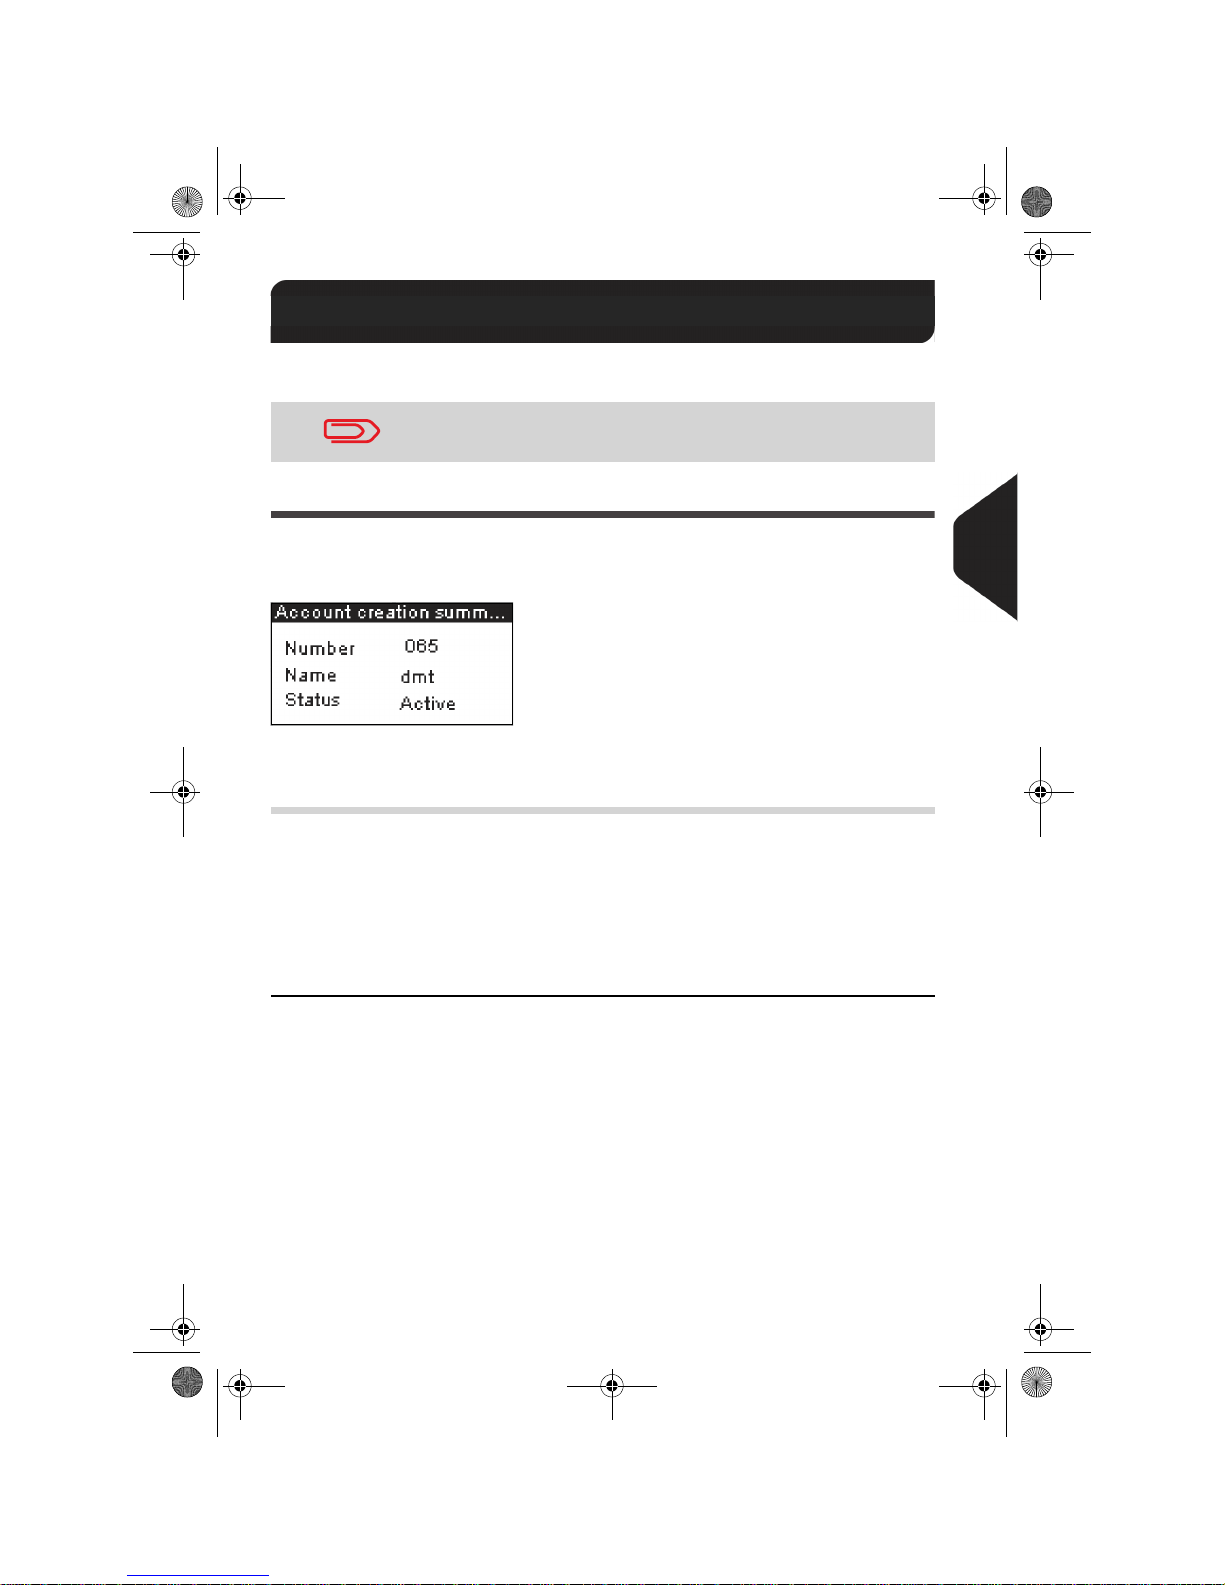
Managing Accounts and Access Rights
81
5
Managing the Accounts
You can only manage accounts in the mode Accounts.
Account Parameters
The number of accounts you can create is set to 25 by default and can be raised optionally to 100.
An account has the following parameters, displayed on the Add account screens:
Table 1 : Account parameters
See also
• About changing the maximum number of accounts, see Account level p.109.
5.5 Managing the Accounts
Before creating accounts, see Implementing the ' Accounts'
mode p.79.
Param. Format Description
Number 11 alphanumeric
characters
Number of the account. Two accounts cannot have
the same number.
An account number cannot be modified after the
account is created. However, the account can be
deleted.
Name 32 alphanumeric
characters
Name of the account. Two accounts cannot have
the same name.
Status Active / Inactive Only active accounts are visible to users.
DELTA2_UK.book Page 81 Vendredi, 27. juin 2008 11:47 11
Page 88
Managing Accounts and Access Rights
82
5
Account Management
Follow the steps below to create, modify, activate/deactivate or delete accounts.
See also
• Account Parameters p.81.
Creating Accounts
How to Create an Ac count
How to Create
an Account
To create an Account:
1 As supervisor (see How to Log in as Supervisor p.116):
The Account list screen is displayed.
2 Select > Add Account and press [OK].
3 Using the keypad:
¾ Enter account Number and press [OK]
¾ Enter Name and press [OK]
¾ Select the account status (active or inactive) and press
[OK].
The Account creation summary screen is displayed.
4 On the Add account screen, press [OK].
The Account creation summary screen is displayed.
5 Press [OK] to create the account.
Press and type 5.2.1 or select the path:
> Account management > Manage accounts >
Account list
DELTA2_UK.book Page 82 Vendredi, 27. juin 2008 11:47 11
Page 89
Managing Accounts and Access Rights
83
5
Editing Accounts
Use the procedures below to modify an account name or status.
The account number cannot be modified.
How to View / Edit Account Parameters
How to View /
Edit Account Parameters
To view or edit the parameters of an account:
1 As supervisor (see How to Log in as Supervisor p.116):
The Account list screen is displayed.
2 Select the account (or type its number) and press [OK].
3 Select Edit / Modify.
The Edit / Modify screen is displayed.
4 Change each parameter using the keypad (use key [C] to
clear characters). Press [OK] to display the next parameter.
The Account modification summary screen is displayed.
5 Press [OK] to validate the changes.
Activating Accounts
Deactivated accounts are not visible to users.
This function allows you to create accounts in advance and prevent them being used
before your account structure is complete.
How to Activate / Deactivate an Account
How to Activate
/ Deactivate an
Account
To activate or deactivate an account:
1 Perform procedure How to View / Edit Account Parameters
p.83.
2 Change the status parameter (the button displays the current
status: active or inactive) and press [OK].
3 On the Account modification summary screen, press [OK] to
validate the changes.
Press and type 5.2.1 or select the path:
> Account management > Manage accounts >
Account list
DELTA2_UK.book Page 83 Vendredi, 27. juin 2008 11:47 11
Page 90
Managing Accounts and Access Rights
84
5
Deleting Accounts
You may need to delete an account.
How to Delete an Account
How to Delete
an Account
To delete an Account:
1 Perform procedure How to View / Edit Account Parameters
p.83.
2 On the Account management screen, select > Delete (or
type
2) instead of Edit/Modify.
A confirmation of account deletion is displayed.
DELTA2_UK.book Page 84 Vendredi, 27. juin 2008 11:47 11
Page 91
Managing Accounts and Access Rights
85
5
Account List Report
This report displays the list of accounts in the machine.
To issue this report
• You have to be logged as supervisor
• The current 'Account mode' has to be Account or Account with access control.
Outputs
• Printer
• USB memory device.
Table 2 : Account List Report Data
How to Issue the Account List Report
How to Issue the
Account List
Report
To issue the Account List Report:
1 As supervisor (see How to Log in as Supervisor p.116):
2 Select an Output and then press [OK].
Data Comments
For each account:
• Account number
• Account name
• Status.
Press and type 5.2.2 or select the path:
> Account management > Manage accounts >
Account list report
DELTA2_UK.book Page 85 Vendredi, 27. juin 2008 11:47 11
Page 92
Managing Accounts and Access Rights
86
5
DELTA2_UK.book Page 86 Vendredi, 27. juin 2008 11:47 11
Page 93
Reports
This section explains how you can view and print out mailing system usage,
credits usage, account usage, and so on.
6.1 Report Overview ................................................ 89
6.2 Issuing a Report .................................................. 91
How to Issue a Report as User....................................................91
How to Issue a Report as Supervisor ...................................91
6.3 Counter Data ..................................................... 92
6.4 System Data ...................................................... 94
6.5 Credit/recredit Data............................................97
6.6 Account Data ..................................................... 99
6 Reports
DELTA2_UK.book Page 87 Vendredi, 27. juin 2008 11:47 11
Page 94
Reports
88
6
DELTA2_UK.book Page 88 Vendredi, 27. juin 2008 11:47 11
Page 95
Reports
89
6
Report Overview
As user or supervisor, you can get a range of reports to regularly view, print or store
information on the mailing system usage, credits usage, account consumption, etc.
Reports generally require a beginning date and an end date. Your mailing system
allows you to get reports on the activity over the past two years.
Typically, the reports are available on screen and can be printed out on an external
USB printer or saved on a USB memory device.
The table that follows lists the reports you can get.
6.1 Report Overview
DELTA2_UK.book Page 89 Vendredi, 27. juin 2008 11:47 11
Page 96
Reports
90
6
List of Reports
Table 1 : Reports
Report name Short description Page
COUNTER DATA
Batch data Batch counter and corresponding postage for
outgoing mail since the last reset.
p.92
Received batch data Batch counter for incoming mail ('Received
on') since the last reset.
p.93
SYSTEM DATA
Daily usage For each day of a selected period, the
consumption information (total items and total
postage value).
p.94
Monthly usage For a selected period and per month, the total
items and total postage value.
p.95
Machine configuration Supervisor settings (imprint default data, date
advance, postal services, connections, MMI,
Printhead, weighing, modem, etc.)
p.96
Credits DATA
Credits summary Information on the credits usage in the
machine (since the installation of the
machine). The content is limited to the history
available in the meter.
p.97
Recredit operation This report displays the last recredit opera-
tions performed on the machine in a selected
period.
p.98
ACCOUNT DATA
Account report List of accounts in the machine.
Tree view of the accounts / groups / subgroups.
p.99
Single account Usage on the account selected in an account
list, in a selected period.
p.99
Multi-accounts Usage on all accounts in a selected period. p.100
DELTA2_UK.book Page 90 Vendredi, 27. juin 2008 11:47 11
Page 97
Reports
91
6
Issuing a Report
For issuing a report, select the desired report, enter the corresponding parameters
and choose how you want to display or record the report:
• On screen
• On an external printer (if any)
• On a label
• On a USB memory device.
How to Issue a Report as User
How to Issue a
Report as User
To issue a Report:
1 As user:
2 A list of available report types is displayed.
3 Select the report type (see TableReports p.90 above).
4 Depending on the report type, the system may ask for para-
meters such as:
¾ Period of time targeted (begin date, end date)
¾ Desired account, etc.
Select or type the required parameters and press [OK].
The Output selection screen is displayed.
5 Select an available output device and press [OK].
Select an available output device.
The system sends the report details to the selected output.
How to Issue a Report as Supervisor
How to Issue a
Report as Supervisor
To issue a Report:
1 As supervisor (see How to Log in as Supervisor p.116):
2 Resume with the steps in How to Issue a Report as User.
6.2 Issuing a Report
Press and type 6 or select the path:
> Reports
Press and type 2 or select the path:
> Reports
DELTA2_UK.book Page 91 Vendredi, 27. juin 2008 11:47 11
Page 98
Reports
92
6
Counter Data
Batch Data Report
This report displays the batch counter and corresponding postage for outgoing mail
(type of imprint [Normal]) since the last reset.
Requirements
To issue this report, you have to be logged as user.
Outputs
Screen.
USB printer.
Table 2 : Batch Data Report
6.3 Counter Data
Fields Comments
Period Begin = Date of last reset
End = Current date
Die number On printed report only
Number of items (without 0.00 items)
Total value of items
After issuing reports like Metering Batch Data or Received Batch
Data, you may wish to reset the batch counters so that your next
reports restart from zero at the current date.
See How to Reset Batch Counters p.64.
DELTA2_UK.book Page 92 Vendredi, 27. juin 2008 11:47 11
Page 99
Reports
93
6
Received Batch Data
This report displays the batch counter for incoming mail ('Received on') since the last
reset.
Requirements
To issue this report, you have to be logged as user.
This batch counter is specific to the [Received] type of imprint.
Outputs
Screen.
USB printer.
Table 3 : Received Batch Data
Fields Comments
Period Begin = Date of the last reset
End = Current date
Incoming Mail Number of items
After issuing reports like Metering Batch Data or Received Batch
Data, you may wish to reset the batch counters so that your next
reports restart from zero at the current date.
See How to Reset Batch Counters p.64.
DELTA2_UK.book Page 93 Vendredi, 27. juin 2008 11:47 11
Page 100
Reports
94
6
System Data
Daily Usage Report
This report displays, for each day of the selected period, consumption data (total
items and total postage value).
Requirements
This report is available as user or supervisor.
You have to specify the period for the report (Begin date and End date).
When you specify the Begin date, the End date field is filled with a proposed value:
Begin date + 31 days.
You can specify another End date, but maximum is Begin date + 31 days.
Default period:
• Begin = 1st day of the current month
• End = current day.
Outputs
Screen.
USB printer.
USB memory device.
Table 4 : Daily Usage Report
6.4 System Data
Fields Comments
Die number On printed report only
For each day in the period:
• Day number
• Number of items processed (zero and non-zero)
• Total postage value for this day
DELTA2_UK.book Page 94 Vendredi, 27. juin 2008 11:47 11
 Loading...