

Page 1

NeoPoint 1600
User’s Guide
NeoPoint
6,03/<025(,17(//,*(17
TM
Version 1.00
TM
© Copyright 1999, 2000 NeoPoint, Inc.
Page 2

About This Manual
The information in this manual is for informati onal use only, subject to change withou t notice,
and should not be construed as a commitment by NeoPoint. NeoPoint assumes no responsibility
or liability for any error s or ina cc ura cies that may appear in this m an ual.
No part of this manual may be re produced, stored in a retrie va l system, or transmitted, in any
form or by any means, electronic, mechanical, recording, or otherwise, without the prior written
permission of NeoPoint, Inc.
Document Number
When ordering or referring to this publication, use the following number:
Publication/PN: 70-16010-00
For information or comments on this manual, please contact NeoPoint Technical Publications or
visit our web site at: http://www.neopoint.com.
NP16010058SWBLD
Copyrights and Trademarks
Copyright© 1999, 2000 NeoPoint, Inc.
All Rights Reserved.
NeoPoint
Inc.
T9
Phone.com
All other trademarks are the property of their owne rs.
™
, SoftSync Plus™, and the Simply More Intelligent™ are trademarks of Neo Point,
™
Text Input and Tegic™ are trademarks of Tegic Communications, Inc.
™
is a trademark of Phone.com, Inc.
Getting Technical Support
You can contact NeoPoint Technical Support via e-mail at:
info@neopoint.com
NeoPoint, Inc.
4225 Executive Square, Suite 600
La Jolla, California 92037
ii NeoPoint 1600 User’s Guide
Page 3
FCC & Industry Canada Regulatory Compliance
The NeoPoint phone is approved for use with CDMA and AMPS networks. This device
complies with Part 15 of the FCC Rul es. Operation is subj ect to the following tw o conditions:
(1) this device may not cause harmful interference, and (2) this devi ce must accept any
interference received, including inte rfe rence that may cause undesired operation.
Y our wireless hand-held portable telephone is a low power radio transmitter and receiver. When
it is ON, it receives and also sends out radi o fre quency (RF) signals. In August 1996, th e
Federal Communication s Com mission (FCC) adopted RF exposur e gui delines with safety
levels for hand-held wire le ss phones. Those guidelines are consistent with safety standa rds
previously set by both U.S. and in te rnational standards bodie s: American National Standa rd
Institute (ANSI), National Council of Radiation Protection and Measurements (NCRP), and
International Commi ssion on Non-Ionizing Radiation Protection (ICNRP). Those standa rds
were based on comprehensive and periodic eval uations of the relevant scientific literature. The
design of your phone com pli es with the FCC guidelines and applicable standards.
WARNING: You should only use the manufacturer specified
hands-free kit with the NeoPoint phone away from your body (n ot
in your pocket); or use it with the handset in the manufacturer
specified leather case. For bo dy worn operations, third party
hands-free accessories that have not been SAR tested may not
comply with FCC RF exposure limits and should not be used.
Important: Read “Safety” on page xvii prior to using your NeoPoint phone.
NeoPoint 1600 User’s Guide iii
Page 4

iv NeoPoint 1600 User’s Guide
Page 5

Table of Contents
About This Manual..............................................................................ii
Document Number..............................................................................ii
Copyrights and Trademarks................................................................ii
Getting Technical Support ..................................................................ii
FCC & Industry Canada Regulatory Compliance..............................iii
Table of Contents........................................................................... v
Preface.........................................................................................xiii
Daily Applications of Your NeoPoint 1600.....................................xiii
Overview of This Manual ................................................................xiv
Dual-Mode ........................................................................................xv
About CDMA....................................................................................xv
Signal Strength and Phone Performance....................................xv
CDMA Advantages...................................................................xvi
Safety...............................................................................................xvii
Did You Know.................................................................................xix
Chapter 1: Getting Started........................................................... 1
Overview.............................................................................................1
Battery Installation and Charging.......................................................2
Inserting Your Battery .................................................................2
Charging Your Battery.................................................................4
NeoPoint Phone Description...............................................................5
Key Functions..............................................................................6
End/Power Key......................................................... ............6
Volume/Scrolling Keys.........................................................6
NeoPoint 1600 User’s Guide v
Page 6

Navigator Key ...................................................................... 6
Soft Keys 1 & 2............................ ..... ................................... 7
Main/Menu and Back Keys.................................................. 7
SEND and CLR Keys........................................................... 7
SHIFT, NEXT, and SPACE Keys........................................8
Display Screen............................................................................. 9
Main and Menu Screens .................................................. .......... 10
Onscreen Icons........................................................................... 11
Entering Text, Number, and Symbol Characters....................... 13
ALPHA/alpha Mode........................................................... 13
T9 Mode ............................................................................. 14
NUM Mode ........................................................................ 15
SYM Mode and Special Characters ................................... 15
Basic NeoPoint Operation................................................................. 16
Main Screen............................................................................... 16
Menu Screen.............................................................................. 18
Menu Applications.....................................................................19
Making a Call... ......................................................................... 20
From the Main Screen........................................................ 20
4-Digit Dialing.................................................................... 21
Answering a Call................................................................ 21
Ending a Call...................................................................... 22
Redialing.............................................................................22
Making a Three-Way Call.................................................. 22
Call Waiting.................................................. ...... ...... .......... 23
Chapter 2: NeoPoint Menu Applications...................................25
Overview........................................................................................... 25
Menu Screen ..................................................................................... 25
Inbox................................................................................................. 26
Call History....................................................................................... 27
Contacts................................ ............................................. ................ 28
Schedule..................................... ..... .................................................. 28
To Do................................................................................................ 29
MiniBrowser..................................................................................... 30
Sync................................................................................................... 30
Preferences........................................................................................ 31
vi NeoPoint 1600 User’s Guide
Page 7

Table of Contents
Ringer Type................................................................................31
Volume .......................................................................................31
Key Beep .................................................. ..................................32
Alerts...........................................................................................32
Main Screen................................................................................33
Display..................................... ...................................................33
Security................................................ .......................................34
General.................................................................................. ......35
Banner.........................................................................................36
More..................................... ...... ........................................................36
HotKeys......................................................................................37
Services..................................................... ...... ..... .......................37
Call Timers .................................... ...... .......................................38
Clock Setting ..............................................................................38
Info..............................................................................................39
Chapter 3: Syncing Your NeoPoint Phone ................................41
Overview............................................................................................41
Syncing the Phone with Your PC......................................................42
Chapter 4: Using Your NeoPoint Phone....................................47
Overview............................................................................................47
Making a Call.....................................................................................47
From the Main Screen ................................................................47
4-Digit Dialing............................................................................47
Answering a Call ...............................................................................48
Ending a Call .....................................................................................48
Redialing............................................................................................49
Making a Three-Way Call .................................................................49
Call Waiting................................................ .......................................49
Disabling Call Waiting ......................................................................50
Muting/Unmuting a Call.............................................................50
Using Quick Mode.............................................................................51
Enabling Keyguard.....................................................................51
Answering a Call With Keyguard Active...................................51
Disabling Keyguard....................................................................51
Locking the Phone......................................................................52
NeoPoint 1600 User’s Guide vii
Page 8

Unlocking the Phone..................................................................52
Changing the Phone Mode.........................................................52
Changing the Incoming Mode................................................... 53
Changing the Incoming Mode to Receive Data ................. 53
Changing the Incoming Mode to Receive a Fax ................ 53
Changing the Incoming Mode to Normal Voice Calls....... 54
Using Inbox....................................................................................... 54
Retrieving Voicemail Messages................................................ 54
Deleting Voicemail Listings...................................................... 54
Viewing Text Messages.............................................................55
Locking Text Messages.............................................................55
Making a Call From a Text Message......................................... 55
Saving a Number From a Text Message.................................... 56
Deleting Text Messages.............................................................56
Using Call History ............................................................................ 57
Making a Call From Call History.............................................. 57
Saving a Number From Call History to Contacts...................... 57
Deleting a Number..................................................... ...... ..... .....58
Using Contacts..................................................................................58
Creating a New Contact Entry................................................... 58
Making a Call From Contacts.................................................... 58
Editing an Entry in Contacts...................................................... 59
Deleting an Entry in Contacts.................................................... 59
Looking Up a Name...................................................................59
Using Schedule ................................................................................. 60
Creating a Schedule Entry .............................. ........................... 60
Making a Call in Schedule......................................................... 60
Editing an Event in Schedule..................................................... 60
Deleting an Event in Schedule................................................... 61
Using To Do...................................................................................... 61
Creating a To Do Entry..............................................................61
Making a Call From To Do ....................................................... 61
Editing a To Do Entry................................................................62
Deleting a To Do Entry.............................................................. 62
Using MiniBrowser........................................................................... 62
Using Sync........................................................................................ 62
viii NeoPoint 1600 User’s Guide
Page 9

Table of Contents
Using Preferences..............................................................................63
Changing the Ringer Type..........................................................63
Changing the Volume Levels/Setting Phone to Vibrate Mode ..63
Key Beep .................................................. ..................................63
Setting the Alerts ........................................................................64
Deleting Your Phone Number from the Main Screen ................64
Changing the Time Format.........................................................64
Controlling the Next Event Display from the Main Screen .......64
Changing Backlight Settings......................................................65
Changing the Display Contrast...................................................65
Changing Night Light Settings...................................................66
Changing the Menu Screen to Display List or Icons..................66
Setting Security Options.............................................................66
Enabling/Disabling your Lock Code...................................67
Changing Your Lock Code..................................................67
Analog Mode.......................................................................67
Creating and Editing an Emergency List.............................67
Resetting the Phone to Factory Default Settings.................68
Default Settings...................... ...... ..... ..................................68
Resetting the Database ........................................................70
Enabling/Disabling Active Flip..................................................70
Enabling/Disabling Anykey Answer..........................................70
Auto Redialing............................................................................71
Setting Sync to Manual or Automatic ........................................71
Enabling/Disabling Screen Save.................................................71
Activating/Deactivating Auto Answer .......................................71
Wakeup Alarm............................................................................72
Net Guard....................................................................................72
Prepend.......................................................................................73
Changing the Banner..................................................................73
Using More........................................................................................73
Creating a HotKey.............. ..... ...... .............................................73
Viewing the List of HotKeys........................................... ..... ......74
Using a HotKey ..........................................................................74
Deleting a HotKey................... ............................................. ......74
Using Block My CallerID...........................................................74
NeoPoint 1600 User’s Guide ix
Page 10

Forwarding a Call...................................................................... 75
Disabling Call Forwarding ................................................... .....75
Setting Call Timers.................................................................... 75
Chapter 5: NeoPoint Care and Troubleshooting ......................77
Overview........................................................................................... 77
NeoPoint Care ................................................................................... 77
Cleaning Instructions........................................................................ 77
Prior to Cleaning........................................................................ 78
Cleaning Your NeoPoint............................................................ 78
Basic Troubleshooting Techniques................................................... 78
Chapter 6: Accessories.................................................................83
List of NeoPoint Accessories............................................................ 83
SoftSync Station ........................................................................ 84
Travel Charger........................................................................... 85
Desktop Holder..........................................................................86
Vehicle Power Adapter.............................................................. 87
Hands-Free Kit...........................................................................88
SoftSync Cable ..........................................................................89
SoftSync Plus CD...................................................................... 90
Leather Case ..............................................................................91
Handstrap................................................................................... 91
Slim Battery............................................................................... 92
Extended Battery ....................................................................... 92
Appendix A: Using Your NeoPoint Phone as a Modem...........93
Overview........................................................................................... 93
Setting Up Your NeoPoint Modem................................................... 94
Using Your NeoPoint Phone to Access Dial-up Networking........... 95
Using Windows 95/98............................................................... 95
Using Windows NT................................................................... 96
Using Your NeoPoint to Receive/Send a Fax................................... 97
Receiving a Fax.................................................................. 98
Sending a Fax..................................................................... 98
Using Your NeoPoint to Receive/Send a Data File.......................... 99
Receiving a Data File ......................................................... 99
Sending a Data File .......................................................... 100
x NeoPoint 1600 User’s Guide
Page 11

Table of Contents
AT Commands.................................................................................100
Appendix B: Using the MiniBrowser.......................................103
Overview..........................................................................................103
How the MiniBrowser System Works.............................................104
Accessing the MiniBrowser.............................................................104
Web Sites.........................................................................................106
Selecting Other Categories From Web Sites Menu..................106
Using Bookmarks ............................................................................107
Creating a Bookmark................................ ................................107
Going to a Bookmark................................................................107
Deleting a Bookmark................................ ...... ..... .....................107
Index................................................................ ......... ......... ......... .109
NeoPoint 1600 User’s Guide xi
Page 12

xii NeoPoint 1600 User’s Guide
Page 13

Preface
Daily Applications of Your NeoPoint 1600
Congratulations! Your new NeoPoint 16 00 is going to change the way you
communicate. NeoPoint: a smart, simple solu tio n to yo ur activ e life style.
NeoPoint 1600 is a compact, lightweight personal communications system with
added featur e s f or the person on th e go. More than just a m obile phone, the Ne oPoint
1600 phone allows you t o:
• Access your e-mail, v oi cemail, and text messages
• Experience greater coverage as t hi s dual-mode phone supports both analog and
digital modes
• Track your outgoing and incoming calls for future reference or call back
• Schedule and organize names and numbers (referred to as contacts)
• Track appointments and meetings (keep your schedule everywhere you go)
• Go on-line through the MiniBrowser (depending on your carrier service - surf the
web, get e-mails, stock quotes, etc.)
• Transfer contacts, schedule, and to do data between your PC and NeoP oint 1600
phone
• Use your NeoPoint 1600 as a wireless modem to send or receive faxes with your
laptop computer.
These are just a few of the many feature s avai lable with your NeoPoint 1600 mobile
phone - all without a bulky appointment book or a personal digital assistant.
NeoPoint - you r new point of communication.
NeoPoint 1600 User’s Guide xiii
Page 14

Overview of This Manual
This manual is intended for use with the NeoPoint 1600 phone. The following table
lists each chapter with a brief description.
Chapter Title Description
Chapter 1: Getting
Started
Chapter 2: NeoPoint
Menu Applications
Chapter 3: Syncing
Your NeoPoint Phone
Chapter 4: Using Y our
NeoPoint Pho n e
Chapter 5: NeoPoint
Care and
Troubleshooting
Chapter 6:
Accessories
Appendix A: Using
Your NeoPoint Phone
as a Modem
Appendix B: Using the
MiniBrowser
Provides a quick start checklist and a brief introduction that
helps you get started using you r NeoPo int 1600 phone.
Provides a brief overview of the NeoPoint 1600 menus and
features.
Provides information on how to install the SoftSync
software, connect the Ne oPoi nt phone to your PC, and how
to transfer or sync your data files.
Contains task-orient ed features and functiona li ty of the
phone. For exam ple: how to place a cal l, ho w to use your
inbox , etc.
Guides you step-by-ste p on troubleshooting commo n
problems you may experience while using your phone. It
also includes service inform at ion for your NeoPoint phone.
Provides information on optional accessories for your
NeoPoint phone.
Provides information on how to setup, send, and receive data
and fax calls your NeoPoin t (wireless modem) phone.
Provides information on how t o send/receive e-mail, search
the web for sites/services, and make bookmarks using the
MiniBrowser feature of your Ne oPoint phone.
xiv NeoPoint 1600 User’s Guide
Page 15

Preface
Dual-Mode
The NeoPoint 1600 is a cellular band, dual-mode wireless phone, compatible with
both digital (CDMA) and analog (AMPS) networks operating at 800MHz.
The term dual-mode represents the ability of your NeoPoint 1600 to transmit and
receive signals from both analog and digital cellu lar phone systems.
The benefits of having a dual-mode phone include being able to use your phone when
traveling in an area where CDMA digital service is not yet activated. Your NeoPoint
1600 phone will automatically find analog service, allowing your call to be
processed.
About CDMA...
Code division multiple access (CDMA) is the type of digital wireless transmission
that the NeoPoint phone employs. The following sections provide information on
CDMA performance and advantages. These sections are designed to help you
understand how to better use your NeoPoint phone.
Signal Strength and Phone Performance
Like other portable wireless phones, signal strength is affected by the surrounding
environment of the user. Buildings, parking garages, elevators, and basements are
some examples of structures that reduce signal strength. Problems initializing a call,
muting of the audio during a call, or a call drop are signs of low signal strength.
Moving toward a window (if indoors) or open space (if outside) and extending the
antenna fully are ways to optimize signal strength. Traveling in a vehicle through
varying terrain, tunnels, or near tall b uildin gs may also cause ra pid chang es in signal
strength.
NeoPoint 1600 User’s Guide xv
Page 16

CDMA Advantages
Security Each conversation is digitized and encoded with a separate
assigned key to help prevent eavesdrop p i ng .
Voice Clarity Uses digital voice coding techniques to enhance quality and
reduce background noise.
Lower Average Using sophisticated power control, the phone transmits the
T r an smit Powe r minimum power required to communicate with the base
station and actually idles in between spoken words. This
results in much lower average power radiating from the
antenna than other technologies.
Increased System Provides 3-10 times the capacit y compared to other
Capacity technologies. This results in fewer dropped calls and system
busy signals for the user.
Digital Services Allows user new services including caller ID, data and fax,
text messaging, and simultaneous voic e and da ta.
xvi NeoPoint 1600 User’s Guide
Page 17
Safety
Preface
Important!
Read these safety guidelines prior to using your phone. Failure to follow
these rules and guidelines may be dangerous and illegal.
Road Safety Information
Do not use a hand-held telephone while driving a vehicle. Talking on the
phone while driving is dangerous and illegal in some places. If using a
hand-held phone, park the vehicle before conversing. Remember - road
safety always comes first!
If you must drive and use yo ur digital wireless phone, purchase and install
the Hands-Free Kit accessory. For more information on the Hands-Free
Kit, refer to “Hands-Free Kit” on page 88.
Aircraft Safety Information
Power down your phone prior to boardin g an aircraft. Sending and
receiving calls on your phone on an aircraft is prohibited by U.S. law.
Using a wireless telephone in an aircraft may interfere with aircraft radio
communication or navigation equipment, and disrupt the wireless
telephone network. When boardin g an aircraft, use the “Po wer Off” se tting
in Quick Mode and press Select (Soft Key 1) to power down your
NeoPoint phon e .
Hospital & Medical Safety Information
Power down your phone prior to en tering hospitals, h ealth care fac ilities, or
when near medical equipment. Operating any radio transmitting
equipment, including digital wireless phones, may interfere with RFsensitive medical devices. Follow all posted regulation s while in hospitals
and health care facilities regarding the use of your phone.
NeoPoint 1600 User’s Guide xvii
Page 18
Blasting and Refueling Safety Information
Do not use your phon e near a blasting site. Power down your phone when
in any area with a potentially explosiv e atmosphere. Radio transmissions in
such areas could cause an explosion or fire, resulting in bodily in jury or
even death. Obey all posted sig ns and instructions regarding the us e of
wireless phone usage.
Observe restrictions on the use of radio equipment in fuel depots (fuel
storage and distribution areas), chemical pl ants or where blasting
operations are in progress.
Interference Safety Information
All mobile phones are subject to radi o frequency interference that may
affect the performance of your phone. Your digital wirel ess phone is a low
power radio transmitter and receiver. The design of your phone complies
with the FCC guidelines and applicable standards.
Never rely solely on your phone for essential communications (e. g.,
medical emergencies). You must be in a service area with adequate signal
strength to use the phone. Emergency calls m ay not be possible on all
wireless phone networks or when certain network services and/or phone
features are in use. Check with your local servi ce provider(s).
Service Safety Information
Only qualified service personnel are authorized to repair your digital
wireless phone and equipment. Use o nl y approved accessories and
batteries. Refer to "C hapter 5: NeoPoint C a re and Troubleshooting" on
page 77 for more information.
xviii NeoPoint 1600 User’s Guide
Page 19

Preface
Did You Know...
This chapter is designed t o help max imize usin g your Neo Point phon e. The fo llowing
list of NeoPoint feat ures may help to improve your knowledge and understanding of
your NeoPoint phone and how to make it your new point of communication.
Did you know... you can send a call to voicemail instead of answering the call?
There are two methods for sending calls to voicemail: Screening cal ls and
redirecting all calls.
Screening calls allows you to view the incoming number and choose wh ether
you want to answer the call or igno re the call. If yo u sele ct Ignore (Sof t Key 2 ),
the call is routed to your voicemail. Refer to “Answering a Call” on page 48 for
more information.
Redirecting all calls allo ws you to re dir e c t or fo rw a rd all of your calls to your
voicemail.
Did you know... you can answer yo ur phone without opening the flip?
By setting the phon e to “Any Key Answer,” you can press any key, e.g.,
Navigator, Soft key 1, Menu, or Back keys to answer the phone. Refer to
“Enabling/Disabling Anykey Answer” on page 70 for more information.
Did you know... you can prevent your phone from ringing while in a meeting, etc.,
without powerin g off your phone?
You can set your phone to “Silent” mode and no audible sounds will be heard.
However, your indicator light at the top of your phone will flash and the display
screen will display that you have an incoming call. Refer to “Changing the Phone
Mode” on page 52 for more information.
Did you know... your NeoPoint 1600 phone notifies you when you have a new
voicemail, e-mail or text message?
When you have a new message, your NeoPoint 1600 phone will ring, display an
on-screen message stating that you have a new vo icemail/e-ma il/text message , and
display a small icon at the top o f the main screen. There are three icons for
incoming messages:
Voicemail
E-mail
Tex t Message
Simply select Inbox and select the message you want to retrieve. Refer to “Using
Inbox” on page 54 for more information.
NeoPoint 1600 User’s Guide xix
Page 20

Did you know... your NeoPoint 1600 phone can tell you who is calling?
Once you have created a cont act in your NeoPoint 1600 phone, every time that
person calls you, their name and number will be displayed. Refer to “Using
Contacts” on page 58 for more information.
Did you know... you can pr og r am your NeoPoint 1600 pho n e to m ak e a call by
pushing a button?
Your NeoPoint 1600 phone allows you to create a HotKey that can place a call to
whomever you choose. After creatin g your HotKey, the command is stored in
memory and can be used whenever yo u want to place a call. Refer to “Creating a
HotKey” on page 73 and “Using a Ho tKey” on page 74 for more information.
Did you know... you can lock your NeoPoint 1600 phone so that no one can use
your phone (except to cal l numbers on your Emergency List)?
By using the Locking the Phon e feat ure in Quic k Mo de, you can lock the ph one so
that no unauthorized use of your phone is allowed. This pr events anyone from
making calls, accessi ng information on your phone, including contacts,
appointments, etc., except to place outgoing calls to numbers on your
Emergency List. Refer to “Locking the Phone” on page 52 for more information.
Creating an Emergency List allows anyone to place a call to a number on your list
when your phone is locked. Your Emergency List can have up to four numb ers.
These numbers can include: police, fire department, your home, etc . Refer to
“Creating and Editing an Emergency List” on page 67 for more information.
Did you know... you can set your NeoPoint 1600 phone not to transmit nor receive
carrier wireless signals?
Your NeoPoint 1600 p hone has a mode that allows it to function solely a s a
personal digital assistant (PDA). PDA mode blocks the phone from making or
receiving any type of signal and forwards all calls to voicemail. This allows you to
work on your contacts, schedul e and notes in areas where cellular calls are not
permitted. For mo re information on setting your NeoPoint 1600 phone to PDA
Mode, refer to “Changing the Phone Mode” on page 52. Obey all applicable
cellular laws.
xx NeoPoint 1600 User’s Guide
Page 21

Preface
Did you know... your NeoPoint 1600 phone can spell words for you?
Your NeoPoint 1600 phon e incorporates Tegic’s T9 text input mode which allows
you to minimize typing on the key pad. As you t ype in a word, the phone star ts to
give any combination of key words. You can press the next key (or the zero
button) to show you the next possible word. Tegic is used to facilitate the storing
of contact numbers, notes etc. For more information on T9, refer to “T9 Mode” on
page 14.
Did you know... you can set your NeoPoint 1600 phone to guard against
accidentally pressing keys while i n your purse or pocket?
Your NeoPoint 1600 phon e incorporates a feature call Keyguard. Keyguard is
different than locking your phone... it prevents your phone from accidentally
pressing unprotected keys, but is deactivated as soon as you open your flip. For
more information on setting Keyguard, refer to “Enabling Keyguard” on page 51.
Did you know... you can store up to 1000 friends, family, and business names, each
with 17 lines of information in your NeoPoint?
Your NeoPoint 1600 phone ha s a feature called Contacts. Each contact record
allows you to include the first and last names, title, company, five different phone
numbers, e-mail address and web site, address, and finally - additional notes. For
more information on creating a contact, refer to “Creating a New Contact Entry”
on page 58.
Did you know... you can update information in your NeoPo int or MS-Outlook (or
another compatible PIM) without retyping the same information again just by
connecting your NeoPoint to your PC?
Once you have installed the SoftSync program, connected your SoftSync cable to
your PC, you can set your NeoPoint phone to automatically update every time you
connect your NeoPoint to the cable. If you are entering information into your PC
and want to update your phone, click on the icon to transfer the data. For
more information on syncing your NeoPoint phone, refer to “Chapter 3: Syncing
Your NeoPoint Phon e” on page 41. For setting your NeoPoint to au tomatically
sync your data, refer to “Setting Sync to Manual or Automatic” on page 71.
Did you know... you can extend your NeoPoint battery life by approximately 20% by
setting and using the Screen Save feature ?
- The NeoPoint phone has a feature called Screen Save. Once activated, the LCD
will “go to sleep” 5 minutes after the last key was pressed, saving battery usage.
For more information on Screen Save, refer to “Enabling/Disabling Screen
Save” on page 71.
NeoPoint 1600 User’s Guide xxi
Page 22

Did you know... you can set an alarm ringer to al ert you before a scheduled
appointment or wake you up while traveling?
- Using the Sc hedule application of your NeoPoint phone, you can set the phone
to sound an alarm and notify you 5, 10, 20, etc . minutes prior to your meeting.
In addition, if you are traveling, you can use this application to schedule an
alarm to sound at a specified time in the morning (by scheduling an event) and
wake you up. For more information on creating a scheduled event, refer to
“Creating a Schedule Entry” on page 60.
Did you know... you can easily place a 3-way co nference call?
- Y ou r Neo Poi nt phon e is ca pab le of confe renc ing tw o ot her pe ople on a cal l. For
more info r m ation on maki ng a 3- w a y conferenc e ca l l , r e f er to “Making a ThreeW ay Call” on page 49.
Did you know... you can easily redial with your NeoPoint?
- Redialing someone is as simple as pressing the S
END button twice. If you called
someone and their line is busy and you want to dial the number again, press the
SEND button. This will display the Call History screen. If the number is
highlighted, press S
highlighted, use the Navigator key to scroll to the number and press S
END again and the call will initiate. If the number is not
END. For
more information on redialin g a number or conta ct, refer to “Rediali ng” on page
49.
Did you know... you can easily track your inbound and outbound calls with Call
History?
- One of the applications your NeoPoint phone has is Call History. Call History
tracks all incoming and outgoing phone calls. To view your Call History, from
the Main menu, press Calls (Soft key1) and your Call History will be displayed.
For more information on Call History, refer to “Using Call History” on page 57.
Did you know... you no longer need to use your PDA or appointment/ address book?
Your NeoPoint replaces both!
- Your NeoPoint phone is the unique marriage of a cellular phone, PDA, and
appointment book all in one. Y ou no longer need to carry three different devices
to meet your needs - just one - the NeoPoint!
xxii NeoPoint 1600 User’s Guide
Page 23

Preface
Did you know... you can access the Internet with your NeoPoint?
- The MiniBrowser application of the NeoPoint phone allows you to acc ess the
Internet. You can surf specialized web pages that are designed specifically for
use on a cellular phone. The world is at your fingertips - using your NeoPoint.
For more information on using MiniBrowser, “Using MiniBrowser” on page 62.
NOTE: MiniBrowser is dependent on your carrier service. Refer to your car-
rier service provider for access and availability of MiniBrowser.
Did you know... your NeoPoint phone can tell whic h da y of the wee k Jul y 4, 20 00
falls on?
- By using the Schedule application in your NeoPoint phone, you can access dates
years in advance. You are not limited to a calendar for anything. From the Main
menu, press the Up Navigator key to access Schedule. Onc e in Schedule, press
Month. Now use your Down Navigator key and scrol l to whatever date you
want. For more information on Schedule, refer to “Using Schedule” on page 60.
Did you know... there is a Hand s -Free Kit that allows you to driv e saf el y an d use
your NeoPoint?
- If you must drive and use your NeoPoint, be safe and use a Hands-Free Kit
accessory. This allows you to drive and talk without having to hold on to your
phone. For more information on the Hands-Free Ki t accessory, refer to “HandsFree Kit” on page 88.
Did you know .. . whenever you see the Phone icon in the upper right corner of the
screen, you can make a call?
- The NeoPoint phone helps make it as easy as po ssible for you to make a call.
Whenever the Phone icon is displayed, y ou can press the S
END key and make a
call. If you are at a screen with several numbers in a list (for example, Contacts
with home, work, fax, etc.) displayed, the NeoPoint will dial the first number on
the list. To dial other numbers on the list, use the Navigator key to scroll to the
number and then press S
END. For more information on the Phone icon, refer to
“Onscreen Icons” on page 11.
NeoPoint 1600 User’s Guide xxiii
Page 24

Did you know... you can save a telephone number from Call History into Contacts?
- From the Call History application of your NeoPoint pho ne, you can save a
number to Contacts. For example, let’s say that you receive an incoming call
from an old friend you had not heard from in year s. You did not have their
number and you want to save it for future reference. After the call ends, access
Call History. Highlight the number and press Options (Soft Key 2). Scroll to
Save Number and press OK. This will transfer you to the Contacts application.
Specify the type of number (home, work, fax, etc.) and enter the rest of the
information. The number has been saved and a new contact established. For
more information on saving a number from Call History, refer to “Saving a
Number From Call History to Contacts” on page 57.
Did you know... you can turn the vibrate mode on or off quickly?
- From the Main screen, press and hold the Back key. When activated, a small
icon will appear at the top of the Main scre en, indicatin g that vibra te mode is on .
xxiv NeoPoint 1600 User’s Guide
Page 25

1
Chapter 1: Getting Started
Overview
This chapter is divided into three sections:
• Ba ttery Installation and Charging
• Ne oPoint Phone Description
• Basic NeoPoint Phone Operat ion
1
NeoPoint 1600 User’s Guide 1
Page 26
1
Battery Installation and Charging
Before you can use your NeoPoint phone, yo u must install and charge your battery.
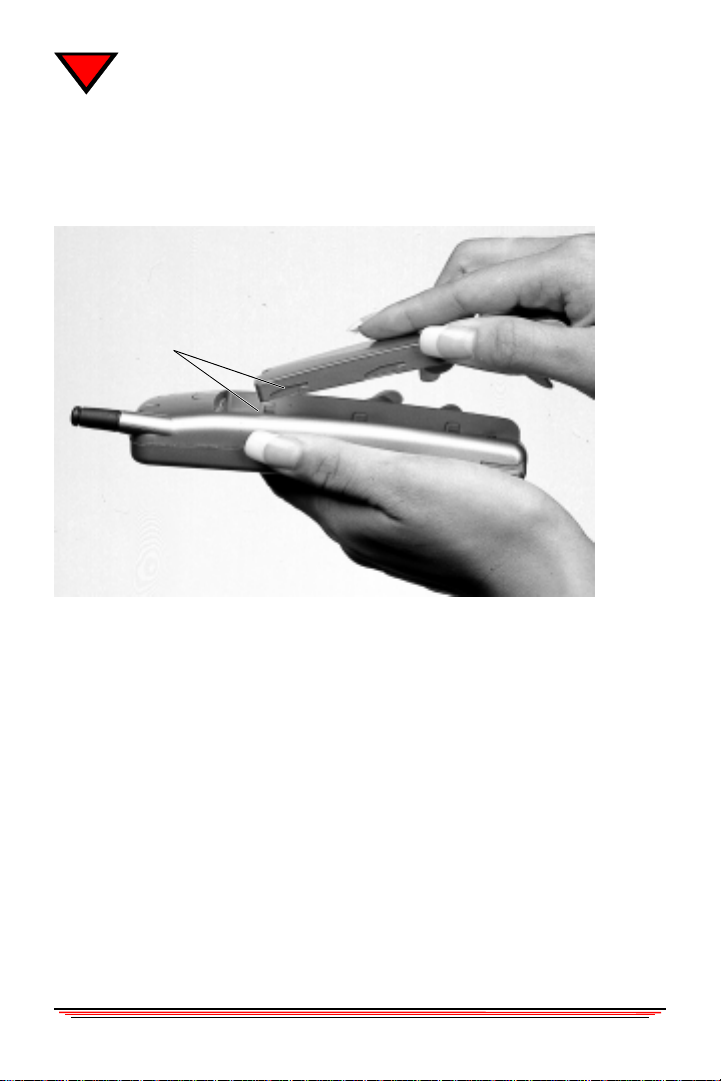
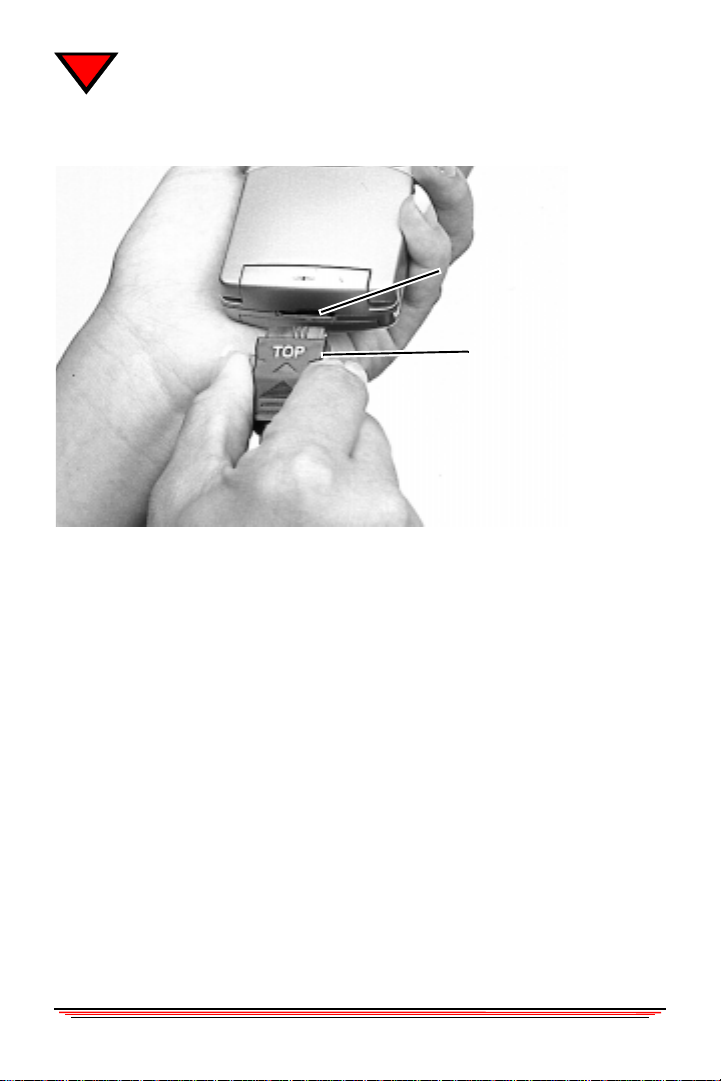
Inserting Your Battery
Battery
Alignment
Slots
Slightly Angled
To insert the battery into the phone, you need to align the battery alignment slots.
Insert the top of the battery into the top of the battery slot at a slight angle.
2 NeoPoint 1600 User’s Guide
Page 27

Chapter 1: Getting Started
Once the top is inserted, lay the battery flat into the battery slot and push forward
until the battery clicks and locks into place.
NeoPoint 1600 User’s Guide 3
Page 28
1
Charging Your Battery
Cable
Connector
Slot
NeoPoint
Phone
Connector
1. Insert one end of the travel charger into your NeoPoint phone.
2. Flip the plug prongs out and plug into the socket.
Your phone will begi n charging. Approximate charging time for the batt eries are:
Slim Battery 90% charged 1.5 hrs (approx.)
Extended Battery 90% charged 2 hrs (approx.)
Once your phone is charged, you can begin normal use. The following section
describes the components of your NeoPoint phone.
4 NeoPoint 1600 User’s Guide
Page 29
Chapter 1: Getting Started
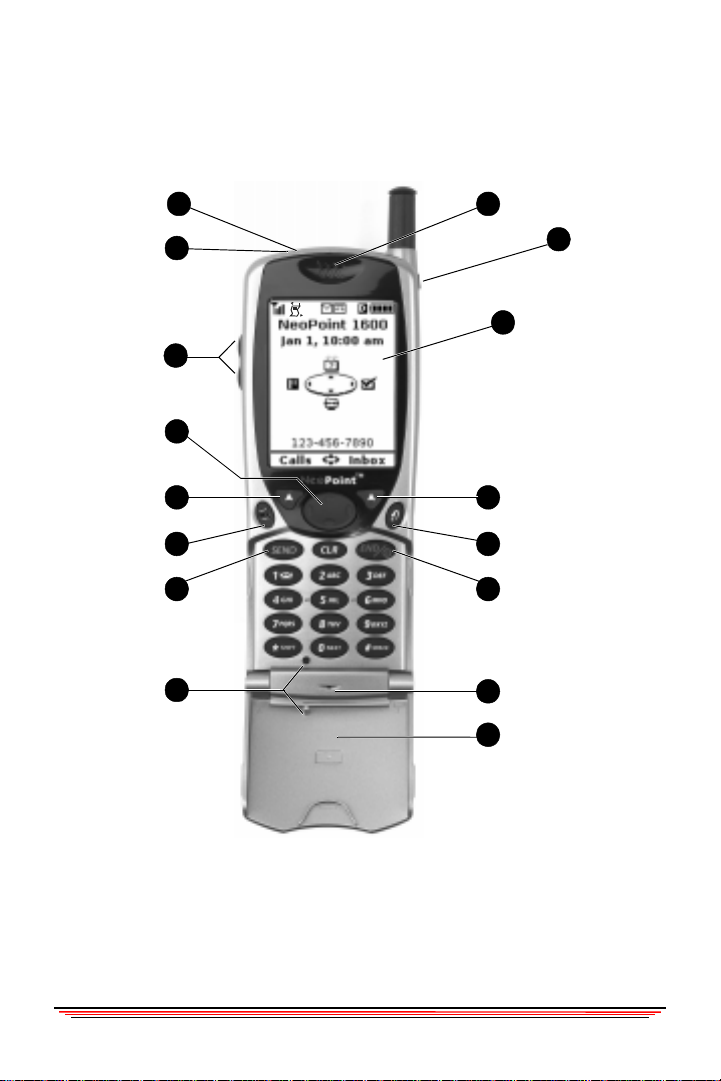
NeoPoint Phone Description
The following shows key components of the NeoPoint phone.
1
2
3
4
5
6
7
8
16
15
14
13
12
11
10
9
1) Call Indicator Light 6) MainMenu/QModeKey 11) End/Power Key
2) Ear Jack Port 7) Send Key 12) Back Key
3) Volume/Scrolling Keys 8) Flip Button & Pin 13) Soft Key 2
4) Navigator Key 9) Flip 14) Display Screen
5) Soft Key 1 10)Microphone 15) RF Port
16) Ear Jack
NeoPoint 1600 User’s Guide 5
Page 30

1
Key Functions
The following describes keys and their functions.
End/Power Key
The END/POWER key performs two functions: powering the phone on or off and
ending a call.
Power On With the phon e off, press and hold the END/PWR key. The phone
will power on, momentarily display the NeoPoint splash screen, and
then display the NeoPoint Main screen.
Power Off With the phone on, press and hol d the END/PWR key until the
display shows the confirmat ion: “Powering down” an d then release
the key.
End Call Pressing the END/PWR key while on a call will terminate the call.
Volume/Scrolling Keys
The Volume/Scrolling keys serve two different functions:
• Adjusting volume for the keypad, ear piece and ring e r
• Scrolling through pages i n the applications
Volume Up Press the V
Volume Down Press the V
Scrolling Pages When in an application (Contacts, Schedule, To Do, etc.) that
contains more entries than the screen can display, press the
VOLUME UP or VOLUME DOWN keys to scroll through the
entries a full page at a time.
Navigator Key
The Navigator key is located below the display screen. It is a four-way button used to
move the cursor up, down, left, and right. If you press on the left side of the key, the
cursor will scroll to the left (providing it has that option). Use this key to navigate
through the menus, applications, and lists within the applications. From the Main
screen, the Navigator key is preset to go directly to specific applications. For more
information on accessing applications usin g the Nav igator key fro m the Ma in screen,
refer to “Main Screen” on page 16.
OLUME UP key
OLUME DOWN key
6 NeoPoint 1600 User’s Guide
Page 31

Chapter 1: Getting Started
Soft Keys 1 & 2
Your phone has two soft keys with up arrows that are located on both sides of the
Navigator key. Their functions are indicated by the words appearing above them on
the screen display. The functions for these keys change, depending on the specific
application.
Main/Menu and Back Keys
The Main/Menu and Back keys are located on the outside of either side of the soft
key.
The Main/Menu key has three functions:
1. Toggles between the Main and Menu screens
2. Provides quic k access to the Main screen from any applicati on
3. Quick Mode is accessed by pressing and hol ding the Main/Men u key while the
phone is on. Once accessed, th e following options are displayed:
• Enable Keyguard
•Power Off
• Lock the Phone
• Mode (Normal, Silent, PDA)
• Incoming (Voice, Data In, Fax In)
For more information on the functions and how to use Quick Mode, refer to “Using
Quick Mode” on page 51.
The Back key returns to the previous screen until you reach the
Main screen. From the Main screen, you can activate the vibrate mode by pressing
and holding the Back key.
SEND and CLR Keys
SEND Initiates a call.
To place a call, dial the number you want to call and press SEND.
The phone will initiate the call.
To receive an incoming call, press S
voicemail).
To call the last number you dialed (to redial), press the S
twice. The phone will access t he Cal l History application and
initiate a call with the first number on the list.
END (or IGNORE to send to
END key
NeoPoint 1600 User’s Guide 7
Page 32

1
To place a call from within an application, select the number and
press the S
LR Clears the last-entered character, or the character located to the left
C
END key.
of the cursor. Press and hold will clear all characters in a field.
ND/PWR Terminates the call and exits MiniBrowser.
E
SHIFT, NEXT, and SPACE Keys
These keys are used in conjunction with specific features. The functions of these keys
change based on the specific feature. The following tabl e displays the different key
modes and the action that occurs when you press one of the three buttons.
Key
Mode/
Action
P
RESSING
S
HIFT
P
RESSING
EXT
N
ALPHA alpha T9 t9 NUM SYM
toggles
alpha
(lower
case)
0 0 next word next word 0 N/A
toggles
ALPHA
(upper
case)
toggles
t9
(lower
case)
toggles
T9
(upper
case)
**
RESSING
P
PACE
S
The S
PACE key is also used to create HotKeys. For more information on HotKeys,
space space space space space #
refer to “Creating a HotKey” on page 73 .
8 NeoPoint 1600 User’s Guide
Page 33

Chapter 1: Getting Started
Display Screen
The Display Screen features ma ny onscreen indicators and one-touch navigation to
applications. The following pro vi des a brief defin itio n of each onscr een icon:
Vibrate On
Signal Strength
MiniBrowser
Contacts
New Text Message
Call History
Your Phone Number
New Voicemail
Digital Mode
Battery Strength
Schedule
To Do
Inbox
The NeoPoint phone opens with the Main screen:
NeoPoint 1600 User’s Guide 9
Page 34

1
Main and Menu Screens
There are two screens that allow you access to the applications when using the
NeoPoint phone: Main Screen and Menu Screen.
Main Menu
Main Screen Displayed after powering on the NeoPoint phone. This screen
displays several onscreen icons (refer to the next section for a
description of onscreen icons) and allows access to six applications
with one touch of a button. For more information on the Main
screen, refer to “Main Screen” on page 16.
Menu Screen Displays the list of the nine NeoPoint applications. These
applications allow you to maximize your use of the NeoPoint
phone. for more information on Menu screen and applications, refer
to “Menu Applications” on page 19.
You can switch between the two screens by pressing the M
AIN/MENU KEY.
10 NeoPoint 1600 User’s Guide
Page 35

Chapter 1: Getting Started
Onscreen Icons
The main screen displays several onscreen icons: the following describes
each of the onscreen icons you may see on the
Signal Strengt h
Displays the strength of the signa l being received by the pho ne.
Vibrate On
When the phone is operating in Vibrate mode, this ic on is present. It
appears at the top of th e screen on your phone. You can toggle between
Vibrate On and Vibrate Off by pressing and hol di ng the Back key from
the Main screen
Digital Mode
When the phone is operating in Digita l m ode, this icon is present. It
appears at the top of the screen on your phone. The Digital icon is located
to the left of the signal streng th icon on your phone. When th e Digital
icon is not present, you r phone is operating in a nalog mode.
NeoPoint phone:
NO
SVC
NeoPoint 1600 User’s Guide 11
No Service
The phone is not receiving a signal from the network, whic h ma y be the
result of one of the following:
Searching for system
No service
New Voicemail
A voicemail message has been received.
New Text Message
A text message has been received.
Battery Strength
Indicates the battery charge level.
Phone
The Phone icon is displayed in the upper right corner of the phone when
you enter a field that has a number that can be dialed. Press
initiate a call.
SEND to
Page 36

1
Locked Phone
Indicates that the phone is locked, and cannot be used without the proper
lock code.
Incoming Fax or Data Mode
Indicates that the phone is in the incomi ng fax or data mode.
New E-Mail
The E-mail icon is displayed in the upper right corner of the phone when
you enter a field th at has an e-mail address.
Recurring Event
Indicates th at th e sche duled event i s a rec urri ng even t (dai ly, 4th Tuesday ,
4th Friday, each 23rd, never, weekly, yearly).
All Day Event
Indicates that the scheduled even t is an all day event.
Event Alarm
Indicates that the scheduled even t has an alarm set.
Inbox
Accesses the Inbox scree n and allows you to view and/or retrieve your
voicemail, text messa ges, and e-mail.
Call History
Accesses the Call History screen and allows you to view all call
information, save ca ll information, etc.
Contacts
Accesses the Contacts screen and allows you to create and maintain a list
of approximately 1,0 00 c ontacts, including names, num bers, addresses,
etc.
Schedule
Accesses the S chedule screen and allows you to create and maintai n all
of your appointments, set alarms, etc., for months in a dva nce.
12 NeoPoint 1600 User’s Guide
Page 37

Chapter 1: Getting Started
To Do
Accesses the To Do screen and allows you to create and maintain a list of
“to do” items, wit h pri orities, etc.
MiniBrowser
Accesses the MiniBrowser screen and allows you to surf the Internet via
specially-designed web pages for cellular telephones.
Sync
Accesses the Sync screen and allows you to transfer information between
your NeoPoint and your PC/La pt op.
Preferences
Accesses the Preference s scree n and allows you to customize your
NeoPoint to suit your needs.
More...
Accesses the M ore ... screen and allows to access your carrier service
provider services.
Entering Text, Number, and Symbol Characters
The NeoPoint has four modes for entering characters:
• ALPHA/alpha Upper and Lowercase letters
• T9/t9 “Smart” word entry
• NUM Numbers
• SYM Symbols/Special Characters
To toggle the modes in an entry field, press Soft Key 2 until the desired mode is
displayed.
ALPHA/alpha Mode
ALPHA/alpha mode (UPPER/lower case) allows you to enter alphabeti c characters
using the multi-tap method. The multi-tap method is designed around the keypad
and it has several letters associated with each key . For example, the number 2 has the
letters “A,” “B,”, and “C” associated with it.
NeoPoint 1600 User’s Guide 13
Page 38

1
T o type a word - for example, the word Hello, you wou ld u s e th e f ollowin g m u lti-tap
sequence on the keypad: 4-4, 3-3, 5-5-5-, 5-5-5, 6-6-6, where dashed numbers (4-4,
etc.) are pressed without pausing. Pausing between pressing the keys may move the
cursor to the next letter. If this happens, press the CLR key to clear the letter and try
again.
ALPHA/alpha mode will automatically begin in uppercase at the beginning of each
data entry and switch to lowerca s e with th e ne xt le tter. If you wish to toggle between
upper/lower case, press the S
HIFT key on the key pad.
T9 Mode
T9 (Text for 9 keys) Mode (or t9 mode - depending on whether you are in UPPER or
lower case) employs an intelligent software protocol that allows you to enter text just
as you would on a desktop keyboard. Press one key for each letter and type the
entire word. Although each key cont ains multiple letters (the “5” key, for example,
can be used to type “J”, “K ”, or “ L” ) T9 au toma tic a lly match es y our keystrokes with
words in an internal database to de termine th e word you a re typing . T9 will sele ct the
matching word that is most often used.
When in data entry mode and T9 appears in the bottom right of the display, you may
enter the word. If it is not displayed, press S
appears. The following example demonstrates how you can practice using T9 mode.
1. Once you are in T9 mode, type the entire word, using one key press per letter.
The word “hello” is entered by pressing keys 4, 3, 5, 5, 6 in that order.
As you type, T9 matches the keys you pressed with words from its database.
Because T9 is working to match your keystrokes, different words may appear as
you are typing. Most likely, your desired word appears after you spell it
completely.
2. If the word you want is not displayed, press N
choices.
Short words are more likely to share the same keystroke sequences. For
example, book and cool both use the sequence 2, 6, 6, 5. T9 display s the more
commonly used word book. To display “cool” - press N
through all the choices for a keystroke sequence by pressing N
3. Press S
PACE when the word you desire appears in the display, to accept it and
continue typing the next word.
4. If your word is not one of the alternate word choices, adding words to the T9
database is easy.
OFT KEY 2 until the T9 mode indicator
EXT to display alternate word
EXT. Y ou may cycle
EXT repeatedly.
14 NeoPoint 1600 User’s Guide
Page 39

Chapter 1: Getting Started
Switch to Alpha mode, type the word using the multi-tap method, and then
switch back to T9. The word is saved automatically and will appear as a word
choice in T9, the next time you want to type it. You may need to press NEXT to
display the new word if other words share the same keystroke sequence.
5. In T9, “Smart Punctuation” is available on the 1 key. This enables you to type
e-mail domains, possessive forms, and contractions quickly and easily. At first,
T9 displays a period. However, T9 uses some simple rules to deter mine and
display the appro pr iate mark as you continue to type. In a message, try typing
“it's easy.”
Press the following keys in order: 4, 8, 1, 7, #S
PACE, 3, 2, 7, 9, 1
Try another example by typing the e-mail address : j ohn@company.com
1. Enter the username john in t9 mode.
2. Press S
OFT KEY 2 to toggle to SYM (Symbols) mode. Using the NAVIGATOR
key to move the cursor to select the @ symbol. Press Select (Soft Key 1). The
phone automatically return s to t9 m o de , an d t9 a pp ear s in t he lo wer r igh t corn e r
of the display.
3. Enter company.com by pressing the following keys, in order: 2, 6, 6, 7, 2, 6, 9, 1,
2, 6, 6. You should now see john@company.com in the field.
Visit the website: www.t9.com for more information on T9 text input mode.
NUM Mode
NUM (Number) mode allows you to enter numbers in Contacts, Schedule, and To Do
applications.
To toggle to NUM mode in an entry field, press S
OFT KEY 2 until NUM mode is
displayed at the bottom right corner of the screen.
SYM Mode and Special Characters
There are two ways to type special characters:
• Using the SYM (Symbol) mode by pressing S
N
AVIGATOR KEY to select the character.
or
• Pressing the 1 key
OFT KEY 2 and then using the
NeoPoint 1600 User’s Guide 15
Page 40

1
Using the SYM mode will display the following pop-up window:
Use the N
In ALPHA/alpha mode, co ntinuously pressing 1 will display the following
characters/choices (in the same position):
Once you have the desired symbol, you can wait momentarily to enter the next
character or change modes.
AVIGATOR key to select the character and press SELECT (Soft Key 1).
. , - ‘ @ / ~ : ? 1
Basic NeoPoint Operation
Main Screen
The NeoPoint phone opens with the Main screen:
The Main screen allows direct access to six menu applications by pressing the
AVIGATOR key, SOFT KEY 1, or SOFT KEY 2.
N
Accessing Menu Applications From Main Screen
16 NeoPoint 1600 User’s Guide
Page 41

Chapter 1: Getting Started
As shown in the previous illu stration , you can acce ss the fo llowing appl ications from
the Main screen:
P NAVIGATOR KEY accesses Schedule application. For more
• U
information on the Schedule applica tio n, refer to
“Schedule” on page 28 .
IGHT NAVIGATOR KEY accesses the To Do application. For more
• R
information on the To Do application, refer to “To
Do” on page 26.
OWN NAVIGATOR KEY accesses the Contacts application. For more
• D
information on the Contacts application, refer to
“Contacts” on page 26.
EFT NAVIGATOR KEY accesses the MiniBrowser application. For more
• L
information on the MiniBrowser application, refer to
“MiniBrowser” on page 26.
OFT KEY 1 accesses the Call History application. For more
• S
information on the Call History application, refer to
“Call History” on page 27.
OFT KEY 2 accesses the Inbox application. For more
• S
information on the Inbox application, refer to
“Inbox” on page 26.
• M
AIN/MENU KEY accesses the Main screen from any application and
toggles between the Main and Menu screens. Allows
you to access Quick Mode when held down.
ACK KEY accesses the Main screen or previous screen. From
• B
the Main screen, allows you to activ ate vibrate mode
when held down.
NeoPoint 1600 User’s Guide 17
Page 42

1
Menu Screen
There are nine applications on the Menu screen.
Changes to
display selected
application.
List Icons
You can change the Menu screen to display the menu items in either list or icon form.
Both screens are shown here. To change the Menu screen to display either List or
Icons, refer to “Changing the Menu Screen to Display List or Icons” on page 66.
18 NeoPoint 1600 User’s Guide
Page 43

Chapter 1: Getting Started
Menu Applications
The following table lists each application with a brief description:
Application Description
Inbox Provides access to voice m ai l a nd te xt
messages. For a brief descripti on, refer to
“Inbox” on page 26. For proce dural
information, refer to “Using Inbox” on page 54.
Call History Tracks all calls, including incoming, outgoing,
Contacts Stores up to 1000 contacts, ea c h wit h
Schedule Calendar with daily and monthly scheduling
To Do Helps organize and prioritize yo ur ta sks. For a
missed, and failed. For a brief description, refer
to “Call History” on page 26. For procedural
information, refer to “Using Call History” on
page 57.
addresses, multiple telephone numbers, e-mail,
web page, and other information. For a brief
description, refer to “Contacts” on page 26. For
procedural information, refer to “Using
Contacts” on page 58.
capabilities. For a bri ef description, refer to
“Schedule” on page 26. For procedural
information, refer to “Using Schedule” on page
60.
brief description, refe r to “To Do” on page 26.
For procedural informat ion , re fe r to “Using To
Do” on page 61.
NeoPoint 1600 User’s Guide 19
Page 44

1
Application Description
MiniBrowser Connects to your carrier service provider’s
Internet server and al lows limited Internet
access. Internet ac ce ss information is provided
by your carrier service provider. For a brief
description, refer to “Mini Browser” on page
26. For procedural information, refer to
“Appendix B: Using the MiniBrowser” on page
103.
Sync Allows you to transfer and upd at e Contacts,
Preferences Allows you to change your phone settings to fit
More Displays applications incl udi ng hot keys,
Schedule, and To Do information between your
NeoPoint phone and your PC. For a br ief
description, refer to “Sy nc ” on page 26. For
procedural information, refer to “Using Sync”
on page 62.
your needs. For a brief descripti on, refe r to
“Preferences” on page 26. For procedural
information, refer to “Using Preferences” on
page 63.
carrier services, ti m ers, cl ock settings, and
manufacturing information. For a brief
description, refer to “Mo re ... ” on pa ge 26. F or
procedural information, refer to “Using
More...” on page 73.
Making a Call...
There are several different methods for placi ng a call. You can place a call from the
Main, Call History, Contacts, Text Messages, To Do, and Schedule screens.
From the Main Screen
1. Open the flip.
2. Dial the telephone number.
3. Press the S
END key.
20 NeoPoint 1600 User’s Guide
Page 45

Chapter 1: Getting Started
4-Digit Dialing
The NeoPoint phone a ll ows you to dial the last four digits of a phone number, given
the number has been programme d into Contacts. For more information programming
a contact, refer to “Using Contacts ” on page 58.
Answering a Call
When the phone rin gs, the phone will indicate that you have an in coming call by:
• Ringing or vibrating
• Flashing the call indicator light
• Displaying an onscreen message “Incoming call from 234-456-7890 (the caller’s
number or res tr icted if blocke d )
You have the following options:
• Press the S
function
or
• Open the flip (when Active Flip is On)
or
• Press any key (except the End/Pwr and volume keys and when Anykey Answer is
On) to answer the call
or
• Press Ignore (Soft Key 2) to send the call to voicemail
END key (while the flip is open) or Soft Key 1 while indicating Send
NOTE:The Anykey Answer and Active Flip factory default settings
are On. To disable th ese features, refer to “Enabling/Disabl ing
Anykey Answer” on page 70 and “Enabling/Di sabling Active Flip”
on page 70. By disable these features, the first two methods of
answering a call will not work.
NeoPoint 1600 User’s Guide 21
Page 46

1
Ending a Call
After concluding your conversation, you can end your call by perf orming one of the
following three options:
• Press the
END/PWR key
or
• Press End (Soft Key 1) to terminate your call
or
• Close the flip of your phone
NOTE:If you have set the Active Flip feature to Of f, closing the flip
will not terminate your call.
Redialing
1. From the Main screen, with the flip open, press the SEND k ey. This takes you to
the Call History screen, displays the Call History list, and selects the last call
you made on your phone.
2. Press Send (Soft Key 1) to initiate the redial.
or
3. From the Main screen, with the flip closed, you can press the Soft Key 1 twice.
Making a Three-Way Call
Three-way calling allows you to talk with two people at the same time.
1. Dial the first number and press the S
2. After the first call connects, dial the second number.
3. Press the S
END key. (The first number you called is no w placed on hold.)
4. Once the second call is connected, press the S
call is now in progress.
END key.
END key again. The conferen ce
22 NeoPoint 1600 User’s Guide
Page 47

Chapter 1: Getting Started
NOTE:If you press the END/PWR key or close the flip with Active
Flip On to terminate a conference call, the connection between the
other two parties will terminate. However, if one of the two parties
terminates a call, it will not affect the connection between you and
the remaining party.
Call Waiting
Call waiting is a feature offered by yo ur carrier service prov ider . Ca ll waiting is when
you are on a current call and you receive an incoming call. On the NeoPoint phone,
you will hear a click through the ear piece indicating that you are receiving another
call. To answer this second call or call waiting, use the following procedure:
1. Press S
2. Press S
3. Press
END to answer the second call. The phon e connects to the second party,
placing the first party on hold.
END again to switch to the first call.
END/PWR when finished with the call.
NeoPoint 1600 User’s Guide 23
Page 48

1
24 NeoPoint 1600 User’s Guide
Page 49

1
2
Chapter 2: NeoPoint Menu
Applications
Overview
This chapter discusses the NeoPoint Menu a pplications. The Menu screen contains
nine main application s . Each of these nine applications and th eir options are
discussed in the following sections.
Menu Screen
There are nine application s on the Menu screen.
Changes to
display selected
application.
List Icons
Y ou can change the Menu screen to display the menu items in either list or icon form.
Both screens are shown here. To change the Menu screen to display either List or
Icons, refer to “Changing the Menu Screen to Display List or Icons” on page 66.
NeoPoint 1600 User’s Guide 25
Page 50

2
The nine applications of the NeoPoint are:
•Inbox
• Call History
• Contacts
• Schedule
•To Do
• MiniBrowser
•Sync
• Preferences
•More...
The following sections describe each of the applications.
Inbox
NOTE:Voicemail is controlled by your carrier service provider. Contact your
carrier service provider for more info rmation on activatin g voicemail.
Each voicemail message is stored at the carrier server
and accessed through a phone call to the mailbox at the
server. Text messages are sent and stor ed on your phone.
When a message is sent to your phone, an ons creen
message and icon appears n ot ifying you of new
messages in your Inbox. Th e icons are:
Voic email
E-mail
Text messages
While voicemai l is selected, Soft keys 1 and 2 display L
When text message is selected, Soft key 1 displays V
ISTEN and VIEW options.
IEW.
Inbox can hold up to 99 messages before it begins overwriting messages. Inbox will
overwrite the oldest message. You can lock your text message to avoid the message
being overwritten. Voicemail is carrier service dependent and the number of
voicemails is not NeoPoint-dependent. Refer to “Using Inbox” on page 54 for
information on voicemail and text message options.
26 NeoPoint 1600 User’s Guide
Page 51

Chapter 2: NeoPoint Menu Applicatio ns
Call History
Call History allows you to view all types of calls at the
touch of a finger. When selected, it displays the last 30
numbers called with a maximum of five calls per number.
These calls are divided into four types of calls:
• incoming
• outgoing
• data
• missed
The type of call is indicated by the letter in front of the
call, e.g., i for incoming, o for outgoing, d for data, and m
for missed.
As you scroll through the list of calls, the number for each call and name of contact
(provided the call was initiated or received from a known contact) is displayed. If the
call was not initiated or re ceived fro m a kn own cont act, on ly the te lephon e nu mber is
displayed. Once you exceed the 30-number storage limit, the oldest call history
record is overwritten.
Pressing Options (Soft Key 2) displ ays the Options pop-up menu. This menu
includes the following options:
Detail Displays call information, i.e., phone number, date, time, call type:
i, o, d, m, and elapsed time.
Save number Transfers phone number to Contacts. Requests you select number
type: home, work, mobile, other, and then goes to Contacts where you
can enter more information.
Delete Deletes record of the selected number
Delete all Deletes all numbers in Call History
Refer to “Using Call Histor y” on page 57 for information on how to save, delete, or
view detailed call information.
NeoPoint 1600 User’s Guide 27
Page 52

2
Contacts
You can store approximately 1000 contacts in your
NeoPoint phon e (depending on amount of data per
contact). Each contact can include:
• First & last name
• Title & company
• Work, home, fax, mobile & other phone numbers
• Business or home address
• Web site & e-mail address
• Note/other information
When a contact is selected, the name is displayed in bold and Soft Keys 1 & 2 change
to Detail, Send, an d Mail (if it is an e-mail). Also, the type of number, e.g., home,
work, fax, mobile, other is shown with a letter (h, w, f, m, o) on the left side of the
contact number. The E-mail icon will be displayed if it is the e-mail address.
NOTE:Whenever you see the phone icon in the upper right corner of the
screen, you can press
indicated number.
Refer to “Using Contacts” on page 58 for information on how to create and use
contacts.
SEND key on the key pad to place a call to the cursor-
Schedule
The Schedule application allows you to keep track of
appointments. When you select Schedule from the Menu
screen, Today’s view will appear by default. This view
shows the event(s) scheduled for that d ay. Each event has
the following settings:
• Subject Title of event
• Time Time of day the event will occur
• Length How long the event is planned (mins., hrs.).
If the event is scheduled for all day, the All
Day icon will be displayed.
• Repeat If event will repeat (weekly, monthly, etc.)
and is shown as circular arrows on the
28 NeoPoint 1600 User’s Guide
Page 53

To Do
Chapter 2: NeoPoint Menu Applicatio ns
left side of the event name.
• Alarm Sounds alarm (5, 10, mins. prior, etc.) and is
shown as a bell on the left side of the
event time.
• Note Notes about the event.
To view the scheduled items for the month, press
Month ( Soft Key 2) from the Today view.
In the Month view, a day with scheduled items will have
the date underlined: e.g ., 25
Refer to “Using Schedule” on page 60 for procedural
information.
The To Do feature helps you to organize and prioritize
your tasks. This feature allows you to set the following
parameters for each task:
Priority High, Medium, Low
Subject Title of task
Status Open or Done
Note Write a brief note regarding this task
Once you have created a list of To Do tasks, as you scroll
through the list, each item will display the title, priority,
and status.
.
NeoPoint 1600 User’s Guide 29
Page 54

2
MiniBrowser
Once you complete the To Do task and change the status
to Done, a check mark will appear to the left of the
subject task name.
Refer to “Using To Do” on page 61 for procedural
information.
The MiniBrowser feature allows you t o vi ew internet
content specially designed for mobile phone interface.
Access and selections within this feature are service
provider-dependent.
For specific information on Mini Browser access
through your NeoPoint phon e, refer to your service
provider.
Refer to “Using MiniBrowser” on page 62 for more
information.
Sync
The Sync feature allows you to connect and transfer data
between your NeoPoint phone and your PC by
performing the following:
1. You must first install the NeoPoint SoftSync
software on your PC.
2. Next, you need to connect the nine-pin serial port
connector end of yo ur So ft Sy nc ca bl e to yo ur PC
and the other end to your NeoPoint phone.
30 NeoPoint 1600 User’s Guide
Page 55

Chapter 2: NeoPoint Menu Applicatio ns
3. Finally, you need to have MS-Outlook or other NeoPoint-compatible persona l
information management (PIM) software installed on your PC. Refer to
www.neopoint.com for a complete list of compatible PIM software.
Refer to “Syncing the Phone with Your PC” on page 42 for procedural information.
Preferences
The Preferences menu allows y ou to access several
options that you may want to change periodically. The
following sections describe each of these options.
Use the NAVIGATOR key to scroll to a menu item. Press
ELECT to view the menu item.
S
Refer to “Using Preferences” on page 63 for procedural
information.
Ringer Type
There are six settings in Ringer Type: Calls, MiniBrowser, Message, Voicemail,
Scheduler, Roam Call. Ringer Type allows you to customize a different tone for
each setting. You can choose any of the 11 different ringer tones:
Basic Susanna Elise
Green Anthem Phantom
None Beep Slots
Parrot Jackpot
Use the Navigator key to scroll and change ringer types. Once you highlight an
option, use the left/ righ t Nav igato r key to chan ge to a di ff ere nt ringe r ton e. Onc e you
have made your selection, press D
ONE.
Volume
The following lists the options where the volume can be controlled:
Ringer 1-6 and Off
Vibrate Off and On (vibrator will pulse when activated)
Ear Piece 1-6 (low to high)
Key Pad Off, Low, and High
NeoPoint 1600 User’s Guide 31
Page 56

2
Key Beep
There are two options in Key Beep:
Key T one T one s or Click
DTMF Length Short or Long
When you are experiencing problems connecting to a number, it may be because the
dual tone modulated frequency (DTMF) length is too short. If the tone s are too short
for the system to recognize the tones for t he number you are trying to reach, the
number will not connect. This problem is usually experienced when you have a very
weak carrier signal.
Try changing the setting the DTMF length from Short to Long length. This will
lengthen the DTMF tone, allow the system to recognize the tones, and help connect
your call through the cellular network.
ONE when finished.
Press D
Alerts
There are five features in the Alerts menu. These features allow you set alerts to
notify you of a change, e.g., when you lose or regain carrier service signal. These
features are:
Roam Beep On/ Off. This feature alerts you when your service changes to
roaming (out of your normal area).
Service Change On/Off. This feature sounds a tone notifying you when you
lose/regain a service signal to your phone.
MiniBrowser On/Off. This feature sounds an alarm when you receive e-mail
or other MiniBrowser-definable settings. Refer to “Appendix
B: Using the MiniBrowser” on page 103 for more information
regarding MiniBrowser options.
Call Drop On/Off. This feature alerts you when a call is terminated by a
person other than the calling or called party.
Power Tones On/Off. This feature alerts you when you are turning the phone
on or off.
Press Done when finished.
32 NeoPoint 1600 User’s Guide
Page 57

Chapter 2: NeoPoint Menu Applicatio ns
Main Screen
The Main Screen menu has the following settings :
Phone Number On/Off. This feature displays/removes your phone number
from the Main screen.
Time Format 12 or 24 hr. This feature c hanges the time format t o display
either 12 hour or 24 hour format.
Next Event On/Off. This feature di splays next scheduled event on the
Main screen.
Soft Keys 1 & 2, Navigator Left/Right/Up/Down keys are user-definable. You can set
these keys to any application or feature of the phone. For example, you can set the
Left Navigator key to call your home number or set Soft Key 1 to access your
security screen. The settings shown are factory default settings.
ONE when changes are complete.
Press D
Display
The Display menu has four features that allow you to customize display settings to
suit your individual needs. These features are:
Backlight Off, 5, 10, 15, 30 secs. and On. Sets the length of time the
display is illuminated after the last key is pushed or flip is
opened.
Note: Setting this feature to On will deplete yo ur batte ry
charge at a faster rate.
Contrast 0 - 10. This feature allows you to change the contrast from 0
(lightest) to 10 (darkest).
Night Light Off, 15 secs, 30 secs, or 1 min. Thi s feature sets the leng th of
time the keypad is illuminated. When not turned Off, this
feature is activated from the hours of 5 PM to 5 AM whenever
your flip is op en.
Menu Screen Lis t o r Icons format. This feature changes the Menu screen
from List form to Icons.
ONE when changes are complete.
Press D
NeoPoint 1600 User’s Guide 33
Page 58

2
Security
Security feature helps you to protect your phone from unauthorized use. To access
this screen, you must enter the 4-digit security code (default = last 4-digits of your
phone number).
Lock Code Enabled or Disabled. Enabled is the default setting. Use this
setting to lock your phone and enter the Security screen (when
enabled).
Also used to change your current lock code. Press Edit (Soft
key 2) to change you r lock code and Done when finished.
Power-up Lock Yes or No. Once set, this feature locks your NeoPoint phone
every time your phone is powered on.
System Allows a preferred system t o be selected. The options are
Standard, A only, B only or Home only.
Nam Nam stands for number assignment module. This module
associates the MIN (mobile identification number) with the
ESN (electronic serial number).
Analog Mode The analog mode option allows you to force you r phone into
analog mode. Although the NP1600 phone is digital preferred,
you have the option to force your phone into analog mode for
ten minutes or until the end of the next call.
Emergency List Allows you to preprogram four emergency numbers that can
be dialed when the phone is lock ed. Refer to “Creating and
Editing an Emergency List” on page 67 for information on
how to create an emergency list.
NOTE:It is recommended that you include the number to your carrier
service provider in your emergency list. This allows you to make calls to your
provider even if your phone is locked, you cannot remember your password,
are experiencing phone difficulties, etc.
Defaults Resets all user settings to default settings. Before using this
feature, it is recommended th at yo u re fer to “ Defau lt S et ting s”
on page 68.
Database Clears all information records from Contacts, Schedule, To
Do, and HotKey applications and features. All user data is
erased.
34 NeoPoint 1600 User’s Guide
Page 59

Chapter 2: NeoPoint Menu Applicatio ns
General
The General menu has the following options:
Active Flip On/Off. This feature allows you to answer a call by opening
the flip or end a call by closing the flip.
Anykey Answer On/Of f. Th is feature a llows you to answer an inc oming call by
pressing any key except End/Power key, the V olume keys or
Ignore (Soft Key 2).
Auto Redial On/Off. When turned on, your NP1600 will automatically
redial a failed call.
Sync Manual/Auto (automatic). To use this feature, your NeoPoint
phone must be in one of the two follo w ing configurations:
1. Connect to your PC via the SoftSync cable.
2. Inserted into your optional Docking Station that is
connected to your P C via the SoftSync cable.
This feature allows you to i ni t iate a sync when yo u ei ther
manually click onto the SoftSync icon or automatically when
you connect/inser t the phone.
Screen Save On/Off. When On, turns LCD off after 5 minutes of no use.
This helps to conserve battery usage.
Auto Answer On/Off. When On, this feature allows your phone to
automatically answer calls. For more information, ref er to
“Activating/Deactivating Auto Answer” on page 71.
Wakeup Alarm Allows you to turn on or off alarm notifications. When your
NeoPoint is powered OFF, Wake up A lar m is set to ON, and
Schedule has an event with alarm set to r ing, your phone will
“wakeup” and sound the alarm. If there is no action (pressing
keys, etc.) for 1.5 minutes, the phone will power OFF.
NetGuard All ows you to choose whether you wan t t he prompt window
“Enter Wireless Internet?” to be displayed when u s ing the
MiniBrowser or launch the MiniBrowser/Wireless Internet
without the prompt. NetGuard also has a warning prompt
when exiting.
NeoPoint 1600 User’s Guide 35
Page 60

2
Prepend On/Off. When activated, a “1” will automatically be inserted
preceeding the number dialed. For example, if you dial a
number that is ten digits or more without dialing “1” first, and
Prepend is On, “1” will auto mati cally be in serte d. Th is fe atu re
is also helpful if you are placing a call from the Call History
list and the number is ten digits or more.
Banner
Banner allows you to en ter or change the 15-character field displayed on the Main
screen. Using capital letters affects what is seen on the display screen and may cause
the last letter(s) not to appear.
Press DONE to save the changes.
More...
The More... menu displays the following features:
Hot Keys Display s your list of HotKeys.
Services Quick access to carrier services.
Call Timers Maintains a running total of calling time
for the curr ent m onth an d pr ev ious mon th.
Call timers begin counting air time as
soon as you initiate or receive a call. This
feature is used to approximate your call
usage. It is for estimation purposes and
cannot be used for billing purposes.
Clock Setting Used to set the time, date, etc. when not
within carrier service range. The carrier
signal will automatically correct the clock
settings when within signal range.
Info Provides phone model, available memory,
software release, record counts, and other
information.
36 NeoPoint 1600 User’s Guide
Page 61

Chapter 2: NeoPoint Menu Applicatio ns
HotKeys
This feature allows you to view the list of HotKeys.
HotKeys allow you to program and quickly access
information and execute applications. Once a HotKey is
programmed, you can access the information or
application with the pus h of a ke y pa d num be r (2 -9 an d
0). Refer to “Creating a HotKey” on page 73 and “Using
a HotKey” on page 74 for procedural information on how
to create and use HotKeys.
Services
The Services application has the following options:
Customer Care Initiate a call to your carrier
service provider regarding your
phone service.
Roadside Rescue Initiate a call to your carrier
service provider requesting
roadside assistance.
Prepaid Calling Initiate a call to your carrier
service provider regarding prepaid
calling options.
Block My CallerID Initiates a call to your carrier service provider to block your
phone number ID to all numbers that you cal l. Providing the
number you are calling has a device or phone capable of
displaying Caller ID, it displays restricted or unavailable
instead of displayi ng your phone number.
Call Wait Off Allows you to turn off the capability to receive a call while
you are currently on a call. This feature initiates a call to your
service provider and is availa ble on a “per call basis.”
Call Forward Off Allows you to turn off forwarding a call to a different phone
number. This feature init iat es a call to your service provide r
and deactivates the Call Forward fe ature.
Call Forward On Allows you to forward calls to a different phone number. This
feature initiates a call to your service provider and is available
on a “per call basis.”
To activate a service, press Send or Select (changes based on specific selection).
NeoPoint 1600 User’s Guide 37
Page 62

2
Call Timers
Call timers allow you to keep a running count of the time
you spend making calls.
This Month Time you spent on the phone since the
Start D ay. Although it cannot be used
for billing purposes, this helps you to
maintain an approximate usage of
calling time.
Last Month Time you spent on the phone from last
month’s Start Day.
Start Day Specifies the day of the mon th you want
to begin timing your calls. You may
want to set the start date to match your
billing start date.
Current Running total time since last reset.
Clear Current Resets timer to zero (0:00).
Timer
Clock Setting
This feature is used only when there is no carrier service signal to your phone. It
allows you to set the clock on your phone. If there is a signal, it will display the
following message: Local time has already been acquired.
38 NeoPoint 1600 User’s Guide
Page 63

Chapter 2: NeoPoint Menu Applicatio ns
Info
The Info feature displays information about your NeoPoint phone. The following two
screens display this type of information, including phone and personal information
manager (PIM) information:
From the PIM Info screen, press M
ORE (Soft Key 2) and the Versions screen will
appear. When calling NeoPoint Customer Service/Support, have this information
readily available.
NeoPoint 1600 User’s Guide 39
Page 64

2
40 NeoPoint 1600 User’s Guide
Page 65

1
3
Chapter 3: Syncing Your
NeoPoint Phone
Overview
This chapter discusses how to sync your NeoPoint phone and your PC. It assumes
you have already installed and configured the sync software. Refer to the SoftSync
Plus User’s Guide for instructions on installing and configuring your sync software.
Why sync your phone?
The benefit of syncing is to make it convenient for you to transfer data between the
NeoPoint phone and your personal information management (PIM) program. For
example: when you ente r all of your friends and business associat es - referred to as
contacts - information into your PC and then transfer or sync the data to your
NeoPoint phone, you have:
• All of the information with you wherever you go (with your phone)
• Saved yourself the task of entering the data twice (on the PC and phone)
• Created a data backup (i f yo u lose the d ata on y our PC , yo u ha ve a da ta b ac k-u p on
your phone.
The same is true for your personal schedule information. The NeoPoint phone can
display your next mee tin g/appointment an d no tif y you in ad v an c e of yo ur me e tin g/
appointm en t , etc.
NeoPoint 1600 User’s Guide 41
Page 66

3
Syncing the Phone with Your PC
IMPORTANT!Close all PIM programs before syncing data.
If the “Monitoring” phone icon is not displayed on your MS-Windows Task Bar,
double-click on the SoftSync shortcut icon on your Desktop to initiate PC
monitoring of your phone. Once activated, the “Monitoring” icon will be displayed
on your Task Bar.
1. Power ON your NeoPoint phone.
2. Plug one end of the SoftSync cable i nto your NeoPoint phone.
42 NeoPoint 1600 User’s Guide
Page 67

Chapter 3: Syncing Your NeoPoint Phone
Y our PC
9-pin Serial Port
3. Plug the other end of the SoftSync cable into one of the 9-pin serial ports on
your PC.
NeoPoint 1600 User’s Guide 43
Page 68

3
.
4. On your phone, press the Main/Menu button.
5. Scroll to the Sync application and press S
ELECT (Soft Key 1).
44 NeoPoint 1600 User’s Guide
Page 69

Chapter 3: Syncing Your NeoPoint Phone
Press
Soft Key 1
6. Press START (Soft Key 1) to begin data transfer between your phone and PC.
7. When the transfer is complete, the phone will display “Sync Completed.”
8. Press D
ONE (Soft Key 2) to return to the Menu screen.
NeoPoint 1600 User’s Guide 45
Page 70

3
46 NeoPoint 1600 User’s Guide
Page 71

1
4
Chapter 4: Using Your
NeoPoint Phone
Overview
The purpose of this chapter is to provide you with easy-to-follow steps for NeoPoint
features and commands.
Making a Call...
There are several different methods for placing a call. You can place a call from the
Main, Call History, Contacts, Text Messages, To Do, and Schedule screens.
From the Main Screen
1. Open the flip.
2. Dial the telephone number.
3. Press the S
END key.
4-Digit Dialing
The NeoPoint phone allo ws yo u to dia l the las t f ou r di gits of a phone number, given
the number has been programmed into Contacts. For more information about
programming a contact, refer to “Using Contacts” on page 58.
NeoPoint 1600 User’s Guide 47
Page 72

4
Answering a Call
When the phone rin gs, the phone will indicate that you have an in coming call by:
•Ringing
• Flashing the call indicator light
• Displaying an onscreen message “Incoming call from 234-456-7890 (the caller’ s
number or res tricted if bloc ke d )
You have the following options:
• Press the S
function
or
• Open the flip (when Active Flip is On)
or
• Press any key (except the E
is On) to answer the call
or
• Press Ignore (Soft Key 2) to send the call to voicemail
END key (while the flip is open) or Soft Key 1 while indicating Talk
ND/PWR and volume keys and when Any key Answer
NOTE:The Anykey Answer and Active Flip factory default settings
are On. To disable these features, refer to “Enabling/Disabling
Anykey Answer” on page 70 and “Enabling/Disabling Active Flip”
on page 70. By disabling these features, the first two methods of
answering a call will not work.
Ending a Call
After concluding your conversation, you can end your call by perf orming one of the
following three options:
• Press the E
or
• Press End (Soft Key 1) to terminate your call
or
• Close the flip of your phone
48 NeoPoint 1600 User’s Guide
ND/PWR key
NOTE:If you have set the Active Flip feature to Of f, closing the flip
will not terminate your call.
Page 73

Chapter 4: Using Your NeoPoint Phone
Redialing
1. From the Main screen, press the SEND key. This takes you to the Call History
screen, displays the Call History list, and selects the last call made from your
phone.
2. Press Send (Soft Key 1) to initiate the redial.
or
3. From the Main screen, you can press the Soft Key 1 twice.
4. Press the S
END key again to dial and connect the call.
Making a Three-Way Call
Three-way calling allows you to talk with two people at the same time.
1. Dial the first number and press the S
2. After the f irst call connects, dial the second number.
3. Press the S
4. Once the second call is connected, press the S
call is now in progress.
END key. (The first number you called is no w placed on hold).
NOTE:If you press the END/PWR key or close the flip with Active
Flip On to terminate a conference call, the connection between the
other two parties will terminate. However, if one of the two parties
terminates a call, it will not affect the connection between you and
the remaining party.
END key.
END key again. The conferen ce
Call Waiting
Call waiting is a feature offered by your carrier service provider. Call waiting occurs
when you receive an incoming call while you are on a call. From the NeoPoint phone,
you will hear a click through the ear piece indicating that you are receiving another
call. To answer this second call or call waiting, use the following procedure:
1. Press S
2. Press S
3. Press E
NeoPoint 1600 User’s Guide 49
END to answer the second call. The phon e connects to the second party,
placing the first party on hold.
END again to switch to the first call.
ND/PWR when finished with the call.
Page 74

4
Disabling Call Waiting
Call waiting can be disabled on a per-call basis from your carrier service provider.
This feature allows you to h a ve a c onve rsa tio n wi th ou t in te rrup tio n from o th er ca ll s.
T o dis a ble call waiting, use the fol l owing procedure:
1. Select More from the Menu screen.
2. Press Select (Soft Key 1).
3. Select Services.
4. Press Select (Soft Key 1).
5. Select Call Wait Off.
6. Press Select (Soft Key 1).
7. Enter the 10-digit number to be dialed.
8. Press OK (Soft Key 1).
Muting/Unmuting a Call
Once you have placed a call, you have the option to mute/unmute the call, by
performing the following:
1. Press Mute (Soft Key 1) to mute the call. The party you called will not be able
to hear you. However, you will be able to hear them.
2. Press Unmute (Soft Key 2) to resume your conver sation.
50 NeoPoint 1600 User’s Guide
Page 75

Chapter 4: Using Your NeoPoint Phone
Using Quick Mode
To access quick mode, use the following procedure:
1. Press and hold the Main/Menu key.
Quick Mode is designed to allow you quick access to several operations:
• Enable Keygaurd Select or Cancel
• Power Off Select or Cancel
• Lock the Phone Select or Cancel
• Mode Normal or PDA
• Incoming Voice, Data In, or Fax In
Enabling Keyguard
NOTE:When the flip is open, keyguard is temporarily disabled.
1. Press the Main/Menu key to access the Quick Mode screen.
2. Scroll to Enable Keyguard.
3. Press Select (Soft Key 1).
Answering a Call With Keyguard Active
There are several methods to answer a call when Keyguard is On. Use any of the
following methods:
• Press Send (Soft Key 1).
• Open the flip (if the Active Flip feature is active).
NOTE:When receiving a call, keyguard is temporarily disabled.
•
Disabling Keyguard
1. Press and hold the Main/Menu key to access the Quick Mode screen.
2. Scroll to Disable Keyguard.
3. Press Select (Soft Key 1).
NeoPoint 1600 User’s Guide 51
Page 76

4
Locking the Phone
NOTE:Ensure that you know the correct lock code prior to locking
the phone. Default lock code is last 4-digits of your phone number.
1. Press the Main/Menu key to access the Quick Mode screen.
2. Select Lock the Phone.
3. Press Select (Soft Key 1). A pop-up window appears and displays “Lock
phone?”
4. Press Yes (Soft Key 1).
Once the phone is locked, a lock indicator will appear on the Main screen. The
phone is restricted from making calls until the lock code /p as swor d is entered .
However, you can still receive phone calls while the phone is locked.
NOTE: You may still call a number on your Emergency List even if
the phone is locked. To create an Emergency List, refer to “Creating
and Editing a n Emergency Lis t” on page 67.
The phone may also be locked by pressing and hol ding the E
seconds.
ND/PWR key for 5
Unlocking the Phone
1. Press Unlock (Soft Key 1) from the Main screen.
2. Enter the code to unlock the handset.
3. Press OK (Soft Key 1) .
Changing the Phone Mode
1. From the Qu ick Mode screen, use the Navigator key to scro ll to Mode.
2. Use the Navigator key to scroll to Normal, Silent or PDA mode.
Normal Sends and receives calls - normal phone operation
Silent Turns off ringer, clicks, key beeps, tones and other sound
generation. Can still receive and place calls.
PDA Allows you to use the PDA/PIM functions of your NeoPoint phone
without transmitting/receiving carrier signals. This allows you to
use your NeoPoint in areas normally prohibited for cellular use obey all applicable cellular laws.
3. Press Select (Soft Key 1).
52 NeoPoint 1600 User’s Guide
Page 77

Chapter 4: Using Your NeoPoint Phone
Changing the Incoming Mode
This mode is used to receive different types of calls: voice, data, and fax. For sending
data and fax transmission, you do not need to change the mode, i.e., use voice mode.
The Incoming Mode has the following three options:
Voice Receives calls - normal phone operation
Data In Sets the phone to function as a wireless modem, receive data
transmission, an d pass to your computer.
Fax In Sets phone to function as a wireless modem, receive fax
transmission, and pass to the attached computer.
For specific instructions on how to setup your NeoPoint phone to act as a wireless
modem, send, and receive data and fax calls, refer to “Appendix A: Using Your
NeoPoint Phone a s a Modem” on page 93.
The following sections detail how to configure your NeoPoint phone to receive data
and fax transmissions.
Changing the Incoming Mode to Receive Data
This feature allows your NeoPoint to functi on like a modem and pass i nformation to
your PC. To use this feature, you must connect your NeoPoint phone to your PC via
your SoftSync cable.
1. Connect your SoftSync cabl e to a 9-pin serial port on your PC.
2. Insert the other end of the SoftSync cable into your NeoP oint phone.
3. Ensure that your NeoPoint is powered On.
4. Press and hold the E
5. From the Qu ick Mode screen, use the Navigator key to scro ll to Incoming.
6. Use the Navigator key to select Data In.
Your phone is now set to receive incoming data calls.
Changing the Incoming Mode to Receive a Fax
This feature allo ws your N eoPoi nt to fu nction li ke a fax m odem an d pass wi reless fax
information to your PC. To use this feature, you must connect your NeoPoint phone
to your PC via your SoftSync cable.
1. Connect your SoftSync cabl e to a 9-pin serial port on your PC.
2. Insert the other end of the SoftSync cable into your NeoP oint phone.
3. Ensure that your NeoPoint is powered on.
ND/PWR key to display the Quick Mode screen.
NeoPoint 1600 User’s Guide 53
Page 78

4
4. Press and hold the END/PWR key to display the Quick Mode screen.
5. From the Qu ick Mode screen, use the Navigator key to scro ll to Incoming.
6. Use the Navigator key to select Fax In .
Your phone is now set to receive incoming fax calls.
Changing the Incoming Mode to Normal Voice Calls
1. From the Qu ick Mode screen, use the Navigator key to scro ll to Incoming.
2. Use the Navigator key to select Voice.
3. Press Select (Soft Key 1).
Your phone is now set to receive voice calls.
Using Inbox
Retrieving Voicemail Messages
1. Scroll to the Inbox from the Menu screen.
2. Press Select (Soft Key 1).
3. Select New Voicemail ( “ No Voicemail” is displayed if you do not have any
voicemail).
4. Press Listen (Soft Key 1).
NOTE:Accessing voicemail is carrier-dependent. Refer to your
carrier service provider for more information.
Deleting Voicemail Listings
Voicemail function is controlled by the carrier. Each voicemail message is stored at
the carrier server and individually accessed through a phone call to the mailbox at the
server.
1. Select Inbox from the Menu screen.
2. The cursor will default to Voicemail. Press Select (Soft Key 1).
3. Press View (Soft Key 2). This displays the Voicemail List.
4. Press Delete (Soft Key 2) and a pop-up window displa ys “Delete all
voicemails?”
5. Press Yes to delete all voicemail listings.
54 NeoPoint 1600 User’s Guide
Page 79

Chapter 4: Using Your NeoPoint Phone
NOTE:Deleting a voicemail message from your Inbox does not delete
it from your carrier service ma il box, and vice versa.
Viewing Text Messages
1. Scroll to the Inbox from the Menu screen.
2. Press Select (Soft Key 1).
3. Select Text from the Inbox screen.
4. Press View (Soft Key 1).
5. Choose the desired message.
6. Press Detail (Sof t Key 1).
The Text Messages screen displays the message.
Locking Text Messages
1. Scroll to the Inbox from the Menu screen.
2. Press Select (Soft Key 1).
3. Select Text from the Inbox screen.
4. Press View (Soft Key 1).
5. Scroll to the desired message to be opened.
6. Press Detail (Soft Key 1).
7. Press Options (Soft Key 1).
8. Select Lock (Soft Key 1)
The text message is now locked and cannot be overwritten or deleted. The Lock-In
Option screen no w ch a ng e s to U nlo c k, re ad y for yo ur dis p os a l.
Making a Call From a Text Message
If a text message contains a phone number, you can make a call from the Text
Messages screen.
1. Scroll to the Inbox from the Menu screen.
2. Press Select (Soft Key 1).
3. Select Text from the Inbox screen.
4. Press View (Soft Key 1).
NeoPoint 1600 User’s Guide 55
Page 80

4
5. Scroll to th e desired message using the Navigator key.
6. If the Phone icon
to place the call.
appears in the upper-right corner or the screen, press SEND
Saving a Number From a Text Message
If a text message contains a phone number, you can save the number to your Contacts
list by performing the f ollowing procedure:
1. Select Inbox from the Menu screen.
2. Press Select (Soft Key 1).
3. Select Text from the Inbox screen.
4. Press View (Soft Key 1).
5. Scroll to th e desired message using the Navigator key.
6. Press Detail (Soft Key 1). The message is displayed.
7. Press Options (Sof t Key 2).
8. Select Find numbers.
9. Press OK (Soft Key 1).
10. Use the Navi gator key to select th e desired number.
11. Press Save (S oft Key 2).
12. Select the phone number type: home, work, mobile, other).
13. Press OK and the phone will automatically go to the Contact feature. From
there, you can enter the contact information.
Deleting Text Messages
1. Select Inbox from the Menu screen.
2. Press Select (Soft Key 1).
3. Select Text from the Inbox screen .
4. Press Select (Soft Key 1).
5. Press View (Soft Key 1).
6. Scroll down to the message you want to delete.
7. Press Options (Soft Key 2).
8. Select Delete.
56 NeoPoint 1600 User’s Guide
Page 81

Chapter 4: Using Your NeoPoint Phone
9. Press OK (Soft Key 1). A pop-up window appears and displays “Delete this text
message?”
10. Press Yes (Soft Key 1) to confirm.
Using Call History
Making a Call From Call History
1. Select Call History from the Menu screen (or by pressing a soft key from the
Main screen if the soft key is set up as “Calls”).
2. Press Select (Soft Key 1).
3. Scroll to the desired number using the Navigator key.
4. Press the S
or
Press Send (Soft Key 1).
or
Press Options (Soft Key 2), select Detail, and press OK (Soft Key 1) and press
Send (Soft Key 1).
Refer to “Saving a Number From Call History to Contacts” on page 57 for more
information on how to save a number from Call History.
END key.
Saving a Number From Call History to Contacts
1. From the Call History screen, select the number you want to save.
2. Press Options (Soft Key 2).
3. Select Save numbe r.
4. Press OK (Soft Key 1).
5. The Save number pop-up window will appear. From this window, select the
location where you want the number to be saved (Home, Work, Mobile, or
Other).
6. Press OK (Soft Key 1). The New Contact screen will appear. For more
information, refer to “Creating a New Contact Entry” on page 58.
NeoPoint 1600 User’s Guide 57
Page 82

4
Deleting a Number
1. Select Call History from the Menu screen.
2. Press Select (Soft Key 1).
3. Scroll to the desired number using the Navigator key.
4. Press Options (Sof t Key 2).
5. Select Delete. A pop-up window displays “Delete the call details?” requesting
you confirm your decision.
6. Press OK (Soft Key 1) .
7. Press Yes (Soft Key 1).
Using Contacts
Creating a New Contact Entry
1. Select Contacts from the Menu screen.
2. Press Select (Soft Key 1).
3. Select Add New Contact.
4. Press New (Soft Key 1).
5. Enter the contact i nformation, i.e., names, numbers, etc.
6. Press Done (Sof t Key 1) when finished.
Making a Call From Contacts
1. Select Contacts from the Menu screen.
2. Press Select (Soft Key 1).
3. Use the Navigator key to select the desired contact.
If there is a usable phone number in the en try, the phone icon will be
displayed in th e upper right corner of the screen.
4. Press the S
58 NeoPoint 1600 User’s Guide
END key or press Send (Soft Key 1).
Page 83

Chapter 4: Using Your NeoPoint Phone
Editing an Entry in Contacts
1. Select Contacts from the Menu screen.
2. Press Select (Soft Key 1).
3. Use the Navigator key to select the entry to be edited.
4. Press Detail (Sof t Key 1).
5. Select Edit (Soft Key 1).
6. Use the Navigator key to go to the fields you want to change.
7. Use the C
field.
8. After you have finished entering the information, press Done (Soft Key1).
LR key to erase a character or press and hold CLR to delete the entire
Deleting an Entry in Contacts
1. Select Contacts from the Menu screen.
2. Press Select (Soft Key 1).
3. Use the Navigator key to select the entry you want to delete.
4. Press Detail (Soft Key 1).
5. Press Delete (Soft Key 2). A pop-up window appears and displays “Delete
record?”
6. Press Yes (Soft Key 1) to confirm.
Looking Up a Name
1. Select Contacts from the Menu screen.
2. Press Select (Soft Key 1).
3. Enter the person's last name usin g the key pad and the phone will attempt to
locate the contact name.
For example, if yo u wan t to lo okup Smit h, type 7648 4. If th er e is mo re than one
entry with the last name Smith, use the Navigator key to scroll to the next
contact.
NeoPoint 1600 User’s Guide 59
Page 84

4
Using Schedule
Creating a Schedule Entry
1. Select Schedule from the Menu screen.
2. Press Select (Soft Key 1).
3. Use the Navigator key to select a date or press Month (Soft Key 2) and select a
date from the monthl y calendar.
4. Press New (Soft Key 1).
5. Select Press New to Add New Event.
6. Use the Navigator key to set the Time, Length, Repeat, and Alarm options.
7. Use the Key pad to enter the Subject and Note information.
8. Press Done (Soft Key 1) when finished.
Making a Call in Schedule
1. Select Schedule from the Menu screen.
2. Press Select (Soft Key 1).
3. Use the Navigato r k ey to s elect th e dat e of th e e ntry or pre ss M onth (S oft K ey 2)
and select a date from the monthly calendar. If there are multiple entries for that
day, select the desired scheduled event.
If there is a usable phone number in the en try, the phone icon will be
displayed in th e upper right corner of the screen.
4. Press Send (Soft Key 1).
Editing an Event in Schedule
1. Select Schedule from the Menu screen.
2. Press Select (Soft Key 1).
3. Use the Navigato r k ey to s elect th e dat e of th e e ntry or pre ss M onth (S oft K ey 2)
and select a date from the monthly calendar.
4. Press Detail (Sof t Key 1).
5. Use the Navigator key to select the entry you want to edit.
6. Press Edit (Soft Key 1) and make the appropriate changes.
60 NeoPoint 1600 User’s Guide
Page 85

Chapter 4: Using Your NeoPoint Phone
7. Press Done (Soft Key 1).
Deleting an Event in Schedule
1. Select Schedule from the Menu screen.
2. Press Select (Soft Key 1).
3. Use the Navigato r key to se lect the da te of th e entry or press Mo nth (So ft Key 2)
and select a date from the monthly calendar.
4. Press Detail (Sof t Key 1).
5. Use the Navigator key to select the entry you want to delete.
6. Press Edit (Soft Key 1).
7. Press Delete (Soft Key 2). A pop-up window appears and displays “Delete
record?”
8. Press Yes (Soft Key 1) to confirm.
Using To Do
Creating a To Do Entry
1. Select To Do from the Menu screen.
2. Press Select (Soft Key 1).
3. Use the Navigator key to select Add New Item.
4. Press New (Soft Key 1).
5. Use the Navigator key to set the Priority and Status.
6. Use the Key Pad to enter the Subject and Note.
7. Press Done (Sof t Key 1).
Making a Call From To Do
1. Select To Do from the Menu screen.
2. Press Select (Soft Key 1).
3. Use the Navigator key to select a To Do item with a phone number.
If there is a usable phone number in the entry, the phone icon will be
displayed in the upper right corner of the screen.
NeoPoint 1600 User’s Guide 61
Page 86

4
4. Press the SEND key.
Editing a To Do Entry
1. Select To Do from the Menu screen.
2. Press Select (Soft Key 1).
3. Use the Navigator key to select the entry to be changed. Change the Status to
Done if the task has been completed by pressing the Navigator key).
4. Press Edit (Soft Key 1) and make the appropriate changes.
5. Press Done (Sof t Key 1).
Deleting a To Do Entry
1. Select To D o from the Menu screen.
2. Press Select (Soft Key 1).
3. Use the Navigator key to select the entry to be deleted.
4. Press Edit (Soft Key 1).
5. Press Delete (Soft Key 2). A pop-up window appears and displays “Delete
record?”
6. Press Yes (Soft Key 1) to confirm.
Using MiniBrowser
For specific information on MiniBrowser, refer to “Appendix B: Using the
MiniBrowser” on page 103.
For more information and documentation on MiniBrowser services, refer to your
carrier service provider.
Using Sync
For detailed information on how to insta ll the So ftSync soft ware prog ram and h ow to
sync your data, refer to “Chapter 3: Syncing Your NeoPoint Phone” on page 41.
62 NeoPoint 1600 User’s Guide
Page 87

Chapter 4: Using Your NeoPoint Phone
Using Preferences
Changing the Ringer Type
1. Scroll to Preferences from the Menu screen.
2. Press Select (Soft Key 1).
3. Scroll to Ringer Type.
4. Press Select (Soft Key 1).
5. Once you highlight a function (Ca lls, MiniBrowser, Message, Voicemail,
Scheduler, or Roam Call), use the Navigator key to cha nge to a different ring
tone.
6. Once you select the type you like, press Do ne (Soft Key 1).
Changing the V ol ume Levels/Setting Phone to Vibrate Mode
1. Scroll to Preferences from the Menu screen.
2. Press Select (Soft Key 1).
3. Scroll to Volume.
4. Press Select (Soft Key 1).
5. Once you highlight a function (Ringer, Vibrate, Ear Pi ece, or Key pad), use the
Navigator key to change the volume level and/or make your selection.
NOTE:Y ou can toggle between Vibrate On and Vibrate Off modes by
pressing and holding the Back key from the Main screen. A small
icon will appear at the top of the screen when in Vibrate On mode.
6. Press Done (Sof t Key 1).
Key Beep
1. Scroll to Preferences from the Menu screen.
2. Press Select (Soft Key 1).
3. Scroll to Key Beep.
4. Press Select (Soft Key 1).
5. Choose the settings for the following: Key Tone, and DTMF Length.
6. Press Done (So ft Key 1).
NeoPoint 1600 User’s Guide 63
Page 88

4
Setting the Alerts
1. Scroll to Preferences from the Menu screen.
2. Press Select (Soft Key 1).
3. Scroll to Alerts.
4. Press Select (Soft Key 1).
5. Using the Navigator key, choose On or Off for the following: Roam Beep,
Service Change, or MiniBrowser.
6. Press Done (So f t Key 1).
Deleting Your Phone Number from the Main Screen
1. Scroll to Preferences from the Menu screen.
2. Press Select (Soft Key 1).
3. Scroll to Main Screen.
4. Press Select (Soft Key 1).
5. Scroll to Phone Number and change to Off using the Navigator key.
6. Press Done (Soft Key 1).
Changing the Time Format
1. Scroll to Preferences from the Menu screen.
2. Press Select (Soft Key 1).
3. Scroll to Main Screen.
4. Press Select (Soft Key 1).
5. Scroll to Time Fmt and change to either 24 Hr or 12 Hr using the Navigator
key.
6. Press Done (Sof t Key 1).
Controlling the Next Event Display from the Main Screen
1. Scroll to Preferences from the Menu screen.
2. Press Select (Soft Key 1).
3. Scroll to Main Screen.
64 NeoPoint 1600 User’s Guide
Page 89

Chapter 4: Using Your NeoPoint Phone
4. Press Select (Soft Key 1).
5. Scroll to Next Event and change to either Off or On using the Navigator key.
6. Press Done (Soft Key 1).
Changing Backlight Settings
1. Scroll to Preferences from the Menu screen.
2. Press Select (Soft Key 1).
3. Scroll to Display.
4. Press Select (Soft Key 1).
5. Scroll to Backlight.
6. Set the length of time (5, 10, 15, 30 secs., On, or Off) using the Navigator key.
7. Press Done (Soft Key 1).
NOTE:Night Light settings override Backlight settings during the
hours of 5 PM to 5 AM. and the flip must be open.
Changing the Display Contrast
1. Scroll to Preferences from the Menu screen.
2. Press Select (Soft Key 1).
3. Scroll to Display.
4. Press Select (Soft Key 1).
5. Scroll to Contrast.
6. Using the Navigator key, select the contrast setting using the scale of 0 (lightest)
to 10 (darkest).
7. Press Done (Soft Key 1).
NeoPoint 1600 User’s Guide 65
Page 90

4
Changing Night Light Settings
NOTE:Night Light settings override Backlight setti ngs during the
hours of 5 PM to 5 AM. In addition, the flip must be open to activate.
1. Scroll to Preferences from the Menu screen.
2. Press Select (Soft Key 1).
3. Scroll to Display.
4. Press Select (Soft Key 1).
5. Scroll to Night Light.
6. Select the length of time (15, 30 sec., 1 min., or Off) using the Navigato r key.
7. Press Done (Sof t Key 1).
Changing the Menu Screen to Display List or Icons
1. Scroll to Preferences from the Menu screen.
2. Press Select (Soft Key 1).
3. Scroll to Display.
4. Press Select (Soft Key 1).
5. Scroll to Menu Screen.
6. Use the Navigator key to select either List or Icons.
7. Press Done (Soft Key 1).
Setting Security Options
1. Scroll to Preferences from the Menu screen.
2. Press Select (Soft Key 1).
3. Scroll to Security.
4. Press Select (Soft Key 1).
5. You have 10 seconds to enter the Lock Cod e.
6. Press OK (Soft Key 1) .
7. Choose the s e ttings or programming for the following: Lock Code, Power-up
Lock, Emergency List, Defaults, and Database Reset.
8. Press Done (Soft Key 1).
66 NeoPoint 1600 User’s Guide
Page 91

Chapter 4: Using Your NeoPoint Phone
Enabling/Disabling yo ur Lock Code
1. From the Security screen and Lock Code option selected, press the Left/Right
Navigator key to enable/disable the lock code.
2. When finished, press Done (Soft Key 1).
Changing Your Lock Code
1. From the Security screen and Lock Code option selected, press Edit
(Soft Key 2).
A pop-up window will appear requesting you to enter the new lock code.
2. Enter the new lock code. It will prompt you to re-enter the new lock code.
3. When finished, press Done (Soft Key 1).
Analog Mode
The analog mode option allows you to force your NeoPoint phone to operate in
analog mode, rather than the digital preferred mode. To force your phone into analog
mode, perform the following.
1. Scroll to Preferences from the Menu screen.
2. Press Select (Soft Key 1).
3. Scroll to Security.
4. Press Select (Soft Key 1).
5. Enter your Lock Code.
6. Press Ok (Soft Key 1).
7. Scroll to Analog Mode.
8. Press Force (Soft Key 2).
9. The following prompt will appear, “Analog for 10 min. or until end of next
call.” Press Yes (Soft Key 1).
Creating and Editing an Emergency List
1. From the Security screen, scroll to Emergency List.
2. Press Edit (Soft Key 2).
3. Enter the emergency phone numbers.
4. Press Done (Soft Key 1).
NeoPoint 1600 User’s Guide 67
Page 92

4
NOTE:It is recommended that you include the number to your
carrier service provider in your emergency list. This allows you to
make calls to your provider even if your phone is locked, you cannot
remember your password, are experiencing difficulties, etc.
Resetting the Phone to Factory Default Settings
NOTE:This feature will reset your phone to default settings. It is not
recommen ded t o use th is op tion u nless yo u ar e su re you w ant to re set
your phone settings. Refer to “Def ault Settings” on pag e 68 to view
the settings.
1. Scroll to Preferences from the Menu screen.
2. Press Select (Soft Key 1).
3. Scroll to Security.
4. Press Select (Soft Key 1).
5. Enter the Lock Code.
6. Press OK (Soft Key 1) .
7. Scroll to Defaults.
8. Press Reset (Soft Key 2). A pop-u p wi nd o w a pp ear s a nd displays “Set all of the
user settings to the factory defaults?”
9. Press Yes (Soft Key 1) to confirm.
10. Press Done ( Soft Key 1).
Default Settings
Ringer Type:
Calls Basic
MiniBrowser Beep
Message Parrot
Voice Mail Slots
Scheduler Elise
Roam Call Jackpot
Volume:
Ringer 6 (Loudest)
Ear Piece 5
Key Pad High
Vibrate Off
Key Beep:
68 NeoPoint 1600 User’s Guide
Page 93

Key Tone Tones
DTMF Length Long
Alerts:
Roam Beep Off
Service Change Off
MiniBrowser On
Call Drop On
Power Tones On
Main Screen:
Phone Number Display On
Time Format 12 Hr
Next Event Off
Soft Key 1 Calls
Soft Key 2 Inbox
Navigator Up Schedule
Navigator Down Contacts/Address
Navigator Right To Do
Navigator Left MiniBrowser
Display Settings:
Backlight 5 seconds
Contrast 5 out of 10
Night Light Off
Menu Screen List
Security:
Lock Code Enabled
Power-Up Lock No
Emergency List
Defaults
Database
General:
Active Flip On
Anykey Answer On
Sync Manual Mode
Screen Save Off
AutoAnswer Off
Wakeup Alarm On
Net Guard Both
Prepend On
Chapter 4: Using Your NeoPoint Phone
NeoPoint 1600 User’s Guide 69
Page 94

4
Banner:
NeoPoint 1600
Resetting the Database
This feature will erase your Contacts, Schedule, To Do and Hot Key
settings. It is not recommended to use this option unless you are
absolutely sure you want to reset these settings.
1. Scroll to Preferences from the Menu screen.
2. Press Select (Soft Key 1).
3. Scroll to Security.
4. Press Select (Soft Key 1).
5. Enter the Lock Code.
6. Scroll to Database.
7. Press Reset (Soft Key 2). A pop-up window appears and displays, “Erase all
contacts, schedule, and to do settings?”
8. Press Yes (Soft Key 1) to confirm.
9. Press Done (Soft Key 1).
Enabling/Disabling Active Flip
1. Scroll to Preferences from the Menu screen.
2. Press Select (Soft Key 1).
3. Scroll to General.
4. Press Select (Soft Key 1).
5. Set Active Flip to On or Off by using the Na vigator key.
6. Press Done (Soft Key 1).
Enabling/Disabling Anykey Answer
1. Scroll to Preferences from the Menu screen.
2. Press Select (Soft Key 1).
3. Scroll to General.
4. Press Select (Soft Key 1).
5. Set Anykey Answer and set it to On or Off by using the Navigator key.
6. Press Done (Soft Key 1).
70 NeoPoint 1600 User’s Guide
Page 95

Chapter 4: Using Your NeoPoint Phone
Auto Redialing
Auto-redial will automatically redial a failed call that you have placed.
1. From Preferences, select General.
2. Scroll to Auto Redial.
3. Use the Navigator key to select Off or On.
Setting Sync to Manual or Automatic
1. Scroll to Preferences from the Menu screen.
2. Press Select (Soft Key 1).
3. Scroll to General.
4. Press Select (Soft Key 1).
5. Scroll to Sync and change the setting to Auto or Manual using the Navigator
key.
6. Press Done (Soft Key 1).
Enabling/Disabling Screen Save
1. Scroll to Preferences from the Menu screen.
2. Press Select (Soft Key 1).
3. Scroll to General.
4. Press Select (Soft Key 1).
5. Scroll to Screen Save.
6. Set to On or Off.
7. Press Done (Soft Key 1).
Activating/Deactivating Auto Answer
Auto Answer allows you to set the phone to automatically answer calls. To activate
Auto Answer, perform the following procedure
1. Scroll to Preferences from the Menu screen.
2. Press Select (Soft Key 1).
3. Scroll to General.
NeoPoint 1600 User’s Guide 71
Page 96

4
4. Press Select (Soft Key 1).
5. Scroll to AutoAnswr using the Navigator key.
6. Choose On or Off using the Navigator key.
7. Press Done (Sof t Key 1).
The phone will be answered three seconds after the ringer type sounds. If you have
selected Susanna as your ringer type, you will hear the first verse of this tune, then
the call will be answered in approximat ely three seconds.
This feature will display the following message on the Main screen:
“*Auto Answer*” when activated.
When Auto Answer is activated, the vibrator will not work. For
example, if you have both Auto Answer and Vibrate On selected,
vibrate mode will not be activated.
Wakeup Alarm
1. Scroll to Preferences from the Menu screen.
2. Press Select (Soft Key 1).
3. Scroll to General.
4. Press Select (Soft Key 1).
5. Using the Navigator key, scroll to Wakeup Alarm.
6. Choose On or Off using the Nav igator key.
7. Press Done (Sof t Key 1).
Net Guard
1. Scroll to Preferences from the Menu screen.
2. Press Select (Soft Key 1).
3. Scroll to General.
4. Press Select (Soft Key 1).
5. Scroll to Net Guard using the Navigator key.
6. Choose Both, None, Enter or Exit using the Navigator key.
7. Press Done (Soft Key 1).
72 NeoPoint 1600 User’s Guide
Page 97

Chapter 4: Using Your NeoPoint Phone
Prepend
1. Scroll to Preferences from the Menu screen.
2. Press Select (Soft Key 1).
3. Scroll to General.
4. Press Select (Soft Key 1).
5. Scroll to Prepend using the Navigator key.
6. Choose On or Off usi ng the Navigator key.
7. Press Done (Sof t Key 1).
Changing the Banner
1. Scroll to Preferences from the Menu screen.
2. Press Select (Soft Key 1).
3. Scroll to Banner.
4. Press Select (Soft Key 1).
5. Using the CLR k ey, erase the old and enter the new message you would li ke to
display on the Main screen.
6. Press Done (Soft Key 1).
Using More...
Creating a HotKey
The HotKey command allows you to quickly access applications, funct ions, etc. by
pressing and holdi ng one of the numeric ke ys (0, 2-9).
1. Scroll to the application or function to be executed by the HotKey command.
2. Press and hold down the #S
3. Scroll to the Make HotKey.
4. Press OK (Soft Key 1).
5. Select an empty number button in th e Make HotKey screen.
6. Press Mark (Soft Key 1).
NeoPoint 1600 User’s Guide 73
PACE key.
Page 98

4
Viewing the List of HotKeys
1. Scroll to the More... screen from the Menu screen.
2. Press Select (Soft Key 1).
3. Scroll to HotKeys.
4. Press Select (Soft Key 1).
The list of HotKeys is displayed.
Using a HotKey
Press and hold down the appropriate HotKey (e.g., the 3 button) for approximately 2
seconds. The function will then be executed.
Deleting a HotKey
1. Scroll to More... from the Menu screen.
2. Press Select (Soft Key 1).
3. Scroll to HotKeys.
4. Press Select (Soft Key 1).
5. Scroll to the HotKey to be deleted.
6. Press Delete (Soft Key 1).
7. Press Yes (Soft Key 1) to confirm.
Using Block My CallerID
NOTE:This function is executed on a per call basis. Prepare to enter
the 10-digit phone number that you intend to call at the prompt.
1. Scroll to More from the Menu screen.
2. Press Select (Soft Key 1).
3. Scroll to Services.
4. Press Select (Soft Key 1).
5. Scroll to Block My CallerID.
6. Press Select (Soft Key 1). A pop-up window is displayed.
7. Enter the 10-digit phon e number to be dialed.
74 NeoPoint 1600 User’s Guide
Page 99

Chapter 4: Using Your NeoPoint Phone
8. Press OK (Soft Key 1). The call is then placed with your CallerID blocked.
9. Press End (Soft Key 1) to terminate the call.
Forwarding a Call
1. Scroll to More... from the Menu screen.
2. Press Select (Soft Key 1).
3. Scroll to Services.
4. Press Select (Soft Key 1).
5. Use the Navigator key to select Call Forward On.
6. Press Select (Soft Key 1)
7. Enter the 10-digit number where you want calls to be forwarded.
8. Press OK (Soft Key 1) when finished.
Disabling Call Forwarding
1. Scroll to More... from the Menu screen.
2. Press Select (Soft Key 1).
3. Scroll to Services.
4. Press Select (Soft Key 1).
5. Scroll to Call Forward Off.
6. Press Send (Soft Key 1) and the call will connect to your service carrier.
7. Once the call has connected, it will last for approximately 4 seconds and then
terminate the call. A pop-up window appears stating that Call Forward has been
turned off. Press OK to clear the message from the screen or wait momentarily
and it will automatically disappear.
Setting Call Timers
1. Scroll to More... from the Menu screen.
2. Press Select (Soft Key 1).
3. Scroll to Call Timers.
4. Press Select (Soft Key 1).
There are two option for setting Call T imers: S tart Day and Clear Current Timer.
NeoPoint 1600 User’s Guide 75
Page 100

4
• To set the Start Day, use the Navigator key to select the day of the month you
want the call timer to begin. Typically, this day of the month should coincide
with your carrier service billing date.
• To clear the Current Timer, press Reset (Soft Key 2).
5. When you have comple te d yo ur ch a ng e s to C a ll Timers, press
Done (Soft Key 1).
If you want to exit Call Timers without saving changes, press the B
pop-up window appears stating “Save Changes?” Press No (Soft Key 2).
ACK key. A
76 NeoPoint 1600 User’s Guide
 Loading...