

Page 1

Smart Pegboard
Quick Guide
Ver.1.0.0
www.neofect.com
Page 2
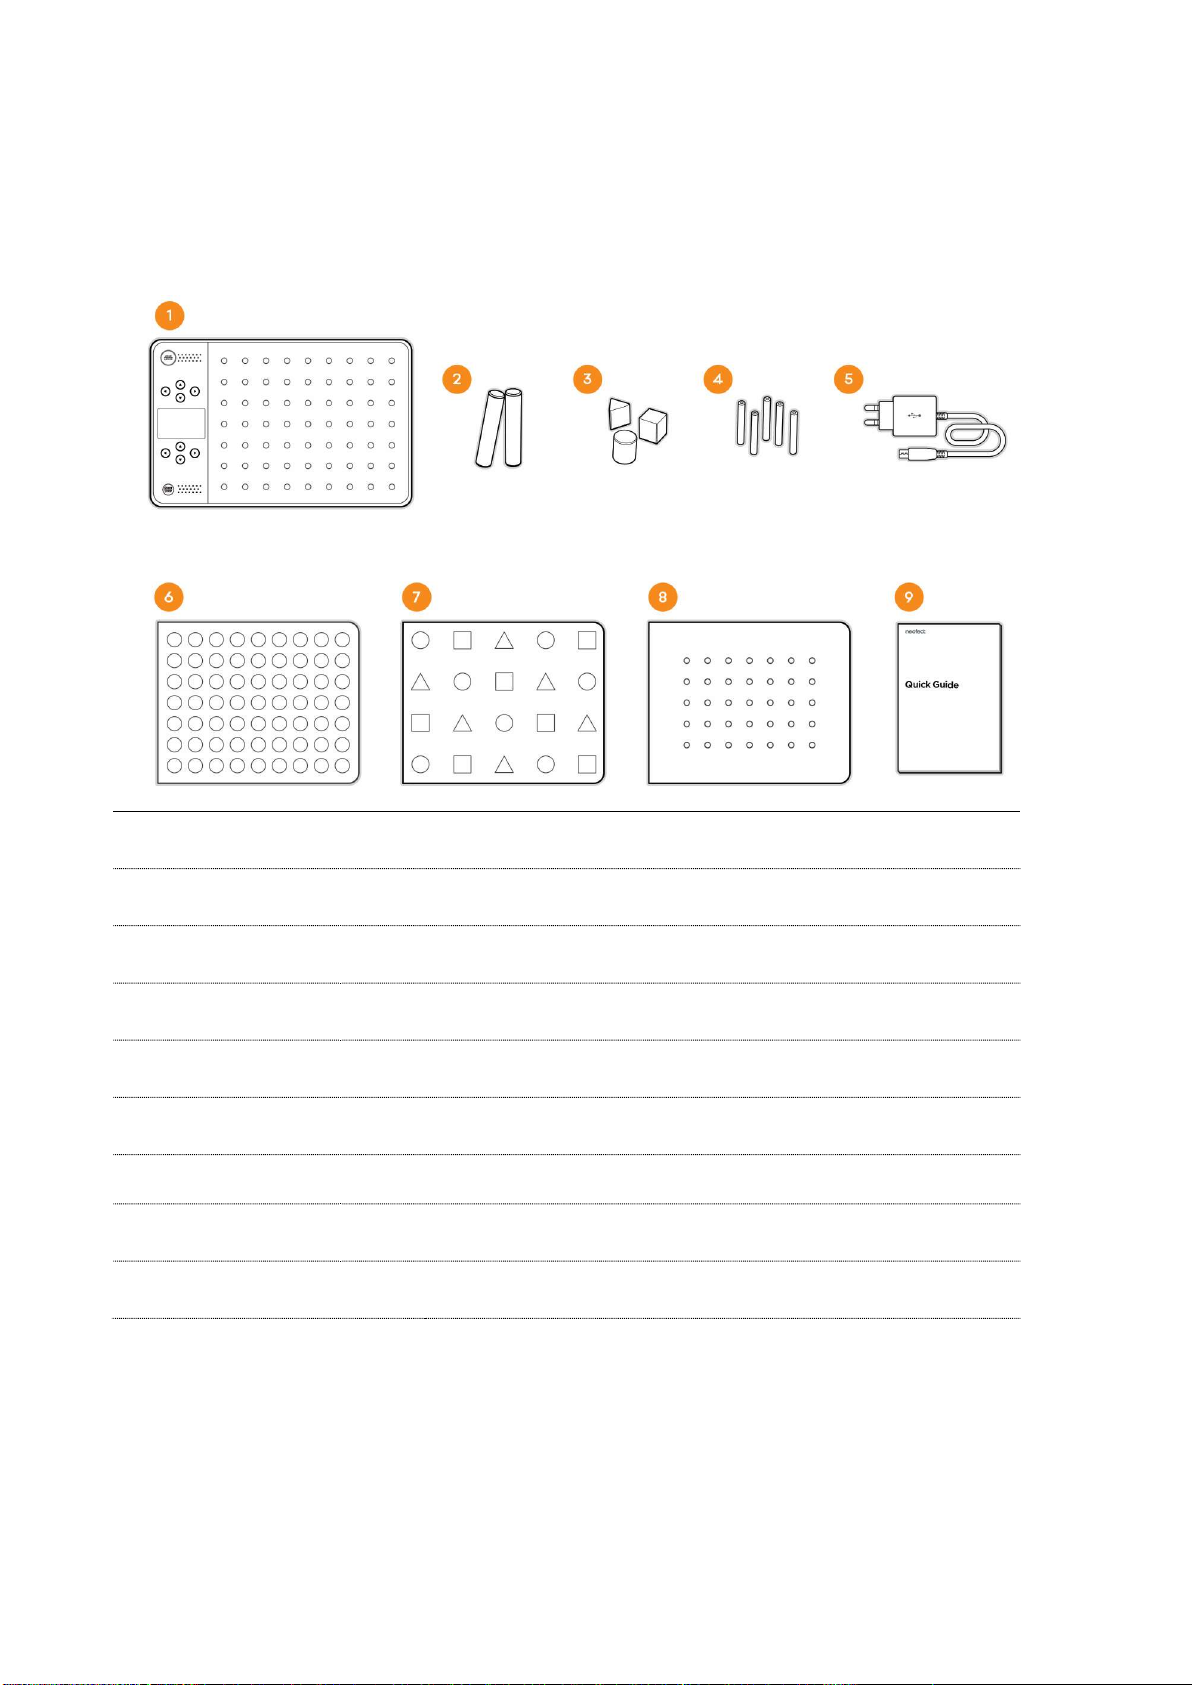
1. Components Overview
The following are the components and accessories of your Neofect Smart Pegboard.
①
Base Unit
②
Standard Pegs
③
Mixed Shape Pegs
④
Pinch Pegs
⑤
Charger
Standard Board
⑥
Mixed Shape Board
⑦
⑧
Pinch Board
⑨
Quick Guide
- The charger and the cable may appear different from images shown on this manual.
(IFU)
X 1 This is the base of the pegboard, LED, LCD and buttons included.
X 63 These pegs are used for the standard board,
X 20 These pegs are used for the mixed shape board.
X 35 These pegs are used for the pinch board.
X 1 This charger is needed for supplying power.
X 1 This board will be attached to the base unit.
X 1 This board will be attached to the base unit.
X 1 This board will be attached to the base unit.
X 1 This is the instruction manual with a summarized explanation of pegboard use.
Page 3
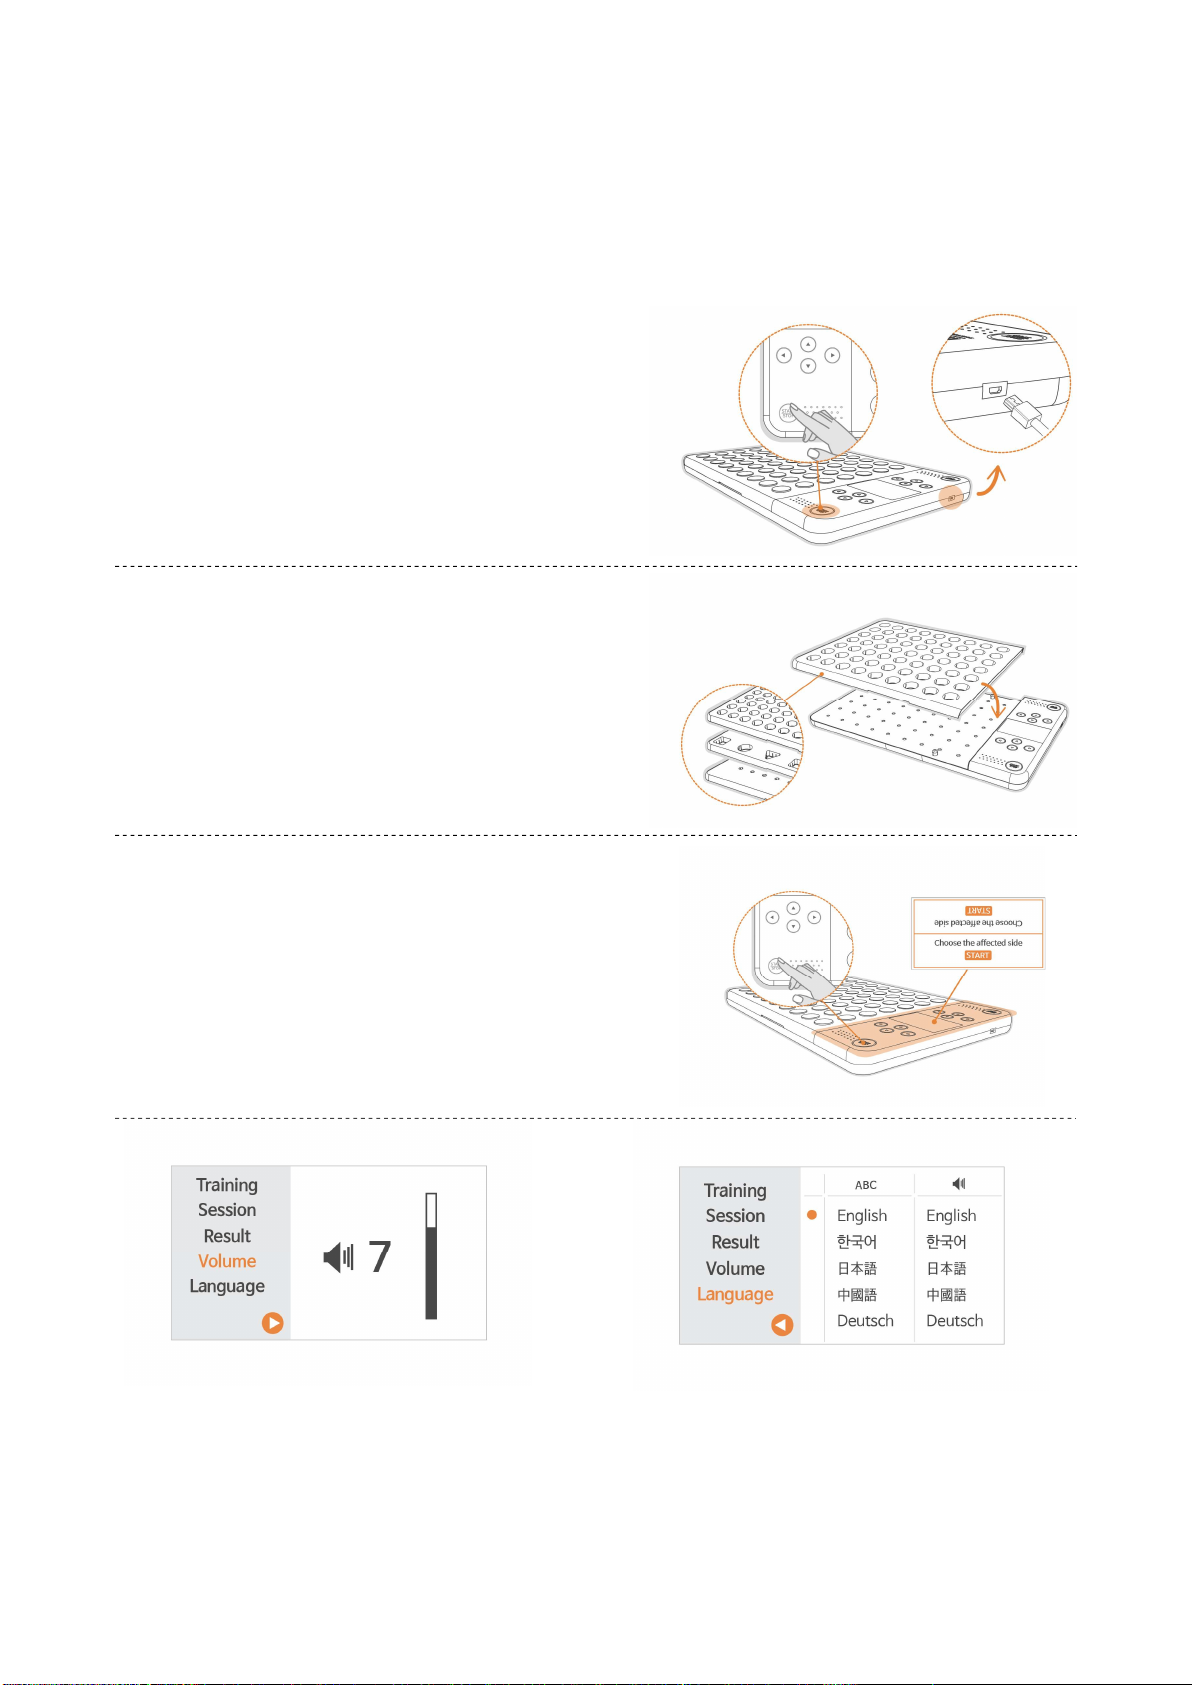
2. How to Use Smart Pegboard
How to Turn the Smart Pegboard ON / OFF
①
ON : Connect the power cable and push the [START] button .
-
-
OFF : Push the [STOP] button for 4 seconds.
-
Disply is off after 10 minutes of inactivity.
-
The power turns off after 1 hour of inactivity.
* For a 10000mAh potable battery-Usable for 6hours.
Placing the board
②
Put the board on the base unit.
- The base unit automatically recognizes the board and proceeds
with the training for each board.
③
Setting up the Affected Side
Set the affected side with the [START] button.
- From the direction where the [START] button is pressed, you
can use the display and the button.
④
Controlling the Volume
When using the pegboard, you can control the volume to suit
the user’s conditions.
Setting Language
⑤
You can set the screen and audio language separately in
<language> menu.
Page 4
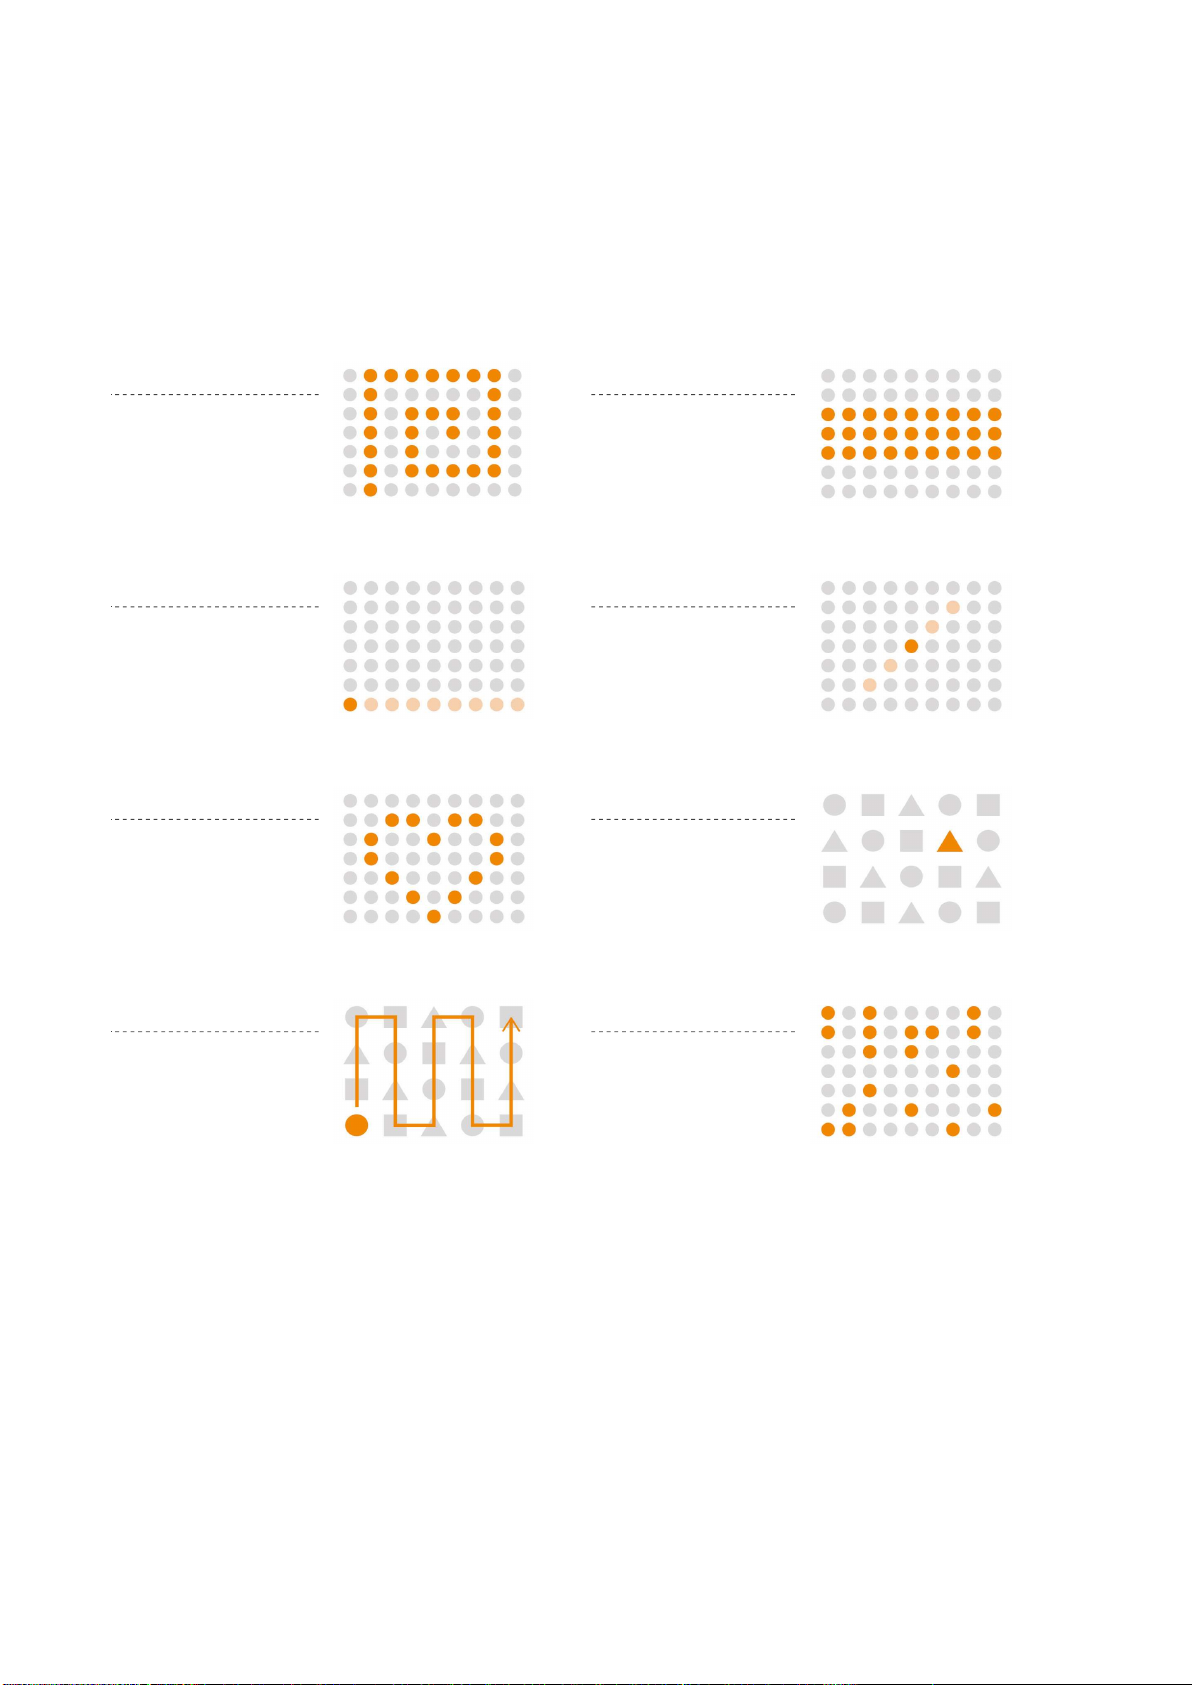
3. Type of Training
Shape Completion
Shape Recognition
Blackout
Randomizer
There are several training types you can perform with your Smart Pegboard.
- The default training type may differ, as each board has its own optimized training.
Freestyle
Place the pegs anywhere you want.
Row Completion
Place the pegs in the given
rows.
Visual Training 1
Place the pegs in the given rows.
Place the pegs to complete
the shape.
Completely fill the whole
board with pegs.
Visual Training 2
When prompted, place the
peg in the middle or at the
end.
Use the correct peg shape.
Place the pegs in the lit
location.
Page 5
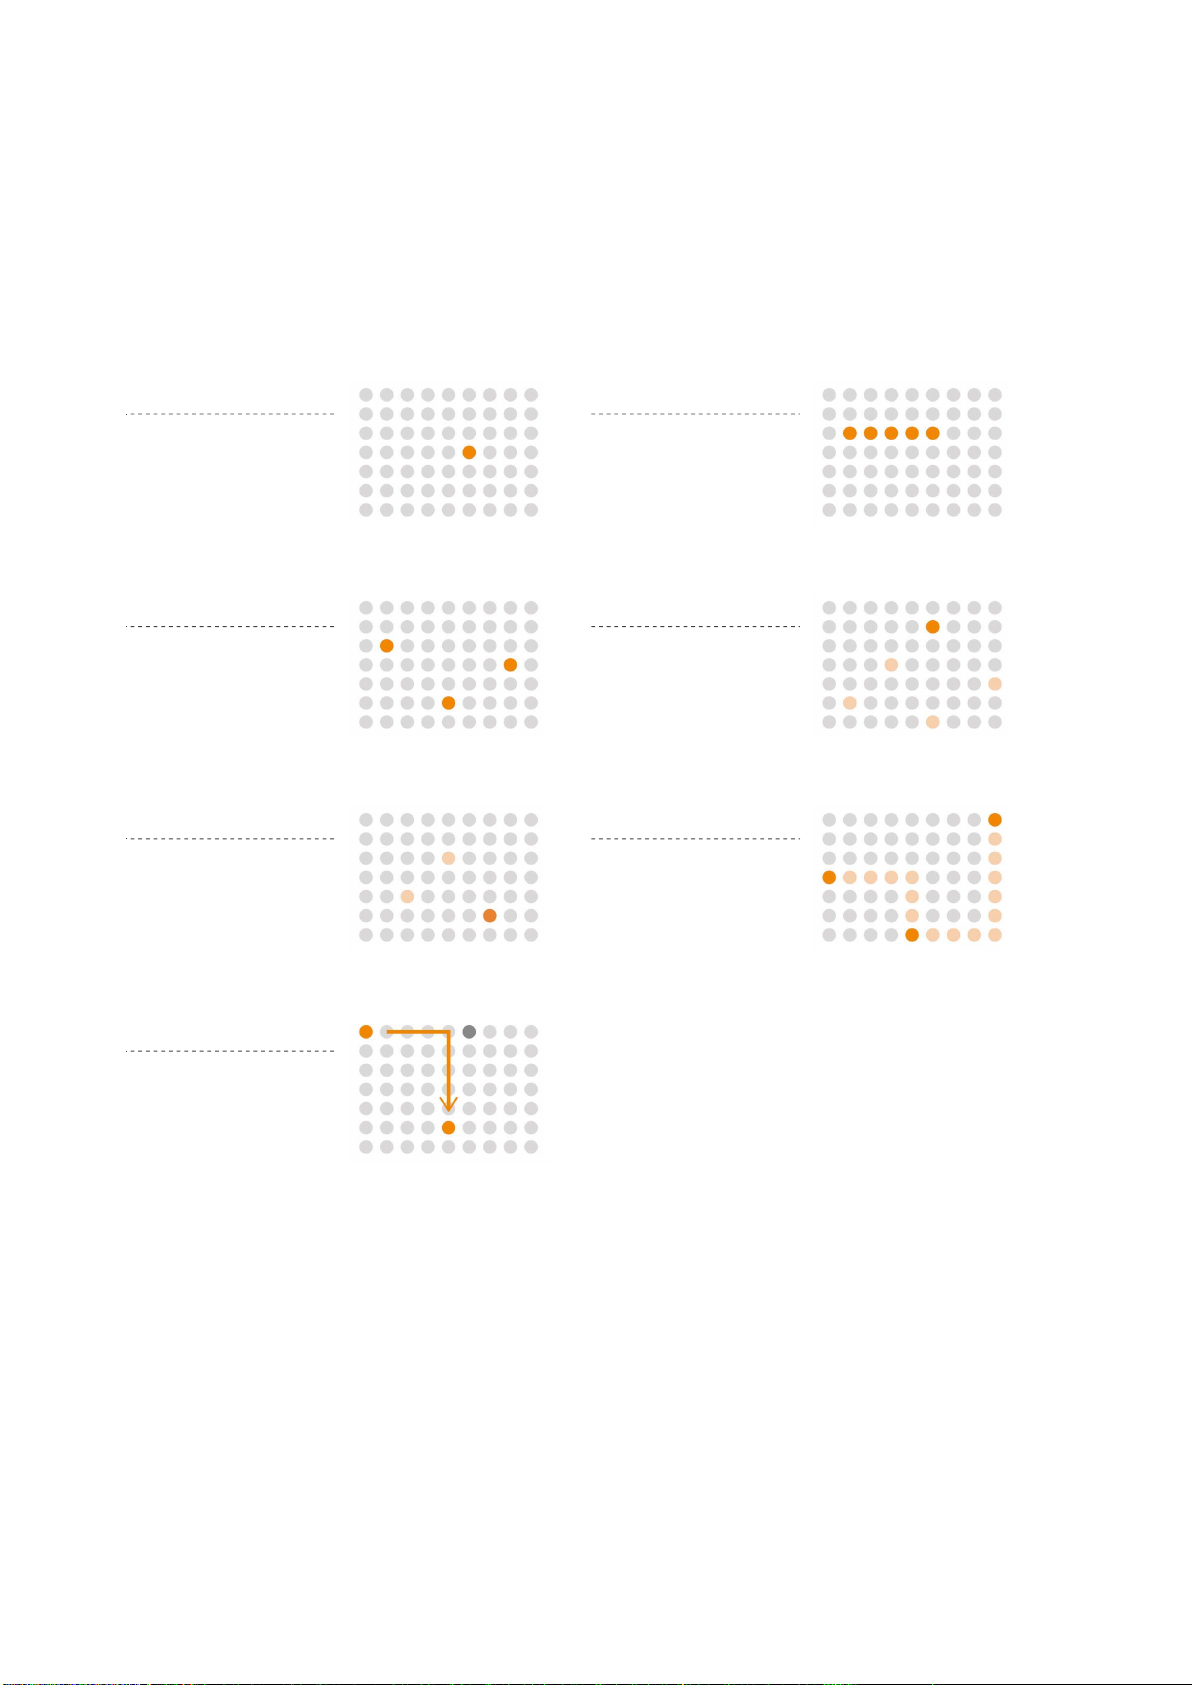
Simon Says 2
P
athfinder
F
ind Home
Smash a Mole
Whack the moles before
they go away.
Snake Trap
Trap the snake’s body with
a peg.
Memory Placement
Memorize the lit locations
and place the pegs.
Memorize the sequence
and place the pegs in
reverse order.
Place pegs to help guide
blinking light through to its
destination.
Simon Says 1
Memorize the sequence
and place the pegs.
Connect all three lights to
make a path.
Page 6
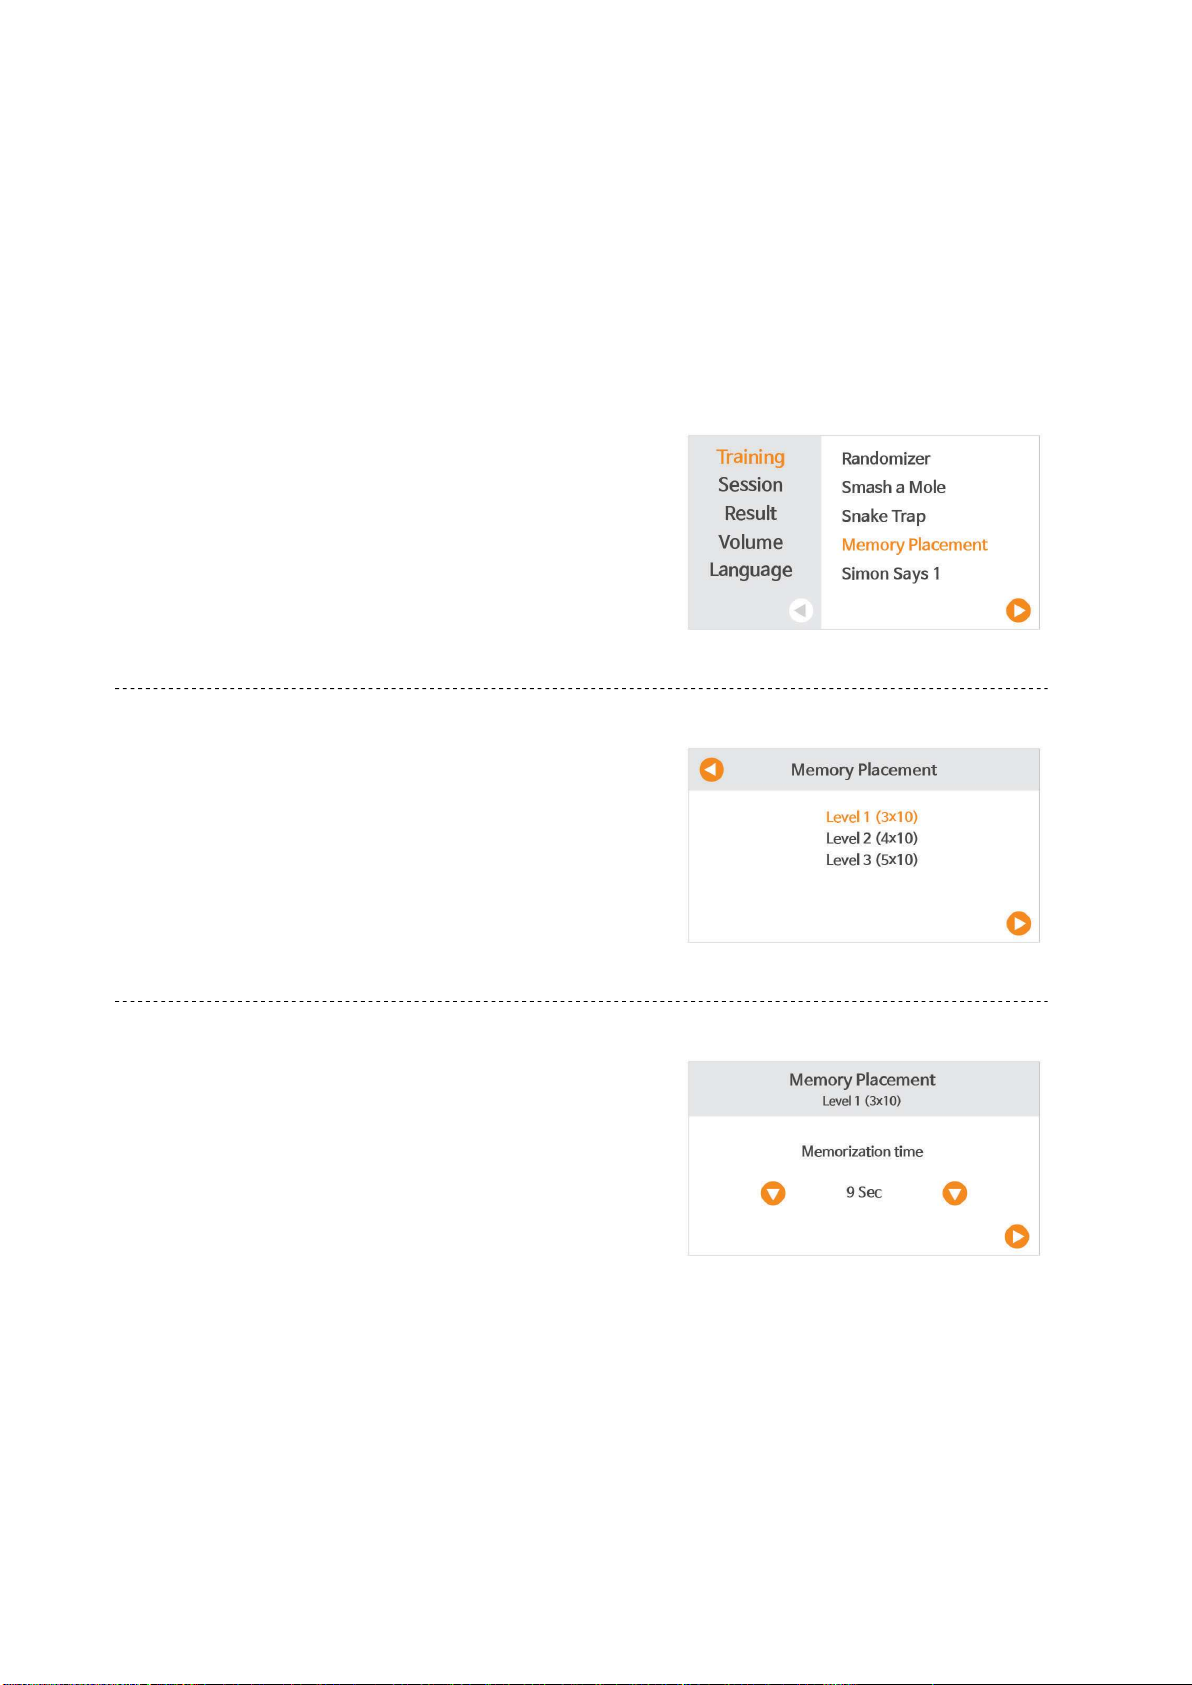
4. Type of Training
You can use the training function in the following steps
①
Training
Select <Training>
Detail Training
②
Make the detailed choices like level.
.
Options
③
You can control the time limit, hint time and the speed of lights.
Page 7
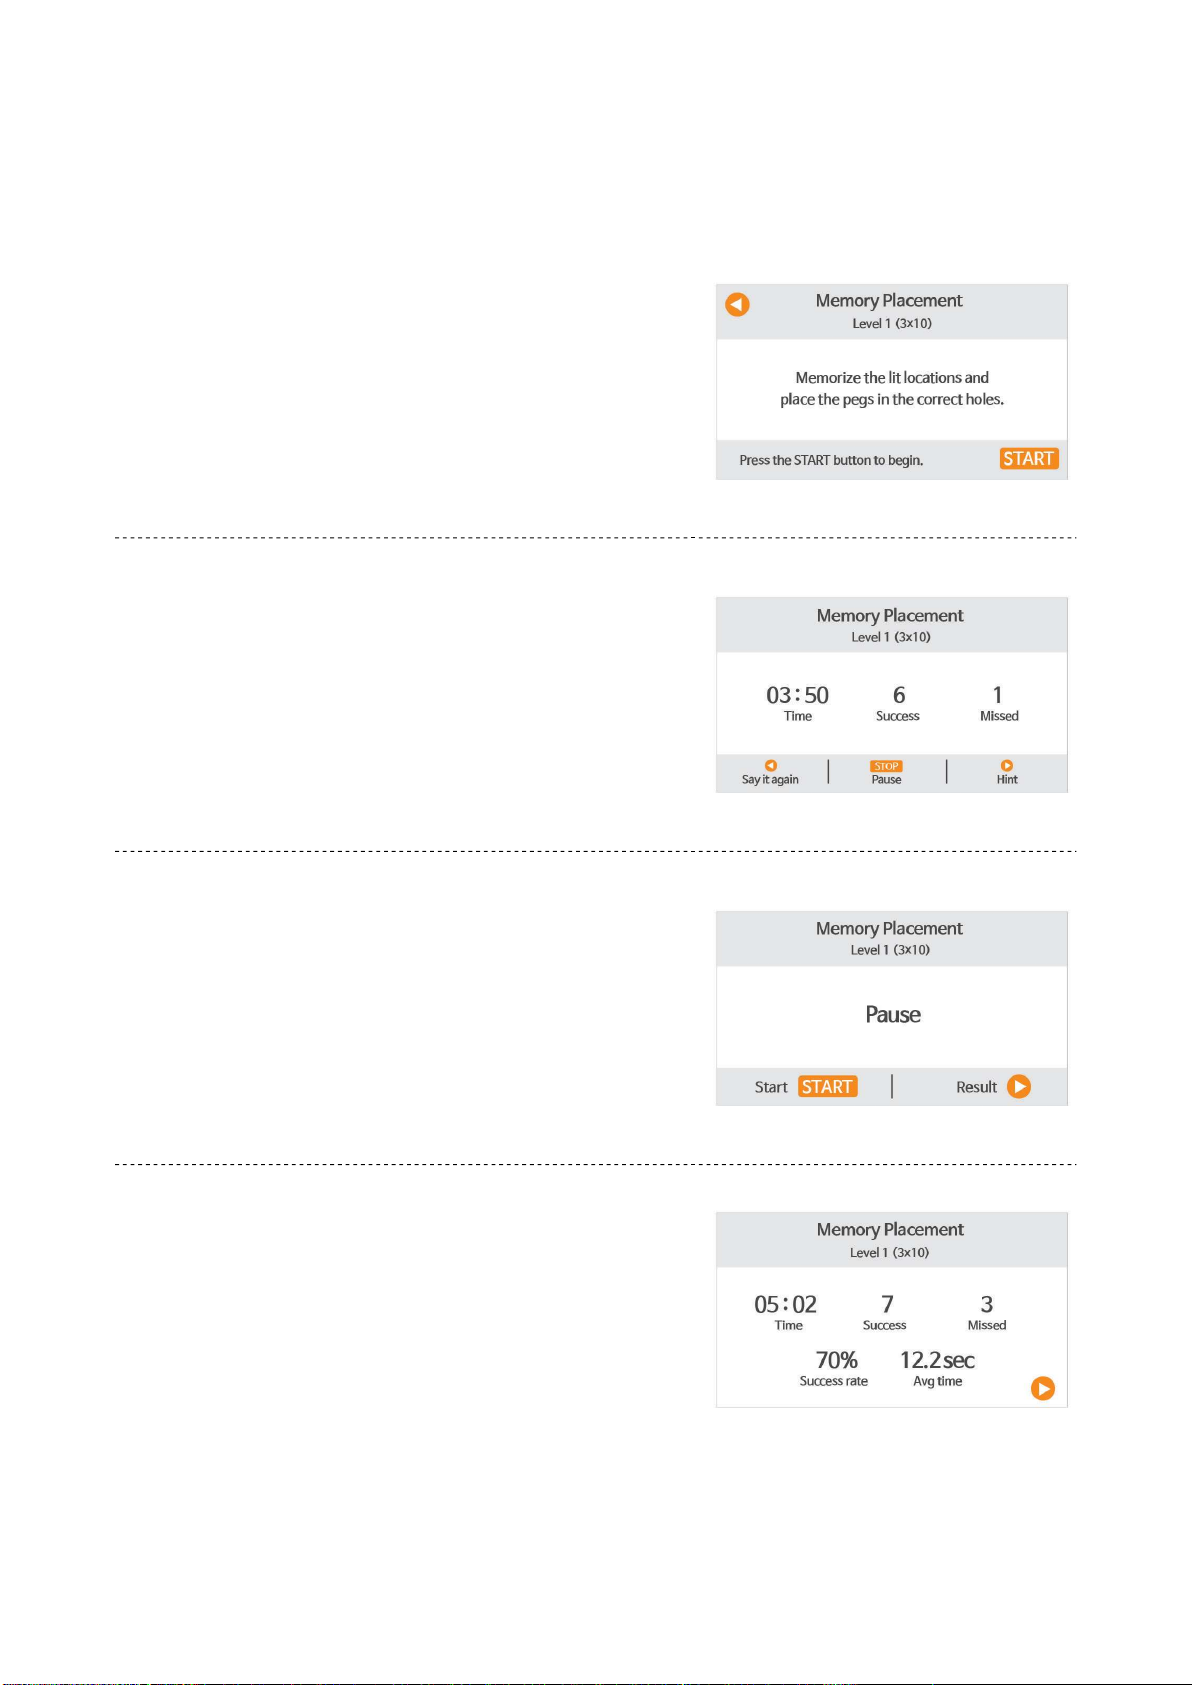
Explanation
④
After reading the explanation on training, press the
[START] or [▶] button to begin.
Training information
⑤
·
When you start the training, you will be guided by a voice assistant.
During the training, you can check your progress in real time on the screen.
·
·
You can listen again voice guide with [◀]button.
You can get hint with [▶] button.
·
⑥
Paused
You can pause the training with the [STOP] button and go on the training with
[START] button.
Results
⑦
·
You can see your results either the training is complete or by pressing the
[STOP] button to quit.
·
You can check the results of your recent training sessions on the <Result>
menu.
- Here you will see your most recent results.
- You can also check your older results by flipping over the pages.
Page 8
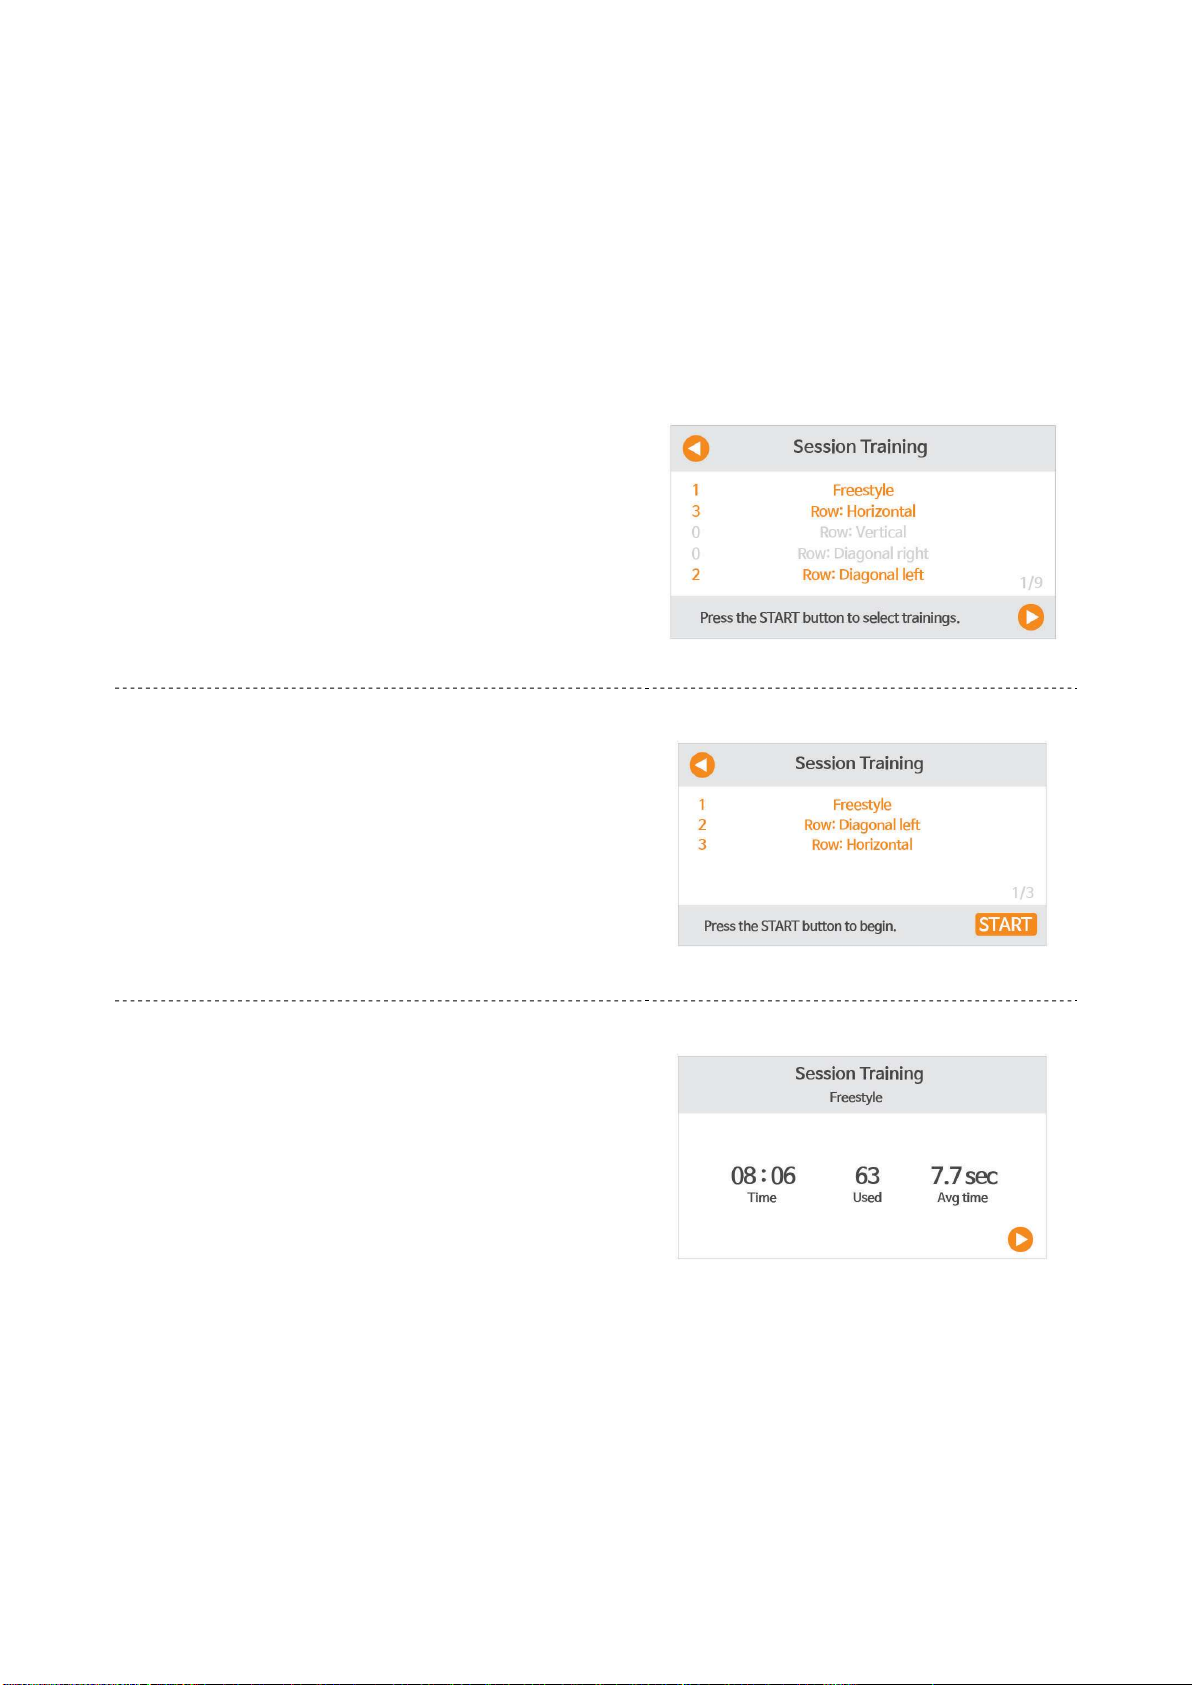
5. Session Training
Through session training you can carry out different types of training at one go without pressing any buttons.
①
Session Training
Press the [START] button in order to select detailed training in the
preferable order.
②
Detail Training
The training proceeds in the selected order.
Results
③
After 15 seconds, the training result screen will automatically move
on the next training session.
Page 9

6. Session Training
Category Description
Temperature / Storage Temperature
Humidity & Storage Humidity
Time of Continued Usage
0 ~ 35 (℃) / -20 ~ 70 (℃)
15 ~ 90 (%)
8 hrs
7. Detailed Device Specifications
Category Description
Device Name
Model Name
Objectives
Dimensions
Weight
Sensor
Neofect Smart Pegboard
PB
Manual Dexterity / Visual Motor integration / Visual Cognition and Shape Recognition
557(W) x 353(H) x 32(D) mm
6.32kg
Hole sensor (Magnetic Recognition)
Recognition : 7mm
LED
LCD
Speaker
Charger Type
Type : High illuminance, 5V LED
4.3’’ TFT-LCD
Built-in speaker for auditory feedback
Power 1.2W
Micro USB 5pin
Page 10
8. Quick Manual Information
Category Description
Document No
Version
Date
9. Certification
기기의 명칭 : Neofect Smart Pegboard
모델명 : PB
인증번호 : MSIP-REM-NeO-PB-01
인증받은 자의 상호 : NEOFECT
제조자/제조국 : NEOFECT Co., Ltd. /
한국 제조년월 : 2017. 08
MSIP-REM-NeO-PB-01
IFU-RSP_C
V 1.0.0
March 25, 2020
Product : Neofect Smart Pegboard
Model : PB
Input : 5V 1.5A
Output : -
Manufacturer : NEOFECT Co., Ltd.
Country of manufacture : Korea
Product : Neofect Smart Pegboard
Model : PB
Input : 5V 1.5A
Output : -
Manufacturer : NEOFECT Co., Ltd.
This device complies with Part 15 of the FCC Rules. Operation is
subject to the following two conditions: (1) this device may not cause
harmful interference, and (2) this device must accept any
interference received, including interference that may cause
undesired operation.
Page 11

We Inspire Hope
ⓒ NEOFECT. All Rights Reserved.
 Loading...