

Page 1
USER
MANUAL
FOR NEUNEO MPEG4 DVD PLAYER
http://www.neodigits.com
Page 2

CONTENTS
IMPORTANT NOTICE
SAFETY INSTRUCTION
GET TO KNOW THIS PLAYER
UNIQUE FEATURE OF THIS PLAYER
TECHNICAL SPECIFICATIONS
WHATS ON THE FRONT PANEL
WHATS ON THE BACK PANEL
WHATS ON THE REMOTE CONTROL
START TO USE THIS PLAYER
HOW TO OUTPUT VIDEO TO THE TV OR PC MONITOR
HOW TO OUTPUT AUDIO TO THE TV OR AMPLIFIER
POWER ON THE PLAYER AND TV
ENTER THE SETUP MENU
THE NAVIGATION SYSTEM IN THE SETUP
GENERAL SETUP
AUDIO SETUP
VIDEO SETUP
PREFERENCE SETUP
PASSWORD SETUP
1
1
2
2
3
4
4
5
6
6
7
8
8
9
9
10
13
14
15
USE THIS PLAYER TO PLAY DVD/VCD/SVCD/CD/HDCD
GENERAL INSTRUCTION
USE THIS PLAYER TO PLAY MPEG4/MP3/WMA/JPEG FILES
HOW TO USE THE FILE NAVIGATION SYSTEM
HOW TO CREATE A PLAY LIST
STORE FILES ON A RECORDABLE DISC
ADDITIONAL FEATURES
OTHER FEATURES
USING KARAOKE
CHANGING REGION CODE OF THIS PLAYER
OTHERS
USEFUL NOTES
TROUBLESHOOTING
16
16
17
17
18
19
19
20
20
20
21
21
21
Page 3

IMPORTANT NOTICE -1-
SAFETY INSTRUCTION
Warning:
To prevent the risk of fire or electric shock, do not expose this unit to rain or moisture.
High voltage components in it so do not attempt to open the enclosure. Only
qualified personnel are allowed for maintenance.
Caution:
This DVD player contains laser system.
Read this manual carefully and get familiar with the instructions before operating.
After reading this manual, please keep it for future reference.
To prevent direct laser radiation, do not attempt to open the enclosure. Visible laser
beam will radiate when the enclosure is opened or when the interlock device is
released. Do not stare at the laser-beam.
To avoid damaging the loader of the unit, please dont pull or drag the tray of the
loader when operating and switch off the power supply only when NO DISC is
displayed.
Never place other things or articles upon the player, otherwise it may cause improper
playback.
http://www.neodigits.com
Page 4
GET TO KNOW THIS PLAYER
UNIQUE FEATURES OF THIS PLAYER
Based on next generation MPEG4 Chipset --- MTK1389, MTK1389 is DivX
Certified and support raw MPEG1/MPEG2/MPEG-4 Avi, DivX* (all version
includes ver 3.11, 4, 5 and up), Xvid, VBR MP3, WMA, Jpeg, PhotoCD, HDCD,
burn your favorite PC format files into CDR and watch on big screen TV!
Offers the best MPEG4 playback quality and compatibility, supports high level
MPEG4 feature like Qpel (Quarter pixel), GMC (Global Motion Compensation) and
advance noise reduction.
100% hardware based MPEG4 decoder, can fast forward/back forward MPEG4
video upto 32X speed. 100% compatible with old DivX 3.11 version codec.
Build-in six 12-bit, 108Mhz video DACs, offers video quality which only available
in highend DVD players before. New MDDi ( Media Direct De-Interlacing) Progressive
scan technology.
-2-
Supports all recordable media format -- CDR/RW, DVD-R/RW and DVD+R/RW.
Put multiple movie files in one single DVDR and play them all!
DVD (Region Code Free), DVD-R/RW , DVD+R/RW, VCD and SVCD.
Support DVD Aspect Ratio 4:3 Pan Scan, 4:3 Letter Box, and 16:9 Wide Screen.
Parental lock, Multi Language(Sound Track), Multi Subtitle and Multi Angle for
DVD playback. Plays Pal 16:9 Anamorphic DVD on an NTSC TV without the
"squeeze effect"
Support Firmware upgrade. New firmware will be released by MTK and will support
future new codec.
PAL and NTSC S-Video, Component Video (YPbPr), VGA and Composite output.
Play PAL movie on NTSC TV or Play NTSC movie on PAL TV
Optical, Coaxial S/PDIF and RCA output. Support Dolby 5.1 and DTS digital
output or 2 Channels analog stereo output. Build-in Dolby 5.1 decoder, support
5.1 channel output.
Page 5
GET TO KNOW THIS PLAYER
TECHNICAL SPECIFICATIONS
-3-
Support Meida Type
Support Codec
Firmware
Audio response
Audio s/n ratio
THD
Channel Separation
Audio DAC
Video DAC
Video Resolution
Video S/N
Audio output (analog)
Audio output (digital)
Video output
CDROM, CD-R/RW, DVD, DVD-R/RW, DVD+R/RW,
Audio CD, Video CD, Supoer Video CD, HDCD,
Kodak PhotoCD
Divx ( 3.11 ~ 5.x), XVID, MPEG1, MPEG2, MPEG4,
MP3(VBR), WMA, JPEG, PhotoCD
Upgradable
20Hz-20kHz
>95dB
0.003%
85 dB
96Khz/ 24 bit Audio D/A Converter
six pair 12 bit 108Mhz Video D/A Converter
520 lines or higher(Progressive Scan)
60 dB
Electric level output: 2V resistance: 10 Kohm
Electric level output: 0.5Vp--p resistance: 75ohm
Electric level output:1Vp--p resistance:
S-Vide output
Power
Power consumption
Dimensions
Weight
75ohm unbalanced negative
Electric level output: brightness (Y) 1Vp-p,
chrominance (C): 0.286Vp-p, resistance: 75ohm
Universal Auto Switching 100-240V, 50/60Hz
25W
17 x 9.8 x 1.45 Inch (430x 250 x 37 mm)
4 lb (1.8KG)
Page 6
GET TO KNOW THIS PLAYER
WHATS ON THE FRONT PANEL
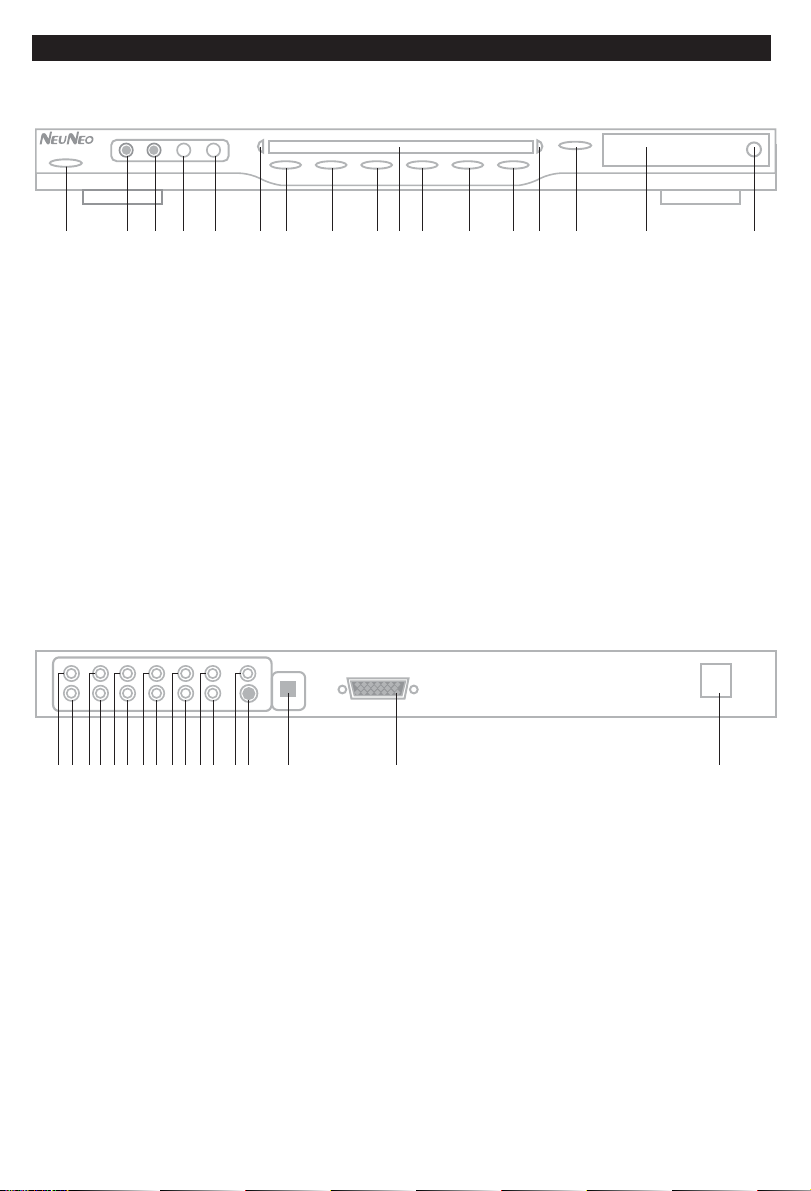
1 234 5 67 8 91011 12 131415 16 17
-4-
1. Power button
2. Microphone Jack 1
3. Microphone Jack 2
4. Microphone Volume 1
5. Microphone Volume 2
6. Power LED Light
7. Previous
8. Next
10. Disc tray
11. Left / Right channel switch
12. Play / Pause
13. Stop
14. Power LED Light
15. Disc tray open/close button
16. Display window
17. Remote control signal sensor
9. NTSC/PAL switch
WHATS ON THE BACK PANEL
L CENTSWSUR-L
R
12 73 4 5 6 8 9 10 1112 1314 15 16 17
1. 2 channel stereo left channel output
2. 2 channel stereo right channel output
3. 5.1 channel center speaker output
4. 5.1 channel subwoofer output
5. 5.1 channel left surround speaker output
6. 5.1 channel right surround speaker output
7. 5.1 channel left front speaker output
8. 5.1 channel right front speaker output
9. Component Y output ( to yellow line)
SUR-R
FRONT-L
FRONT-RYCOAXIAL
Pb/Cb
VIDEO
S-VIDEO
OPTICAL
Pr/Cr
VGA
10. Coaxial output
11. Component Pb/Cb output (to blue line)
12. Component Pr/Cr output (to red line)
13. Composite video output
14. S-video output
15. Optical output
16. VGA output
17. Power cable to 110-240V power source
AC 100-240V
Page 7
GET TO KNOW THIS PLAYER
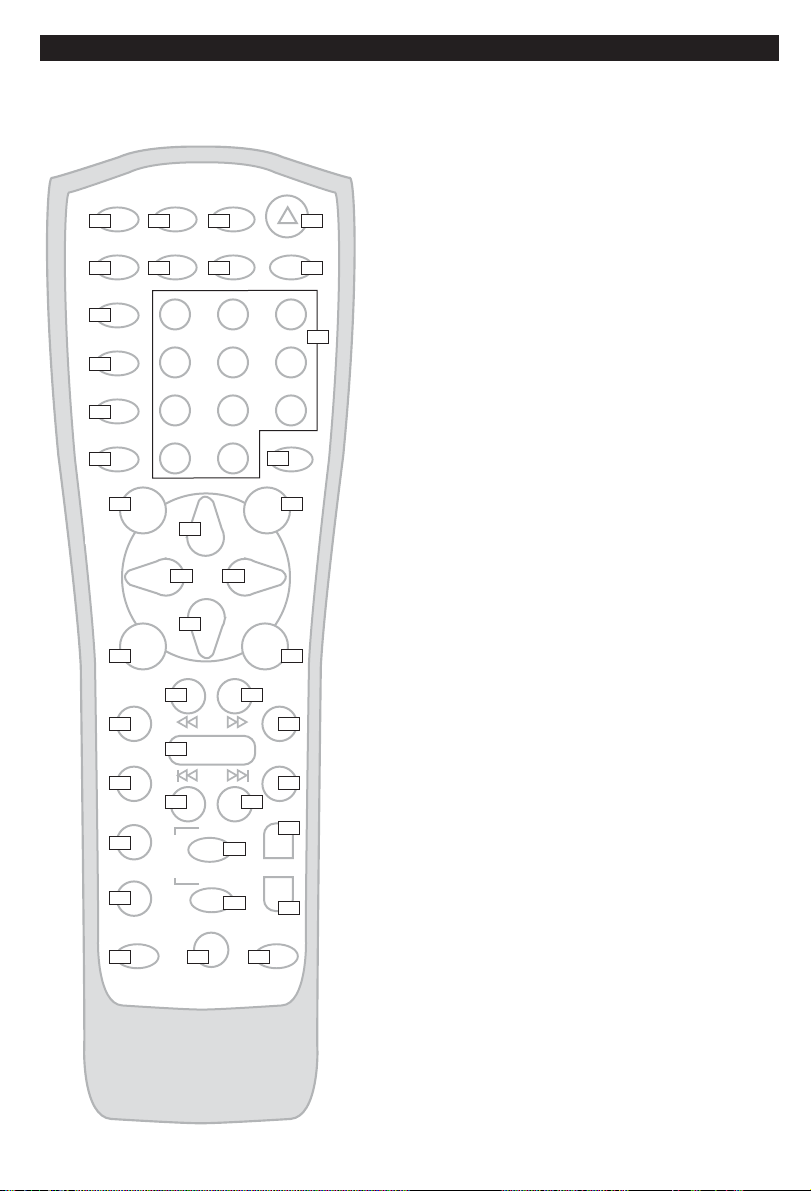
WHATS ON THE REMOTE CONTROL
-5-
MUTE
GOTOPOWER
1 2 3 4
DISPLAY
10
11
PROGRAM
12
SETUP
RANDOM
REPEAT A-B
5 6 7 8
AUDIO
9
ANGEL
12 3
45 6
SUBTITLE
78 9
CLEAR
10+
34
35
DVDMENU
V
O
L
CHANNEL
14
PAUSE
TITLE/
PBC
26
29
36
+
-
37
STOP
0
15 16
17
18 19
PLAY/
ENTER
21 22
SLOW
25
STEP
28
RETURN
32
P-SCAN
33
PAL/NTSC
38 39 40
20
23 24
27
ZOOM
30 31
+
E
C
H
O
-
BOOKMARK
1. Power on/off.
2. Mute button, press once to mute,twice to un-mute
3. Goto. Play from the desired location.
4. Eject. Open or close disc tray.
5. Display. Display or hide play information.
6. Random. Random play.
7. Repeat. Repeat play.
13
8. A-B Repeat the selected.
9. Audio. Switch audio track.
10.Angel. Switch play angel.
11.Subtitle. Switch subtitle.
12.Program. Enter the play list edit mode.
13.Number buttons.
14.Clear. Clear input numbers.
15.Setup. Enter setup menu for this player.
16.Stop.
17.Up cursor.
18.Left cursor.
19.Right cursor.
20.Down cursor.
21.Play/Enter. Playback / Select button.
22.Pause.
23.Fast backward button.
24.Fast forward button.
25.Slow. Slow motion playback.
26.Title/PBC. Enter DVD title menu or VCD 2.0 PBC menu.
27.Zoom. Zoom in / out button.
28.Step. Play frame by frame.
29.Prev. Skip backward.
30.Next. Skip forward.
31.DVD menu. Enter DVD root menu.
32.Return. Back to previous menu/clearing input numbers.
33.P-Scan. Switch between progressive scan and interlace.
34.Echo +. Rise tone.
35.Echo -. Fall tone.
36.Vol+. Increase volume.
37.Vol-. Decrease volume.
38.PAL/NTSC. Switch between PAL and NTSC system.
39.Bookmark. Bookmark the playback material / add item to
play list.
40.Channel. Switch to left/right sound channel.
Page 8
START TO USE THIS PLAYER
-6-
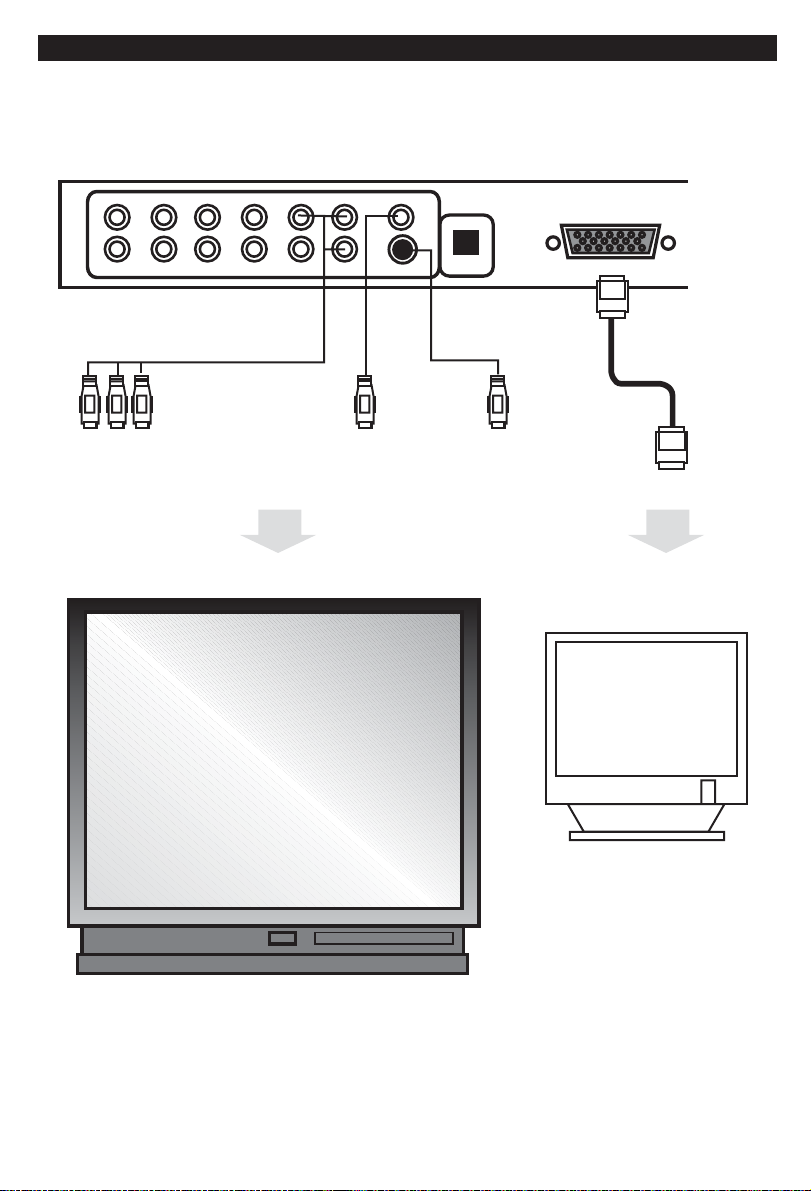
HOW TO OUTPUT VIDEO TO THE TV OR PC MONITOR
LRCENTSWSUR-L
SUR-R
component cable s-video cable
To component video input on
the back of TV (If available)
FRONT-L
FRONT-RYCOAXIAL
back of the TV
TV
Pb/Cb
Pr/Cr
S-VIDEO
To video-in
port on the
VIDEO
OPTICAL
video cable
To S-video in
port on the back of
the TV
VGA
VGA cable
To VGA port
PC Monitor / TV with VGA port
Page 9
START TO USE THIS PLAYER
-7-
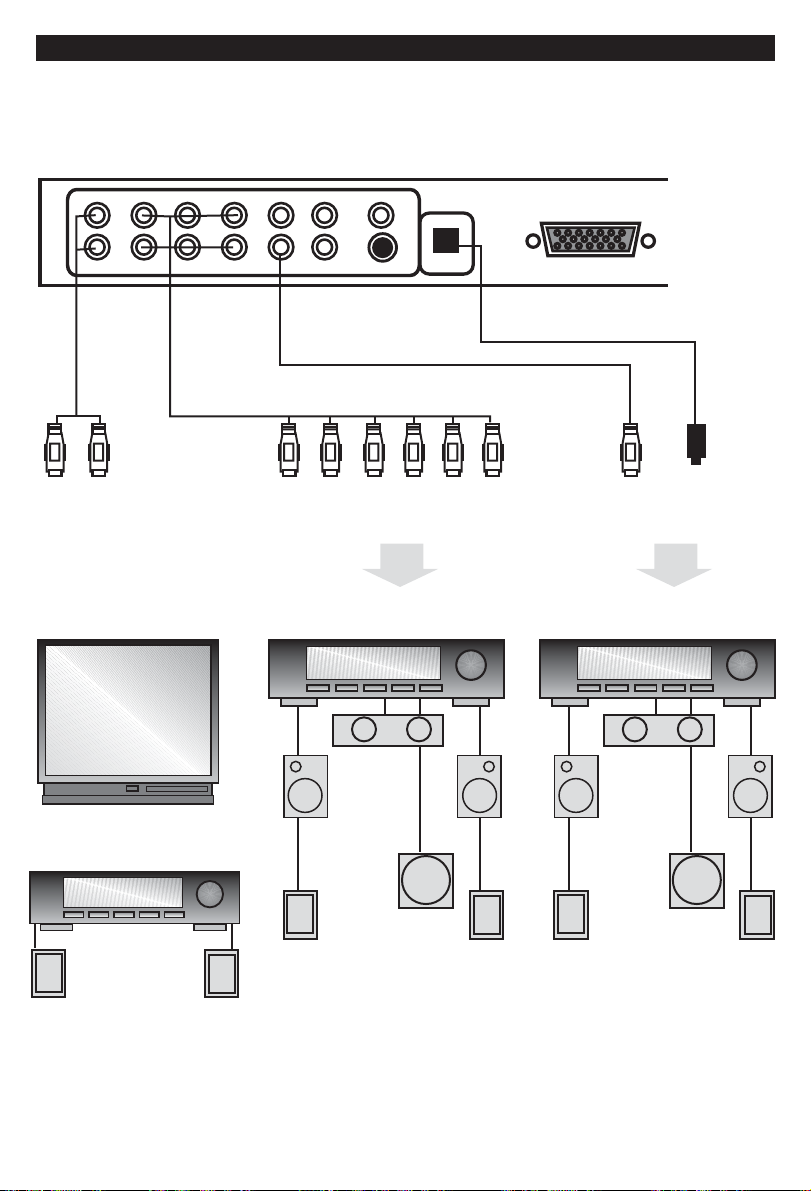
HOW TO OUTPUT AUDIO TO THE TV / AMPLIFIER
LRCENTSWSUR-L
SUR-R
audio cable
2 channel audio cable connect
to the left / right audio input on
TV
FRONT-L
FRONT-RYCOAXIAL
Pb/Cb
Pr/Cr
VIDEO
S-VIDEO
OPTICAL
coaxial cable
6 audio cables
6 audio cables connect to left/right /center/left
surround/right surround and subwoofer audio
input on the back for the amplifier accordingly.
5.1 Channel Amplifier
center
speaker
VGA
optical cable
Connect either coaxial cable or optical
cable to the coaxial port or optical port
on the back of the amplifier.
5.1 Channel Amplifier with built-in
Dolby Digital / DTS decoder
center
speaker
2 Channel Stereo Amplifier
left speaker
right speaker
left speaker
left surround
speaker
speaker
subwoofer
right
right surround
speaker
left speaker
left surround
speaker
speaker
subwoofer
right
right surround
speaker
Page 10
START TO USE THIS PLAYER
POWER ON THE PLAYER AND TV
Connect this player with your TV / PC Monitor / Projector, amplifier (if available)
1.
and power source.
Turn on this player by click the power button on the front panel.
2.
Turn on TV and switch it to the appropriate video mode ( composite video input,
3.
S-video input or component video input ).
If you connect the TV via component video input and get no image on the TV
4.
screen, please press P-SCAN button on the remote control a couple times until
the TV shows image.
If you get black/white image on the TV screen, click PAL/NTSC button on the
5.
remote control to switch the player to the appropriate TV system ( PAL or NTSC).
You should be able to see the welcome screen on the TV by now.
6.
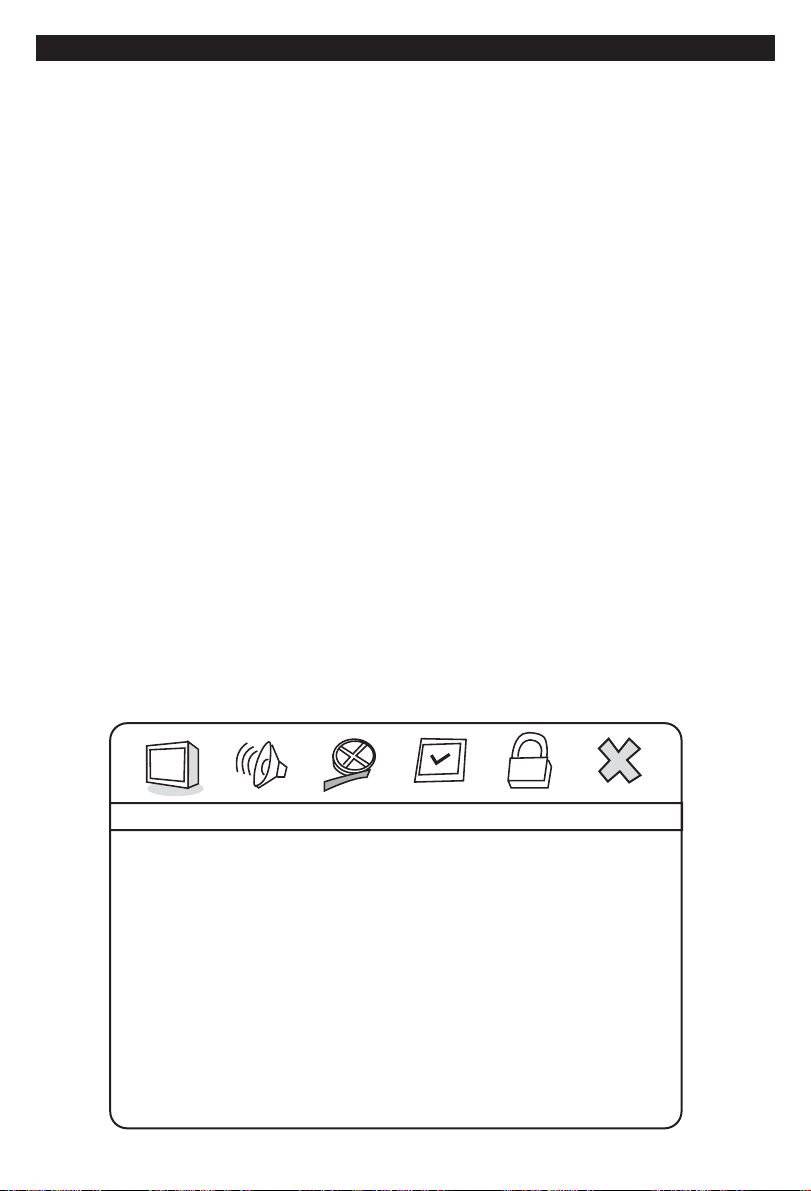
ENTER SETUP MENU
-8-
1.
Click SETUP button on the remote control.
2.
You will see the general setup page show up on the screen.
--- General Setup Page ---
TV Display
Angle Mark
OSDLang
Captions
Screen Saver
Last Memory
PS
On
Eng
Off
On
Off
Page 11
START TO USE THIS PLAYER
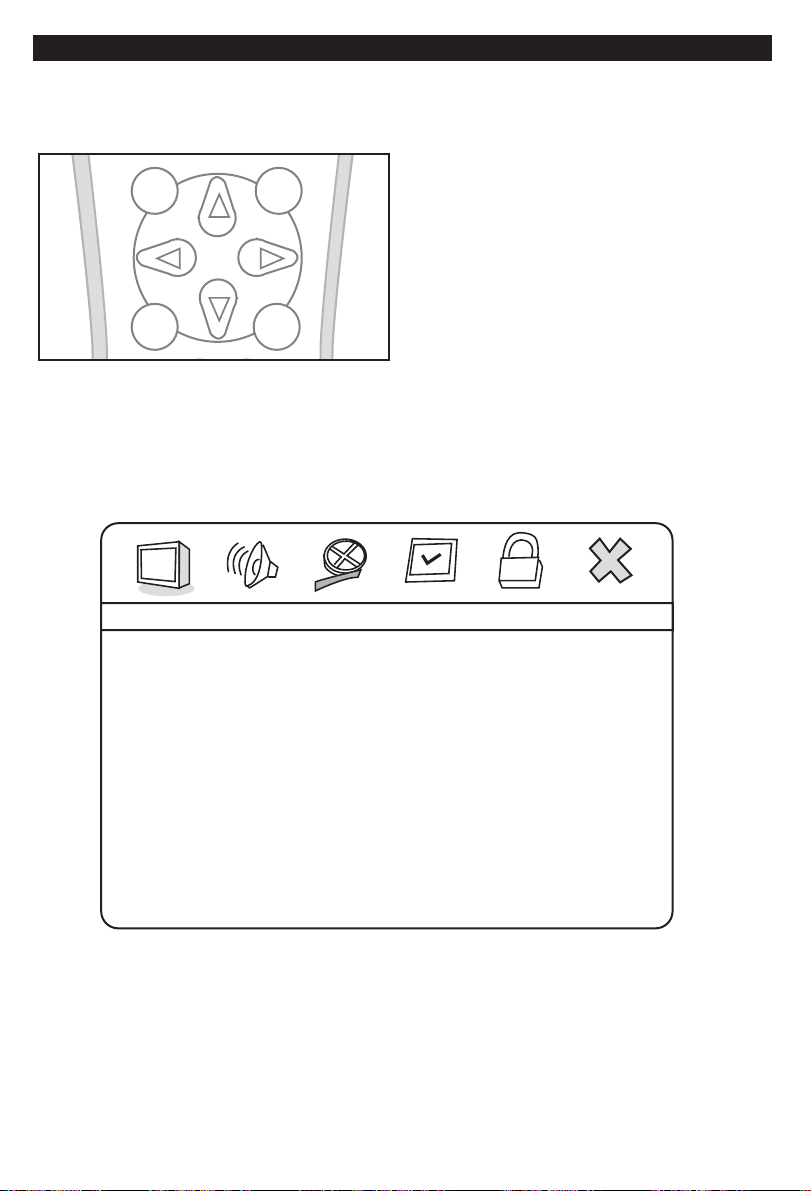
THE NAVIGATION SYSTEM IN THE SETUP
Left / right / up / down button let you
1.
choose the menu cursor left / right / top
SETUP
PLAY/
ENTER
STOP
PAUSE
/ down.
Left button-- back to the previous menu.
2.
Right button -- enter sub-menu
3.
Enter -- make selection
4.
Menu -- enter the menu / exit the menu
5.
GENERAL SETUP
--- General Setup Page ---
-9-
TV Display
Angle Mark
OSDLang
Captions
Screen Saver
Last Memory
TV Display
Angel Mark
PS
On
Eng
Off
On
Off
To set the aspect ratio of this players output image.
Optional settings: Normal/PS ( Pan-scan ), Normal/LB
(Letterbox format), Wide ( 16:9 format ).
When a DVD title with multi-angle is played, the user will be
able to view a particular angle.
Optional settings: On/off
Page 12
START TO USE THIS PLAYER
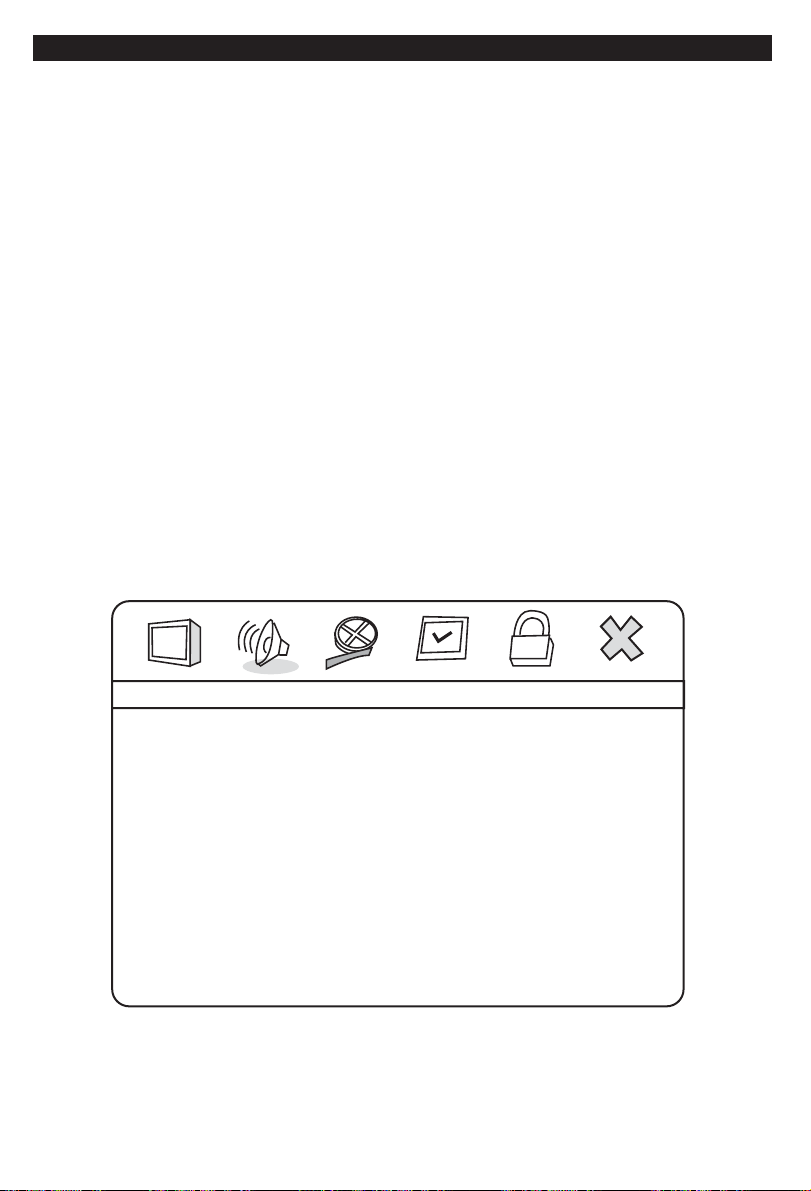
GENERAL SETUP
OSD Lang
This item is used to set the prompts language on the screen.
Optional settings: English / Chinese
-10-
Captions
Screen Saver
Last Memory
To play the enclosed captions on some DVD title.
Optional settings: On/off
Open or close the screen saver function.
Optional settings: On/off
When play DVD / CD / VCD, after you press stop button, the
player will remember the position of current playing program.
Next time you turn on this player, you just need to click play
button and the player will jump to the last memory position.
Optional settings: On/off
AUDIO SETUP
--- Audio Setup Page ---
Speaker Setup
SPDIF Setup
Dolby Digital Setup
Equalizer
3D Processing
HDCD
Karaoke Setup
Page 13

START TO USE THIS PLAYER
AUDIO SETUP
-11-
Speaker Setup
Downmix
Front Speaker
Center Speaker
Rear Speaker
Sub Woofer
Test Tone
Dialog
You dont need do anything in speaker setup when you
are using digital audio output ( optical / coaxial ). This is
for user who are using this players built-in 5.1 channel
output function.
If you only need 2 channels to enjoy music, it is
recommended to select Stereo option. When you use
this players built-in Dolby Digital decoder to play 5.1
channel sound, please select off.
To select speaker size. You can select Large or big size
speaker, Small for small size speaker. You can turn off
the Center/Rear speaker when you choose off
Optional settings: Large, Small, Off.
You can turn on/off the sub woofer speaker.
Optional settings: On, Off
To play test tone to test each speaker connect to the
player. Optional settings: On, Off
This function is to adjust the volume of dialog in the playing
material. ( Only available when you choose Downmix to
2 channels option. Optional settings: On, Off
Post DRC
SPDIF Setup
Spdif output
This option is for compress audio signal with wide dynamic
range proportionally to reduce intense impact to speakers.
Optional settings: On, Off
This option is from users who are using digital audio
output ( optical / coaxial ).
This is for choosing the digital audio format from
optical/coaxial output. If you are using an ampfilier with
built-in Dolby/DTS decoder, please choose SPDIF/RAW.
Optional settings: SPDIF OFF, SPDIF/RAW, SPDIF/PCM,
Manual.
Page 14

START TO USE THIS PLAYER
AUDIO SETUP
-12-
Spdif output
LPCM Out
Dolby Digital Setup
Dual mono
Dynamic
Channel Delay
Equalizer Setup
This is for choosing the digital audio format from
optical/coaxial output. If you are using an amplifier with
built-in Dolby/DTS decoder, please choose SPDIF/RAW.
Optional settings: SPDIF OFF, SPDIF/RAW, SPDIF/PCM,
Manual.
Set LPCM output rate.
Optional settings: 48K, 96K
Optional settings: Stereo, L-mono, R-mono, Mix-mono.
To set the linear compression ratio to get different
compression result. Optional settings: Off, 1/4, 1/2, 3/4,
Full.
To set delay time of the center/surround/subwoofer
speaker.
EQ Type
Bass boost
Super bass
Treble bass
3D Processing Setup
Reverb
To set EQ mode.
Optional settings: None, Rock, Pop, Live, Dance, Techno,
Classic, Soft.
To open/close bass boost. Optional Settings: On, Off.
To open/close super bass. Optional Settings: On, Off.
To open/close treble bass. Optional Settings: On, Off.
To set Reverb mode.
Optional settings: Off, Concert, Living Room, Hall,
Bathroom, Cave, Arena, Church.
Page 15
START TO USE THIS PLAYER
AUDIO SETUP
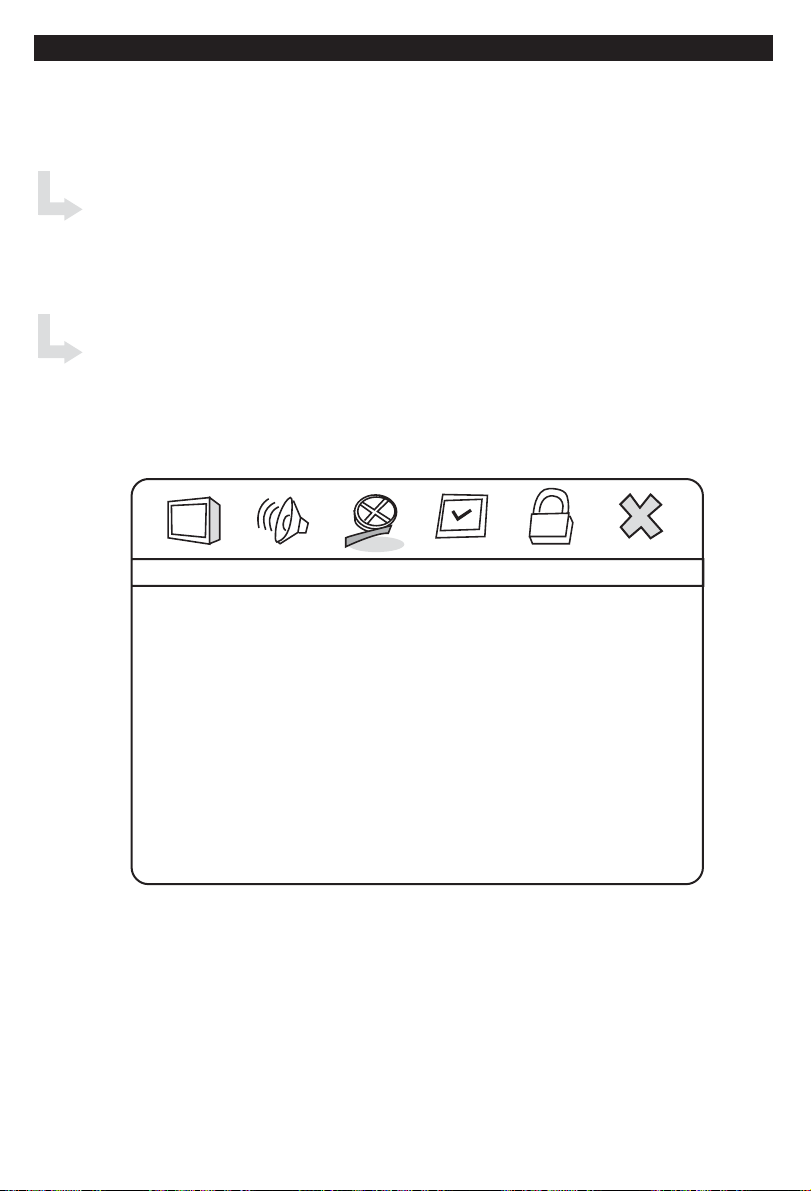
HDCD Setup
-13-
Filter
Karaoke Setup
MIC
VIDEO SETUP
--- Video Setup Page ---
Component
TV Mode
Quality
To setup HDCD playback filter.
Optional settings: 1X (44.1K), 2X (88.2K)
To turn on/off microphone for Karaoke.
Optional settings: On/Off
YUV
Component
TV Mode
Quality
To set the component output mode, YUV for normal component
connection, VGA for enable VGA output.
Optional Settings: Off, YUV, VGA
To switch from Progressive Scan and normal Interlace Scan.
Optional Settings: Interlace, P-Scan ( Progressive Scan)
To adjust output video quality.
Optional Settings: Brightness, Contrast, Hue, Saturation.
Page 16
START TO USE THIS PLAYER
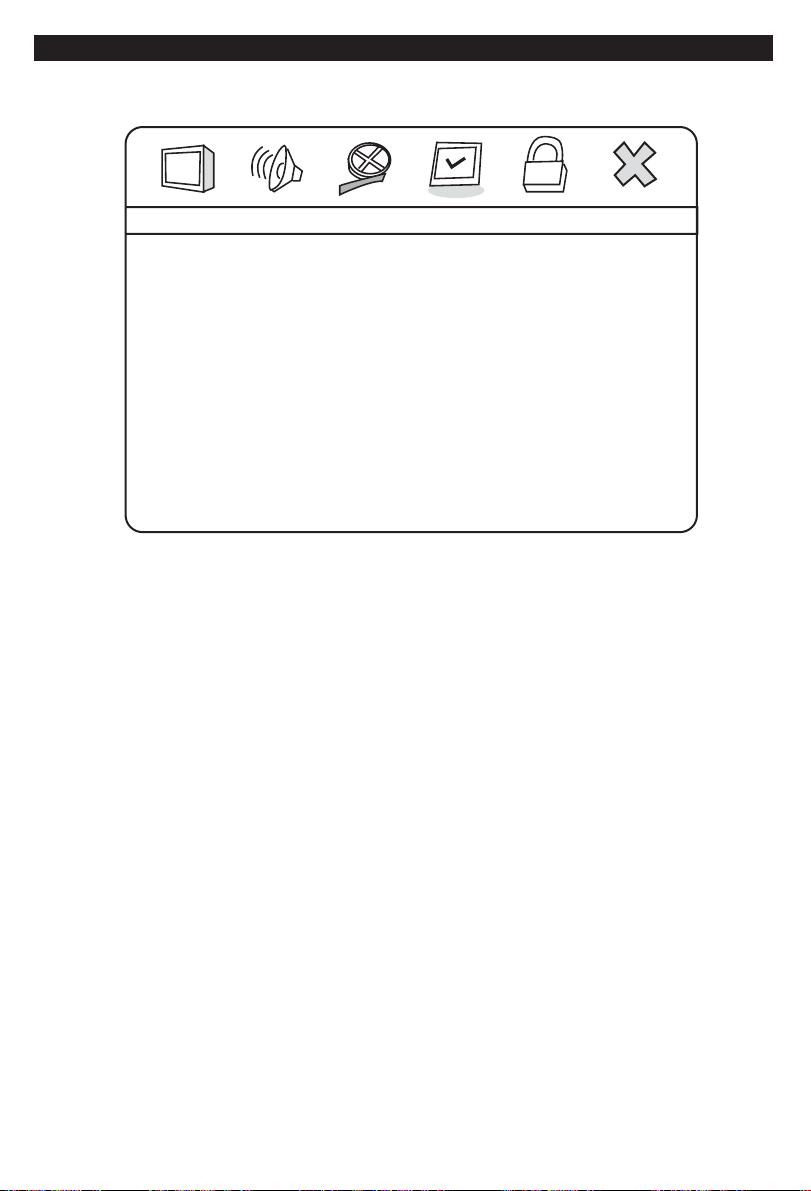
PREFERENCE SETUP
--- Preference Setup Page ---
-14-
TV Type
PBC
Audio
Subtitle
TV Type
PBC
Audio
Subtitle
Disc Menu
Parental
Default
To set the TV system. Optional Settings: PAL, NTSC, Multi.
To enable PBC ( Play Back Control) menu for VCD 2.0 version
VCD or Super VCD ( SVCD). Optional Settings: On, Off.
To set the default audio language when playing DVD.
Optional Settings: English, French, Spanish, Chinese, Japanese,
Korean, Russian, Thai.
To set the default subtitle when playing DVD.
Optional Settings: English, French, Spanish, Chinese, Japanese,
Korean, Russian, Thai.
YUV
Off
Eng
Eng
Eng
Disc Menu
Parental
Default
To set the default language menu when playing DVD.
Optional Settings: English, French, Spanish, Chinese, Japanese,
Korean, Russian, Thai.
To enable parental lock when playing DVD. User require to enter
password ( can be set in the password setup) when playing
certain rating DVD titles. Optional Settings: KID, G, PG, PG13,
PGR, R, NC17, Adult, Off.
Reset to default setting. Optional Settings: On, Off.
Page 17
START TO USE THIS PLAYER
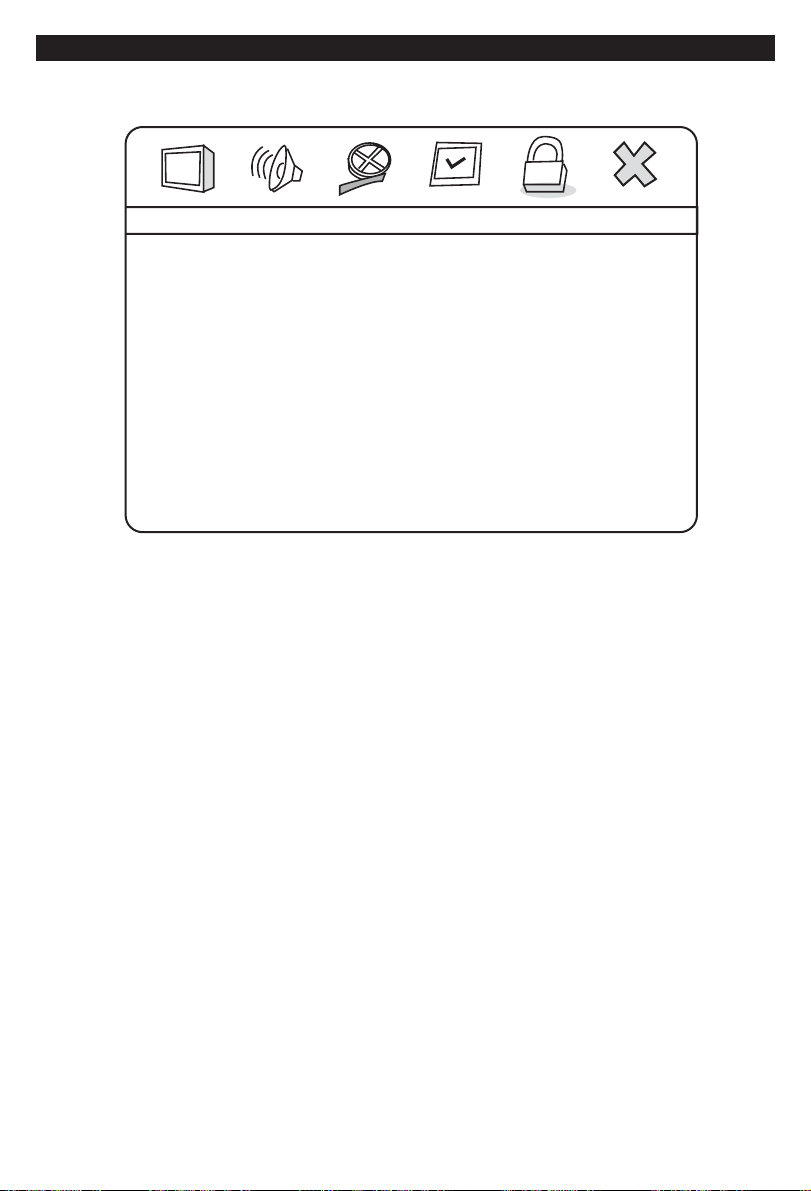
PASSWORD SETUP
--- Password Setup ---
-15-
Password mode
Change Password
Password mode
Change Password
On
Enable Password for changing parental lock.
Optional Settings: On, Off.
Change the password.
Default password: 136900
Page 18

USE THIS PLAYER TO PLAY DVD/VCD/SVC/CD/HDCD
-16-
GENERAL INSTRUCTION
Put DVD/CD/SVCD/CD/HDCD disc inside the disc tray, then close the tray. The
player will automatically start to play these materials.
Some DVD has built-in title menu. The player will automatically show the title menu
of the player. You can always go back to the title menu by pressing Title/PBC button
or go back to the initial menu by pressing DVD Menu button.
Some VCD, Super VCD has PBC ( Playback control ) menu, the player will show this
menu first unless you disable the PBC function in preference setup. You can always
jump back to PBC menu by pressing Title/PBC button.
You can jump directly to certain chapter of DVD/VCD or sound track on music CD
by pressing the chapter number directly on the remote control.
You can fast forward / back forward ( upto 32x) or slow playback ( upto 1/16) on
DVD/VCD/SVCD.
Upto 4X zoom is available for all video materials ( DVD/SVCD/VCD ). ( Using zoom
button )
While playing CD, you can choose 4 different play mode ( single, repeat, shuffle,
random) by using repeat button.
Page 19
USE THIS PLAYER TO PLAY MPEG4/MP3/WMA/JPEG FILES
-17-
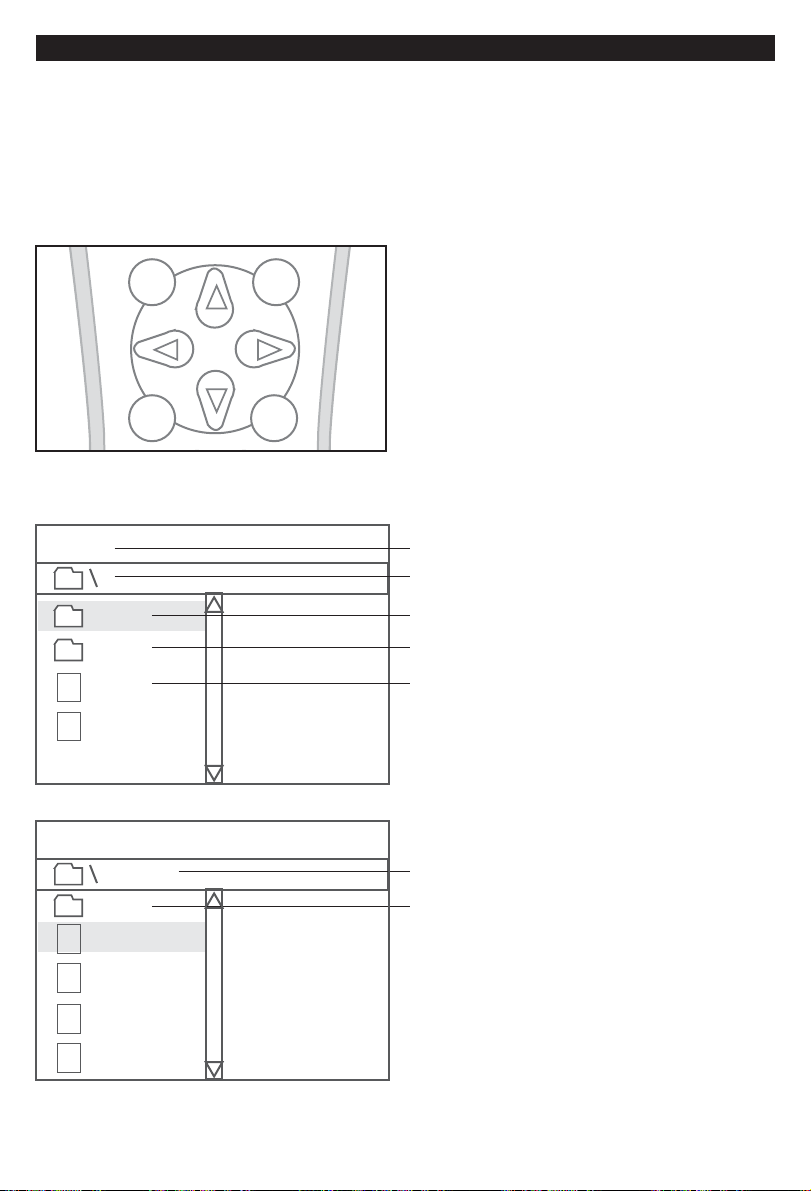
HOW TO USE THE FILE NAVIGATION SYSTEM
When put a disk with MPEG4 / MP3 / WMA / JPEG files into the player, the file
navigation window will show up.
Left / right / up / down button let you
choose the cursor left / right / top /
down.
SETUP
STOP
PLAY/
ENTER
00:00 00:00
001/004
DIR01
DIR02
FILE01
FILE02
00:00 00:00
001/004
DIR01
..
FILE01
PAUSE
ENTER/PLAY: to enter/leave a directory
or play a selected file.
Program and Bookmark: to create a play
list.
Selected file number / Total file number
Directory Location
Selected/high lighted file / folder
Folder
Playable file
Directory Location
Go back to the previous directory
FILE02
FILE03
FILE04
Page 20
USE THIS PLAYER TO PLAY MPEG4/MP3/WMA/JPEG FILES
-18-
HOW TO USE THE FILE NAVIGATION SYSTEM
00:00 00:00
001/004
DIR01
DIR02
FILE01
FILE02
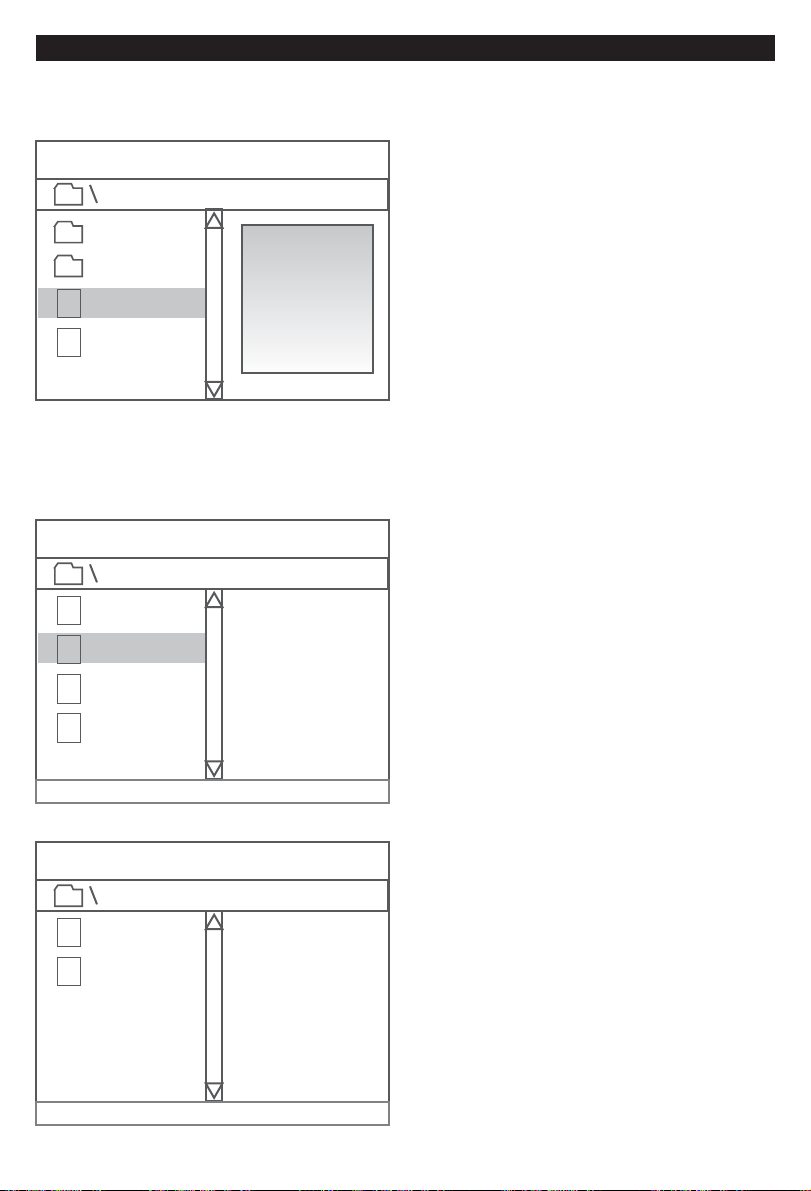
Picture
preview
Jpeg file preview will be displayed on the
right window when a jpeg file is selected.
When display a JPEG picture on the TV
screen, you can use left/right/up/down
cursor button to rotate the image in any
direction.
When playing MP3, you can still go to
different folder to view JPEG files.
HOW TO CREATE A PLAY LIST
00:00 00:00
001/004
FILE01
FILE02
FILE03
FILE04
Press program button on the remote
control, enter the file list mode. In this
mode, all the files ( includes files in all
different directories if available ) will all
display in this file list window.
Select file you want to put in play list by
press bookmark button.
File List
00:00 00:00
001/004
FILE02
FILE03
Play List
Press program button again to enter play
list mode. In this window, all files you have
selected in the previous window will be
displayed. You can start to play the play
list by click enter on any file in this play
list.
Page 21

USE THIS PLAYER TO PLAY MPEG4/MP3/WMA/JPEG FILES
-19-
STORE FILES ON A RECORDABLE DISC
You can store any MPEG4 ( DivX / Xvid ), MPEG1/2, MP3, WMA, JPEG files on a
recordable disk and then play on this player. CD-R, CD-RW, DVD-R, DVD-RW, DVD+R,
DVD+RW are supported.
There is no limitation about how many files you can put on one disk. Folders are
supported. One folder can store upto 999 different files. For example, you can put
about 5-7 DivX movies on one DVD+R disk, or you can put 100-200 MP3 songs on
one CD-R. You can put different type media files on one disk, for example, you can
put Jpeg files, MP3, WMA, MPEG4 files on one single disk.
This player determine the file type by reading the extension name of each file. Extension
name *.avi, *.mpg, *.mpeg, *.mp3, *.wma, *.jpg are supported. If your file has a different
extension name, it will not be recognized by this player. For example, if you want to
put several SVCDs on one DVD-R, you can rename the SVCD file ( *.dat) to *.mpg
file.
Please burn the recordable disk in normal ISO9660 disc format. Long file name is
supported.
ADDITONAL FEATURES
For all files in one disk, you can use repeat button to choose 6 play mode ( Repeat,
Shuffle, Single, Repeat All, Repeat Folder, Random ), then the player will play all files
on the disk automatically according to the play mode you choose.
You can fast forward / back forward upto 32X on any video file ( MPEG4, DivX, Xvid
and etc). ( Using fast forward / back forward button).
You can zoom in/out upto 4X on any video file or Jpeg file. ( Using zoom button)
Page 22
OTHER FEATURES
-20-
USING KARAOKE
In the Audio Setup, turn on the microphone input.
Plug the microphone into the mic slot on the front panel. You can adjust microphone
volume by adjusting the mic vol control on the front panel.
While playing Karaoke VCD / CD, you can switch the sound channel by using
channel button.
You can adjust the echo level by using the echo+ and echo- buttons.
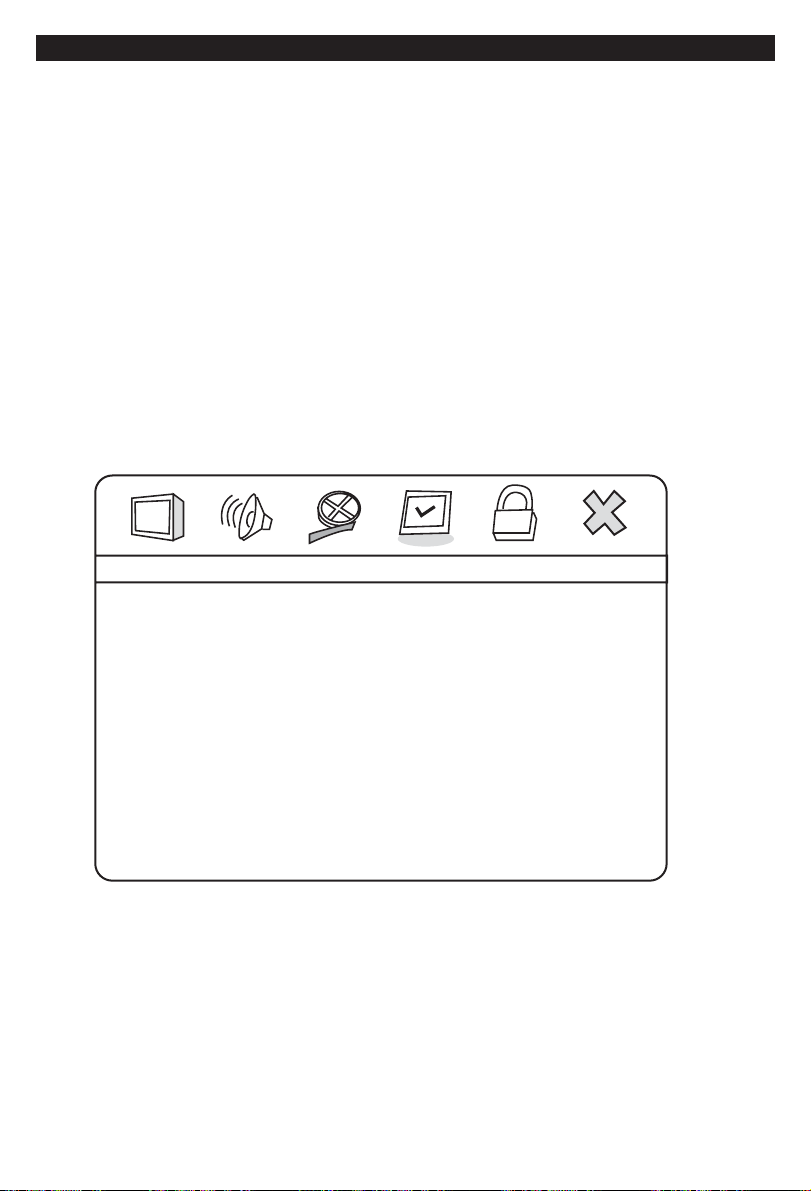
CHANGING REGION CODE OF THIS PLAYER
--- Preference Setup ---
TV Type
PBC
Audio
Subtitle
Disc Menu
Parental
Default
Goto Preference Setup Page.
Press 1006.
The region code adjust window will show up. Use left/right cursor button to adjust
region code ( 0 -- region code free, 1--6 region code 1-- 6), PLAY/ENTER to confirm
the change.
YUV
Off
Eng
Eng
Eng
Page 23

OTHERS
-21-
USEFUL NOTES
In order to prolong the service life of your player, it is recommend to wait at least
30 seconds before you turn it on again after switching it off.
Turn off power after operation.
Only use the power supply of the nominal voltage, otherwise the player will not be
operational or even be damaged.
In case of occasional player halt, please turn it off and turn it on again.
Dont turn off this player while it is still showing loading on the display.
TROUBLESHOOTING
Symptom Cause Solutions
No sound
Signal not properly connected
Disc warped or dirty.
Player in mute status.
Connect signal securely.
Clean your disc.
Press MUTE button again.
No picture
No color
No disc reading
Remote control
failure
Temporary function
failure
Picture rolling
Signal not properly connected.
TV not set for proper system.
TV system not right.
TV set color not properly adjusted.
No disc in the player.
Disc not properly loaded.
Condensation on the laser head.
Remote control not pointing to the sensor
window.
Remote controls operating distance more
than 8 meters away from the TV.
Batteries low.
Mal-fabricated disc used.
Wrong buttons pressed.
Static leakage into the player from outside.
TV set not properly adjusted.
Connect signal securely.
Reset the AV/TV status of your TV set.
Press PAL/NTSC button.
Adjust color of the TV set.
Load a disc.
Reloaded a disc, with the label side facing up.
Turn on the player, unload the disc and leave it on
for about an hour.
Use the remote control properly.
Use the remote control within 8 meters range.
Replace the batteries.
Wait 5-10 secs and the player will return to normal.
Operate once more.
Turn off the player for 1 to 2 mins, turn it on again.
Re-adjust system of the TV set.
Page 24

http://www.neodigits.com
c
Copyright 2004, NeoDigits. All rights reserved.
 Loading...