

Neodigits HELIOS X5000 user Manual
User Manual
HELIOS X5000 HD Upscaling Multimedia
& DVD Player

General Introduction
Thank you for purchasing your new HELIOS X5000 Network Media player.
The Helios X5000 is built with professional-grade components and state-of-the-art
features. Unlike your standard DVD player, the X5000 is somewhat of a mini-computer.
And like all other computers, you will notice that it takes some time for this player to start
up as it loads different software. It takes about 10 seconds f or the player to fully turn itself
on. Once on, please note that it takes a little bit of time to switch from feature to feature
The following pages provide you with detailed information on everything you need to
know about your HELIOS X5000. If you have any query that is left unanswered after
reading this manual, please do not hesitate to contact us at support@neodigits.com

Table of contents
1. Safety precautions
2. Before Use
What’s-in-the-box checklist
Overview of HELIOS X5000
Supported Discs and Formats
Precautions
3. Front panel
4. Front Panel Display
5. Rear Panel
6. Remote Control
7. Preparations
Connecting to a TV
Connecting to audio Equipment
Connecting to Network
Connecting to Wireless Network
8. Before Operation
Initial Settings
Language
Picture
Sound
Network (wired)
Network (Wireless)
Install NeoLink Server Software
9. Operating the Network Media Player
Setting system browser mode
DVD, VCD, CD setup and playback
Playing from a USB storage device
Playing content over a network
Playing content from Internet
Entering text using the remote control
Changing the front panel display
Playing DRM content on your HELIOS
Creating and using web bookmarks on your HELIOS
Sharing content with other HELIOS users
Control access to your media library.
10. Adjusting Player Setup
11. Appendix
Check your computer’s IP address
Troubleshooting
Support information
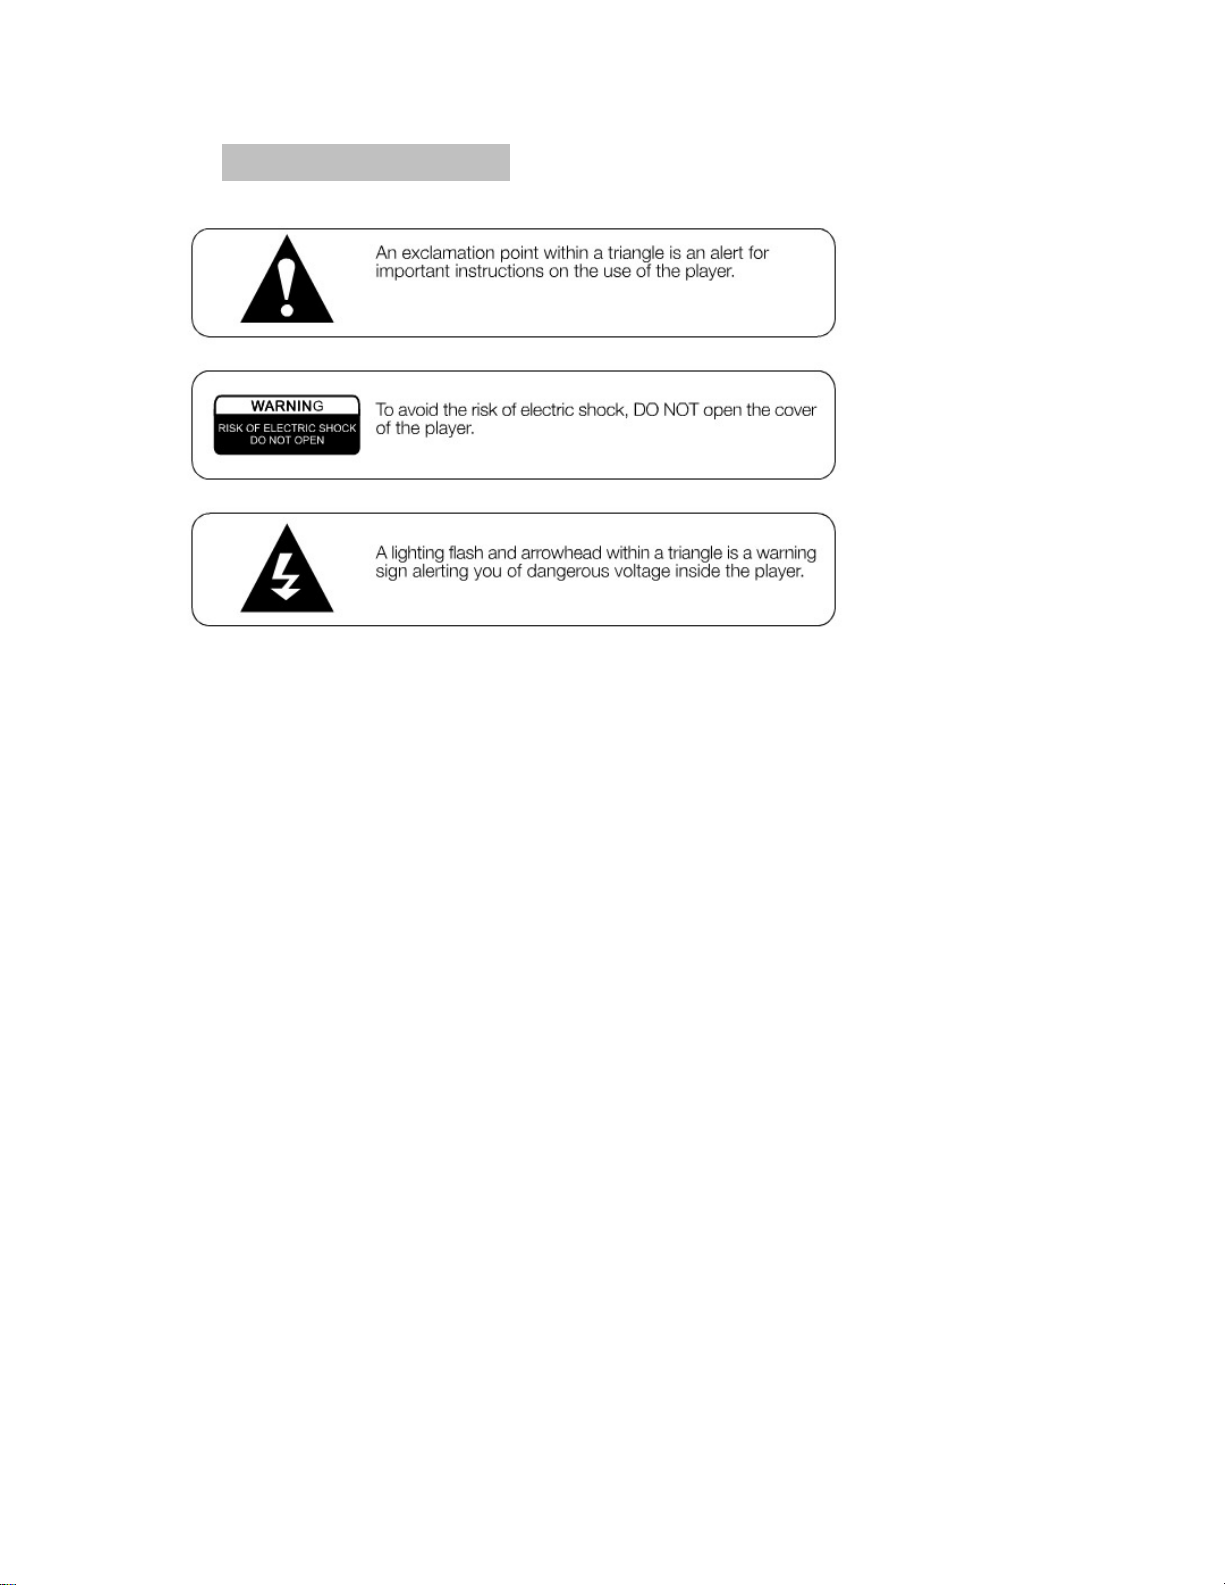
1) Safety Precautions
Symbols
Warning: key operations and maintenance instruction enclosed with the player
Caution: DO NOT open the cover of the player to avoid the risk of fire or electric
shock. Contact a professional for repair.
Warning: Dangerous high voltage inside and risk of electrical shock.
CAUTION
To reduce the risk of fire, electrical shock or damage to the player, do not expose this
device to moisture and do not place water filled objects close to or on top of it.
Usage Notice
• Before plugging in this device, make sure your power supply voltage matches the
product. The working voltage of this player is marked on the rear panel.
• To avoid damage to the audio system, switch the volume of connected devices
such as speakers or amplifiers to minimum before turning the player on/off.
• Unplug the player when unused for long periods.
• Do not unplug by pulling on the power cable.
• Do not place heavy objects on top of the player.
• Do not put fingers or other objects into the player.
2) Before Use
What’s-in-the-box checklist
• One HELIOS X5000 HD Upscaling Multimedia & DVD player
• One Remote Control
• Two AA batteries for remote control
• One HDMI digital video connection cable
• One RCA audio video cable
• One Power cable
• One Quick Start Guide
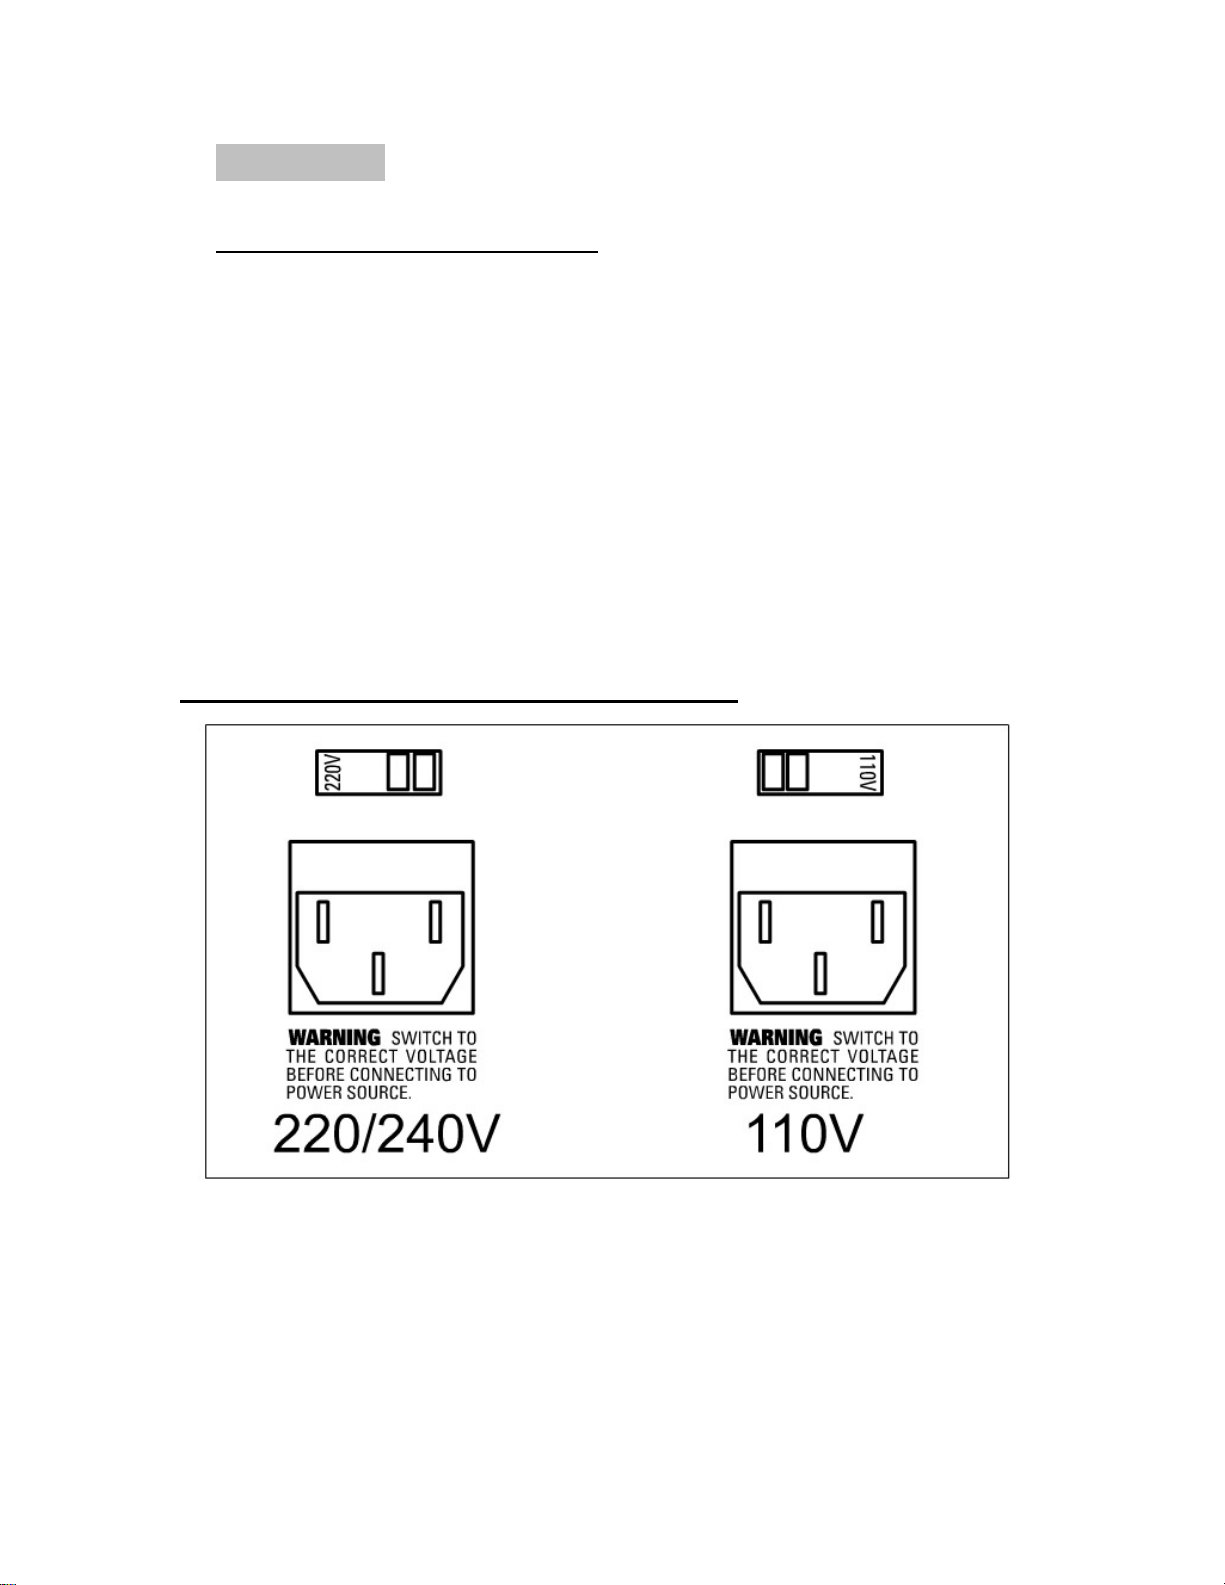
Select the correct power supply voltage
The HELIOS X5000 works under 220/240V or 110V power supply. Before you connect this player
to your power source, be sure to check the back of your player to see if the voltage switch is set to
the right setting. The voltage switch shows the current volt age setting. Flip the switch to the right to
select 220/240V mode; flip the switch to the left to the left for 110V mode.

Overview of HELIOS X5000
Main features
• High Definition Upscaling DVD Player up to 1080P(1920x1080) resolution
• High Definition Network Media Player
• Video (standard and high definition)/audio/picture media file playback
• Built-in 10/100M LAN and 54M 802.11G WIFI
• HELIOS Media Portal* (Online radio, television and news broadcasts)
• Streams video/audio from network computer running HELIOS NeoLink
software**or third party UPnP compatible server software’s (Windows Media
Connect, Nero Digital Software)
• Built-in web browser supports HTML, RSS feed, Internet music and Internet Video
• Supports USB 2.0 Mass Storage devices
• Multi-language support: English, French, German, Spanish, Italian and Dutch
* Requires a Broadband Internet Connection
** Requires a PC running Windows XP/2K
Supported Discs and formats
Video Formats
NB: All figures below are peak values
Format Wired LAN DVD CD USB 2.0 USB 1.1
MPEG-1,MPEG-2 12Mbps 10Mbps 4Mbps 10Mbps 3Mbps
DivX,XviD, MPEG4 1.5Mbps 1.5Mbps 1.5Mbps 1.5Mbps 1.5Mbps
WMV9 8Mbps 8Mbps 4Mbps 8Mbps 3Mbps
* AVI files can only be played when they are interleaved
If a non-interleaved file is played, either the video or audio quality will be compromised.
Make sure the file you want to play is interleaved. For interleaving of a file during the file
creation process, refer to the Help screens or manual of the encoding application you are
using.
* DivX files encoded with GMC, Quarter Pixel or Adaptive Multiple Consecutive setting
cannot be played
* Copyright-protected WMV9 discs cannot be played directly but copy protected discs &
files can be played over the LAN via NeoLink server and Windows Media Connect.
Supported Audio Formats
NB: All figures below are peak values. Music files encoded in CBR and VBR are both
supported.
Format
Bit rate Sampling rate

MP3 64k~192kbps 32k/44.1k/48kHz
WMA (excluding WMA9Pro) 64k~192kbps 44.1k/48kHz
Ogg Vorbis 64k~192kbps -
AAC 64k~192kbps 32k/44.1k/48kHz
PCM(WAVE) - 32k/44.1k/48kHz
* Copyright-protected WMA discs cannot be played directly but copy protected discs &
files can be played over the LAN via NeoLink server and Windows Media Connect.
Supported Image Formats
Format
JPEG 2048×1532 Network
BMP 2048×1532 Network
GIF 2048×1532 Network
PNG 2048×1532 Network
* Network refers to wired LAN connection
Limitations on Video File Size
Format Maximum file size
AVI(DivX, XviD) 2GB
MPEG 4 GB if the disk format is FAT32, or 2 TB if the disk format is
NTFS)
WMV9 4 GB if the disk format is FAT32, or 2 TB if the disk format is
NTFS)
Resolution Display method
1600×1200 DVD/CD, USB
Precautions
Handling the player:
When transporting the player
Repacking the player in the original packaging is the safest way of transporting
the player.
To keep the exterior surface clean
Do not use volatile liquids, such as insecticide spray, near the unit. Use a soft
cloth lightly moistened with a mild detergent solution. Do not use strong solvents
such as alcohol, benzene, or thinner as these might damage the surface of the
unit.
To obtain a clear picture
The DVD ROM unit in the player us a high-tech, precision device. If the optical
pick-up lens and disc-drive parts are dirty or work the picture quality will be poor.
Always try to minimize exposing the player to a dusty / dirty environment.
How to handle Discs
Do not touch the play back side of the disc. Hold the disc by the edges so that
fingertips will not get on the surface. Do not stick paper or tape on the disc.
After playing, store the disc in its case.
Do not expose the disc to direct sunlight or sources of heat. For example, do not
leave a disc in a parked car exposed to direct sunlight.
Clean discs with a clean cloth. Wipe the disc from the center out. Do not wipe in a
circular motion.
Do not use strong solvents such as alcohol, benzene, thinner or anti-static spray
intended for vinyl records.
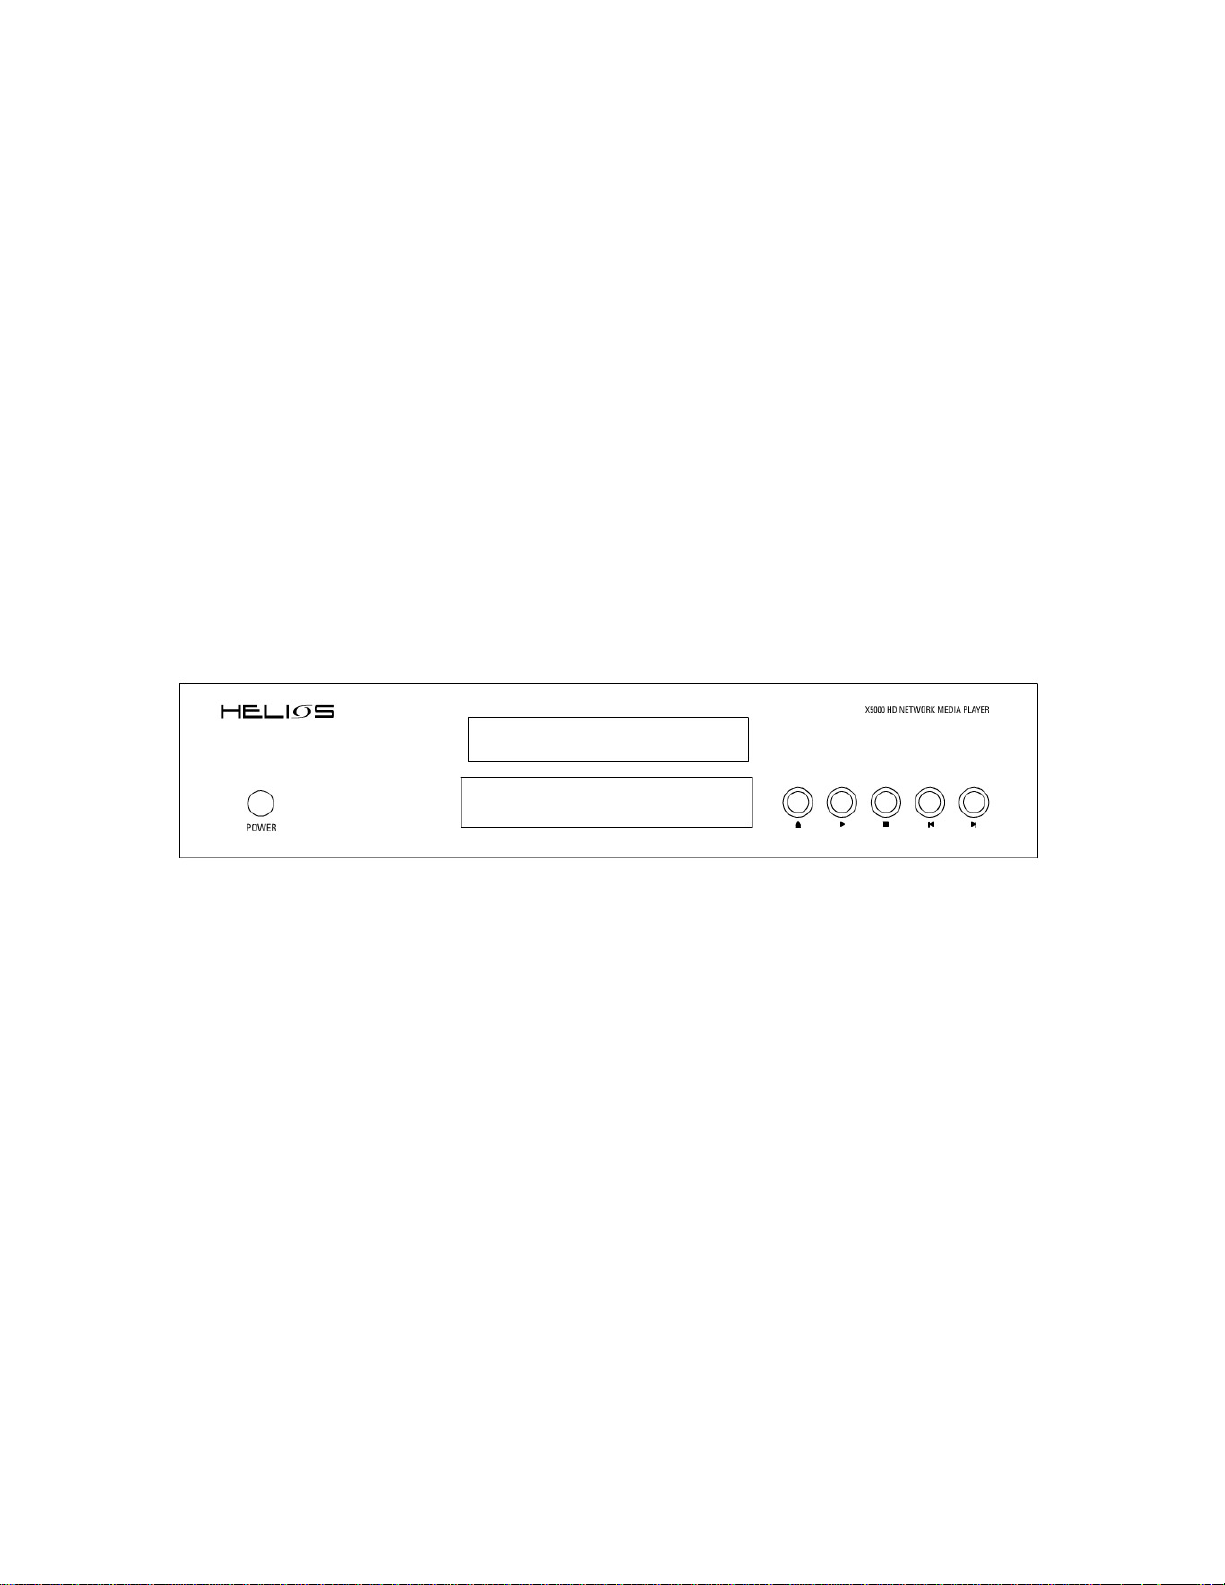
3) Front panel
Buttons and features explained
1. Power button.
2. Front panel display
3. Disk tray
4. Eject button
5. Play/Pause button
6. Stop button
7. Previous button
8. Next button
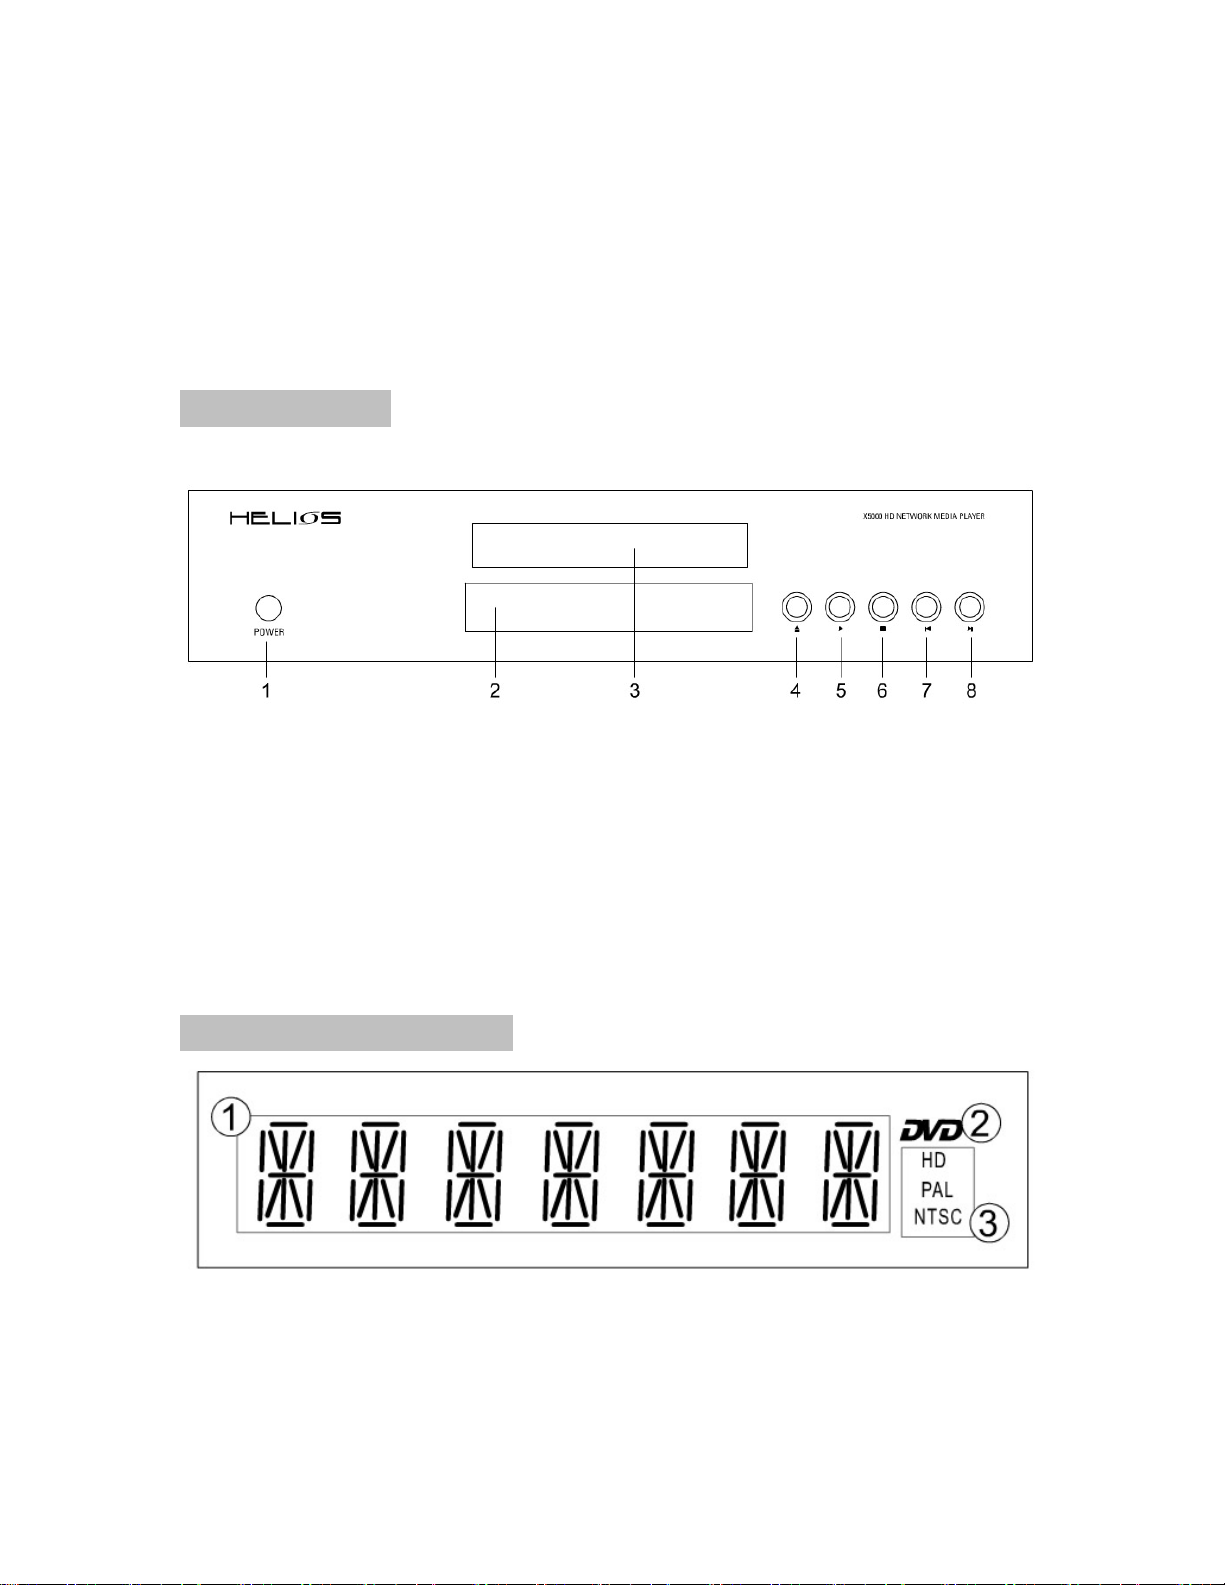
4) Front panel Display
1. Main information display: show playback elapsed time, player’s status.
2. DVD logo. This logo will show up when a DVD disc is being played.
3. Video mode display. HD means High Definition video mode is being used,
PAL/NTSC means the video mode is in standard definition PAL/NTSC mode.

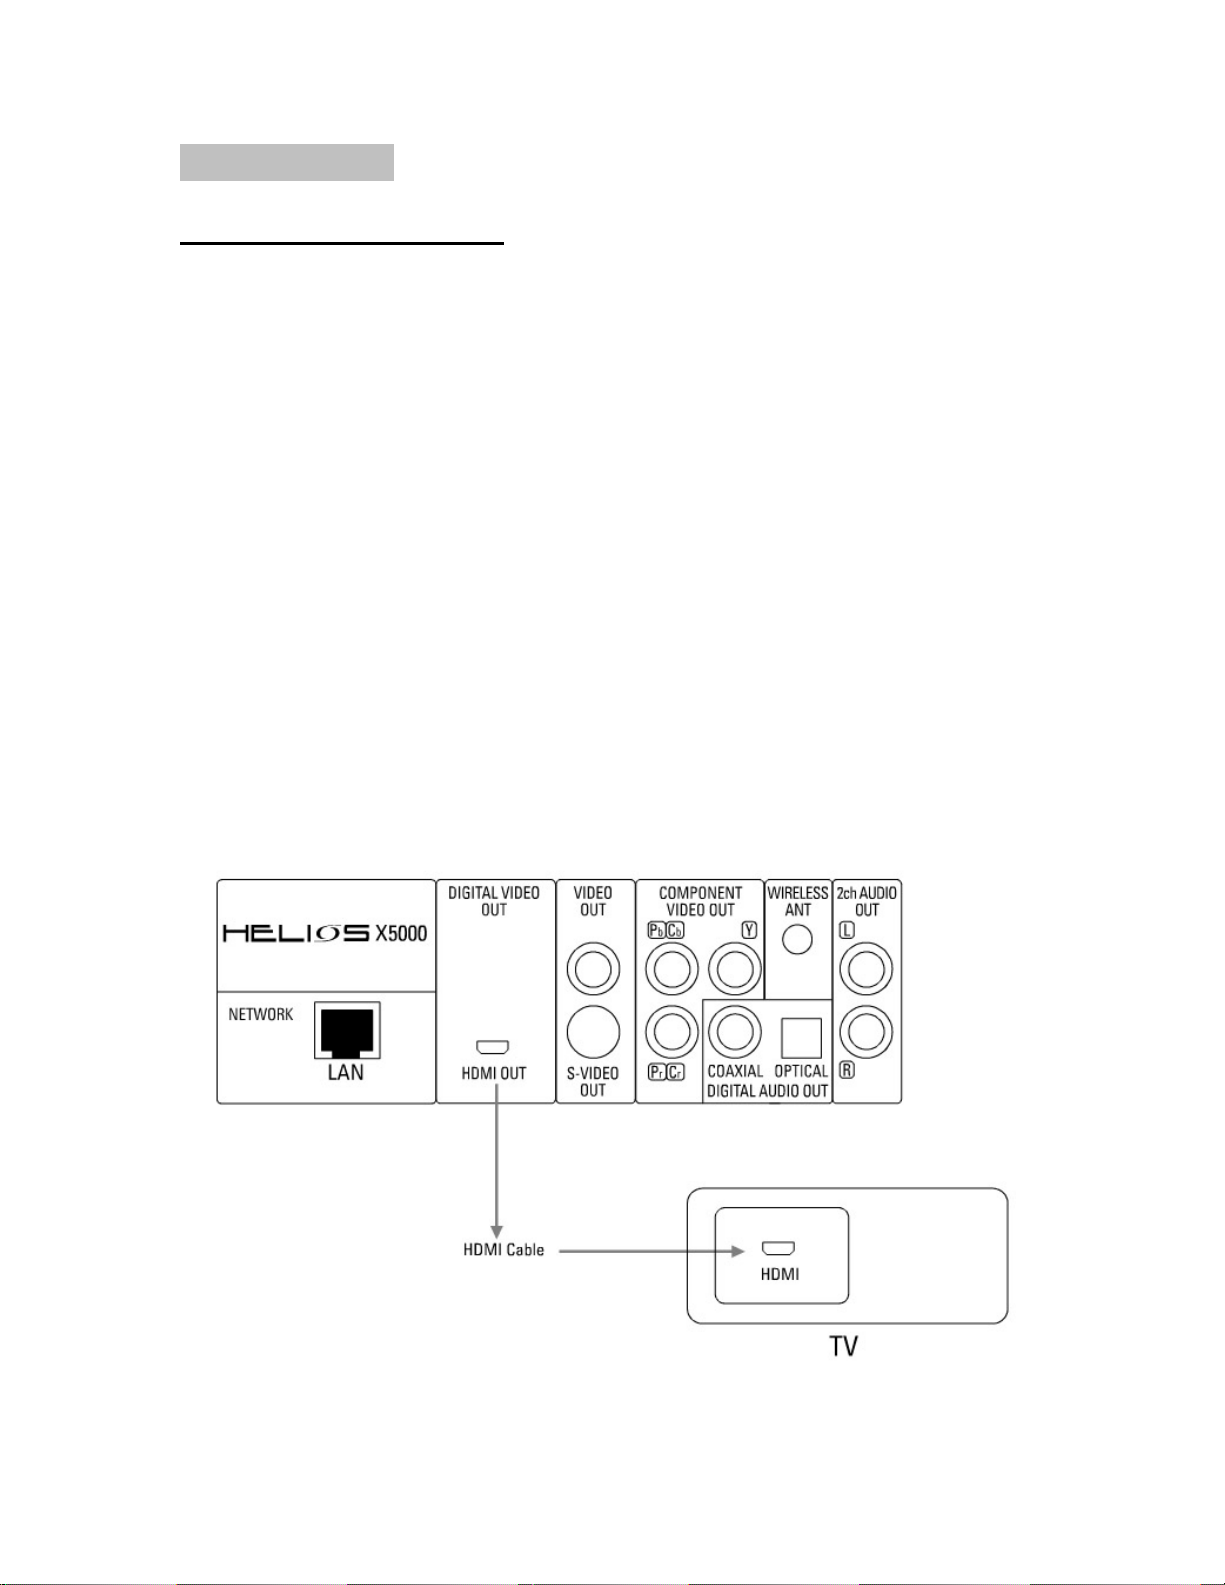
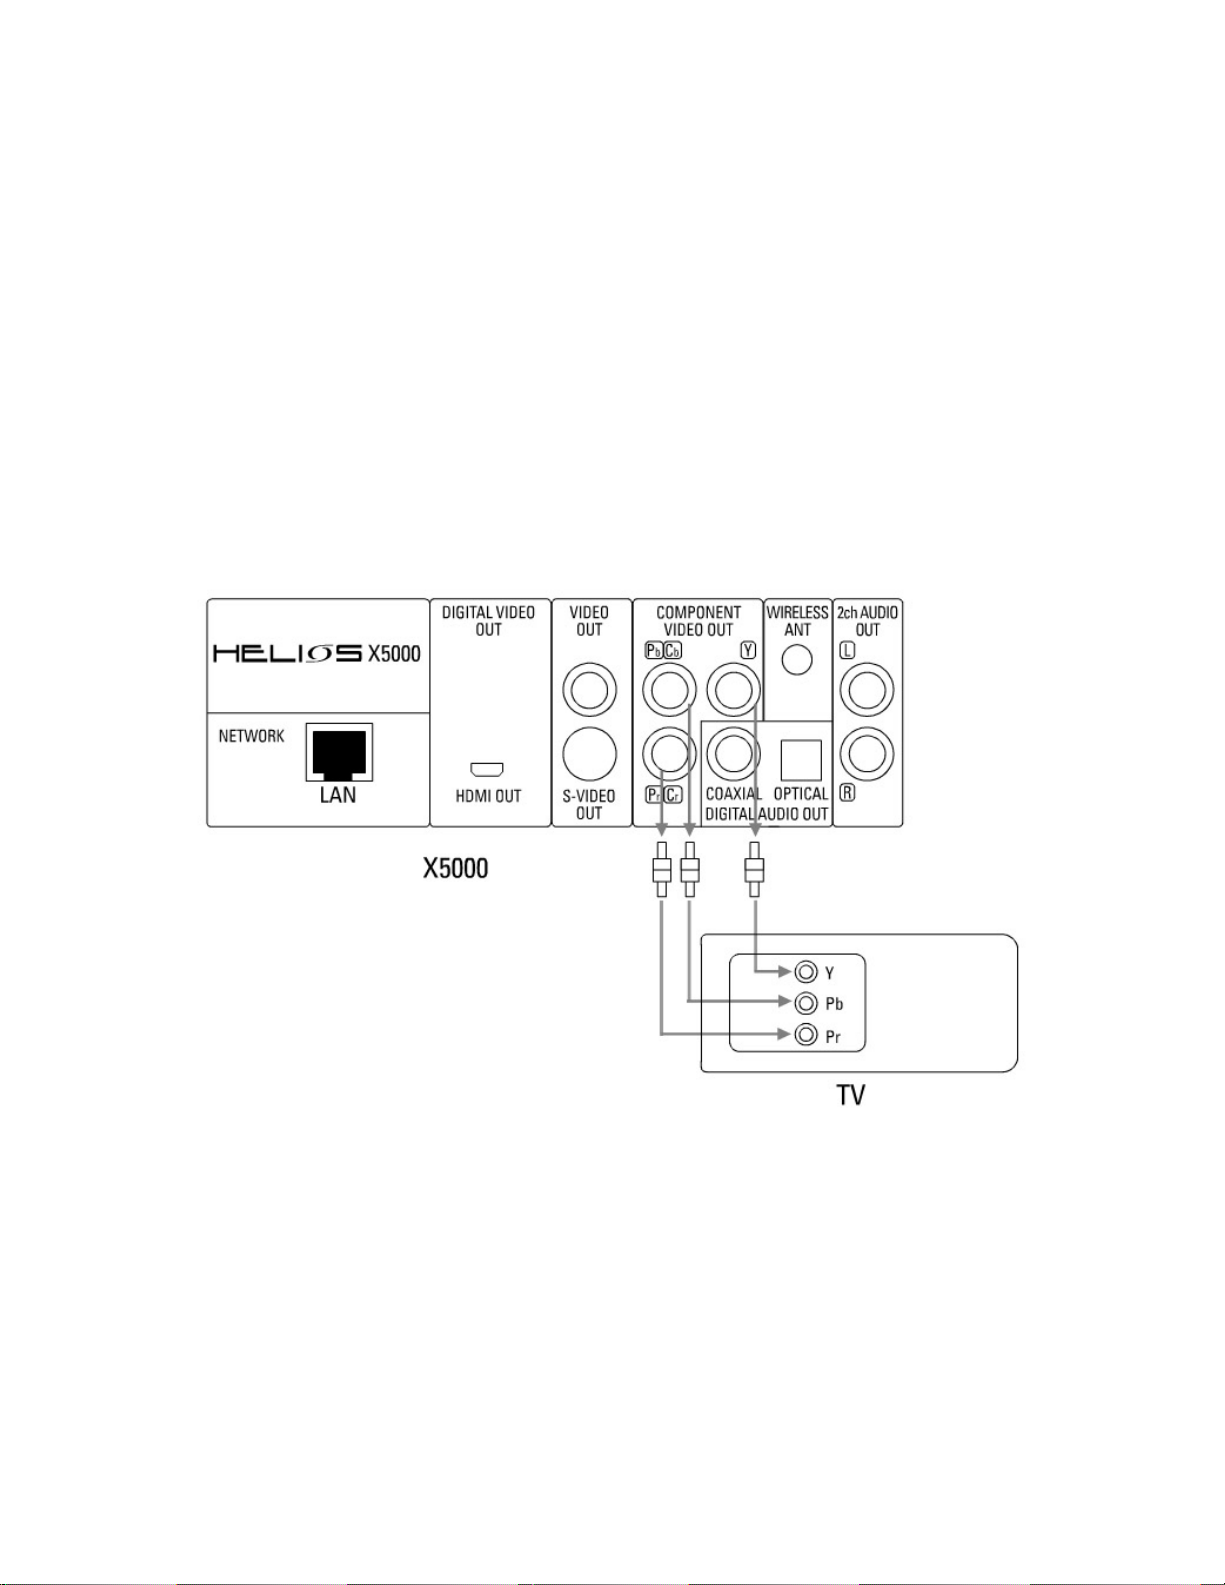
5) Rear panel
1. LAN (RJ45) connector.
2. HDMI digital video output.
3. S-video output
4. Composite video output
5. Component video output
6. Coaxial digital audio output
7. Optical digital audio output
8. External antenna connector
9. 2 channel(left and right) stereo audio outputs
10. USB connector
11. Heat sink
12. Voltage switch
13. Power connector
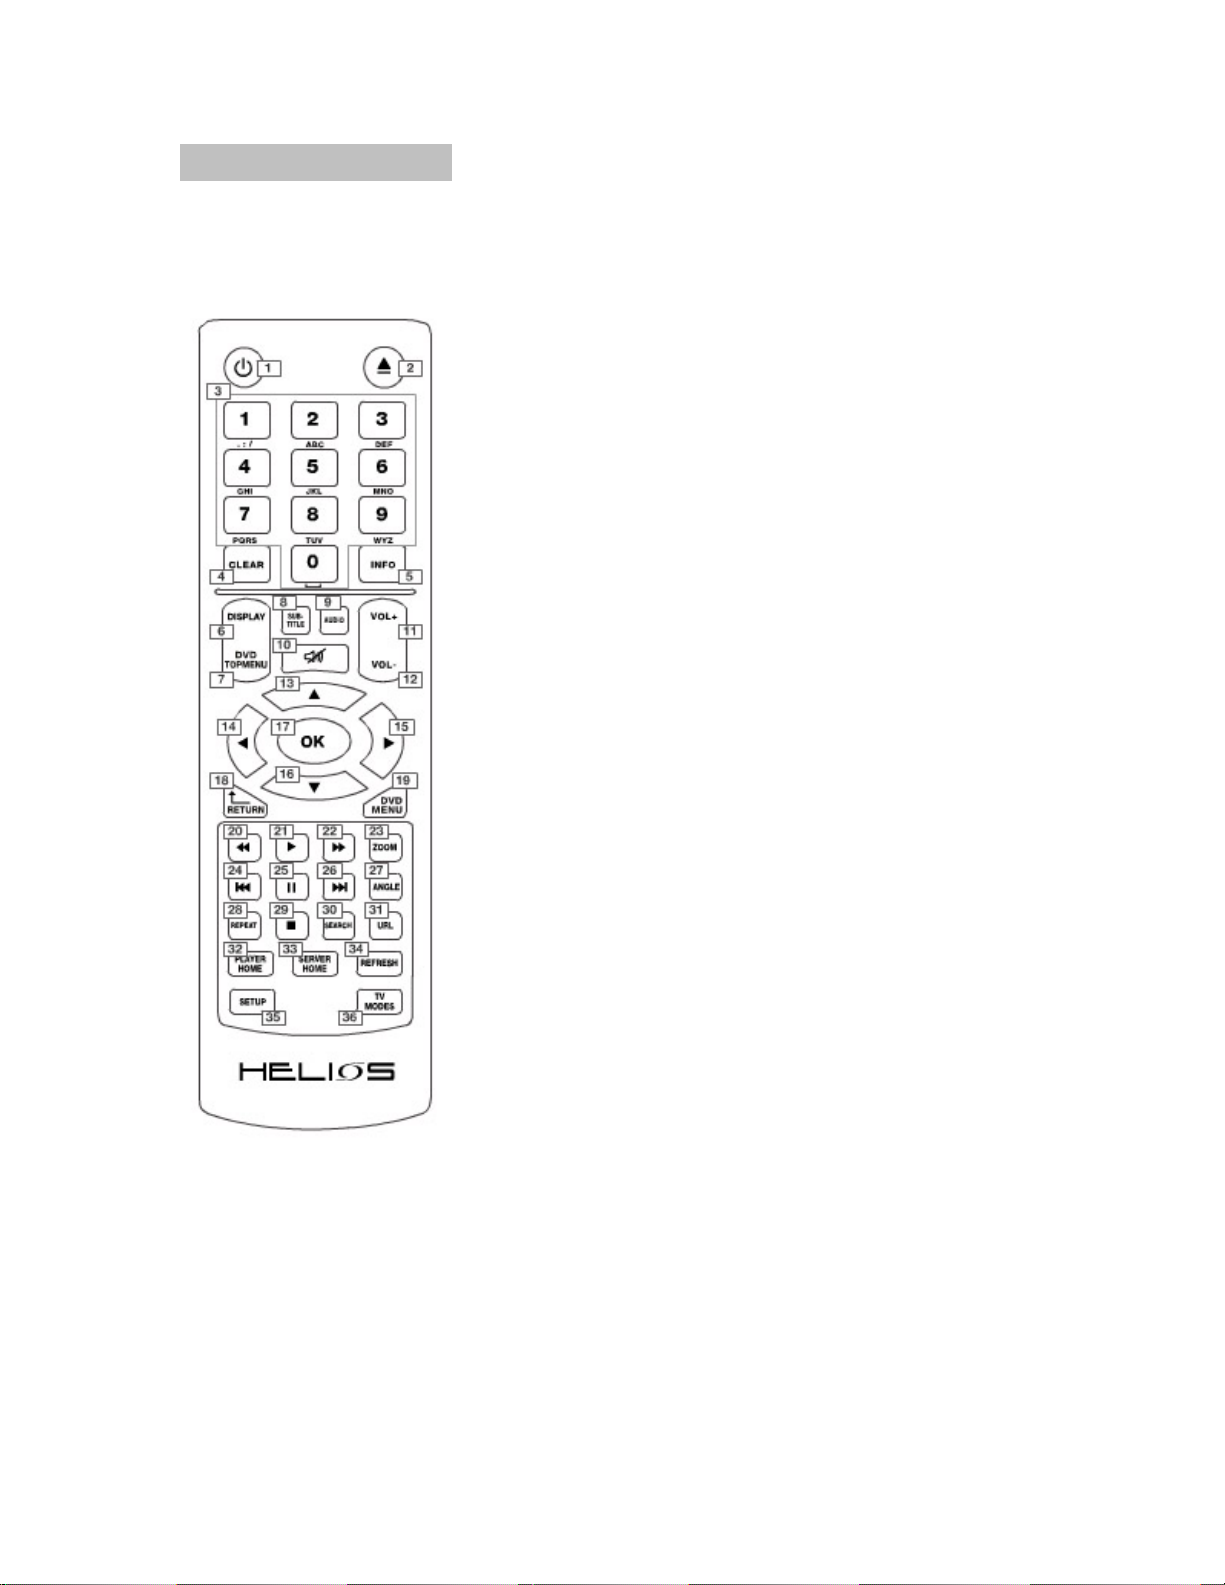
6) Remote control
All the features of the Helios X5000 can be accessed with the remote control via two user
modes: media player mode- to play DVD/ CD and audio/video files network mode- to
browse the Internet and the local area network. Some buttons on the remote control
operate differently in media player mode
1. Power On/Off
2. Eject: open or close disc tray
3. Numeric buttons
4. Clear:
a) Erases the number or data you just entered
b) Front panel display switch when playing contents
5. Info: Display information about the content been played
6. Display: Shows or hides OSD menu
7. DVD top menu: Open DVD title menu
8. Subtitle: switches between subtitle options
9. Audio: Switches audio tracks
10. Mute: Press once to mute. Press twice to undo mute
11. Volume increase
12. Volume decrease
13. Up cursor
14. Left cursor
15. Right cursor
16. Down cursor
17. OK / Enter
18. Return: go back to previous menu / page
19. DVD Menu
20. Fast backward
21. Play
22. Fast forward
23. Zoom
24. Previous: Skip backward
25. Pause
26. Next: Skip forward
27. Angle: switches play angles
28. Repeat: Switches between repeat options during CD / DVD /
VCD playback
29. Stop
30. Search:
31. URL: use to enter a URL address
32. Player Home: go to the player home page
33. Server Home: go to the NeoLink server home page
34. Refresh:
a) Refresh / reload the current page
b) Switches between repeat options during video/audio
c) file playback.
35. Setup:
a) open the setup menu
b) open color adjustment menu during video
i. playback
36. TV Modes: switched through the player output and resolution
combinations
7) Preparation
Connecting to a TV / Display
Depending on your TV and other equipment you wish to connect, there are vario us ways you
can connect the player to your AV equipment and computer network.
Please refer to the manual of your TV, stereo system or other devices where necessary to
make the best connections.
For better sound reproduction, you can connect the player’s Audio output to a separate
amplifier / AV receiver.
The Helios X5000 offers 4 different video output options and 11 different video output resolutions.
Proper video setup is needed to ensure optimum results.
Make one of the following connections depending on your equipment (TV / computer monitor,
projector etc).
Note:
If your display device only supports standard definition video input (PAL or NTSC), then you
can connect your TV with the Helios X5000 via composite video cable, S-video cable or
component cable.
A. Digital HDMI (or DVI) connection
The following resolutions are available via HDMI connection:
480p/ 576p/ 720p/ 1080i/ 720P 50hz/ 1080i 50hz/ 1080p and 1280 X 768
The HDMI output of you HELIOS X5000 can output both digital audio and video signal
over the same HDMI cable.
Use the HDMI cable to connect the player to the HDMI input of your display. When a
HDMI output resolution is selected your X5000 will output both video and audio.
If you wish to use a DVI connection instead of HDMI, you can connect to your TV using a
HDMI to DVI converter cable.
If using DVI, you will have to connect your sound system separately using the supplied
audio cable to connect to your TV
Or
You can connect the X5000 sound output to your AV receiver using Stereo, 5.1 Surround
or digital audio connections (coaxial / optical).
C. Component connection
The following resolutions are available via component connection:
PAL, NTSC, 480p, 576p, 720p, 1080i, 720p/50hz, 1080i/50hz and 1080p.
Insert one end of the component video (Y / Cb / Cr) into the red / blue / green socket of
the component video output located on the rear of the player. Insert the other end of the
cable into the component video input socket located on your TV / display.
Use the supplied audio cable to connect the player to the TV
Or
You can digital audio connection (coaxial / optical) or 5.1 channel connection to your AV
receiver
 Loading...