

NEO Coolcam Motion Sensor 2 Quick Start Manual

Neo Coolcam
Motion Sensor 2 with temperature sensor
SKU: NEOEMS02Z
Quickstart
This is a Multilevel Sensor for Europe. To run this device please insert fresh 1 * CR123A
batteries. Please make sure the internal battery is fully charged.
1) Disassemble PIR main body and insert battery into PIR sensor. After making it powered
on, please do not operate it within 20s.
2) Make sure PIR sensor is located within the Z-Wave network range of gateway.
3) Set Z-Wave gateway into inclusion mode (Refer to gateway user manual).
4) Press the code button in PIR sensor three times continuously, LED Color Indicator then
PIR sensor will enter inclusion mode. Meanwhile, LED light would flash red color five times
on and off alternately.
5) PIR will be detected and included in the Z-Wave network.
6) Wait for gateway to configure PIR sensor.

What is Z-Wave?
Z-Wave is the international wireless protocol for communication in the Smart Home. This
device is suited for use in the region mentioned in the Quickstart section.
Z-Wave ensures a reliable communication by
reconfirming every message (two-way
communication) and every mains powered
node can act as a repeater for other nodes
(meshed network) in case the receiver is not
in direct wireless range of the transmitter.
This device and every other certified Z-Wave
device can be used together with any other
certified Z-Wave device regardless of brand
and origin as long as both are suited for the same frequency range.
If a device supports secure communication it will communicate with other devices secure as
long as this device provides the same or a higher level of security. Otherwise it will
automatically turn into a lower level of security to maintain backward compatibility.
Product Description
Motion sensor(PIR) is a passive infrared detector or physical sensor. This sensor doesn’t emit
any energy but only passively receive and detect infrared radiation from outside. Under room
temperature, all items have radiation. Human beings are warm-blooded animals with stable
infrared radiation, so are most easily to be detected. That’s why we also call it body sensor.
PIR send messages via Z-Wave network to Z-Wave gateway. In the Z-Wave
network communications, PIR can be connected to any Z-Wave gateway. Different countries
or areas, the radio frequency is different. In the communication between PIR and ZWave gatwway, PIR can only send messages, not be able to receive messages. When PIR is
triggered, PIR will send message to Z-Wave gateway, and associate devices to work through
ZWave gateway. PIR is battery powered, is small and can be installed easily.
Prepare for Installation / Reset
Please read the user manual before installing the product.
In order to include (add) a Z-Wave device to a network it must be in factory default state.
Please make sure to reset the device into factory default. You can do this by performing an
Exclusion operation as described below in the manual. Every Z-Wave controller is able to
perform this operation however it is recommended to use the primary controller of the
previous network to make sure the very device is excluded properly from this network.

Reset to factory default
This device also allows to be reset without any involvement of a Z-Wave controller. This
procedure should only be used when the primary controller is inoperable.
1. Remove the cover of PIR sensor.
2. Make sure the sensor is powered.
3. Press and hold the reset button for 10-15 seconds, then LED lights would flash red color 1
time first, then 5 times on and off alternately.
4. Release the code button.
Safety Warning for Batteries
The product contains batteries. Please remove the batteries when the device is not used. Do
not mix batteries of different charging level or different brands.
Installation
Holder Installation
Fix the holder with screws and screw stopper or put the sticker on the bottom of motion
sensor then fix it on the wall.
Battery Installation
1.Make sure PIR placed within the Z-Wave network range of gateway.
2.PIR is recommended to be fixed at the height of 2- 4 meters off the ground.
3.When install PIR, please keep it far away from places where air temperature changes
sensitively, e.g., around air conditioners, refrigerators, stoves and so on.
4.Furniture, large bonsai or other spacers shouldn’t be placed within PIR’s detection area.
5.When installing PIR, please keep it away from stairs, elevators and other obstructions. Make
sure these obstructions are outside of PIR’s detection area.
6.After instaling PIR, please test whether PIR works properly or not, if there is false alarm
from PIR, please install PIR in another place.
7.Direct association can be allowed between PIR and other ZWave network devices if preset
association functionality. Z-Wave gateway will not take part in such communication. Using
this mechanism, PIR can communicate with other devices even when gateway is damaged.
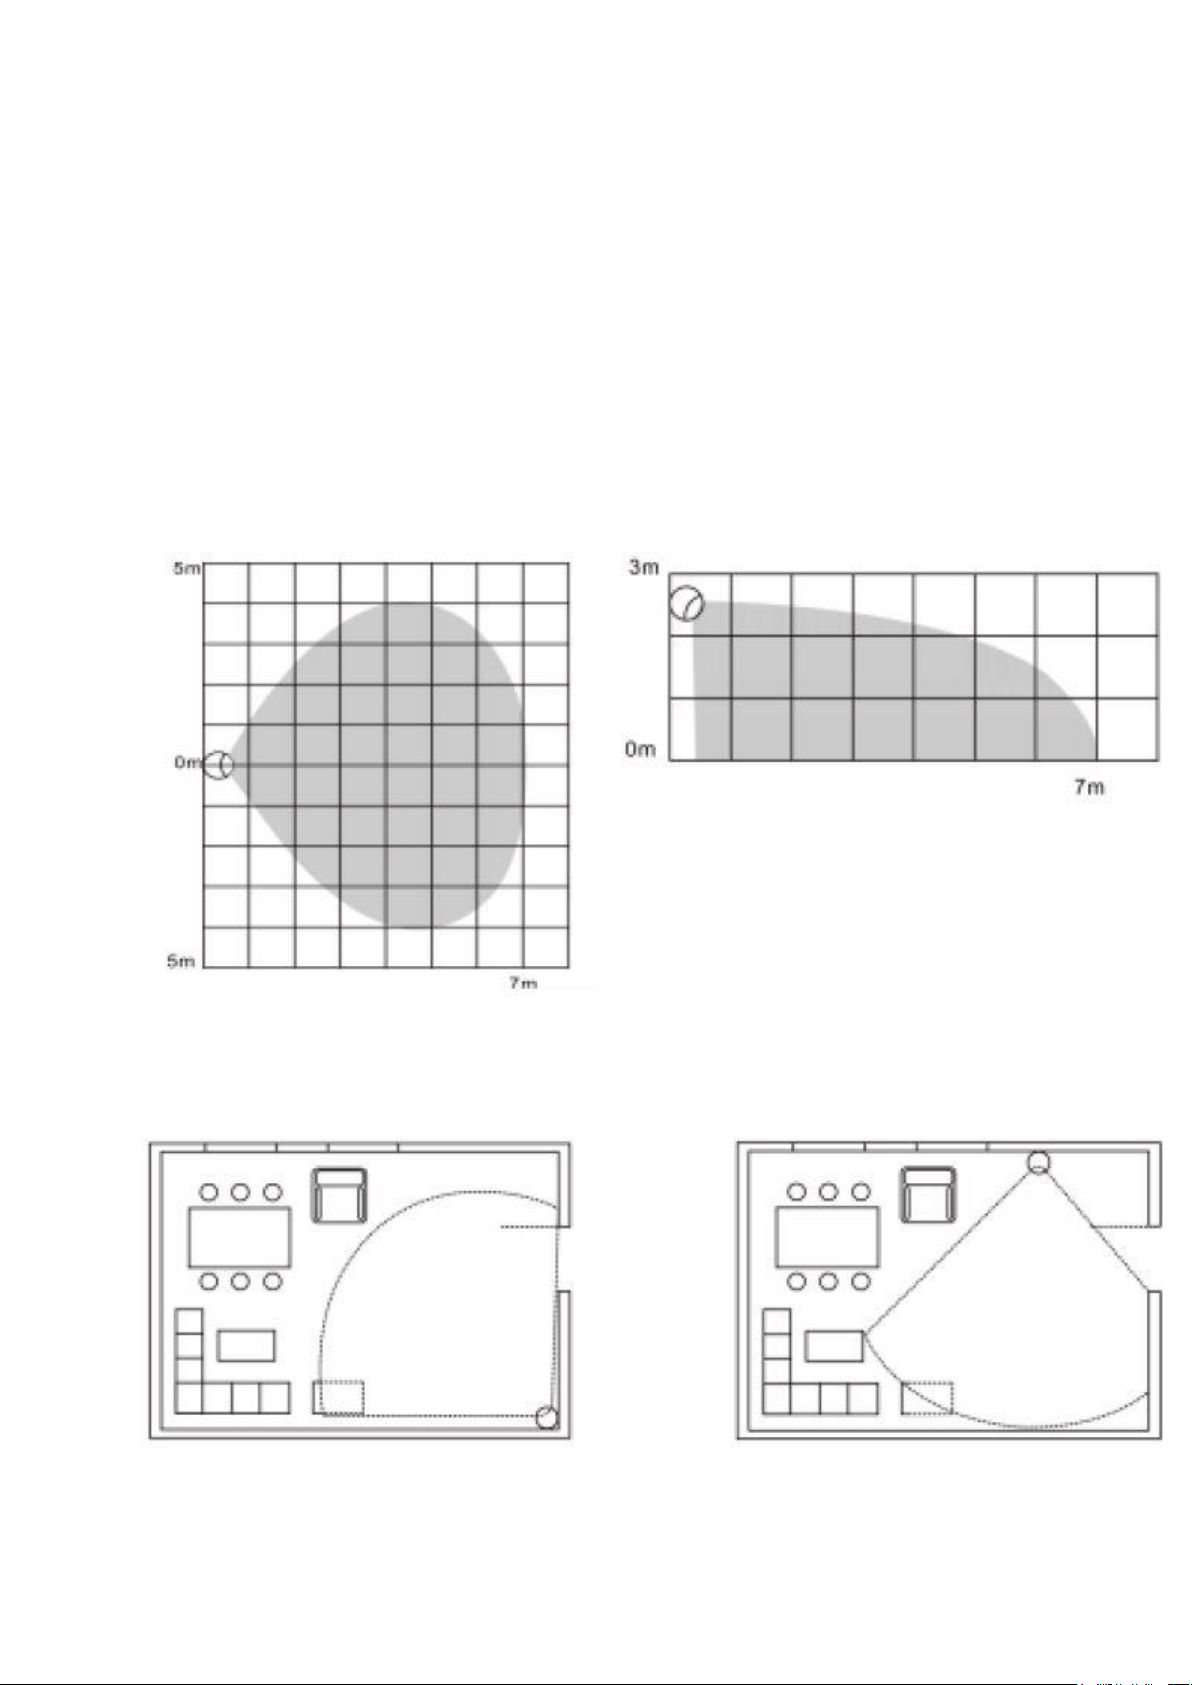
Detection Range
PIR has to be installed in a corner of room or perpendicularly to door. Actual detection range
of this sensor can be influenced by environment conditions. If there are false alarms
reported, check if there are any moving objects within sensor‘s detection
area, such as trees blowing in the wind, cars passing by, windmills. False motion alarms may
be caused by masses of moving air and heat as well. If sensor keeps on reporting false alarms,
despite eliminating all of above-mentioned factors, then install sensor in another place.
Detection range of PIR shown in the following picture
Working Conditions
If there is someone moving within the detection area, then alarm would be triggered, and LED
lights would flash in the inductive area at the same time.
Work schematic diagram of PIR is shown in the following picture
 Loading...