

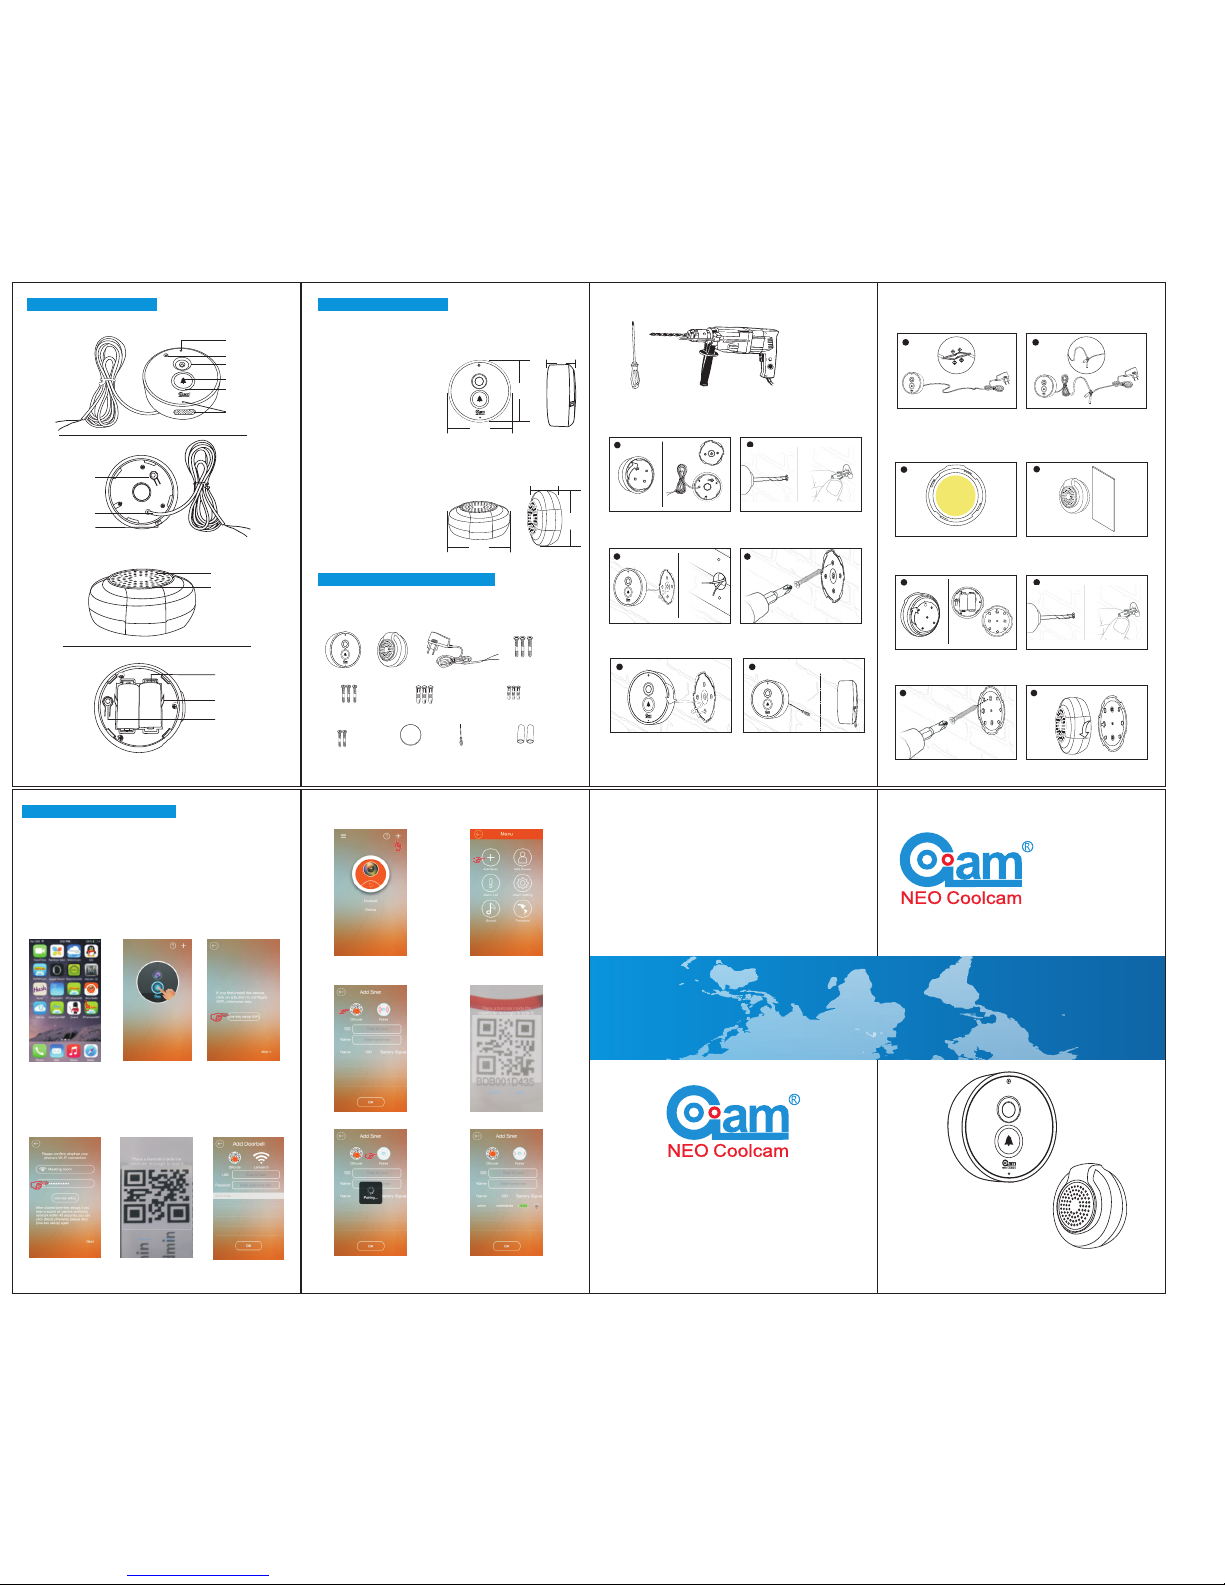
NEO Coolcam iDoorbell Quick Installation Manual
Two: iDoorbell door chime installation steps
1. Remove the back cover of the chime
2. Drill holes to insert ¾”screw wall
anchors(if needed)
2
1
3. Mount the back plate using 3X3/4"
screws
4. Mount Door chime to the back cover
Make sure to turn clockwise until the chime
is firmly secured
3
4
1. Stick the double sided tape to the
back of the chime
2. Stick it to the wall
2
1
Method 1: Paste method
Method 2: Mou nting method
4
iD oo rb el l Qu ic k In st al la ti on G ui de
Mic ropho ne
Wide angl e lens
Touch butt on
Lou dspea ker
Photoresistance
LED l ight
Powe r cable
Scre w holes
Reset button
1
iDo orbel l featu res
Door Chime Features
Spe aker
LED l ight
2
WiFi: 802.11b/g/n
Audio: full duplex two way audio
Resolution: 720P
View angel: 120 degree
TF card: 8GB
Power: DC5V 2A
Operate temperature
Dimension:
:-10F ~120F
2.7”(D) X 1.2” (W)
70mm
70mm
28mm
Product specification
Doorbell specification
Loudspeaker specification
Power: CR123A X 2
Battery life: 12 months
Continuous work: 1400 times
Operate temperature:
Sound intensity: 120dB
Dimension:
-10F ~120F
2.7”(D) X 1.2” (W)
70mm
31mm
68mm
You may need: electric drill and a screwdriver
1. Remove the idoorbell camera
back cover
2. Drill hole to run iDoorbell power wire
2
1
3. Run iDoorbell power wire through
the hole
4. Mount the back plate using 3X1"screws
(use 1” screw wall anchors if needed)
4
3
One : iDoorbell Camera installation steps
Two: A dd iDoo rbell D oor Chi me
6
App download & Add device
App downl oad
1: Scan the QR code on package to download
2: Android phone: download from GooglePlay.
iOS phone, download “iDoorbell” from App Store
“iDoorbell”
Add d evice
One .Add iD oorbe ll Came ra
5
For the first time use and installation
7
3
7.Connect iDoorbell power line’s positive(red) line
to Power adapter power line’s positive(red) line.
Connect iDoorbell power line’s Negative(black) line
to Power adapter power line’s negative(black) line
Art icle la b
Bat tery
Note: Ensure that there is WiFi network for the doorbell to connect.
Accessories
6. Fix iDoorbell camera to the back
plate using metal screw
6
5. Mount iDoorbell camera to the
camera backplate
8
8. Fasten each connected using the
power connection sleeve
1pc 5V2A pow er adapter
3 pcs 1” scre ws for Do orbel l Camera
3 pcs 1” screws wall anchor for Doorbell Camera
2 pcs 5/8"screws with wall
anchor for Doorbell camera
3 pcs ¾”screws wall anchor for Door chime
3M PE FOAM
3M PE FOAM
3M PE FOAM
3M PE FOAM
1 pc double side tape
1pc small screwdriver
2 pcs Power connection sleeve
Product features
Reset button
1 pc Doorbell camera
1 pc Door Chime
3 pcs ¾” scre ws for Do or chim e
5
1.Run“iDoorbell” from
Google Play (first time) or
from your phone desktop
2.Tap on “+” icon on
top right corner to add
iDoorbell camera
3.For first time installation,
tap on “one key setup wifi”
icon or choose skip(only if
camera wifi setup is done.)
4. While iDoorbell gives ringing
sound, choose WiFi router from the
list which you want to connect the
iDoorbell camera to. Then, input WiFi password and tap on “one key
setup wifi.”Normally it takes about 40
seconds for iDoorbell camera to
connect to your Wi-Fi router. When it
is done, you will hear a short burst of
ringing sound.
5. Add iDoorbell to your app
by scanning QR code on the
back of the iDoorbell and input
password(default: “admin”)
6.Add by Lansearch(select from
the Doorbell List) and input
password(default:“admin”)
1.Tap on setup menu on top left corner
2. Tap on add siren button “+”
3. Add door chime by scanning QR code located on the front of the device.
Then name your device.
4. Add door chime by automatic pairing method. Then, name your device
 Loading...