

NeoCharge Dual-Car User Manual
Contact Info
75 Higuera St. Suite 120, San Luis Obispo, CA 93401
858–952–8117
info@getneocharge.com
Warnings
Do not use (or discontinue using) the NeoCharge if it is defective, appears
cracked, frayed, broken or otherwise damaged, or fails to operate.
Do not use the NeoCharge in any outlet for which it is not designed.
Do not attempt to open, disassemble, repair, tamper with, or modify
the NeoCharge. The NeoCharge is not able to be serviced by the user.
Please contact NeoCharge for any repairs.
Do not disconnect the NeoCharge from the wall outlet when the vehicle
or your appliance is charging.
Do not plug the NeoCharge into a damaged, loose or worn power outlet.
When using the NeoCharge in an inside location such as a garage, position
Do not use the NeoCharge outside or while exposed to severe or mild weather.
Prevent the NeoCharge from damage, strong impact, and force. Do not drop
or step on the NeoCharge.
Avoid and prevent the NeoCharge from foreign objects as well as moisture and
water at all times. If any sort of corrosion or damage is suspected discontinue
use of the NeoCharge immediately.
If rain falls during charging, do not allow rain water to run along the length of
the charge cable plugged into the NeoCharge.
Do not plug the NeoCharge into an electrical outlet that is submerged in water
or covered in snow. If, in this situation, the NeoCharge is already plugged in and
Warnings
Avoid the use of cleaning solvents with the NeoCharge.
Do not use private power generators as a power source for charging.
Do not operate the NeoCharge in temperatures outside its operating
range of
−22°F to 122°F (−30°C to +50°C).
Store the NeoCharge in a clean dry place in temperatures between
−40°F and +185°F (−40°C and +85°C).
Warranty
NeoCharge warrants the included device against defects in
materials and workmanship under normal use for two years
from the date of purchase. The warranty does not apply if the
device has been opened, altered, abused, or misused and will
only apply if the device is defective. NeoCharge shall make the
the claim to this warranty.
Please contact support@getneocharge.com for service or support
of your NeoCharge.
NeoCharge User Manual (Dual-Car)
www.getneocharge.com
Do not touch the NeoCharge’s end terminals with sharp metallic objects, such
as wire, tools or needles. Do not insert any foreign objects into any part of the
NeoCharge.
Contents
NeoCharge Mounting bracket
Thumb screws (x2) Bracket screws (x2)
Required Tools
Phillips screwdriver
Before You Start
Please read and fully understand all directions and safety
information before installing your NeoCharge.
circuit breaker.
Note: Appliance breaker is usually 50 Amps.
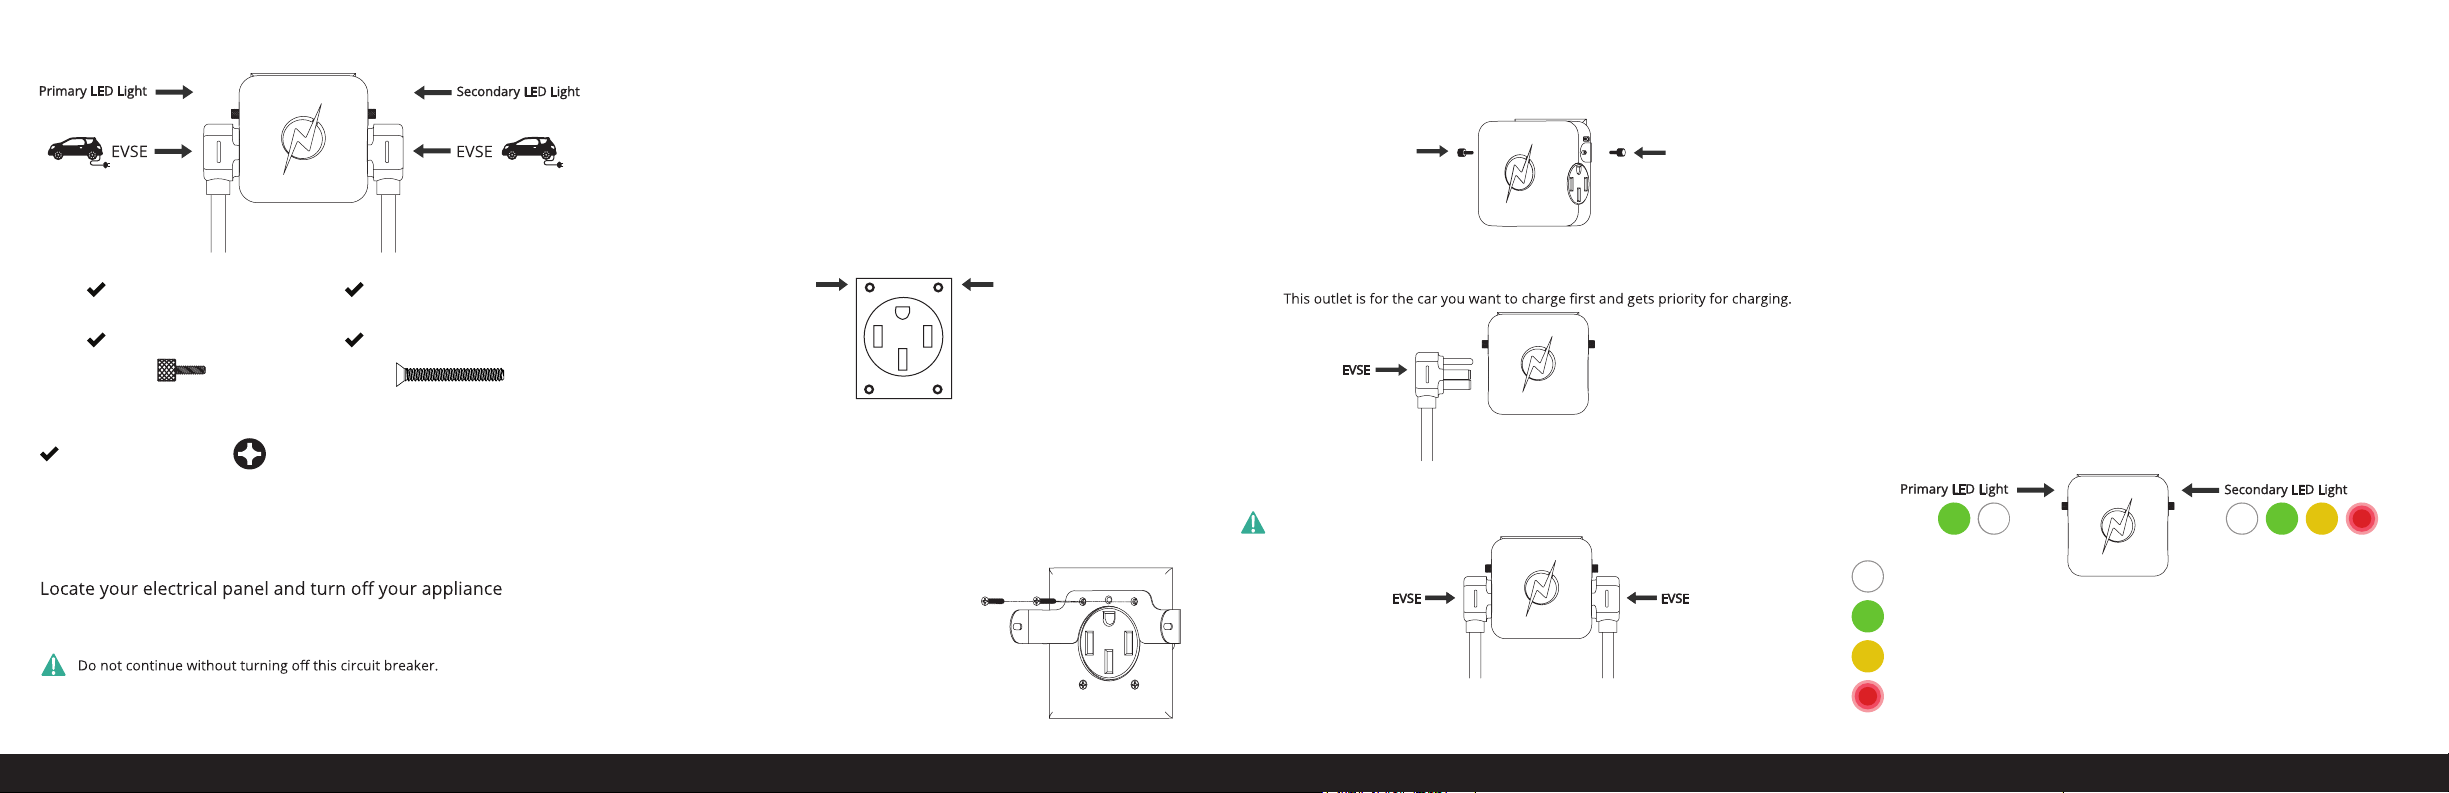
Installation
Step 1
Unplug your EVSE (Car charger) from your 220 volt outlet.
Step 2
Verify the back of your NeoCharge and your outlet match.
Step 3
Use a screwdriver to unscrew the screws on the face plate
of your outlet.
Note: If your orientation is right side up you will unscrew screws on the top of
the outlet. If your orientation is upside down you will mount under the outlet.
See picture above for outlet orientation.
Step 4
Use a screwdriver to screw in bracket screws (x2)
to secure mounting bracket to faceplate.
Step 5
Plug your NeoCharge in.
Step 6
Screw in thumb screws (x2) to the sides of your NeoCharge
to secure to the mounting bracket.
Step 7
Plug your EVSE into the left side of your NeoCharge (Primary).
Note:
Step 8
Plug your EVSE cord into the right side of your NeoCharge.
Do not use an extension cord with your NeoCharge.
Step 9
(Optional) Mount your EVSE’s to the wall as directed in the EVSE
manuals.
Step 10
Turn on your circuit breaker and verify that your NeoCharge is
powered by checking that the indicator lights are on.
Step 11
To charge both cars at the same time, set the current limit on both
EVSE’s to 20A or below.
Note: In some cases you may need to adjust the charge speed or current limit
in your car.
Step 12
To charge one car at a time, you can set the current limit to the
maximum allowed by the car or EVSE.
Note: The maximum current allowed on a NEMA 14-50 outlet is 40 Amps.
Step 13
Enjoy your fast, easy, and smart home charging for both of
your cars.
Indicator Lights
White — Idle/on
Green — Receiving power
Yellow — Charging paused
Blinking Red — Error, car not charging. Lower the current
limit on the car or charger.
 Loading...