

Page 1
P. 1
- Neo Nexu s Switch 24
USER MANUAL / MANUAL DE USUARIO
PLEASE READ THE INSTRUCTIONS CAREFULLY BEFORE USE
POR FAVOR LEA LAS INSTRUCCIÓNES ANTES DE USAR
NEXUS
SWITCH 24
Network Art-Net
& DMX Switch
Page 2

P. 2
Neo Nexu s Switch 24 -
1. OVERVIEW
English version
Nexus Switch 24
Network Art-Net & DMX Switch - 24 DMX universes
Nexus Switch 24 is a wireless network switch that
supports up to 24 universes (12288 DMX channels)
and works with Art-Net, Kling-Net & sACN lighting
control protocols. Equipped with optically isolated
signal ports, with RJ45 connectors, the equipment
ensures a very low latency making it an ideal alternative for live shows. Nexus Switch 24 also features an
OLED display with an intuitive menu, multiple color
modes in KlingNet, and has its own website that
allows both a quick and easy update as well as the
management of the information of the connected
xtures.
Features
• Art-Net/DMX Switcher
• 24 DMX universes / 12288 DMX channels
• 19 inch rack mountable
• Each universe can be in input, output and disable mode
• Support TCP/IP protocols
• Support DMX merge (HTP,LTP)
• Protocols: Art-net, sACN & KlingNet
• Multiple color-type in KlingNet: RGB, RGBW,
RGBA, RGBD & RGBAW
• Firmware updateable via web
• Can be acted as DMX splitter
• IP address can be set manually
• Wi-Fi: AP
• Navigation switch with backlight
• Indicator LEDs on each connector
• Built-in website to manage the xture informa-
tion
• DMX outputs with adjustable frame rate
• DMX interfaces optically isolated
Technical
• Operating temperature: 5ºC~40ºC / 41ºF~104ºF
• Input voltage range: AC100–240V, 50-60Hz
• Power consumption: 30W
• PowerCON input
• Electric standard signal ports: EIA-485
Physical
• Dimensions: 482.6x144.8x44.5 mm. /
19x5.7x1.75 in.
• Weight: 2.4 Kg. / 5.3 Lbs.
Page 3

P. 3
- Neo Nexu s Switch 24
English version
2. GENERAL INSTRUCTIONS
Please read the user manual carefully, as it includes important information regarding details
of operation, maintenance, and technical data.
Keep this manual with the unit for future consultation.
WARNINGS
• DO NOT make any inammable liquids, water or
metal objects enter the unit.
• Should any liquid be spilled on the unit, DISCONNECT the power immediately.
• STOP using the unit immediately in the event
of serious operation problems and contact
with your local dealer for a check or contact us
directly.
• DO NOT open the unit--there are no user serviceable parts inside.
• NEVER try to repair the unit by yourself. Repairs
by unqualied people could cause damage or
faulty operation.
CAUTIONS
• Aer having removed the packaging, please
check that the unit is NOT damaged in any way. If
in doubt, DON’T use it and contact an authorized
dealer.
• Packaging material (plastic bags, polystyrene
foam, nails, etc.) MUST NOT be le within children’s reach, as it can be dangerous.
• This unit must only be operated by adults. DO
NOT allow children to tamper or play with it.
• NEVER use the unit under the following conditions: In places subject to excessive humidity. In
places subject to vibrations or bumps. In places
with a temperature of over 45°C/113 F or less
than 2°C/35.6 F. Protect the unit from excessive
dryness or humidity (ideal conditions are between35% and 80%).
• DO NOT dismantle or modify the unit privately.
Page 4
P. 4
Neo Nexu s Switch 24 -
English version
3. DESCRIPTION
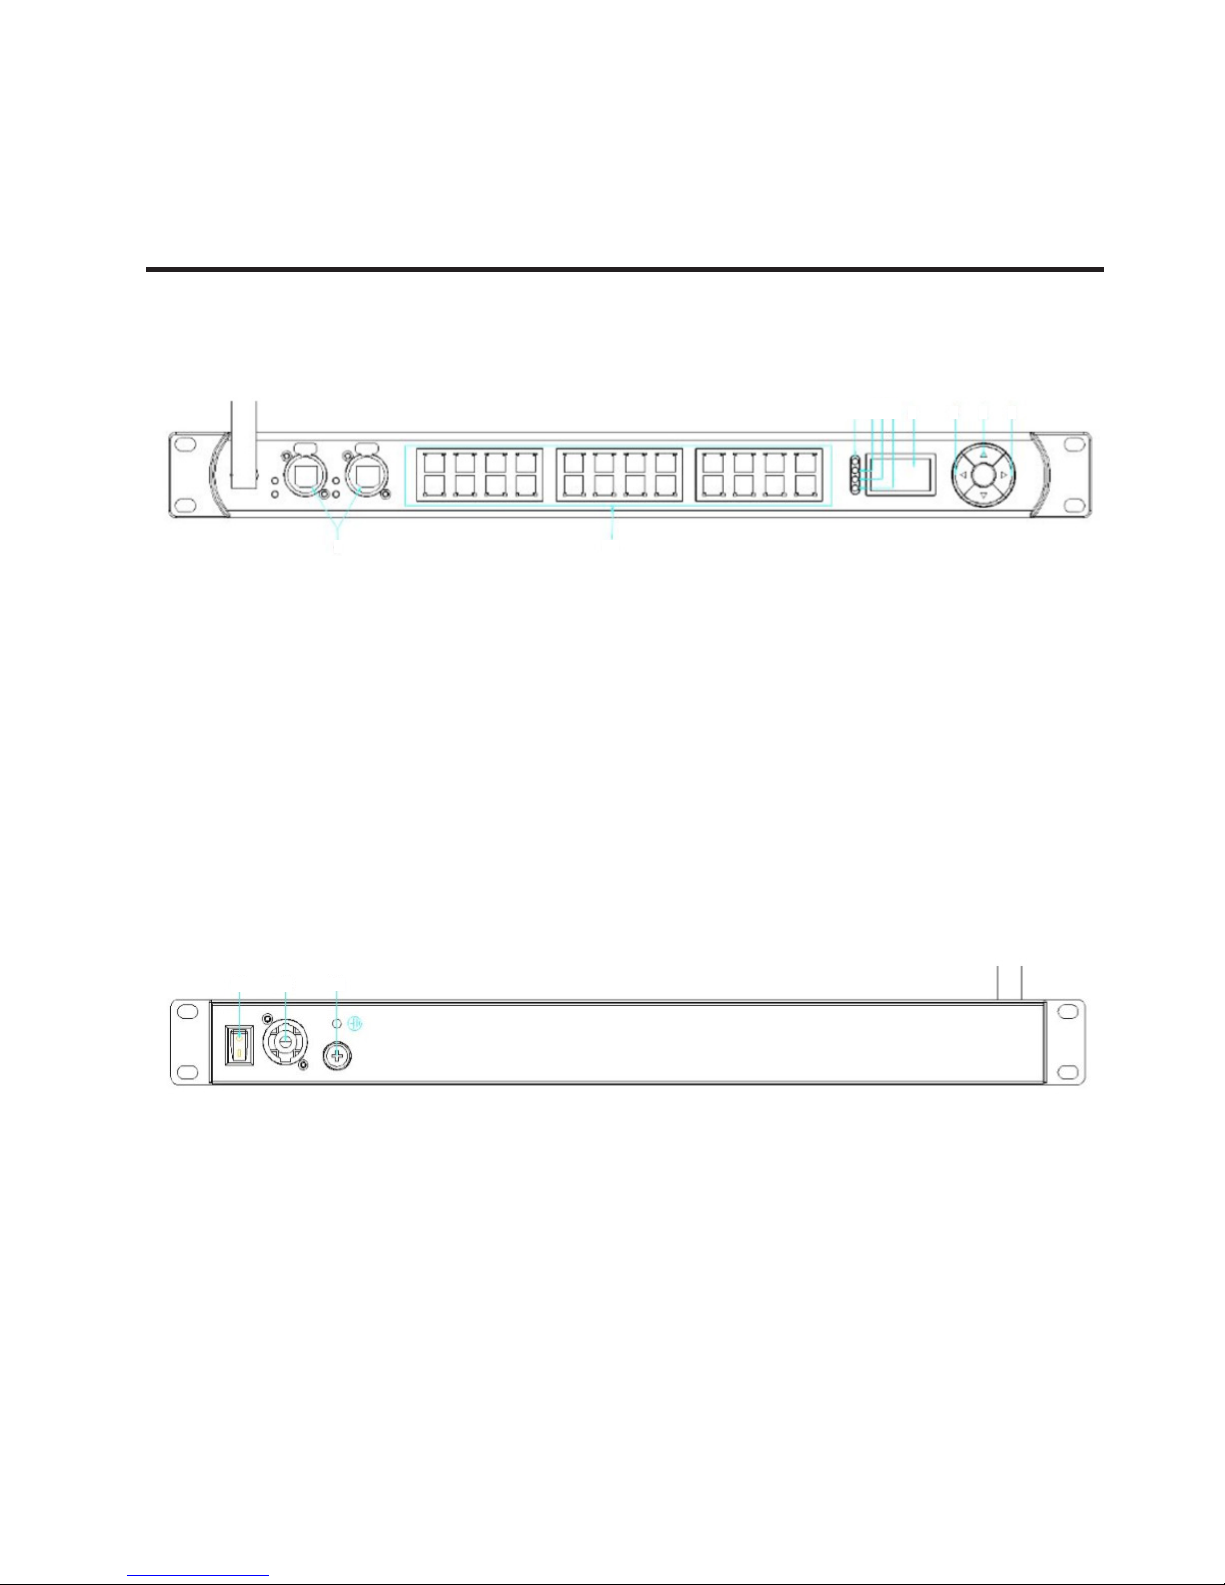
Front View
1. POWER LED indicator To show the on/o status
of the unit.
2. LINK LED indicator Network connect status
indicate.
3. ACTIVITY LED indicator Network activity indica-
tor, when there is any data transmit, it will ash.
4. WiFi link LED indicator WiFi link indicator.
5. OLED Display display the present status and the
available option.
Rear View
11. Power Switch Button Power ON/OFF the unit
12. Power supply Connect with the power cord
13. Fuse Holder Fuse installation
6. MENU Button Enter into main menu or back to
last menu.
7. UP/DOWN Button UP and DOWN.
8. ENTER Button Enter and Conrm.
9. Ethernet RJ45 connector Connect with net-
work cable.
10. DMX port 1-24 Can be set as DMX in/DMX out.
10
1 2 3 4 5 86 7
9
11 12
13
Page 5
P. 5
- Neo Nexu s Switch 24
English version
4. OPERATION GUIDE
Startup View
There are 6 dierent statuses (as pictures show)
you can check when you power on the unit. You can
switchover them by pressing the UP and DOWN. All
of the options can be changed in the main menu.
In the port status, A/B means the network port; “x”
means there is no network connected. “√” means
the network has been connected. 1-8 refers to the
DMX port 1-8/ port 9-16/ port 17-24. In the status,
“x” means the DMX port’s status is inactive. It will
hold the current output. “√” stands the DMX port’s
status is activity, it has connected to the network.
“-” means the current port status is forbidden.
Page 6
P. 6
Neo Nexu s Switch 24 -
English version
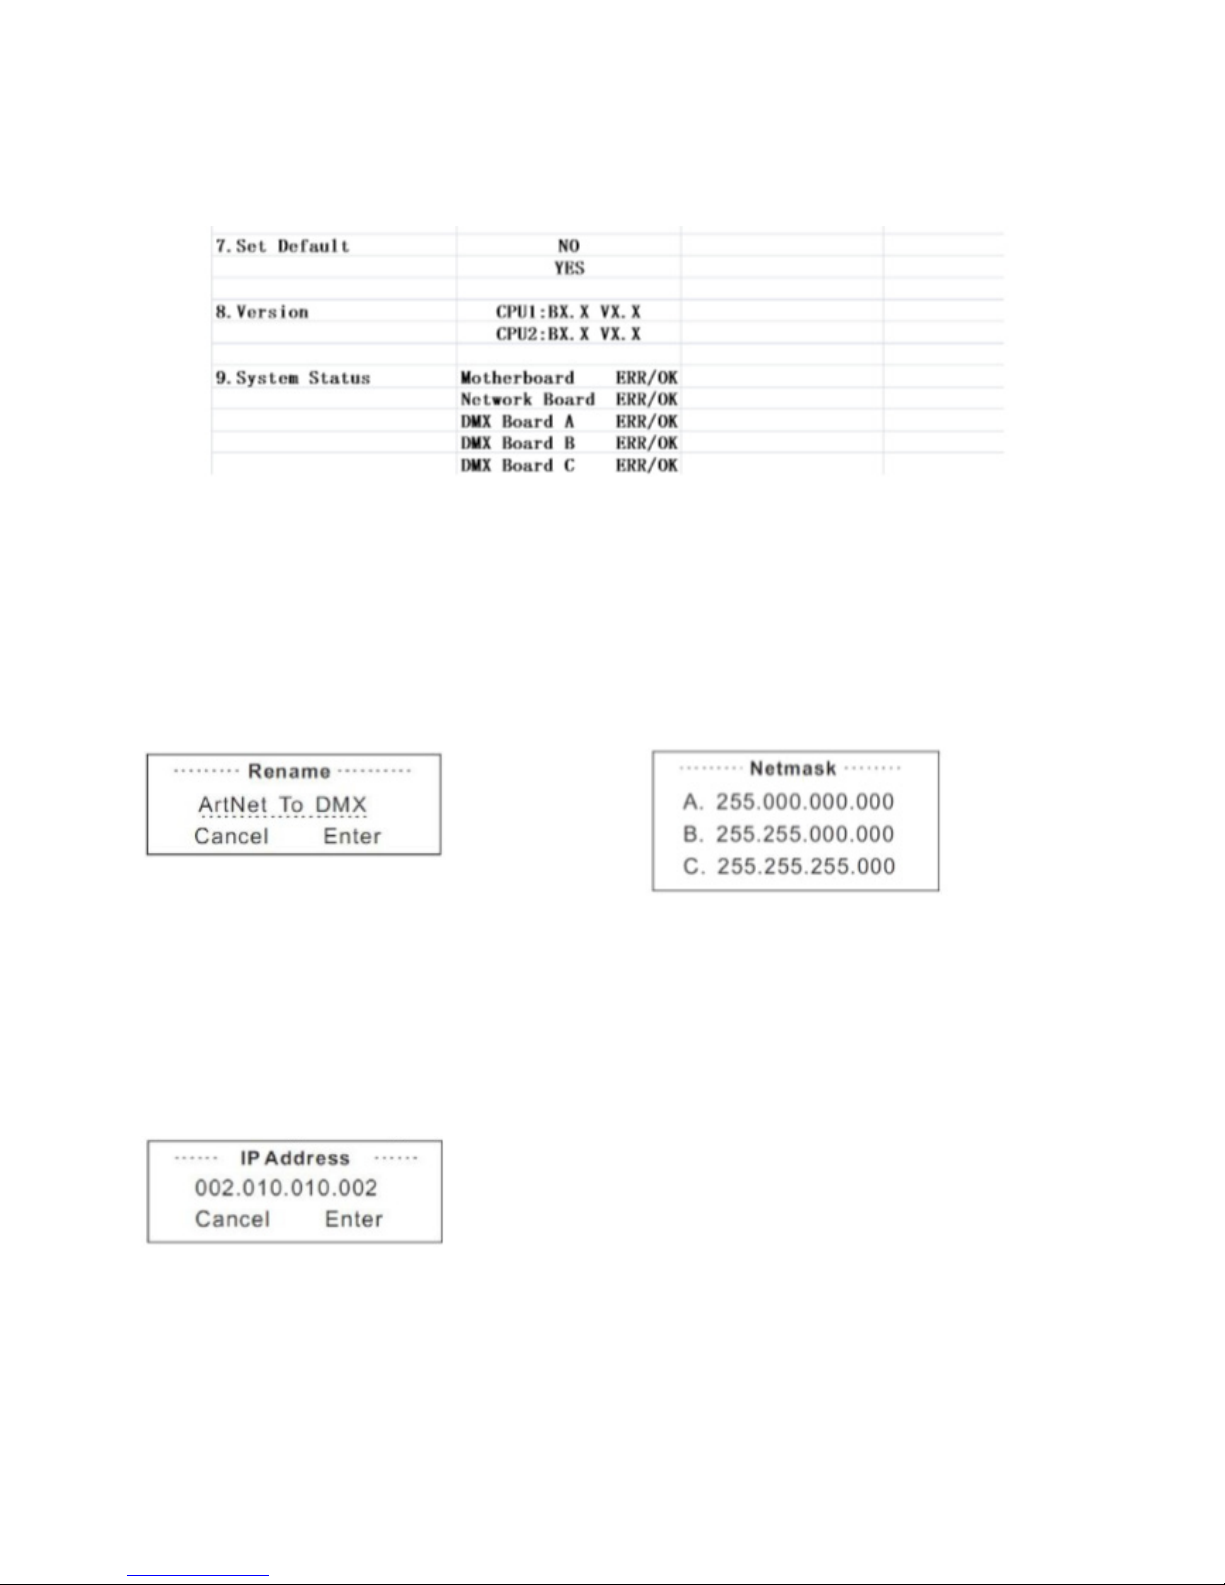
Rename Device
Enter into the main menu by press MENU, then pressing the UP and DOWN to choose the Rename Device
option and then press the ENTER to conrm your selection. Now you can rename the device by pressing
UP and DOWN now. Conrm you change and move
to next option by press the MENU.
Set IP Address
Enter into the main menu by press MENU, then
pressing the UP and DOWN to choose the Set IP
Address option and then press the ENTER to con-
rm your selection. Now you can set IP address by
pressing UP and DOWN now. Conrm you change
by press the ENTER.
Please note: Each of the IP address should be
unique.
Set Net mask
Enter into the main menu by press MENU, then
pressing the UP and DOWN to choose the Set
Netmask option and then press the ENTER to con-
rm your selection. Now you can set Netmask by
pressing UP and DOWN now. Conrm you change
by press the ENTER.
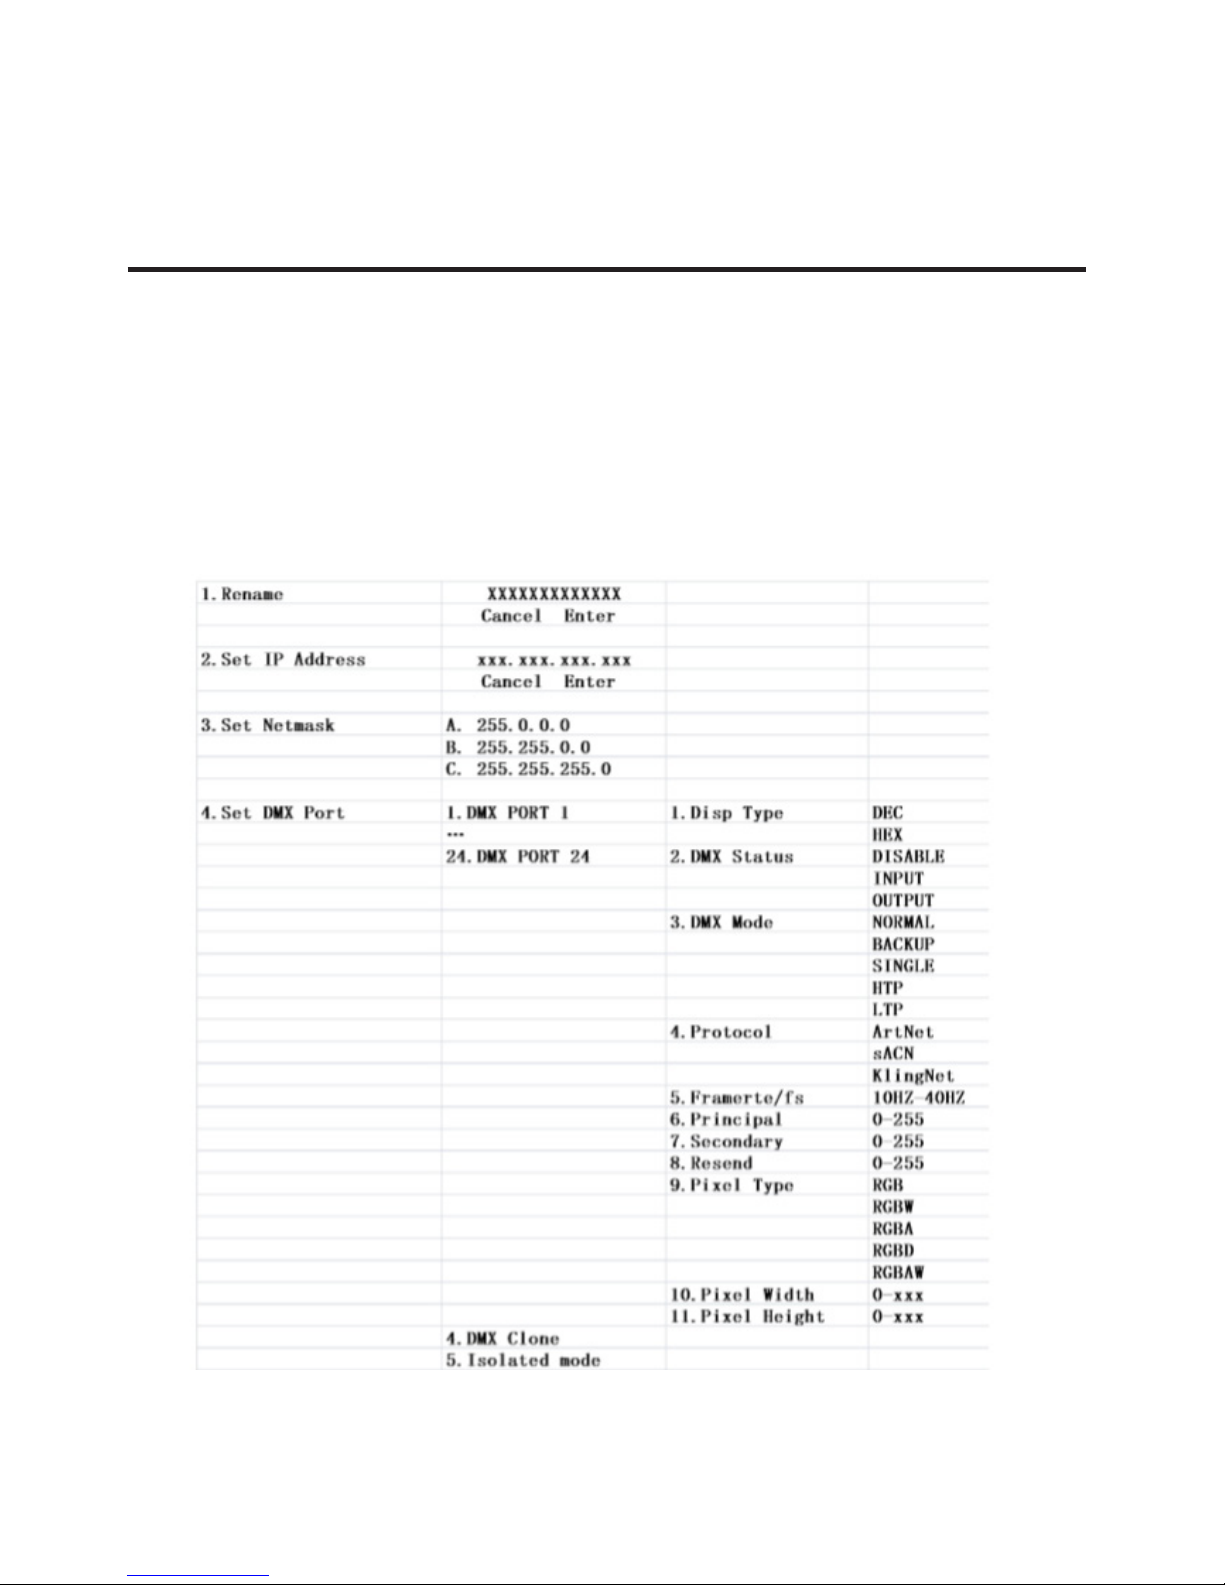
Set DMX port
Enter into the main menu by press MENU, then
pressing the UP and DOWN to choose the Set DMX
port option and then press the ENTER to conrm
your selection. Then you can set the parameter of
the each port by pressing UP /DOWN and ENTER
now.
1-24 DMX output You can enter to any of the DMX
port 1-24 and set as below:
1. Disp Type, adjust the display mode
2. Port Status, DMX port status can be set as IN /
OUT/ DIS;
3. DMX Mode, As the DMX port set as Input status, then the Mode only can be set as normal
or backup; As the DMX port set as output
Page 7

P. 7
- Neo Nexu s Switch 24
English version
status, then the Mode only can be set as SINGLE,HTP or LTP.
4. Protocol, can be set as ArtNet/ sACN/ KlingNet;
5. Framerte/fs, adjust the speed of DMX output.
6. Principal, adjust the value.
7. Secondary, adjust the value.
8. Resend, adjust or disable the value for universal
of network.
9. Pixel Type, available under klingnet protocol.
10. Pixel Width, available under klingnet protocol.
11. Pixel Height, available under klingnet protocol.
Normal mode means it will send the data received
from DMX IN port to the universal of network regardless if there is any data in the universal of the
network.
Backup mode refers that when there is any data
on the universal of network, the CA-AN08 won’t
send any data to universal of network. Only when
the universal of network is no any data, then the
CA-AN08 will receive the data from DMX IN port and
send it to the universal of network simultaneously.
Single means this port will only output one universal. LTP means this port will output the latter one
between the universal of principle and secondly.
The unit will compare the two universal and resend
the later one to the network.
HTP means the port will output the one with higher
value between the universal of principle and secondly. The unit will compare the two universal and
resend the higher data to the network. They can be
set within the range of 0.0-F.F./001-255. (These two
formats can be change through Display Mode). 1-24
DMX port disabled:
Any of the port 1-24 can be set as Disabled status.
Upon the port has been set as Disabled status,
the DMX port will be disabled, it cannot send or
receive any data from now on.
Please note that the Framerte/fs only available
for Output status; The Secondly and Resendoptiononlyavailablefor the HTP/LTPmodeunder
thestatusof Output.
Set ID NO.
Enter into the main menu by press MENU button,
pressing UP and DOWN to choose the Set ID NO.
option, then press the ENTER to conrm your
selection. You can set the ID No. for the unit from
000 to 255. The ID is only used to recognize each
of the unit easily.
User Preset
Enter into the main menu by press MENU button,
then pressing the UP and DOWN to choose the
User Preset option and then press the ENTER
to conrm your selection. This setting help you
easily use the application avoid complicated set-
Page 8

P. 8
Neo Nexu s Switch 24 -
English version
up procedure. You can simply choose you desired
mode by pressing UP and DOWN, and conrm your
choose by pressing ENTER.
Version
You can check the version number from this option.
System Status
You can check if xture hardware work normally or
not.
Web page settings
Input IP of this xture in web browser to access
internal webpage. Default account is admin, Password is admin.
Please set the webpage as below image. Please set
the dmx ports refer to above menu instructions
(See Set DMX port section).
Page 9

P. 9
- Neo Nexu s Switch 24
English version
Upgrade firmware through webpage
Note: The supplier will not assume responsibility for errors or omissions in the manual.
The information in this manual is subject to change without prior notice.
Page 10

P. 1 0
Neo Nexu s Switch 24 -
Versión Español
1. DESCRIPCIÓN
Nexus Switch 24
Switcher Art-Net & DMX / 24 universos DMX
Nexus Switch 24 es un switcher inalámbrico que
soporta hasta 24 universos (12288 canales DMX)
y trabaja con los protocolos Art-Net, Kling-Net &
sACN. Dotado de puertos de señal ópticamente
isolados, con conectores RJ45, el equipo asegura
una latencia realmente muy baja convirtiéndose así
en una alternativa ideal para shows en vivo. Nexus
Switch 24 cuenta además con una pantalla OLED
con un intuitivo menú, multiples modos de color en
KlingNet, y posee un sitio web propio que permite
tanto una actualización rápida y fácil, como también el manejo de la información de los equipos
conectados.
Características
• Switcher Art-Net/DMX
• 24 universos DMX / 12288 canales DMX
• Rackeable de 19 pulgadas
• Universos asignables como entrada, salida o
deshabilitados
• Soporta protocolos TCP/IP
• Soporta DMX merge (HTP,LTP)
• Protocolos: Artnet, sACN & KlingNet
• Multiples modos de color en KlingNet (RGB,
RGBW, RGBA, RGBD, RGBAW)
• Firmware actualizable via web
• Puede trabajar como splitter DMX
• Asignación de address IP manual
• Wi-Fi: AP
• Switch de navegación con backlight
• LEDs indicadores en cada conector
• Página web incorporada para manejar la información de los equipos
• Salidas DMX con frame rate ajustable
• Interfaces DMX opticamente aisladas
Técnic a
• Temperatura de operación: 5ºC~40ºC /
41ºF~104ºF
• Rango de voltaje de entrada: AC100–240V,
50-60Hz
• 24 conectores RJ45
• Consumo de potencia: 30W
• Conector powerCON de entrada
• Estándar eléctrico de los puertos de señal:
EIA-485
Físico
• Dimensiones: 482,6x144,8x44,5 mm. /
19x5,7x1,75 pulg.
• Peso: 2,4 Kg. / 5,3 Lbs.
Page 11

P. 11
- Neo Nexu s Switch 24
Versión Español
2. INSTRUCCIONES GENERALES
Lea atentamente el manual antes de utilizar la
unidad y procure seguir las instrucciones, ya que
contiene información importante sobre el uso, la
instalación y el mantenimiento del equipo. Conserve este manual para futuras referencias.
ADVERTENCIAS
• Evite el ingreso de sustancias inamables, líqui-
dos u objetos de metal dentro del equipo.
• En caso de que algún líquido se derrame sobre el
equipo, desconéctelo inmediatamente.
• Si observa un problema grave de funcionamiento, desconecte el equipo y póngase en contacto
el fabricante o el servicio técnico autorizado.
• El equipo no contiene piezas que puedan ser
reparadas por el usuario. En caso de precisar
asistencia, póngase en contacto con el servicio
técnico autorizado.
• No trate de reparar la unidad por sus propios
medios. Las reparaciones efectuadas por personas no calicadas pueden causar daños irreparables.
PRECAUCIONES
• Abra el embalaje con cuidado y revise que el
equipo se encuentre en buen estado. Si observa
piezas dañadas o faltantes, no lo utilice y póngase en contacto con el fabricante de inmediato.
• Mantenga el material de embalaje (bolsas de
plástico, polietileno, etc.) fuera del alcance de
los niños.
• El equipo sólo debe ser utilizado por adultos. No
permita que los niños jueguen con el equipo o lo
manipulen.
• No utilice la unidad: En lugares con humedad
excesiva. En lugares propensos a las vibraciones
o sacudidas. En lugares con temperatura superior a 45°C/113°F o inferior a 2°C/35,6°F. Proteja
el equipo de la humedad excesiva. Los valores
de humedad aceptable se encuentran entre
35-80%.
• No introduzca modicaciones no autorizadas
en el equipo.
Page 12

P. 12
Neo Nexu s Switch 24 -
Versión Español
3. DESCRIPCIÓN DEL PRODUCTO
Vista frontal
1. Indicador LED de encendido Muestra si la unidad
está encendida o apagada.
2. Indicador LED LINK Muestra el estado de conexión de la red.
3. Indicador LED de actividad Muestra la actividad
de red. Cuando haya transmisión de datos, titilará.
4. Indicador LED WiFi Muestra si hay un enlace
WiFi.
5. Pantalla OLED Despliega el modo/estado activo
y las opciones disponibles.
Vista dorsal
11. Interruptor de encendido Enciende/apaga la
unidad.
12. Fuente de alimentación Conector para el cable
de alimentación.
13. Porta fusible Instalación del fusible.
6. Botón de MENU Accede al menú principal o
regresa al menú anterior.
7. Botón UP/DOWN Se desplaza hacia arriba o
hacia abajo.
8. Botón ENTER Accede a un submenú o conrma
su selección.
9. Conector Ethernet RJ45 Conector para
adaptar un cable de red
10. Puertos DMX 1-24 Pueden congurarse como
entradas o salidas DMX.
10
1 2 3 4 5 86 7
9
11 12
13
Page 13

P. 13
- Neo Nexu s Switch 24
Versión Español
4. GUÍA DE FUNCIONAMIENTO
Fase inicial
Al encender la unidad, el usuario podrá seleccionar entre seis estados disponibles, como indica el
diagrama. Si desea alternar entre estados, utilice las
teclas UP y DOWN. Recuerde que puede modicar
todas las opciones desde el menú principal.
En el estado del puerto, A/B se reere al puerto de
red. “X” indica que no hay una red conectada,
mientras que “√” indica que la red está conectada. 1-8 se reere a los puertos DMX 1-8, puertos
9-16/17-24. En el campo de estado, “x” indica que
el puerto DMX está inactivo. Por lo tanto manten-
drá la salida congurada. “√” indica que el puerto
DMX está activo y conectado a una red. “-” indica
que el estado actual del puerto está vedado.
Page 14

P. 14
Neo Nexu s Switch 24 -
Versión Español
Renombrar dispositivo
Presione la tecla MENU para acceder al menú principal. Utilice las teclas UP/DOWN para localizar la
opción Rename Device. Luego presione ENTER para
acceder. Utilice las teclas UP/DOWN para renombrar
el dispositivo. Presione ENTER para guardar los cambios y MENU para continuar con la siguiente opción.
Configurar dirección IP
Presione la tecla MENU para acceder al menú principal. Utilice las teclas UP/DOWN para localizar la
opción Set IP Address. Luego presione ENTER para
acceder. Utilice las teclas UP/DOWN para
congurar la nueva dirección IP. Presione ENTER
para guardar los cambios.
Observación: Cada dirección IP es única e
irrepetible.
Configurar máscara de red
Presione la tecla MENU para acceder al menú
principal. Utilice las teclas UP/DOWN para localizar la opción Set Netmask. Luego presione
ENTER para acceder. Utilice las teclas UP/DOWN
para congurar la máscara de red. Presione ENTER para guardar los cambios.
Configurar puerto DMX
Presione la tecla MENU para acceder al menú
principal. Utilice las teclas UP/DOWN para localizar la opción Set DMX port. Luego presione
ENTER para acceder. Utilice las teclas UP/DOWN
para congurar los parámetros
de cada puerto.
DMX port 1-24 Ingrese a cualquiera de los 24 puer-
tos DMX y congure los siguientes parámetros:
1. Disp Type: Seleccione el modo de la pantalla
entre el sistema decimal y hexadecimal.
2. DMX Status: Seleccione el estado del puerto
DMX entre disable, input u output (desactivado, entrada o salida respectivamente).
3. DMX Mode: Seleccione NORMAL o BACKUP si
Page 15

P. 15
- Neo Nexu s Switch 24
Versión Español
conguró el estado DMX como input o SINGLE,
HTP o LTP si lo conguró como output.
4. Protocol: Seleccione entre ArtNet, sACN y KlingNet.
5. Framerte/fs: Regule la velocidad de la salida
DMX
6. Principal: Ajuste el valor del primer universo.
7. Secondary: Ajuste el valor del segundo universo.
8. Resend: Ajuste o deshabilite los valores de
reenvío de la red del universo.
9. Pixel Type: Tipo de píxel. Solo disponible para el
protocolo Klingnet.
10. Pixel Width: Ancho de píxel. Solo disponible
para el protocolo Klingnet.
11. Pixel Height: Alto de píxel. Solo disponible para
el protocolo Klingnet.
Modos DMX
Normal Este modo envía los datos recibidos a
través del puerto DMX de entrada al universo de
la red a pesar de que ya exista cualquier tipo de
datos.
Backup Si el universo de red ya cuenta con datos,
el CA-AN08 no enviará más datos. Solo cuando el
universo esté libre de datos, el CA-AN08 recibirá
datos del puerto de entrada DMX y lo reenviará
automáticamente.
Single Indica que este puerto solo enviará datos a
un universo. LTP Este puerto enviará datos del último universo. La unidad comparará ambos universos y enviará el último a la red.
HTP Este puerto enviará datos del último universo
con valor más alto. La unidad comparará ambos
universos y enviará el de valor más alto a la red.
Se pueden congurar la velocidad entre 0,0F.F/001-255 (el usuario puede modicar ambos
formatos en Disp Type).
Puertos DMX 1-24 deshabilitados:
Cualquiera de los 24 puertos puede ser congurado como deshabilitado. Una vez deshabilitado,
el puerto DMX no puede enviar ni recibir datos de
ningún tipo.
Tenga en cuenta que la función framerte/fs solo
se encuentra disponible para el modo de salida,
y las funciones secondary y resend para el modo
HTP/LTP bajo el modo de salida.
Configurar número de ID
Presione la tecla MENU para acceder al menú
principal. Utilice las teclas UP/DOWN para localizar la opción Set ID NO. Luego presione ENTER
para acceder. Congure el número de ID entre
000-255. La identicación del equipo solo se em-
plea para reconocer cada unidad más fácilmente.
Referencia de imagen
In DMX Entrada DMX
Out DMX Salida DMX
In IP IP de entrada
Merger HTP LTP Fusión HTP LTP
Out IP IP de salida
Page 16

P. 1 6
Neo Nexu s Switch 24 -
Versión Español
Preajustes de usuario
Presione la tecla MENU para acceder al menú
principal. Utilice las teclas UP/DOWN para localizar
la opción User Preset. Luego presione ENTER para
acceder. Este ajuste facilita el uso de la aplicación y
evita los procedimientos complejos. Seleccione el
modo deseado con las teclas UP/DOWN y presione
ENTER para conrmar su selección.
Versión
Revise la versión actual del dispositivo desde esta
opción.
Estado del sistema
Corrobore si el hardware del dispositivo funciona
normal y correctamente.
Configurar página web
Introduzca la IP del dispositivo en su explorador
web para acceder a una web interna. Cuenta predeterminada: admin. Contraseña: admin.
Congure los campos como se describe en la imagen a continuación.
Congure los puertos DMX de acuerdo con las
instrucciones del menú (ver Congurar puerto
DMX).
Page 17

P. 17
- Neo Nexu s Switch 24
Versión Español
Actualizar firmware en línea
Observación: El proveedor no asumirá responsabilidad por los errores u omisiones del manual.
La información de este manual está sujeta a cambios sin previo aviso.
Page 18

P. 18
Neo Nexu s Switch 24 -
 Loading...