

Page 1
P. 1
- Neo Nexu s Split 4
USER MANUAL / MANUAL DE USUARIO
PLEASE READ THE INSTRUCTIONS CAREFULLY BEFORE USE
POR FAVOR LEA LAS INSTRUCCIÓNES ANTES DE USAR
NEXUS
SPLIT 4
DMX splitter, recorder
& player
Page 2

P. 2
Neo Nexu s Split 4 -
1. OVERVIEW
English version
Nexus Split 4
DMX splitter, recorder & player
Nexus Split 4 is an equipment that combines the
function of a splitter with a DMX recorder and player. The controller has 4 DMX outputs and 4 switchable 220V outputs that can be easily monitored and
also have a customizable limiter. Nexus Split 4 can
execute its scenes and sequences through DMX or
with fully customizable timers, becoming an ideal
alternative for all types of installations that require
pre programmed shows, which can be stored in its
internal 8 GB memory.
Features
• DMX Splitter
• DMX Recorder & player
• Internal storage
• Programs storage in internal SD memory
• Shows executed via DMX or timer
• Intuitive menu
• Internal 8 GB SD memory
Technical
• Operating temperature: -30ºC~55ºC /
-22ºF~131ºF
• Power output: 15A per channel / 15A max total
Physical
• OLED display
• Input DMX connector: 1 XLR-3 connector
• Output DMX connector: 4 XLR-3 connectors
• Power output connectors: 4 PowerCon
connectors
• Power input connector: 1 PowerCon connector
• Dimensions: 483x130x44 mm. / 19x5.1x1.7 in.
Peso: 2.4 Kg. / 5.3 Lbs.
Page 3
P. 3
- Neo Nexu s Split 4
English version
2. PRODUCT DESCRIPTION
The product functions as a relay pack to control the
power sent to individual lighting products. This product takes one powerCON input and branches it into
four outputs, each of which can be powered o individually via DMX or an internal timer/scheduler. The
product may be rack, truss or wall mounted. It also
includes a 4-port DMX port, allowing users to easily
branchtheir DMX universe in multiple directions and
amplify the signal aer a long run.
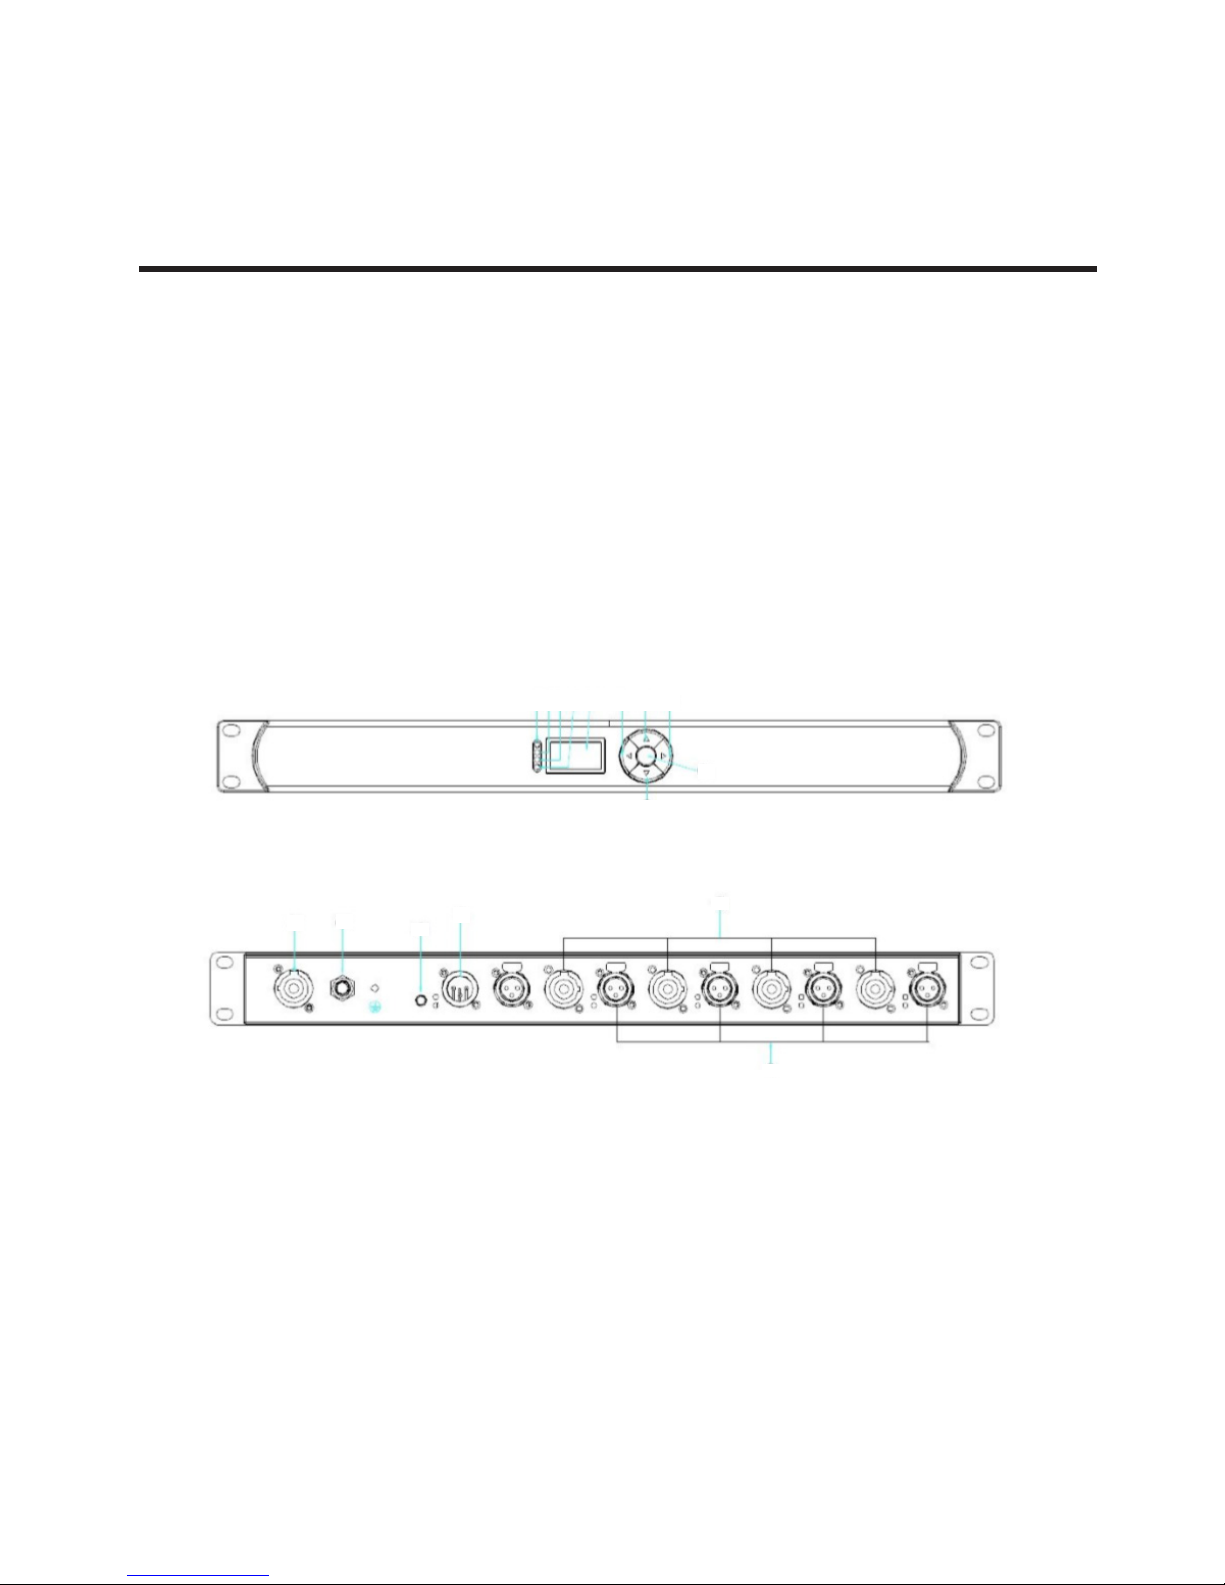
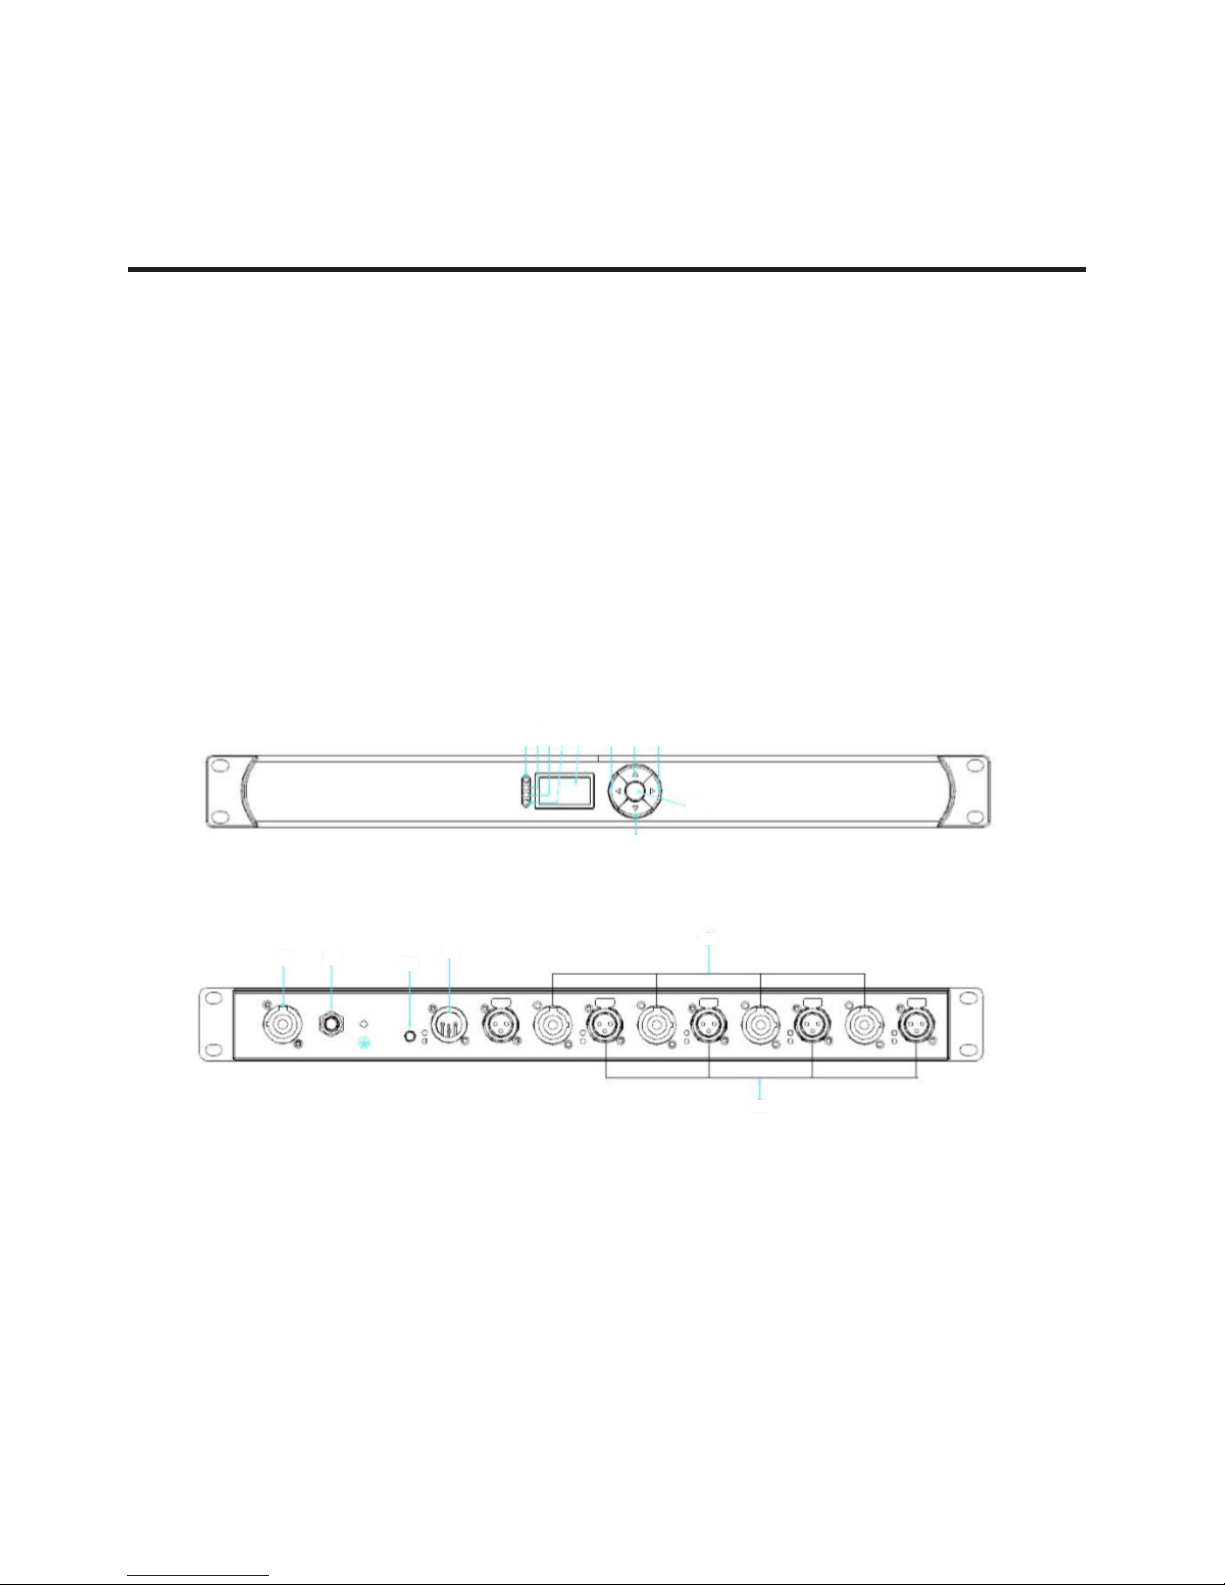
Device Overview
1. Power Indicator
2. DXM Signal Indicator
3. DMX Error Indicator
4. Over Current Indicator
5. OLED Display
6. UP Button
7. DOWN Button
8. LEFT Button
9. RIGHT Button Or Return Button
10. Enter Button
11. Power IN
12. Auto Fuse
13. Terminal Resister
14. DMX Input And DMX Through
15. Power Output 1-4
16. DMX Output 1-4
16
10
12
13
14
15
16
1 2 3 4 5 8 6 9
7
11
Page 4
P. 4
Neo Nexu s Split 4 -
English version
3. MENU MAP
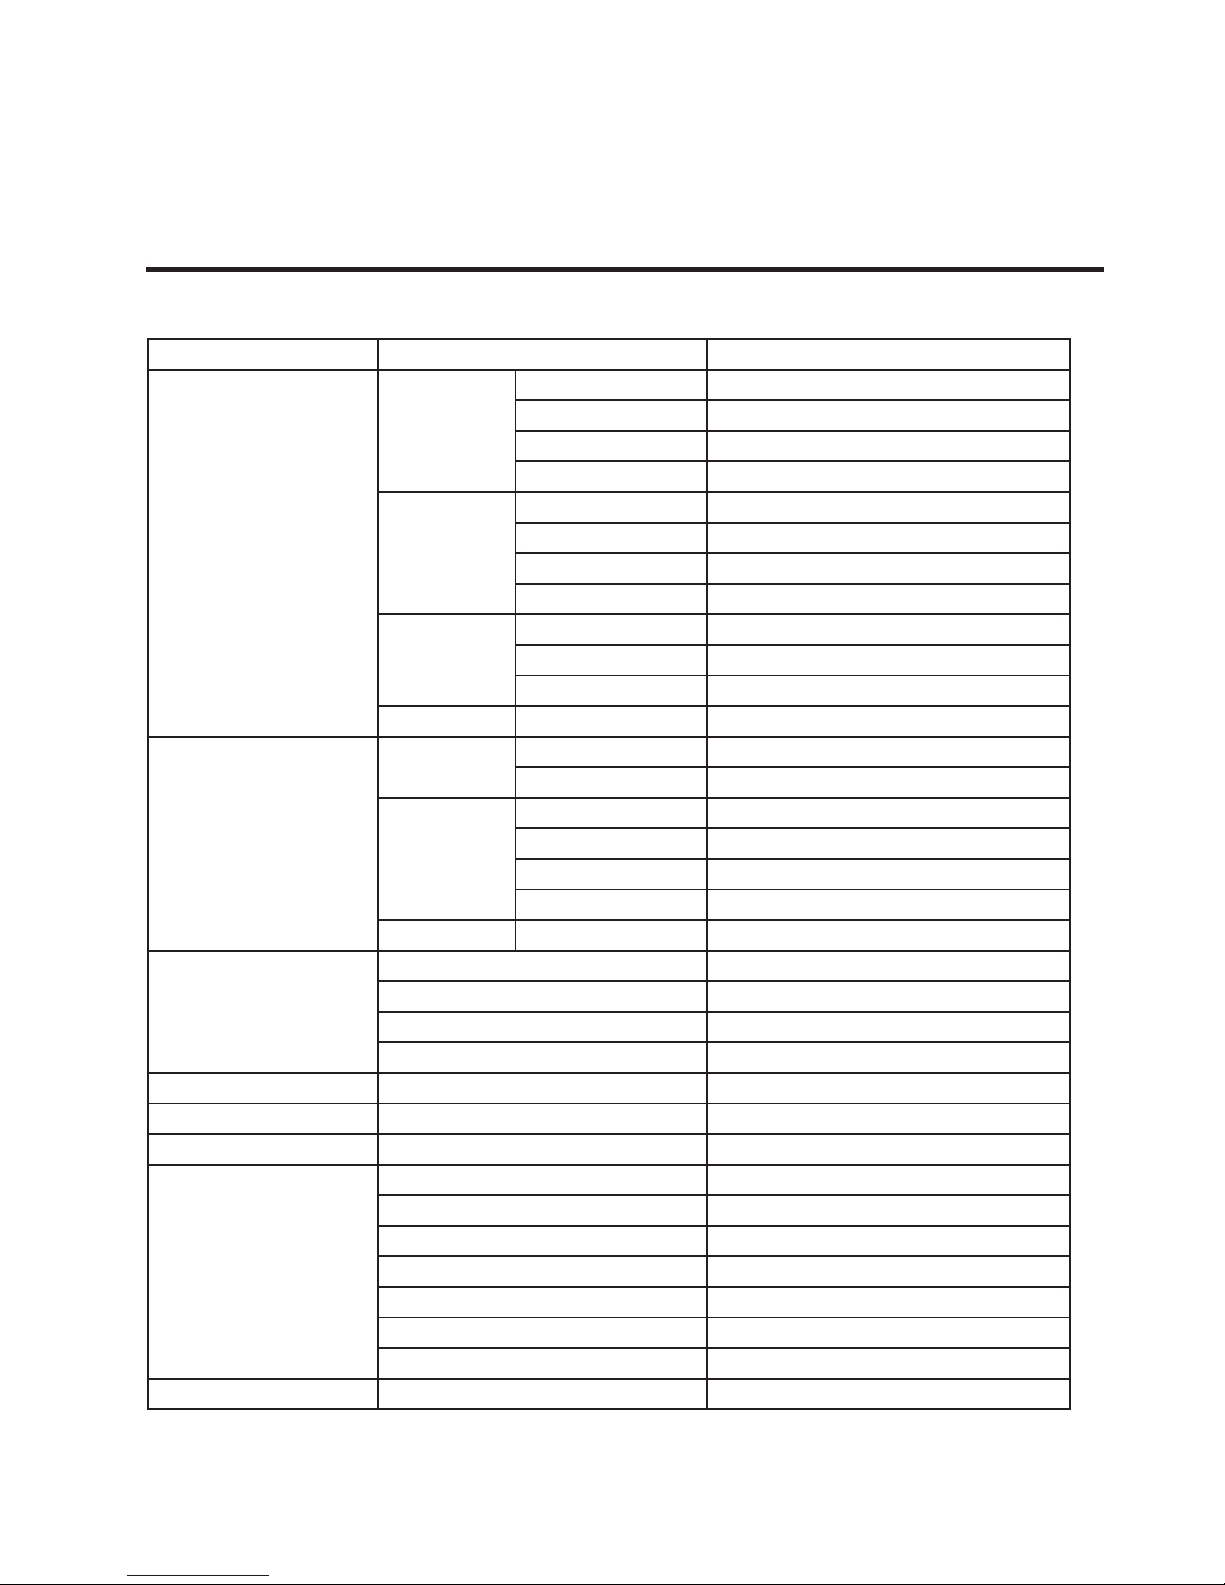
Main Level Programming Levels Description
Source
Scene
Record Scene Record scene le
Play Scene Play scene le
Delete Scene Delete scene le
Return Return to previous menu
Chase
Add Chase Add chase le
Play Chase Play chase le
Delete Chase Delete chase le
Return Return to previous menu
Show
Record Show Record show le
Play Show Play show le
Delete Show Delete show le
Return Return Return to previous menu
Trig ger
DMX
Add DMX TR Add a DMX trigger
Edit&Del DMX TR Edit and Delete DMX trigger
Timer
Add Daily TR Add a daily trigger
Edit&Del Daily TR Edit and Delete Daily trigger
Add Weekly TR Add a weekly trigger
Edit&Del Weekly TR Edit and Delete weekly trigger
Return Return Return to previous menu
Action
Add Action Add a action
Edit&Del Action Edit and delete action
Stop Action Stop a action manually
Return Return to previous menu
Voltage Current Check ports voltage and current
DMX Port Status Check ports DMX Out information
Clear Warning Clear warning when port over current
Device Setting
Set Data&Time Set data and time
Set Max Current Set ports max current
Set OLED Option Set OLED o time
Set Buzzer Set buzzer to open
View Device Label See device label
View Version See soware version
Return Return to previous menu
Backup Data Backup device data to TF-Card
Page 5
P. 5
- Neo Nexu s Split 4
English version
Restore Data Restore device data formTF-Card
Default Setting Restore factory settings
4. OPERATION INSTRUCTIONS
Navigator Switch buttons
UP, DOWN, LEFT, RIGHT and ENTER in the middle.
Indicator lights on frontpanel
RED: Power LED;
GREEN: DMX in;
YELLOW: DMX Error;
WHITE: Current out of range
Indicator lights on back panel
GREEN: DMX Out;
YELLOW: Power Out
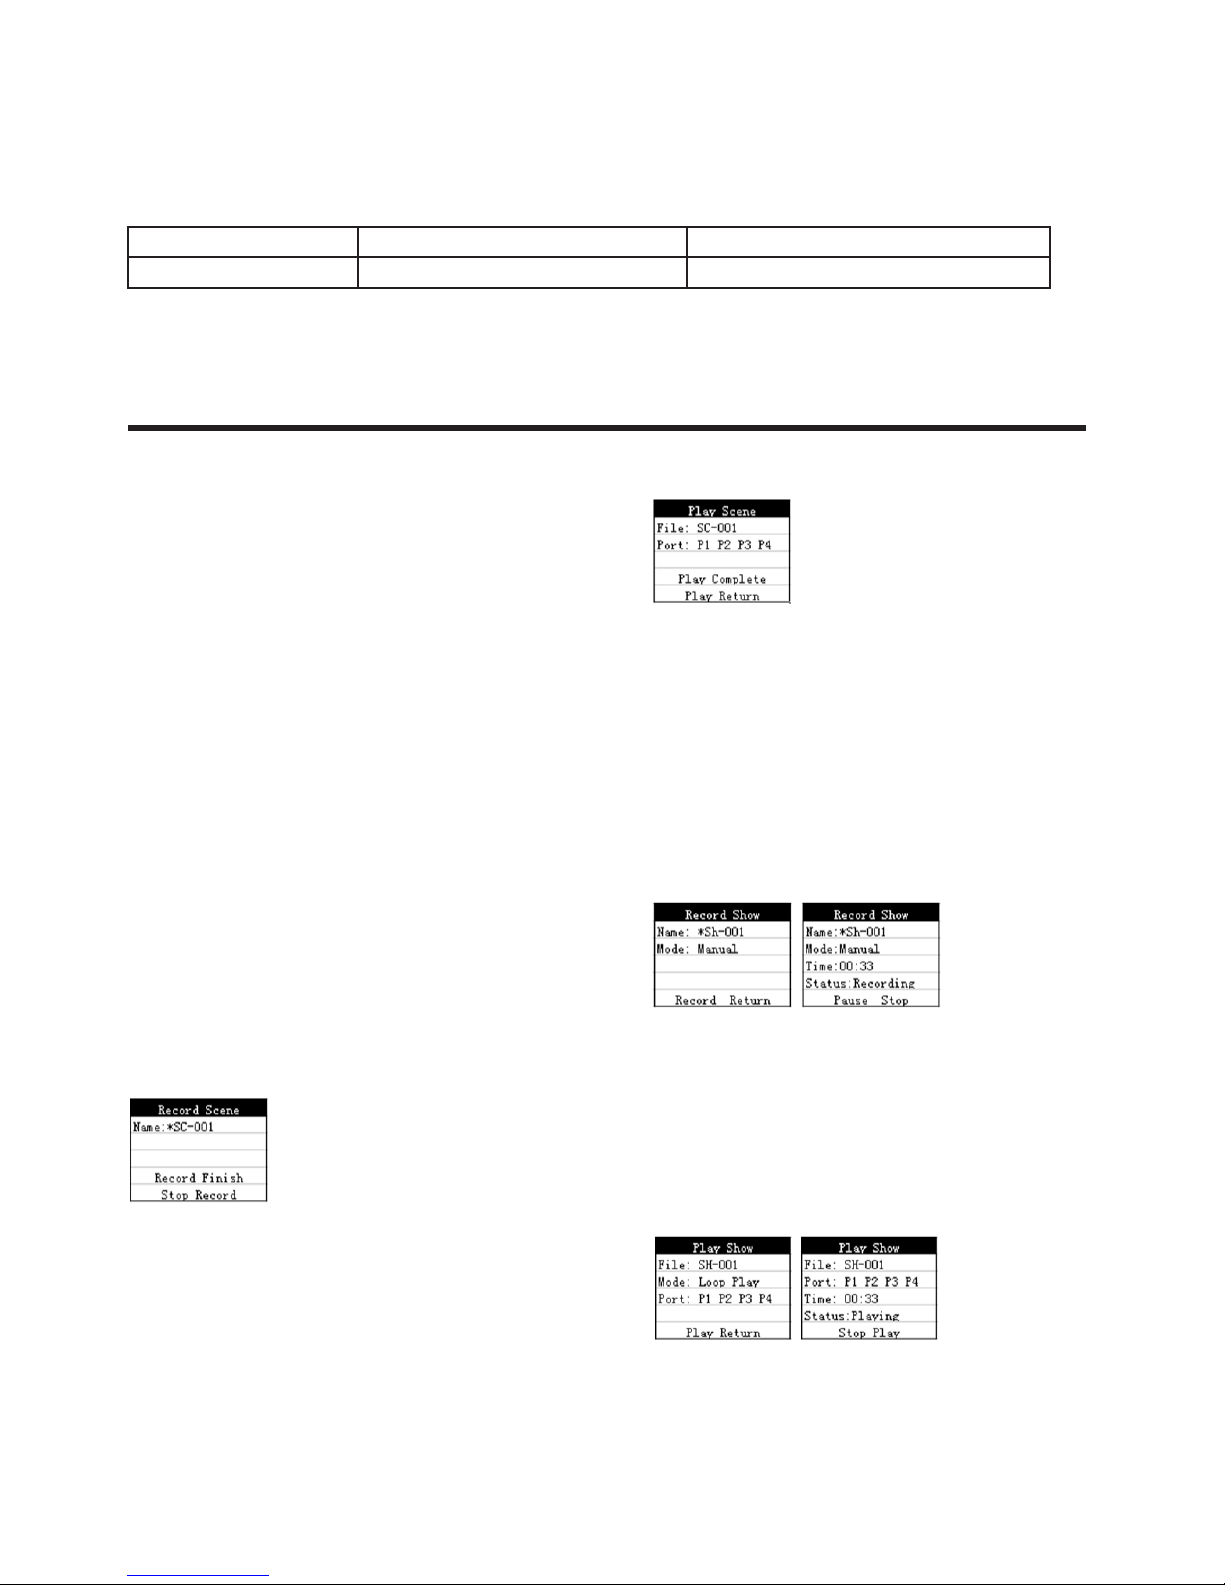
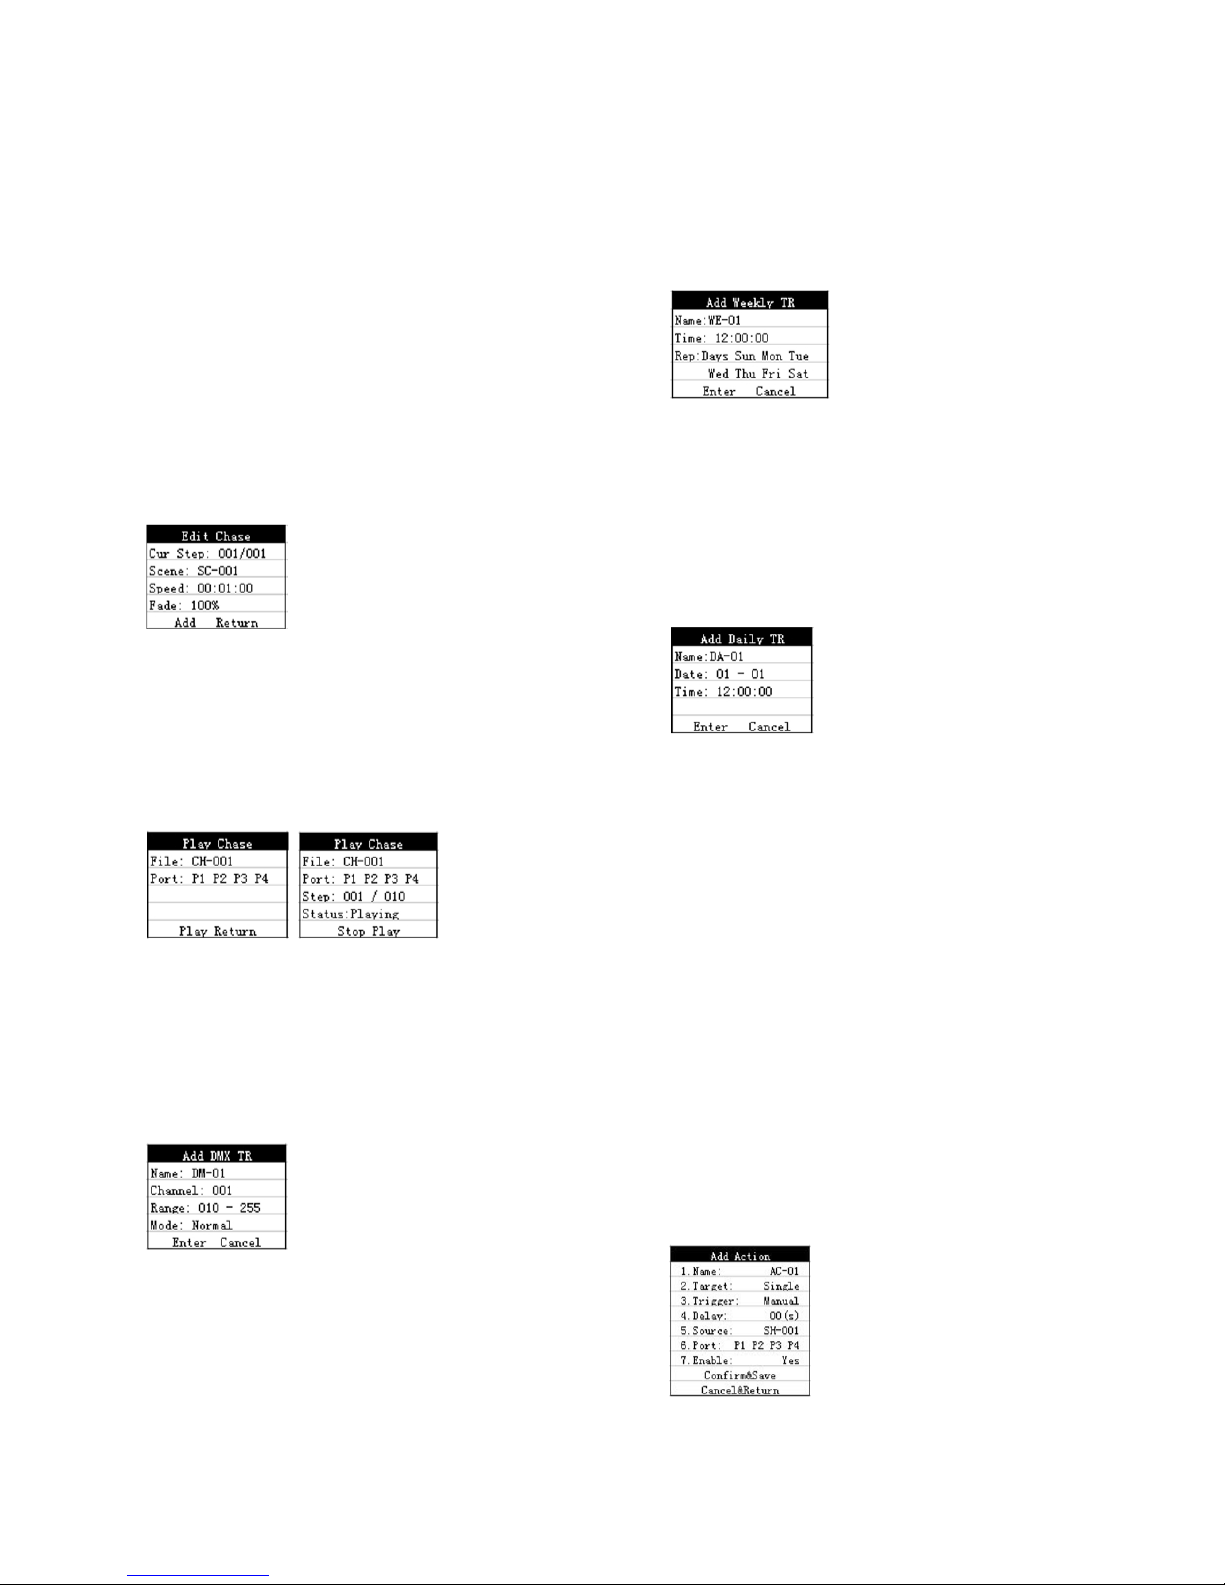
How to record scenes
Firstly, enter into Source->Scene->Record Scene,
then input DMX signal source, click Record, wait for
Record Finish.
How to play recorded Scenes
Firstly, enter into Source->Scene->Play Scene,
select the wanted le and output port, click Play.
When show “Play Complete”, then nish.
How to record Shows
Firstly, enter into Source->Show->Record Show,
then input le name, select record mode and input
DMX signal source, click Record, and click Stop
when nish. Record Modes:
Manual: manual start and manual stop.
Semi_Auto: buto start but manual stop.
Auto: nonzero start, zero stop.
How to play recorded Shows
Firstly, enter into Source->Scene->Play Show,
select the wanted le and output port, click Play to
start and click stop play to nish. Play modes: One
Play & Loop Play
Page 6
P. 6
Neo Nexu s Split 4 -
English version
How to add Chase files
Firstly, users need to record Scenes, then enter into
Source->Chase->Add Chase, input Chase name, enter into Edit Chase menu. Select your wanted scene,
set speedtime and fade value, click Add to nish
adding rst scene. Then continuously select anoth-
er scene, set speedtime and fade value, click Add to
nish adding second scene. By parity of reasoning,
add all the wanted scenes. Finally, click Return to
save les and back.
How to play recorded Chases
Firstly, enter into Source->Scene->Play Chase,
select the wanted le and output port, click Play to
start and click stop play to nish.
Add DMX trigger
Firstly, enter into Trigger->Dmx->Add Dmx menu,
then set channel number and DMX value range and
trigger mode, nally click Enter to nish.
Add weekly time trigger
Firstly, enter into Trigger->Timer->Add Weekly
menu, then set time and weekly date , nally click
Enter to nish. (Attention: Current date and time
should be preset correctly).
Add daily time trigger
Firstly, enter into Trigger->Timer->Add Daily menu,
then set date and time , nally click Enter to nish. (Attention: Current date and time should be
preset correctly).
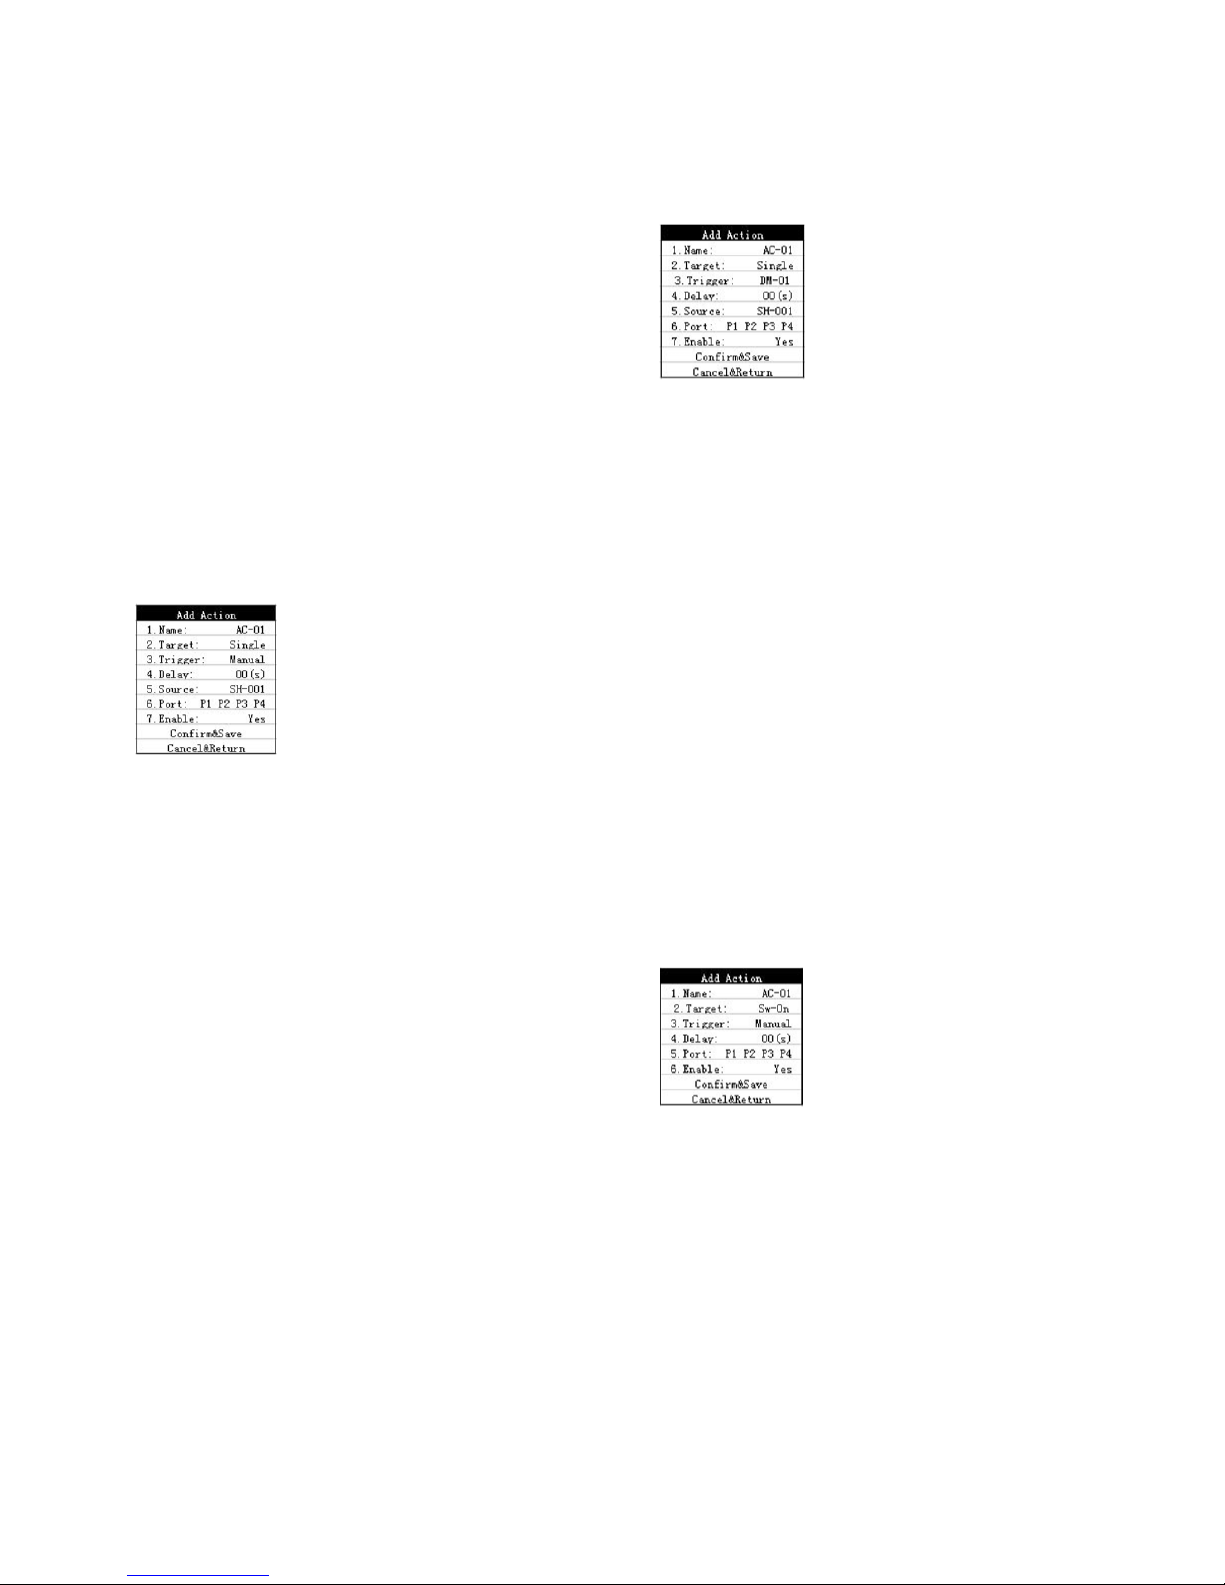
How to play DMX file manually
Firstly, enter into Action->Add Action
1. Name: Input the name.
2. Target: Target of the action: (Single: play one
time; Loop: play in loops; Stop: stop playing).
3. Trigger: Choose the trigger method, please
choose Manual here.
4. Delay: 0-10S.
5. Source: Choose the playing les, could be
Scene, Chase, Show and DMX_IN.
6. Port: Choose DMX output port (P1 P2 P3 P4).
7. Eanble: set the action enable or not. Please
choose Yes here.
8. Conrm & Save: save and exit, the action will
start to run or couting delay time.
9. Cancel & Return: cancel and exit.
Page 7

P. 7
- Neo Nexu s Split 4
English version
How to play DMX files when match
setting triggers
Firstly, enter into Action->Add Action
1. Name: Input the name.
2. Target: Target of the action. (Single: play one
time; Loop: play in loops; Stop: stop playing).
3. Trigger: Choose the trigger method: DMX trigger
(DM-01), Daily trigger (DA-01), Weekly trigger (WE-01)
4. Delay: 0-10S
5. Source: Choose the playing les, could be Scene,
Chase, Show, and DMX_IN.
6. Port: Choose DMX output port (P1 P2 P3 P4).
7. Eanble: set the action enable or not. Please
choose Yes here.
8. Conrm & Save: Save and exit, the action will
start to waiting for trigger.
9. Cancel & Return: cancel and exit.
How to ON/OFF port power
manually
Firstly, enter into Action->Add Action
1. Name: Input the name.
2. Target: Choose the target of the action. (Sw-On:
set port power on; Sw-O: set port power o).
3. Trigger: Choose the trigger method, please
choose Manual here.
4. Delay: 0-10S
5. Port: choose the power output port. (P1 P2 P3 P4).
6. Eanble: set the action enable or not. Please
choose Yes here.
7. Conrm & Save: save and exit, the action will
start to run or couting delay time.
8. Cancel & Return: cancel and exit.
How to ON/OFF port power
when match setting triggers
Firstly, enteri nto Action->Add Action
1. Name: Input the name.
2. Target: Choose the target of the action. (Sw-On:
set port power on; Sw-O: set port power o).
3. Trigger: Choose the trigger method: DMX trigger
(DM-01), Daily trigger (DA-01), Weekly trigger (WE-01)
4. Delay: 0-10S
5. Port: choose the power output port (P1 P2 P3 P4).
6. Eanble: set the action enable or not. Please
choose Yes here.
7. Conrm & Save: save and exit, the action will
start to waiting for trigger.
8. Cancel & Return: cancel and exit.
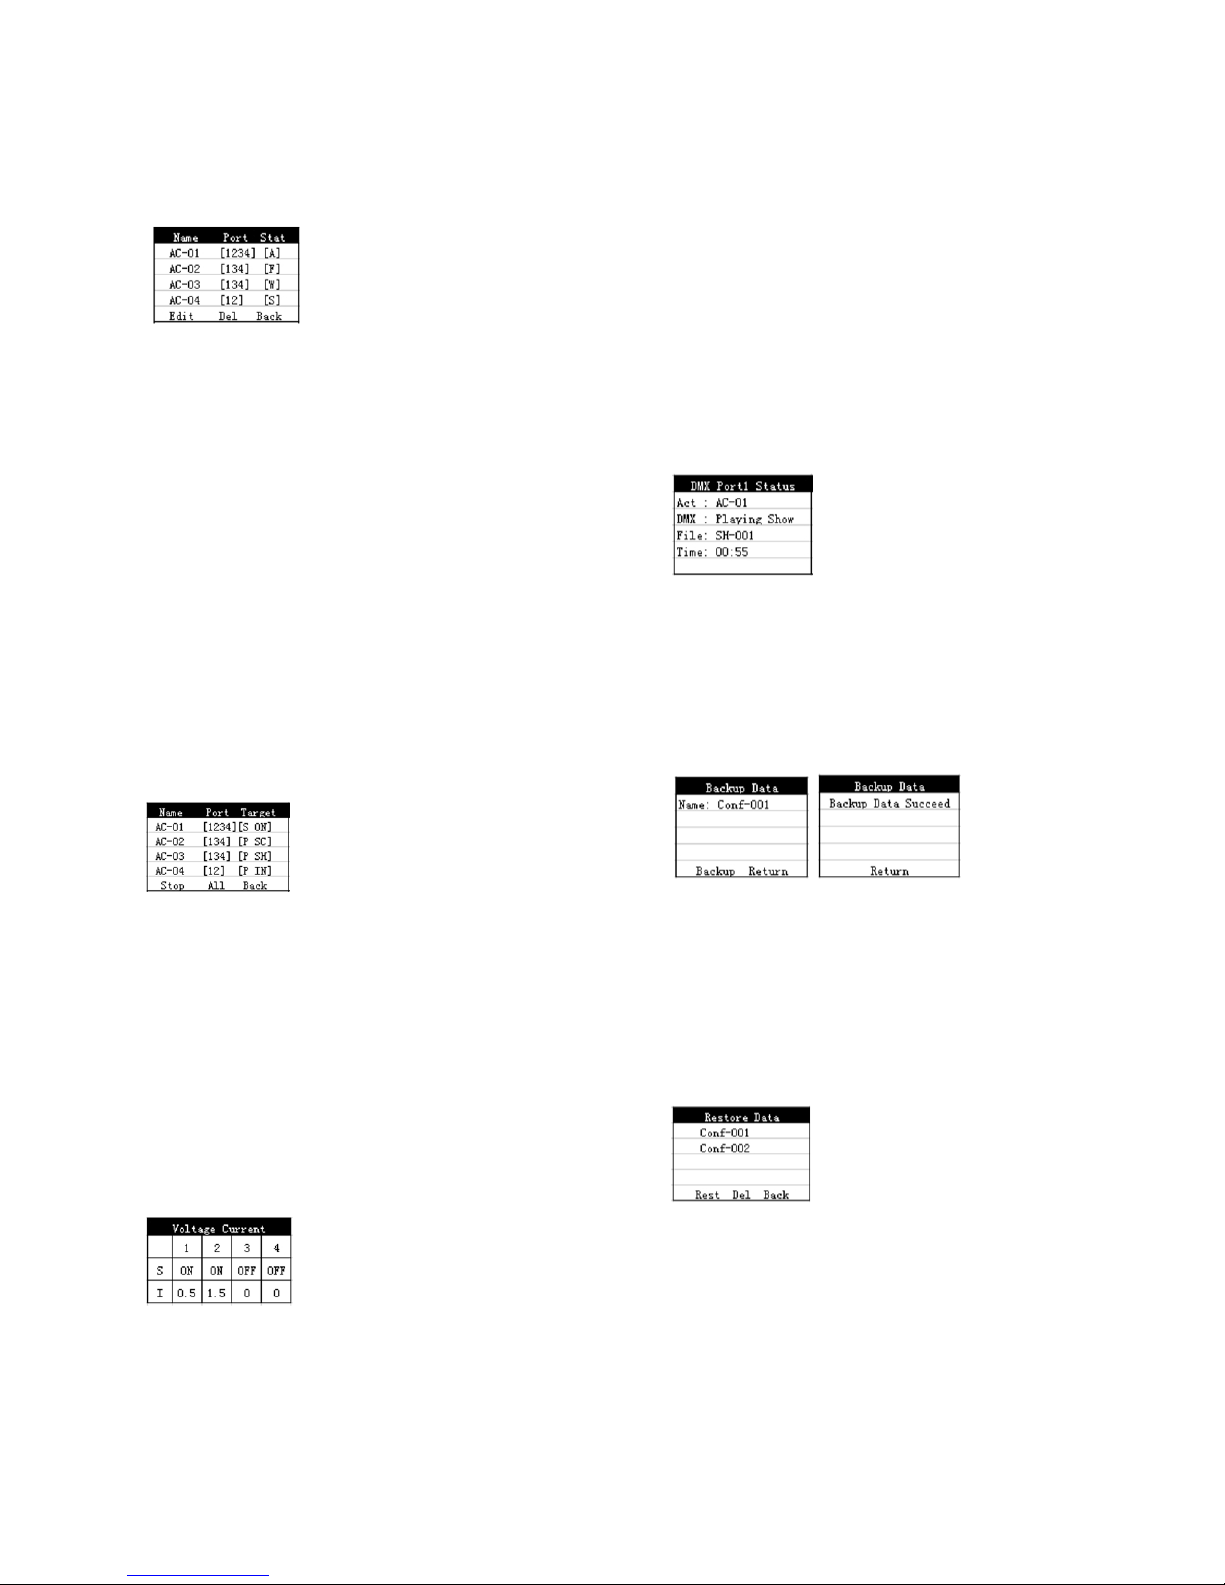
How to edit or delete Actions
Firstly, enter into Action->Edit & Del Action
Name: the builted action name.
Port: output port of action.
Stat: [A]: action is running, [F]: fail to act, [W]:
waiting for trigger, [S]: already started but was
stopped manually.
Edit: Edit actions
Del: Delete Action.
Back: To exit.
Page 8
P. 8
Neo Nexu s Split 4 -
English version
How to manually stop the running
action
Firstly, Enter into Action->Stop Action.
Name: The name of running action.
Port: Output port of action.
Target: Choose the target of the action, [S_ON]: set
the port power on, [S_OF]: set the port power o,
[P_SC]: play scenes, [P_CH]: play chases, [P_SH]:
play Show, [P_IN]: pass DMX_IN data. [STOP]: stop
playing les.
Stop: Manually stop actions. (If Target is [S_ON]then
o the power. If target is [P_SC], [P_CH], [P_SH],
then stop playing les.)
All: Manually stop all the running actions.
Back: To exit.
How to check ports voltage and
current
Firstly, enter into Voltage Current menu
1-4: 4 dierent power ports
S: port status
ON: power out
OFF: no power out
I: output current value (0.5 means 0.5A current
output)
How to check ports DMX OUT
information
Firstly, enter into DMX Port Status menu Act:
means which action DMX: means which DMX is
output File: means which DMX le is output Time:
playing time Using UP DOWNbuttons on naviga-
tor switch to change dierent ports status, press
ENTER to back.
Backup Data
Firstly, enter into Backup Data, Modify the want-
ed le, click Backup,when showing Backup Data
Succeed then nish.
Restore Data
Firstly, enter into Restore Data, choose the le
wantted to restore, click Rest to start. When
nish, xture will power on again automatically.
Click Del to delete les.
Set date and time
Firstly, enter into Setting->Date & Time, set the
current date and time. (Only setting the current
date and time correctly, Daily time trigger and
Page 9

P. 9
- Neo Nexu s Split 4
English version
weekly time trigger functions can work normally).
Clear the over-current warnings
Firstly, enter into Clear Warning, when port output
current exceed the setted value, will show Warning.
Only when click the port to clear warning, can work
normally again.
Tips: If the actions did not use LEFT or RIGHT buttons, users could also press the LEFT button to exit,
not necessary to click Back.
Page 10

P. 1 0
Neo Nexu s Split 4 -
Versión Español
1. DESCRIPCIÓN
Nexus Split 4
Splitter, grabadora & reproductora DMX
Nexus Split 4 es un equipamiento que combina la
función de splitter con la de una grabadora y reproductora DMX. El controlador cuenta con 4 salidas
DMX y 4 salidas de 220V conmutables que pueden
ser facilmente monitoreables y que además cuentan con un limitador personalizable. Nexus Split 4
puede ejecutar sus escenas y secuencias mediante
DMX o con temporizadores totalmente customizables, convirtiendose en una alternativa ideal para
todo tipo de instalaciones que requieran shows
preprogramados, los cuales pueden ser almacenados en su memoria interna de 8 GB.
Funcionalidad
• Splitter DMX
• Grabador y reproductor DMX
• Almacenamiento de programas en memoria SD
interna
• Los shows pueden ser ejecutados via DMX o
temporizador
• Intuitivo menú de fácil navegación
• Memoria SD interna: 8 GB
Técnic a
• Temperatura de operación: -30ºC~55ºC /
-22ºF~131ºF
• Salida de corriente: 15A por canal / 15A total
máx.
Físico
• Display OLED
• Conectores DMX de entrada: 1 conector XLR-3
• Conectores DMX de salida: 4 conectores XLR-3
• Conectores de alimentación de salida: 4
conectores PowerCon
• Conector de alimentación de entrada: 1
conector PowerCon
• Dimensiones: 483x130x44 mm. / 19x5,1x1,7
pulg.
• Peso: 2,4 Kg. / 5,3 Lbs.
Page 11
P. 11
- Neo Nexu s Split 4
Versión Español
2. INTRODUCCIÓN
Nexus Split 4 funciona como un relevador o relé que
controla la potencia enviada a luminarias individuales. Este equipo cuenta con una entrada powerCON
que se divide hasta en cuatro salidas, cada una de
las cuales puede apagarse vía DMX o temporizador interno. El equipo puede montarse en pared,
truss o bastidor. Asimismo, incluye un puerto DMX
de 4 puertos que le permite al usuario expandir un
universo DMX en diversas direcciones y amplicar la
señal a largo plazo.
Device Overview
1. Indicador de encendido
2. Indicador de señal DXM
3. Indicador de error DMX
4. Indicador de sobrecorriente
5. Pantalla OLED
6. Botón hacia arriba
7. Botón hacia abajo
8. Botón izquierda
9. Botón derecha o botón regresar
10. Botón Enter
11. Entrada de potencia
12. Fusible
13. Resistencia terminal
14. Entrada y thru DMX
15. Salida de potencia 1-4
16. Salida DMX
16
10
12
13
14
15
16
1 2 3 4 5 8 6 9
7
11
Page 12

P. 12
Neo Nexu s Split 4 -
3. MENÚ DE FUNCIONES
Menú Submenú Descripción
Source
Scene
Record Scene Grabar una escena
Play Scene Reproducir una escena
Delete Scene Eliminar una escena
Return Regresar al menú anterior
Chase
Add Chase Añadir un chase
Play Chase Reproducir un chase
Delete Chase Eliminar un chase
Return Regresar al menú anterior
Show
Record Show Grabar un show
Play Show Reproducir un show
Delete Show Eliminar un show
Return Return Regresar al menú anterior
Trig ger
DMX
Add DMX TR Añadir un disparador DMX
Edit&Del DMX TR Editar y eliminar un disparador DMX
Timer
Add Daily TR Añadir un disparador DMX diario
Edit&Del Daily TR Editar y eliminar un disparador DMX diario
Add Weekly TR Añadir un disparador DMX semanal
Edit&Del Weekly TR Editar y eliminar un disparador DMX semanal
Return Return Regresar al menú anterior
Action
Add Action Añadir una acción
Edit&Del Action Editar y eliminar una acción
Stop Action Detener una acción
Return Regresar al menú anterior
Voltage Current Vericación del voltaje de los puertos y la corriente
DMX Port Status Vericación la información de los puertos de salida DMX
Clear Warning Eliminar advertencia por sobrecorriente en el puerto
Device Setting
Set Data&Time Congurar fecha y hora
Set Max Current Congurar la corriente máxima de los puertos
Set OLED Option Congurar el tiempo de apagado de la pantalla
Set Buzzer Congurar timbre como abierto
View Device Label Ver la etiqueta del dispositivo
View Version Ver la versión actual del soware
Return Regresar al menú anterior
Backup Data Hacer copia de respaldo en tarjeta TF
Versión Español
Page 13

P. 13
- Neo Nexu s Split 4
Restore Data Restaurar datos de dispositivo de una tarjeta TF
Default Setting Restaurar valores de fábrica
4. INSTRUCCIONES DE USO
Botones disponibles
Arriba, abajo, derecha, izquierda y enter en el medio.
Indicadores del panel frontal
Rojo: Encendido.
Verde: Entrada DMX.
Amarillo: Error DMX.
Blanco: Corriente fuera de rango.
Indicadores del panel dorsal
Verde: Salida DMX.
Amarillo: Apagado.
Grabar escenas
Acceda a Source/Scene/Record Scene, ingrese la
fuente de señal DMX, presione Record y aguarde a
que nalice la grabación.
Reproducir escenas grabadas
Acceda a Source/Scene/Play Scene, seleccione el
archivo deseado y el puerto de salida. Por último,
presione Play. Cuando la pantalla indique “Play
Complete”, la reproducción habrá nalizado.
Grabar shows
Acceda a Source/Show/Record Show. Ingrese
el nombre del archivo, la fuente de señal DMX,
seleccione el modo de grabación (record mode) y
presione Record. Cuando desee nalizar, haga clic
en Stop.
Modos de grabación:
Manual: Inicio y detención manual.
Semi_Auto: Inicio automático y detención manual.
Auto: Inicio con cualquier valor y detención con
valor cero.
Reproducir shows grabados
Acceda a Source/Scene/Play Scene, seleccione el
archivo deseado y el puerto de salida. Por último,
presione Play para comenzar la reproducción y
Stop para detenerla.
Modos de reproducción:
One play: Reproducción única.
Versión Español
Page 14

P. 14
Neo Nexu s Split 4 -
Versión Español
Loop Play: Reproducción continua.
Añadir un chase
Primero el usuario debe grabar escenas. Luego acceda a Source/Chase/Add Chase, ingrese el nombre
del chase e ingrese al menú Edit Chase.
Seleccione la escena deseada y congure la velocidad (speed) y valor de fade (fade value). Presione
Add para nalizar la adición de la primera escena.
Seleccione la escena deseada y congure la velocidad (speed) y valor de fade (fade value). Presione
Add para nalizar la adición de la segunda escena.
Reitere el último paso para añadir todas las escenas deseadas. Por último, haga clic en Return para
guardar los archivos y regresar.
Reproducir Chase grabados
Acceda a Source/Scene/Play Chase, seleccione el
archivo deseado y el puerto de salida. Por último,
presione Play para comenzar la reproducción y
Stop para detenerla.
Añadir un disparador DMX
Acceda a Trigger/Dmx/Add Dmx, congure el
número de canal (channel), el rango de valor DMX
(range) y el modo del disparador (mode). Por último, presione Enter para nalizar.
Añadir un disparador DMX
semanal
Acceda a Trigger/Timer/Add Weekly, congure la
hora (time) y el día de la semana (Rep) y presione
Enter para nalizar.
Observación: La fecha y hora actual deben estar
previamente conguradas.
Añadir un disparador DMX diario
Acceda a Trigger/Timer/Add Weekly, congure la
hora (time) y el día de la semana (Rep) y presione
Enter para nalizar.
Observación: La fecha y hora actual deben estar
previamente conguradas.
Reproducir un archivo DMX de
forma manual
Acceda a Action/Add Action
1. Name: Ingrese el nombre.
2. Target: Objetivo de la acción (Single: repro-
Page 15
P. 15
- Neo Nexu s Split 4
Versión Español
ducción única, Loop: reproducción continua, Stop:
detener reproducción).
3. Trigger: Seleccione el modo de activación. En
este caso, manual.
4. Delay: Retraso de 0-10 segundos.
5. Source: Seleccione los archivos entre escenas,
chases, shows y entradas DMX.
6. Port: Seleccione el puerto de salida DMX (P1-P4).
7. Enable: Habilite o deshabilite la acción. En este
caso, seleccione sí.
8. Conrm&Save: Guarde y abandone el menú.
La acción se ejecuta o comenzará el tiempo de
retardo.
9. Cancel&Return: Cancele y abandone el menú.
Reproducir un archivo DMX cuando
coinciden los ajustes
Acceda a Action/Add Action
1. Name: Ingrese el nombre.
2. Target: Objetivo de la acción (Single: reproducción única, Loop: reproducción continua, Stop:
detener reproducción).
3. Trigger: Seleccione el modo de activación entre
DMX trigger (DM-01), Daily trigger (DA-01) o Weekly
trigger (WE-01).
4. Delay: Retraso de 0-10 segundos.
5. Source: Seleccione los archivos entre escenas,
chases, shows y entradas DMX.
6. Port: Seleccione el puerto de salida DMX (P1-P4).
7. Enable: Habilite o deshabilite la acción. En este
caso, seleccione sí.
8. Conrm&Save: Guarde y abandone el menú. La
acción aguarda el tiempo de activación.
9. Cancel&Return: Cancele y abandone el menú.
Encender/apagar el puerto de
alimentación de forma manual
Acceda a Action->Add Action.
1.Name: Ingrese el nombre.
2. Target: Objetivo de la acción (Sw-On: puerto
de alimentación encendido; Sw-O: puerto de
alimentación apagado).
3. Trigger: Seleccione el modo de activación. En
este caso, manual.
4. Delay: Retraso de 0-10 segundos.
5. Port: Seleccione el puerto de potencia de salida
(P1-P4).
6. Enable: Habilite o deshabilite la acción. En este
caso, seleccione sí.
7. Conrm&Save: Guarde y abandone el menú.
La acción se ejecuta o comenzará el tiempo de
retardo.
8. Cancel&Return: Cancele y abandone el menú.
Encender/apagar el puerto de
alimentación cuando coinciden
los ajustes
Acceda a Action/Add Action.
1. Name: Ingrese el nombre.
2. Target: Objetivo de la acción (Sw-On: puerto
de alimentación encendido; Sw-O: puerto de
Page 16

P. 1 6
Neo Nexu s Split 4 -
Versión Español
alimentación apagado).
3. Trigger: Seleccione el modo de activación entre
DMX trigger (DM-01), Daily trigger (DA-01) o Weekly
trigger (WE-01).
4. Delay: Retraso de 0-10 segundos.
5. Port: Seleccione el puerto de potencia de salida
(P1-P4).
6. Enable: Habilite o deshabilite la acción. En este
caso, seleccione sí.
7. Conrm&Save: Guarde y abandone el menú. La
acción aguarda el tiempo de activación.
8. Cancel&Return: Cancele y abandone el menú.
Editar o eliminar acciones
Acceda a Action/Edit&Del.
Action Name: Ingrese el nombre de la acción.
Port: Puerto de salida de la acción.
Stat: [A]: acción en curso, [F]: Fallo en la acción, [W]:
En espera para activar, [S]: Acción comenzada, pero
detenida de forma manual.
Edit: Edite acciones.
Del: Elimine acciones.
Back: Abandone el menú.
Detener una acción en curso de
forma manual
Acceda a Action/Stop.
Name: Ingrese el nombre de la acción en curso.
Port: Puertos de salida de la acción.
Target: Objetivo de la acción ([S_ON]: puerto de
potencia encendido, [S_OF]: puerto de potencia
apagado, [P_SC]: reproducir escenas, [P_CH]: reproducir chases, [P_SH]: reproducir show, [P_IN]:
pasar datos DMX_IN). [STOP]: detener archivos en
reproducción.
Stop: Detiene acciones de forma manual (si el
objetivo está encendido [S_ON], se apaga. Si
el objetivo está reproduciendo escenas [P_SC],
chases [P_CH] o shows [P_SH], los archivos en
reproducción se detendrán).
All: Detiene todas las acciones en curso de forma
manual.
Back: Abandone el menú.
Verificar el voltaje de los puertos
y la corriente
Acceda al menú Voltage Current.
1-4: 4 puertos de potencia diferentes.
S: Estado del puerto.
ON: Salida de potencia.
OFF: No hay salida de potencia.
I: Valor de corriente de salida (0.5 indica 0,5 A de
corriente).
Verificar la información de los
puertos de salida DMX
Acceda al menú DMX Port Status.
Act: La acción correspondiente.
DMX: El puerto DMX que funciona como salida.
File: El archivo DMX que funciona como salida.
Time: Tiempo de reproducción.
Utilice los botones arriba y abajo para modicar
el estado de los puertos. Presione ENTER para
Page 17

P. 17
- Neo Nexu s Split 4
Versión Español
conrmar y abandonar el menú.
Copia de respaldo
Acceda al menú Backup Data, modique el archivo
deseado y presione Backup. Cuando la pantalla
indique “Backup data succeed”, la copia habrá
nalizado correctamente.
Restaurar valores de fábrica
Acceda al menú Restore Data, seleccione el archivo que desea restaurar y presione Rest. Cuando el
equipo se reinicie, la restauración habrá nalizado
correctamente. Por otro lado, presione Del si desea
eliminar archivos.
Configurar fecha y hora
Acceda a Setting/Date&Time y congure la fecha
y hora actuales. Observación: Ingrese los datos
correctos de fecha y hora para que los disparadores
diarios y semanales funcionen correctamente.
Eliminar advertencias por sobrecorriente
Acceda al menú Clear Warning. Cuando la corriente de salida de un puerto exceda el valor
congurado, el dispositivo emitirá una advertencia. Solo cuando el usuario haga clic sobre el
puerto con advertencia, este volverá a funcionar
correctamente.
Sugerencia: Si en las acciones, el usuario no utilizó
los botones izquierda o derecha, puede presionar
el botón izquierda para abandonar un menú.
Page 18

P. 18
Neo Nexu s Split 4 -
Versión Español
Observación: El proveedor no asumirá responsabilidad por los errores u omisiones del manual.
La información de este manual está sujeta a cambios sin previo aviso.
Page 19

P. 1 9
- Neo Nexu s Split 4
Versión Español
 Loading...