

Page 1
P. 1
- Neo ION 575
USER MANUAL / MANUAL DE USUARIO
PLEASE READ THE INSTRUCTIONS CAREFULLY BEFORE USE
POR FAVOR LEA LAS INSTRUCCIÓNES ANTES DE USAR
ION 575
spot moving head powered by a 75W white LED
Page 2

P. 2
Neo ION 575 -
1. OVERVIEW
English version
Ion 575
Spot moving head powered by a 75W white LED
ION 575 is a spot moving head powered by a 75W
white LED. The unit provides a motorized focus,
3-facet rotating prism, 0-100% full range dimmer and
0-30Hz range strobe. ION 575 Led also sports a color
wheel with 8 dichroic lters + open with bidirectional rainbow eect & a rotating gobo wheel with 7
indexable and interchangeable rotating gobos. As in
all the ION series, the movements of this xture are
highlighted because of their precision and speed,
thanks to its compact design & 3-phase motors.
Source & Optics
• Light Source: 1 x 75W White LED
• LEDs life: 60,000 hours
• Zoom: 13º-18º beam angle
Photometric data
• Luminous Flux: 6400 lumen
• Flux: 6990 lux @ 2.5m (8 .)
Effects & Functions
• Color wheel: 8 dichroic lters + open, indexable
and bidirectional rainbow eect
• Color bounce
• Rotating gobo wheel: 7 interchangeable, rotat-
ing, indexable gobos + open
• Gobo diameter: Outside 23 mm, Inside 18 mm
• Gobo animation eect
• Gobo shaking
• Zoom: 13º to 18º
• 3-facet rotating prism
• Motorized focus
• Dimmer: Full range 0-100%
• Strobe eect
Control
• DMX channels:11/14
• Hibernation when lost DMX for preset time
• Soware upgrade via DMX
• Fan speed auto-change according to
temperature
Movement
• Pan: 630° / 540°
• Tilt: 265°
• 16-bit resolution
• Auto repositioning
Electrical
• Input voltage range: 100–240V, 50-60Hz
• Power supply: Electronic auto-ranging
• Power consumption: 160W
Physical
• DMX connectors: 2 XLR connectors (XLR-3 In
and Out)
• Power supply connectors: Interlock In/Out
• LED display
• Dimensions: 299x252x431 mm. / 11.7x10x17 in.
• Weight: 10 Kg. / 22 Lbs.
Page 3
P. 3
- Neo ION 575
English version
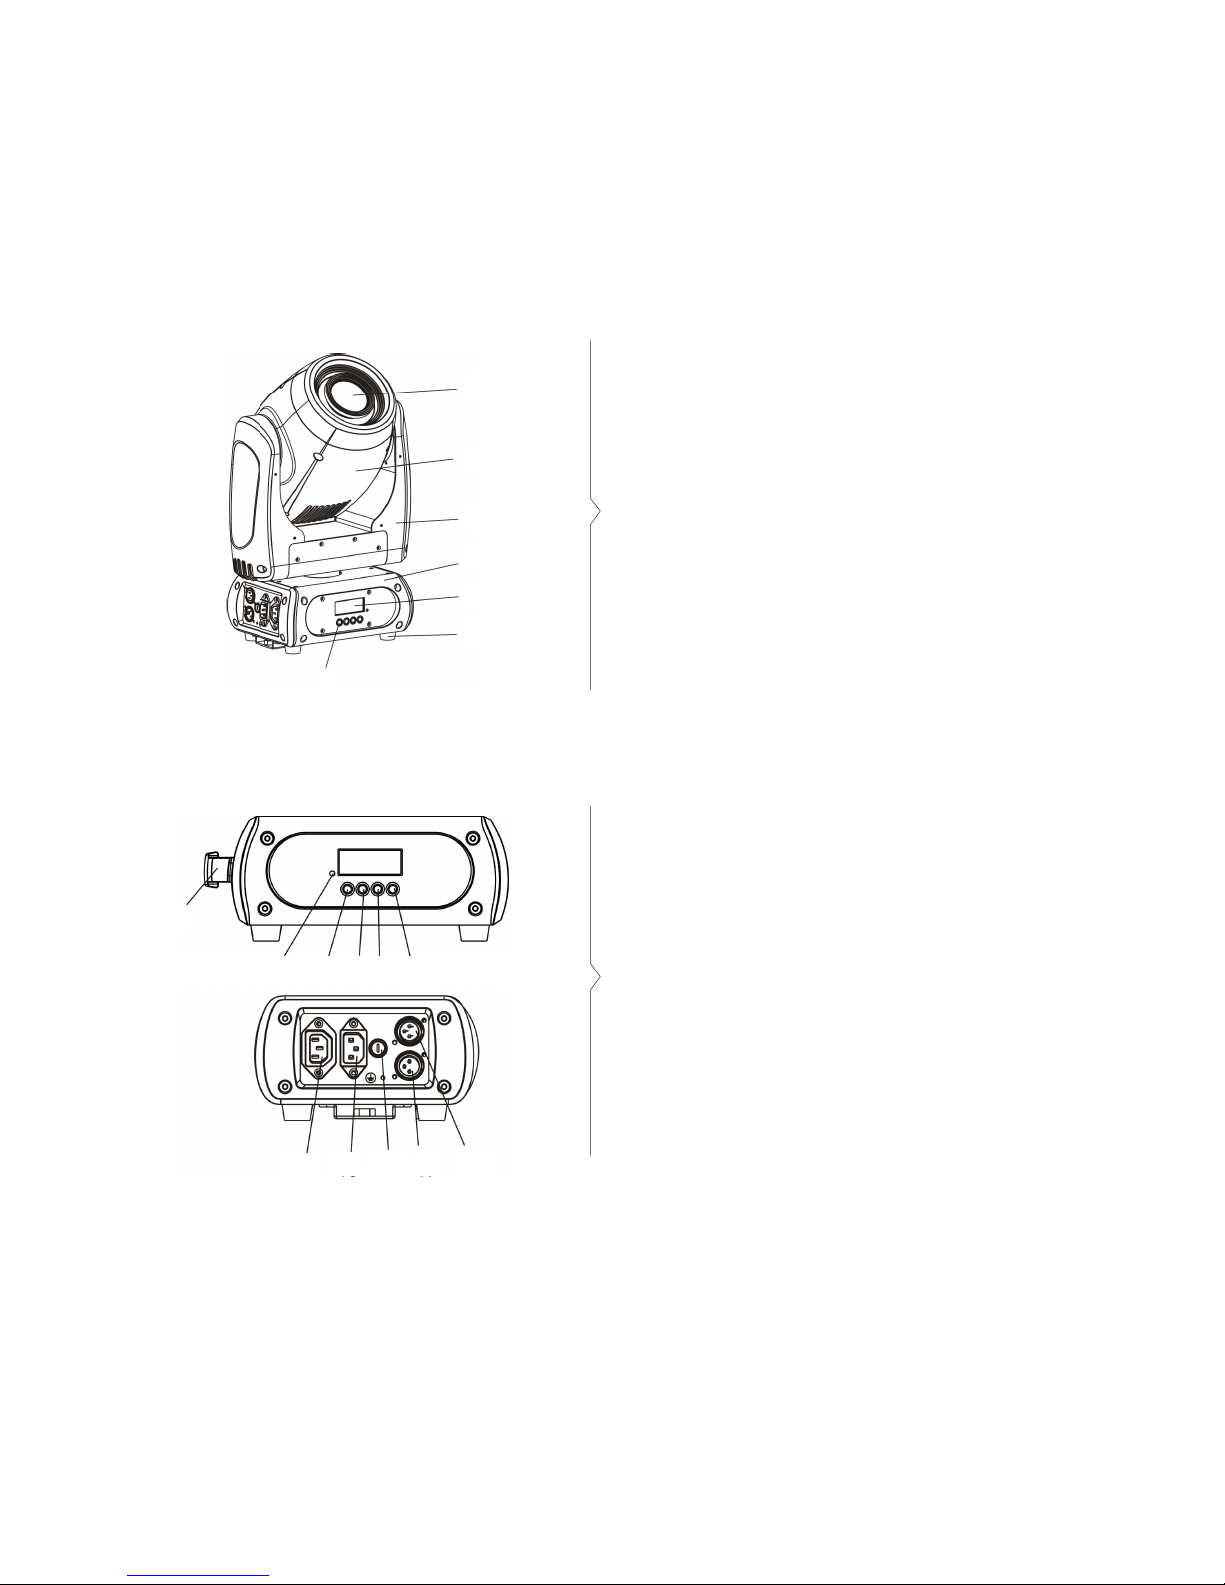
Description of the Device
8. Handle
9. Mic
10. MODE/ESC button
11. Down button
12. Up buttom
13. Enter button
14. Powercon in
15. Powercon out
16. Fuse
17. 3-pin DMX out
18. 3-pin DMX in
1. Project lens
2. Head
3. Arm
4. Base
5. Display
6. Foot stand
7. Operation button
1
2
3
4
7
6
5
8
17 18
9 1011 1213
14 15 16
Page 4

P. 4
Neo ION 575 -
Colors and Gobos
1 Open
2
Magenta
3 Orange
4 Sky blue
5 Pink
6 Yellow
7 Green
8 Blue
9 Red
English version
Page 5

P. 5
- Neo ION 575
Rotating gobo wheel (slot-in-out gobos)
English version
Page 6
P. 6
Neo ION 575 -
Before operate this unit, please carefully read this users guide and keep if needed in
future. It’s necessary to respect following rules.
The disposal of the device aer lifecycle could damage the environment, need to take
it to special company for recycling or return to authorized dealer.
The products referred to in this manual conform to the Eur opean Community Directives and are therefore marked with CE logo.
Keep this device away from children and unauthorized users, the manufacturer will
not take responsibility for the damage due to any disregard of the information provided in this manual and wrong operation.
Before operate the device, pls make sure the xture is in good housing, ensure pan
and tilt can rotate in its complete range.
Pls make sure minimal 0.5m distance need to kept between the xture to any ammable material.
The device can only run with 100-240v voltage, 50/60Hz power, don’t connect to any
other wrong power. Disconnect the device from main power before open the shield or
maintenance.
The device is designed only for indoor usage, pls keep it away from moisture. Do not
expose the device under the sun or directly to any other lighting source.
Never look directly into the projecting lens when the xture is power on, the light may
trigger epileptic seizures in photosensitive persons or persons with epilepsy. Espe-
cially at beam eect, extreme caution and observance of these safety instructions is
mandatory.
Don’t put or install the device on a surface that subject to vibration
or bumps.
2. SAFETY AND MAINTENANCE INFORMATION
Safety info
--0.5m
English version
Page 7

P. 7
- Neo ION 575
Maintenance
Ta=45°C
The device is supposed to work in the temperate range -15° C and +45° C, do not use
the device when the temperate exceed this range.
The lens, shield need to be replaced when obviously broken, never use the device
when the shield is not completed closed.
Safety I class device, need to be earth connected.
When the xture is hanged overhead, the safety rope must be xed to the bottom of
the device to the appropriate xing point.
Always carry the device by the handles, do not take the head or arm directly for
transportation.
• Operation only allowed to qualied person,
damages due to unprofessional operation or remove of any parts inside will not be considered
in warranty service. There are no serviceable
parts inside the device or package, service only
leaves to authorized dealers.
• Never allow the optical components contact
with oil, fat or any other liquid.
• A regular clearance of the device is needed for
long-term usage, this is very helpful to maintain
the lifetime and brightness need to use a so
and lint-free cloth to clean the optical system,
fan and air owing tunnel.
English version
Page 8

P. 8
Neo ION 575 -
Replacement of the fuse
Trouble Shooting
Need to replace with same type and rating, which
originally installed in the device.
Step One: Unplug power cable from main power.
St ep Two: Unscrew the fuse holder out of the hous-
ing with a screwdriver.
Step Three: Remove the broken fuse and replace
with an exact same type of new fuse.
Step Four: Insert the fuse holder back to the housing and screw tight and reconnect power.
Problems Possible reasons Checking or solutions
Device not
power up
Powercon or power cable damaged Change a good power cable to try
Faulty power supply Replace new power supply
Pan/Tilt error
or vibrate
Faulty Pan/Tilt PCB Replace PT001 PCB
Faulty opto sensor Replace opto sensor OP001
Cable loosen Check the cable connect to OP001
LED o
Temperature protection Check the temperature from menu
Fan not working Check the fan speed info from menu
Faulty LED Replace new LED
Dimmer and strobe set at 0 Set dimmer and strobe channel at 255
Faulty power supply Replace new power supply
Device not response
to DMX
Faulty communication IC Replace the IC with back-up one in the
display PCB
Faulty display PCB Replace new display PCB
Wrong DMX addressing Check the address and setting
Faulty DMX cable Change to a good DMX cable
English version
Page 9
P. 9
- Neo ION 575
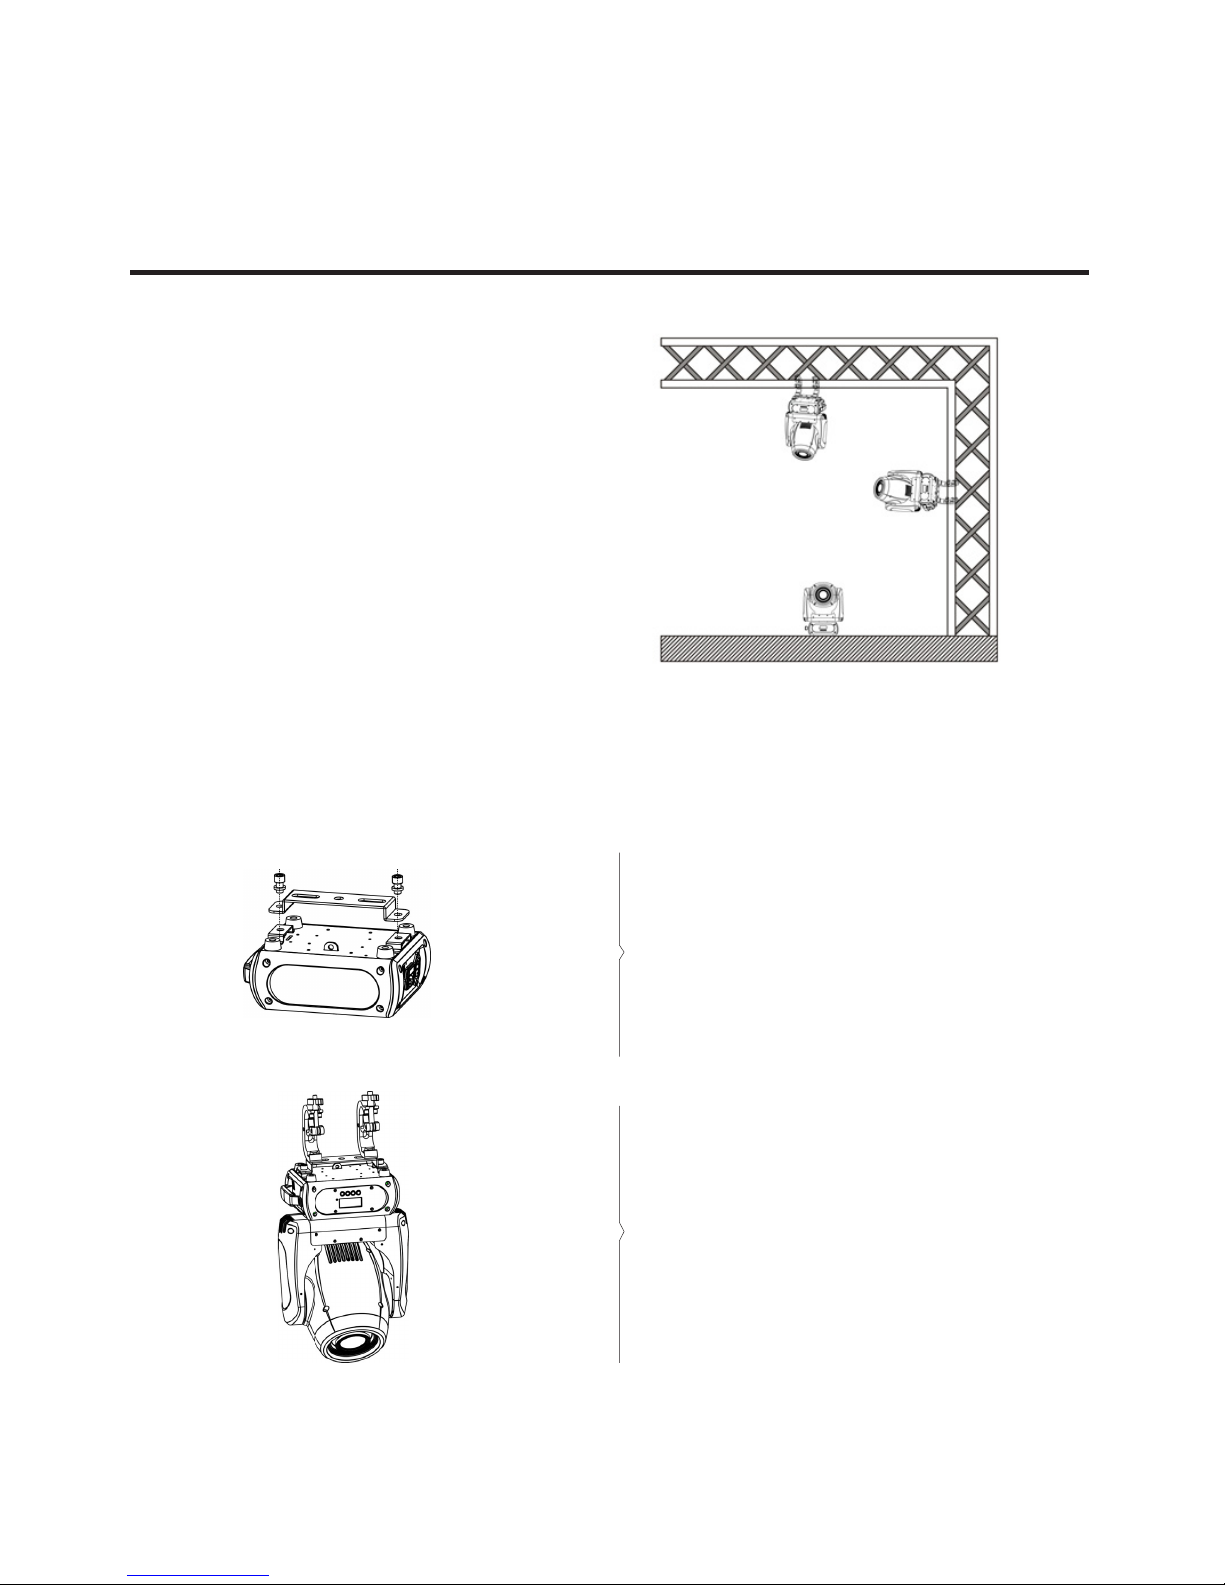
3. INSTALLATION
The device could be either put on a solid and even
surface, or mounted upside down or sideways like
le picture.
The mounting place must be suicient stable and
be able to support a weight of 10 times of the unit’s
weight. When the xture is hanged, always additionally secure the device with the safety chain,
fasten the safety rope at a suitable position so that
the maximum fall of the projector will be 20 cm.
How to do mounting installation.
Step two: Install the clamp and bracket on the
bottom of panel, fasten the quick-locks;
Step one: Installation the clamp onto the
omega bracket;
English version
Page 10

P. 1 0
Neo ION 575 -
4. CONTROL MENU
Meaning of the icon in menu
Default setting shadowed. mark with 1 can be basic
reloaded, 2 be program reloaded, 3 can be private
reloaded.
Step three: Install the whole device onto
appropriate truss and fasten the clamps, tight
the safety rope with the truss or other xing
point at a suitable position that drop down
distance not exceed 20 cm.
Connect Light Infomation Set Program
Menu tree
English version
Mode
Addr XXX DMX address setting
Slav Choose Slave mode
Sequ Alon/Mast Choose Sequence mode
Sund Alon/Mast Choose Sound mode
Lamp
Temp 80~139°C, 80°F Lamp o if temperature continuously over
for 5 minutes
Adju CHxx=XXX….. Adjust value of each channels
Info DriT XXXC Temperature of driver
Page 11

P. 11
- Neo ION 575
English version
Set
Move
RPan
RTilt
Degr
Enco
Mode
ON/OFF
ON/OFF
630/540
ON/OFF
Mod1/Mod2
Pan Reverse
Tilt Reverse
Choose Pan Degree
Encoder wheel on/o
Choose pan/tilt mode
UI
Mic
Sign
Fan
Hibe
Back
Flip
User
0~99%,60%
Close/Hold/Auto/
Music
Auto Speed /High
Speed
OFF, 01M~99M, 15M
02~60m 02m
ON/OFF
Use1/Use2
Sensitivity of Mic
Mode when no signal
Fans mode
Sleeping mode
Show backlight time
Display 180°reverse
Users mode
Cali
Code
CHxx
XXX
XXX
Password: 050
Calibrate channel value
Ver X1.0.0 IC Version
load ON/OFF Reload Default
Rest Reset
Page 12

P. 12
Neo ION 575 -
5. DMX CONNECTION AND DMX PROTOCOL
The device is controlled by universal DMX 512 protocol, DMX address is the start channel used to receive instructions from the external controller. For
independent control, each xture must be assigned
its unique address control channels. For example,
this device has four channel modes: 11/14, if we set
the mode at standard 11 channels mode, and there
are several models need to be independently con-
trolled, we just simply address rst xture at 1, and
second xture at 12, third one at 33, etc.
If the devices have the same address, they will behave synchronically.
DMX addressing is limited, don’t set the address so
high that without enough control channels for the
xtures.
Display is ashing when no DMX signal is received.
This device is equipped with 3-pins DMX in and
out sockets only. Pin 1 = GND, Pin 2 = Signal (-)
, Pin 3 = Signal (+)
The termination is prepared by soldering a 120Ω
resistor between pins 2 and 3.
DMX addressing
Connection: use DMX cable with 3-pin XLR-plugs
to connect the controller with the xture or one
xture with another.
English version
Page 13

P. 13
- Neo ION 575
English version
DMX chart
Channel Name Function Min DMX Max DMX
St Ex
1 1 Pan Pan Coarse 0 255
2 Pan ne Pan Fine 0 255
2 3 Tilt Tilt Coarse 0 255
4 Tilt ne Tilt Fine 0 255
3 5 Movment
Speed
fastest to Slowest 0 255
6 Movment
Function
Normal 0 15
Movement With Backout 16 31
TBD 32 255
4 7 Shutter
Shutter closed 0 31
No function (shutter open) 32 63
Strobe eect slow to fast 64 95
No function (shutter open) 96 127
Pulse-eect in sequences 128 159
No function (shutter open) 160 191
Random strobe eect slow to fast 192 223
No function (shutter open) 224 255
5 8 Dimmer Dimmer(Close to Open) 0 255
6 9 Color
Indexed
Position 1 (Open) 0 2
Position 2 ~ Position 18 3 53
Indexed With Backout
Position 1 (Open) 54 56
Position 2 ~ Position 18 57 106
Indexed With Bounce
Position 1 107 119
Position 2 ~ Position 10 120 223
Forward Wheel Spin
Stop to fastest 224 239
Reverse Wheel Spin
Stop to fastest 240 255
7 10 Rot Gobo
Indexed
Position 1 (Open) 0 5
Position 2 ~ Position8 6 47
Page 14

P. 14
Neo ION 575 -
Indexed With Backout
Position 1 (Open) 48 53
Position 2 ~ Position8 54 95
Indexed With Shake
Position 2 98 115
Position 3 ~ Position8 116 223
Forward Wheel Spin
Stop to fastest 224 239
Reverse Wheel Spin
Stop to fastest 240 255
8 11 Gobo Rot
Continuous
Positioning from 0-360 degrees 0 191
Forward Animate Rotate
Stop to fastest 192 207
Reverse Animate Rotate
Stop to fastest 208 223
Forward Spin
Stop to fastest 224 239
Reverse Spin
Stop to fastest 240 255
9 12 Prism &
Prism Rot
Prism
Position 1 (Open) 0 3
Prism Rot Forward Spin
Stop to fastest 4 127
Prism Rot Reverse Spin
Stop to fastest 128 255
10 13 Focus
Continuous
Focus In to Focus Out 0 255
11 14 Control
Normal 0 7
Reset All 8 15
Pan&Tilt Reset 16 23
Color Reset 24 31
Gobo Reset 32 39
TBD 40 47
Other Reset 48 55
Display O 56 63
Display On 64 71
TBD 72 87
Hibernation 88 95
TBD 96 255
English version
Page 15

P. 15
- Neo ION 575
English version
6. UNIQUE FEATURES
• RDM, stand for “Remote Device Management”,
with this function, users can realize remote
control of the device, such as remotely changing DMX address, reverse pan/tilt setting, check
a lot of useful information such as temperature,
power consumption, fan speed. Etc. Every
single device has a unique RDM code before le
factory to distinguish from each other, usually
not suggest users change this code freely.
• Soware upgrade function via DMX cable, if
there is any new rmware for this device come
out, it can be upgraded simply via a soware
upgrade box, no need to change any mechanical parts. The upgrade box is not included in
the package, if need any further assistance pls
just contact authorized dealers.
• Hibernation, the device will enter sleeping
mode if activated aer a period of disconnect-
ing DMX signal to save the power consumption, and will return immediately as soon as
the DMX signal is sent again.
• Display battery, this function is prepaid in
the display PCB, users just need to install
a normal 10440 600mAh 3.7V rechargeable
lithium battery, then users could power on
the display and do setting without connect to
main power.
• Display back-up communication IC, there is
a back-up communication IC installed in the
display PCB, so users could replace at once
if the working one is broken, no need to wait
long time from service.
• Display ip, by press up and down button for
more than 3 seconds, the display will ip automatically, this function is useful to read menu
conveniently when device is hanged.
7. DIMENSIONS DRAWING
Page 16

P. 1 6
Neo ION 575 -
Versión Español
1. DESCRIPCIÓN
Ion 575
Cabezal móvil tipo spot que cuenta con un LED blanco
de 75W
Ion 575 es un cabezal móvil tipo spot que cuenta con
un LED blanco de 75W. La unidad provee, además,
foco motorizado, prisma de 3 caras, dimmer de
rango completo y un estrobo de 0-30Hz. Ion 575
Led cuenta, por otra parte, con una rueda de ltros
dicróicos con 8 colores + abierto, efecto de arcoiris
bidireccional, y otra rueda con 7 gobos rotativos, indexables e intercambiables. Al igual que toda la serie
ION, los movimientos de este modelo se destacan
por su velocidad y precisión, gracias a su motor de 3
fases y su compacto diseño.
Fuente & Óptica
• Fuente de luz: 1 LED blanco de 75W
• Vida útil promedio: 60.000 horas
• Zoom: 13º-18º de ángulo de haz
Información fotométrica
• Flujo luminoso: 6.400 lumen
• Flux: 6.990 lux @ 2,5m (8 .)
Efectos y Funciones
• Rueda de color: 8 ltros dicroicos + abierto,
efecto arcoiris indexable & bidireccional
• Rebote de color
• Rueda de gobos rotativos: 7 gobos rotativos,
intercambiables e indexables + abierto
• Diámetro de gobo: por fuera 23 mm, por dentro
18 mm
• Efectos de animación de gobo
• Gobo Shaking
• Zoom: 13º a 18º de ángulo de haz
• Prisma rotativo de 3 caras
• Foco motorizado
• Dimmer: Rango completo 0-100%
• Efecto estrobo
Control
• Canales DMX:11/14
• Hibernación cuando pierde DMX por tiempo
preestablecido
• Actualización de soware vía DMX
• Velocidad del ventilador acorde a la
temperatura
Movimiento
• Pan: 630° / 540°
• Tilt: 265°
• 16-bit de resolución
• Reposicionamiento automático
Eléctrico
• Rango de voltaje de entrada: 100–240V, 5060Hz
• Alimentación: Rango automático
• Consumo máximo de potencia: 160W
Físico
• Conectores DMX: 2 conectores XLR (XLR-3 de
entrada & salida)
• Conectores de alimentación: Interlock
Entrada/Salida
• Display LED
• Dimensiones: 299x252x431 mm. / 11,7x10,3x17
pulg.
• Peso: 10 Kg. / 22 Lbs.
Page 17

P. 17
- Neo ION 575
Versión Español
Descripción del equipo
8. Manija
9. Micrófono
10. Tecla MODE/ESC
11. Tecla de desplazamiento hacia abajo
12. Tecla de desplazamiento hacia arriba
13. Tecla Enter
14. Conector Powercon de entrada 1 5. Conec tor Powercon de salida
16. Fusible
17. Salida DMX de 3 pines
18. Entrada DMX de 3 pines
1. Lente
2. Cabezal
3. Brazo
4. Base
5. Pantalla LCD
6. Soporte
7. Teclas de operación
1
2
3
4
7
6
5
8
17 18
9 1011 1213
14 15 16
Page 18

P. 18
Neo ION 575 -
Colores y globos
Versión Español
1 Abierto
2
Magenta
3 Orange
4 Sky blue
5 Pink
6 Yellow
7 Green
8 Blue
9 Red
Page 19

P. 1 9
- Neo ION 575
Rueda de gobos rotativos
Versión Español
Page 20

P. 2 0
Neo ION 575 -
Antes de utilizar la unidad, lea atentamente el presente manual y consérvelo para
referencias futuras. Deberá cumplir con todas las espefcicaciones consignadas en el
presente manual.
Si luego de nalizada la vida útil de la unidad, ésta debiera ser desechada, deberá
entregarla a una empresa especializada en su reciclaje o devolverla a un distribuidor
autorizado a n de procurar el cuidado del medioambiente.
Los productos referenciados en el presente manual cumplen con las Directivas de la
Comunidad Europea y por tal motivo exhiben el marcado CE.
Mantenga la unidad alejada de niños y usuarios no autorizados; el fabricante no
asumirá responsabilidad alguna por daños generados al no cumplir con las pautas
indicadas en el presente manual o una ejecución indebida.
Antes de poner en funcionamiento la unidad, asegúrese de que ésta no se ha dañado
como consecuencia de su transporte. Verique que el pan y el tilt pueden rotar en su
rango completo.
Deberá dejar una distancia de por lo menos 50 cm entre el equipo y materiales in-
amables.
La unidad podrá ser utilizada exclusivamente con un rango de voltaje de 100-240v
y una potencia de 50/60Hz. Cumpla con esta pauta. Desconecte la unidad antes de
realizar las tareas de mantenimiento o levantar la tapa.
La unidad ha sido diseñada para su uso en espacios interiores. Mantengala alejada
de condiciones de humedad. No ubique la unidad bajo el sol ni la exponga en forma
directa ante otra fuente de luz.
Nunca mire en forma directa a los lentes de proyección cuando la unidad está encen-
dida. La luz podría generar convulsiones epilèpticas en personas fotosensibles o con
epilepsia. Es fundamental, especialmente con el efecto beam, tener extrema precaución y cumplir con las instrucciones consignadas.
No coloque ni instale la unidad en una supercie expuesta a golpes o vibraciones.
2. SEGURIDAD Y MANTENIMIENTO
Seguridad
--0.5m
Versión Español
Page 21

P. 2 1
- Neo ION 575
Mantenimiento
Ta=45°C
Procure que la unidad opere en un rango de temperatura de 15° C y+45° C. No la utilice cuando la temperatura se ubica por fuera de dicho rango.
Los lentes deberán ser reemplazados cuando se han roto. Nunca utilice el equipo
cuando la tapa no se encuentra completamente cerrada.
Equipo Clase I. No es necesaria la conexión a tierra.
Cuando instale la unidad en una posición colgante, la cadena de seguridad debe ser
colocada en el extremo inferior del equipo en el punto de
jación apropiado.
Siempre que desplace la unidad, tómela de la manija y nunca del cabezal
o brazo.
• El equipo está diseñado para uso profesional.
La garantía no cubre daños causados por el
uso inapropiado de este producto. Evite desarmar el equipo. En su interior no hay piezas que
puedan ser reparadas por el usuario. En caso de
precisar reparación, pónganse en contacto con
el servicio técnico autorizado.
• Evite que líquidos, aceites o productos grasos
entren en contacto con las piezas ópticas del
equipo.
• Se recomienda la limpieza regular del equipo
para prolongar su vida útil y optimizar la salida
de luz. Utilice un paño suave que no genere
pelusa para las piezas ópticas, el ventilador y el
tubo de ujo de aire.
Versión Español
Page 22

P. 2 2
Neo ION 575 -
Sustitución del fusible
Resolución de problemas
Cuando sea necesario cambiar el fusible, utilice uno del
mismo tipo y rango instalado en el equipo.
Paso uno: Desconecte la unidad del suministro eléctrico.
Paso dos: Utilice un destornillador para extraer el por-
tafusible.
Paso tres: Quite el fusible roto y coloque uno nuevo del
mismo tipo.
Paso cuatro: Vuelva a colocar el portafusible y conecte
el equipo.
Problema Posible causa Resolución
El equipo no enciende.
Cable de alimentación o conector
powercon dañados.
Reemplace el cable de alimentación
por uno nuevo.
Suministro eléctrico erróneo.
Reemplace el cable de alimentación
por uno nuevo.
Pan/Tilt defectuoso o
con vibración.
La placa de circuito impreso está
dañada.
Reemplace la placa de circuito
interno PT001.
Opto sensor dañado. Reemplace el opto sensor OP001.
Cable suelto.
Compruebe que el cable esté conectado
al OP001.
LED apagado
Protección de temperatura. Controle la temperatura en el menú.
El ventilador no funciona.
Controle la velocidad del ventilador en el
menú.
Lámpara dañada. Reemplace el LED.
Dimmer y estrobo congurados con
valor 0.
Congure los canales dimmer y estrobo
con el valor 255.
Suministro eléctrico erróneo.
Reemplace el cable de alimentación por
uno nuevo.
El equipo no responde
al modo DMX.
Error en la comunicación IC.
Reemplace el conector IC con uno de
respaldo en la placa de circuito impreso.
La placa de circuito impreso de la
pantalla está dañada.
Reemplace la placa de circuito impreso de
la pantalla.
Conguración de dirección DMX
errónea.
Revise la conguración y los ajustes de la
dirección DMX.
El cable DMX está dañado. Reemplace el cable DMX por uno nuevo.
Versión Español
Page 23

P. 2 3
- Neo ION 575
3. INSTALACIÓN
La unidad deberá ser colocada sobre una supercie
sólida Y lisa o montada al revés o de costado, tal
como se muestra en la imagen.
Asegúrese de que la estructura donde planea
montar la unidad sea segura y pueda tolerar un
peso equivalente a 10 veces el peso del equipo. En
caso de instalaciones colgantes, procure colocar
una cadena de seguridad para proteger la unidad.
Coloque la cadena en una posición adecuada a n
de que la caída máxima del proyector sea de 20 cm.
Instalación del equipo.
2. Asegure la abrazadera y el soporte a la parte
inferior del panel de equipo. Ajuste los sujetadores quick-lock.
1. Fije la abrazadera al soporte.
Versión Español
Page 24

P. 2 4
Neo ION 575 -
4. MENÚ DE CONTROL
Signicado de los íconos
La conguración predeterminada está sombreada.
Podrá visualizar con 1 Recarga básica, 2 Recarga de
programa, 3 Recarga de forma particular.
3. Instale el equipo en una estructura apropiada. Atornille la abrazadera y coloque el
cable de seguridad en la estructura o punto
de jación, de manera tal que la distancia de
caída no exceda los 20cm.
Conexión Luz Infomación Conguración Programar
Árbol de menú
Versión Español
Mode
Addr XXX Conguración de la dirección DMX.
Slav Modo esclavo.
Sequ Alon/Mast Modo secuencia.
Sund Alon/Mast Modo audiorítimico
Lamp
Temp 80~139°C, 80°F La lámpara se apagará si la temperatura
aumenta continuamente por 5 minutos.
Adju CHxx=XXX….. Modicar los valores de cada canal.
Info DriT XXXC Temperatura del driver
Page 25

P. 2 5
- Neo ION 575
Versión Español
Set
Move
RPan
RTilt
Degr
Enco
Mode
ON/OFF
ON/OFF
630/540
ON/OFF
Mod1/Mod2
Pan en sentido antihorario
Tilt en sentido antihorario
Seleccionar ángulo de Pan
Rueda codicadora encendida/ apagada
Seleccionar modo pan/tilt
UI
Mic
Sign
Fan
Hibe
Back
Flip
User
0~99%,60%
Close/Hold/Auto/
Music
Auto Speed /High
Speed
OFF, 01M~99M, 15M
02~60m 02m
ON/OFF
Use1/Use2
Sensibilidad del micrófono.
Modos sin señal.
Modos del ventilador
Modo de suspensión
Duración de la luz de fondo
Pantalla invertida
Modos de usuario.
Cali
Code
CHxx
XXX
XXX
Contraseña: 050
Calibrar el valor del canal
Ver X1.0.0 Versión de IC
load ON/OFF Volver a los valores por defecto
Rest Restablecer valores
Page 26

P. 2 6
Neo ION 575 -
5. PROTOCOLO Y CONEXIÓN DMX
Direccionamiento DMX
Versión Español
El equipo funciona de acuerdo con el protocolo
DMX512 universal. La dirección DMX corresponde
al canal de partida empleado para recibir instrucciones del controlador externo. Para el control
independiente cada equipo debe tener asignada
una dirección única de canales. Por ejemplo, esta
unidad posee cuatro modos de canales: 11/14. Si
cuenta con diversos equipos que necesiten control
independiente y está utilizando el modo estándar
de 11 canales, lo único que debe hacer es congurar la primera unidad al 1, la segunda al 12, la
tercera al 33, etc.
Si todos los equipos se conguran con la misma
dirección funcionarán de forma sincronizada.
El direccionamiento DMX es limitado, por lo tanto
procure no congurarlo en valores muy altos que
no dejen canales libres para los equipos. La pan-
talla titilará cuando no reciba señal DMX.
El equipo cuenta con conectores DMX de entrada y salida, de tres clavijas. Pin 1 = Tierra Pin,
2 = Señal negativa (-), Pin 3 = Señal positiva (+)
La terminación cuenta con un resistor 120 Ω ubi-
cado entre las clavijas 2 y 3.
Connection: Utilice un cable DMX con conectores
XLR-3 para enlazar el controlador con la unidad o
para enlazar dos unidades entre sí.
Page 27

P. 2 7
- Neo ION 575
Canales DMX
Versión Español
Canal Nombre Función Mín DMX Máx DMX
St Ex
1 1 Pan Pan Coarse 0 255
2 Pan no Pan Fino 0 255
2 3 Tilt Tilt 0 255
4 Tilt no Tilt Fino 0 255
3 5 Velocidad
de
movimiento
Velocidad decreciente 0 255
6 Función
movimiento
Normal 0 15
Movimiento con blackout 16 31
TBD 32 255
4 7 Shutter
Shutter cerrado 0 31
Sin función (shutter abierto) 32 63
Efecto estrobo (velocidad creciente) 64 95
Sin función (shutter abierto) 96 127
Efecto pulse en secuencia 128 159
Sin función (shutter abierto) 160 191
Efecto estrobo aleatorio (velocidad
creciente)
192 223
Sin función (shutter abierto) 224 255
5 8 Dimmer Dimmer (cerrado a abierto) 0 255
6 9 Color
Indexado
Posición 1 (abierto) 0 2
Posición 2 ~ Posición 18 3 53
Indexado con blackout
Posición 1 (abierto) 54 56
Posición 2 ~ Posición 18 57 106
Giro de rueda hacia adelante
Posición 1 107 119
Posición 2 ~ Posición 10 120 223
Giro de rueda hacia adelante
Interrupción al más rápido 224 239
Giro de rueda hacia atrás
Interrupción al más rápido 240 255
7 10 Gobo
Indexado
Posición 1 (abierto) 0 5
Posición 2 ~ Posición 8 6 47
Page 28

P. 2 8
Neo ION 575 -
Indexado con blackout
Posición 1 (Open) 48 53
Posición 2 ~ Posición 8 54 95
Indexado con movimiento
Posición 2 98 115
Posición 3 ~ Posición 8 116 223
Giro de rueda hacia adelante
Interrupción al más rápido 224 239
Giro de rueda hacia atrás
Interrupción al más rápido 240 255
8 11 Gobo
rotativo
Continuo
Posicionamiento entre 0-360° 0 191
Animación rota hacia delante
Interrupción al más rápido 192 207
Animación rota hacia atrás
Interrupción al más rápido 208 223
Giro hacia delante
Interrupción al más rápido 224 239
Giro hacia atrás
Interrupción al más rápido 240 255
9 12 Prisma &
rotación de
prisma
Prisma
Posición 1 (abierto) 0 3
Rotación hacia adelante
Interrupción al más rápido 4 127
Rotación hacia atrás
Interrupción al más rápido 128 255
10 13 Foco
Continuo
En foco a fuera de foco 0 255
11 14 Controles
Normal 0 7
Restablecer todo 8 15
Restablecer Pan y Tilt 16 23
Restablecer color 24 31
Restablecer gobo 32 39
TBD 40 47
Restablecer otros 48 55
Pantalla apagada 56 63
Pantalla encendida 64 71
TBD 72 87
Hibernación 88 95
TBD 96 255
Versión Español
Page 29

P. 2 9
- Neo ION 575
6. CARACTERÍSTICAS ÚNICAS
• La sigla RDM hace referencia al Manejo Remoto
de la Unidad. Esta función le permite al usuario manejar el equipo de forma remota. Podrá
cambiar la dirección DMX, invertir la conguración del pan y el tilt, vericar la temperatura, el
consumo de energía y la velocidad del venti-
lador, entre otras cosas. Antes de ser despachado de fábrica, a cada equipo se le asigna un
código RDM único que lo diferenciara del resto.
No es aconsejable modicar dicho código por
cuenta propia.
• En caso de crearse un nuevo rmware, el
equipo es compatible con la actualización de
soware a través del cable DMX. Sólo deberá
acceder al paquete de actualización, sin necesidad de cambiar piezas mecánicas. El paquete
de actualización no está incluido en la caja
del equipo. En caso de necesitar mayor información, contáctese con el distribuidor.
• Hibernación: El equipo entrará en modo de
suspensión con el n de ahorrar energía si no
recibe señal DMX. Volverá a activarse cuando
detecte la señal DMX.
• Batería de la pantalla: Es una función de la
pantalla PCB. Deberá instalar una batería recargable de litio normal 10440 6000mAh 3.7V
para poder utilizar la pantalla del equipo sin
tener que conectarlo al suministro eléctrico.
• Comunicación de respaldo IC: Se encuentra
instalada en la pantalla PCB para que pueda
instalarla en que caso de que el original deje
de funcionar. Evitará esperar un tiempo prolongado por la reparación.
• Rotación de pantalla: Presione las teclas UP y
DOWN durante tres segundos para rotar verticalmente la pantalla. Esta función es de gran
utilidad si el equipo se encuentra en posición
colgante.
Versión Español
7. DIMENSIONES
Page 30

P. 3 0
Neo ION 575 -
 Loading...