


Druid LCD
Electric Fence Energizer
Installer Manual

Introduction & disclaimer 3
Guarantee 4
Nemtek group outlets 5
Foreword 6
Mounting & battery replacement 7
PC Board replacement 8
Connections and configuration 9
Fence wiring diagrams 10
Bi-polar fence wiring diagrams 11
4-zone installation 12
Network card and Nemtek Connect 13
Large network 14
Detailed service indicators & Fuses 15
Installation notes 16
Programmable options 17
Appendix 28
Programmable options summary 31
IEC Safety Information 32
Document revision history 32
Table of Contents
2

INTRODUCTION
The DRUID LCD is a battery (12V 7AH nominal) operated energizer suitable for connection to
mains (AC 100V-240V, 50-60Hz).
The batteries to be used are rechargeable lead-acid batteries. Non-rechargeable batteries must
not be used. The lead-acid batteries require venting and it is imperative that the energizer be
situated in a well-ventilated area.
A new fully charged battery will typically provide in excess of 24 hours backup. Backup time will
vary with fence condition though.
Electric fencing can be lethal. Please avoid entanglement\entrapment hazards (See APPENDIX
at the end of this manual) and warn the user to avoid head contact with the fence.
DISCLAIMER
NEMTEK Holdings (Pty) Ltd or any of its subsidiary companies does not guarantee that the
operation of the product will be uninterrupted or totally error free.
Energizer specifications may be altered without prior notification.
The installer is referred to the definitions and general requirements in the Appendix.
The installer must take into consideration the applicable municipal laws concerning the
installation of electric fences. General guidelines are available, or refer to the website:
http://www.nemtek.com. International standards can be viewed at http://www.iec.ch and
South African standards on http://www.sabs.co.za.
Introduction & disclaimer
3

GUARANTEE
The Druid LCD Electric Fence Energizer, manufactured by NEMTEK, is guaranteed for a period
of two years from date of sale against defects due to faulty workmanship or materials.
NEMTEK will, at its discretion, either repair or replace a product that proves to be defective.
NEMTEK guarantees that the product, when properly installed and used in line with the
specification as determined by NEMTEK from time to time, will execute its function of
generating a suitable potential. NEMTEK does not guarantee that the operation of the product
will be uninterrupted and totally error free. Faulty units must be returned to one of the NEMTEK
Group outlets. The buyer shall pay all shipping and other charges for the return of the product
to NEMTEK or NEMTEK Security Warehouse.
LIMITATION OF GUARANTEE
The guarantee does not apply to defects resulting from acts of God, modifications made by the
buyer or any third party, misuse, neglect, abuse, accident and mishandling.
EXCLUSIVE REMEDIES
The remedies provided herein are NEMTEK’s sole liability and the buyer’s sole and exclusive
remedies for breach of guarantee. NEMTEK shall not be liable for any special, incidental,
consequential, direct or indirect damages, whether based on contact, tort, or any other legal
theory. The foregoing guarantee is in lieu of any and all other guarantees, whether expressed,
implied, or statutory, including but not limited to warranties of merchantability and suitability
for a particular purpose.
Guarantee
4

HEAD OFFICE
Tel: +27 (0)11 462 8283 Northriding Commercial Park
Fax: +27 (0)11 462 7132 Stand 251, Aintree Street, Northriding
Randburg, South Africa
EXPORTS
Tel: +27 (0)11 462 8283 exports@nemtek.com
Fax: +27 (0)11 462 7132
EDENVALE
Tel: +27 (0)11 453 1970 Unit 4, Meadowdale Park
Fax: +27 (0)11 453 1858 Cnr. Dick Kemp & Herman Roads
Meadowdale, Edenvale, South Africa
CAPE TOWN
Tel: +27 (0)21 386-3742 27B Concord Crescent, Airport City
Fax: +27 (0)21 386-5573 Cape Town, South Africa
NELSPRUIT
Tel: +27 (0)13 752-2187 Waterval Ave, Riverside Industrial
Fax: +27 (0)13 752-2188 Nelspruit, South Africa
KWAZULU-NATAL
Tel: +27 (0)31 701-2125 19 Henwood Road
Fax: +27 (0)31 701-2125 Pinetown, South Africa
AUSTRALIA
Tel: (08) 9303 9855 Unit 5, 19 Innovation Circuit,
Email: nemtek@bigpond.net.au Wangara, 6065, Perth, WA, Australia
Website: www.nemtek.com
E-mail: nemtek@nemtek.com
Manufactured in South Africa
NEMTEK Group outlets
5

The DRUID LCD 2x energizer should ideally be operated by means of a remote keypad to
obtain access to the many energizer features and receive the greatest protection. It can
however be operated by means of a Nemtek tab or external switch.
The energizer includes many user and installer settings. These will be retained in the event
of total power loss. i.e. the battery is exhausted during a prolonged mains failure.
The energizer can be configured as a master only 2 zone installation, or as a master and
slave networked 4 zone installation. Only a master energizer can communicate with
keypads and other devices present on the keypad bus.
A set of jumpers positioned above each of the three energizer relays, allow the relay
contacts to be configured as either wet (providing 12V nominal power) or dry (potential
free) contacts.
The energizer display will light with a blue (OFF), green (all is OK), yellow (alarm in history
or other medium priority event) or red (active alarm condition exists) background to
announce the energizer’s state at a glance and from a distance.
The DRUID LCD energizer incorporates an advanced and patented fence voltage
regulation, arc detection and avoidance system. What this means is, the fence energy is
maintained at a higher level than would normally be possible using a conventional
energizer on the same fence, when factors such as poor or damaged insulators, wet
insulators after a rain storm, or salt build up on insulators (at the coast) prevent the fence
from supporting a high voltage. A conventional energizer will push all available energy
through any arcing that may occur across the insulator, thus reducing the fence’s
effectiveness. The DRUID LCD energizer however will detect the arcing and then attempt
to operate the fence at a voltage just below that at which arcing occurs, thus maintaining
higher energy levels on the fence and improving the effectiveness of the fence. Nemtek is
the inventor and patent holder of this innovative technology.
Nemtek Connect
Nemtek Druid LCD 2x energizers can be upgraded for remote connectivity through a
smartphone application or internet browser via Nemtek Connect. Contact Nemtek for
more information on the hardware and software upgrades required.
Foreword
6

Mounting & battery replacement
7
STEP 1: Disconnect mains. Open the lid after
removing the two cap screws. Unplug the
battery terminals if connected.
STEP 2: Remove screws and battery bracket
STEP 3: Remove battery
*Dispose of old battery according to legal
requirements. Do not replace with a nonrechargeable battery!
STEP 4: Use a drilling template and drill 4 x
8mm holes in the wall for mounting the unit.
Four nail-in anchors are supplied with the unit.
Insert the plastic sleeve of the nail in anchor
into the wall then hammer the screw in with a
screwdriver and hammer. Leave a gap slightly
more than the thickness of the casing between
screw heads and wall. Position the casing so
that the screws go through the slots provided
then drop it into position. Tighten the top 2
screws to secure the casing. The bottom two
screws will slot into the casing for stability,
they don’t need to be tightened.
STEP 5: Insert battery with the negative
terminal to the top.
STEP 6: Place the battery bracket back (with
plastic offsets at the top) and fasten the
screws into place.
STEP 7: Connect battery wires. Close the lid
by hooking the top of the lid in first and then
fasten the bottom down with the two cap
screws. Apply mains power to the unit.
Note: Energizer to be mounted vertically against a
flat surface, in a well ventilated area.
Avoid prolonged exposure to direct sunlight.

PC Board replacement
8
STEP 1: Disconnect mains power and the
battery terminals if connected.
STEP 2: Remove all five connectors,
C1 – C5.
STEP 3: Remove the five screws, S1 – S5.
STEP 4: To remove the PC Board, gently
pull the PC Board away from the mounting
plate, unplugging it from the connectors
beneath it. There are four spade connectors
beneath the PC Board in the middle of the
board and two box connectors beneath and
near the bottom of the board.
STEP 5: To replace the PC Board, first align
the box connector near the bottom of the PC
Board and then align the four spade
connectors at the top of the PC Board using
the guide tabs, and gently press the PCB
down into place.
STEP 6: Re-insert and tighten the five
screws.
STEP 7: Reconnect the five connectors to
the PC Board.
STEP 8: Reconnect the battery terminals
and apply mains power.
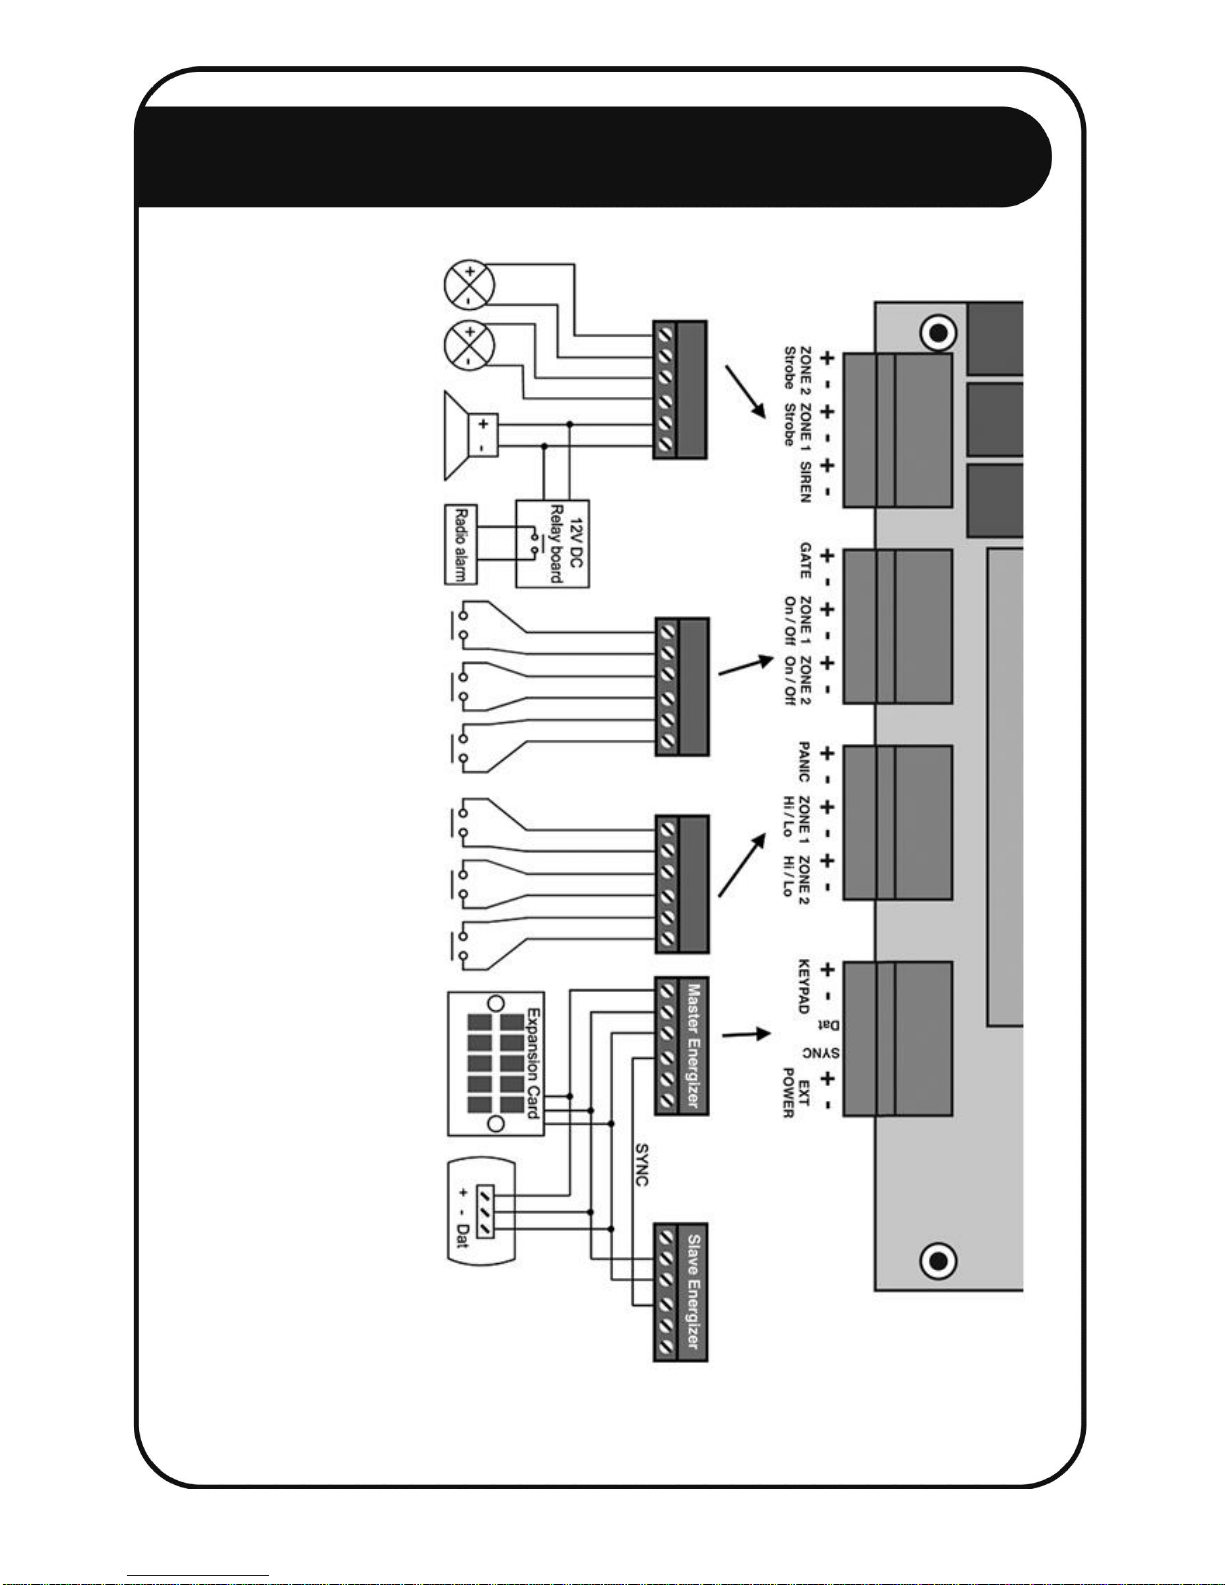
Connections
9
12V DC Strobe Light
for Zone 2
12V DC Strobe Light for
Zone 1
20W max 12V DC
Siren
Radio alarm not to be
powered from energizer!
Gate Switch
(Normally closed)
External On/Off Switch
for Zone 1
External On/Off Switch
for Zone 2
Panic Switch
(Normally closed)
High/Low voltage switch
for Zone 1
High/Low voltage switch
for Zone 2
A maximum of two Nemtek
Druid 4-Zone keypads, two
expansion cards and 100m
of comms cable can be
connected.
A total of two energizers
can be linked together.
See; Creating a 4 zone
installation, later on in this
manual.

The installation and erection of an electric fence in, South Africa, is to be done according to
the latest addition of SANS 10222-3. In other countries, according to relevant
specifications.
Live wire connection
Fence wiring diagrams
10
Fence 1
Fence 2
The fence earth wire is
to be connected to the
main earth spike and
not directly to the
energizer
All earth spikes are
connected to one wire of the
fence only, and this one wire
is connected to the rest of
the fence at the main.
Earth wire connection with earth loop monitoring (preferred)
The fence earth wire is
to be connected to the
main earth spike and
not directly to the
energizer
Install the main earth spikes close to the energizer
Earth wire connection with no earth loop monitoring
Fence 1
Fence 2
Install the main earth spikes close to the energizer
Fence 1
Fence 2

Bi-polar fence wiring diagrams
11
Live wire connection with double the voltage between adjacent strands
Fence 1
Fence 2
Earth wire connection with no earth loop monitoring

CREATING A 4-ZONE INSTALLATION
Using two DRUID LCD 2x energizers, a four zone installation can be created. Implementing
four zones, a property owner can identify the location of an attempted intrusion to a
greater degree of accuracy. For example, the front, back, left or right side of the property
can each be a unique zone.
To create a four zone system, two DRUID LCD 2x energizers need to be linked via the
keypad bus. Three wires in total need to be wired correctly between the two energizers.
The system ground (KEYPAD-) wire, the data wire (DATA), and the synchronization wire
(SYNC).
One energizer must be configured as a master, and the other energizer configured as a
slave. An energizer is configured by means of a Master/Slave jumper on the energizer main
PCB, just below the LCD display. A master energizer will have the jumper absent, and a
slave energizer must have the jumper inserted.
Master will show as zones 1 & 2 on the keypad.
Slave will show as zones 3 & 4 on the keypad.
Lastly, the master needs to be informed whether a slave energizer is connected creating a
four zone system or if it is a master only two zone system. This is so that a communication
failure (service alarm) can be generated should the slave energizer not respond to the
master’s request for information, and so that the keypad can be dealt with correctly as
either a two or four zone installation.
The SLAVE ENERGIZER PRESENT setting is set by first entering installer mode, and
then entering installer code 5001*#. Further details of this code can be found in this
manual under the PROGRAMMABLE OPTIONS section.
Note: Please read the section, KEYPAD ZONE FOCUS, in the Druid LCD User Manual Rev1.2 or
later. This section explains how to direct keypad input to a specific zone, or to all zones
simultaneously. Installer PROGRAMABLE OPTIONS which are zone focus specific will have the
following text appear bellow the programmable option later in this manual.
*Can be directed to a specific zone, using KEYPAD ZONE FOCUS.
4-zone installation
12

The Druid LCD 2x energiser has a data port to which communications cards such as a
network card or a Nemtek Connect card can be connected. These cards enable networking
or remote access and control of the energiser.
Visit the Nemtek website, www.nemtek.co.za, for the latest details on the smartphone
app and networking options available to you.
Network cards and Nemtek Connect
13

Up to 32 Druid LCD 2x energisers (64 Zones) can be networked together.
Each of the energisers will need to have a unique address in the range 1-32.
The energiser’s large network address is set using installer code 51??*# detailed on
page 27 of this manual.
Often when networking energizers it is possible to come into contact with more than one
energized fence at a time. In this case, for safety, the energizers should be synchronised
with one another. Synchronisation is achieved by either making all energizers dependant
on the timing of one of the energizers in the network, or by making all energizers
dependant on an accurate external clock source with a period of one second, such as the
GPS receiver available from Nemtek.
Use the installer code 503?*#, detailed on page 26 of this manual, to change the
synchronisation behaviour of an energizer. Synchronisation may also be an issue in nonnetworked fences that are adjacent at some point.
Large network
14
When the energizer front cover is opened while displaying a service condition (spanner
symbol), if the service condition is still present, further information will be displayed
indicating the cause of the service condition as listed below.
A = Aux fuse blown
I = Fence interference detected
S = High voltage boost circuit failure, SCR failure or rapid triggering
B = Battery fuse blown, battery fault or not connected
N = Slave energizer communication failure
V = Output high voltage sense error
F = High voltage boost circuit control loss
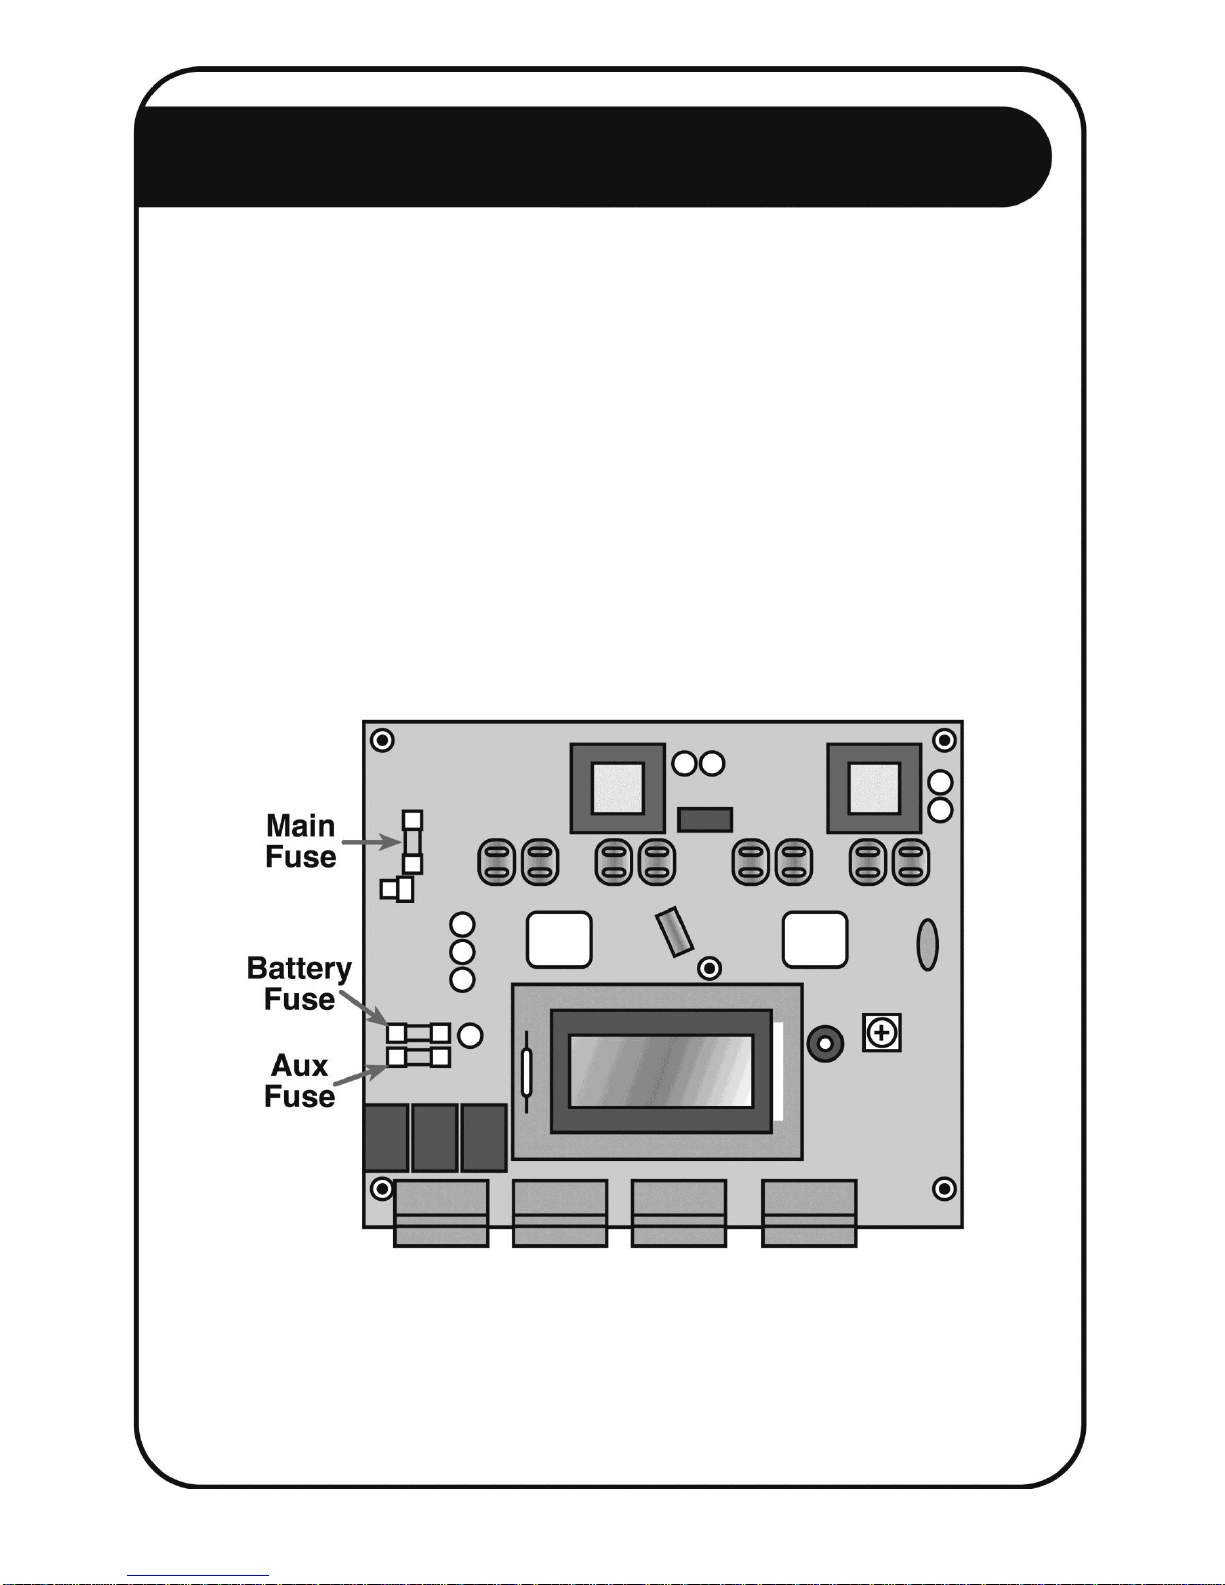
FUSE DESCRIPTION AND FAULT SYMPTOMS
All fuses are of the “fast blow” type with a 2A rating. Main fuse 4A
Detailed service indicators & fuses
15
Main Fuse: Energizer displays a battery symbol, and not the mains power symbol (plug).
Battery Fuse: Energizer does not operate when mains power is disconnected.
Aux Fuse: The Siren and strobes do not function.

• Keep the wires to the fence separate from the keypad, gate, siren, strobe and
mains wiring.
• Do not try and modify the energizer. Any unauthorized modifications will null and
void the warranty and possibly render the unit illegal.
• If the external On/Off facility is used, the wire between the remote switch and the
energizer can be up to a 100m in length. The switch contact must be open for the
fence to be energized.
• A remote receiver can obtain 12VDC from the keypad bus. Current consumption
must not exceed 0.1 Amps. This is not sufficient to supply power for an armed
response transmitter.
• The siren and strobe lights together must not draw more than 1.8Amps.
• Never use the energizer battery to power a radio alarm transmitter or alarm panel.
• The wire between the magnetic gate switch and the energizer can be up to a 100m
in length, but must not run parallel with any fence wires. The gate switch must be
open circuit if the gate is open.
• The remote keypad cable must not exceed 100m in total length. Avoid running this
cable parallel with any fence (high voltage) wires.
• You may connect a total of two keypads, one expansion card and one slave
energizer to an energizer set to master.
• Use HT (high voltage) wire between the fence and energizer, including the earth
wire. Never run these wires in the same conduit or through the same hole as the
low voltage wiring.
• Always use ferrules or line clamps to connect two high voltage wires together.
Avoid using dissimilar materials for connections like copper on steel.
• The fence must be earthed properly with three earth electrodes close to the
energizer. The distance between the fence earth electrode and any other earth
systems shall be not less than 2m for a security fence installation. (Typically a
suburban property installation), and 10m for an agricultural fence installation.
(Typically a rural property installation.)
• When replacing the front of the energizer, hook the top in first while holding it an
angle and then push it closed at the bottom. Fasten the lid down with the two cap
screws.
• Always test the fence after installation for correct short and open-circuit alarming at
various points along the fence.
• Do not use the energizer with non-rechargeable batteries.
• The energizer contains a sealed lead-acid battery that will vent to the atmosphere
under certain conditions. For this reason it is imperative that the energizer be
installed in a well ventilated area.
• Refer to the applicable laws concerning the installation of electric fences in your
area.
Installation notes
16

RESTORE FACTORY DEFAULTS 2 3 8 9 #
Returns the energizer configuration, including all PINs to their factory default values
Enter this code within 60s of powering the energizer on after complete power removal, i.e
mains and battery power removal simultaneously.
ENTER PROGRAMMING MODE _ _ _ _ _ _ * 0 #
Enables programming mode
Programmable options can only be changed once the energizer is placed into programming
mode. The keypad will beep three times if the code is accepted. The factory default
installer PIN is 012345. Programming mode will timeout and exit after five minutes or
upon entering the *# exit code.
CHANGE INSTALLER PIN 0 0 _ _ _ _ _ _ #
Changes the factory default six digit installer PIN to a new six digit PIN
SIREN ON TIME 0 1 _ _ * #
Sets the siren on (active) time
m = minutes, s = x10 seconds
Programmable range is 0101*# (10s) to 0141*# (4m:10s)
Factory default value is 0120*# (2m:0s)
Siren active time is the amount of time that the siren will sound before automatically
turning off, if not reset by the user.
SIREN OFF TIME 0 2 _ _ *#
Sets the siren off (inactive) time
m = minutes, s = x10 seconds
Programmable range is 0201*# (10s) to 0241*# (4min:10s)
Factory default value is 0230*# (3min:0s)
Siren off time is the amount of time that the siren will be forced to remain off after having
automatically timed out (siren on time) from a previous alarm condition.
Programmable options
17
INSTALLER PIN
NEW

EVENTS BEFORE RE-ARM TIMEOUT 0 3 0 _ *#
Sets the total unacknowledged events before the re-arm time comes into play
? = total events before re-arm time
Programmable range is 0301*# (1 event) to 0307*# (7 events)
Factory default value is 0303*# (3 events)
See SIREN RE-ARM TIME below.
SIREN RE-ARM TIME 0 4 _ _ _ _ _ * #
Sets the sirens re-arm time period
d = day, hh = x10 hours + hours, mm = x10 minutes + minutes
Programmable range is 0400001*# (1min) to 0471402*# (7d:14h:02min)
Factory default value is 0410000*# (1d:00h:00min)
The re-arm time comes into play after the siren has sounded for the set number of events
without being manually reset by the user. This is required by law to prevent an alarm from
sounding indefinitely while the owner is not home to correct the alarm condition.
RELAYS ACTIVE OPEN 0 0 6 _ * #
Set the active state of all three relays on the energizer PCB.
? = 0 (relay closed when active) or 1 (relay open when active)
Factory default value is 0060*# (relay normally open, closed on activation)
Typically used when the energizer is connected to an alarm system requiring a normally
closed input.
STROBE LIGHT Z1 RELAY FUNCTION 0 0 1 _ * #
Selects between zone 1 strobe light only, or zone 1 & 2 combined function.
? = 0 (zone 1 strobe light) or 1 (zone 1 & 2 combined)
Factory default value is 0010*# (zone 1 strobe light only)
The Z1 strobe light relay can be assigned to be active when an alarm is triggered on zone
1 only (0), or an alarm is triggered on either of zone 1 or zone 2 (1)
Programmable options
18
d h h m m

STROBE LIGHT Z2 RELAY FUNCTION 0 0 0 _ *#
Selects between zone 2 strobe light, or fence on/off indication.
? = 0 (zone 2 strobe light) or 1 (fence on/off indication)
Factory default value is 0020*# (zone 2 strobe light only)
The Z2 strobe light relay can be assigned to be active when an alarm is triggered on zone
2 only (0), or to indicate when the fence is energized (1). Both zone 1 and zone 2 need to
be active for the relay to indicate the fence is energized.
SIREN RELAY FUNCTION 0 0 3 _ * #
Selects between gate alarm, energizer on/off indication, or service alarm, when in ALARM
SENSOR MODE only.
? = 0 (gate alarm) or 1 (energizer on/off indication), or 2 (service alarm)
Factory default value is 0030*# (gate alarm)
The siren relay can be assigned to be active when a gate alarm occurs (0), or to indicate
when the fence is energized (1), or to activate on service alarm (2). *Note that both zone
1 and zone 2 need to be active for the relay to indicate the fence is energized.
ALARM SENSOR MODE 4 0 8 _ * #
Enable or disable the energizer alarm sensor mode.
When this mode is active, the display will indicate “AlmSensr”
? = 0 (conventional energizer mode) or 1 (alarm sensor mode)
Factory default value is 4080*# (conventional energizer mode)
When in alarm sensor mode, the strobe relays, regardless of STROBE LIGHT Z1/Z2 RELAY
FUNCTION settings, will function as follows;
The Zone 1 strobe relay is active only as long as zone 1 is in alarm condition.
The Zone 2 strobe relay is active only as long as zone 2 is in alarm condition.
The siren relay by factory default will be active only as long as the gate is in alarm condition. If
however the siren relay function has been altered using the SIREN RELAY FUNCTION, the siren
relay will be active as long as both fence zone 1 and zone 2 are energized.
Additional status information can be obtained, such as, zone active, zone low voltage mode, zone
check condition, mains fail, service and tamper conditions, by fitting an expansion card onto the
keypad bus.
This mode is typically used when the energizer is connected to an alarm system and no user
interaction with the energizer will take place. The energizer is thus treated as simply another alarm
detecting sensor for the alarm panel.
Programmable options
19

GATE ALARM DELAY TIME 1 0 _ _ * #
Sets the gate alarm delay time
m = minutes, s = x10 seconds
Programmable range is 1001*# (10s) to 1041*# (4min:10s)
Factory default value is 1010*# (1min:0s)
The gate alarm will only sound once the gate has remained open for longer than the GATE
ALARM DELAY time. The GATE ALARM INSTANT user code can be used to temporarily
override this delay period, and the GATE ALARM BYPASS user code can be used to
temporarily disable the gate alarm function.
GATE CHIME ON CLOSE 1 1 9 _ * #
Enable or disable a gate close chime, only when gate chiming is enabled.
? = 0 (no chime on close) or 1 (chime on close)
Factory default value is 1190*# (no chime on close)
The user can enable a gate chime notification using the GATE CHIME user code, as
detailed in the Druid LCD User Manual. This GATE CHIME ON CLOSE installer code
additionally enables chiming on closure of the gate as well.
INPUT TOGGLE SELECT 1 1 1 _ * #
Selects toggling or direct on/off control of the fence.
? = 0 (direct control) or 1 (toggle control)
Factory default value is 1110*# (direct control)
With direct control, the fence is energized when the input transitions to open circuit.
With toggle control, the fence operating state is toggled each time the input transitions
from closed to open circuit.
FENCE CONDITION CHECK LEVEL 2 0 1 _ * #
Sets the value at which the CHECK message will be displayed should the fence condition
indicator reduce to or below this set value.
? = check level between 3 and 6
Programmable range is 2013*# (3 = fair to poor) to 2016*# (6 = good)
Factory default value is 2014*# (4 = fair)
*Can be directed to a specific zone, using KEYPAD ZONE FOCUS.
Programmable options
20
m s
?
?
?

FENCE STATE AT POWER ON 2 0 2 _ * #
Sets the operating state that the fence is returned to after a complete power failure has
ended.
? = 0 (off), 1 (on) or 2 (fence returns to on/off state at power loss)
Factory default value is 2022*# (fence returns to on/off state at power loss)
A complete power failure occurs when the energizer shuts down due to the internal battery
running flat during a prolonged mains power failure.
*Can be directed to a specific zone, using KEYPAD ZONE FOCUS.
FENCE INTERFERENCE ALARM 2 0 3 _ * #
Enables or disables the fence interference detected alarm function.
? = 0 (disabled), 1 (enabled)
Factory default value is 2031*# (enabled) for DRUID_18
Factory default value is 2030*# (disabled) for DRUID_114
Fence interference may occur when a neighboring fence comes into contact with the fence
been driven by this energizer or when criminals attempt to defeat the energizer fence
alarm detection mechanism.
*Can be directed to a specific zone, using KEYPAD ZONE FOCUS.
FENCE HIGH POWER VOLTAGE 2 1 _ _ * #
Sets the energizer output voltage during high power operation.
k = kilo volts, v = x100 volts
Programmable range is 2160*# (6.0kV) to 2197*# (9.7kV)
Factory default value is 2197*# (9.7kV)
The fence condition indication value is affected by this value. Setting this value to a lower
voltage will cause the fence condition indication to increase towards 9 (excellent) as the
energizer works less hard to maintain the lower set voltage on the fence.
*Can be directed to a specific zone, using KEYPAD ZONE FOCUS.
Programmable options
21
k v
?
?

FENCE HIGH POWER CHECK LEVEL 2 2 _ _ * #
Sets the value at which the CHECK message will be displayed should the fence return
voltage reduce to below this set value when operating in high power mode.
k = kilo volts, v = x100 volts
Programmable range is 2230*# (3.0kV) to 2260*# (6.0kV)
Factory default value is 2240*# (4.0kV)
The check level must always be set above the alarm level for the new setting to be
accepted.
*Can be directed to a specific zone, using KEYPAD ZONE FOCUS.
FENCE HIGH POWER ALARM LEVEL 2 3 _ _ * #
Sets the value at which the BAD message will be displayed, and at which the alarm will
sound should the fence return voltage reduce to or below this set value when operating in
high power mode.
k = kilo volts, v = x100 volts
Programmable range is 2320*# (2.0kV) to 2350*# (5.0kV)
Factory default value is 2330*# (3.0kV)
The alarm level must always be set below the check level for the new setting to be
accepted.
*Can be directed to a specific zone, using KEYPAD ZONE FOCUS.
FENCE ALARM DELAY 2 5 _ _ * #
Sets the number of violating fence pulses that have to occur before the alarm is activated.
?? = number of pulses before alarm occurs
Programmable range is 2501*# (1 pulse) to 2515*# (15 pulses)
Factory default value is 2503*# (3 pulses) for DRUID_18
Factory default value is 2507*# (5 pulses) for DRUID_114
*Can be directed to a specific zone, using KEYPAD ZONE FOCUS.
FENCE LOW POWER VOLTAGE 2 7 _ _ * #
Sets the energizer output voltage during low power operation.
k = kilo volts, v = x100 volts
Programmable range is 2709*# (0.9kV) to 2719*# (1.9kV)
Factory default value is 2715*# (1.5kV)
*Can be directed to a specific zone, using KEYPAD ZONE FOCUS.
Programmable options
22
k v
k v
? ?
k v

FENCE LOW POWER ALARM LEVEL 2 8 _ _ * #
Sets the value at which the BAD message will be displayed, and the alarm will sound
should the fence return voltage reduce to or below this set value when operating in low
power mode.
k = kilo volts, v = x100 volts
Programmable range is 2805*# (0.5kV) to 2815*# (1.5kV)
Factory default value is 2808*# (0.8kV)
*Can be directed to a specific zone, using KEYPAD ZONE FOCUS.
FENCE CONTROL ALGORITHM 3 0 1 _ * #
Sets the fence control algorithm.
? = 0 (conventional) or 1 (arc detection and avoidance)
Factory default value is 3011*# (arc detection and avoidance)
Conventional control will output a maximum of 8kV onto the fence to reduce the risk of arcing
across insulators. Setting the FENCE HIGH POWER VOLTAGE to a value greater than 8kV will not
raise the output voltage beyond 8kV when using conventional control. For more information on arc
detection and avoidance control, read the FOREWORD at the front of this manual.
*Can be directed to a specific zone, using KEYPAD ZONE FOCUS.
MAGNETIC SWITCH 4 0 1 _ * #
Enables or disables the magnetic switch.
? = 0 (disabled) or 1 (enabled)
Factory default value is 4011*# (enabled)
When using a keypad, disable the magnetic switch to increase the level of security offered.
TAMPER ALARM 4 0 3 _ * #
Enables or disables the tamper alarm function.
? = 0 (disabled) or 1 (enabled)
Factory default value is 4031*# (enabled)
When enabled, the tamper alarm will sound if the energizer front is opened while the fence is
energized. The tamper symbol t will always be shown on the display, regardless of whether the
tamper alarm is enabled or disabled.
Programmable options
23
k v
?
?
?

SERVICE ALARM 4 0 4 _ * #
Enables or disables alarming during a service condition.
? = 0 (disabled) or 1 (enabled)
Factory default value is 4041*# (enabled)
DISPLAY INSTALLER TEL NUMBER 4 0 5 _ * #
Enables or disables the displaying of the installers telephone number during a service
condition.
? = 0 (disabled) or 1 (enabled)
Factory default value is 4050*# (disabled)
When enabling this function, don’t forget to set a new telephone number using the (10 digit new
telephone number)# code below.
SHOW KEY PRESSES ON LCD 4 0 6 _ * #
Enables or disables the displaying of keypad key presses on the energizer display.
? = 0 (disabled) or 1 (enabled)
Factory default value is 4061*# (enabled)
For increased security when the energizer and keypad are far apart, it may be desirable to disable
this function and so prevent the user PIN being read from the energizer display.
SOLAR POWERED INSTALLATION 4 0 7 _ * #
Modifies the energizer operation for permanent battery operation.
? = 0 (disabled, requires mains power) or 1 (solar installation)
Factory default value is 4070*# (disabled)
If the energizer is to be run permanently from battery power, which is typically the case when
running a solar powered site, then enabling this function will prevent the energizer from reacting to
mains power loss as an error condition.
MAINS FAIL CHIME 4 0 9 _ * #
Enable or disable mains fail chime.
? = 0 (no chime on mains fail) or 1 (chime on mains fail)
Factory default value is 4091*# (chime on mains fail)
The energizer and connected keypad will chime upon detecting mains failure, if enabled.
Programmable options
24
?
?
?
?
?

SLAVE ENERGIZER PRESENT 5 0 0 _ * #
Enable or disable whether a slave energizer should be present.
? = 0 (Master only 2 zone system) or 1 (Slave connected 4 zone system)
Factory default value is 5000*# (Master only 2 zone installation)
The master energizer needs to be configured as to whether a slave energizer is connected, creating
a four zone system, or if it is a master only two zone system. This is required so that a
communication failure (service alarm) can be generated should the slave energizer not respond to
the master’s request for information, and so that the keypad can be dealt with correctly as either a
two or four zone installation.
EXPANSION CARD CONFIGURATION 5 0 2 _ * #
Selects the configuration used in assigning a function to each of the ten relays and each of
the four inputs on the expansion card.
? = configuration to select (contact NEMTEK for customized configurations)
Programmable range is 5020*# to 5022*#
Factory default value is 5020*# (Configuration 0)
The expansion card address jumper must be set to 1for the master energizer info or 2 for the slave.
Configuration 0.
Relay 1 = Expansion card communication timeout.
Relay 6 = Mains fail.
Relay 2 = Zone 1 On/Off status.
Relay 7 = Battery low or Service alarm.
Relay 3 = Zone 2 On/Off status.
Relay 8 = Zone 1 in “Check”.
Relay 4 = Zone 1 in low voltage mode.
Relay 9 = Zone 2 in “Check”.
Relay 5 = Zone 2 in low voltage mode.
Relay10 = Energizer tamper state.
Input 1 = Zone 1 On / Off control.
Input 3 = Zone 1 Low / High voltage select.
Input 2 = Zone 2 On / Off control.
Input 4 = Zone 2 Low / High voltage select.
Configuration 1.
Relay 1 = Expansion card communication timeout.
Relay 6 = Zone 1 in “Check”.
Relay 2 = Zone 1 On/Off status.
Relay 7 = Zone 2 in “Check”.
Relay 3 = Zone 2 On/Off status.
Relay 8 = Mains fail, battery low, service, tamper.
Relay 4 = Zone 1 in low voltage mode.
Relay 9 = Zone 1 in alarm.
Relay 5 = Zone 2 in low voltage mode.
Relay10 = Zone 2 in alarm.
Input 1 = Zone 1 On / Off control.
Input 3 = Zone 1 Low / High voltage select.
Input 2 = Zone 2 On / Off control.
Input 4 = Zone 2 Low / High voltage select.
Configuration 2.
Relay 1 = Expansion card communication timeout.
Relay 6 = Mains fail.
Relay 2 = Zone 1 On/Off status.
Relay 7 = Battery low, service alarm.
Relay 3 = Zone 2 On/Off status.
Relay 8 = Zone 1 high voltage alarm.
Relay 4 = Zone 1 in low voltage alarm.
Relay 9 = Zone 2 high voltage alarm.
Relay 5 = Zone 2 in low voltage alarm.
Relay10 = Tamper.
Input 1 = Zone 1 high voltage activate.
Input 3 = Zone 1 low voltage activate.
Input 2 = Zone 2 high voltage activate.
Input 4 = Zone 2 low voltage activate.
Programmable options
25
?
?

MASTER ENERGIZER PASSIVE SYNC 5 0 3 _ * #
Sets whether a master energizer should actively drive, or passively listen to the SYNC
signal.
? = 0 (Master with active SYNC) or 1 (Master with passive SYNC)
Factory default value is 5030*# (Master with active SYNC)
In a single energizer installation, the energizer provides its own timing pulse.
For a number of master energizers to all pulse together in a synchronized fashion, this code allows
the switching of an energizer from active sync to passive sync.
In passive sync mode the energizer monitors the sync input for a sync pulse and sets its timing
according to this sync pulse. The sync pulse can come from another master energizer set to active
sync, via the keypad bus directly, or via a network, or the pulse could also be provided from a
Nemtek GPS module. The GPS module extracts absolute time from the network of satellites making
up the global position system (GPS).
The advantage of using a Nemtek GPS sync module is that any number of D24 energizers can be
synchronized over vast distances without any physical network connections between the energizers.
To create a network of synchronized energizers using one of the energizers as the timing master,
first enter this code into all energizers excepting one. You need to leave exactly one master
energizer with an active SYNC, to which all passive SYNC masters will synchronize, once connected
together.
To connect the energizers together, from the keypad/networking connector, wire the synchronize
line (SYNC) of all energizers together, and wire the negative line (-) of all energizers together.
LARGE NETWORK TOPOLOGY 5 0 4 _ * #
Switches the large network topology from daisy chain to multi drop.
? = 0 (Daisy chain) or 1 (Multi drop)
Factory default value is 5040*# (Daisy chain)
See the “D24 RS485 Network card” manual for further information on network topologies.
Programmable options
26
?
?

LARGE NETWORK ADDRESS 5 1 _ _ * #
Sets the address of an energizer connected in a large network.
Programmable range is 5101*# (Address 1) to 5132*# (Address 32)
Factory default value is 5100*# (No address)
A maximum of 32 energizers can be networked together using network cards.
The factory default address of 0 is a broadcast address which allows an energizer to be found on a
new network, but for the network to operate correctly the energizer must finally be assigned an
address in the range of 1 to 32.
SET INSTALLER TEL NUMBER _ _ _ _ _ _ _ _ _ _ #
Sets the telephone number to be displayed during a service condition.
The telephone number must be exactly 10 digits long and the displaying of this number must be
enabled, as the factory default is to not display this number. (See code 4051*#)
EXITING PROGRAMMING MODE * #
Exits programming mode.
Programmable options
27
? ?
10 Digit Installer
Tel Number

Basic definitions
• Electric Fence:
A barrier which includes one or more electric conductors, insulated from earth, to
which electric pulses are applied by an energizer
• Connecting Lead:
An electric conductor, used to connect the energizer to the electric fence or the
earth electrode
• Electric Security Fence:
A fence used for security purposes which comprises an electric fence and a physical
barrier electrically isolated from the electric fence
• Public Access Area:
Any area where persons are protected from inadvertent contact with pulsed
conductors by a physical barrier
• Pulsed Conductors:
Conductors which are subjected to high voltage pulses by the energizer
• Secure Area:
An area where a person is not separated from pulse conductors below 1,5m by a
physical barrier
General requirements for electric security fences
Electric fences shall be installed and operated so that they cause no electrical hazard to
persons, animals or their surroundings.
Electric fence constructions which are likely to lead to the entanglement of animals or
persons shall be avoided, as entrapment can be lethal.
An electric fence shall not be supplied from two different energizers or from independent
fence circuits of the same energizer.
For any two different electric fences, each supplied from a different energizer with
independent timing, the distance between the wires of the two electric fences shall be at
least 2.5m. If this gap is to be closed, this shall be affected by means of electrically nonconductive material or an isolated metal barrier.
Barbed wire or razor wire shall not be electrified by an energizer or placed physically close
to an electric fence as these circumstances can create a lethal entanglement/entrapment
hazard.
Appendix
28

Any part of an electric fence which is installed along a public road or pathway shall be
identified at frequent intervals by prominently placed warning signs securely fastened to
the fence posts or firmly clamped to the fence wires. The size of the warning signs shall be
at least 100mm x 200mm. The background colour of both sides of the warning plate shall
be yellow. The inscription on the plate shall be in black.
The warning sign shall typically appear as depicted in the figure below. The inscription
shall be indelible, inscribed on both sides of the warning plate and have a height of at least
25mm.
Warning signs shall be placed at;
• each gate
• each access point
• intervals not exceeding 10m
• adjacent to each sign relating to chemical
hazards for the information of emergency services.
Gates in electric security fences shall be capable of being opened without the person
receiving an electric shock.
Connecting leads that are run inside buildings shall be effectively insulated from the
earthed structural parts of the building. This may be achieved by using insulated high
voltage cable.
Connecting leads that are run underground shall be run in a conduit of insulating material
or else insulated high voltage cable shall be used. Care shall be taken to avoid damage to
the connecting leads due to external factors.
Connecting leads shall not be installed in the same conduit as the mains supply wiring,
communication cables or data cables.
Connecting leads and electric fence wires shall not cross above overhead power or
communication lines.
Mains supply wiring shall not be installed in the same conduit as signalling leads associated
with the electric security fence installation.
Where an electric security fence passes below bare power line conductors, the highest
metallic element shall be effectively earthed for a distance of not less than 5m on either
side of the crossing point.
Appendix
29

Crossings with overhead power lines shall be avoided wherever possible. If such a crossing
cannot be avoided, it shall be made underneath the power line and as nearly as possible at
right angles to it.
If connecting leads and electric fence wires are installed near an overhead power line, the
clearances shall not be less than those shown in the table below.
Power Line Voltage Clearance
Equal or less than 1kV 3 meter
Greater than 1kV, but equal or less than 33kV 4 meter
Greater than 33kV 8 meter
If connecting leads and electric fence wires are installed near an overhead power line, their
height above the ground shall not exceed 3m.
This height applies either side of the orthogonal projection of the outermost conductors of
the power line on the ground surface, for a distance of
• 2m for power lines operating at a nominal voltage not exceeding 1kV
• 15m for power lines operating at a nominal voltage exceeding 1kV
Electric security fences and their ancillary equipment shall be installed, operated and
maintained in a manner that minimizes danger to persons, and reduces the risk of persons
receiving an electric shock unless they attempt to penetrate the physical barrier, or are in a
secure area without authority. Exposed conductive parts of the physical barrier shall be
effectively earthed.
A spacing of 2.5m shall be maintained between non insulated electric fence conductors or
non insulated connecting leads supplied from different energizers. This spacing may be less
where conductors or connecting leads are covered by insulating sleeving, or consist of
insulated cables, rated to at least 10kV.
This requirement need not apply where the separately energized conductors are separated
by a physical barrier, which does not have any openings greater than 50mm.
A vertical separation of not less than 2m shall be maintained between pulsed conductors
fed from different energizers.
Ensure that all ancillary equipment connected to the electric security fence circuit provides
a degree of isolation between the fence circuit and the supply mains equivalent to that
provided by the energizer. Protection from the weather shall be provided for the ancillary
equipment unless this equipment is certified by the manufacturer as being suitable for use
outdoors, and is of a type with a minimum degree of protection IPX4.
Appendix
30

RESTORE FACTORY DEFAULTS 2 3 8 9 #
ENTER PROGRAMMING MODE (6 digit installer PIN) * 0 #
CHANGE INSTALLER PIN 0 0 (new 6 digit installer PIN) #
SIREN ON TIME 0 1 m s * #
SIREN OFF TIME 0 2 m s * #
EVENTS BEFORE RE-ARM TIMEOUT 0 3 0 ? * #
SIREN RE-ARM TIME 0 4 d h h m m * #
RELAY ACTIVE OPEN 0 0 6 ? * #
STROBE LIGHT Z1 RELAY FUNCTION 0 0 1 ? * #
STROBE LIGHT Z2 RELAY FUNCTION 0 0 2 ? * #
SIREN RELAY FUNCTION 0 0 3 ? * #
GATE ALARM DELAY TIME 1 0 m s * #
GATE CHIME ON CLOSE 1 1 9 ? * #
INPUT TOGGLE SELECT 1 1 1 ? * #
FENCE CONDITION CHECK LEVEL 2 0 1 ? * #
FENCE STATE AT POWER ON 2 0 2 ? * #
FENCE INTERFERENCE ALARM 2 0 3 ? * #
FENCE HIGH POWER VOLTAGE 2 1 k v * #
FENCE HIGH POWER CHECK LEVEL 2 2 k v * #
FENCE HIGH POWER ALARM LEVEL 2 3 k v * #
FENCE ALARM DELAY 2 5 m s * #
FENCE LOW POWER VOLTAGE 2 7 k v * #
FENCE LOW POWER ALARM LEVEL 2 8 k v * #
FENCE CONTROL ALGORITHM 3 0 1 ? * #
MAGNETIC SWITCH 4 0 1 ? * #
TAMPER ALARM 4 0 3 ? * #
SERVICE ALARM 4 0 4 ? * #
DISPLAY INSTALLER TEL NUMBER 4 0 5 ? * #
SHOW KEY PRESSES ON LCD 4 0 6 ? * #
SOLAR POWERED INSTALLATION 4 0 7 ? * #
ALARM SENSOR MODE 4 0 8 ? * #
MAINS FAIL CHIME 4 0 9 ? * #
SLAVE ENERGIZER PRESENT 5 0 0 ? * #
EXPANSION CARD MAPPING 5 0 2 ? * #
MASTER ENERGIZER PASSIVE SYNC 5 0 3 ? * #
LARGE NETWORK TOPOLOGY 5 0 4 ? * #
LARGE NETWORK ADDRESS 5 1 ? ? * #
SET INSTALLER TEL NUMBER (10 digit installer tel number) #
EXITING PROGRAMMING MODE * #
Programmable options summary
31

32
IEC Safety Information
• There are no user serviceable parts inside the energizer.
• If the supply cord is damaged, it must be replaced by the manufacturer, its
service agent, or similar qualified persons in order to avoid a hazard.
• This appliance is not intended for use by persons (including children) with
reduced physical, sensory or mental capabilities, or lack of experience and
knowledge, unless they have been given supervision or instruction concerning
use of the appliance by a person responsible for their safety.
• Electric fencing can be lethal. Avoid head contact with the fence.
Ask the installer to explain the options of current limiting resistors, the
programmable output energy levels as well as the low-voltage operation of the
energizer.
Rev 1.0, 1 May 2012
First release
Rev 1.1, 11 June 2012
Added more expansion card configurations
Rev 1.2, 25 Sep 2013
Added codes 51??*# and 504?*#
Rev 1.3, 12 Aug 2015
Updated illustrations, added D25/28 codes, added IEC Safety Information
Rev 1.4, 19 May 2016
Corrected illustration on Pg9
 Loading...