

Page 1
POLE SUPPORTED
TECHN OLOGY
AIRSUPPORTED
EXTREME CONDITIONS
TECHN OLOGY
EXTREME CONDITIONS
ST ATIS TI C S
NEMO PRODUCT
TECHN OLOGY
MIN WEIGHT
2 lbs, 8 oz
1.1 kg
PACKED SIZE
6.5 x 6 in dia
16 x 15 cm dia
FLOOR DIM
87 x 39 in
221 x 99 cm
MASTER OF ULTRALIGHT
The Obi™ tents are the black belt martial artists of
our lineup. They are nely tuned instruments, with
not one ounce of material wasted, every feature and
detail driven by purpose and strategy. Subtly moving
the front pole hub overhead gives the pole skeleton
shoulders, creating more interior volume without the
need for an additional ridge pole. A raised waterproof
tub oor allows cutouts in the y to save signicant
weight while improving ventilation. Obi™ 1P includes
a vestibule perfectly sized for tucking in your pack
and shoes at night and large side vent to keep a cross
ow of air.
for detailed setup, care, and repair instructions, visit:
www.nemoequipment.com/support
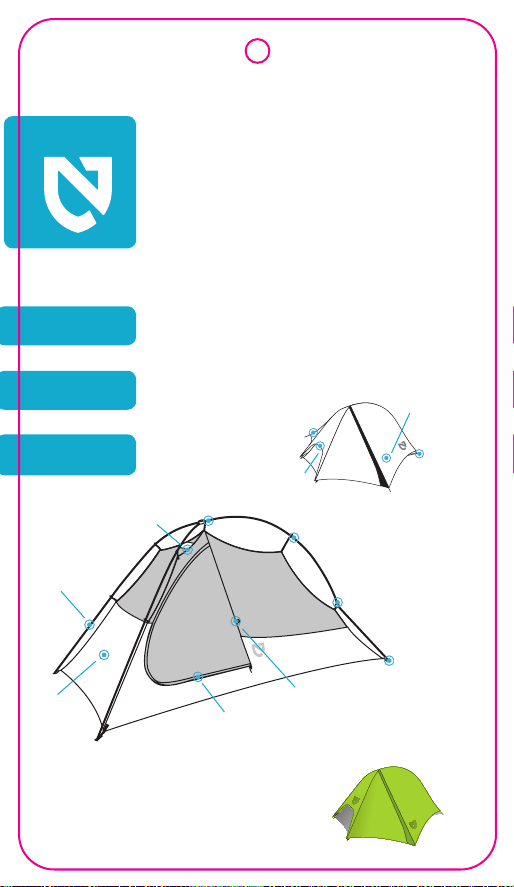
Rear Vent
Ventilation
Cut-Out in Fly
Light Pocket™
Center Pole Hub
Twist Clip
Vestibule
Jake’s Foot
Fly Anchors
Main Poles
Splash
Guard
Floor
OBI™ 1P
Mesh Door
1 PERSON
Volumizing
Guy-out
Rear Pole
Hub
Jake’s Foot
Corner Anchors
Page 2

NEMO PRODUCT
ACCESSO RIES
NEMO PRODUCT
28"
ST ATIS TI C S
29"
40"
39"
87"
Minimum Weight 2 lbs, 8 oz / 1.1 kg
Packaged Weight 3 lbs, 3 oz / 1.5 kg
On the Fly Weight 1 lbs, 15 oz / 900 g
Packed Size 6.5 x 6 in dia / 16 x 15 cm dia
17 in / 43 cm pole bag
Frame 1 DAC 8.5 mm Featherlite® NSL
Shell Fabric No-See-Um Mesh / 20D PU Nylon
Fly/Vestibule Fabric 20D PU Nylon
Floor Fabric 30D PU Nylon
Floor Dimensions 87 x 39 in / 221 x 99 cm
Interior Height 40 in / 102 cm
Floor Area 21 sq ft / 2.0 sq m
Vestibule Area 9 sq ft / 0.9 sq m
Included Accessories Dr y bag style stu sack, stakes,
guy-out cord, repair kit
Optional Accessories Footprint, Gear Caddy
31"
Page 3
NEMO PRODUCT
TECHN OLOGY
POLE SUPPORTED
TECHN OLOGY
AIRSUPPORTED
EXTREME CONDITIONS
TECHN OLOGY
EXTREME CONDITIONS
ST ATIS TI C S
NEMO PRODUCT
INNOVATIONS
NEMO is constantly developing new aluminum pole technology, hardware, and frame
congurations to maximize the strength,
wind resistance, interior volume, weight, and
usability of our tents. We pursue simplicity
and pure geometric forms wherever possible.
Classic arch shapes are used to fend o top
loads and catenary curves transfer tension
through fabric panels. Every design element
is deliberate and has a functional purpose,
much like nature itself.
OBI™ 1P HIG HLIGHTS
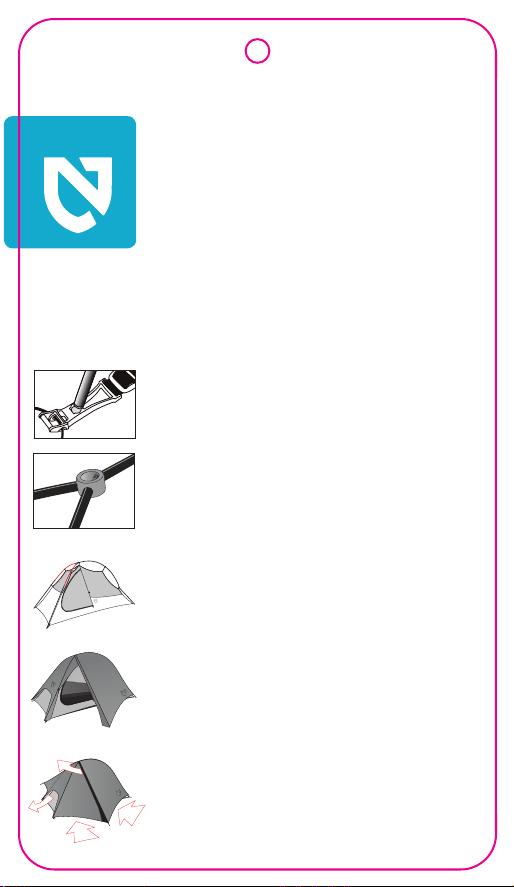
The DAC Jake’s Foot corner anchor system makes
setup fast and easy. The Jake’s Feet also improve
fabric tension by acting as cantilevers to pull the
corners of the inner tent closer to the ground.
Pole hubs at the front and rear of the tent allow
multiple poles to intersect at a single point creating
a unique pole architecture that allows free-standing suppor t while minimizing pole weight.
Strategic controlled bends in the poles achieve
a maximum volume to weight ratio. By utilizing
bends in just the right places, this pole set creates
signicantly more volume for living in the tent.
A large side entry and generous vestibule make
entrances/exits easier on the body and provides
coverage. The large D-shaped door gives you easy
access to your gear, and makes it simple to lace up
shoes or pack your gear under vestibule cover.
Strategic cutouts in the y combined with high
bathtub walls allow low-to-high ventilation. Even
when the vestibules are fully closed, catenary cuts
allow air movement under the vestibule and into
the tent.
Page 4
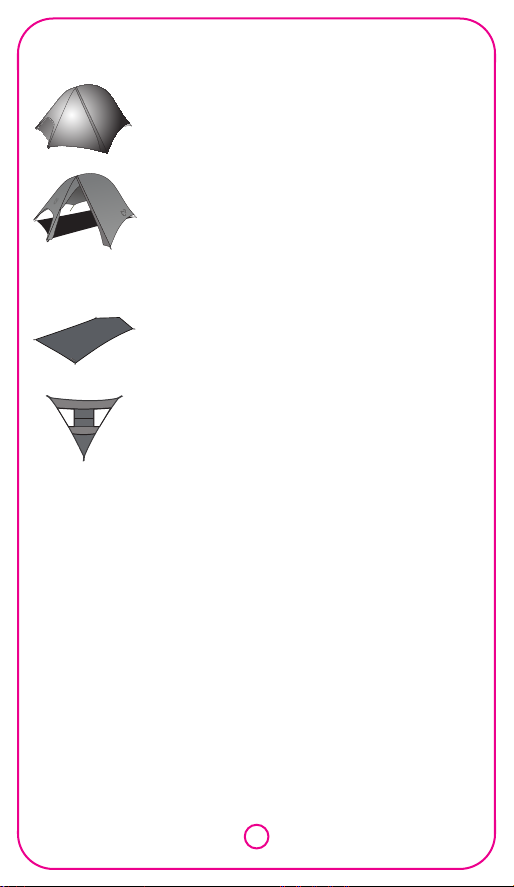
An integrated Light Pocket™ diuses light from
your headlamp to cast an even glow throughout
the tent. Interior mesh gear pockets are sized to t
glasses, books, hats, or gloves.
On the Fly conguration is a lightweight tarp structure created by your y, poles, and footprint. Setup
is simple with Jake’s Foot corner anchors.
OBI™ 1P ACCES SORIES
Footprints reduce the wear and tear on your tent
oor from contact with the ground. They are made
of 70D abrasion-resistant nylon fabric and are
perfectly sized to your tent. The fabric is PU coated
for waterproofness.
Gear Caddies are detachable mesh storage units
with Light Pockets™ that hold your headlamp and
diuse light throughout the tent.
Page 5
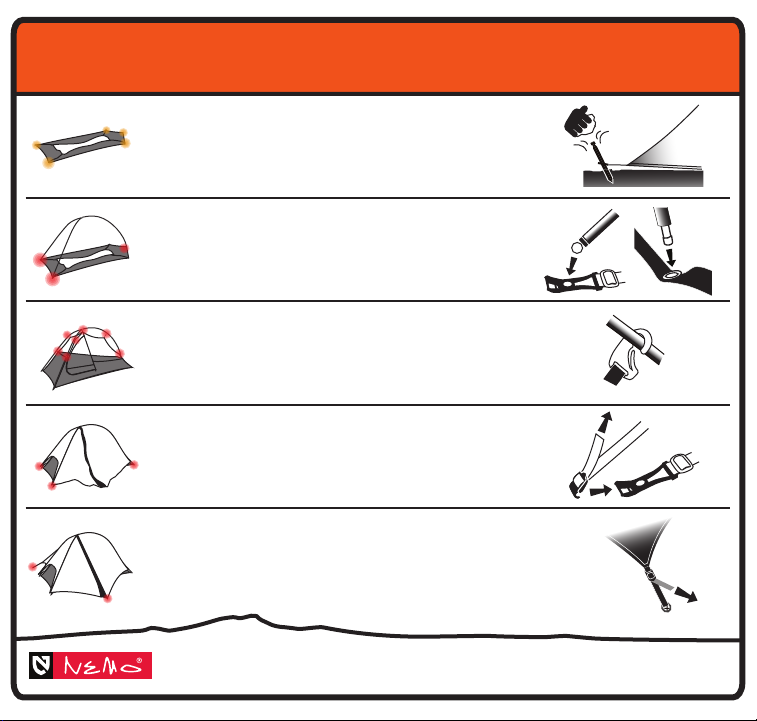
INSTRUCTIONS FOR SETUP
Stake Corners (optional)
1
Secure the corner anchors by pounding stakes into the
ground with a rock or hard object. If the ground is too hard,
trap the stakes under a rock or another heavy object.
Attach Jake’s Feet
2
At the front of the inner tent, press the ball ends of poles into
the fittings (Jake’s Feet). Insert the endtip into the grommet
at the rear of the inner tent.
Clips
3
Attach the inner tent to the main poles with clear clips.
Adjust the tension of the inner tent by changing the
webbing of the adjustable length clip.
4
Attach Fly
Clip the front corners of your tent fly to the last bar on the Jake’s
Feet. Pull firmly on the adjustable corner anchors. Stake the rear
corners of the inner tent and fly to maximize volume and strength.
5
Stake Vestibule and Vent
Stake the vestibule anchor and pull firmly on the webbing to ensure
proper tension. Stake side vent and clip to inner tent for maximum
interior volume.
Remember to leave no trace. Before leaving your campsite, take a thorough look
around making sure you have not left anything behind, out of place, or damaged.
To contact NEMO Customer Service
Email: [email protected]
Phone: 800-997-9301
©2012 NEMO Equipment, Inc.
OBI™ 1P
 Loading...