

Page 1
Page 2
NEMO MISSION
Our 2010 product line is the result of 8 years of devoted
labor and half a million years or so of developing better
tools for shelter and survival. NEMO is about what we
have just discovered and what we have known for a
long time. It’s about beautiful design and intelligent
engineering. It’s about serene cloudless days and bitter
cold nights spent battling snow drifts and frostbite. It’s
about bringing two worlds together: the world of design
and technology and the actual world where we test
ourselves and our inventions. We are pursuing perfection.
It is an epic journey, often elusive, demanding youthful
energy, creativity, and courage. We have come a long
way in our travels and we promise never to yield in our
determination. Like our ancestors who explored new
places for the first time, we will change the common idea
of what is possible.
NEMO’s spirit is in adventure. Without the beautiful wild places
where adventures are made, our spirit dies. We are committed
to reducing our environmental impact. Finding the right path
forward takes a great deal of research, problem solving and
commitment. And finding the right path is only the first challenge,
walking that path is the real test. NEMO has been making strides
to use more sustainable materials, to repurpose byproducts of
manufacturing, and to recycle products at the end of their useful
life. We are taking steps for the future of our planet and hope
you will do the same. To learn more about NEMO’s GRN™ efforts,
please visit our website.
Page 3
1
2
3
4
5
6
7
8
9
10
11
86"
53"
43"
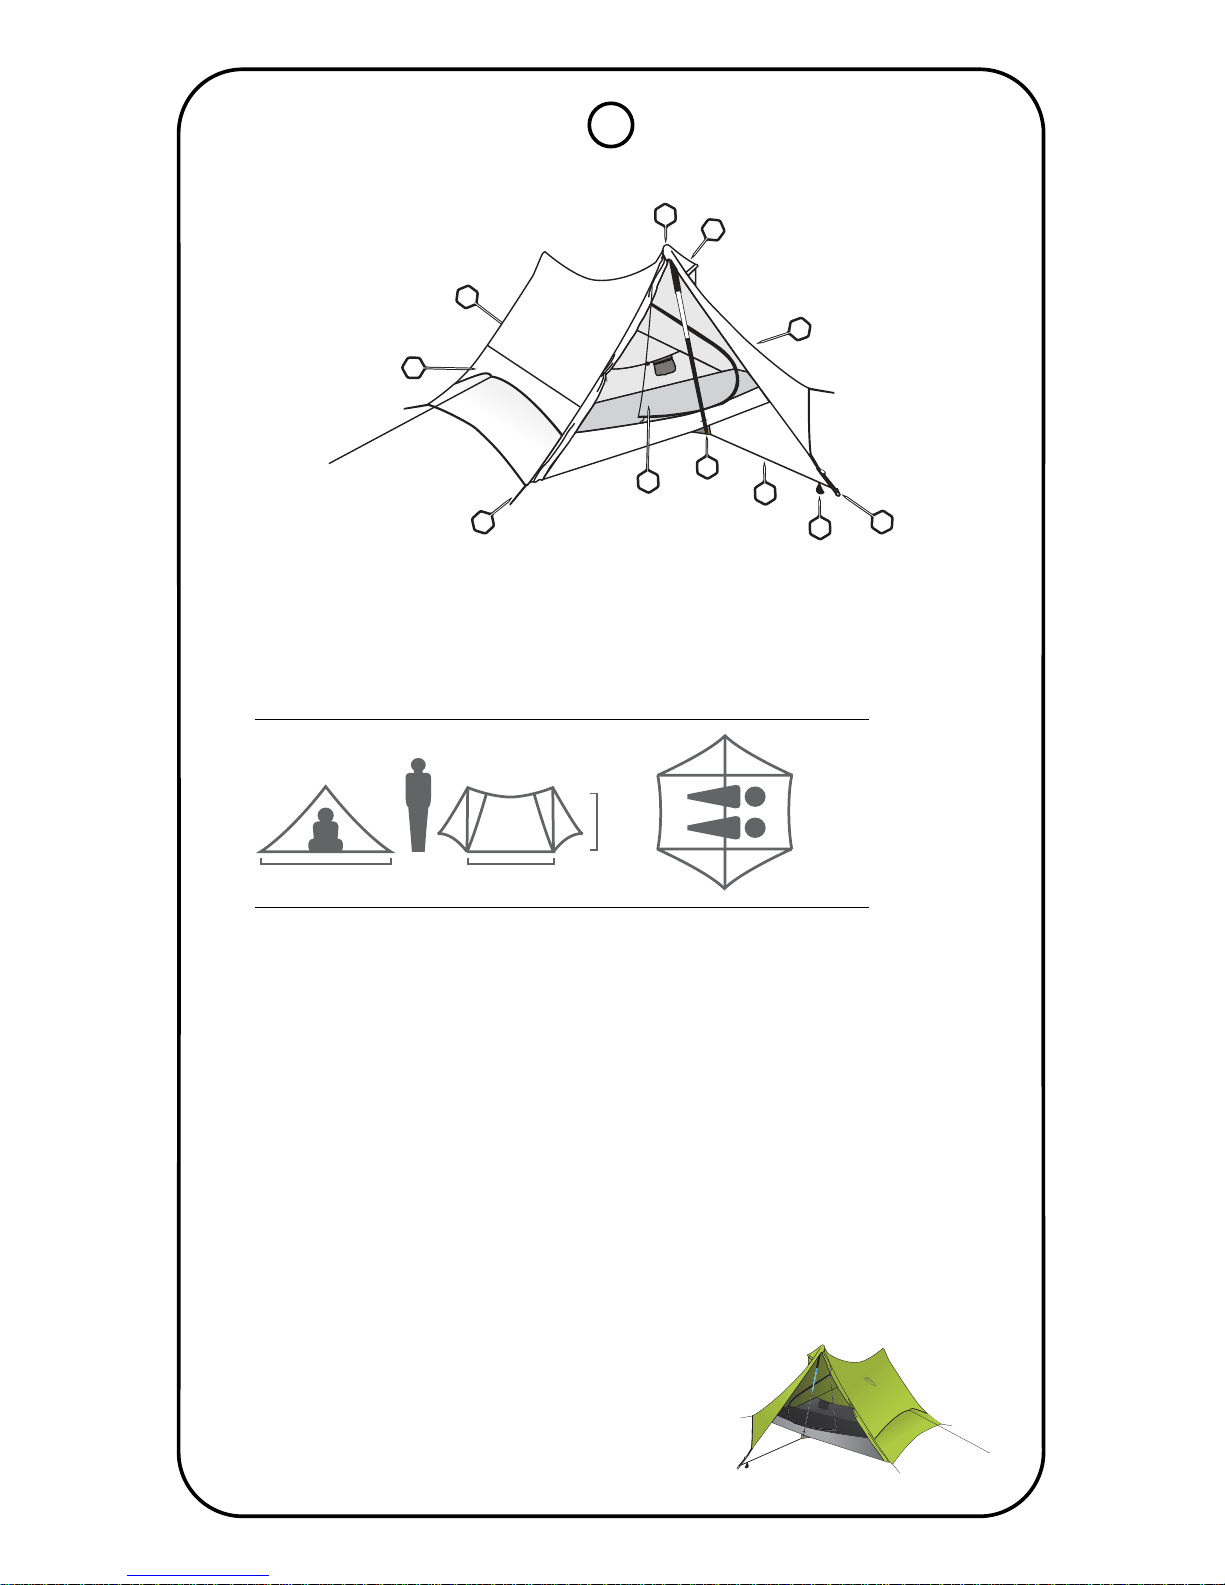
1. Side Vent
2. Rear Door and Vestibule
3. Reinforced Pole Pocket
4. Upper Vent
5. Vestibule
6. Vestibule Anchor
7. Tensioning Cord Sack
8. Webbing Strap
9. Oversized Pole Grommet
10. Mesh Door
11. Adjustable Corner Anchor
Capacity: 2
Minimum Weight: 2.9 lbs (1.3 kg)
Packed Weight: 3.4 lbs (1.5 kg)
Packed Dimensions: 5" × 7" dia. (13 × 18 cm)
Frame: 2 Trekking Poles (not included)
Shell Fabric: Mesh / 20D PU Nylon
Vestibule Fabric: 20D PU Nylon
Floor Fabric: 30D PU Nylon
Floor Dimensions: 86" × 53" (218 × 135 cm)
Interior Height: 43" (109 cm)
Floor Area: 36 ft² (3.3 m²)
Vestibule Area: 22 ft² (2.0 m²)
META 2P
™
2 PERSON
Page 4
Setup Guide
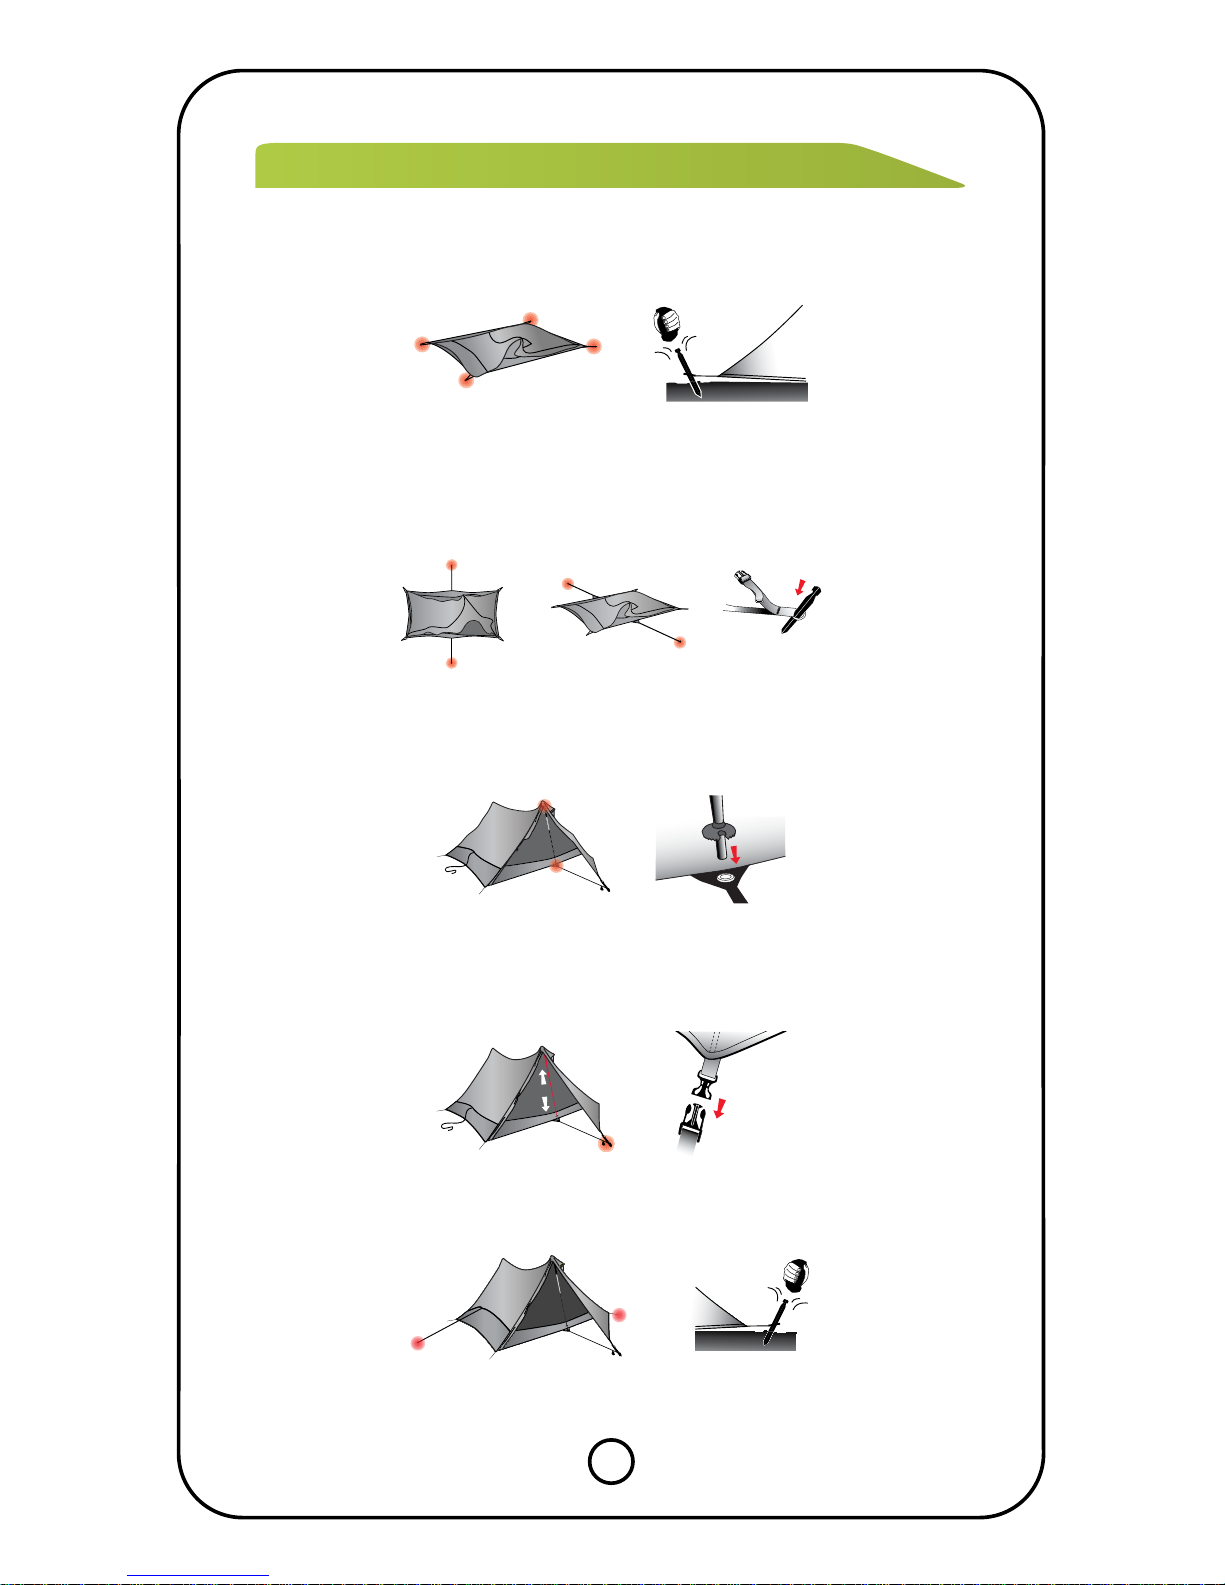
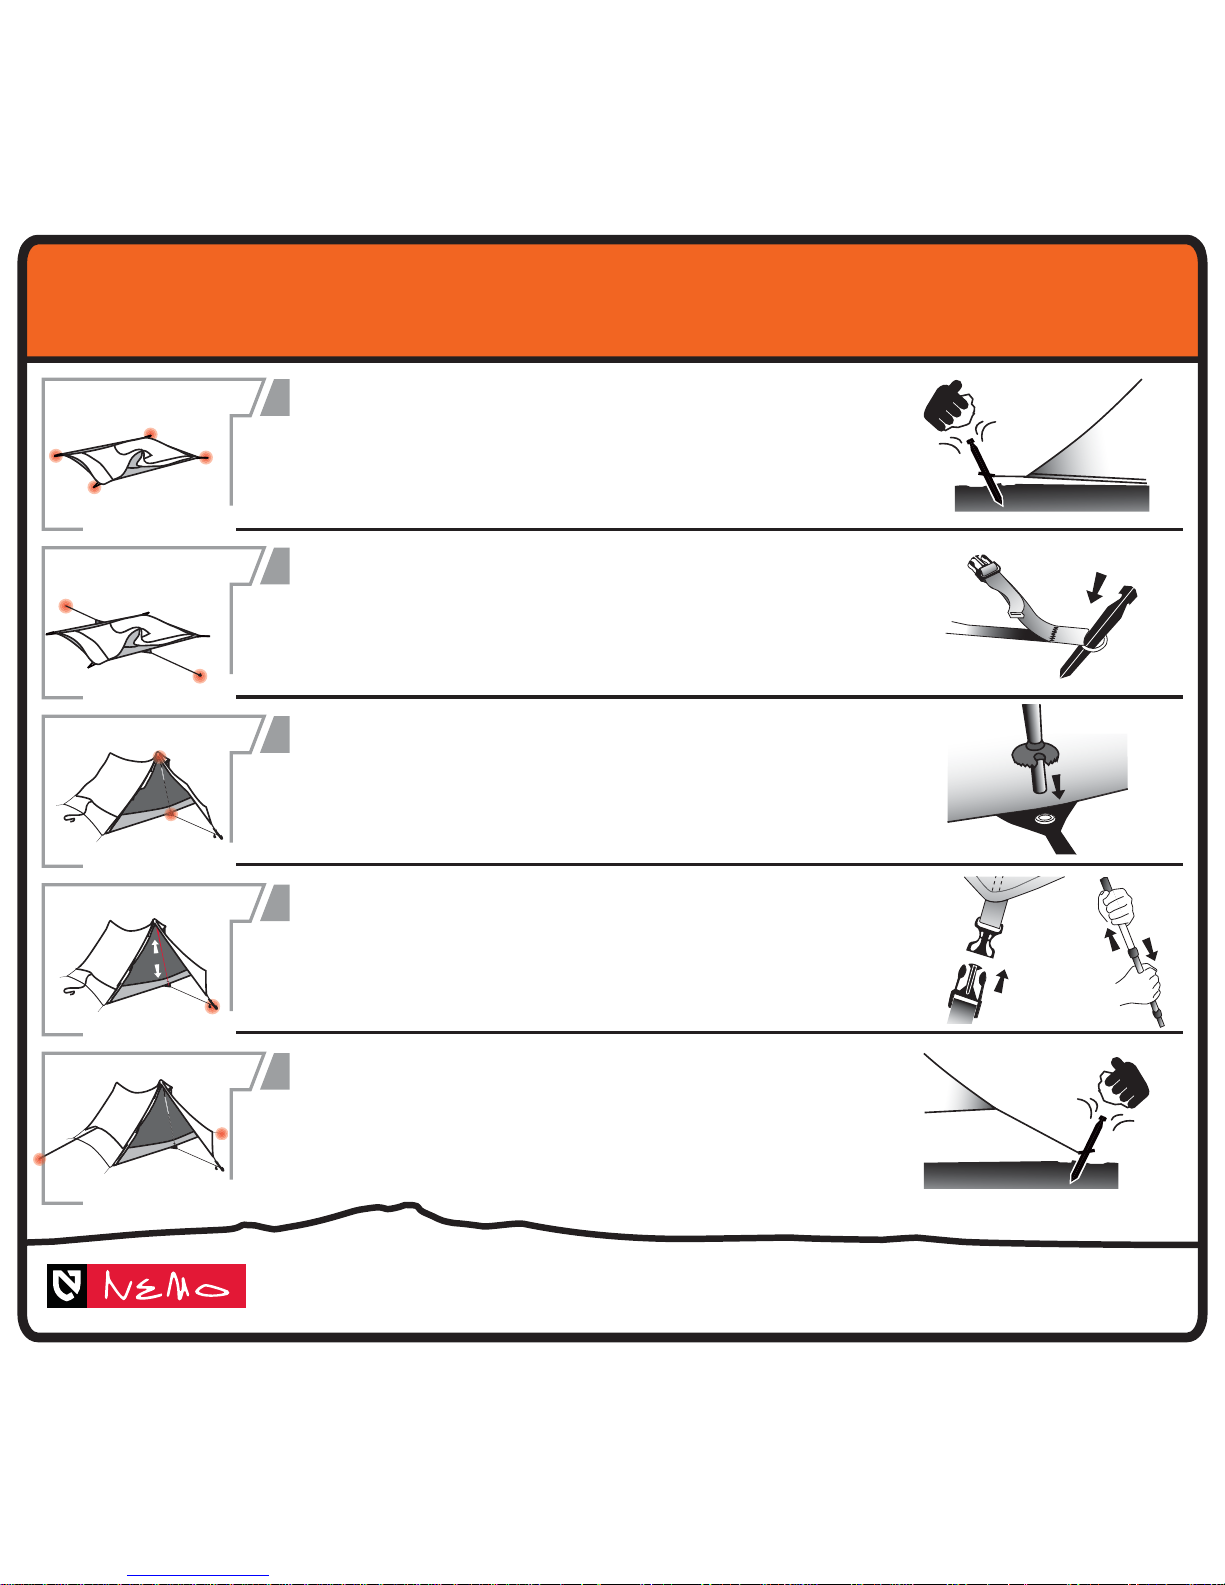
1. Secure the corner anchors by pounding the stakes into the ground with a
rock or hard object. If the ground is too hard, trap the stakes under a rock
or another heavy object.
2. Tension the webbing strap straight out from the center of the door,
making sure not to distort the bottom of the tent. Stake the webbing
strap anchor in place. Repeat for the webbing strap on the opposite side
of the tent.
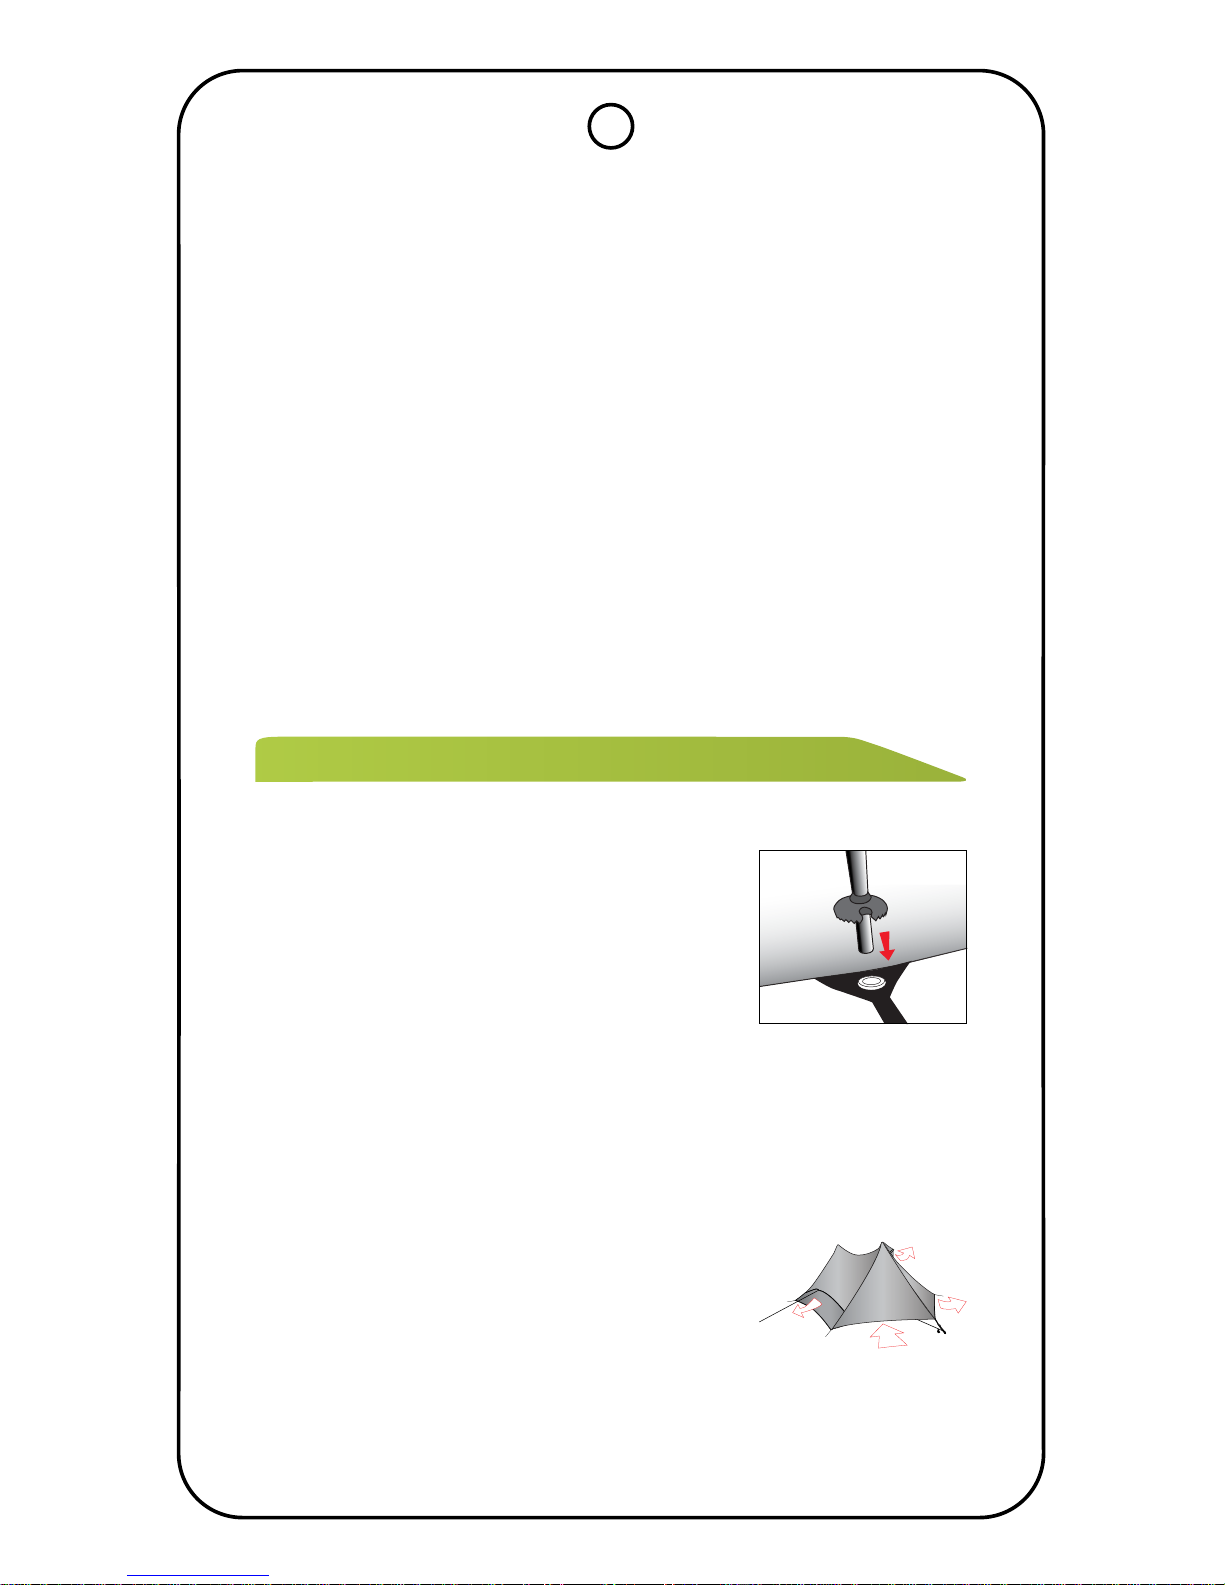
3. Slide the handle of the trekking pole into the reinforced pocket at the top
of the tent. Insert the trekking pole tip into the grommet near the center
of the door. Repeat with the opposite side.
4. Connect the side release buckle on the vestibule to the end of the front
webbing anchor and extend the trekking pole upwards for maximum
tension. Repeat with opposite side.
5. Stake the reflective side vent cords to maximize airflow. Adjust the tension
on the side vents and vestibules to ensure maximum water shedding and
wind resistance.
Page 5
META 2P™ Innovations
META 2P
™
Trekker’s Paradise
Meta 2P™ is a striking example of the efficiency and weight savings of a welldesigned trekking pole tent. It has one of the best space-to-weight ratios
of any tent on the market. In order to save you precious ounces, trekking
poles are used to support the tent in lieu of standard tent poles or NEMO
airbeams. Thanks to well-placed anchor points, setup of Meta 2P™ is quick,
with none of the pole slippage and tensioning issues that plague other
trekking pole tents. Multiple venting options and vestibule configurations
keep the rain out and the air circulating. Despite its paltry weight, Meta 2P™
upholds the NEMO standard for comfort and usability, with four integral
vents, multiple mesh pockets, and the highest quality fabrics and hardware.
Meta 2P’s™ dual vestibules combine with the tent interior to total 61 sq. ft. of
rain-protected comfort and gear storage; pretty amazing for less than 3lbs of
packed weight! Includes watertight stuff sack, stakes, and repair kit. Optional
Footprint and Pawprint™ are available.
1. Easy Setup: Smart design and straightforward
functionality make the setup of Meta 2P™ a cinch.
Simply stake out each of Meta 2P’s™ anchor points
and insert and expand your trekking poles until
the tent is properly tensioned. Oversized grommets
locate the tips of your trekking poles and reinforced
areas at the top of the tent receive the pole handles.
A total of eight anchor points keep Meta 2P™
nailed to the ground, vented, and ready to face
all conditions.
2. Venting: A combination of venting options in
Meta 2P™ help combat condensation and promote
good air circulation. Head and foot vents can be
deployed by staking out the reflective guy-out cord
at the side of the tent. Reinforced hoops keeps the
upper vents open at all times, allowing low-to-high
ventilation. The upper vent construction is fully
seam taped and stays waterproof in all weather.
Even when the vestibules are fully closed, strategic
catenary cuts allow air movement under the
vestibule and into the tent.
Page 6
Optional Accessories
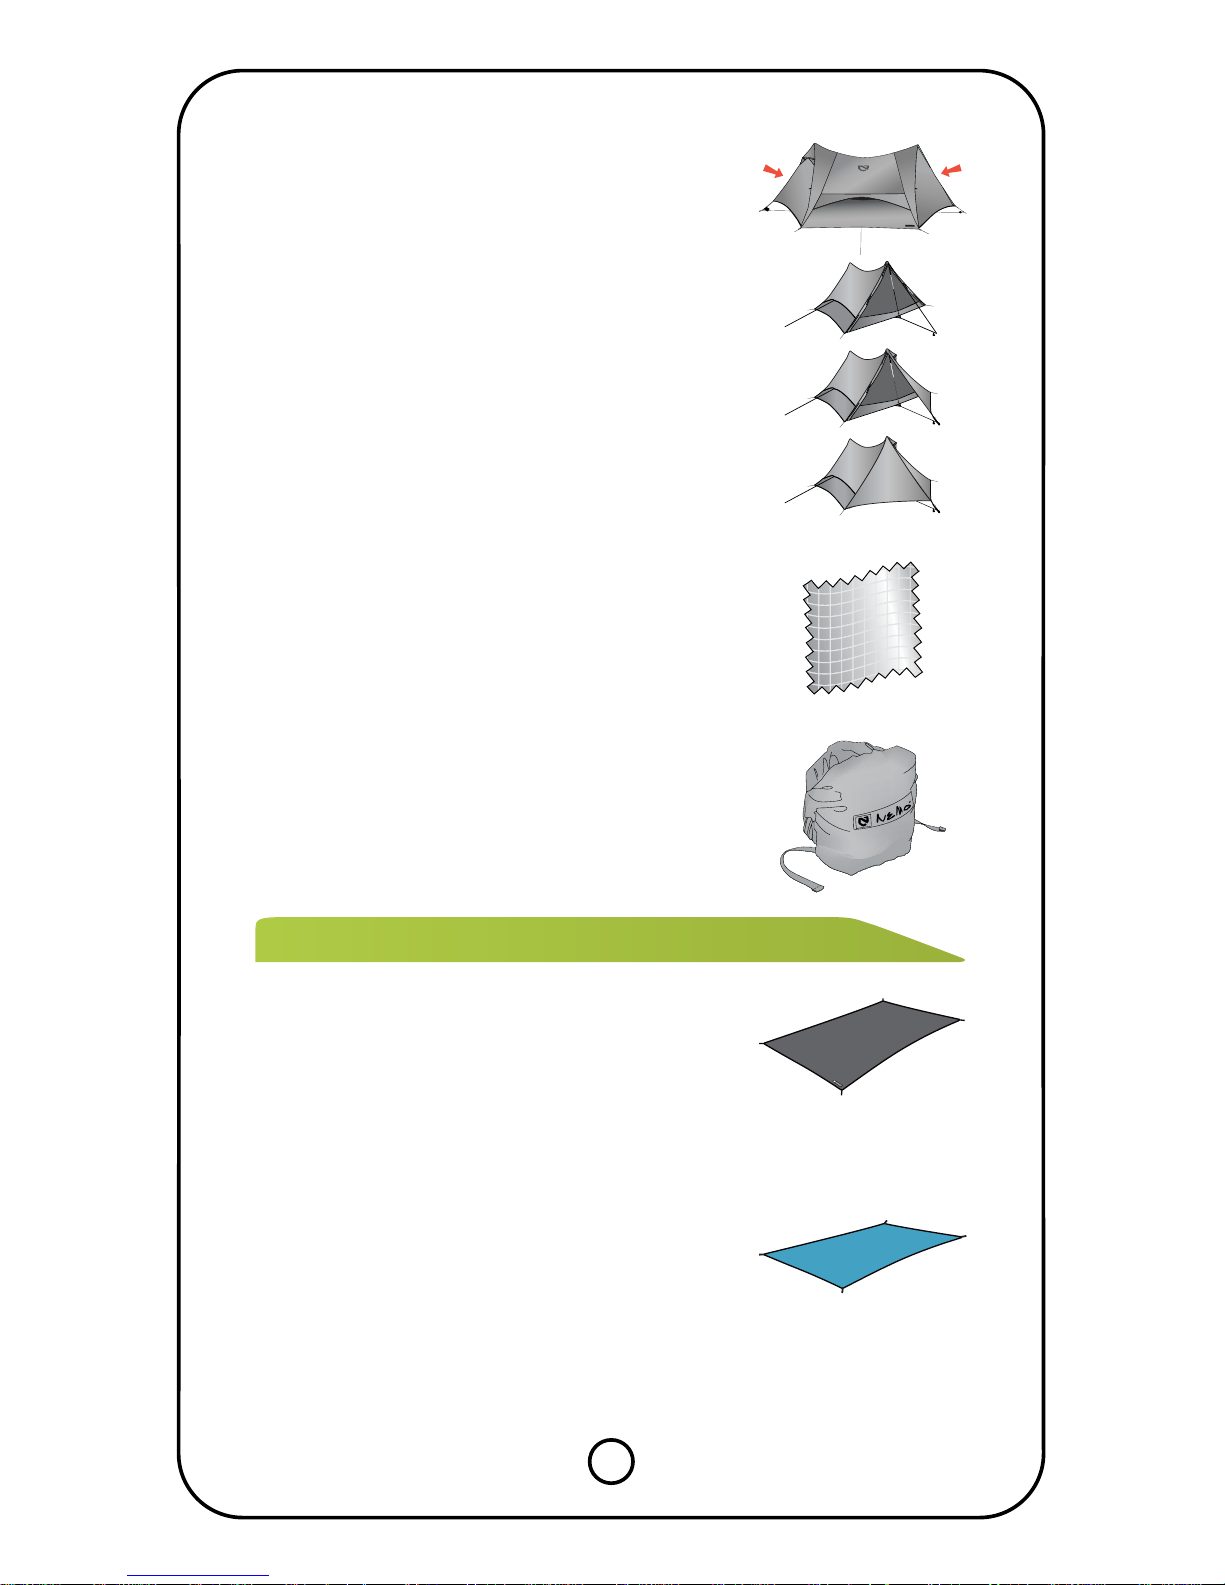
3. Dual Vestibule/Entries: Two doors and two
vestibules eliminate jostling for position and
gear storage.
4. Vestibule Options: Meta 2P’s™ vestibule options
give you all-weather versatility. When the skies are
clear, both vestibule doors can be rolled back to
expose the full mesh wall. When rain isn’t a concern,
but you need protection from the wind, keep one
side of the vestibule rolled up and the other side
deployed. In rainy weather, deploy both sides for
full protection from the elements.
5. 20D Fabric: NEMO’s ultralight 20D fabric was
made for adventures where every ounce matters.
Engineered to yield the perfect balance of tear
strength, waterproofness, abrasion-resistance,
and weight, this 20D high tenacity PU-coated
nylon ripstop is one of the most advanced textiles
in the market.
6. Watertight Compression Sack: A 70D PU Nylon
compression sack keeps your tent dry while you hike
in the rain or roll your kayak.
1. Footprint: The Footprint is a 70D abrasion-
resistant nylon fabric ground sheet perfectly sized
to fit underneath your tent. The fabric is PU coated
for waterproofness. The Footprint reduces wear and
tear on your tent floor from contact with the ground.
2. Pawprint: The Pawprint™ is a removable liner
perfectly sized to fit inside your tent. It has the dual
function of protecting your tent floor from boots
and paws, and of adding serious comfort. The
Pawprint™ is made of a machine-washable brushed
polyester that is very soft to the touch. Place your
sleeping pads between the Pawprint™ and floor to
help them stay in place.
Page 7
NEMO Quality
NEMO Warranty
There is a reason why our logo resembles a medieval shield. If you’ve
ever seen an authentic medieval shield or piece of armor, the detail and
quality of craftsmanship are astonishing. Hours were spent shaping and
perfecting every component knowing the gravity of purpose and the need
for reliable performance. At NEMO, we take the same approach to quality.
We know from our own experience how vital a tent can be for comfort and
survival. Your tent is your home in the wilderness and your armor against
the elements. We obsess over every design decision to ensure you get
the greatest comfort and protection possible. Our process begins with
pencil and paper and evolves methodically through computer modeling,
prototyping, testing, and development. We use all the latest tools, software,
manufacturing methods, and materials. If we aren’t happy with what’s
available, we make our own. We strive to design and build the best tents
on the planet. We stand behind our shield, the symbol of NEMO quality.
To learn more, please visit our website at www.nemoequipment.com.
NEMO guarantees every product we sell. We put great effort into choosing
the best materials and providing you with the highest level of workmanship.
We proudly stand behind everything we make. NEMO products carry a
lifetime warranty against defects in workmanship and materials to original
owner, with proof of purchase. Warranted products will be replaced or
repaired at NEMO’s discretion. NEMO does not warranty products against
normal wear and tear, unauthorized modifications or alterations, improper
use, improper maintenance, misuse or neglect or if the product is used
for a purpose for which it is not intended. Except as expressly set forth in
these terms and conditions, NEMO is not liable for any direct, indirect or
consequential damages arising out of or resulting from the use of a NEMO
product. The warranties set forth in these terms and conditions are in lieu
of all other warranties, express or implied, including without limitation,
implied warranties of merchantability or fitness for a particular purpose.
If you are having a problem with your NEMO product, please visit
www.nemoequipment.com/tent-manufacturer-warranty
or call NEMO Customer Service at 1-800-997-9301.
We will do our best to see that you are satisfied with your NEMO product.
Our goal is to get you back in the outdoors as quickly as we can.
Page 8
WARNING
©2010 NEMO Equipment, Inc.
www.nemoequipment.com
Printed on Recycled Paper
Never place your stove, campfire,
or other flame source in or near
your tent. Never cook, light, or
refuel a stove or any other heat
source inside your tent. Death
by suffocation and/or serious
burns is possible.
Maintain adequate ventilation
inside your tent at all times.
Death by suffocation is possible.
Anchor your tent properly at all
times to reduce the risk of loss or
injury to the tent or occupants.
Carefully consider the possibility
of falling rocks or tree limbs,
lightning strikes, flash floods,
avalanches, strong winds, and
other hazards when choosing
a campsite to reduce the risk of
loss orinjury.
If you have additional questions, please contact
NEMO Equipment, Inc. directly at 800-997-9301.
NOTE: All 2010 NEMO tents meet the CPAI-84 standard
for flame retardancy.
Page 9
®
Insert Trekking Poles
Slide the handle of the trekking pole into the reinforced pocket at
the top of one door. Insert the trekking pole tip into the grommet
near the center of the door. Repeat with opposite side.
Stake Corners
Secure the corner anchors by pounding the stakes into the
ground with a rock or hard object. If the ground is too hard,
trap the stakes under a rock or another heavy object.
Connect Vestibules and Extend Trekking Poles
Connect the side release buckle to the webbing anchor and
extend the trekking pole upwards for maximum tension.
Repeat with opposite side.
Guy-out Tent and Vent
Stake the reflective side vent cords to promote airflow.
Adjust the tension on the side vents and vestibules to
ensure maximum water shedding and wind resistance.
Tension webbing strap straight out from the center of the door
making sure not to distort the bottom of the tent. Stake in place.
Repeat for webbing strap on opposite side of the tent.
Stake Webbing Straps
Remember to leave no trace. Before leaving your campsite take a thorough look
around making sure you have not left anything behind, out of place, or damaged.
©2010 NEMO Equipment, Inc.
1
2
3
4
5
To contact NEMO Customer Service
Email: [email protected]
Phone: 800-997-9301
META 2P
™
INSTRUCTIONS FOR SETUP
 Loading...