


Instructions Manual
Please read this manual before you use the product.
The product may be different from the described in the manual depending on
renewal or upgrade of S/W version and performance and it can be altered
without notice.
V1.0


Contents
1. Connections ......................................................................... 1
2. Remote Control ..................................................................... 2
3. Controls ................................................................................. 3
4. Operation ............................................................................... 4
4.1 Time and Indicators........................................................ 4
4.2 Menu Operation ........................................................... 4
5. Main Menu ............................................................................. 7
5.1 Record .......................................................................... 7
5.2 Display .......................................................................... 8
5.3 Storage ....................................................................... 11
5.4 System ........................................................................ 12
1
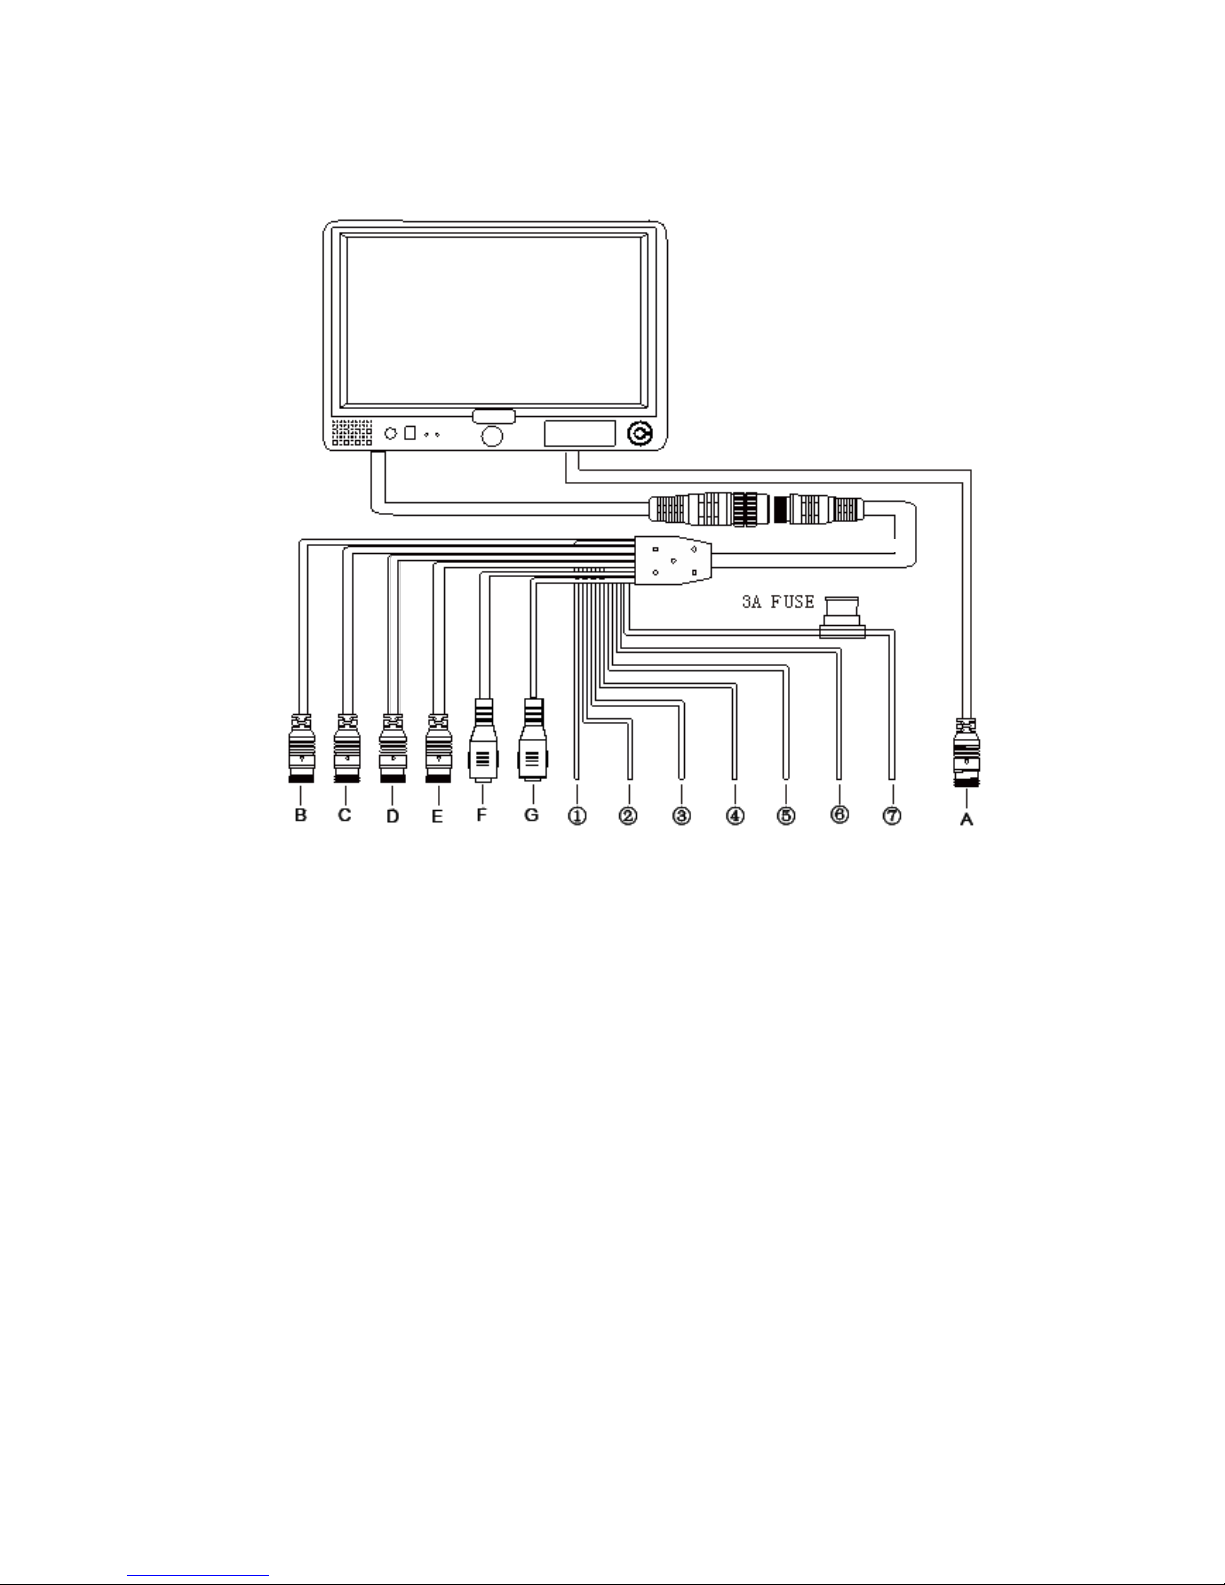
1. Connections
A: GPS GPS Input
B: Camera1 White 4 PIN Female
C: Camera2 Blue 4 PIN Female
D: Camera3 Green 4 PIN Female
E: Camera4 Brown 5 PIN Female / 4
PIN Female
F: Video Out Yellow RCA Female
G: Audio Out White RCA Female
① White: Camera 1 trigger
② Blue: Camera 2 trigger
③ Green: Camera 3 trigger
④ Brown: Camera 4 trigger
⑤ Purple: Speed
⑥ Black : Ground
⑦ Red: VCC
A: GPS GPS Input
B: Camera1 White 4 PIN Female
C: Camera2 Blue 4 PIN Female
D: Camera3 Green 4 PIN Female
E: Camera4 Brown 5 PIN Female / 4 PIN Female
F: Video Out Yellow RCA Female
G: Audio Out White RCA Female
① White: Camera 1 trigger
② Blue: Camera 2 trigger
③ Green: Camera 3 trigger
④ Brown: Camera 4 trigger
⑤ Purple: Speed
⑥ Black : Ground
⑦ Red: VCC
2
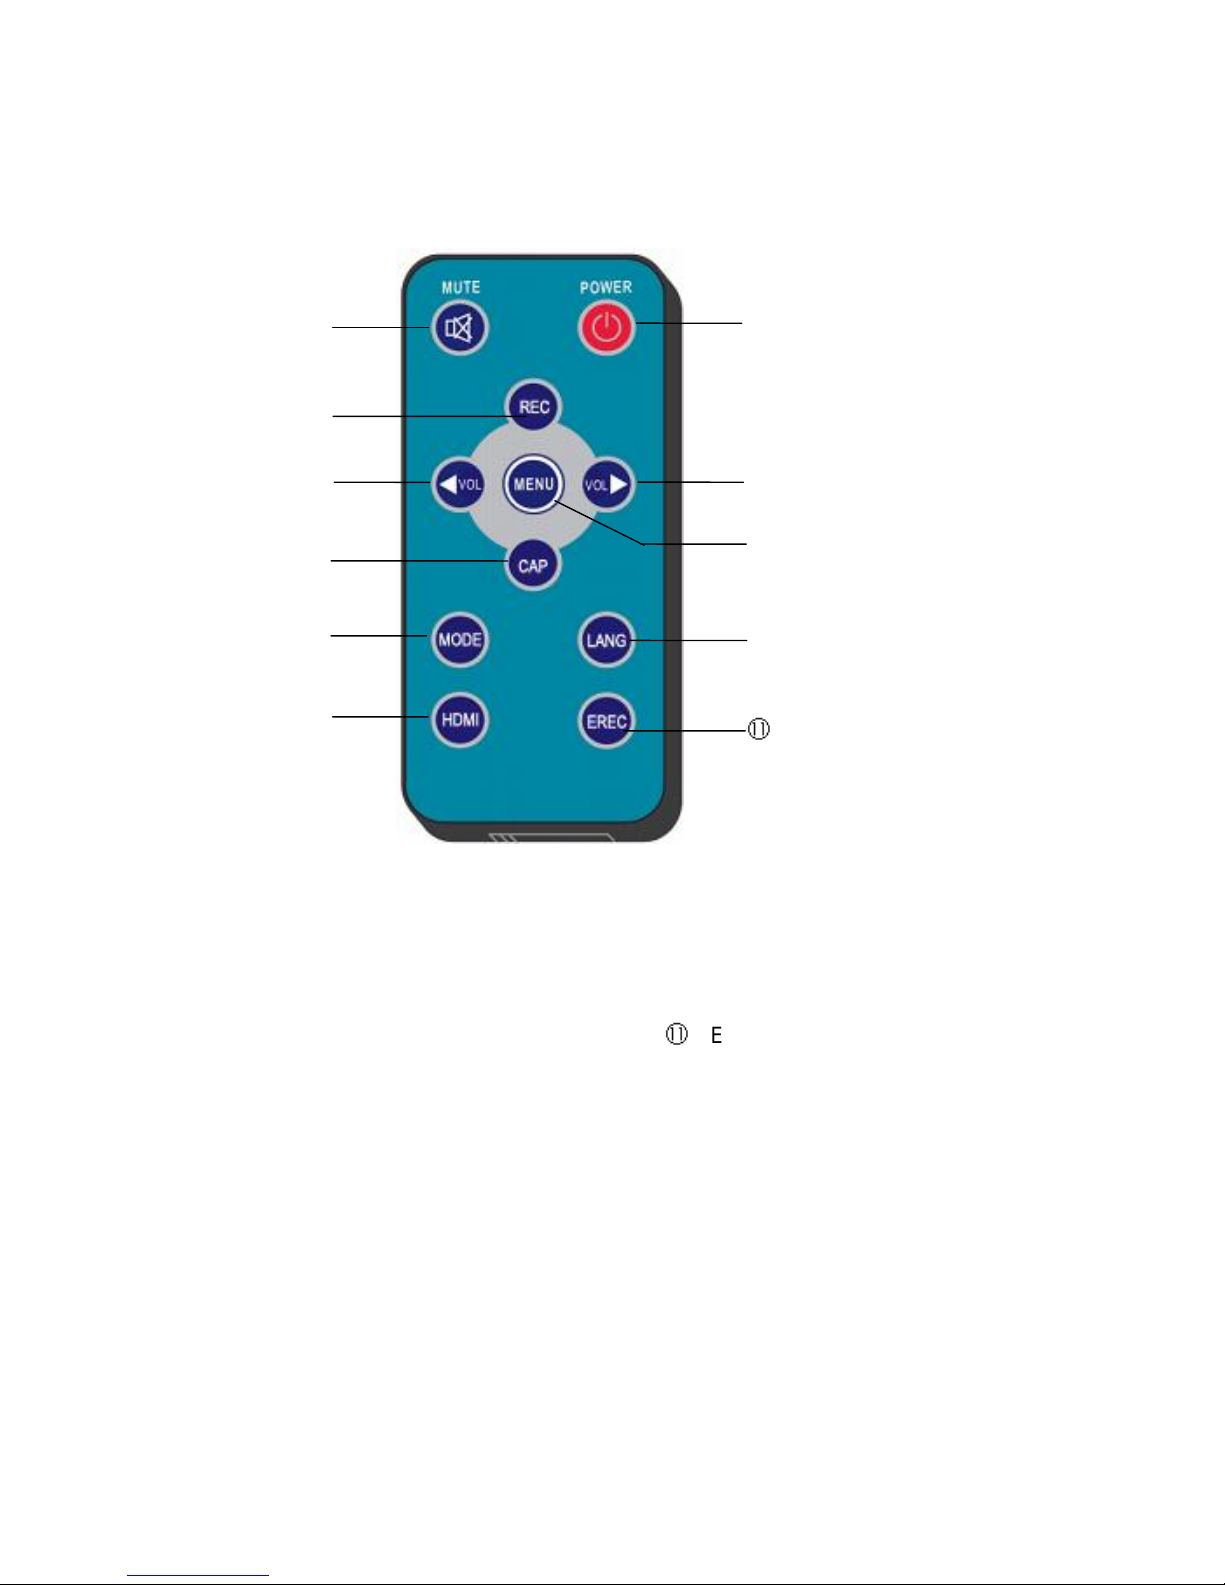
2. Remote Control
① Mute
② Standby
③ Recording
④ Volumn Decrease
⑤ Volumn Increase
⑥ Snapshot
⑦ Menu
⑧ Display Mode Selection
⑨ Language Selection
⑩ HDMI Switch
Event Recording
①
②
③
④
⑥
⑧
⑩
⑦
⑤
⑨
3
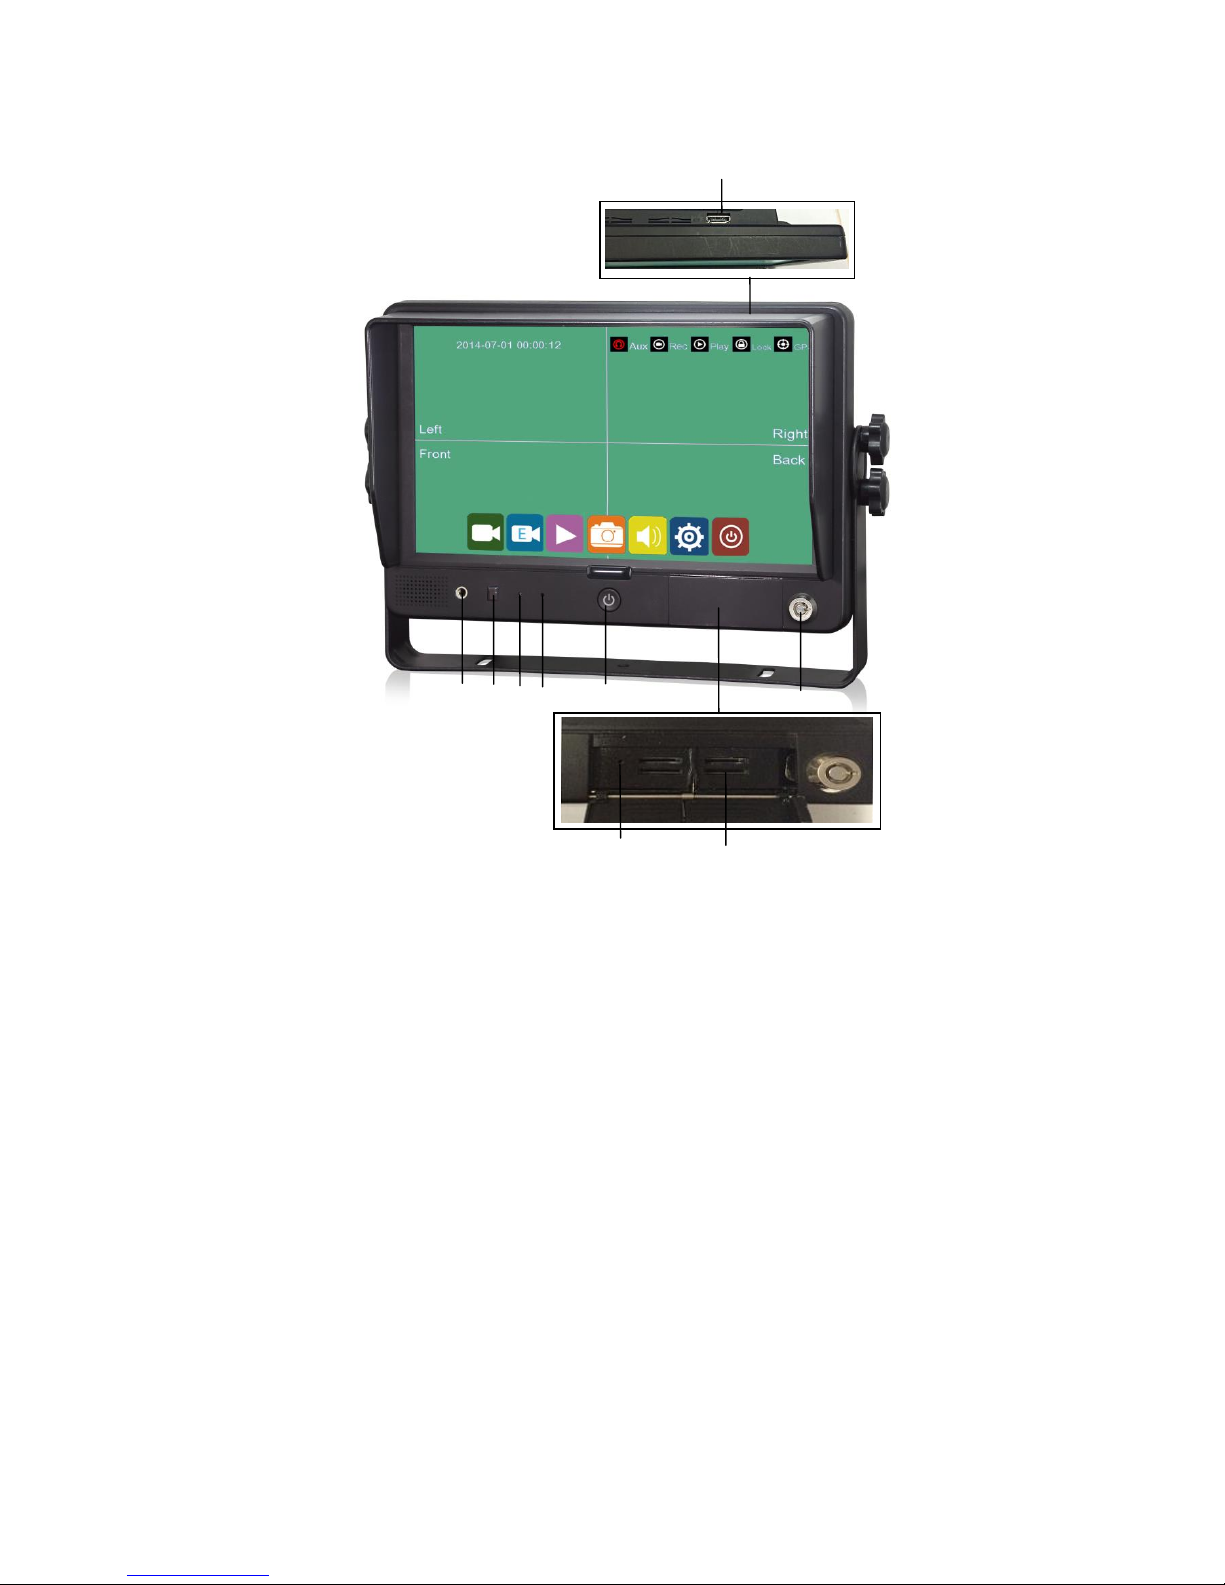
3. Controls
①AUX Input
②Remote Receiver
③LDR
④Recording Indicator
⑤Power
⑥Lock
⑦Emergency Hole
⑧Micro SD Slot
⑨HDMI Input
Power Function:
a/ Short press the power button to turn the monitor on when the panel LED is red.
b/ Press the power button for 5 seconds to turn off the monitor.
c/ Short press the power button to turn off the backlighting when monitor is on.
LDR:Light dependent resistor.
Emergency Hole:Press the emergency hole using some needle can reset the whole machine, in
case the system halted.
①
② ③ ④ ⑤ ⑥
⑧ ⑨ ⑦

4
4. Operation
4.1 Time and Indicators
Top left displays date and time.
Top right displays 5 indicators: AUX/Rec/Play/Lock/GPS
AUX indicator turns red when AUX audio is inserted on the front panel.
Rec indicator turns red when recording.
Play indicator turns red when playing back.
Lock indicator turns red when menu is locked.
GPS indicator flickers when searching signal.
GPS indicator turns red when GPS signal is received.
4.2 Menu Operation
Click this icon to start or stop recording. Video files are saved in normal list
of player menu.
Click this icon to start event recording. The video buffer 15 seconds before
the click will also be saved in this event record mode. The event recording
will stop when the pre-set recording time is up. Video files are saved in
event list of player menu.
Click the icon again when the event recording is not ended, the monitor
will will switch to normal recording after pre-set recording time is up.
Click this icon to play back video. A prompt dialog will show“Can not record
in play mode! Continue?” Click OK to enter recording calendar menu. Video
files are available in green highlighted dates. Click the date to select, play or
delete video files or snapshots. Multiple video files can be selected to play
back in sequence, while snapshots must be viewed in folder one by one.
Touch the
bottom area
to display
menu

5
Exit
Capture List
Event Recording List
Normal Recording list
Delete
Select All
Play
Protect Files
Year Selection
Month Selection
Exit
Video files and
Snapshots Are available
in Green highlighted
dates
Play last file
Play next file
Volume Adjustment
Pause Video Play
Hide Player Menu
Exit
Display last
picture
Display next
picture
6
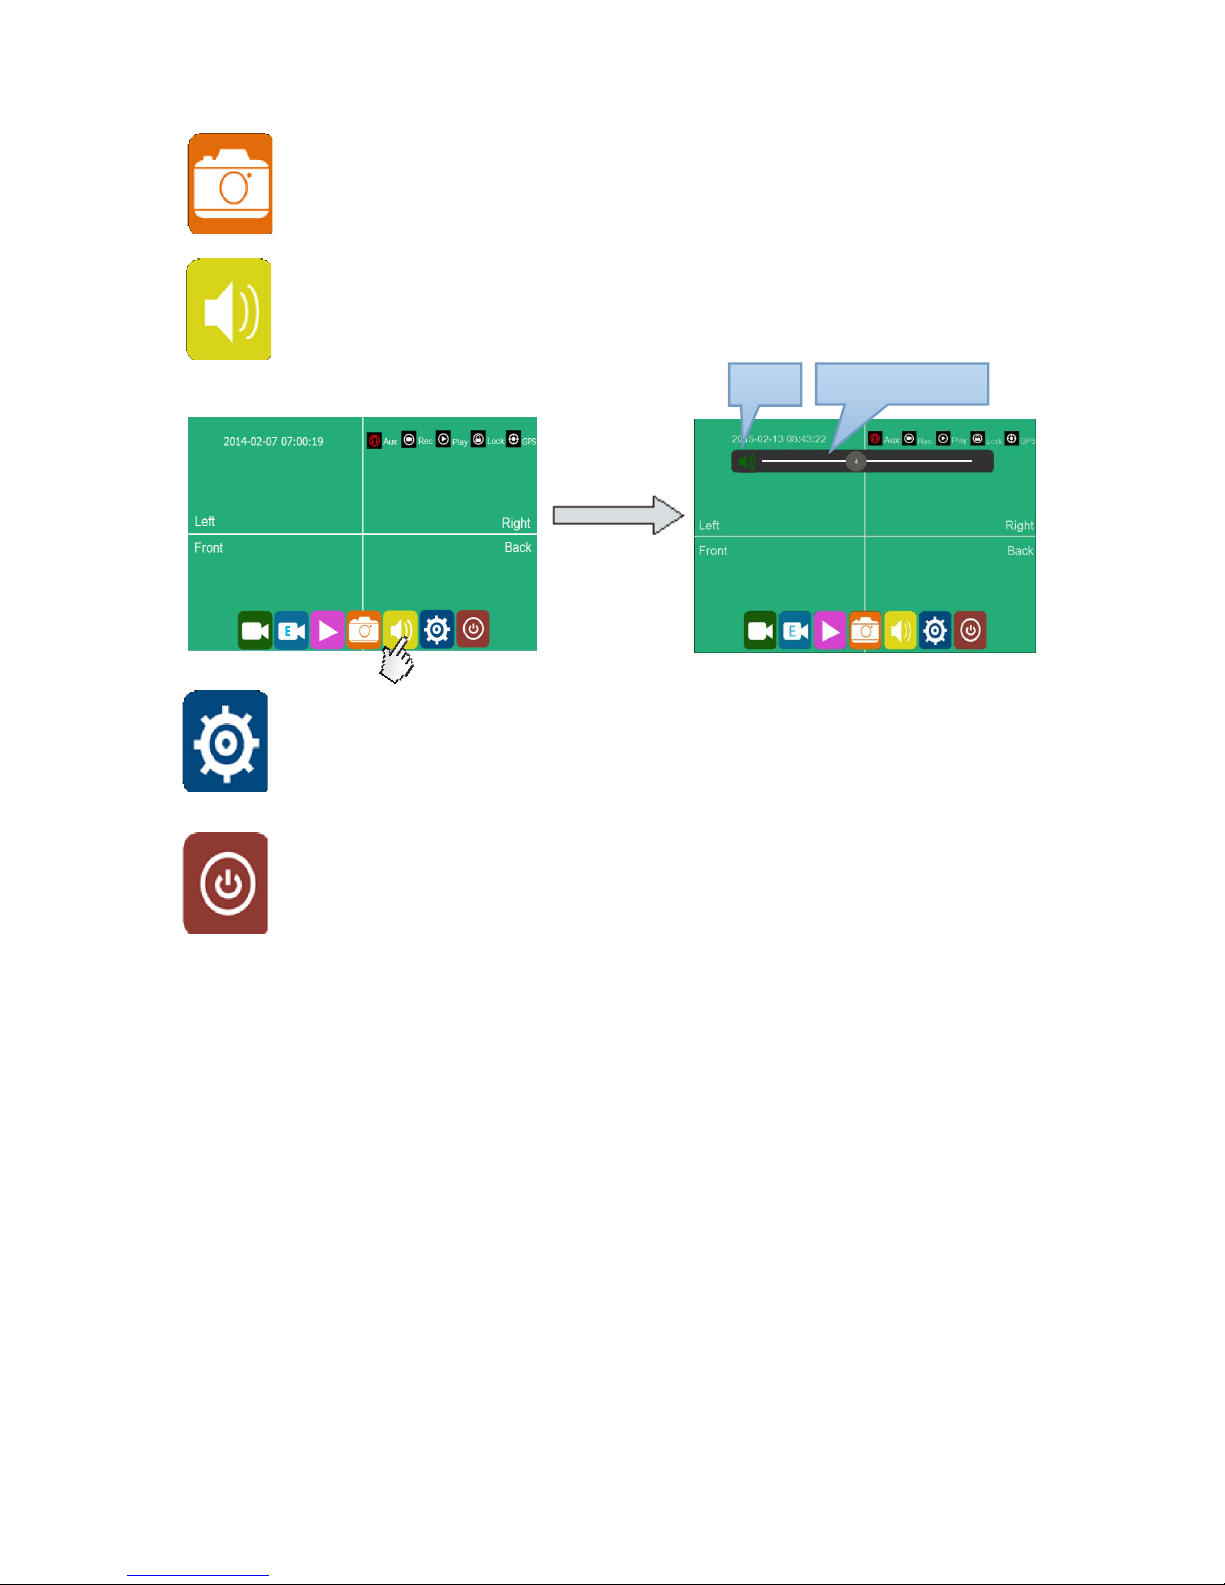
Click this icon for snapshot under live recording and playback mode.
“Snapshot Success” will display when snapshot is done. Pictures are saved
in capture list of player menu.
Click this icon to adjust volume under live recording and playback mode.
Click this icon to set menu. A prompt dialog will display "Can not record in
configuration mode! Continue ?” Click OK to enter.
Click this icon to turn off the monitor.
Mute
Volume-leveling Value

7
5. Main Menu
5.1 Record
Power On Rec:
Recording will start when power is on if setting the Power On Rec ON.
Continuous Rec:
New video files will overwrite the previous ones when SD cards are full if setting
the Continuous Rec ON. Recording will stop when SD cards are full if setting the
Continuous Rec OFF. Overwriting will not cover event recording files.
Trig.4 Rec:
Event recording will start if setting the Trig.4 Rec ON.
Motion Rec:
Event recording will start if set the Motion Rec ON.
Event Record Time:
Event recording time can be set from 15 seconds, 30 seconds to 1 minute.
Record Channel:
Select any camera channel for recording. Default setting is recording ALL
channels under normal record and power on record mode, while it is ALL
channels for event recording and can't be changed.
Motion Sensitivity:
Motion Sensitivity is optional for low, middle, high level.
8
G-sensor Sensitivity:
G-sensor Sensitivity is optional for low, middle, high level,which stands for +/-1g,
+/-2g, +/-4g.
Video Quality:
Resolution of video quality is classified into low /middle /high. Default quality is
high.
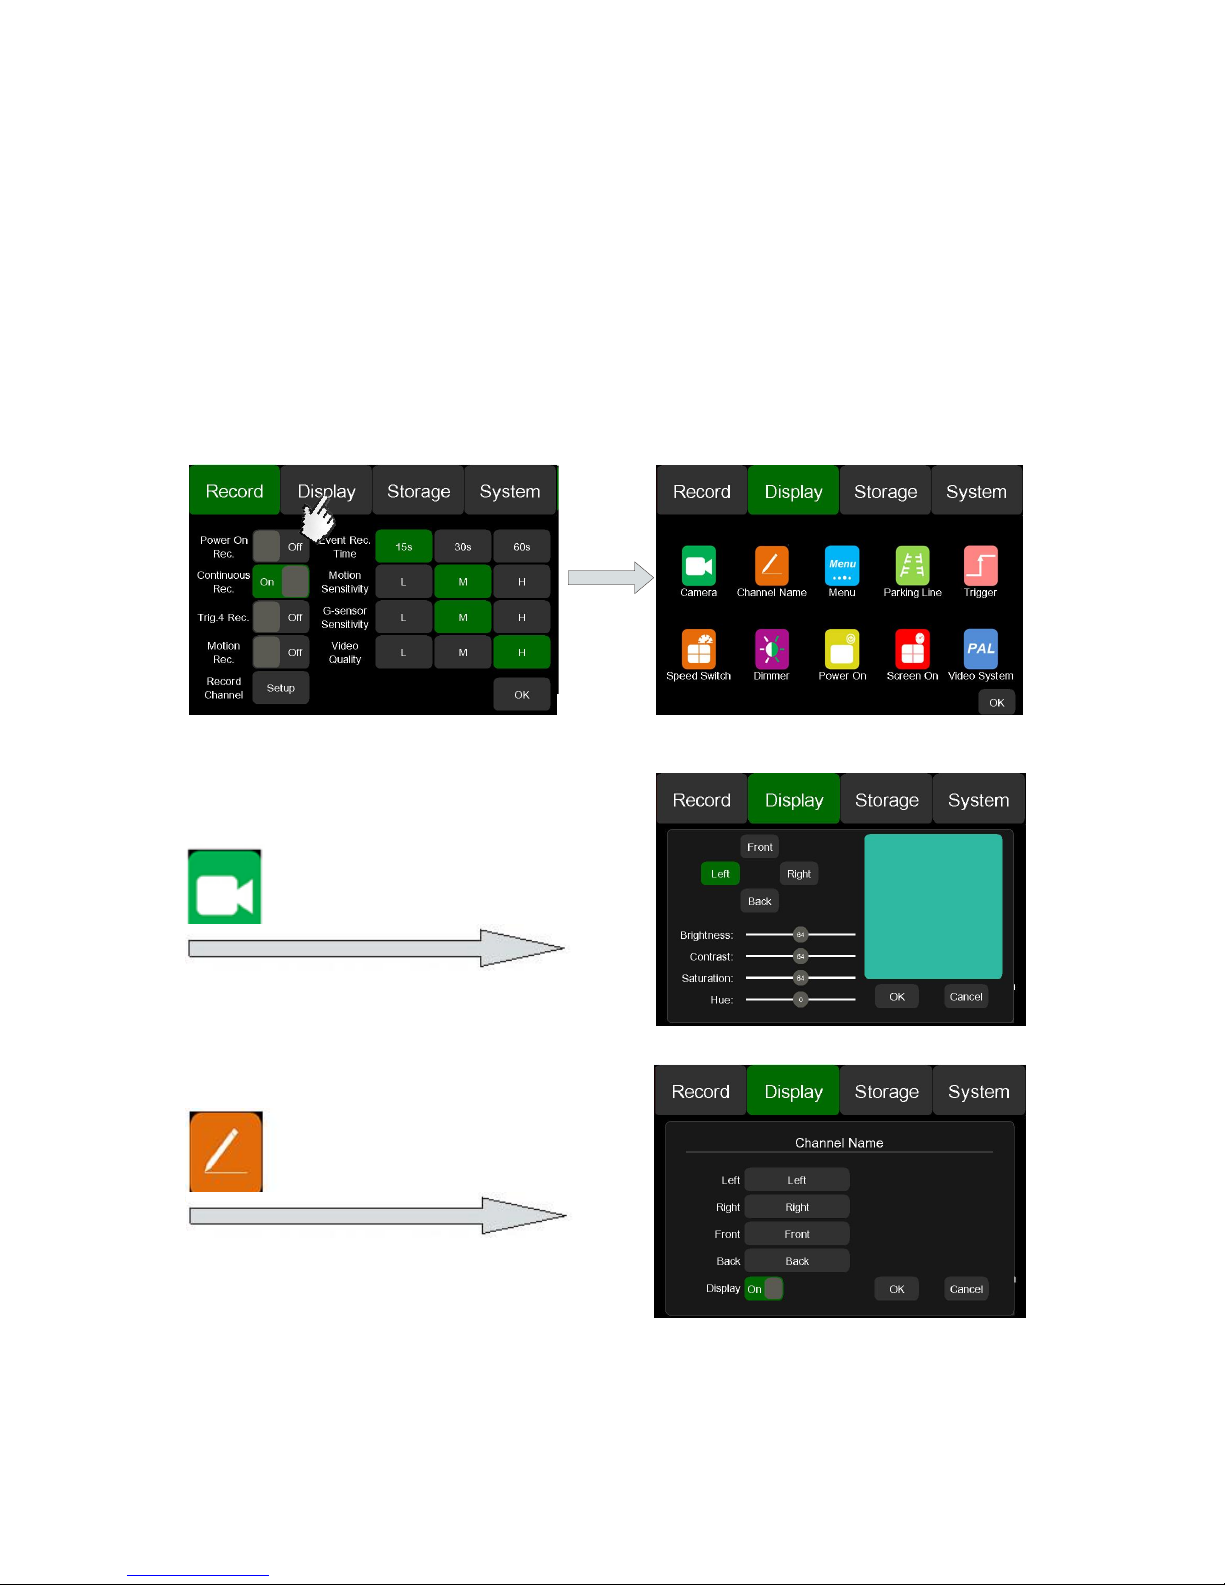
5.2 Display
Camera Name Setting
Camera Display Setting

9
Click the camera name in the gray box and input new one with maximum 8 digits.
Click this icon to set menu
Display time
Click Menu Lock Setting to set menu
password. Default Password is 123456
Click this icon to turn on / off camera
parking lines. Click Calibrate to adjust
parking lines.
Click this icon to set trigger delaying
time and priority,4 is the highest priority.

10
Connect the vehicle speed wire with the
monitor speed wire before operation.A full
screen of selected camera will be
displayed when the vehicle is over speed
or underspeed.Click the Option icon to
set the speed threshold. Speed recording
will start if setting the Speed Rec. ON.
Click this icon to set blacklighting
value.
Click this icon to set power on
display mode.
Speed Switch——Option…
Click the Calibrate icon to calibrate the
current speed for the monitor. Then you
can set the threshold of High Speed and
Low Speed to display the corresponding

11
5.3 Storage
ALL: Capacity and free capacity for all cards.
TF1~4: Capacity and free capacity for each individual micro SD card.
Format : Format micro SD card.
All: Formal all micro SD cards.
TF1~4: Format any individual micro SD card. Format icon will be gray if SD
card is not found.
TF SLOT: Micro SD card slot position.
Warning: Micro SD cards must not be taken out during recording or playback.
Click this icon to set screen on duration
and battery power supply duration after
external power is off.
Click this icon to select video system
Under camera mode or HDMI input
under non-camera mode.
12
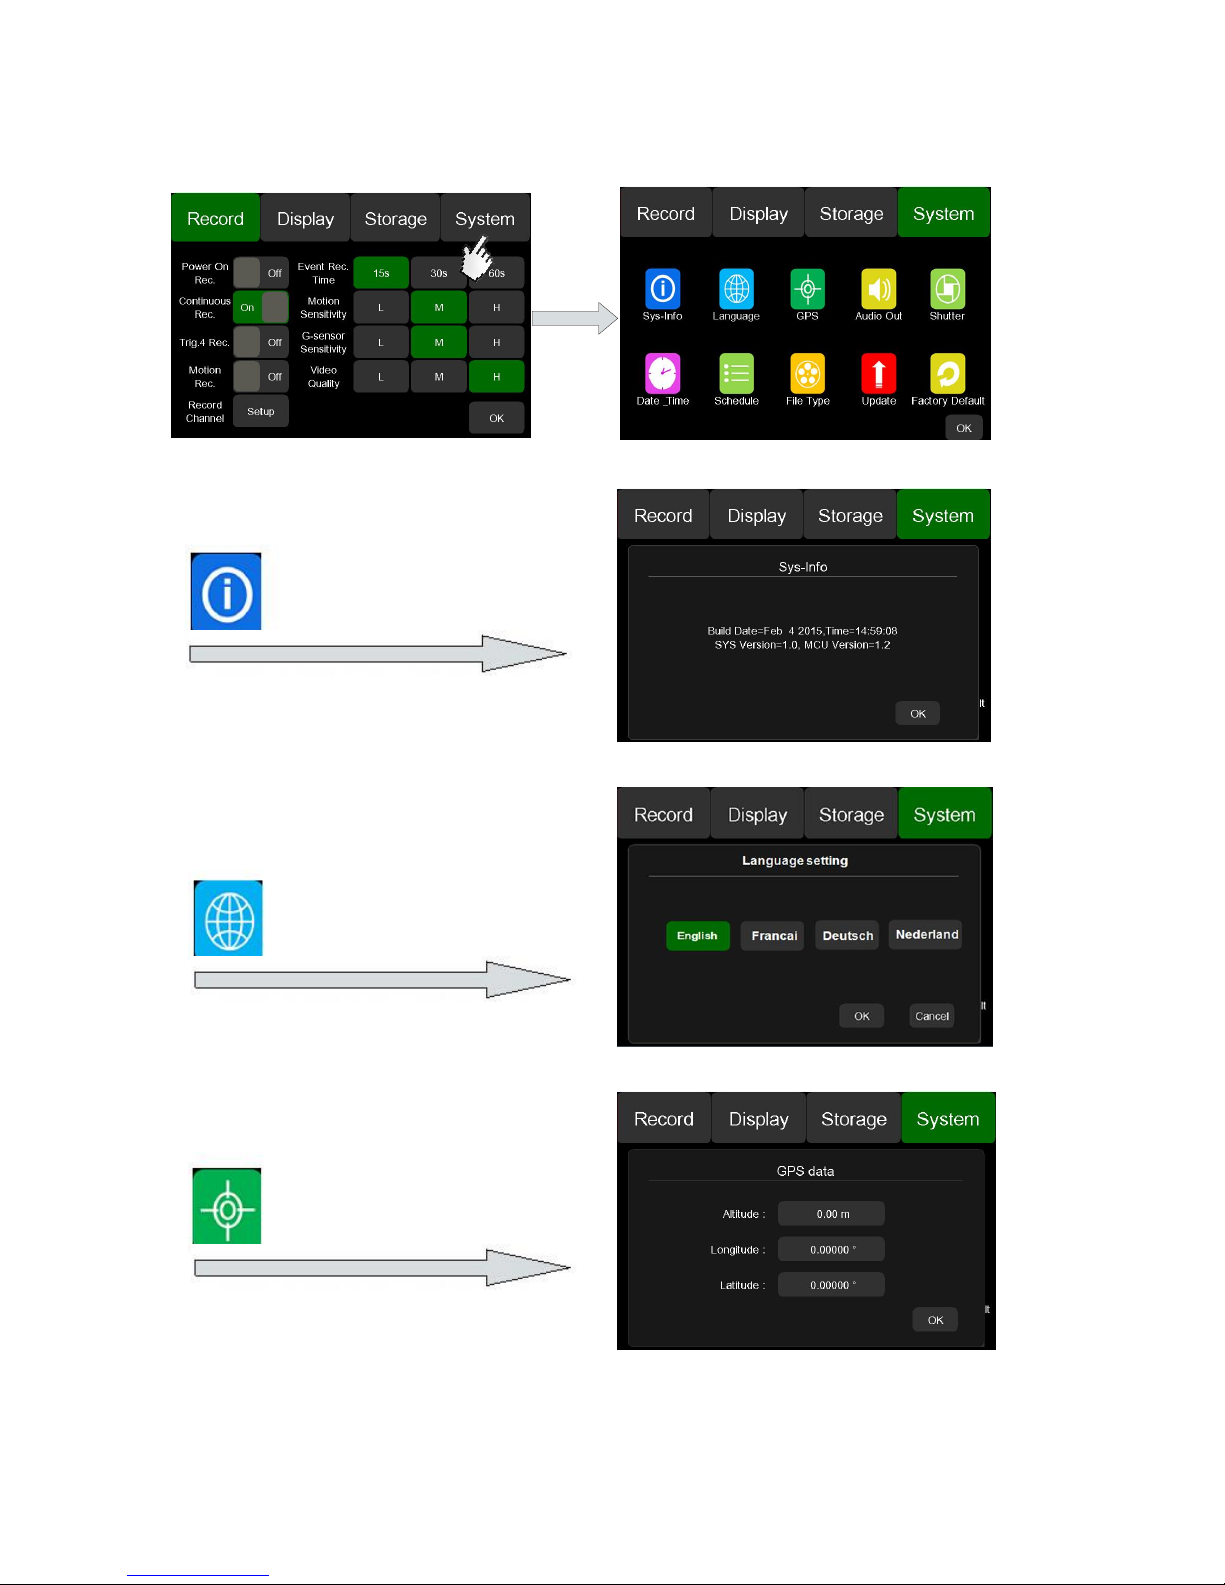
5.4 System
Click this icon to display the monitor
Software release time and version
Click this icon to select language
Click this icon to display GPS information
13
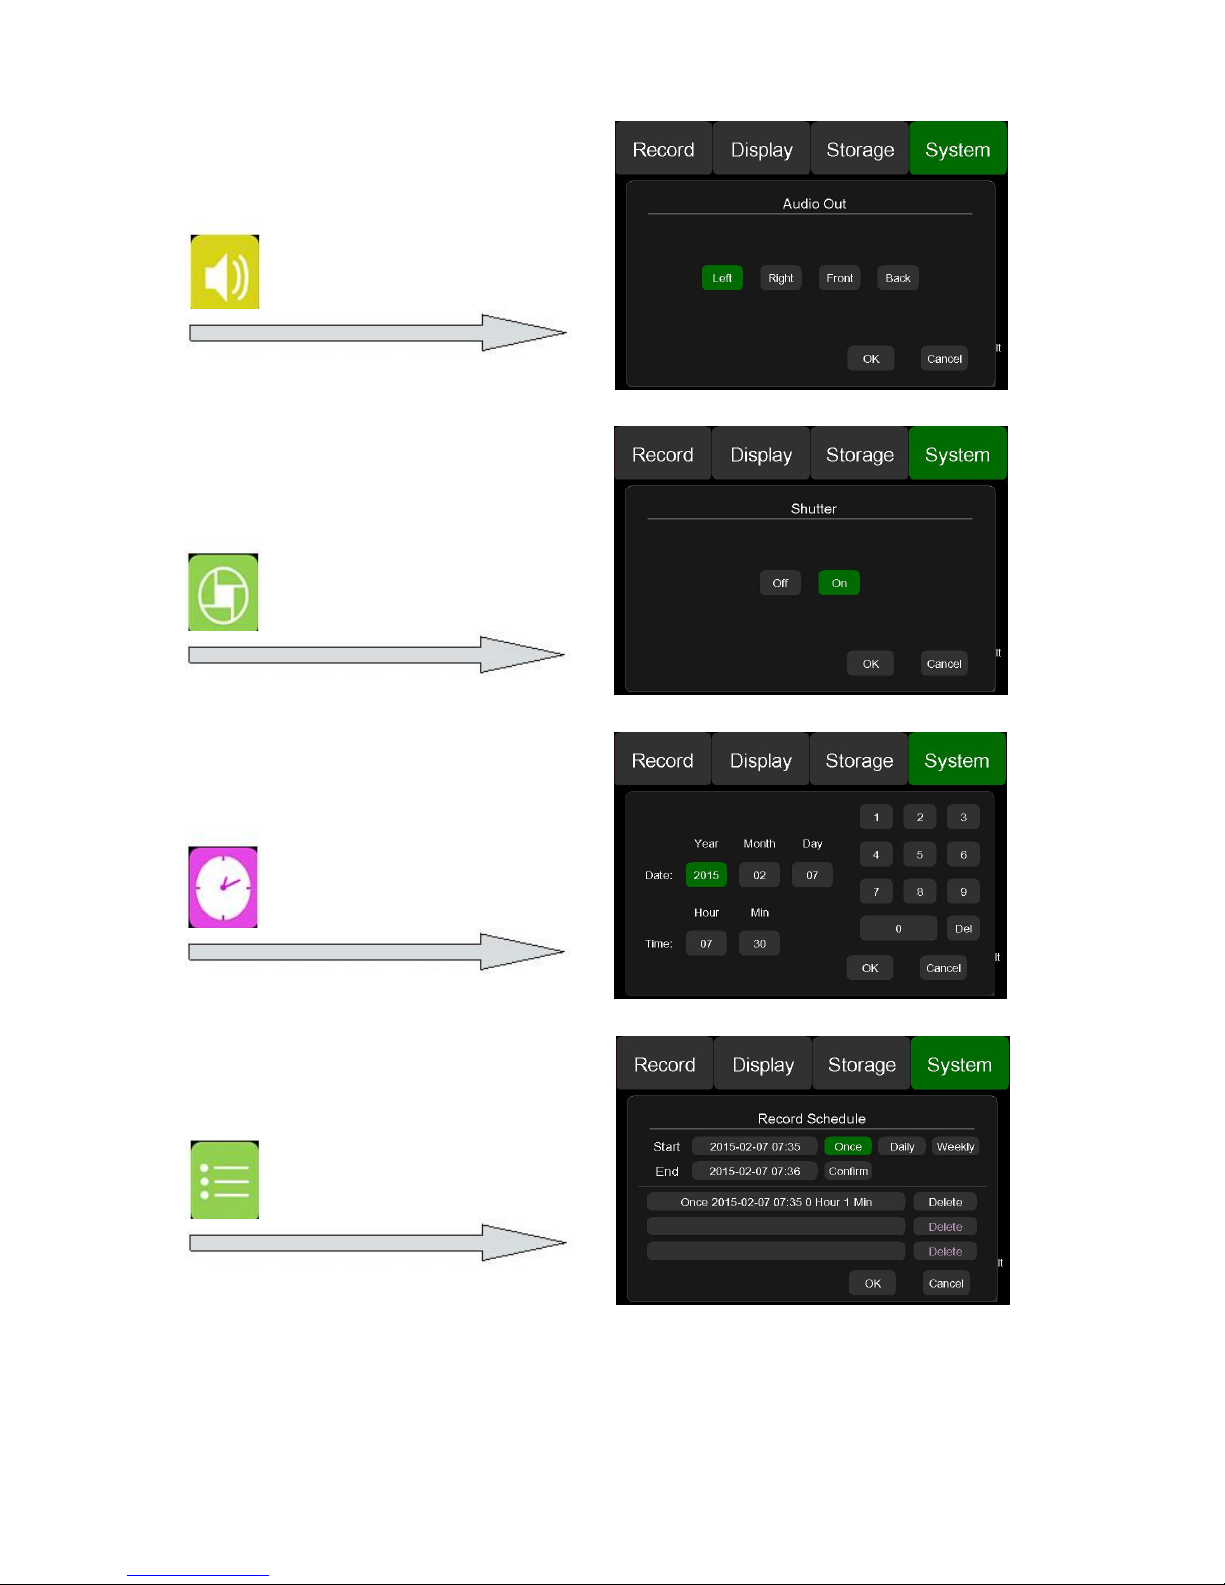
Click this icon to set audio out
channel.
Click this icon to set shutter on or off
When using a motorized camera.
Click this icon to set date and time.
Year should range between
2000-2037
Click this icon to set scheduled
recording.
14
Start: Start time of scheduled recording.
End: End time of scheduled recording.
Confirm: Add scheduled recording
Scheduled recording:
* Add a scheduled recording with maximum of 3. Scheduled recording can be
set once, daily or weekly.
* Single scheduled recording will display as expired, completed or deleted.
* Overlapped scheduled recording is not allowed.
* Recording setting must be resumed if interrupted.
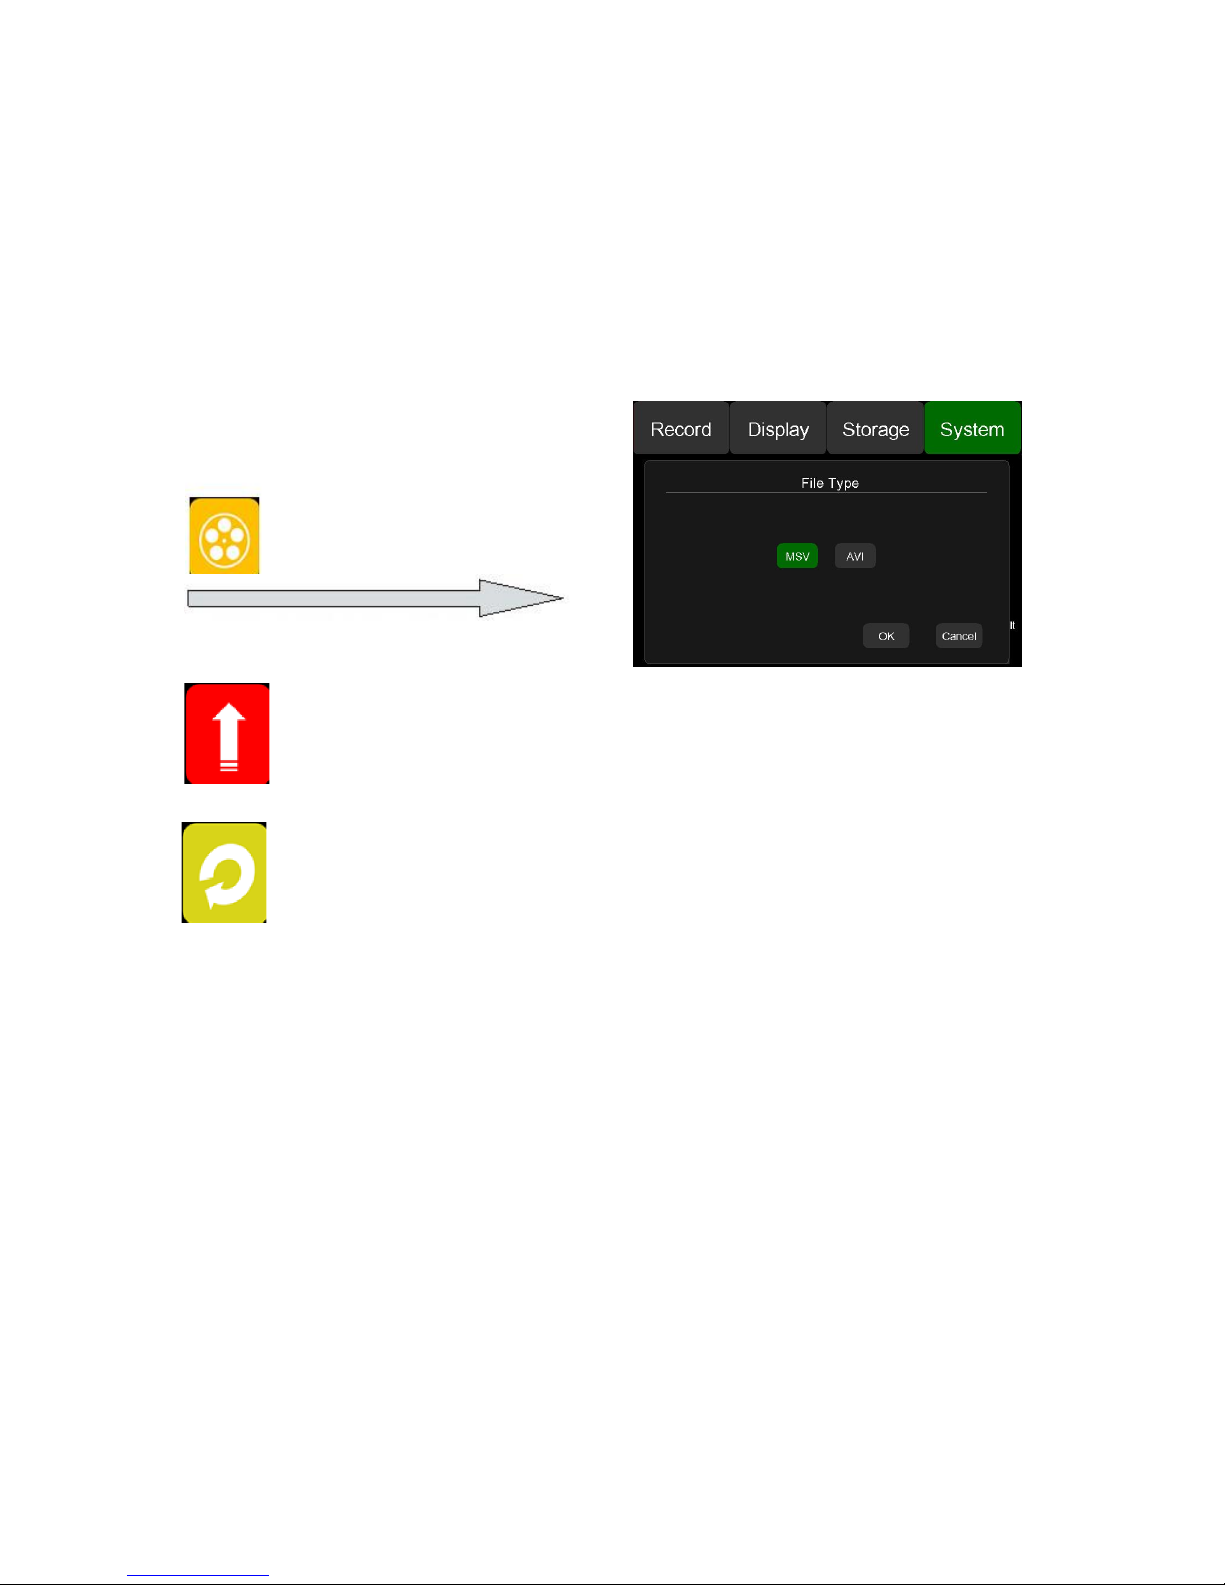
Update: Click this icon to update software.
Factory Default: “Confirm to restore the factory setting ?” Click this icon to
restore factory setting.
Click this icon to select file type.


 Loading...