


Operating Instructions
7"/10.1" HD Digital LCD Color Monitor
Please read this manual before you use the product.
The product may be different from the described in the manual depending on
renewal or upgrade of S/W version and performance and it can be altered
without notice.
V1.0


Contents
1.Precautions
2.Features and Specifications
3. Accessories
4. Parts Identification
5. Connections
6. Menu Operation & Functional Specification
6.1 IR Remote Control
6.2 Menu Operation
6.2.1 Desktop
6.2.2 Home Menu
6.2.3 Volume
6.2.4 Mode
6.2.5 Source
........................................................................................................
...........................................................................
......................................................................................................
...........................................................................................
.....................................................................................................
..................................................................................
.......................................................................................
...........................................................................................
....................................................................................
.............................................................................................
..............................................................................................
...........................................................................................
...............................................
1
3
4
5
6
7
7
8
8
9
9
10
10
6.2.6 Setting
............................................................................................
11

1. Precautions
● Storage and Keeping
1. Do not expose the monitor to excessive heat or coldness. Storage temperature is
-30~+80℃; Operating temperature is -20~+70 ℃; Humidity is Rh90%.
2. Never use this device near a bathtub, wash basin, kitchen, damp basement,
swimming pool or similar places.
3. Never use this device in the environment with excessive moisture, dust or smoke.
4. Avoid dropping or striking.
5. Never use this device in enclosed spaces, areas with excessive vibration or subject
to severe impacts.
6. Never puncture, scratch or use abrasive cleaning materials on this device.
7. Do not place cables where they may be pinched or stepped on.
8. Leave at least a 2" space between the monitor and walls, cabinets or other
objects to allow adequate air circulation around the device.
9. The monitor is not designed to be waterproof.
● Operating Precautions
1. The device may be powered by DC power 10V - 32V (eg. 12V or 24V ACC).
2. Make sure all cables are connected properly. Observe polarity. Improper cable
connections may damage the monitor. Remove the power cable connections when
you do not intend to use the device.
Warning!
1. High voltage is present within the monitor. Opening monitor case should be done by
professionals.
2. Do not watch the video only while driving.
Special Notice
Occasionally, a few highlights or dark spots may occur on the LCD screen. That is a very
common phenomenon in active matrix display technology, and it doesn’t necessarily
indicate any defects or faults.
Never try to repair this device by yourself. If any problem, please turn off the display at once
and notify our company or authorized dealer. The monitor is a complex device. Any
disassembly or modification may lead to damage and invalidate warranty.
1

● Maintenance
1. Remove all the cable connections from the monitor before cleaning the device.
2. Use a mild household detergent and clean the unit with a slightly damp, soft cloth.
3. Never use strong solvents such as thinner or benzine, as they might damage the finish
of the device.
Caution
Risk of electric shock
Do not open
Caution: to reduce the risk of electric shock,
Do not remove cover (or back).
No user-serviceable parts inside.
Refer servicing to qualified service personnel.
This symbol is intended to alert the user to the presence of
uninsulated "dangerous voltage" within the product's enclosure that
may be of sufficient magnitude to constitute risk of electric shock to
persons.
This symbol is intended to alert the user to the presence of
important operating and maintenance (servicing) instructions in the
literature accompanying the appliance.
This symbol is intended to alert the user not to waste electrical and
electronic equipment.
CAUTION
You are cautioned that any changes or modifications not expressly approved
in this manual could void your warrantee and necessitate expensive repairs.
● Declaration of conformity
This device complies with Part 15 of the FCC Rules. Operation is
subject to the following two conditions:
la FCC (Comisión Federal de Comunicaciones). El funcionamien
to está sujeto a dos condiciones:
(1) This device may not cause harmful interference.
(2) This device must accept any interference received, including
interference that may cause undesired operation.
2

2.Features and Specifications
10.1”/7’’ HD quad-view monitor with LVDS interface, support input up to
Support 4 channel cameras in PAL / NTSC / HDA / HDT / HDC (720p/1080p).
Image can be set to horizontally flipped, vertically flipped, normal and zoom
Support multiple image display modes like single, dual, triplex, quad, trefoil,
Support 1 x HDMI video input, for easy connection to PC or smart electronic
Support 1 x VGA video input and resolution can be 1080p.
Support 1 x CVBS video input for DVD.
Capacitive touch-screen
Support 5 x triggers, trigger priority & trigger delay are selectable.
Support auto scan, scan channel and scan time are selectable.
Support backlight adjustment manually in 3 levels and automatically.
Parking line
With 1.5W speaker
Monitor operated by remote control or touch-screen.
Support 9 languages OSD (English, German, Japanese, Russian, Chinese,
Working voltage: 10-32V, with short circuit protection and short circuit alarm
Compliance with CE/FCC standards
resolution at 1920 *1080.
Image.
Y-split, H-split.
devices, etc. (optional)
Italian, Spanish, French, Dutch)
function.
3

3. Accessories
U-Support Bracket
Center Mount Bracket
Sun Shield
Power cable
Angle Adjustment Screws
IR Remote control
Special Notice
Accessory supply may be different for different application.
Power cable
4

4. Parts Identification
Digital Color LCD screen, touch screen
Mounting bracket installation
Remote control sensor
Power Switch /
Power indicator
Light lever sensor
Loudspeaker
HDMI Interface
5

5. Connections
A: Camera1 White 4PIN male
B: Camera2 Blue 4PIN male
C: Camera3 Green 4PIN male
D: Camera4 Brown 4PIN male
E: Black 5PIN male
F: Black 5PIN Female:
③ / ④ / ⑤ / ⑥ / ⑦
①: Red:
②: Black: GND
③: White: Camera1 trigger
④: Blue: Camera2 trigger
⑤: Green: Camera3 trigger
⑥: Brown: Camera4 trigger
⑦: Yellow: Split trigger
6

6. Menu Operation &Functional Specification
Pic.6.1
Move up the menu cursor
Mute or unmute
Standby mode enter or quit
Move up the menu cursor or
decrease volume
Move up the menu cursor or
increase volume
Move down the menu cursor
switch Input Source
Enter the Language setup menu
Call home menu or return to
previous menu
Confirmation button
Switch TV system
Null
Reset the system
6.1 IR Remote Control
●MUTE: Mute or unmute
●Power: Turn on or enter standby mode
●VOL+: Move up the menu cursor, or increase volume
●VOL-: Move up the menu cursor, or decrease volume
●MENU: Call home menu or return to previous menu
●UP: Move up the menu cursor, or switch screen display mode when there
Is no pop-up menu and signal source is selected as camera.
●DOWN: Move down the menu cursor, or switch screen display mode when
there is no pop-up menu and signal source is selected as camera
●MODE: Switch input source
●P/N: When signal source is selected as camera, switch TV system under
screen split mode in the order: NTSC->PAL->720p60Hz->720p50Hz->1080i60Hz
->1080i50Hz
●LANG: Enter the Language setup Menu
●REST: System reset button
●AV: Null
7

6.2 Menu Operation
6.2.1 Desktop
Pic. 6.2.1-1
●Touch anywhere in white lined section to call home menu.
Pic. 6.2.1-2
●When signal source is selected to be cameras, image display mode can be swi
tched by sliding to left / right on screen in the order: LEFT->RIGHT->FRONT->BA
CK->DUAL->TRIPLE->TREFOIL->Y-SPLIT->H SPLIT->QUAD->LEFT.
●Sliding to up / down on screen can quit / enter the standby mode conveniently.
Pic. 6.2.1-3
●Touch the camera channel under multi-split screen mode to zoom into a single full
screen and touch again to get back to multi-split screen.
8

6.2.2 Home Menu
Pic.6.2.2
●Touch the icons to enter the menu or touch the area out of the white lined to exit.
6.2.3 Volume
Pic.6.2.3
●Drag the slider on volume bar to adjust volume.
●Click speaker icon to set Mute or Unmute.
9

6.2.4 Mode
●Touch the icons to switch the channel.
6.2.5 Source
Pic.6.2.4
Pic.6.2.5
●Automatic recognition of signal input.
●Supports video standards: NTSC/PAL,HDA/HDT/HDC1080p/720p.
●Multiple HDMI and VGA input resolutions:
640x480,720x480,720x576,800x600,1024x768,1280x720,1280x1024,1366x768,1440x
900,1600x900,1920x1080.
10
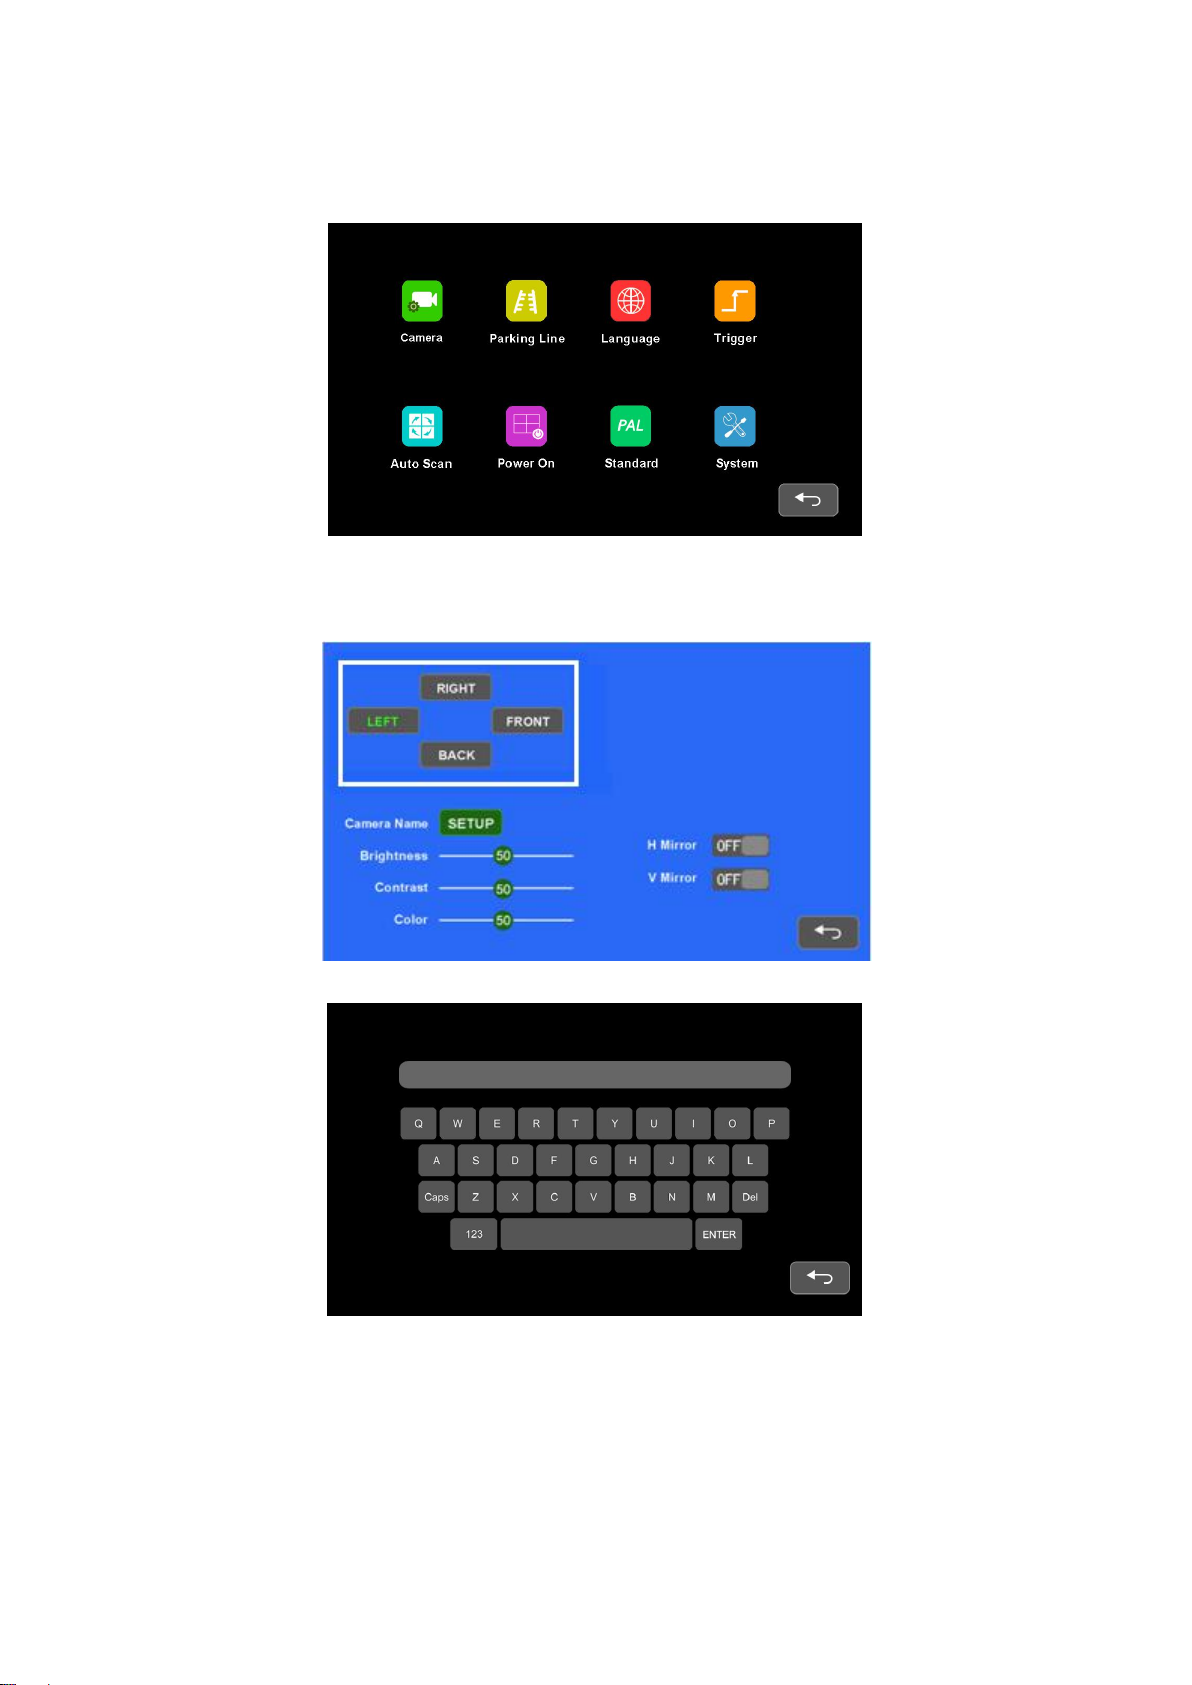
6.2.6 Setting
6.2.6.1 Camera
Pic.6.2.6
Pic.6.2.6.1-1
Pic.6.2.6.1-2
●Set Camera name with in 8 digits (max).
11

6.2.6.2 Parking Line
Pic.6.2.6.2
●Touch to select Line 1 or Line 2 and drag cursor to adjust.
6.2.6.3 Language
●Touch to select language for OSD.
Pic.6.2.6.3
12

6.2.6.4 Trigger
Pic.6.2.6.4-1
●Trigger delay range: 1~60s.
●Trigger priority: 1~5.
●Trigger function takes priority over Auto Scan function.
●When there is a trigger signal detected, signal source will be automatically switched to
the working camera. It will be back to the previous signal source after the trigger ends.
●Support standby trigger.
Pic.6.2.6.4-2
●Trigger Display setting only acts on the fifth trigger channel (yellow wire).
13

6.2.6.5 Auto Scan
●Auto Scan Delay Range: 1~60s.
6.2.6.6 Power On
Pic.6.2.6.5
Pic.6.2.6.6
●Power On Display setting only displays under camera signal source except the last
selection (Boot into standby mode).
14

6.2.6.7 Standard
Pic.6.2.6.7 -1
●Standard setting interface (TV system setting in split-screen display mode) , as shown
in the Pic. 6.2.6.7-1.
Pic.6.2.6.8-2
15

Pic.6.2.6.8-3
●Standard setting is only for multi-split screen display modes.
●Multi-Split screen display mode supports camera inputs in different resolution,but
there are some limitations described as below:
When camera input resolution is lower than the size of its corresponding split screen, it
will be centered display in the original scale, conversely, it will zoom out to be split
screen in full formats show in the Pic.6.2.6.8-2 and the Pic.6.2.6.8-3.
NTSC Camera of standard definition only displays in NTSC / 720p60Hz and 1080i60Hz
mode, PAL Camera only displays in PAL / 720p50Hz and 1080i50Hz mode.
6.2.6.8 System
Pic.6.2.6.8
●Set Menu Lock ON to disable touch control.
●Menu Lock can be enabled / disabled by pressing the physical power button on the
monitor for 3 seconds while menu is off.
16
 Loading...