

Page 1

- 1 -
Product Overview:
This product is a leading FHD Digital vehicle driving recorder, with FULL HD 1080P high
resolution video, G-Sensor, SOS emergency saving, audio saving, and HDMI output etc.
function.
Warm prompt:
●This user manual will detail how to use, operation, technical specifications and precautions.
Before use, please read this m anual tho roughly a nd fully understan d, Please k eep this manual,
we hope our product s can meet your ne eds an d lo ng -term service to you!
●Do not put the machine into the damp working condition, this machine have no waterproof
function, so please make the m achine no p our water or exposed to rain water.
●Do not try open the shell or try repair by yourself, if the accessorie s for this m achine ha ve any
problem, please do to the professional maintenance station to repair.
●Do not use the thrill chemical substance, clean solvent or cleaner to clean this machine,
please use the moist soft cloth to clean.
●Do not use this machine under the condition that the dust and density is too large, to
avoid affecting the video.
●Please protect the environment, don’t discard this machine randomly; do not throw this
machine into fire, otherwise will have an explosion.
●Please pay attention to clean the lens surface, use the moist soft cloth clean the lens then
use, to avoid the video is not so good.
Content Guide
(A)Unit Structure chart
(B)Button and Interface Instruction
(C)Charge and Power on/off instruction
(D)Photograph/Video/Playback basic operation instruction
(E)Menu Setting Instruction
(F)Product Specification
(G)Frequently Asked Questions
Page 2
- 2 -
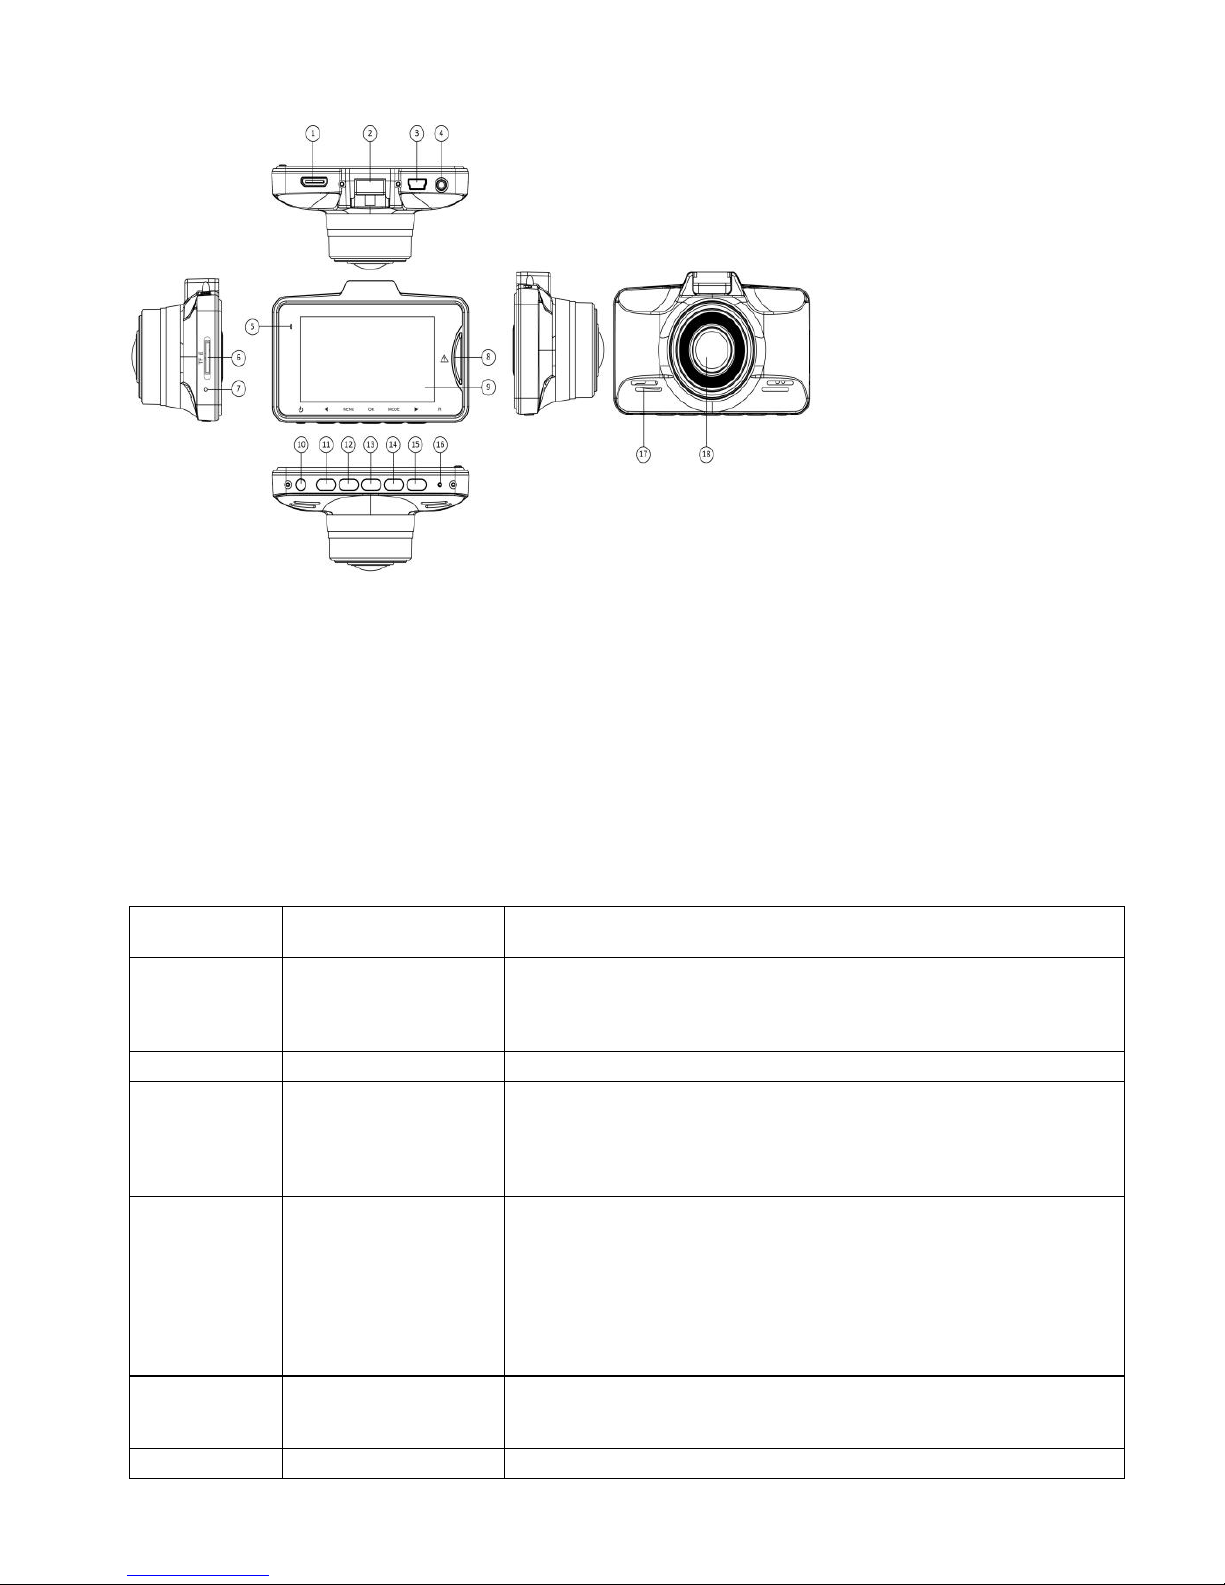
A. Unit Structure chart
1)HDMI 2)Holder Connector 3) USB Interface
4)TV-OUT or GPS 5)Power Indication Light 6)TF Slot
7)MIC 8)SOS Emergency Button 9)LCD
10)Power Button 11) UP Button 12)MENU Button
13)OK Button 14)MODE Button 15) DOWN Button
16)Reset 17)Speaker 18) HD Cameras
B
:
Button and Interface Instruction:
Button
Name
Button Function Instruction for Use
Power Power on/off
1. Power on:Short press to turn on and the red indication
lamp on.
2. Pow e r off :Long press to turn off and the red indication
lamp off.
Reset
Reset
1.short press to turn on again when the machine standby
OK
Confirmation
Video
start/stop/photograph
function
Menu confirmation
1: In the video mode: short press to start record, short
press again to stop recording
2: In the photograph mode: short press to confirm
make photo
3: In the menu mode:set and confirm
Menu
Photograph/record/
playback, all
functions setting
1. In the video mode: short press once to switch vi d e o
setting; short press twice to switch system setting.
2. In the photograph mode: short press once to switch
photograph setting; short press twice to switch system
setting;
3.In the video/photo playback mode: short press once to
switc h playback setting; short press twice to switch system
setting;
Up
Choose up
Turn on/off the
audio recording
1. In the menu mode :Up
2. In the video mode :short press to turn on/off the audio
recording
Down
Choose down
1. In the menu mode :Down
Page 3
- 3 -
Mode
Switch among
photograph/
record/playback
1.In the video mode: Switch among photograph/
record/playback.
2.Screen shot: in the video mode, short press mode
button could screen shot the current figure.
SOS
Emergency
Button
Press to lock the
file
Press to lock the file when under the video status.
TF card Slot
TF card Slot
Insert the TF card into this Slot
HDMI
Interface
High def initi o n
output
Conn ect t h e H D t el e vision by H D MI c a bl e, i n t he video
mode, view the video/photos; in the photograph mode,
make photos, view video and photos.
AV Slot
AV Output or GPS
Output
1.The AV slot ca n’t b e a ct e d a s AV output if t he m ac hine
be set with GPS, only acte d a s G P S o ut p ut .
2. The AV slot can’t be acted as GPS output if the machine
be set without G P S, o nly acte d a s AV output .
Holder
Interface
Install holder Install the holder on the machine
USB Output storage/charging
1: Connect USB cable for auto recording, and view the
video/photo.
2:Connect USB cable for auto charging
C
.
Charge and Power on/off instruction:
1. Charge Method:
1.1: Charge by connecting the cigarette lighter
1.2: Charge by connecting the computer via USB data cable
The blue indication light will on when charging, and need about 60 minutes to be full, after
it’s full the indication light will off.
2. Operating guide
Auto power on/off:
After the vehicle connect with the vehicle power, this machine support auto video record
when the vehicle startup, auto power off and save the video when the vehicle shut down.
2.1: the vehicle startup- cigarette lighter connect power- auto power on and video record.
2.2: the vehicle shut down - cigarette lighter disconnect power- auto power off and save the
video.
Page 4
- 4 -
3. Before installation, operate instructions by hand:
3.1. Power on/off by hand
Short press Power button, the red indication lamp will be on. Enter the video mode, Long
press Power button again, the red indication lamp will be off.
Attention: the device will be turn off automatically after a warning of low battery when the
power is very low.
3.2 Charge by connecting the computer via USB data cable
vehicle DVR mainly use while charging, the full built-in battery could maintain about 35minutes for standby, if use for long time, must connect the power cable for charging; and
use by connecting the mobile power at home.
D
:
Photograph/Video/Playback basic operation instruction:
Video Mode:
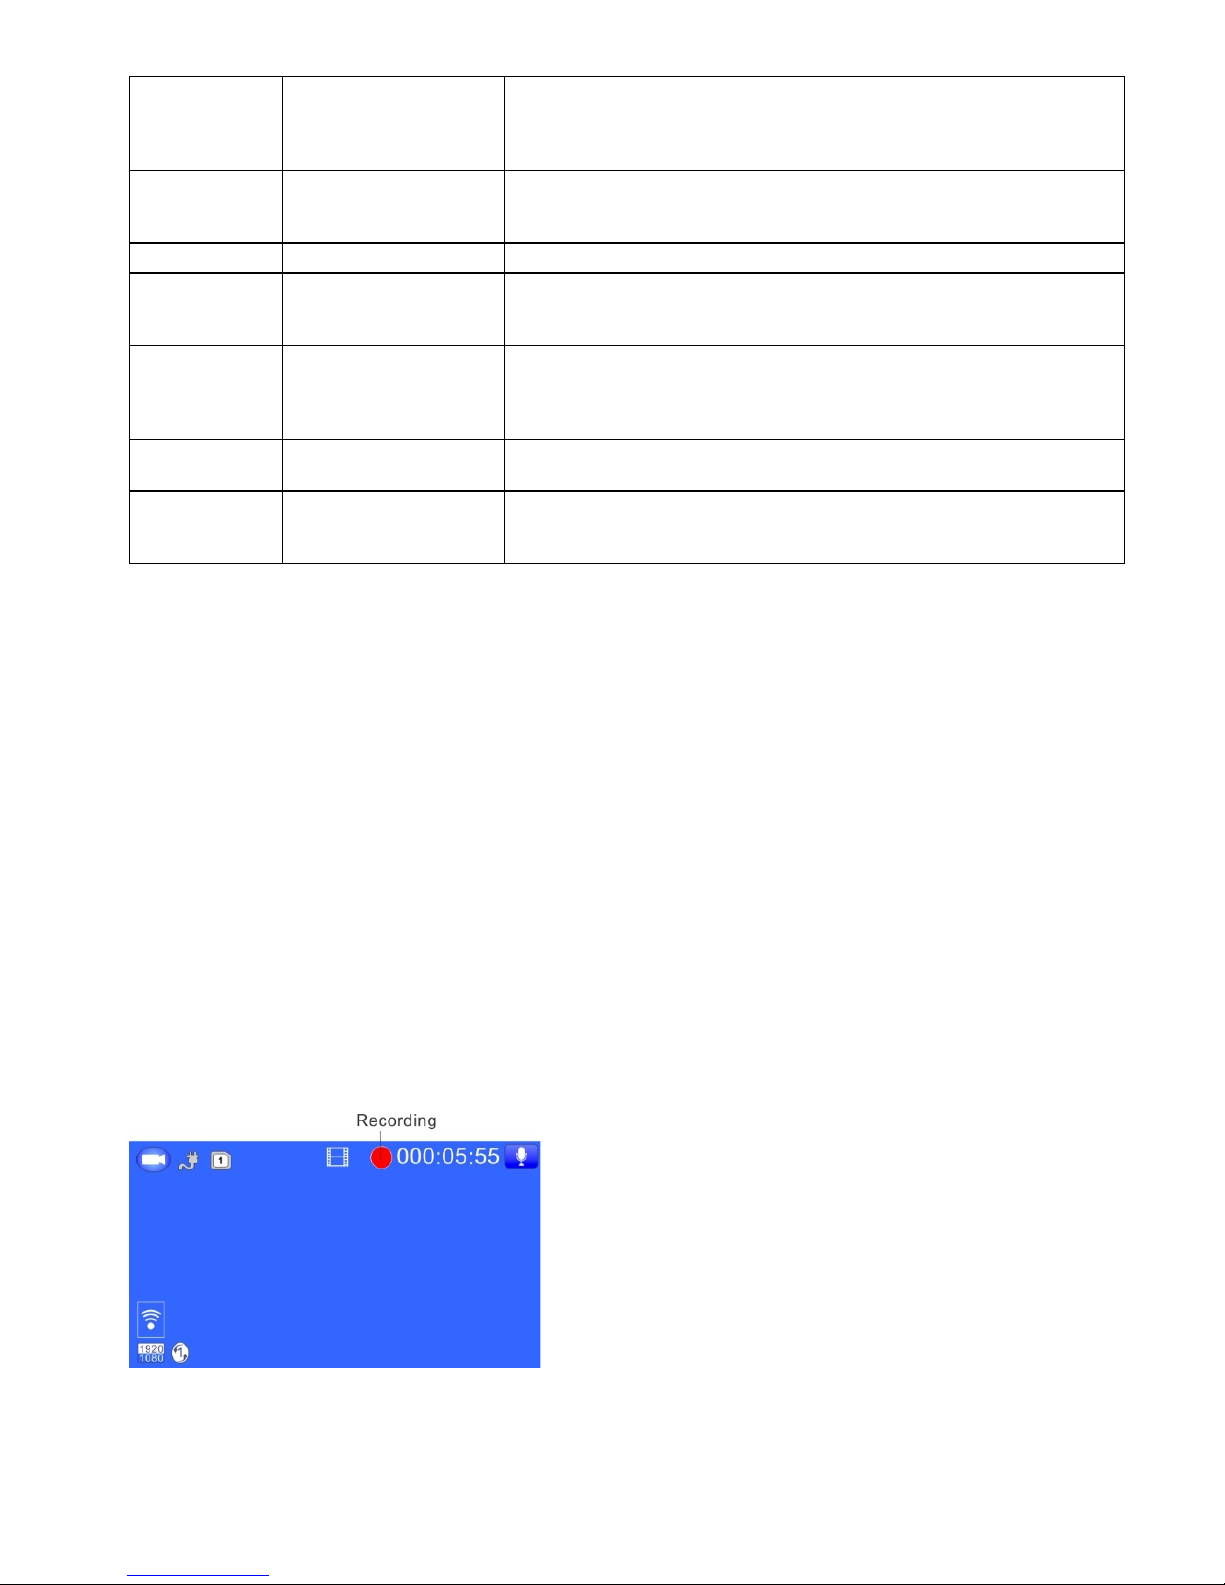
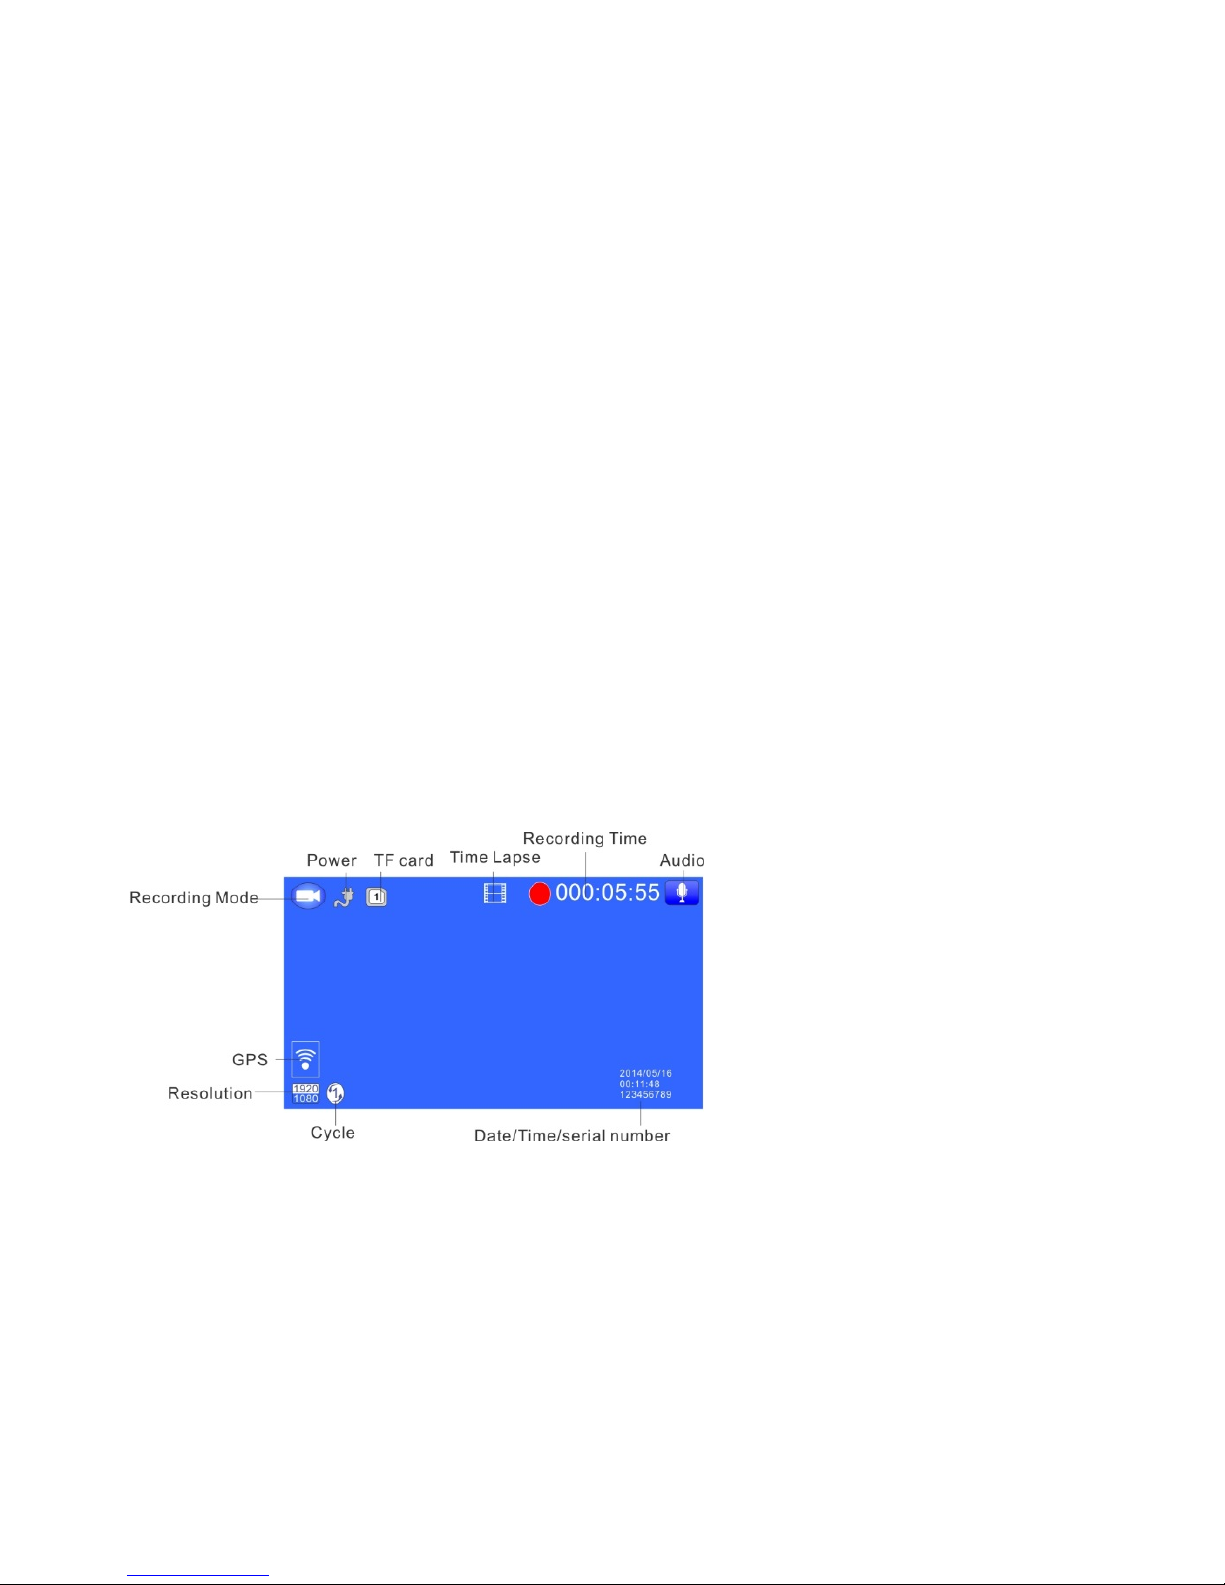
Short press mode button to switch to video mode, there is a video recording icon shown on
the top left corner of the LCD; short press OK button to start recording, the red video
indication light start to flash, that is the DVR is under recording, short press OK button
again to stop recording.
Video process: Power on——enter vid eo mode——short press REC button to record——
short press REC button again to stop recording.
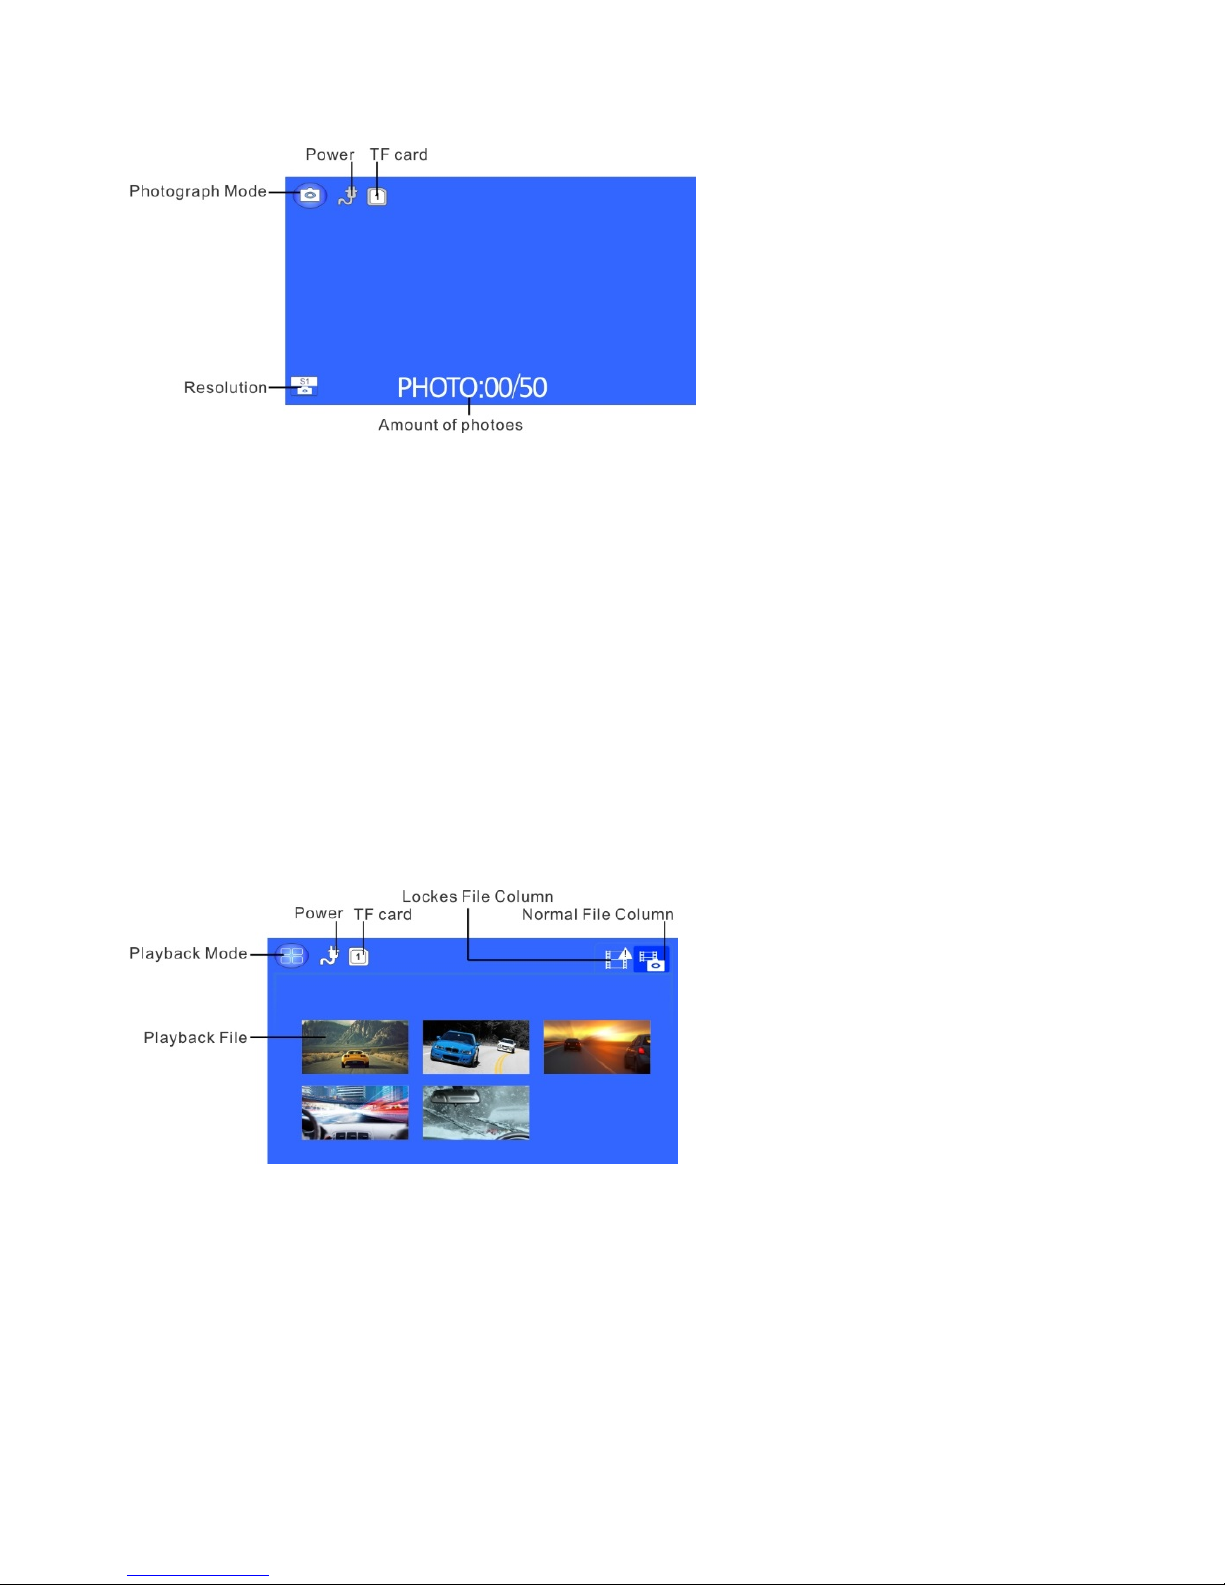
Photo Mode:
Short press MODE button to switch to photo mode, there is a photo shooting icon shown
on the top left corner of the LCD, short press OK button to shooting, when photography is
finished, the LCD will be flash one time.
Attention
:
1. Under the video status, press MODE button to screen shot the current
video; first stop recording, then press MODE button one time to switch the photograph
mode; 2. This machine is limited only for 50 photos, and can’t take photos when over 50.
Photograph process: Power on——enter video mode——press MODE button to switch
Page 5
- 5 -
the photograph mode——press OK button to make photos.
Video/Photo Playback
Short press MODE button twice to switch playback mode, the playback icon will be shown
on the LCD top left corner:
1. Short press up/down button to selecting the file section(locked section/ regular file
section);
2. Short press OK button to enter the playback section, then short press up/down button
to selecting the file, press OK button again to enter single file playback(press OK button
again to start playback the video)
Attention
:
Under the video status, press MODE button to screenshot the current video;
first stop recording, then press MODE button twice to switch the playback mode
Playback process: Power on——enter playba ck mod e——press MODE button twice to
switch the playback mode——press up/down button to enter the section and press OK
button to choose——press OK button to enter single file playback(press OK button again
to start playback the video)
E
:
Menu Setting Instruction
Video setting
After power on enter the video mode, the video icon will be shown on the LCD top left
corner: short press MENU button one time to switch the video setting, the video icon will be
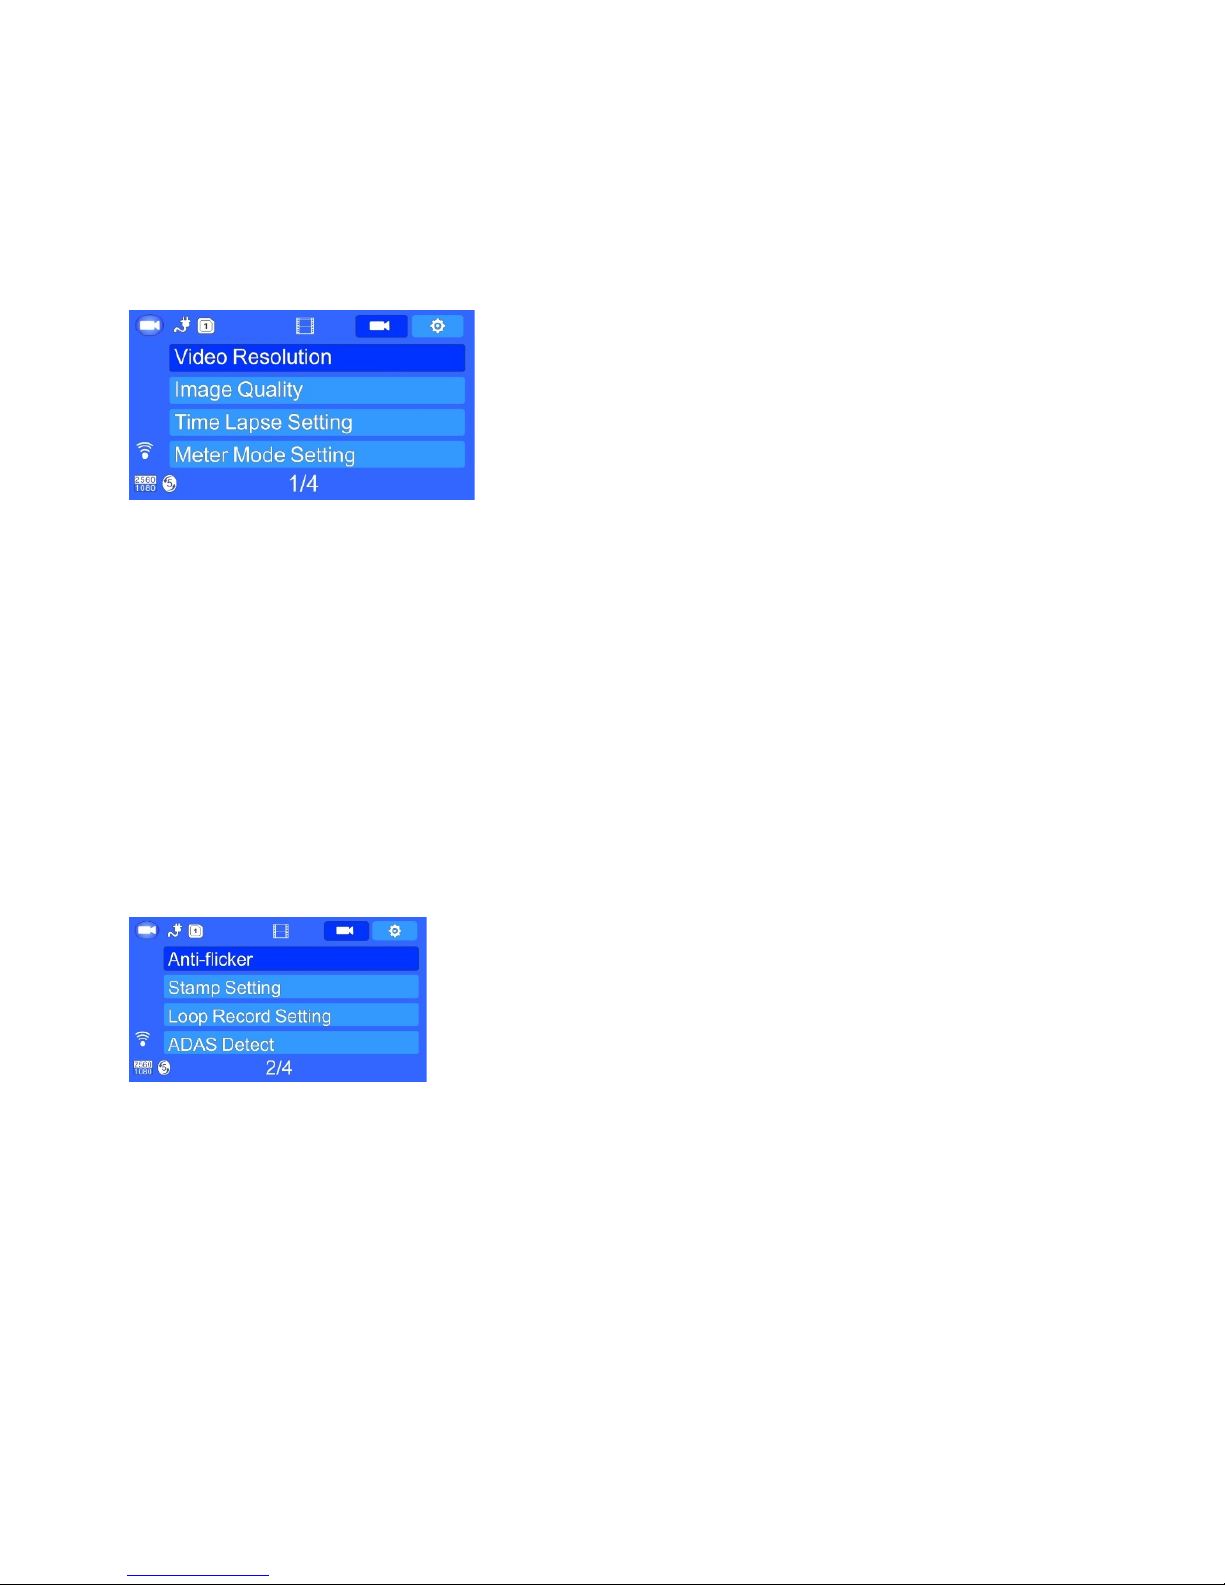
shown on the LCD top right corner: there are 4 setting options at the first page( Video
resolution, Image quality, Time Lapse Setting, Meter mode setting); there are 4 setting
options at the second page(Anti-flicker, Stamp setting, Loop Record Setting, ADAS
Detect):there are 4 setting options at the third page(ADAS Calibration ,G-sensor,
Motion detection, MIC);there is 1 setting option at the forth page(Park Mode);short
Page 6
- 6 -
press up/down to switch the setting options, short press OK button to enter the setting,
short press up/down button to modify the setting, and sh ort press OK butto n to conf ir m the
modification.
Attention
:
Under the video status no any use to press MENU button, first stop recording, then press
MENU button again to switch the video mode
Video resolution
Chipset A7LA50
:
Six modes:2560×1080 30P 21:9/2304×1296 30P 16:9 /192 0×1080
30P 16:9/HDR 1920×1080 30P 16:9/1280×720 60P 16:9/1280×720 30P 16:9
Image quality
:
Three effects:superior/good/general, the default is good, recommend the
default is superior;
Time Lapse Setting: off/0.2 seconds/1 seconds/5 seconds/30 seconds, the default is off
Time Lapse Setting means function of 1 second 1 shoot, also could extend shooting time,
support Park mode 0.2second means 1 second 5 photos, 1second means 1 second 1
photo, and s on
Intell igent M o de:If detect objects are moving ahead, entering video recording; when
detecting the recorded image keep static for 3minutes, then unit will stop recording, and turns
to time lapse recording (the default setting is 1 second 2 shoots).
Meter mode setting:Three modes:center/average/point, the default is center;
Anti-flicker
:
Three modes:Auto/60Hz/50 Hz (please set according to local frequency)
Stamp Setting
:
Three modes:date/time/vehicle driv er no. The default is off
Loop Record Setting
:
Three modes:1minute/3 minutes /5 minutes the default is 5
minutes
ADAS Detect
:
on/off the de fault is off. (Only suitable for chipset A7LA50/A7LA70)
ADAS include below 4 parts/functions:
LDWS - Lane Departure Warning system: when vehicle exceed white lines during
changing lanes, it will remind.
FCWS - Front Collision Warning system: when predict the dangerous driving it will remind
the driver 3 seconds before dangerous happens.
FCMD - Front vehicle Moving Detection: when the traffic red light turns green, and the front
vehicle moving, it will remind.
Page 7
- 7 -
LLWS - Low light Warning System: it will remind the driver when low light environment.
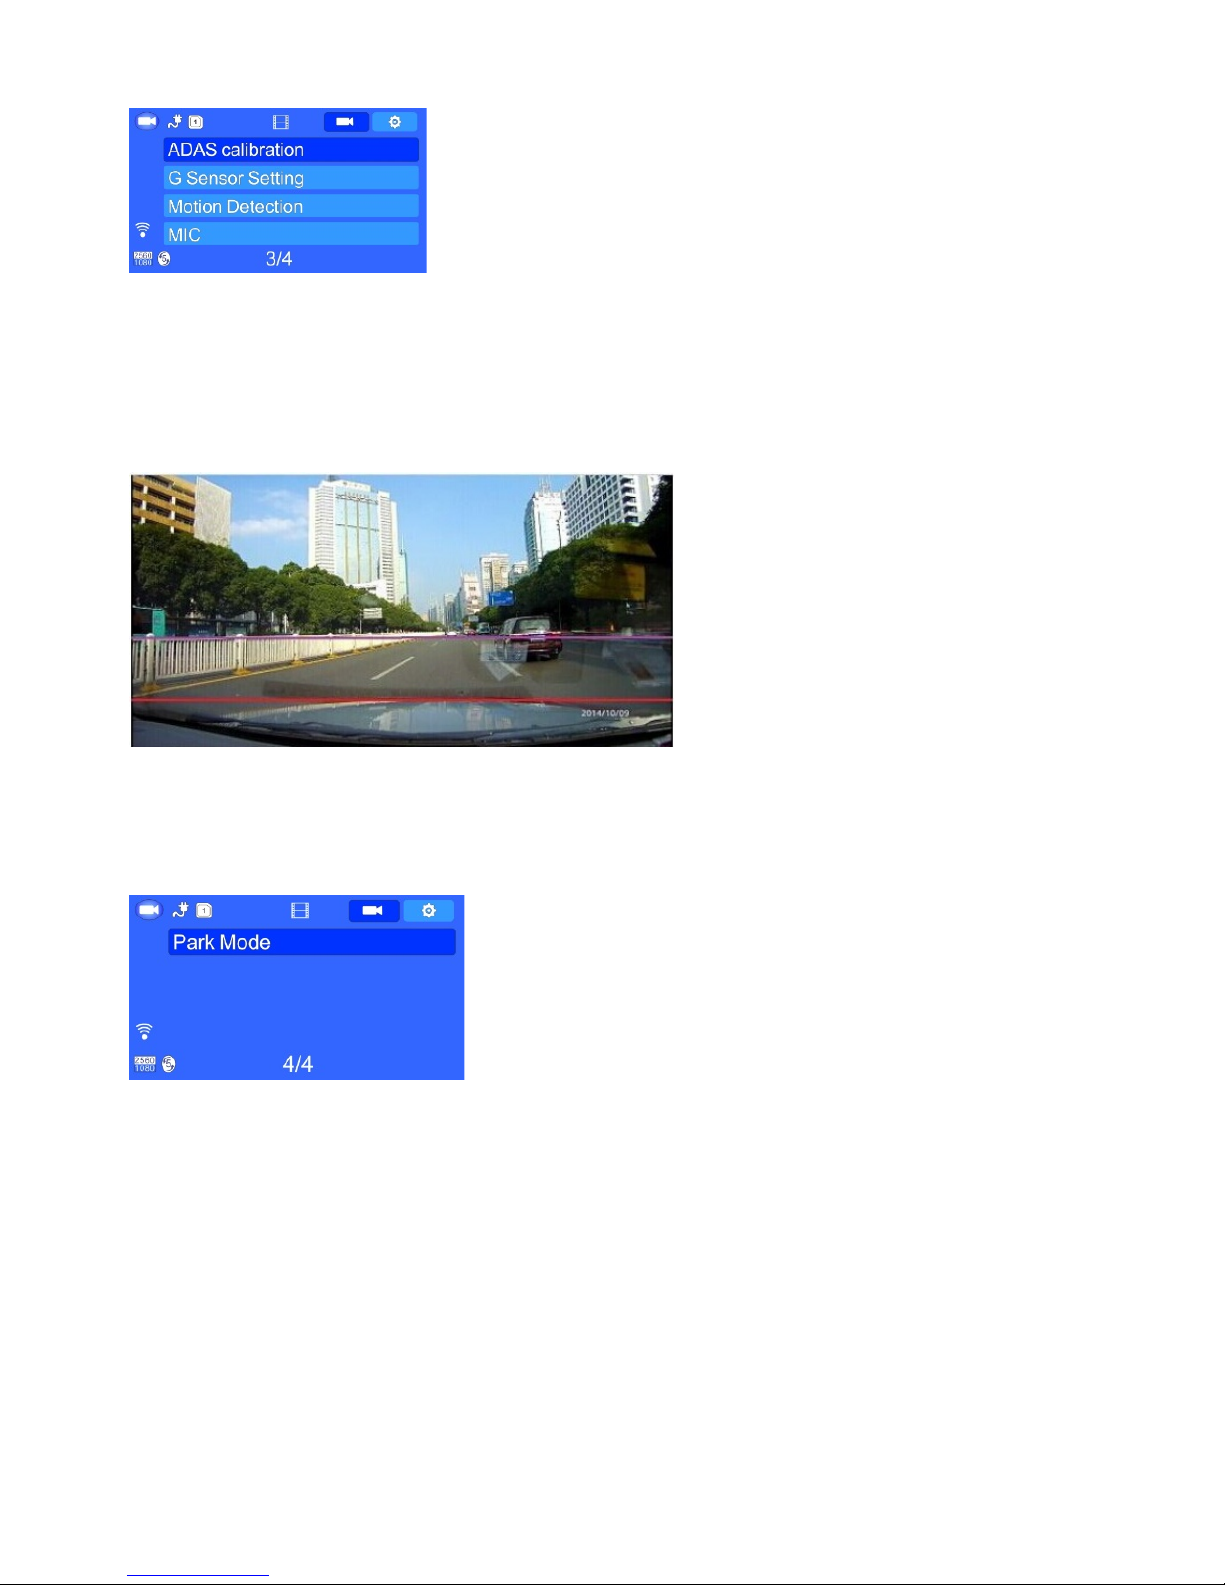
ADAS Calibration
:
show purple/red two lines, purple line represent the farthest line,
and red line represent the nearest line to vehicle headstock, DVR could distinguish
whether there's vehicle in front (FCWS) or whether the vehicle change lane
(LDWS)according to these two lines,。 So when open the ADAS setting, please set these
two lines firstly accordingly, press up/down button directly to adjust the purple line, press
MODE button then press up/down button to adjust the red lines.
G-sensor setting
:
Four modes:off/high/middle/low the default is middle,recommend
the default is middle。
Motion detection
:
on/off the default is off, recommend the default is off.
MIC
:
on/off the default is on, recommend the default is on.
Park Mode: on/off, the default is off (park mode requires permanent power)
System setting:
After power on enter the video mode, the video icon will be shown on the LCD top left
corner: short press MENU button twice to switch the system setting, the video icon will be
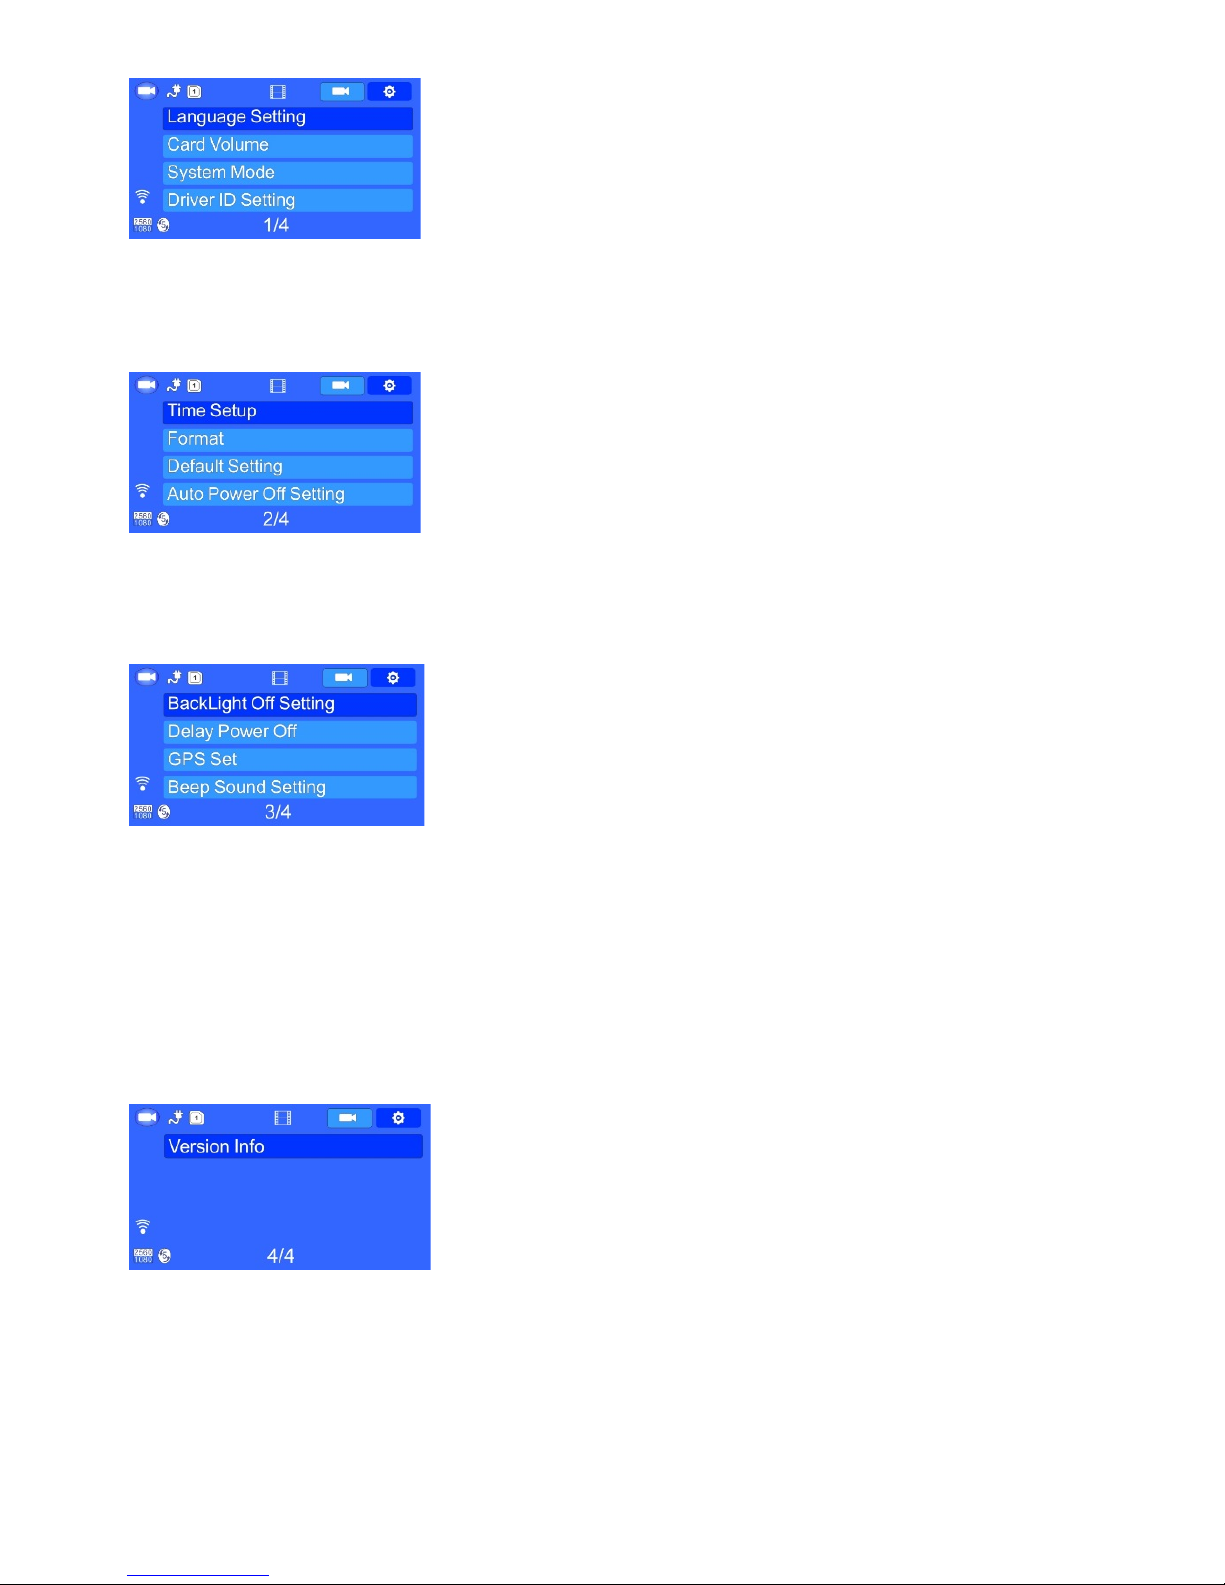
shown on the LCD top right corner: there are 4 setting options at the first page( Language
setting, Car Volume, System Mode, Drive ID Setting); there are 4 setting options at the
second page(Time setting, Format, Default setting, Auto Power off setting):there are 4
setting options at the third page(Backlight setting, Delay power off, GPS setting, Warning
tone setting); there are 2 setting options at the forth page ( Version information);short
press down button to switch the setting options, short press OK button to enter the setting,
short press up/down button to modify the sett ing, and sh ort pr ess OK butto n to confir m the
modification.
Attention
:
Under the video status no any use to press MENU button, first stop recording,
then press MENU button twice to switch the system setting
Page 8
- 8 -
Language setting
:
English//Simpl ifi ed Chi ne se/Traditional Chinese/Russian/Poli sh… et c
Card volume
:
Three modes:tot al cap acit y /usage /sur plu s
System mode
:
NTSC/PAL the default is PAL
Driver ID setting: set1-9 9 positions
Time setup:set year/month/date/time
Format
:
choose √ or ×,choose √ means format, choose × means no;
Default setting: choose √ or ×,choose √ means r ese t, choo se × means no;
Auto Power off setting
:
Four modes:off/1 minute / 3 minutes/5 minutes the default is off ;
Backlight Off setting
:
Four modes:of f/1 mi nute /3 min ute s/5 minutes the default is 3
minutes;
Without any buttons press operation for unit during the set time, the screen will off, but the
unit is still working.
Delay Power Off
:
Four modes:off /15 se cond s /30 sec ond s /1minute the default is 15
seconds;
GPS set
:
on/off(only for the unit with GPS function)
Beep sound setting
:
on/off the default is on;
Version info:view the version information;
Photograph setting
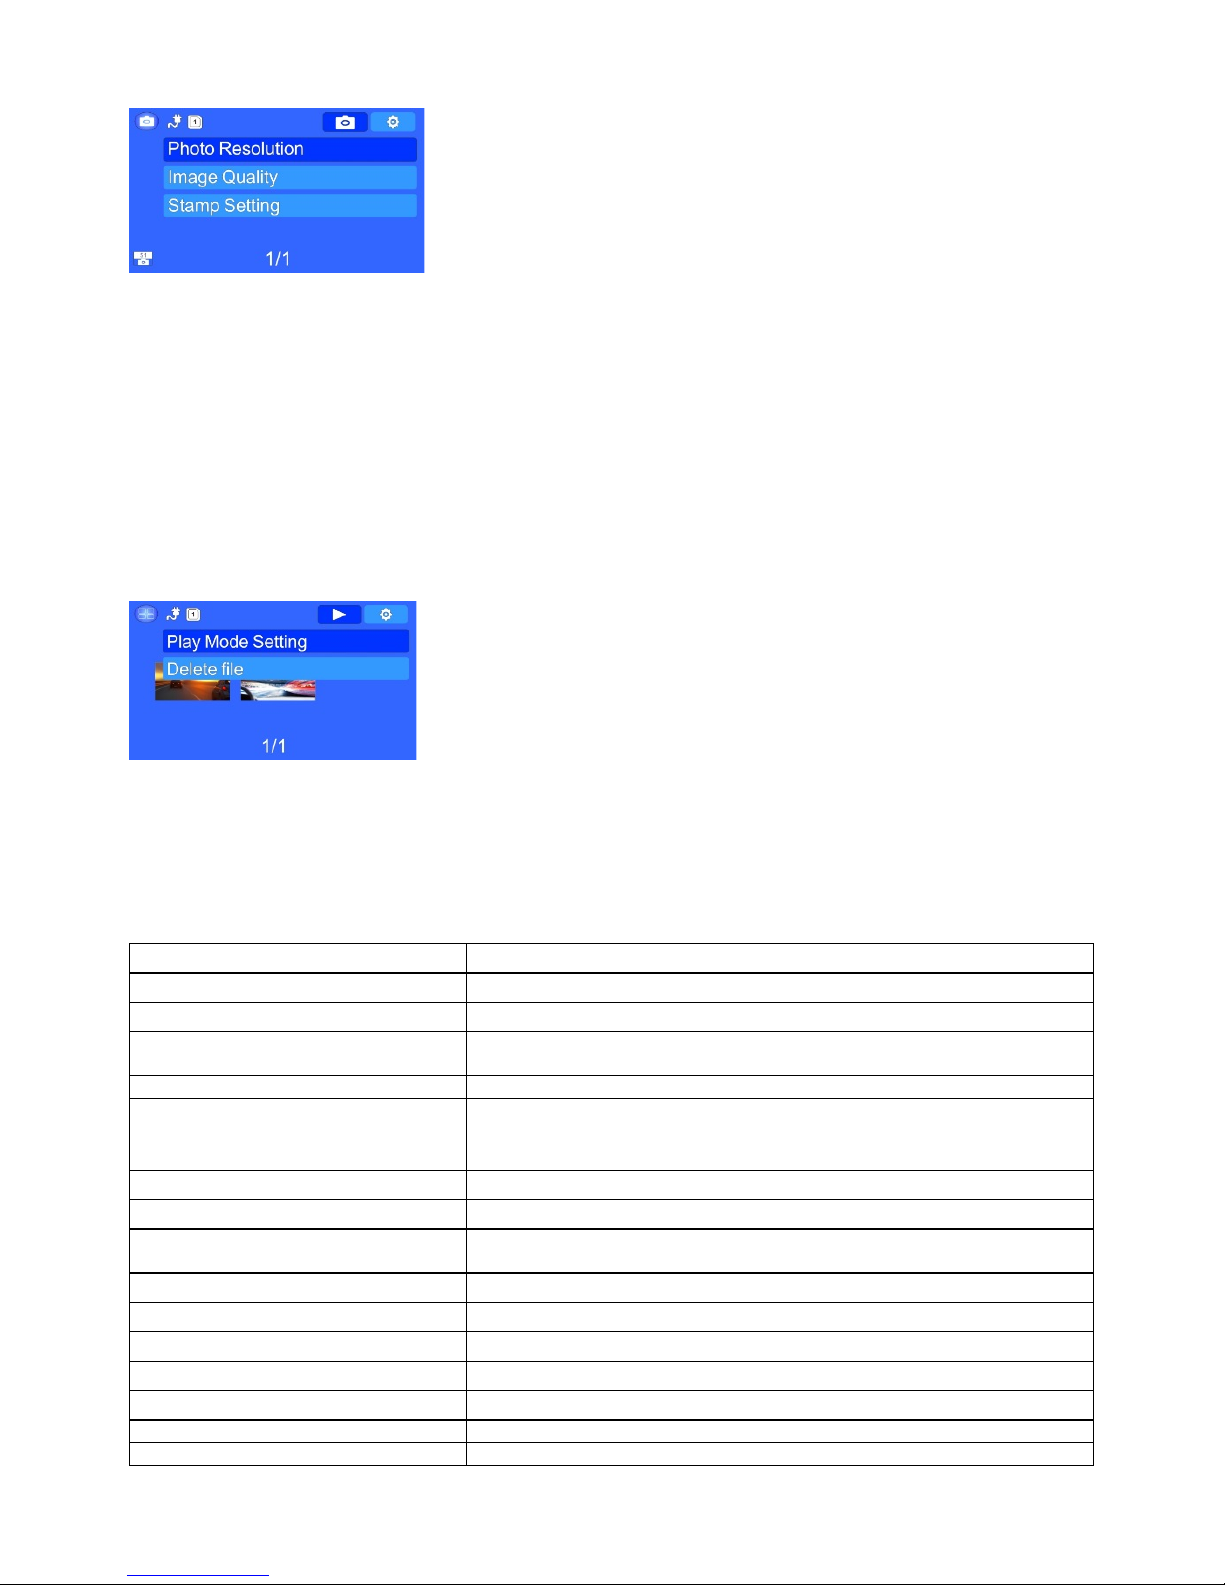
After power on, short press MODE button to switch the photograph mode, the photo icon
will be shown on the LCD top right corner: there are 3 setting options (Photo resolution,
Image quality, Image label setting); short press up/down button to switch the setting
options, short press OK button to enter the setting, short press up/down button to modify
Page 9
- 9 -
the setting, and short press OK button to confirm the modification.
Photo resolution
:
Three modes: 4M (2688×1512 16:9)/9M (4000×2250 16:9)/13M
(4800×2700 16:9) /16M(5312×2988 16:9) the default is 4M
Image quality
:
Three modes: superior/ good /general the default is superior
Stamp setting
:
Three modes:date/t ime /v ehi cle driv er no. The default is off
Playback setting
After power on, short press MODE button twice to switch the playback setting, the photo icon will be
shown on the LCD top right corner, press MENU button one time to enter setting, there are 2 setting
options (Play mode setting, Delete the file); short press up/down button to switch the setting options,
short press OK button to enter the setting, short press up/down button to modify the setting, and
short press OK button to confirm the modification.
Play mode setting:Four modes:play single/ play all / single loop / al l l oop the default is play
single
Delete file:Two modes:delete the current file/delete all fil es the default is dele te the current file
F. Product Specification:
Product Feature
HD Camera, Super HD Recording
LCD Size
2.7LTPS 16:9
Lens
178 Degree A+ HD ultra wide angle
Language
Russian/English/Simplified Chinese/Traditional
Chinese/Polish…etc.
Video Format
MOV.
Video Resolution
Six modes:2560×1080 30P 21:9/2304×1296 30P
16:9/1920×1080 30P 16:9/HDR 1920×1080 30P
16:9/1280×720 60P 16:9/1280×720 30P 16:9
Video Codec
H.264, Audio: AAC
Loop Recording
Support with seamless recording
Auto turn on/off while
vehicle power on/off
Support turn on while vehicle starts. And turn off while
vehicle shutdowns.
Year/Month/Day/Hour/Minute
Support
Photo Resolution
16M/13M/9M/4M
Photo Format
JPEG
Memory card
TF (Max support 64GB)
MIC
Support
Speaker
Built in
TV Output
PAL/NTSC
Page 10
- 10 -
GPS
Optional(With GPS no AV, or With AV no GPS)
G-sensor
Built in
ADAS Function
LDWS,FCWS,FCMD,LLW(only apply to
A7LA50&A7LA70 chipse t)
Frequency
50HZ/60HZ
USB Function
1:Storage 2:Charging
Power Interface
5V 1.5A/1+5-
Battery
Built-in Li-ion Battery
Parking Mode
Support
1 second 1 shoot
Support
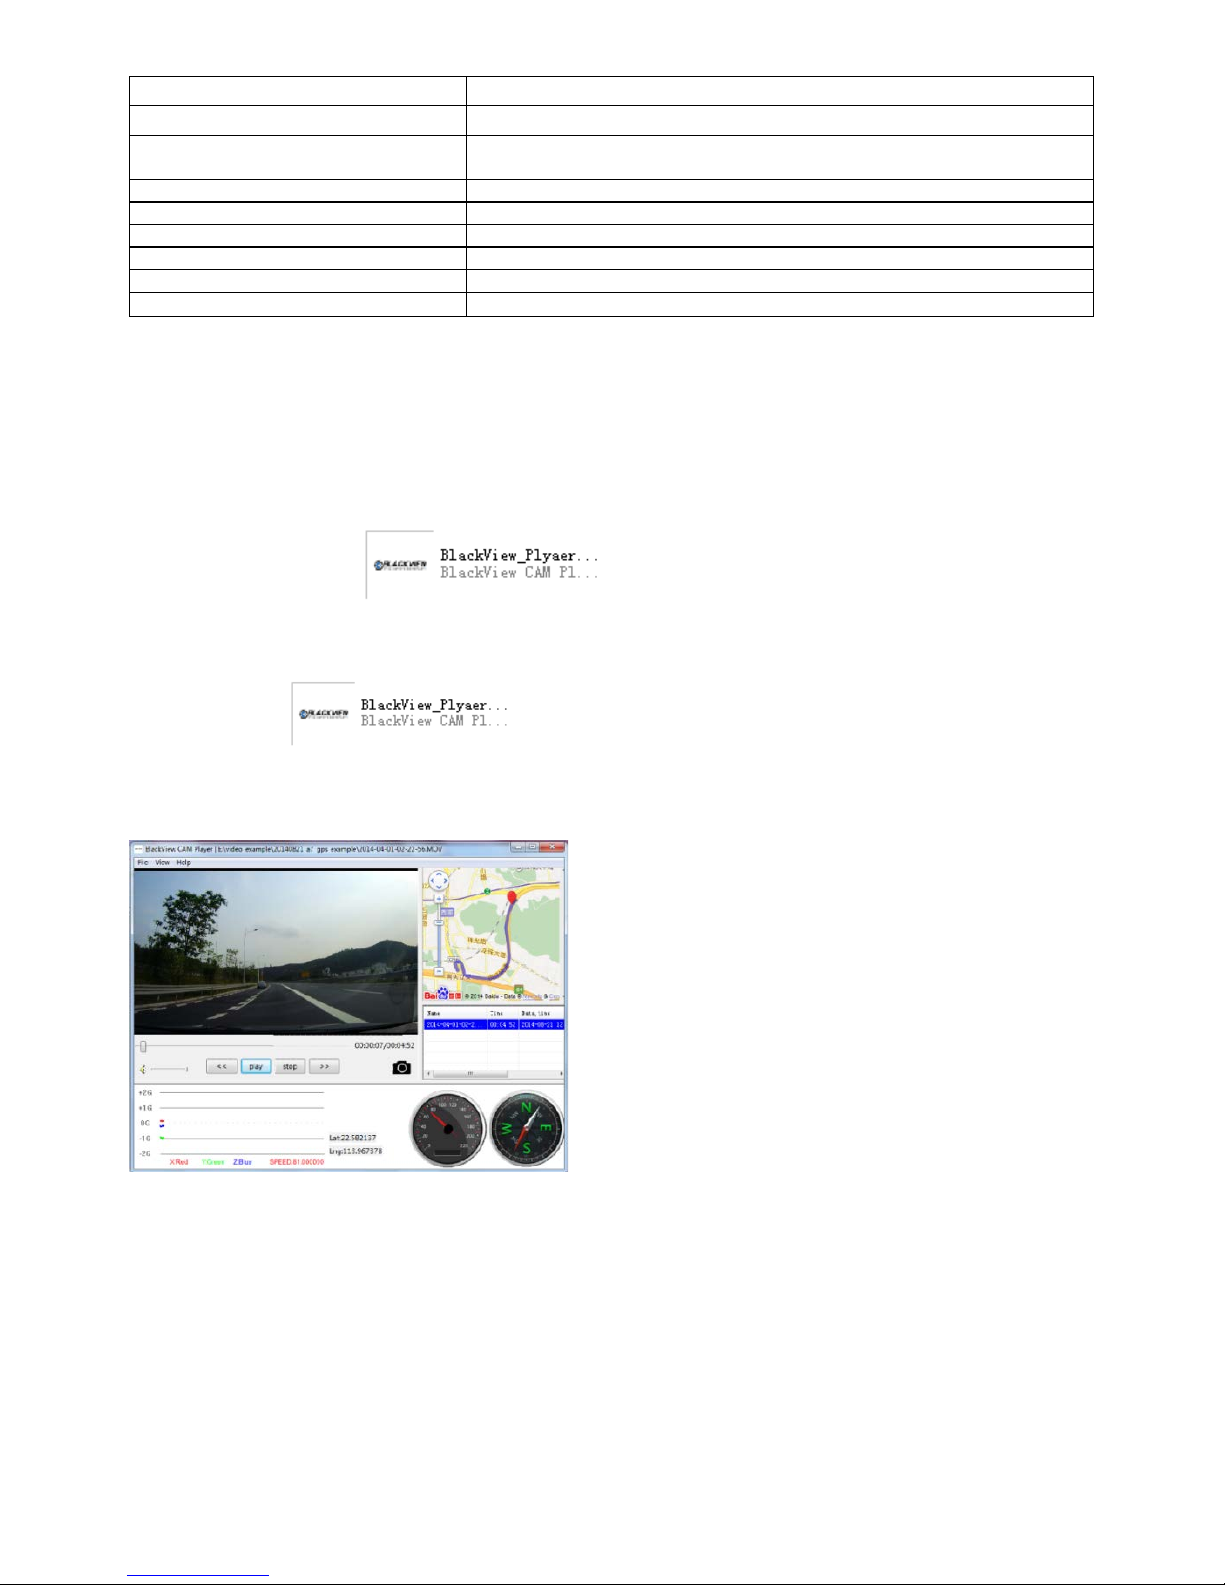
G.GPS player software Installation and Using Instruction (Only suitable for the
units with GPS function)
If need check the GPS information, the professional player must be installed firstly
1. Please install the file provided in the unit:
2. Please copy the file to computer and install.
Using the player software:
1. Please open and install it for the first use.
2. Click File –Open to choose the file which need play, and open the play mode directly, as
below
Page 11

- 11 -
H
.
Frequently A sked Questions
Under normal operating conditions, if there is problems with the device, please refer to the
following methods to solve.
Cannot take picture and record
Please check whether there is enough space for of TF card, or if it is locked.
Stopping automatically while recording
Due to the huge amount of HD video data, please use high-speed C10 TF card with SDHC
compatible, there will be the mark of C10 on the TF card.
There is “wrong file” shown on LCD when replay the photo/video
Uncompleted files because of TF card storage error, please format your TF card.
Fuzzy image
Please check if the lens stay with dirt, fingerprints, please cleaned lens with paper before
shooting.
Dark image when shooting the scene of sky or water
There will have an impact on the exposure when the big difference between the scenes.
Please adjust the “EV” in the menu setting.
The color is not good in the cloudy or indoor
Please check the “white balance” is Auto or not in the menu.
Horizontal stripes interference in the image,
This is due to the wrong setting of light frequency error, please set the frequency 60HZ or
50HZ according to the local power supply.
Hang off
Please reset to recover when device hangs off.
 Loading...