

Page 1
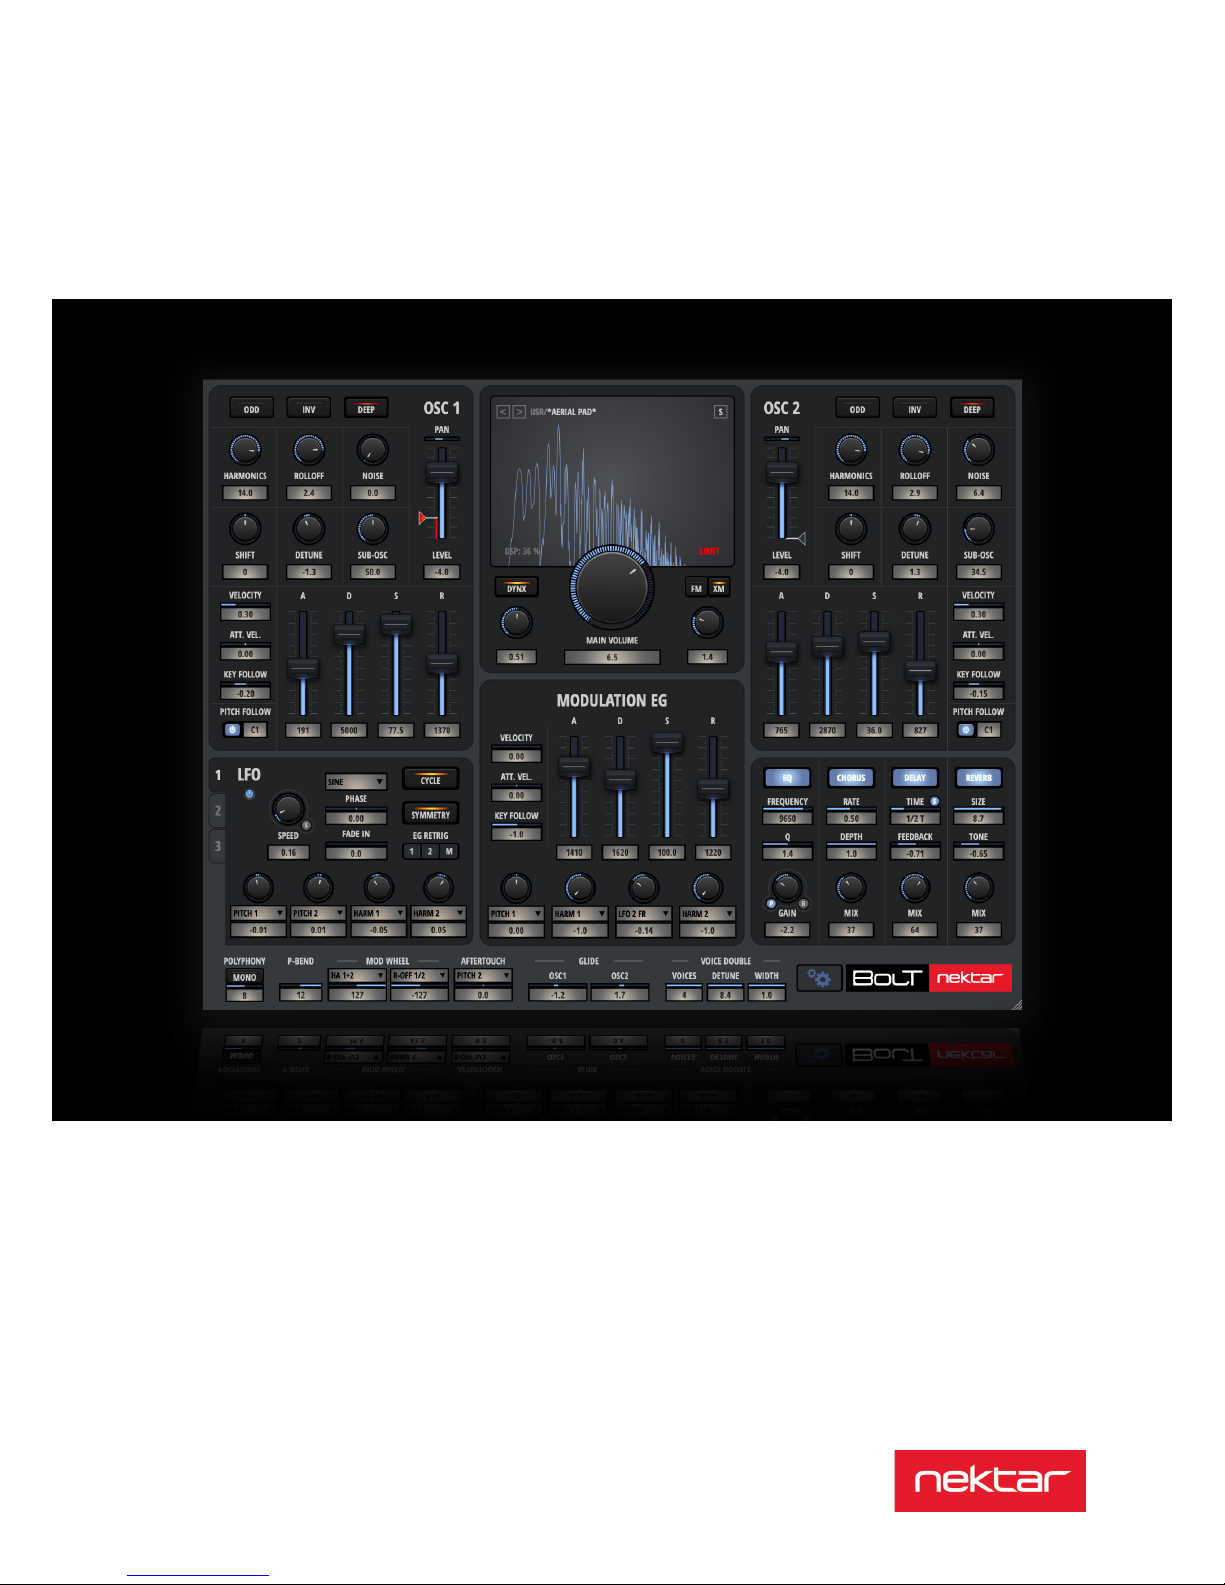
www.nektartech.com
User Guide
BOLT™
Harmonics Synthesizer
Page 2

2 Nektar Bolt User Guide www.nektartech.com
Content
Introduction 3
Welcome! 3
Bolt Features 3
Minimum System Requirements 3
Installation and Activation 4
Installation 4
Online Activation 5
Offline Activation 6
System Settings Dialog 7
CPU Performance Requirements and Audio Resolution 7
Getting Started – User Interface Controls 8
General Operation 9
Oscillator 9
LFO – Low Frequency Oscillator 12
Modulation Envelope 13
FX Section 14
General Parameters 15
Loading and Saving Patches 16
Factory Patches and Patch Selection 16
User Patches and Patch Saving 16
Share Patches with Host 17
Tutorial 18
Simple Saw Bass with one Oscillator 18
First XM-Experiments: Bolt‘s FM arsenal 19
Page 3

www.nektartech.com Nektar Bolt User Guide 3
Thank you for purchasing the Nektar Bolt Harmonics Synthesizer!
BOLT is the first of its kind and employs a new form of synthesis based on a concept by Professor Dr. Udo Zoelzer of Helmut Schmidt
University (HSU) in Hamburg, Germany – a scientist with decades of experience in digital signal processing. Originally, he came up with the
MSO-technology (multi sine oscillator) to synthesize voices, but once we heard it, we just had to join in and help develop this into a fullblown synthesis engine.
The potential of this slightly different take on synthesis intrigued us: It is kind of additive synthesis ... and it isn’t! What’s more, unlike
most known additive approaches it is extremely easy to use. Just by turning one knob, you can change the sound from subtle sines to
overtone-rich waveforms. And a traditional filter section is not required either, it all happens directly in the oscillator. “Typical” filter-like
sounds are created by modulating the Harmonics and Rolloff parameters. The resulting sounds are very organic and give BOLT its own
sonic character. Apart from standard shapes such as sine, saw or square, this synthesis is also capable of generating pulse chains or even
alternating shapes. And if you want to push the envelope further, engage cross modulation between oscillators which opens the door to
FM-like sounds and all sorts of fun mayhem.
We have labelled this tone generation “Harmonics Synthesis” and set out to shape the technology into an instrument that won’t require
you to have a PhD in sound design. Although the concept is new, we would like to bring back the spirit of those “olden times”, when
synthesizers were about turning knobs and simply experimenting: On those instruments you might not even know what a particular knob
does, but the results somehow almost always work. Many vintage mono-synths or the Roland Juno-60 are great examples for this interface
philosophy (not claiming that Bolt sounds like a Juno by the way – this is not an emulation of anything!). Apart from those classics’ obvious
sonic qualities, their secret lies in the limited number of controls. Yes – you’ve read that right: Reducing complexity is a feature! Cramming
tons of parameters for all kinds of eventualities into a piece of software is easy. Reducing them down to an essential set, less so.
Bolt sports a one window approach: What you see is what you get. No complex x/y-matrix tables staring at you, forcing you to assign
parameters before anything meaningful can happen. Also, we avoided “novelty” parameter naming: If you’ve ever worked with traditional
subtractive synthesis, you should feel right at home. So, without any further ado, give BOLT a spin: Select a preset and simply start “knobbing around”. Control the parameters from your MIDI controller for the ultimate tactile feeling – and boldly go wherever you want to. BOLT
was designed to feel like a musical instrument – and not like just another piece of technology. We hope, that we have succeeded – enjoy!
Specifications
• Harmonics Synthesizer with up to 16 voice polyphony
• 4 oscillators (2 main, 2 sub) + white noise generator per voice
• Unison Voice Double Mode with detune and stereo spread: Stack up to 4 instances
• Frequency Modulation (FM) of Oscillator 1 by dedicated sine oscillator
• X-Mod: cross-modulation of OSC1 from OSC2
• Overdrive stage for each oscillator
• ADSR envelope generator per oscillator
• 1 modulation envelope generator
• 3 LFOs with extended range up to 10 kHz, 13 waveforms and MIDI sync
• 4 modulation targets per modulation source (LFO 1-3, Mod EG)
• 4 FX processors: EQ, Chorus, Delay and Reverb
• Mono and Poly modes with adjustable glide
• Support for multiple sample rates
• Automatic 2-stage protection limiter
Minimum System Requirements
• Computer running Windows (64bit) version 7, 8, 10 or higher or a Mac with OS X 10.9 or higher.
• Any host DAW application with support for VST 2.4, VST 3 or AU Instrument Plug-Ins.
(All other requirements dependent on the DAW software / audio interface used, please consult the respective manuals for further details.)
Introduction
Page 4
4 Nektar Bolt User Guide www.nektartech.com
Installation
Install Bolt
There are two ways to authorize Bolt: If you have an internet connection, you can do it online – if your computer is not connected to the internet, you will have to go via a different computer to the user account on the Nektar Website and we’ll mail you the authorization key. You
may install Bolt on up to three machines. So after the 3rd activation, you will need to deactivate a machine in your Nektar user account
before you can authorize a new one. But let’s get the software installed first. Here’s how:
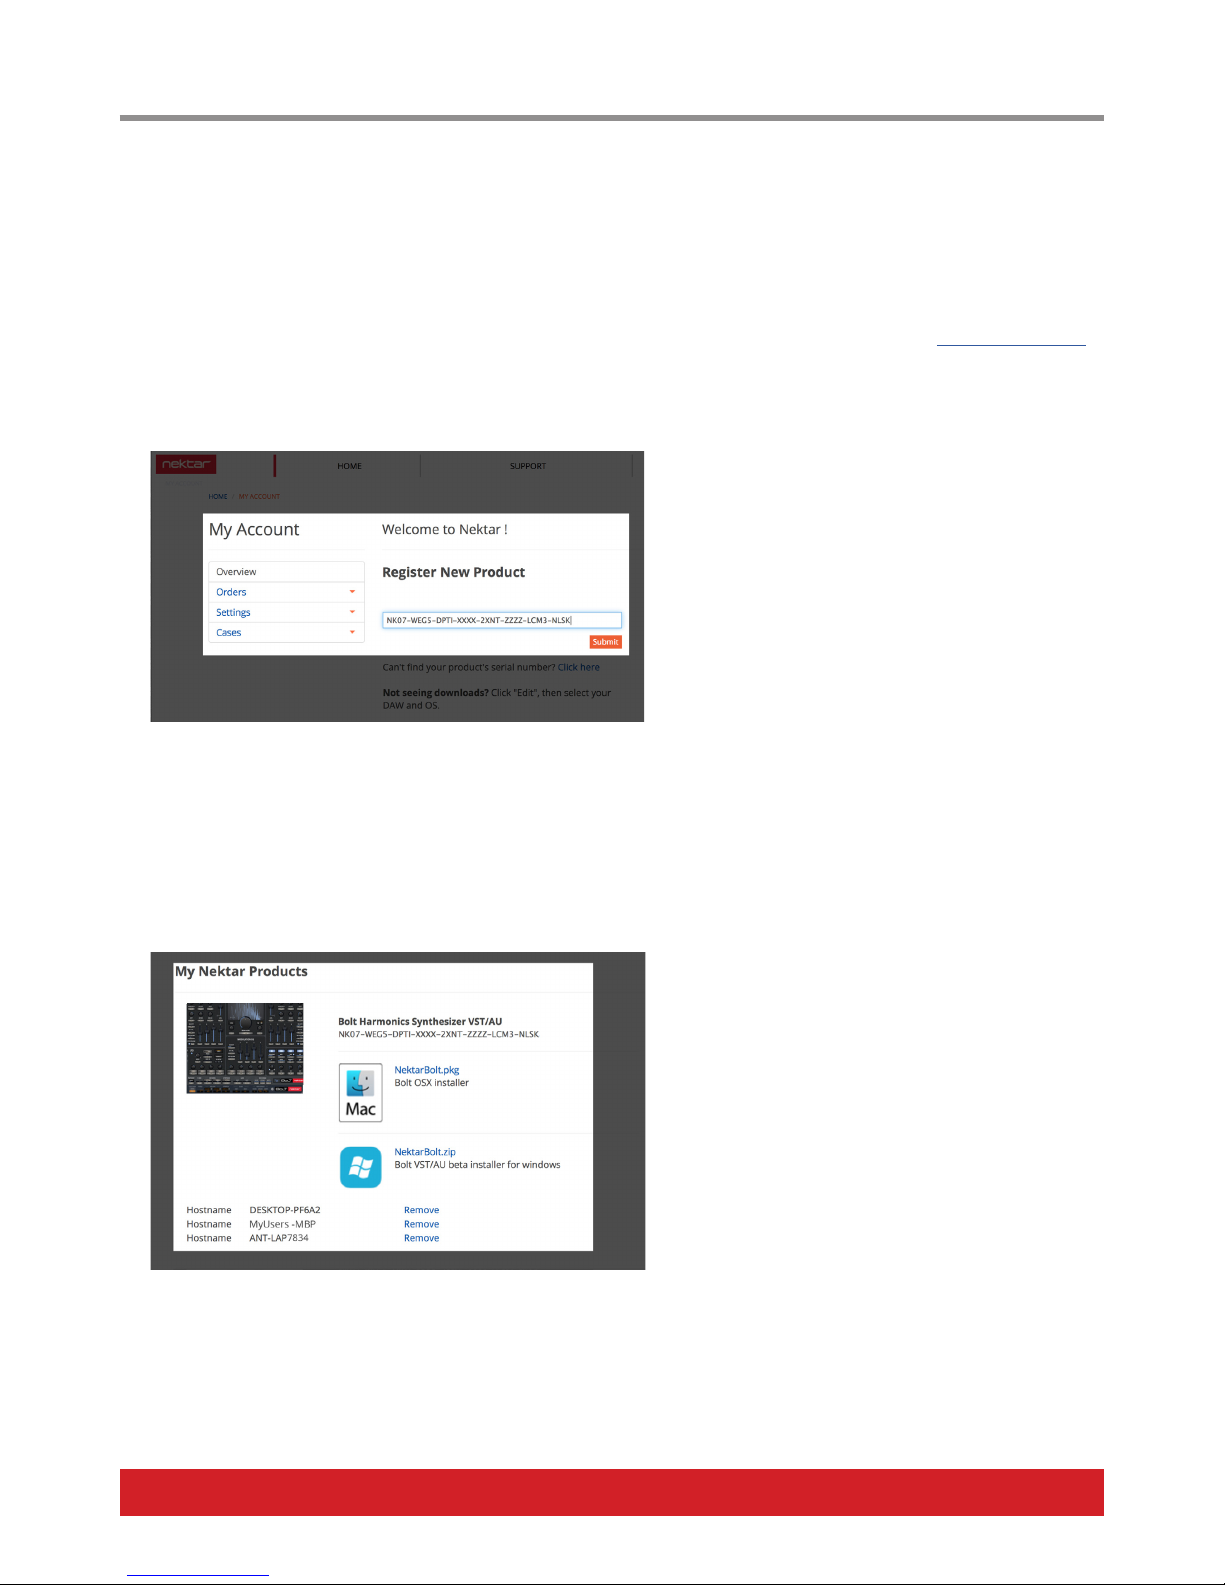
1. Register your Bolt serial number and download the latest version by logging into your Nektar Account at this link: www.nektartech.com
2. Type or paste the serial number you received when you purchased Bolt into the “Register New Product” field on your account’s overview
screen and click “Submit”
3. Now scroll further down to the “My Nektar Products” section on this page. With successful registration, the appropriate software
packages are automatically made available to you. Select the required installer package by clicking on its title.
On this screen you can also check which computers are activated for Bolt, as pictured in the screenshot above. To deactivate,
simply click “Remove”. The maximum number of activations is three. How you activate the software, is described on the next page.
4. Run the Installer and follow the on-screen instructions. If applicable, select the plugin format (VST 2.4, VST 3 or AU) you want to install
(default: all).
Page 5
www.nektartech.com Nektar Bolt User Guide 5
Activation
Online Activation
Bolt uses online activation. This means, that you need an active internet connection in order to authorize the plugin. This process is only
required once, after successful activation, Bolt will not need a connection to run. Here’s how you activate Bolt:
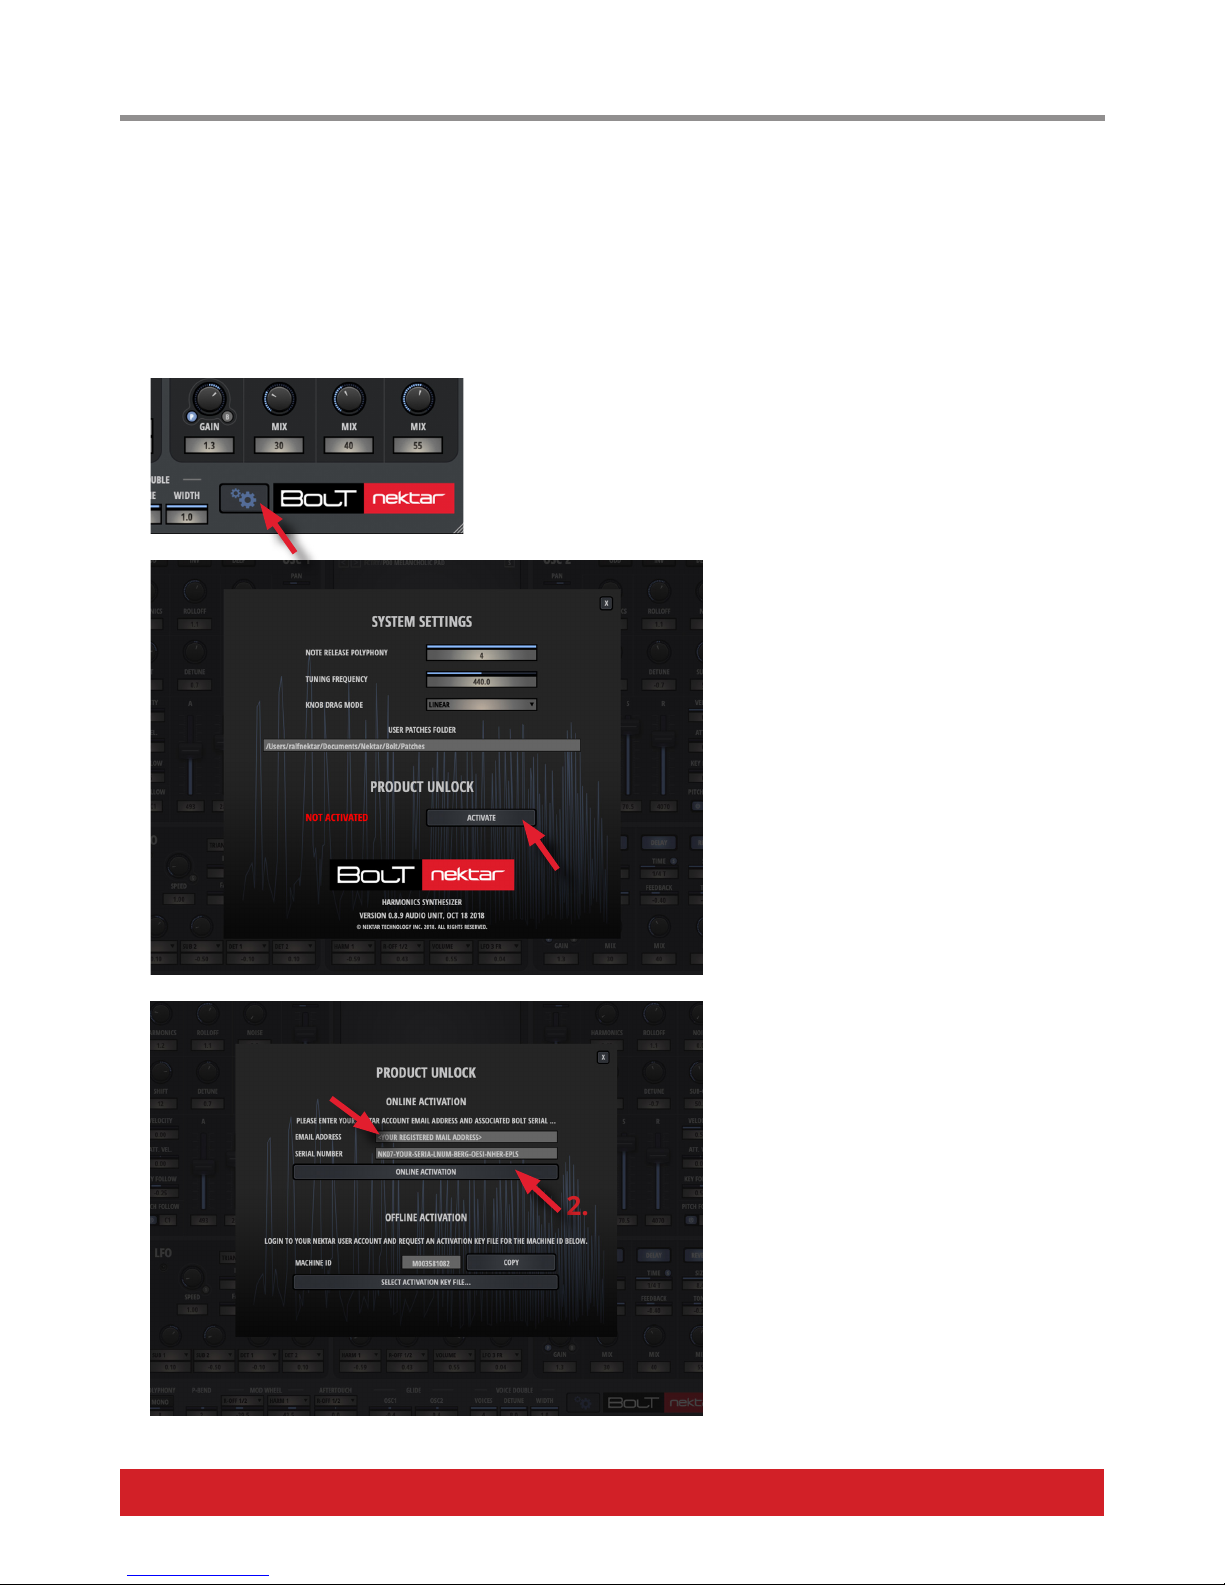
1. Open your DAW, load Bolt onto an instrument track and open the plugin window. How this is done, is described in your DAW’s manual.
2. Open the Setup dialog by clicking on the sprocket wheel next to the Bolt logo:
2. Click on “Activate”.This will open a new dialog.
IMPORTANT: You need an active internet connection
in order to activate the software.
3. Now enter the registered e-mail address into the
first and your serial number into the second field (1),
then click on “Online Activation” (2) to authorize your
product.
Please note, that you must register your serial
number at nektartech.com before you can activate
(see page 4).
1.
2.
Page 6
6 Nektar Bolt User Guide www.nektartech.com
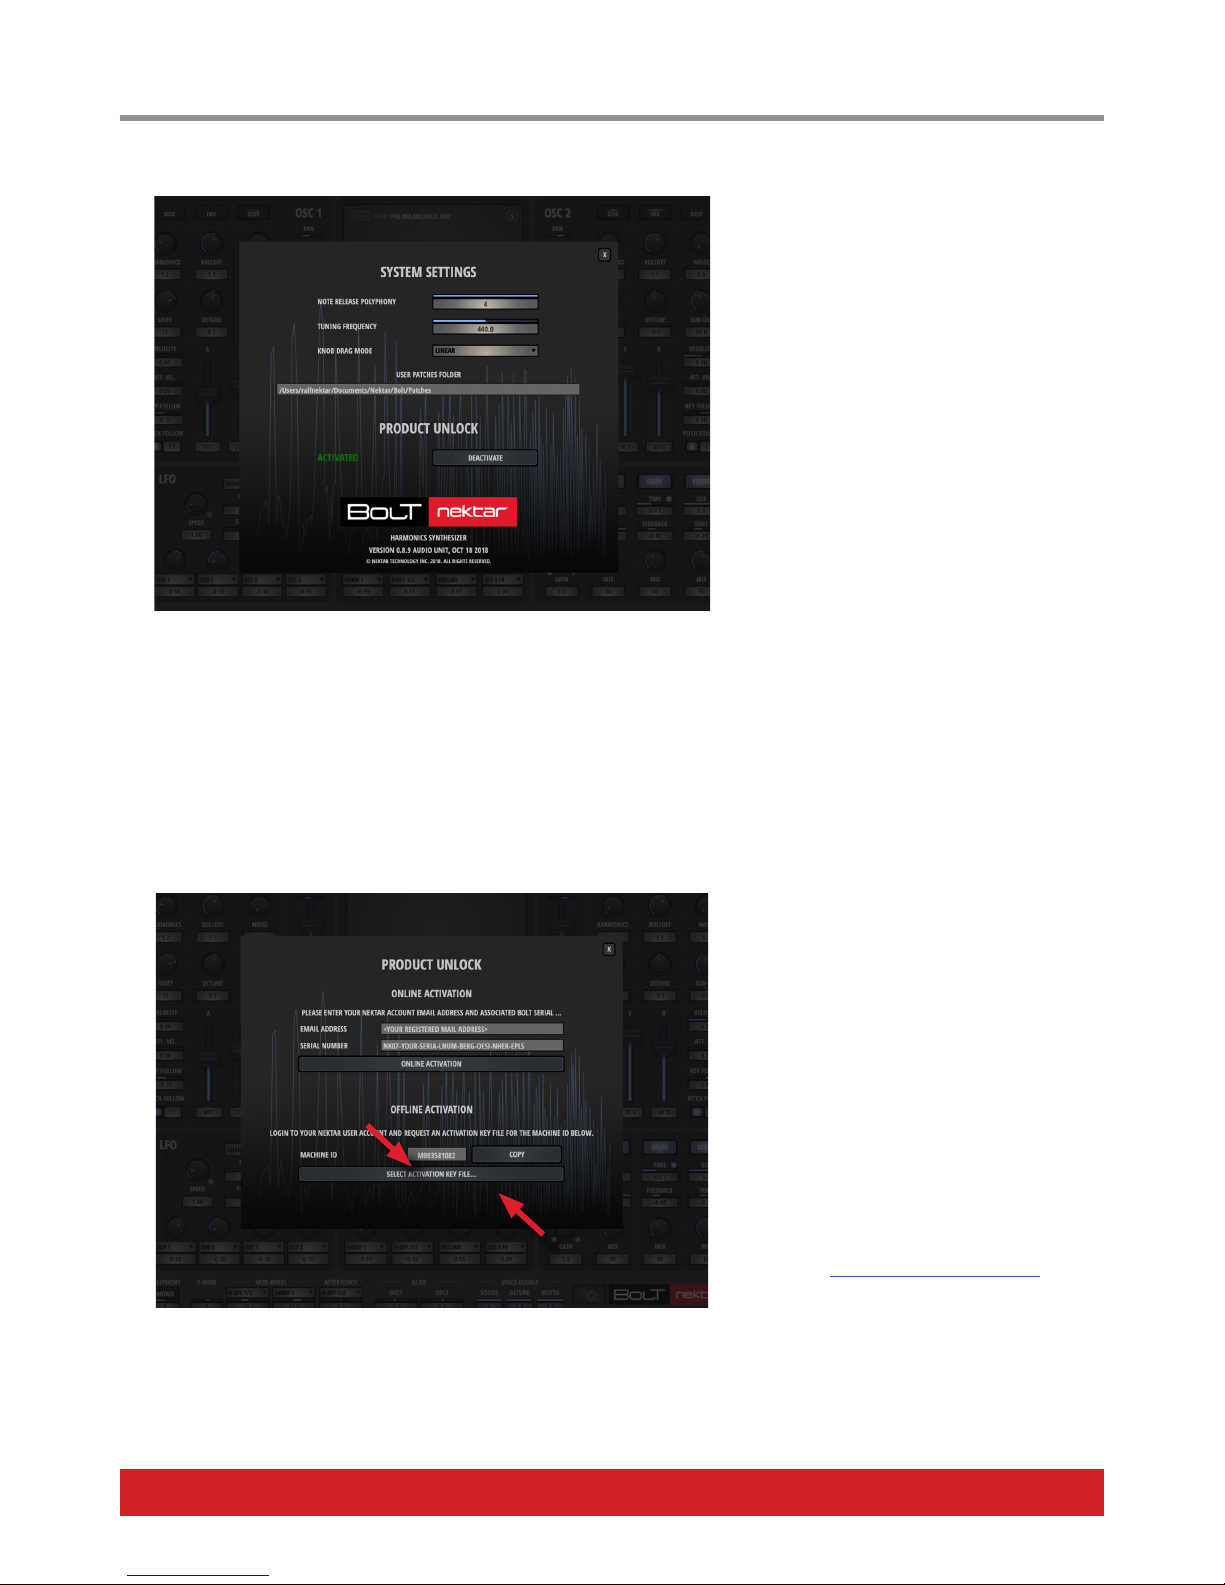
4. You are ready to use Bolt. The plugin is activated now - and the dialog should look just like the one below:
NUMBER OF ACTIVATIONS: Your Bolt license includes a maximum of 3 activations at the same time. Once you reach this limit, you will not
be able to activate additional copies. In your Nektar user account, you will see a list of the activated computers (as shown on page 4). Deactivate a Bolt authorization by clicking on “Remove” in your user account. This will allow you to free it up and move it to another computer.
Offline Activation
If you don’t have an internet connection on your computer, please copy the Machine ID from the lower half of the activation dialog (1) and
submit it to us with your serial number. We will then create a key-file for you, that you can use to activate Bolt.
You will receive an e-mail with your activation key
file. Simply load the file into Bolt by clicking on
“Select Activation File...” (2). Once loaded, Bolt will
be active. More detailed installation instructions will
be in our e-mail.
Please allow 24 hours response time during normal
business hours. We do recommend to use online
authorization, as it will be much faster for you.
If you have questions regarding the installation or
activation of your Nektar software, please look in
the FAQ section on our website or contact our support team at: www.nektartech.com/support
1.
2.
Activation
Page 7
www.nektartech.com Nektar Bolt User Guide 7
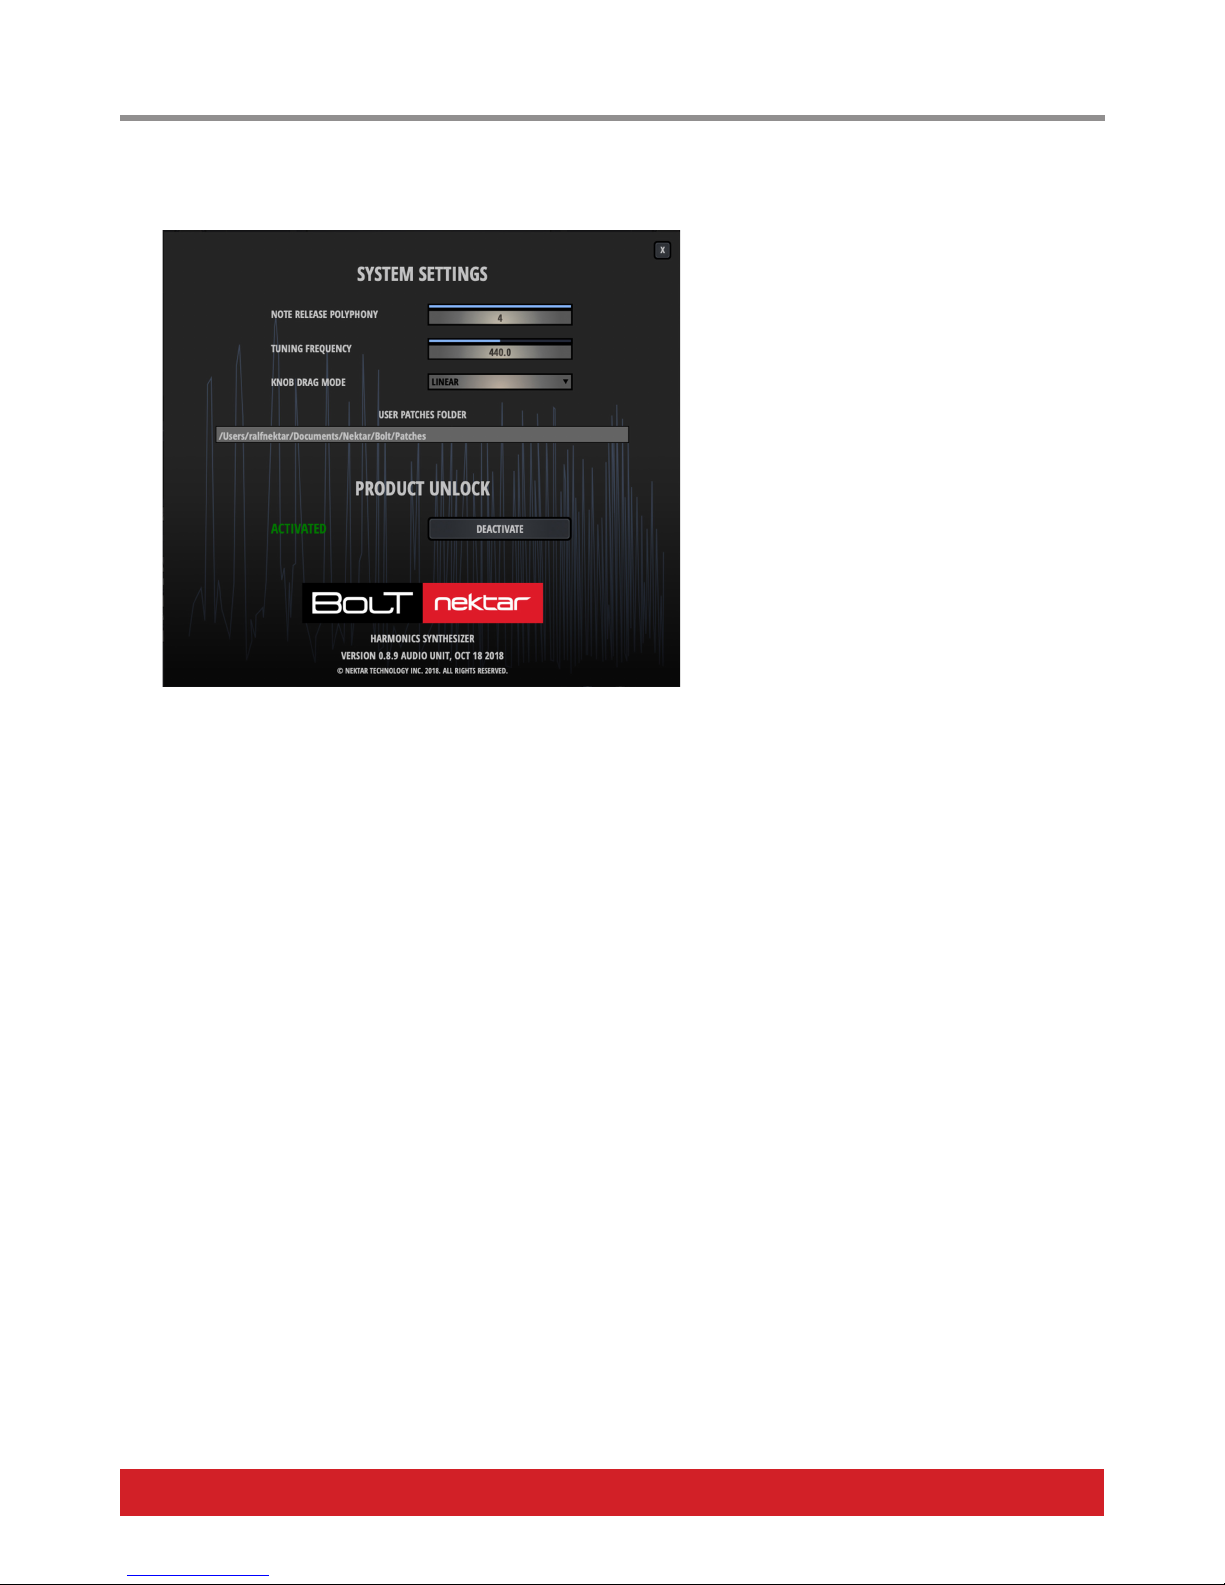
In Bolt’s System Settings dialog, you will find a couple of options that globally affect all active instances of the plugin (how to
open it is described on page 5). Apart from the activation, that we’ve explained on the previous pages, this is what you can edit:
Activation: Please see previous pages.
Note Release Polyphony: If you play the same note re-
peatedly on a sound with long release time, the release
phases might stack and hog performance unnecessarily. By adjusting the Release Polyphony, you can adjust
this overlap from 0 (note is cut off on next note repeat)
to 4 (up to 4 identical notes can decay according to their
set release phase while you play the next). Please note,
that increasing the voice count increases the performance requirements. The default setting is 4.
Tuning Frequency: Bolt’s tuning reference can be
changed from 430 to 450 Hz. Factory default is 440 Hz.
Knob Drag Mode: Set the knob behaviour to Linear or
Rotary. Rotary has the advantage, that the further you
get away from the control while adjusting, the finer you
can set the value. Linear is preferred by many, because
you simply need an up-and-down movement to change
a value. Factory default is Linear.
User Patches Folder: Choose your preferred user patches folder. This will make your patches available in Bolt’s Patch Browser for easy
selection. More details on page 16 “Loading and Saving Patches”.
Once you have edited a parameter, the change is confirmed and active. In the case you are running several instances of Bolt in your project, reload your project for the changes to take effect in all instances.
CPU Performance Requirements and Audio Resolution
Several parameters will affect and increase Bolt’s CPU requirements. In the following, we want to guide you through the most
important ones, as there is hardly ever “enough CPU performance” available.
Polyphony: Default is 10, maximum is 16 voices. If you set polyphony to maximum and have 5 instances open, 10 additional voices are
being processed. So this quickly adds up. You change polyphony in Bolt’s General Parameter section described on page 15. Polyphony
changes take effect immediately.
Voice Double: Also located in the General Parameters section, this feature provides unison and voice double effects. Mode 2 adds 2
instances for doubling, Mode 4 adds 4 instances: So in Mode 4 you are practically running 5 instances of Bolt! Setting changes take effect
immediately.
Modulation: The more modulation is going on, the more performance is required. So a sound with MOD EG and 3 LFOs modulating Bolt’s
oscillators will require more CPU than a “simple” sound running only one LFO.
Sample Rate: Bolt supports multiple sample rates. So you can get even higher fidelity by running your DAWs audio at 96 kHz, which will
also further reduce aliasing. Keep in mind, that this will increase the CPU-load at the same time. You change the sample rate in your DAW’s
setup or project preferences.
System Settings Dialog
Page 8
8 Nektar Bolt User Guide www.nektartech.com
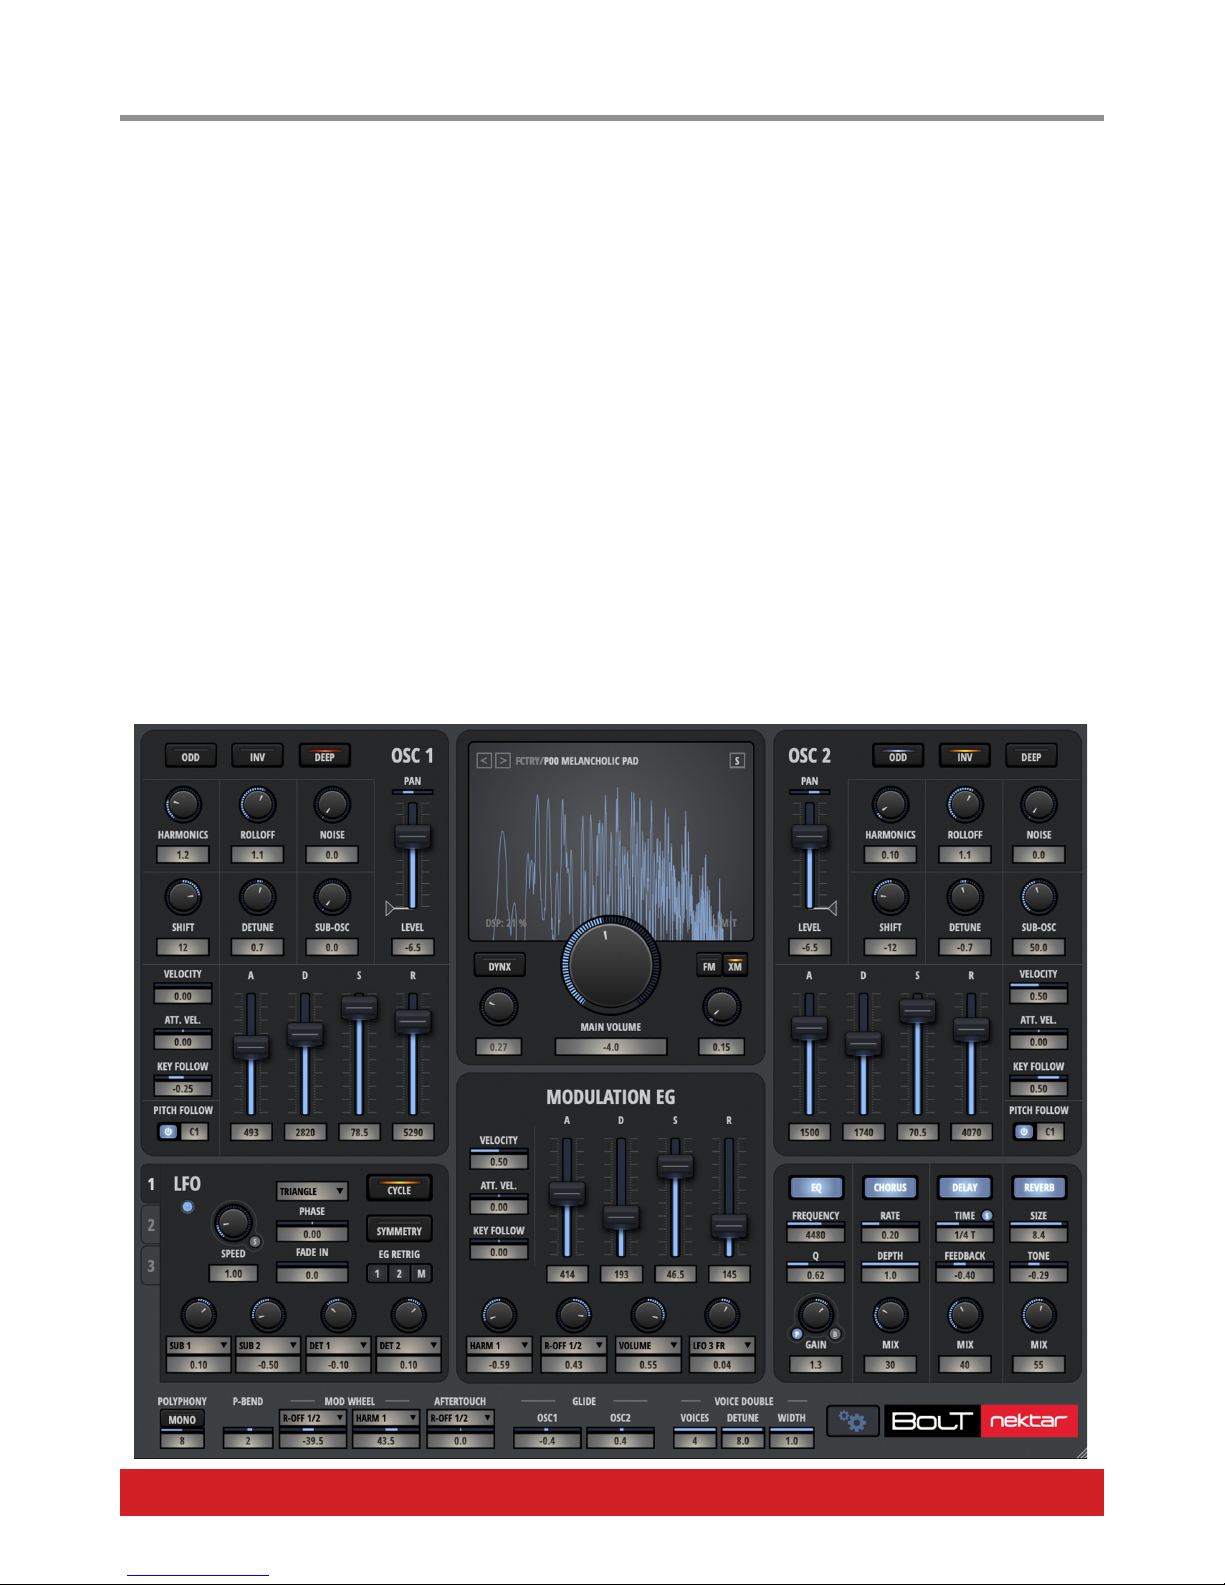
In this chapter we are taking you on a tour of Bolt’s user interface and explain what each control does. This manual assumes that
you are already familiar with synthesizer terminology. If not, there are many excellent books on the subject such as “Synthesizer
Technique” by Bob Moog or “The Synthesizer” by Mark Vail, just to name a few.
General Operation
Coarse and fine parameter adjustments: Simply grab a fader or knob by clicking and dragging with the mouse for coarse adjustments. A
second option for coarse adjustments is to hover over a knob or fader and scroll with the mouse wheel. For fine adjustments, hover over a
value field and adjust the value by clicking and dragging or scrolling up and down with the mouse wheel. Please note, that you can change
the knob behaviour from linear to rotary in the setup dialog (click on the sprocket wheel located next to the logo).
Direct parameter entry: If you prefer direct parameter entry, double-clicking on any of the value fields will allow you to do that.
Reset to Default value: Double-clicking on a fader, knob or label will invoke a default setting for that parameter. So if you’ve been too
daring, or quickly want to reset parameters such as Shift, Harmonics, ADSR or level – it’s just one double-click away!
Section Disable: Section headings double up as bypass buttons. If you want to quickly deactivate an LFO, Oscillator or Modulation EG, a
click on their heading will get you there without having to alter any settings.
OSC Parameter Link and Copy: If you hold down shift and click on a parameter in one of the Oscillators (or shift-click and drag), the corresponding parameter in the other Oscillator will take over the setting and follow. You can also shift-click on a parameter heading to set the
other Oscillator’s corresponding parameter to the same setting. This makes it very easy to align settings across Oscillators.
Getting Started: User Interface Controls
Page 9
www.nektartech.com Nektar Bolt User Guide 9
Oscillator
Each Oscillator includes its own ADSR-envelope and all parameters required to shape its sound, apart from modulation. So you
are able to create a solid foundation for a sound using just one oscillator. If you engage FM, Oscillator 1 will be modulated from
an independent sine oscillator for frequency modulation sounds. When you activate X-Mod, Oscillator 2 becomes the modulation
source for the first oscillator’s pitch, giving you access to more advanced frequency modulation options including shift, envelope,
level and velocity.
OSCILLATOR DISABLE – By clicking on an oscillator label (like “OSC 1”), you can bypass it. The parameters will grey out to show their inac-
tivity. This is helpful for fast A/B comparison of settings.
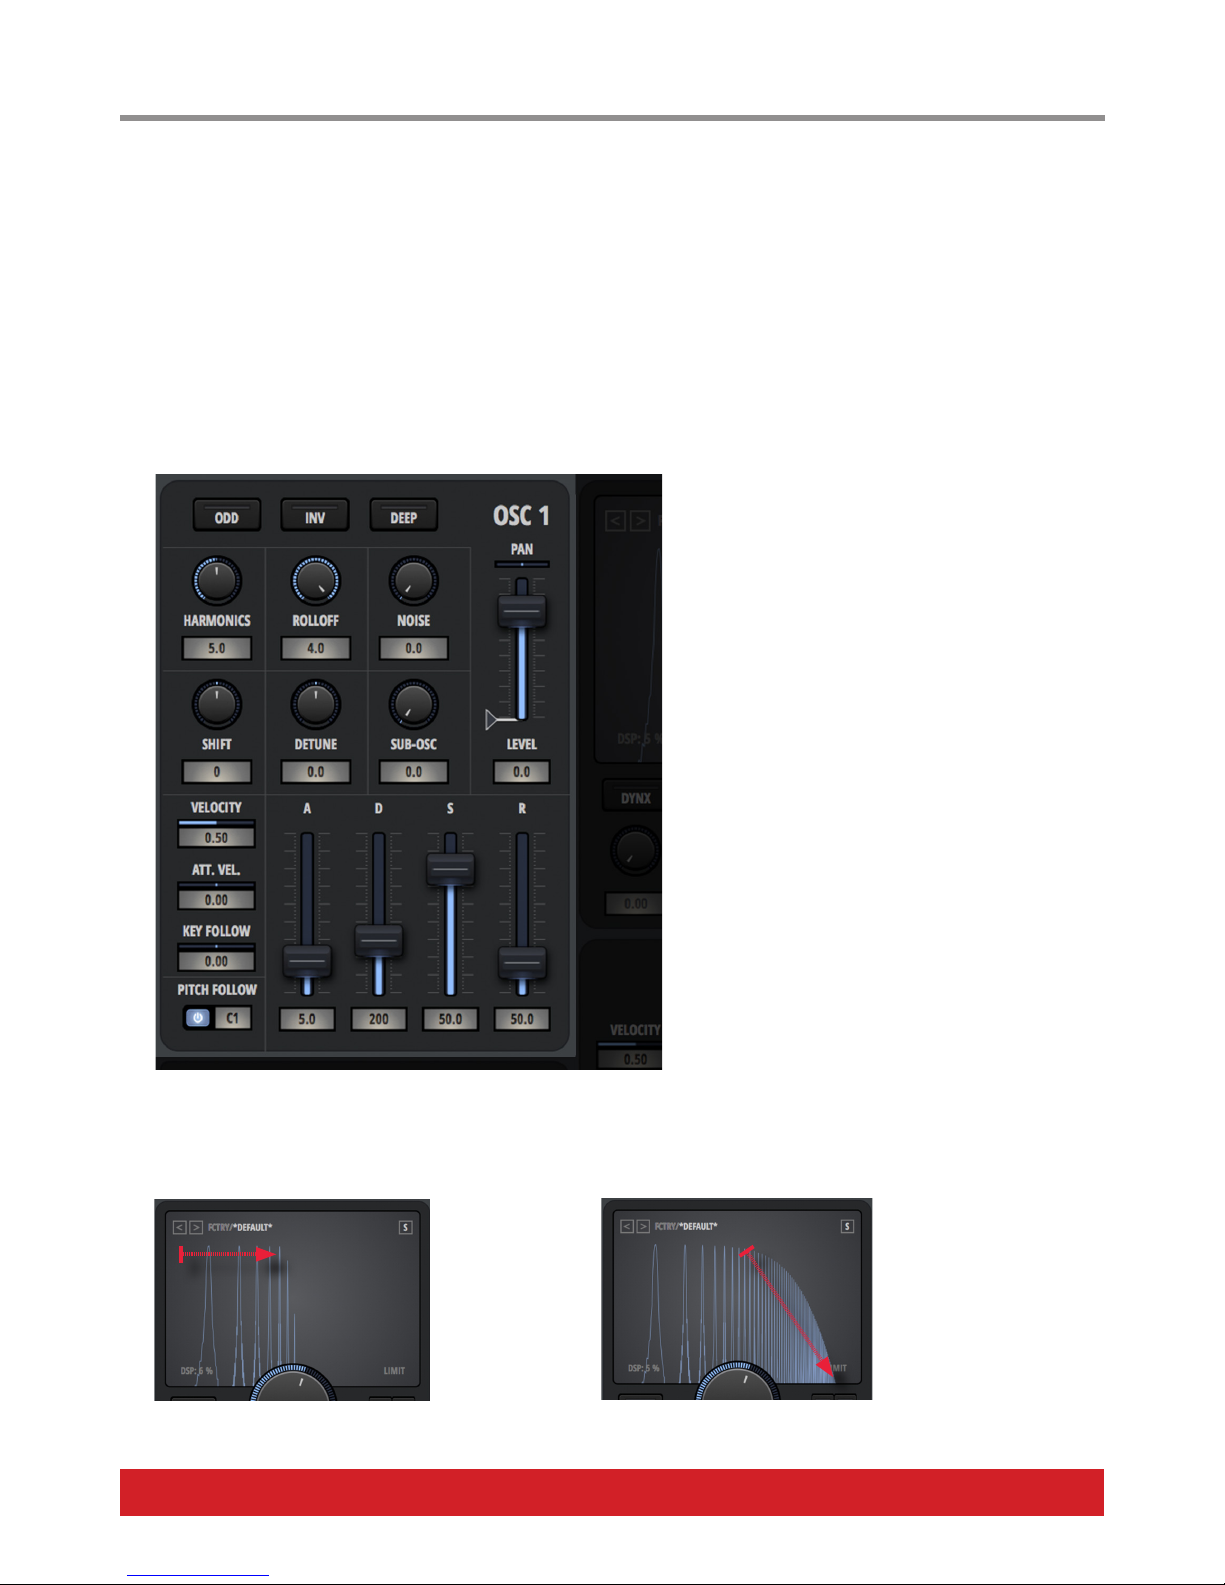
ODD – If you switch this on, the oscillator will generate odd harmonics only. If you additionally engage DEEP, the wave displayed in Bolt’s
oscilloscope display will look close to a square wave
shape.
INV – Inverts the oscillator output. Allows for interesting
phase cancellation effects when you set both oscillators to
identical settings and then modulate the settings on one
of them.
DEEP – This special filter boosts the low end, makes the
wave sound “softer” and shapes it to be more like a traditional sawtooth (ODD off) or square (ODD on) waveform
at higher HARMONICS amounts.
HARMONICS - Adjusts the oscillator’s harmonic content in
a range from 0 to 20. At 0, only the fundamental harmonic is audible, the further you turn this knob, the more
harmonics are being added. It sounds very similar to the
effect of a filter cutoff.
The ROLLOFF setting also has an effect on the harmonic
content of your waveform.
ROLLOFF – Controls the slope of the HARMONICS from
0.01 to 4.0. This parameter adds additional harmonics
above your set number of harmonics. Each added higher
ROLLOFF harmonic is added at a lower volume than the
previous one. The higher the ROLLOFF, the softer and
broader the resulting slope and the more harmonics are
being added towards the top end of the frequency spectrum. If you switch the waveform display to spectrum view (click on the display to
toggle), you will instantly see what’s going on as you turn the HARMONICS and ROLLOFF knobs:
HARMONICS (0 - 20) ROLLOFF (0.01 - 4.0)
User Interface Controls (cont.)
Page 10
10 Nektar Bolt User Guide www.nektartech.com
NOISE – Level Balance for the white noise generator: Turn it clockwise to add white noise to the oscillator or fully clockwise for noise only.
HARMONICS and ROLLOFF change the noise sound similar to that of a filter cutoff and resonance. When the Oscillator’s PITCH FOLLOW is
on, the noise filter follows the keyboard pitch. The Noise level may be modulated as a modulation target from the LFO and Modulation EG.
SHIFT – Shifts the Oscillator Pitch by +/- 36 semitones. Double-click resets it to zero.
DETUNE – Allows for oscillator detune from up to +/- 50 cents. Double-click resets it to zero.
SUB – Adds a sub oscillator one octave below the main oscillator’s pitch. The SUB’s settings are identical to your main oscillator settings.
However, you will notice a different behaviour when using DYNX: Without DYNX, the SUB will have less harmonics, if you activate DYNX,
the Sub “opens up” and sounds brighter.
PAN – Panning balance for the oscillator: Double-click for center position, or click and drag left and right for desired position. You can also
use the mouse wheel. The range goes from -1.0 (hard left) to 1.0 (hard right).
LEVEL – Adjusts the oscillator’s output gain from -40 dB to +6 dB. If the signal passes the clipping threshold of 0dB (digital scale), the automatic protection Limiter will engage and show up red in Bolt’s main display. At the bottom fader position, the oscillator output is muted
and the parameter display reads “MUTE”. Mute comes in handy when you use OSC 2 for XM modulation.
DRIVE – The little triangles left (respectively right) of an oscillator LEVEL fader add distortion to an oscillator’s signal. The range goes from 0
(distortion off, clean) to 60 (maximum distortion). When drive is active, the little triangle shines red - when it is deactivated, it is grey. Drive
emulates the behaviour of analogue harmonic distortion and saturation, resulting in a warmer, softer character. Hover over the triangle to
see the currently set value. Double-click to reset to zero.
ADSR Envelope – Provides the traditional envelope parameters A (Attack, 1 msec – 5 sec), D (Decay, 1 msec – 10 sec), S (Sustain, Level
0-100%) and R (Release, 1 msec – 10 sec). Attack Time and Level can be modulated in the Oscillator’s mod section. Key Follow can change
the Decay time dependent on the pitch.
Oscillator Modulation – The oscillator mod section provides Velocity modulation (0-1) to make the oscillator level velocity sensitive,
Attack Velocity modulation (+/- 1.00) for Attack time control using velocity and Key Follow for the envelope decay (+/- 1.00). Key Follow
is centered around C4 (MIDI Note 48), so you will hear no effect on that key. The further you move away from C4, the more audible the
alteration of the envelope’s decay time becomes.
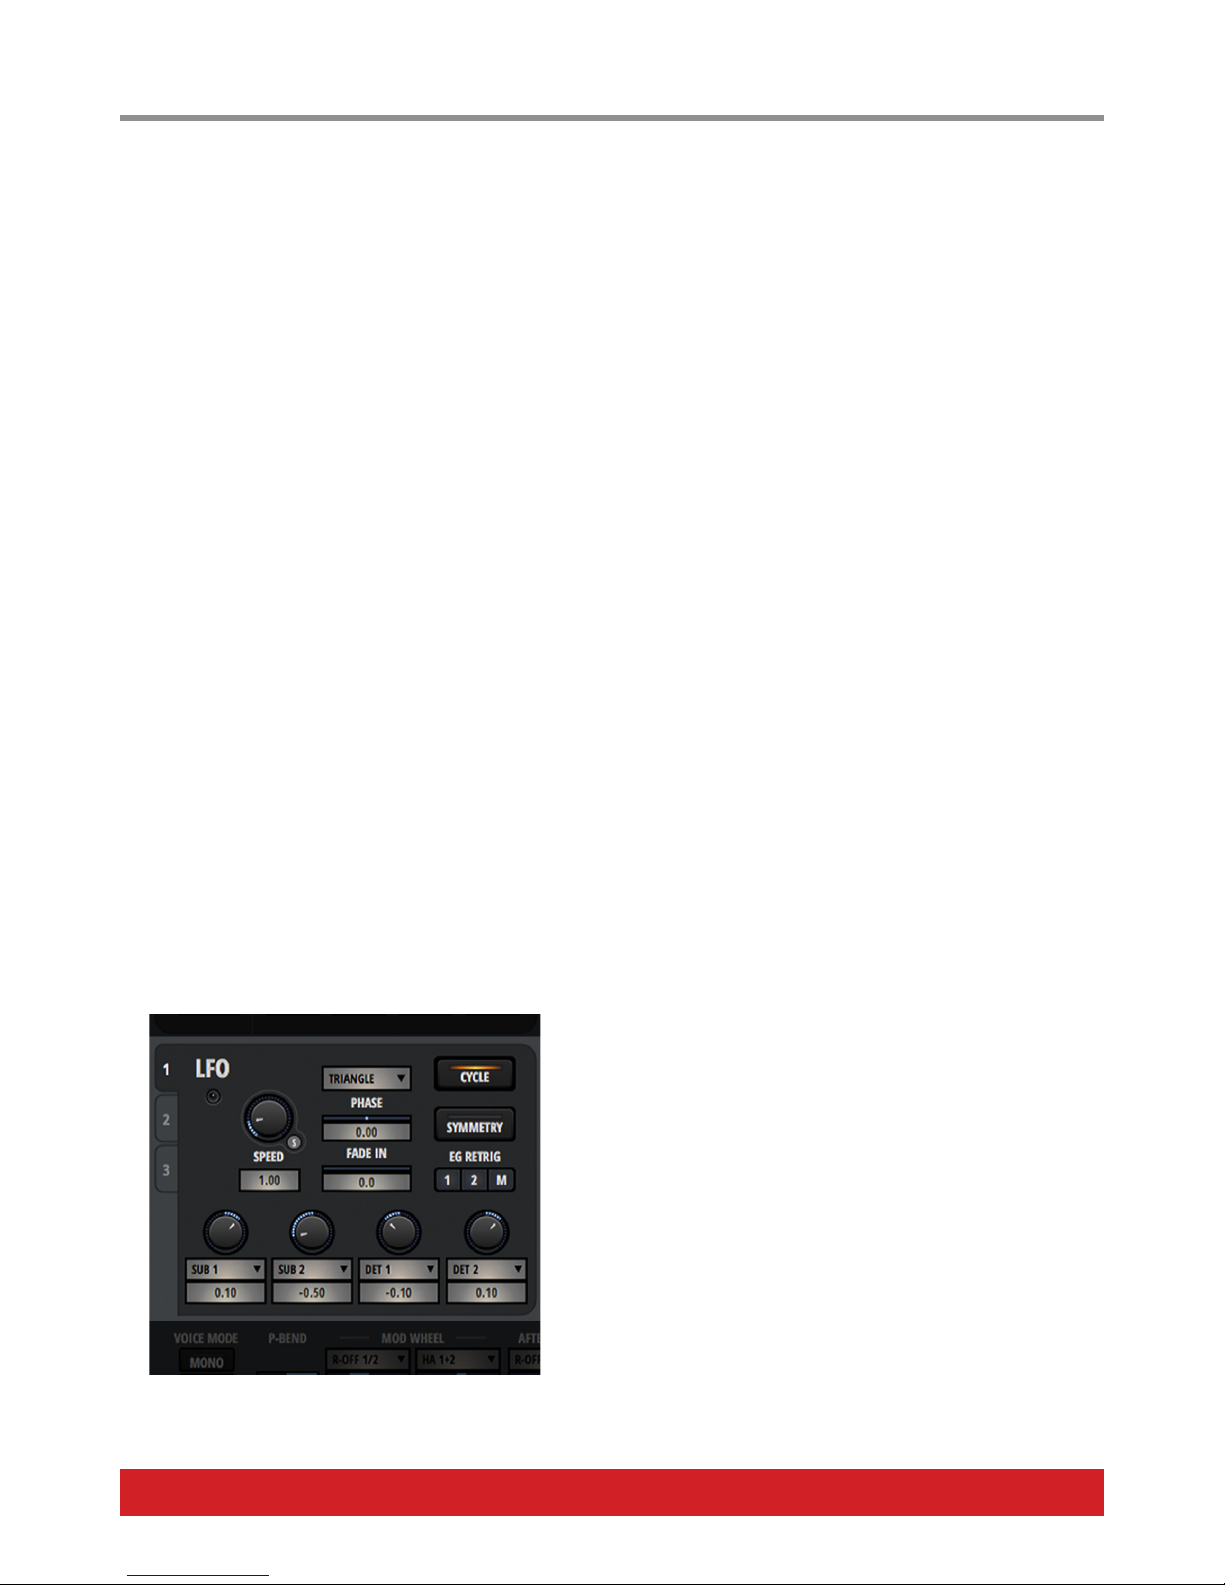
LFO – Low Frequency Oscillator
Bolt offers three identical LFO sections with 13 waveforms and 4
assignable modulation targets each. A drop-down list with up to 24
different targets provides a lot of routing flexibility. What’s more, the
LFOs have several operation modes including one shot, retrigger or
MIDI-sync. So you have plenty of sound-shaping tools at hand. You can
also use the LFOs as auxiliary envelopes, if you eg. use a Saw Wave
with CYCLE set to off and modulate Pitch or Harmonics. You select an
LFO by clicking on the numbered tabs to the left of the heading.
LFO BYPASS –Click on the active LFO’s label (“LFO”) to bypass it without
having to change any parameters for quick A/B-ing.
SPEED – The LFO’s speed range goes from 0.01 Hz to 10 kHz. When SYNC is
active, the incoming MIDI clock is used as tempo basis and SPEED displays
musical divisions from 16 bars per LFO cycle down to 1/128th note triplet
instead. This makes it easy to create rhythmical modulation effects.
User Interface Controls (cont.)
Page 11
www.nektartech.com Nektar Bolt User Guide 11
SYNC – Switches the oscillator speed between MIDI and internal clock. With SYNC active, the SPEED display shows musical values instead
of Hertz.
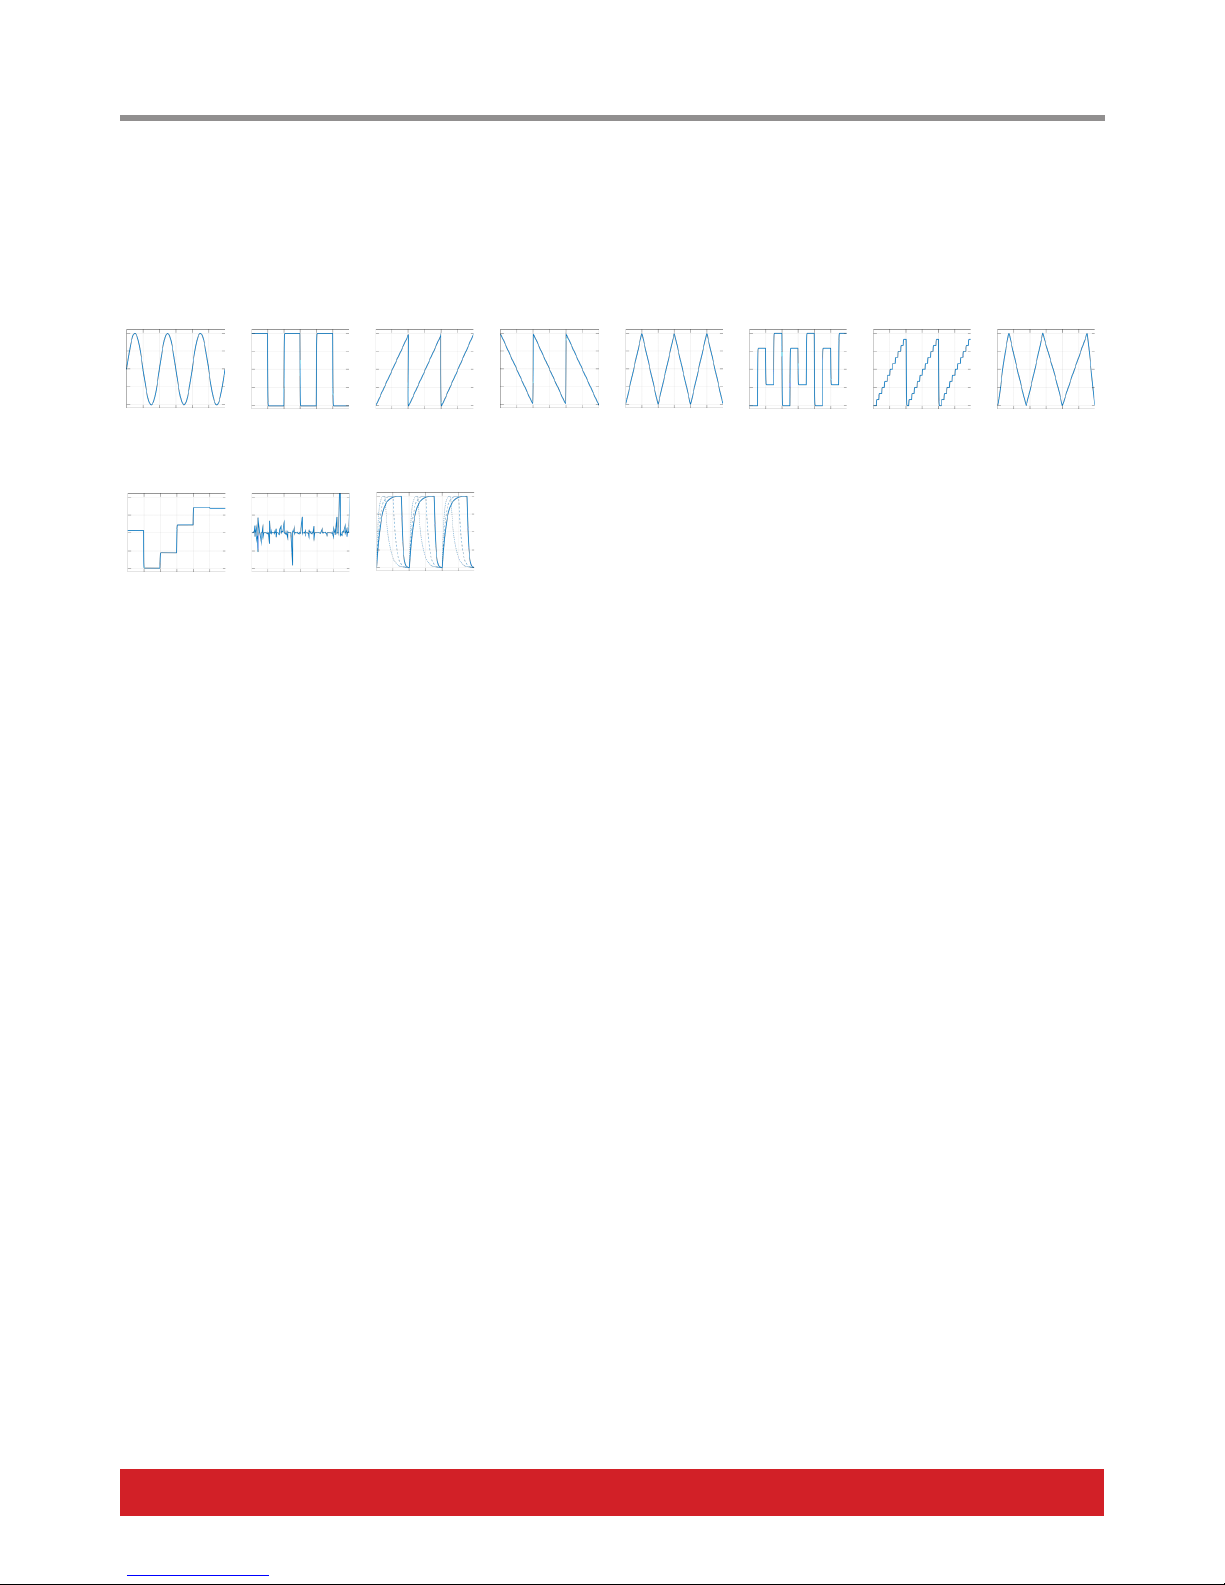
WAVE – This drop-down menu offers 13 LFO waveforms. Available are:
Sine Square Saw + Saw - Triangle Step 4 Step 12 Random
Random Step Noizy Shark 1, 2 and 3
PHASE – Adjusts the offset of the LFO wave’s start phase from 0 to +/- 180 degrees. So you can start a sine wave at +1 rather than 0 for
instance, allowing you to start the modulation at the wave’s maximum rather than the start.
FADE IN – Determines the offset time for the LFO to reach its maximum intensity. If set to 0, it starts immediately. If set to any other time,
you will notice the LFO to blend its modulation depth in gradually. The delay time ranges from 0.1 msec to 10 sec. In sync, it follows musical values down to 64th note triplet or up to 4 bars.
CYCLE – Most LFOs simply keep on running, and always have their cycle set to on. Bolt’s LFO allows you to switch it to one shot mode: With
Cycle off, the LFO will stop after one cycle of the selected waveform. This opens up some interesting modulation possibilities: Use the LFO
to modulate a parameter just once, rather than continuously – employ it as an auxiliary envelope (saw waves are great for that, the speed
setting the envelope’s shape – or use a square wave set at a very high speed (over 20 Hz) to inject a transient for percussive sounds). With
the Noizy wave you can inject noise by modulating HARMONICS, PITCH or LEVEL with speeds above 100 Hz and up to 10 kHz.
SYMMETRY – Sets the symmetry of the LFO waveform. With Symmetry on, the LFO oscillates between -1 and 1, with Symmetry off, it oscillates between 0 and 1.
RETRIGGER – If EG RETRIG is switched on, the selected Oscillator EG (1,2) or Modulation EG (M) will be triggered each time the waveform
cycles. This is great, when you use the LFO to create arpeggio-style effects (set LFO WAVE to “Square”, activate CYCLE, RETRIGGER and
SYNC, select ¼ note in SPEED and choose “Pitch” as Modulation target with an amount set to “1.0” for that classic octave arpeggio).
MOD AMOUNT – The Modulation Amount parameter is centered, so you can add positive or negative modulation. The range goes from
-1.00 to +1.00. The parameters you modulate, are selected with the next parameter.
MOD DESTINATION – The LFO Mod destinations are selectable from a drop-down list. We have pre-selected some typical destinations for
you – but there’s more to discover! You have access to:
• Pitch 1, 2, 1 and 2 • Detune 1, Detune 2, Detune 1/2 • Harmonics 1, 2 or 1 and 2
• Roll-Off 1, 2, 1 and 2 • Noise 1, Noise 2 (Level modulation) • Pan 1, 2, 1 and 2
• Sub 1, 2 (Level) • Level 1, 2 (OSC Level modulation) • Volume (Main Volume)
• Drive 1, 2, 1 and 2 • LFO Frequency (1/2, 1/3, 2/3 - dep. on sel. LFO)
User Interface Controls (cont.)
Page 12
12 Nektar Bolt User Guide www.nektartech.com
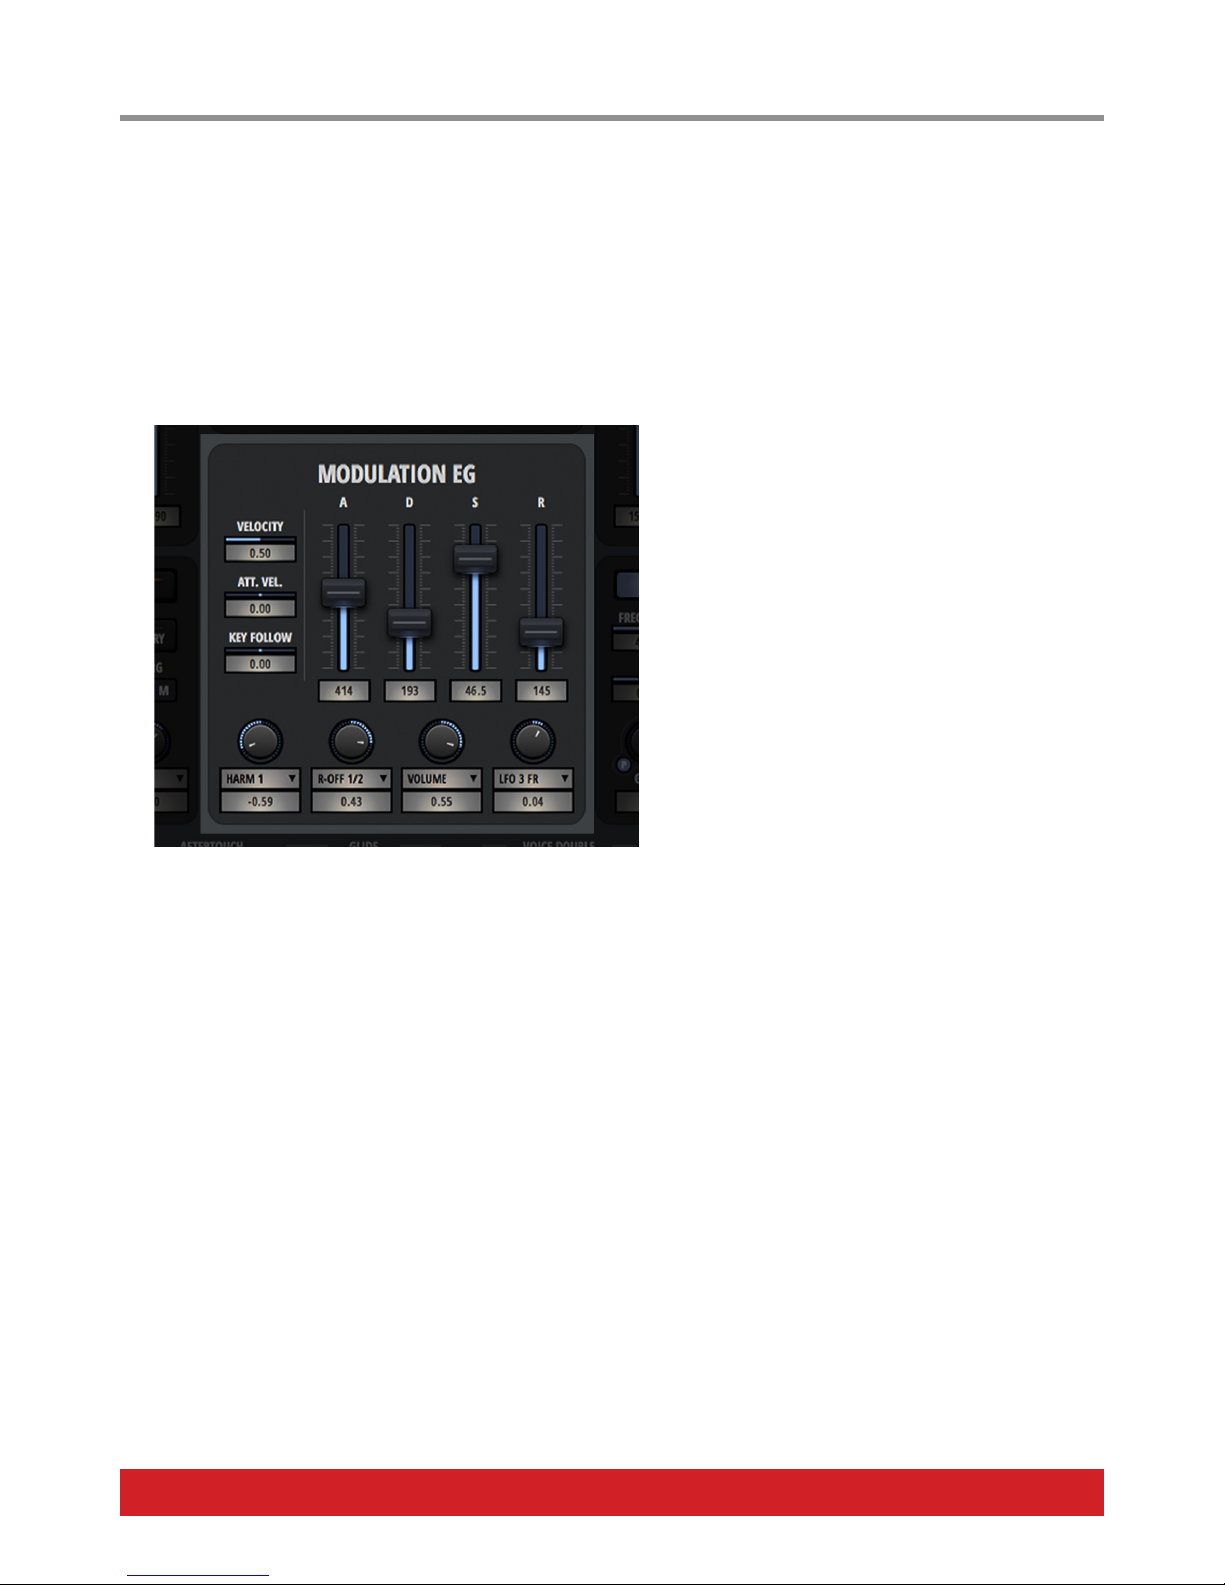
Modulation Envelope Generator
Bolt is slightly different from conventional synthesizer concepts insofar, that you won’t find the typical subtractive filter section
with cutoff and resonance parameters. This is due to the Harmonics Synthesis concept: The sound is shaped directly in the oscillator simply by adjusting HARMONICS and ROLLOFF and with the MODULATION EG you can then modulate this shaping. Apart
from a typical ADSR-Envelope, the MODULATION EG provides 4 selectable modulation targets and can be made responsive to
Velocity, Attack Velocity and Key Follow. If you are aiming for filter-style effects, modulate the HARMONICS and ROLLOFF parameters. But of course you can also assign it to many other modulation targets.
MOD EG BYPASS – Click on the MODULATION EG label to deactivate the envelope for quick comparisons.
MOD AMOUNT – The Modulation Amount parameter is
centered, so you can add positive or negative modulation.
The range goes from -1.00 to +1.00. The parameters you
modulate, are selected with the next parameter.
MOD DESTINATION – The Mod destinations are selectable
from a drop-down list. We have preselected some destinations for you – but there’s more to discover! You have access
to:
• Pitch 1, 2 or 1 and 2
• Detune 1, 2 or 1 and 2
• Harmonics 1, 2 or 1 and 2 (default target 1 and 2)
• RollOff 1, 2 or 1 and 2 (default target 3 and 4)
• Noise 1, Noise 2 (Level modulation)
• Pan 1, 2, 1 and 2
• Sub 1, 2 (Level)
• Level 1, 2 (OSC Level modulation)
• Volume (Main Volume)
• Drive 1, 2, 1 and 2
• LFO Frequency 1, 2, 3 / • LFO Intensity 1, 2, 3
MOD EG MODULATION – The oscillator mod section provides the following parameter:
- VELOCITY: Velocity modulation (0 - 1.00). The higher the value, the more the modulation intensity will be controlled by Velocity. Great for
creating more dynamic sounds.
- ATT.VEL.: Attack Velocity modulation (+/- 1.00). The higher the value, the more the Attack time can be increased (+) or decreased (-), when
you hit the keyboard harder. Also excellent for creating more lively sounds.
- KEY FOLLOW: Positive or negative Key Follow for the envelope decay (+/- 1.00). Key Follow is centered around C4 (MIDI Note 48), so you
will hear no effect on that key. The further you move away from C4 the more audible the alteration of the envelope’s decay time becomes.
User interface controls (cont.)
Page 13
www.nektartech.com Nektar Bolt User Guide 13
Master Section
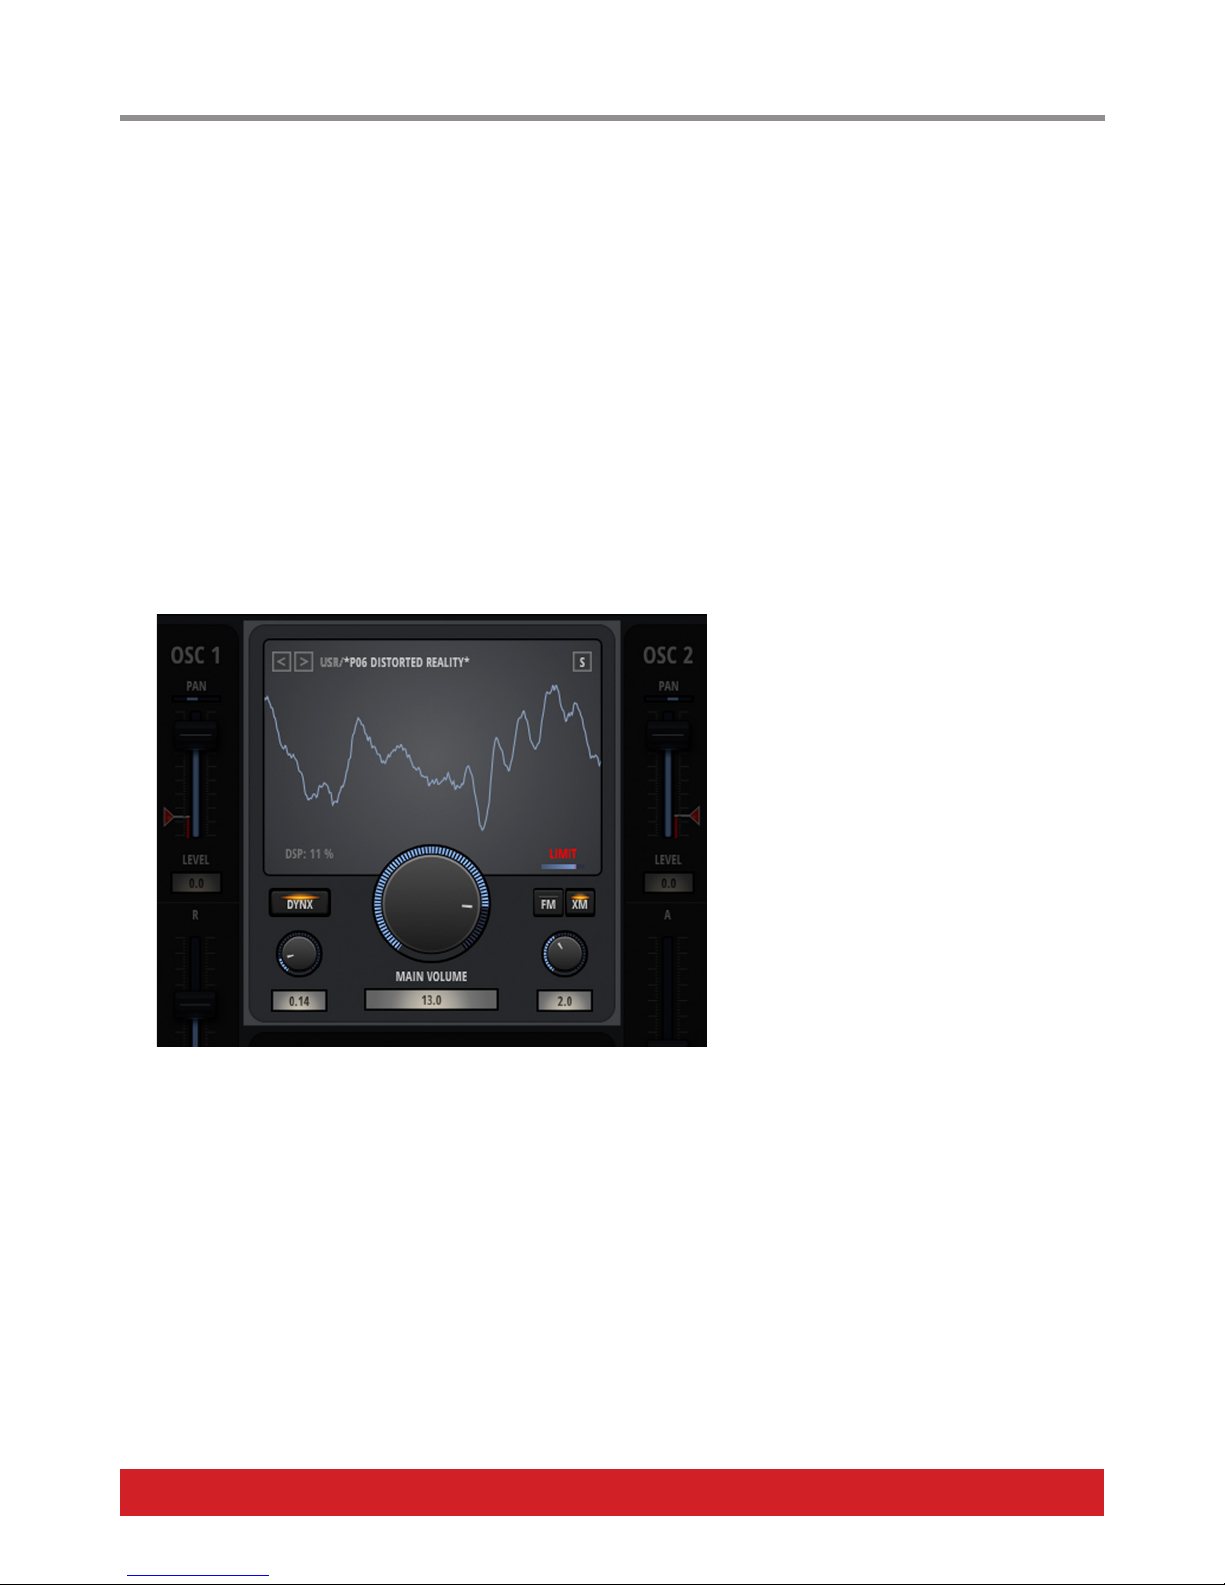
In this section you set Bolt’s Output Level, DYNX, FM and X-MOD settings. What’s more, the waveform display shows the synthesizer’s generated overtone structure in realtime.
DISPLAY – Shows the shape and overtone structure of Bolt’s waveforms. Toggle between Oscilloscope and Spectrum views by clicking on
the display. Spectrum view visualizes a frequency range from 50 Hz to 16 kHz.
DSP – Shows the estimated amount of DSP resources used by the plugin instance. If the load goes beyond 60 - 70%, you might experience
frame drops resulting in audible crackle. In this case, reduce polyphony or increase your audio system buffer size.
DYNX – Switch DYNX on, turn the knob and experience a brighter, louder sound. The effect becomes more pronounced once HARMONICS
is set to a value greater than 3 and if HARMONICS and ROLLOFF are being modulated. When DYNX is disabled, the perceived overall loudness remains the same, independent of your HARMONICS and ROLLOFF settings.
MAIN VOLUME – Sets the Main Volume from -40 dB to +20 dB. If the output signal exceeds a level of -1 dB, the automatic protection limiter will be activated and the display’s LIMIT indicator lights up red.
LIMIT – Bolt’s automatic protection limiter is on by
default. Click on its indicator to open a drop-down
settings menu:
• Standard – Fast Protection Limiter (thresh. -1 dB)
• Slow – Protection Limiter plus slow Limiter (thresh.
-6 dB), helps to avoid limiting artefacts with sustaining sounds such as pads.
• Off – All limiting bypassed
LEVEL METER – The level meter below the LIMIT
indicator displays the peak level after Main Volume.
The range is from -20 dB to 0 dB digital scale, where
the meter will light up red to indicate clipping.
FM – This button activates a sine oscillator that’s
hardwired to modulate the pitch of OSC 1. Set the
modulation amount from 0 to 5 with the knob right
underneath. Once you move beyond 1, the effect
sounds increasingly extreme and metallic. For ease
of use, the FM oscillator’s pitch is fixed at a shift value of -12, which produces musical results. If you change OSC 1’s SHIFT parameter however, you can also try out metallic mayhem. Please
note, that modulation and carrier pitch will be identical if you shift OSC 1 by -12, so the FM-effect will be minimal and only audible at high
amount settings. For even more frequency modulation power, switch to XM. FM and XM may only be used alternatively.
XM – This switch activates cross modulation from the 2nd Oscillator. For first experiments load the Default Patch, engage X-MOD with a
value of 1.00, turn the 2nd Oscillator’s LEVEL down to “MUTE”, set its SHIFT to -12 and DECAY and SUSTAIN to maximum levels. Now play
with the HARMONICS and ROLLOFF parameters: The less harmonics OSC 2 has, and the greater the negative pitch distance to OSC 1, the
more extreme the modulation. Shifting OSC 2 below OSC 1 produces more extreme results than shifting it higher. The Oscillator Mode
settings ODD, INV and DEEP also have an effect on the modulation’s sound.
Now play with the 2nd Oscillator’s ADSR-Envelope: Start by increasing the XM amount to 3 and bring down SUSTAIN and then DECAY.
Yeah, things can get wild here as you are modulating the frequency – especially, when you now also add the SUB-OSC. DYNX influences the
frequency properties as well. Not wild enough? Add VOICE DOUBLE with a DETUNE of more than 4 cents and a high PAN SPREAD. And add
GLIDE for the second oscillator. Enjoy!
User interface controls (cont.)
Page 14
14 Nektar Bolt User Guide www.nektartech.com
Effects Section
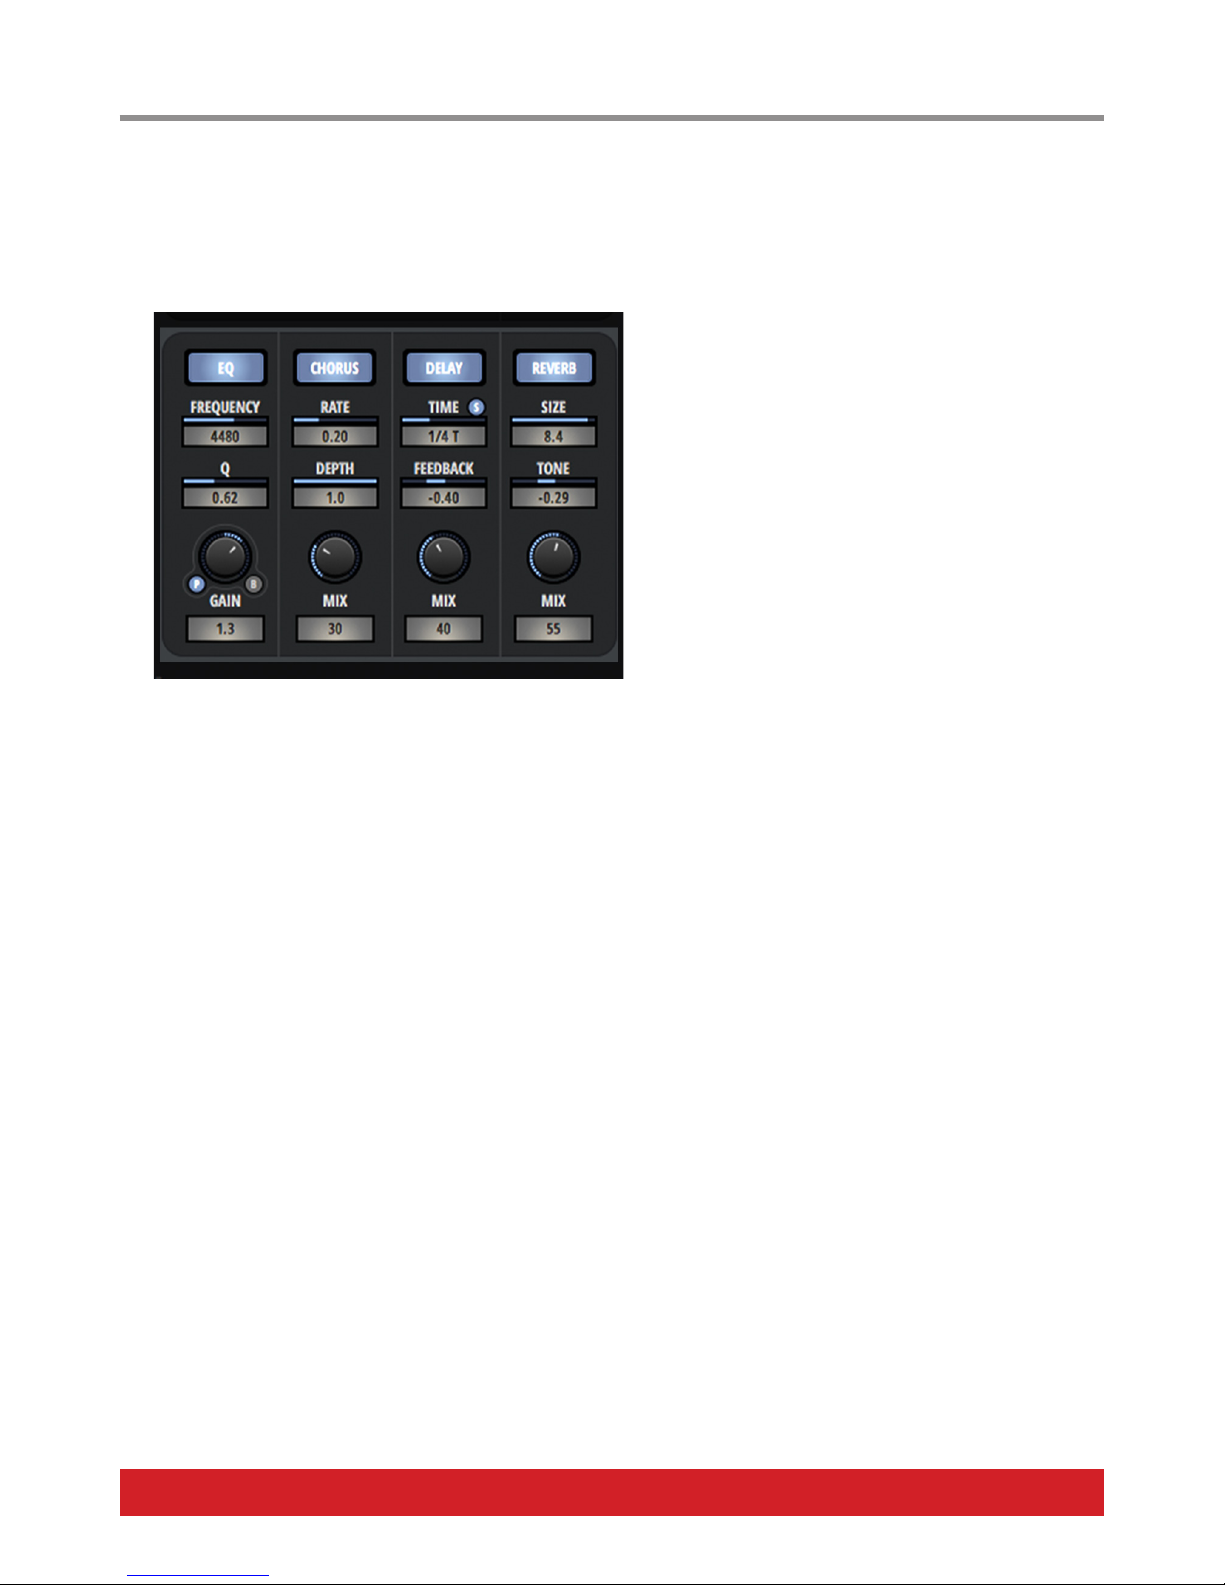
Four processors allow you to add some icing to your sonic cake. The idea is to provide you with fast and easy performance effects, so we
have limited the control to two parameters each plus gain or mix ratio. The effects are routed in series and are in the order you see in the
user interface.
Effects activation – Effects are switched on and off by clicking
on the effect label.
EQ – One peak or bandpass EQ-band. The peak EQ band has
a Q of 0.05 – 10, a frequency range from 20 Hz to 16 kHz and
+/- 24dB Gain. When you switch to bandpass EQ, the Q sets the
band’s width and the frequency represents the band’s center
frequency.
CHORUS – Rich classic chorus effect with a rate from 0.05 – 3
Hz, a modulation depth setting from 0.1 to 1 and dry/wet MIX
parameter. It will give you rich pads instantly. Immediately
apparent when you use the default setting (double click the
parameter labels to reset them).
DELAY – Delay with a range from 1 msec – 3 sec, click on the
“S” button for tempo sync (switching the display to show musical values ranging from 2 bars – 1/128th triplet). The Feedback control is
centered, if you move the feedback to the left you will get stereo feedback – if you move it to the right, the delay delivers mono feedback
up to oscillation at very high values. We have modelled the behaviour of analog delays: so each repeat will increasingly sound duller. The
dry/wet mix ratio is set by the MIX knob.
REVERB – Setting a reverb effect with only 2 parameters limits your choices of course: So we came up with meta parameters. SIZE controls
stereo width, initial reflections and room size at the same time. From settings 0.00 – 1.00 you will notice a tighter, more “mono” ambience,
once you move beyond 1.00 the stereo field expands to full width. TONE alters the reverb tail‘s sound and EQ: Move it to the left for dark
and dull reverbs – to the right for bright reverb tails.
User Interface Controls (cont.)
Page 15
www.nektartech.com Nektar Bolt User Guide 15
General Parameters
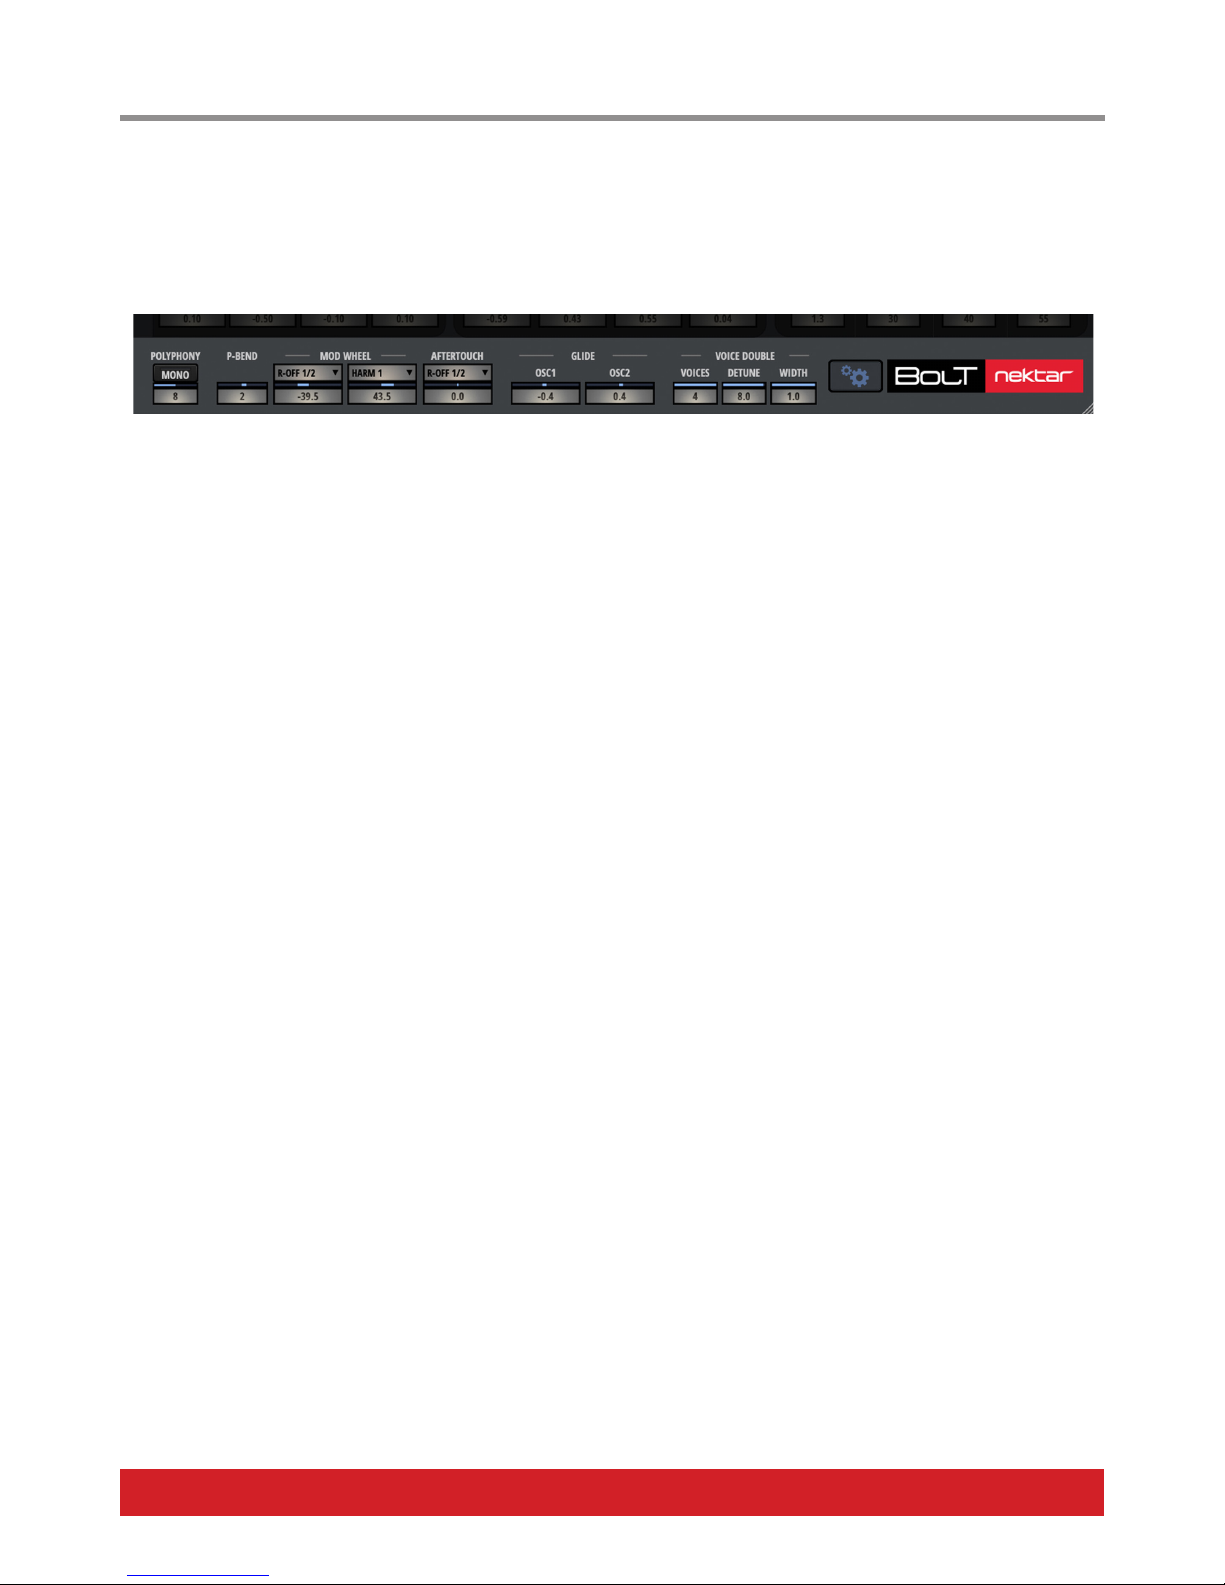
In the section at the bottom of Bolt’s UI you set general parameters such as the Voice Mode, realtime modulators, Glide per oscillator and the Voice Double mode. A click on the sprocket wheel will open the system settings and authorization dialog (details on
how to activate Bolt on page 4 “Installation”).
VOICE MODE – Poly or Mono mode. The maximum polyphony of Bolt is 12 voices, the default setting is 10. This may be changed in the
SETUP dialog, rule of thumb: less voices, less CPU performance required. Note: This setting affects all loaded instances of Bolt. So if you
are running out of performance, decreasing the voice count will free up resources across all loaded instances in a project upon next
reload.
PITCH-BEND – Sets how Bolt reacts to MIDI-Pitch Bend. The maximum range is +/-12 semitones.
MOD-WHEEL – Allows you to assign the Modulation Wheel to various parameters from the drop-down menu. The Mod-Wheel can modu-
late two targets simultaneously. The value field below is centered with a range from -127 to +127.
AFTERTOUCH – Allows you to assign your keyboard’s aftertouch to various parameters from the drop-down menu. The value field below is
centered with a range from -127 to +127.
GLIDE OSC 1/2 – Dedicated Glide parameters per oscillator. Sets the time it takes to glide from one played pitch to the next (mono mode)
or how long it takes to glide to the played note from the octave below or above (poly mode) in msec.
VOICE DOUBLE –Want your patches to sound fat? Then move this fader up – you can take this up to 4 additional instances of Bolt running
at the same time with your sound. In combination with DETUNE and WIDTH you’ll arrive at super-fat sounds in no time, just like on an old
analog synth. Keep in mind, that this also makes Bolt more performance hungry – so keep an eye on your CPU.
Note: With low detune settings below 0.50 you might experience shifts in the stereo image due to phase cancellation as we don’t reset the
oscillators’ phase for a more vivid sound. In this case decrease WIDTH or increase DETUNE.
DETUNE –Adds detune to your Voice Double instances. Range from 0 to 8 cents. For nice flanging effects set Voice Double to 4 with de-
tune between 1 and 2 cents, and notice how it then it moves into rich detuning once you increase this parameter further.
WIDTH – This parameter only has an effect, when Voice Double is active: The more you double, the more the spread will become obvious.
As the name implies, PAN SPREAD is spreading the doubled instances across the stereo panorama. Make sure Chorus is set to off, then set
Osc 1 Panning to -0.3, Osc 2 Panning to +0.3, Voice Double to 2 or higher, add a Detune of 4 and then start playing with PAN SPREAD: Who
needs Chorus, right? Well, now add Chorus. Of course, the stereo depth will become a bit blurry – but could it be any lusher?
User Interface Controls (cont.)
Page 16
16 Nektar Bolt User Guide www.nektartech.com
Factory Patches and Patch Selection
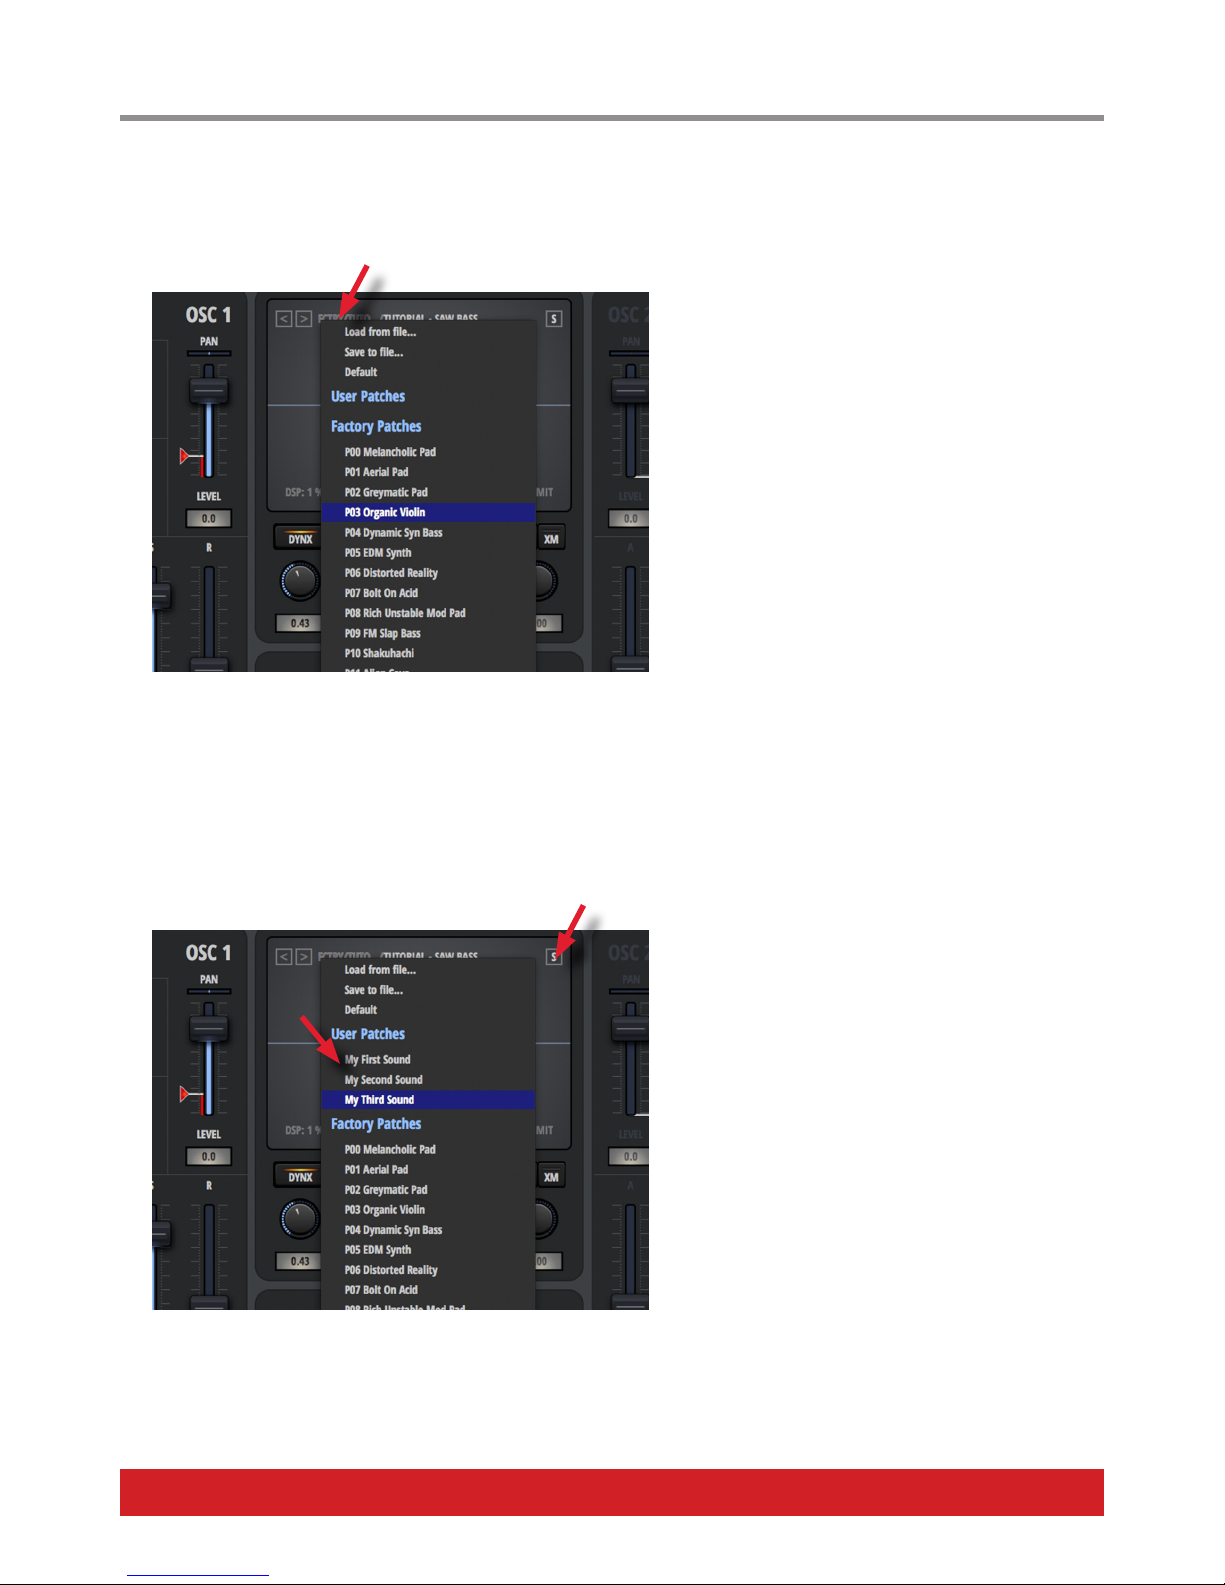
Bolt comes with over 500 Factory patches to get you started. After installation, you will find a list of the patches by clicking on
the patch name next to the two triangles in Bolt’s display. This will open up a list you can browse through in categories:
At the top of the list we have placed a bunch of sounds
to showcase Bolt’s versatility, further down you will find
folders with categories such as Bass, Brass, Pads and so on,
each containing patches from that category.
Direct Selection: Select a patch from the list by pointing
with the mouse and click to confirm.
Patch Up/Down: You can step up and down through patches using the “<” and “>” arrows left of the patch name.
Factory Patches are “read-only”: When you edit a sound
and click on [S] to save, it will automatically be saved as a
user sound. User patches are described in the next section.
User Patches and Patch Saving
User Patches will extend your patch list automatically at the top, and move the Factory Patches further down in the list. So your
own sounds will always come out on top.
Saving Patches: Click on [S] in the display (1.). This will open up your computer’s file selection dialog. Then, pick the location you want to
save your patch to. If you’d like your User Patches to show up in Bolt’s file dialog automatically (2.), you have to save them to the default
location as described on the next page.
Loading Patches: Click on the active patch name in the display, this will open up the Patch Browser. Now pick a sound
from the list and click the name to confirm.
Patch Up/Down: Use the “<” and “>” arrows left of the
patch name in the Display.
1.
2.
Loading and Saving Patches
Page 17
www.nektartech.com Nektar Bolt User Guide 17
Setting the User Patches Folder
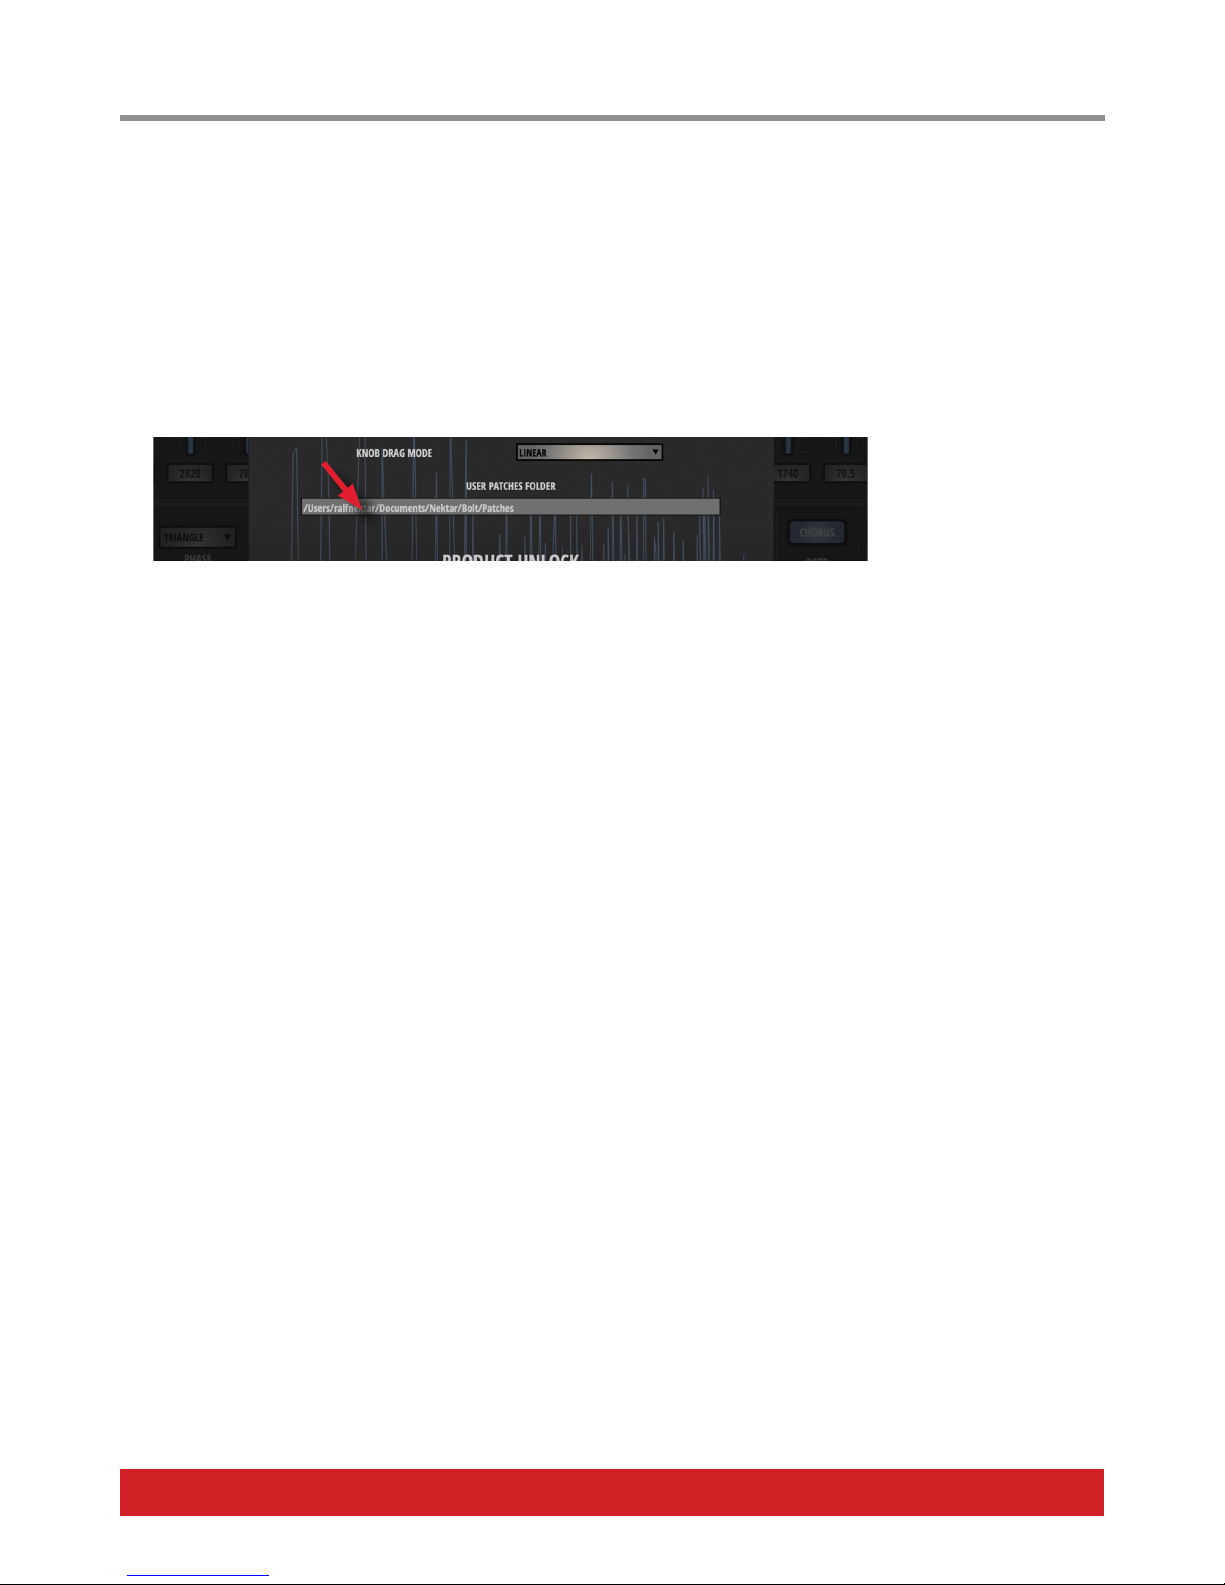
Any Patch that is saved into the selected User Patches Folder will automatically be displayed in Bolt’s patch dialog for instant
selection. You can change this folder during runtime and the patch list will reflect the change right away.
The factory default path after installation is <user>/Documents/Nektar/Bolt/Patches. This folder is used to display user patches in Bolt’s file
browser. This is how you set the User Patches Folder:
- Click on the Sprocket Wheel at the bottom of Bolt’s UI. This opens the Settings dialog.
- Click on the currently selected path, displayed right at the center of the dialog above “Product Unlock”(1).
Now use your operating system’s file browser to choose a new location. As stated above, the change is activated immediately in this
instance of the plugin. If you have multiple instances of Bolt in your session, the other instances are still pointing to the User Patch Folder
that was active at the time of their loading. If you want all instances to point to the same folder, save and reload your session. After reload,
all instances of Bolt will point to the new location.
Default Patch
We have created a patch with some generic settings to get you started: There is a read-only version as part of your factory patches. But you can also create your own!
Everyone has their own preferences, when it comes to their favourite settings. So if you’d like to adapt the Default Patch to your own
needs, you can! Simply load the Default, make any changes you want and save your version into the top level of your User Patches (default
path: <user>/Documents/Nektar/Bolt/Patches). The next time you load the Default from Bolt’s Patch menu, it will automatically be your
version.
If you’d like to reset the Default to factory settings, simply delete your version of the patch. The next time you load Default, it will be the
factory version again.
1.
Loading and Saving Patches (cont.)
Page 18
18 Nektar Bolt User Guide www.nektartech.com
Tutorial
Simple Saw Bass with one Oscillator
In order to help you familiarize yourself with Bolt’s UI, we we’ll guide you through the creation of a simple saw bass sound, starting from scratch with the Default Patch.
1. Open Bolt and load the “Default” patch from the patch menu.
2. Click on the “OSC 2” heading to deactivate the second oscillator. We’ll only need one oscillator for this sound!
Click on the display once to switch it to the spectogram mode. Now you see the harmonics structure, rather than a waveform.
3. Activate “DEEP” to engage the special filter that allows Bolt to generate the more traditionally shaped waveforms.
4. By default, HARMONICS is set to 2.0 - move that up and down to get a feel for the sound. We will set it to the tone we want at the “end”
of the saw bass sound, so quite dull and low: set HARMONICS to 3.0. Don’t worry about the dullness... we’ll get to that in a second.
5. Of course, we want it to sound a bit more “squeaky”. So bring ROLLOFF down to its minimum of 0.01 from the default setting of 0.90.
You will instantly note how the sound becomes more nasal and almost organ-like.
6. OSC1, ADSR-Envelope: We’ll leave this envelope untouched, using its default settings (5.0, 200, 50.0, 50.0).
7. MODULATION EG: As we’ve mentioned elsewhere in this manual, Bolt doesn’t have a traditional filter section. But that doesn’t mean,
you can’t create such sounds! We’ll use the MODULATION EG for that by routing it to modulate HARMONICS and ROLLOFF. In the Default
Patch, Target 1 and Target 3 are already assigned to HARM 1 and R-OFF 1 (if for whatever reason you are seeing something different, click
on the little triangles to the right of the target parameters and pick the correct parameters from the drop-down menu). Now move HARM 1
to a value of approx. 0.65. You should now be hearing something resembling filter modulation, in sound similar to a steep 12 dB filter.
8. ADSR-Envelope in the MODULATION EG: The default curve already works quite well for this sound: but we’d like the “filter” to close
more. So bring the Sustain parameter “S” down to 8.3. Adjust the Decay parameter “D” to 432. We’ll leave the 2 other parameters at their
default settings (A - 5.0, R - 50.0).
9. Depending on your preference, you can add ROLLOFF to make the sound more wiry and less nasal. Set R-OFF 1 to a value of 0.20. If you
want velocity to have more effect on the filtering, move VELOCITY up to 1.0. Make higher notes become “duller” faster by adjusting KEY
FOLLOW to -0.15.
10. OK - now we have a bare-bones saw-y bass sound. Too soft we hear you say? not enough bass? OK:
Bring OSC 1’s SUB-OSC parameter up to 50.0 to add a sub-octave and engage DYNX in Bolt’s Master Section. Set DYNX to 0.43. DYNX allows
you to reduce the normalization we introduce to make up for the level increase when harmonics are added. By bringing the value up, you
are reducing this effect, making Bolt sound brighter and more punchy. Better? Now boost the Main Volume to 10.0. Done!
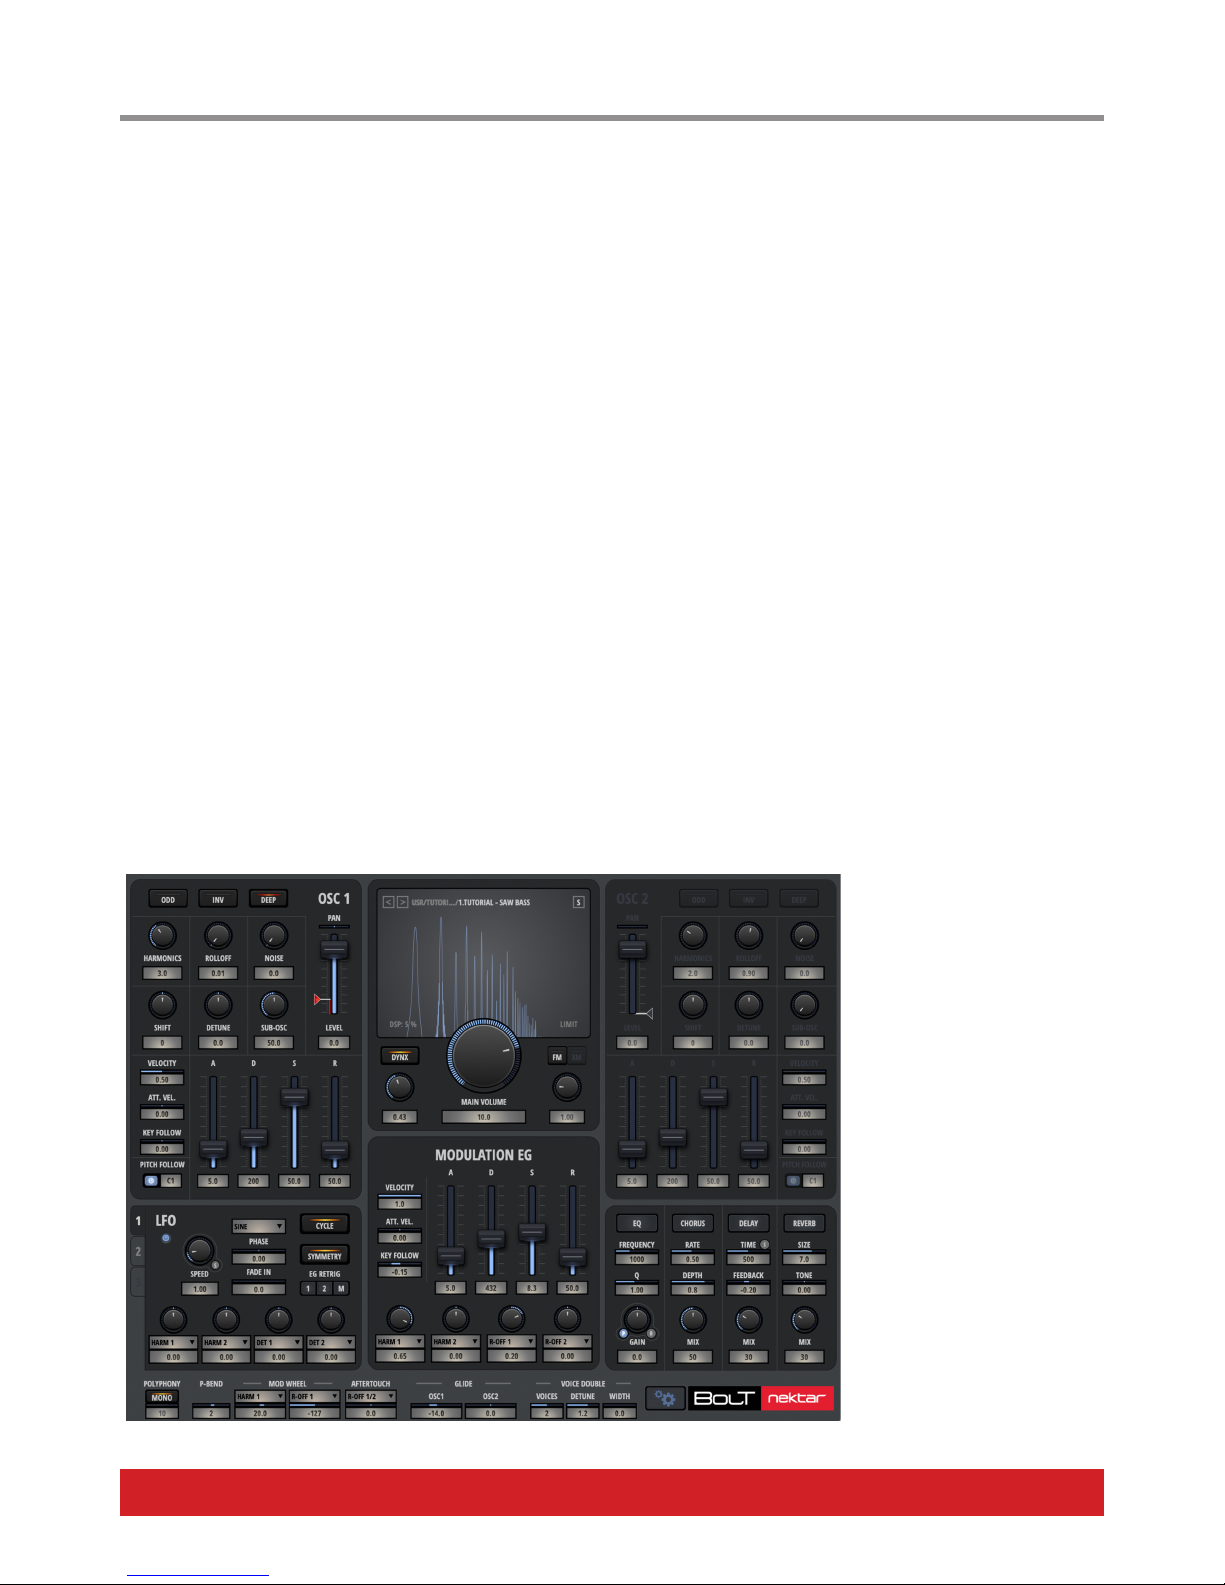
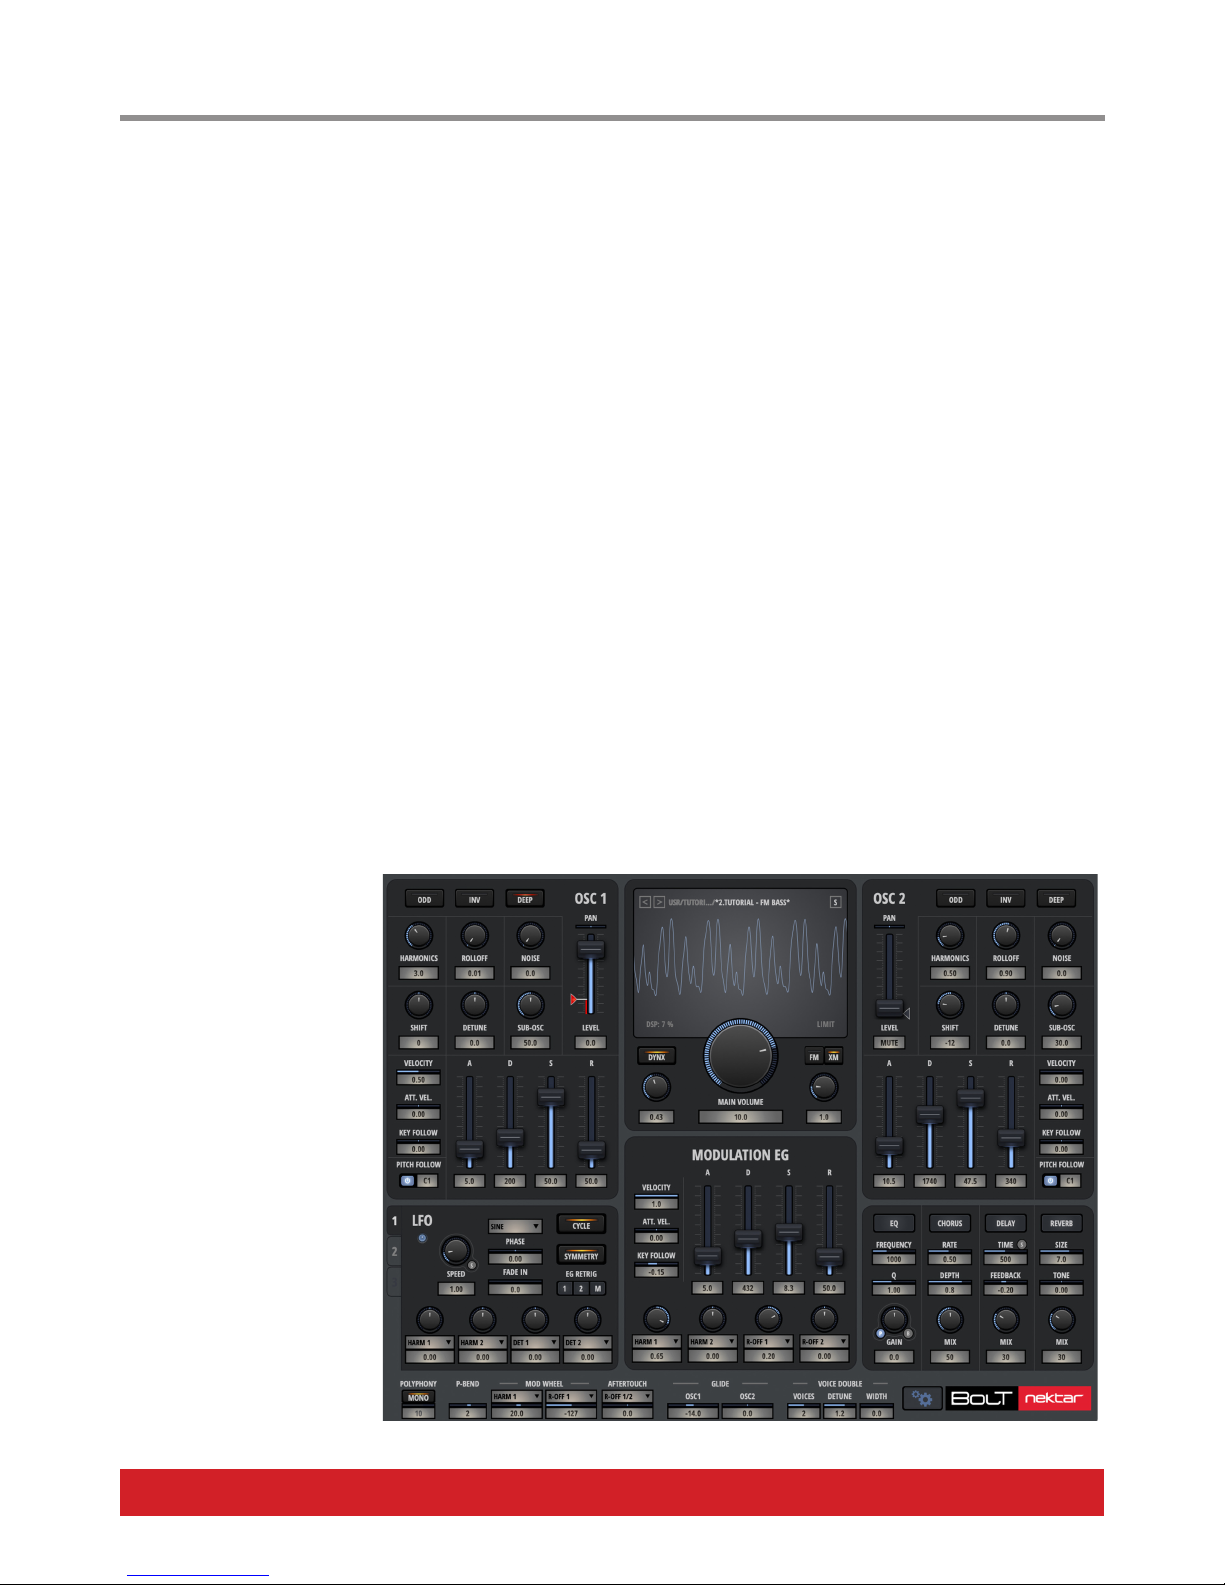
Tutorial Saw Bass Patch
This is what your patch should
look like, once you’ve finished
setting it up (includes the optional settings on the next page).
OSC 2 and the Effects section
are bypassed, The LFOs are all
deactivated.
(
You will find this patch in the
“Tutorial” folder of our Factory
Patches.
)
Page 19
www.nektartech.com Nektar Bolt User Guide 19
Tutorial
11. Optional finishing touches: Of course, this sound is barley scratching the surface of Bolt’s possibilties. But let’s show you, how you
can take this sound further with just a few more tweaks:
- Set POLYPHONY in the General Parameters bar to mono by clicking on the MONO button.
- Set P-BEND to 2, assign MOD WHL to HARM 1 with a value of 20.0 and the second modulator to R-OFF 1 with a value of -127.
(Oh. That pitch modulation is irritating you as well? That’s because LFO 3 is pre-assigned to the Mod Wheel by default and set to create
vibrato. Let’s get rid of that by clicking on the “3” in the LFO-section to bring LFO 3 to the front. Deactivate it by clicking the “LFO” heading. If
you now move the mod wheel up, Bolt’s HARMONICS open up, the ROLLOFF comes down, creating a sound like a filter opening up.
- Glide: Add a bit of pitch glide by setting OSC1 in the GLIDE section of the General Parameters to -14.0
- Distortion: The little triangle to the left of the OSC 1 LEVEL control will add saturation when you move it up. Set it to a value around 6 - 7
for a touch of grit (Tip: if you have a wheel mouse, hover over the control and move the wheel. Easier that way!
- Unison Voice Double: Set VOICES to 2 and DETUNE to 1.2, leave WIDTH at 0 for a bit of unison feel. If you engage voice double, Bolt adds
additional instances with the same settings – and DETUNE will offset their pitches slightly against each other. This makes it really easy to
create rich and fat sounds.
First XM-Experiments: Bolt’s FM Arsenal
XM allows the second Oscillator to modulate OSC1, with all of OSC2’s parameters having an influence on the modulation: Harmonics, Pitch, Detune and ADSR Envelope all affect the sound. Let’s extend our simple Tutorial Bass with a touch of FM-magic:
1. Activate OSC2 by clicking on its heading. Move the volume down to “Mute”, we only want to use it as a modulator. For more low end, you
can add the volume back in later.
2. Activate XM in the Master Section and set it to 1.0.
3. Set SHIFT to -12. For XM to deliver the expected results, it should be an octave lower than OSC1. Experiment with other values: odd
intervals (-11, -27, etc.) create all kinds of mayhem. Now add the SUB-OSC with a value of 30.0 to make it sound “rougher”.
4. Set HARMONICS to 0.50 and ROLLOFF to 0.90 (the lower the harmonics settings, the more extreme the modulation).
5. Set the ADSR-Envelope as follows: A - 10.5, D - 1740, S - 47.5 and R - 340. Double-Click numerical fields to enter the values directly.
Set VELOCITY, ATT.VEL and KEY FOLLOW to zero (0.00). As the Envelope now affects the pitch of OSC1, velocity is not always desirable.
Done! (Experiment by switching PITCH FOLLOW off and moving the pitch to, say, C#4 (click & drag with the mouse): This creates atonal,
metal-bowel-like sounds.)
Tutorial FM Bass Patch
There you have it: A typical
FM-style Bass created with just
a couple more tweaks. For more
low-end, simply switch OSC 2
DEEP on and move its LEVEL
up. If you want more of “that”
FM-touch, move XM up to 2.0 or
beyond. To tame it a little, move
OSC 1 HARMONICS down to 1.0.
And finally, if you switch the OSC
1 and OSC 2 ODD Buttons on,
only odd harmonics are generated and you can give the patch a
more “square-like touch.
(
You will find this patch in the
“Tutorial “ folder of our Factory
Patches.
)
Page 20

www.nektartech.com
Designed by Nektar Technology, Inc
(
v 1.0)
 Loading...