


U12M42N0GB
*9000540339* 9000540339
[en] Instruction manual ..................................2

Ú Table of contents
Safety precautions .....................................................................3
Before installation ...............................................................................3
Safety notes .........................................................................................3
Causes of damage .............................................................................3
Energy and environment tips .................................................... 3
Saving energy......................................................................................3
Environmentally-friendly disposal.....................................................4
Your new appliance.................................................................... 4
Control panel ....................................................................................... 4
Operating modes ................................................................................ 4
Shelf positions .....................................................................................5
Accessories .........................................................................................5
Before using the appliance for the first time ...........................5
Setting the clock .................................................................................5
Cleaning the appliance......................................................................6
Operating the appliance ............................................................ 6
Switching on the appliance...............................................................6
Switching off the appliance ...............................................................6
Electronic clock.......................................................................... 7
Clock display .......................................................................................7
Timer ..................................................................................................... 7
Cooking time .......................................................................................7
End of operation .................................................................................8
Preset operation..................................................................................8
Setting the clock .................................................................................8
Checking, correcting or deleting settings ......................................8
Baking ......................................................................................... 8
Baking on one level............................................................................8
Baking on two or more levels ..........................................................9
Baking table.........................................................................................9
Baking table for ready-made products ........................................ 10
Tips and tricks .................................................................................. 11
Roasting and braising.............................................................. 11
Roasting............................................................................................. 11
Braising.............................................................................................. 12
Tables for roasting and braising ................................................... 12
Tips and tricks .................................................................................. 13
Grilling.......................................................................................13
Defrosting ................................................................................. 14
Defrosting with CircoTherm® ........................................................ 14
Defrost................................................................................................ 14
Yoghurt......................................................................................15
Cleaning and care .................................................................... 15
Cleaning the appliance exterior .................................................... 15
Cleaning the cooking compartment............................................. 15
Removing and fitting the appliance door.................................... 16
Cleaning the door panels............................................................... 16
Cleaning the hook-in racks ............................................................ 17
Faults and repairs .................................................................... 17
Replacing the oven light bulb ....................................................... 18
Changing the door seal.................................................................. 18
After-sales service ................................................................... 18
E number and FD number ............................................................. 18
Test dishes................................................................................ 19
Produktinfo
Additional information on products, accessories, replacement
parts and services can be found at www.neff-
international.com and in the online shop www.neffeshop.com
2

ã=Safety precautions
Please read this instruction manual carefully. Please keep the
instruction and installation manuals in a safe place. Please
pass on these manuals to the new owner if you sell the
appliance.
Before installation
Damage during transport
Check the appliance for damage after unpacking it. Do not
connect the appliance if it has been damaged in transit.
Electrical connection
Only a licensed expert may connect the appliance. You will lose
your warranty entitlement in the event of any damage caused
by incorrect connection.
Safety notes
This appliance is intended for domestic use only. This
appliance must only be used for food preparation.
Adults and children must not operate the appliance without
supervision,
■ if they are physically or mentally incapable of doing so or
■ if they have insufficient knowledge or experience.
Never let children play with the appliance.
Hot cooking compartment
Risk of burns!
■ Never touch the interior surfaces of the cooking compartment
or the heating elements. Open the appliance door carefully.
Hot steam may escape. Small children must be kept at a safe
distance from the appliance.
■ Never prepare food containing large quantities of drinks with
a high alcohol content. Alcoholic vapours can catch fire in the
cooking compartment. Only use small quantities of drinks
with a high alcohol content and open the appliance door
carefully.
Risk of fire!
■ Never store combustible items in the cooking compartment.
Never open the appliance door if there is smoke inside.
Switch off the appliance. Pull out the mains plug or switch off
the circuit breaker in the fuse box.
■ Do not place greaseproof paper loosely over accessories
during preheating. A draught is created when the appliance
door is opened. The greaseproof paper may come into
contact with the heating element and catch fire. Always
weight down the greaseproof paper with a dish or a baking
tin. Only cover the surface required with greaseproof paper.
The greaseproof paper must not protrude over the
accessories.
Risk of short circuit!
Never trap connecting cables of electrical appliances in the hot
appliance door. The cable insulation could melt.
Risk of scalding!
Never pour water into the hot cooking compartment. This will
produce hot steam.
Hot accessories and ovenware
Risk of burns!
Never remove ovenware or accessories from the cooking
compartment without an oven cloth or oven gloves.
Improper repairs
Risk of electric shock!
Improper repairs are dangerous. Repairs may only be carried
out by one of our trained after-sales engineers. If the appliance
is defective, pull out the mains plug or switch off the appliance
at the circuit breaker in the fuse box. Call the aftersales
service.
Causes of damage
Caution!
■ Accessories, foil, greaseproof paper or ovenware on the
cooking compartment floor: do not place accessories on the
cooking compartment floor. Do not cover the cooking
compartment floor with any sort of foil or greaseproof paper.
Do not place ovenware on the cooking compartment floor if a
temperature of over 50 ºC has been set. This will cause heat
to accumulate. The baking and roasting times will no longer
be correct and the enamel will be damaged.
■ Water in a hot cooking compartment: do not pour water into
the cooking compartment when it is hot. This will cause
steam. The temperature change can cause damage to the
enamel.
■ Moist food: do not store moist food in the cooking
compartment when it is closed for prolonged periods This will
damage the enamel.
■ Fruit juice: when baking particularly juicy fruit pies, do not
pack the baking tray too generously. Fruit juice dripping from
the baking tray leaves stains that cannot be removed. If
possible, use the deeper universal pan.
■ Cooling with the appliance door open: only allow the cooking
compartment to cool when it is closed. Even if the appliance
door is only open a little, front panels of adjacent units could
be damaged over time.
■ Heavily soiled oven seal: if the oven seal is heavily soiled, the
oven door will no longer close properly when the oven is in
operation. The fronts of adjacent units could be damaged.
Always keep the oven seal clean.
■ Oven door as a bearing surface: do not stand or place
objects on the oven door when it is open. Do not place
ovenware or accessories on the oven door.
■ Carrying the appliance: do not carry or hold the appliance by
the door handle. The door handle cannot support the weight
of the appliance and could break.
Energy and environment tips
Here you can find tips on how to save energy when baking and
roasting and how to dispose of your appliance properly.
Saving energy
Only preheat the oven if this is specified in the recipe or in the
operating instruction tables.
Use dark, black lacquered or enamelled baking tins. They
absorb the heat particularly well.
3
Open the appliance door as little as possible during cooking,
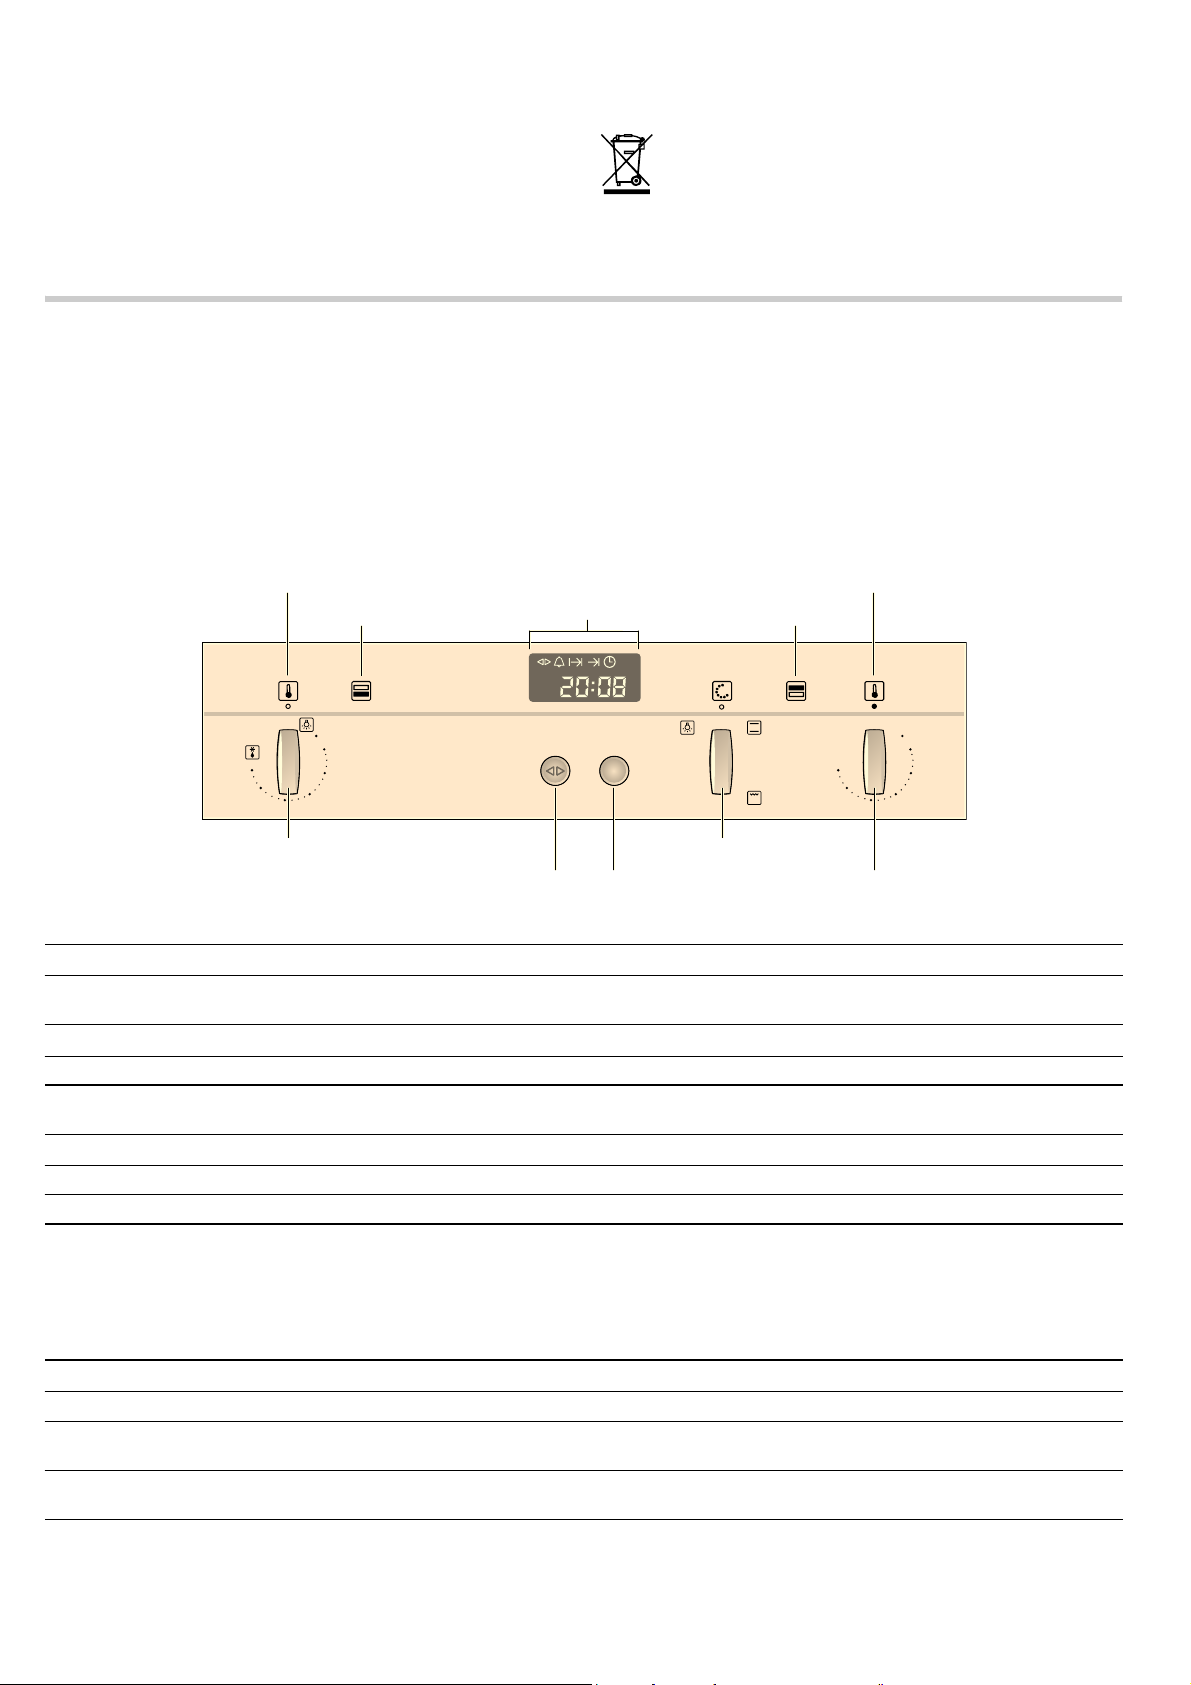
2SHUDWLQJPRGHVHOHFWRU
&ORFNIXQFWLRQEXWWRQ 5RWDU\VHOHFWRU 7HPSHUDWXUHVHOHFWRU
(OHFWURQLFFORFN
7HPSHUDWXUHLQGLFDWRUODPS 7HPSHUDWXUHLQGLFDWRUODPS
%RWWRPRYHQ 7RSRYHQ
2SHUDWLQJPRGHDQG
7HPSHUDWXUHVHOHFWRU
baking or roasting.
It is best to bake several cakes one after the other. The cooking
compartment is still warm. This may reduce the baking time for
the second cake.
For longer cooking times, you can switch the oven off
10 minutes before the end of the cooking time and use the
residual heat to finish cooking.
Your new appliance
In this section, you will find information on
■ the control panel
■ the operating modes
■ the shelf positions
■ accessories
Control panel
Environmentally-friendly disposal
Dispose of packaging in an environmentally-friendly manner.
This appliance complies with European Directive
2002/96/EC on Waste Electrical and Electronic
Equipment (WEEE). The directive gives a framework for
the collection and recycling of old appliances, which is
valid across the EU.
Bottom oven õ
Control element Use
KJ
Operating mode and temperature selector
Clock function button Selects the desired clock function (see section: Electronic clock)
Switches on the interior lighting, selects the temperature for CircoTherm® or the
Defrost operating mode
Rotary selector Makes settings within a clock function (see section: Electronic clock)
Top ovenô
Control element Use
Operating mode selector Selects the desired operating mode
Temperature selector Sets the desired temperature
Operating modes
Here is an overview of the operating modes of your appliance.
Bottom oven
Operating mode Used for
\
A
õ
Interior lighting Provides assistance when maintaining and cleaning the cooking compartment
50 - 270 °C
CircoTherm®
Defrost setting For gentle defrosting of pieces of meat, bread and delicate pastries (e.g. cream
For baking and roasting on one or more levels
gateau)
4
Top oven
Operating mode Used for
%
(
\
ô
Top/bottom heat Especially suitable for cakes with moist toppings (e.g. cheesecake)
Full-surface grill For large amounts of flat, small items for grilling (e.g. steaks, sausages)
Interior lighting Provides assistance when maintaining and cleaning the cooking compartment
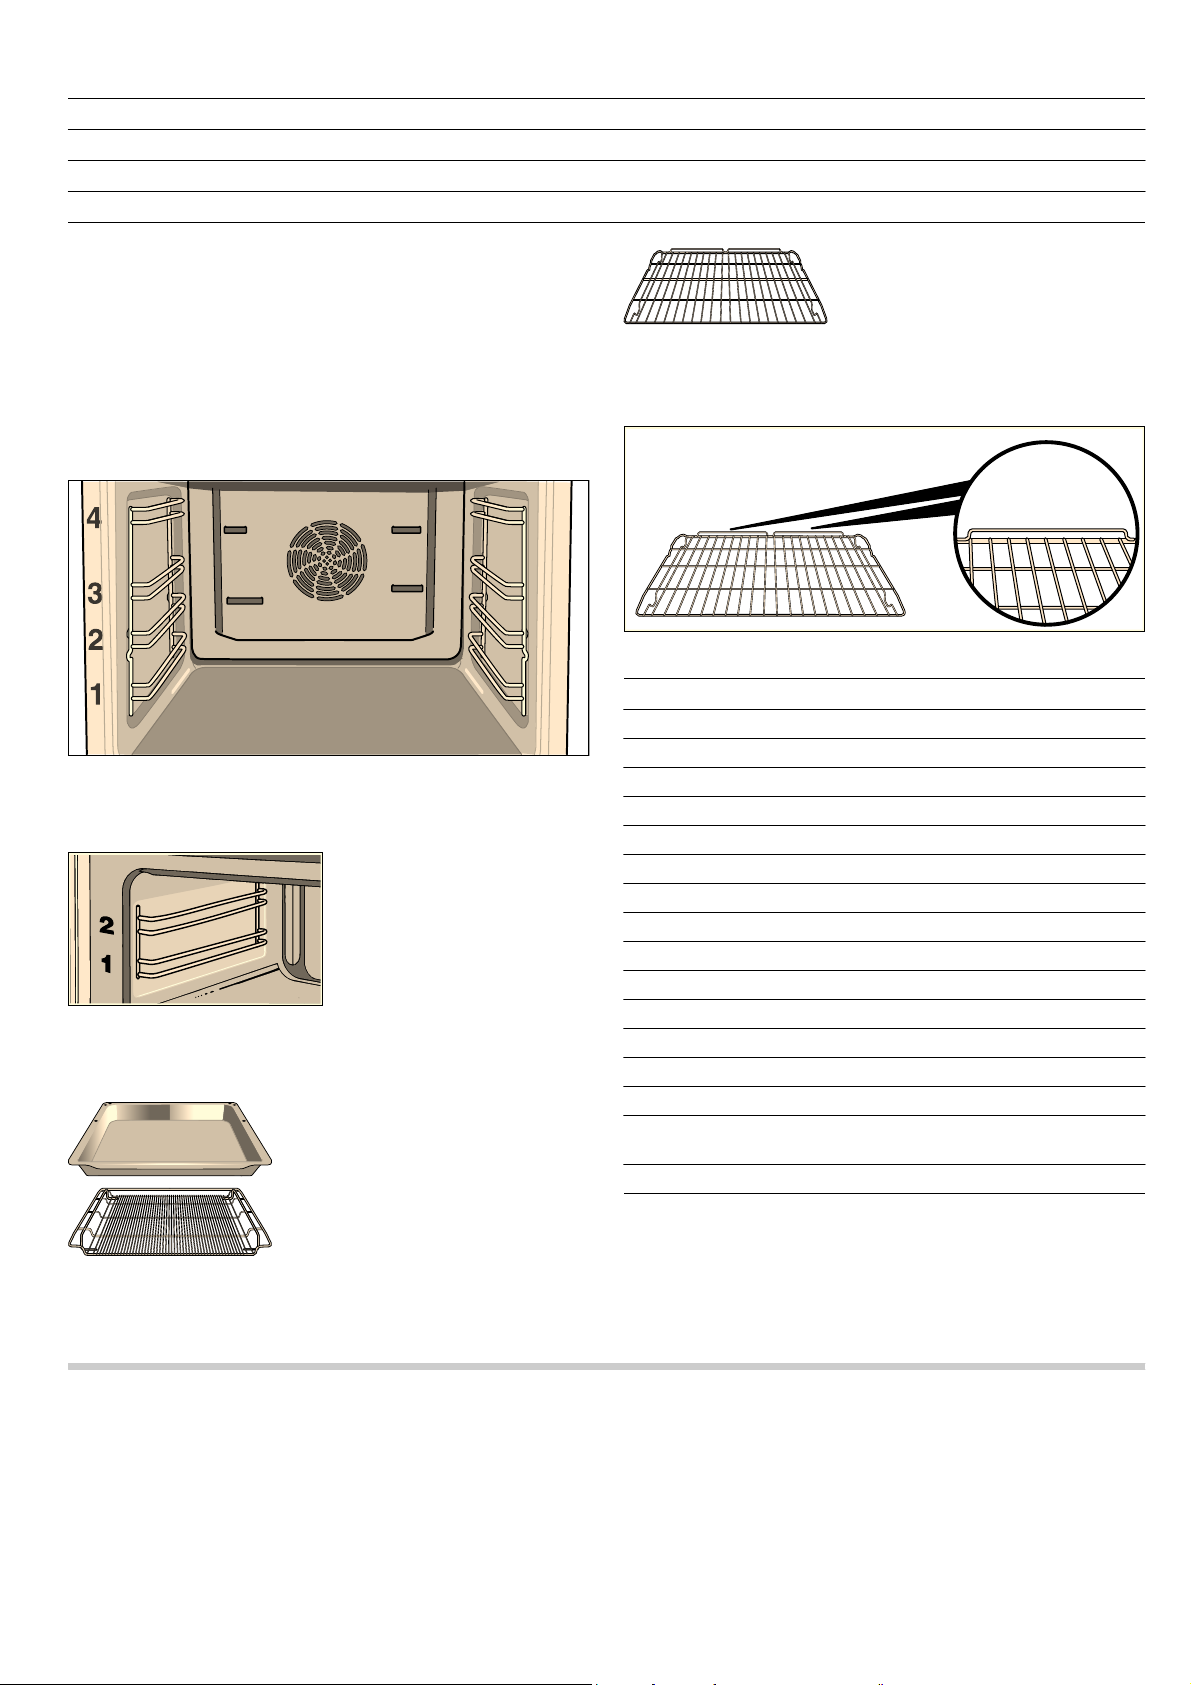
Shelf positions
The shelf positions in the cooking compartment are counted
from the bottom up.
Note: When baking and roasting with CircoTherm®
use shelf position 2. This will adversely affect air circulation and
your baking and roasting results will not be as good.
Bottom oven
The cooking compartment in the bottom oven has four shelf
positions.
Top oven
The cooking compartment of the top oven has two shelf
positions.
õ
ô
3, do not
Accessories
The following accessories are supplied with your appliance:
Enamelled universal pan
for baking moist cakes, roasting,
grilling and collecting dripping
liquids
Wire rack, stepped, close-meshed
For baking, roasting and grilling,
can be inserted in the universal pan
Wire rack, flat, with tilt protection
For baking
Slide the flat wire racks in so that the rear upstand, for
preventing items sliding off the back of the shelf, is at the rear
and facing upwards (see illustration below). Otherwise, the tilt
protection feature will not work properly.
You can obtain further accessories from specialist retailers:
Accessories Order no.
System steamer N8642X0EU
Grill set Z1240X2
Glass pan Z1262X0
Roasting pan, enamelled Z1272X0
Baking tray, aluminium Z1332X0
Baking tray, enamelled Z1342X0
Baking tray, non-stick Z1343X0
Baking and roasting shelf, close meshed Z1453X0
Roasting tray, enamelled, two-piece Z1512X0
CLOU 1x telescopic railing retrofit kit Z1701X1
CLOU 3x telescopic railings retrofit kit Z1742X1
CLOU 4x telescopic railings retrofit kit Z1752X1
Tilt protection retrofit kit, pull-out stop Z9110X0
Universal roasting dish, enamelled Z9930X0
Protective device for the door of the bottom
oven
Protective device for the door of the top oven 673716
Note: The baking tray or universal pan may become distorted
during use. This is caused by the considerable temperature
differences acting on the accessories. This may happen when
only a part of the accessory is covered with food or when
frozen items such as pizza have been placed on the accessory.
440651
Before using the appliance for the first time
In this section, you can read about
■ How to set the clock after connecting up your appliance
■ How to clean your appliance before using it for the first time
Setting the clock
Note: When you press the KJ clock function button, you have
3 seconds to set the clock using the rotary selector. Should this
have been insufficient for you, you can amend the clock time
later.
5
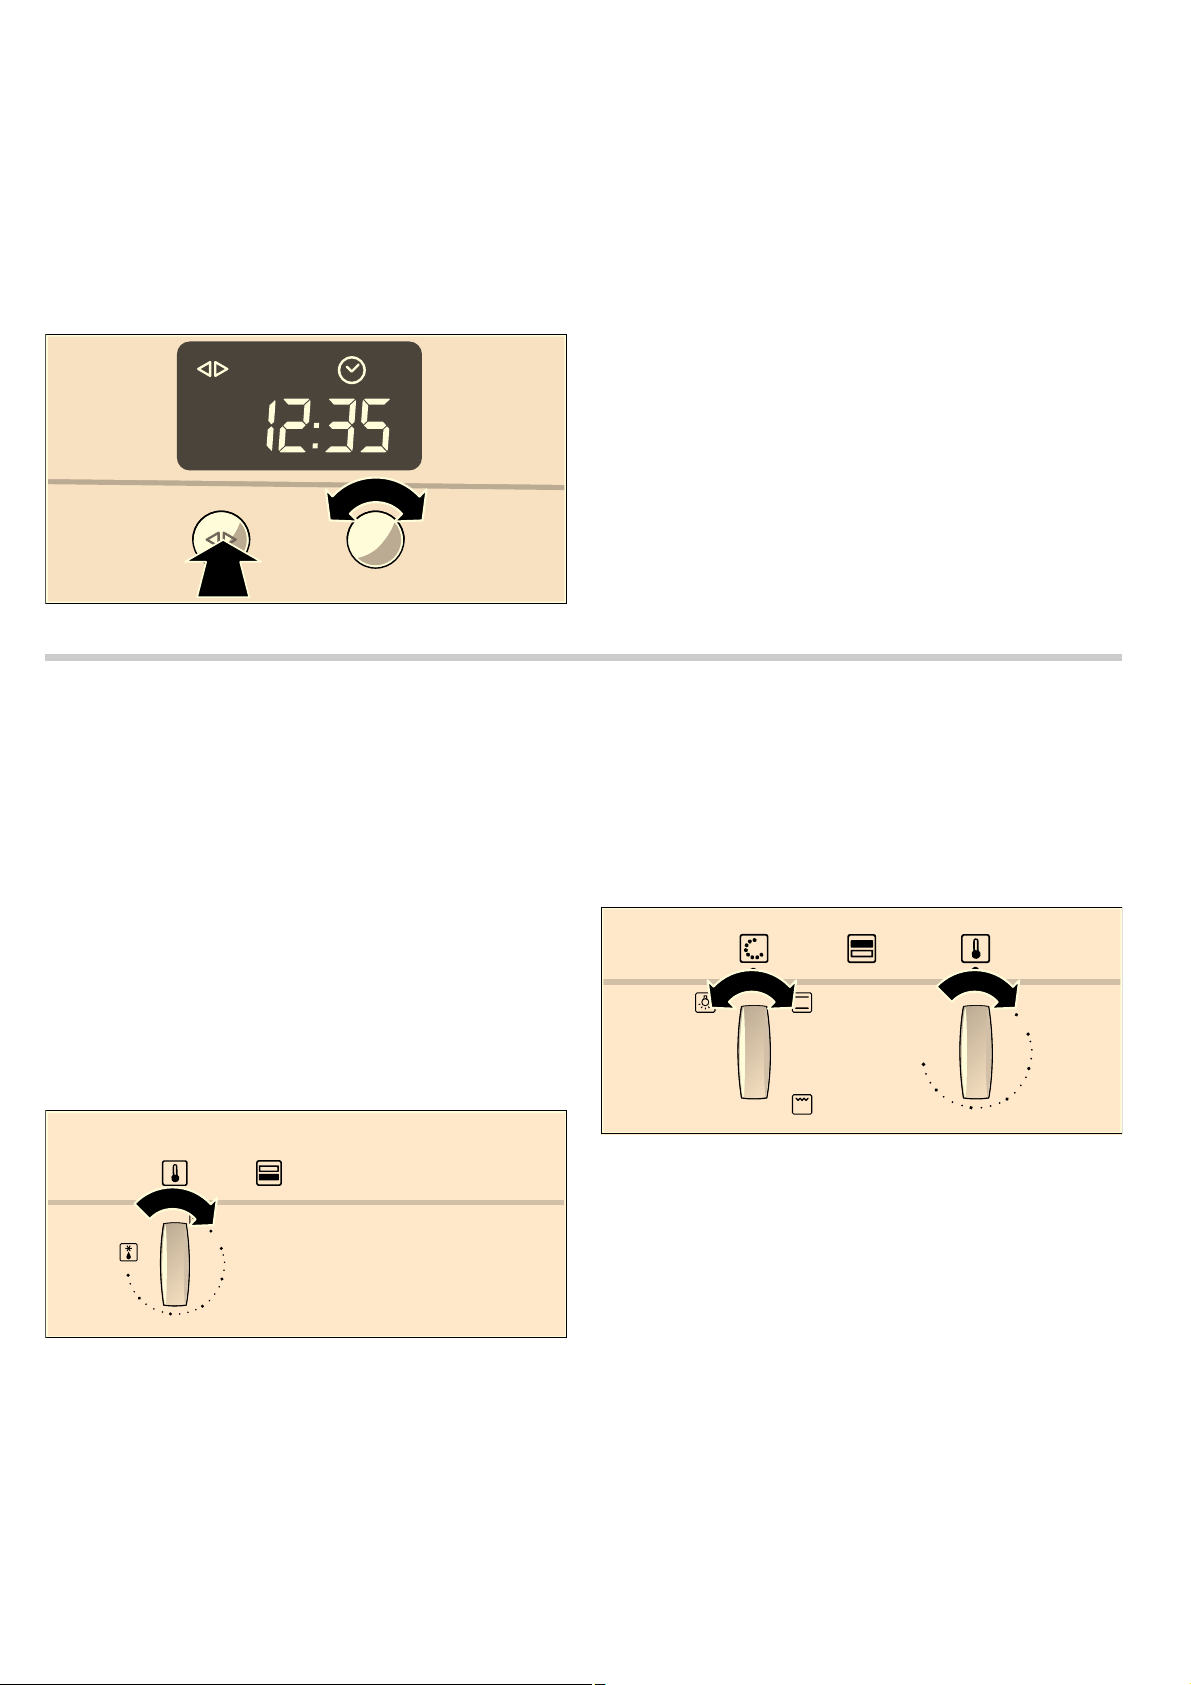
‹:‹‹ flashes in the clock display.
1. Briefly press the KJ clock function button to go to the
setting mode.
The
KJ and 3 symbols light up. ‚ƒ:‹‹ appears in the
clock display.
2. Set the current time using the rotary selector.
Your setting is accepted after 3 seconds.
Changing the clock
To subsequently change the time, press the
button repeatedly until the
Change the time with the rotary selector.
KJ and 3 symbols light up again.
KJclock function
Cleaning the appliance
Clean your appliance before using it for the first time.
1. Remove any accessories and residual packaging from both
cooking compartments.
2. Clean the accessories and cooking compartments with hot
soapy water (see section: Cleaning and care).
3. Heat the at 270 °C using Full-surface grill and the bottom
oven at 240 °C using CircoTherm for 30 minutes.
4. Once the cooking compartments have cooled, wipe them out
with hot soapy water.
5. Clean the outside of the appliance with a soft, damp cloth
and soapy water.
Operating the appliance
In this section, you can read about
■ how to switch your appliance on and off
■ how to select an operating mode and temperature
Switching on the appliance
Bottom oven õ
Interior lighting
Turn the operating mode and temperature selector to the
position in order to switch on the interior lighting.
CircoTherm®
Turn the operating mode and temperature selector to the
required temperature in order to switch on CircoTherm® .
Defrost
Turn the operating mode and temperature selector to the
position in order to switch on the defrost setting.
\
A
Top oven
1. Turn the operating mode selector until the desired operating
mode is selected.
2. Turn the temperature selector until the desired temperature is
selected.
The
up and during any subsequent heating.
ô
r indicator lamp lights up while the appliance is heating
Switching off the appliance
Turn the operating mode and temperature selector back to
the
Û position.
After the appliance is switched off, the cooling fan may
continue to run.
6
 Loading...