

Nef C17DR02.1 User Manual

STEAM OVEN
[en] INSTRUCTION MANUAL
C17DR02.1


Table of contents
[en]INSTRUCTION MANUAL
8 Intended use. . . . . . . . . . . . . . . . . . . . . . . . . . . . . 4
( Important safety information . . . . . . . . . . . . . . . 4
en
Q Basic settings. . . . . . . . . . . . . . . . . . . . . . . . . . . 18
Changing the basic settings . . . . . . . . . . . . . . . . . . . .18
List of basic settings. . . . . . . . . . . . . . . . . . . . . . . . . .18
] Causes of damage . . . . . . . . . . . . . . . . . . . . . . . . 5
7 Environmental protection . . . . . . . . . . . . . . . . . . 6
Tips for saving energy . . . . . . . . . . . . . . . . . . . . . . . . . 6
Environmentally-friendly disposal . . . . . . . . . . . . . . . . . 6
* Getting to know your appliance . . . . . . . . . . . . . 7
Control panel . . . . . . . . . . . . . . . . . . . . . . . . . . . . . . . . 7
Controls . . . . . . . . . . . . . . . . . . . . . . . . . . . . . . . . . . . . 7
Main menu . . . . . . . . . . . . . . . . . . . . . . . . . . . . . . . . . . 8
Steaming menu . . . . . . . . . . . . . . . . . . . . . . . . . . . . . . 8
Cooking compartment functions . . . . . . . . . . . . . . . . . 8
_ Accessories . . . . . . . . . . . . . . . . . . . . . . . . . . . . . 9
Accessories included . . . . . . . . . . . . . . . . . . . . . . . . . . 9
Inserting accessories . . . . . . . . . . . . . . . . . . . . . . . . . . 9
Optional accessories . . . . . . . . . . . . . . . . . . . . . . . . . . 9
K Before using for the first time. . . . . . . . . . . . . . 10
Before using for the first time . . . . . . . . . . . . . . . . . . . 10
Initial use . . . . . . . . . . . . . . . . . . . . . . . . . . . . . . . . . . 10
Calibrating the appliance and cleaning the cooking
compartment . . . . . . . . . . . . . . . . . . . . . . . . . . . . . . . 10
Cleaning the accessories. . . . . . . . . . . . . . . . . . . . . . 11
1 Operating the appliance . . . . . . . . . . . . . . . . . . 11
Switching the appliance on and off . . . . . . . . . . . . . . 11
Filling the water tank . . . . . . . . . . . . . . . . . . . . . . . . . 12
Setting and starting the appliance operation . . . . . . . 12
Changing or cancelling the appliance operation . . . . 13
After each use . . . . . . . . . . . . . . . . . . . . . . . . . . . . . . 13
O Time-setting options . . . . . . . . . . . . . . . . . . . . . 14
Showing and hiding the time-setting options . . . . . . . 14
Setting the timer . . . . . . . . . . . . . . . . . . . . . . . . . . . . . 14
Setting the cooking time . . . . . . . . . . . . . . . . . . . . . . 14
Start delay – "Ready at" . . . . . . . . . . . . . . . . . . . . . . . 14
Checking, changing or deleting settings . . . . . . . . . . 14
D Cleaning . . . . . . . . . . . . . . . . . . . . . . . . . . . . . . . 19
Cleaning agents . . . . . . . . . . . . . . . . . . . . . . . . . . . . .19
Descaling . . . . . . . . . . . . . . . . . . . . . . . . . . . . . . . . . .20
Removing and fitting the appliance door . . . . . . . . . .21
Removing and installing the door panels . . . . . . . . . .21
Cleaning the rails . . . . . . . . . . . . . . . . . . . . . . . . . . . .23
3 Trouble shooting . . . . . . . . . . . . . . . . . . . . . . . . 24
Fault table. . . . . . . . . . . . . . . . . . . . . . . . . . . . . . . . . .24
Replacing the cooking compartment bulb . . . . . . . . .25
Replacing the glass cover or seals . . . . . . . . . . . . . .26
Changing the door seal . . . . . . . . . . . . . . . . . . . . . . .26
4 Customer service. . . . . . . . . . . . . . . . . . . . . . . . 26
E number and FD number . . . . . . . . . . . . . . . . . . . . .26
J Settings table and tips. . . . . . . . . . . . . . . . . . . . 27
Accessories . . . . . . . . . . . . . . . . . . . . . . . . . . . . . . . .27
Ovenware . . . . . . . . . . . . . . . . . . . . . . . . . . . . . . . . . .27
Cooking time and quantity . . . . . . . . . . . . . . . . . . . . .27
Distributing food evenly . . . . . . . . . . . . . . . . . . . . . . .27
Pressure-sensitive food. . . . . . . . . . . . . . . . . . . . . . . .27
Cooking a menu . . . . . . . . . . . . . . . . . . . . . . . . . . . . .27
Vegetables . . . . . . . . . . . . . . . . . . . . . . . . . . . . . . . . .27
Side dishes and pulses . . . . . . . . . . . . . . . . . . . . . . .28
Poultry and meat . . . . . . . . . . . . . . . . . . . . . . . . . . . .28
Fish . . . . . . . . . . . . . . . . . . . . . . . . . . . . . . . . . . . . .29
Soup vegetables, miscellaneous . . . . . . . . . . . . . . . .29
Dessert, compote . . . . . . . . . . . . . . . . . . . . . . . . . . . .30
Reheating food . . . . . . . . . . . . . . . . . . . . . . . . . . . . . .30
Sous-vide . . . . . . . . . . . . . . . . . . . . . . . . . . . . . . . . . .31
Defrosting . . . . . . . . . . . . . . . . . . . . . . . . . . . . . . . . . .34
Dough proving . . . . . . . . . . . . . . . . . . . . . . . . . . . . . .34
Extracting juice . . . . . . . . . . . . . . . . . . . . . . . . . . . . . .34
Preserving . . . . . . . . . . . . . . . . . . . . . . . . . . . . . . . . .34
Frozen products . . . . . . . . . . . . . . . . . . . . . . . . . . . . .35
Test dishes . . . . . . . . . . . . . . . . . . . . . . . . . . . . . . . . .35
P Programmes . . . . . . . . . . . . . . . . . . . . . . . . . . . . 15
Selecting a programme . . . . . . . . . . . . . . . . . . . . . . . 15
Information about the programmes . . . . . . . . . . . . . . 15
Table . . . . . . . . . . . . . . . . . . . . . . . . . . . . . . . . . . . . . 16
A Childproof lock. . . . . . . . . . . . . . . . . . . . . . . . . . 17
Automatic childproof lock . . . . . . . . . . . . . . . . . . . . . 17
One-time childproof lock . . . . . . . . . . . . . . . . . . . . . . 17
Produktinfo
Additional information on products, accessories,
replacement parts and services can be found at
www.neff-international.com and in the online shop
www.neff-eshop.com
3

en Intended use
8Intended use
Intended use
Read these instructions carefully. Only then
will you be able to operate your appliance
safely and correctly. Retain the instruction
manual and installation instructions for future
use or for subsequent owners.
This appliance is only intended to be fully fitted
in a kitchen. Observe the special installation
instructions.
Check the appliance for damage after
unpacking it. Do not connect the appliance if it
has been damaged in transport.
Only a licensed professional may connect
appliances without plugs. Damage caused by
incorrect connection is not covered under
warranty.
This appliance is intended for domestic use
only. The appliance must only be used for the
preparation of food and drink. The appliance
must be supervised during operation. Only
use this appliance indoors.
This appliance is intended for use up to a
maximum height of 2000 metres above sea
level.
This appliance may be used by children over
the age of 8 years old and by persons with
reduced physical, sensory or mental
capabilities or by persons with a lack of
experience or knowledge if they are
supervised or are instructed by a person
responsible for their safety how to use the
appliance safely and have understood the
associated hazards.
Children must not play with, on, or around the
appliance. Children must not clean the
appliance or carry out general maintenance
unless they are at least 15 years old and are
being supervised.
Keep children below the age of 8 years old at
a safe distance from the appliance and power
cable.
Always slide accessories into the cooking
compartment the right way round.
~ "Accessories" on page 9
(Important safety
information
Import ant safet y informat i on
:Warning – Risk of burns!
■ The appliance becomes very hot. Never
touch the interior surfaces of the cooking
compartment or the heating elements.
Always allow the appliance to cool down.
Keep children at a safe distance.
Risk of serious burns!
■ Accessories and ovenware become very
hot. Always use oven gloves to remove
accessories or ovenware from the cooking
compartment.
Risk of burns!
■ Hot steam may escape during operation.
Do not touch the ventilation openings. Keep
children away.
:Warning – Risk of scalding!
■ The accessible parts become hot during
operation. Never touch the hot parts. Keep
children at a safe distance.
Risk of scalding!
■ Water in a hot cooking compartment may
create hot steam. Never pour water into the
cooking compartment when the cooking
compartment is hot.
Risk of scalding!
■ When you open the appliance door, hot
steam can escape. Steam may not be
visible, depending on its temperature. When
opening, do not stand too close to the
appliance. Open the appliance door
carefully. Keep children away.
Risk of scalding!
■ The water in the evaporator dish is still hot
even after the appliance has been switched
off. Do not empty the evaporator dish
immediately after switching off the
appliance. Allow the appliance to cool down
before cleaning it.
Risk of scalding!
■ Hot liquid may spill over the sides of the
accessory when it is removed from the
cooking compartment. Remove hot
accessories with care and always wear
oven gloves.
:Warning – Risk of injury!
■ Scratched glass in the appliance door may
develop into a crack. Do not use a glass
scraper, sharp or abrasive cleaning aids or
detergents.
Risk of injury and risk of fire!
■ Flammable liquids can catch fire in the
cooking compartment when it is hot
(explosion). Do not fill the water tank with
any flammable fluids (e.g. alcoholic drinks).
Only fill the water tank with water or with the
descaling solution that is recommended by
us.
4

Causes of damage en
:Warning – Risk of electric shock!
■ Incorrect repairs are dangerous. Repairs
may only be carried out by one of our
trained after-sales engineers. If the
appliance is faulty, unplug the mains plug or
switch off the fuse in the fuse box. Contact
the after-sales service.
Risk of electric shock and serious injury!
■ The cable insulation on electrical
appliances may melt when touching hot
parts of the appliance. Never bring
electrical appliance cables into contact with
hot parts of the appliance.
Risk of electric shock!
■ Do not use any high-pressure cleaners or
steam cleaners, which can result in an
electric shock.
Risk of electric shock!
■ When replacing the cooking compartment
bulb, the bulb socket contacts are live.
Before replacing the bulb, unplug the
appliance from the mains or switch off the
circuit breaker in the fuse box.
Risk of electric shock!
■ A defective appliance may cause electric
shock. Never switch on a defective
appliance. Unplug the appliance from the
mains or switch off the circuit breaker in the
fuse box. Contact the after-sales service.
]Causes of damage
Cau s es of damage
Caution!
■ Accessories, foil, greaseproof paper or ovenware on
the cooking compartment floor: Do not place
accessories on the cooking compartment floor. Do
not cover the cooking compartment floor with any
sort of foil or greaseproof paper. The cooking
compartment floor and the evaporator dish must
always be kept clear. A build-up of heat may
damage the appliance. Always place ovenware in a
perforated cooking container or on a wire rack.
■ Aluminium foil in the cooking compartment must not
come into contact with the door panel. This could
cause permanent discolouration of the door panel.
■ Ovenware: Ovenware must be heat and steam
resistant.
■ Ovenware with areas of rust: Do not use any
ovenware which displays areas of rust. Even the
smallest spots of rust can lead to corrosion in the
cooking compartment.
■ Dripping liquids: When steaming with a perforated
cooking container, always insert the baking tray, the
universal pan or the solid cooking container
underneath. Dripping liquid is caught.
■ Moisture in the cooking compartment: Over an
extended period of time, moisture in the cooking
compartment may lead to corrosion. Allow the
cooking compartment to dry after use. Do not keep
moist food in the closed cooking compartment for
extended periods of time. Do not store food in the
cooking compartment.
■ Extremely dirty seal: If the seal is very dirty, the
appliance door will no longer close properly during
operation. The fronts of adjacent units could be
damaged. Always keep the seal clean. Never
operate the appliance if the seal is damaged or
missing. ~ "Cleaning" on page 19
■ Appliance door as a seat, shelf or worktop: Do not
sit on the appliance door, or place or hang anything
on it. Do not place any cookware or accessories on
the appliance door.
■ Inserting accessories: depending on the appliance
model, accessories can scratch the door panel
when closing the appliance door. Always insert the
accessories into the cooking compartment as far as
they will go.
■ Carrying the appliance: do not carry or hold the
appliance by the door handle. The door handle
cannot support the weight of the appliance and
could break.
■ Looking after the appliance: The cooking
compartment on your appliance is made of highquality stainless steel. Improper care may lead to
corrosion in the cooking compartment. Refer to the
care and cleaning instructions in the instruction
manual. Remove food residues from the cooking
compartment as soon as the appliance has cooled.
■ Hot water in the water tank: Hot water can damage
the pump. Only fill the water tank with cold water.
■ Descaling solution: Do not allow any descaling
solution to come into contact with the control panel
or other surfaces on the appliance. This damages
the surfaces. If this does happen, remove the
descaling solution immediately with water.
■ Cleaning the water tank: Do not clean the water tank
in the dishwasher. Otherwise, the water tank will be
damaged. Clean the water tank with a soft cloth and
standard washing-up liquid.
5

en Environmental protection
7Environmental protection
Envi r onment al prot ec t i on
Your new appliance is particularly energy-efficient.
Here you can find tips on how to save even more
energy when using the appliance, and how to dispose
of your appliance properly.
Tips for saving energy
■ Only preheat the appliance if this is specified in the
recipe or in the operating instructions table.
■ Open the appliance door as infrequently as possible
while the food is cooking.
■ When steaming, you can cook on several levels at
the same time. When preparing foods with different
cooking times, those with the longest cooking time
should be placed in the oven first.
Environmentally-friendly disposal
Dispose of packaging in an environmentally-friendly
manner.
This appliance is labelled in accordance with
European Directive 2012/19/EU concerning
used electrical and electronic appliances
(waste electrical and electronic equipment WEEE). The guideline determines the
framework for the return and recycling of used
appliances as applicable throughout the EU.
6
Getting to know your appliance en
*Getting to know your
appliance
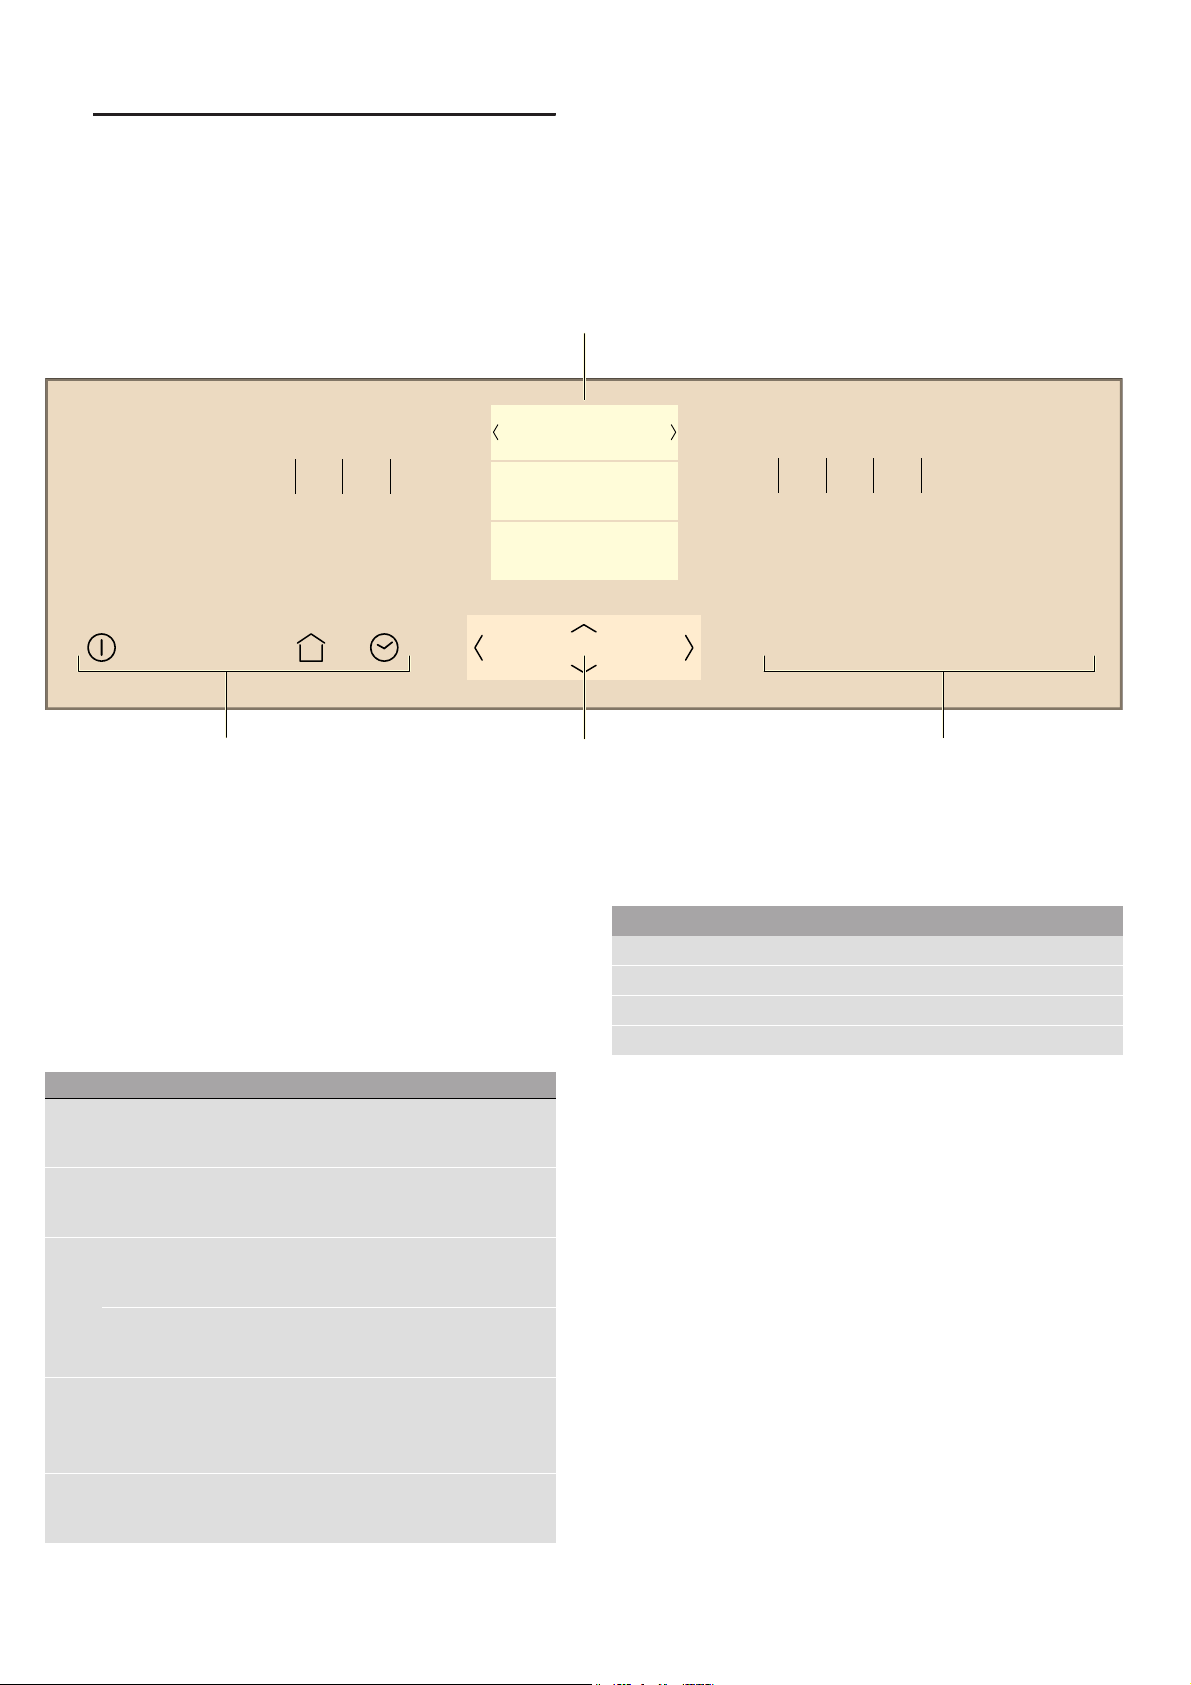
Gett i ng to know your appl i anc e
In this section, we will explain the indicators and
controls. You will also find out about the various
functions of your appliance.
¯
6WHDP
PLQ_V
Note: Depending on the appliance model, individual
details and colours may differ.
Control panel
You can set your appliance's various functions on the
control panel. The current settings are shown in the
display.
&
£ § È
( Display
0 Touch buttons
8 ShiftControl control element
Controls
Use the controls to set your appliance simply and
directly.
Touch buttons
There are sensors under the touch buttons. Touch the
corresponding touch button to select a function.
Touch button Use
# On/off Switches the appliance on or
off~ "Switching the appliance on
and off" on page 11
0 Main menu Selects operating modes and settings
~ "Setting and starting the
appliance operation" on page 12
3 Time-setting options Sets the timer, cooking time or "Fin-
ished at" start delay ~ "Time-setting
options" on page 14
Childproof lock Activating and deactivating the child-
proof lock ~ "Childproof lock"
on page 17
! Information Displays additional information
Displays the current temperature
~ "Setting and starting the
appliance operation" on page 12
# Start/stop Start or pause the appliance
~ "Setting and starting the
appliance operation" on page 12
--------
ShiftControl control element
Use the ShiftControl control element to navigate
through the lines on the display and select the settings.
Settings that you can change have left and right
arrows '.
Button Use
( Left Navigates to the left on the display
) Right Navigates to the right on the display
% Up Navigates upwards on the display
& Down Navigates downwards on the display
Note: You can also scroll through the settings values
quickly by pressing and holding a button. As soon as
you release the button, you stop scrolling through the
values quickly.
7

en Getting to know your appliance
Main menu
Touch the 0 touch button to access the main menu.
Menu Use
‹
²
"
,
--------
Steaming
Setting and starting the appropriate type of steam
heating. ~ "Operating the appliance" on page 11
Steam programmes
Prepare dishes with steam. ~ "Programmes"
on page 15
Basic settings
Individually adjusting the appliance
settings~ "Basic settings" on page 18
Descale
~ "Cleaning" on page 19
Steaming menu
Your appliance has different types of heating. After
switching on the appliance, you are taken directly to the
Heating function Temperature Use
Steam 30-100 °C For vegetables, fish, side dishes, for extracting juice from fruit and for blanching
‹
¨
Œ
¸
“
Cooking compartment functions
The features of the cooking compartment make your
appliance easier to use. This, for example, enables the
cooking compartment to be well lit and a cooling fan to
prevent the appliance from overheating.
Opening the appliance door
If you open the appliance door while the appliance is in
operation, this pauses the programme. The operation
continues to run when you close the door.
Reheat 80-100 °C For plated meals
Cooked food is gently reheated. The steam ensures that the food does not dry out
Dough proving 30-50 °C For yeast dough
Dough will rise considerably more quickly than at room temperature. The surface of the dough
does not dry out
Sous-vide 50-95 °C Cooking under a vacuum at low temperatures between 50and 95 °C and 100% steam: Suitable
for meat, fish, vegetables and desserts.
A vacuum-sealing machine is used to heat-seal the food in a special air-tight, heat-resistant cooking
bag. The protective envelope retains the nutrients and flavours.
Defrost setting 30-60 °C For fruit and vegetables
The moisture gently transfers the heat to the food. The food does not dry out or lose its shape
Steaming menu, in which you can find the types of
heating.
Note: You can set the interior lighting to not come on
during the operation in the basic settings. ~ "Basic
settings" on page 18
Cooling fan
The cooling fan switches on and off as required. The
hot air escapes above the door.
Caution!
Do not cover the ventilation slots. Otherwise, the
appliance may overheat.
Note: For some types of heating, the operation
continues to run even when the appliance door is open.
Interior lighting
When you open the appliance door, the interior lighting
switches on. If the door remains open for longer than
around 15minutes, the lighting switches off again.
In most operating modes, the interior lighting will switch
on as soon as the appliance is started. Once the
program is complete, the lighting switches off.
8
To cool the cooking compartment more quickly after
operation, the cooling fan continues to run for a certain
period afterwards.
Note: You can change how long the cooling fan
continues to run in the basic settings. ~ "Basic
settings" on page 18
Accessories en
_Accessories
Accessori es
Your appliance is accompanied by a range of
accessories. Here, you can find an overview of the
accessories included and information on how to use
them correctly.
Accessories included
Your appliance is equipped with the following
accessories:
Steam container, perforated, size L
For steaming whole fish or large quantities of vegetables, for juicing berries,
etc.
Steam container, unperforated, size
L
For catching dripping liquid when
steaming and for cooking rice, pulses
--------
Only use genuine accessories. They are specially
adapted for your appliance.
You can buy accessories from the after-sales service,
from specialist retailers or online.
and cereals
Locking function
The accessories can be pulled out approximately
halfway before they lock in place. The locking function
prevents the accessories from tilting when they are
pulled out.
■ The accessories must be inserted into the cooking
compartment the right way round for the tilt
protection to work properly.
■ Always insert the accessories fully into the cooking
compartment so that they do not touch the appliance
door.
When inserting the wire rack, ensure that the lug ƒ is
facing downwards and the ‚ safety lug on the wire rack
is at the rear and is facing upwards.
E
D
When inserting steam containers, make sure that the
lug „ is at the back and is facing downwards.
D
Inserting accessories
The cooking compartment has four shelf positions. The
shelf positions are counted from the bottom up.
In some appliances, the top shelf position in the
cooking compartment features a grill symbol.
( Evaporator dish
0 Water tank in the water tank recess
Caution!
■ Do not place anything on the cooking compartment
floor. Do not cover it with aluminium foil. A build-up
of heat could damage the appliance.
The cooking compartment floor and the evaporator
dish must always be kept clear. Always place
ovenware in a perforated cooking container or on a
wire rack.
■ Do not slide any accessories between the shelf
positions, or they may tip.
F
F
Optional accessories
You can purchase optional accessories from the aftersales service and specialist retailers, or on the Internet.
You will find a comprehensive range of products for
your appliance in our brochures and on the Internet.
Both availability and whether it is possible to order
online differ between countries. Please see your sales
documents for more details.
Note: Not all optional accessories are suitable for every
appliance. When purchasing, please always quote the
exact designation (E no.) of your appliance.
~ "Customer service" on page 26
Optional accessories
Steam container, perforated, size S
Steam container, unperforated, size S
Steam container, perforated, size L
Steam container, unperforated, size L
Wire rack for steamer
Porcelain cooking container, unperforated, size S
Porcelain cooking container, unperforated, size L
Decorative strip
--------
9

en Before using for the first time
KBefore using for the first
time
Bef or e usi ng for the first time
Before you can use your new appliance, you must
make some settings. You must also clean the cooking
compartment and accessories.
Before using for the first time
Before using the appliance for the first time, enquire
about the water hardness of your tap water from your
water supplier.
So that the appliance can reliably remind you to
decalcify it when required, you must correctly set your
water hardness range.
Caution!
The appliance may be damaged if unsuitable liquids are
used.
Do not use distilled water, highly chlorinated tap water
(>40mg/l) or other liquids.
Only use cold, fresh tap water, softened water or
uncarbonated mineral water.
Notes
■ If your water is very hard, we recommend that you
use softened water.
■ If you only use softened water, you can set the water
hardness range to "softened" in this case.
■ If you use mineral water, set the water hardness
range to "4very hard".
■ If you use mineral water, only use uncarbonated
mineral water.
Water hardness range Setting
0 0softened
1(up to 1.3 mmol/l) 1soft
2(1.3- 2.5 mmol/l) 2medium
3(2.5- 3.8 mmol/l) 3hard
4(above 3.8 mmol/l) 4very hard
Initial use
As soon as the appliance is connected to the power
supply, the first setting "Language" appears on the
display.
Setting the date
1. Use the & button to navigate to the next line.
2. Use the ( or ) button to select the current day.
3. Use the % button to return to "Day".
4. Use the ) button to select the next setting.
5. Use the & button to navigate to the next line.
6. Use the ( or ) button to select the current month.
7. Use the % button to return to "Month".
8. Use the ) button to select the next setting.
9. Use the & button to navigate to the next line.
10. Use the ( or ) button to select the current year.
11. Use the % button to return to "Year".
12. Use the ) button to select the next setting.
Setting the water hardness
1. Use the & button to navigate to the bottom line.
2. Use the ( or ) button to select the water hardness
range.
3. Use the % button to return to "Water hardness".
4. Use the ) button to apply the settings.
The initial use is complete.
Notes
■ You can change these settings at any time in the
basic settings. ~ "Basic settings" on page 18
■ After connecting the appliance to the power or
following a power cut, the settings for initial use are
shown in the display.
Calibrating the appliance and cleaning the
cooking compartment
The boiling point of water depends on the air pressure.
During calibration, the appliance sets itself to the
pressure ratio at the installation location.This occurs
automatically during the first steam operation. This
results in a lot of steam.
Preparing the calibration
1. Remove the accessories from the cooking
compartment.
2. Remove leftover packaging, such as polystyrene
pellets, from the cooking compartment.
3. Before calibrating the appliance, wipe the smooth
surfaces in the cooking compartment with a soft, wet
cloth.
Setting the language
1. Use the & button to navigate to the bottom line.
2. Use the ( or ) button to select the language.
3. Use the % button to return to "Language".
4. Use the ) button to select the next setting.
Setting the time
1. Use the & button to navigate to the next line.
2. Use the ( or ) button to select the current time.
3. Press the % button.
4. Use the ) button to select the next setting.
10

Operating the appliance en
Calibrating the appliance and cleaning the cooking
compartment
Notes
■ The calibration can only be started once the cooking
compartment is cold (room temperature).
■ Do not open the appliance door during calibration.
Calibration will otherwise be interrupted.
1. Use the # touch button to switch on the appliance.
2. Fill the water tank. ~ "Filling the water tank"
on page 12
3. Set the heating type, temperature and cooking time,
then start the appliance operation. ~ "Setting and
starting the appliance operation" on page 12
Settings
Heating type Steam ‹
Temperature 100 °C
Cooking time 20 minutes
4. Use the # touch button to switch off the appliance.
5. Wait until the cooking compartment has cooled
down.
6. Clean the smooth surfaces with soapy water and a
dish cloth.
7. Empty the water tank and dry the cooking
compartment. ~ "After each use" on page 13
Notes
■ So that the appliance adapts to a new installation
location after moving house, reset the appliance to
the factory settings. Repeat the initial use settings
and the calibration.
■ The appliance saves the calibration settings, even in
the event of a power cut or disconnection from the
mains.It must not be calibrated again.
Cleaning the accessories
Clean the accessories thoroughly using soapy water
and a dish cloth or soft brush.
1Operating the appliance
Operat i ng the appl i ance
You have already learnt about the controls and how
they work. Now we will explain how to set your
appliance. You will learn about what happens when you
switch the appliance on and off, and how to select the
operating mode.
:Warning – Risk of scalding!
When you open the appliance door, hot steam can
escape. Steam may not be visible, depending on its
temperature. When opening, do not stand too close to
the appliance. Open the appliance door carefully. Keep
children away.
:Warning – Risk of scalding!
The water in the evaporator dish is still hot even after
the appliance has been switched off. Do not empty the
evaporator dish immediately after switching off the
appliance. Allow the appliance to cool down before
cleaning it.
:Warning – Risk of scalding!
When you open the appliance door, hot water may flow
out of the appliance. When opening the door, do not
stand too close to the appliance. Open the appliance
door carefully. Keep children away from the appliance.
If the evaporator dish overflows, do not pour more water
into the water tank.
Switching the appliance on and off
Touch the # touch button to switch the appliance on or
off.
After switching off the appliance, on the display you can
see how high the residual heat in the cooking
compartment is.
Display Meaning
-h- Residual heat (between 60 °C and 100 °C)
Notes
■ Certain displays and notes, such as the residual heat
in the cooking compartment, remain visible on the
display even when the appliance is switched off.
■ After an appliance operation, the cooling fan runs on
audibly until the cooking compartment has been
cooled as far as possible.
■ Switch off your device when you do not need to use
it. If no settings are applied for a long time, the
appliance switches itself off automatically.
11
 Loading...