

Page 1

Neets Control – OsCar
Installation Manual
Page 2

Page 2 of 12
Foreword
The purpose of this document is to describe how to install and configure the Neets Control –
OsCar DK and EU models.
COPYRIGHT - All information contained in this manual is the intellectual property of and
copyrighted material of Neets. All rights are reserved. You may not allow any third party access
to content, information or data in this manual without Neets’ express written consent.
CHANGES - Neets reserve the right to change the specification and functions of this product
without any notice.
Questions, AFTER reading this manual, can be addressed to your local dealer or:
Neets
by E-Mail: Support@Neets.dk
or you may use our contact form at www.neets.dk
Revision list
Author: Date Description Pages Rev
TSA 07/03-2012 First release All 1.00
MH 08-07-14
New design according to Neets design guide All 2.00
MH: 09-07-2015 Changed photo of BraVo to OsCar (backside) 3 3.00
What is in the box?
When you open the box it will contain the following items:
OsCar, DK
1 x Neets Control - OsCar
1 x 12V wall plug PSU
Terminal connectors
1 x Front cover
1 x Paper cover
OsCar, EU
1 x Neets Control - OsCar
1 x 12V wall plug PSU
Terminal connectors
1 x Front cover
1 x Paper cover
Metal plate
2 x screws for metal plate
Page 3

Page 3 of 12
Important Safety Instructions
Caution:
Read these instructions:
Read and understand all safety and operating instructions before using the equipment.
Keep these Instructions:
The safety instructions should be kept for future reference.
Heed all Warnings:
Follow all warnings and instructions marked on the equipment or in the user information.
Avoid Attachments:
Do not use tools or attachments that are not recommended, because they may be hazardous
Warning!:
• This equipment should be operated only from the included power supply.
• To remove power from the equipment safely, remove all power cords from the rear of the equipment, or the
desktop power module (if detachable), or from the power source receptacle (wall plug).
• Power cords should be routed so that they are not likely to be stepped on or pinched by items placed upon or
against them.
• Do not defeat the safety purpose of a polarized or grounding-type plug. A polarized plug has two blades with one
wider than the other. A grounding-type plug has two blades and a third grounding prong. The wide blade or the
third prong is provided for your safety. If the provided plug does not t into your outlet, consult an electrician for
replacement of the obsolete outlet.
• Unplug this apparatus during lightning storms or when unused for long periods of time.
• Refer all servicing to qualied service personnel. There are no user-serviceable parts inside. To prevent the risk of
shock, do not attempt to service this equipment yourself because opening or removing covers may expose you to
dangerous voltage or other hazards. Contact your local Neets reseller or distributor.
• If the equipment has slots or holes in the enclosure, these are provided to prevent overheating of sensitive
components inside. These openings must never be blocked by other objects.
• Do not use this equipment near water.
• To reduce the risk of re or electric shock, do not expose this apparatus to rain or moisture and objects lled
with liquids.
• Unplug the product before cleaning. Clean only with a dry cloth and not cleaning uid or aerosols. Such products
could enter the unit and cause damage, re, or electric shock. Some substances may also mar the nish of the
product.
FCC Class A Notice:
This equipment has been tested and found to comply with the limits for a Class A digital device, pursuant to part
15 of the FCC Rules. Operation is subject to the following two conditions:
1. This device may not cause harmful interference.
2. This device must accept any interference received, including interference that may cause undesired operation.
The Class A limits are designed to provide reasonable protection against harmful interference when the
equipment is operated in a commercial environment. This equipment generates, uses, and can radiate radio
frequency energy and, if not installed and used in accordance with the instruction manual, may cause harmful
interference to radio communications. Operation of this equipment in a residential area is likely to cause harmful
interference, in which case the user will be required to correct the interference at his own expense.
FCC regulations state that any unauthorized changes or modications to this equipment, not expressly approved by
the manufacturer, could void the user’s authority to operate this equipment.
The lightning bolt triangle is used to alert the user to the presence of uninsulated “dangerous
voltages” within the unit’s chassis that may be of sufcient magnitude to constitute a risk of electric
shock to humans.
The exclamation point triangle is used to alert the user to presence of important operating and
service instructions in the literature accompanying the product.
!
Page 4

Page 4 of 12
Contents
Foreword: ..............................................................2
Revision list: ............................................................2
What is in the box ........................................................2
Important safety instructions................................................3
Contents ..............................................................4
Description: ............................................................5
Quick guide to the OsCar ...................................................6
Installation .............................................................7
DK Version .............................................................7
EU version .............................................................8
Connections and Controls ..................................................9
Power input port .........................................................9
I/O Ports...............................................................9
IR/RS-232 port ..........................................................10
Buttons ...............................................................10
Conguration through USB port ..............................................10
Troubleshootiong .........................................................11
Specications ...........................................................12
Page 5

Page 5 of 12
Description
Neets Control – OsCar is a small, but intelligent control system with a minimum of buttons,
which makes it very simple to use.
With Neets Control – OsCar anyone can start up a presentation without an introduction - just
press ONE button and you are ready to begin!
Neets Control – OsCar is easy to install and perfect for use in classrooms.
Function description
RS-232 (Tx/Rx) / IR (controls 1 device)
1
I/O 2
LAN port 1
Buttons 4
LED (Color: Red) 4
USB port for programming 1
PIR sensor input Ye s
Light on/off Ye s
Room darkening Ye s
Screen up/down Yes
Volume control Ye s
Page 6
Page 6 of 12
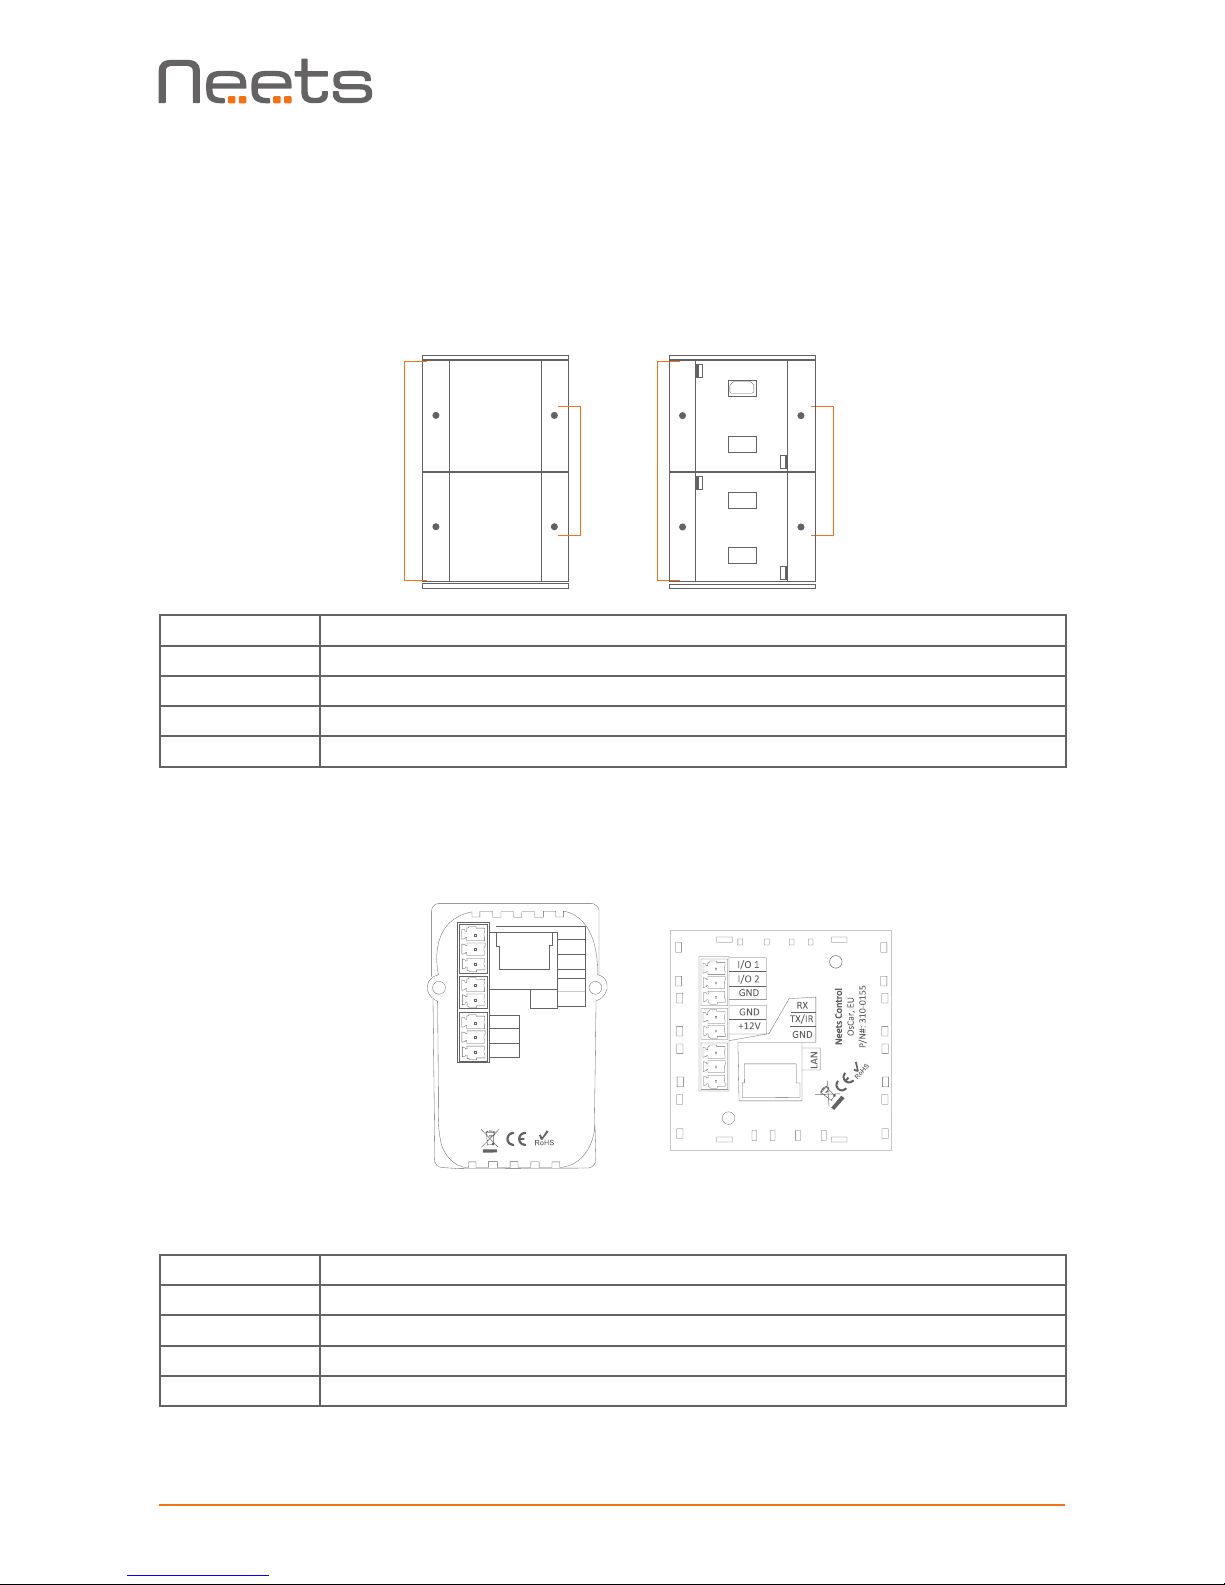
Quick guide to the OsCar
Buttons, indicators and connectors are available on the front and rear panels.
These are shown below:
Front:
Number: Description
1 Push buttons for controlling the AV setup
2 Red LED lights for indication of AV setup status
3 Front cover with label for button description
4 Mini USB for programming (behind front cover)
Rear:
Number: Description
1 External 12V DC input
2 RS-232 or IR control out
3 Input/Output
4 LAN connector
1
MUTE OFF
PC1 PC 2
3
2 1 2
DK version EU version
3
4
2
1
With front cover Without front cover
2
3
1
4
Neets Control
OsCar, DK
P/N#: 310-0255
GND
GND
I/O 2
I/O 1
GND
+12V
RX
LAN
TX/IR
4
Page 7

Page 7 of 12
Installation
The OsCar can be installed in standard electrical back boxes or by using mounting brackets. Each
model (DK, EU) ts in typical boxes matching specic installation requirements for the country of
sale.
1. Prepare the installation site by installing the needed back box or brackets. Pull the needed
cables through the back box or bracket.
2. Mount the supplied connectors to the cables as needed and connect to the control
system.
3. Mount the control system in the back box or on the bracket:
DK version
Insert a athead screwdriver gently and pry out the front cover. Remove the
front cover and the paper label behind it.
Insert a athead screwdriver into the button. Gently push and pry out the button.
Insert the control system in a frame matching the back box used.
Insert screws (not supplied) matching the back box into the two holes. Secure the
control system to the back box without overtightening the screws.
Remount the paper label, insert a printed transparent label showing the button func-
tions, and mount the front cover. Note that the front cover mounts in only one direction.
BLANK
PC 1
PC 2
Flathead screwdriver
Paper label
Transparent label
Front cover
Page 8

Page 8 of 12
EU version
Insert a athead screwdriver gently and pry out the front cover. Remove the
front cover and the paper label behind it.
Insert the control system in a frame matching the back box used.
Insert screws matching the back box or bracket into the two holes. Secure the
control system to the back box or bracket without overtightening the screws.
Remount the paper label, insert a printed transparent label showing the button func-
tions, and mount the front cover. Note that the front cover mounts in only one direction.
4. Connect and apply power to the control system.
5. Congure the control system using the Neets Project Designer.
PC 1
PC 2
BLANK
Paper label
Transparent label
Front cover
Page 9

Page 9 of 12
Connections and Controls
Power input port
Connect the OsCar to the supplied universal
mains AC power adaptor. Using the supplied 2
pole screw block terminal connect white/black
wire to 12V and black wire to GND.
I/O ports
The Neets Control – OsCar has 1 I/O onboard.
They can be used for external keyboard, PIR
(movement) sensor, keyboard lock, extra relay
and so on.
The port is not potential free, which means you
will need external relays, if you need to prevent
e.g. ground loops.
When used as output it is active low (when the
software says activated, the pin are tied to GND
through a FET transistor - also called open drain/
collector function). You can draw up to 24VDC/
500mA.
When used as input the voltage has to be below
1 Volt DC to be accepted as LOW, and above 4
VDC (but below 24 VDC) to be accepted as high.
GND
I/O 2
I/O 1
GND
+12V
RX
LAN
TX/IR
GND
GND
I/O 2
I/O 1
GND
+12V
RX
LAN
TX/IR
Relay control
Input trigger
Relay
Switch
GND
GND
I/O 2
I/O 1
GND
+12V
RX
LAN
TX/IR
Page 10
Page 10 of 12
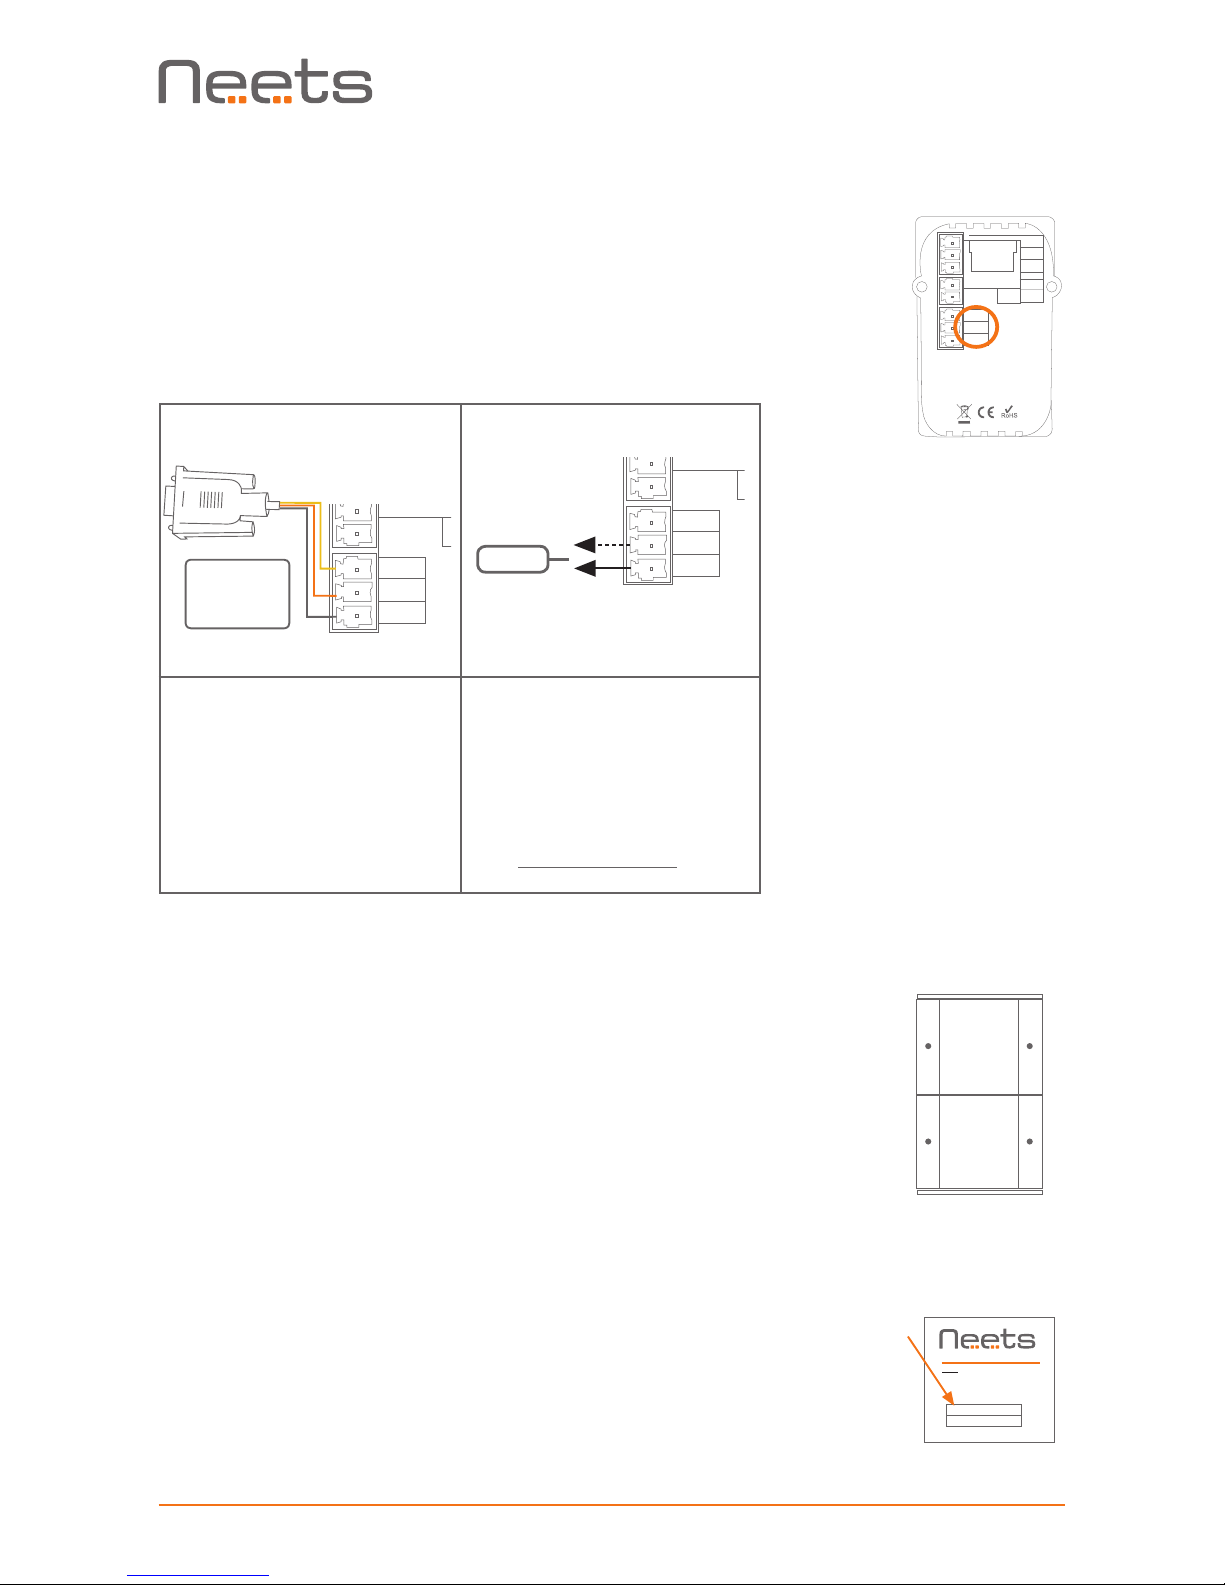
IR/RS-232 port
The OsCar has 1 port (TX/IR) which can be configured (in software)
either as RS-232 or as IR emitter.
The RS-232 port is used for one- or two-way communication. A
two way port is used for devices where reply commands is used.
Connect the OsCar as shown here.
Connect the port as shown below.
Neets Control
OsCar, DK
P/N#: 310-0255
GND
GND
I/O 2
I/O 1
GND
+12V
RX
LAN
TX/IR
MUTE OFF
PC1 PC 2
1
2
3
4
Neets website - sign up
Username (E-mail)
Sign up Login
Home
My Neets:
Buttons
The four front panel buttons are accessed by the end user to
control the AV system in which OsCar functions as the
controller. The buttons are numbered as shown to the right.
Each button has a tactile click feedback to ensure proper
activation. Also, each button has an embedded red LED light to
indicate current status of the AV system.
Button function and LED indication are set up using the Neets
Project Designer software.
Conguration through USB port
The USB port can only be used to program the Neets Control
– OsCar from the Neets Project editor software. It cannot be
used to control any devices what so ever.
From the USB you can also power the system. This is to be
used in programming situations, so you do not have to connect
12VDC to the unit to program it.
When used as single IR port:
Connect the IR emitter to
TX-/IR (striped wire) and
GND, as shown above.
Use Neets IR-Emitter
When used as RS-232
transmit port:
Connect the device to TX/
IR, RX and GND, as shown
above.
GND
GND
I/O 2
I/O 1
GND
+12V
RX
LAN
TX/IR
GND
GND
I/O 2
I/O 1
GND
+12V
RX
LAN
TX/IR
PIN 2 <-> RX
PIN 3 <-> TX
PIN 5 <-> GND
Page 11
Page 11 of 12
The USB connector needed to connect to the Neets Control
– OsCar is of the type mini USB B 5P. You can either buy this
cable from Neets or via the web (buy a USB A to Mini USB B
5P). The cable type is also widely used for MID devices,
compact cameras and so on.
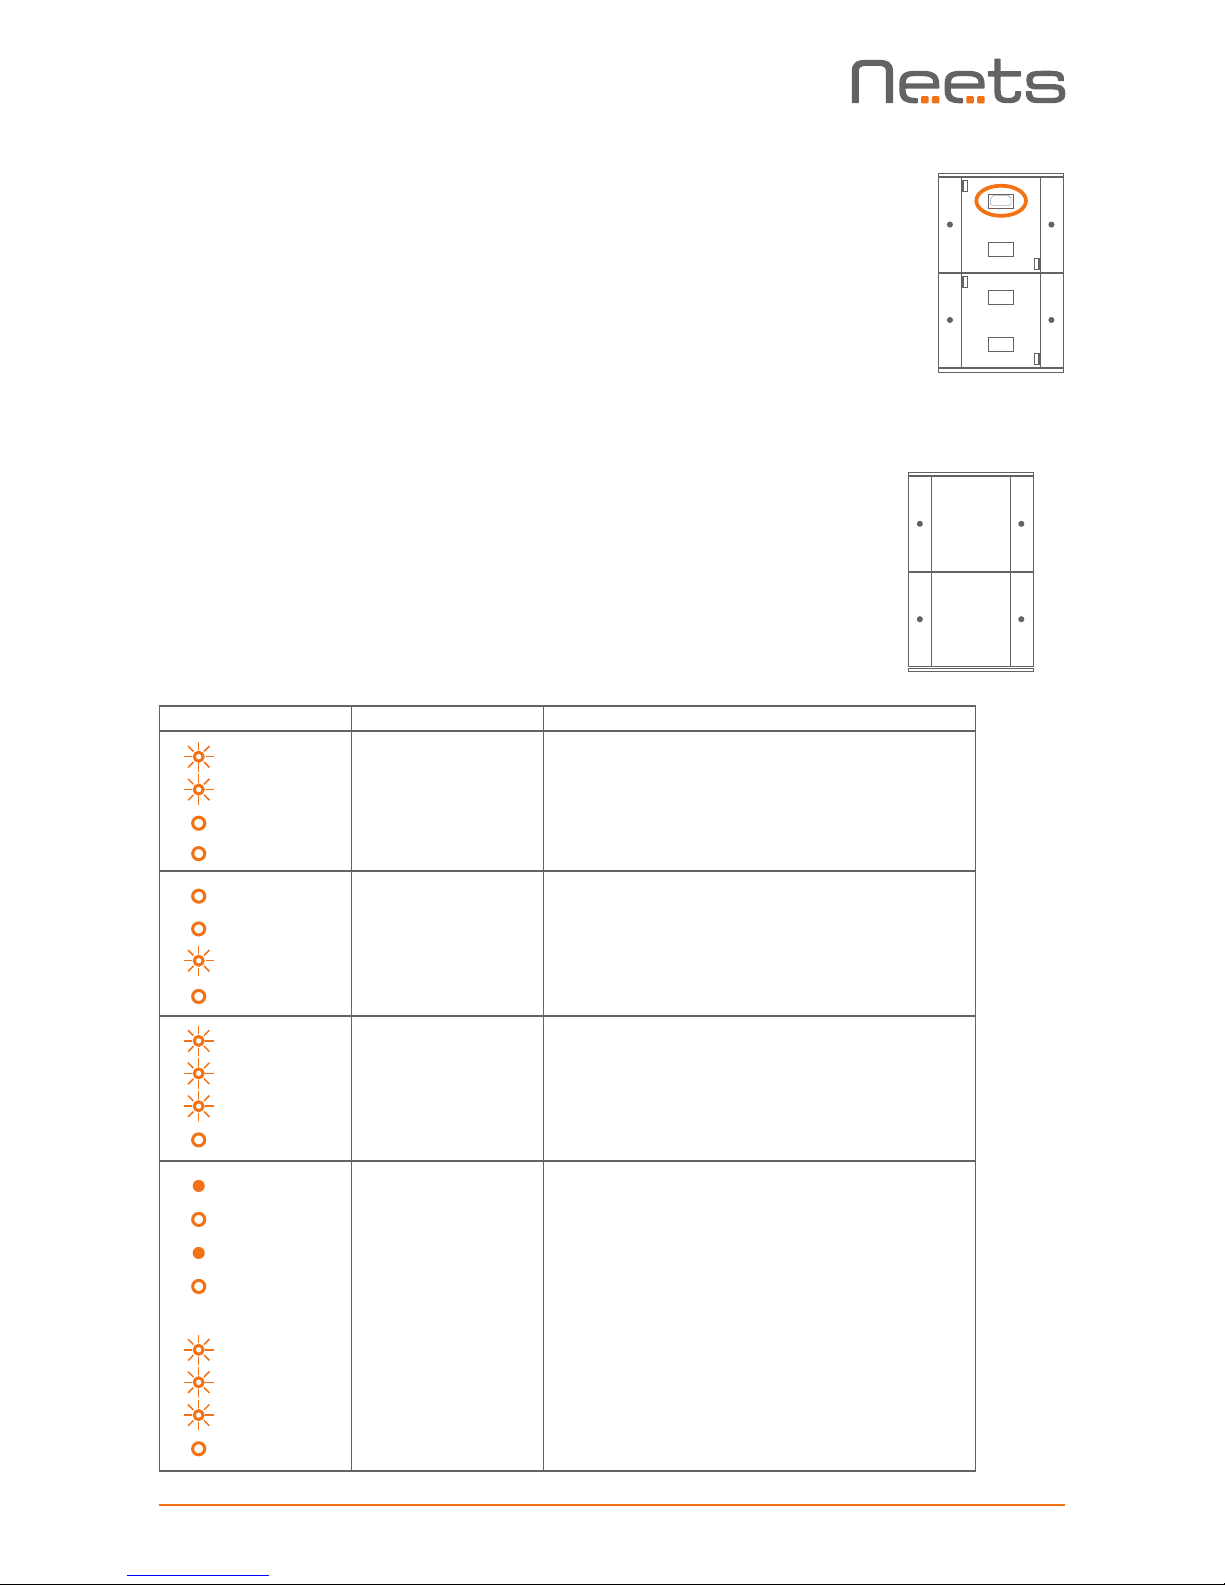
Troubleshooting
Error indication using LEDs
When errors occur the LED will indicate this. The following will
give you a guide to find these errors. In the Neets Control –
OsCar the LED´s are placed here:
MUTE OFF
PC1 PC 2
1
2
3
4
The flashing error descriptions and patterns are described below:
LED shows
Description Solution
1 Flashing
2 Flashing
3 Off
4 Off
Unexpected Error o Turn off the power to the control system for 20 sec before
turning the power on again.
1 Off
2 Off
3 Flashing
4 Off
Error in serial number o You need to return the unit to Neets or your local dealer for
replacement/repair.
1 Flashing
2 Flashing
3 Flashing
4 Off
No project found on the
control system or unable
to start the project
o Try to upload the project again.
o Alternatively, there can be a problem in the project you have
uploaded. In this case, try uploading an empty project and
see if this works.
1 Constant light
2 Off
3 Constant light
4 Off
↓
1 Flashing
2 Flashing
3 Flashing
4 Off
System are resuming
factory default settings
o When pressing Switch 1 and 2 during power on, the system
will delete the current settings and resume factory default.
This method is only intended to be used, if the control
system locks up and enters “Unexpected Error”.
Page 12

Page 12 of 12
Specications
Power input
Input voltage 12 VDC
Power Usage 1 W
Connector 2 pin screw block
Power adaptor (included)
Input voltage 100 VAC – 240 VAC
Line frequency 50 Hz – 60 Hz
Max power usage Max 8 W
RS-232 or IR port
Ports 1 x bi-directional
Baud rate 1200 – 115200 bit/sec
Data bits 7, 8
Parity Even, Odd, None
Stop bits 1, 2
IR frequency 400 Hz to 500 KHz
Connector 3 pin screw block
Product number
310-0155 OsCar EU, white
310-0255 OsCar DK, white
Compliancy
IEC/EN 61000-6-1
IEC/EN 61000-6-2
FCC Part 15, Class A
CE
Input / Output
Ports 2 x I/O
Input trigger low < 1VDC
Input trigger high > 4VDC
Output type Open drain
Isolated output No
Max voltage load 24 VDC
Max current 0.5 A
Connector 3 pin screw block
Network (LAN)
Speed 10 / 100 Mbit
Duplex modes Half or Full
DHCP Default off
Default IP 192.168.254.252
Default gateway 192.168.1.1
Default subnet mask 255.255.255.0
General
Width, EU 55 mm
Height, EU 55 mm
Depth, EU 17 mm
Width, DK 45 mm
Height, DK 72 mm
Depth, DK 17 mm
Weight,EU/DK 90 g
Shipping weight 0,3 kg
Shipping dimension: EU, DK
(W/D/H) 155x85x55 mm
Storage temperature -20 °C to 50 °C
Storage moisture Non-condensing
Operation temperature 0 °C to 30 °C
Operation moisture Non-condensing
 Loading...