


INSTRUCTION MANUAL
ENGLISH
0
1
CAPTURE AT SOURCE
F
No. 148546 / 03
2006-10-01

List of contents
CE, Declaration of conformity
page
3
Installation
Operating
Starting
Settings
Service
Repair
Delivery check
IMPORTANT! Safety imformation
Pre-installation
Technical data
Dimensions
Mounting instructions
Mounting the filter cartridges
Compressed air connection
Electrical installation
Accessories, electrical installation
Earth control measuring
Applications
Wiring diagram
Connection of several FilterMax to one system
Connection of 2 or 3 pilot boxes
Fans
Duct dimensioning / System installation
Operating description
Starting the system
Monitoring system, settings
Monitoring system, general descriptions
Monitoring system, fault indications
Service instructions
Trouble-shooting schedule
Spare parts
3
4
4
4
5
6
7
8
9
9 - 11
12
12
13
14
15
15
16
17
18
18 - 19
20
21 - 22
23 - 25
26 - 28
29
Accessories
Protocols
Accessories
Installation protocol
Service protocol
Service notes
0
1
30
31 - 32
33 - 36
37
0
0
1
1
FilterMax F 30
FilterMax F 60 FilterMax F 90
2

This product is designed to meet the
requirements of the relevant EC directives.
To maintain this status all installation, repair
and maintenance work must be carried out by qualified
personnel using only original spare parts. Contact your
nearest authorised dealer or AB Ph. Nederman & Co. for
advice on technical service or if you require spare parts.
AB Ph. Nederman & Co.
Sydhamnsgatan 2
S-252 28 Helsingborg
Sweden
2006-10-01
Lennart Andersson, Product Manager
DELIVERY CHECK
The following modules should be mounted
together to assemble the complete FilterMax F.
When delivered A - C are already assembled
(units shipped by sea may contain more
components).
A. Filter unit (1, 2 or 3 pcs.)
B. Stand
C. Control box
D. Collector (2 x 40 litres or 2 x 100 litres
with stand extentions)
E. Inlet
F. Outlet
G. Filter cartridges
(6 pcs./filter unit)
A
E
Declaration of conformity
We, AB Ph. Nederman & Co., declare under our sole
responsibility that the Nederman product: FilterMax F
serial 667 with accessories, to which this declaration
relates, are in conformity with the following directives,
underlying standards or other normative documents:
Directive: 98/37/EC - Safety of machinery
Applied standards EN 292 Part 1,2, EN ISO 4871
Directive: 89/336/EEC - Electromagnetic compatibility.
Applied standards EN 50082-1, EN 61000, EN 55011
and EN 55022
Directive: 73/23/EEC - Low voltage equipment.
Applied standards EN 60204-1,EN 60947-1
Directive: 87/404/EEC - Simple pressure vessels
Applied standards EN 286-1 part 1
F
G
The units should be checked for any
damage that may have occured during
transport. If there is damage or parts
missing, the carrier and your local
Nederman representative should be
notified immediately.
FilterMax F can be supplemented by
a number of accessories (see page 30).
B
D
C
0
1
D
3

IMPORTANT! SAFETY INFORMATION
Nederman FilterMax F is designed for collecting and
filtering fume and non-explosive dry dust.
To guarantee the correct function and a minimal service
FilterMax F must only be used for these purposes and
according to the instructions in this manual. The manual
contains important warning directions which have to be
read and followed.
Any functional disorders, especially those affecting the
safety of the machine, should be rectified immediately.
For safe and reliable results assembling
work, electrical installation, use, service
and trouble-shooting should be performed
by qualified personnel. Special training may
also be necessary.
Please contact your nearest authorised
dealer or AB Ph. Nederman & Co. for
technical advice.
PRE-INSTALLATION
FilterMax FI is for indoor installation.
FilterMax FO is for outdoor installation.
FilterMax F should be located with consideration for easy
handling of the collected dust and for convenience of
service and maintenance.
FilterMax F is usually installed on a reinforced concrete
foundation. However, installation on another structure is
also possible. When calculating for foundation or supporting
structure the following factors should be taken into consideration (see technical data):
• Total weight of FilterMax F
• Max. weight of collected contamination
• Possible wind load
• Possible snow load
IMPORTANT! Location must be clear of all obstructions
such as utility lines etc. Pay particular attention to the
anchor bolt location. Anchor bolts (M16) must extend at
least 60 mm above foundation. If you intend to secure the
unit by using expansion bolts or equivalent fittings, the
concrete floor must be prepared accordingly.
max. 155°
1200
min. 100
min. 5001000
50
20
FILTERMAX
1320
967
TECHNICAL DATA
Filtration
Operating airflow
Filterarea / filter cartridge
Filter material
Operating temperature
Process air (dry) temperature
Material description
Environment classes *
Compressed air requirements
Compressed air consumption
Compressed air connection
Voltage supply
Protection class
Relay voltage, accessory
Working pressure
Pulse noise
Weight
Basic PW filter: 99% at 0,3 µm (after some time in operation), BIA class C
PTFE filter: 99,9% at 0,3 µm (after some time in operation), BIA class C
1 module: 2400 - 3600 m3/h (depending on load and application)
2 modules: 4800 - 7200 m3/h (depending on load and application)
3 modules: 7200 - 10800 m3/h (depending on load and application)
1 module: 60 m2, 2 modules: 120 m2, 3 modules: 180 m
2 layer polyester / polypropylene
-20°C to +60 °C
0 °C to +60 °C, not condensing
3 mm painted steel (FilterMax FI, FO), epoxy based zinc primer and top coat (FO only))
C2 = low corrosion risk, indoors, unheated air varying temperature (FilterMax FI)
C4 = high corrosion risk, outdoors polluted urban areas and coastal areas (FilterMax FO)
0,6 MPa (6 bar, 87 psi), water and oil free
32 N-litres / cleaning pulse at 0,6 MPa (6 bar, 87 psi)
1/2" R 15, max. 0,6 MPa (6 bar, 87 psi)
100 V, 120 V, 230 V, 50/60 Hz
IP 54
24 V AC, max. 60 VA
0 to -5 kPa, not overpressure
Lp Aeq, 30 s, 50 dB
1 module: 615 kg, 2 modules: 890 kg, 3 modules: 1150 kg
2
*according to EN ISO 12944
4

G
DIMENSIONS
3 MODULES
2 MODULES
OUTLET
1 MODULE
ABC
FE
135
INLET
D
H
2270 3190 4120
115
1180
open angle 155
°
50
20
1515
1690
1320
970
1030
1160
2 x 40 litres
containers
NB!
The height dimensions for the
filter are only valid when using
the 40 litres containers.
In/Outlet inner diameters (mm)
500
-
400
2440
3365
4290
3540
4470
1445
395
-
2565
3490
4415
-
4600
1465
445
A
B
C
D
E
F
G
H
250
2450
3370
275
-
-
-
-
-
315
2375
3300
2560
3480
4410
1430
325
130
5

MOUNTING INSTRUCTION
WARNING!
Risk of personal injuries
and/or product damages!
Use approved lifting equipment for
unloading, assembly and installation
of the units.
0
1
Use schackles,
not hooks on the
lifting sling.
x 3
Connect the lifting sling
to 4 cabinet lifting lugs.
Distribute loads equally.
NB! Maximum 2 units should be
lifted at the same time.
IMPORTANT!
Ensure that the inlet, outlet and
all filter units always are mounted
together with bolts in all intended
holes. Always use toothed washers
to ensure electric connection.
1. Mount the dust containers. If dust containers
2 x 100 litre should be mounted the stand extensions
also must be mounted.
2. FilterMax is usually anchored to a concrete foun-
dation with expansion bolts or similar. Fit the fixing bolts
and use adjusting pieces, if necessary, to get the filter
unit in level. Check with a spirit level.
For more stabilty, the filter unit can be braced
against the wall.
3. For FilterMax F 60 and F 90 two and three
filter units are used respectively. Mount the units
together to build the complete filter unit.
6

NB! The inlet and outlet are reversable
and concequently they can be positioned
for duct connection on the
right or left side of
the filter.
4. Fit the inlet and outlet.
(NB! The inlet is equipped with
an inspection cover on top.)
MOUNTING THE FILTER CARTRIDGES
1. Unscrew the two fixing screws on the
access door. Use the enclosed T-key or a 10 mm
standard hexagon key. Open the door.
2. Loosen the nuts
on the filter holders
but don’t screw them
off completely.
Remove the filter
holders.
3. Handle the filter cartridges carefully to
avoid mechanical damage to the filter surface.
4. Insert the filter
cartridges. NB! The
mark on the back end
cap should be put on
the angled sheet-metal
plate just inside the
filter hole.
WARNING!
Risk of personal injury!
For FilterMax F equipped with 2 or 3 modules
(12 or 18 filter cartridges), an approved lifting
platform (see figure) has to be used when
mounting or replacing the filter cartridges.
5. Hang the filter holders on the screws
and fasten the nuts.
6. Shut the access door and
fasten the two fixing screws.
7

COMPRESSED AIR CONNECTION
Connect the compressed air supply line
to the compressed air connection of
the filter. Use pipe sealant on all
compressed air connections.
Compressed air components
(accessories, see page. 30)
A shut off valve for service work and a
filter regulator should be installed in the
compressed air pipe line (Note the flow
direction during the installation).
Important! the filter regulator
must be positioned in a frost free
environment.
Recommended connection size:
minimum 1/2".
Compressed air tank, module no. 3
Water drain valve
Compressed air tank, module no. 2
Water drain valve
FilterMax F
Control box
Pressure switch
(accessory)
Service valve with
integrated drain valve
(accessory)
Filter regulator,
recommended pressure
0,5 MPa (5 bar / 73 psi)
(accessory)
Compressed
air connection
Compressed air tank, module no. 1
Water drain valve
IMPORTANT!
• The compressed air supply pressure has
to be = 0,4 - 0,6 MPa (4 - 6 bar / 58 - 87 psi).
• The compressed air shall have a dew point
below the minimum temperature at which the
system is ment to be used.
• The compressed air supply must be both oil
and water free.
• Improper air pressure or contamination in
the compressed air can result in cleaning
valve failure, poor cleaning and filter
performance.
• Purge compressed air lines to remove debris
before connecting to the compressed air
manifold.
• Do not use thread-sealing tape after the
filter regulator.
• Quick couplings throttle the air too much
and are not recommended.
• Turn off and bleed off compressed air supply
before doing any service work.
• Do not pressurise the system if the air tem perature is below the minimum operating
temperature, that is -20 °C. At lower air tem perature the process could be started and be
in operation for a while (approx. 15 min.) after
which the system can be pressurised.
8

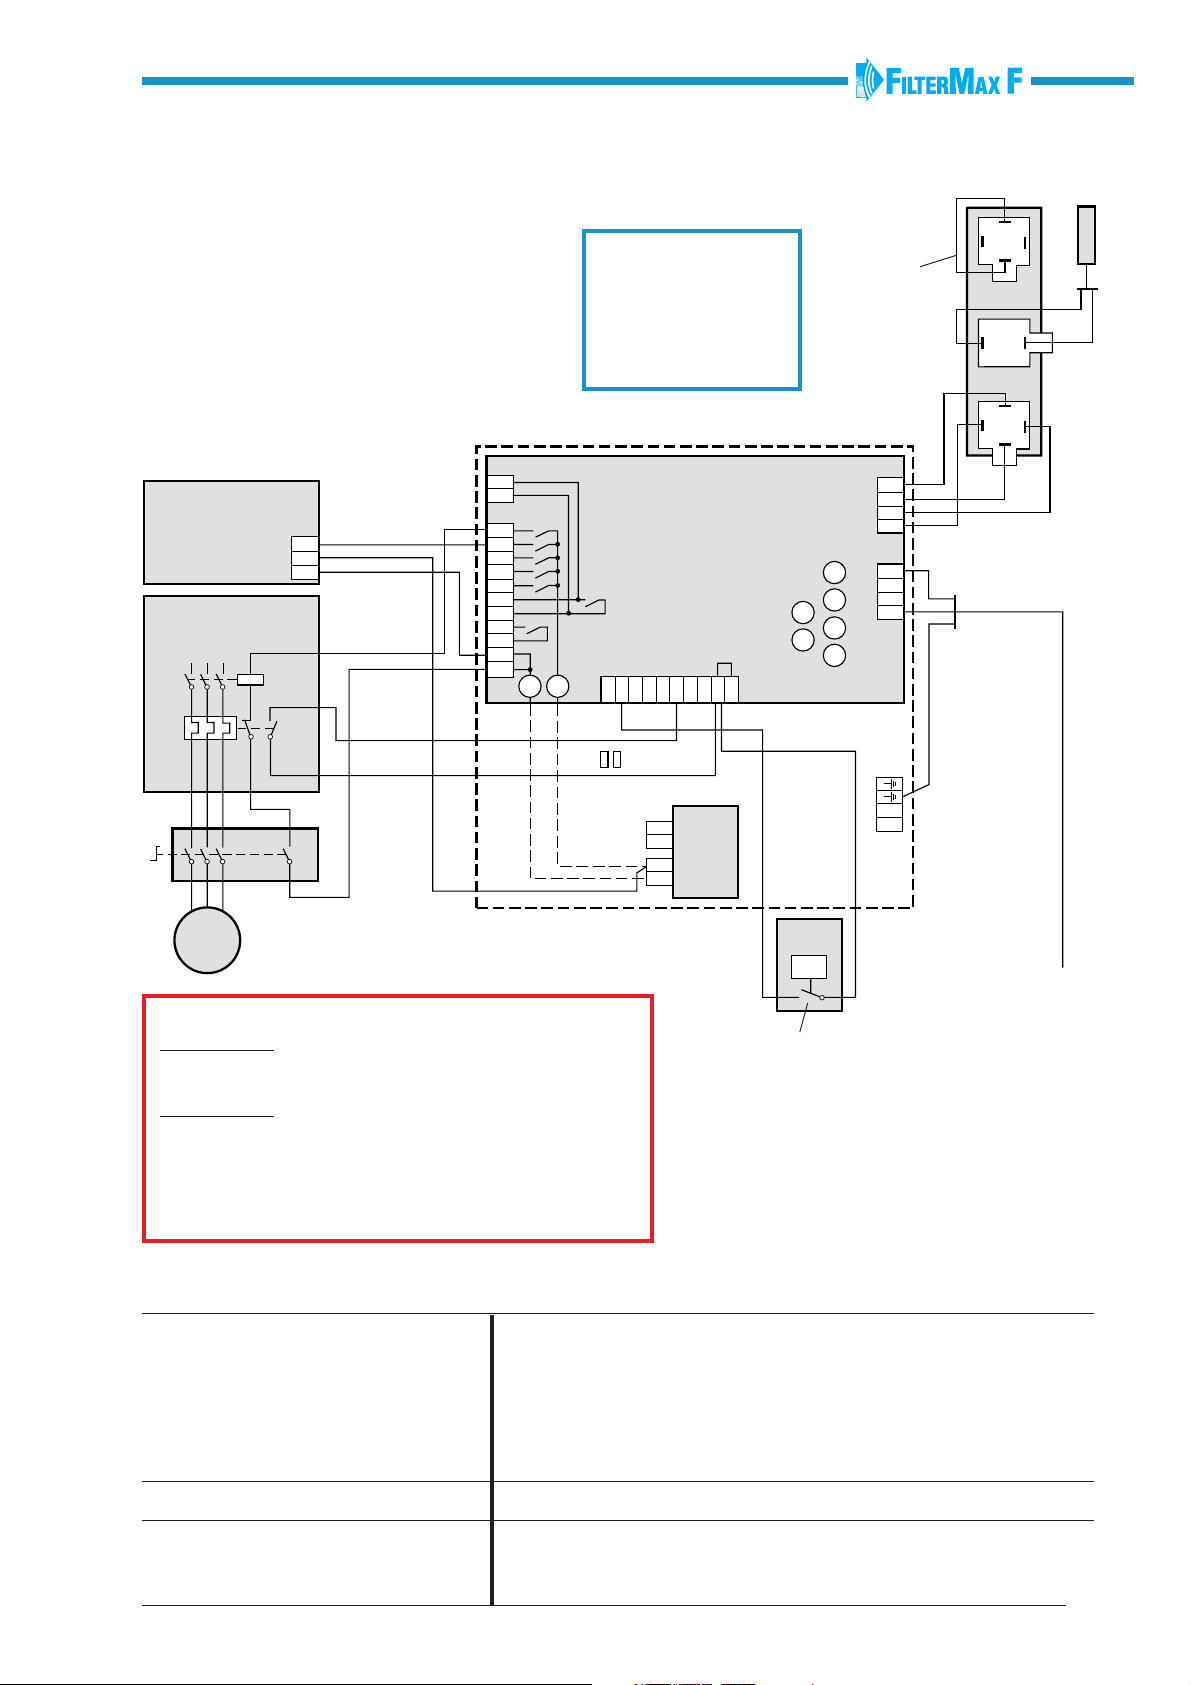
ELECTRICAL INSTALLATION
IMPORTANT!
All electrical work must be done by a qualified
WARNING!
Risk of personal injury!
Disconnect the electrical power
before servicing any electrical component.
All exposed conductive parts of the electrical
equipment and the machine shall be connected
to the protective earthing (see wiring diagram).
electrician according to local regulations.
Connect FilterMax F to the mains and connect fan and
other components and accessories according to the
following wiring diagrams.
A lockable safety switch should be fitted on the
mains connection cable.
Electrical connection together with Nederman Fan Starter
or Fan Inverter is described on wiring diagrams supplied
with these products.
ACCESSORIES, ELECTRICAL CONNECTION
Connecting fan and other accessories to the FilterMax F
as well as connecting the FilterMax F to the mains must
be done by a qualified electrician.
Connection block JP 1: Digital inputs
External START/STOP
Pressure switch, compressed air
High dust level
Pressure switch, high dP /
low airflow / simple dP control
Spare, not used
Fan motor protector
Fire alarm
14 109876532
97 98
Dielectric detector PNP
132
> P
JP1
The accessories must be equipped with
a potential free contact
Connection block JP 6: Outputs
Max. 2 A
Fan starter (24 V AC)
Down time damper (24 V AC)
Dust feeder (24 V AC)
Automatic depressurising of
compressed air tanks at fire
Alarm signal (A or S), 24 V AC
A-Alarm, potential free
contact, 24 V AC
Fan starter
potential free
contact, 24 V AC
14 10119876532
Alarm device
Start contactor
Damper motor
JP6
Compressed
air tank on
FilterMax F
P > 3 bar
Fan start equipment
Pressure switch
Automatic depressuring of compressed air tanks at fire
Frost free
Normally closed
valve with big bore.
Normally
opened valve.
Compressed
air connection.
Filter
regulator
Both valves shall be connected to
JP6:4, 10/11, so they will be activated (drawn) at normal operation.
At a possible fire alarm (or a power
failure) the valves are switching and
the compressed air tanks will be
depressurised.
9

ACTIVATING THE MENU
0
1
1
0
P
Push the P-button and the 0/1-button more than 4 seconds.
ACTIVATING INPUTS AND OUTPUTS
The inputs or outputs should be activated when accessories
have been connected. Push the P-button to activate actual
input/output. The LED’s indicate, where appropriate, with
red blinking lights.
The inputs are activated in the following order:
Selecting OFF, nC or nO
Push the 0/1-button and OFF, nC or nO comes up on the display.
OFF The selected input is not activated.
nC Normally closed: The selected input is activated.
nO Normally opened: The selected input is activated.
Select NC or NO depending on type of contact on the connected
accessory. Make a note of the setting which has been selected.
or nC or nO
P
A
OFF
Red blinking
B
OFF
Red blinking
C
OFF
or nC or nO
or nC or nO
0
1
0
1
Motor protector, fan
Push the P-button.
Activated input: JP1: 6
Set OFF, nC or nO with the 0/1-button.
OFF nC nO
P
0
1
0
1
High dust level indicator
Push the P-button.
Activated input: JP1: 3
Set OFF, nC or nO with the 0/1-button.
OFF nC nO
P
0
1
0
1
Pressure switch, compressed air
Push the P-button.
Activated input: JP1: 2
Set OFF, nC or nO with the 0/1-button.
OFF nC nO
D
OFF
Red blinking
or nC or nO
Red blinking
P
0
1
0
1
P
Pressure switch
high dP / low airflow
Push the P-button.
Activated input: JP1: 4
Set OFF, nC or nO with the 0/1-button.
OFF nC nO
10

E
EA OFF
or nC or nO
0
1
0
1
Fire alarm
Push the P-button.
Activated input: JP1: 7
Set OFF, nC or nO with the 0/1-button
OFF nC nO
P
F
G
H
or OFF or Int
dF On
00 - 60 s
dA 00
or OFF
LO ON
Dust feeder
Push the P-button.
0
1
0
1
P
0
1
0
1
P
0
1
0
1
P
Activated output: JP6: 3
Direct controlled by contactor or other 24 V relay.
On: The dust feeder is in operation
OFF: The dust feeder is not in operation
Int: Intermittent operation of the dust feeder
Set On, OFF or Int with the 0/1-button.
On OFF Int
Down time damper delay
Push the P-button.
Activated output: JP6: 2
24 V AC supply for opening a damper motor with
spring return or magnetic valve for compressed air.
Is used to reduce the starting current at fan start.
Delay time for opening the down time damper:
10 - 60 s after fan start. Set the required delay time
with the 0/1-button.
Local START/STOP
Push the P-button.
Activated input: JP1: 1
Inactivates the start/stop button on the control box.
Only remote start is possible in OFF-position.
Set On or OFF with the 0/1-button.
On OFF
or FAN
J
PULSE
Red fixed light
In the Fan start mode
Start signal Stop signal
In the Pre-coate mode
ST PA IN PA IN PA
Start signal
0
Stop signal
0
1
1
P
Pre-Coate Control
In some applications with FilterMax it is necessary to inject
dust. The purpose can be to reduce the fire risk or improve
cleaning of the filter cartridges. The input JP6:1 can be
used in 2 ways. When the function of the motor protection
has been chosen, the fan LED will show fixed red light.
Then you are able to choose the use of JP6:1 PULSE or
FAN with the 0/1-button. PULSE is the pre-coate mode.
PULSE FAN
If PULSE is set there will be a choise of parameters to set:
ST - Start. The initial injection time: 0, 1, 2, 3, 4, 5, 7, 10,
15, 20, 30, 40, 60 or 90 s.
IN - Injection. The injection time: 0, 1, 2, 3, 4, 5, 7, 10, 15,
20, 30, 40 or 60 s.
PA - Pause. The pause time between the injections: 0 or
20 s. 1, 2, 5, 10, 20 or 60 min.
If FAN is set JP6:1 will run in parallel with JP6:8,9 serving
as a 24 V fan start signal.
11

EARTH CONTROL MEASUREMENT
Earth control measuring must only be done by a
person with necessary knowledge.
IMPORTANT!
All metal parts of the filter unit must be earthed
reciprocally and connected to earth. To secure
this, the following procedure must be followed.
6
When the FilterMax F has been installed and during maintenance
work the earthing shall be measured. The measuring is done
between GND1 (in the Control Box, see picture below) and the
following components on FilterMax F. Disconnect protection earth
from GND1 before measuring.
1. Inlet
2. Cleaning access point (on the inlet)
3. Dust container
4. Adapter for dust container
5. Filter cartridge
6. Filter module
7. Door
Reconnect protection earth to GND1.
Circuit card
FilterMax F
Control Box
JP3
230
120
100
0
1
2
7
0
1
4
3
GND1
0
24
APPLICATIONS
Nederman FilterMax F separates for instance welding
fume, metal oxides, talcum, lime stone, dust
and grinding dust.
FilterMax F must not be used for separating
explosive contaminations.
Explosive dusts are dry organic dusts and some metallic
dusts. The metallic dusts are, for example, aluminium,
magnesium, titanium, chromium and fine virgin dusts of
other metals. Welding fumes from these metals are not
explosive, but grinding dust is a problem. Please contact
your Nederman representative in case of doubts.
Various combinations of semi combustible fumes/dusts
(oil, grease) and sparks can cause fires when grinding or
welding. The most important action is to prevent sparks
from entering the extraction devices. Secondly it is very
important to perform regular cleaning of the extraction
arms/devices and the duct system.
FilterMax F does not separate gases.
Disconnect at earth
control measuring
WARNING!
Risk of personal injury!
• In some countries the purified air must not be
recycled in the workshop if FilterMax F is used
to separate welding fume or some contaminations
that may be a health hazard.
• Use a safety filter if the air is recycled in the
workshop.
Risk of fire or explosion!
• Do not use FilterMax F to separate explosive
fume or dust.
• Connect a fire alarm to the filter controling
processor, which means the filter will stop at
a possible fire.
• Care should be taken when working with
painted or oiled material. Consult your Nederman
representative for advice.
• FilterMax F must not be exposed for burning/
glowing material.
12
CONNECTION TO THE MAINS
WIRING DIAGRAM
Pilot box
CONNECTION OF:
• FAN STARTER
• SAFETY SWITCH (Nederman accessory)
• AFTER CLEANING DAMPER
• PRESSURE SWITCH (Nederman accessory)
• PILOT BOX (included in the delivery)
• FAN (Nederman accessory)
NB! After cleaning damper with spring
return should be connected only to JP6
no. 2 and no.10 or 11.
Motor
After cleaning
damper
1
Fan contactor
Control voltage 24 V
2 A max
135
246
135
246
135
246
Open
Supply
Com
95 97
96 98
13
14
JP5
JP6
1
2
1
2
3
4
5
6
7
8
9
10
11
F8 F7
Designations, Circuit card
FilterMax F control box:
JP1: Inputs
JP3: Power supply
JP4: Pilot box
JP5: A-alarm off
JP6: Outputs
Circuit card
FilterMax F
Control box
123456789
0
24
0
24
JP1
10
2
1
2
34
NB! connection
between 3 and 4
JP4
4
Door
{
3
Pilot
-
2
control
+
1
Brown
JP3
230
F1
120
100
F2
F6
F3
F5
F4
GND1
0
24
0
Output
Input
1
34
Black
Black
Blue
Connection of
2 or 3 pilot boxes,
see page 15
2
Door switch
M
For fan start, two alternatives are possible.
Alternative 1:
Connection to block JP6: 1 (24 V AC), for direct control
by contactor or other 24 V relay.
Alternative 2:
Connection to block JP6: 8 - 9, potential free relay
output, is used when the start equipment has its own
24 V control voltage, for example Nederman Fan Starter
(which is recommended). The complete connection is
described in the Fan Starter Instruction Manual.
BASIC FUNCTIONS
1. Down time damper
Alt. 1. Electric motor open and close
Alt. 2. Electric motor open, Spring return
Alt. 3. Magnetic valve for compressed air
operated damper with spring return.
2. Transformer
FilterMax F
Wire to JP6 : 2 and 10 or 11(common) and the lower
24 V AC output from the transformer (2).
Wire to JP6 : 2 and 10 or 11(common).
3
> P
Pressure switch
Fuses
F1: T 1 A, 230 Vac power supply
F2: T 1,6 A, 120 Vac power supply
F3: T 2 A, 100 Vac power supply
F4: T 2 A, 100, 120, 230 Vac power supply
F5: 2 A, Basic card, inputs, dP card and
operator terminal power supply
F6: 2 A, Basic card, inputs, dP card and
operator terminal power supply
F7: 2 A, Outputs power supply
F8: 2 A, Outputs power supply
Mains-connection
100/120/230 V,
PE, 50/60 Hz
3. Pressure switch, compressed air
FilterMax F - Wire to JP1 : 2 and 9 or 10(common).
Select nO in the software setting if an OPEN contact indicates OK.
Select nC in the software setting if a CLOSED contact indicates OK.
13

CONNECTION OF TWO FILTERMAX TO ONE SYSTEM
LINE 1
0
1
LINE 2
LINE 1 LINE 2
1
2
34
1
2
1
1
34
2
34
2
34
0
1
NB! connection between
3 and 4 on the last pilot box.
1
1
1
1
2
34
2
34
2
34
2
34
NB! Remove the connection
between 3 and 4 on the output
contact before the cable from the
pilot box above is connected.
JP5
1
2
JP6
1
2
3
4
5
6
7
8
9
10
11
Circuit card
FilterMax F
Control Box
123456789
JP1
10
Door
Pilot
control
GND1
1
2
34
JP4
4
{
3
2
-
1
+
JP3
230
120
100
0
IN OUT
4
3
2
0
24
1
1
4321
2
34
4
3
2
1
IN OUT
4
3
2
1
GND to
filter house
1
2
34
1
2
34
4321
4
3
2
1
GND to
filter house
NB! connection between 3 and 4
14

CONNECTION OF 2 OR 3 PILOT BOXES
1
JP4
2
34
1
2
34
4
3
2
1
NB! Remove the connection between 3 and 4 on the output
contact before the cable from the pilot box above is connected.
1
1
2
34
2
34
1
1
2
34
2
34
NB!
connection
between 3 and
4 on the last
pilot box.
Total pressure
Pa
4000
3000
2000
NCF 40/25
NCF 30/25
NCF 30/15
FANS
NCF 160/25
NCF 120/25
NCF 50/25
NCF 80/25
NCF 80/15
NCF 120/15
1000
0
0
Each FilterMax F can be connected to an
existing central fan or to a fan dimensioned
specially for the system.
An adequate fan can be selected from the
Nederman NCF-range. Please contact your
2000 4000 6000 8000 10000 12000 14000 m /h
3
Air flow
Nederman representative for
dimensioning the right fan capacity.
Calculated air pressure drop over
the filter is approximately 1200 Pa.
15


STARTING THE SYSTEM
1. Turn on the compressed air supply to the cartridge filter.
Adjust to 0,4 - 0,6 MPa (4 - 6 bar, 58 - 87 psi) of pressure.
Pressure of 0,5 MPa is the most typical setting for
satisfactory cleaning performance.
2. Close the regulating damper halfway, see figure,
page 16. (As an alternative the airflow can be controlled
by a Nederman FanInverter).
3. Start the fan and check fan impeller rotation. Refer to
the rotation sticker on the fan motor. Proper fan impeller
rotation is extremely important. Contact a qualified
electrician if the impeller rotation must be reversed.
WARNING!
Risk of personal injury!
Stand clear of blower fan exhaust area as
debris can be exhausted and cause injury.
4. IMPORTANT! It is necessary to adjust the airflow
to the dimensioned value using the regulating damper
(or Nederman FanInverter). The air flow can be measured
with a fixed airflow meter (or a pitot tube) and a micromanometer.
IMPORTANT! Too much airflow can dramatically
reduce the life of the filter element.
Impeller rotation
direction
5. All the solenoid valves should open and close
continuously with a set interval time between each
cleaning pulse (factory set of 30 seconds).
Check operation of the solenoid valves in the following
way: Set the pause time on tst (see below). NB! This
is only a control setting and should not be used for normal operation. Start the system and count the number
of air pulses. It should be 6 pulses per module.
NB! Return the pause time to the original value
after checking.
MONITORING SYSTEM, SETTINGS
CLEANING DURING OPERATION
FilterMax F is in its standard design equipped with a fully
automatic compressed air cleaning of the filter cartridges.
A piping system directs, by a system of solenoid valves,
air pulses of 100 ms into the filter cartridges. The pause
time between the air pulses is factory set at 30 s, but can
be set between 5 s and 90 s. Shorter pause time can be
used if more than 1 module is used or if FilterMax F is
used for heavy load.
RECOMMENDATIONS FOR
PAUSE TIME SETTINGS
The pause time setting depends on the size of the filter
(i.e. the number of cartridges) and the load at which the
filter is working.
• Light load - A dust that is easy to clean off the filter
cartridges, such as dry stone dust or grinding dust.
• Normal load - Applications such as welding fume or
light dusts in heavy concentrations.
• Heavy load - Typically metal cutting with laser or
plasma and heavy welding.
With light load the cleaning pressure could be reduced
to 0.4 MPa (4 bar). Check that the filter pressure drop
does not rise too quick. If so, the pause time could be
reduced with one step and the cleaning pressure could
be increased, but maximum to 0.6 MPa (6 bar).
Model / Dust load
FilterMax F 30
FilterMax F 60
FilterMax F 90
The factory setting is 30 s for all FilterMax F.
* or no on line cleaning
pt 30
Setting the pause time
Push the P-button until pt is shown in the display.
Set one of the following values for pause times with
the 0/1-button. tst = test position, all valves will be
opened 1 time with 1 s interval.
tst
10 s
15 s
20 s
30 s
45 s
Light
90 s *
60 s
30 s
Normal
60 s
30 s
15 s
60 s
90 s
No cleaning
during operation
Heavy
30 s
15 s
10 s
1
0
0
1
P
18

CLEANING AFTER OPERATION
It is possible to choose cleaning after operation, that
is when the fan has stopped. This is more efficient
than cleaning during operation and is therefore
recommended. The pause time at cleaning after
operation is always 15 s.
If cleaning after operation has been chosen, one
has to set the desired number of cleaning cycles,
where one cycle means the cleaning of all filter
cartridges, that is 6, 12 or 18 cartridges, depending
on the number of modules in operation. 2 - 3 cycles
are recommended depending on the dust load
(light - normal) When cleaning after operation it is
recommended to use an after cleaning damper
(see accessories page 30).
0
1
dt 3
0
1
P
A-ALARM FUNCTION
The alarm-function is always ON when the system
operates, which means if there are negative
or Go
0
1
dL StP
0
1
P
Setting the cleaning cycles
Push the P-button until dt is shown in the
display. Set the desired number of cleaning
cycles with the 0/1-button.
0
1 cycle
2 cycles
influences on the function during operation, the alarm
will release, that is LED no. 7 will show a red fixed light.
3 cycles
4 cycles
5 cycles
Setting the alarm-function
Push the P-button until dL is shown in the display. Choose
any of the functions Go or StP with the 0/1-button. For fume/
dust generating processes that can’t be stopped immediately
when a fault accurs it is recommended to set Go and that a
clearly visible alarm device is installed.
Go: The system does not stop when the A-alarm is
activated, with exception for explosion/fire-alarm, motor
protection and with the access door open. The system
always stops for these functions.
StP: The system stops automatically when the alarm is
activated.
REMOTE START
It is possible to choose the functions Aut or OFF
with the 0/1-button. For most filters that are remotly
started from a machine or a process eg. it is
convenient to choose Aut.
or OFF
0
1
rE Aut
0
1
P
The remote start control should be connected to JP 1 and
9 or 10 (see page 9). If remote start is used, the system
can not be stopped with the 0/1-button. The text rE is
shown in the display for a short time.
Remote start, setting
Push the P-button until rE is shown in the display.
Choose Aut or OFF with the 0/1-button.
OFF: When using remote start there is no automatic
restart when a fault has been rectified. The remote started
mashine must be stopped and the FilterMax F must be
reset by one push on the start button before a new remote
start can be done.
Aut: When using remote start there is automatic restart
when a fault has been rectified or after a power failure.
19

MONITORING SYSTEM, GENERAL DESCRIPTIONS
The LED:s can indicate the following:
0
1
0
1 2 3 4 5 6 7
The display on the control box gives information
about the number of operating hours, cleaning
process, alarm functions and possible faults.
Blinks when the cleaning
function operates.
1
0
1
1, 2, 3, 4, 5 green fixed light: All functions normal
and correct
1
1, 2, 3, 4, 5 green fixed light alternating with blinking red:
The system operates. Incorrect function
has been rectified (alarm memory)
1, 2, 3, 4, 5 red fixed light: Incorrect function which
P
requires investigations.
6 yellow fixed light: Incorrect function which
requires attention.
7 red blinking light: Incorrect function which
requires immediate investigations.
1, 3, 4, 5 is only active after the inputs for the
accessories has been activated
(see page 10).
0
1
Fixed red light when
the system operates.
P
0
1
1 2 4
r E
Both "point" and 11 blinks when cleaning after operation is in progress.
0
1
The total number of operating
P
hours are displayed.
0
1
0
1
r E is displayed when trying to stop
the system from the control box when
P
the system is remote started.
0
1
0
1
1
The system has stopped and the cleaning
after operation is active. If the 0/1 button is
pressed once more the cleaning after ope-
P
ration is stopped immediately.
20

MONITORING SYSTEM, FAULT INDICATIONS
0
1
0
1
The fan motor overload protector is released.
Check the cause. Rectify the fault and reset
P
Red blinkingRed fixed
light
the motor protector. FilterMax F always stops
when the motor protector is released.
Red
fixed light
Red fixed light
Yellow
fixed light
Red blinkingRed fixed light
0
1
0
1
P
0
1
0
1
P
0
1
0
1
P
Possible faults (depending on how the input
has been used):
1. The pressure drop over the filter is high.
2. The air flow in the system is too low.
• Check if the filter cartridges are saturated,
change if necessary.
• Check if any damper is not open enough.
• Check the inlet for dirt. Clean if necessary.
Low pressure in the compressed air supply.
FilterMax F will not start.
FilterMax F has stopped due to low compressed
air pressure (less than 0,4 MPa (4 bar)).
FilterMax F will not start until correct pressure
is resumed.
EA
1
0
Red blinking
1
0
Red blinking
0
1
P
0
1
P
A-alarm! Means acute problems which could disturb
the function of the system. Action should be taken as
soon as possible. Call for a service technician.
Example:
• More than 1 valve is defective or does not work.
It is displayed which valves that are defective (Err +
1, 2, 3, ........ 18) are displayed, alternating with the
number of operating hours).
• Electronic faults on the circuit card.
Fire alarm. Call for service technician. Check
the reason and do not start the system until
the fault has been rectified.
21

Red fixed light
0
Yellow fixed light
0
Red blinkingRed fixed light
0
0
1
1
Service requirements! Should be rectified
as soon as possible.
1
Example:
• One valve is defective or does not work. It is
displayed what valve that is defect (Err + the
defective valve no. (1 - 18) is displayed, alternating
P
with the number of operating hours.
0
1
The door has been opened during
P
system operation. Shut the door.
0
1
1
The door is open and FilterMax F
P
will not start.
Red fixed light Yellow fixed light
r E A
light
p F a i l
Red blinkingRed fixed
Yellow fixed light
0
1
0
1
The dust container is full.
P
Empty the container.
0
1
0
1
r E A is diplayed (alternating with the
number of operating hours) in combination
with a motor error and a desplayed
P
A-alarm at remote controlling.
0
1
0
1
There has been a power failure.
Reset by pressing the 0/1-button. If
the filter is remotely started it will start
P
directly when the 0/1-button is pressed.
22

or another digit
0
1
Err 0
0
1
See B, Trouble-shooting Schedule,
P
page 26
SERVICE INSTRUCTIONS
In order to ensure that the system continues to operate correctly,
the following should be checked at periodic intervals depending
on what kind of contaminations that are separated and the
amount of use. Defective and worn parts should be replaced
immediately.
EMPTYING THE DUST CONTAINER
IMPORTANT!
Empty the dust containers when they are approximately
70 % full. Do not let them overfill. It can cause poor filter
performance and cause an extensive clean up work due to
overflow of dust when removing the containers.
Normal working light is required for emtying the containers.
Inspect how much the containers have been filled in the
beginning of the filtering process, to make it possible to
estimate a normal emptying interval.
1. Switch off the FilterMax F.
2. Put a pallet, which can be operated by a lift truck, under
the dust containers.
3. Loosen the dust containers by realising the excentric
locks. Let the containers down to the pallet.
4. Empty the dust containers. Disposal of dust should be
in accordance with local regulations.
5. Check that the gasket between the filter and dust
container not is damaged.
6. Put the dust containers back under the filter and fit
them with the excentric locks, Check that the gasket
between the filter and container is correctly fitted and
seals after locking.
WARNING!
Risk of personal injury!
Use protective goggles, breathing
mask and gloves when doing servicing and repairing work inside the
system, specially when replacing
the filter cartridges and emptying
the dust containers.
Avoid contact or exposure to dust as
much as possible during servicing or
maintenance.
Shut-off and bleed compressed air
supply before opening the inspection
door and servicing any compressed
air components.
Disconnect electrical power before
servicing.
CHECK WHEN EMPTYING THE DUST CONTAINER
Check if there is water (or oil) in the filter regulator. In that
case, the compressed air is not dry enough and there is a risk
of damage to the filter cartridges. Check that the pressure is
set to 0.4 - 0.6 MPa (4 - 6 bar, 58 - 87 psi). If there is water in
the filter regulator container, check that there is no water in
the pressure tank (tanks), by opening the drain nipple on the
right bottom side of the tank.
Filter regulator
container
23

SERVICE AFTER 1000 OPERATION HOURS,
BUT AT LEAST ONCE EVERY 6TH MONTH
• Check that all valves in the cleaning system operate properly. Count the
number of air pulses, 6 per module, that is 6, 12 or 18 per cycle.
• Remove dust collections from the lower part of the clean air room.
SERVICE AFTER 2000 OPERATION HOURS, BUT AT LEAST
ONCE A YEAR OR WHEN REPLACING FILTER CARTRIDGES
• Unscrew the inspection cover on top of the inlet.
Check the seals. Clean when necessary.
• Check that there is no water in the pressure tank
(tanks), by opening the drain nipple on the right bottom
side of the tank.
• Check the filter cartridges. They should be replaced if
the outer surfaces are damaged or if the air flow through
FilterMax is insufficient due to saturation of the filter
cartridges despite repeated cleaning.
• Take measures against possible corrosion by
grinding, primer and touch up paint.
• Earth control measurement (see page 12)
GND1 - Inlet
GND1 - Inlet cleaning access cover
GND1 - Dust container
GND1 - Dust container adapter
GND1 - Filter cartridges
GND1 - Filter units
GND1 - Doors
REPLACING THE FILTER CARTRIDGES AT
DAMAGE OR INSUFFICIENT FILTER FUNCTION,
BUT AT LEAST AFTER 6000 OPERATION HOURS
Inspection cover
WARNING!
Risk of personal injury!
For FilterMax F equipped with 2 or 3 modules
(12 or 18 filter cartridges), an approved lifting
work platform (see figure) has to be used
when exchanging the filter cartridges.
Instructions for replacing the filter cartridges,
see next page.
After 6000 operating hours, also check
that the cables not are damaged or
connected incorrectly.
24

REPLACING THE FILTER CARTRIDGES
1. Switch off the FilterMax F.
2. Shut off and bleed the compressed air.
3. Unscrew the two fixing screws on the
access door. Use the enclosed T-key or a 10 mm
standard hexagon key. Open the door.
4. Loosen the nuts
on the filter holders
but don’t screw them
off completely.
8. Remove the mounting frame
and fold the plastic bag in a way
5. Remove the
filter holders.
that the filter cartridge will be
completely enclosed and sealed.
9. Proceed in the same way with the
remaining filter cartridges.
7. Hang the mounting frame
with the plastic bag over the
end of the filter cartridge. Draw
the whole cartridge in to the
plastic bag.
10. Inspect the filter housing and look for damage,
dust layers etc. Clean inside the filter housing.
A vacuum cleaner is recommended.
11. Handle the new filter cartridges carefully
to avoid damage.
12. Insert the new filter cartridges. NB! The mark on the
back end of the filter cartridge should be put on the angled
sheet-metal plate just inside the filter housing.
13. Hang the filter holders on the screws and
fasten the nuts.
14. Check the access door seal. Shut the door and
fasten the two fixing screws.
15. Turn on the compressed air supply.
6. Draw a plastic bag
through the opening in
the enclosed mounting
frame, as the picture
shows.
25

TROUBLE-SHOOTING SCHEDULE
FilterMax F will not start.
Are there any LED’s on the
controlbox panel that are on.
NO
YES
A
Is the A-alarm LED no. 7, on?
Possible faults
Control questions
Actions
IMPORTANT!
• Turn off the compressed air
supply with the service valve
before doing any work on the
cleaning system.
• Do not pressurise the system
if the air temperature is below
the minimum operating temperature (= -20 °C). At lower air
temperatures the process can
be started and operated for a
while (approx. 15 min.) whereafter the system can be
pressurised.
Check the fuses on the card and
the power supply to the card. If
the power supply and the fuses
are fully functional, contact your
nearest Nederman representative
for more assistence.
FilterMax F starts, but stops after
a while and the display shows
Err + a digit.
Is the display showing Err 0 ?
YES
The cable connecting the controller
to the first pilot box is not properly
connected.
NO
NO
Are you trying to remote start
the filter?
NO
Contact your nearest Nederman
representative for advice.
YES
YES
B
Is the display showing Err +
another digit than 0 ?
NO
Contact your nearest Nederman
representative for advice.
YES
Correct the error indicated by the
function LED’s, see page 21 - 22.
Check that the wiring is correct.
Closing 1 + 9 or 10 shall start
the filter.
There is an electrical fault in one
or more of the pilot valves. The
number/s shown after Err are the
number of the faulty valve/s.
Depressurise the system. Check
that the leads to the valve coil are
properly connected. Remove the
leads and measure the resistance
of the coil, it shall be approximately 26 Ω . If the resistance is
more than 29 Ω or less than 23 Ω
or if the coil circuit is cut, replace
the pilot valve.
FilterMax F starts, but the fan will
not start.
C
Check that the electrical wiring
for the fan start is done correctly
between 1 and output common
(10 or 11) on the outputs (block
JP6). See wiring diagram, page 13.
26

The FilterMax F pressure
resistance is high.
Is the cleaning system fully
functioning?
NO
YES
D
Check the pressure of the compressed air. It should be 0,4 - 0,6
MPa (4 - 6 bar, 58 - 87 psi).
Are there some valves that are
functioning?
NO
Go to B
The airflow is insufficient.
Is the pressure resistance high
( >1000-1500 Pa)?
YES
Go to F
If the ∆ P Control is installed go
to the ∆ P Control manual section
regarding the adjustment of
cleaning the system.
Otherwise, check the pause time
set on the timer (see page 18).
The default value is 30 s. A heavy
application or a 2 - 3 module unit
(12 - 18 filter cartridges) will require
shorter times. A very light application can use longer times.
If the cleaning has been adjusted
previously you may have to replace
the filter cartridges.
E
YES
Go to D
Contact your nearest Nederman
representative for advice.
NO
Has the airflow been satisfactory?
NO
Is the fan operating correctly?
Does the impeller rotate in the
right direction?
YES
Check the rotating direction of
the fan impeller. Compare with
the arrow on the label on the fan
motor. It is very important that
the rotation direction is right.
If the impeller rotates in the wrong
direction, the fan gives only 40 %
of its possible air volume. Contact
a qualified electrician if the impeller rotation must be reversed.
YES
NO
Check if the system contains any
dampers and the position of these.
Open dampers to adjust the flow,
but don’t exceed the dimensioned
airflow for the filter unit.
Check that the filter unit’s inspection
panels are closed.
Check the fan for blocked outlet or
other damage.
Open the filter unit’s inlet inspection
door on the top of the inlet and
check for blockage, clean if
necessary.
If the inlet is blocked/partly blocked
by sticky dust/particles open the
inspection panel on the top off the
unit and clean the preseparator.
27

H
H
G
G
A valve is not operating correctly
(but there are functioning valves).
F
Does the display on the control
box show Err + a digit?
YES
Go to B
NO
G
Leaking compressed air system
(notified by sound)
Are the external connections
leaking?
Is the air temperature below 0 °C ?
NO
Check which valve is malfunctioning by listening. The valve
sequence is 4, 5, 6, 1, 2, 3 (where
1 is to the left when the door has
been opened).
Dismantle the valve housing and
check that the little air hole in the
diaphragm not is blocked.
Change defective valves (spare
part) or repair them with a repair
set (spare part). Mounting/repairing
instructions comes with the spare
parts.
YES
IMPORTANT!
Turn off the compressed air
supply with the service valve
(accessory) before doing any
work on the cleaning system.
If you have compressed air with a
dew point close to or higher then
the air temperature, the pilot valve
may freeze. An indication is that the
valve starts operating again when
the temperature increases.
IMPORTANT!
Do not pressurise the system
if the temperature is below the
minimum operating temperature
(= -20 °C). At lower air temperatures the process can be started
and operated for a while (approx.
15 min.) whereafter the system
can be pressurised.
YES
Repair the external connections.
NO
H
High emission. Abnormal emission
levels in the exhaust air.
Stop the system! Shut off the
compressed air and drain the tank.
Are all cartridges properly installed?
NO
Install them properly.
YES
Stop the system. Decrease the
system pressure to < 1 bar. Open
the access door and find the leak.
Shut off the pressure and drain the
tank.
Is a pulse-jet valve leaking ?
YES
Dismantle the valve and check for
contamination or damaged parts.
Clean and/or replace damaged
parts.
Look into the cartridges and check
if there are any traces of dust. Dust
on the clean side indicates a leak.
Replace damaged cartridges.
NO
Replace other damaged parts.
28

SPARE PARTS
Ordering Instructions
When ordering spare parts always
indicate the following.
A. Part No. and Control No.
(see FilterMax identification plate)
B. The spare part’s name and number
(see Spare Parts List)
C. Quantity of parts required.
5
Spare Parts List
Name
1 Filter cartridges (6-pack)
2 Circuit card (monitoring system)
3 Control box, complete
incl. electric components
4 Cover with display
5 Pulse valve
8
2
0
1
6 Pilot box, complete
7 Cleaning pipe (x 6)
8 Door gasket
9 Transformer
10 Pilot valve
10
6
0
1
4
7
REPLACEMENT CARTRIDGES (6-pack)
Basic PW
Dual layer polyester /
polypropylen.
Suitable for fumes
and fine particles.
Efficiency:
99 % at 0,5 µm
Filter area: 10 m
BIA class C
Part no. 12372055
2
Poly Web
Spun bound polyester.
Suitable for medium to
coarse particles.
Efficiency:
99 % at 0,5 µm
Filter area: 10 m
Washable
BIA class C
Part no. 12373279
2
Poly Web PTFE
PTFE membrane,
laminated to spun
bound polyester.
Suitable for fine to
medium particles.
Efficiency:
99,9 % at 0,5 µm
Filter area: 10 m
Washable
BIA class C
Part no. 12372060
2
3
9
1
29

ACCESSORIES
INLET
With cleaning access
panel on the top
Connection
diameter
Ø 250 mm
Ø 315 mm
Ø 400 mm
Ø 500 mm
for FilterMax FI
Part no.
12372070
12372071
12372072
12372073
for FilterMax FO
Part no.
12373561
12373562
12373563
12373564
OUTLET
Connection
diameter
Ø 315 mm
Ø 400 mm
Ø 500 mm
for FilterMax FI
Part no.
12372057
12372058
12372059
for FilterMax FO
Part no.
12373565
12373566
12373567
DUST HANDLING SYSTEM
All container kits contains adapter and
suitable extension legs if required.
FilterMax FI
Part no.
Container kit
2 x 40 l
Container kit
2 x 100 l, on wheels
Container, 40 l
Container, 100 l
incl. lid
∆
P-CONTROL KIT
Is used for controlling the cleaning more efficiently and
with better supervision. Saves pressured air in some
applications with intermittent load. Equipped with alarm
functions for high fall of pressure for filter.
Part no. 12373603
12372140
12372067
12372228
12372655
FilterMax FO
Part no.
12373881
12373897
12373898
12373899
FILTER REGULATOR
Is used for setting the correct air pressure.
Separates dust in the pressured air why
it also protects the valves. Should be
installed in the compressed air pipe line.
Must be positioned in a frost free
environment
Part no. 12372064
SHUT OFF VALVE FOR
COMPRESSED AIR
An air venting type. Should be installed in
the compressed air pipe line. Is used to turn
off the compressed air supply before
any service on the system is done.
Part no. 12372083
PRESSURE GAUGE KIT
Measures the pressure drop over the
filter cartridges. Is mounted on the
FilterMax’ stand.
Part no. 12372079
1500
500 1500
0
2000
PRESSURE SWITCH FOR
COMPRESSED AIR
Protects the filter from damage during use
without compressed air. Must not be
placed in explosion risk areas.
Part no. 12372142
PRESSURE SWITCH
(Not a Nederman product). Is used to indicate
low airflow or high fall of pressure over the filter.
AFTER CLEANING DAMPER
(Not a Nederman product) The damper closes
the duct when FilterMax F is shut off, which will
prevent dust from being transported back into the
workshop by the air pulses from the down time
cleaning. The damper should be mounted close
to the FilterMax F inlet.
SAFETY FILTER
Is recommended if the filtered air is recirculated
into the facility. Please contact your Nederman
dealer for more information.
30

INSTALLATION PROTOCOL, PAGE 1
If controls give results (for example measured values) which
differ much from earlier results, this must be understood as a
warning signal and lead to more careful investigations.
FilterMax F No.
Performed by
Control points
1. Delivery control (page 3)
A. Missing components
B. Transport damage
2. Installation control (page 4, 6 - 7)
A. Safe mounting / foundation
B. Fixing bolts / Traction forces
C. Wind / Snow load
D. Weight FilterMax F / collected dust
E. Conductible screw fittings
F. Inlet and Outlet
G. Dust container or Dust feeder
H. (2 or 3 filter units)
J. Filter cartridges
Date
Result Result Result Note
3. Compressed air connection (page 8)
A. Service valve
B. Filter regulator
C. Pressure switch
D. Pressure 0,4 - 0,6 MPa
E. Dew point
F. Oil / Moisture
G. Cleaning compressed air connections
4. Duct dimensioning (page 16)
A. Duct diameters
B. Inlet duct, length/inclination
C. Cleaning access covers
D. Fire damper
E. After cleaning damper
F. Flow meter
G. NCF fan
H. Extraction arms
31

INSTALLATION PROTOCOL, PAGE 2
FilterMax F No.
Performed by
Control points
5. Electrical installation (page 9-15)
A. Overload protector
B. Safety switch
C. After cleaning damper
D. Pilot box (1, 2 or 3)
E. Fan
F. Fan Starter
G. Extern START/STOP
H. Pressure switch, compressed air
J. Pressure switch, high dP/low airflow
K. Fire alarm
L. Dust feeder
M. Sum alarm, alarm signal devices
N. A-alarm
O. Activating, in/outputs
Date
Result Result Result Note
6. Earth control measurement (page 12)
A. GND1 - Inlet
B. GND1 - Inlet cleaning access cover
C. GND1 - Dust container
D. GND1 - Dust container adapter
E. GND1 - Filter cartridges
F. GND1 - Filter units
G. GND1 - Doors
7. Monitoring system, settings
(page 18-19)
A. Cleaning during operation
B. Pause time setting
C. Cleaning after operation
D. A-alarm function
E. Remote control
8. System start
A. Dimensioned airflow
B. Actual airflow
C. Filter ∆ P
32

SERVICE PROTOCOL (page 12, 23 - 25)
FilterMax F No.
Operating hours
Performed by
Control points
1. Dust container / Filter regulator
A. Empty the dust container (when 70 % full)
B. Water check filter regulator
C. Water check pressure tank
2. Magnetic valves,
function check
3. Remove dust,
clean air room
every 2000 h *
every 1000 h *
4. Cleaning access covers, cleaning
A. Check pre-separator inlet
5. Water check pressure tank
6. Checking the filter cartridges
Date
Result Result Result Result Result
every 6000 h *
A. Check cartridges for damage.
B. Measure cartridge ∆ P. If higher that
1500 Pa replace the cartridges.
7. Remove corrosion by grinding,
primer and touch up paint
8. Earth control measurement (page 12)
A. GND1 - Inlet
B. GND1 - Inlet cleaning access cover
C. GND1 - Dust container
D. GND1 - Dust container adapter
E. GND1 - Filter cartridges
F. GND1 - Filter units
G. GND1 - Doors
9. Replacing the filter cartridges
(page 25)
10. Check that the cables not are
damaged or connected incorrectly
11. Airflow (adjust if neccesary)
A. Dimensioned airflow
B. Actual airflow
*
Every 1000 hours or at least once every 6th month.
Every 2000 hours or at least once a year or when replacing filter cartridges.
Every 6000 hours or at damage or insufficient filter function.
33

SERVICE PROTOCOL (page 12, 23 - 25)
FilterMax F No.
Operating hours
Performed by
Control points
1. Dust container / Filter regulator
A. Empty the dust container (when 70 % full)
B. Water check filter regulator
C. Water check pressure tank
2. Magnetic valves,
function check
3. Remove dust,
clean air room
every 2000 h *
every 1000 h *
4. Cleaning access covers, cleaning
A. Check pre-separator inlet
5. Water check pressure tank
6. Checking the filter cartridges
Date
Result Result Result Result Result
every 6000 h *
A. Check cartridges for damage.
B. Measure cartridge ∆ P. If higher that
1500 Pa replace the cartridges.
7. Remove corrosion by grinding,
primer and touch up paint
8. Earth control measurement (page 12)
A. GND1 - Inlet
B. GND1 - Inlet cleaning access cover
C. GND1 - Dust container
D. GND1 - Dust container adapter
E. GND1 - Filter cartridges
F. GND1 - Filter units
G. GND1 - Doors
9. Replacing the filter cartridges
(page 25)
10. Check that the cables not are
damaged or connected incorrectly
11. Airflow (adjust if neccesary)
A. Dimensioned airflow
B. Actual airflow
*
Every 1000 hours or at least once every 6th month.
Every 2000 hours or at least once a year or when replacing filter cartridges.
Every 6000 hours or at damage or insufficient filter function.
34

SERVICE PROTOCOL (page 12, 23 - 25)
FilterMax F No.
Operating hours
Performed by
Control points
1. Dust container / Filter regulator
A. Empty the dust container (when 70 % full)
B. Water check filter regulator
C. Water check pressure tank
2. Magnetic valves,
function check
3. Remove dust,
clean air room
every 2000 h *
every 1000 h *
4. Cleaning access covers, cleaning
A. Check pre-separator inlet
5. Water check pressure tank
6. Checking the filter cartridges
Date
Result Result Result Result Result
every 6000 h *
A. Check cartridges for damage.
B. Measure cartridge ∆ P. If higher that
1500 Pa replace the cartridges.
7. Remove corrosion by grinding,
primer and touch up paint
8. Earth control measurement (page 12)
A. GND1 - Inlet
B. GND1 - Inlet cleaning access cover
C. GND1 - Dust container
D. GND1 - Dust container adapter
E. GND1 - Filter cartridges
F. GND1 - Filter units
G. GND1 - Doors
9. Replacing the filter cartridges
(page 25)
10. Check that the cables not are
damaged or connected incorrectly
11. Airflow (adjust if neccesary)
A. Dimensioned airflow
B. Actual airflow
*
Every 1000 hours or at least once every 6th month.
Every 2000 hours or at least once a year or when replacing filter cartridges.
Every 6000 hours or at damage or insufficient filter function.
35

SERVICE PROTOCOL (page 12, 23 - 25)
FilterMax F No.
Operating hours
Performed by
Control points
1. Dust container / Filter regulator
A. Empty the dust container (when 70 % full)
B. Water check filter regulator
C. Water check pressure tank
2. Magnetic valves,
function check
3. Remove dust,
clean air room
every 2000 h *
every 1000 h *
4. Cleaning access covers, cleaning
A. Check pre-separator inlet
5. Water check pressure tank
6. Checking the filter cartridges
Date
Result Result Result Result Result
every 6000 h *
A. Check cartridges for damage.
B. Measure cartridge ∆ P. If higher that
1500 Pa replace the cartridges.
7. Remove corrosion by grinding,
primer and touch up paint
8. Earth control measurement (page 12)
A. GND1 - Inlet
B. GND1 - Inlet cleaning access cover
C. GND1 - Dust container
D. GND1 - Dust container adapter
E. GND1 - Filter cartridges
F. GND1 - Filter units
G. GND1 - Doors
9. Replacing the filter cartridges
(page 25)
10. Check that the cables not are
damaged or connected incorrectly
11. Airflow (adjust if neccesary)
A. Dimensioned airflow
B. Actual airflow
*
Every 1000 hours or at least once every 6th month.
Every 2000 hours or at least once a year or when replacing filter cartridges.
Every 6000 hours or at damage or insufficient filter function.
36

SERVICE NOTES
Point no. Date Note
FilterMax F No.
37

www.nederman.com
Nederman is represented in:
Australia, Austria, Bahrain, Belgium, Brazil, Bulgaria, Canada, China, the Czech Republic, Cyprus, Denmark, Egypt, Estonia, Finland, France,
Germany, Greece, Hong Kong, Hungary, Iceland, India, Iran, Ireland, Italy, Japan, Korea, Latvia, Lithuania, Malaysia, the Netherlands, Norway,
Philippines, Poland, Portugal, Romania, Russia, Saudi Arabia, Serbia & Montenegro, Singapore, Slovenia, South Africa, Spain, Sweden,
Switzerland, Taiwan R.O.C., Thailand, Turkey, United Arab Emirates, United Kingdom, USA.
 Loading...