

Table of Contents
Quick Start Guide
2
Neckmike Components
3
Proper Fitment and Care of Earplug Speakers
3
Proper Fitment of Neckmike Microphone
5
M4 Bluetooth Unit Overview
6
M4 Bluetooth Unit Functions and Operation
Basic Operation
8
Bluetooth Pairing
8
Pairing with a Mobile Phone
9
Using with a Mobile Phone
9
Pairing Two M4 Bluetooth Units
10
Using the M4 Bluetooth Unit Intercom
11
Pairing Additional M4 Bluetooth Units
12
Pairing with a GPS Navigation Device
14
Pairing with an MP3 Player
14
Mounting the M4 Bluetooth Unit
15
M4 Wireless Handlebar Remote
16
Support
17
Notifications
Battery Warning
17
Declaration of Conformity- Bluetooth®
17
FCC Compliance
17
Copyright
18
IMPORTANT SAFETY INFORMATION
18
Limited Warranty
19
M4 Bluetooth®
User Guide
© 2013 Neckmike USA

M4 Bluetooth User Guide v1.4
Page 2
Quick Start Guide
Fitting the Neckmike headset
Place the Neckmike around your neck, with the microphone
cabinet 1-2” (3-5cm) to the side of your voice box. It should be
placed relatively high on the neck, otherwise your voice may
sound muffled. If it is too close to the voicebox and your voice
may sound distorted.
Install the earplugs by reaching over head and gently pull up and
back on outer ear to the straighten ear canal. With opposite
hand, grasp the earplug stem and insert with a circular motion to
form an airtight seal. Lightly wetting the earplugs or ear canal will
enable easier insertion into the ear and will provide a better
acoustic seal. When fitted correctly, it should be as quiet as
when you put your fingers in your ears. Multiple earplug sizes
are included so you can find the one that offers the best fit and
the most hearing protection.
Connect the Neckmike via the coiled extension cable to the M4
Bluetooth unit, with the right-angled end plugged into the
Bluetooth unit and the straight connector plugged into the
headset.
Operating the M4 Bluetooth unit
You must first charge the M4 unit battery and remote control
prior to operation. (Please see detailed instructions).
Press and hold the On/Off button (marked with a motorcycle
icon) for 5-6 seconds until the blue LED illuminates, then
release. The LED will flash approximately every two seconds to
indicate the unit is powered on.
Pair with your mobile phone for voice calls and music, GPS for
guidance, or additional M4 units for rider-to-passenger or bike-to-
Thank you for choosing the Neckmike M4 Bluetooth
communication system!
Neckmike enables communication while providing
hearing protection in high noise environments with a
unique and patented headset design. Because
Neckmike is a professional grade, military-derived
product, please follow the instructions in this User
Guide for best results.
--Proper fitment is essential to achieve good results--
Save this manual for future reference.

M4 Bluetooth User Guide v1.4
Page 3
bike communication via Bluetooth. (Please see detailed
instructions).
To power off, press and hold the On/Off button for 6-8 seconds
until the blue LED is constant, then release. Alternatively, you
may press the small gray reset button to immediately power off
the unit. Pressing the reset button does not erase Bluetooth
pairings made with mobile phones or other M4 units.
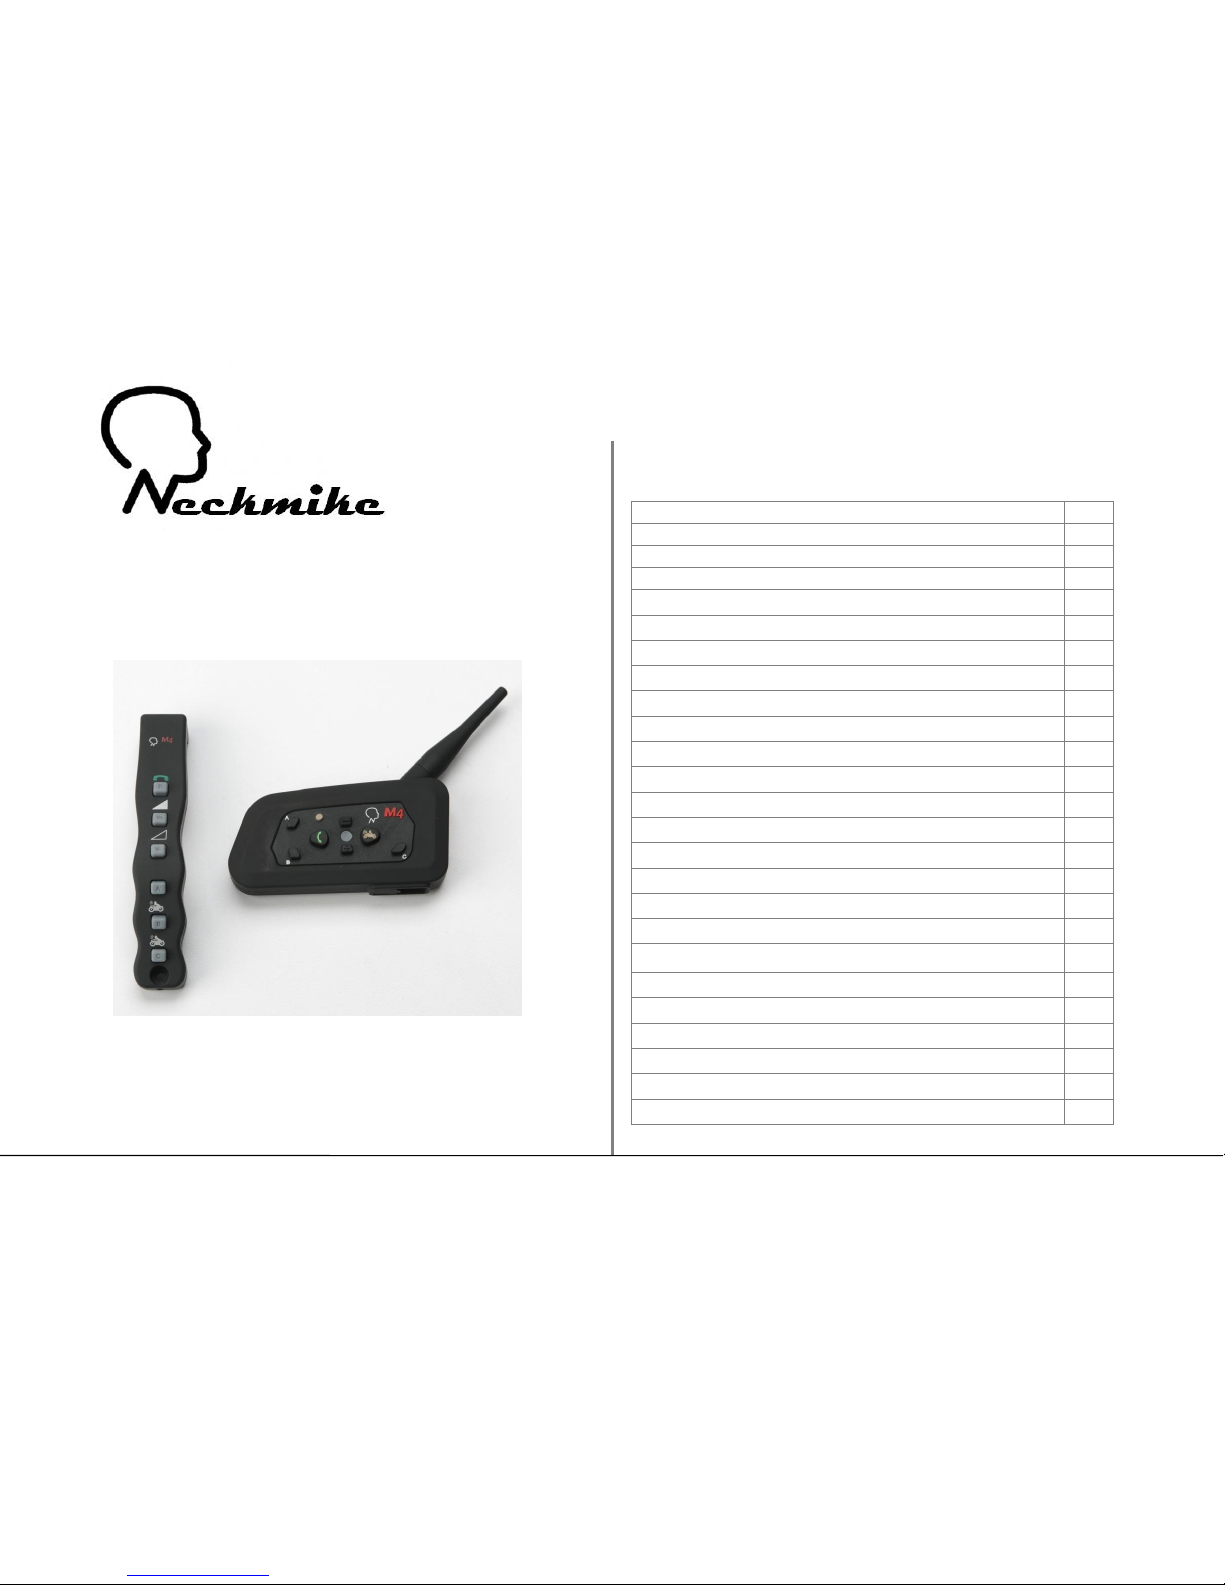
Neckmike Components
The Neckmike is comprised of several components, which are
referenced in this User Guide (Image 1).
Proper Fitment and Care of Earplug Speakers
The Neckmike silicone earplugs are designed to provide comfortable
hearing protection, while enabling you to hear voice communication,
music, navigation instructions, etc. via the built-in speakers. Proper
fitment is essential for blocking out unwanted outside sounds and
enabling you to hear the relevant audio (intercom, music, etc.)
enabled by Neckmike.
Neckmike comes with multiple sizes of earplugs, to fit different
diameter and depth of ear canals. The small size is black, medium
size is green and large size is blue (Image 2). Additional sizes and
shapes may be included. You should experiment to find the earplug
that best fits your ear canal. When fitted correctly, outside noises
should sound muted, similar to putting your fingers in your ears.
The silicone earplugs are attached to the stereo micro-speakers by
gently pushing them into place (Image 3).
Image 2
Image 1
High-fidelity
speakers with
silicone
earplugs
Flexible
Neck band
Microphone
Cabinet
Small
Medium
Large
Hook & loop
retention strap
3.5mm
connector

M4 Bluetooth User Guide v1.4
Page 4
Install the earplugs by reaching over head with the opposite hand
and gently pulling up and back on outer ear to straighten the ear
canal. With opposite hand, grasp the earplug and insert with a
circular or wiggling motion to form an airtight seal. For the best seal,
rub a few drops of water onto the silicone earplugs prior to insertion
(make sure to avoid the center speaker hole of the earplug) or put
some water droplets on your finger to wet your ear canal prior to
insertion. Lightly wetting the earplugs or ear canal will enable easier
insertion into the ear and will provide a much better acoustic seal.
The earplug should remain securely in place when there's a good
seal. If you've inserted the earplug as far as is comfortable, but
cannot achieve a good seal, try a larger size earplug.
If your ear canals are shallow and / or you are having trouble
achieving a good seal, then the green or blue earplugs may be
modified by removing the smallest flange at the end in order to
improve the fit. This can be done with sharp scissors or razor blade
(Image 4).
If you wear a helmet with Neckmike, you should also shorten the
earplugs on the end which affixes to the micro-speakers, so that the
earplugs are not easily knocked out of position while putting on your
helmet and do not protrude uncomfortably inside the helmet (Image
5).
Earplugs may be washed with soap and water as needed.
Cut at
molded
edge for
use with a
helmet.
Gently press fit the
silicone earplug onto
the micro-speakers
Image 3
Image 4
Image 5

M4 Bluetooth User Guide v1.4
Page 5
Earplugs should be removed from the micro-speakers prior to
cleaning and should be completely dry prior to reattaching to the
micro-speakers. Otherwise, the micro-speakers may be damaged by
the water.
In some regions or states, the use of headphones or helmet audio is
restricted or prohibited. Familiarize yourself with all laws and
regulations that apply to your region before using Neckmike and
remember that compliance with all laws and regulations is your
responsibility.
The AMA maintains a helpful resource of motorcycle laws by state:
http://www.americanmotorcyclist.com/Rights/State-Laws.aspx
Permanent hearing loss may occur if headphones are used at a
high volume. Use caution and common sense with the headphone
volume level for voice communication and music.
Hearing experts suggest that you limit the amount of time you use
headphones at high volume, and avoid turning up the volume to
further block out noisy surroundings. Your ear can adapt to a higher
volume of sound over time, which may sound normal but can be
damaging to your hearing. Set your volume to a safe level before
that happens. If you experience ringing in your ears, reduce the
volume or discontinue use of your audio device.
Proper Fitment of the Neckmike Microphone
Neckmike is designed for all-day comfort and the neck band is
flexible to accommodate different neck sizes. The microphone
cabinet should have full contact against the skin for the best
microphone performance. Note that a beard or whiskers in the area
of the microphone may be heard as a scratching noise in the
background.
The microphone cabinet is held in place by the built-in tension of the
neck band. For active use, you should use the included hook and
loop retention strap to hold the Neckmike securely in place. Once
comfortably fitted, the extra strap material (if any) should be trimmed
with scissors.
Using both hands, gently bend the neck band into a 2-3” (6-7cm)
diameter prior to wearing. This will help to ensure proper tension in
the band (Image 6). This should be done each time you wear the
Neckmike.
NOTICE
WARNING
Image 6
NOTICE
M4 Bluetooth User Guide v1.4
Page 6
Place the Neckmike around your neck, with the microphone cabinet
flush against the skin, approximately 1-2” (3-5cm) to the side of your
voice box (Image 7). It should be placed relatively high on the neck,
otherwise your voice may sound muffled.
If your voice is higher pitched, you may want to move the
microphone cabinet further away from the voice box for best results.
Experiment with the location of the microphone cabinet while using
the intercom to see what position is best for you
.
It is not necessary to shout when using Neckmike in a noisy
environment; just speak clearly. The Neckmike microphone is
designed to give your voice the best possible quality, even when the
surrounding noise is strong.
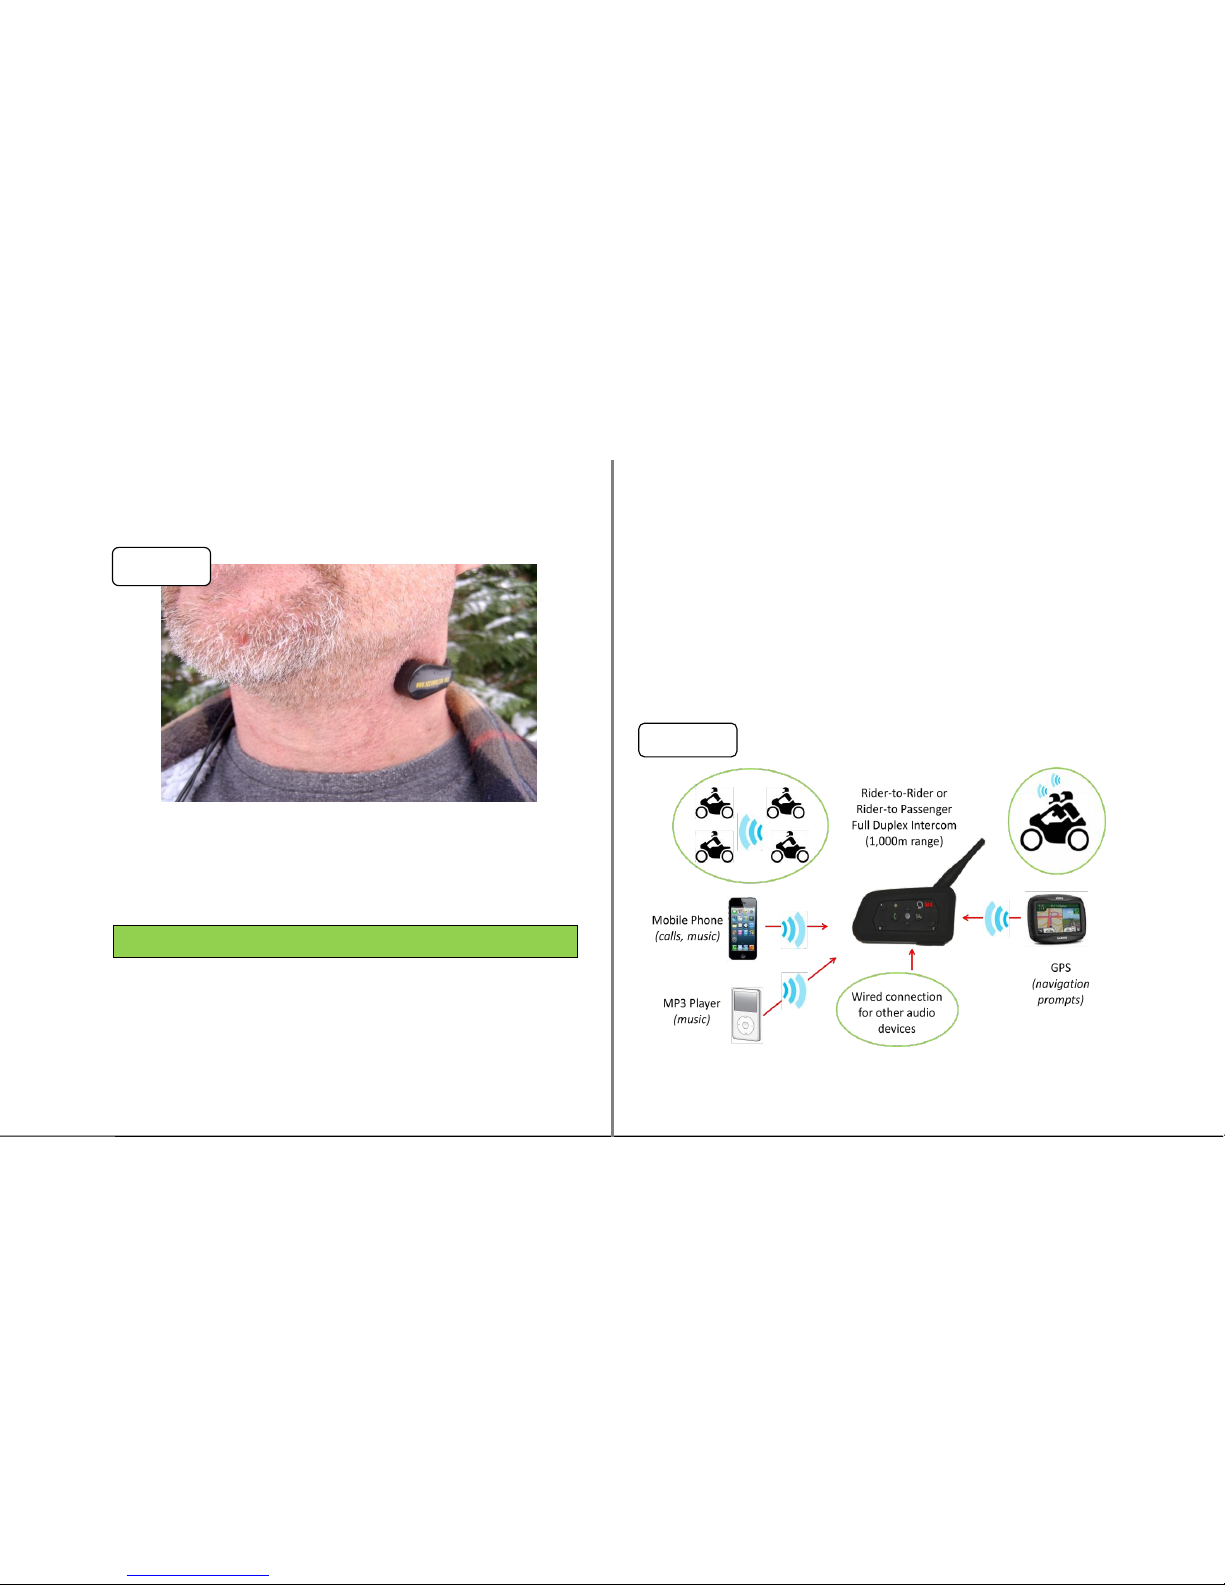
M4 Bluetooth Unit Overview
The M4 Bluetooth unit is a Class 1 Bluetooth transceiver that is
waterproof and includes a glove-friendly handlebar remote. The M4
unit enables one-to-one Bluetooth intercom functionality up to
1,000M between up to four different M4 units (You + 3 others). Note
the functional range of the intercom feature will be influenced by
terrain such as trees and hills, obstacles such as buildings and
weather conditions.
The Neckmike M4 Bluetooth unit may also be paired with Bluetoothenabled mobile phones for voice calls and music, MP3 players for
music and GPS units for guidance and/or music (Image 8).
Image 7
HELPFUL HINT
Image 8
 Loading...