

Page 1

MODEL No.
PF51T31
Instruction Manual
Colour Television
Page 2

Contents
Important safeguards 1
Before Operation 2
Connecting external equipment 3
Identification of Controls 5
Daily use 7
Menus 9
Teletext 16
Specifications 18
Page 3
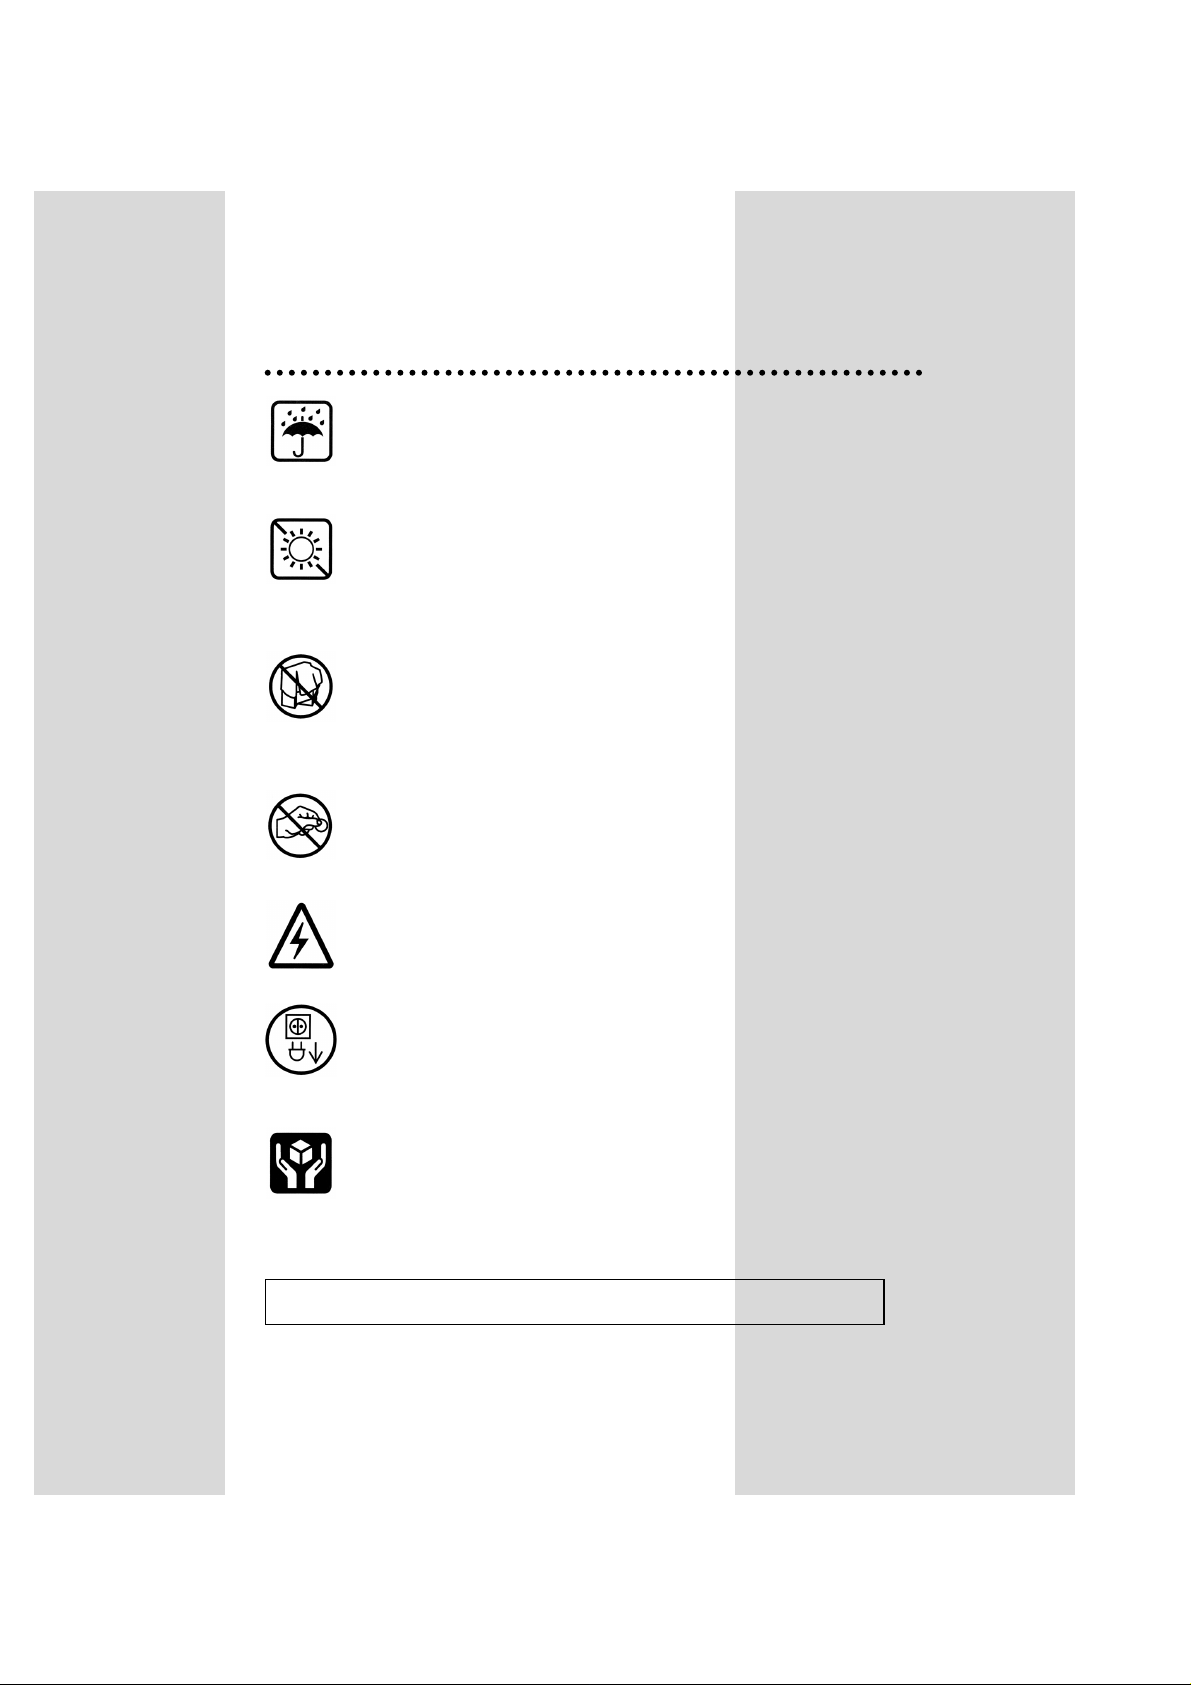
Important safeguards
WATER AND MOISTURE
Never install the set in the following places : In a
wet basement, bathroom. Do not place any
container with liquid on the set.
HEA T
Never place the set near heat sources.
VENTILA TION
Do not cover the ventilation openings in the
cabinet and never place the set in a confined
space such as a bookcase or built-in unless proper
ventilation is provided.
Leave a minumum 10cm gap all around the unit.
OBJECT ENTRY
Do not insert foreign objects, such as needles and
coins, in the ventilation openings.
LIGHTNING STRIKING
You should disconnect the set from the mains and
the aerial system during thunderstorms.
CLEANING
Unplug the set from the mains during cleaning.
AFTER MOVING THE SET
If the set is moved in a different direction, the
MAIN POWER button must be switched off for at
least 15 minutes in order to take out a colour strain
on the screen.
1
-The appliance is not intended for use by young children or infirm persons without supervision;
-Young children should be supervised to ensure that they do not play with the appliance.
Page 4
Before Operation
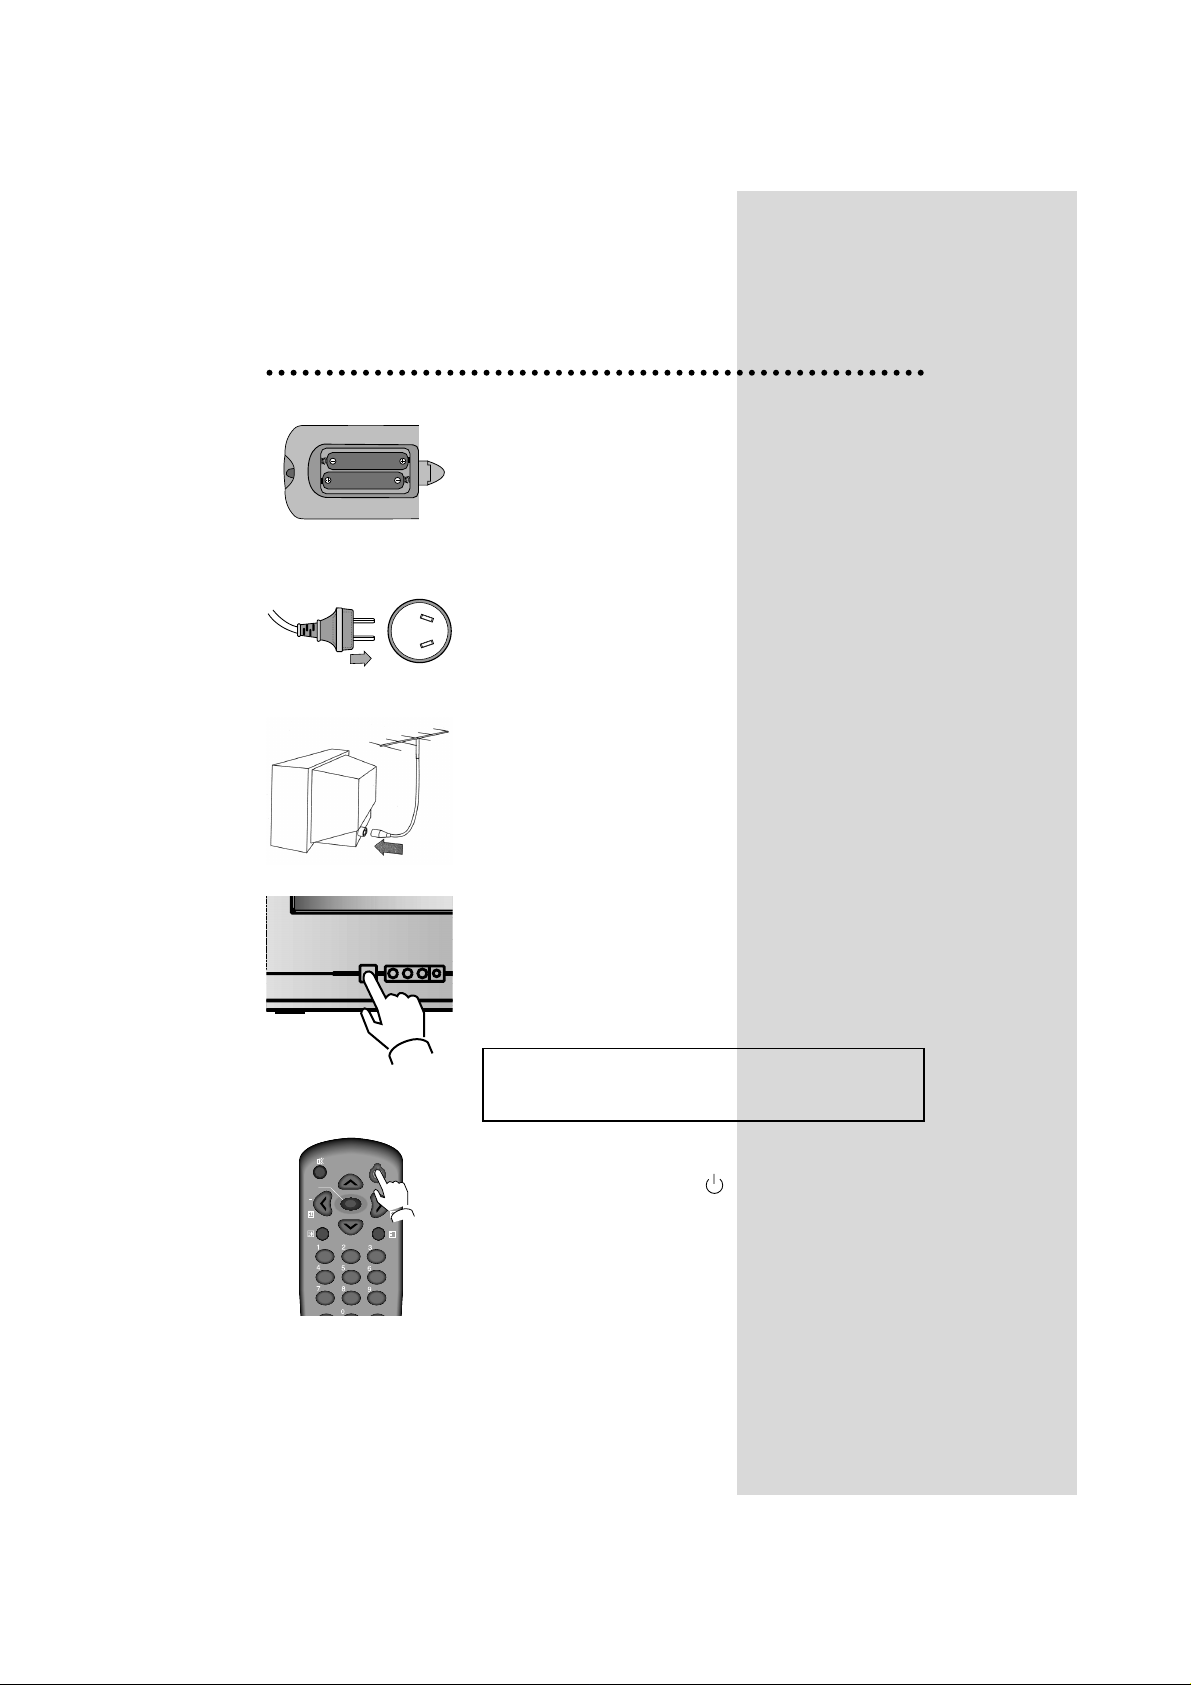
INSERTING BA TTERIES INT O THE REMOTE
CONTROL UNIT
Insert the batteries (two 1.5V, type AA)
MAINS CONNECTION
Plug the mains cable into the power socket with 240V/50Hz AC.
AERIAL CONNECTION
When using an outdoor aerial, it is usually connected to the set
by means of 75 ohm.
SWITCHING ON AND OFF
Switching on
Switch the set on with the MAIN POWER button(POWER),
and then CH UP or DOWN button on the front of the set.
Or use the OPERATE button or the CH UP/DOWN button or
one of the NUMBER buttons on the remote control.
NOTE : When switching power on, full picture and sound shall
appear in 6-8 seconds. This is to ensure optimum picure
stabilisation. This is indicated by a blinking LED indicator.
Switching off
Press the OPERATE button( ), on the remote control to
return the set to its stand by mode.
If you don't use the set for an extended period of time, turn
it off with MAIN POWER button on the set.
2
CH
CH
OPERATE
MENU
SLEEP
VOL
CH-CALL
PICTURE/OK
TV/VIDEO
?
VOL
Battery options
Page 5
Connecting external equipment
TV AND AV
3
TV
VCR
(AV OUT)
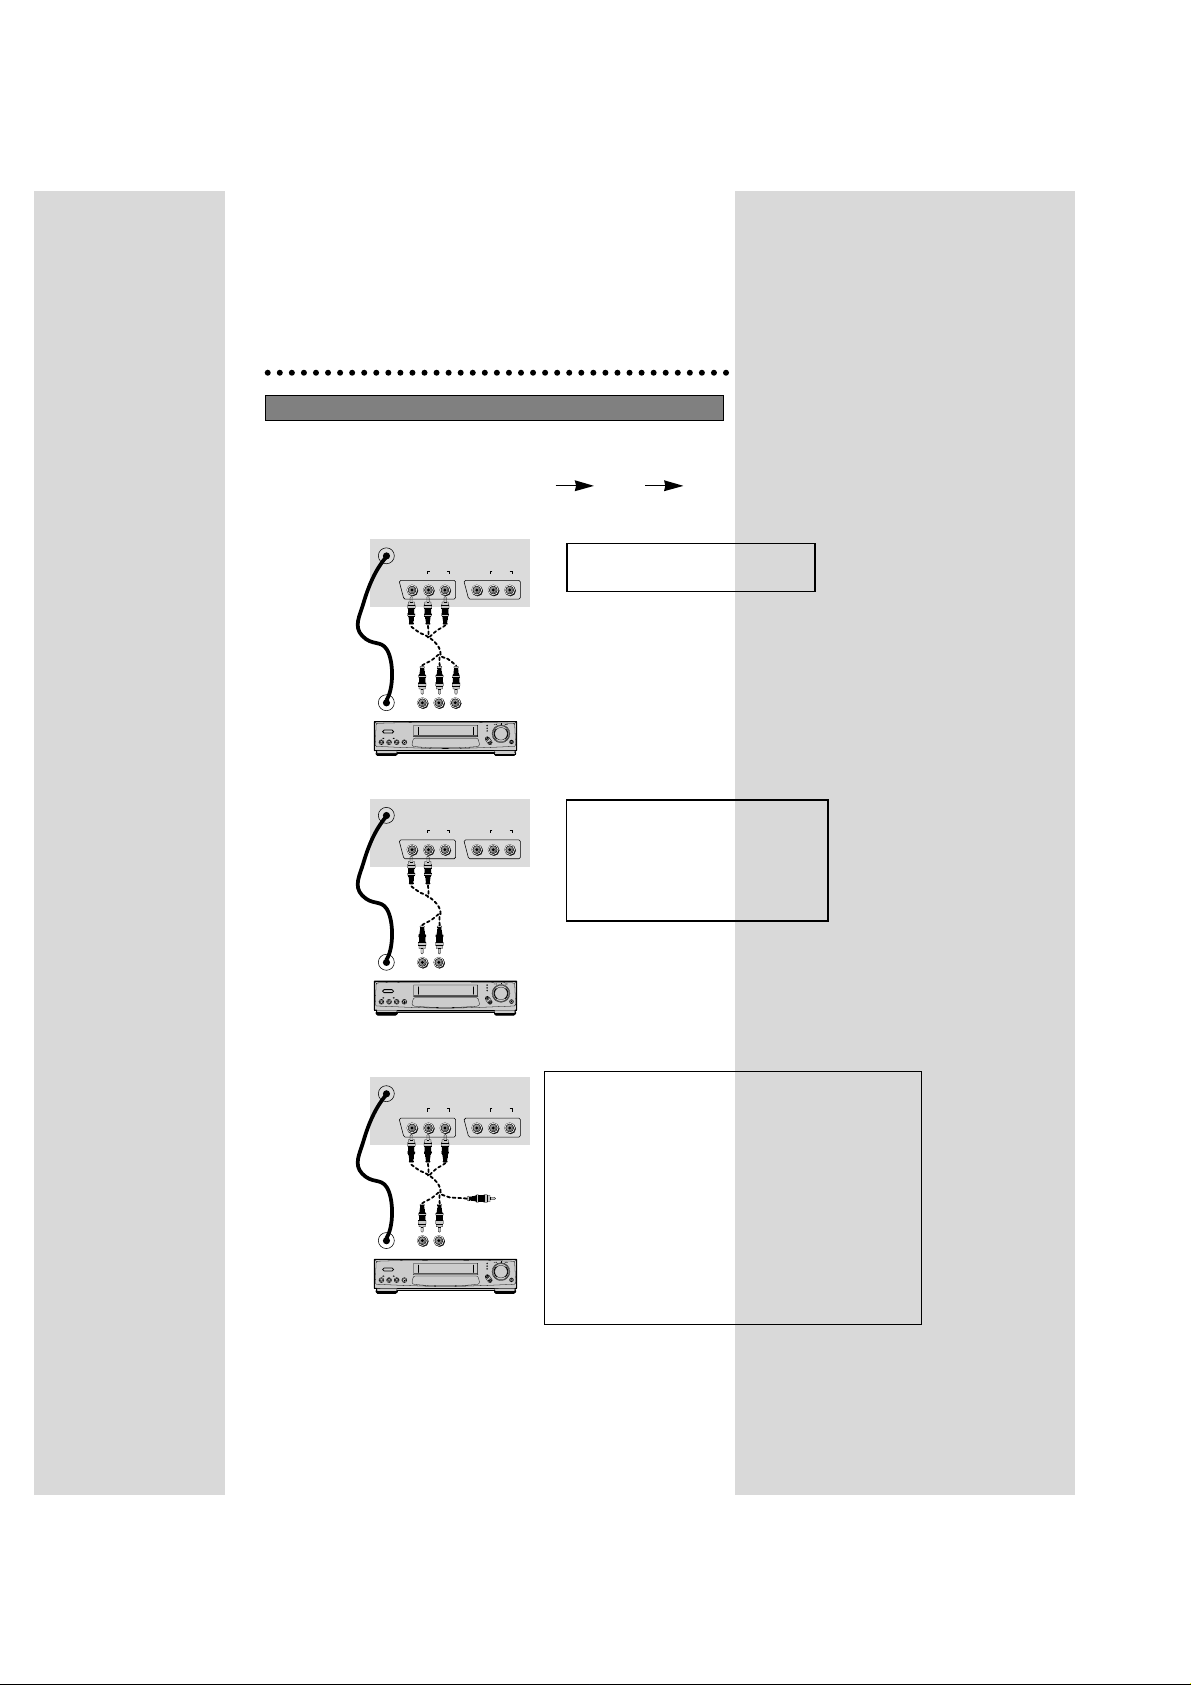
CONNECTING TO A STEREO VCR
RECOMMENDED CONNECTION TO A MONO VCR
ALTERNATE CONNECTION TO A MONO VCR
Follow the connection as shown,
to have a stereo sound.
Use a two wire RCA cable to make
a connection with a mono VCR.
If L audio input of TV is connected
to Audio out of VCR, the sound will
come from both speakers.
If three RCA cable is used as the connector. Press the
‘MODE’ button on TV remote control several times to
change the mode.
If L-input of the TV is connected to the audio out of
VCR, the mode will be
. STEREO : The sound will
only
come from one speaker.
.
L-INPUT : The sound will come from both speakers.
. R-INPUT : The sound will not come at all.
If R-input of the TV is connected to the audio out of VCR,
the mode will be
. STEREO : The sound will only come from one speaker.
. L-INPUT : The sound will not come at all.
. R-INPUT :The sound will come from both speakers.
TV
VCR
(AV OUT)
TV
VCR
(AV OUT)
Use the TV/VIDEO button on the remote control or on the front of the set to select one of
the following two options. Whenever the TV/VIDEO button is pressed, the on-screen
display will be changed as shown: AV1 AV2 TV
AV IN
ANT
VIDEO VIDEO
VIDEO L AUDIO R
ANT
VIDEO VIDEO
VIDEO AUDIO
LR
AV IN
LR
AV OUT
AV OUT
AUDIOAUDIO
LR
AUDIOAUDIO
LR
AV IN
ANT
VIDEO VIDEO
LR
AV OUT
AUDIOAUDIO
LR
VIDEO AUDIO
Page 6
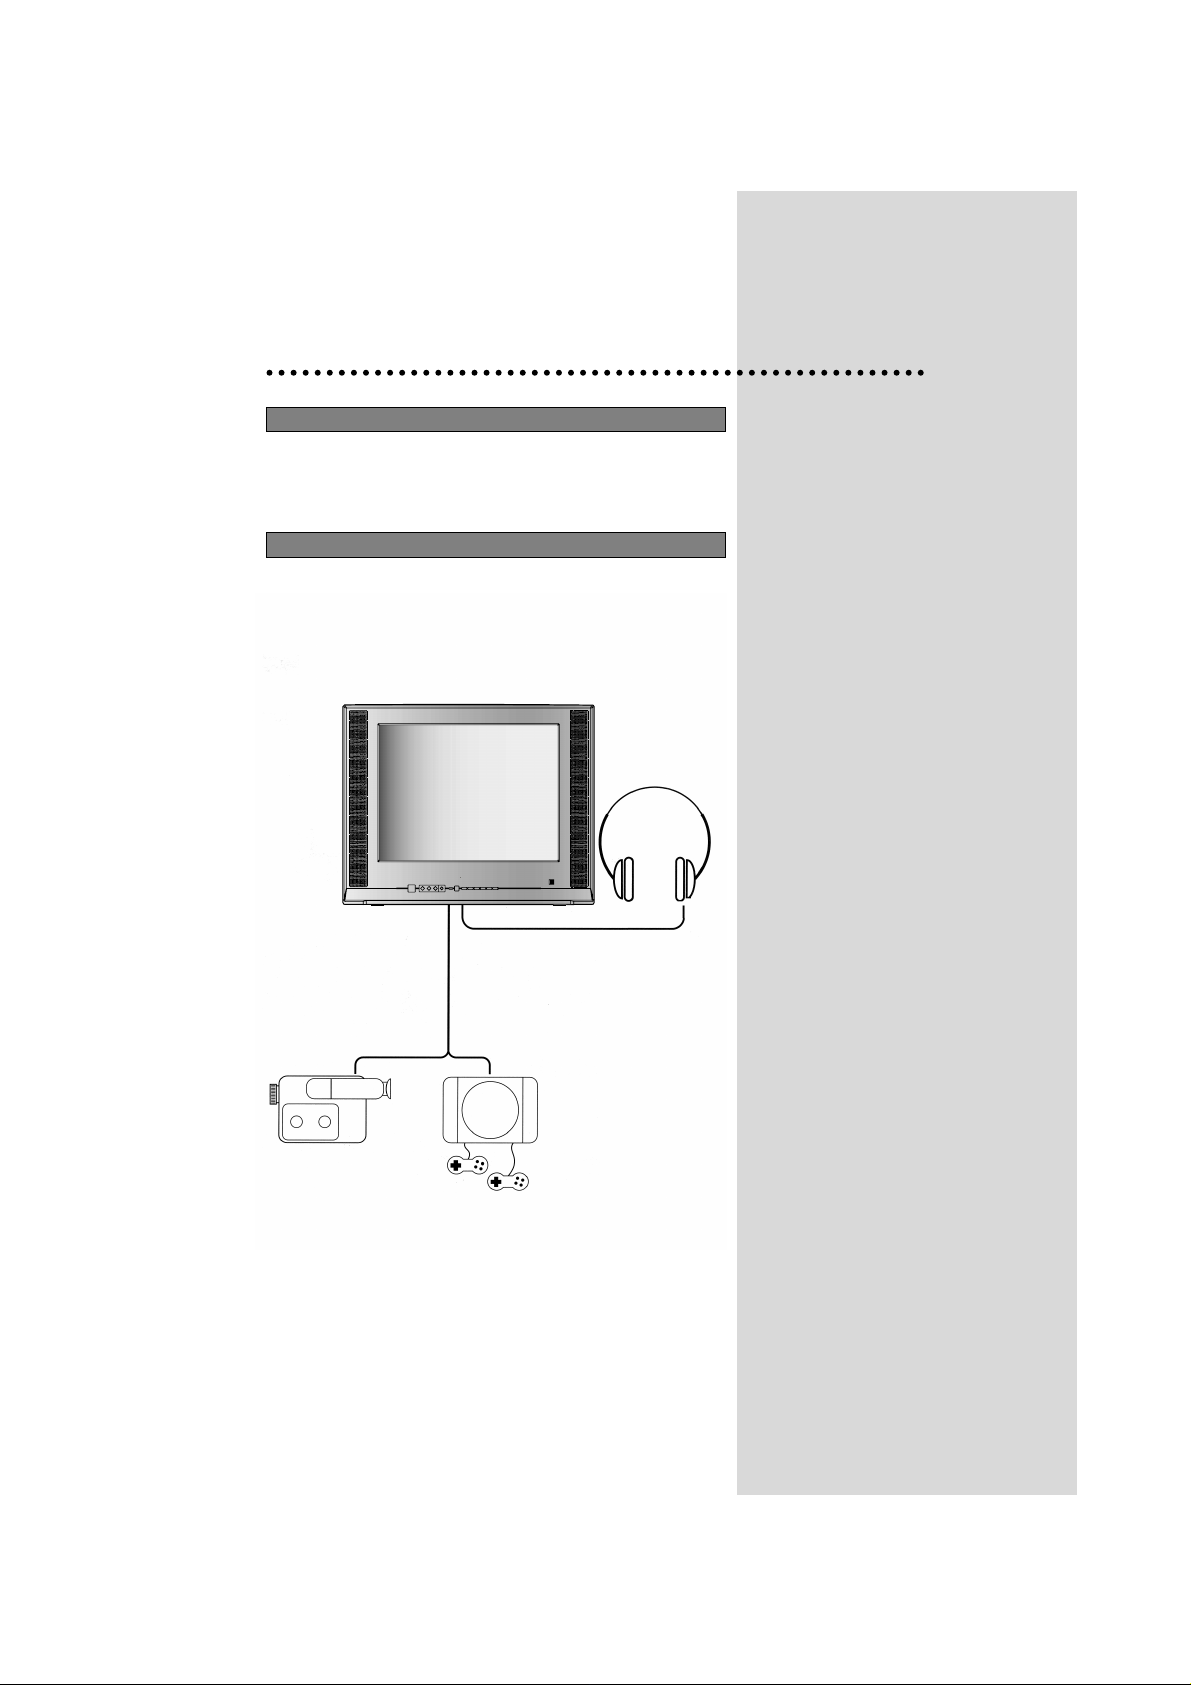
INPUT2 (RCA JACK)
Connect the AV (Audio/Video) socket with an appropriate
cable to the corresponding socket of the external equipment.
Select AV2 mode by pressing the TV/VIDEO button.
Press the TV/VIDEO button to return to the TV mode.
4
HEADPHONE JACK
Insert the headphone plug (3,5mm)
into the headphone socket.
The sound from the speaker will be
cut off.
OR
CAMCORDER
VIDEO GAME
A/V OUTPUT (RCA JACK)
This always provides the TV signal output of the selected
channel. This is used to connect a VCR for recording or a
monitor device for displaying.
INPUT1 (RCA JACK)
Connect the AV (Audio/Video) socket with an appropriate
cable to the corresponding socket of the external equipment.
Select AV1 mode by pressing the TV/VIDEO button.
Press the TV/VIDEO button to return to the TV mode.
Page 7
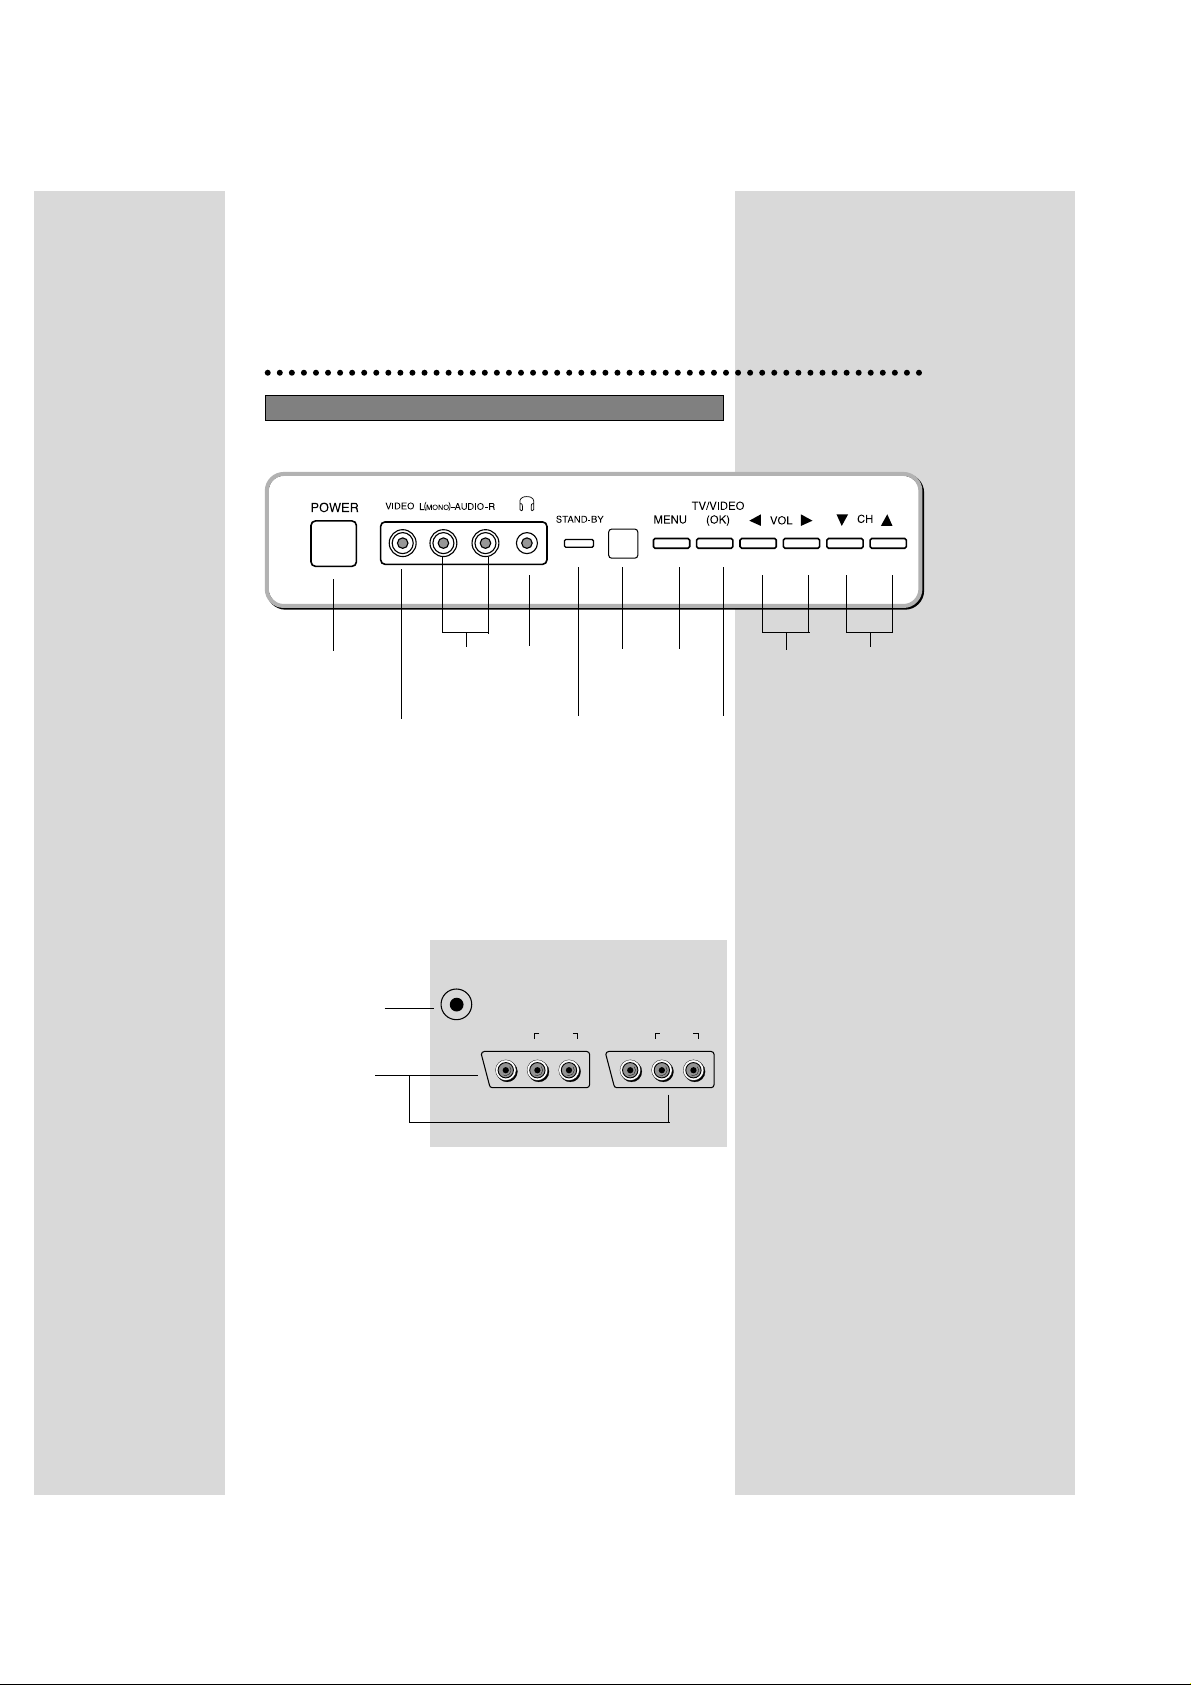
FRONT CONTROL
Front
Back
5
Identification of Controls
MAIN
POWER
BUTTON
VIDEO
INPUT
Aerial Terminal
RCA Socket
AUDIO
INPUT
HEAD
PHONE
REMOTE
SENSOR
STAND-BY
INDICATOR
TV/VIDEO(OK)
BUTTON
VOLUME
DOWN/UP
BUTTONS
CHANNEL
DOWN/UP
BUTTONS
MENU
BUTTON
AV IN 2
ANT
AV IN
VIDEO AUDIO
LR
AV OUT
VIDEO AUDIO
LR
Page 8
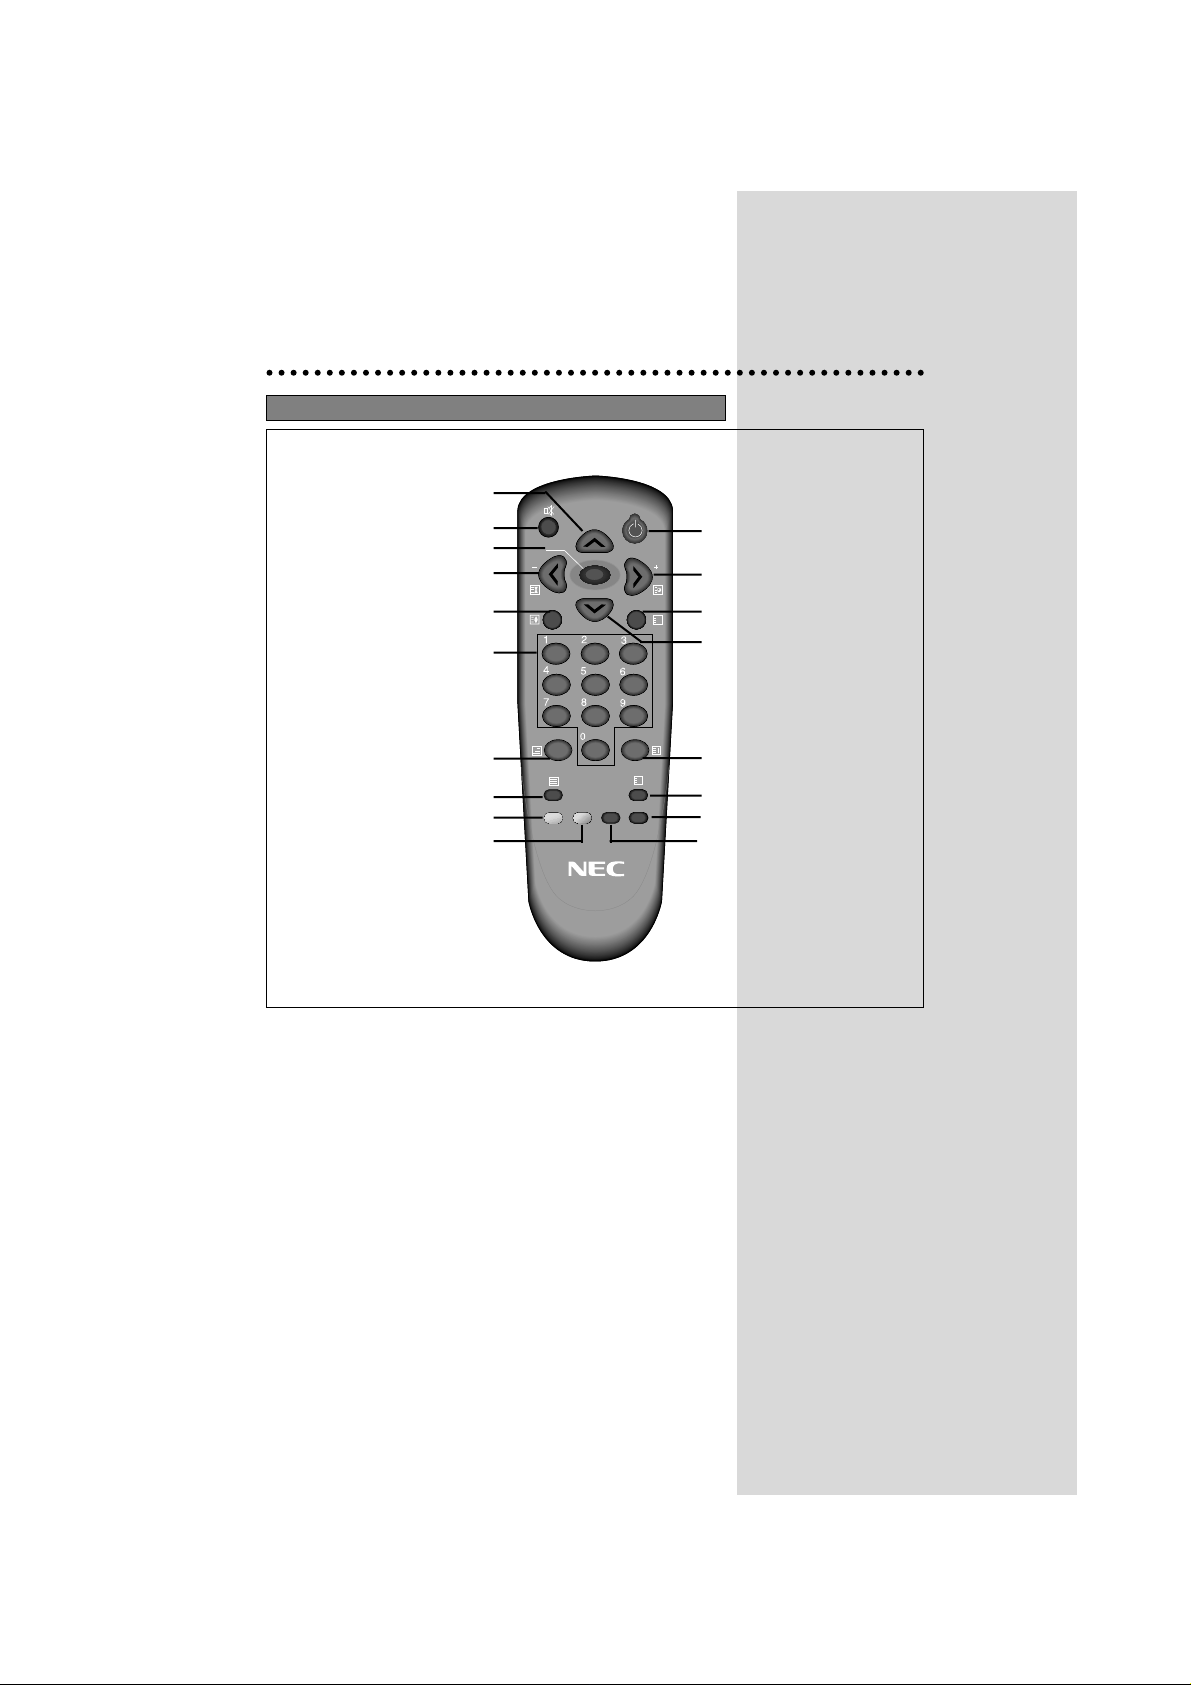
REMOTE CONTROL
6
X
CH
CH
OPERATE
MENU
SLEEP
VOL
CH-CALL
PICTURE/OK
SKIP
TV/VIDEO
MOVE
DELETE
MODE
?
VOL
TELETEXT mode
1 OPERATE
2 NUMBER 0-9
3 INDEX
4 MIX
5 PAGE UP
6 SUBPAGE
7 MENU
8 PAGE DOWN
9 HOLD
10 MUTE
11 REVEAL
12 SIZE
13 CANCEL
14 Green Key
15 Red Key
16 TV/TEXT
17 Yellow Key
18 Cyan Key
TV mode
1 OPERATE
2 NUMBER 0-9
3 PICTURE/OK
4 TV/VIDEO
5 CH (CURSOR)UP
6 VOLUME UP (CURSOR RIGHT)
7 MENU
8 CH(CURSOR) DOWN
9 VOLUME DOWN(CURSOR LEFT)
10 MUTE
11 RECALL
12 SLEEP
13 Not Used
14 MOVE(Edit mode only)
15 SKIP(Edit mode only)
16 TV/TEXT
17 DELETE(Edit mode only)
18 MODE(Sound Mode Change)
5
10
7
9
12
2
4
16
15
14
1
6
11
8
3
13
18
17
Page 9
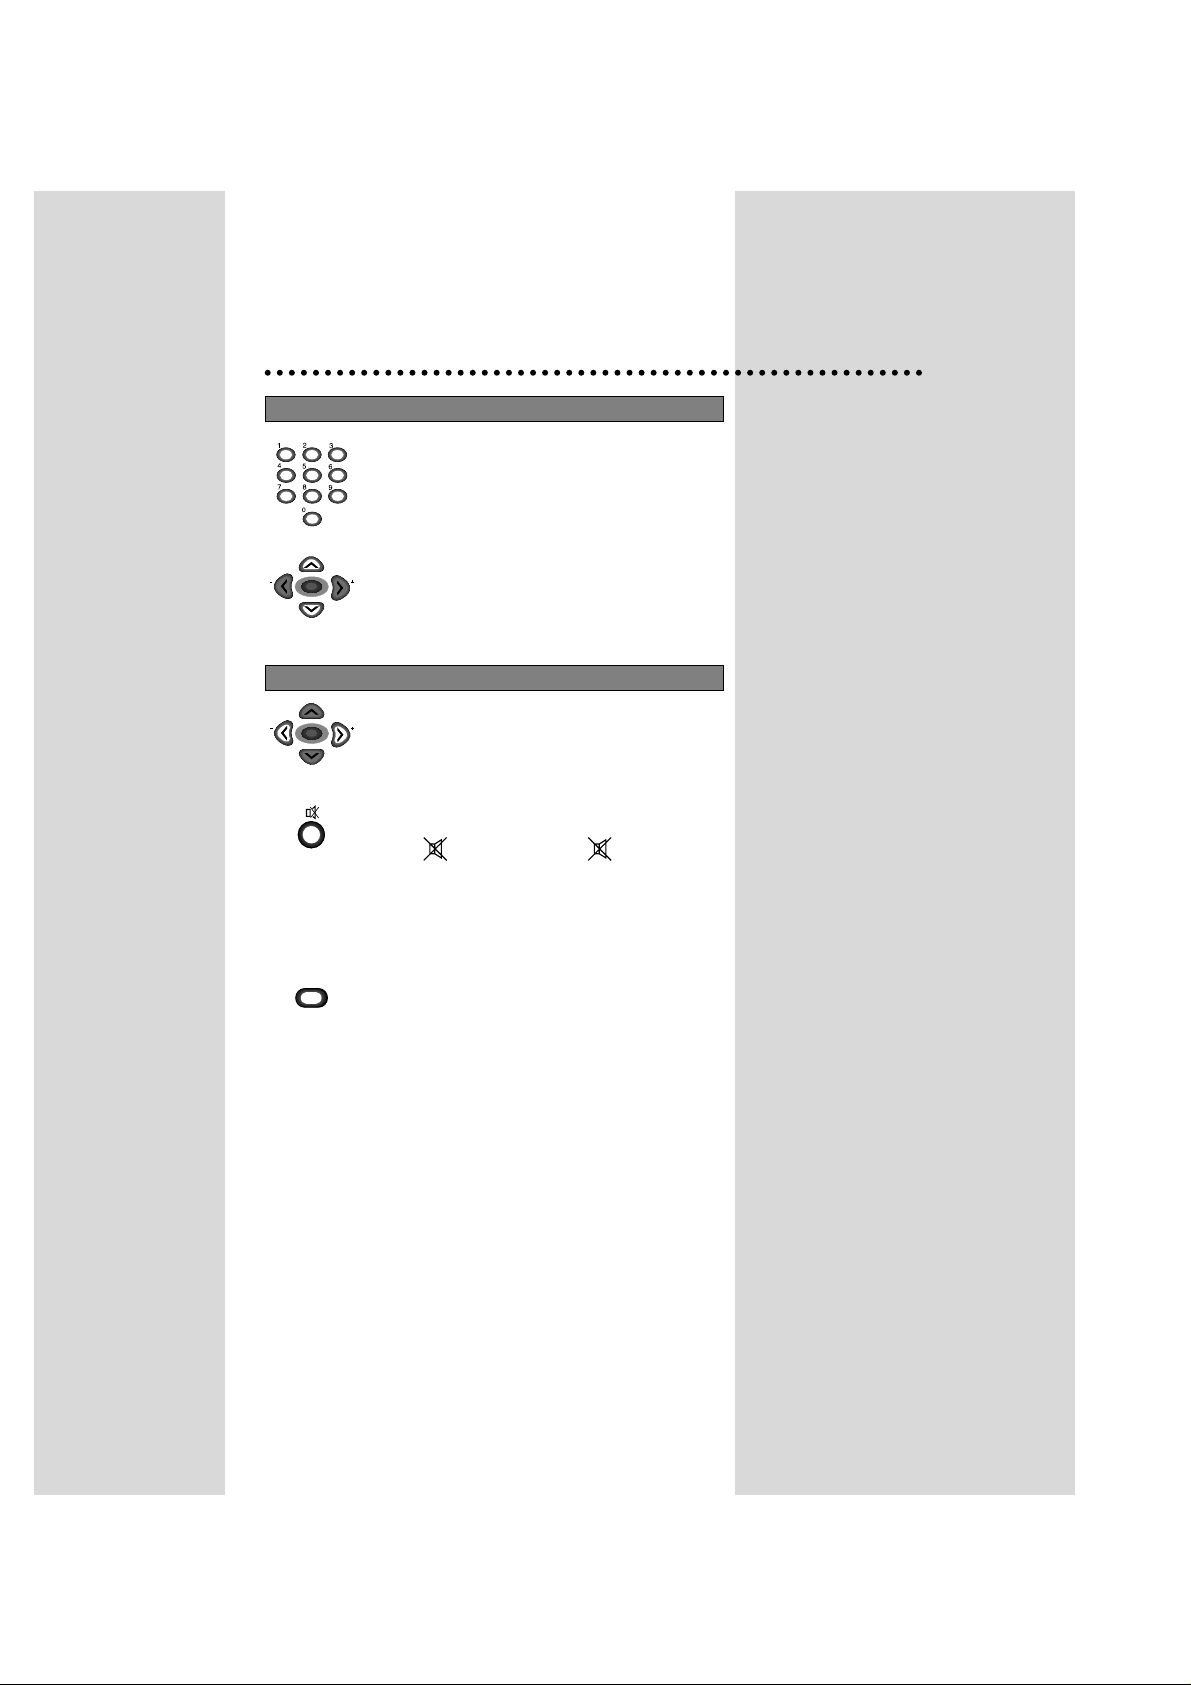
Direct selection
Use remote control NUMBER 0…9 buttons.
For two digits programme numbers, press the
button for the second digit within 2.5 seconds.
Up/Down controls
Use CH UP/DOWN buttons of the remote
control unit or on the front of the set.
DAILY USE
PROGRAMME SELECTION
Volume adjustment
Use VOLUME UP/DOWN buttons of the remote
control unit or on the front of the set.
Mute
Turn sound off by pressing the remote control
MUTE ( ) button. The logo ( ) is displayed.
Sound returns by pressing the same button once
more.
Forced Mono, Bilingual language
If you are unable to get a good sound on a
channel due to a poor stereo broadcasting
signal, you can change from stereo to mono
transmission by pressing remote control MODE
button. Then the programme status concerning
this programme indicates "Mono" (in red colour).
On the other hand, during a bilingual
programme, MODE button allows you to hear
the second language. To return to initial state,
press the MODE button once more. For other
adjustments (bass, treble, balance and sound
effect) see sound menu page 10.
SOUND CONTROL
7
CH
VOL
VOL
VOL
CH
CH
VOL
CH
MODE
Page 10
8
You can choose between three picture settings, by
repeatedly pressing the remote control PICTURE
button :
Normal I (standard hard picture)
Normal II (standard soft picture)
Favourite (you can adjust picture setting as you
want by using the Picture menu).
For other adjustments : Brightness, contrast, colour,
sharpness, see Picture menu. (page 10)
PICTURE CONTROL
PICTURE/OK
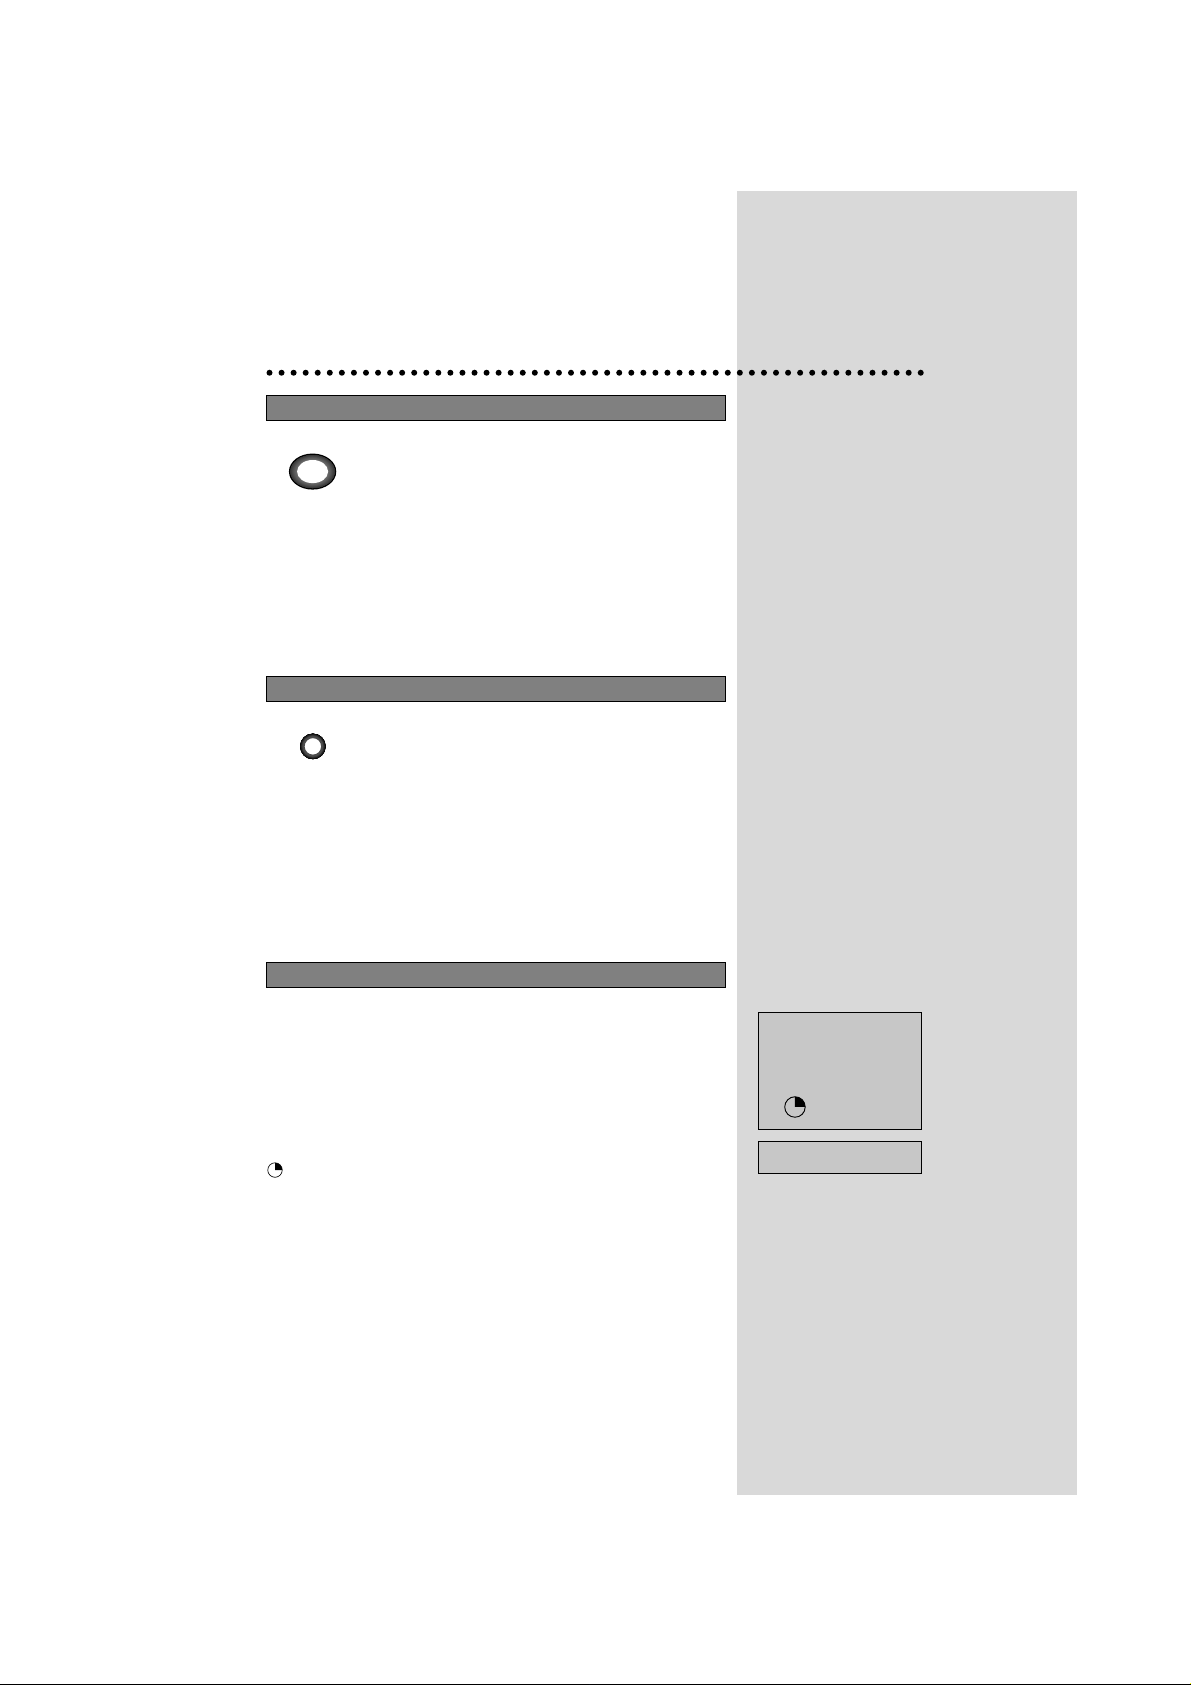
The sleep function will switch the television to
stand-by after a set period of time.
By repetitively pressing the remote control
SLEEP button, you can enter one of the
following settings :
OFF >30 min > 60 min > 90 min >120 min >OFF
The remaining time before TV turn-off is
displayed on programme status.
01
Programme number.
-----
Channel name.
NICAM STEREO
Sound transmission mode : Displayed in red color only if
forced to mono by MODE button.
11:11
Clock.
SLEEP 60
Remaining time (minutes)
before TV set turns off.
Only when sleep function is activated.
SLEEP FUNCTION
PROGRAMME STATUS DISPLAY
SLEEP
01 -----
NICAM STEREO
11:11
SLEEP 60
Page 11
Menus
9
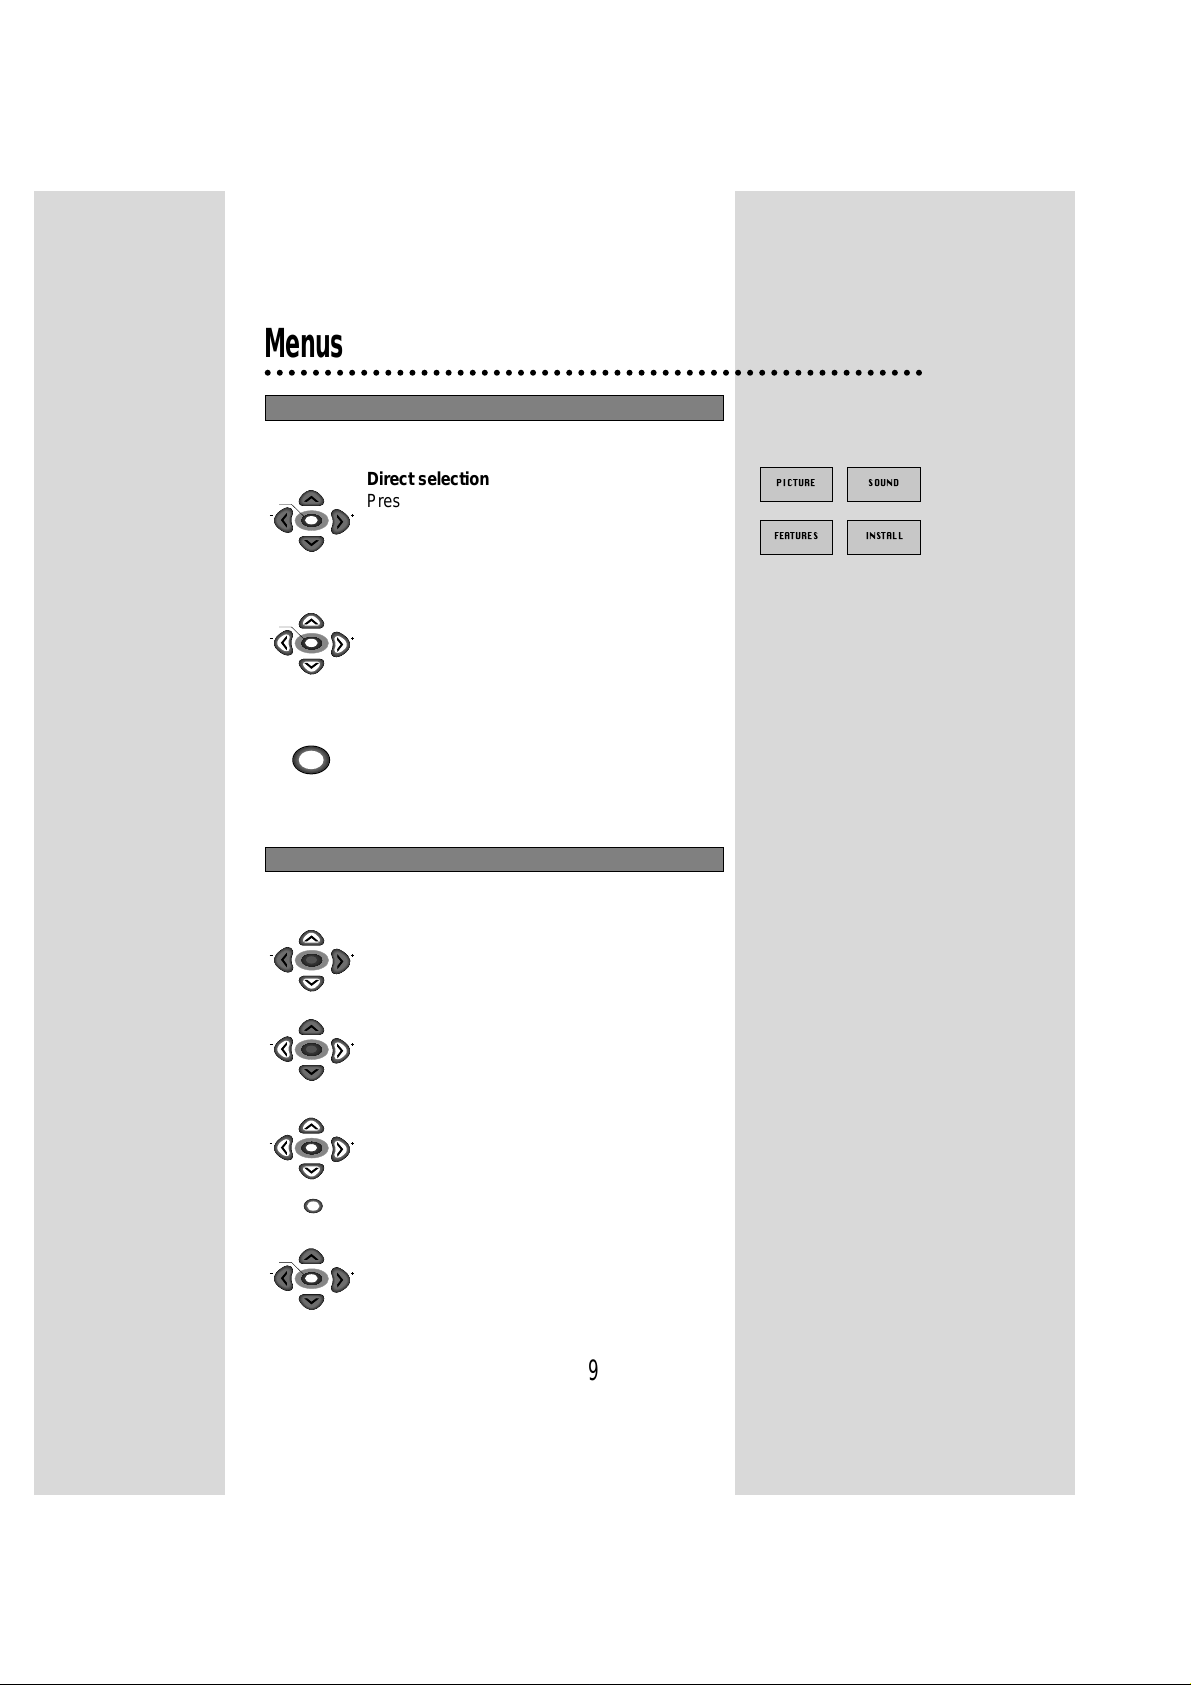
Direct selection
Press remote control MENU button to display
main menu.
Then, you have a choice between several submenus .
If you want to cancel immediately from main
menu, press MENU button once more.
To select one of the sub-menus, use the remote
control CURSOR buttons UP, DOWN, LEFT,
RIGHT.
To enter the selected sub-menu, press remote
control PICTURE/OK button .
MAIN MENU
✳ The following is applied to all of the sub-menus.
Select the function you want to change the
remote control CURSOR UP or DOWN buttons.
Adjust the function using the
remote control CURSOR LEFT or RIGHT button.
Confirm (if needed) by pressing remote control
PICTURE/OK button .
Then return to the main menu by pressing the
MENU button .
HOW TO USE SUB MENUS
All menus are removed within 25 seconds if you don’t press any button.
PICTURE/OK
CH
MENU
VOL
MENU
VOL
VOL
CH
CH
VOL
CH
CH
VOL
VOL
VOL
CH
CH
VOL
PICTURE SOUND
FEATURES INSTALL
CH
CH
VOL
MENU
VOL
VOL
CH
PICTURE OK
CH
VOL
CH
Page 12
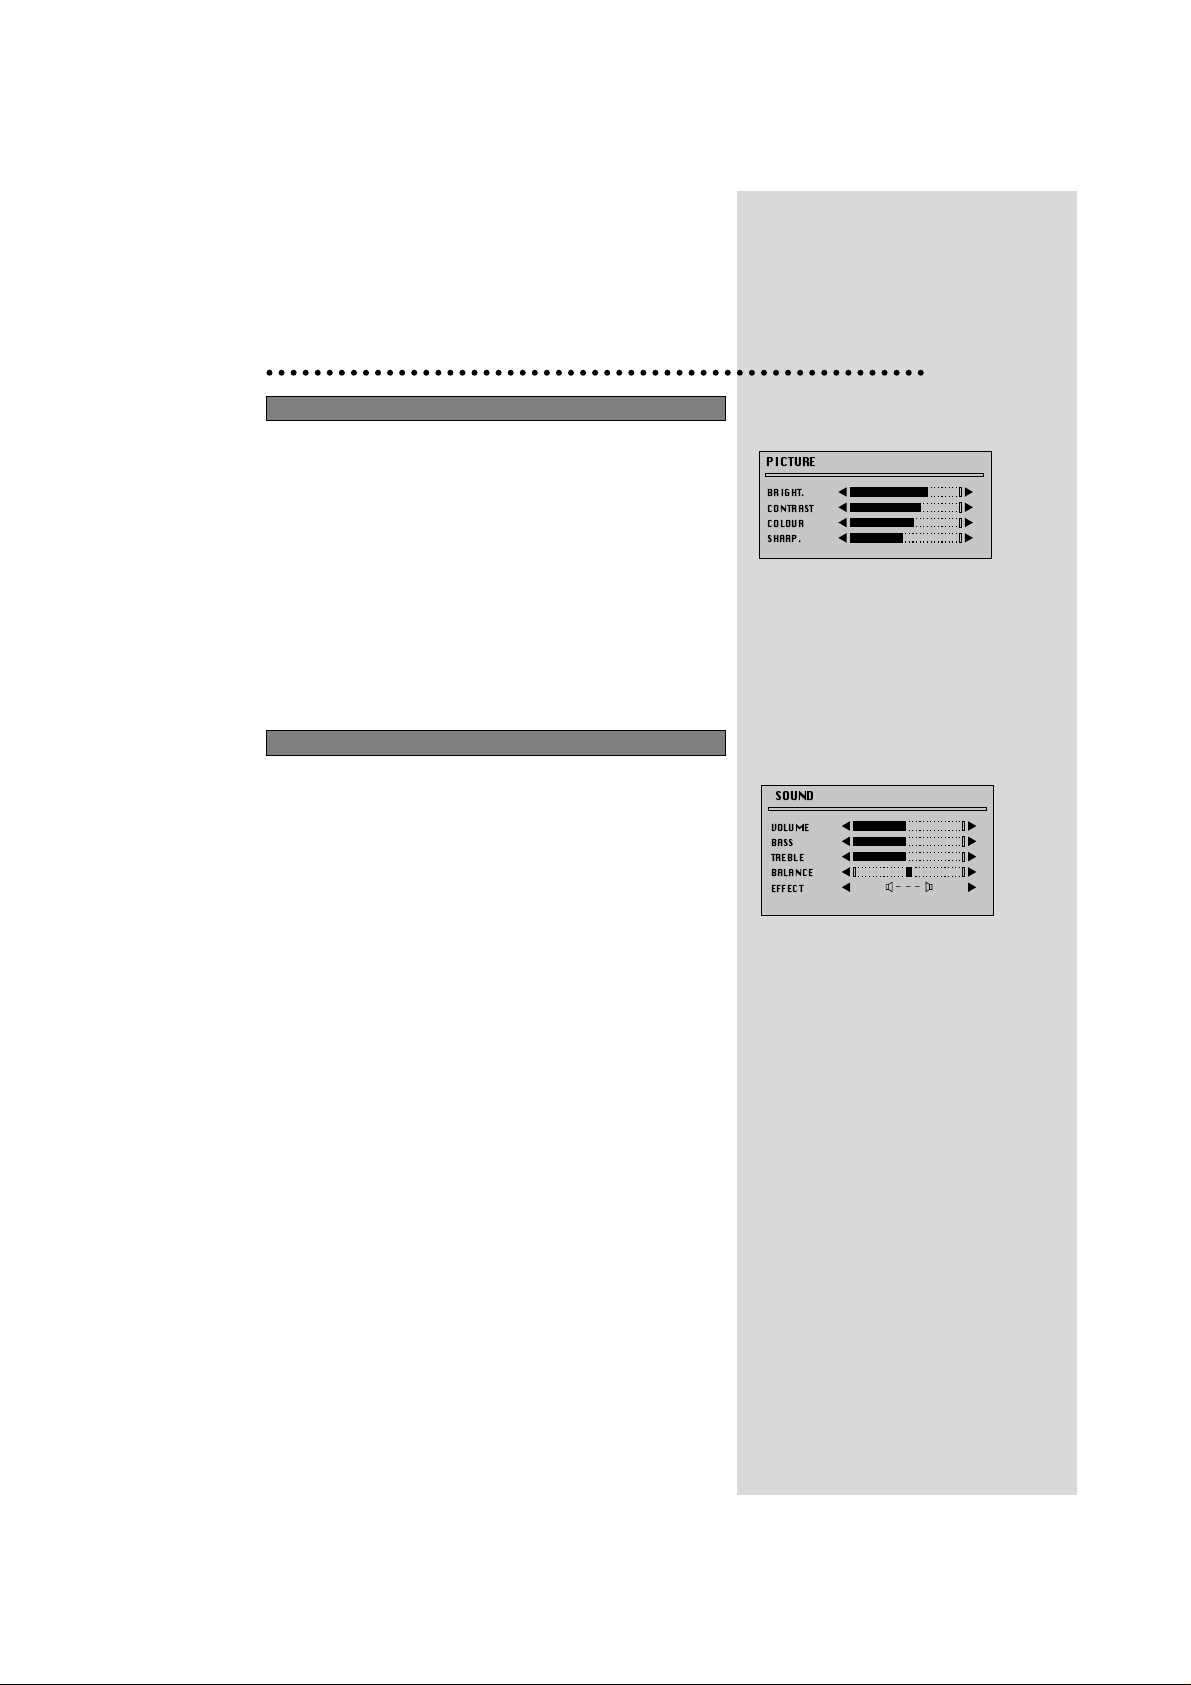
Select and adjust the level of each function :
BRIGHT.
CONTRAST
COLOUR
SHARP.
PICTURE MENU
Select and adjust the level of each function :
VOLUME
BASS
TREBLE
BALANCE
EFFECT
✳ Adjusted values are automatically stored in the favourite mode.
SOUND MENU
10
PICTURE
BRIGHT.
CONTRAST
COLOUR
SHARP.
SOUND
VOLUME
BASS
TREBLE
BALANCE
EFFECT
___
Page 13
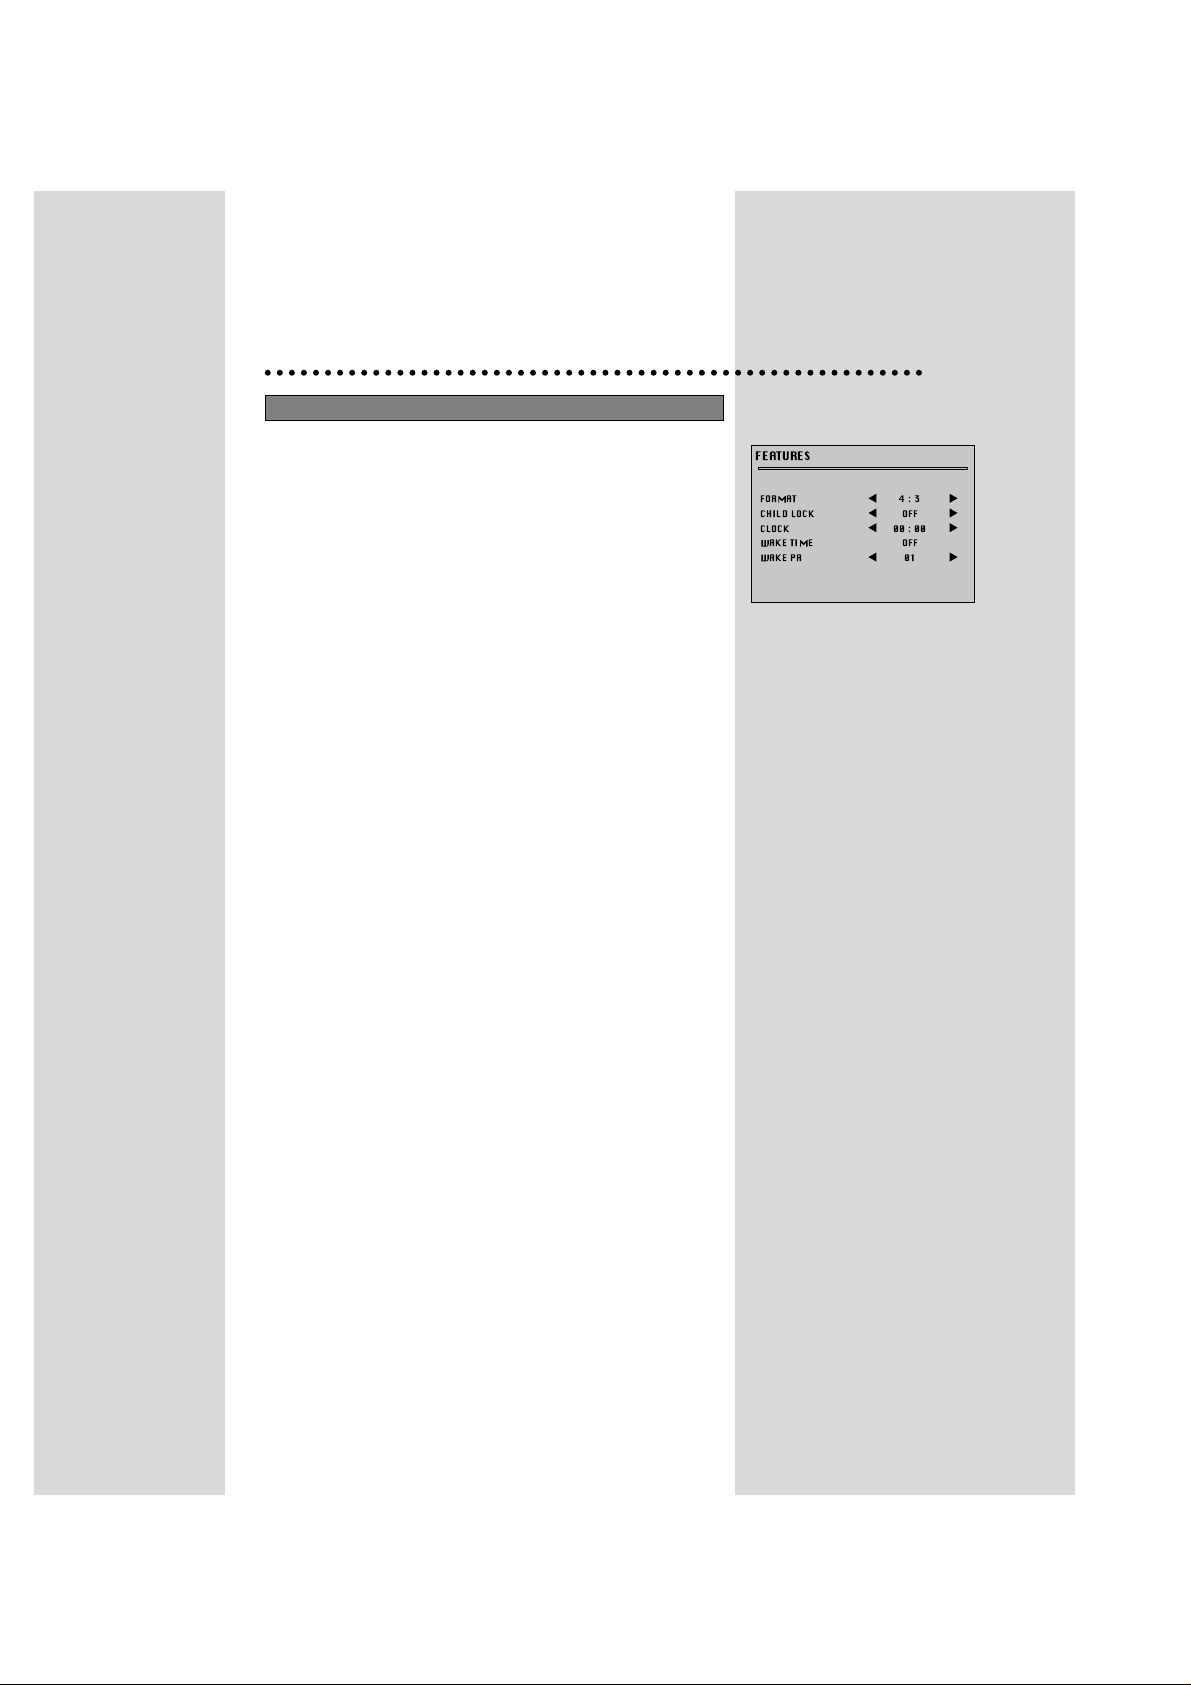
FORMAT
Picture format selection.
Select picture format between :
- 4/3: normal size
- 16/9: 16/9 size
- Zoom : expanded picture.
CHILD LOCK
Child lock prevents the use of the TV set without the remote control
unit.
Select this value ON or OFF:
- When switched ON: the stand-by indicator is lit orange and, child
lock is operating.
- The set can only be switched ON with the remote control unit.
CLOCK
TV clock setting.
- Note that if you turn off the set with the MAIN POWER button, the
clock setting is lost and must be reset if necessary. The clock is set
automatically if programme No. 7 is selected for at least 6 seconds
and programme No. 7 has teletext data.
- Set TV clock with remote control 0…9 NUMBER buttons, then
clock starts.
WAKE TIME
Wake up function.
- The TV set turns on at the time and with the programme chosen by
the customer. This function is only available when clock is set and
when TV set is switched to stand -by mode.
- Switch "WAKE TIME" function ON/OFF with remote control
CURSOR LEFT or RIGHT button.
- Enter wake up time with remote control 0...9 NUMBER buttons.
WAKE PR
Select TV turn-on programme number.
FEATURES MENU
11
FEATURES
FORMAT
CHILD LOCK
CLOCK
WAKE TIME
WAKE PR
4:3
OFF
00:00
OFF
01
Page 14
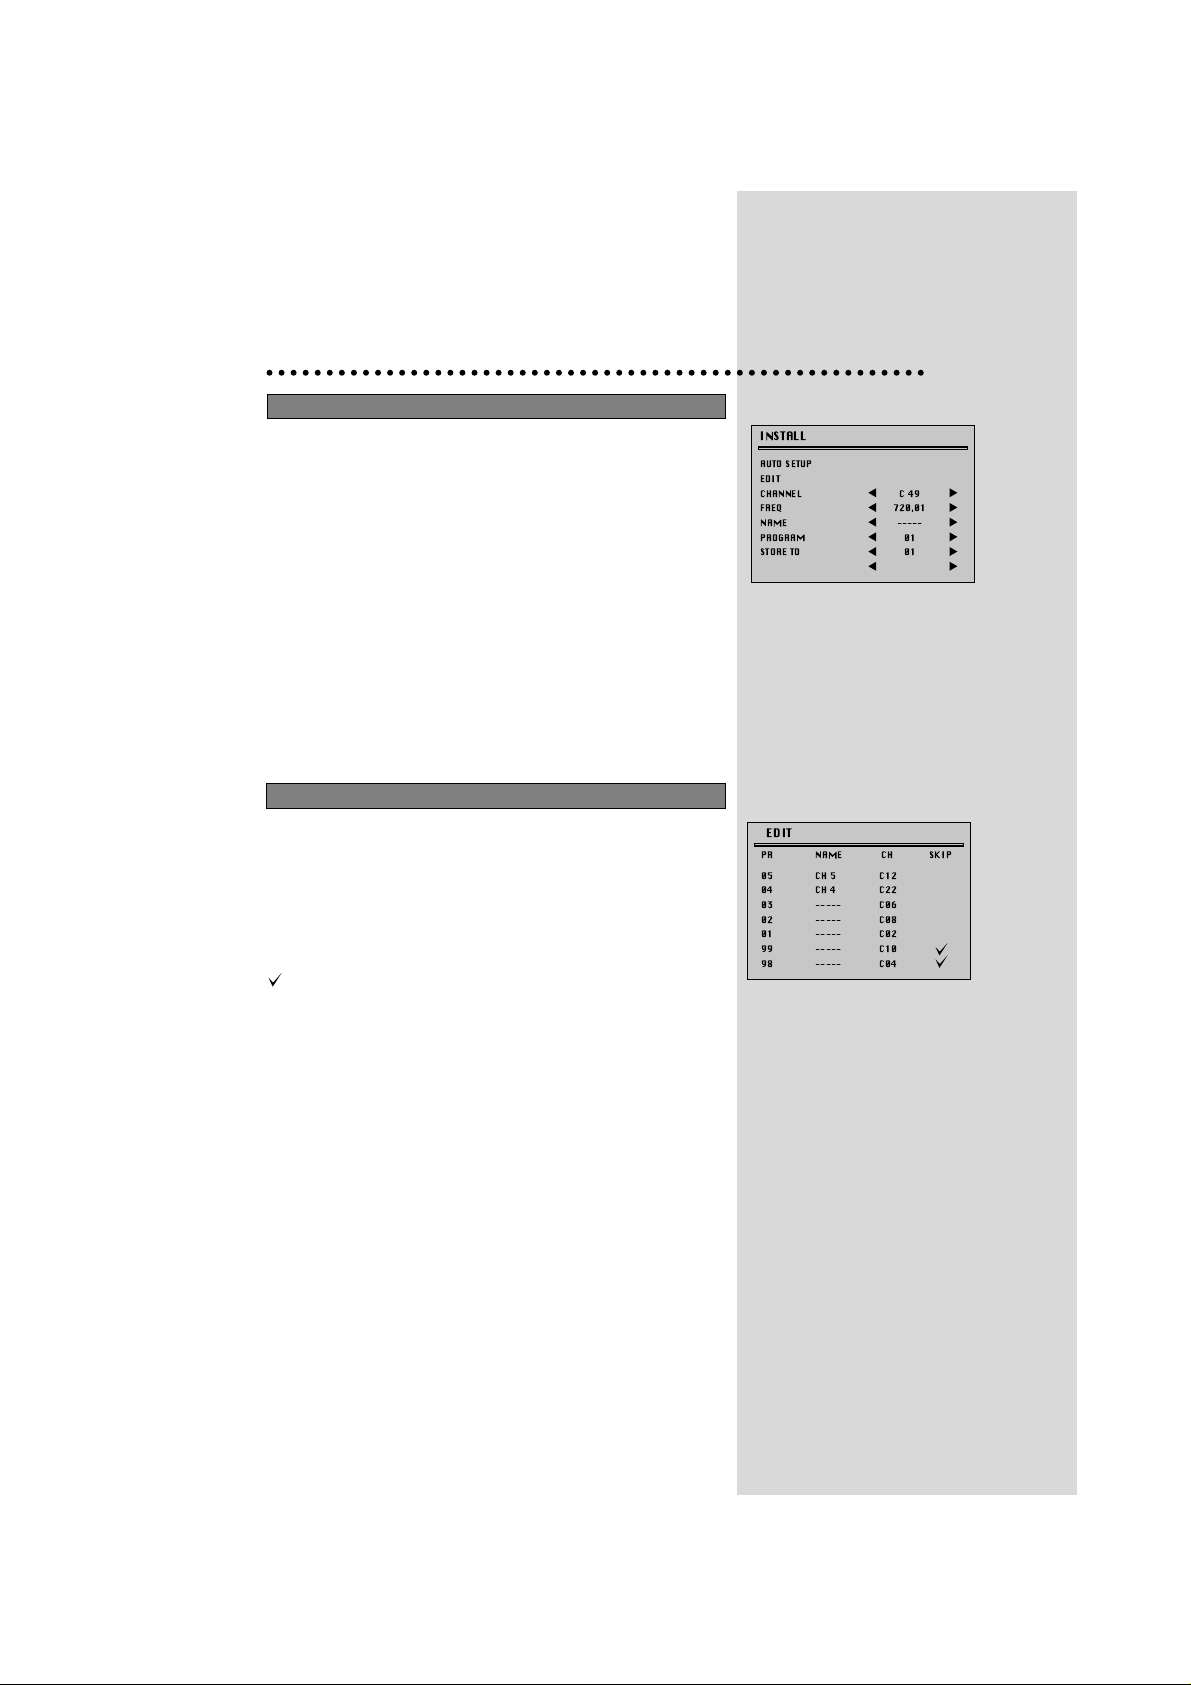
AUTO SETUP
Automatic Tuning system.
EDIT
Programme list edition.
CHANNEL
Channel number.
FREQ
Channel Frequency.
NAME
Channel name.
PROGRAM
Programme number.
STORE TO
Programme storage number.
PR
Programme number.
NAME
Station name.
CH
Channel number.
Skip
: programme skipped.
12
INSTALL MENU
EDIT MENU
INSTALL
AUTO SETUP
EDIT
CHANNEL
FREQ
NAME
PROGRAM
STORE TO
C49
720,01
-----
01
01
EDIT
PR NAME CH SKIP
05
CH 5
04
CH 4
03
-----
02
-----
01
-----
99
-----
98
-----
C12
C22
C06
C08
C02
C10
C04
Page 15
13
Using the Edit Menu, you can easily modify the
programme listing. Please do not refer
programmes as “existing recorded
programmes”. Please call them existing
programmes.
Select "EDIT" function and confirm with the
remote control “PICTURE/OK" button :
Edit menu appears and shows existing
recorded programmes.
The recorded programmes can be modified as
follows :
Channel skipping
You can select skip "YES" or "NO" using the
remote control SKIP button .
A programme with skip " " doesn't appear
on screen when changing programmes with
CH UP/ DOWN buttons.
Channel deleting
Select the programme to delete using remote
control CURSOR UP/ DOWN buttons.
Press the remote control DELETE button .
The deleted programme is moved to the
programme number 99 with skip " ".
The existing 99 programme is moved to
programme number 98 and so on.
AUTOMATIC TUNING SYSTEM
Automatic Tuning System
Select "AUTO SETUP" function.
Press remote control button "PICTURE/OK"
button for more than 3 seconds to start the
automatic tuning.
When automatic tuning is finished, recorded
programmes are displayed on screen.
PROGRAMME LIST EDITION
PICTURE/OK
PICTURE/OK
SKIP
CH
VOL
VOL
VOL
CH
CH
VOL
CH
DELETE
Page 16
14
Channels order changing
Select the programme to move using the remote
control CURSOR UP/ DOWN buttons.
Press the remote control
MOVE
button : the
programme appears as red and can be moved
to another place using the remote control
CURSOR UP/ DOWN buttons.
When required position is reached, confirm this
new position by pressing the remote control
MOVE
button. Then, the programme appears
again as green.
Entering a station name. - copying a
programme to another programme number
Use Install menu "NAME" and " STORE TO"
functions as explained in manual channel tuning
paragraph.
MANUAL CHANNEL SETTINGS
Choose starting point
Select with "PROGRAM" function the programme
from which you want to start manual tuning.Then,
the channel number, the frequency, the name and
the programme number of this programme are
displayed in the install menu.
Channel searching
Select "FREQ." function.
Press the remote control CURSOR RIGHT / LEFT
buttons for more than 3 seconds to start (up / down)
manual tuning.
After searching, tuning will stop automatically at the
next channel. (To stop searching press the remote
control MENU button)
Note: If you know the channel number or the
frequency of the channels you want to
search, you can tune directly to these
channels, entering this data directly into the
"CHANNEL" or "FREQ." function.
CH
CH
VOL
VOL
CH
CH
VOL
VOL
CH
CH
MENU
VOL
VOL
MOVE
Page 17
15
Fine Tuning
If you are unable to get a good picture or sound
because of a poor broadcasting signal, it is
possible to fine tune a signal.
Select channel frequency ("FREQ.") function.
Press and release the remote control CURSOR
RIGHT/LEFT buttons to fine tune a signal.
Enter station name
Select "NAME" function.
Use the CURSOR RIGHT/LEFT buttons to
select the character (letter) you want to modify.
To modify this letter press the CURSOR
UP/DOWN buttons until the desired letter is
displayed.
Store programme in memory
Select "STORE TO" function
Adjust the programme number you want to store
and confirm by pressing the remote control
"
PICTURE/OK
" button.
Remarks: This function can also be used if you
want to copy a programme already
memorised to another programme
number.
CH
CH
VOL
VOL
CH
CH
MENU
VOL
VOL
PICTURE/OK
Warning: This television has been factory
pretuned to channels 2, 7, 9, 10 and
28. If the auto search function is
activated, these preset channels will
be deleted and new channels tuned
to 1, 2, 3 ETC..
Page 18

16
Teletext
SWITCHING TELETEXT ON/OFF
Select the channel which is broadcasting the teletext
programme you want to watch.
Press the remote control TELETEXT ( ) button to select
teletext mode.
The overview station page or the last page viewed (in case
you already watched teletext at this channel previously)
appears.
If you need to return to TV mode, press again the remote
control TELETEXT ( ) button again.
PAGE SELECTION
You can enter directly the desired page number with the
remote control NUMBER 0...9 buttons .
You can sequentially select page number by pressing the
remote control PAGE UP / DOWN buttons.
On TOP / FLOF teletext, you can enter directly a page number
displayed at the bottom of the screen using the corresponding
remote control coloured buttons.
USEFUL FUNCTIONS WHILE WATCHING TELETEXT PAGES
INDEX ( ) button : Allows to return directly to the overview
page of the station you are viewing.
SUBPAGE ( ) button : Allows to enter subpage directly :
Press SUBPAGE button.
Enter directly the subpage number you want with the remote
control NUMBER 0...9 buttons :
for example to enter the 2nd page, sequence 0002 .
PAGE HOLD ( ) button : Any teletext page or subpage can
be held on the screen by pressing the PAGE HOLD ( )
button.
Press the button again to cancel the hold mode.
REVEAL ( ) button : Press this button to reveal on certain
pages hidden information such as the answer to a quiz. Press
the button again to hide the information.
Page 19

17
TELETEXT FORMAT, PICTURE, SOUND CONTROL
Doubling character size
Repeatedly pressing the SIZE ( ) button doubles the
character size in the following order :
Upper half of the pages > Lower half of the page > Return to
normal size.
Volume and brightness control in teletext mode
Pressing the MENU button in teletext mode, the volume and
brightness control menu will be displayed
at the bottom of the screen.
You can adjust volume and brightness using the
corresponding colour on the remote control unit.
OTHER FUNCTIONS AVAILABLE
Superimpose teletext broadcasting to the current TV
program using the MIX button
Press the MIX ( ) button again to return to the normal
teletext display.
Watch one TV programme and keep informed at the same
time as some teletext pages are updated
To do this, press CANCEL ( ) button . Then, TV
programme appears on screen and the teletext symbol
appears at the top of the screen.
When teletext programme will be updated, concerned page
number appears on screen. Note that TV programme cannot
be changed with CANCEL button activated.
Pressing the CANCEL button again, the teletext page
appears with the updated information.
Page 20
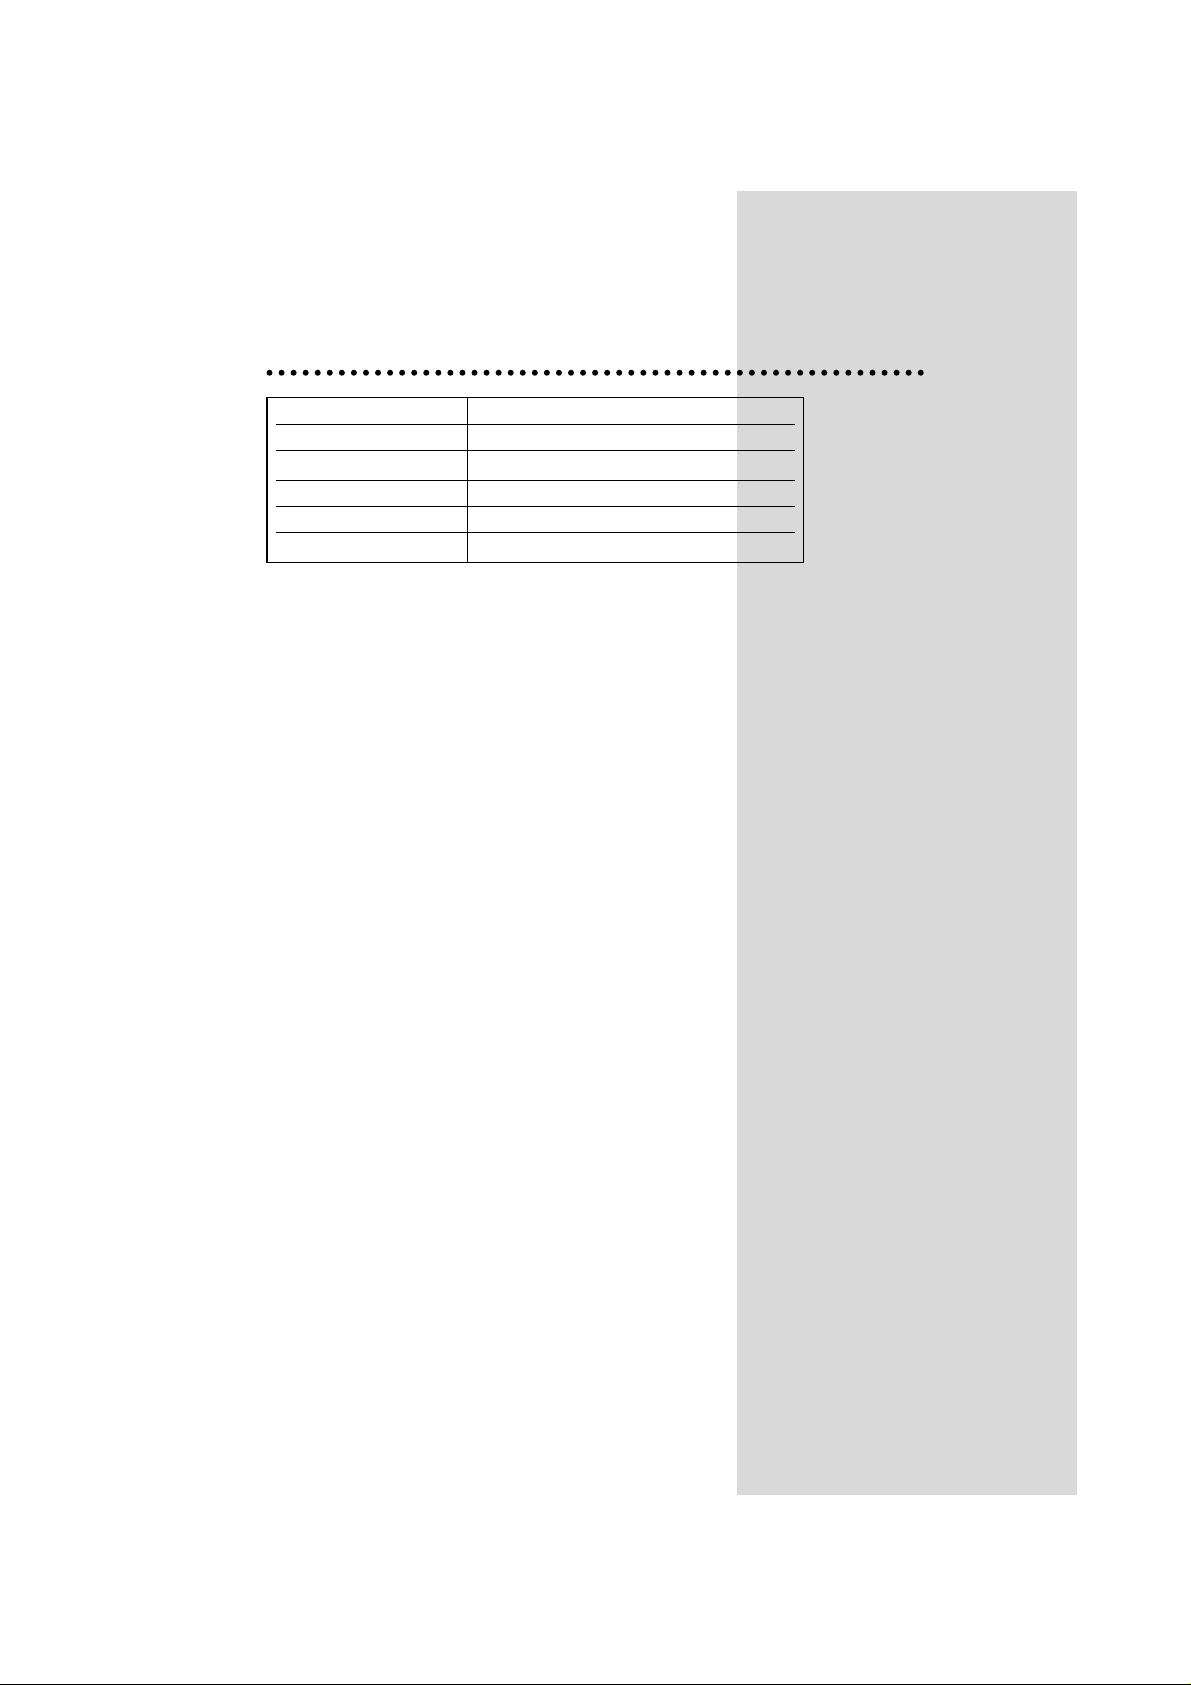
SPECIFICATIONS
TV Standard PAL/SECAM-B/G,H, NTSC(AV ONLY)
Main Voltage 240V~, 50Hz
Power Consumption 95W
Sound Ouput Power 3W+3W(60% MOD. at 1KHz THD. 10%)
Dimensions(WxHxD) 590 x 471 x 465mm
Weight
24.2Kg
18
Page 21

NEC Australia Pty. Ltd.
ABN 14 004 803 490
Home Electronics Group
NEC Australia Pty. Ltd.
Home Electronics Group
244 Becroft Road EPPING 2121
Tel:131 632
Fax:(02) 9930 2383
NEC Service Centres
New South Wales
Sydney 184 Milperra Rd, Revesby 2212 (02)9780 8688
Newcastle 120 Parry Street, Newcastle West 2302 (02)4926 2466
Victoria
Melbourne 480 Princes Highway, Noble Park 3174 (03)9554 6245
Queensland
Brisbane 116 Ipswich Road, Woollongabba, 4102 (07)3361 5858
Southport Shop 1, 48 Ferry Road, Southport 4215 (07)5591 3670
South Australia
Adelaide 84A Richmond Rd, Keswick, 5053 (08)8375 5710
Western Australia
Perth 45 Sarich Court, Osborne Park 6017 (08)9446 5333
For Service in outer areas, please contact your NEC retailer for the address of the nearest Authorised
NEC Service Centre
P/N : 48586785E104-R1
 Loading...