

Page 1

NVM-Professional
NVM-Server
NVM-Server Desktop
NVM-Server XL
Windows 2000 Platform
Integrating the Voice Mail System
with SMTP Email Server
Page 2

This manual has been developed by NEC Unified Solutions, Inc. It is intended for the use of its customers and service
personnel, and should be read in its entirety before attempting to install or progra m the system. Any comments or
suggestions for improving this manual would be appreciated. Forward your remarks to:
NEC Unified Solutions, Inc.
4 Forest Parkway Shelton, CT 06484
Attention: Manager, Technical Publications
www.necunifiedsolutions.com
Nothing contained in this manual shall be deemed to be, and this manual does not constitute, a warranty of, or
representation with respect to, any of the Equipment covered. This manual is subject to change without notice and
NEC Unified Solutions, Inc. has no obligation to provide any updates or corrections to this manual. Further, NEC
Unified Solutions, Inc. also reserves the right, without prior notice, to make changes in equipment design or
components as it deems appropriate. No representation is made that this manual is complete or accurate in all respects
and NEC Unified Solutions Inc. shall not be liable for any errors or omissions. In no event shall
NEC Unified Solutions, Inc. be liable for any incidental or consequential damages in connection with the use of this
manual. This document contains proprietary information that is protected by copyright. All rights are reserved. No
part of this document may be photocopied or reproduced without prior written consent of NEC Unified Solutions, Inc.
© 2005 by NEC Unified Solutions, Inc. All Rights Reserved
Printed in U.S.A.
Page 3

Table of Contents
Table of Contents
Introduction
Features........................................................................................................................................... 1
Materials Re qu ired....................... ................ ............... ................ ............... ................ ...................... 2
Related Doc um e nts ..................... ................ ............... ................ ............... ................ ...................... 2
Comparison o f In te g r a tio n T yp e s............ ................ ............... ................ ............... ................ ........... 2
Connecting the Voice Mail Server to the Network
Connecting Voice Mail to the Network............................................................................................. 3
Configuring the Nework Settings ..................................................................................................... 4
Setting Up the Voice Mail Server
Checking the Voice Mail Software Version...................................................................................... 6
Stopping the Voice Mail Service......................................................................................................7
Upgrading th e Voice Mail Softwa re......... ... .. ............... ................ ............... ................ ............... ....... 9
Installing the SMTP Feature............................................... ........................................................... 10
Restarting the Voice Mail Service..................................................................................................12
Programming Mailboxes ........ .. ............... ................ ............... ................ .. ............... ................ . ...... 14
Installing UM Client Mailbox Options
Installing the Mailbox Options Software.........................................................................................18
Setting Up the Mailbox Options Software...................................................................................... 20
Using the UM Client Mailbox Options............................................................................................ 21
SMPT - Simple Mail Transport Protocol
SMTP Sequence............................................................................................................................23
NVM Voice Mail Win2K/SMTP Email Integration
i
Page 4

Ta ble of Contents
ii
NVM Voice Mail Win2K/SMTP Email Integration
Page 5

Introduction
The NVM Windows 2000 Voice Mail system can be integ rated wi th an SMTP Ser ver
and can be configured to operate in a POP3 or IMAP4 environ ment.
This document tell s you how to upgrade your Voice Mail software to the late st
version, and how to ins tall the SMTP Ema il feature. Th is document appl ies to the
following NVM series Voice Mail platforms:
The SMTP featu re allo ws Voice Mail to send Voice and Fax mess ages to any P OP3
or IMAP4 Email client. An incoming Voice Mail or Fax message app ears on the
SMTP client in the same list as incoming Emails. Email users can read, delete, reply
to, and forwar d Email message s that ar e in the ir POP3 or IMAP4 account.
Any of the followin g Email applica tions can be used as an SMTP client to view
messages:
Introduction
NVM - Professional (P/N 1770005)
NVM- Server (P/N 1770006)
NVM - Server Desktop (P/N 1770004)
NVM - Server XL (P/N 1770007)
■ MS Outlook
■ Outlook Express
■ Web based - See service prov ider
When a Voice/Fax message is sent to the POP 3 account, and the us er deletes or
reads the me ssage, it will n ot be del eted or marked as read in the Voice Mail
mailbox. However, if the Voice/Fax message is d ele te d fro m th e Voice Mail mail box ,
an attempt is made to de lete it from the P OP3 account, prov ided the user mai lbox
has POP3 informat ion programmed . If the POP3 mail box informati on is left blank,
no attempt is made.
Features Unified Messa ging is the fe ature that allo ws Voice, Fax, and Email to be re ceived
on the same client PC, us ing Outlook or ot her Email app lication. Each Voice Mail
Server is ship ped wi th a de fault nu mber of Unified Messagin g seats. Thi s number
can be expanded by purc hasing addit ional seats. All th at is require d for the defa ult
number of Unified Messa ging sea ts to be active, is to perfor m the SMTP integr ation.
Text-to-Speech copies your Email text messages and converts them to synthe s ized
speech so tha t you can listen to them through your Sub scriber Ma ilbox a t a
telephone. A digital vo ice synthesizer tells you the sen der and subject before
reading you the actua l Email message.
Synchroniz ation is a featur e of IMAP4 that allows the action s performed at a
subscriber mail box to b e rep eated at the Email server and vic e ver sa. For instance ,
if synchronization is enabled and a subscri ber deletes a messag e in his mailbox,
the message will als o be deleted on the ser ver.
Unified Messaging Mailbox Options is a software component that can be installed
on the Email client , so that SMTP accou nts can be created lo cally by the clien t,
rather than a t the Voice Mail Serve r.
NVM Voice Mail Win2K/SMTP Email Integration
1
Page 6

Introduction
Materials
Required
Related
Documents
Comparison
of Integration
Types
The following components are required to perform SMTP integration:
■ NVM Voice Mail Win2K software installat ion CD - version 3.30.04 or highe r
■ NVM - 2000WS System Guide P /N 17750INS01
■ NVM Server System Guide P/N 17720INS02
■ Activating or Addi ng Clients to NVM Deskto p Messaging
(P/N 17726UMSA C02)
■ NVM - Server Activati ng and Installing Text-to Speech
(P/N 17733WIN2KINS02)
The NVM Win2K Voice Mail System can be integr ated with the fo llowing types of
Email Servers:
■ MS Exchange 2000
■ SMTP/POP3
■ SMTP/IMAP4
The table below o ffers a co mparison o f the fe atures availab le for ea ch type of
server:
Table 1: Email Integr ation Features
Client Integration
Outlook/Exchange
Outlook/POP3
Outlook/IMAP4 N/A
Outlook Express/POP3
Outlook Express/IMAP4
Other than Outlook
Voice Mail
SMTP/POP3
Synch NO
Forms YES
Synch NO
Forms YES
Synch NO
Forms NO
Synch NO
Forms NO
Synch NO
Forms NO
Voice Mail
SMTP/IMAP4
Synch YES
Forms YES
N/A
Synch YES
Forms YES
N/A
Synch YES
Forms NO
Synch YES
Forms NO
2
NVM Voice Mail Win2K/SMTP Email Integration
Page 7
Connecting the Voice Mail Server to the Network
Connecting the Voice Mail Server to the Network
The NVM Voice Mail unit mu st be c onnected t o a ne twork th at has ac cess to the
SMTP Email Server.
Connecting
Voice Mail to
the Network
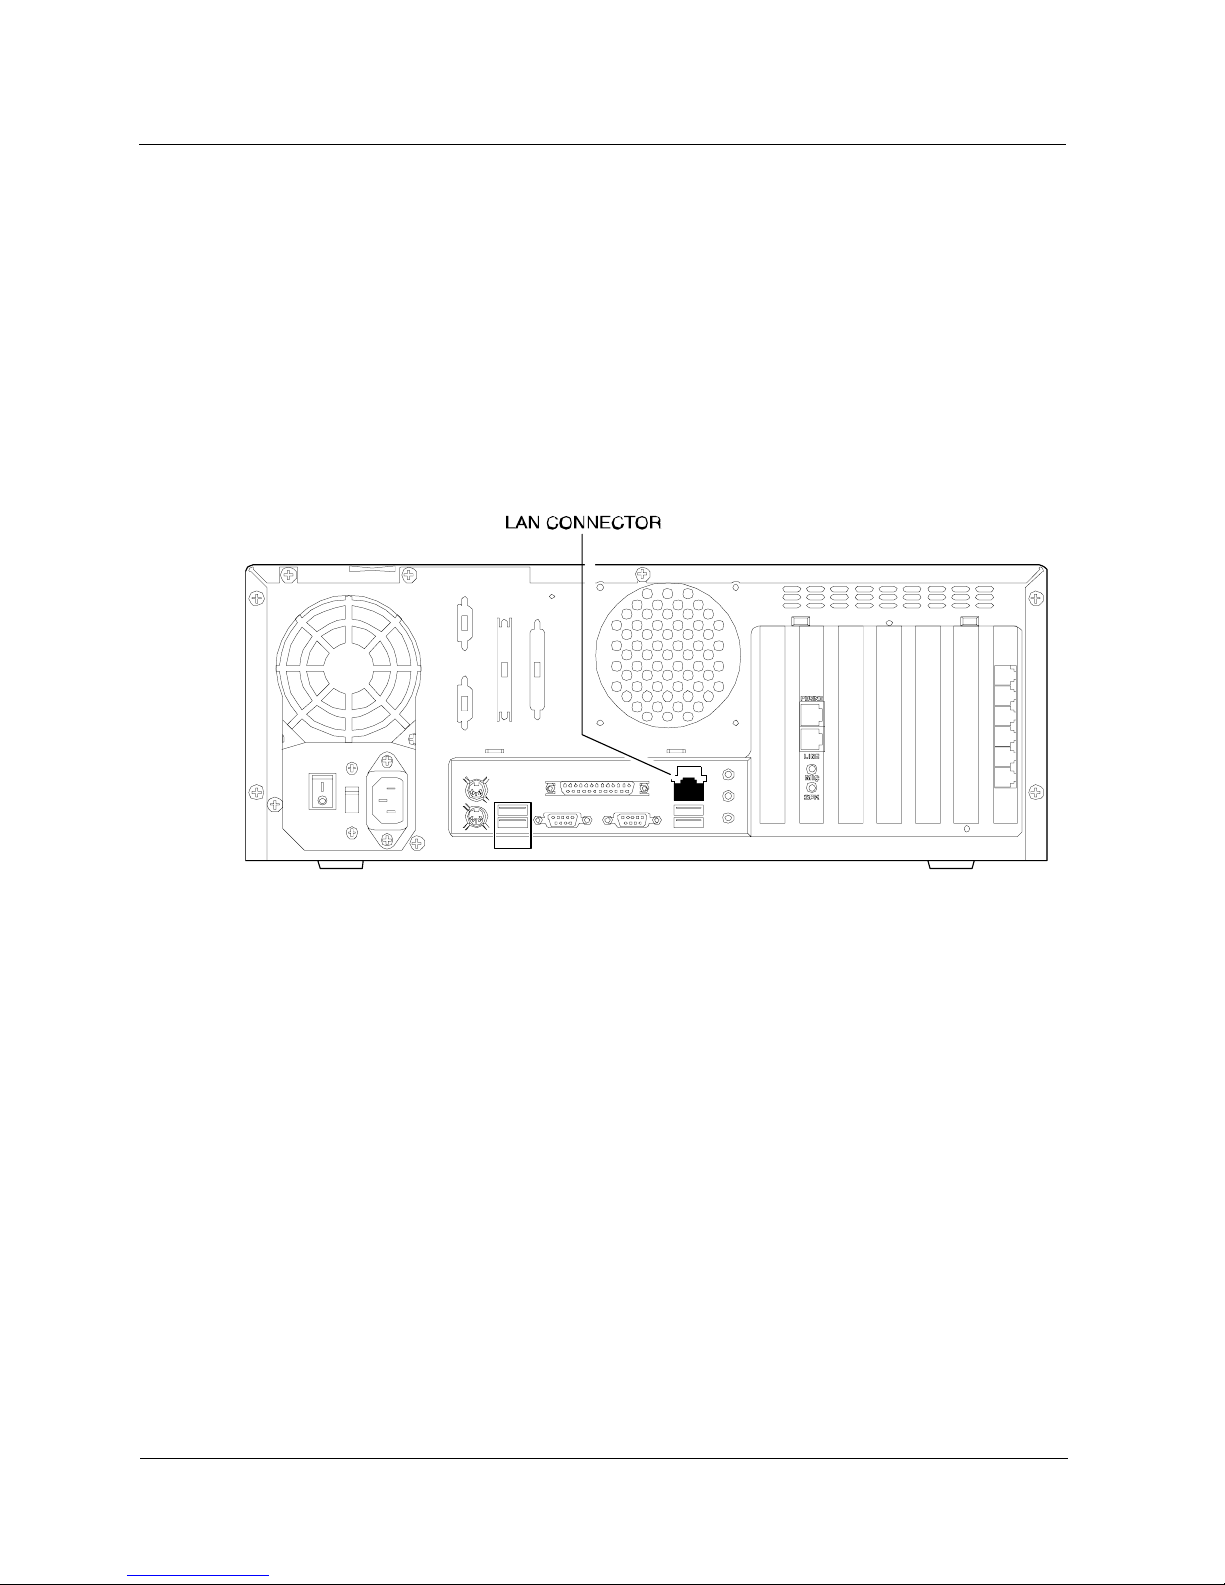
Connect a cabl e from the Ethe rnet p ort on t he rear of th e Voice Mail unit t o the
network. Figu re 1 s hows the locatio n of the LAN por t (Ethe rnet c onnector) on th e
rear of the unit.
Figure 2: NVM Win2K Voice Mail Unit, LAN Port
NVM Voice Mail Win2K/SMTP Email Integration
3
Page 8
Connecting the Voice Mail Server to the Network
Configuring Network Settings
Configuring
Network
Settings
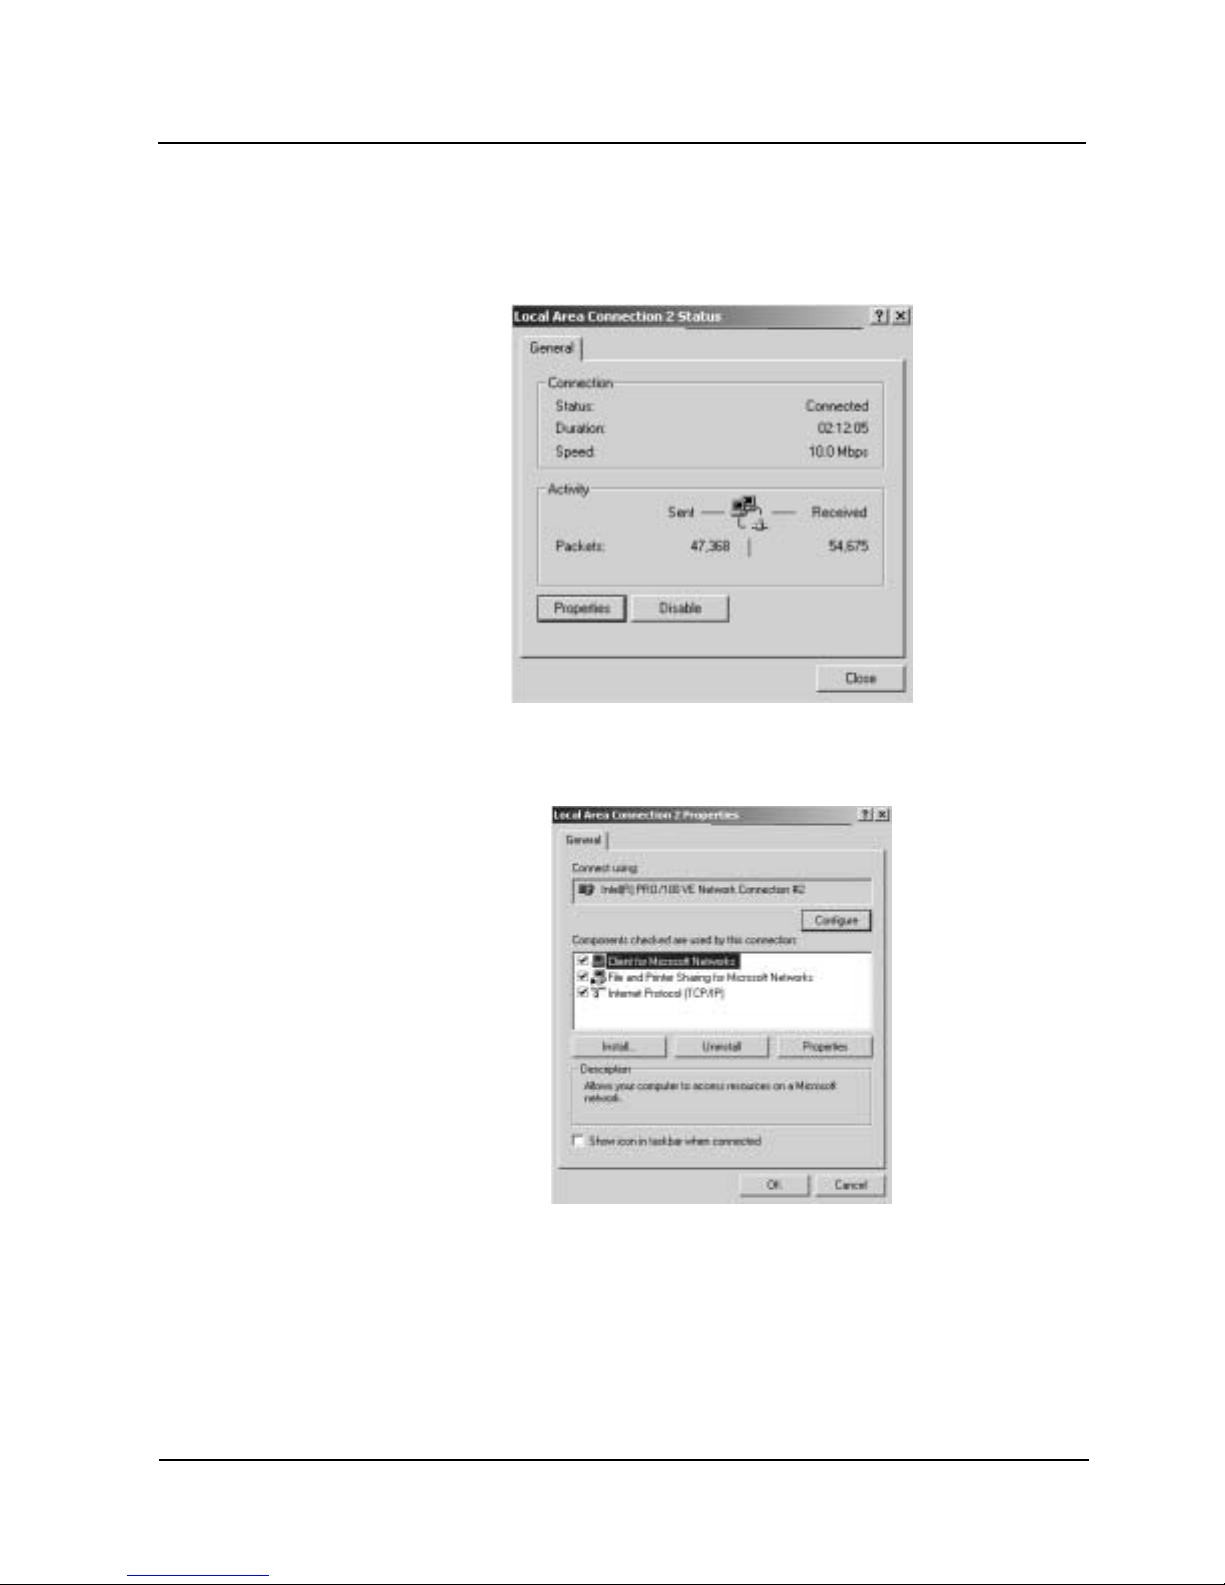
1) Click Star t ! Settings ! Network and D ial-Up Con nections ! Loca l Area
Connection.
The Local Area Connection Status screen is displayed:
2) Click the P roperties button. The Local Area Connection Properties screen is
displayed:
4
NVM Voice Mail Win2K/SMTP Email Integration
Page 9
Connecting the Voice Mail Server to the Network
Configuring Network Settings
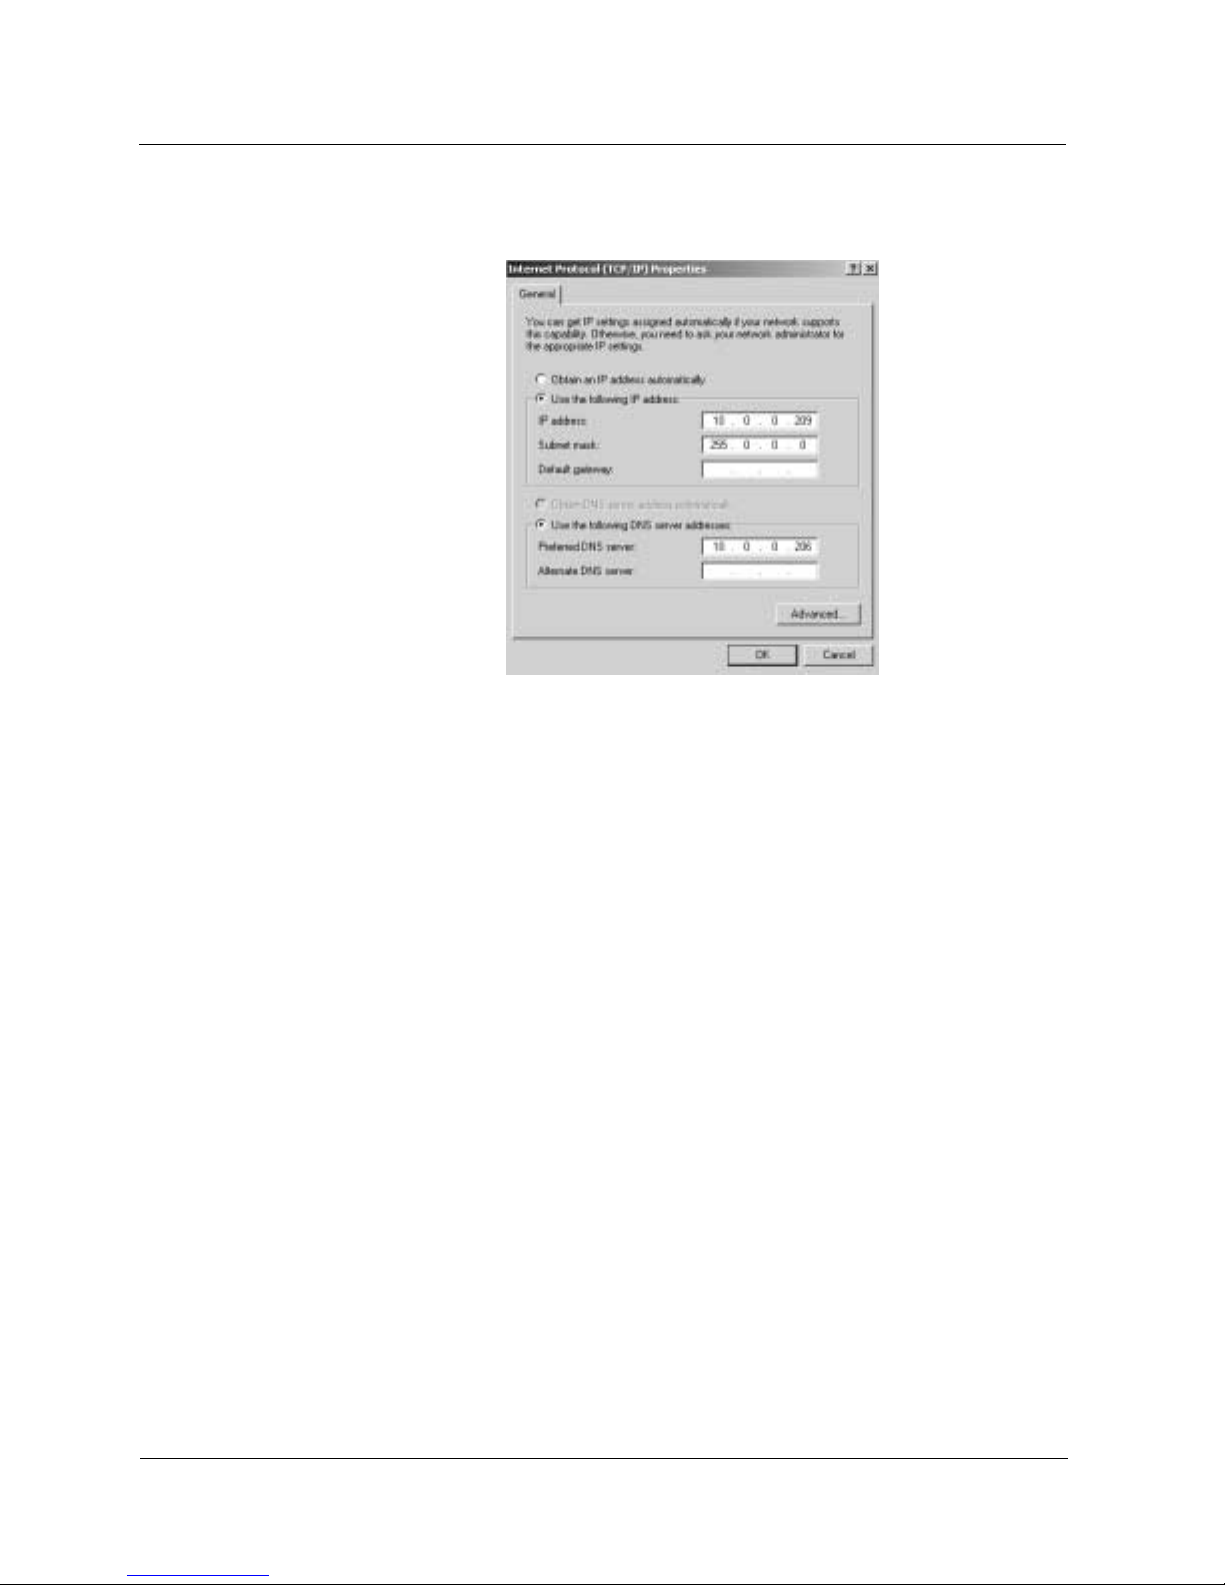
3) Double-click on Internet Protocol (TCP/IP). The Internet Protocol P ropert ies
screen is disp layed:
4) On the General page of the Internet Prot ocol Proper ties screen, enter the
values for:
■ IP address of the Voice Mail server
■ Subnet mask
■ Default gateway
■ DNS server (If DHCP is not being used, this address must be set)
These values can be obtai ned from the netw ork administ rator.
NVM Voice Mail Win2K/SMTP Email Integration
5
Page 10
Setting Up the Voice Mail Server
Checking the Voice Mail Software Version
Setting Up the Voice Mail Server
Checking the
Voice Mail
Software
Version
NVM Win2K Voice Mail software must be version 3.30.04 or higher in order to use
the SMTP featur e. To check the current version of Voice Mail software , perfo rm the
following:
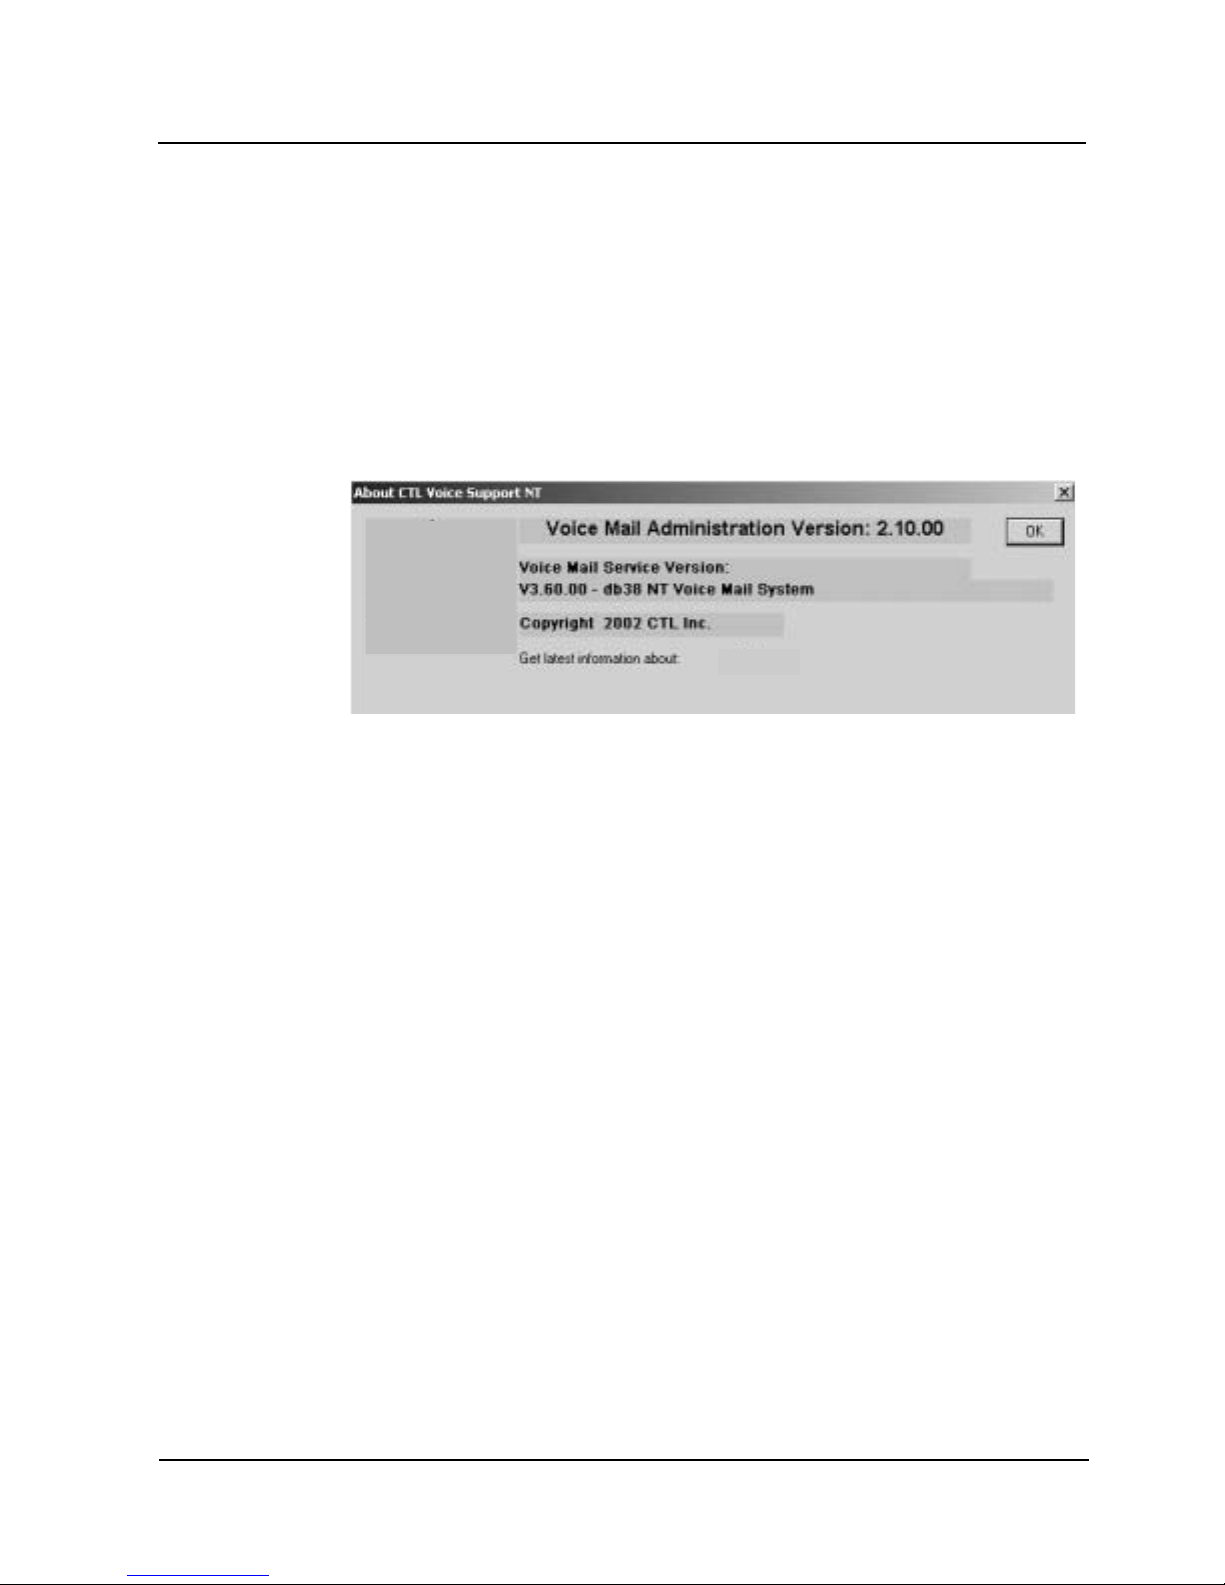
1) Start the Voice Mail application a nd click About in the Menu bar.
2) A screen similar t o the one shown below indicates the in stalled ve rsion of the
GUI and the Voice Mail Service.
■ The GUI version should be 2.1 0.0.0 or higher
■ The Voice Mail version should b e 3.30.04 or hi gher
3) If an earlier version of software is installed, you will need to perform the upgrade
procedure prior to installing the SMTP feature.
6
NVM Voice Mail Win2K/SMTP Email Integration
Page 11
Setting Up the Voice Mail Server
Stopping the Voice Mail Service
Stopping the
Voice Mail
Service
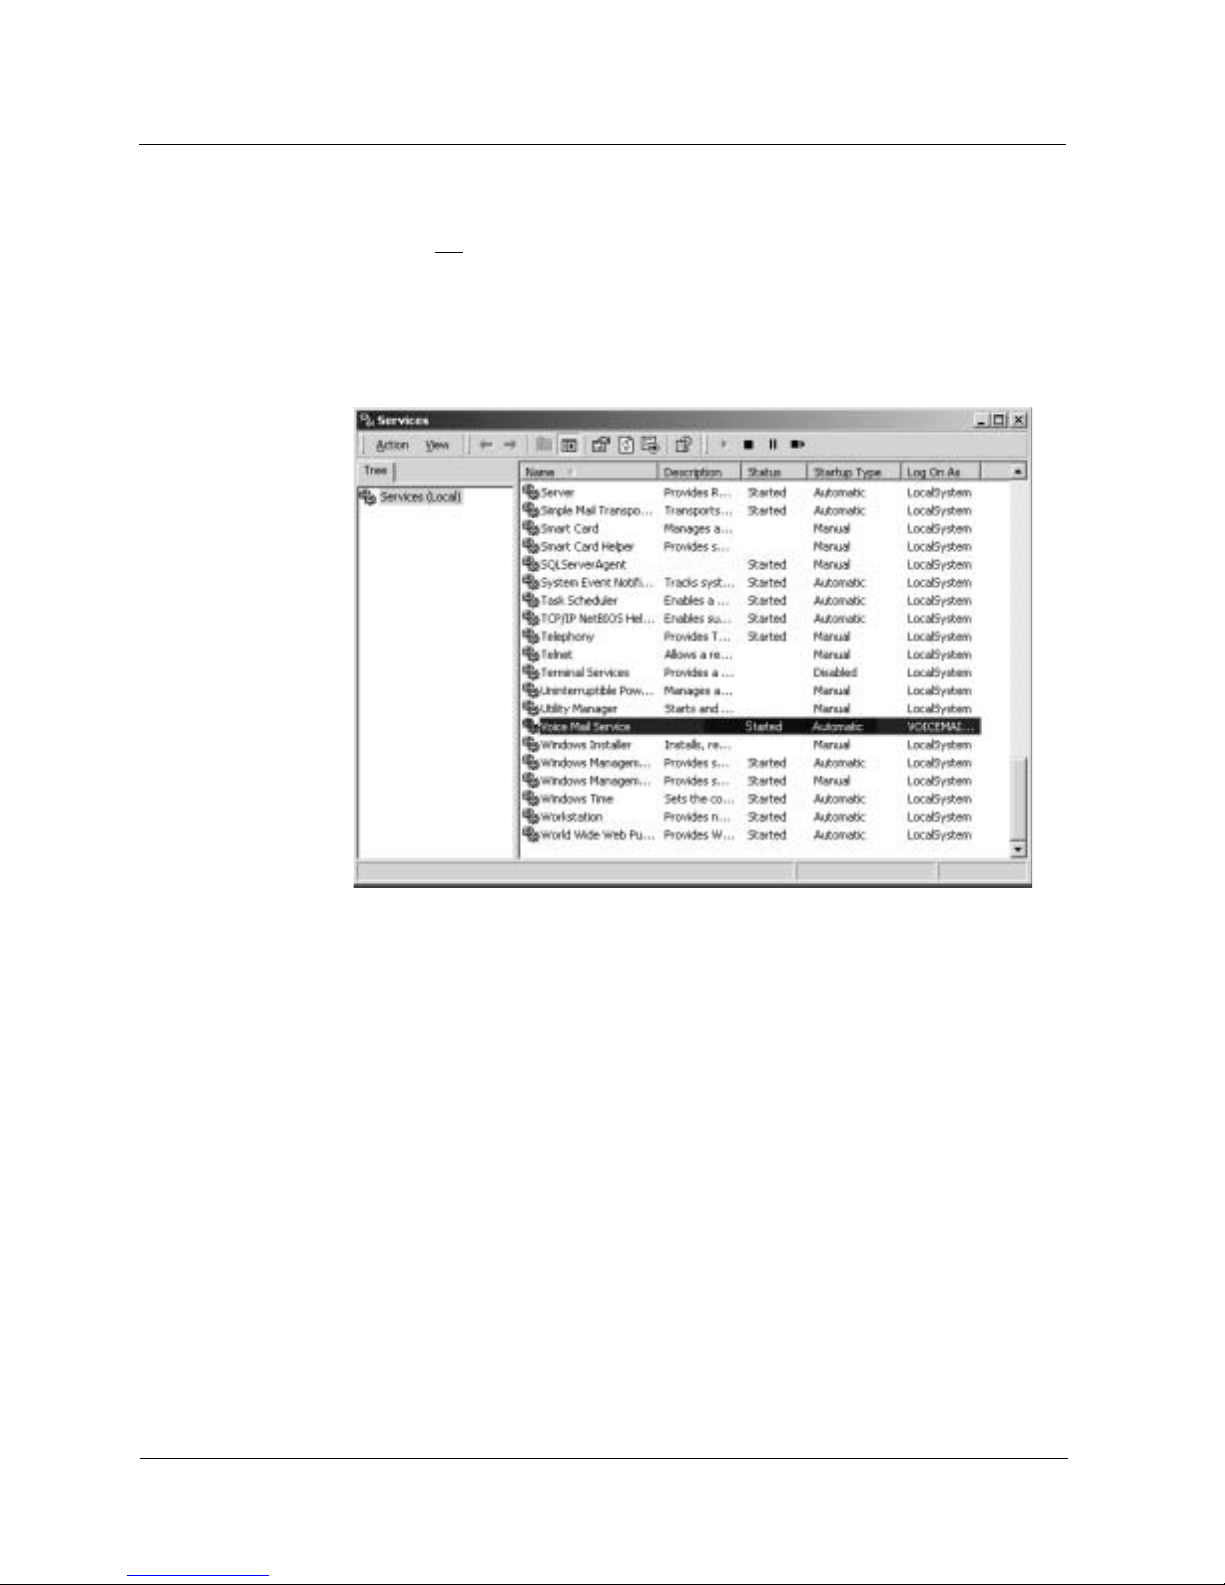
1) If you have a Services shortcut on your desk top, dou ble-cli ck the Se rvices icon.
If you do not
■ Click Start ➱ Se tti ngs ➱ Control Panel.
■ Double-click the Admi nistrative Tools icon on t he Co ntrol Panel window.
■ Double-click the Ser vices icon on the Admi nistrativ e Tools window.
You see a Services window similar to the one shown bel ow:
have a Services shor tcut o n your de sktop:
2) In the Services window, use the scrol l bar to locate Voice Mail Serv ice and
double-click.
NVM Voice Mail Win2K/SMTP Email Integration
7
Page 12
Setting Up the Voice Mail Server
Stopping the Voice Mail Service
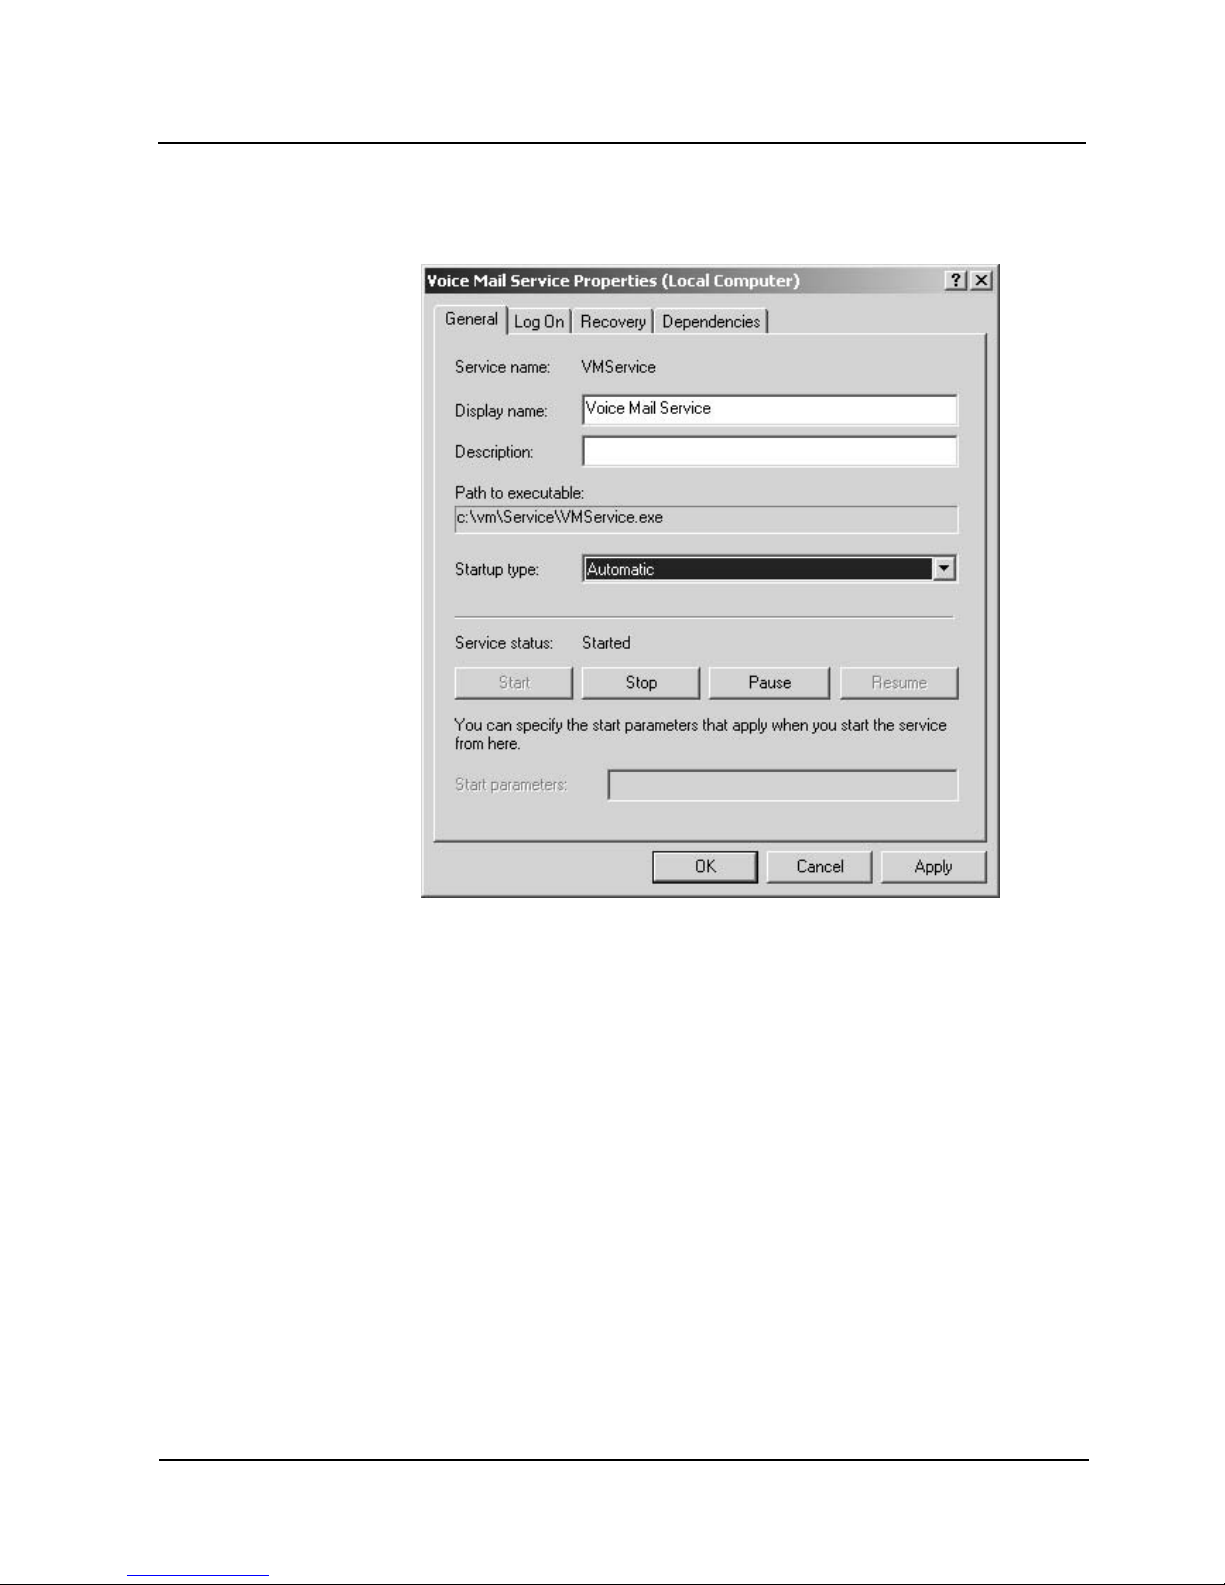
You will see the Voice Mail Service P ropert ies window similar t o the one shown
below:
3) On the General page of th e Voice Mail Service P roperti es window:
■ In the Star tup type field, click the scroll down arrow and select Manual.
■ Click the Stop button to stop the Voice Mail Service.
■ Click Apply, then click OK to close the Voice Mail Serv ice Prop erti es
window.
4) Close the Services window and reb oot the comput er.
8
NVM Voice Mail Win2K/SMTP Email Integration
Page 13
Setting Up the Voice Mail Server
Upgrading the Voice Mail Software
Upgrading
the V oice Mail
Software
If it is necessary to upgra de the Voice Mail sof tware to the curre nt versio n, perfor m
the steps below. If the version is already 3.30.04 or higher, skip this section and go
to
Installing the S MTP Feat ure
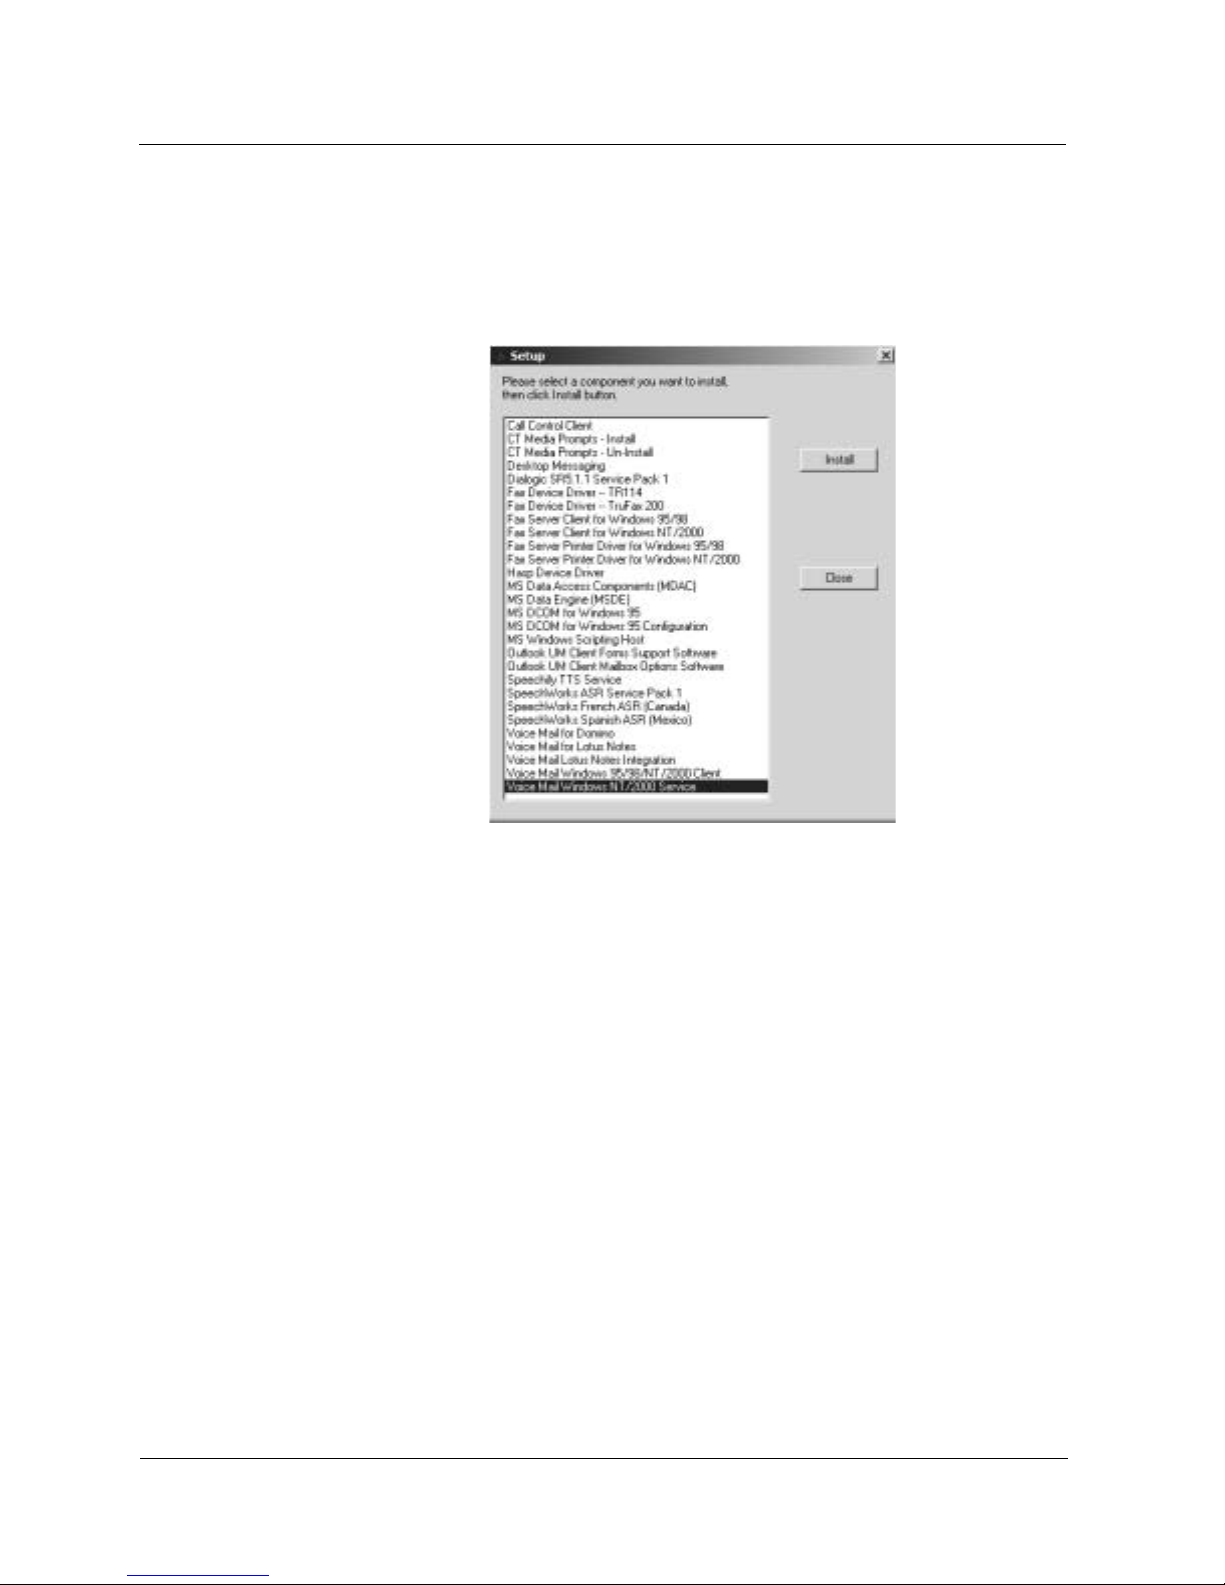
1) Insert the Window s 2000 Voice Mail software installat ion disk into the CD drive.
The disk wil l autos tart and t he Setup screen w ill ap pear.
on page 10.
2) Select Voice Mail Windows NT/2000 Se rvice from th e list and click th e Instal l
button.
3) The Install W izard starts. Cli ck Next.
4) When the L icense Agr eement dialog is displaye d, click Yes.
5) In the Setup Type screen, click the radio button to select Upgrade, then click the
Next button.
6) You are not required to enter any information into the SQL Server, Computer
Name, User N ame, Password screen. Click t he Next button.
7) The Progres s In di cator will be act iv e whi le the up grad e i s takin g p lac e. Once th e
software upgrad e is com plete t he messa ge
displayed.
8) Click the Fi nish button. If the Setup sc reen is still ope n, click Close.
InstallShie ld Wiz ard Comple te
is
NVM Voice Mail Win2K/SMTP Email Integration
9
Page 14
Setting Up the Voice Mail Server
Installing the SMTP Feature
Installing the
SMTP Feature
To install the SMTP software:
1) Insert the NVM Win2K Voice Mail software instal la tio n di sk int o the C D dri ve. Th e
disk will autostart and the Setup screen will appear.
2) Select Voice Mail Windows N T/2000 Se rvic e from the list and cl ick the Instal l
button.
3) The Install Wi zard starts. Cl ick Next.
4) When the License Ag reement dial og is displayed, click Yes.
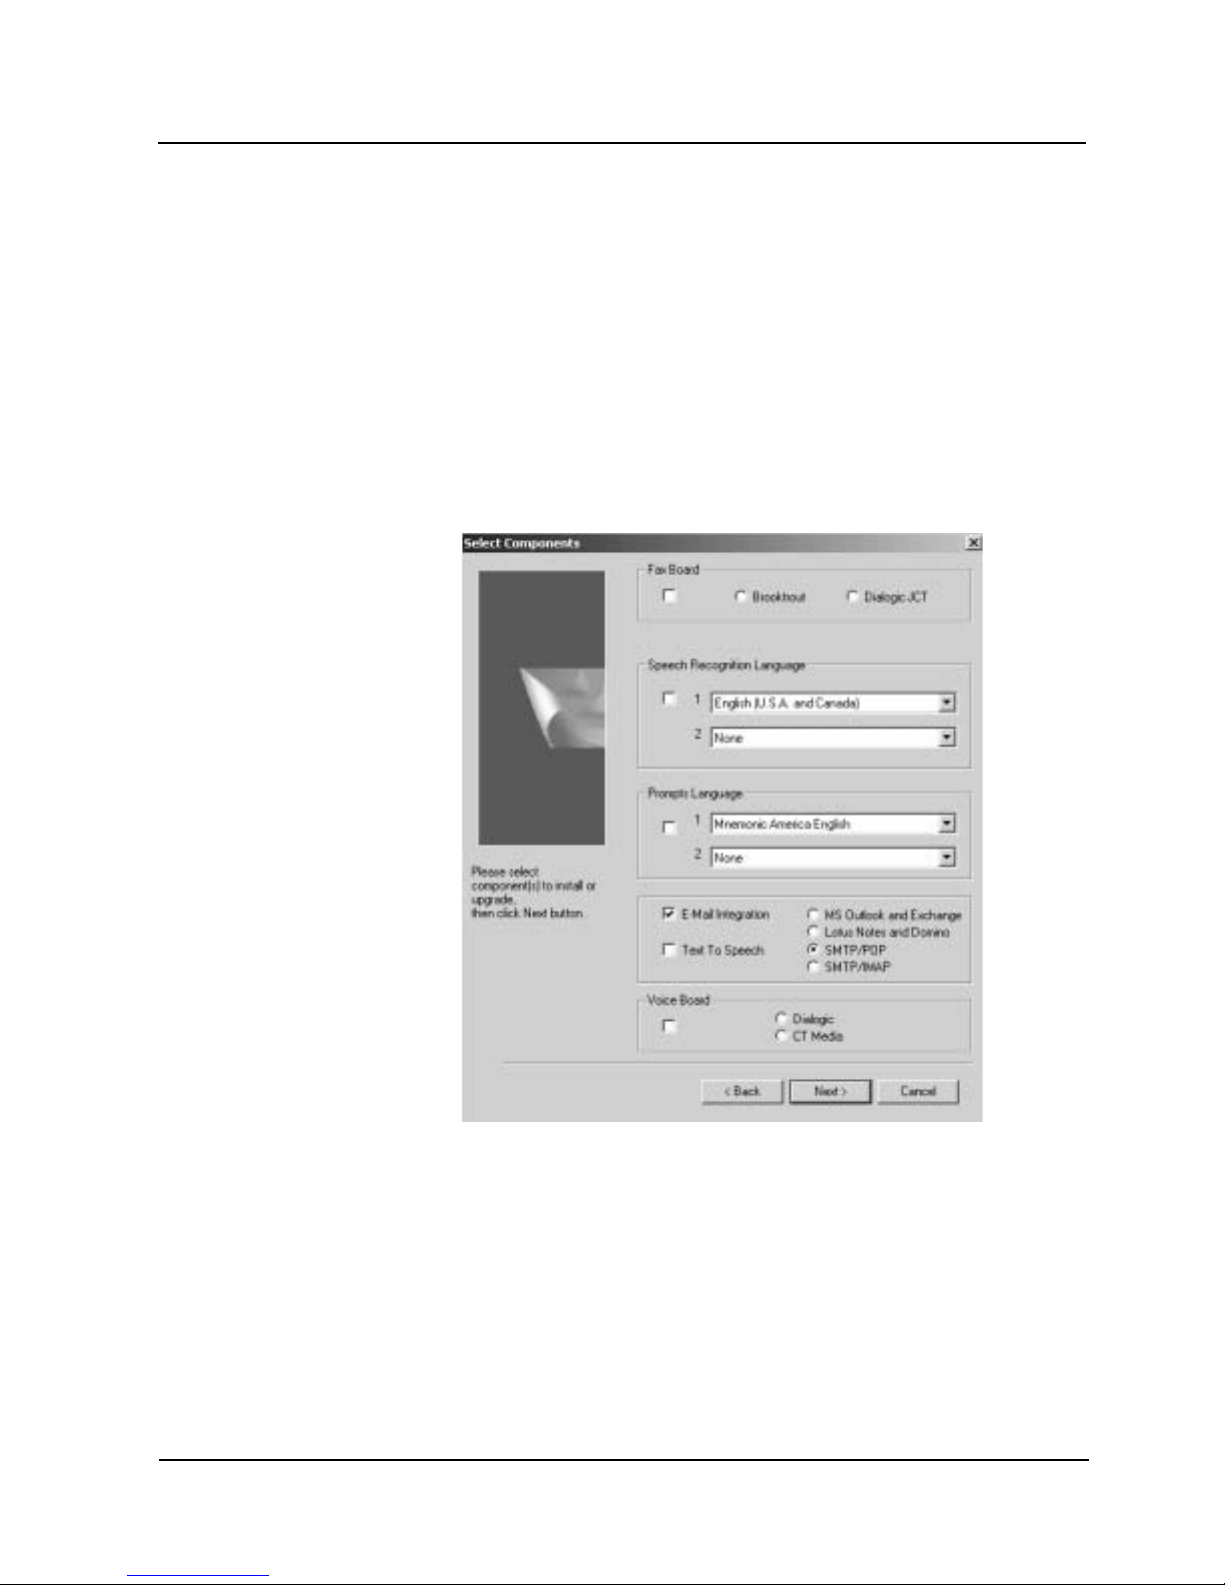
5) In the Setup Type screen, click the ra dio butto n to se lect Component
Installation an d then click the Next button.
6) The Select Components win dow is displayed:
■ Check E-Mail Integration
■ Click the radio but ton to select ei ther SMTP/POP or SMTP /IMAP
7) Click Next.
8) The Progress Indica tor will be acti ve while the ins tallation is taking pl ace. Once
the installation is complet e, the message
displayed.
9) Click the Fi nish button. If the Setup screen is sti ll open, click Close.
10
InstallShield Wizard Complete
is
NVM Voice Mail Win2K/SMTP Email Integration
Page 15
Setting Up the Voice Mail Server
Installing the SMTP Feature
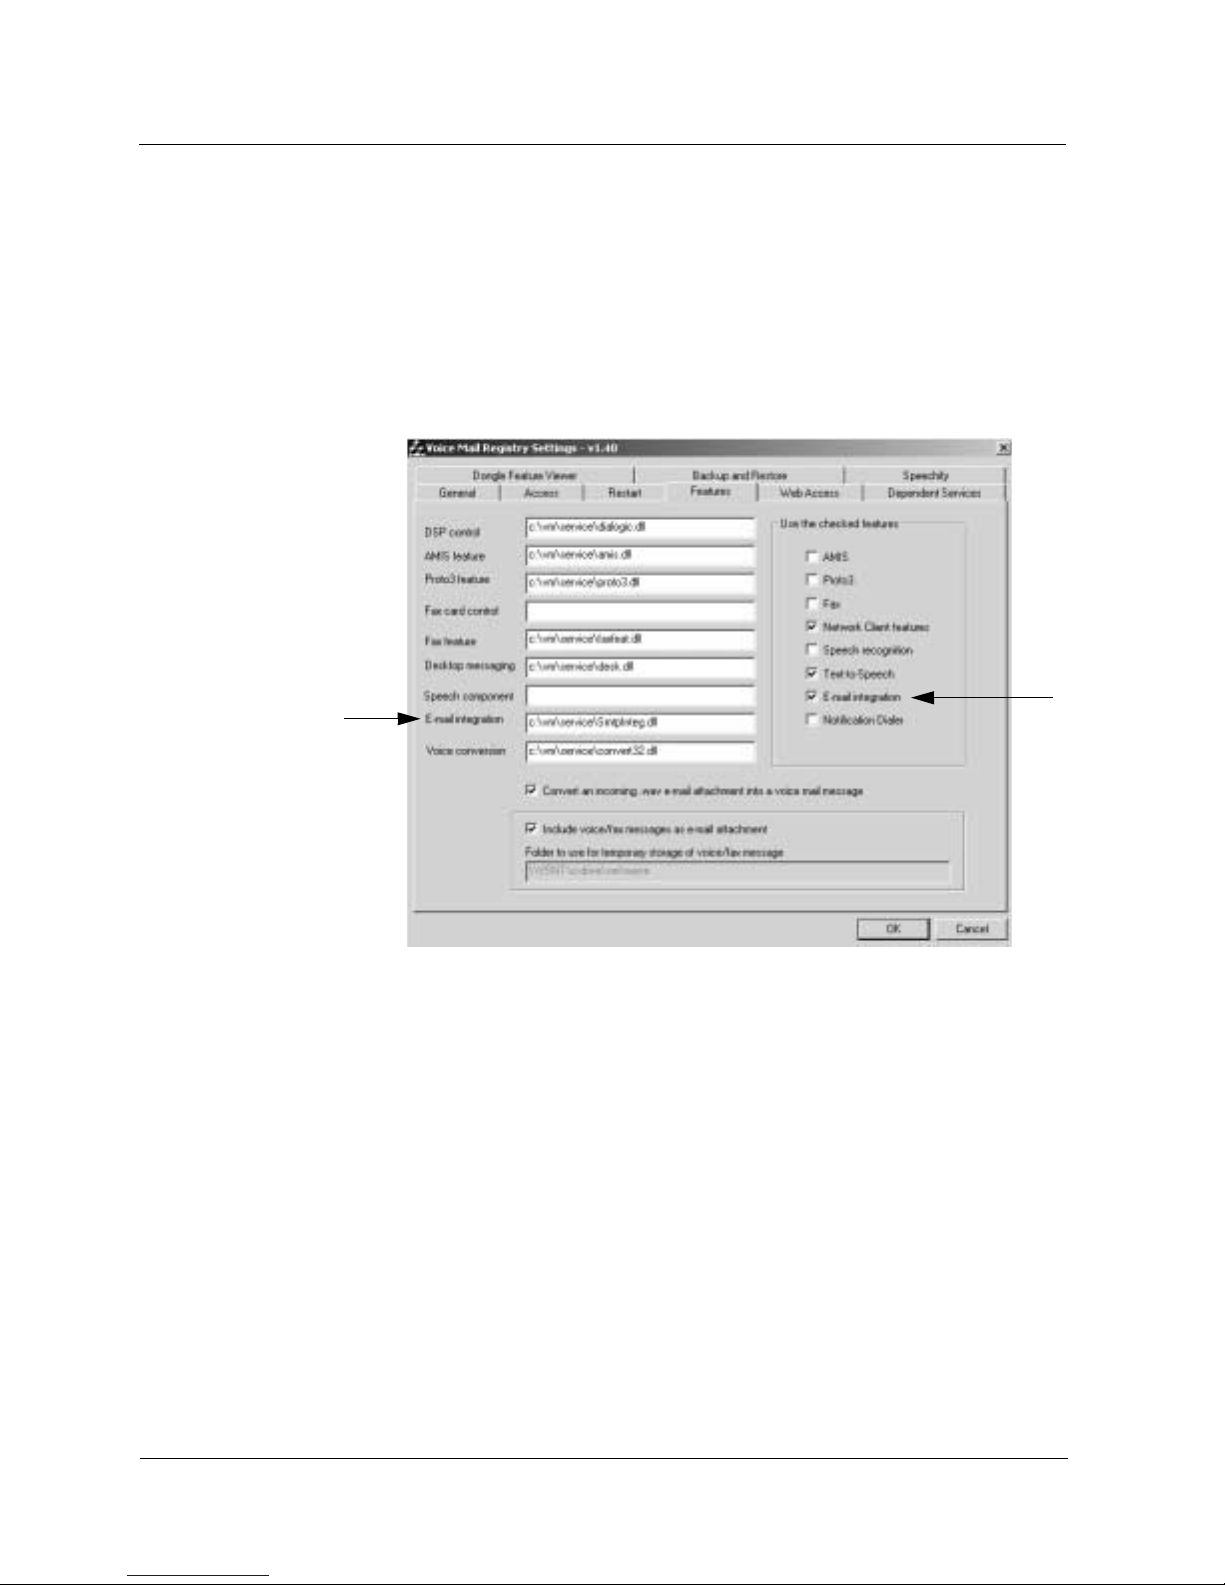
To verify that the feature installation was successful:
1) Click Star t ➱ Programs ➱ Voice Mail System ➱ Registry Configuration. The
Voice Mail Registry Settings windo w appears.
2) Click the Fe atures tab. Check to see tha t the SMTP compone nt is installed.
The E-mail integration checkb ox should be checke d
■
■ The E-mail integrat ion field shou ld contain c:\vm\service\SmtpInteg.dll if
using POP3 or, c:\vm\service\IMAP4Integ.dll if using IMA P4.
3) Click OK to close the Voice Mail Registry Set tings window.
NVM Voice Mail Win2K/SMTP Email Integration
11
Page 16
Setting Up the Voice Mail Server
Restarting the Voice Mail Service
Restarting the
Voice Mail
Service
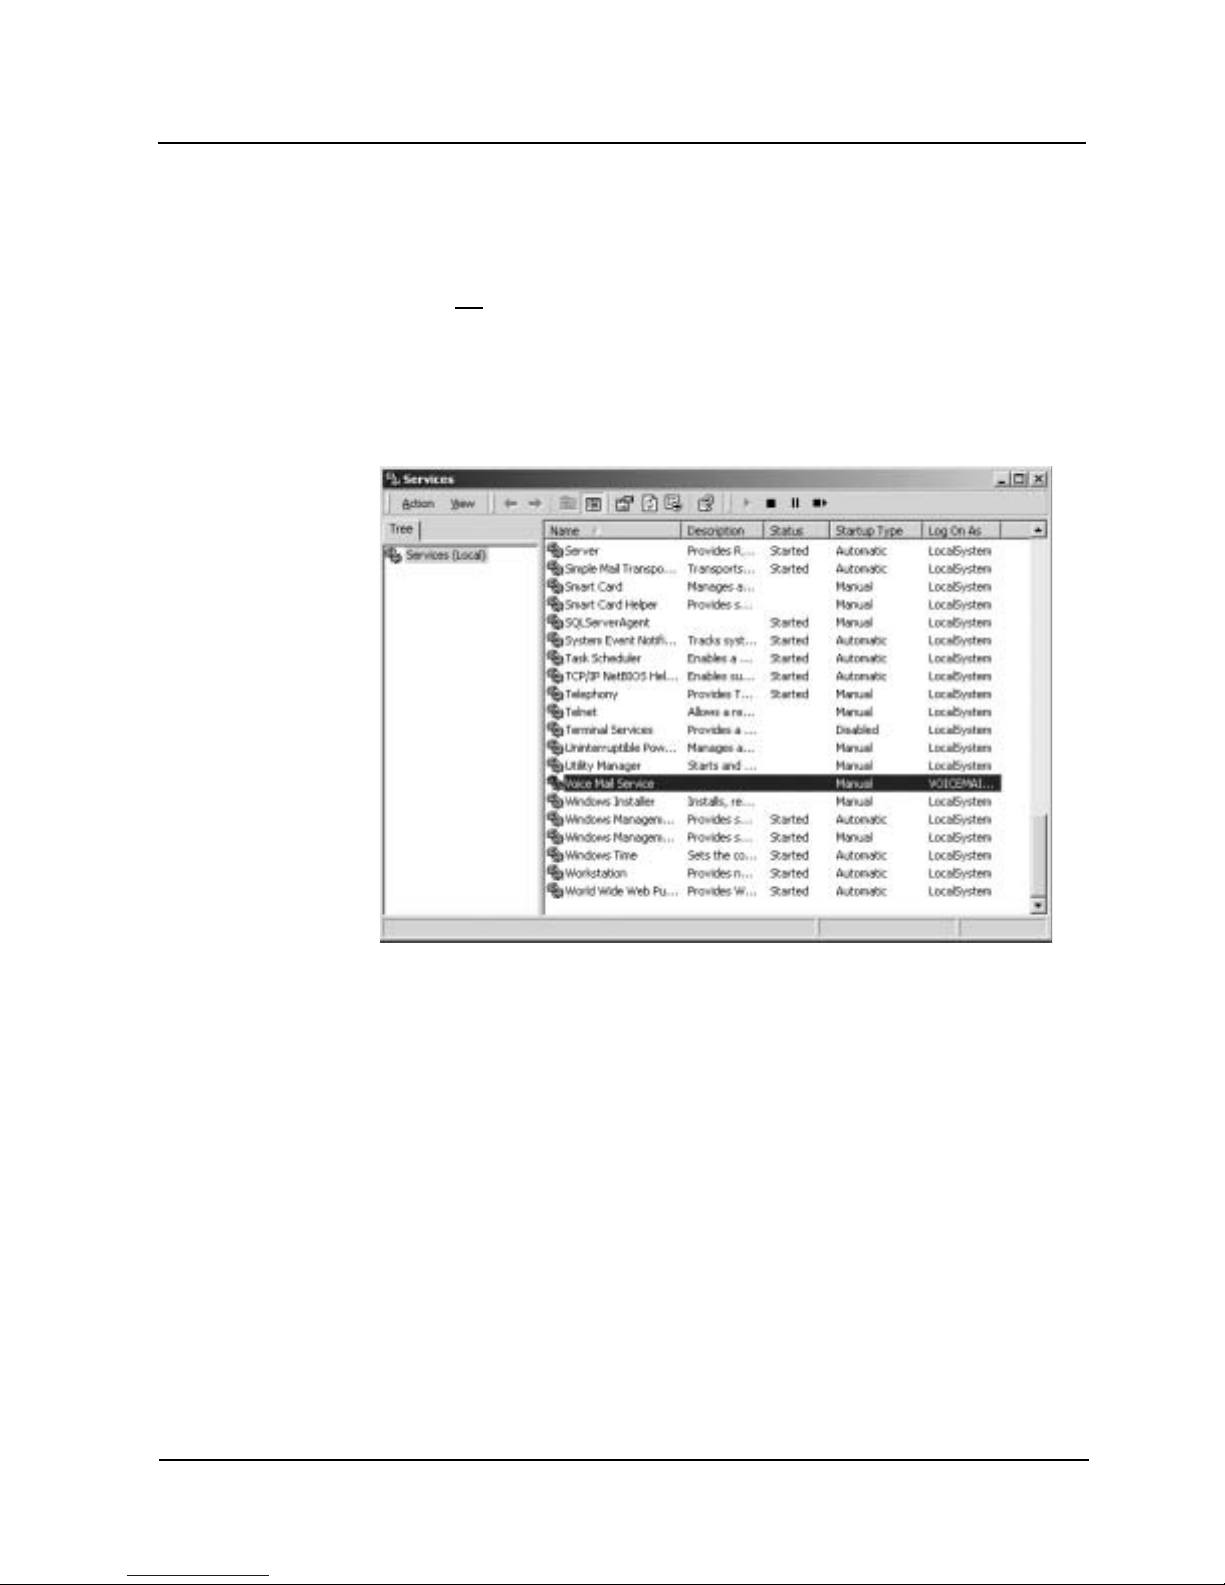
For normal operat ion, the startu p mode must be retur ned to
Mail will not star t on i ts own aft er a c omputer o r power fail r estart.
1) If you have a Se rvic es short cut on your desktop, double-cl ick the Services icon.
If you do not have a Services shortcut on your desktop:
■ Click Start ➱ Settings ➱ Control Panel.
■ Double-click the Administrative Tools icon on the Cont rol Panel window.
■ Double-click the Services icon on th e Admi nistrative Tools window.
You see a Services window similar to the one shown below.
Automatic
or the Voice
12
2) In the Ser vices w indow, use the scr oll bar to loca te Voice Mail Service and
double-click.
NVM Voice Mail Win2K/SMTP Email Integration
Page 17
Setting Up the Voice Mail Server
Restarting the Voice Mail Service
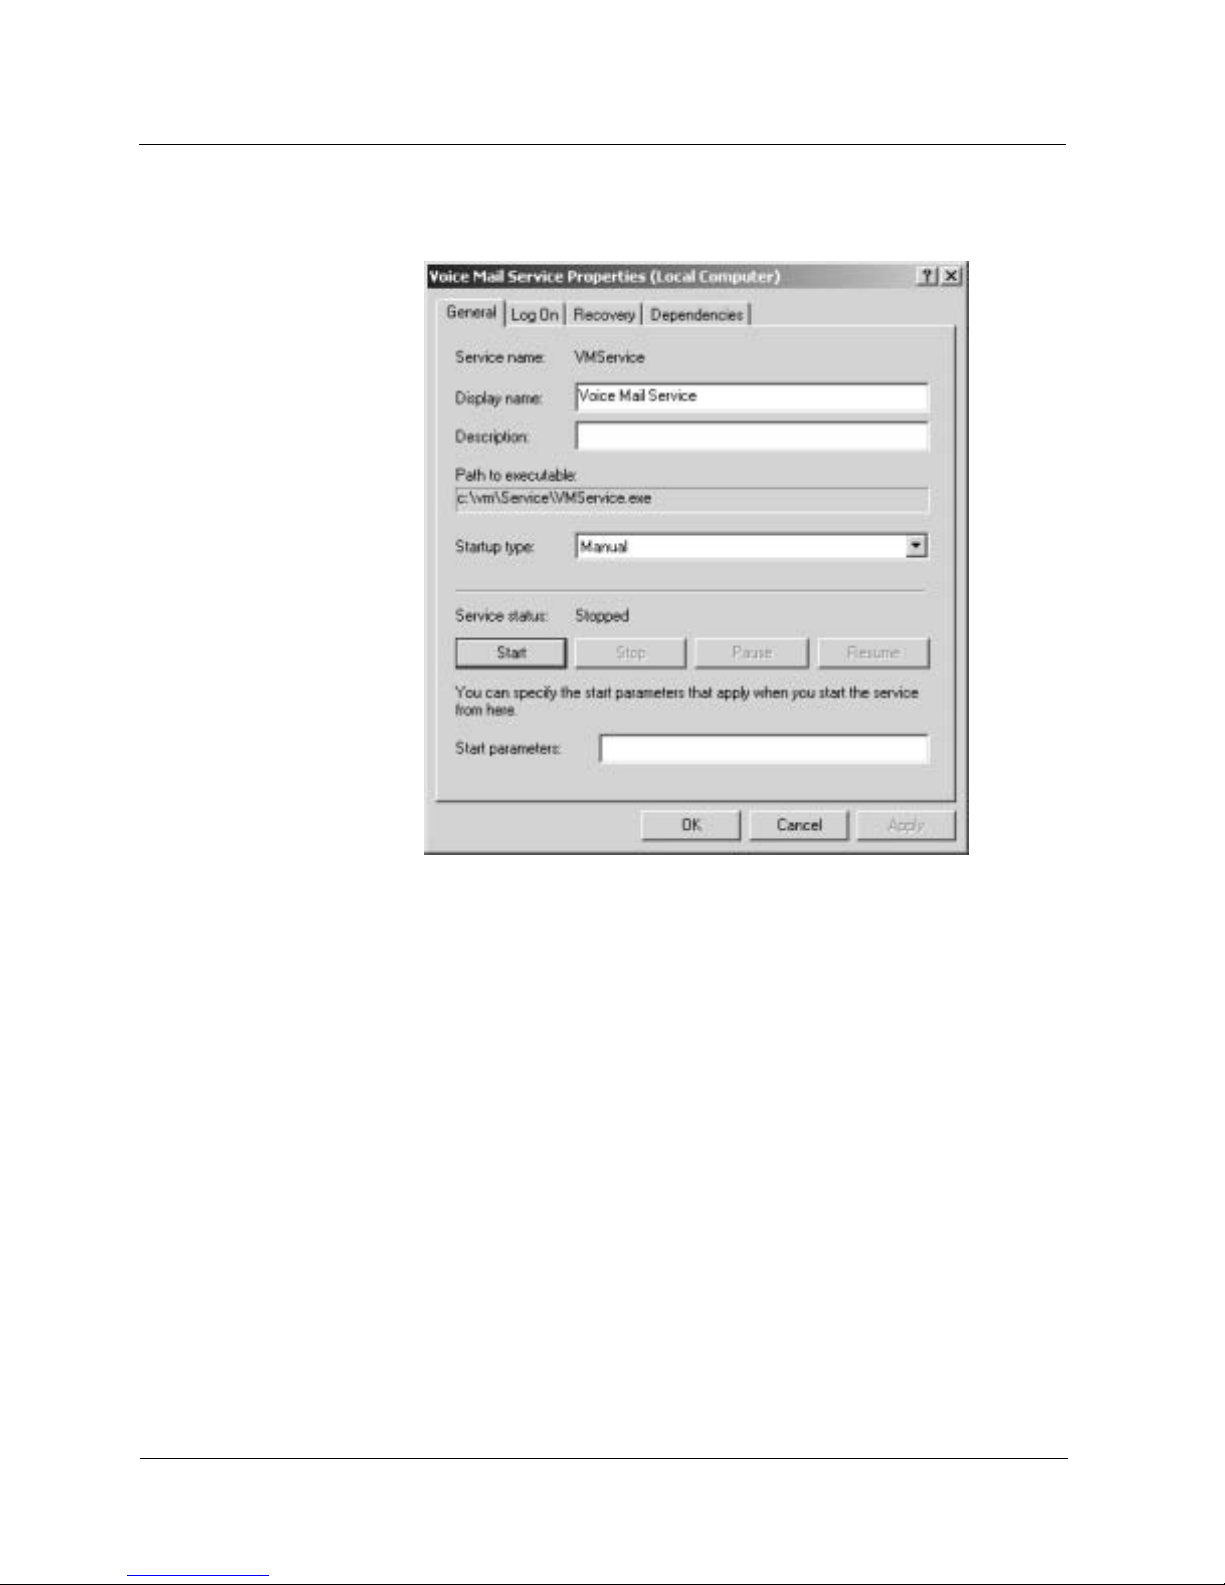
You will see the Voice Mail Service P roperties win dow similar to the one shown
below.
3) On the General page of the Voice Mail Ser vice Propert ies window:
■ In the Startup type field, click the scrol l down arrow and sel ect Automatic.
■ Click the Start button to start the Voice Mail Ser vice.
■ Click Apply, then click OK to close the Voice Mail Service Properties
window.
4) Close the Services window.
NVM Voice Mail Win2K/SMTP Email Integration
13
Page 18
Setting Up the Voice Mail Server
Programming Mailboxes
Programming
Mailboxes
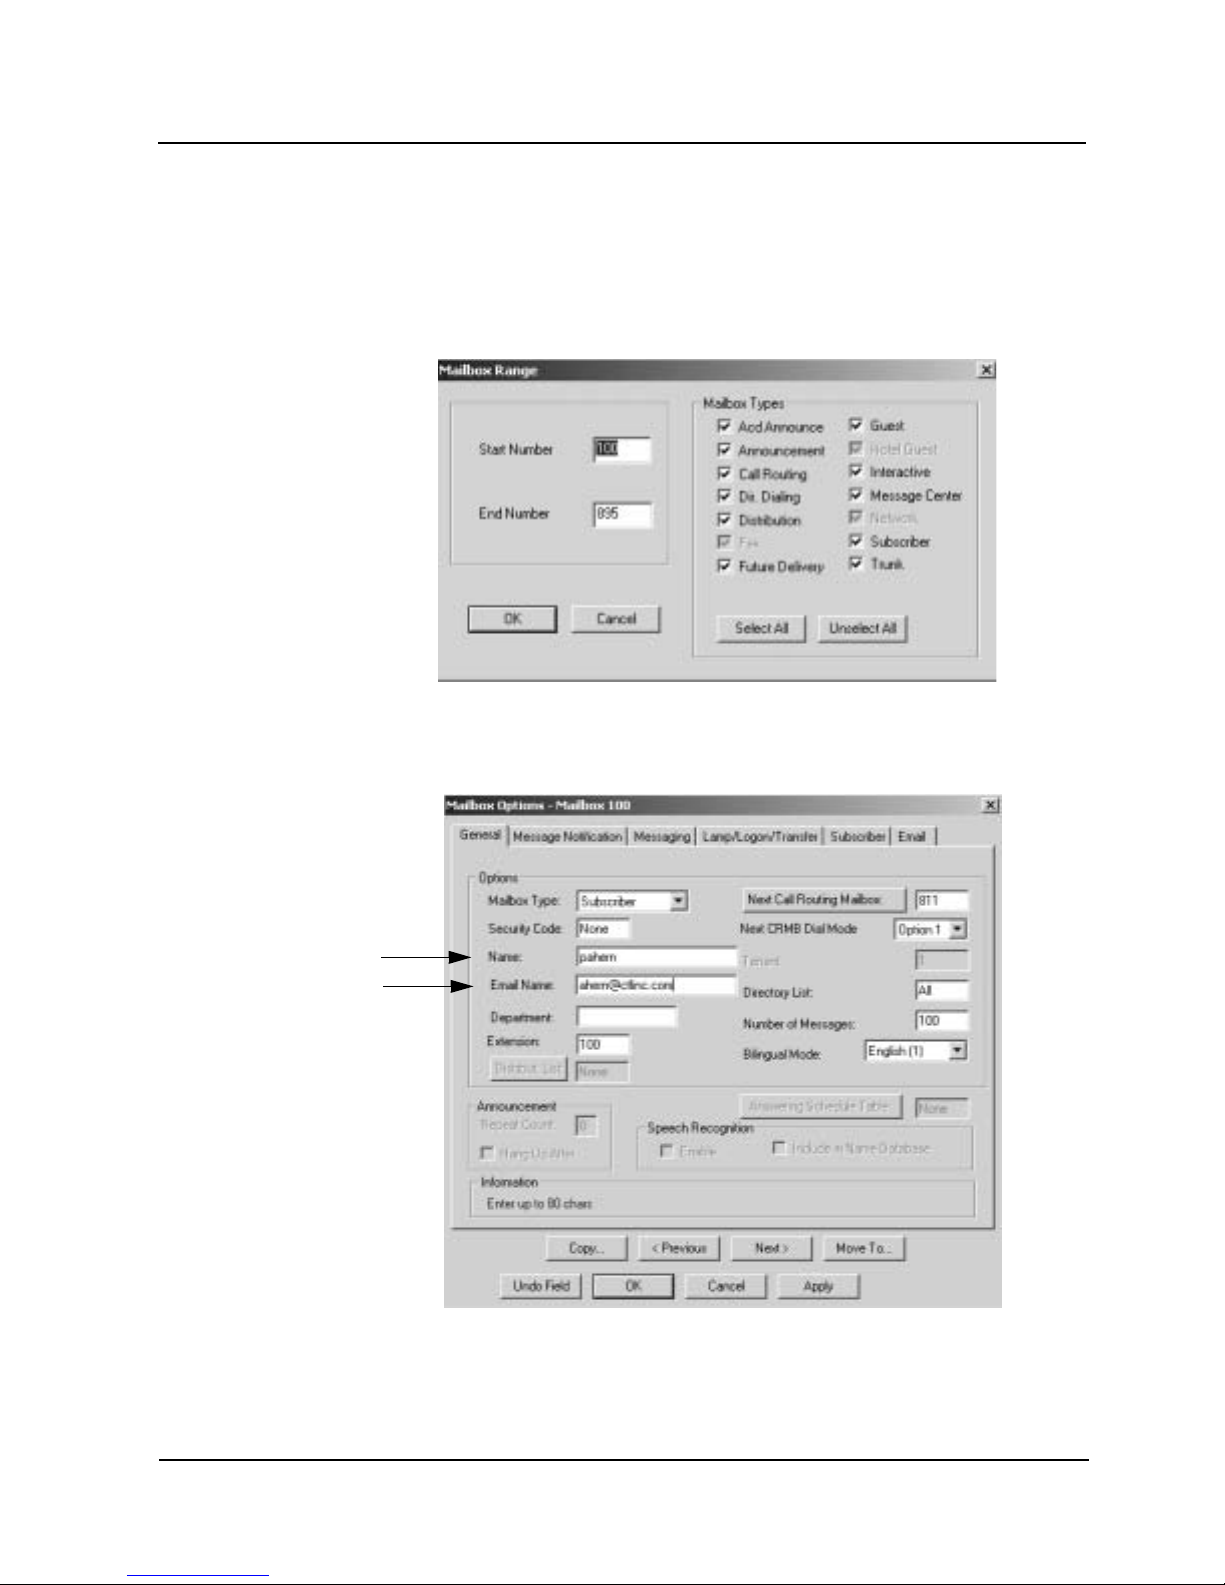
All Subscriber Mailb oxes that will be a part of Unif ied Messaging mu st have the
Email integrati on feature enabl ed and have the SM TP Account in formation filled in.
1) Start the Voice Mail GUI.
2) From the GUI Menu bar, click Customize ➱ Mailbox Options ➱ Edit.
The Mailbox Rang e screen is disp layed a s shown below:
3) Select the Subscri ber Mailbox or ran ge of mailboxes an d click OK.
The General page of the Mail box Options windo w appears for th e selected
mailbox, (or th e first m ailbox i n the selected range).
14
NVM Voice Mail Win2K/SMTP Email Integration
Page 19
Setting Up the Voice Mail Server
Programming Mailboxes
4) Enter the Subscriber’s name in the Name field. Whatever name is e ntered in th is
field will be used f or Name Dialing and will also appear on the Email and on
reports.
5) In the Email Name field, enter the Email address where t he voic e mail wi ll be
received.
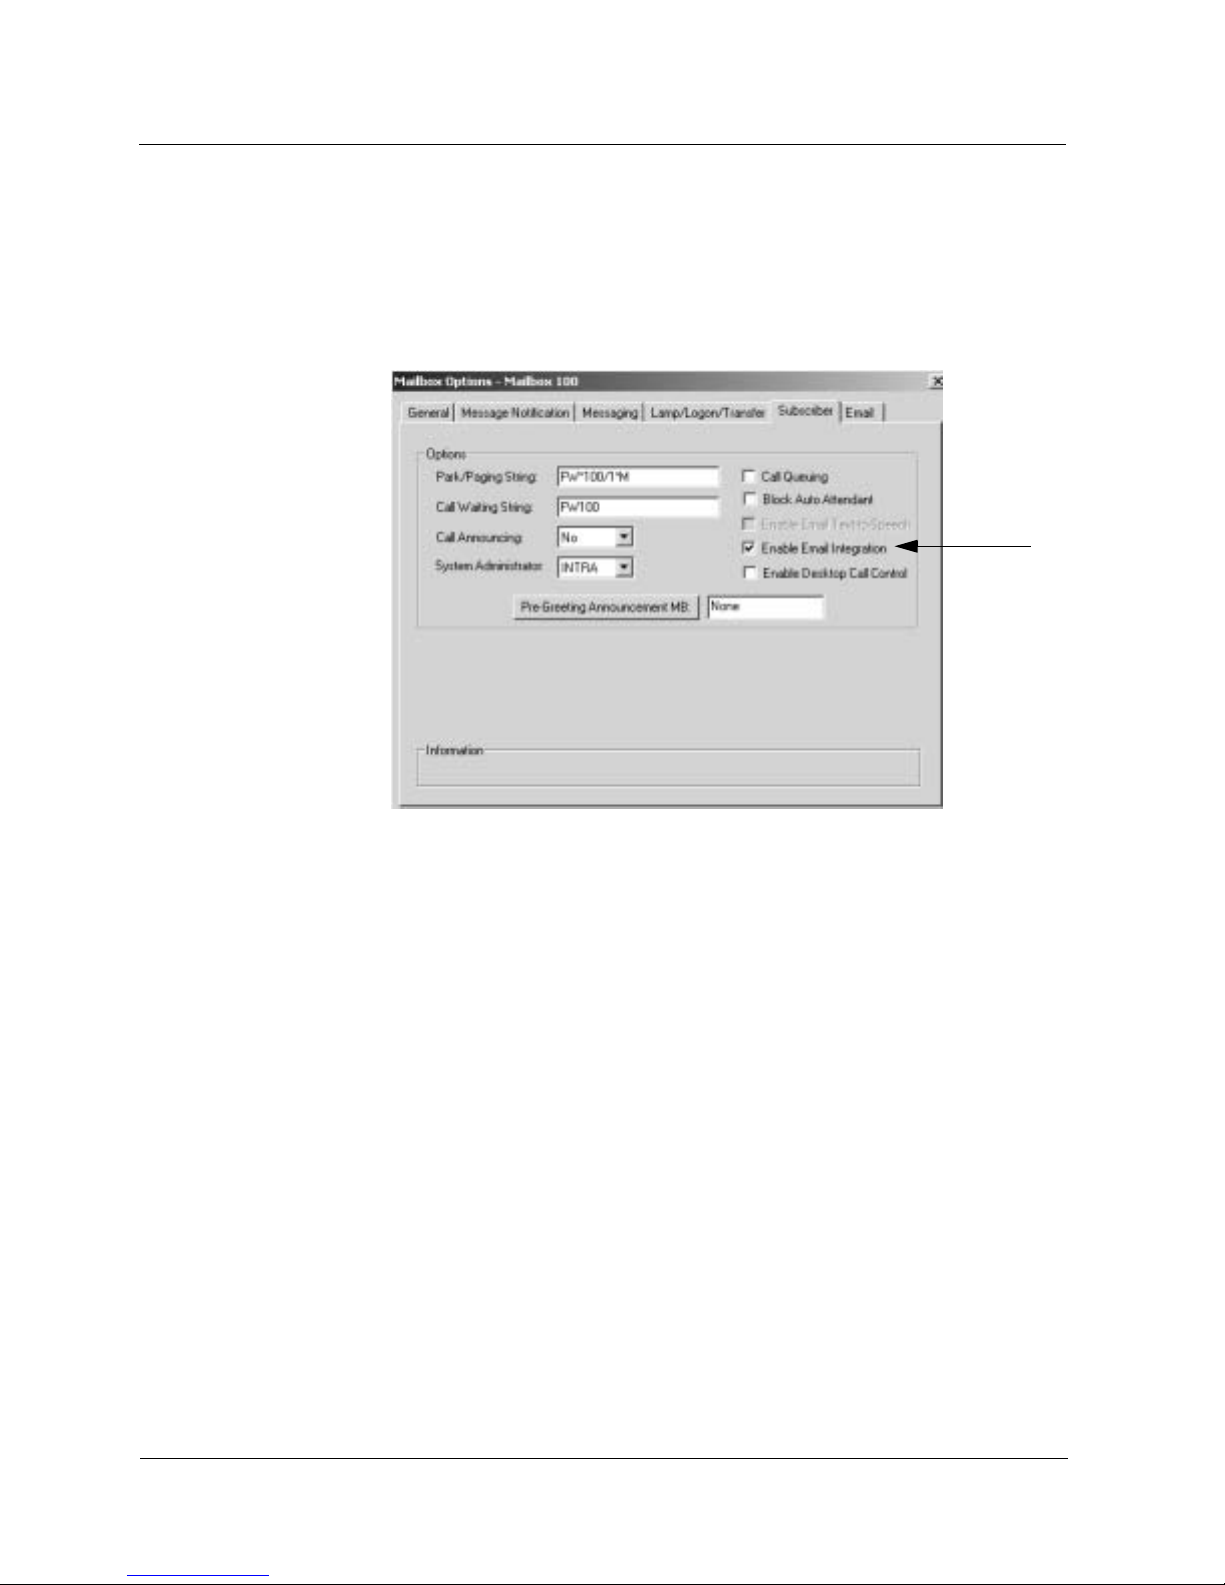
6) Click the Subscri ber tab on the Mailbox Opt ions window.
■ Check Enable Email Integration.
■ Check Enable E mail Text-to-Speec h if the Text-to-Speech option is
installed.
NVM Voice Mail Win2K/SMTP Email Integration
15
Page 20
Setting Up the Voice Mail Server
Programming Mailboxes
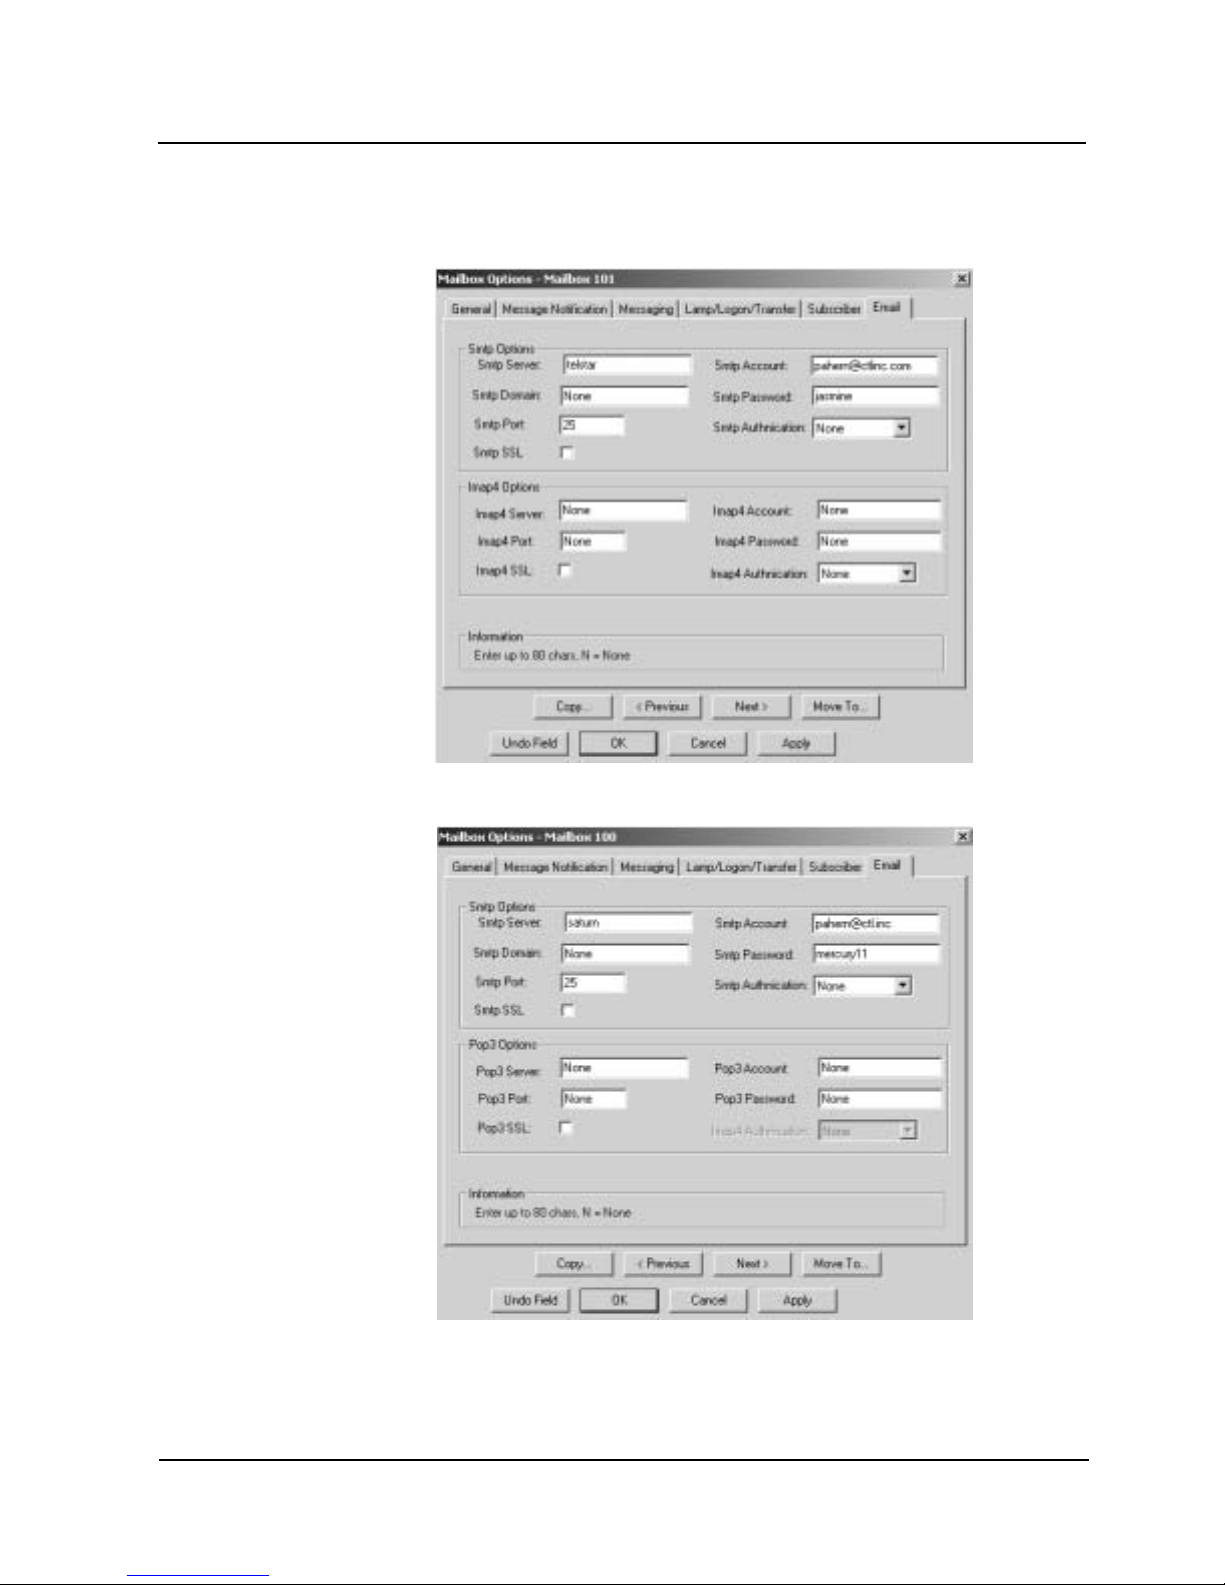
7) Click on the E mail tab of the Ma ilbox Optio ns screen.
If SMTP/IMAP4 was installed, the fo llowing windo w will be displ ayed:
If SMTP/POP3 was installe d, the followin g window will be displayed:
16
NVM Voice Mail Win2K/SMTP Email Integration
Page 21

Setting Up the Voice Mail Server
Programming Mailboxes
8) Enter the SMTP account information (obtained from the ISP) in each of the
following fields:
Smtp Options
Smtp Server Name or IP Address of the SMTP Server
Smtp Domain Enter the SMTP domain name if available. Otherwise,
leave this field blank.
Smtp Port Normally, the port number will be 25. If a Secure Socket
Layer (SSL) is being used, enter 465 as the port number.
Smtp SSL Secure Socket Layer. If this feature is enabled, make su re
that 465 is entered as the port number.
Smtp Account Enter the Email address for this subscriber, for example -
Smtp Password Enter the password that would normally be used to by this
subscriber to access his Email
Smtp Authentication Enter an authentication code if one is required by the ISP
Imap4 Options
If Text-to-Speech is being used, or if synchronization is desired between the Voice
Mail mailbox and the E mail Server, fi ll in the account information in th e fields
below. Otherwise, leave the Imap4 Options sect ion blank.
Imap4 Server Name or IP Address of the SMTP Server
Imap4 Port Normally, the port number will be 143.
Imap4 SSL N/A
Imap4 Account Enter the Email address for this subscriber
Imap4 Password Enter the password that would normally be used to by this
subscriber to access his Email
Imap4 Authentication Enter an authentication code if one is required by the ISP
Pop3 Options
If Text-to-Speech is bein g use d, fil l in th e accoun t inf or ma tion in the f iel ds be low.
Otherwise, lea ve the Pop3 Op tions se ction b lank. Note - If you want to use this
feature, you must leave a copy of the message on the SMTP server via the Email
client that you are using.
Pop3 Server Name or IP Address of the SMTP Server
Pop3 Port Normally, the port number will be 110. Enter 995 if Secure
Socket Layer is being used.
Pop3 SSL Secure Socket Layer. If this feature is enabled, make sure
that 995 is entered as the Pop3 port number.
Pop3 Account Enter the Email address for this subscriber
Pop3 Password Enter the password that would normally be used to by this
subscriber to access his Email
9) Click Apply, then click OK.
NVM Voice Mail Win2K/SMTP Email Integration
17
Page 22
Installing UM Client Mailbox Options
Installing the Mailbox Options Software
Installing UM Client Mailbox Options
Normally, the Email client requires no further set up for Voice Mail integratio n.
Optionally, the Unified Messag ing Cli ent Ma ilbox Optio ns softw are ca n be i nstalled .
This feature al lows E mail Int egration to be set up l ocally f rom the client machine
rather than from the Voice Mail server.
Installing the
Mailbox
Options
Software
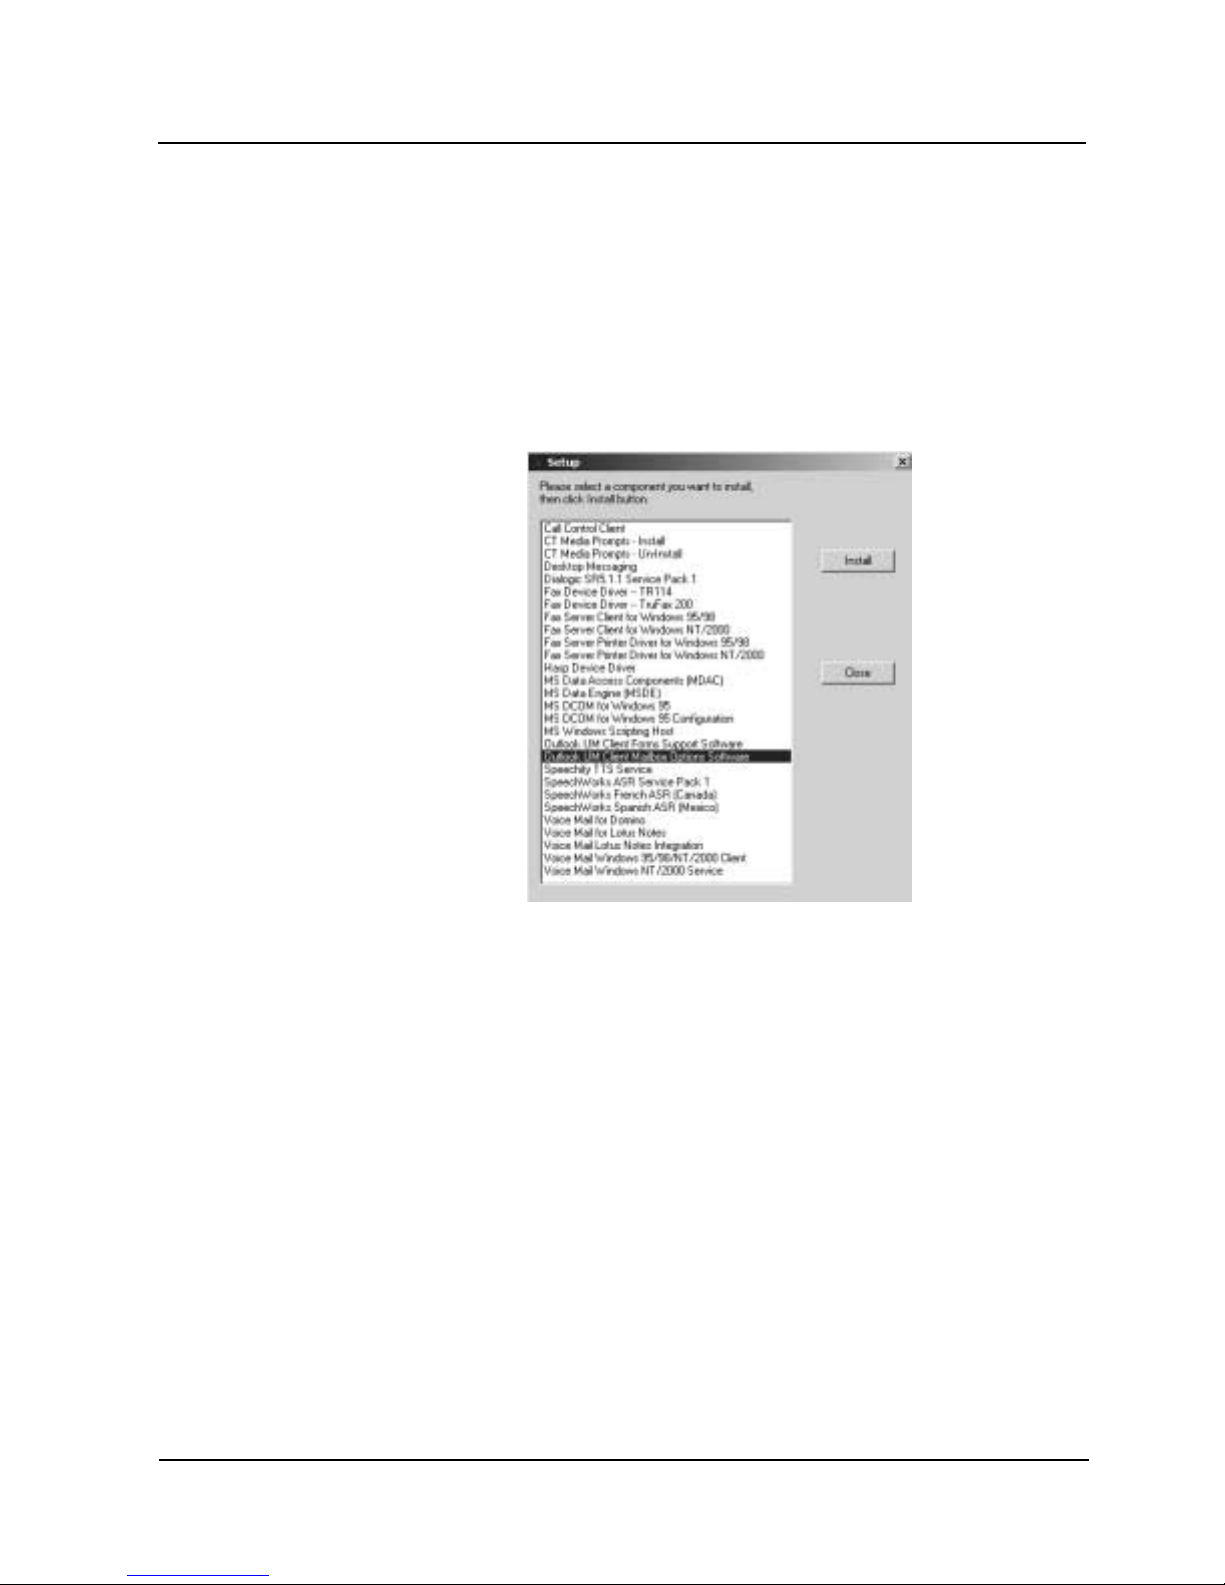
1) Insert the Voice Mail Software Installation CD into the CD drive on the client
machine. The CD will au tostart and the S etup win dow wil l be displ ayed:
2) Select Out look UM Client Ma ilbox O ption s Softwar e from the l ist and cl ick the
Install button.
3) The Install Wizard starts and a Welcome screen is displaye d. Click Next.
4) Choose a Destination Lo cation and clic k Next.
5) Choose a Program Fol der and click Ne xt.
18
NVM Voice Mail Win2K/SMTP Email Integration
Page 23
Installing UM Client Mailbox Options
Installing the Mailbox Options Software
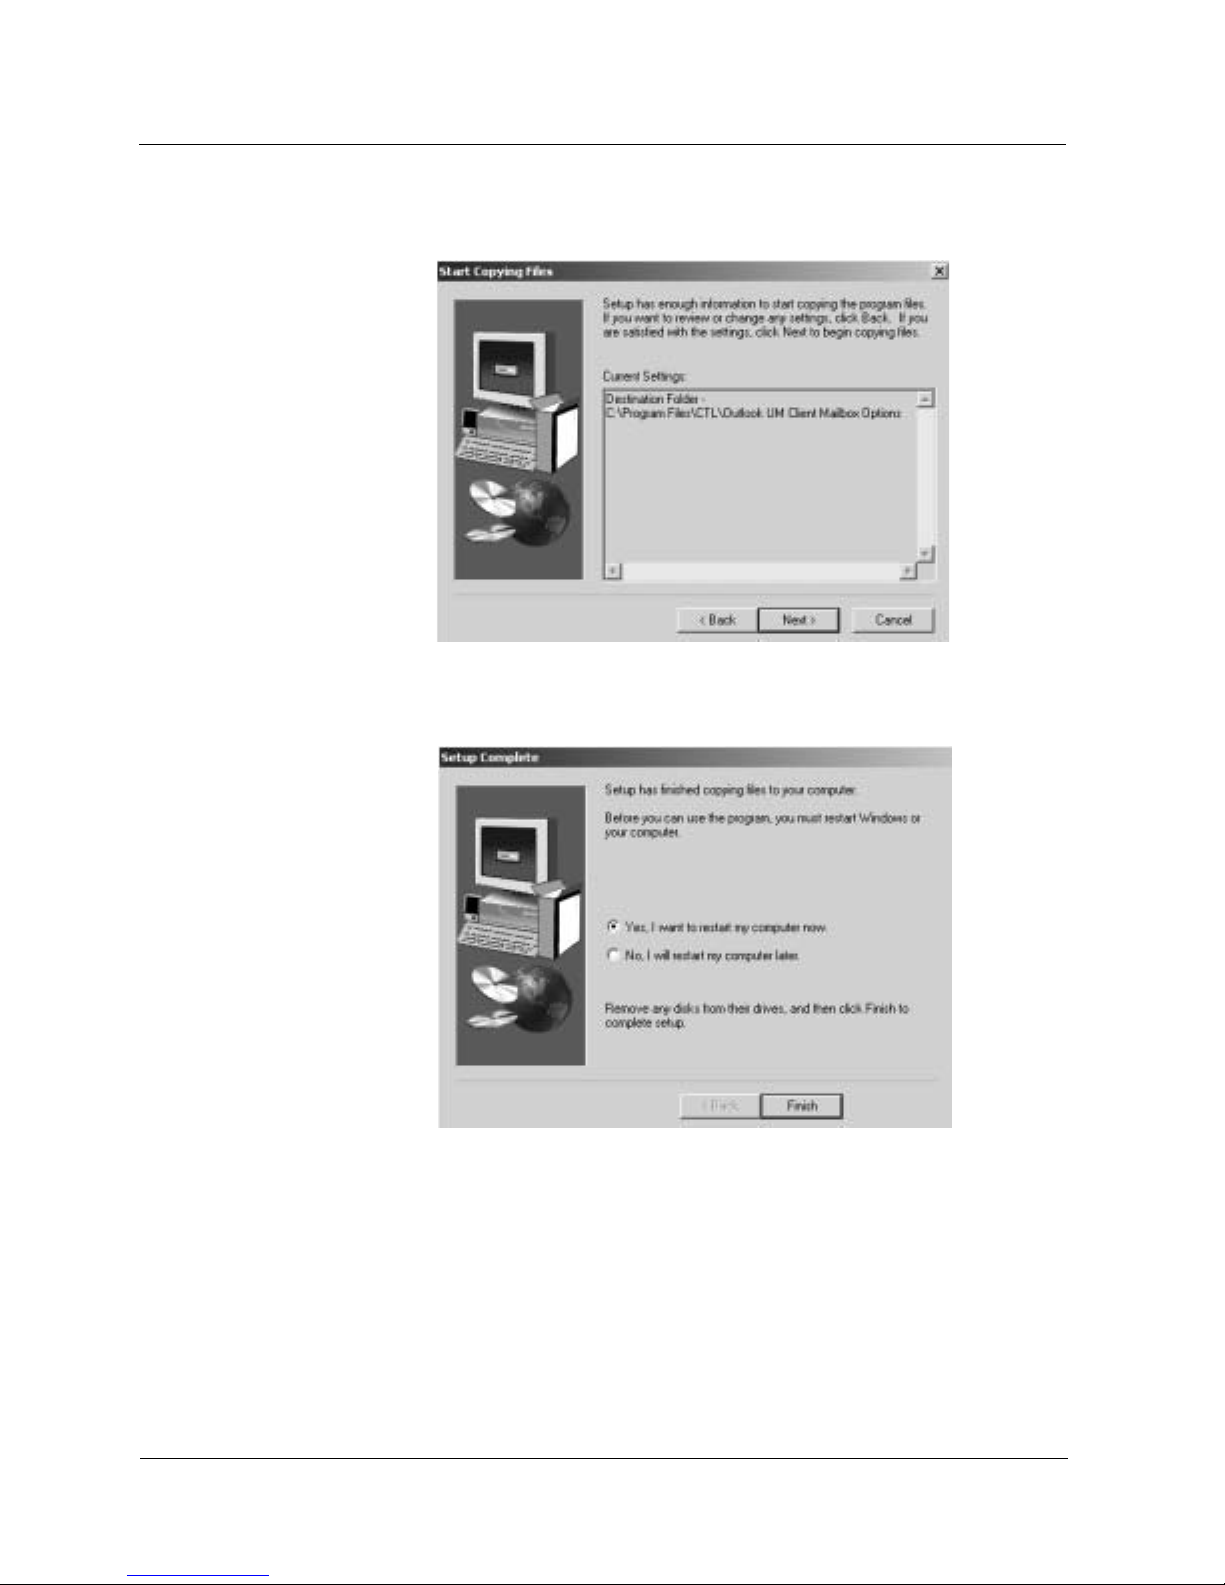
The Start Copying Files window is displayed showing the selected destination
and program folder:
6) If the destinatio n and folder are co rrect, click Next.
A Setup Complete window is displayed with the option of restarting the computer.
7) Click the radio button for Yes, I want to restart my computer now and click
Finish. The computer will reboot.
NVM Voice Mail Win2K/SMTP Email Integration
19
Page 24
Installing UM Client Mailbox Options
Setting Up the Mailbox Options Software
Setting Up
the Mailbox
Options
Software
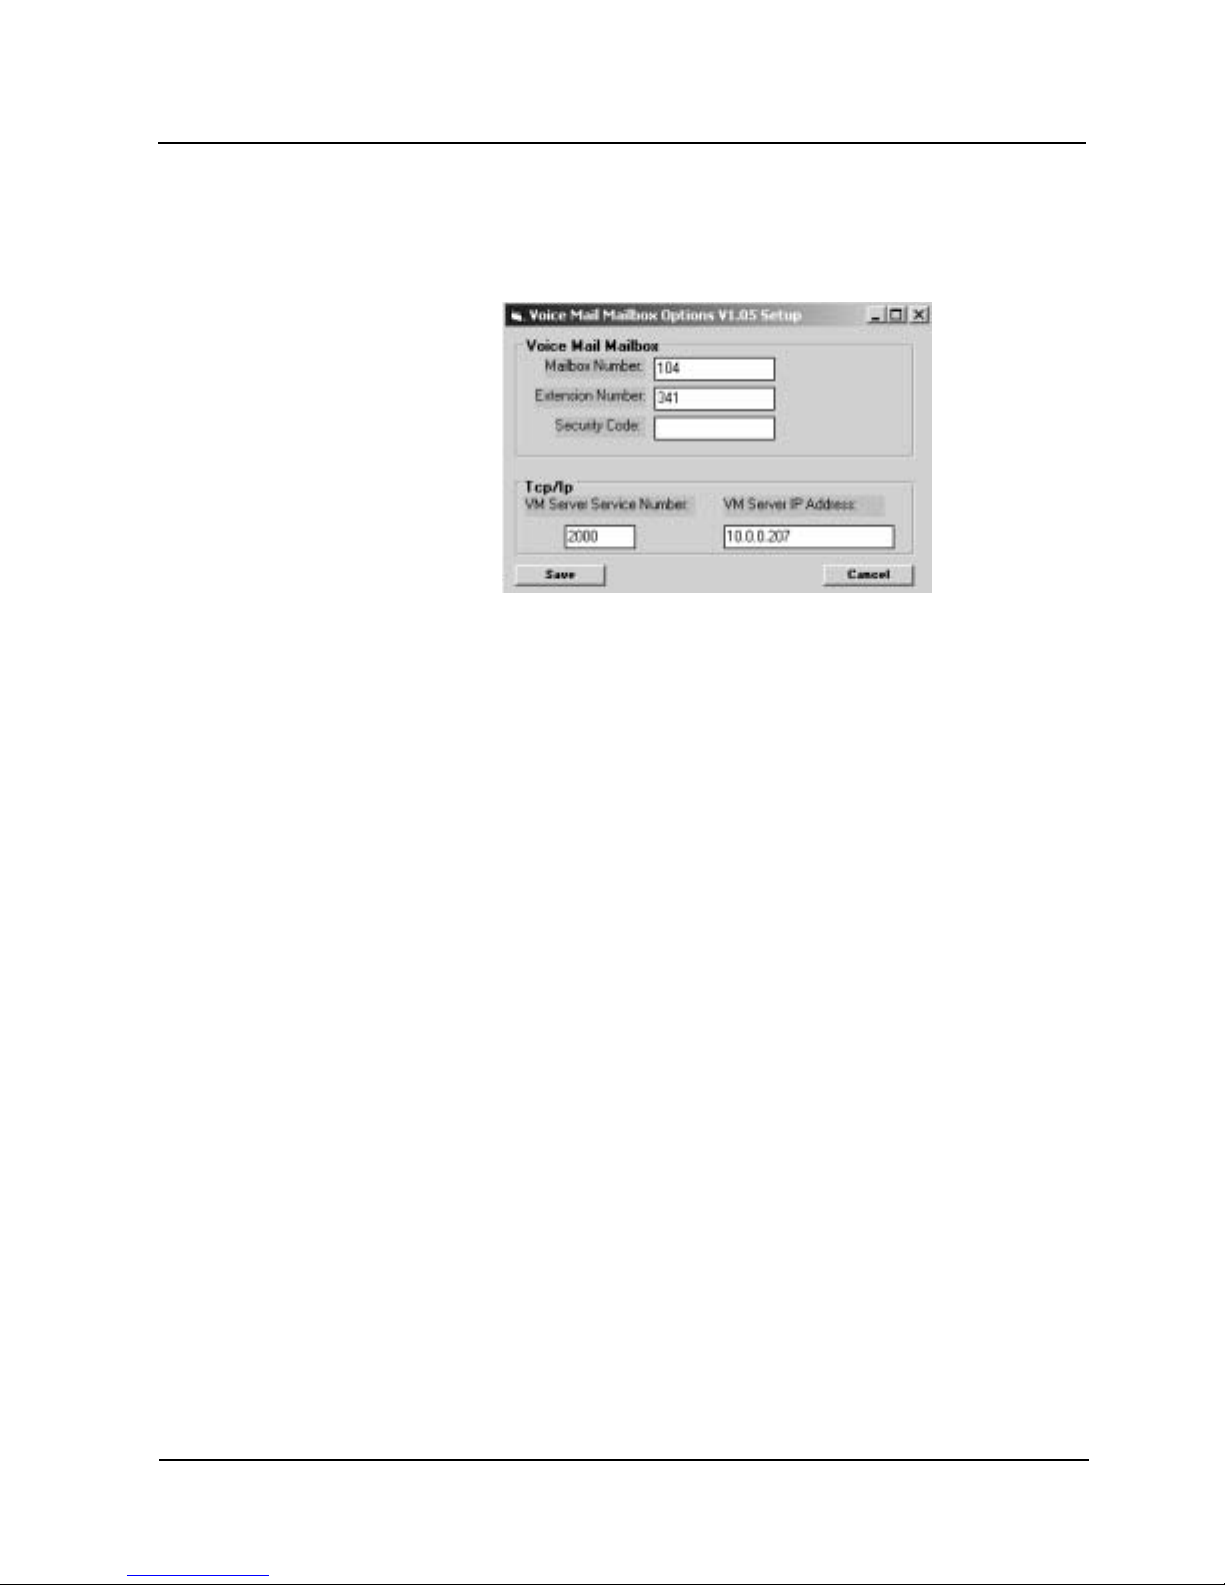
1) After the computer has finished r ebooting, click Start ➱ Progr ams ➱ Outlook
UM Client Mail box Opt ions ➱ Outlook UM Client Mailbo x Optio ns. The Voice
Mail Mailbox Opti ons Setup window i s displa yed:
2) Enter the appropr iate data in the fo llowing fi elds:
Mailbox Number Enter the Voice Mail mailbox number for this client
Extension Number Enter the Voice Mail extension number for this client
Security Code Enter the Security Code (if required)
VM Server Number Enter the TCP/IP service number for the Voice Mail server.
This number is always 2000.
VM Server IP Address Enter either the computer machine name or, the
TCP/IP address of the Voice Mail Server.
3) Click Save. If this is the first time the UM Client Mailbox Options software is
being used, the Voice Mail Mailbox Options win dow is displayed.
20
NVM Voice Mail Win2K/SMTP Email Integration
Page 25
Installing UM Client Mailbox Options
Using the UM Client Mailbox Options
Using the UM
Client
Mailbox
Options
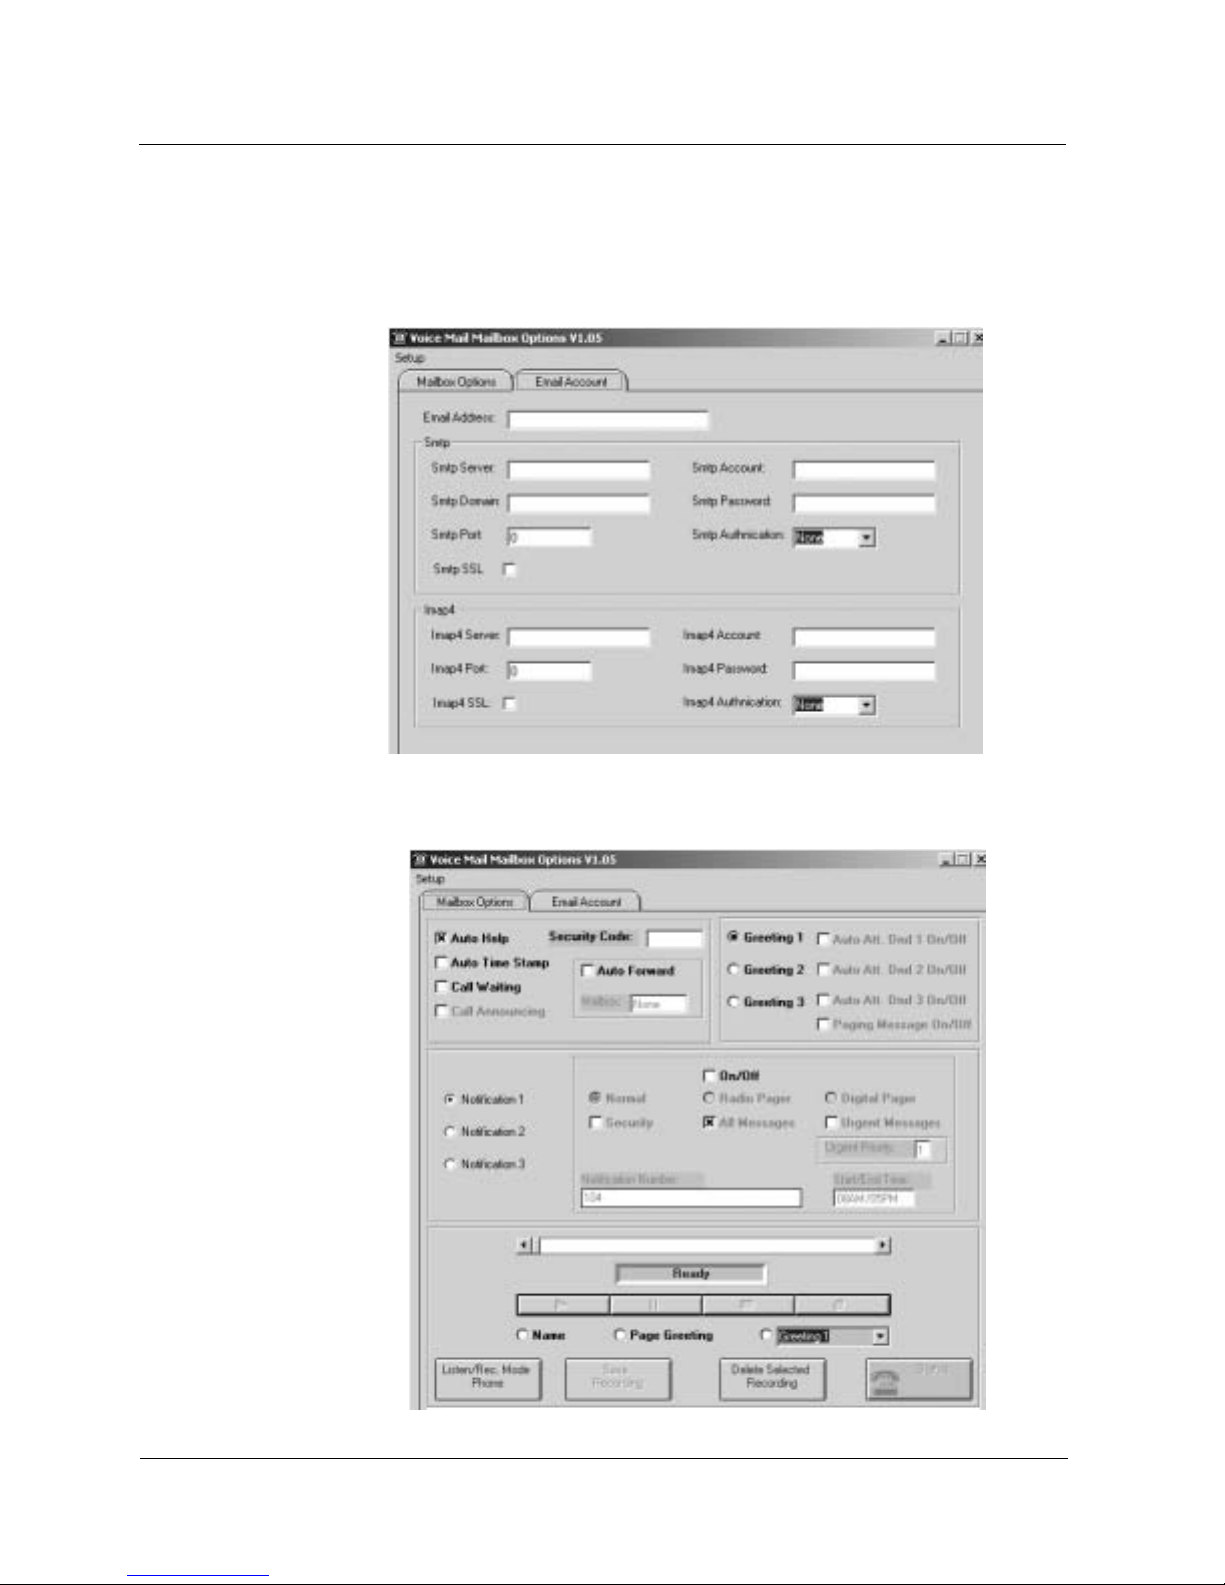
1) Click Star t ➱ Programs ➱ Outlook UM Client Mailbox Op tions ➱ Outlook UM
Client Mailbox Options. The Voice Mail Mailbox Opt ions window is dis played:
2) Click the Email Acco unt tab. Enter the SMTP A ccount informat ion as outlined in
Programming Mailboxes
on page 17.
3) Click the Mailbox Opti ons tab. Use this GU I to select the desir ed options as
outline in the User’s Guide,
Using Mailbox Op tions
NVM Voice Mail Win2K/SMTP Email Integration
21
Page 26

SMTP - Simple Mail Transport Protocol
SMTP - Simple Mail Transport Protocol
SMTP (Simple Mail Transfer Prot ocol) is a TCP/IP protocol used in sending Email .
SMTP uses a
been sent to a destinatio n, the message is sp ooled to a device, usu ally a disk.
However, since it is limited in its abi lity to queue messages at the receiving end, it is
usually used with one of t wo oth er pro tocols , POP 3 or I MAP, that lets the user save
messages in a server mailb ox and download th em periodica lly from the server.
Typically, a program that uses SM TP sends messages fr om a mail client to a mail
server and a progra m using either PO P3 or IMAP retr ieves messages from the
server to an Email client . Microsoft E xchange includ es an SMTP server and can
also be set up to include P OP3 support.
POP3 (Post Office Protoc ol 3) is the most re cent version of a standard proto col for
receiving Em ail. POP3 is a client /server p rotocol in w hich Ema il is r eceived and
held in a single mailbox on the server. Periodically, the client Email recei ver che cks
the mailbox on the serve r and downloads an y mail. POP3 can be thought of as a
"store-and-forwa rd" ser vice. POP3 is de signe d to del ete mail o n the se rver as soo n
as the user has downloade d it. However, some implementati ons allow users or an
administrator to specify that mail be saved for some period of time. The POP3
protocol is built into mos t popular Email pr oducts, such as Eudor a and Outlook
Express. It's also bui lt into the Netscape and Microsoft Int ernet Explor er browsers.
The IMAP (Internet Mess age Access Proto col) is an alternat ive protoco l for
accessing Email from you r loca l ser ve r. IMAP represents an impr ovem ent ov er POP
by allowing a client to acces s and manipula te Email message s on a server such as
retaining messages and or ganizing them in folders. IMAP 4 is a client/se rver
protocol in whi ch Email is re ceived and he ld by t he serv er. IMAP can be t hought of
as a “remote file serv er”. T he Em ail cl ient can vi ew just the heading and t he sen der
of the letter a nd th en decid e wh ethe r to do wnlo ad th e mail . You can also create an d
manipulate multiple folders or mailboxes on the server, delete messages, or search
for certain parts or an entire not e. IMAP requi res continual acce ss to the server
during the time that y ou are working wit h your mail.
spooled
or
queued
method of mail delivery. Once a message has
22
NVM Voice Mail Win2K/SMTP Email Integration
Page 27

SMTP - Simple Mail Transport Protocol
SMTP Sequence
SMTP
Sequence
SMTP commands are ASCII strings terminated by a CRLF combination. Here is how
a typical SMT P connect ion wo rks:
The client has responsibility for delivering a message to one or more envelope
recipients, or notif ying an envelope sender if deliver y is not made. It wants to
transfer this responsibility to the server.
The client wai ts for the server's greetin g:
220 heaven.af .mil ESM TP
If the serv er does n ot accep t the connecti on, the client q uits.
The client then sends a HELO request, and waits for the response:
HELO sun.af.mil
250 heaven.af .mil
If the serv er does n ot accep t the request, the cli ent quits.
The client then sends a MAIL request showing the envelope sender address, and
waits for the response:
MAIL FROM:<drive [email protected] l>
250 ok
If the serv er does n ot accep t the request, the cli ent quits.
The client then sends one RCPT request for each envelope recipient address,
waiting for a response after each address:
RCPT TO:<[email protected]>
250 ok
It keeps track of w hich addr esses ar e accep ted. If no ne of the addre sses are
accepted, the c lient q uits.
The client then sen ds a DATA request, and waits for the resp onse:
DATA
354 go ahead
If the serv er does n ot accep t the request, the cli ent quits.
The client then sen ds the encoded mess age, waits for the resp onse, and quits:
Date: 8 Aug 1998 04 :10:45 -00 00
From: driver@ sun.af. mil
Subject: chariot is back in service
I patched up the wheel. It's as go od as new.
250 ok 90254947 3 qp 24 035
.
QUIT
221 heaven.af. mil
If the client encount ers a message I/O error, it closes the con nection immedi ately,
without sendin g a fi nal dot and wit hout se nding a QU IT requ est.
NVM Voice Mail Win2K/SMTP Email Integration
23
Page 28

SMTP - Simple Mail Transport Protocol
SMTP Sequence
For each recipient, th e client decide s whether re sponsibility w as transferre d to the
server. There are three possible results:
Success: The serve r acc epted r espon sibili ty for this recipi ent. The cli ent i s no
longer responsibl e.
Deferral: The server temporarily rejected responsibility for this recipient. The
client will try again later.
Failure: The se rver pe rmanently rejected respons ibility fo r this recipient . The
client will notify the sender.
This result is determin ed by the first di git of the serv er's response codes for the
connection (C) , the HELO r equest (H ), the MAIL req uest (M) , the R CPT reque st for
this recipient (R), the DATA request (D), and the enco ded message (E), according
to the follow ing table:
C H M R D E Result
5 deferral (some clients: failure)
4 deferral
2 5 deferral (some clients: failure)
2 4 deferral
2 2 5 failure (a few clients: deferral)
2 2 4 deferral
2 2 2 5 failure
2 2 2 4 deferral
2 2 2 2 5 failure
2 2 2 2 4 deferral
2 2 2 2 3 5 failure
2 2 2 2 3 4 deferral
2 2 2 2 3 2 success
24
NVM Voice Mail Win2K/SMTP Email Integration
Page 29

NEC America, Inc., Corporate Networks Group
NEC Unified Solutions, Inc.
4 Forest Parkway, Shelton, CT06484
T el: 800-365-1928 Fax: 203-926-5458
www.necunifiedsolutions.com
cng.nec.com
Other Important Telephone Numbers
Sales: . . . . . . . . . . . . . . . . . . . . . . . . . . . . . . . . . . . .203-926-5450
Customer Service: . . . . . . . . . . . . . . . . . . . . . . . . . . .203-926-5444
Customer Service FAX: . . . . . . . . . . . . . . . . . . . . . . .203-926-5454
Technical Service: . . . . . . . . . . . . . . . . . . . . . . . . . . .203-925-8801
Discontinued Product Service: . . . . . . . . . . . . . . . . . .900-990-2541
Technical Training: . . . . . . . . . . . . . . . . . . . . . . . . . . .203-926-5430
Emergency Technical Service (After Hours) . . . . . . . .203-929-7920
(Excludes discontinued products)
Page 30

*1770004SMTP01*
1770004SMTP01
NEC Unified Solutions, Inc.
4 Forest Parkway, Shelton, CT 06484
TEL: 203-926-5400 FAX: 203-929-0535
www.necunifiedsolutions.com
March 2005
Printed in U.S.A.
 Loading...