

Page 1
NEC Versa®VX Notebook Computer
V ERSA VX
USER’S GUIDE
Page 2

Proprietary Notice and Liability Disclaimer
The information disclosed in this document, including all designs and related
materials, is the valuable property of NEC Computers Inc. (hereinafter “NECC”) and/or its licensors.
NECC and/or its licensors, as appropriate, reserve all patent, cop yright and other pro prietar y rights to
this document, including all design, manufacturin g, reproduction, use, and sales rights thereto, except
to the extent said rights are expressly granted to others.
The NECC product(s) discussed in this document are warranted in accordance with the terms of the
Warranty Statement accompanying each product. However, actual perfor mance of each such product
is dependent upon factors such as system configuration, customer data, and operator control. Since
implementation by customers of each product may vary, the suitability of specific product
configurations and applications must be determined by the customer and is not warranted by NECC.
To allow for design and specification improvements, the information in t his document is subject to
change at any time, without notice. Reproduction of this document or portions thereof without prior
written approval of NECC is prohibited.
As an ENERGY star partner, NEC Computers Inc. (NECC) has determined that this product meets the
ENERGY star guidelines for energy efficiency.
NEC and Versa are registered trademarks of NEC Corporation and/or one or more of its subsidiaries.
ENERGY STAR is a U.S. registered trademark.
All other product, brand, or trade names used in this publication are the trademarks or registered trademarks of
their respective trademark owners.
First Printing — January 2000
Copyright 2000
NEC Computers Inc.
15 Business Park Way
Sacramento, CA 95828
All Rights Reserved
Page 3

Contents
Using This Guide
Text Conventions ..................................................................................................................x
Related Documents................................................................................................................x
1 Introducing the NEC Versa
Before You Begin...............................................................................................................1-2
About Your NEC Versa VX Notebook..............................................................................1-3
Around the Front of the System..........................................................................................1-4
LCD Panel...................................................................................................................1-4
Control Panel...............................................................................................................1-5
Power Button........................................................................................................1-6
Status Icons..........................................................................................................1-7
Keyboard Panel and Base Unit....................................................................................1-8
Around the Back of the System........................................................................................1-12
Around the Left Side of the System.................................................................................1-13
Around the Right Side of the System...............................................................................1-14
Around the Bottom of the System....................................................................................1-15
About the Port Replicator.................................................................................................1-16
2 Getting Started
NEC VersaGlide.................................................................................................................2-2
Making VersaGlide Adjustments................................................................................2-3
VersaGlide Tips ..........................................................................................................2-3
Power Sources....................................................................................................................2-3
Using the AC Adapter .................................................................................................2-4
Powering the System On and Off................................................................................2-5
Using the Battery.........................................................................................................2-5
Replacing the Battery..................................................................................................2-6
Low Battery Power......................................................................................................2-8
Returning the Battery to its Normal State ...................................................................2-8
Handling the Battery ...................................................................................................2-9
Extending Battery Life................................................................................................2-9
Charging the Battery .................................................................................................2-10
Battery Precautions ...................................................................................................2-10
Precautions for Recharging the Battery.....................................................................2-11
Disposing of the Battery............................................................................................2-11
Internal Batteries.......................................................................................................2-11
CMOS Battery....................................................................................................2-11
System Care......................................................................................................................2-12
Precautions................................................................................................................2-12
Storage Requirements................................................................................................2-14
Routine Cleaning.......................................................................................................2-15
Contents iii
Page 4

3 Using the BIOS Setup Utility
Introducing BIOS Setup .................................................................................................... 3-2
Entering BIOS Setup ......................................................................................................... 3-2
BIOS Setup Main Menu.............................................................................................3-3
Looking at Screens..................................................................................................... 3-4
Using Keys ................................................................................................................. 3-5
Checking/Setting System Parameters................................................................................3-5
Resetting System Parameters...................................................................................... 3-6
Standard CMOS Setup................................................................................................ 3-6
Advanced CMOS Setup.............................................................................................. 3-7
System Security Setup ................................................................................................ 3-8
Password Protection ................................................................................................... 3-9
Establishing Passwords............................................................................................... 3-9
Hard Disk Drive Passwords........................................................................................ 3-9
Establishing Hard Disk Drive Passwords.......................................................... 3-10
Changing Hard Disk Drive Passwords.............................................................. 3-10
Using Hard Disk Drive Password Protection.................................................... 3-10
Moving the Hard Disk Drive ............................................................................. 3-11
Power Management Setup........................................................................................ 3-11
Boot Device Setup.................................................................................................... 3-14
Peripheral Setup........................................................................................................ 3-15
Other BIOS Setup Options....................................................................................... 3-16
Managing System Power................................................................................................. 3-16
Windows 98 Power Management Properties............................................................ 3-16
Windows 98 Power Schemes.................................................................................... 3-17
Windows 98 Alarms................................................................................................. 3-18
Windows 98 Power Meter........................................................................................ 3-18
Windows 98 Advanced............................................................................................. 3-19
Windows 98 Hibernate............................................................................................. 3-19
Windows 98 Power Management States .................................................................. 3-20
Recognizing the Windows 98 Power Management States........................................ 3-20
Windows 95 Power Management States .................................................................. 3-21
Recognizing the Windows 95 Power Management States........................................ 3-21
Updating the BIOS .......................................................................................................... 3-22
Obtaining the BIOS Update...................................................................................... 3-22
Preparing the BIOS Update Diskette........................................................................ 3-23
Performing the BIOS Update.................................................................................... 3-23
Identifying the Switch Settings........................................................................................ 3-24
4 Using the Operating System and Utilities
Windows Introduction.......................................................................................................4-2
Windows 98 Second Edition ...................................................................................... 4-2
Desktop Icons...................................................................................................... 4-2
Taskbar Icons ...................................................................................................... 4-3
Windows 95................................................................................................................ 4-4
Windows NT .............................................................................................................. 4-5
iv Contents
Page 5

NEC Customize Utility.......................................................................................................4-5
Using the NEC Customize Utility........................................................................4-6
HDPREPEZ Utility ............................................................................................................4-6
Using HDPREPEZ in Windows 98 or 95....................................................................4-6
Application and Driver CD ................................................................................................4-7
Launching the Application and Driver CD with Windows 98/95...............................4-7
Launching the Application and Driver CD with Windows NT...................................4-7
Application and Driver CD Dialog Box......................................................................4-8
Installing the A&D Software....................................................................................... 4-8
Personal Code Setting Utility.............................................................................................4-8
Installing the Personal Code Setting Utility................................................................4-9
Setting a Personal Code...............................................................................................4-9
DVD Player......................................................................................................................4-10
NEC Info Center...............................................................................................................4 -10
Installing the NEC Info Center..................................................................................4-10
Uninstalling the NEC Info Center.............................................................................4-11
Partition Magic.................................................................................................................4-11
Product Recovery CD.......................................................................................................4-12
Guidelines for Using the Product Recovery CD .......................................................4-12
Product Recovery CD Options.................................................................................. 4-13
Full Disk Drive Restore.............................................................................................4-13
Partition Only Restore...............................................................................................4-15
System Diagnostics...................................................................................................4-16
5 Using the System Drives and Bays
24X CD-ROM Drive..........................................................................................................5-2
CD Loading .................................................................................................................5-3
CD Care.......................................................................................................................5-3
Changing the Auto Play Setting..................................................................................5-3
DVD-ROM Drive...............................................................................................................5-4
Hard Disk Drive .................................................................................................................5-5
Memory Modules...............................................................................................................5-6
6 Communicating with Your NEC Versa
Mini-PCI Modem...............................................................................................................6-2
Connecting the Modem...............................................................................................6-2
Mini-PCI LAN ...................................................................................................................6-3
Mini-PCI Modem/LAN......................................................................................................6-3
Installing the Online Modem/LAN Guides.................................................................6-3
PC Cards.............................................................................................................................6-3
Type II Cards...............................................................................................................6-4
Type II Extended Cards...............................................................................................6-4
Type III Cards.............................................................................................................6-4
Communication Cards.................................................................................................6-4
Storage Cards..............................................................................................................6-5
Contents v
Page 6

Interface Cards............................................................................................................ 6-5
Other Cards................................................................................................................. 6-5
PC Card Slots ............................................................................................................. 6-5
Inserting a PC Card..................................................................................................... 6-6
Removing a Card........................................................................................................ 6-7
Internet Connections.......................................................................................................... 6-7
Internet Connection Wizard in Windows 98.............................................................. 6-7
Internet Connection Wizard in Windows 95.............................................................. 6-8
Accessing the Internet ................................................................................................ 6-8
Sending and Receiving Email..................................................................................... 6-8
Modifying the Internet and Email Shortcut Keys....................................................... 6-9
IR Port ............................................................................................................................... 6-9
Enabling the IR Port................................................................................................. 6-10
Using the IR Port...................................................................................................... 6-10
7 Traveling Tips
Preparing for Travel........................................................................................................... 7-2
Packing for Travel.............................................................................................................7-2
Using Power Connections.................................................................................................. 7-3
Getting Through Customs.................................................................................................. 7-3
Using Your Modem........................................................................................................... 7-4
8 Using External Devices
Monitor.............................................................................................................................. 8-2
Parallel Devices.................................................................................................................8-3
Serial Devices.................................................................................................................... 8-4
Keyboard/Mouse................................................................................................................ 8-5
Television Connection....................................................................................................... 8-6
USB Device....................................................................................................................... 8-7
Audio Options.................................................................................................................... 8-8
Port Replicator................................................................................................................... 8-8
9 Using Multimedia
Audio................................................................................................................................. 9-2
Recording ................................................................................................................... 9-2
Line-In........................................................................................................................ 9-3
CD-ROM Input........................................................................................................... 9-3
Microphone................................................................................................................. 9-3
Playing Back............................................................................................................... 9-4
Using Headphones...................................................................................................... 9-4
Using the Built-In Speakers........................................................................................ 9-4
Using External Stereo Speakers.................................................................................. 9-4
Video ................................................................................................................................. 9-5
Using Digital Video Files........................................................................................... 9-5
Using Animation Files................................................................................................ 9-5
vi Contents
Page 7

Multimedia Applications....................................................................................................9-6
10 Solving System Problems
Problem Checklist............................................................................................................10-2
Startup Problems ..............................................................................................................10-3
POST Error Messages...............................................................................................10-4
If You Need Assistance....................................................................................................10-5
11 Getting Service and Support
Service and Support Contact Information........................................................................11-2
NECC Web Site................................................................................................................11-3
NECC FTP Site................................................................................................................11-3
NECC Support Services...................................................................................................11-3
Email/Fax to Support Services.........................................................................................11-4
A Setting Up a Healthy Work Environment
Making Your Computer Work for You.............................................................................A-2
Arrange Your Equipment..................................................................................................A-3
Adjust Your Chair.............................................................................................................A-3
Adjust Your Input Devices ................................................................................................A-4
Adjust Your Screen or Monitor.........................................................................................A-4
Vary Your Workday..........................................................................................................A-5
Pre-existing Conditions and Psychosocial Factors............................................................A-5
B Specifications
System Components..........................................................................................................B-2
Interrupt Controllers..........................................................................................................B-7
Memory Map.....................................................................................................................B-8
C Frequently Asked Questions
External Mouse..................................................................................................................C-2
Display ..............................................................................................................................C-2
PC Cards............................................................................................................................C-3
Diskette Drive....................................................................................................................C-4
Booting..............................................................................................................................C-6
Power Management...........................................................................................................C-6
Miscellaneous....................................................................................................................C-9
Glossary
Index
Contents vii
Page 8

Using This Guide
The NEC Versa® VX User’s Guide gives you the information you need to maximize the
use of your NEC Versa notebook computer. Read this guide to fa miliarize yourself
with the NEC Versa and its features. For specific information see
! Chapter 1, “Introducing the NEC Versa,” to acquaint yourself with system
hardware.
! Chapter 2, “Getting Started,” for instructions on how to connect, power on, and care
for your system.
! Chapter 3, “Using the BIOS Setup Utility,” for details about modifying system
parameters and power management.
! Chapter 4, “Using the Operating System and Utilitie s,” for an understanding of your
Windows operating system. You’ll also learn how to use the system utilities and
CDs for loading applications, drivers, and the NEC Info Center.
! Chapter 5, “Using the System Drives and Bays,” to master procedures for upgrading
the internal hard disk drive and installing a memory module.
! Chapter 6, “Communicating with Your NEC Versa,” for essential information about
using PC cards, the mini-PCI modem, mini-PCI LAN, or mini-PCI modem/LAN,
and other communication features of the system.
! Chapter 7, “Traveling Tips,” for a variety of checklists to help you to prepare the
notebook computer for travel, getting through customs and using your modem when
you are on the road.
! Chapter 8, “Using External Devices,” for procedures for connecting external
devices like an external monitor, headphones, a printer, or speakers.
! Chapter 9, “Using Multimedia,” for steps on integrating video and sound clips into
impressive presentations.
! Chapter 10, “Solving System Problems,” for simple solutions to common problems
that may arise while operating your notebook.
! Chapter 11, “Getting Service and Support,” for information about getting help when
you need it from NEC Computers Inc. (NECC).
! Appendix A, “Setting Up a Healthy Wo rk Environme nt ,” for guidelines that help
promote a healthy work sett ing.
! Appendix B, “Specifications,” to review NEC Versa system specifications.
Using This Guide ix
Page 9
! Appendix C, “Frequently Asked Questions,” (FAQs) for a look at questions that
users commonly ask and the answers to those questions.
Text Conventions
To make this guide as easy as possible to use, text is set up as follows.
! Warnings, cautions, and notes have the following meanings:
personal injury or loss of life.
software.
Warnings alert you to situations that could result in serious
Cautions indicate situations that can dam age the hardw are or
Note
! Names of keys are printed as they appear on the ke yboard, for example,
! Text that you must type or keys that you must press are presented in bold type. For
Notes give important information, et c.
Enter
.
example, type
dir
and press
Related Documents
See the following documents for additional information on your NEC Versa notebook
computer:
! The NEC Versa VX Quick Setup sheet helps get your system up and running.
! The NEC Versa VX Quick Reference card provides an easy-to-carry reference to
LED meanings, controls, function key combina t ions, and NECC help numbers.
(The quick reference card does not ship with some systems purchased outside of the
United States and Canada.)
The NEC Info Center is a fully navigational, pdf document containing multime dia
elements, a full search capability, and all of the information about your NEC Versa that
you find in this printed user’s guide, and more.
Enter
Ctrl, Alt
, or
.
x Using This Guide
Page 10

Introducing the NEC Versa
Before You Begin
!
About Your NEC Versa VX Notebook
!
Around the Front of the System
!
Around the Back of the System
!
Around the Left Side of the System
!
Around the Right Side of the System
!
Around the Bottom of the System
!
About the Port Replicator
!
1
Page 11

Before You Begin
pose a risk of serious injury. To reduce your risk of injury, set up and use your computer
in the manner described in Appendix A, Setting Up a Healthy Work Environment.
After completing the steps in the quick setup sheet that comes with your computer,
your NEC Versa VX system is ready to go! To get started, do the following:
!
Read Appendix A, “Setting Up a Healthy Work Environment,” for guidelines that
help you use your compute r productively and safely. Informat ion includes how to
set up and use your computer to reduce your risk of developing nerve , muscle, or
tendon disorders.
!
Read through this guide to familiarize yourself with the NEC Versa.
Prolonged or improper use of a computer workstation may
1-2 Introducing the NEC Versa
Page 12

About Your NEC Versa VX Notebook
The NEC Versa VX notebook computer offers you a portable system filled with
exciting resources for home, business or travel. Standard features include a powerful
®
Intel
Celeron™, Pentium® II or Pentium III microprocessor that works together with
the latest Peripheral Component Interconnect (PCI) architecture.
In addition, your system provides a high-performance hard disk drive, diskette drive,
and PC card support. Most models are equipped with a 24X CD-ROM drive, or a
DVD-ROM drive. and a V.90-compliant 56 kilobits per second (Kbps) modem. As a
multimedia system, your NEC Versa VX provides the tools needed to create and
present impressive ima ges using video clips and sound.
NEC Versa VX notebook computer
To get comfortable with your notebook, read the following sections and take a tour
around your sys te m!
Introducing the NEC Versa 1-3
Page 13
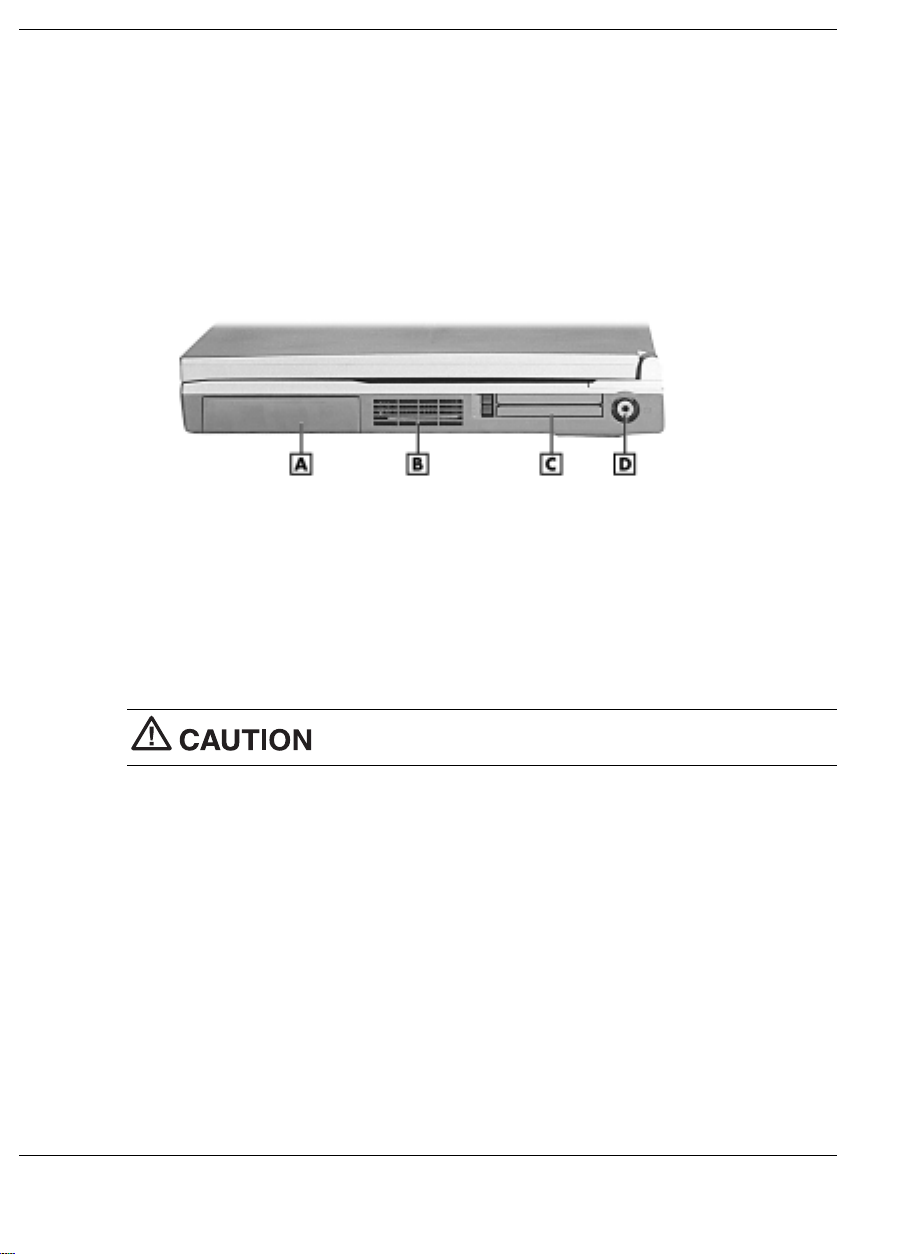
Around the Front of the System
The NEC Versa is compact with features on every side. First, look at the front of the
system. The following sections describe front features, beginning with the liquid crystal
display (LCD) panel.
LCD Panel
The NEC Versa VX comes with a color LCD panel that you can adjust for a
comfortable viewing position. The LCD panel can be a 12.1-inch Super Video
Graphics Array (SVGA) color display, or a 13.3/14.1-inch Extended Graphics Array
(XGA).
!
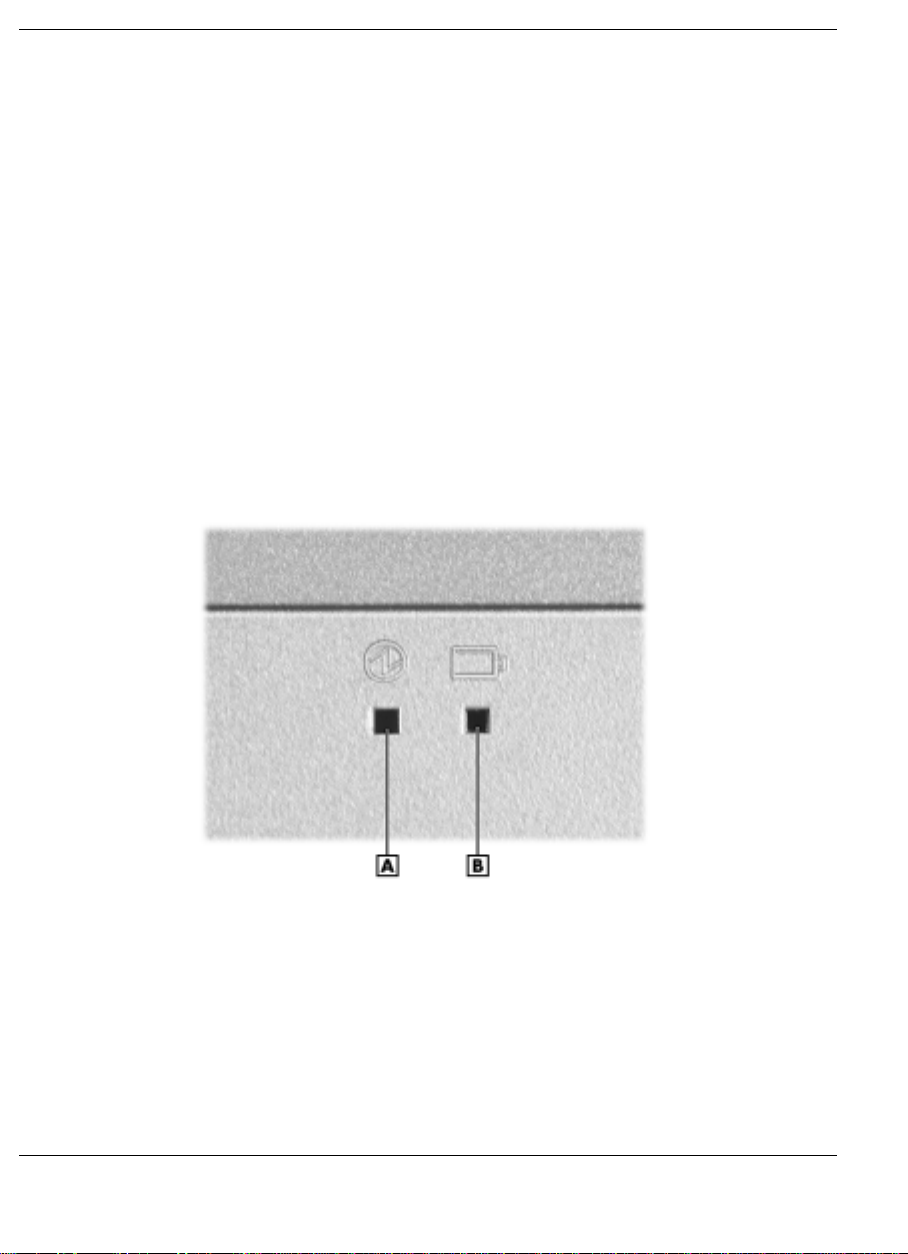
Power and Battery Charging Status LEDs — (identified by icons) are located just
under the front of the LCD panel. The status LEDs are duplicated on the back of the
LCD panel to allow viewing when the panel is closed.
Power and Battery Charging LEDs
A
– Power LED
1-4 Introducing the NEC Versa
B
– Battery Charging LED
Page 14
— Power LED — lets you know that power to the syste m is t urned on. This LED is
— Battery Charging LED — lights to indicate battery charging status.
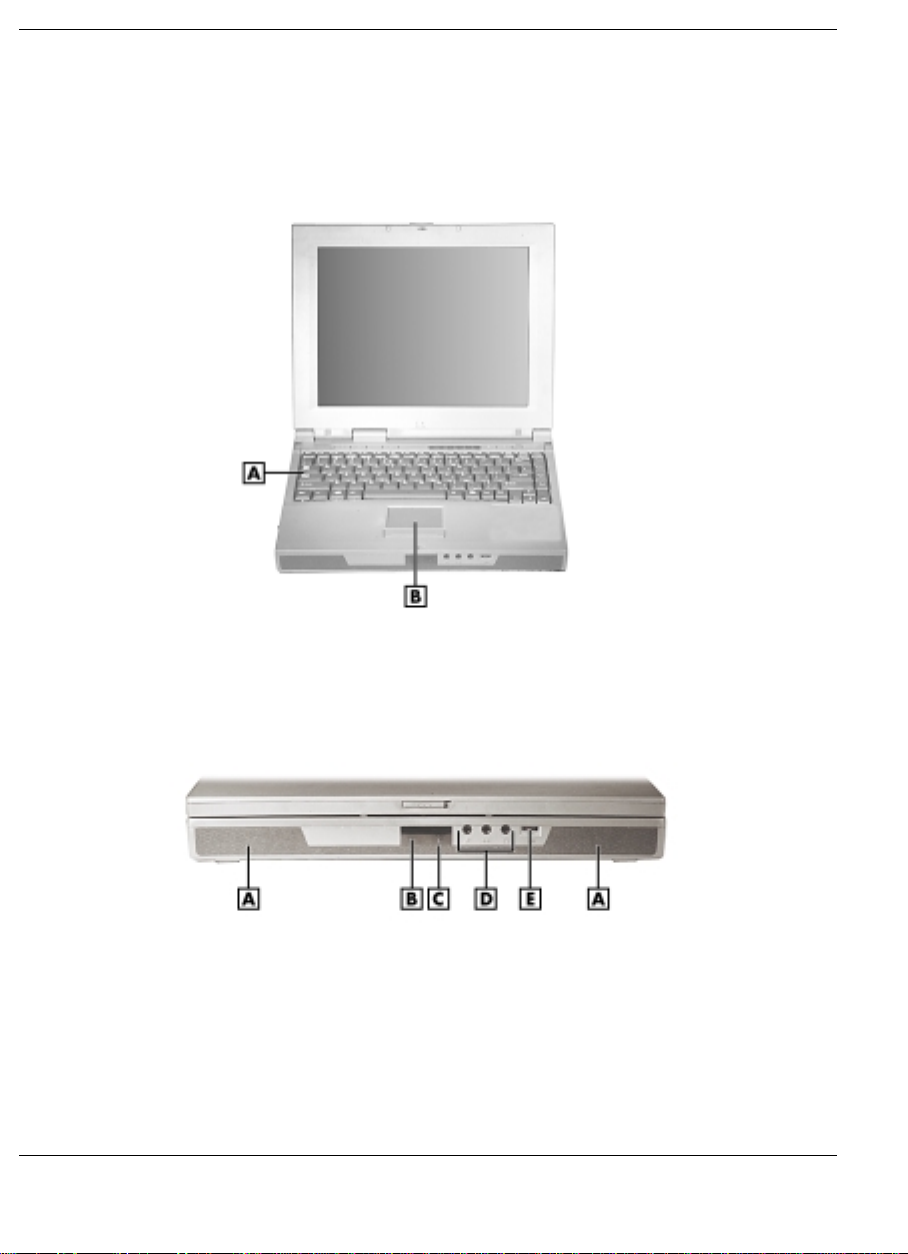
Control Panel
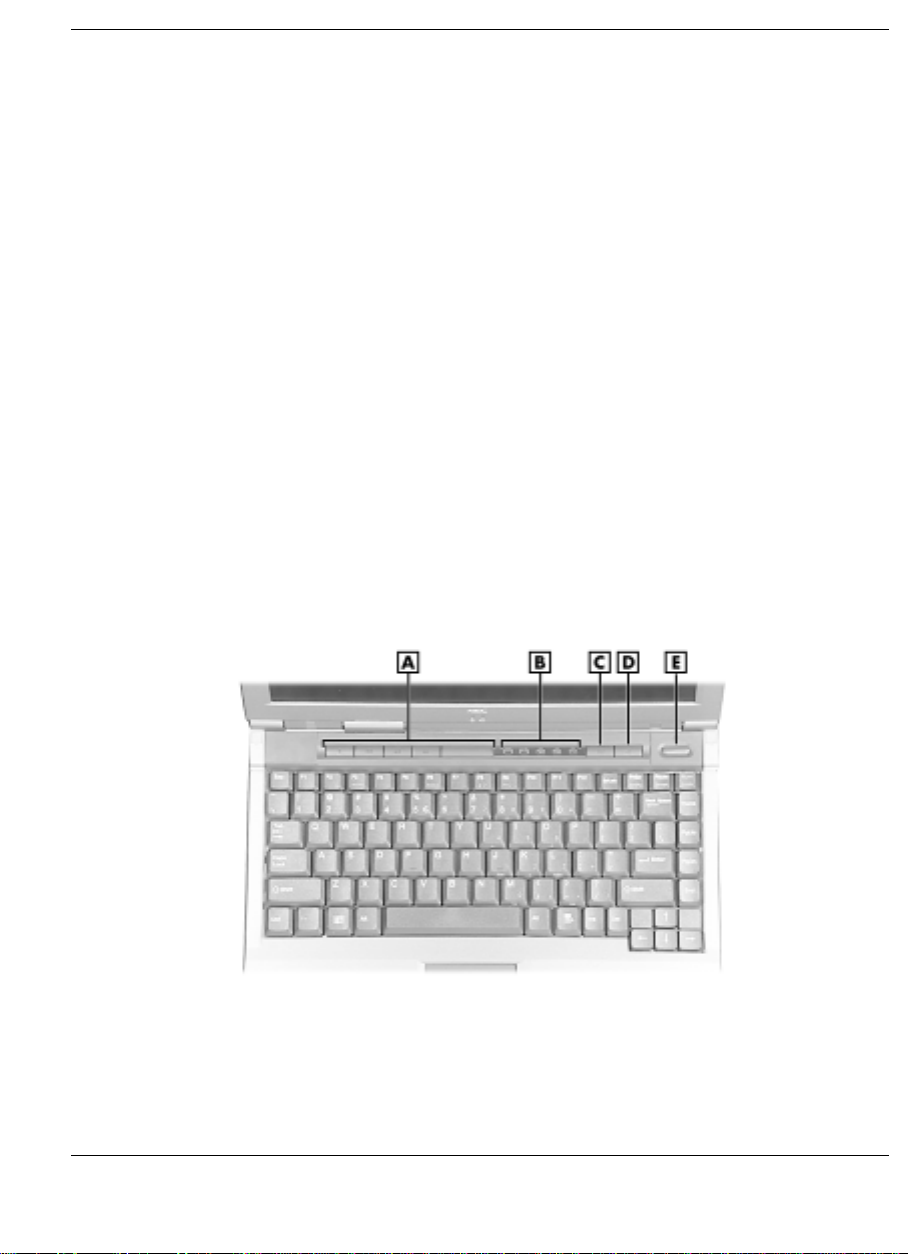
The NEC Versa VX Control Panel provides the features shown i n the following figure.
The Control Panel features are described after the figure.
positioned so that you see the power state whether the LCD panel is opened or
closed.
– Lights green when the system is powered on using the AC adapter,
battery, or auto adapter.
– Lights green when on and has nor mal battery power. Lights yellow when
on and low (8% to 4%) battery power. Lights amber when in Windows 95
Suspend mode or Windows 98 Standby mode and very low (3% or less)
battery power.
– Lights amber to indicate the battery is charging.
– Blinks amber to indicate an error.
– Lights off to indicate the battery is fully charged.
Control Panel
A
– CD Control Buttons or Password Buttons
B
– Status LEDs
C
– Email Button
D
– Internet Button
E
– Power Button
Introducing the NEC Versa 1-5
Page 15

!
CD Control Buttons — controls the CD-ROM drive (stop , r e verse, play/pause, and
fast forward ). Available on some systems.
!
Personal Code Buttons — sets a personal code for security. Available on some
systems.
!
Status LEDs — keeps you informed of your NEC Versa VX’s current operating
status. Descriptions of the status icons appear in the following sec tion.
!
Email Button — accesses your email software.
!
Internet Button — accesses the Internet.
!
Power Button — powers on and off the system.
Note
Power button and hold it in place until the system powers off.
Power Button
The Power button is a “smart” switch, meaning that it recognizes when the system is in
Suspend (Windows 95) or Standby (Windows 98) mode, if the BIOS parameter
“System Switch” is set to “Sleep.” If in Suspend or Standby mode, you cannot power
off until you press the Power button to re sume operation.
Put the unit in Suspend or Standby mode when you need to be awa y from your system
for a short period of time and want to return to where you left off. Suspend mode in
Windows 95 and Standby mode in Windows 98 shuts down all devices in the system
while retaining data and system status.
!
!
!
If you are unable to power off the system, use the power override. Press the
In Windows 95, press the Power button for less than 4 seconds to put your system
into Suspend mode.
In Windows 98, go to Start, Shutdown, Standby to put your system into Standby
mode.
Use the Power button in the following ways:
— Press the Power button to power on.
— Press the Power button to resume from Suspend (Windows 95) or Standby
(Windows 98) mode and proceed with normal operation.
— Hold the Power button in place for 4 or more seconds to initiate power override
(powers off the syste m). Only use this option if you cannot power off your
system using Start, Shutdown.
1-6 Introducing the NEC Versa
Page 16

Status Icons
The NEC Versa VX system uses status lights marked with icons to communicate
system status. See the following figure and list for each icon’s meaning.
Status LED icons
A
– Hard Drive Access
B
– Diskette Drive Access
C
– Caps Lock
!
Hard Drive Access — lights when the NEC Versa VX accesses the hard disk drive,
D
– Scroll Lock
E
– Num Lock
CD-ROM drive, or DVD-ROM drive.
!
Diskette Drive Access — lights when the NEC Versa VX writes data to or retrieves
data from the diskette drive.
!
Caps Lock — lights when caps lock is in effect.
!
Scroll Lock — lights when scroll lock is in effect.
!
Num Lock — lights when Num Lock mode is active.
Introducing the NEC Versa 1-7
Page 17
Keyboard Panel and Base Unit
The NEC Versa VX keyboard panel and base unit contain the following features. The
keyboard panel and base unit features are described after the figure.
Keyboard panel
A
– Keyboard
A
– Speakers
B
– IR Port
C
– Microphone
1-8 Introducing the NEC Versa
Base unit
B
– NEC VersaGlide
D
– Audio Ports
E
– Volume Control
Page 18
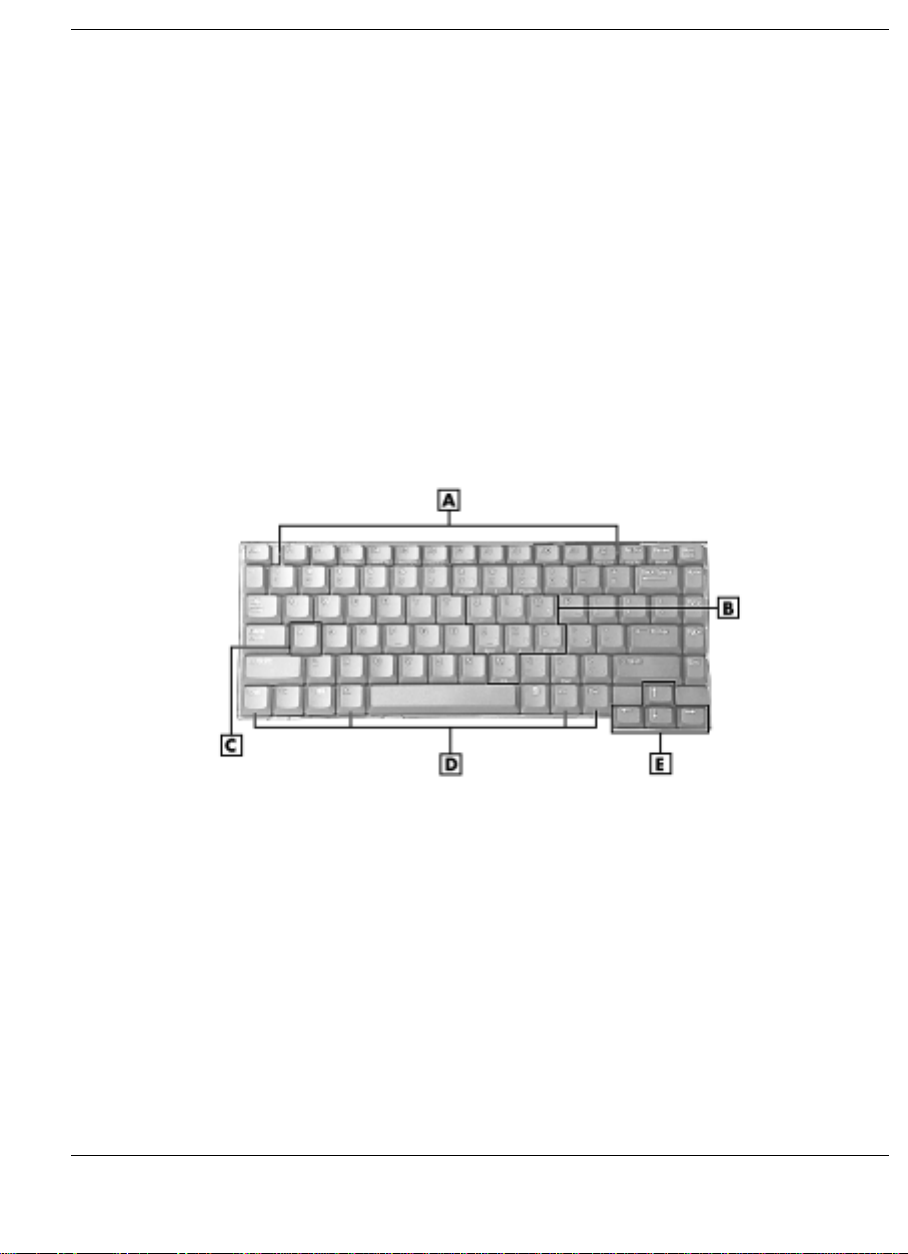
!
Keyboard — standard QWERTY-key layout. (Models shipped outside of the U.S.
are equipped with country-specific keyboard layouts.) The keyboard is equipped
with many features. These include:
— Function keys
— Windo ws keys
— Cursor c ontrol keys
— Typewrit er ke ys
— Numeric keypad
— Control keys.
Key features and operations are described after the figure.
Keyboard
A
– Function Keys
B
– Numeric Keypad
C
– Typewriter Keys
!
Function Keys — Twelve function keys, F1 through
Versa VX keyboard. These keys work together with the
D
– Control Keys
E
– Cursor Control Keys
F12
, are available on the NEC
Fn
key to activate special
functions. Eight keys (printed in blue) are pre programmed with dual functions.
Function keys are application-driven. See the specific application’s user guide for
information about how each function key works within the application you are
using.
The following function key combinations are pre-programmed for the NEC Versa
VX.
Introducing the NEC Versa 1-9
Page 19

Fn-Left Ctrl
— Simulates pressing the right control key to support IBM 327X
connections.
Fn-F3
— Toggles the video mode between LCD only, CRT only, Simultaneous
mode, and TV out.
Fn-F4
— Sets standby power management mode on, in Windows 95.
— In Windows 95, press any key to resume from Standby mode.
— No funct ion when Windows 98 configured for Advanced Configuration and
Power Interface (ACPI). In Windows 98, Standby is equivalent to Windows 95
Suspend mode. To resume from Windows 98 Standby mode, press the Power
button.
Fn-F6
—
Toggles the system beep off and on.
Fn-F7
— Toggles between various p ower manage ment levels i n Windows 95.
Beeps indicate the level chosen as follows:
1 beep Off
2 beeps Custom
3 beeps Highest Performance
4 beeps Longest Life
No function when Windows 98 configured for Advanced Configuration a nd Power
Interface (ACPI).
Fn-F8
— Increases the LCD’s brightness (eight settings). Applies to XGA LCD
panels only.
Fn-F9
— Reduces the LCD’s brightness (eight settings). Applies to XGA LCD
panels only.
Fn-F10
Fn-F12
Fn-Power
— Provides zoom in/out control.
— Toggles the scroll lock feature.
— Initiates a save-to-file on demand, only in Windows 95, when the
BIOS Suspend option is set to “STF.” Saves your working environment to a
reserved area on the hard drive.
Fn-ESC
— Initiates a Save-to-Ram, only in Windo ws 95, when the BIOS System
Switch is set to “Sleep.” Saves your working environment to memory.
1-10 Introducing the NEC Versa
Page 20

Windows keys — Use the following two keys to facilitate your work.
— Shortcut/Application key – provides quick access to shortcut menus. (This key
acts like a right mouse button.)
— Floating Window key – displays the Star t menu.
!
Numeric Keypad — Pressing
Num Lock
on the keyboard activates the numeric
keypad numbers and functions printed in blue on top of the keys.
The keypad lets you type numbers and mathematical operands (+, –) as you would
on a calculator. The keypad is ideal for entering long lists of numbers.
When you press
Num Lock
again, the keys revert to the ir normal functions as
typewriter keys.
!
Typewriter keys — Typewriter keys (also called alphanumeric keys) are used to
enter text and characters. Keys with blue print on them behave differently when
Fn
combined with control keys or the
!
Control keys —
Ctrl, Alt, Fn
, and
key.
Shift
are controls used in conjunction with other
keys to change their functions. To use c ontrol keys, press and hold the control key
while pressing another key. For example, “Press
Ctrl
key and type the letter c. Key combinations work specific to the application
Ctrl c
” means to hold down the
you are running.
!
Cursor Control keys — Cursor control keys let you position the cursor on the screen
where you want. On the screen, the cursor is a blinking underline, block, or vertical
bar depending on the application. The cursor indicates where t he next text typed is
inserted.
!
NEC VersaGlide — works like a standard computer mouse. Simply move your
fingertip over the VersaGlide to control the position of the cursor. Use the selection
buttons below the VersaGlide to select menu items. See “Using the NEC
VersaGlide” in Chapter 2 for information about customizing VersaGlide settings.
!
Speakers — provides stereo sound for your multimedia presentations or listening
pleasure.
!
IR Port — allows you to transfer files between you NEC Versa and an IR-equipped
desktop or notebook computer.
!
Microphone — allows you to record monophonic sound directly into your notebook
computer. See Chapter 9, “Using Multimedia,” for details about recording.
!
Audio Ports
— Microphone — Allows you to connect an external microphone for monophonic
recording or amplification through the unit. Plugging in an external microphone
disables the built-in microphone.
Introducing the NEC Versa 1-11
Page 21
— Line In — Lets you use another audi o system, like a home stereo, as an input
source. Use a cable to connect to the Line-Out port on the other audio system to
record or play.
— Headphones — Lets you plug in stereo headphones or powered speakers.
!
Volume Control — Allows you to control the speaker volume through the thumb
wheel.
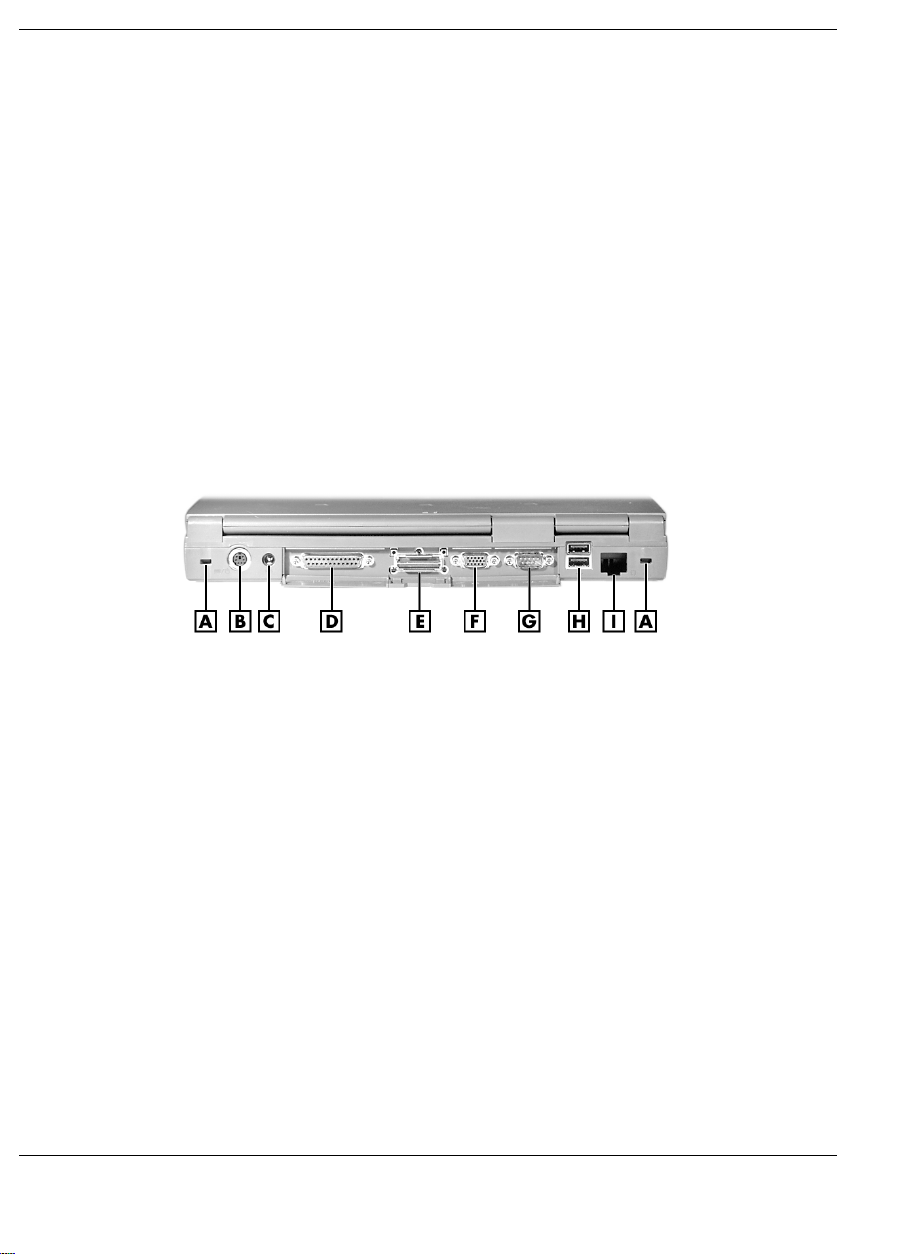
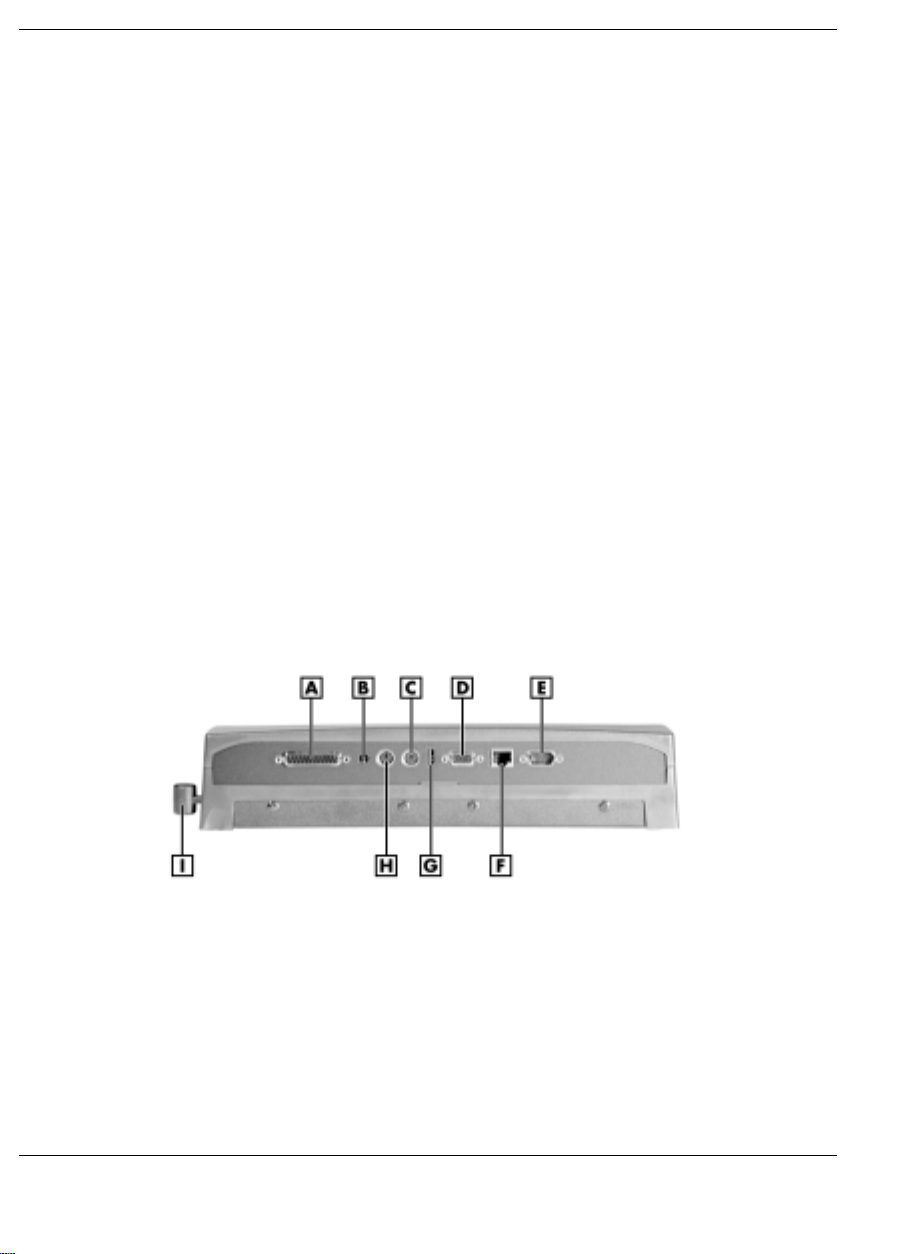
Around the Back of the System
You’ll find system por ts for connecting your NEC Versa VX to optional de vi ces (like a
printer or external monitor) on the back of your NEC Versa VX. The ports are
described after the figure.
Back system features
A
– Port Replicator Notches
B
– PS/2 Port
C
– AC Power Port
D
– Parallel Port
E
– Expansion Port
!
Port Replicator Notches — Use these notches to secure the Port Replicator to the
back of the system. (There are two Port Replicator notches located at the both ends
of the rear side of the system.)
!
PS/2 Port — Use the standard PS/2 port to connect an external PS/2-style mouse,
PS/2-style keyboard, or PS/2 style Numeric Keypad to the system. With an optional
Y-adapter cable, you can connect up to two of these devices at the same time.
!
AC Power Port — Lets you attach the NEC Versa VX to the AC power source
using the AC adapter that comes with your system. Keep the system connected to
AC power whenever possible to keep the battery pack and internal CMOS battery
charged.
1-12 Introducing the NEC Versa
F
– VGA Port
G
– Serial Port
H
– USB Ports
I
– Modem/LAN Port
Page 22
!
Parallel Port — Use this port to connect a parallel printer or other parallel device.
The parallel port default supports the Enhanced Capabilities Port (ECP) standard.
The port also supports bidirectional and output only protocols.
!
Expansion Port — Use this port to connect the Port Replicator.
!
VGA Port — Use this 15-pin port to attach an external monitor to your NEC Versa
VX.
!
Serial Port — Use this port to connect a serial printer or other serial device.
!
USB Ports — Each Universal Serial Bus (USB) po r t allows you to connect up to
127 USB-equipped peripheral devices (for example, printers, monitors, scanners) to
your NEC Versa VX.
!
Modem/LAN Port — NEC includes a 56K fax/data modem or mini-PCI LAN. It
keeps you connected to the outside world!
Around the Left Side of the System
The left side of your NEC Versa VX provides the features shown in the following
figure. The left side features are described after the figure.
Left side features
A
– Kensington Lock Latch
B
– CD-ROM Drive
!
Kensington Lock Latch — This latch allows you to attach a Kensington security
C
– Diskette Drive
D
– Hard Disk Drive
lock or other compatible lock to secure the notebook from theft.
!
CD-ROM Drive — Allows you to load and start programs from a compact di sc
(CD) and play audio CDs.
!
Diskette Drive — A 3.5-inch, 1.44-MB diskette drive comes installed in the NEC
Versa.
Introducing the NEC Versa 1-13
Page 23
!
Hard Disk Drive — An internal hard disk drive comes installed in the NEC Versa.
The disk drive is upgradeable.
Around the Right Side of the System
The right side of the NEC Versa VX offers the features shown in the following figure.
The right side features are described after the figure.
Right side features
A
– Battery Bay
B
– Fan
!
Battery Bay — Depending upon the model, the battery bay contains a rechargeable
C
– PC Card Slots
D
– TV Out
Nickel-Metal-Hydride (NiMH) or Lithium-Ion (Li-Ion) battery pack.
!
Fan — Allows your system to cool properly and maintain a safe operating
environment.
Do not block the fan while the NEC Versa VX is in use.
!
PC Card Slots — Two PC card slots allow you to insert two Type II PC cards or
one Type III PC card in the bottom slot. Card BUS cards are supported and Zoom
Video is supported in the top slot.
!
TV Out — Allows you to connect to a television.
1-14 Introducing the NEC Versa
Page 24
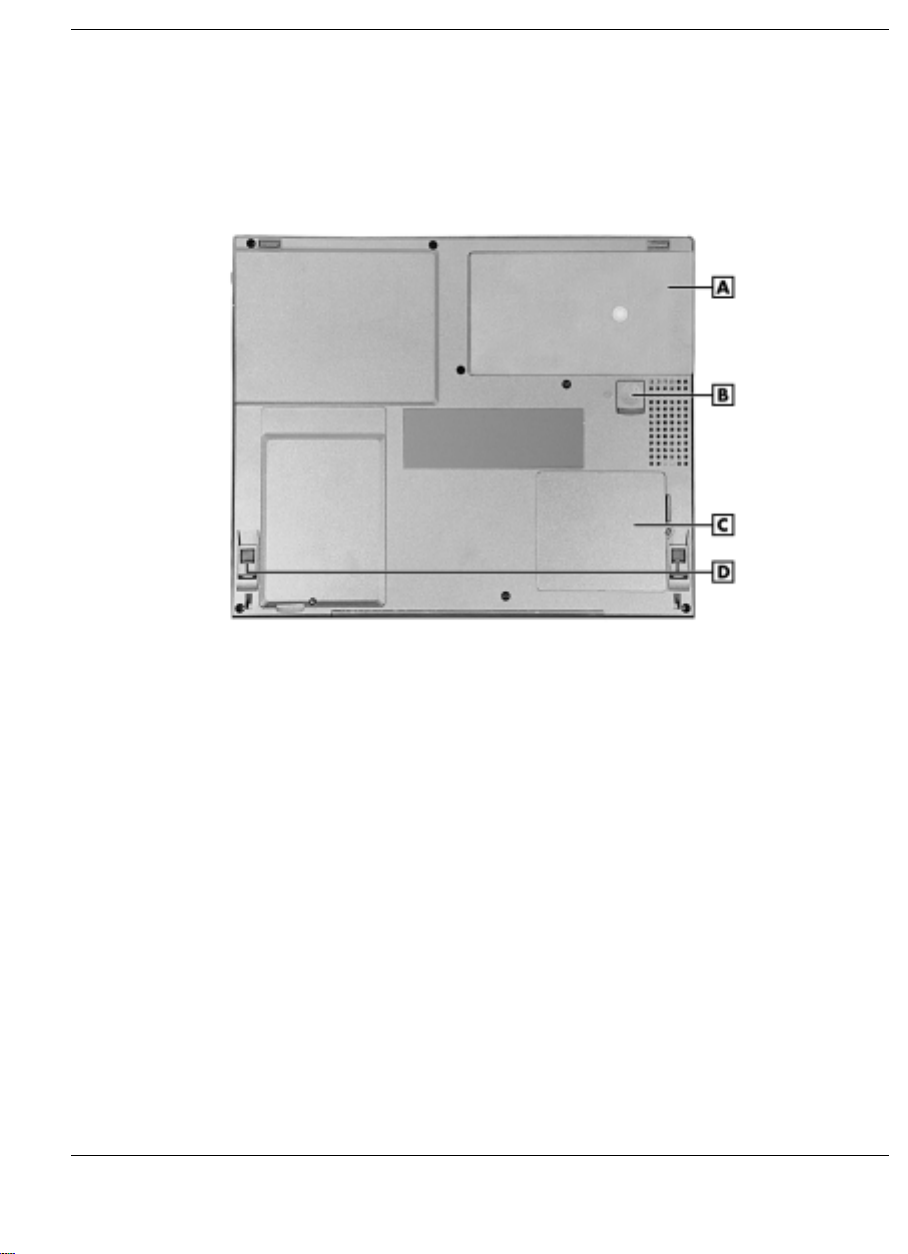
Around the Bottom of the System
The bottom of the NEC Versa VX offers the following features. The features are
described after the figure.
Bottom of the system
A
– Battery Bay
B
– Battery Release Latch
!
Battery Bay — Equipped with a rechargeable Nickel-Metal-Hydride (NiMH) or
C
– Memory Module Bay Cover
D
– Tilt Foot
(depending on the model) Lithium-Ion (Li-Ion) battery.
!
Battery Release Latch — Slide the latch to the other end and hold it. While holding
the latch, slide the battery bay outwards to remove the battery.
!
Memory Module Bay Cover — Remove the screw to find two SO-DIMM slots.
One is inserted with SDRAM memory board configured by the factor y. The other is
empty for upgrade use.
!
Tilt Foot — Adjust to provide flexible keyboard angle.
Introducing the NEC Versa 1-15
Page 25
About the Port Replicator
The NEC Port Replicator is an accessory that duplicates some of the ports found on the
back of your NEC Versa VX system. It also has a LAN port for a net work connection
and a Kensington lock. The lock secures the NEC Versa VX to the Port Replicator and
secures the Port Replicator to the desk. Keep the NEC Port Replicator in your office
connected to peripherals while you take your NEC Versa VX on the road.
The ports on the Port Replicator are as follows.
!
Parallel Port — Connects to a printer. You can change the LPT Mode in the Setup
program.
!
AC Power Port — Connects to an AC adapter.
!
PS/2 Mouse Port — Connects to a PS/2 mouse.
!
PS/2 Keyboard Port — Connects to a 6-pin standard PS/2-style keyboard.
!
USB Port — Connects up to 127 peripheral devices to your notebook computer.
!
VGA Port — Connects to an external VGA/SVGA monitor.
!
LAN Port — Connects via an RJ45 connector to the system’s built-in LAN or
modem/LAN card.
!
Serial Port — Connects to a serial device, such as an external modem.
Port Replicator
A
– Parallel Device Port
B
– AC Power Port
C
– External Keyboard Port
1-16 Introducing the NEC Versa
D
– VGA Port
E
– Serial Devi ce Port
F
– Ethernet LAN Port
G
– USB Port
H
– Mouse Port
I
– Docking Lever
Page 26

Getting Started
NEC VersaGlide
!
Power Sources
!
System Care
!
2
Page 27
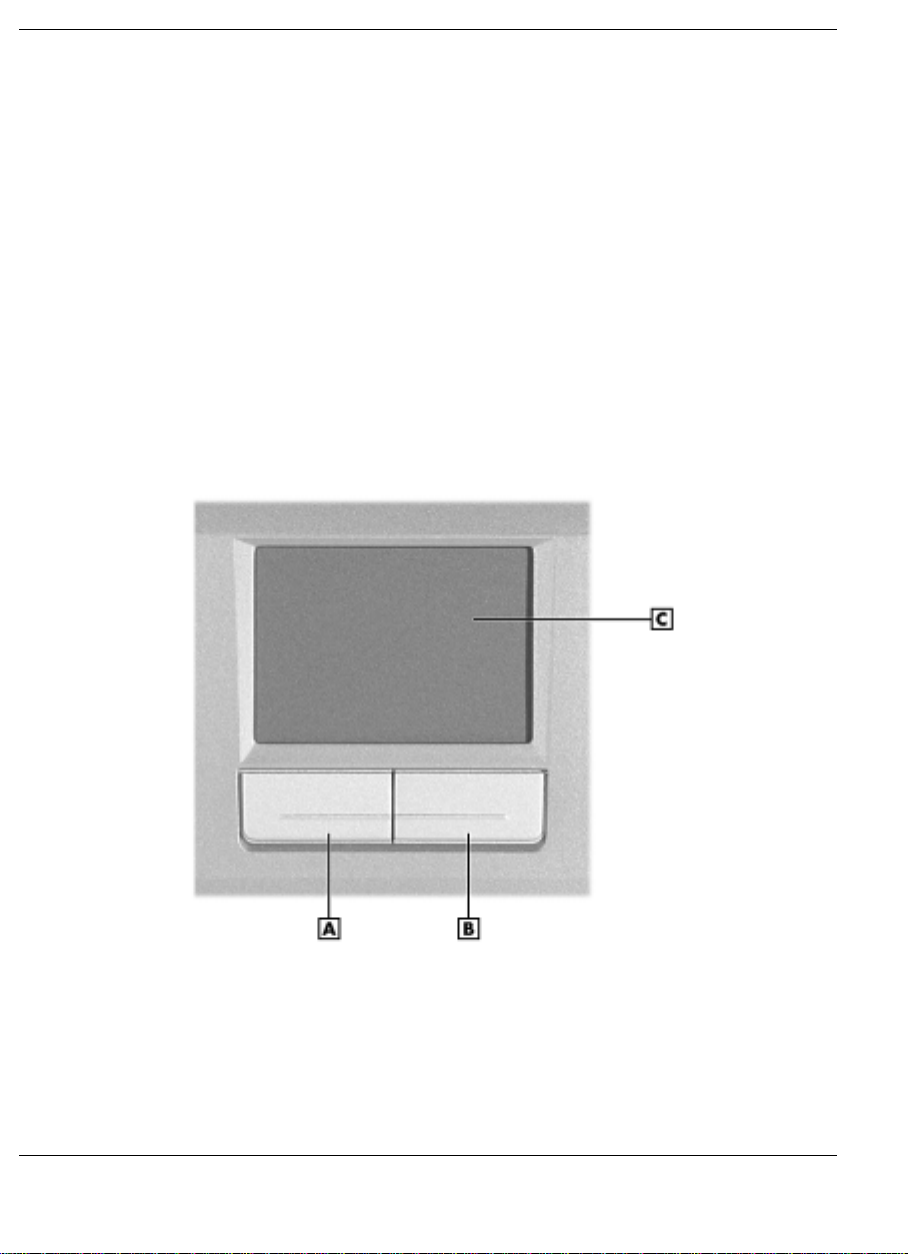
NEC VersaGlide
The NEC VersaGlide is an easy way to control the cursor with your finger. Lightly
glide your finger across the NEC VersaGlide and the cursor follows. To use the
VersaGlide, you can
!
Single tap to the touchpad, equivalent to a single click of the primary mouse
button.
!
Double tap to the touchpad, equivalent to a double click of the primary mouse
button.
!
Click and hold, then drag your finger across the VersaGlide touchpad, equivalent
to a click and drag of the primary mouse button.
!
Slide your finger along the right side of the touchpad to scroll your document or
screen.
VersaGlide features
A
– Left Button
B
– Right Button
Try both ways and decide which you prefer. If you find the double tap difficult to use,
go to the next section for general directions about adjusting the VersaGlide p roperties.
2-2 Getting Started
C
– NEC VersaGlide
Page 28

Note
capability may be lost.
If you install another mouse driver over the shipping default, the double-tap
Making VersaGlide Adjustments
The NEC VersaGlide offers a number of options that let yo u c ustomize how it
functions. To access these options, locate the Control Panel and double click on the
Mouse icon.
The options let you control the size and color of the cursor, cursor speed, the accepted
double-click speed, and selection button orientation.
VersaGlide Tips
Follow these basic ergonomic tips while working:
!
Use a light touch on the VersaGlide surface.
!
Set up the NEC Versa VX with your keyboard and VersaGlide at a comfortable
height. Keep your forearms parallel to the floor. Your wrists should be relaxed and
straight.
!
While using the keyboard and VersaGlide, keep your shoulders and arms as relaxed
as possible.
!
Take regular breaks from the computer to rest your eyes. Perform stretching
exercises to relax your fingers, hands, wrists, forearms, and shoulders.
See Appendix A, “Setting Up a Healthy Work Environment,” for more information.
Power Sources
The NEC Versa can be powered using three different sources, making it a truly portable
system.
Operate your NEC Versa just about anywhere using one of the following power
sources:
!
the AC adapter connected to an electrical wall outlet (using AC power)
!
the battery pack
!
the optional auto adapter (For details about its use, refer to the accessory sheet that
ships with the option.)
Read the following sections for specific information about using the NEC power
sources.
Getting Started 2-3
Page 29
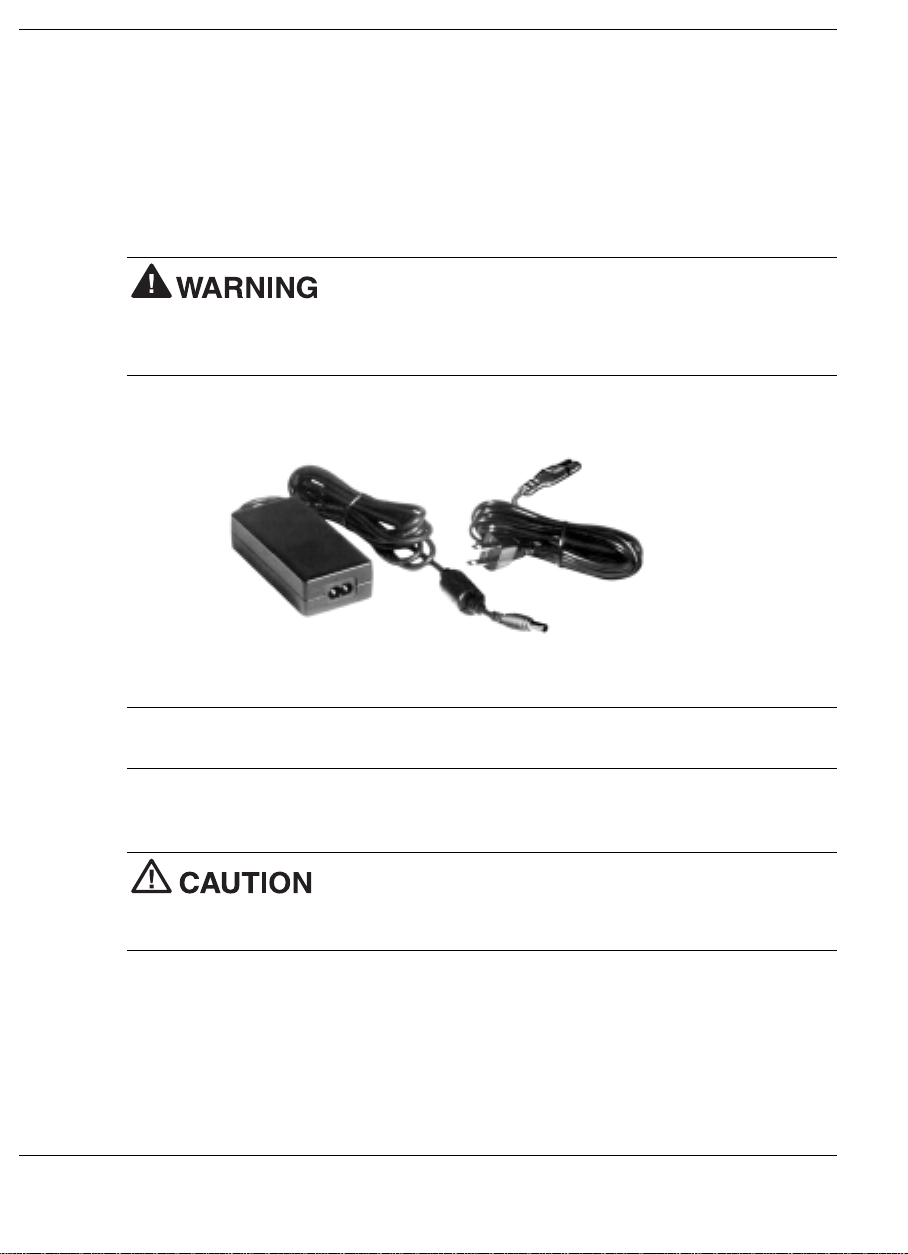
Using the AC Adapter
Use the AC adapter and power cable that came with your NEC Versa VX to run your
computer on alternating current (AC) power, or to recharge the battery pack. Use the
AC adapter whenever a wall outlet is nearby.
When connected, the AC adapter charges the battery whether or not the NEC Versa VX
is powered on.
adapter has no user-replaceable or serviceable parts inside. Dangerous voltage in the
AC adapter can cause serious personal injury or death. The AC adapter is intended for
use with a computer. Both must meet EN60950 standards.
Do not attempt to disassemble the AC adapter. The AC
AC adapter
Note
the cord and plug are appropriate for your AC source.
Connect the AC adapter as follows:
system. Although other AC adapters may look similar, using them can damage the
system.
1.
Connect the AC adapter cable to the power port on the back of your NEC Versa
VX system.
2-4 Getting Started
The AC outlet voltage should be in the range of 100–240 Volts AC. Verify that
Use only the AC adapter that comes with your NEC Versa VX
Page 30

2.
Plug one end of the AC power cable into the AC adapter and the other end into a
120- or 240-volt wall outlet.
Connecting the AC adapter
Do not cover or place objects on the AC adapter. Doing so
can cause the adapter to overheat.
Powering the System On and Off
To power on, locate the Power button on the upper right hand side of the notebook
above the keyboard and press it. To power off the system, press the Power button. In
Windows, the computer automatically shuts down, when “Shut Down” is selected from
the Start menu. That is, you do not need to press the Power button to switch off the
computer.
Depending on the operating system, the “smart” switch may be enabled to allow you to
power down using the Po wer button instead of the Windows Start menu.
Using the Battery
The NEC Versa VX system comes with a rechargeable Nickel Metal-Hydride (NiMH)
or Lithium-Ion (Li-Ion) battery. Battery packs are easy to install and re move.
Note
reduce the initial battery charge. We recommend that the first time you use your system,
connect it to AC power using the AC adapter. This also recharges your battery.
When battery power drops to the level where the Battery Warning is activated, the
power LED lights yellow.
Although the battery is fully charged at the factory, transit and shelf time may
Getting Started 2-5
Page 31

When battery power reaches 8%, the power LED lights amber and the system beeps a
warning and the system goes into Suspend or Save to File mode.
the following:
!
Keep the battery away from extreme heat.
!
Keep metal objects away from the battery terminals to prevent a short circuit.
!
Make sure the battery is properly installed in the battery bay.
!
Read the precautions printed on the battery.
Replacing the Battery
Install the battery in your system as follows:
connecting the AC adapter. Failure to do so can result in data loss.
1.
Save your files, exit Windows, and turn off system power .
2.
Close the LCD panel and turn over the system.
To prevent accidental battery ignition or explosion, adhere to
Be sure to save your data before replacing the battery pack or
2-6 Getting Started
Page 32

3.
Remove the battery as follows:
!
Locate the battery release latch.
!
Slide the battery release latch towards the back of the system and hold firmly.
!
Continue to hold the battery release latch as you slide the batter y out of the
system.
Removing the battery
A
– Battery Release Latch
Getting Started 2-7
Page 33

4.
Insert the new battery as follows:
!
Locate the alignment groove on the edge of the battery.
!
Locate the alignment groove inside the battery bay.
!
Align the grooves on the batter y with the grooves in the bay.
!
Slide the battery into the bay until securely locked into place.
Installing the battery
5.
Turn over the system.
Low Battery Power
When battery power gets low, connect your system to the AC adapter. If an AC adapter
is not available, change the battery using the battery replacement procedure. See the
section, “Replacing the Battery.”
Returning the Battery to its Normal State
To return the battery to its normal state, try the following:
!
remove and then reinstall the battery
!
reinstall the battery in your NEC Versa and fully recharge the battery (to 100%).
2-8 Getting Started
Page 34

Handling the Battery
Review the following before handling the system battery.
computer for which they are designed. Mixing other NEC Versa VX batteries, other
manufacturer’s batteries, or using a combination of very old and new batteries can
deteriorate battery and equipment performance.
!
Turn off power to the system after use.
!
Clean the battery terminals with a dry cloth if they get dirty.
!
When not in use, store the battery in a cool dry area.
The following symptoms indicate that battery life is nearing an end. Discard batteries
that display these symptoms:
!
shorter work times
!
discoloration, warping
!
hot to the touch
!
strange odor.
Use the NiMH or Li-Ion batteries only in the NEC Versa VX
Extending Battery Life
The NEC Versa VX NiMH or Li-Ion battery life is effected by the following
conditions:
!
When it is new and full y charged.
!
When no peripherals are connected to your NEC Versa V X.
!
When you have no options installed.
Enabling power management features increases battery life.
While on the road, it is important to be aware of the simple things you can do to extend
the life of the system’s main battery. Turning down the screen brightness (
extends battery life.
Fn + F9
)
Getting Started 2-9
Page 35

Charging the Battery
Charge time depends on whether or not you are using the system. There are two ways
to charge your battery while it is installed in the NEC Versa VX:
!
When the system is off or in Suspend mode and the AC adapter is connected,
charge time is approximately 3 hours.
!
When the system is powered on and the AC adapter is connected, charge time is
approximately 4 hours.
For maximum battery performance, fully discharge the battery before recharging it. To
do so, unplug the AC adapter, turn off power management features (through BIOS
Setup and Windows power management), and turn on the system. Once the battery is
fully discharged, plug in the AC adapter and recharge the battery.
The warning beep that sounds when battery power becomes critically lo w is always a
true indicator that battery power is low. Be sure to save your data when you hear t he
beep and take proper steps to provide power to your system.
Battery Precautions
To prevent accidental battery ignition, rupture, or explosion, adhere to the following
precautions.
replaced. Replace only with the same or equivalent type recommended by the
manufacturer. Discard used batteries according to the manufacturer’s instructions.
!
Keep the battery away from heat sources including direct sunlight, open fires,
microwave ovens, and high-voltage containers. Temperatures over 60ºC (140ºF)
may cause damage.
!
Do not drop or impact the battery.
!
Do not disassemble the battery.
!
Do not solder the battery.
!
Do not puncture the battery.
!
Do not use a battery that appears damaged or deformed, has any rust on its casing,
is discolored, overheats, or emits a foul odor.
!
Keep the battery dry and away from water.
!
Keep metal objects away from battery terminals. Metal objects in contact with the
terminals can cause a short circuit and damage.
!
If the battery leaks onto skin or clothing, wash the area immediately. Battery fluid
can cause a skin rash and damage fabric.
!
If battery fluid gets in eyes, DO NOT rub; rinse with clear water immediately and
see a doctor.
2-10 Getting Started
There is a danger of explosion if the battery is incorrectly
Page 36

Precautions for Recharging the Battery
Adhere to the following precautions when recharging the battery.
!
Use only the NEC battery charger designed for your NEC Versa battery type.
Different NEC Versa models require different batteries and battery chargers.
!
Charge the battery for the specified charge time only.
!
During charging, keep the environmental temperature between 41°F and 95°F (5°C
to 35°C).
!
Read the instructions that came with the battery charger before charging the battery.
Disposing of the Battery
Before disposing of the battery, put adhesive tape on the terminals. Depending upon the
NEC Versa VX model, the main battery is made of Nickel Metal-Hydride (NiMH) or
Lithium-Ion (Li-Ion).
Contact your local waste management officials for information regarding
environmentally sound collection, recycling, and disposal of batteries.
Internal Batteries
The Nickel Metal-Hydride or Lithium-Ion battery is the main power source in your
NEC Versa VX computer. Appendix B lists battery specifications. In addition to the
main battery, the CMOS battery provides power to maintain syste m con fi guration
settings.
CMOS Battery
This battery provides battery backup and prevents data loss in the system’s
complementary metal-oxide semiconductor (CMOS) RAM. This memory area contains
information on the system’s configuration, for example, date, time, drives, and
memory.
Getting Started 2-11
Page 37

cord if it becomes damaged. U.S. and Canadian replacement cords must be ULapproved (CSA certified in Canada) type SPT-2, 18 AWG, 2-conductor cord with a
permanently attached NEMA type 5-15P plug at one end, and a permanently attached
connector body on the other. Cord length may not exceed 15 feet.
Outside the U.S. and Canada the cord must be rated for at least 250VAC at 10 amps,
and must indicate international safety agency approval. The plug must be a type
appropriate for the country where it is used. Check with your local dealer for HAR type
18 AWG, 2 conductor cord, or better. (Reference the booklet, “Getting Service and
Support for Asia, Australia, and Europe” to find out how to contact the local office in your
country.)
Obtain replacement cords at an authorized service center. The replacement must be of
the same type and voltage rating as the original cord.
Disconnect all supply lines before the hinged front cover is removed. Replace the
hinged cover before the unit is restarted.
System Care
The NEC Versa VX is a durable, dependable system built for extensive use and travel.
Follow these guidelines to maintain the condition, performance and safety of your
computer. Please read these safety instructions carefully and keep this user’s guide for
reference.
This equipment uses an ungrounded power cable. Replace the
following conditions:
!
The power cord is damaged or frayed.
!
Liquid spills on or into the NEC Versa VX.
!
System is dropped or casing is damaged.
Precautions
Follow these precautions when using your NEC Versa VX and AC adapter. Always
follow all cautions and warnings.
!
Avoid dropping or bumping the computer or the AC adapter.
!
Do not stack heavy objects on the computer, the AC adapter, or the battery packs.
!
Do not place items near the NEC Versa VX that could block air vents and cause
overheating.
2-12 Getting Started
Immediately turn off and unplug the NEC Versa VX under the
Page 38

!
Use the NEC Versa VX on a level surface and avoid moving the NEC Versa VX
during system operation, especially while the hard disk, diskette drive, or CD-ROM
drive is being accessed.
!
When using the AC adapter, make sure the power source falls within the system’s
compatible range of 100–240 volts AC. Never use the AC adapter if the voltage
falls outside of this range. (Watch for this when traveling to other countries.)
!
Turn computer power off before attaching or removing non-plug and play devices.
!
Disconnect the notebook from the electrical outlet if it is not going to be used for a
long time. This will avoid damage by transient over-voltage.
!
Do not attempt to disassemble the computer. For safety the computer should be
disassembled only by a qualified service person.
!
Do not push any foreign objects into the NEC Versa VX bays, connectors, a nd
slots.
!
Avoid using the computer or AC adapter for extended periods in direct sunlight.
!
Do not use the system in humid or dusty environments.
!
Keep liquids and food away from the system.
!
Turn computer power off before cleaning it.
!
If the AC adapter becomes extremely hot, unplug the adapter and let it cool.
!
The electrical outlet and any extension cords should be rated to support the total
current load of all connected devices.
!
Be sure to follow these power cord safety tips:
— Unplug by the plug only; do not pull on the cable.
— Place the power cord so that it can not be tripped on, stepped on, nor have items
placed directly on the power cord.
— Use an electrical outlet that is as close as possible to the computer.
!
Do not use the IR port directly under fluorescent lighting, or near flashing
incandescent light.
!
If one of the following situations arises, have the notebook checked by service
personnel:
— The power cord or plug is damaged.
— Liquid has penetrated into the notebook.
— The notebook has been exposed to moisture.
Getting Started 2-13
Page 39

— The notebook has not worked well or you can not get it to work according to the
user’s guide.
— The notebook has been dropped and damaged.
— If the notebook has an obvious sign of damage.
!
An approved power cord has to be used for the notebook’s power supply. For a
rated current up to 6A and an equipment weight more than 3 kg, a power cord not
lighter than H05VV-F, 2G, 0.75mm
!
The sound pressure level at the operator’s position according to IEC 704-1: 1982 is
equal or less than 70dB(A).
Storage Requirements
Store the computer and AC adapter in an environment that meets the following
conditions:
example, when you move the system from a cold place to a warm place), vapor
condenses inside the system. Turning on the system under this condition can damage
the internal system components.
Before turning on the system, wait until the system's internal temperature equalizes with
the new environment and any internal moisture can evaporate.
2
, has to be used.
If the temperature of the NEC Versa suddenly rises or falls (for
!
Maintain storage temperatures between -4°F and 104°F (-20°C and 40°C).
!
Keep the storage area free from vibration and ma gnetic fields.
!
Keep the system and its components away from organic solvents or corrosive gases.
!
Avoid leaving the system and its components in direct sunlight or near heat sources.
2-14 Getting Started
Page 40

Routine Cleaning
Clean or dust your system as follows:
cleaners that contain caustic materials on the NEC Versa computer.
These cleaners are usually high in alkalinity which is measured in pH. Using these
cleaners can cause the plastic surface to crack or discolor.
!
LCD screen — Carefully wipe the LCD screen with a soft cloth or a screen wipe
designed for that purpose. Special screen wipe s are available through your local
computer dealer.
!
System case — NECC recommends that you carefully wipe the case with a slightly
damp, almost dry cloth.
Never use harsh solutions, household cleaners, or spray
Getting Started 2-15
Page 41

Using the BIOS Setup Utility
Introducing BIOS Setup
!
Entering BIOS Setup
!
Checking/Setting System Parameters
!
Managing System Power
!
Updating the BIOS
!
Identifying the Switch Settings
!
3
Page 42

Introducing BIOS Setup
Your NEC Versa VX computer comes with a hardware program called BIOS Setup that
allows you to view and set system parameters. BIOS Set up also allows you to set
password features that protect your system from unauthorized use.
Use BIOS Setup to:
!
set the current time and date
!
customize your operating system to reflect your computer hardware
!
secure your system with a password
!
balance your performance needs with power conservation.
Entering BIOS Setup
Access the BIOS utility at power-on. Just press F2 when the following prompt appears.
Press <F2> to enter Setup.
When you press F2 to enter BIOS Setup, the system interrupts the Power-On Self-Test
(POST) and displays the current CMOS RAM settings.
If the system detects an error during POST, it prompts you with a double beep and a
message: “Pr ess <F1> to resume .” If you press
automatically. If you want to fix the error, carefully read the error message that appears
above the prompt (taking notes if you want), and press
your CMOS ba t tery becomes fully discharged.
F1
, the system enters BIOS Setup
F2
. You will see this message if
3-2 Using the BIOS Setup Utility
Page 43

BIOS Setup Main Menu
After you press F2, the system displays the BIOS Setup Main Menu screen, similar to
the following.
Use the up and down arrow keys (located on the lower right corner of the keyboard) to
toggle through the BIOS Setup menu items.
BIOS Setup Main Menu
Using the BIOS Setup Utility 3-3
Page 44

Looking at Screens
BIOS setup screens have three areas as shown next.
!
Parameters — The left side of the screen. This area lists parameters and their
current settings.
Advanced CMOS Setup
!
Available Options and Help — The right side of the screen. This area lists alternate
settings and Help text for each parameter.
!
Key Legend — The bottom right corner of the screen. These lines display the keys
that move the cursor and select parameters.
Options that are grayed out are not available for the current selection.
3-4 Using the BIOS Setup Utility
Page 45

Using Keys
The following table lists the BIOS Setup keys and their functions.
BIOS Setup Key Functions
Key Function
↑ ↓
PgUp/PgDn Toggles through the current parameter settings.
Tab For some parameter settings, moves the cursor between the
ESC Exits the current screen and returns to the Main Menu screen. From
F3/F4 Changes the screen color.
F10 Saves and exits the BIOS Setup utility.
Moves the cursor between the displayed parameters.
subfields. Also moves the cursor to the next line or selection. For
example, for System Time, Tab moves the cursor from hour to minute
to second.
the Main Menu screen, displays the prompt, “Quit without saving.”
Checking/Setting System Parameters
The BIOS Setup utility consists of a number of screens, each representing a specific
area of the BIOS. The following tables list the BIOS parameters, their factory default
settings, alternate settings, and a description of each setting. See the item-specific help
that appears on each Setup screen for more details.
The BIOS Setup Utility is broken down as follows:
!
Standard CMOS Setup
!
Advanced CMO S Setup
!
System Security Setup
!
Power Management Setup
!
Boot Device Setup
!
Peripheral Setup
Using the BIOS Setup Utility 3-5
Page 46

Resetting System Parameters
To reset all parameters to the default settings, select Auto Configuration with Defaults
from the BIOS Setup Main Menu, press the arrow keys to select
Standard CMOS Setup
Use the Standard CMOS Setup screen to view the System Time, System Date and to
modify drive parameters and related settings.
Parameter Default Setting Alternate Setting(s)
Date mm/dd/yyyy
System Memory (automatically detected)
Time hh:/mm:/ss
Diskette Drive A 1.44 MB, 3 1/2 Not installed, 1.44 MB 3 1/2
Internal Auto User Defined, CDROM,
Internal Slave Auto User Defined, CD/DVD,
Standard CMOS Setup
Not installed
Not installed
Yes
and press
Enter
.
Boot Sector Virus
Protection
!
Date — Sets your NEC Versa’s calendar month, day and year. The calendar clock is
year 2000-compliant. These settings remain in memory even after you turn off
system power.
To set the date use the
PgDn
or
!
System Memory — Displays the amount of system memory currently installed in
key to change the numbers within each field.
your system.
!
Time — Sets the time, enter the current hour, minute, and second in hr:/min:/sec,
24-hour format.
To set the time use the
PgDn
or
!
Diskette Drive — Designates the drive type for your diskette drive.
key to change the numbers within each field.
3-6 Using the BIOS Setup Utility
Disabled Enabled
Tab
or arrow keys to move from field to field. Use the
Tab
or arrow keys to move from field to field. Use t he
PgUp
PgUp
Page 47

!
Internal Drives — Assigns devices to the internal drives in your system.
!
Boot Sector Virus Protection — Write protects the boot sector of the hard disk drive
to avoid infection by some virus types.
Advanced CMOS Setup
Use the Advanced CMOS Setup to set the followi ng functions.
Parameter Default Setting Alternate Setting(s)
Video Out Type NTSC PAL
Advanced CMOS Setup
LCD Panel View
On Off
Expansion
PS/2 Port Warm Swap Enabled Disabled
Internal Mouse Enabled Disabled
!
Video Out Type — Specifies the signal type used by the video device connected to
the TV Out Port.
!
LCD Panel View Expansion — Specifies whether the panel view is reduced/off or
expanded/on.
!
PS/2 Port Warm Swap — Specifies whether or not you can swap a PS/2 device
during system operation.
!
Internal Mouse — Specifies whether or not you can use both t he internal and the
external mouse.
Using the BIOS Setup Utility 3-7
Page 48

System Security Setup
Use the System Security Setup to establish system passwords.
Parameter Default Setting Alternate Setting(s)
System Security Setup
Assign Supervisor
Press Enter
Password
Assign User Password Press Enter
Boot Password Required
Resume Password
Required
2
1
No Yes
No Yes
Assign HDD Password Press Enter
Internal HDD password Disabled Enabled
1
Option is not available until supervisor password is set up
2
Only active when Boot Password is set to Yes.
!
Assign Supervisor Password — Establishes password protection for entering the
.
BIOS Setup utility, booting the system, and resuming from suspend.
!
Assign User Password — Establishes a user password once a supervisor password
is set. The user password allows the system to boot and resume from Suspend and
Save-to-File.
!
Boot Password Required — Indicates whether or not a password is required to boot
the system.
!
Resume Password required — Indicates whether or not a password is required to
resume the system. Boot Password must be defined to activate this parameter.
!
Assign HDD Password — Allows you to assign a pass word to allow or restrict
access to the hard disk drive contents.
!
Internal HDD Password — Enables or disables the HDD password.
3-8 Using the BIOS Setup Utility
Page 49

Password Protection
Your NEC Versa supports a password for system security on several levels. Keep in
mind that you must set the supervisor password before the BI OS Setup utility allows
you to set a user password.
Once you set a supervisor password, you must enter it before you can enter BIOS
Setup, access the system at startup, or resume from Suspend or Save -to-File, depending
on your configuration selection.
Establishing Passwords
To establish password protection for entering the BIOS Setup utility or accessi ng the
system at startup, you must set the supervisor password before setting a user password.
!
To enter a password simp ly select Assign Supervisor Password, enter the password,
re-enter the password to confirm, a nd press any key to continue. Repeat the
procedure to set the user password.
!
To initiate password protection while you step away from your system, simply press
Ctrl, Alt, Backspace
lock LEDs alternately flash indicating that you must enter a password to resume
operation.
In Windows 98, the supervisor and user passwords are only valid when resuming from
Save-to-File. To establish password protection for resuming from Standby or
Hibernation modes you must do the following:
or Suspend/Save-to-File the system. The Caps lock and Scroll
!
Set a Windows password in Control Panel, Password Properties, Change
Passwords.
!
Enable the option “Prompt for password when the computer goes off standby,” in
Control Panel, Power Ma nagement Properties, Advanced.
Hard Disk Drive Passwords
Your NEC Versa allows you to establish password pro tection for the internal hard disk
drive. Hard disk drive (HDD) password protection restricts access to the drive, only if
the drive is removed from your NEC Versa and installed in anot her system. You are not
prompted to enter your hard disk drive passwords while the drive remains in your
current system.
The HDD passwords are written to the system BIOS and to the hard disk drive to
ensure that the password protection travels with the drive when moved from syste m to
system.
Using the BIOS Setup Utility 3-9
Page 50

Establishing Hard Disk Drive Passwords
To establish password protection for your system’s hard disk drive you must establish a
master password, establish a user password, and enable the established passwords for
the internal HDD. Follow these steps to establish HDD passwords and to enable HDD
password protection.
1.
Enter the BIOS setup, highlight and select the System Security Setup.
2.
Highlight Assign HDD Password and press
The system prompts you to enter a master password.
3.
Enter a master HDD password and press
The system prompts you to enter the password again to verify.
4.
Enter the master password and press
The system confirms the creation of the master password and prompts you to enter
a user password.
5.
Enter a user password and press
The system prompts you to enter the password again to verify.
6.
Enter the user password and press
7.
Highlight and select Internal HDD Password and use the
enable the selection. (This enables password protection for the internal HDD.)
Changing Hard Disk Drive Passwords
To change hard disk drive passwords, enter the System Secur i ty Setup, highlight
Internal HDD Password and enter the current password that you wish to change. If you
enter the current master password, you are prompted to enter a new master password. If
you enter the current user password, you are prompted to enter the new user password.
If you do not wish to establish a new master or user password, press
entering a new password.
Enter
Enter
Enter
.
.
Enter
Enter
.
.
.
PgUp/PgDn
Esc
instead of
keys to
Using Hard Disk Drive Password Protection
To facilitate the transfer of one or more HDDs between system, establish a single
master password (and document the password in a secure place). Establish different
user passwords to limit access to specific systems.
3-10 Using the BIOS Setup Utility
Page 51

Moving the Hard Disk Drive
When a password protected HDD is moved from its original system and installed in
another system, error messages appear indicating that the drive is locked. Next, the
Security Setup screen appears requiring the user to enter the master password to unlock
the drive. Highlight the HDD password line and enter the master password, when
prompted.
If you wish to move an HDD from one system to another, follow steps 1 through 6 in
the section, “Establishing Hard Disk Drive Passwords,” before installing the HDD in a
different system. Install the HDD in the desired system then follow step 7 to establish
HDD protection.
To take advantage of HDD password protection in another system, the system must be
equipped with the same HDD password protection feature. To determine if the system
has HDD password, check the System Security Setup in the BIOS setup to see if there
are provisions for establishing HDD passwords.
Power Management Setup
Use the Power Management Setup to balance high performance and energy
conservation.
Power Management Setup
Parameter Default
Setting
System Switch Power Button Sleep Button
Power Management
under AC
Power Savings Level Longest Life High Perform/Custom/Off
CPU Speed Control 100% 12.5, 25, 50%
Hard Disk Timeout
Video Timeout
Peripheral Timeout
Audio Device Timeout
Standby Timeout
Auto Suspend Timeout
LCD Suspend Disabled Enabled
1
1
1
1
Off On
2 minutes 5/30/45 sec; 1/4/6/8/10/15 min.
2 minutes 30/45 sec.; 1/4/6/8/10/15 min.
On Off
1
On Off
4 minutes Off/1/2/6/8/10/15 min.
1
10 minutes Off/5/15/20/25/30 min.
Alternate Setting(s)
Off
Off
Using the BIOS Setup Utility 3-11
Page 52

Power Management Setup
Parameter Default
Alternate Setting(s)
Setting
Suspend Option Suspend STF
Auto Save-to-File Enabled Disabled
Panel Brightness Auto User Defined
Suspend Warning Tone Enabled D isabled
Remote Power On Disabled Enabled
Wake Up Alarm Disabled Enabled
Resume Alarm Time
2
Off Set time in 5 min. increments when
Wake Up Alarm is set.
1
Available when power savings is set to Custom
2
Resume alarm time is selectable when wake up from suspend alarm is set
!
System Switch — Sets the Power button as a power switch or a sleep button.
!
Power Management Under AC — Specifies whether to enable power manageme nt
.
.
features when AC power is in use. When AC power i s connected to your NEC
Versa system, power management is usua lly disabled . If you enable this parameter,
the system automatically activates the power management profile you set, even
when AC power is used.
!
Power Savings Level — Spe cifies one of four levels o f power management.
— High Performance — provides good battery life and best performance with only
minimal power conservation Use while on the road or traveling short distances.
— Longest Life — provides best battery life, the maximum amount of power
savings, and good performance. Use while traveling long distances.
— Off — disables power management and all device timeouts. Works well in an
office environment while powering your NEC Versa with AC power.
— Custom — lets you define power management levels and specific device
timeouts according to your own needs and present environment. Custom lets
you set the following timeouts.
3-12 Using the BIOS Setup Utility
Page 53

Custom Timeout Options
Option Definition
CPU Speed Control Sets CPU performance at one of four levels.
Hard Disk Timeout Sets the time delay before your hard disk powers
down.
Video Timeout Sets whether to timeout the video or not.
Peripheral Timeout Sets whether to timeout the peripheral or not.
Audio Device
Timeout
Sets the time delay before your audio device powers
off.
Standby Timeout Selects the system standby timeout period.
Auto Suspend
Timeout
Defines how much time elapses from the time the
system enters Standby mode to the time the system
automatically enters Suspend Mode.
!
LCD Suspend — Allows you to suspend the system when the LCD panel is closed.
!
Suspend Option — Specifies either Suspend or Save to File (STF) as the default
power management mode. For details about using this parameter, see the section,
“Managing System Power,” later in this chapter.
!
Automatic STF — Enables the system, after 30 minutes in Susp end mode, to save
the current working environment to a special file on the hard disk and to power
down the system.
If Auto Save to File is set to Off and the save-to-file area is presen t on your hard
drive, pressing the
Fn-Power/Sleep
key combination puts the system into Save to
File mode. For details about using this parameter, see the section, “Managing
System Power,” later in this chapter. For details about creating the save-to-file area,
see the section, “HDPREPEZ Utility,” in Chapter 4.
!
Panel Brightness — Selects t he LCD screen brightness.
!
Suspend War ni ng Tone — Spec i fi es whether the system warning tone sounds when
Suspend mode starts. It is best to keep this option enabled.
!
Wake Up from Suspend Alarm/Resume Alarm Time — Allows the alarm to wake
up the system from Suspend. Designates the ti me parameter in five minutes
increments.
Using the BIOS Setup Utility 3-13
Page 54

Boot Device Setup
Boot Device Setup allows you to define the following functions.
Parameter Default Setting Alternate Setting(s)
Quick Boot Enabled Disabled
Silent Boot Enabled Disabled, Black
Boot Display Device Simul. Mode CRT only, LCD only
BootUp NumLock Auto On, Off
st
1
Boot Device
2nd Boot Device
3rd Boot Device
4th Boot Device
Try Other Boot Devices Yes No
1
Bootable device when set to IDE hard drive. Only one IDE device is bootable
!
Quick Boot — Specifies whether or not the system performs all tests during system
boot.
!
Silent Boot — Specifies whether or not to display the NEC logo during the system
boot.
Boot Device Setup
1
CD/DVD
Disabled,1
CD/DVD,SCSI,Network
1
1
1
Floppy Disabled,1st Fnd IDE,CDROM
1st Fnd IDE Disabled,Floppy,CD/DVD
Disabled Floppy,CD/DVD,1st Fnd IDE
st
Fnd IDE,Floppy
.
!
Boot Display Device — Specifies the display device(s) for system boot messages.
!
BootUp NumLock — Specifies whether NumLock is On or Off at system startup.
!
Boot Devices — Specifies the sequence of boot devices and whether or not the
system attempts to boot from a device other than those specified.
!
Other Boot Devices — Allows you to specify IDE devices as bootable devices.
3-14 Using the BIOS Setup Utility
Page 55

Peripheral Setup
The Peripheral Setup menu displays the connection locations between the system and
the Input/Output (I/O) ports and lets you specif y different port assignments as needed.
Parameter Default Setting Alternate Setting(s)
USB Controller Disabled Enabled
AC’97 Audio Enabled Disabled
Internal Hard Drive Enabled Disabled
Serial Port Auto Disabled/(PnP OS Setup
Peripheral Setup
COM1,IRQ4/COM2,IRQ3
COM3,IRQ4/COM4,IRQ3
1
)
Parallel Port Auto Disabled/LPT1/LPT2
(PnP OS Setup
1
)
Parallel Mode Bi-Directional Uni-Directional/ECP/EPP
IR Serial Port Dis a bled Auto/(PnP OS Setup
1
COM2,IRQ3/COM3,IRQ4/
COM4,IRQ3
1
Appears only when configured by the Windows 98 or Windows 95 device manager.
Peripheral Setup allows you to define the following functions.
!
USB Controller — Enables or disables the USB controller.
!
AC’97 Audio — Enables or disables the internal sound.
!
Internal Hard Drive — Enables or disables the internal hard drive.
!
Serial Port — Disables the port or changes its address assignment.
!
Parallel Port/Parallel Mode — Disables or reassigns the parallel port and select a
parallel port mode.
!
IR Serial Port — Enables, disables, or reassigns the IR serial port.
)
Using the BIOS Setup Utility 3-15
Page 56

Other BIOS Setup Options
BIOS Setup offers other options, including the following:
!
Change Lan guage Setting — Controls the BIOS setup la nguage display. English
and Japanese are the available options.
!
Refresh Battery — Launches the Refresh Battery utilit y. Once la unc hed, the utility
fully discharges your battery to eliminate any residual memory effect. Once
refreshed, your battery is conditioned to recharge to its full capacity. To recharge
the battery, connect your NEC Versa to AC power. This process may take up to
four hours to complete.
!
Auto Configuration with Defaults — Load s default settings.
!
Save Settings and Exit — Accepts changes made to current settings, saves to
CMOS, and exits BIOS Setup.
!
Exit Without Saving — Reverts to previously selected settings and exits Setup.
Managing System Power
In the Windo ws 9 8 environment, your NEC Versa manages it s power resources using
the Advanced Configuration and Power Interface (ACPI) while the system is powered
on using AC or battery (DC) power. ACPI enables the operating system to manage the
power given to each attached device and to turn off a device when not in use.
In the Windows 95 environment, your NEC Versa uses the Advanced Power
Management (APM) utility to manage and conserve power while the system is powered
on using AC or battery power.
Take advantage of the opportunity to manage power on your system to:
!
Minimize battery drain.
!
Preserve the life of your NEC Versa.
!
Save time. When you return from that urgent call or meeti ng, you don’t have to
reboot, just press the Power button to resume system operation.
Windows 98 Power Management Properties
In Windows 9 8, most ACPI power management setting s are controlled through
Windows Power Management Proper ties, not through the BIOS Setup utility, unless
otherwise noted. To access Windows Power Management Properties, go to Start,
Settings, Cont rol Panel, a nd double clic k Power Management.
3-16 Using the BIOS Setup Utility
Page 57

The Power Management Properties features are broken down as follows:
!
Power Schemes
!
Alarms
!
Power Meter
!
Advanced
!
Hibernate
Windows 98 Power Schemes
Use the Power Schemes options to define the appropriate Power scheme for your
system, and to set timeouts for standby, LCD panel, and hard disk. Define parameters
for your system when r unning under AC (plugged in) or DC (running on batteries)
power.
Parameter Default Setting Alternate Setting(s)
Power Schemes Portable/Laptop Home/Office Desk,
Power Schemes
Always On
System Standby
(Plugged In)
System Standby
(Running on batteries)
Turn off monitor
(Plugged In)
Turn off monitor
(Running on batteries)
Turn off hard disks
(Plugged In)
Turn off hard disks
(Running on batteries)
After 20 Minutes 1, 2, 3, 5, 10, 15, 20, 25,
30, 45 minutes; 1, 2, 3, 4,
5 hours; Never
After 5 Minutes
1, 2, 3, 5, 10, 15, 20, 25,
30, 45 minutes; 1, 2, 3, 4,
5 hours; Never
After 15 Minutes 1, 2, 3, 5, 10, 15, 20, 25,
30, 45 minutes; 1, 2, 3, 4,
5 hours; Never
After 2 Minutes 1, 2, 3, 5, 10, 15, 20, 25,
30, 45 minutes; 1, 2, 3, 4,
5 hours; Never
After 30 Minutes 3, 5, 10, 15, 20, 25, 30, 45
minutes; 1, 2, 3, 4, 5
hours; Never
After 3 Minutes
3, 5, 10, 15, 20, 25, 30, 45
minutes; 1, 2, 3, 4, 5
hours; Never
Using the BIOS Setup Utility 3-17
Page 58

!
Power Schemes — Defines t he most appropriate power scheme for yo ur computer.
!
System standby — Selects the system standby timeout period for your system when
running under AC or DC power.
!
Turn off monitor — Selects the time delay before your LCD p a nel turns off.
!
Turn off hard disks — Selects the time delay before your hard disk(s) power down.
Windows 98 Alarms
Use the Alarms screen to define the point at which the battery alarm activates. Define
the alarm to either sound, display a warning message, or invoke Standby, Hibernate or
Shutdown.
Parameter Default Setting Alternate Setting(s)
Low battery alarm 10% 0-100%
Alarm Action Notification Display message Sound alarm
Alarm Action Power level none Standby, Hibernate,
Critical battery alarm 3% 0-100%
Alarms
Shutdown
Alarm Action Notification Display message Sound alarm
Alarm Action Power level Standby Hibernate, Shutdown,
!
Low battery alarm — Allows you to define a low battery alarm percentage,
notification, and system action.
!
Critical battery alarm — Allows you to define a critical battery alarm percentage,
notification, and system action.
Windows 98 Power Meter
The Power Meter screen displays the remaining battery power and charging status for
the primary and secondary batteries. Choose to display either a percentage progress bar
or a battery icon with percentage indicator for your battery status information.
3-18 Using the BIOS Setup Utility
none
Page 59

Windows 98 Advanced
The Advanced window allows you to select behaviors for the taskbar ico n, standby
password, LCD panel, when closed, and the Power button.
Parameter Default Setting Alternate Setting(s)
Advanced
Always show icon on
checked unchecked
taskbar
Prompt for password
unchecked checked
when computer goes off
standby
Hibernate, Shutdown,
When I close the lid on my
computer
When I press the Power
Standby
Shutdown
1
None
Standby, Hibernate
button on my computer
1
When None selected, LCD panel turns off when closed.
!
Always show icon on the taskbar — determines whether or not the Power Meter
icon displays on the taskbar.
!
Prompt for password when computer goes off standby — Determines whether or
not the system prompts for your Windows password when resuming from Standby.
!
When I close the lid of my computer — Defines the system act ion when the LCD
panel is closed.
!
When I press the Power button on my computer — Defines the system action when
the Power button is used.
Windows 98 Hibernate
Use the Hibernate window to enable hibernate support. When your system hibernates it
performs a save-to-disk or save-to-file (STF). Your current working environment is
saved to the hard disk. Use the Power button to resume from hibernation and your
system returns to its previous state.
Using the BIOS Setup Utility 3-19
Page 60

Windows 98 Power Management States
ACPI uses different le vels or states of power management. The power management
states occur automatically, based on the system’s default settings, or manually, when
invoked. Settings are configurable to occur while on battery power or AC power.
The Windows 98 ACPI power management states include:
!
LCD timeout — manages power at the lowest level by shutting down the LCD.
!
Standby — also known as Save-to-RAM (STR), Standby manages power by saving
your curren t working environment to memory and shutting down most system
devices. Conserves more power than an LCD timeout.
!
Hibernate — also known as save-to-disk, or save-to-file (STF) manages power by
saving the current working environment to an area on your hard disk, then powering
off your system. Conserves the most bat tery power.
Recognizing the Windows 98 Power Management States
It is important to recognize your system’s behavior when in each of these power
management states. The following table describes the system behavior for each power
management state.
Windows 98 Power Management Behavior
LCD Timeout Standby (STR) Hibernate (STF)
Default
2 Minutes, DC power
5 Minutes, DC power
30 minutes after Standby.
Setting
Manually
Invoke
System
behavior
15 Minutes, AC power
Close LCD panel. Go to Start, Shutdown,
LCD panel is blank.
Status LED lights
green.
20 minutes, AC power
Standby.
LCD panel is blank.
Status LED blinks green.
Close LCD panel.
Press Power button.
LCD panel is blank.
Status LED turns off.
Progress bar indicates that
current working
environment saved to hard
disk.
Resume
Press any key. Press Power button. Press Power button.
Progress bar appears
during process.
1
Only when BIOS “Suspend Option” set to STF and BIOS “Auto Save to File” set to enabled.
2
Also when 3% battery power remaining, if BIOS set as in number 1.
3
Only when set in Advanced Windows Power Management Properties.
3-20 Using the BIOS Setup Utility
1,2
3
3
Page 61

Windows 95 Power Management States
APM uses different levels or states of power management. These power management
states occur automatically, based on your system’s default settings, or manually, whe n
invoked. Settings are configured to occur while on battery power or on AC power.
The Windows 95 APM power management states include:
!
Standby — manages power at the lowest level by shutting down the LCD, hard disk
drive, and CPU.
!
Suspend — also known as Save-to-RAM (STR), Suspend mode manages power by
saving your current working environment to memor y and shutting d own most
system devices. Conserves more power than Standby mode.
!
Save-to-file (STF) — also known as save-to-disk, STF mode manages power by
saving the current working environment to an area on your hard disk, then powering
off your system. Conserves the most bat tery power.
Recognizing the Windows 95 Power Management States
It is important to recognize your system’s behavior when in each of these power
management states. The following table describes the system behavior for each power
management state.
Windows 95 Power Management Behavior
Standby Suspend (STR) Save-to-File (STF)
Default
4 Minutes 10 minutes after Standby 30 minutes after Suspend
Setting
Manually
invoke
Fn-F4
Press Power button for less
than 4 seconds
2
or
Click Start, Suspend
System
behavior
LCD panel is blank.
Status LED lights
green.
LCD panel is blank.
Status LED blinks green.
Progress bar indicates that
current working environment
saved to memory.
Resume
Press any key Press Power button.
Progress bar appears during
process.
1
Must configure Suspend Option in BIOS as STF.
2.
Must configure System Switch in BIOS as Sleep button.
3
Standby when there is only 3% power remaining in the system.
Using the BIOS Setup Utility 3-21
1,3
Fn-Power
1,2
LCD panel is blank.
Status LED turns off.
Progress bar indicates that
current working environment
saved to hard disk.
Press Power button.
Progress bar appears during
process.
Page 62

Updating the BIOS
The BIOS is code transmitted onto your system’s microprocessor, or central processing
unit (CPU). As indicated in this chapter, you use the BIOS Setup utility to configure
your system’s software and hardware features. Use the BIOS Update Diskette, for your
specific model, only, to update your NEC Versa system BIOS.
Note
or fixes to the current system BIOS. Your authorized NECC dealer or NECC Support
Services representative can help you determine this.
You only need to update the BIOS if NECC makes significant improvements
To update the system BIOS you must:
!
Obtain the BIOS Update
!
Prepare the BIOS Update Diskette
!
Perform the BIOS Update
Obtaining the BIOS Update
If you are informed that the default BIOS needs an update contact the NECC Support
Services at (800) 632-4525, Fax (801) 981-3133, or access the web site, www.neccomputers.com to obtain a copy of the BIOS update.
Note
please contact a local NECC or dealer in your country.
If you purchased and are using this computer outside the U.S. or Canada,
3-22 Using the BIOS Setup Utility
Page 63

Preparing the BIOS Update Diskette
Before usi ng the BIOS update diskette you must ma ke the diskette BIOS flash ready.
Refer to the readme.txt file on the diskette before using the diskette.
Follow these instructions to prepare the BIOS Update Diskette.
1.
Scan your hard drive for any computer viruses.
2.
Enable the diskette for write access.
3.
Insert the diskette into the diskette drive.
4.
Type a:install at the DOS prompt and follow the on-screen instructions.
Install.bat copies the DOS system files from your hard drive onto the BIOS Update
Diskette to make it BIOS flash ready.
The system prompts you when the process is complete.
5.
Scan the BIOS Update Diskette for computer viruses.
The diskette is ready for use.
Performing the BIOS Update
Follow these steps to perform the BIOS update.
1.
Make sure that the computer is operating under AC power and that the power is
off. Insert the BIOS Update diskette into the diskette drive.
2.
Power on the computer with the diskette in the drive. The computer boots and
automatically loads the utility. A message similar to the following appears:
The NEC BIOS Update Utility should not be used to modify the BIOS in a Versa
system which is docked. If your Versa is docked, please exit the BIOS Update
Utility, power down, and undock your Versa before running the utility. Plug in your
AC cable before restarting the flash utility.
Press
Enter
to continue.
3.
The utility checks the currently installed BIOS version and the diskette’s BIOS
version. The Main menu ap pears.
4.
Use the arrow keys to highlight the “Display BIOS Version” option on the Main
Menu. Use this option to check the currently installed BIOS version and the
version of the new repla cement BIOS.
Press any key to return to the Main menu.
5.
Highlight the “Install New BIOS” option and press
Enter
.
Using the BIOS Setup Utility 3-23
Page 64

6.
Press Y and then press
Enter
. After a brief pause, a message appears telling you to
remove the diskette from the drive.
7.
Remove the diskette and press any key to continue. The utility updates the BIOS.
Power off your computer . The next time you power on your computer, you will
have the latest NEC Versa VX computer BIOS revision level.
8.
Enter Setup to restore the default parameter setti ngs.
9.
Be sure to modify any custom settings that you may have configured.
Identifying the Switch Settings
A six-position dip switch is located on the bottom of the system. The switch is
accessible by removing the access panel beneath the CD-ROM drive. The following
list identifies each switch setting and its function.
!
Switch 1, Password override — The default setting is “OFF.” I f you forget your
password and cannot access the data on your NEC Versa, change the setting to
“ON” and your current password is erased.
!
Switch 2 — Keyboard select; Default is “ON” for U.S. 85 key keyboard .
!
Switch 3 — Reserved for factory use; Default is “ON.”
!
Switch 4 — Keyboard select; Default is “ON” for U.S. 85 key keyboard .
!
Switch 5 — Password enable; Default is “OFF” (Personal Code Setting utility).
!
Switch 6 — Logo select; Default is “OFF” for U.S.
Default switch settings
3-24 Using the BIOS Setup Utility
Page 65

Using the Operating System and Utilities
Windows Introduction
!
NEC Customize Utility
!
HDPREPEZ Utility
!
Application and Driver CD
!
Personal Code Setting Utility
!
DVD Player
!
NEC Info Center
!
Partition Magic
!
Product Recovery CD
!
4
Page 66

Windows Introduction
Your NEC Versa comes pre-installed with either the Windows 98 Second Editio n (SE),
Windows 95, Windows NT, or Windows 2000 (when available) operating system.
These Microsoft
navigating through your file structure, and using your notebook computer. Each
operating system offers its own look and employs its own tools through an easy-to-use
graphical interface.
Windows 98 Second Edition
Windows 98 gives you the new est featur es offered b y Microsoft, inc luding a De sktop
with room to maneuver, a taskbar for quick access to a variety of system functions,
state-of-the-art plug and play support, powerful system utilities, enhanced
entertainment features, and a fully integrated Internet experience.
Desktop Icons
With Windows 98, the following icons are installed on your desktop:
!
My Computer — Provides access to drives, printers, the control panel, network
features, and scheduled tasks.
!
Recycle Bin — Gives you a trash container in which to put and discard unwanted
files or allows you to restore those same files back to their original location.
!
Setup MSN Internet Access — Provides a setup program that allows you to sign-up
for the Microsoft Network. If you already have an account, use this interface to
sign-on to the Microsoft Network.
®
operating systems provide a means of running applications,
!
Network Neighborhood — Appears when your computer is connected to a network.
Use the network neighborhood to browse through the computers in your workgroup
and the computers in the entire network.
!
My Briefcase — Provides a mechanism for file synchronization between the NEC
Versa and another system.
!
My Documents — Provides you with a convenient place to store documents,
graphics, and other files for quick access.
!
Connect to the Internet — Runs the Internet Connectio n wizard that helps you to set
up your computer to access the Internet.
Note
and a working phone line to your system or install a LAN card for network access.
!
Before connecting to the Internet, you must either connect an optional modem
Online Services — Includes setup icons fo r a variety of o nline services.
4-2 Using the Operating System and Utilities
Page 67

Your NEC Versa comes with all the software you need to get started on the most
popular services available today. For a fee, online services give you access to the
Internet, email, the world wide web, travel information, news reports, and more.
Note
optional modem to your system and to a working phone line. The phone line must be
analog. If you are unsure what type of line you have, call your local phone company.
If you are using this product outside of the United States or Canada, some online
services may require a long-distance or international call.
!
!
!
Taskbar Icons
With Windows 98, a number of icons appear on the taskbar. Use the cursor to hover
over the icon and display its function, right click the icon to display its menu options,
or double click the icon to launch it.
The following icons normally appear on the left side of the Windows 98 taskbar.
!
!
Before choosing and registering for an online service, you must connect an
NEC Customize — Gives you the option to launch the Application and Driver CD.
Outlook Express — Provides your default email program with secure and
personalized features for email and newsgroup communication. Also access
Outlook Express under Start, Programs, Outlook Express.
Internet Explorer — Provides your default internet program. Also access Internet
Explorer under Start, Programs, Internet Explorer.
Internet Explorer — Allows you to browse the internet or view local HTML files.
Also access Internet Explorer under Start, Programs, Internet Explorer.
Outlook Express — Provides your default email program with secure and
personalized features for email and newsgroup communication. Also access
Outlook Express under Start, Programs, Outlook Express.
!
Show Desktop — Minimizes all active screens to display your desktop.
The following icons normally appear on the right side of the Windows 98 taskbar.
!
Task Scheduler — Enables you to schedule tasks, such as Disk Defragme nter, to
run regularly. Also access Task Scheduler under Start, Programs, Accessories,
System Tools, Scheduled Tasks.
!
Power Management Properties — Displays your current power source and total
remaining battery power. Access Power Management Properties under Start,
Settings, Cont rol Panel, Power Management.
!
Infrared Monitor — Allows you to enable, disable, and control the infrared
communication on your notebook computer.
Using the Operating System and Utilities 4-3
Page 68

!
!
!
For more information about the desktop and taskbar icons, refer to the Windows 98
online help.
Windows 95
Windows 95 gives you features offere d by Microso ft , including a D esktop wit h room to
maneuver, a taskbar for quick naviga tion between open windows, plug and play
features, online net working functions, and more.
When you install Windows 95, the following icons are lo aded on your desktop:
!
!
!
NEC VersaGlide — Allows you to adjust your VersaGlide (mouse) p r operties. Also
access NEC VersaGlide under Start, Settings, Control Panel, Mouse.
Volume Control — Adjusts the volume and speaker balance when you play audio
files. Also access Volume Control under Start, Programs, Accessories,
Entertainment, Volume Control.
Time Clock — Allows you to adjust the time and date, rearrange active wi ndows on
your desktop, create a new toolbar or customize your existing toolbar.
My Computer — Provides access to drives, printers, the control panel, and network
features.
Inbox — Lets you access the Microsoft fax and mail software as well as Microsoft
network services.
Recycle Bin — Gives you a trash container in which to put unwanted fi l es.
!
Network Neighborhood — Appears when your computer is connected to a network.
Use the network neighborhood to browse through the computers in your computers
in your workgroup and the computers in t he e ntire network.
!
My Briefcase — Allows easy transfer of files between the NEC Versa and another
system.
!
Online Services — Includes setup icons fo r a variety of o nline services.
!
The Microsoft Network — Allows you to use the Microsoft Network to access the
outside world.
Your NEC Versa comes with all the software you need to get started on the most
popular services available today. For a fee, online services give you access to the
Internet, email, the world wide web, travel information, news reports, and more.
4-4 Using the Operating System and Utilities
Page 69

Note
optional modem to your system and to a working phone line. The phone line must be
analog. If you are unsure what type of line you have, call your local phone company.
If you are using this product outside of the United States, some online services may
require a long-distance or international call.
!
See the Windows 95 online help for detailed instructions on using Windows 95.
Windows NT
Windows NT allows you to run applications created specially for Windows NT and
Windows 95. You can also run applications created for other versions of Windows,
MS-DOS
Windows NT gives you a vari ety of feat ures offered by Microsoft, including a desktop
to maneuver, a taskbar for quick na vigation between open win dows, and more. The
following icons appear on the desktop.
!
!
!
!
!
!
!
Before choosing and registering for an online service, you must connect an
NEC Customize — Gives you the option to launch the Application and Driver CD.
®
.
My Computer — Provides access to drives, printers, the Control Panel, and network
features.
Network Neighborhood — Appears when your computer is connected to a network.
Use the network neighborhood to browse through the computers in your computers
in your workgroup and the computers in t he e ntire network.
Inbox — Lets you access the Microsoft mail software and services.
Internet Explorer — Allows you to browse the internet or view local HTML files.
Also access Internet Explorer under Start, Programs, Internet Explorer.
NEC Customize — Gives you the option to launch the Application and Driver CD.
My Briefcase — Allows easy transfer of files between the NEC Versa and another
system.
Recycle Bin — Gives you a container in which to put unwa nted files.
NEC Customize Utility
In Windows 98 s yste ms, Windows 95 syste ms, and Windows NT systems, the NEC
Customize utility gives you the option t o launch:
!
NEC custom wallpaper (Windows 95 or Windows 98, only )— Installs wallpaper
displaying t he NEC logo.
!
Application and Driver CD — Installs software applications, dr ivers, etc.
!
NEC-supplied mouse driver — Takes advantage of the VersaGlide features.
Using the Operating System and Utilities 4-5
Page 70

The NEC Customize utility screen consists of the following.
!
A window at the top half of the screen lists the available options.
!
The window below the options list displays a description of eac h option when the
option is highlighted.
!
The Launch button initiates a selected option when clicked.
!
The More Info button provides an overview of the NEC Customize utility.
!
The Exit button closes the NEC Customize utility.
Using the NEC Customize Utility
Follow these steps to use the NEC Custo mize utility.
1.
Double click the NEC Customize icon.
2.
From the display window, select the desired op tion.
3.
Click Launch to initiate the selected option.
4.
Follow the on-screen instructions to process the selected option.
For some of the selected options you are prompted to reboot your system.
5.
If necessary, click Exit to close the NEC Customize dialog box.
HDPREPEZ Utility
Using the HDPREPEZ utility automatically configures your NEC Versa’s system’s
save-to-file (STF) area on the hard disk drive.
Note
the NECUTILS/HDPREP directory.
Using HDPREPEZ in Windows 98 or 95
In Windows 98 or 95, run the HDPREPEZ utility if you increase the memory capacity
in your NEC Versa beyond the factory installed base memory.
Follow these steps to run the HDPREPEZ utility.
1.
2.
4-6 Using the Operating System and Utilities
For more details about the HDPREPEZ utility, see the HDPREPEZ.TXT file in
Power off and restart your NEC Versa.
At the statement “Starting Windows 98 (or 95),” press F8.
Page 71

3.
From the Startup menu, select the “Safe Mode Command Prompt Only” option.
4.
Enter MS-DOS. At the c: prompt, type
cd \necutils\hdprep
and press
change to the \necutils\hdprep directory.
5.
Type
HDPREPEZ
and press
Enter
. The utility automatically prepares your NEC
Versa for the newly installed memory.
6.
Power off your system and then power on. A file, large enough to accommodate
your system’s memory is created on the hard disk drive.
Application and Driver CD
A variety of third-party software applications, drivers, utilities, inter net br owsers, and
the NEC Info Center are provided on the Application and Driver (A&D) CD that ships
with your NEC Versa VX system. Some of the drivers are already installed as part of
your operating system environment. The additional soft ware on the Application and
Driver CD lets you take fu ll advantage of your system resources.
Use the Application and Driver CD to install the software of your choice. Some
software applications install their own desktop icon allowing quick access to the
application. You can also access an application through the Start, Programs menu.
Launching the Application and Driver CD with Windows 98/95
Follow this procedure to launch the Application and Driver CD using NEC Customize
with Windows 98 and Windows 95.
Enter
to
1.
Insert the Application and Driver CD into the CD-ROM or DVD-ROM drive.
2.
Double click the NEC Customize icon, if necessary.
3.
Highlight Application and Driver CD.
4.
Click launch.
The Application and Driver CD dialog box appears.
Launching the Application and Driver CD with Windows NT
Follow this procedure to launch the Application and Driver CD using NEC Customize
with Wi n dows NT.
1.
Insert the Application and Driver CD into the CD-ROM or DVD-ROM drive.
2.
Double click the NEC Customize icon.
3.
Select Application and Driver CD.
Using the Operating System and Utilities 4-7
Page 72

4.
Click Install to launch the CD.
The Application and Driver CD dialog box appears.
Application and Driver CD Dialog Box
The Application and Driver CD dialog box consists of the following components.
!
Selection Tabs — Located just below the title bar, each tab represents a software
category. The selection tabs include applications, drivers, utilities, internet
browsers, and the NEC Info Center.
!
Description — Located in the bottom portion of the dialog box, the text describes
the selected or highlighted software category or application, driver, etc.
!
Install — Clicking the Install button installs the selected software.
!
Exit — Clicking the Exit button closes the Application and Driver CD dialog box.
Installing the A&D Software
Once the Application and Driver CD dialog box appears, follow these steps to install
the desired software.
1.
Click the selection tab of your choice.
2.
Click the desired application, driver, or utility.
3.
Click the Install button to install your selec tion.
Follow the on-screen instructions to install your selection.
4.
Click Exit to close the Application and Driver CD dialog box.
5.
Remove the CD from the CD-ROM drive when the installat ion is complete.
Personal Code Setting Utility
Use the Personal Code Setting utility along with the personal code buttons on the
NEC Versa VX (available on some systems) to set a personal code and secure the
system. Once the personal code is set, the system will not boot until you enter the
personal code. Use the following procedures to install the utilit y and set up your
personal code.
4-8 Using the Operating System and Utilities
Page 73

Installing the Personal Code Setting Utility
Use the following steps to install the Personal Cod e Setting utility.
1.
Double click the Personal Code Setting utility icon on the desktop.
The Personal Code Setting Utility Setup screen appears.
2.
Click Next to start setup. The Target Folder dialog box appears.
3.
Click Next to select the default target folder.
A prompt to create the default target folder appears. Click Yes.
4.
Click Finish to exit Setup.
Setting a Personal Code
Use the following procedure to set a personal code.
1.
From the Windows Start menu, select Programs, Personal Code, and then Personal
Code Setting Utility.
The Personal Code Setting utility screen appears. This screen allows you to set
your personal code. The personal code can be up to 5 digits.
2.
Click on one number from each row for each digit of your personal code. Press
Enter
when done.
3.
A dialog box appears asking if you want to enter the personal code. Click Yes.
4.
A dialog box appears stati n g the new personal code has been entered. Click OK.
5.
Click Exit to exit the Personal Code Setting utility.
To test your personal code, fully shutdown the system. (Do not select Shutdown and
Restart.) Power on the system using the Power button. A green LED next to the
personal code buttons lights and the screen remains black. Enter your personal code
using the personal code buttons and press the personal code Enter key. The system
boots when the correct code is entered.
The utility also lets you erase your current personal code and enter a new personal
code. There is an Options button that allows you to set system sounds, siren and beeps,
to alert you that a correct or an incorrect personal code has been entered.
Using the Operating System and Utilities 4-9
Page 74

DVD Player
DVD Player allows you to play DVD movies in your DVD-ROM drive. Use the
following procedure to install DVD Player.
Note
1.
Disable power management when using DVD Player.
Insert the ATI Soft DVD CD into the CD-ROM drive. If the CD does not load
automatically, do the following:
!
From the Windows taskbar, select Start and Run.
!
Click Browse to access the files on the CD. Select setup.exe on the CD and
click Run.
2.
Click Next at the Welcome screen.
3.
Click Yes to accept the license agreement.
4.
Click Next to accept the default destination directory.
5.
Highlight your geographical region and click Next.
6.
The installation completes. Click Finish to restar t the system.
To run DVD Player, select Start, Programs, Multimedia, and DVD Player.
NEC Info Center
The Application and Driver CD contains the NEC Info Center, a fully navigational
online document that provides information for the traveling professional and an online
version of this printed user’s guide.
Installing the NEC Info Center
To install the NEC Info Center simply follow the instr uctions, presented earlier in this
chapter, for launching the A&D CD and installing the software. For the most current
version of the NEC Versa VX User’s Guide, periodically c heck our web site at
http://www.nec-computers.com/.
4-10 Using the Operating System and Utilities
Page 75

Uninstalling the NEC Info Center
Use one of the following methods to uninstall the NEC Info Center.
!
Use this method to uninstall the NEC Info Center using the Windows Add/Remove
Programs feature.
1.
Go to Start, Settings, Control Panel, and double click Add/Remove P r ograms.
2.
Use the scroll bar, if necessary, to display the NEC Info Ce nter item.
3.
Highlight N EC Info Center and click the Add/Remo ve button.
4.
Select Automatic as the uninstall method and click Next.
5.
Click Finish to complete the uninstall.
6.
When the uninstall is complete, click OK and close the Control Panel window.
!
Use this method to uninstall the NEC Info Center usi ng the Wise uninstall feature.
1.
Access the C:\NEC INFO directory on your hard disk drive.
2.
Double click the
associated with the NEC Info Center.
Partition Magic
Dividing the hard disk drive into several partitions lets you efficiently organize
operating systems, programs, and data. Partition Magic, included on the A&D CD that
ships with your system, allows you to optimize hard disk drive space with an easy click
of the mouse. Visually create, format, shrink, expand, and move hard disk partitions in
minutes.
Your NEC Versa ships with an internal hard disk drive consisting of a single FAT 32
partition, drive C:. Use Partition Magic if you want to create multiple partition s and
convert your hard disk drive to FAT 16 partitions.
notes on the Application and Driver CD. The cautionary notes contain important
information about designating the partitions on the hard disk drive.
The partitions must be properly designated before using the Product Recovery CD to
reinstall your operating system. If the partitions on the hard disk drive are not properly
designated, it will appear as though data loss has occurred after using the Product
Recovery CD.
unwise.exe
Before using Partition Magic, refer to the associated cautionary
file or icon to remove all files and directories
Using the Operating System and Utilities 4-11
Page 76

Product Recovery CD
The Product Recovery CD includes the following software and diagno stics.
!
The NEC Pr oduct Recover y utility
!
The Laptop Assurance Test
If you determine that you need to restore your system to its initial installation state, or
you want to run system diagnostics to ensure that components ar e fully operational,
follow the instructions given here.
Note
installation state as a last resort. Check the problem checklist in Chapter 10 for
information about solving problems before using the CD. The Product Recovery utility
provides options that either remove or replace existing files, a process that may result in
data loss.
utility and restore the BIOS default settings. Save the default settings before exiting the
BIOS Setup utility.
Only use the Product Recovery utility to restore your system to its initial
Before using the Product Recovery CD, enter the BIOS Setup
Guidelines for Using the Product Recovery CD
Follow these guidelines when using the Product Recovery CD.
!
Use AC po we r .
!
Remove all optional hardware such as PC cards, USB devices, printers, and
monitors.
4-12 Using the Operating System and Utilities
Page 77

Product Recovery CD Options
The Product Recovery CD utility provides you with a number of choices. Move the
cursor over each selection on the NEC Product Recovery utility screen to display a
description of the selection in the window on the right side of the screen.
!
Restore System — Select this option to restor e your hard disk drive to its initial
installation state. Restore System allows you to r estore your system in one of the
followi n g ways.
— Full Disk Drive — Completely rebuilds your hard disk drive, destro ying all
existing data in the process. Once you choose this option, you are prompted to
confirm your choice. When your choice is confirmed, the recovery proceeds
without requiring any intervention or resp onses on your part. Simply walk away
and return in about half an hour.
Note
partition (drive).
Use the Full Disk Drive restore option if your hard disk consists of one
— Partition Only — Lets you preser ve your existing hard disk drive partition
structure and format only the primary partition without affecting the extended
partition(s). Partition Only formats drive C: (o f a multiple partitioned drive) and
restores drive C: to its initial installation state. Additional partitions, e.g., drives
D:, E:, etc., remain intact. For important information about partitioning your
hard disk drive, see the section, “Partition Magic,” earlier in this chapter.
Note
more partitions (drives).
!
Use the Partition Only restore option if your hard disk is partitioned into two or
System Diagnostics — Launches the Laptop Assurance Test that tests the hardware
components and boot records on your hard disk drive.
!
Exit — Exits the NEC Product Recovery utility.
Full Disk Drive Restore
If your preinstalled software becomes unusable and you cannot boot from the hard disk,
use the Product Recovery utility to restore your system to its initial shipping
configuration. The Full Disk Drive restore option erases the hard disk completely
before reinstalling the files.
Using the Operating System and Utilities 4-13
Page 78

The Full Disk Drive restore option deletes all files on the hard
drive and replaces them with the original factory installed files.
Only use the Full Disk Drive restore option if the preinstalled software is unusable.
Use the Product Recovery utility to perform a Full Disk Drive restore as follows:
1.
Check the Product Recovery CD title and make sure that it is the correct CD for
your NEC Versa computer and operating system.
2.
Put the CD into the CD-ROM drive tray, close the drive door, and power on your
system.
3.
Read the License Agreement screen that appears. Use the VersaGlide touchpad to
position the cursor on the Accept button. Left click to accept the agreement.
You have the option of accepting or declining the agreeme nt. If you decline the
agreement, the recovery utility exits.
4.
In the NEC Product Recovery utility screen, use the VersaGlide touchpad to
choose Full Disk Drive to restore your hard disk drive to its original factory
installed state.
Choose your restore option carefully to prevent losing data and
applications installed on your system.
5.
Read the Warning screen.
A warning displays indicating that your hard disk is about to be erased.
6.
Select Continue to perform a Full Disk Drive restore.
If you select Back, the recovery utility returns to the prior screen which has an exit
option.
If you select Continue, a scre en with progress bars displays and lets you know the
progress of the recovery.
Do not turn off or disturb the system during the recovery
process.
4-14 Using the Operating System and Utilities
Page 79

7.
When the recovery process is complete, you are prompted to remove the CD from
the CD-ROM drive and reboot your system.
8.
Press
Enter
, click Reboot, or press
A series of hardware detection screens display, the system reboots and the
Windows Setup screen appears. Follow the on-screen instr uctions to set up
Windows.
You are required to reenter your Microsoft license number.
Partition Only Restore
If your preinstalled software on drive C: on your multiple par titioned drive becomes
unusable and you cannot boot from the hard disk, use the Product Recovery utility to
restore your primary partition to its initial shippin g configuration.
drive consists of multiple partitions and if drive C: contains the operating system and
related drivers. Move all other data and applications to other partitions (drives) or the
Partition Only restore process will erase them completely.
The Partition Only restore option deletes all files on drive C: and replaces them with the
original factory installed files. Only use the Partition Only restore option if the
preinstalled software on drive C: is unusable.
For important information about partitioning your hard disk drive, see the section,
“Partition Magic,” earlier in this chapter.
Alt-R
to reboot your system.
Use the Partition Only restore option only if your hard disk
Use the Product Recovery utility to perform a Partition Onl y resto re as follows:
1.
Check the Product Recovery CD title and make sure that it is the correct CD for
your NEC Versa computer a nd operating system.
2.
Put the CD into the CD-ROM drive tray, close the drive door, and reboot your
computer.
3.
Read the License Agreement screen that appears. Use the VersaGlide touchpad to
position the cursor on the Accept button. Left click to accept the agreement.
You have the option of accepting or declining the agreeme nt. If you decline the
agreement, the recovery utility exits.
4.
In the NEC Product Recovery utility screen, use the VersaGlide touchpad to
choose Partition Only to restore drive C: of a multiple partitioned drive to its
original factory installed state.
Using the Operating System and Utilities 4-15
Page 80

Choose your restore option carefully to prevent losing data and
applications installed on your system.
If the hard disk is configured with multiple or extended partitions you may have to
reinstall some software to restore configuration settings and shared files.
5.
Read the Warning screen.
A warning displays indicating that drive C: (the primary dr ive/partition) is about to
be erased and formatted. It may be necessary to reinstall software to the other
drives (partitions) to reestablish Start Menu lin ks and other configuration
requirements stored on drive C:.
6.
Select Continue to proceed, to perform a Partition Only restore.
If you select Back, the recovery utility returns to the prior screen which has an exit
option.
If you select Continue, a scre en with progress bars displays and lets you know the
progress of the recovery.
Do not turn off or disturb the system during the recovery
process.
7.
When the recovery process is complete, you are prompted to remove the CD from
the CD-ROM drive and reboot your system.
8.
Press
Enter
, click Reboot, or press
Alt-R
A series of hardware detection screens display, the system reboots, and the
Windows Setup screen appears. Follow the on-screen instr uctions to set up
Windows.
You are required to reenter your Microsoft license number.
System Diagnostics
Use the System Diagnostics option to launch the Laptop Assurance Test (LAT). The
LAT tests all system co mponents and boot records to ensure that your system is fully
operational.
Use the Product Recovery utility to launch the LAT as follows.
1.
Check the Product Recovery CD title and make sure that it is the correct CD for
your NEC Versa computer and operating system.
4-16 Using the Operating System and Utilities
to reboot your system.
Page 81

2.
Put the CD into the CD-ROM drive tray, close the drive door, and reboot your
computer.
3.
Read the License Agreement screen that appears. Use the VersaGlide touchpad to
position the cursor on the Accept button. Left click to accept the agreement.
You have the option of accepting or declining the agreeme nt. If you decline the
agreement, the recovery utility exits.
4.
In the NEC Product Recovery utility screen, use the VersaGlide touchpad to
choose System Diagnostics to launch the Laptop Assurance Test (LAT).
A warning displays indicating that you are about to exit the Product Recovery
Utility.
5.
Click Continue to launch the Laptop Assurance Te st.
The LAT setup takes a few minutes to complete.
6.
Press
Enter
to initiate the LAT.
The LAT runs and tests the components and boot records of your system. When
the LAT completes, a test summary displays on the LCD screen.
7.
Press any ke y to continue.
The LAT wind ow displays with a variety of menu selections. Use the arrow keys
to highlight your selection and to display the detailed help text. The LAT menu
selections include the following.
!
Main — Choose Automatic Test, Interactive Test, or Exit.
!
Level 2, 3, and 4 — Choose by individual component test.
!
System Information — Choose from Auto Detection or Year 2000
Compliance.
!
About — Displays the LAT version number.
8.
Once the LAT completes its system diagnostics, choose
9.
At the DOS prompt either:
!
Press
Ctrl, Alt, Del
to reboot your system to the Product Recovery CD utilit y,
Exit
from the Ma in menu.
or
!
Remove the Product Recovery CD and press
Ctrl, Alt, Del
to reboot your
system to the Windows operating system.
Using the Operating System and Utilities 4-17
Page 82

Using the System Drives and Bays
24X CD-ROM Drive
!
DVD-ROM Drive
!
Hard Disk Drive
!
Memory Modules
!
5
Page 83

24X CD-ROM Drive
Your NEC Versa may ship with a 24X CD-ROM drive that features the latest in CDROM technology. The CD-ROM drive is assigned an available drive letter.
Use the CD-ROM drive to load and start programs from a compact disc (CD). You can
also use the CD-ROM drive to play your audio CDs. The 24X CD-ROM drive is fully
compatible with Kodak M ultisession Photo CDs™ and standard audio CDs.
The CD-ROM drive operates at different speeds depending on whether the CD you are
using contains data or music. This allo ws you to get your data faster a nd to see
smoother animation and video.
CD-ROM drive features are shown in the following figure. Descriptions of these
features follow.
24X CD-ROM drive
A
– Status LED
B
– Release Button
!
Status LED — lights during data read operations. Do not eject the CD or turn off
the NEC Versa when the indicator is lit.
!
Release Button — ejects the CD tray. Press this button when power is on to insert a
CD into or remove a CD from the drive.
!
Emergency Eject Hole — allows you to manually remove a disc from the CD-ROM
drive if the eject function is disabled by software or a power failure occurs.
To remove a disc, insert the end of a paper clip into the eject hole, and push in until
you hear a click. Manually open the drawer.
5-2 Using the System Drives and Bays
C
– Emergency Eject Hole
Page 84

CD Loading
To insert a CD into the CD-ROM drive, follow these steps.
1.
2.
3.
4.
Press the Release button. The CD tray emerges a short way out of the drive door.
Gently pull the tray out until you can easily position a disc in the tray.
Put your CD, printed side up, into the circular impression in the tray.
Push the CD tray in until it clicks shut.
Note
Some CDs vibrate when playing. This does not affect the CD-ROM drive.
CD Care
When handling CDs, keep t he following guidelines in mind.
!
Always pick up the disc by its edges.
!
Avoid scratching or soiling the side of the disc that has no printing or writing on it.
This is the data side of the disc.
!
Do not write on or apply labels to either side of the disc.
!
Keep the disc away from direct sunlight or high temperatures.
!
Clean fingerprints or dust from the disc by wiping it with a soft cloth. Gently brush
the cloth from the center of the disc toward the edge.
Avoid using benzene, paint thinner, record cleaner, static
repellent, or any other chemical on the disc. Chemicals and cleaners can damage the
disc.
Changing the Auto Play Setting
Your system may not be configured to allow a CD to automatically play upon insertio n.
Although t his feature makes using your CDs very convenient, it may interfere with the
system’s po wer ma na ge me nt fu nction.
Follow these instructions to enable or disable the Auto play feature.
1.
From the Windows 98 or 95 Start menu, select Settings and Control Panel.
2.
In the Control Panel, highlight and double-click on the System icon.
Using the System Drives and Bays 5-3
Page 85

3.
Select the Device Manager tab.
4.
Locate and open the CD-ROM folder.
5.
Highlight the appropriate CD-ROM line.
6.
Press the properties button at the bottom of the window and select the Settings tab.
7.
Proceed as follows:
!
To enable Auto Play, click to add a check mark next to the line “Auto insert
notification.”
!
To disable Auto Play, click to remove the check mark next to the line “Auto
insert notification.”
8.
Select OK twice to accept the settings in the Settings tab and exit the Properties
window.
9.
To activate the new setting, reboot the system when prompted.
DVD-ROM Drive
The DVD-ROM drive offers many improvements over the standard CD-ROM
technology including superior video and audio playback, faster data access, and greater
storage capacities. The drive uses the latest DVD technology which reads fro m
specially designed DVD discs as well as standard audio and video CDs.
5-4 Using the System Drives and Bays
Page 86

Hard Disk Drive
The hard disk drive can be upgraded to a larger capacity drive.
To upgrade the hard disk drive, follow these steps.
1.
Locate the drive access panel on the left side of the system. Open the panel using
the notch.
Opening the panel
A
– Drive Access Panel
2.
Remove the screw that secures the hard disk in the system.
B
– Notch
Removing the screw
A
– Screw
Using the System Drives and Bays 5-5
Page 87

3.
Slide the hard disk drive out of the system.
4.
Insert the new hard disk drive into the disk drive slot.
5.
Secure the disk drive with the screw removed in step 2.
Memory Modul es
The notebook computer offers two 64-bit memory slots using 144-pin SO-DIMM
(Small Outline Dual Inline Memory Module) at 32 MB, 64 MB, and 128 MB SDRAM.
This configuration supports single SO-DIMM module insertion in the memory slot.
The memory slots are located on the underside of yo ur computer inside the memory
bay.
Removing the disk drive
Follow these steps to upgrade the system memory.
1.
Power off the system and disconnect any peripheral devices.
5-6 Using the System Drives and Bays
Page 88

2.
Turn the system over and locate the screw on the memory bay.
Memory bay cover and screw
A
– Memory Bay Cover
3.
Remove the screw and lift off the memory bay cover.
4.
Locate the alignment notch on the module.
Using the System Drives and Bays 5-7
B
– Screw
Page 89

5.
Locate the memory module slot.
Memory module slot
A
– Memory Module Slot
5-8 Using the System Drives and Bays
Page 90

6.
Align the notch with the notch in the slot connector and install the module as
follows:
!
Hold the SO-DIMM at a 60-degree angle and align the SO-DIMM connector
with the slot in the system. Push the connector into the slot.
!
Press down on the edge of the SO-DIMM until the locking tabs on the sides
snap into place, securing the module.
Installing the memory module
7.
To remove a SO-DIMM, press the locking tabs away from the sides of the module
until the module pops up. Then, re move the SO-DIMM.
Removing the memory module
Using the System Drives and Bays 5-9
Page 91

8.
Reassemble the NEC Versa VX components as follows.
!
Replace the memory bay cover.
!
Replace the screw.
!
Turn the system over.
5-10 Using the System Drives and Bays
Page 92

Communicating with Your NEC Versa
Mini-PCI Modem
!
Mini-PCI LAN
!
Mini-PCI Modem/LAN
!
PC Cards
!
Internet Connections
!
IR Port
!
6
Page 93

Mini-PCI Modem
The NEC Versa VX comes equipped with a 56K capable fax/data modem that allows
you to communicate with others via fax, email, or connect to an online service or
bulletin board. (The mode m is only available on some models.)
Note
the 56K modem transmits at a maximum speed of 52K.
The speed of data transmission is dependent on the quality of telephone lines. Digitally
terminated lines improve the speed of data transmission. Contact your service provider
for more information.
Due to FCC regulations in effect at the time that this document was printed,
Connecting the Modem
The fax/data modem provides one standard phone connector. NEC provides one analog
cable for your convenience.
Use the following steps to connect the analog phone cable to your modem.
Note
international telephone adapter, available at most electronics supply stores.
1.
2.
When using a modem outside the U.S. and Canada, you might need an
Locate the analog phone cable that ships with the NEC Versa VX. Each end of the
cable has a RJ-11 connector that plugs into a standard wall outlet.
Connect one end of the cable into a standard telephone wall outlet.
Use only 26AWG phone line when connecting the modem.
3.
Connect the other end of the cable into the computer’s modem port at the rear of
the system.
Note
modem in order to enable the IR port for wireless data transfer.
Depending on your operational requirements, you may need to disable the
6-2 Communicating with Your NEC Versa
Page 94

Mini-PCI LAN
Your NEC Versa VX system may ship with mini-PCI LAN that allows you to connect
your system to a local area network. The mini-PCI LAN is a 10/100Base-TX interface
that supports both Wake-on-LAN and Network Boot functions.
To take advantage of the LAN, simply connect an RJ-45 cable to the LAN port on the
rear of the system.
Mini-PCI Modem/LAN
Your NEC Versa VX system may ship with an internal combination modem/LAN card
that allows you to connect your system to a telephone line or a local area network. The
internal modem/LAN card is a 56K V.90-compliant modem and a 10/100 Ethernet
LAN connection that supports Wake-on-LAN and network boot functio ns.
To use the modem, simply connect an analog phone cable to the modem port on the
rear of the system. To take advantage of the internal LAN, you must attach the optional
NEC Port Replicator to the NEC Versa VX system. Simply connect an RJ-45 cable to
the LAN port on the rear of the Port Replicator.
Installing the Online Modem/LAN Guides
For additional information about LAN features or your modem’s AT commands and
s-registers, use the Application and Driver CD to install the online LAN or modem
guides for your syste m. To determine the guide that is appropriate for your system, go
to Start, Settings, Control Panel, System, and select the Device Manager tab. Double
click Modem (if your system is equipped with an optional modem or an optional
combination modem/LAN) to identify the name of your system’s modem. Double click
Network adapters (if your system is equipped with an optional LAN or an optional
combination modem/LAN) to identify the name of your system’s LAN. Use the
Application and Driver CD to install the online guide of the sa me name to your NEC
Versa hard drive.
PC Cards
PC cards are all approximately the same size and vary only in thickness. All have a
standard 68-pin connector. Your NEC Versa supports the installation of the PC cards
described next.
Communicating with Your NEC Versa 6-3
Page 95

Type II Cards
Type II cards have a thickness of 5.0 milli meters (mm). Type II cards are often storage
or communications devices such as battery backed Static Random Access Memory
(SRAM), Read Only Memory (ROM), Flash Memory, LAN, and Small Computer
System Interface (SCSI). Typical Type II cards include input/output (I/O) features such
as modems and LANs.
Type II Extended Cards
Many PC cards are Type II extended cards. The extended card has an additional
physical component that protrudes beyond the traditional card size. The extension can
be as large as 40 mm deep by 9.65 mm high. This extension provides room for
additional electronics as well as a location for external connectors.
Type III Cards
Type III cards are thicker (10.5 mm) than Type II cards and allow no extensions. Type
III card uses include advanced function I/O cards with additional features such as
wireless modems, multimode cards (cards with more than one function such as a
combined modem and LAN card), and small hard drive storage.
Communication Cards
You can use both fax/mod em and networ k PC cards with your NEC Versa. Here are
some suggesti ons to help you get the best syst em performa nce.
Note
local NECC dealer for availability information.
!
If you are using this unit outside of the United States or Canada, contact a
Network Cards — You can use a network card with your system to gain access to a
local area network (LAN).
You can insert a network card in either slot.
!
Fax/Modem Cards — You can use a PC card modem with your system to
communicate with others via fax, email, or connect to an online service or bulletin
board.
You can insert a fax/modem card in either slot.
Note
adapter approved for the local telephone system. Check with your local dealer for details
about purchasing this equipment.
Outside the U.S. and Canada, you might need a modem and telephone
6-4 Communicating with Your NEC Versa
Page 96

Always insert the fax/modem card be fore using your fax/modem software applicatio n.
If you start the application before inserting the fax/modem card, the application
typically does not find the card.
Storage Cards
When you insert a memory or storage card in an NEC notebook computer, it appears as
a unique drive as long as the system has an available interrupt for the card.
Interface Cards
You can connect most Standard Small Computer System Interface (SCSI) devices
using the optional NEC PC card-SCSI card.
Other Cards
Many other kinds of PC cards are available for notebook computers. They include the
following cards:
!
Global Positioning System (GPS) — enables the tracking of remote units (for
example, delivery trucks)
!
Serial — adds an extra serial communications port
!
Multimedia — combines animation and sound
!
Audio — enables the use of sound (for example, in voice mail)
PC Card Slots
Your NEC Versa VX has two Cardbus slots for inserting two PC or Cardbus cards. The
slots support two Type II cards or one Type III PC card.
Using the system’s PC card slots, you can add optional PC cards and connect external
devices to your NEC Versa VX. These devices include peripheral devices, such as
modems, LAN cards, and storage cards.
Communicating with Your NEC Versa 6-5
Page 97

Inserting a PC Card
Follow these steps to insert a PC card in your system.
inserting a PC card you may have to disable either the IR port, USB port, or the 56K
internal modem. Check the Windows device manager to ensure that one of these
devices is disabled before inserting a PC card.
For information about enabling and disabling devices on your NEC Versa VX, see
“Enabling and Disabling Devices,” later in this chapter.
1.
Align the card so that the 68-pin connector points towards the slot and the arrow on
the PC card faces up.
2.
Slide the card into either slot. A low tone followed by a high tone lets you kno w
that the card is fully inserted and recognized. (If you turn off the sound, no sound
is emitted.)
indicate that the card is inserted, but the card type is unknown.
Some PC cards require additional system resources. Before
Other two-tone sequences such as high, then low tones
Inserting a PC card
3.
You can use the PC card software preinstalled on your system to check PC card
slot availability. For example, look for the PC Card icon in the Windows Control
panel. It shows which slot contains a PC card and which is empty.
6-6 Communicating with Your NEC Versa
Page 98

Removing a Card
Follow these steps to remove a PC card in Windows 98.
1.
Double click My Computer, double click Control Panel, and double click the PC
card icon or simply double click the PC card icon from the taskbar.
2.
Select the PC card to remove, and select Stop.
The Windows operating system alerts you if any applications are still using the
card. If all applications using the card are closed, services for that card are shut
down. You receive a message saying that it is safe to remove the card.
3.
Press the button on the side of the PC card in the slot twice.
Internet Connections
Your NEC Versa VX system is equipped with the Windows operating system to
provide a fully-integrated internet experience. Use the Internet Connection Wizard on
your desktop to configure your system for email and internet access. Sign up for a new
account or configure your system to use an existing account.
Before using the Internet Connection wizard, to transfer an existing account for email
and internet access, you need an internet service provider (ISP) account and some or all
of the following configuration information:
!
the dial-up telephone number
!
TCP/IP settings
!
port settings
!
a user name/logon and password
!
your email address
!
the name of a POP3, IMAP, or HTTP server (for incoming mail)
!
the name of an SMTP server (for outgoing mail)
Internet Connection Wizard in Windows 98
Access the Internet Connection Wizard in Windows 98 through its desktop icon. The
Windows 98 Internet Connection Wizard offers the following choices:
!
Sign-up for a new internet account. Take advantage of t he Microsoft Internet
Referral Service.
!
Transfer an existing internet account.
Communicating with Your NEC Versa 6-7
Page 99

!
Manually configure an internet account or connect through a local area network
(LAN).
Launch the connection wizard and follow the on -screen pro mpts to configure your
system for internet access.
Internet Connection Wizard in Windows 95
To access the Internet Connection Wizard in Windows 95, go to Start, Programs,
Accessories, Internet Tools, Get on the Internet. The Windows 95 Internet Connection
Wizard offers the following choices:
!
Take advantage of the Microsoft Internet Referral Service by allowing the wizard to
automatically configure your account.
!
Manually configure an internet account or connect through a local area network.
!
Use your current account information to establish an internet connection.
Launch the connection wizard and follow the on -screen pro mpts to configure your
system for internet access.
Accessing the Internet
Your NEC Versa VX system is equipped with an Internet shortcut key, located just
above the keyboard. The first time that you press the Internet shortcut key, the Internet
Connection Wizard launches, allowing you to configure your system for internet
access. Once your internet connection is configured, pressing the Internet shortcut key
launches your associated dial-up network connect i on, allowing you to enter your logon
name and password. In addition, Microsoft Internet Explorer launches, providing quick
access to your favorite internet sites.
Sending and Receiving Email
Your NEC Versa VX system is equipped with an Email shortcut ke y, located just above
the keyboard. The first time that you press the Email shortcut key, the I nternet
Connection Wizard launches, allowing you to configure your system for email access.
Once your inte rnet connec tion is configured, pressi ng the Email shortcut key launches
your associated dial-up network connection, allowing you to enter your logon name and
password. In addition, Outlook Express launches, providing quick access to your email
functions.
6-8 Communicating with Your NEC Versa
Page 100

Modifying the Internet and Email Shortcut Keys
The Internet and Email shortcut keys are configured (default setting) to launch your
Internet browser and email applications, respectively. To modify the default application
settings, you must edit the NECMFK.INI file on your hard d rive.
Follow these instructions to modify the NECMFK.INI file.
1.
Use Windows Explorer to locate the file, C:\Windows\NECMFK.I NI.
2.
Double click the NECMFK.INI file to open it.
3.
Use the scroll bar to locate the sections at the end of the file designated as Btn6 and
Btn7.
4.
To modify the application to launch when pressing the Email shortcut ke y, cha nge
the variable Btn6_AP1=msimn.exe to the *.exe of your choice. Be sure to use the
full path name, for exa mple, C:\Program Files\Netscape\Netscape.exe.
In addition, modify the variable Btn6_Name=Mail to an appropriate and
corresponding identifier.
5.
To modify the application to launch when pressing the Internet shortcut key,
change the variable Btn7_AP1=iexplore.exe to the *.exe of your choice. Be sure to
use the full path name, for example, C:\Program Files\Netscape\Netscape.exe.
In addition, modify the variable Btn7_Name=Internet to an appropriate and
corresponding identifier.
IR Port
6.
Click File, Save, then File, Exit to save your changes.
You are now ready to use yo ur shortcut ke ys to launch t he applications of your
choice.
The IR port on the front of your system lets your NEC Versa VX communicate with
other devices that also use infrared technology. T he IR port is Infrared Data
Association (IrDA) compatible. You can easily transfer files between your NEC Versa
Note and an IR-equipped desktop, or print to an IR-equipped printer without using
cables.
IR transfer speed ranges from 2.4 Kbit/sec to 4.0 Mbit/sec. You can limit the IR
transfer speed through the Infrared icon in the Windows control panel. Double click the
icon and select the options to access the speed parameter.
Communicating with Your NEC Versa 6-9
 Loading...