

Page 1
Owner’s Manual
Model :N LT-40W
40" Wide LCD Color TV
2
Warnings
WARNING :
To prevent fire or shock hazard, do not expose the set to rain or moisture. Do not rub
or strike the Active Matrix LCD with anything hard as this may scratch, mar, or
damage the Active Matrix LCD permanently.
The appliance is not intended for use by young children or infirm persons without
supervision.
Young children should be supervised to ensure that they do not play with the
appliance.
CAUTION:
Do not attempt to modify this product in any way without written authorization.
Unauthorized modification could void the user’s authority to operate this product.
Service
Never remove the back cover of the TV, this can expose you to high voltage and
other hazards. If the TV does not operate properly, unplug it and call your nearest
NEC Service Centre. Antenna Connect the antenna cable to the connection marked
Ant. (on the rear). For best reception, use an outdoor antenna.
WARNING
RISK OF ELECTRIC SHOCK
DO NOT OPEN
WARNING :
To reduce the risk of electric shock do not remove cover (or back).
No user serviceable parts inside. Refer servicing to qualified service personnel.
The lightning flash with arrowhead symbol, within an equilateral
triangle, is intended to alert the user to the presence of uninsulated
“dangerous voltage” within the product’s enclosure that may be of
sufficient magnitude to constitute a risk of electric shock to persons.
The exclamation point within an equilateral triangle is intended to
alert the user to the presence of important operating and
maintenance (servicing) instructions in the literature accompanying
the appliance.
Page 2

3
Location
Position your TV so that no bright light or sunlight will shine directly on the screen. Do
not expose the TV to vibration, moisture, dust or heat. Also ensure that the TV is
placed in a position that allows a free flow of air. Do not cover the ventilation
openings on the back cover. You can place it on a table-top.
Cleaning
Unplug the TV before cleaning the face of the LCD Screen. Dust the TV by wiping the
screen and cabinet with a soft, clean cloth. If the screen requires additional cleaning,
use a clean, damp cloth. Do not use liquid or aerosol cleaners.
Warnings
5
Contents
Warnings 2~3
Contents 5
Supplied Accessories 6
Controls 7~9
Controller of panel 7
Remote controller 8~9
Basic Operation 10
On and off 10
Programme selection 10
Volume adjustment 10
Q.View 10
Mute Function 10
On screen Language selection 10
On Screen Menus and Displays 11
Setting up TV Programme 12~14
Auto Programme 12
Manual Programme 13
Programme edit 14
Picture Control 15
Manual picture setup 15
Auto picture setup 15
Sound Control 16
Other functions 17~18
TV, COMPONENT and S-VIDEO mode 17
Auto sleep 17
Blue Back 18
ARC(Aspect Ratio Control) 18
Sleep timer 18
Sound output selection 18
PIP function 18
Programme list 19
TELETEXT 20~21
Text On/Off 20
TOP text 20
FLOF text 20
Special Text function 21
External Equipment Connection 22~23
Antenna IN 22
COMPONENT 22
D-TV IN 22
S-VIDEO IN 23
Headphone OUT 23
Sub woofer OUT 23
Connecting PC as monitor 24~25
Product specifications 26
Troubleshooting 27
NEC Service Centres 28
Before operating the set, please read this manual carefully.
Page 3
6
Supplied Accessories
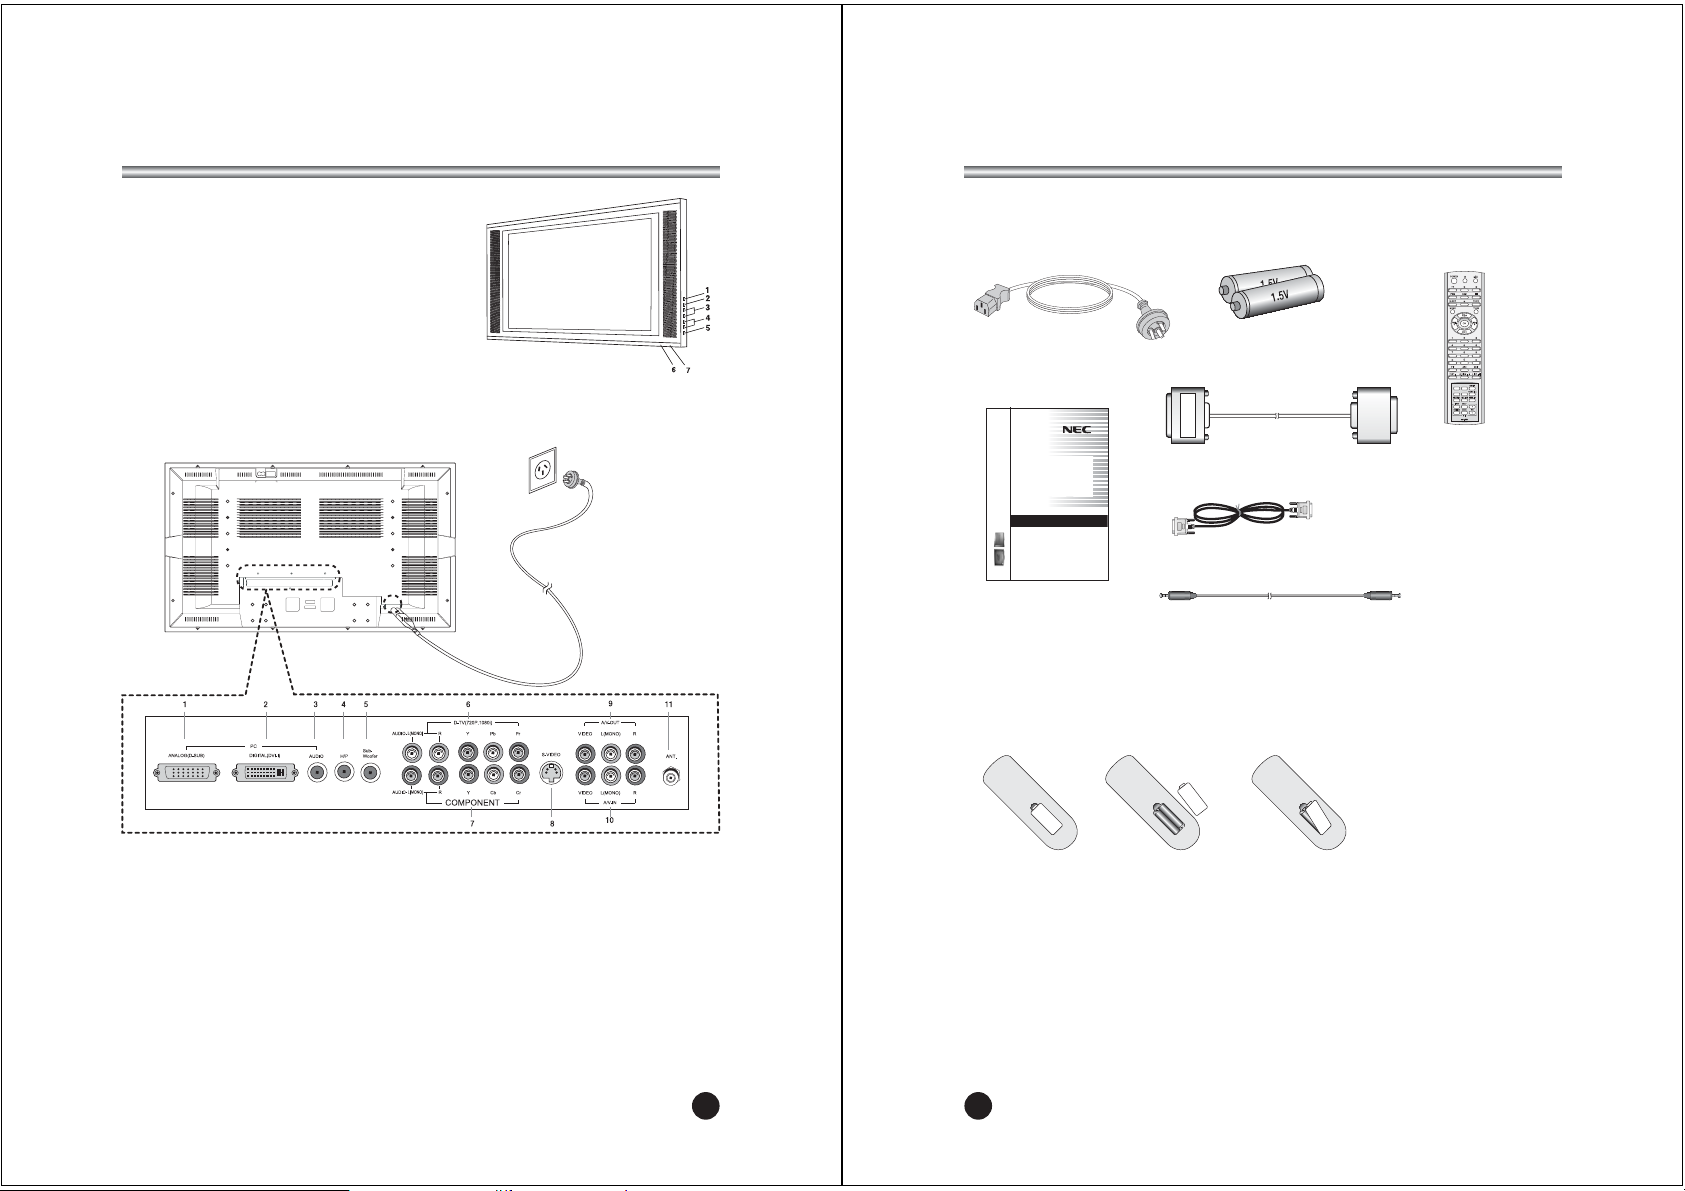
L Make sure the following accessories are provided with Product.
3. Remote controller
5. Owner’s manual
4. PC ANALOG IN cable
6. PC DIGITAL IN cable
7. PC AUDIO IN cable
2. Batteries (2EA)
Owner’s Manual
Model:
NLT-40W
40" Wide LCD Color TV
→→
Battery installation
uInserting batteries
1. Remove the battery cover by pulling it upward in the direction shown by the arrow.
2. Insert the batteries with correct polarity ( "+" to "+", and "-" to "-" ).
3. Replace the battery compartment cover.
*Install two high-quality 1.5V "AAA" alkaline batteries. Don't mix old batteries with
new batteries.
*Remove batteries when you won't use the remote controller for long time. Liquid
leakage from old batteries may cause operation failure.
uNotes for using remote controller
• Make sure there are no objects between the remote controller and its sensor.
• Don't place the remote control near a heater or in damp place. Strong impact to the
remote control may cause operation failure.
• Signal from the remote control may be disturbed by sun light or other bright light. In
this case, darken the room or move the TV.
1. AC cord
Controls
1. ON/OFF Switches TV set on or off.
2. MENU
Displays a menu.
3. + PR - (Programme Up/Down)
Selects a programme or a menu item.
4. + VOL - (Volume Up/Down)
Adjusts the volume./ Adjusts menu settings.
5. TV/AV Selects TV, COMPONENT, S-VIDEO,
PC-ANALOG or PC-DIGITAL mode./ Clears the menu frorn the screen.
6. Power Indicator
Illuminates in red when the TV is in standby mode./ Illuminates in green when the
TV is switched on. Illuminates in blinked when the power save mode(only PC mode).
7. Remote control sensor
Accepts the IR signal of remote controller.
1. PC ANALOG(D-SUB) IN
2. PC DIGITAL(DVI-I) IN
3. PC AUDIO IN
Connect the audio cable from the PC Audo IN of the set.
4. HEADPHONE OUT
Connect a headphone to this socket.
5. Sub Woofer OUT
6. D-TV (720P/1080I) IN
7. COMPONENT IN
8. S-VIDEO IN
9. AV-OUT
10. AV-IN
11. ANT.
7
Page 4
228
Controls
All the functions can be controlled with the remote controller. Some functions can
also be adjusted with the buttons on the front panel of the set.
Remote controller
Before you use the remote controller, please install the batteries.
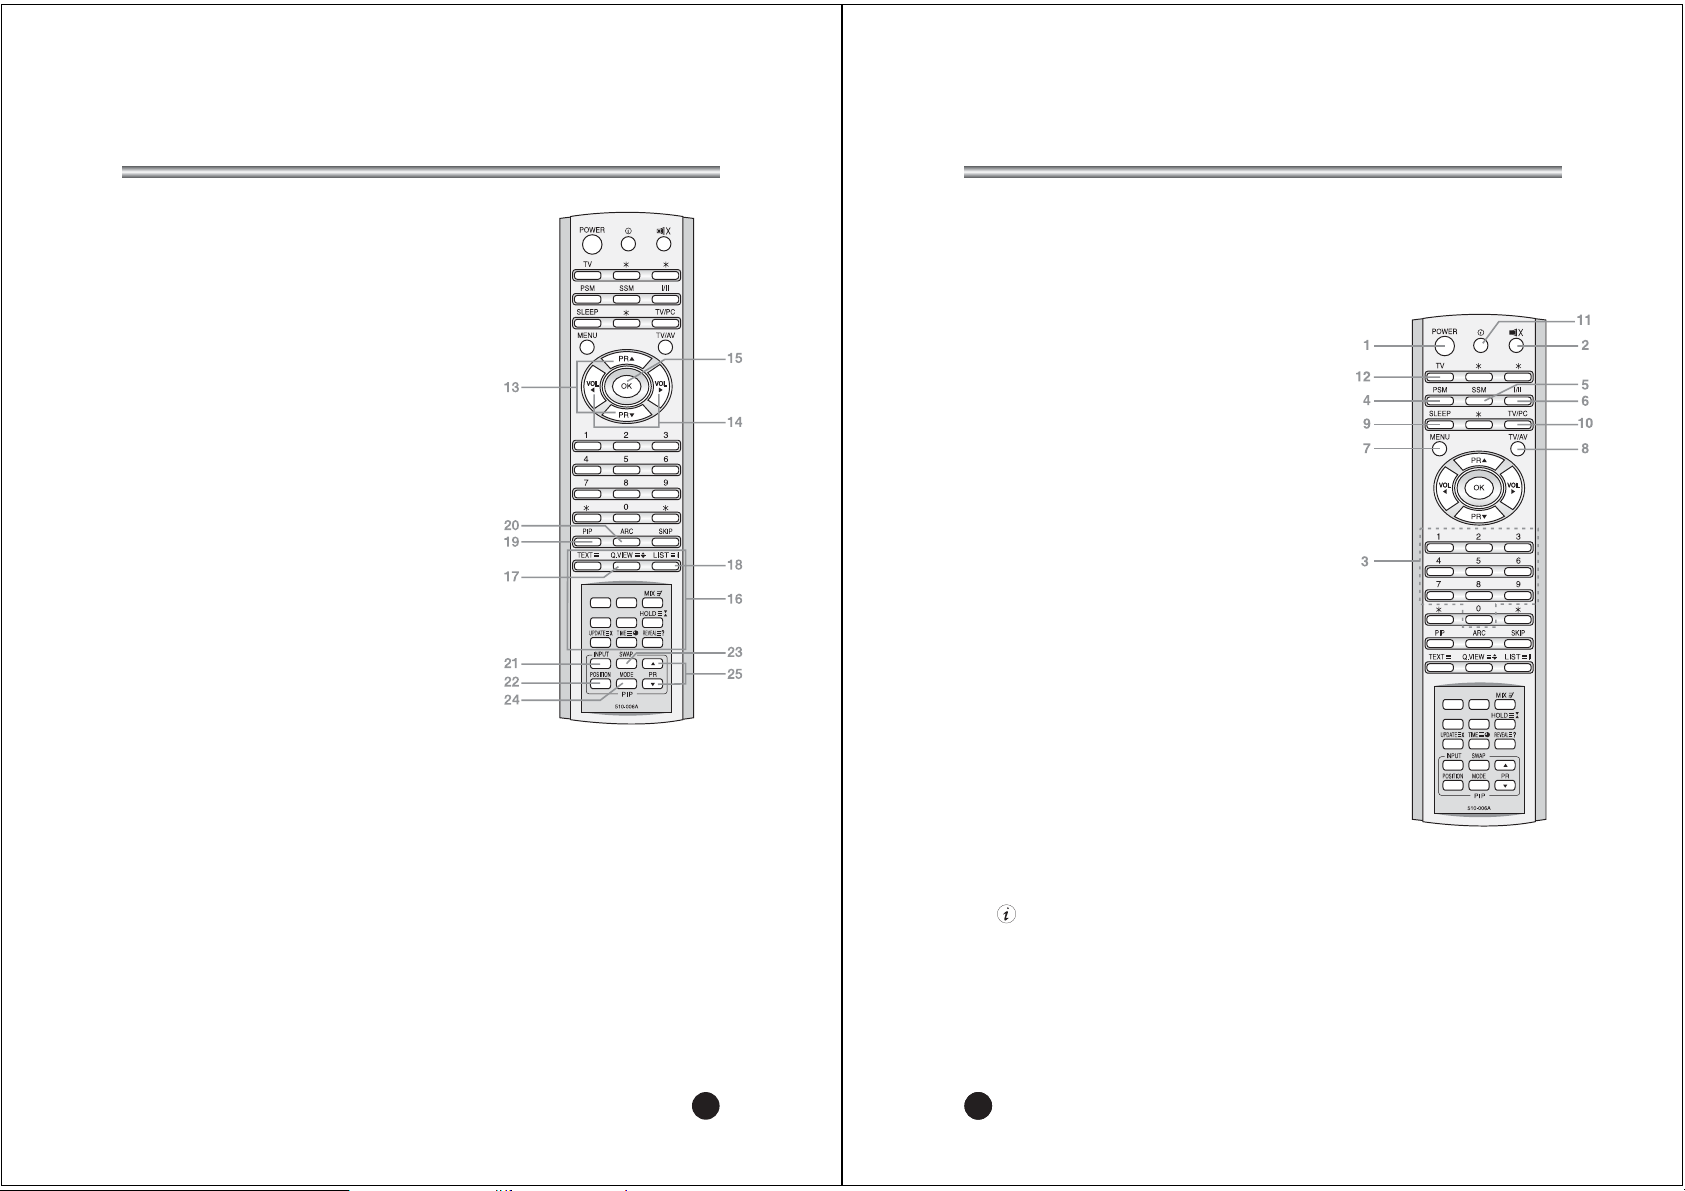
1. POWER
Turns the TV on from standby or off to standby mode.
2. MUTE
Turns the sound on and off.
3. NUMBER buttons
Selects programme numbers.
4. PSM (Picture Status Memory)
Recalls your preferred picture setting
5. SSM (Sound Status Memory)
Recalls your preferred sound setting
6. I/II
Selects the language during dual language broadcast.
Selects the sound output.
7. MENU
Displays a main menu.
8. TV/AV
Selects TV, COMPONENT, S-VIDEO, PC-Analog
or PC-Digital mode.
Clears the menu from the screen.
9. SLEEP
Sets the sleep timer.
10. TV/PC
Selects TV or PC mode directly.
11. (Information Display)
Use to see information on the current broadcast.
12. TV
The future reserved.
9
Controls
13. PRxy (Programme Up/Down)
Selects next programme or a menu item.
14. VOLÏq (Volume Up/Down)
Adjusts the sound level.
Adjusts menu settings.
15. OK
Accepts your selection or displays the current mode.
16. TELETEXT Buttons
These buttons are used for TELETEXT.
For further details, see the ‘TELETEXT’ section.
17. Q.VIEW
Returns to the previously viewed programme.
Note: In TELETEXT mode,
The Q.VIEW button is used for TELETEXT function.
18. LIST
Displays the programm list menu.
18. PIP
Displays a PIP(Picture In Picture) screen.
20. ARC
Selects a screen mode- 16:9, 14:9, ZOOM 1:1
and Auto Wide.
21. INPUT
Selects the AV source of sub picture in PIP mode.
22. POSITION
Selects a position of PIP screen.
23. SWAP
Switches a main picture for sub picture in PIP mode.
24. MODE
Selects a PIP screen mode. – 16:1, 9:1, double window
and scan mode
25.xPRy
Selects a programme when RF signal is displayed in PIP
mode.
Page 5

10
Turning the TV On and Off
Press the ON/OFF button on the side panel of the TV to go
into standby mode.
1. If the TV is in standby mode, press the POWER button
on the remote controller or the TV itself to turn the TV
on.
2. Press the POWER button again on the remote
controller or the TV itself to turn the TV off.
Note : If the TV is on and the POWER button is pressed
to turn the TV off, the TV goes into standby mode.
Programme selection
You can select a Programme number with the PRxybutton
or NUMBER buttons.
Volume adjustment
Press the VOLÏqbutton to adjust the sound level.
Quick view
Press the Q.VIEW button to view the last channel you were
watching.
Sound mute function
Press the MUTE button. The sound is switched off and the
mute display appears.
To cancel mute mode, press the MUTE button again, VOL
Ïq
or SSM button.
Information display
The display identifies the current programme and the status of
certain audio-video settings.
Press the button on the remote control. The TV will display
the programme, the type of sound, and the status of certain
picture and sound settings.
On screen menu language selection
The menu can be displayed on the screen in desired
language.
First select your language.
1. Press the MENU button.
2. Select the Setup menu.
3. Select the Language.
4. Press the PRxybutton to select your desired
language.
5. Press the TV/AV button.
All the on screen menu will appear in the selected language.
Basic Operation
ƇƉ 5-6=<>)>
Language
English
Deutsch
Français
Italiano
Español
11
On Screen Menus and Display
1. Press the MENU button to display main menu.
2. Press the PRxybutton to select menus-Picture, Sound, Special, Setup.
3. Adjust each menu with the VOLÏqbutton.
4. Press the MENU button to return to preceding menu.
5. Press the TV/AV button to finish adjusting menu.
ƇƉ ȖȘ 5-6=<>)>
Main menu
Picture q
Sound q
Special q
Setup q
ƇƉ ȖȘ 5-6=<>)>
Picture
Contrast 90
Brightness 75
Colour 75
Sharpness 50
Tint 0
ƇƉ 5-6=<>)>
Equalizer
Flat
Music
Movie
Speech
User
ƇƉ ȖȘ 5-6=<>)>
Auto programme
System BG
Storage from 1
Start
ƇƉ ȖȘ 735-6=<>)>
Manual programme
System BG
Channel V/UHF 5
Fine ȘȘȘ
Search ȘȘȘ
Name
Storage 1
ƇƉ 5-6=<>)>
Language
English
Deutsch
Français
Italiano
Español
ƇƉ ȖȘ 5-6=<>)>
Sound
Equalizer Ș
Balance 0
AVL Off
Surround Off
nVolume 30
Sub woofer 0
ƇƉ ȖȘ 5-6=<>)>
Special
Input TV
Auto sleep Off
Blue back On
Auto wide Off
ƇƉ ȖȘ 5-6=<>)>
Setup
Auto programme Ș
Manual programme Ș
Programme edit Ș
Language Ș
3Pb
ƇƉ ȖȘ 5-6=<>)>
Programme edit
0 ----- 5
1 6
2 7
3 8 ----4 9 -----
ƀ
ƀ
Delete
ƀ
Copy
ƀ
Move
ƀ
Skip
Page 6
12
Setting up TV Programme
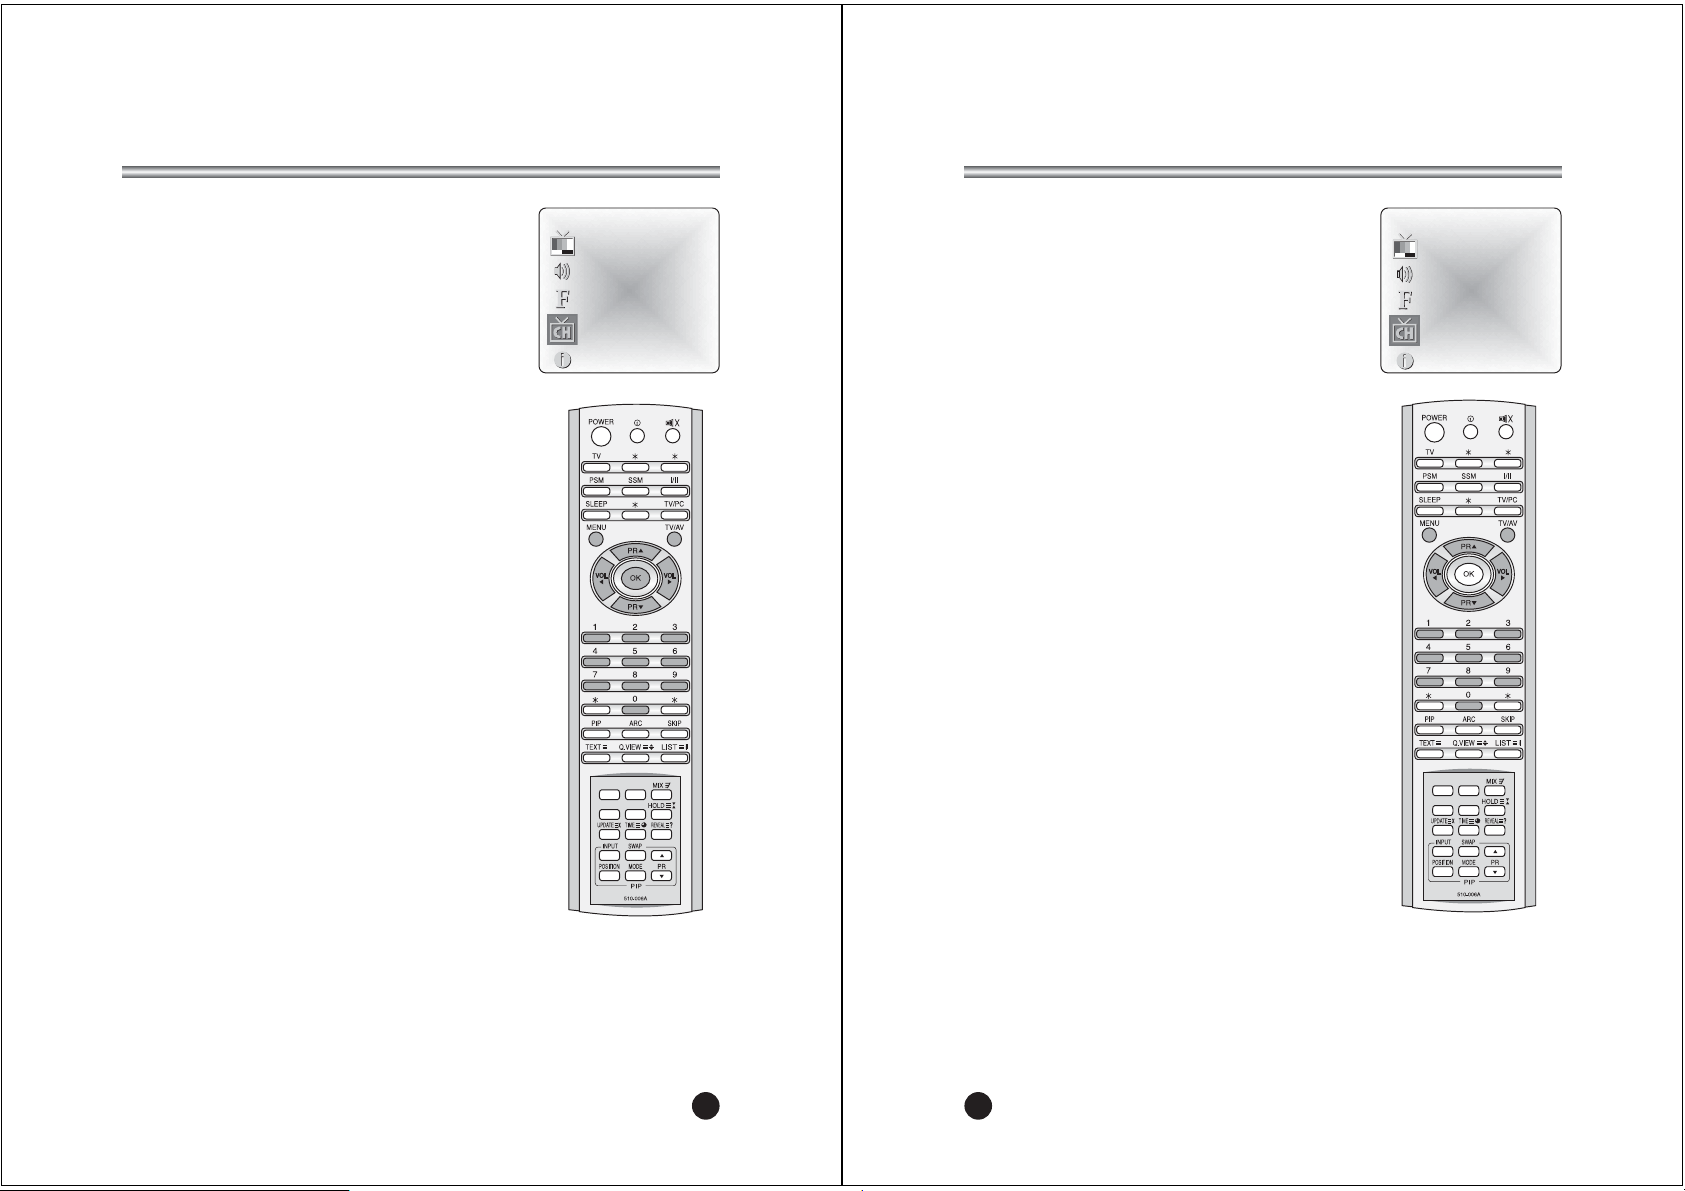
Once you have preset the programme, you will be able to
use the PRxyor NUMBER buttons to scan the
programme you programmed.
Programme can be tuned using Auto or Manual
programme menu.
Auto Programme
All programme that can be received are stored by this
method. It is recommended that you use Auto programme
during installation of this set.
1. Press the MENU button.
2. Select the Setup menu, then press VOLÏq button.
3. Select the Auto programme menu, then press
VOLÏq button.
4. Press the PRxybutton to select System.
5. Select a TV system with the VOLÏq button;
BG : (West Europe/Asia/M.East/Africa/Australia)
I : (UK/Hong Kong/South Africa)
DK : (Russia/China/East Europe)
M : (USA/Korea/philippines)
6. Press the PRxybutton to select Storage from.
7. Select the beginning programme number with the
PRxybutton or NUMBER buttons.
8. Select Start, then press VOLÏq button.
Press MENU button to finish auto programme.
9. Press the TV/AV button to finish Auto programme.
10. Press the TV/AV button to return to normal TV
viewing.
ƇƉ ȖȘ 5-6=<>)>
Auto programme
System BG
Storage from 1
Start
13
Setting up TV Programme
Manual Programme
Manual Programme lets you manually tune and arrange
the programme in whatever order you desire. Also you can
assign a programme name with 5 characters to each
programme number.
1. Press the MENU button.
2. Select the Setup menu, then press VOLÏqbutton.
3. Select Manual programme menu, then press
VOLÏqbutton.
4. Press the PRxybutton to select System.
5. Select a TV system with the VOLÏqbutton.
BG : (West Europe/Asia/M.East/Africa/Australia)
I : (UK/Hong Kong/South Africa)
DK : (Russia/China/East Europe)
M : (USA/Korea/philippines)
6. Press the PRxybutton to select Channel.
7. Press the VOLÏq button to select V/UHF or Cable
as required. If possible, select the programme
number directly with the number buttons.
8. If the TV picture reception is not good, then do the
fine tuning. Select FINE, then adjust the received
signal with the VOL Ïq button.
9. Press the PRxybutton to select Search. Press
the VOL Ïq button to commence searching. If a
channel is found the search will stop.
10. Press PRxybutton to select NAME.
Press VOL Ïq button to allocate the location and
use PRxybutton to select the character.
(blank, +, -, Alphabet A to Z, Numeric 0 to 9)
11. If this programme is the one required, press the
PRxybutton to select Storage. Select the
desired programme number with the VOL
Ïqbutton or NUMBER buttons.
12. Press the OK button to store it. The display Stored
will appear.
To store another programme, repeat steps 5 to 10.
ƇƉ ȖȘ 735-6=<>)>
Manual programme
System BG
Channel V/UHF 5
Fine ȘȘȘ
Search ȘȘȘ
Name
Storage 1
Page 7
14
Setting up TV Programme
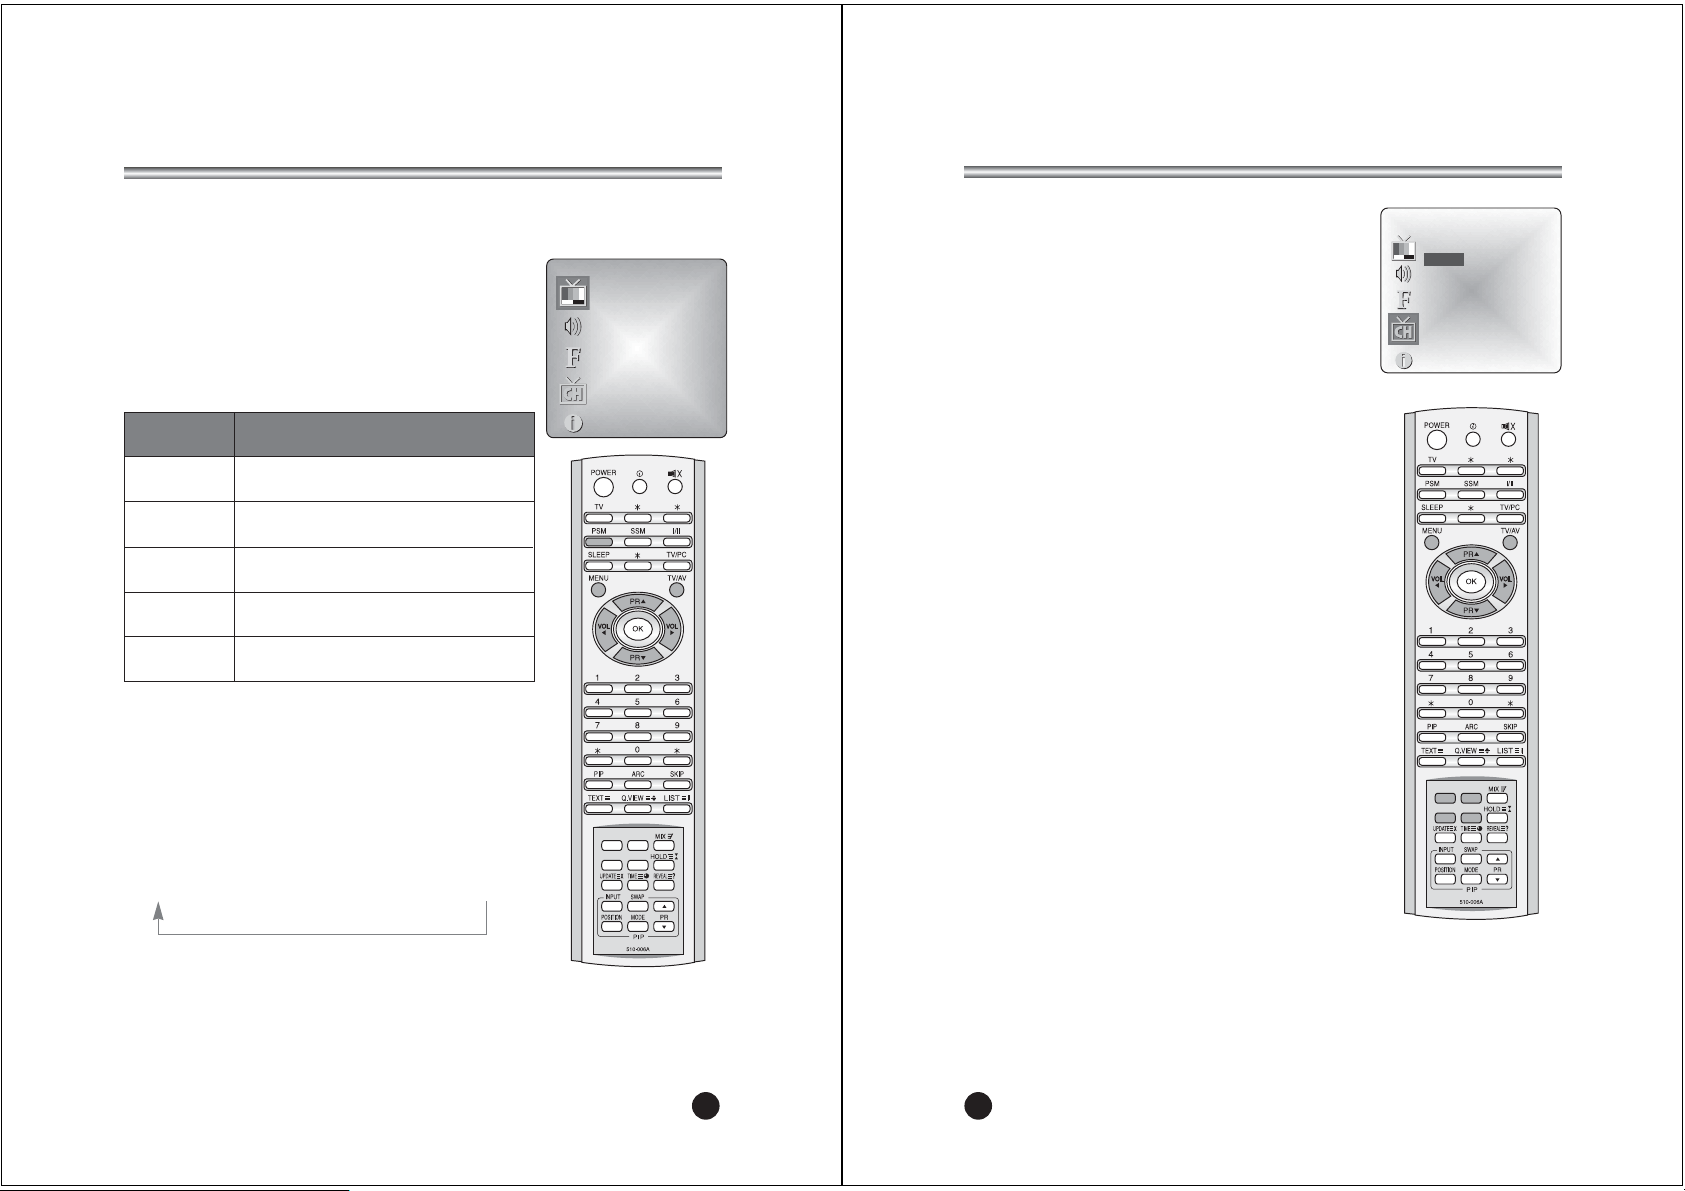
Programme edit
This function enables you to delete, copy, move or skip or
skip the stored programme.
Also you can move some programme to other
programme numbers or insert a blank programme data
into the selected programme number.
1. Press the MENU button.
2. Select the Setup menu, then press VOLÏq button.
3.
Press the PRxybutton select Programme edit
menu
,
then press VOLÏq button.
Select the programme name to edit with the PRxyand
VOLÏq.
Deleting a programme
1. Select a programme to be deleted with the PR
xy
or VOLÏqbutton.
2. Press the RED button twice.
The selected programme is deleted, all the
following programme is shifted up one position.
Copying a programme
1. Select a programme to be copied with the PR
xy
or VOLÏqbutton.
2. Press the GREEN button.
All the following programmes are shifted down one
position.
Moving a programme
1. Select a programme to be moved with the PR
xy
or VOLÏqbutton.
2. Press the YELLOW button.
3. Move the programme to desired programme
number with the PRxyor VOLÏqbutton.
4. Press the YELLOW button again to release this
function.
Skipping a programme number
1. Select a programme number to be skipped with the
PRxyor VOLÏqbutton.
2. Press the CYAN button. The skipped programme
turns to blue.
3. Press the CYAN button again to release the
skipped programme.
Note: When a programme number is skipped it
means that you will be unable to select it using the
PRxybutton during normal TV viewing. If you want
to select the skipped programme, directly enter the
programme number with the NUMBER buttons or
select it in the programme edit or table menu.
ƇƉ ȖȘ 5-6=<>)>
Programme edit
0 ----- 5
1 6
2 7
3 8 ----4 9 -----
ƀ
Delete
ƀ
Copy
ƀ
Move
ƀ
Skip
15
Picture Control
You can adjust picture Contrast, Brightness, Colour, Sharpness and Tint to the levels
you prefer.
Manual Picture Control
1. Press the MENU button.
2. Select the Picture menu, then press VOLÏq button.
3. Press the PRxybuttons to select a picture item.
4. Press the VOLÏqbuttons to adjust the picture
condition as you want.
5. Press the TV/AV button to store for the picture User.
*
TINT menu only appears at NTSC signal.
Auto Picture Control
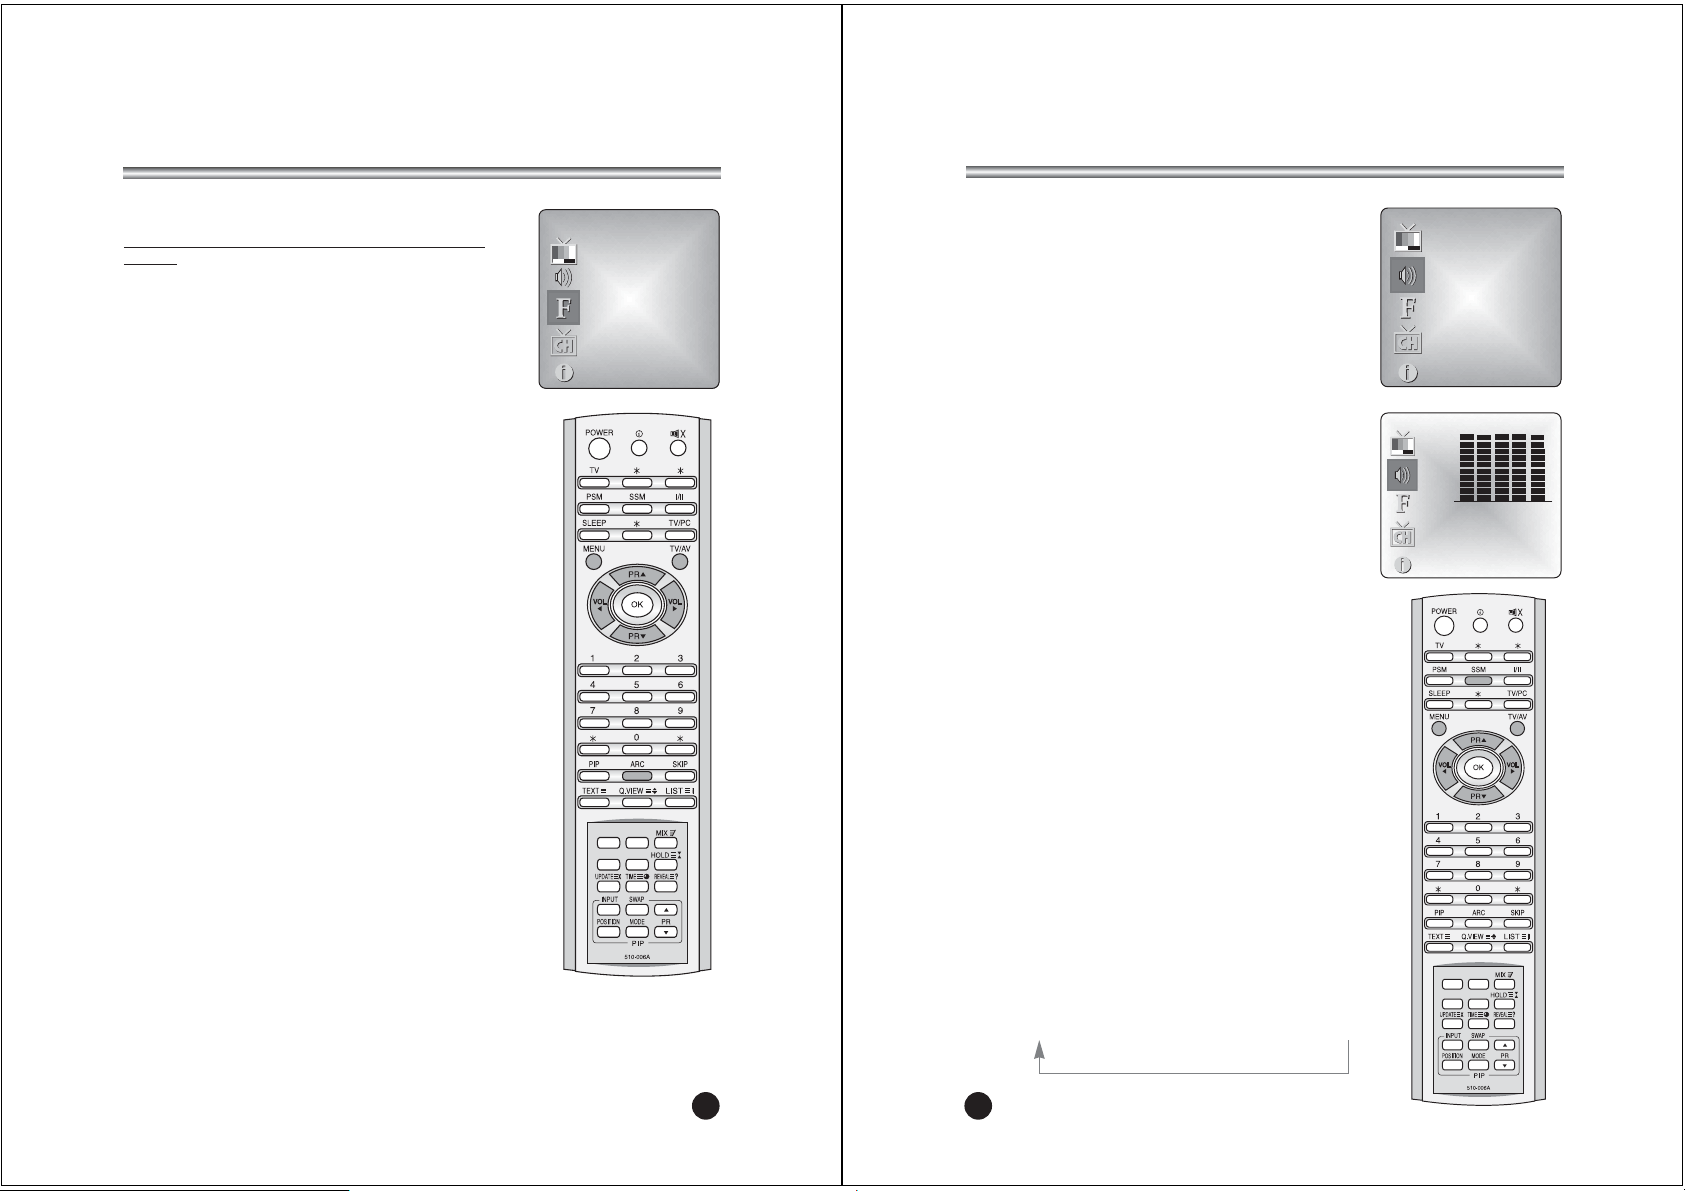
PSM (Picture Status Memory)
1. Press the PSM button.
2. Press the PSM button repeatedly to select [PSM].
Each press of the button changes the screen display as
below.
Dynamic ؋ Standard ؋ Mild ؋ Game ؋ User
• Dynamic : Vivid Picture Appearance
• Standard : Standard Picture Appearance
• Mild : Softer Picture Appearance
• Game : External Video Game Picture Setup
• User : Manual Picture Setup
Selected Item
Contrast
Brightness
Color
Sharpness
Tint
Setting Change
More darkness VOLÏ 0~100 qVOL More light
Less bright VOLÏ 0~100 qVOL More bright
Lower color intensity VOLÏ 0~100 qVOL Higher color intensity
Soft picture VOLÏ 0~100 qVOL Hard picture
More purpleÏ 50~50 qMore green
ƇƉ ȖȘ 5-6=<>)>
Picture
Contrast 90
Brightness 75
Colour 75
Sharpness 50
Tint 0
Page 8
16
Sound Control
You can select your preferred sound setting; Flat, Music,
Movie or Speech and you can also adjust the sound
frequency of equalizer, balance. If you switch AVL to on,
the set automatically keeps on an equal volume level even
if you change programme.
1. Press the MENU button.
2. Select the Sound menu, then press VOLÏq button.
3. Press the PRxybutton to select the desired
sound item; Equalizer, Balance, AVL Surround or
headphone Volume.
4. Press the VOLÏqbutton to make desired
adjustment.
5. Press the VOLÏqbutton in Equalizer to set the
Equalizer.
6. Press the PRxybutton to select your preferred
setting ; Flat, Music, Movie, Speech or User.
To set the Equalizer User.
a. Select User by pressing the PRxybutton.
b. Select a sound band by pressing the VOLÏq
button.
c. Make appropriate sound level with the PR
xy
button.
d. Press the MENU button to return to preceding
MENU and the TV/AV button to return to normal
TV viewing.
7. Select the Balance menu and adjust the balance of
speakers.
8.
Select the AVL(Automatic Volume Leveler) menu On
or Off
9.
Select the Surround menu On or Off.
10. Select the nVolume menu and adjust the volume
from headphone.
11. Select the Sub woofer menu to adjust the bass
volume.(It is possible when the Sub woofer is
connected to the set.)
ż The sound Flat, Music, Movie and Speech are
programmed for good sound reproduction at the factory
and cannot be changed.
Auto Sound Control
SSM (Sound Status Memory)
1. Press the SSM button.
2. Press the SSM button repeatedly to select.
Each press of the button changes the screen display as below.
Flat ؋ Music ؋ Movie ؋ Speech ؋ User
ƇƉ ȖȘ 5-6=<>)>
Sound
Equalizer Ș
Balance 0
AVL Off
Surround Off
nVolume 30
Sub woofer 0
ƇƉ 5-6=<>)>
Equalizer
Flat
Music
Movie
Speech
User
3Pb
17
Other functions
TV,
COMPONENT
and S-VIDEO modes
(You can’t set PC mode in this menu. Use the TV/AV
button)
External equipment inputs:S-VIDEO mode are used for
video devices like VCRs, DVDs, etc.), COMPONENT
mode is used for COMPONENT type devices.
Note : If a VCR is connected to the antenna jack, use TV
mode. See External Equipment Connection section.
1. Press the MENU button.
2. Select the Special menu.
3. Press the PRxybutton to select Input.
4. Press the VOLÏqbutton to select TV,
COMPONENT and S-VIDEO.
COMPONENT : Component device connected to the
COMPONENT jack.
S-VIDEO : S-VIDEO device connected to the TV's
S-VIDEO Input.
To return to TV mode, press the TV/AV button.
Alternatively you can select the TV, COMPONENT,
S-VIDEO, PC-ANALOG or PC-DIGITAL mode by
pressing the TV/AV button.
Auto sleep
If you select Auto sleep on the set will automatically
switch itself to standby mode approximately ten minutes
after a TV Channel stops broadcasting.
1. Press the MENU button, select the Special menu,
then press VOLÏq button.
2. Press the PRxybutton to select Auto sleep.
3. Press the VOLÏqbutton to select On.
4. Press the TV/AV button to return to normal TV
viewing.
Blue back
Programme without a program signal appear in blue.
Auto wide (Aspect Ratio Control)
Press the ARC button to select a desired picture format.
Each press of the ARC button, selects Auto Wide, 16:9,
14:9, ZOOM, 1:1 and Auto wide mode.
ƇƉ ȖȘ 5-6=<>)>
Special
Input TV
Auto sleep Off
Blue back On
Auto wide Off
Page 9
18
Other functions
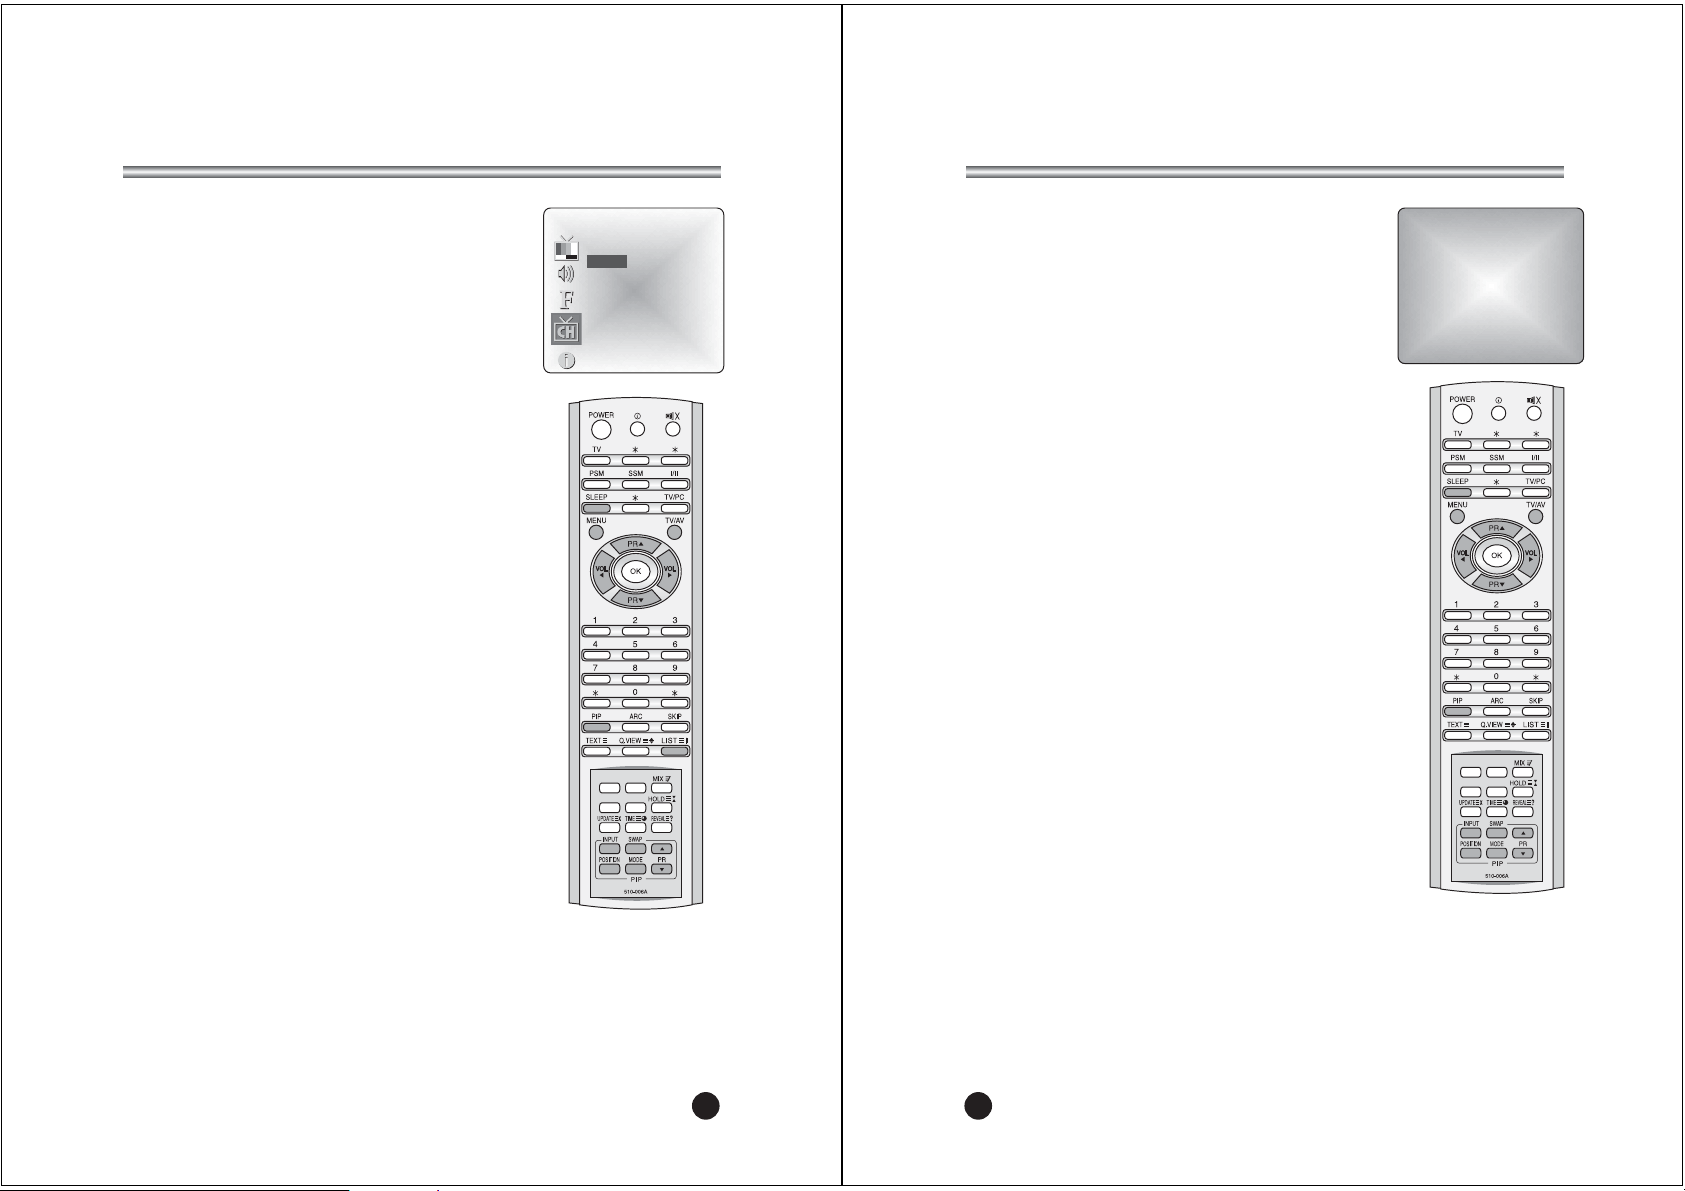
Sleep timer
You don’t have to remember to switch the set off before you
go to sleep. The sleep timer automatically switches the set
to standby after the preset time elapses.
Press the SLEEP button to select the number of minutes.
The display will appear on the screen, followed by 0, 10, 20,
30, 60, 90, 120, 180 and 240. The timer begins to count
down from the number of minutes selected.
Note:
a. To view the remaining sleep time, press the SLEEP button
once.
b. To cancel the sleep time, repeatedly press the SLEEP
button until it display “O”.
Sound output selection
In VIDEO mode, you can select output sound for the left and
right loudspeakers. Repeatedly press the I/II button to select
the sound output.
L+R : Audio signal from audio L input is sent to left
loudspeaker and audio signal from audio R input is sent
to right loudspeaker.
L+L : Audio signal from audio L input is sent to left and right
loudspeakers.
R+R : Audio signal from audio R input is sent to left and right
loudspeakers.
PIP function
PIP will let you view two separate source inputs on your TV
screen at the same time.
Viewing the PIP picture
Press the PIP button. (Press the PIP button again, to turn
PIP off.)
Selecting the PIP picture mode
Press the MODE button to adjust the PIP picture mode.
Each press the MODE button, selects the 16:1, 9:1, double
window and multi picture mode.( Multi picture mode is just
available when the main picture is in AV mode.)
Moving the PIP picture
Press the POSITION button to adjust the position of sub picture in PIP mode.
Switching the main and PIP picture
Press the SWAP button to switch the main and sub picture in PIP mode.
Viewing the external source input
Press the INPUT button to select the input source of sub picture in PIP mode.
Press the PRxybutton to select the programme desired in TV mode of sub
picture.
0
B
19
Other functions
Calling the programme list
You can check the programmes stored in the memory
by displaying the programme LIST.
Displaying programme list
1. Press the LIST button to display the Programme list
menu. The programme list appears on the screen.
One programme list contains ten programmes as right.
Note :
a. You may find some blue programmes.
They have been set up to be skipped by auto
programming or in the programme edit mode.
b. Some programmes with the channel number
shown in the programme list indicate there is no
station name assigned.
Selecting a programme in the programme list
Select a progranne with the PRxyor VOLÏqbutton.
Then press the OK button.
The set switches to the chosen programme number.
Paging through a programme list
There are 10 programme table pages in which contain
100 programmes.
Pressing the PRxyor VOLÏqbutton repeatedly turns
the pages.
ƇƉ ȖȘ 735-6=<>)>
Programme list
0 ----- 5
1 6
2 7
3 8 ----4 9 -----
Page 10
20
TELETEXT
TEXT On/Off
Press the TEXT/MIX button to switch to TELETEXT. The
initial page or last selected page appears on the screen. The
first page number indicates your selection, while the second
shows the current page displayed.
1. Press TEXT button once, displays the Teletext pages.
2. Press MIX button once more, displays the Teletext
pages superimposed on the TV picture.
3. Press the TEXT button to switch off Teletext once
more, Text mode is off, and TV mode appears.
TOP text
The user guide displays four fields-red, green, yellow and
blue at the bottom of the screen. The yellow field denotes
the next group and the blue field indicates the next block.
Group/block/page selection
1. With the BLUE button you can progress from block to
block.
2. Use the YELLOW button to proceed to the next group
with automatic overflow to the next block.
3. With the GREEN button you can proceed to the next
existing page with automatic overflow to the next
group. Alternatively the PRxbutton can be used.
4. The RED button permits to return to previous
selection. Alternatively the PRybutton can be used.
FLOF text
The Teletext pages are colour coded along the bottom of the
screen and are selected by pressing the corresponding
coloured button.
Page selection
1. Press the INDEX button to select the index page.
2. You can select the pages, which are colour coded
along the bottom line with the same coloured buttons.
3. The VOLÏqbutton can be used to select the
preceding or following page.
21
TELETEXT
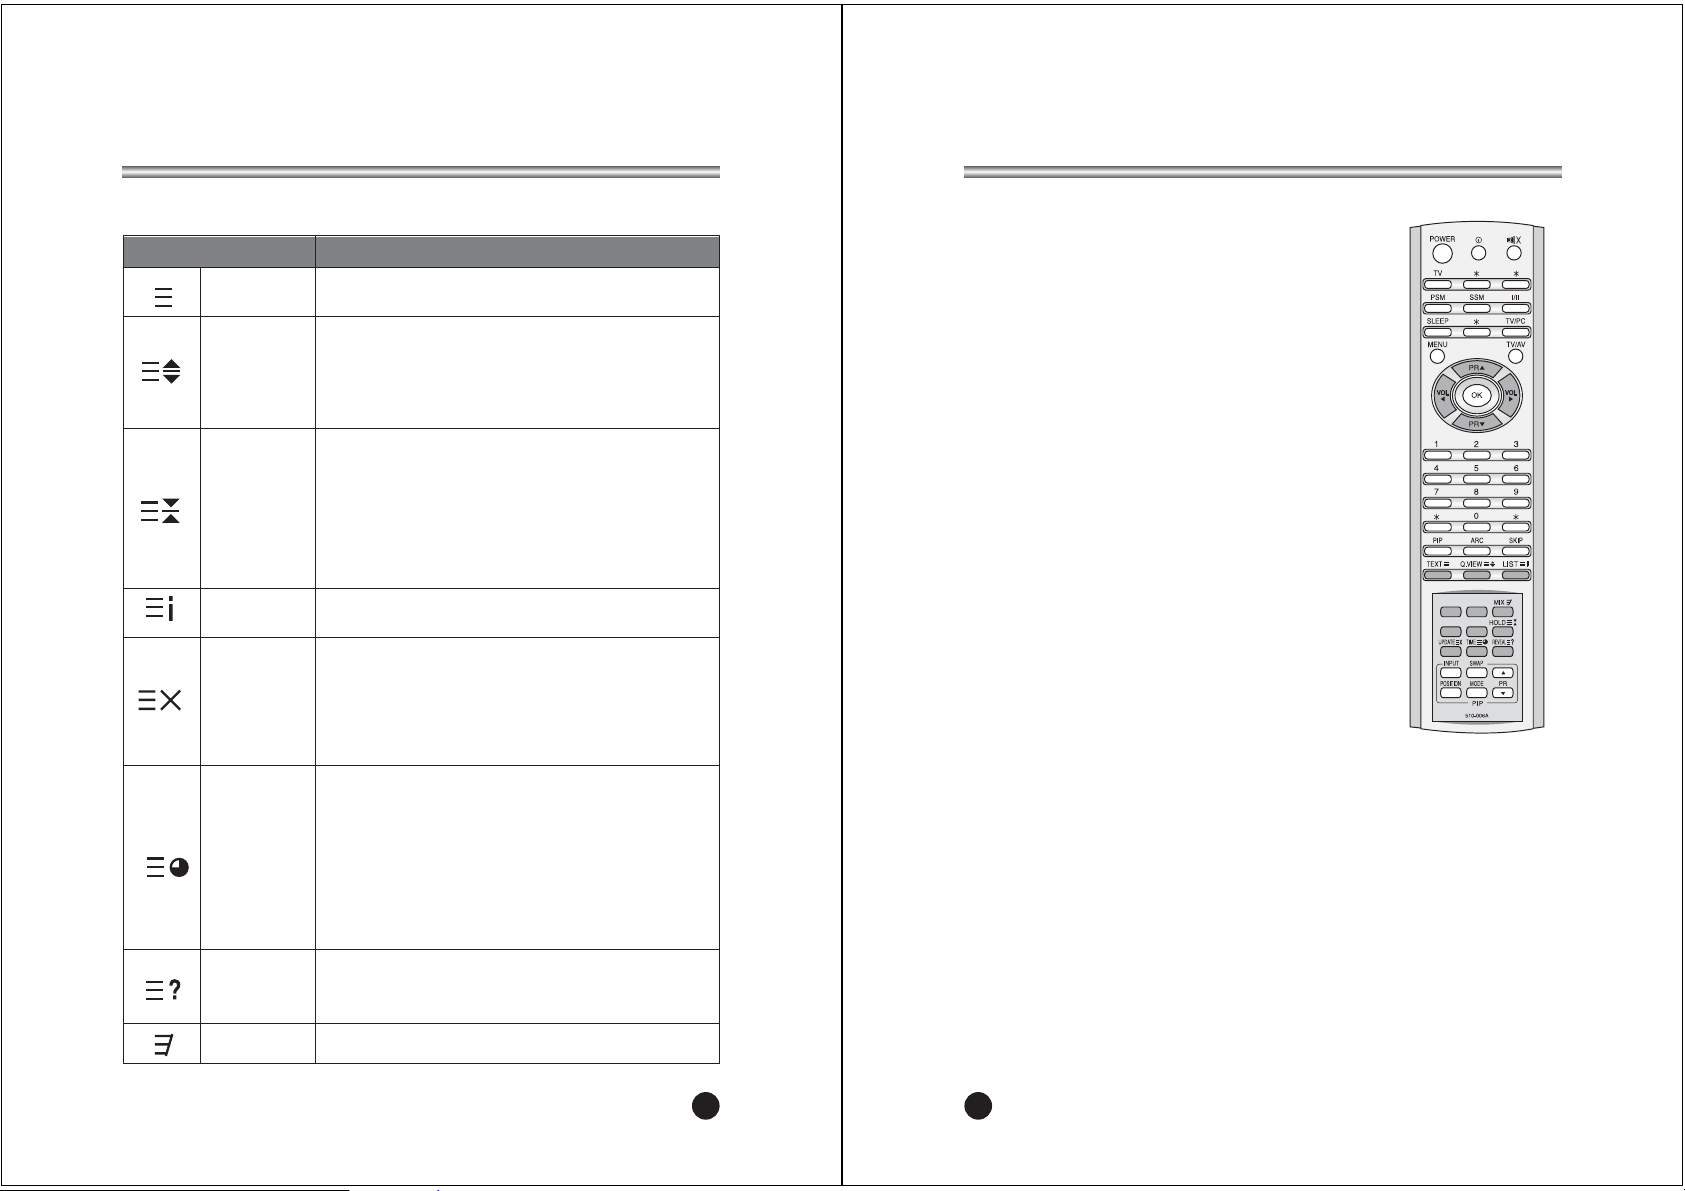
Special TELETEXT functions
Changes TELETEXT mode
Only TELETEXT mode, text mode superimposed on
the TV picture, TV mode.
Selects double height text.
Press this button to enlarge the top half of the page.
Press this button again to enlarge the bottom half of
the page.
Press this button again to return to the normal display.
Stops the automatic page change, which will occur if a
TELETEXT page consists of 2 or more sub pages. The
number of sub pages and the sub page displayed is,
usually, shown on the screen below the time. When
this button is pressed the stop symbol is displayed at
the top left-hand corner of the screen and the
automatic page change is inhibited. To continue press
this button again.
Return to index page
TEXT
FunctionsMENU
SIZE
HOLD
INDEX
Displays the TV picture on the screen while waiting for
the new TELETEXT page. The display will appear at the
top left hand corner of the screen. When the updated
page is available then display will change to the page
number.
Press this button to view the updated TELETEXT page.
UPDATE
When viewing a TV programme, press this button to
display the time at the top right hand corner of the
screen. Press this button again to remove the
display.The time will only be displayed at the channel
that broadcasting Teletext. In TELETEXT mode press
this button to select and hold or change a four-digit
sub page number. This is displayed along the bottom
of the screen. Press this button again to exit this
function.
TIME
Press this button to display the concealed information,
such as solutions of riddles or puzzles.
Press this button again to remove the information from
the display.
REVEAL
MIX
Page 11
22
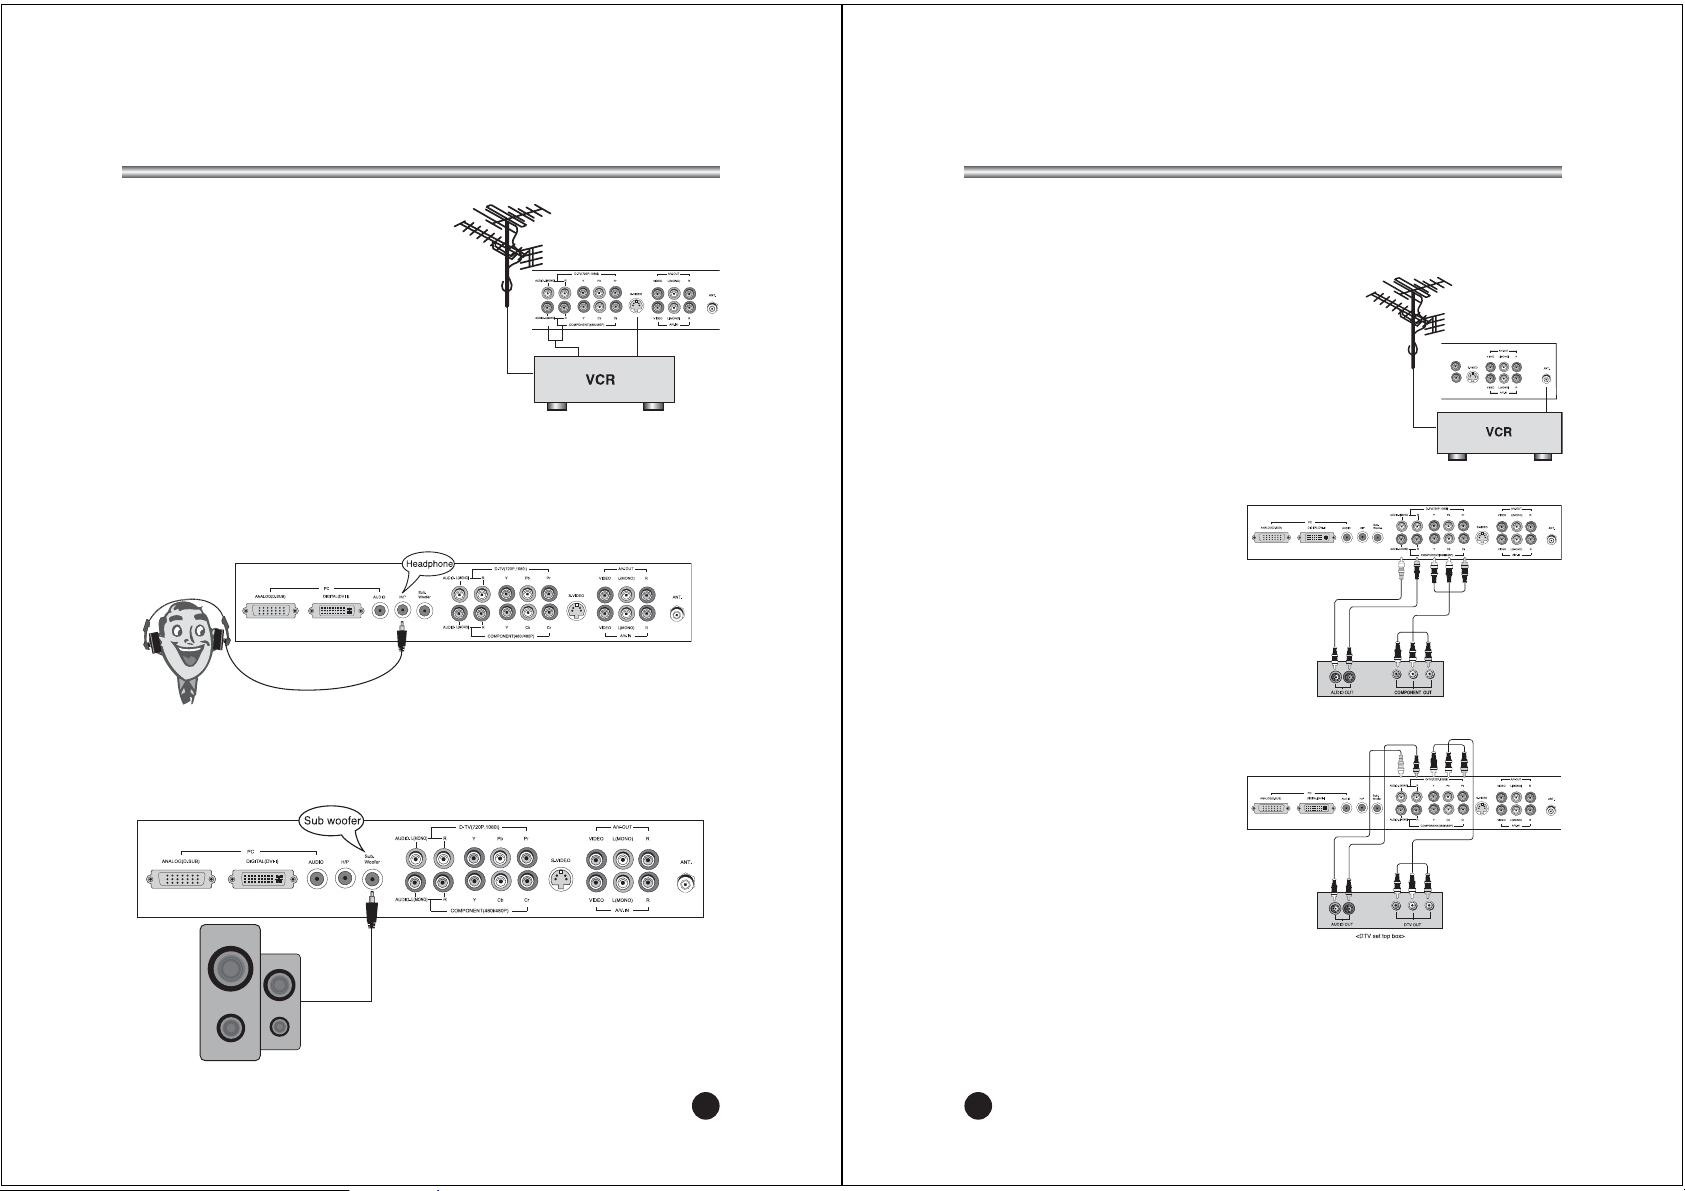
External Equipment Connection
You can connect additional equipment, such as VCRs, camcorders etc. to your set.
Examples are shown below.
When connecting to other equipment, please ensure you turn the main switch OFF to
prevent any damage to the equipment.
Antenna connection
1. Connect RF out on the VCR to the Antenna input
on the rear of the TV.
2. Connect the antenna cable to the antenna in jack
on the VCR.
3. Use the TV/AV button to select TV mode.
4. Press the PLAY button on the VCR.
COMPONENT INPUT
1. Connect the AV out jacks on the AV
device to the COMPONENT on the TV.
2. Use the TV/AV button to select
COMPONENT mode.
3. Press the PLAY button on the DVD.
DTV Input
1. Connect the DTV video output
sockets(Y,Pb, Pr) of the DTV set top
box to the COMPONENT Input
sockets of the set.
2. Connect the audio cable from the DTV set
top box to the Audio Input sockets of the set.
3. Press the TV/AV button to select DTV mode.
23
External Equipment Connection
S-VIDEO input
If using an S-VIDEO source, the picture quality
will be improved over a video source.
1. Connect the S-VIDEO output of a VCR
to the S-VIDEO input on the TV.
2. Connect the audio cables from the
S-VIDEO VCR to the L (MONO) R inputs
on the TV.
3. Select S-VIDEO mode by pressing the
TV/AV button repeatedly.
4. Press the PLAY button on the VCR.
The VCR playback picture appears on the
screen.
Headphone jack
Insert the headphone plug to the headphone jack on the TV. You can listen to the
sound through the headphone; no sound from the speaker on the TV. To adjust the
headphone volume, use the
n
Volume menu in the Sound menu.
Sub woofer output
Connect the cable of the sub woofer to the sub woofer output on the TV.
You can listen to the bass well. To adjust the bass volume, use the Sub woofer menu
in the sound menu.
Page 12
Connecting PC as monitor
24
Resolution
Note:
a. If possible, use the VESA 1,024x768@60Hz video mode to obtain the best
image quality for your LCD monitor. If used under the other resolutions, some
scaled or processed pictures may appear on the screen. The set has been preadjusted to the mode VESA 1,024x 768 @60Hz.
b. Some dot defects may appear on the screen, like Red, Green or Blue spots.
However, this will have no impact or effect on the monitor performance.
800X600
800X600
800X600
800X600
640X480
640X480
640X480
640X480
720X400
1024X768
1024X768
1024X768
1280X768 47.7 KHz 60 Hz
VGA
SVGA
XGA
WXGA
35.2 KHz
37.9 KHz
48.1 KHz
46.9 KHz
31.5 KHz
35 KHz
37.9 KHz
37.5 KHz
31.5 KHz
48.4KHz
56.5 KHz
60.2 KHz
56 Hz
60 Hz
72 Hz
75 Hz
60 Hz
67 Hz
72 Hz
75 Hz
70 Hz
60Hz
70 Hz
75 Hz
Mode Resolution
Horizontal
frequency (KHz)
Vertical
frequency (Hz)
PC ANALOG(D-SUB) INPUT
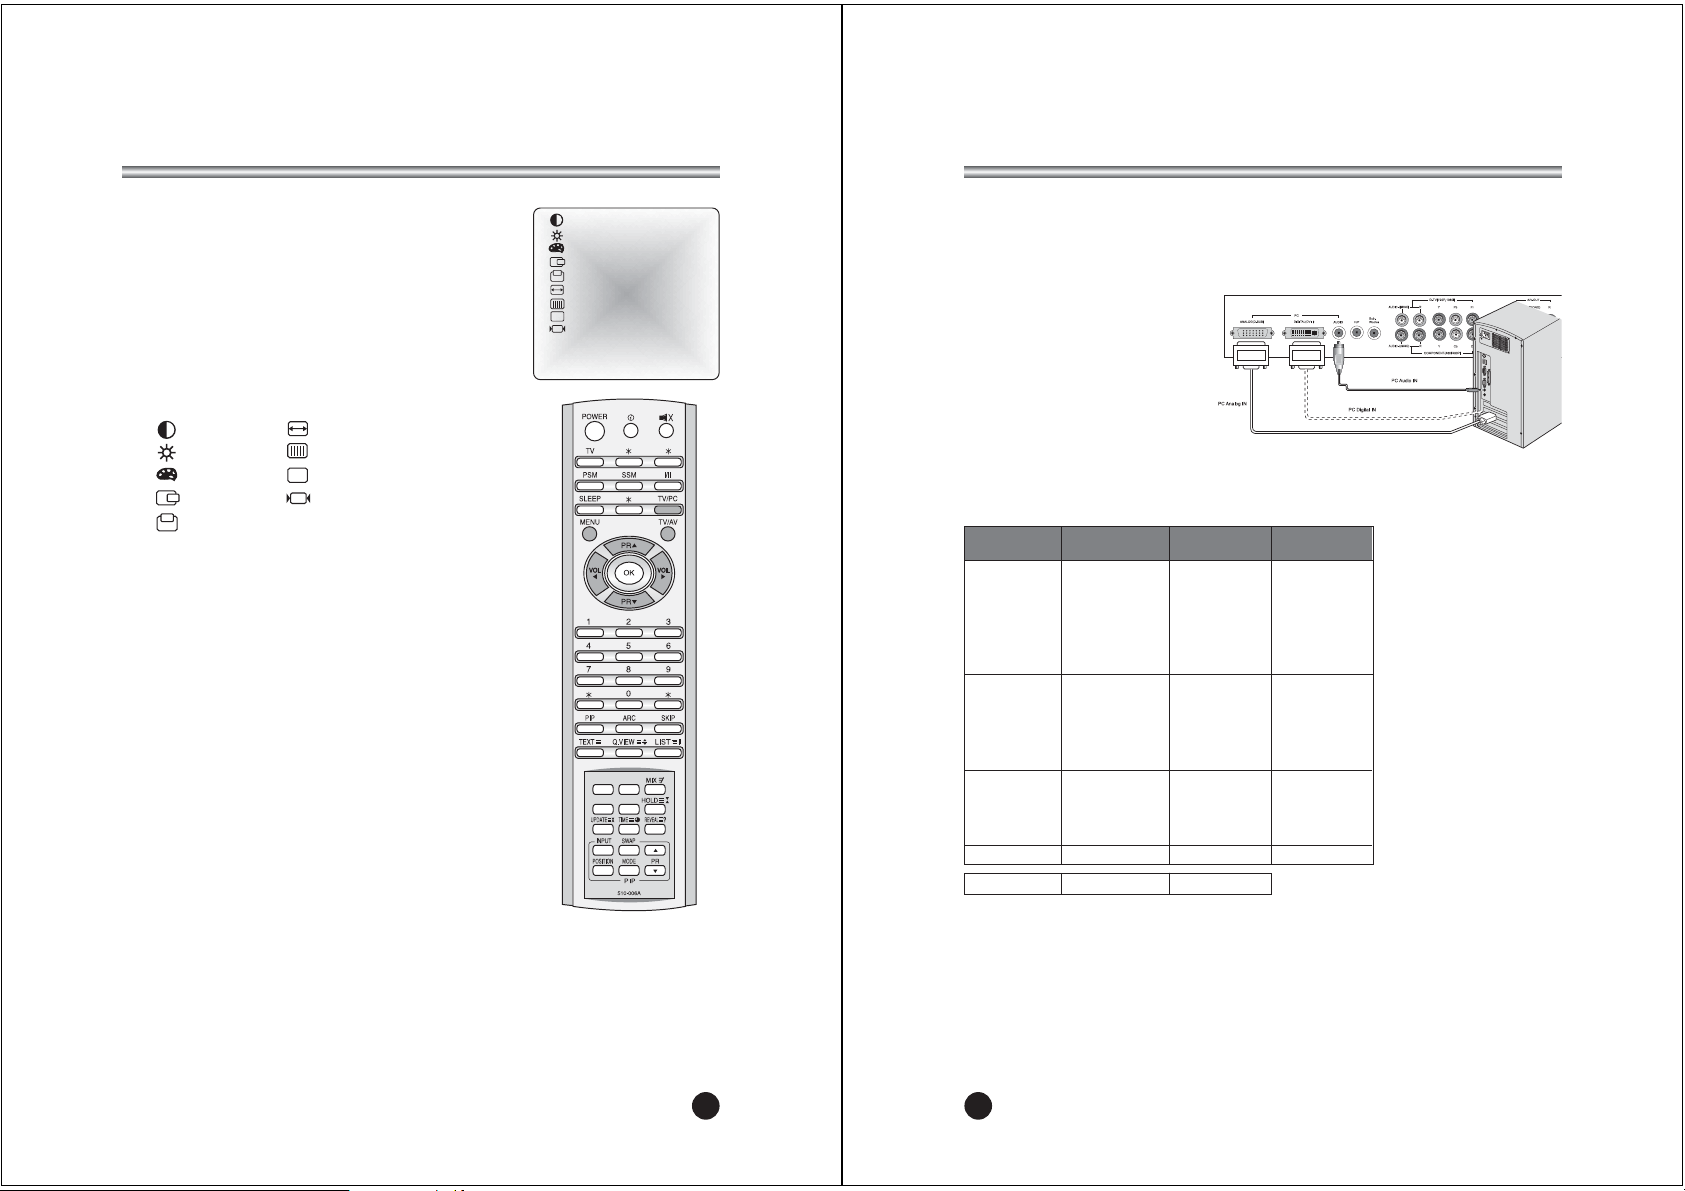
1. Connect the PC ANALOG IN cable (D sub jack) from the monitor output socket of
the PC to the PC/DTV input socket of the set.
2. Connect the PC Audio IN cable from the PC to the PC Audio IN of the set.
3. Press the TV/AV or TV/PC button to select PC ANALOG IN mode.
4. Switch on the PC, and the
PC screen appears on the set.
The set can be operated as
the PC monitor.
DVI (Digital Visual Interface) INPUT
1. Connect the DVI of PC to
the DVI input on the TV.
2. Select PC-DIGITAL mode by pressing the TV/AV button repeatedly. (When
DVI source is connected, TV/AV mode converts PC to DVI mode.)
HDTV
1080i 50Hz
25
Connecting PC as monitor
Picture adjustment
You can adjust picture Contrast, Brightness,
Horizontal/Vertical position,
Clock, Phase, Auto and Reset as you prefer.
1. Press the TV/AV or TV/PC button to select the PC
mode.
2. Press the MENU button.
3. Press the PRxybutton to select the desired
picture item.
4. Press the VOLÏqbutton to make appropriate
adjustments.
Contrast
This function is to adjust picture to light/dark.
Brightness
This function is to adjust brightness of picture.
Temperature
Temperature is a measure of the warmth of the image color.
Horizontal Position/Vertical Position
This function is to adjust picture to left/right and up/down
as you prefer.
Clock
This function is to minimize any vertical bars or stripes visible
on the screen background. And the horizontal screen size will
also change.
Phase
This function allows you to remove any horizontal noise and
clear or sharpen the image of characters.
Auto
This function is for the automatic adjustment of the screen
position, clock and clock phase. The displayed image will
disappear for a few seconds while the Auto-configuration
is in process.
Note: Some signal from some graphics boards may not function properly.
If the results are unsatisfactory, adjust your monitor’s position, clock
and clock phase manually.
Reset
This function allows you to return to the good picture reproduction programmed
at the factory and cannot be changed.
5. Press the TV/AV button to exit menu.
ƇƉ ȖȘ 5-6=<>)>
Contrast
x
0
Ï
100q100
y
1024 X 768
48.4KHz 60.0Hz
AUTO
Contrast
Brightness
Temperature
H-position
V-position
Clock
Phase
Auto
AUTO
Reset
Page 13
26
Product Spec.
Model NLT-40W
Main body
Horizontal size 1085 mm Thickness 110(280) mm
(With stand) Height 632(704) mm Weight 28.5(33) kg
Television system PAL-BG, I, DK / SECAN-BG DK / NTSC-M
Television programme VHF: 2~13 UHF: 21~69 Cable: S1~S41
LCD Panel 40” wide TFT LCD panel
Power consumption 220W
External antenna impedance 75Ω
Audio output 10W + 10W
• DVI-IN 1 • S-VIDEO IN 1
External IN/OUT ports
• HEADPHONE JACK 1 • PC IN 1
• PC AUDIO IN 1 • COMPONENT 1
• ANTENNA IN 1 • D-TV IN 1
• SUB WOOFER OUT 1
AC Power AC 100-240V, 2.5A-1.5A, 50/60Hz
27
Troubleshooting
No picture on screen and no sound
from speakers.
No picture/No picture from AV
terminal.
Picture is displayed, but no sound
from the speakers.
Picture is too light
There are stripes on the screen or
colors fade.
Picture is too dark.
Remote control does not work.
No picture from AV OUT terminal.
The picture is not sharp.
The picture moves.
The picture is doubled or tripled.
The picture is spotted.
• Make sure the LCD TV is not in the standby mode
(The POWER/Standby indicator is red.)
• Turn on the MAIN POWER button on the top of the
display.
• Check the brightness setting of the display.
• Lamp may have malfunction.
• Check the sound setting.
• Make sure the sound is not muted.
• Make sure the connectors of the optional speaker
system are securely inserted.
• Make sure COLOR and CONTRAST settings.
• Is the unit receiving interference from other devices?
Transmission antennas of radio broadcasting stations
and transmission antennas of amateur radios and
cellular phones may also cause interference.
• Use the unit as far apart as possible from devices
that may cause possible interference.
• Make sure BRIGHTNESS setting is not set too low.
• Check to see if BRIGHTNESS setting
• Lamp may have malfunction.
• Change the batteries.
• Make sure the infrared transmitter window is not
receiving strong light such as light from fluorescent
lamps.
• Make sure AV INPUT is not set.
• Make sure the input source other than AV
• The reception may be weak.
• The state of the broadcast may also be bad.
• Make sure the antenna is facing the right direction.
• Make sure the outside antenna is not disconnected.
• Make sure the antenna is facing the right direction.
•There may be reflected electric waves from
mountains or buildings.
• There may be interference from automobiles, trains,
high voltage lines, neon lights, etc.
• There may be interference between the antenna cable
and power cable. Try positioning them further apart.
Check item
Problem
Page 14

28
NEC Australia Pty. Ltd.
ABN 86 001 217 527
Home Electronics Group
NEC Service Centres
New South Wales
Sydney 184 Milperra Rd, Revesby 2212 (02) 9780 8688
Newcastle 120 Parry Street, Newcastle West 2302 (02) 4926 2466
Victoria
Melbourne Unit1/6, Garden Road, Clayton, 3168 (03) 8562 6245
Queensland
Brisbane Unit 4/305 Montague Road, West End, 4101 (07) 3840 5858
Southport Shop 1, 48 Ferry Road, Southport 4215 (07) 5591 3670
South Adelaide
Adelaide 84A Richmond Rd, Keswick, 5053 (08) 8375 5710
Western Australia
Perth 45 Sarich Court, Osbome Park 6017 (08) 9445 5901
For Service in outer areas, please contact your NEC retailer for the
address of the nearest Authorised NEC Service Centre
NEC Australia Pty. Ltd.
Home Electronics Group
244 Beecroft Road EPPING 2121
Tel:131-632
Fax:(02) 9877 2353
 Loading...