

Page 1

NEC-101T
User Guide
Page 2

2
Thank you for purchasing of this product. Before using this product, read this
manual.
Page 3

3
Precautions
To e n sure that you use this product correctly, please read
the following before use. These precautions must be
observed at all times as they contain information
intended to prevent body injury or damage to property.
• Do not use, keep, or leave the devices (this product,
battery pack, AC charger, SIM card, and other supplied
options) in locations subject to high temperatures, such
as near fire, indirect sunlight, inside of a car on a hot
day, or near a heating system.
• Do not put the devices in heating equipment such as a
microwave oven or pressurized container.
• Do not put the devices on the unstable place such as
an un
stable chair.
• Do not disassemble or modify the devices.
• Do not place electrically conductive objects (wires,
pencil leads, etc.) in contact with the charging product
or microUSB connector. Do not insert such materials
inside the product.
• Do not cover or wrap the devices with bedding, etc.
while in using or charging.
•If something unusual happens, such as unusual odor,
overheating, discoloration, or deformation during use,
charge or storage, be sure to:
-Unplug the AC charger from the power outlet.
-Turn off the power.
- Remove the battery pack from this product.
• Do not leave or use the devices in humid or dusty
places.
•Use a battery pack and AC charger specified by NEC
de México, S.A. de C.V.
• Do not throw the devices
, or expose to excessive shock
or mechanical vibration.
• Do not use damaged devices.
• The supplied AC charger and battery pack are
exclusive for this product. Do not use these with other
devices.
Precautions for this product
•Avoid using this product in extremely high or low
temperatures. The ambient temperature for operating
should be 5°C to 40°C (limited to the temporary use in
a bathroom etc. when temperature is above 36°C) with
humidity of 45% to 85%.
• Make sure to turn off this product and stop charging
before you get close to places like a gas station where
a flammable gas is generated.
• Do not turn on the light near a person's or pets' eyes.
• Do not turn on the light against car drivers, etc. Doing
so may interfere with driving and cause a traffic
accident.
•Please turn off this product when inside an airplane,
hospital, or other area where use in prohibited.
- The product may adversely affect electronic or
medical equ
ipment. Follow the instructions provided
by the medical facility for the use of mobile phones.
-Using the phone in an airplane is prohibited, and is
punishable by law. However, to enable use inside an
airplane such as using a non-emission setting, follow
the instructions of the airplane before using.
•Make sure to hold this product at a safe distance from
your ear when you talk with the speaker on, or when
the ring tone sounds. Also, when you play games or
music with an earphone / microphone etc. connected to
the product, adjust the volume properly.
• When viewing the display, maintain a proper distance
between your eyes and the screen in a bright place.
• Do not view the display for a long period continuously.
• There may be cases where the customer's physical
condition or predisposition leads to itchiness, rashes, or
sores. If this occurs, immediately stop using this
product and see a doctor.
For materials of each part, refer to "Material list" (P.6).
• Operations of this product for a long period repeatedly
may cause pain on your hand, arthralgia, backache,
stiff shoulders, etc.
•If you have a weak heart, take precautions when
setting the Vibrator or Ring volume.
•Please turn off the power near electronic equipment
that contains high-precision mechanis
ms or handles
delicate signals.
The product may interfere with the operation of
sensitive electronic equipment. Electronic equipment to
watch out for includes hearing aids, implanted
pacemakers, ICDs, and other electronic medical
devices; fire alarms, automatic doors, and other
automatically controlled apparatus. Users of implanted
pacemakers, ICDs, and other electronic medical
devices are advised to ask their doctor, the
manufacturer of the equipment, or the shop of
purchase whether or not these devices can be affected
by radio waves.
• If the display or camera lens is broken, be careful with
broken glass and any exposed produ
ct parts. A
protective film is used for the display, and a plastic
panel is used for the camera lens surfaces to avoid
glass scattering. However, touching broken or exposed
parts may cause injury.
• If the display is broken and the liquid crystal leaks, do
not touch it with your face, hands, etc.
• The display has a protective film on its surface. It helps
you ensure safety even when the display gets damaged
due to a fall or shock (shatterproof hardened glass). Do
not remove or scratch the protective film.
• Do not swing this product by the strap or other parts
.
• Do not use this product outside when you hear thunder.
• The service of the emergency calls is not supported for
all areas. Please only consider this product is one way
to make emergency calls, such as calling the
ambulance.
• Do not place water or other liquid, metal items, easily
burnable objects, etc., around the SIM card tray or
microSD card slot.
• Do not paint or put labels / stickers on this product.
Page 4

4
Precautions for children and pets
• Keep the devices out of children's or pets' reach.
Children or pets may try to swallow them, etc., or suffer
injury.
• Keep your pets away from the battery pack as they may
accidentally bite it.
• If a child is to use this product, instruct him / her on how
to use it. Check if he / she always uses this product
correctly as you instruct.
Precautions for charging
•Pay special attention when you use this product
connected to the AC charger for a long period.
If you use for a long time while charging, the
temperature of the product, battery pack, or AC charger
may rise.
If you touch the warm part of these devices for a long
period of time, it may cause redness, itch, skin
irritation, or low temperature burns depending on your
constitution or physical condition.
• Do not use the AC charger if the microUSB cable is
damaged.
• Do not use the AC charger in humid locations such as
a bathroom.
• Do not touch the AC charger when you see lightning or
hear thunder.
• Do not use the AC charger outside.
• Do not short-circuit the charging terminals when the AC
charger is pl
ugged into the power outlet. Also, do not
let the charging terminals contact with your body (hand,
fingers, etc.).
• Do not put heavy objects on the microUSB cable of the
AC charger.
• When plugging / unplugging the AC charger into / from
the power outlet, make sure that no metallic straps or
other metallic objects are caught between the plug and
the socket.
• When plugging the AC charger into the power outlet,
make sure to insert it firmly.
•Use the specified voltage and current.
AC charger: AC 100 V to 240 V (household AC outlet
only)
• Wipe off any dust on the plug.
•Always grasp the AC charger when unplugging the plug
from the power outlet. Do not pull the microUSB cable
itself.
• If water or other liquid gets into the AC charger,
immediately unpl
ug it from the power outlet.
• Unplug the AC charger from the power outlet when the
AC charger will be left unused for a long period.
• Unplug the AC charger from the power outlet before
cleaning it.
• The ambient temperature of the room should be 5°C to
35°C.
Precautions for the battery pack
• Check the orientation of the battery pack before
attaching. If you have difficulty attaching to this product,
do not put excessive pressure on the battery pack.
• Do not place metal items such as wires in contact with
the charging terminals. Also, do not carry or store the
battery pack with metal items such as a necklace.
• Do not throw the battery pack into fire.
• Do not puncture the battery pack, hit it with a hammer
or step on it.
• Do not use or charge the battery pack if wet.
•Never use the battery pack if something abnormal such
as deformation or damaged has occurred.
• If the battery pack leaks or emits an unusual odor, stop
using it immediately and move it away from any flame
or fire.
• If the battery pack leaks, do not touch any leaked
battery fluid etc., with your face, hands, etc.
Failure to observe this precaution may caus
e loss of
eyesight or damage to your skin. If the battery fluid etc.
gets into your eyes or mouth, or it adheres to your skin
or clothing, immediately rinse with clean water. In this
case of contact with your eyes or mouth, see a doctor
immediately after rinsing.
Precautions for the SIM card
• Be careful with sharp edges when removing the SIM
card.
Precautions for using near electric
medical devices
•If you are wearing electronic medical devices, ask your
doctor whether the devices can be affected by radio
waves before using.
• Take care of the following inside hospitals.
- Do not take this product into the operating room,
intensive care unit (ICU), or coronary care unit
(CCU).
-Turn off the power even in hospital lobbies, waiting
rooms and corridors if electronic medical devices
may be in use near you.
-For use inside medical institutions, please follow the
instructions given at individual locations.
• A person with an implanted pacemaker or ICD should
use or carry this product at a distance more than 22 cm
from the site of implantation. Radio waves emitted by
thi
s product may adversely affect implanted
pacemakers and ICDs when using in close proximity.
Page 5

5
Precautions for driving
• Before using in a vehicle, ask the manufacturer or sales
agent whether the operation of the vehicle can be
affected by radio waves. In some types of vehicle, using
this product may interfere with the operation of the
vehicle's electronic equipment. In this case, stop using
this product immediately.
•Be carefu l when using this product while driving. A fine
may be imposed for holding a mobile phone while
driving. However, exceptions are made in case of
emergency, such as to safeguard injured persons or to
maintain public safety.
•Please check the law and regulations of the area for
using a mobile phone, and follow them.
•Please do not place this product near the air bag of a
car. When the air bag operates, it may be inj
ured by
this product.
Disposing the battery pack
• Do not dispose of used battery packs with ordinary
garbage. Check local regulations by contacting your
local city office or your household waste disposal
service for disposing.
Page 6
6
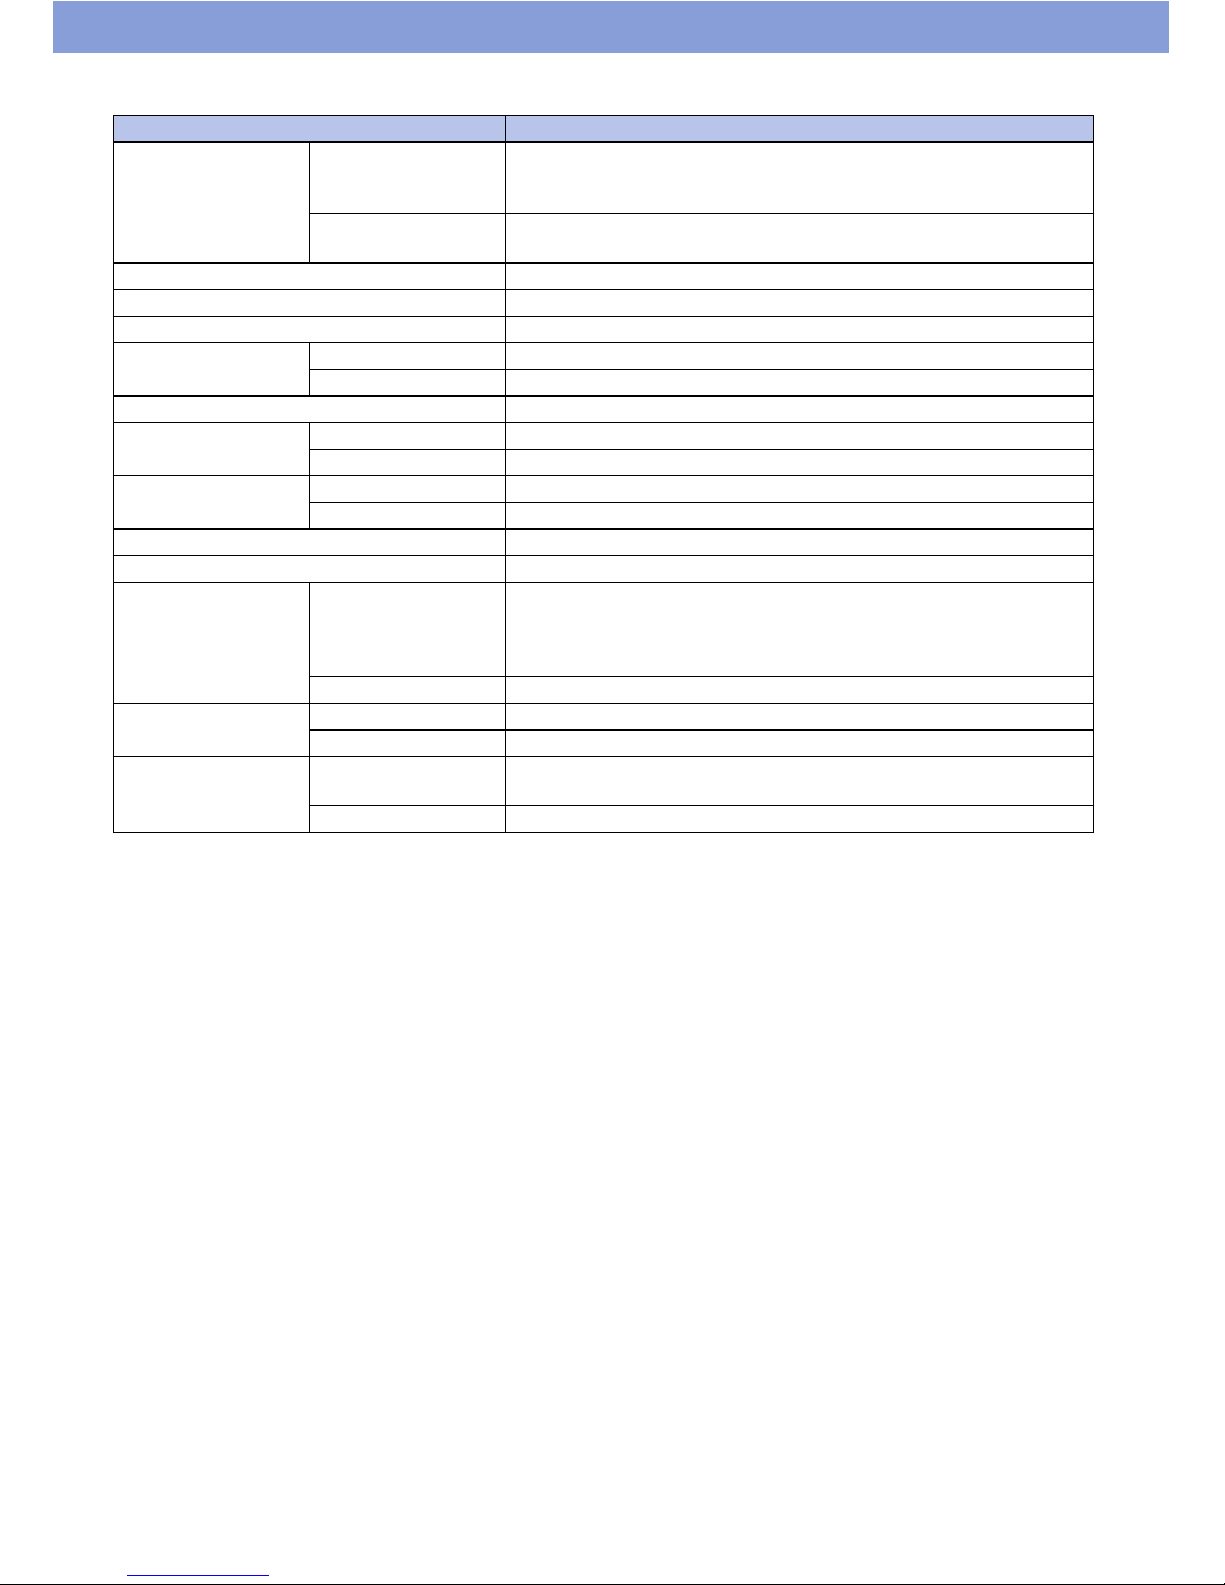
■ Material list
Part Material / Surface treatment
Outer case Display surface Nylon resin / UV coating
PC resin / UV coating
Acrylic resin / UV coating
Battery side Nylon resin / UV coating
PPE Polyphenyleneether (black sheet under back cover)
Camera lens Acrylic resin / UV coating
Display Glass
Anti-splinter film PET resin
Key Power switch PC / UV coating
Volume keys PC / UV coating
Side frame Aluminum / Alumite painting
Back cover Outer side PC resin / UV coating
Water stop Silicone / Silicon coating
Cap (microUSB
connector)
Outer side PC resin / UV coating
Water stop Silicone / Silicon coating
microUSB connector Stainless alloy
Machine screw Stainless alloy
Battery pack recess Recess surface Side: Nylon resin
Bottom: Polyester film (Label)
: Stainless alloy (Metal Part)
: Epoxy resin (Substrate)
SIM slot tray POM resin
Battery terminal Terminal connector LCP resin
Terminals Gold plating
Battery pack
(terminal)
Battery pack Resin: PC resin
Label: PET resin
Terminals Gold plating
Page 7

7
Handling Precautions
• While this product is designed to be waterproof, do not
allow water to seep into this product. Also, do not allow
accessories and optional equipment to get wet.
The battery pack, AC charger, SIM card, microSD card,
and other supplied options are not waterproof. Do not
use them in a humid place such as a bathroom or in the
rain. If you carry this product close to your body,
perspiration may corrode the internal parts of this
product and cause malfunction. Note that if trouble is
diagnosed as exposure to water or other liquid, repair
of this product may not be covered by the warranty or
repair may not be possible. Repair, when possible, is
not covered by the warranty and is carried out at cost.
• Wipe with a soft, dry cloth (such as
an eyeglass
cleaning cloth).
-Rubbing the display of this product with a dry cloth
may scratch the display surface.
- The display surface may be stained if moisture or dirt
is left on it for a long period.
-Never use chemicals such as alcohol, thinners,
benzen, or detergents, as these agents may erase
the printing on this product or cause discoloration.
• Occasionally clean the connection terminals with a dry
cotton swab, etc.
- Soiled connectors may result in poor connections,
loss of power, or incomplete charging. Wipe with a
dry cloth or cotton swab.
• Do not place this product near an air conditioning vent.
Condensation may form due to rapid changes in
temperature, and this
may cause internal corrosion and
malfunction.
• Do not put excessive pressure on this product or
battery pack.
- Do not put this product in a bag filled with many
objects or sit down with it in a hip pocket.
-Excessive pressure may result in malfunction or
damage to the display, internal circuit or the battery
pack, etc. Also, if an external device is connected to
the external connector terminal (earphone /
microphone terminal), excessive pressure may result
in malfunction or damage to the connector.
• Do not scratch the display with metallic objects.
Handling the product
• Do not use forcefully push or use a pointed object
(nails, ball pointed pen, pin, etc.) on the touch panel.
• Reception may be affected if you use this product near
a land-line phone, television, or radio in use. Use this
product away from such devices.
•Ensure this product does not come near a fire such as
a stove, or fall from a tabletop (the product may slide
when it vibrates).
• When connecting an external device to the microUSB
connector (earphone / microphone terminal), do not
insert at an angle to connect or pull the cord.
•It is normal for this product to become warm while
being used or charged. This is not a malfunction.
• Do not leave the camera exposed to direct sunlight.
Doing so may discolor or burn its components.
• Keep the microUSB connector cap closed when not in
use.
• Do not use this product with the back cover removed.
Doing so may cause the battery pack to fall out, or
cause malfunction or damage.
• Do not insert hard, sharp objects into the earpiece,
mouthpiece, speaker, or sub-microphone.
• Do not remove the microSD card or turn off the power
while in use. Doing so may cause data loss or
malfunction.
• Do not let magnetic cards, etc. come close to this
product or its parts. The magnetic data in cash cards,
credit cards, prepaid cards, floppy disks, etc. may be
erased.
• Do not let strong magnetic objects come close to this
product or its parts. Strong magnetism may ca
use a
malfunction.
• Keep a separate record of the information you have
registered for this product.
- NEC de México, S.A. de C.V. bears no obligation or
responsibility in the event that data is altered or lost.
Handling the battery pack
• The battery pack is replaceable.
Battery life varies depending on usage conditions, etc.,
but it is time to change the battery charger when the
usage time has become extremely short, even when it
has been fully charged. In this case, purchase a new
battery pack.
• Depending on the usage condition, the battery pack
may expand slightly when the battery life is almost over.
This is not a malfunction.
• Do not store the battery pack in the following cases.
- The battery is fully charged (immediately after the
charging is complete).
- The battery has run out (the phone cannot power on).
The performance and life of the battery pack may
deteriorate.
It is recommended that you store the battery pack with
around 40% of a full charge.
Page 8

8
Handling the AC charger
• Do not charge the battery pack at the following places.
-A humid, dusty or unstable place
- Near a land-line phone, TV, or radio
• Do not expose the AC charger to strong shocks. Do not
deform the charging terminal.
•If you use an electrical outlet with an unplugging-
protection mechanism, follow the instructions of the
manual for the outlet.
• Do not use a car DC adapter to charge the battery pack
when the car engine is not running.
Handling the SIM card
• Do not apply excessive force to the SIM card when
attaching / removing it.
• Note that the warranty does not cover damage caused
by inserting the SIM card into another type of the IC
card reader or writer.
•Always keep the IC part clean.
• Wipe with a soft, dry cloth (such as an eyeglass
cleaning cloth) for cleaning.
• Keep a separate record of the information you have
registered in your SIM card.
- NEC de México, S.A. de C.V. bears no obligation or
responsibility in the event that data is altered or lost.
• Do not damage, scratch, unnecessarily touch, or short-
circuit the IC part.
• Do not drop the SIM card or expose it to strong shocks.
• Do not bend the SIM card or place a heavy object on it.
• Do not put a label or sticker on the SIM card when
attaching it to this product.
Statements of
Compliance
COFETEL
"The operation of this product is the subject to the
following conditions:
(1) This product may not cause harmful interference, and
(2) This product must accept any interference, including
interference that may cause the undesired operation."
Page 9

9
Table of Contents
Precautions ...................................................................3
Precautions for this product ......................................3
Precautions for children and pets .............................4
Precautions for charging...........................................4
Precautions for the battery pack ...............................4
Precautions for the SIM card ....................................4
Precautions for using near electric medical devices
..................................................................................4
Precautions for driving ..............................................5
Disposing the battery pack........................................5
Handling Precautions...................................................7
Handling the product.................................................7
Handling the battery pack .........................................7
Handling the AC charger...........................................8
Handling the SIM card ..............................................8
Statements of Compliance...........................................8
COFETEL .................................................................8
About This Manual......................................................11
Notes............................................................................11
Bluetooth
®
Function....................................................12
Wireless LAN...............................................................12
Waterproof / Dustproof Function ..............................13
Things to keep in mind............................................13
Important notices ....................................................14
Draining water when the product gets wet..............15
When charging the battery pack .............................15
Getting Started .......................................16
Parts Names ................................................................16
Removing / Attaching the Back Cover......................16
Inserting the SIM Card................................................17
Inserting the microSD Card .......................................17
Attaching the Battery Pack ........................................18
Opening / Closing the microUSB Connector Cap ...18
Charging the Battery ..................................................19
Charging with the PC connection............................19
Basic Operation ..........................................................19
Using the front keys ................................................19
Using the touch panel .............................................19
Turning Power On and Off .........................................20
Turning power on ....................................................20
Turning power off ....................................................20
Initial Settings .............................................................21
Access Point Settings ................................................21
Adding an access point...........................................21
Initializing an access point ......................................21
Wi-Fi Settings ..............................................................22
Connecting with Wi-Fi easy settings.......................22
Adding a Wi-Fi network manually ...........................22
Disconnecting a connected Wi-Fi network..............22
Optional settings for Wi-Fi.......................................22
Setting an Email Account ..........................................23
Setting a Google or other account ..........................23
Idle Screen...................................................................23
Adding an application shortcut................................23
Creating an application folder.................................24
Setting the wallpaper ..............................................24
Status Bar.................................................................... 24
Status icons ............................................................24
Notification icons..................................................... 25
Applications List Screen............................................25
Applications list ....................................................... 26
Widgets list ............................................................. 27
Task Manager.............................................................. 27
Text Entry .................................................................... 28
Calling ..................................................... 29
Making a Call............................................................... 29
Operations during a call..........................................29
Making an international call ....................................29
Receiving a Call ..........................................................30
Call forwarding ........................................................ 30
Voicemail ................................................................ 30
Using the earphone cable (hands-free phone) .......30
Call Log .......................................................................31
Contacts (Phonebook) ...............................................31
Creating a contact...................................................31
Displaying the profile screen...................................32
Favorites...................................................................... 32
Email / Browser ...................................... 33
Email ............................................................................ 33
Displaying email......................................................33
Creating and sending email .................................... 33
Opening mailboxes ................................................. 33
Changing email settings ......................................... 33
Gmail............................................................................ 34
Displaying Gmail..................................................... 34
Creating and sending Gmail ................................... 34
Managing message threads ...................................34
Changing Gmail settings.........................................34
Messaging (SMS / MMS) ............................................35
Creating and sending Message ..............................35
Displaying sent / received Message .......................35
Displaying the Message conversation ....................35
Displaying the folder list.......................................... 35
Moving Message.....................................................35
Deleting Message ................................................... 35
Changing Message settings ...................................35
Google Talk .................................................................36
Browser ....................................................................... 36
Using bookmarks .................................................... 37
Changing browser settings ..................................... 37
Android Market....................................... 38
Installing Applications ............................................... 38
Deleting applications............................................... 38
Changing Android Market settings..........................38
Page 10

10
GPS..........................................................39
Enabling the Location Service ..................................39
Google Maps ...............................................................40
Looking up directions ..............................................40
Navigation ...................................................................41
Places ..........................................................................41
Latitude ........................................................................42
Multimedia...............................................43
Camera.........................................................................43
Shooting photos......................................................43
Shooting videos ......................................................43
Gallery..........................................................................44
Music Player................................................................44
Using playlist...........................................................45
Clock / Calendar .....................................46
Clock ............................................................................46
Setting the alarm .....................................................46
Calendar ......................................................................46
Creating a schedule ................................................46
Changing calendar settings ....................................46
Settings ...................................................47
Setting List ..................................................................47
Wireless & networks ...............................................47
Call settings ............................................................47
Ringtones and sounds ............................................48
Display ....................................................................48
eco mode ................................................................48
Location & security..................................................48
Applications.............................................................49
Accounts & sync .....................................................49
Privacy ....................................................................49
Storage ...................................................................49
Language & keyboard .............................................49
Voice input & output................................................50
Accessibility ............................................................50
Date & time .............................................................50
About phone............................................................50
Wizard.....................................................................50
Mobile Networks .........................................................51
Bluetooth .....................................................................51
Connecting to a Bluetooth device ...........................52
Connecting to a VPN ..................................................52
Adding a VPN .........................................................52
Connecting to a VPN ..............................................52
Security Code..............................................................53
PIN1 code / PIN2 code ...........................................53
Enabling the SIM's PIN ...........................................53
PIN unblocking key (PUK) ......................................53
File Management ....................................54
Bluetooth Communication .........................................54
Sending...................................................................54
Receiving ................................................................54
Connecting a PC .........................................................54
Appendix.................................................55
Troubleshooting .........................................................55
Error message ........................................................57
Warranty and After-Sales Service............................. 57
Warranty ................................................................. 57
After-sales service .................................................. 57
Precautions .................................................................58
Memory dial (Contacts) and downloaded data .......58
Updating Software ......................................................59
Before updating software........................................59
Updating immediately .............................................59
Confirming update ..................................................60
Automatically Software Update (Auto update)........60
Specifications ............................................................. 61
Radio Frequency (RF) Signals .................................. 63
FCC Regulations.........................................................64
Declaration of Conformity .........................................65
Intellectual Property Right......................................... 65
Copyright and portrait rights ...................................65
Trademarks.............................................................65
Others .....................................................................66
Notational conventions for Windows....................... 66
GPL / LGPL - applicable software .......................... 66
Page 11
11
About This Manual
• Some of contents of this manual are not supported in
all countries / regions or by all networks and / or
service providers in all areas.
Contact your network operator or service provider for
any specific service or feature and to determine
whether additional access or usage fees apply.
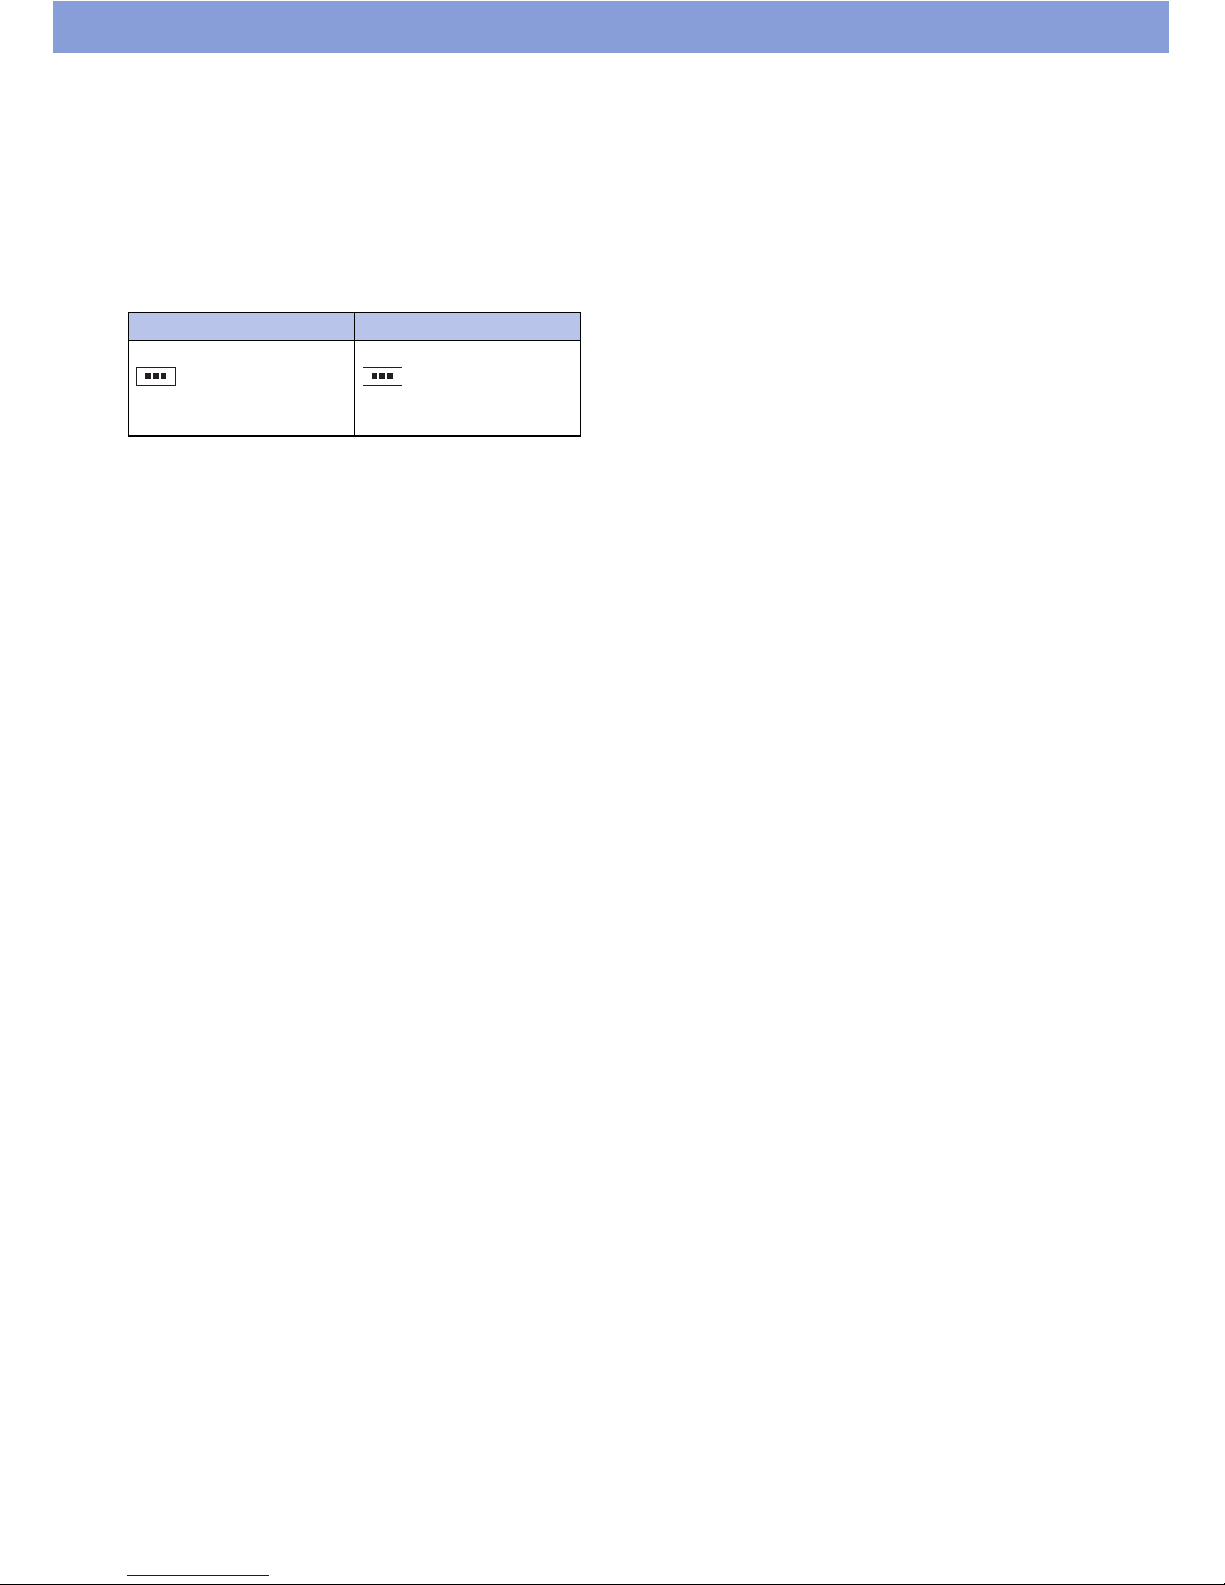
•In this manual, operations are simplified as follows.
•Display examples used in this manual are for
explanation only and may be different from the actual
display.
•This manual assumes the settings are the same as
they were when you purchased the product, Therefore
the views
and operations may differ if you have
changed the settings.
• The reproduction or reprinting of all or part of this
manual without prior permission is prohibited.
• The contents of this manual are subject to change
without notice.
Notes
• Google applications and service content may change
without notice.
• Setting the phone to silences the ringtone and
notification sounds. However, sound from video
playback, music, etc., is unaffected and will continue to
be heard.
•You can update the software (P.59).
• Updates for product quality improvement and operating
system (OS) upgrades may be applied. Such updates
or upgrades may cause applications you are using to
be unusable or have unexpected errors.
• When the memory capacity of a microSD card or the
product become nearly full, applications may not
function correctly. If this happens, delete some of the
saved data.
•For security, set a screen lock password (P.48).
• Refer to the Google Inc. terms of usage regarding
services that Google provides. Also refer to the
respective terms of usage for other web services.
•If this product is lost, change your password for each
account via a PC to prevent other persons from using
your account with Google services such as Google
Talk, Gmail, Android Market, etc.
Description Operation
From the Idle screen, tap
` "Settings" `
"Wireless & networks".
From the Idle screen, tap
, then "Settings",
then "Wireless &
networks".
Page 12

12
Bluetooth® Function
• This product supports a security function
compliant with Bluetooth standards, but the
security may not be sufficient, depending on the
setting.
Concern about communication using the Bluetooth
function.
• NEC de México, S.A. de C.V. is not responsible for
data leak when making data communications using
Bluetooth.
• You can use a headset, handsfree, audio, object
push, serial port, and phonebook access on the
product. The audio / video remote control may be
available for audio. (Only on Bluetooth compatible
devices.)
• Bluetooth cautions
The operating frequency band of this product is
used by industrial, scientific, consumer and
medical equipment including microwave ovens,
premises radio stations for identifying mobile units
used in manufacturing (radio stations requiring a
licence), specified low power radio stations (radio
stations requiring no licence) and amateur radio
stations. (Hereinafter, any of the above stations is
referred to as "another station").
1 Before using Bluetooth with this product, confirm that
"another station" is not being operated nearby.
2 In the event that this product is causing radio
interference with "another station", immediately
change the operating frequency or stop radio wave
emission by turning off the power, etc.
3 If you have further questions, contact General
Inquiries on the last page of this manual.
Wireless LAN
• A wireless LAN (Wi-Fi) uses radio waves for
transmission, and thereby has the benefit of
allowing a LAN connection anywhere in an area
reachable by those radio waves. Conversely,
eavesdropping by a third party or wrongful
intrusion are possible if security settings are not
configured. You are advised to use discretion and
configure security settings before using.
• Wireless LAN
Do not use wireless LAN near magnetic devices such as
electrical appliances or AV / OA devices, or in radio
waves.
- Magnetism or radio waves may increase noises or
disable communications (especially when using a
microwave oven).
- When used near TV, radio, etc., reception
interference may occur, or sound and images on the
TV screen may be disturbed.
- If there are multiple wireless LAN access points
nearby and the same channel is used, search may
not work correctly.
• Available channels vary depending on the country /
region.
•For use in an aircraft, contact the airline beforehand.
•For use of Wi-Fi in another country / region , there may
be limitations on the locations where yo
u can use it.
Before using Wi-Fi in another country / region, confirm
the locally available frequencies, laws, regulations, and
other conditions for the use of Wi-Fi.
Page 13

13
• 2.4 GHz device cautions
The operating frequency band of this Wi-Fi device is
used by home electrical appliances such as microwave
ovens, as well as industrial, scientific and medical
equipment including private radio stations on factory
premises for identifying mobile units used in
manufacturing lines (radio stations requiring a licence),
specified low power radio stations (radio stations
requiring no licence), and amateur radio stations (radio
stations requiring a licence).
1 Before using the device, confirm that private radio
stations for identifying mobile units, specified low
power radio station
s and amateur radio stations are
not being operated nearby.
2 If the device causes harmful radio interference to
private radio stations for identifying mobile units,
immediately change the frequency band or stop use,
and contact a Call Center on the Warranty Guide.
3 If the device causes radio interference to low power
radio stations or amateur radio stations, contact a
Call Center on the Warranty Guide.
Waterproof / Dustproof
Function
This product is waterproof to IPX5 / IPX7 and dustproof
to IP5X standards if the microUSB connector cap is
closed as well as the back cover is securely attached.
- IPX5: means that this product continues to function as
a phone after being sprayed from all directions with
12.5 liters of water per minute from a 6.3 mm diameter
nozzle for at least 3 minutes, from a distance of approx.
3 meters.
- IPX7: The product retains phone functionality after
slowly immersing in still, room-temperature tap water to
a depth of 1 meter and leaving it there for 30 minutes
before bringing it out of the water.
- IP5X: The product can be operated and the safety can
be kept after keeping the product inside of the
equ
ipment including dust with a diameter of less than
75µm for 8 hours.
•You can talk without an umbrella in the rain (approx.
20 mm of rain in an hour).
• Do not attach / remove the back cover or do not open /
close the microUSB connector cap when your hands
are wet or when this product has water drops on it.
•You can rinse the product by immersing and slowly
moving in tap water of room temperature filled in a
bowl, or rinse it with hands under light running water
from the faucet.
-Rinse the product with the back cover securely
attached while covering the external connector
terminal cap to prevent it from opening.
- Do not use a brush, sponge, soap, or detergent for
washing.
- Do not apply running water directly to the mouthpiece
or earpiece / speaker.
- Do not immerse or drop in pool water or sea water.
Things to keep in mind
• Before use, ensure that you securely close the
microUSB connector cap and back cover so that they
are completely attached. If any fine dirt (fine fibers,
hairs, or sands) is between the cap / cover and the
product, water could enter the inside of the product.
• Do not use the product (operate keys, etc.) under
water.
• Do not spray or immerse the product in liquids other
than water of room temperature, such as soap /
detergent / bath powder, sea water, pool, hot spring,
sand / mud.
Page 14
14
Important notices
• If the product gets wet with the microUSB connector
cap or the back cover open, the liquid may get inside
the product causing electric shock or malfunction. Stop
using the product, turn the power off, remove the
battery pack and contact a Call Center on the Warranty
Guide.
• The microUSB connector cap and the rubber packing
of the back cover play an important role in maintaining
waterproof / dustproof function. Do not remove or
scratch them. Also, prevent dust from adhering to them.
If the microUSB connector cap and the rubber packing
of the back cover is damaged or deformed, contact a
Call Center on the Warranty Guide.
• Do not insert sharp objects through the gap of the
microUSB connector cap or back cover. Doing so may
damage the rubber packing and allow water to seep in.
• If the back cover is damaged, replace it. Water may
seep into the inside of the product through a damaged
section causing electric shock, corrosion of the battery
pack, or other malfunctions.
• Do not leave the product with water drops.
• To prevent condensation, do not bring the produ
ct from
a cold place to a warm place, etc., without letting the
product get back to room temperature.
• Do not apply water flow stronger than allowed (e.g.,
such water flow that gives you pain when applied to
your skin directly from a faucet or shower head). Doing
so may cause malfunction though the product is
waterproof to IPX5 standard.
• Do not wash the product in a washing machine, etc.
• Accessories and options are not waterproof.
•Do not put the product in hot water, use it in a sauna or
apply hot air flow to it.
• Do not leave the product on the sand at a beach.
Sand might enter the mouthpiece or earpiece / speaker
and result in smaller sound.
•Using the product with water or sand still in it may result
in unclear
sound.
• Water may enter by the microUSB connector cap or
back cover even if only a tiny amount of sand lodges in
them.
• Do not poke the mouthpiece or earpiece / speaker with
cotton swabs or sharp objects. The waterproof /
dustproof protection may deteriorate.
•This product does not float on water.
• Do not drop the product. Scratches may lead to
lowered waterproof / dustproof capability.
• Do not leave water on the mouthpiece or earpiece /
speaker. If water adheres to the product, the volume
during a call or ringtone may be decreased or sound
quality may deteriorate. In such a case, drain the water
to recover the function.
• NEC de México, S.A. de C.V. does not guarantee all
operations under actual use conditions. Malfunctions
deemed to be caused by inappropriate operation by the
customer are not covered by the warranty.
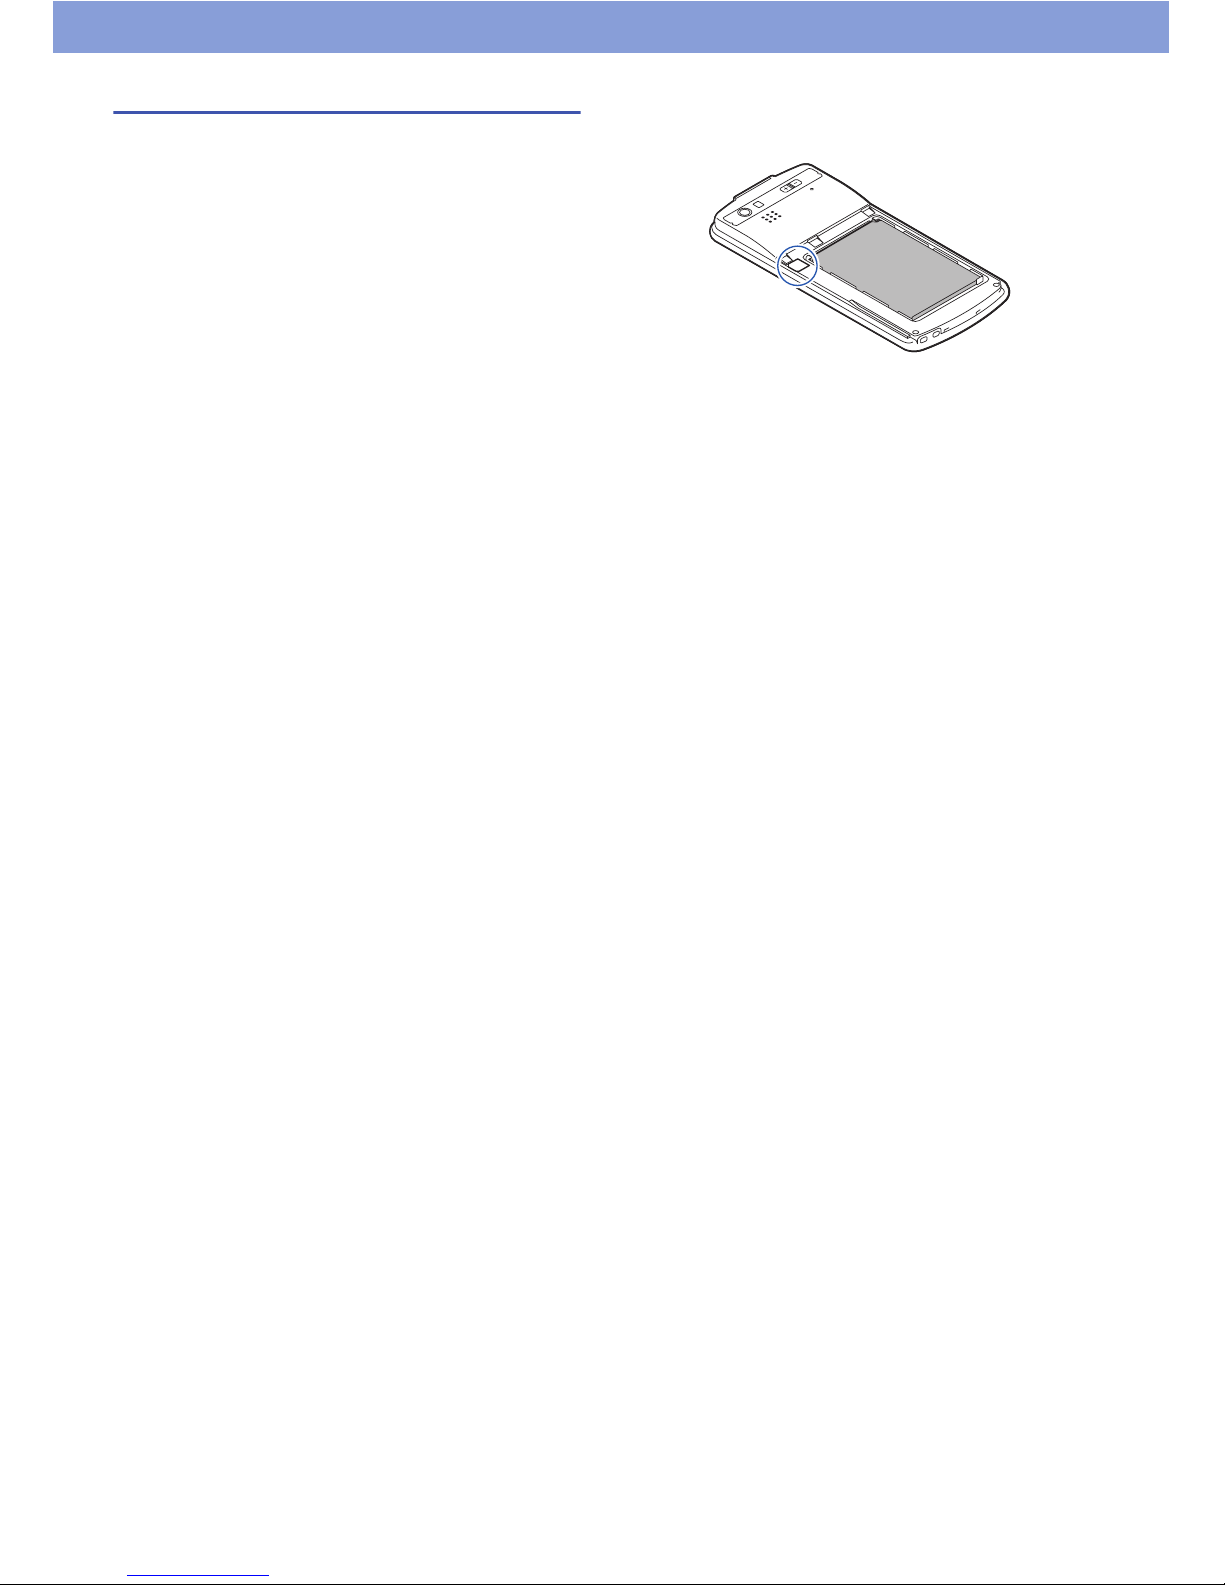
• Even if the back cover is securely attached, removing
the sealing shown may result in a loss of waterproof /
dustproof capability. Do not remove the sealing.
Page 15
15
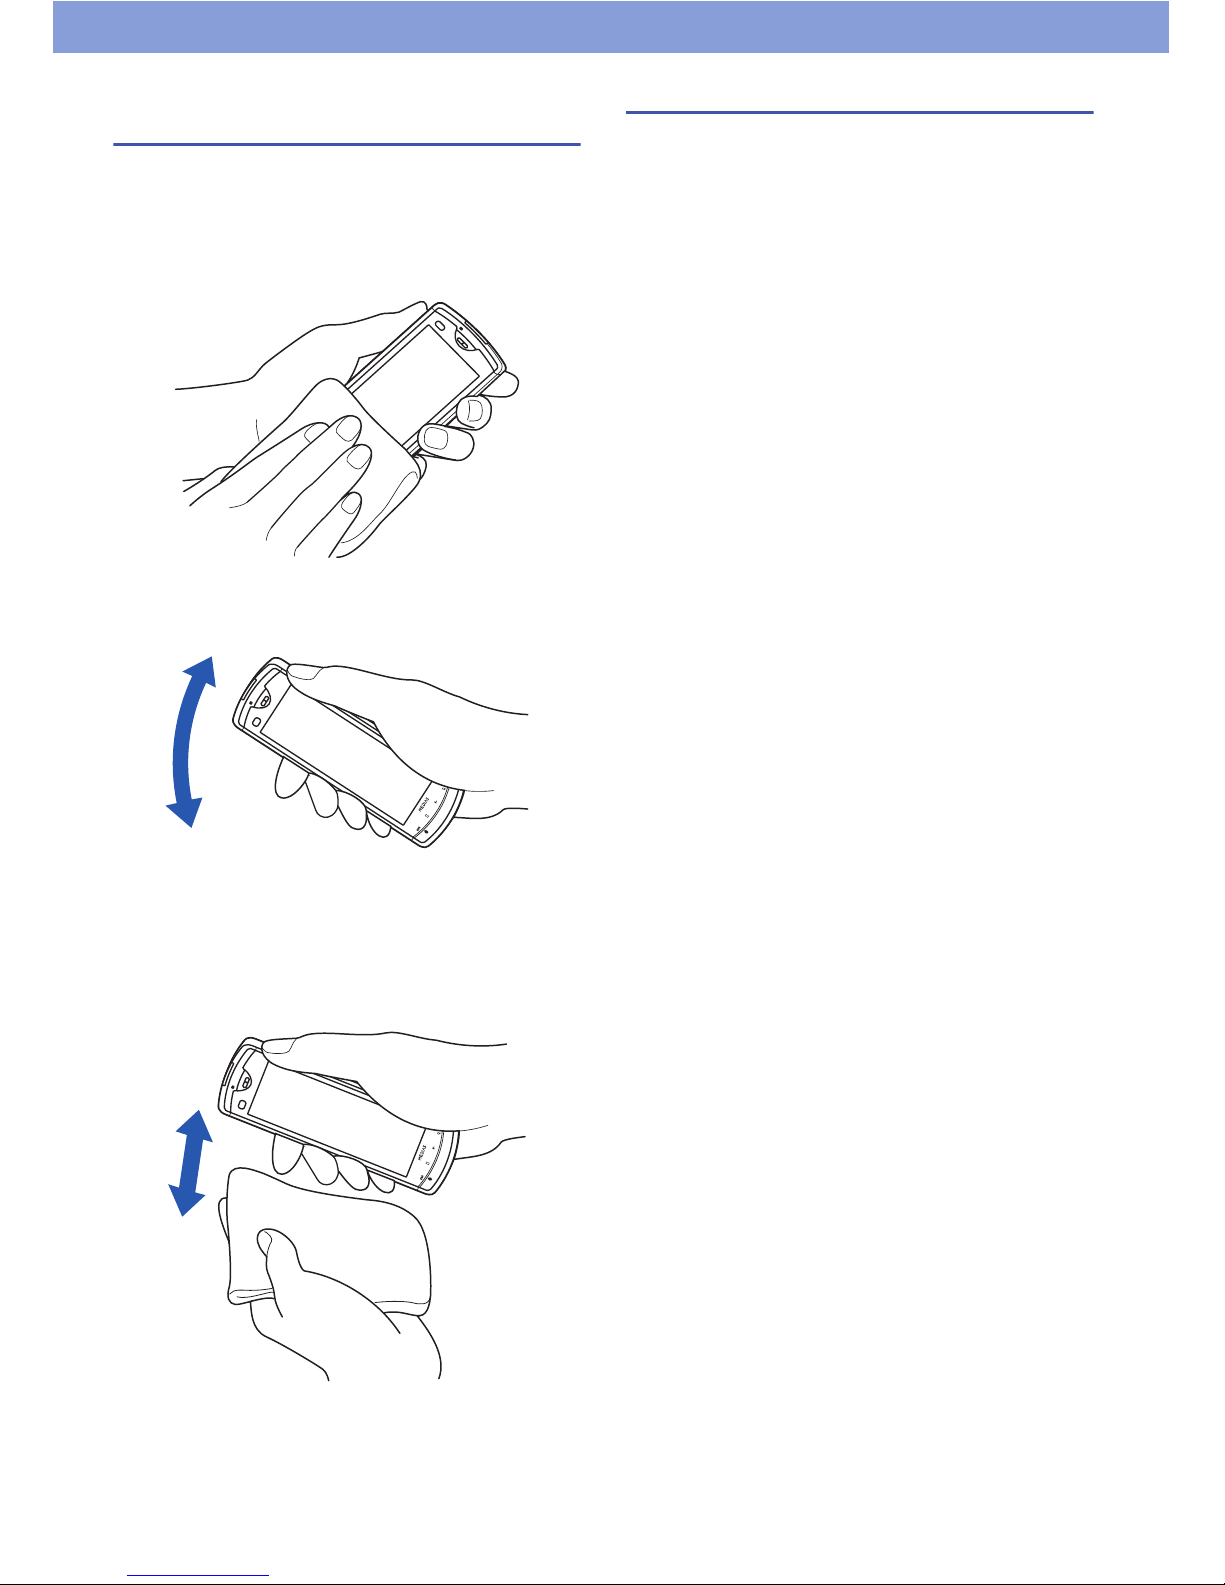
Draining water when the product
gets wet
If water adheres to the mouthpiece or earpiece / speaker,
the volume or sound quality may deteriorate. In such a
case, drain the water following the steps below and dry
the product in open air.
1 Wipe the surface with a clean dry cloth.
2 Securely hold the product and shake it
approximately 20 times until no more water
comes out.
Draining from mouthpiece or earpiece / speaker
3 Softly press a clean dry cloth to wipe off water
remaining in the mouthpiece or earpiece /
speaker.
Do not use a cotton swab, etc., to poke into any of the
recesses.
4 Thoroughly wipe off the product with a clean dry
cloth.
Any water remaining in the product may leak out after
wiping off.
When charging the battery pack
Accessories and options are not waterproof / dustproof.
Check the following before and after charging.
•Make sure that the product is not wet before connecting
the microUSB cable.
• When the microUSB connector cap is opened for
charging, close the cap securely after charging.
• Do not touch the AC charger with wet hands.
•Use the AC charger in a place not exposed to water. Do
not use it in a bathroom, shower room, kitchen,
washroom or other places subject to water.
Page 16
16
Getting Started
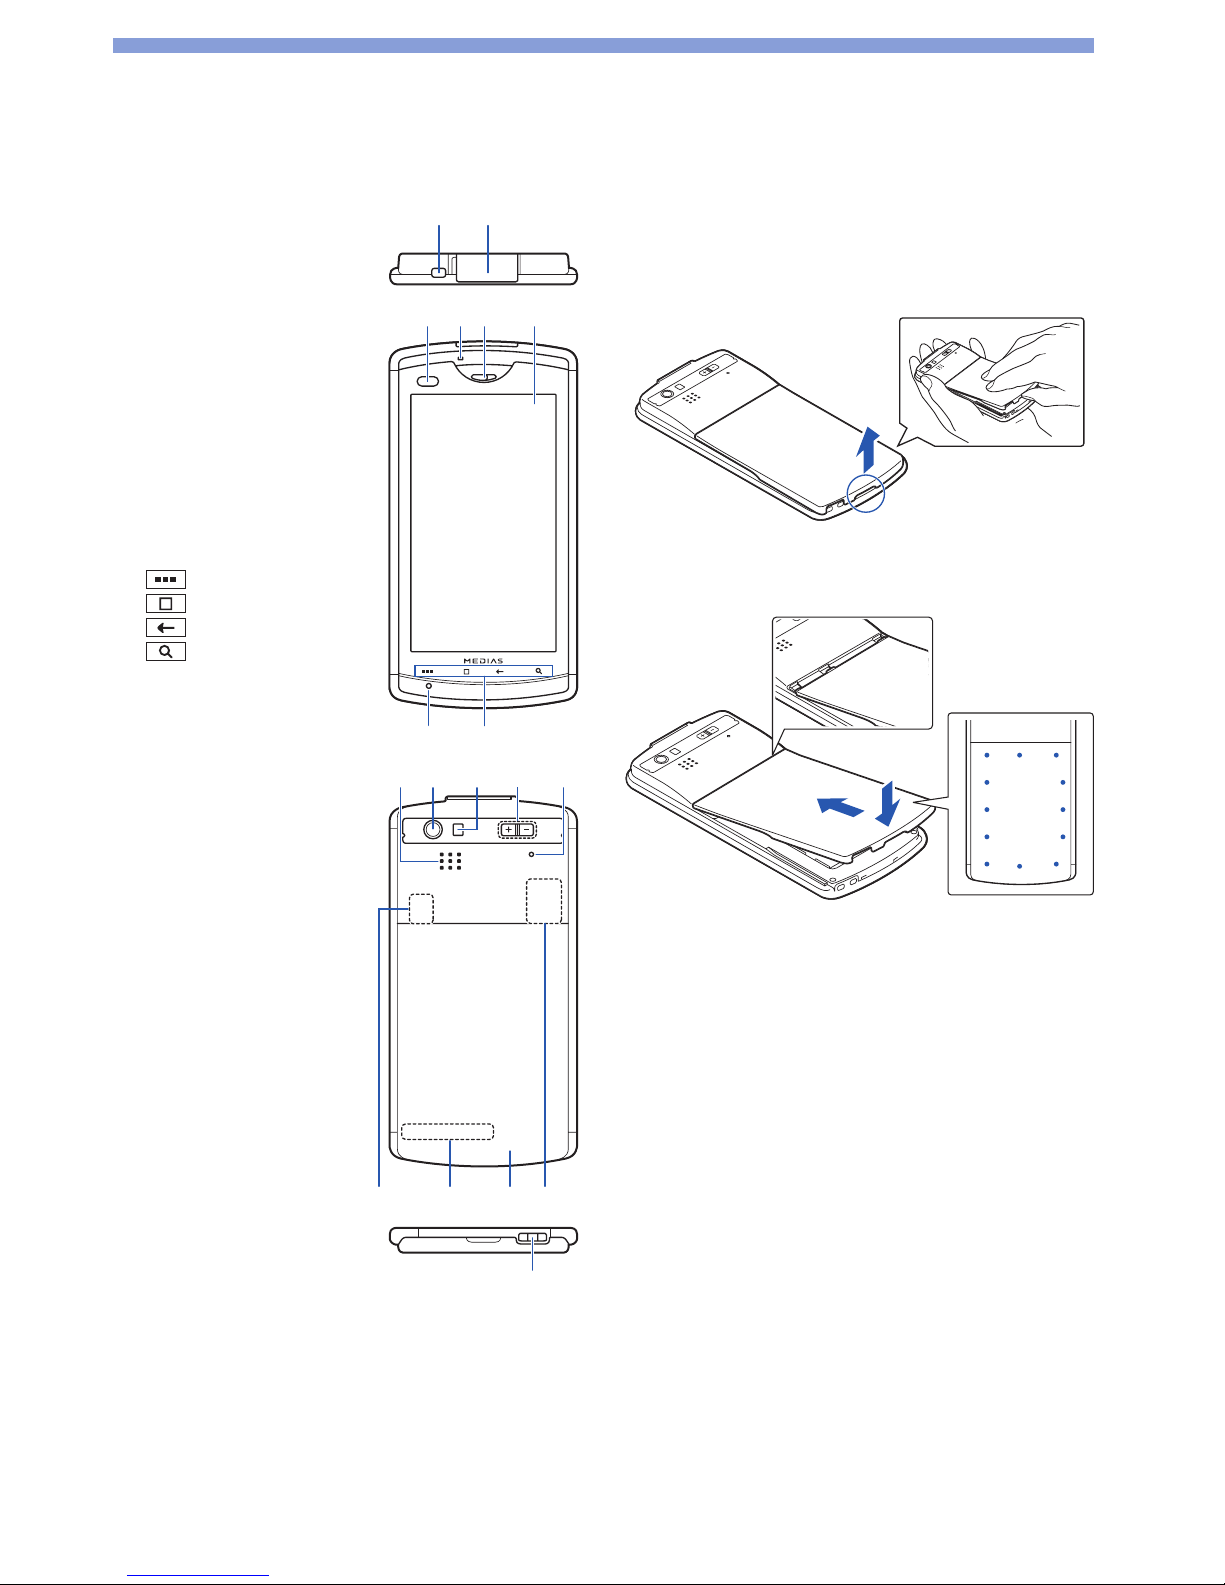
Parts Names
1 Power switch
2 microUSB connector
3 Proximity / Illuminance
sensor
* The display may be dark
during calls if this sensor is
covered. Do not put labels or
stickers on the sensor.
4 Notification LED
5 Earpiece (receiver)
6 Display (Touch panel)
7 Mouthpiece /
microphone
8 Front keys
(menu) key
(home) key
(back) key
(search) key
9 Speaker
10 Camera
11 Light
12 + / - (volume) keys
13 Sub-microphone
14 microSD card slot
15 Antenna sensor
* For the best performance,
do not cover these areas by
your finger, etc. when using
this product.
16 Back cover
17 SIM slot
18 Strap slot
Removing / Attaching
the Back Cover
To remove the back cover, hook your finger in the slot
and remove in the direction shown, without too much
force.
To attach the back cover, insert the tabs on top of the
back cover into the slots, slide it in the direction shown,
and push it down securely in the direction shown.
Securely push the areas illustrated by the dots and make
sure that there is no space between the back cover and
this product.
Notes
• When removing the back cover, make sure that you remove
water and wipe moisture off this product.
• When attaching the back cover, make sure that no dust or dirt
adheres to the back cover (especially to the rubber packing).
• Water might enter the inside of this product unless you attach
the back cover securely.
• When attaching the back cover, make sure that the SIM card,
the microSD card, and the battery pack are attached
securely. If the SIM card or microSD card is not securely
inserted, the battery pack will sit on the SIM or microSD card
and create a gap between this product and the back cover
when attaching the back cover. The waterproof functionality
of the product might be lost as a result.
1
2
345 6
87
10
91112 13
15 16 1714
18
Page 17
17
Getting Started
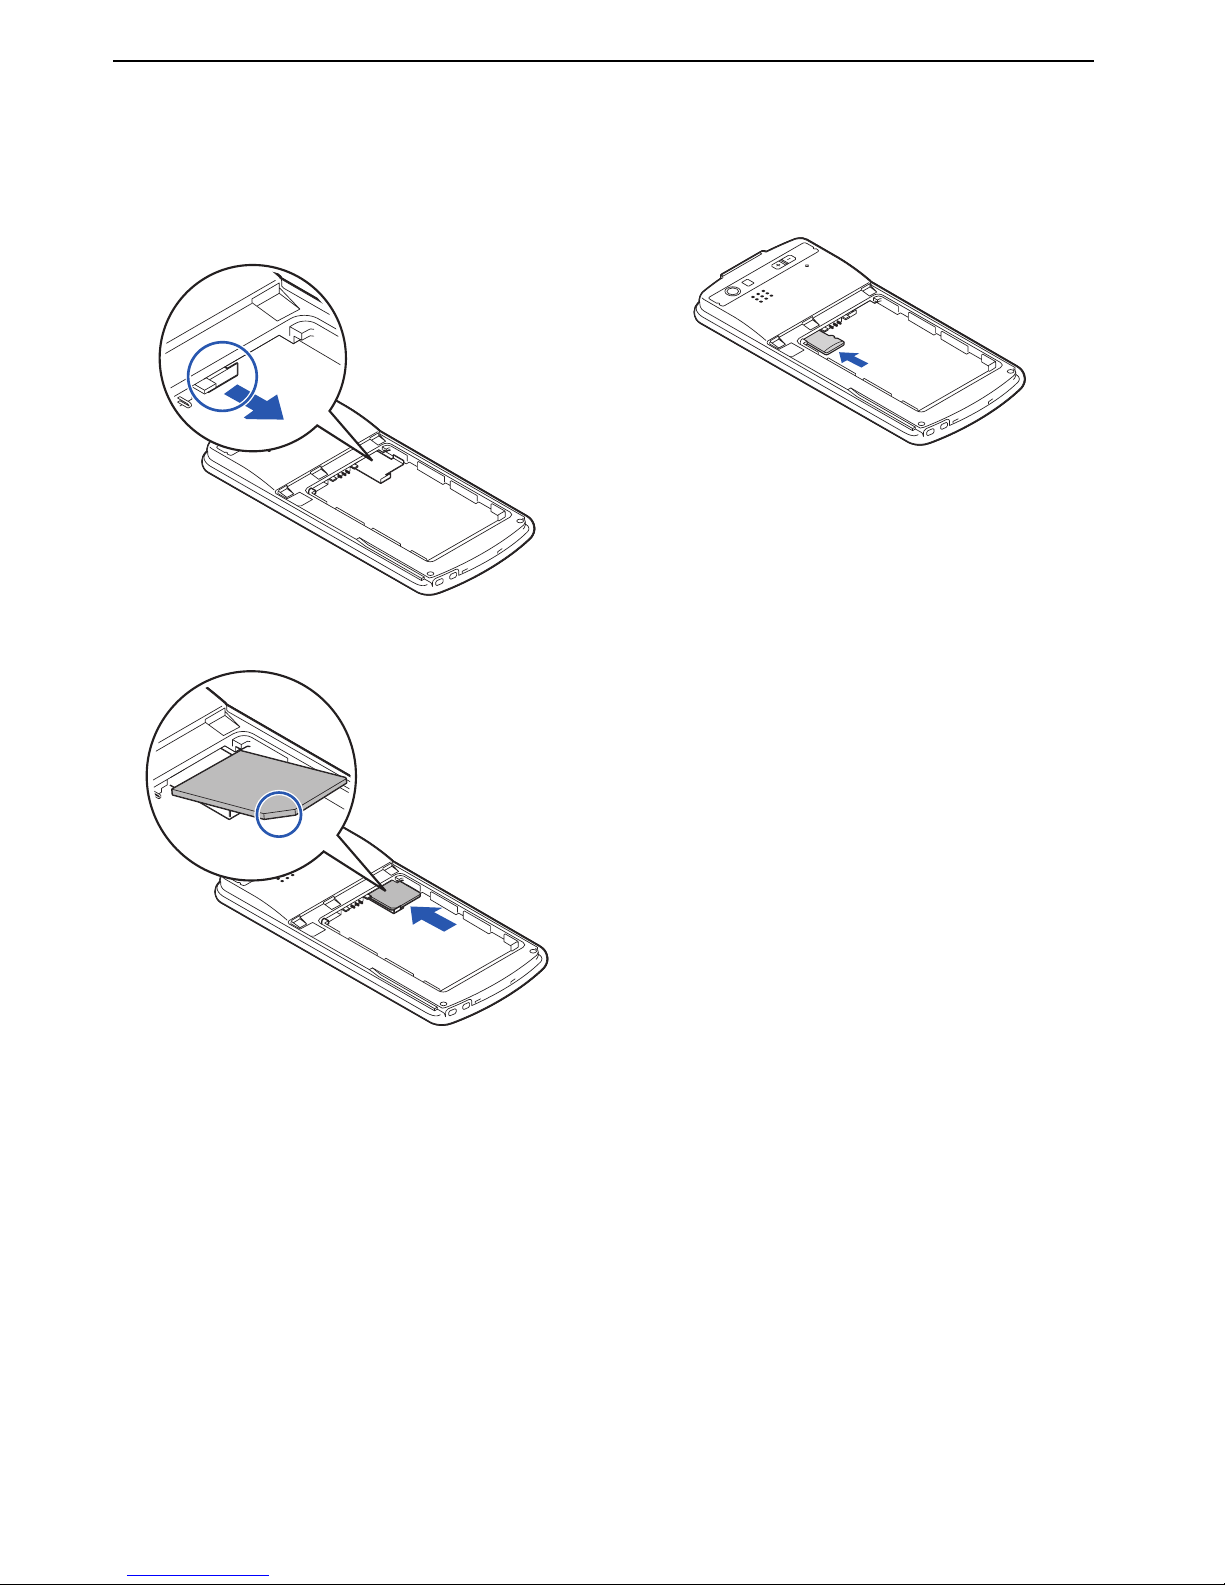
Inserting the SIM Card
The SIM card is an IC card that stores your phone
numbers and other information. Some functions are not
available if the SIM card is not inserted.
1 Hold the tab to slide the tray.
2 Place the SIM card on the tray with the IC surface
(gold-colored) facing up and seating correctly.
3 Slide the tray to the end.
Inserting the microSD
Card
Insert the microSD card with the microSD logo side
up into the microSD card slot until it is locked.
To remove the microSD card, push it as shown.
Page 18
18
Getting Started
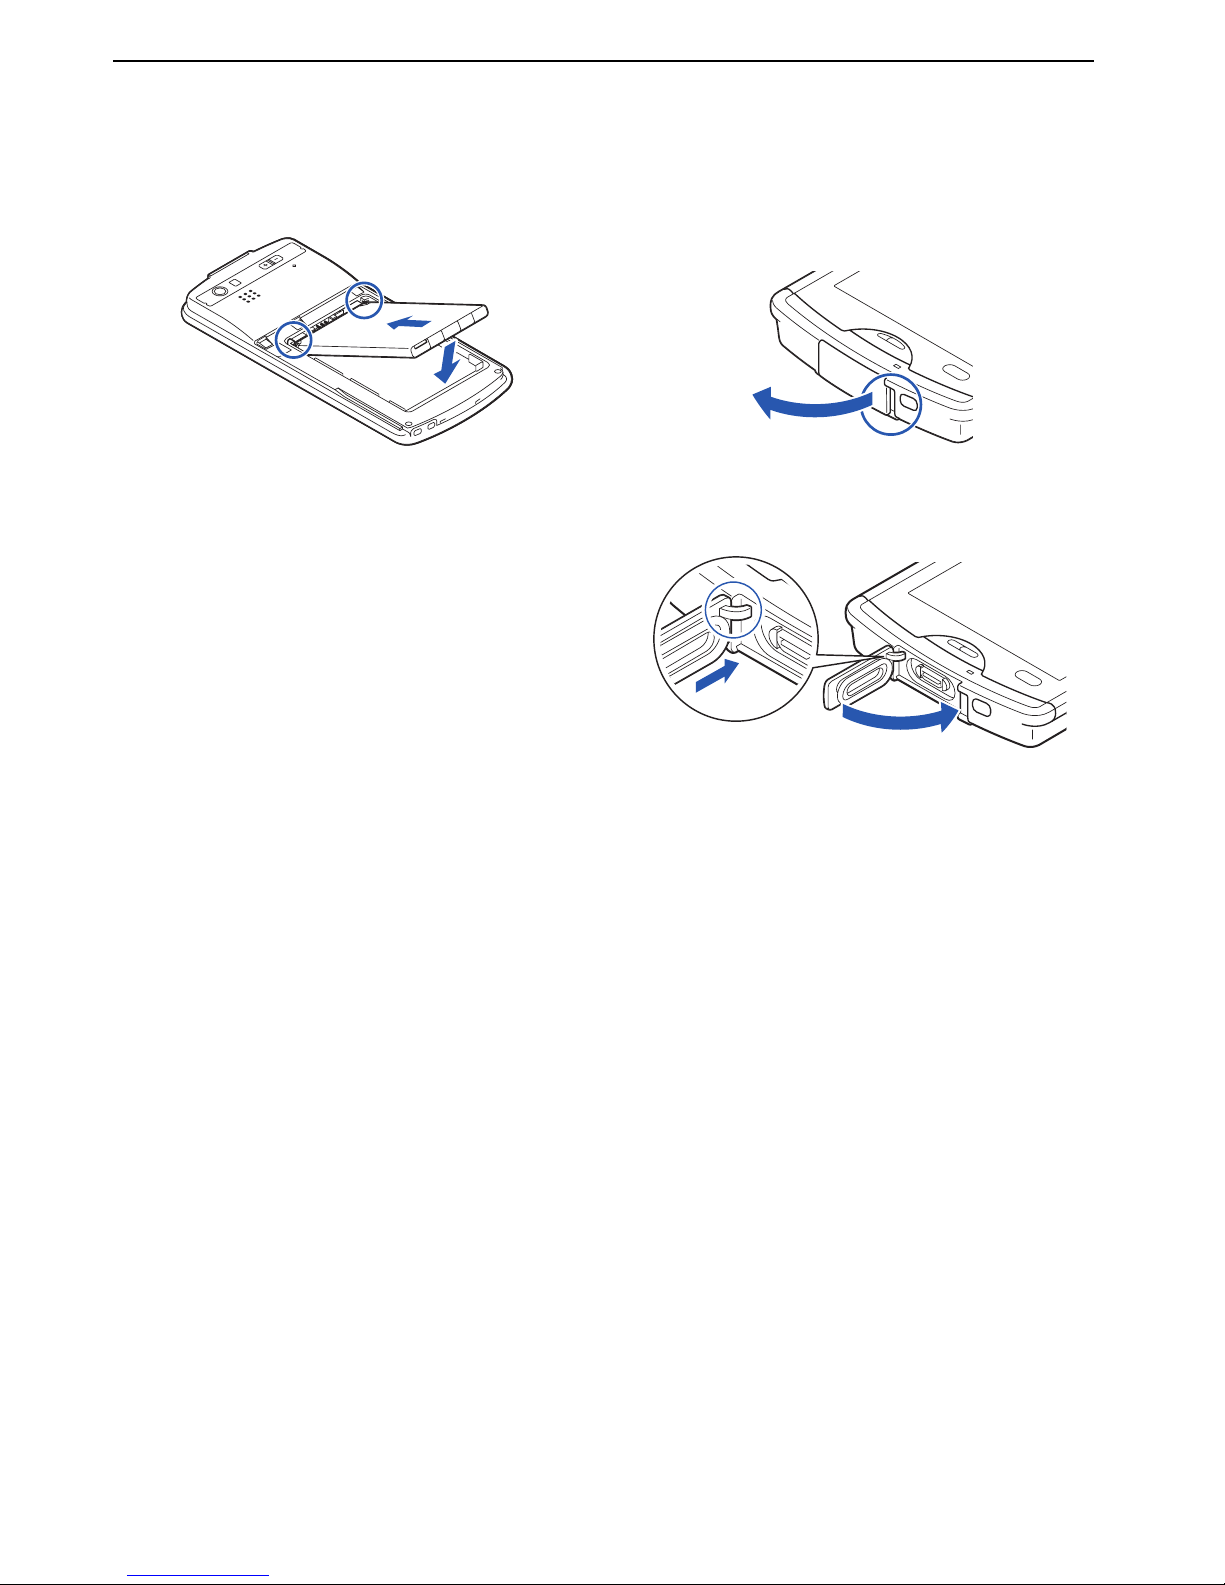
Attaching the Battery
Pack
Insert in the direction by hooking the tabs on the
battery pack in the slots.
Opening / Closing the
microUSB Connector
Cap
To open the microUSB connector cap, hook your finger in
the slot and open the cap in the direction of the arrow.
To close the microUSB connector cap, insert the tab on
the back of the cap in direction (1), and then close the
cap by pressing securely in direction (2).
2
1
Page 19
19
Getting Started
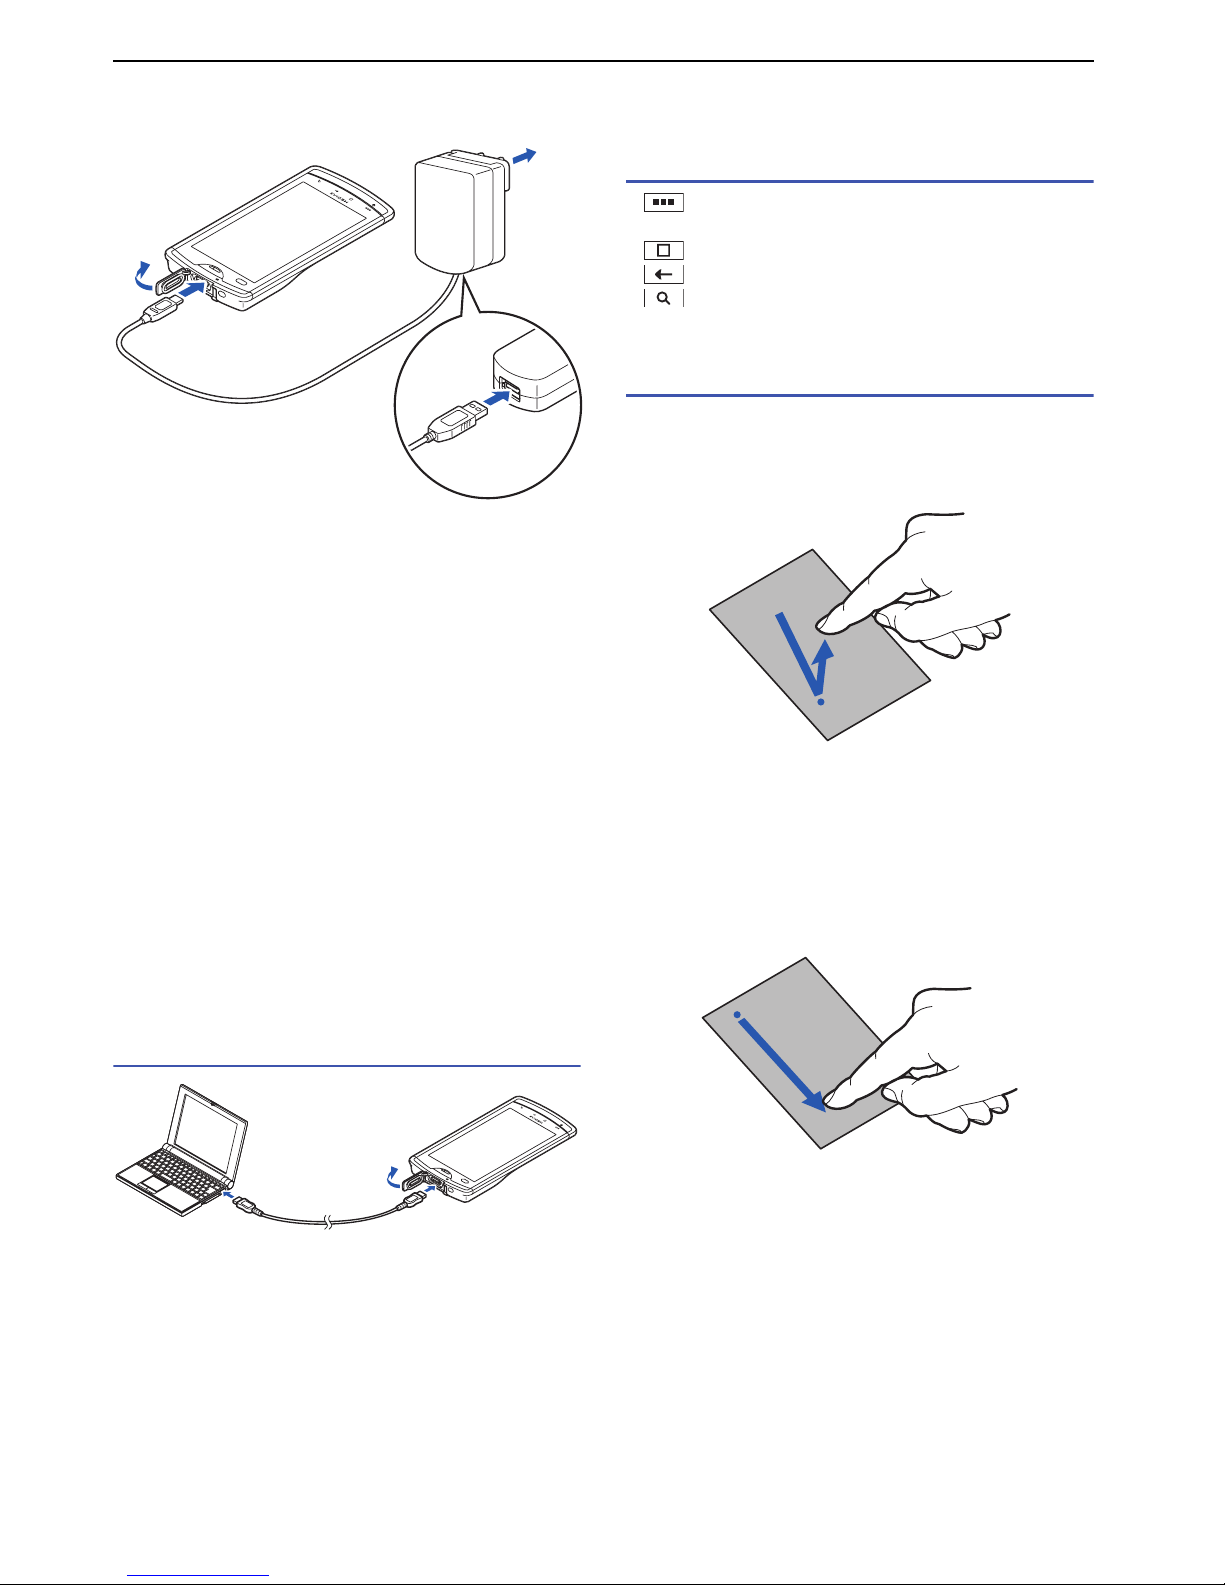
Charging the Battery
1 Open the microUSB connector cap.
2 Connect the microUSB plug with the supplied
microUSB cable engraved side facing down with
the microUSB connector.
3 Connect the USB plug of the cable with the
supplied AC charger.
4 Insert the AC charger plug into the power outlet.
■ About the notification LED
Notification LED turns red while charging.
Notification LED turns green when the battery level is
over 90%, and off when charging is complete.
When charging starts, such as when the battery is
depleted, the notification LED may not immediately light.
However, charging has started.
Note
• When connecting to the microUSB connector of this product,
hold the microUSB plug straight against the connector without
tilting it vertically or horizontally and insert it gently.
Charging with the PC connection
1 Open the microUSB connector cap.
2 Connect the microUSB plug with the supplied
microUSB cable with engraved side facing down.
3 Connect the USB plug of the cable to your PC.
Basic Operation
Using the front keys
• displays the menu available for the current
screen.
• displays the Idle screen.
• goes back to the previous screen.
• opens "Google Search" when pressing on the
Idle screen.
Using the touch panel
■ Tap
With touching and releasing your finger, the item is
selected or run.
■ Touch and hold
In some screens, continuing to touch the touch panel
displays a menu.
■ Slide
With sliding your finger, the screen scrolls up / down / left
/ right in direction.
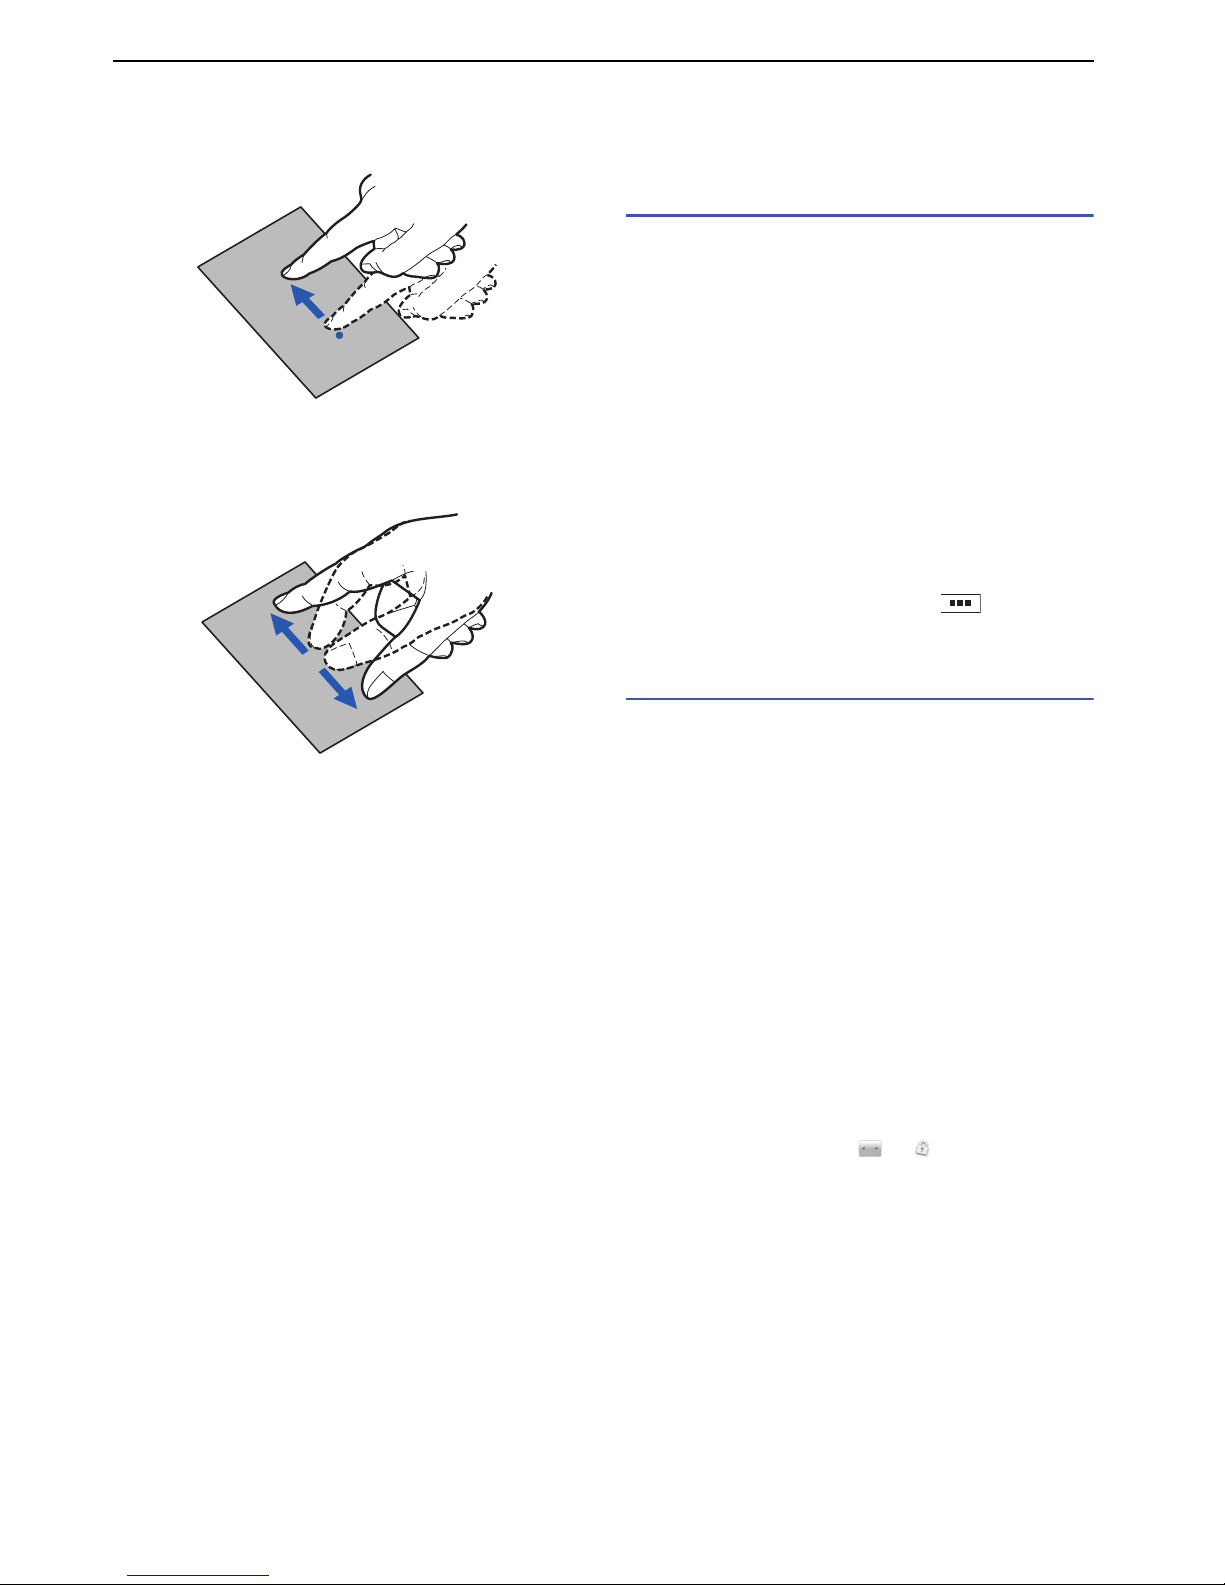
■ Drag
Quickly slide your finger while touching an item (icon,
etc.) to move.
1
2
3
4
1
2
3
Page 20
20
Getting Started
■ Flick
With quickly sliding and releasing your finger, the screen
quickly scrolls in direction.
■ Pinch with two fingers
To zoom in or zoom out, touch the touch panel with two
fingers, and then slide them apart or together.
Turning Power On and
Off
Turning power on
Press and hold the power switch for two seconds or
longer.
When the power is turned on for the first time, tap
"Aceptar". The language selecting screen appears. After
tapping the language, tap "Next" twice. The "Get started
!!!" screen appears.
•"Basic": Basic instruction screens appears. When
these instruction screens are finished, the "Get started
!!!" screen appears again.
• "Applications": The instruction screens for operating an
application appear. Tap an application to see that
instruction. When these instruction screens are
finished, the "Get started!!!" screen appears again.
•"Setting
s": See "Initial Settings".
To skip these screens, tap "Exit". You can start from the
language selecting screen again. Tap ` "Settings"
` "Wizard".
Turning power off
1 Press and hold the power switch for one second
or longer.
2 Tap "Powe r off" .
3 Tap "OK ".
■ Sleep mode
When this product is not operated for a specified duration
of time, the display turns off and this product enters sleep
mode automatically. To enter sleep mode manually, press
the power switch.
Pressing the power switch quits sleep mode.
For automatically turning on sleep mode, set "Screen
timeout" (P.48).
■ Screen lock
When you turn the power on or quit sleep mode, the
touch panel is locked. Drag to to unlock the
screen.
Page 21

21
Getting Started
Initial Settings
When the power is first turned on, the language selecting
screen appears.
1 Tap the language, and then "Next".
2 Tap "Next".
The "Get started !!!" screen appears.
3 Tap "Settings".
4 Tap the item to set up.
• "Date and Time"
Set date and time. Also, you can select time zone,
time / date display format. If you check the box of
"Automatic", date and time settings are
automatically adjusted.
Tap "Back" to complete "Date and Time" settings.
•"Network"
Set Wi-Fi settings. Check the box of "Wi-Fi" to turn
on the Wi-Fi. A scan for Wi-Fi networks starts
automatically. Tap the name of the Wi-Fi networks
that you want to connect to.
Tap "Back" to complete "Network" settings.
•"Accounts"
Tap "Corporate" or "Google" to set the account.
Follow the screens.
• "Email account"
Enter your email address and the password to set
the account.
5 Tap "Done" to complete initial settings.
Yo u can set these settings later. Tap ,
"Settings", and then select the item to set (P.47).
Access Point Settings
The access points required for connecting to the Internet
are preset. You may add or change them as required.
1 From the Idle screen, tap ` "Settings" `
"Wireless & networks" ` "Mobile networks" `
"Access Point Names".
2 Tap the radio button for the access point.
Adding an access point
1 From the Idle screen, tap ` "Settings" `
"Wireless & networks" ` "Mobile networks" `
"Access Point Names".
2 Tap ` "New APN".
3 Tap "Name" ` enter the name of the new network
profile ` "OK".
4 Tap "APN" ` enter the access point name ` "OK".
5 Enter any other items requested by your network
operator.
6 Tap ` "Save".
Note
• Do not change "MCC" or "MNC". Otherwise, registered /
added access points will no longer display on the screen. If
access points no longer display due to the "MCC" and "MNC"
settings being changed, you can either restore default
settings or manually set the access points again.
Initializing an access point
When you initialize an access point, it returns to its
default settings.
1 From the Idle screen, tap ` "Settings" `
"Wireless & networks" ` "Mobile networks" `
"Access Point Names".
2 Tap ` "Reset to default".
Page 22
22
Getting Started
Wi-Fi Settings
Wi-Fi is a function that allows you to use email and the
Internet, via access points for household / corporate
networks or public wireless LAN services.
1 From the Idle screen, tap ` "Settings" `
"Wireless & networks" ` "Wi-Fi settings".
2 Check the box of "Wi-Fi".
A scan for Wi-Fi networks begins automatically. A list
of available networks appears.
If your network does not appear, tap ` "Scan"
to begin a scan again.
3 Select the Wi-Fi network.
4 Enter the password when requested.
5 Tap "Connect".
Connecting with Wi-Fi easy settings
When an access point-capable device supports "WPS",
you can easily complete the required settings, including
ESSID and the security method.
1 From the Idle screen, tap ` "Settings" `
"Wireless & networks" ` "Wi-Fi settings".
2 Check the box of "Wi-Fi".
3 Tap "Wi-Fi Easy Settings" ` "WPS".
4 Tap "Push Button Control method" or "PIN
method".
Push Button Control method
Searching for access points starts, so you should press
the pushbutton on an access point itself or an access
point's setting screen. Follow the screen prompts.
PIN method
Searching for access points starts. Follow the screen
prompts. When PIN code (for WPS) appears, register the
displayed number in the access point.
Adding a Wi-Fi network manually
For information on using an access point, refer to the
manual for the access point.
1 From the Idle screen, tap ` "Settings" `
"Wireless & networks" ` "Wi-Fi settings".
2 Check the box of "Wi-Fi".
3 Tap "Add Wi-Fi network".
4 Enter "Network SSID" and the "Security" type.
5 Enter additional security information as required.
6 Tap "Sa ve".
Disconnecting a connected Wi-Fi
network
1 From the Idle screen, tap ` "Settings" `
"Wireless & networks" ` "Wi-Fi settings".
2 Tap the box of "Wi-Fi" to clear the check mark.
The password of the connected Wi-Fi network will be
stored.
To delete the password, tap the connected Wi-Fi
network ` "Forget" while the "Wi-Fi" is on.
Optional settings for Wi-Fi
Turn on "Wi-Fi" beforehand.
1 From the Idle screen, tap ` "Settings" `
"Wireless & networks" ` "Wi-Fi settings".
2 Tap ` an item.
Change priority
To uch and hold the name of the network to change
switching priority.
Advanced
Wi-Fi sleep policy
Set Wi-Fi to enter sleep if no keys are pressed for 15
minutes after the screen dims. After entering sleep,
Wi-Fi connection will be closed, but it will connect to
an access point automatically. You can also set the
Wi-Fi function not to enter sleep at any time, or
during charging.
Connection setup of Wi-Fi
MAC address
IP address
Use static IP
Set whether to specify a static IP address for
connecting with a Wi-Fi network. To use a static IP
address, "IP address", "Gateway", "Netmask", "DNS
1", and "DNS 2" need to be set.
Page 23
23
Getting Started
Setting an Email
Account
Yo u can use email by setting up your own account with
any of the usual service providers. Details on setting up
your account should be available from your provider.
1 From the applications list screen, tap "Email".
2 Enter the email address and password ` "Next".
For an email account without preset provider
information, settings must be completed manually.
Contact your provider for details on settings.
3 Enter the account name.
4 Tap "Done".
■ To set another account
From the "Email" screen, tap ` "More" ` "Accounts"
` ` "Add account".
Setting a Google or other account
By configuring a Google account, you can use Gmail,
market, and other services.
1 From the Idle screen, tap ` "Settings" `
"Accounts & sync" ` "Add account".
2 Tap the type of account.
3 Follow the screen prompts to configure the
account.
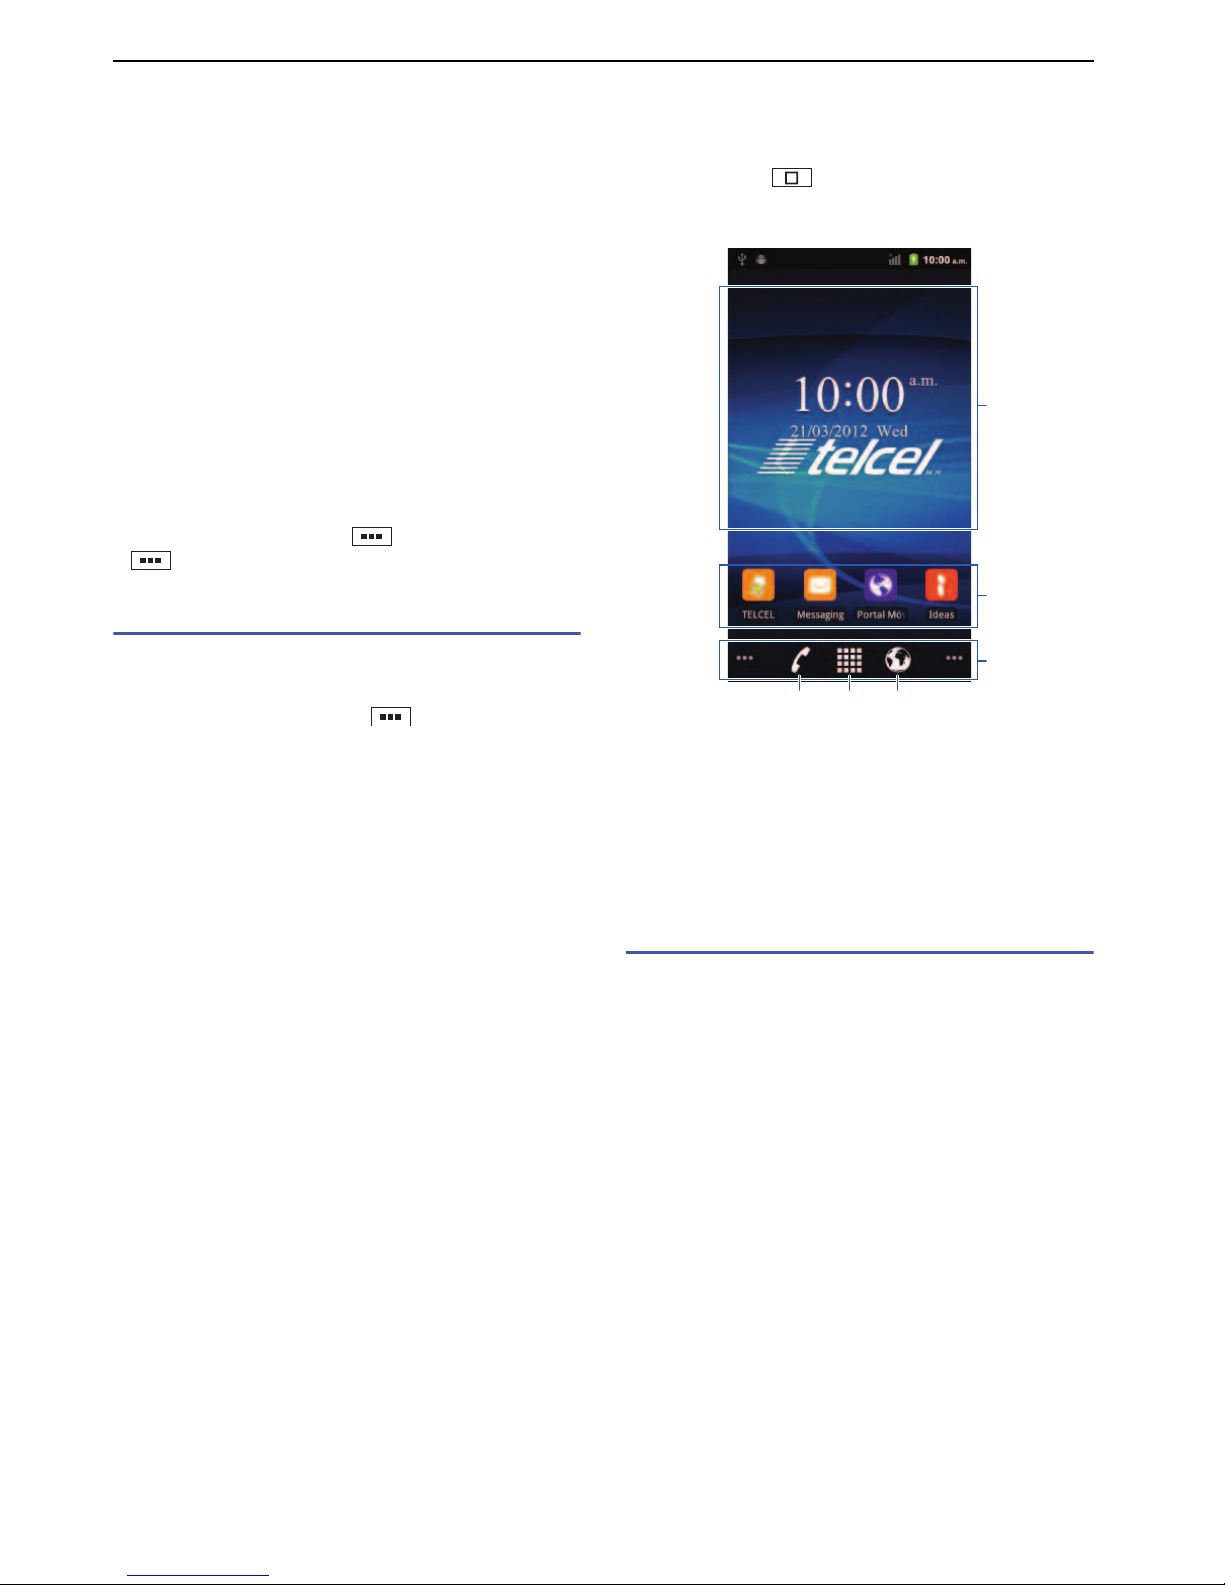
Idle Screen
The Idle screen is the starting screen for using
applications. Tap to open the screen.
Yo u can slide the screen to move the Idle screen to a
page on the right or left.
1 Widgets
2 Application shortcuts
3 Dock
4 Launch "Phone", "Call log", and "Contacts"
5 Open the application list screen
6 Launch browser
Adding an application shortcut
1 Touch and hold the Idle screen.
2 Tap "Shortcuts".
3 Tap the application shortcut to add.
The shortcut is added to the Idle screen.
■ Adding a widget
In step 2, tap "Widgets" instead of "Shortcuts".
■ Moving a shortcut
1 From the Idle screen, touch and hold the shortcut
to move.
2 Drag it to the desired place and release your
finger.
To mov e a shortcut to another page, drag the
shortcut to the right or left edge of the screen to
change the Idle screen to the right or left page.
To move to the Dock, make space by moving the
application from the Dock first.
1
2
3
4 5 6
Page 24
24
Getting Started
■ Deleting a shortcut
1 Touch and hold the shortcut to delete.
2 Drag it to the trash icon at the bottom of the
screen and release your finger.
Creating an application folder
1 Touch and hold the Idle screen.
2 Tap "Folders" ` "New folder".
3 Touch and hold the shortcut you want to add to a
folder.
4 Drag the shortcut to the folder and release your
finger.
Yo u can tap a folder to open it and access shortcuts.
■ Renaming a folder
1 Tap the folder to rename.
2 Touch and hold the title bar.
3 Enter a title ` tap "OK".
■ Deleting a folder
1 Touch and hold the folder to delete.
2 Drag it to the trash icon at the bottom of the
screen and release your finger.
Applications in the deleted folder will also be deleted
from the Idle screen.
Setting the wallpaper
1 From the Idle screen, tap ` "Wallpaper".
2 Select the item stored with the image to set.
3 Follow the screen to set.
• For "Gallery", select the image to set as the
wallpaper, and then drag the trimming frame to
where the wallpaper will be used. Tap "Save" to set
the wallpaper.
• For "Live wallpapers", depending on the wallpaper,
"Settings..." appears for changing the color, etc.
■ Changing the lock screen
Ta p ` "Settings" ` "Location & security" ` "Custom
Lock Screens" ` select the screen type ` "Select".
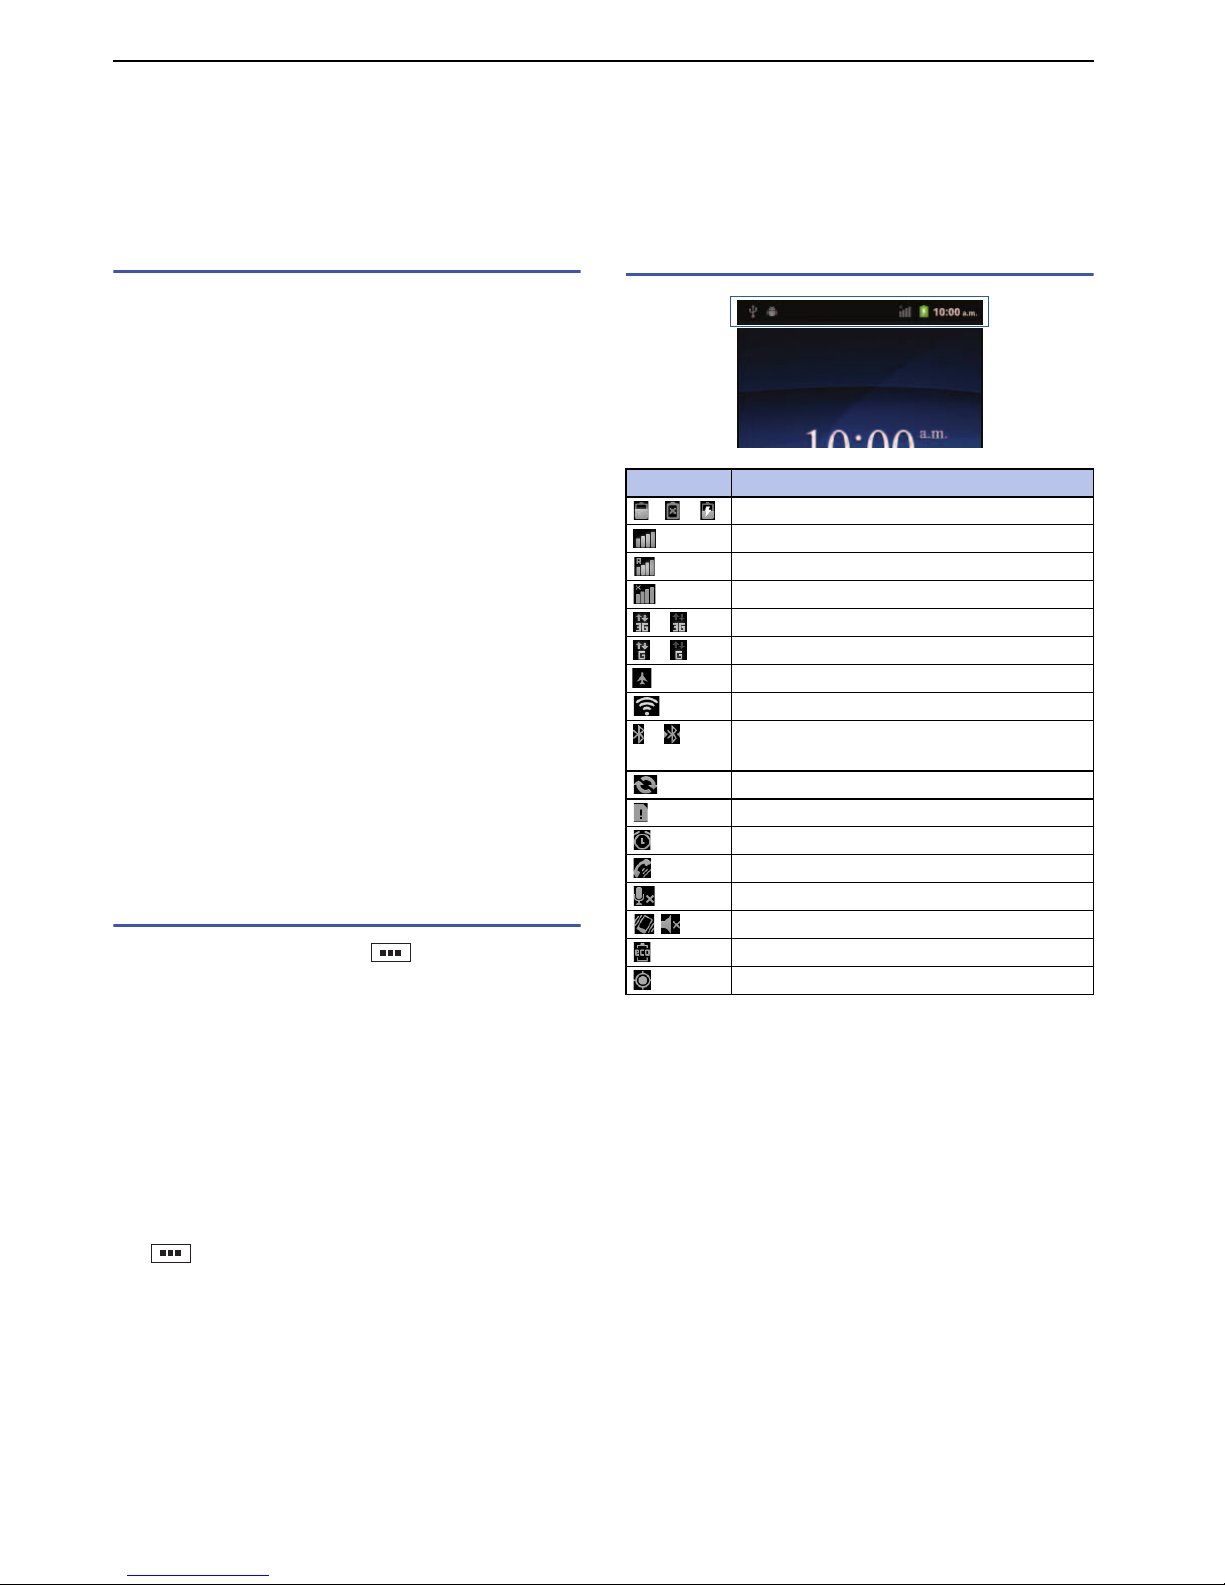
Status Bar
Notification icons for new information are displayed on
the left side of the status bar, and status icons are
displayed on the right side.
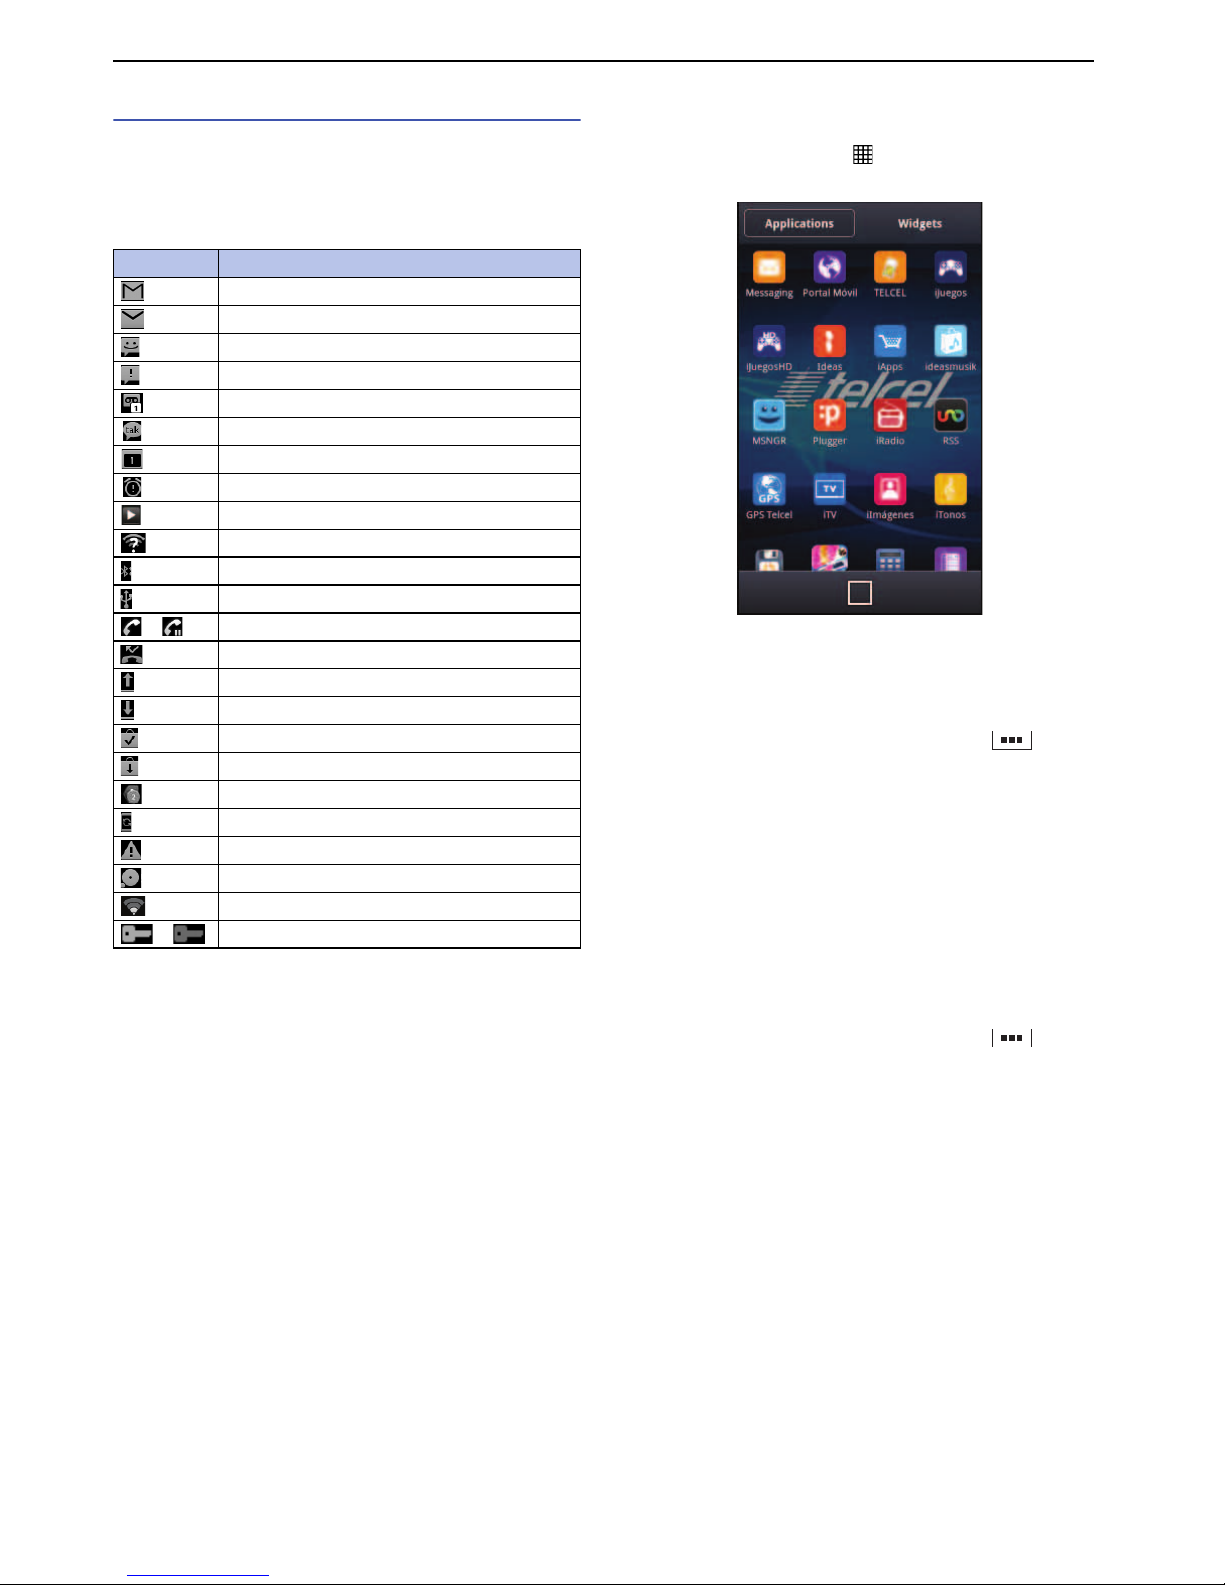
Status icons
* When a Google account is configured (synchronized), the
icon appears in green. When not configured (not
synchronized), the icon appears in grey.
Icon Description
( / ) Battery level (requires charging / charging)
* Signal strength
* International roaming
Out of service
/ * 3G communicating / available
/ * GPRS communicating / available
Airplane mode
* Wi-Fi connection
/ Bluetooth is on / connected to compatible
device
Synchronizing data
SIM card is not inserted.
Alarm is set.
Speaker is on during call.
Microphone is muted.
Silent mode with vibration on / off
Eco mode
GPS is positioning.
Page 25
25
Getting Started
Notification icons
When a notification icon appears, you can open the
Notifications panel to check a message or event
notification.
Drag the status bar downwards.
■ Deleting notifications
Drag the status bar downwards, and then tap "Clear" to
delete all check marked notifications, or tap the checkbox
of notification to delete.
■ Closing the Notifications panel
Drag the bottom of the panel to the top.
Applications List Screen
From the Idle screen, tap .
The applications list screen appears.
■ Moving an application
You can move an application icon in the application list
screen, however, some icons cannot be moved.
1 From the applications list screen, tap `
"Arrangement".
2 Touch and hold the application to move.
3 Drag it to the desired place and release your
finger.
4 Tap "Finished" to complete.
■ Uninstalling an application
You can uninstall the application only installed by
"Market".
1 From the applications list screen, tap `
"Uninstall".
2 Tap the application to uninstall ` "OK" ` "OK".
3 Tap "Finished" to complete.
■ Adding an application shortcut to the Idle
screen
From the applications list screen, touch and hold the
application to add.
The screen changes to the Idle screen, with the
application added.
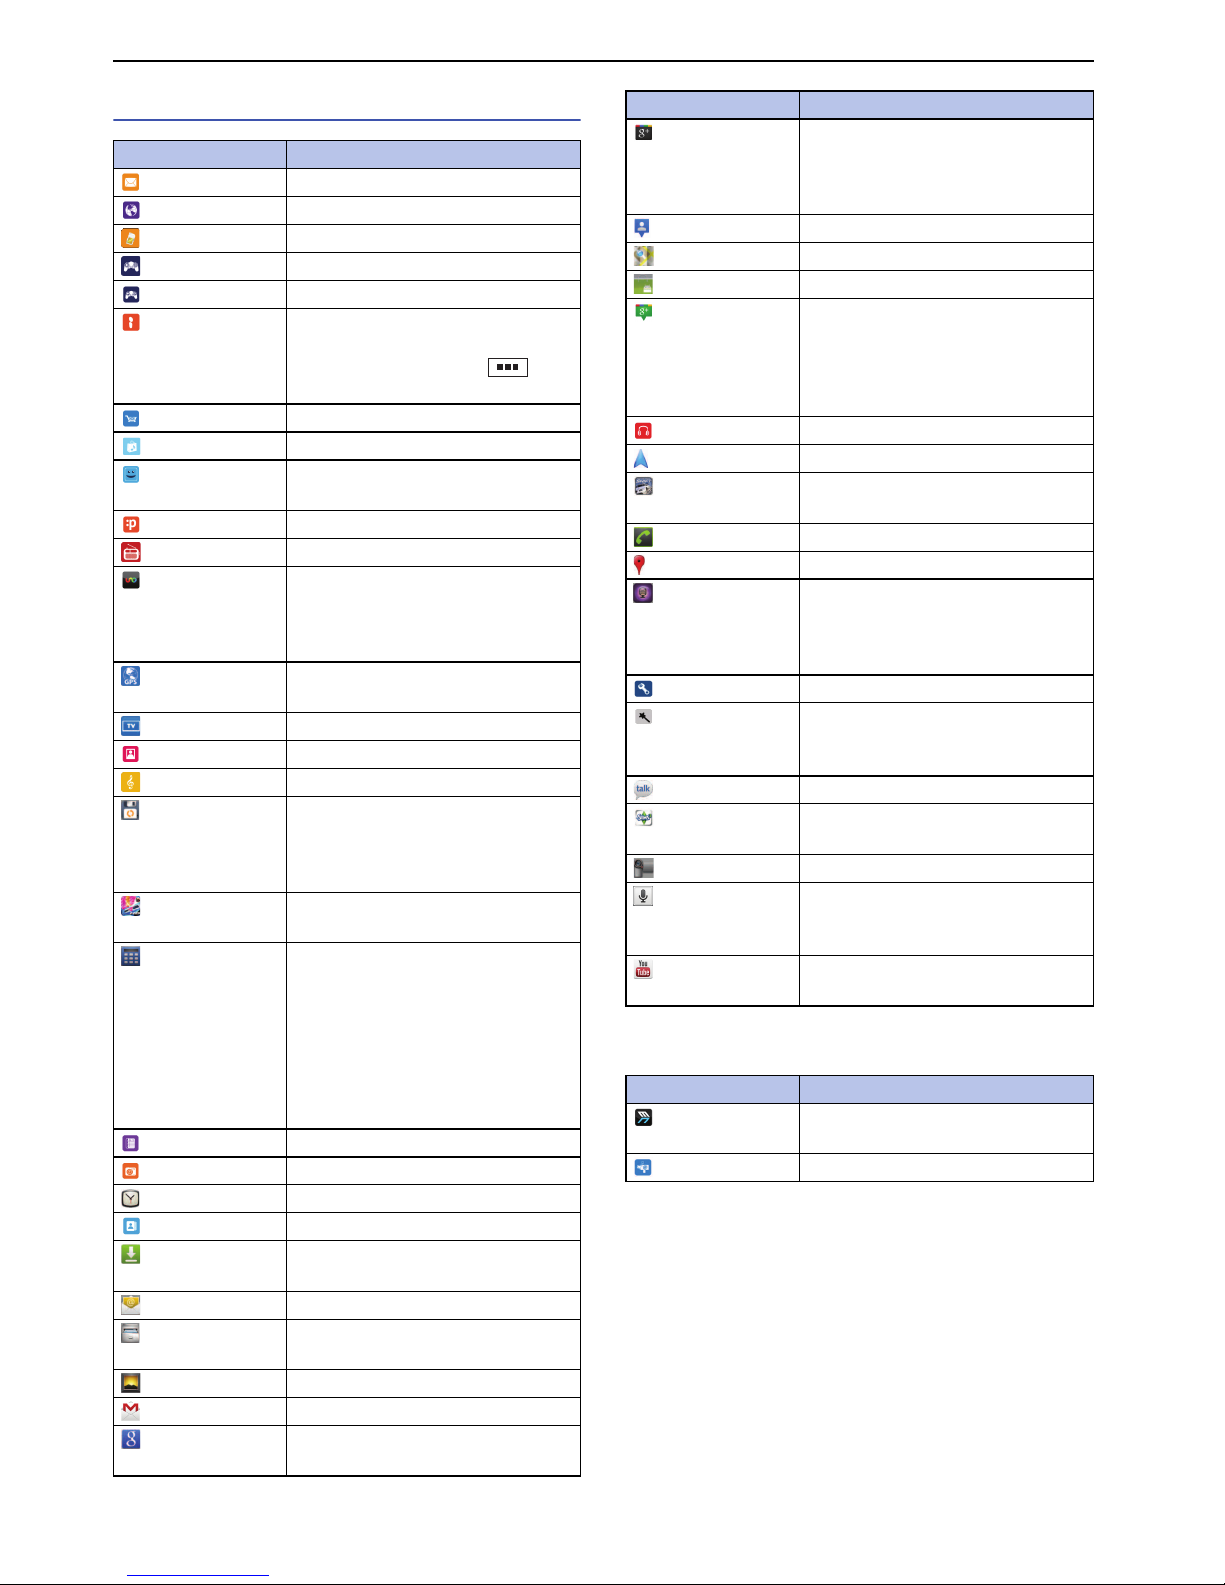
Icon Description
New Gmail
New Email
New SMS / MMS message
Failed to send SMS / MMS
New Voice Mail message
New instant message
Upcoming calendar event
Alarm is snoozing.
Music is playing.
Unsecured Wi-Fi network is found.
Newly received file via Bluetooth
USB is connected.
/ In call / on hold
Missed call
Data upload / send
Data download / receive
Application installation is completed.
Update of installed application available
Some notification icons are not displayed.
Software update notification, updating
Error / alert message
Not available space
Wi-Fi access point available
/ VPN is connected / not connected.
Page 26
26
Getting Started
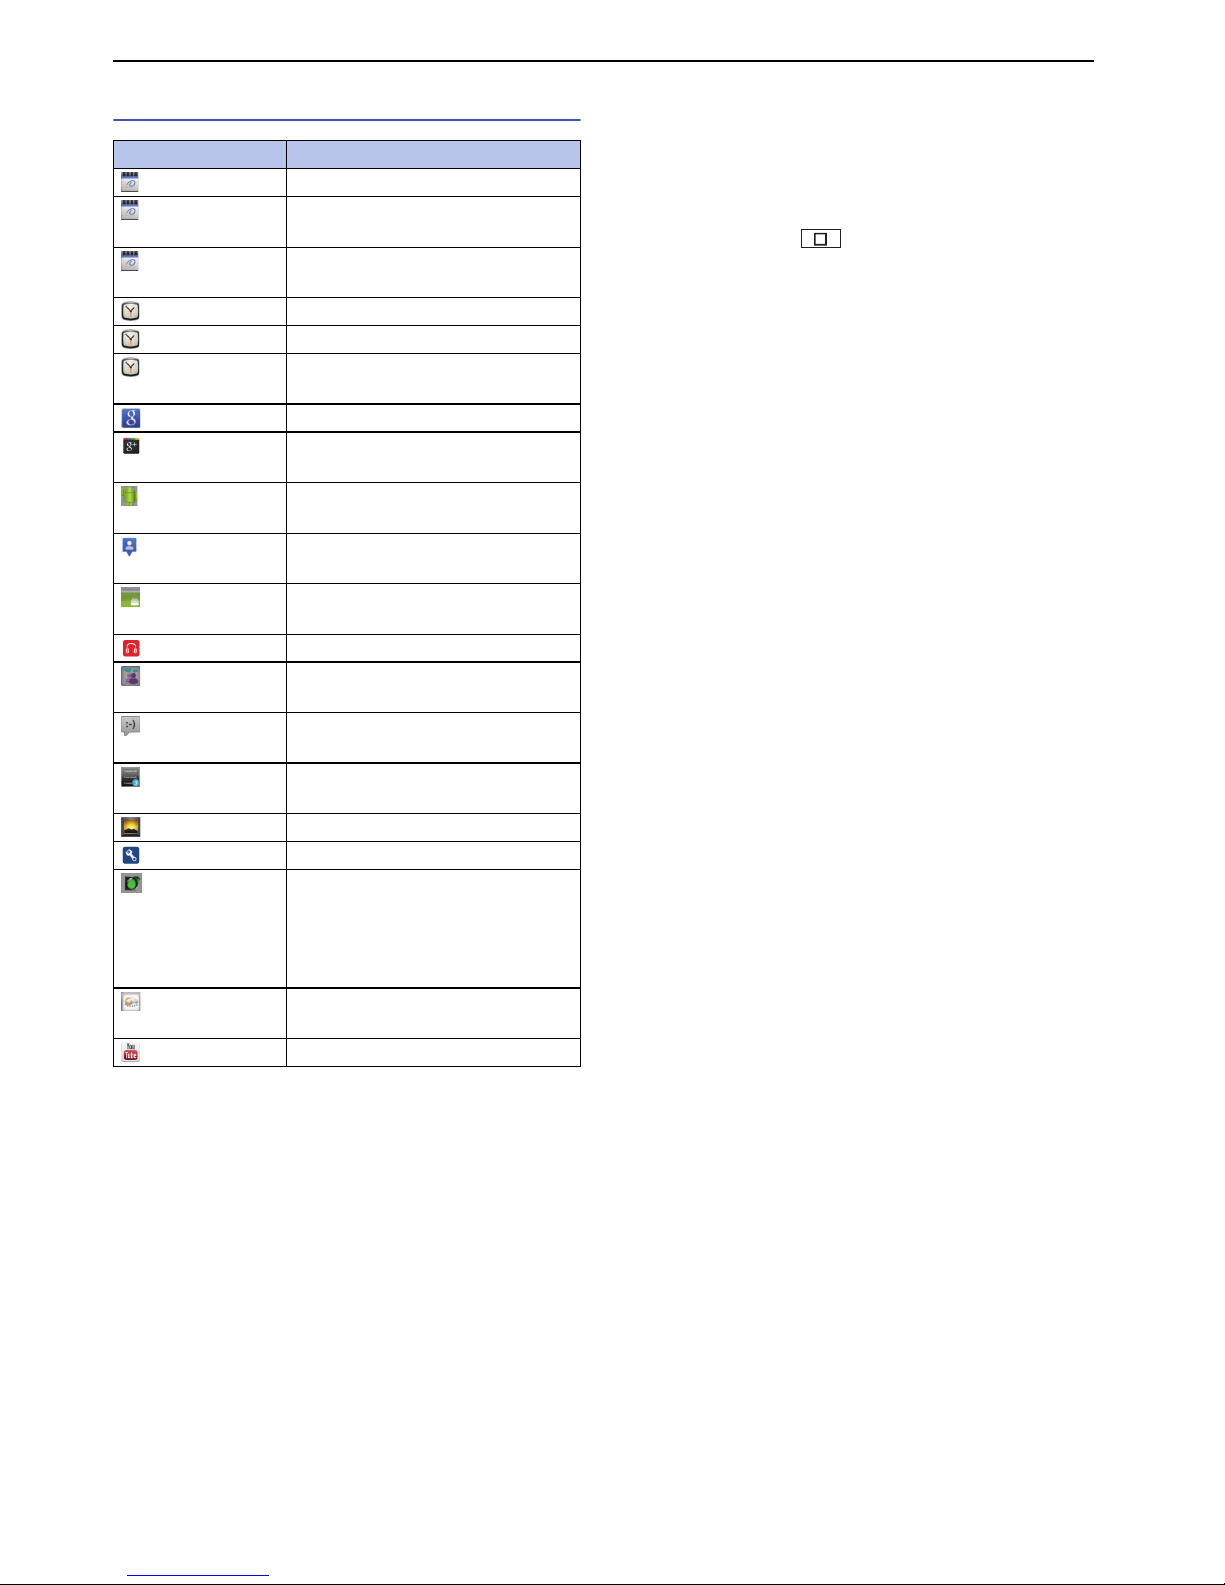
Applications list
Also, more installed applications are displayed on the Idle
screen.
Application Description
Messaging (P.35)
Portal Móvil (P.36)
TELCEL The Telcel service menu appears.
iJuegos The Telcel service site appears.
iJuegos HD Opens GAMELOFT website.
Ideas Useful applications are listed on
the screen. You can switch the
screen view by tapping `
"grid" / "list".
iApps The Telcel service site appears.
ideasmusik The Telcel service site appears.
MSNGR Tap "Descargar ahora" to
download the Telcel messenger.
Plugger The Telcel service site appears.
iRadio The Telcel service site appears.
RSS The RSS lis
t appears. Tap a RSS,
then the browser opens. Your
Google account is necessary for
RSS.
GPS Telcel The Telcel service application
starts.
iTV The Telcel service site appears.
iImágenes The Telcel service site appears.
iTones The Telcel service site appears.
BackupThis service allows you to back up
data, which can be restored if you
lose this product or accidentally
erase data.
Block Breaker
3HD
Start playing the game "Block
Breaker 3HD".
Calculator Flick to left / right to switch
between functions and + / - / × / ÷.
Yo u can touch and hold the
formula box to copy / pas
te a
formula. Tap "CLEAR" to delete
entered digits and operators, or
touch and hold to delete an entire
formula.
Calendar (P.46)
Camera (P.43)
Clock (P.46)
Contacts (P.31)
Downloads Display a log of files downloaded
from the browser.
Email (P.33)
File Manager You can display a list of files
stored on the microSD card.
Gallery (P.44)
Gmail (P.34)
Google Search You can search for contacts,
applications or search web pages.
Google+ Register with your Google account
to use Google Instant Upload. You
can upload pictures shot by
"Camera" automatically.
Latitude (P.42)
Maps (P.40)
Market (P.38)
Messenger Register with your Google account
to use Google Messenger. You
can use one group chat for talking
to several friends at the same
time.
Music (P.44)
Navigation (P.41)
NFS Shift Start playing the racing game
"NFS Shift".
Phone (P.29)
Places (P.41)
Recorder You can operate the voice
recording. For using this
application, insert the microSD
card for saving the recording file.
Settings (P.47)
SetUpWizard The selecting language screen
appears. Basic in
structions or
initial settings appear.
Talk (P.36)
The Sims 3 Start playing the game "The Sims
3".
Video Camera (P.43)
Voice Search Spoken words are recognized,
then searched in the browser by
Google search.
Yo uTube You can watch / upload YouTube
videos.
Application Description
MEDIAS NAVI Connect to the manufacturer's site
"MEDIAS NAVI".
iTelcel The Telcel service site appears.
Application Description
Page 27
27
Getting Started
Widgets list
Task Manager
The Task manager shows the running applications and
allows you to switch tasks. It also allows you to quit
applications.
1 Touch and hold .
The "Running applications" screen appears.
2 Tap the application to display.
3 Tap "×", or "Close all" ` "Yes".
Note
• Running more than one application may consume more
energy. Doing so may cause applications to be terminated
forcibly or slow down.
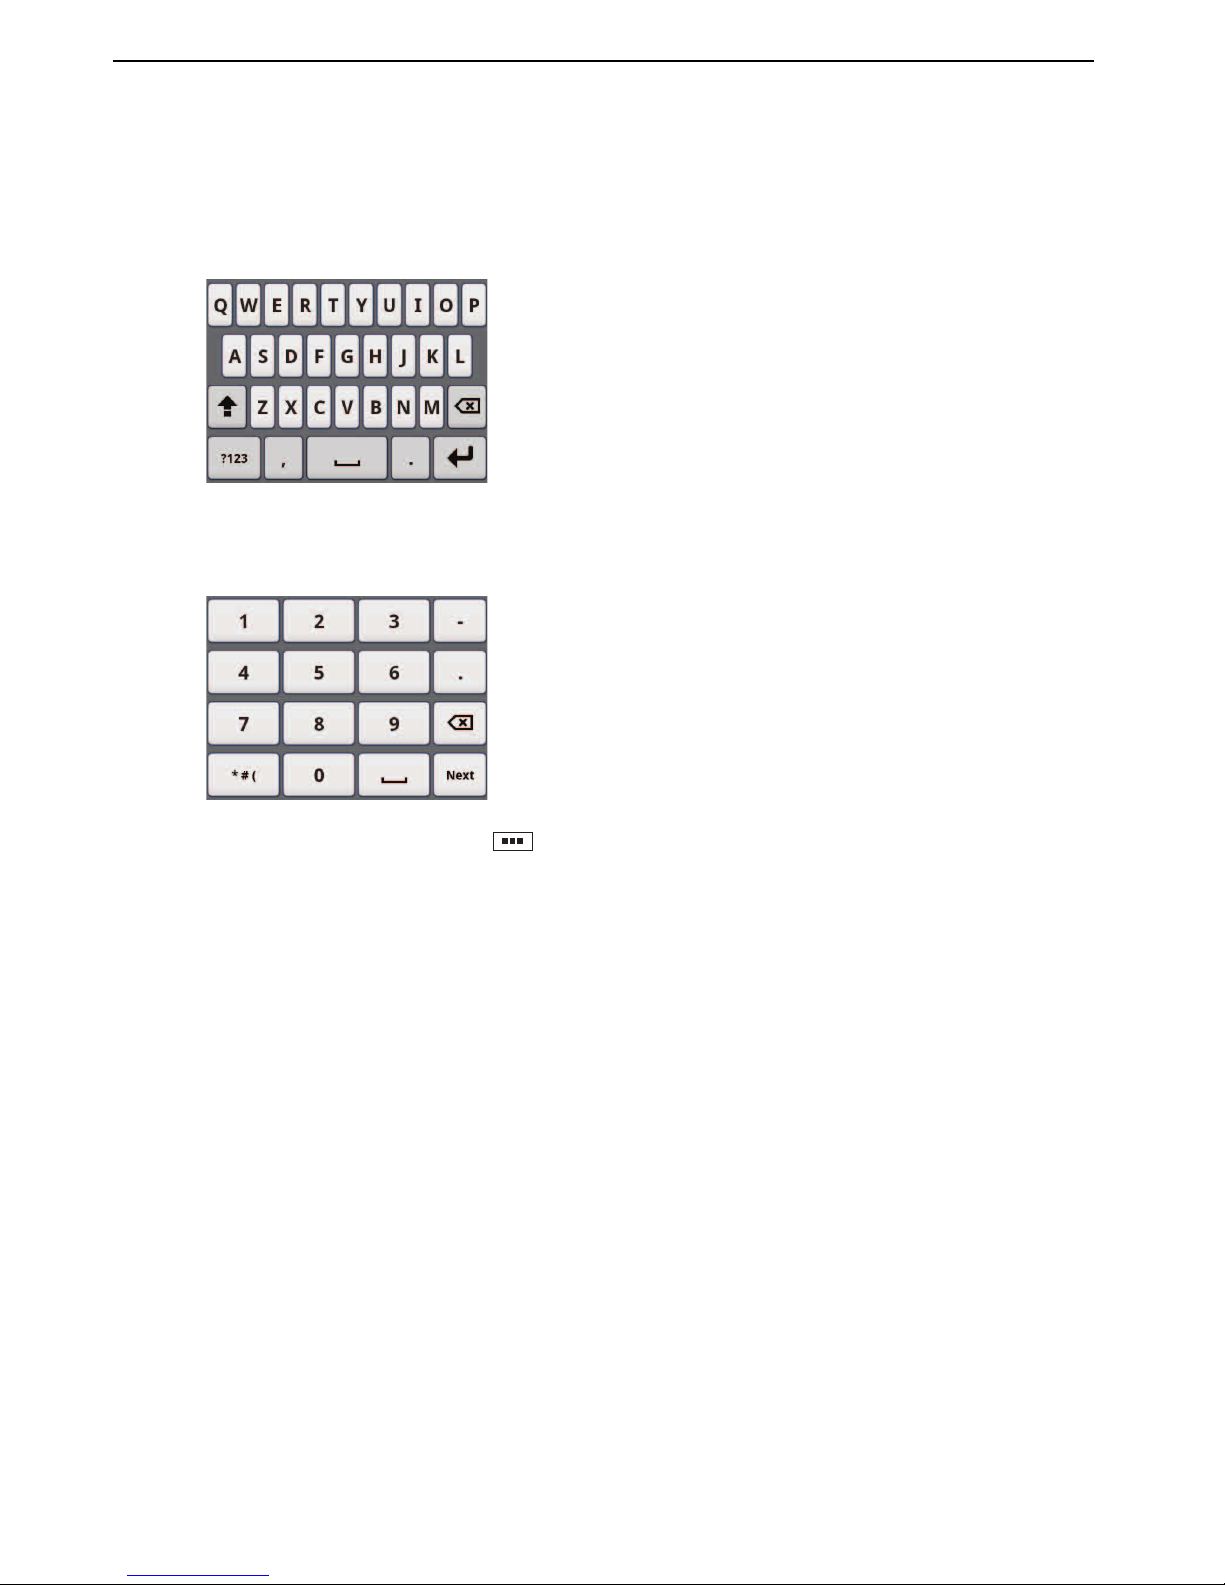
Icon Description
Calendar (large) Add a large sized calendar.
Calendar
(small)
Add a small sized calendar.
Calendar
(upcoming events)
Display upcoming events
scheduled in the calendar.
Clock (analog) Add an analog clock.
Clock (digital) Add a digital clock.
Clock (world) Display the local time and the time
for a specified city.
Google Search Add a search box.
Google+ You can directly use a "Google+"
application.
Home screen
tips
Display the help for operating the
Idle screen.
Latitude Display the location of friends
registered at "Latitude".
Market Display information for Android
Market.
Music Display a music control panel.
My
Conversations
Add the contacts.
My Message
Widget
Open messages and make a call.
Notification
Widget
Display notifications.
Picture frame Add an image.
Power Control Tap the icon to turn it on / off.
Traffic You can set locations that will in
real-time, update to show you how
long it may take you to get there
depending on your current
location.
Weather Widget Display the weather forecast with
setting.
YouTube Search and view YouTube.
Page 28
28
Getting Started
Tex t E n t r y
Tap a text box on the screen to display the on screen
keyboard.
■ QWERTY keyboard
This keyboard uses a PC keyboard layout.
■ 10-key keyboard
Depending on the screen, this appears to enter only
numbers such as phone number.
Note
• For keyboard settings, from the Idle screen, tap `
"Settings" ` "Language & keyboard" ` "XT9 Text Input" (P.49).
Page 29
29
Calling
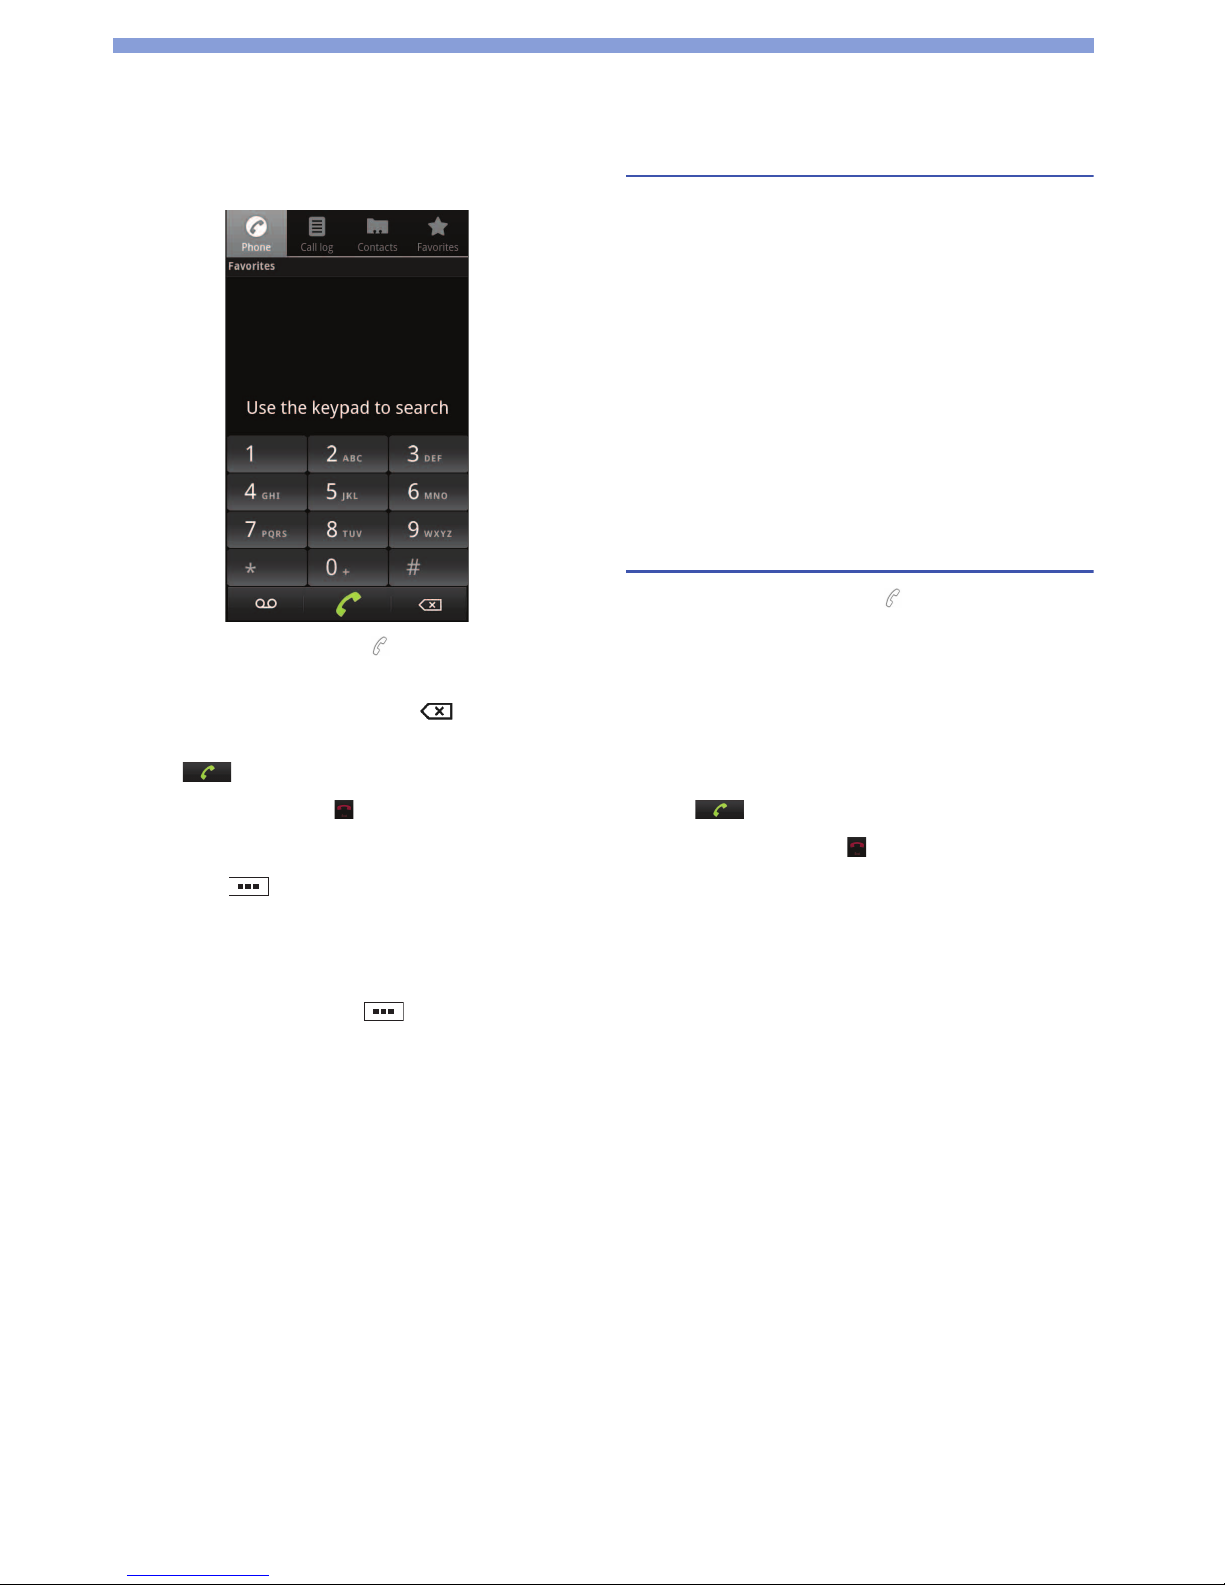
Making a Call
1 From the Idle screen, tap .
2 Enter the phone number.
If you enter a wrong number, tap to delete the
number.
3 Tap to start the call.
4 To finish the call, tap .
■ Entering a push tone (pause)
In step 2, tap ` "Add 2-sec pause" / "Add wait".
■ Using the Speed dial
Yo u can register a phone number to find easily from the
speed dial list.
From the "Phone" screen, tap ` "Speed dial list" `
select the registered phone number. To register a
number in the list, tap "Speed dial is not set" ` select a
contact.
Note
• If you have set PIN1 code entry and Airplane mode, you need
to enter the PIN1 code to make an emergency call.
For information about PIN1 code, see P.53.
Operations during a call
■ Adjusting the call volume
Press the + / - (volume) keys.
■ Putting the other party on the speaker
Tap "Speaker".
■ Muting your voice to the other party
Tap "Mute".
■ Using the Bluetooth function
Tap "Bluetooth" when connected to a Bluetooth device
compatible with your headset, etc.
Making an international call
1 From the Idle screen, tap .
2 Touch and hold "0" to enter "+".
3 Enter the country / region code ` area code (city
code) ` recipient's phone number.
If the area code begins with "0", omit "0". However,
"0" may be required for calling some countries or
areas, such as Italy.
4 Tap .
5 To finish the call, tap .
Page 30

30
Calling
Receiving a Call
1 When a call is received, drag to the right.
2 When the call is finished, tap .
■ Declining a call
Drag to the left.
Call forwarding
The Call Forwarding service forwards a call to a preset
forwarding number if you do not answer the call within the
preset ring time, or if the product is outside of the service
area or is powered off.
From the Idle screen, tap ` "Settings" ` "Call
settings" ` "Call forwarding" ` select any item.
If you do not answer an incoming call, the call is stored
as a missed call in the log and the missed call icon
appears in the status bar.
Note
• For setting each number of the item, contact your network
operator or service provider.
Voicemail
When the product receives a call, the call is connected to
the Voicemail service center if not answered. The caller
records a message, and you are notified that there is a
message at the Voicemail service center, then you can
play back the message.
For more details about Voicemail service, contact your
network operator or service provider.
1 From the Idle screen, ` "Settings" ` "Call
settings" ` Voicemail settings".
2 Tap "Voicemail number <not set>" ` enter the
Voicemail number ` "OK" ` "OK".
For the Voicemail number, contact your network
operator or service provider.
When the product receives a call, the call is
connected to the Voicemail service center if not
answered. The caller records a message, and you
are notified that there is a message at the Voicemail
service center, then you can play back the message.
Notes
• Calls you are unable to answer after starting the Voicemail
service are recorded as "Missed call" in "Call log", and
appears in the status bar.
• (indicating the number of messages) appears in the
status bar when a message is recorded.
• Depending on your using service provider, this function could
be not usable.
Using the earphone cable (handsfree phone)
1 Open the microUSB connector cap.
2 Connect the microUSB plug of the supplied
earphone cable with engraved side facing down
with the microUSB connector.
3 Connect the supplied earphones' plug with the
earphone cable.
4 To answer an incoming call, press the button of
the earphone cable.
5 Talk using the microphone of the earphone cable.
6 To finish the call, press the button of the
earphone cable.
1
2
3
4, 6
5
Page 31

31
Calling
Call Log
Yo u can check the outgoing / incoming calls history.
1 From the Idle screen, tap .
2 Tap "Call log".
: Outgoing call
: Incoming call
: Missed call
■ Showing "Call time"
Ta p ` "View call time".
■ Showing the categorized screen
Ta p ` "Category view".
■ Adding a phone number from "Call log" to
"Contacts"
To uch and hold the entry you want to add ` "Add to
contacts" ` "Create new contact" ` enter required items `
"Done".
•If multiple accounts are registered, select one from the
accounts.
•If you want to select a contact already registered, just
select the contact.
■ Deleting the log
Ta p ` "Clear call log" ` "OK".
All logs will be deleted.
To delete individual entries, touch and hold an entry to
delete and then tap "Remove from call log".
Also, you can delete by tapping ` "Delete" ` select
logs ` ` "Delete".
Contacts (Phonebook)
Yo u can add data such as phone numbers and email
addresses. You can easily make a call from "Contacts".
From the application list screen, tap "Contacts".
■ Searching a contact
If a lot of contacts exist, you can find a particular contact
easily by key search.
From the "Contacts" screen, tap ` "Search" ` enter
for searching.
■ Setting the "Contacts" screen
From the "Contacts" screen, tap ` "Display
options". Select the item to change. To complete the
setting, tap "Done".
Creating a contact
1 From the "Contacts" screen, tap ` " New
contact".
2 Select the account.
3 Enter required items such as name, number, and
email address.
4 Tap "Done" to complete.
■ Importing contacts from the SD card / SIM
card
Tap ` "Import/Export" ` "Import from SD card" /
"Import from SIM card" ` select the account.
■ Exporting contacts to the SD card / SIM card
Tap ` "Import/Export" ` "Export to SD card" /
"Export to SIM card" ` "OK".
■ Sharing visible contacts
Tap ` "Import/Export" ` "Share visible contacts" `
select the application used for sharing.
■ Deleting a contact
1 Tap ` "More" ` "Delete contacts".
2 Check the box of the contact to delete.
To select all the contacts, tap ` "Select all".
3 Tap ` "Delete contacts" ` "Delete".
Yo u can also delete the contact from the account.
After step 1, tap "Delete from account" ` follow the
screen prompts.
Page 32

32
Calling
Displaying the profile screen
From the "Contacts" screen, tap the name of the
contact to display.
■ Editing a contact
Tap the name of the contact to edit ` ` "Edit
contact" ` edit items ` "Done" to complete.
■ Sharing a contact
Tap the name of the contact to share ` ` "Share" `
select an application to use for sharing the contact `
follow the screen prompts.
■ Sending a contact
Tap the name of the contact to send, and then tap
` "Send contact" ` enter the address and message `
"Send".
■ Merging duplicate contact information
If the same contact information (name, etc.) is registered
several times, you can merge the contact information
together.
Tap a contact ` ` "Edit contact" ` ` "Join" `
select a contact to join ` "Done".
To separate the connected contacts, tap `
"Separate" ` "OK".
Favorites
On the "Phone" screen, a list of contacts set as
"Favorites" is displayed for easy searching. You can also
display the list on the "Favorites" screen.
1 From the "Contacts" screen, tap the name of the
contact to set as "Favorites".
2 Tap .
Page 33

33
Email / Browser
Email
By setting an email account, you can send and receive
emails in the same way as your PC. For more details on
setting the account, see P.23.
From the application list screen, tap "Email".
The "Inbox" screen appears. Any received email is
displayed in the "Inbox".
To refresh the "Inbox", tap and then "Refresh".
Displaying email
From the "Inbox" screen, tap an email.
■ Replying to email
Tap "Reply" / "Reply all", enter a message, and then
"Send".
■ Forwarding email
Tap , "Forward", enter the forwarding email address
in "To", and then "Send".
■ Searching email
From the "Inbox" screen, tap ` "Search" ` enter a
keyword ` .
■ Deleting email
Tap "Delete".
To delete all received email, from the "Inbox" screen, tap
` "Select All" ` "Delete".
Creating and sending email
1 From the "Inbox" screen, tap ` "Compose".
2 Enter each item.
To add a Cc or Bcc, tap ` "Add Cc/Bcc".
To add an attachment, tap ` "More" ` "Add
attachment".
3 Tap "Send".
Opening mailboxes
From the "Inbox" screen, tap ` "Folders".
Changing email settings
1 From the "Inbox" screen, tap ` "More" `
"Account settings".
2 Tap the item for setting a notification for a new
email.
• "Email notifications"; sets whether a notification
appears in the status bar for a new email.
• "Select ringtone"; sets a ringtone for notifying of a
new email.
• "Vibrate"; sets the vibration for when there is a
notification of a new email.
■ Setting automatic check of your email
In step 2, "Inbox check frequency" ` set the interval at
which to automatically check.
Page 34

34
Email / Browser
Gmail
Gmail is an email service provided by Google. You can
use Gmail to send and receive email. For more details on
setting a Google account, see P.23.
From the application list screen, tap "Gmail".
The "Inbox" screen appears. Any received Gmail is
displayed in the "Inbox".
To refresh the "Inbox", tap and then "Refresh".
Displaying Gmail
From the "Inbox" screen, tap a message thread.
■ Switching accounts
From the "Inbox" screen, tap ` "Accounts" ` the
account to display. To add another account, tap "Add
account" and follow the screen to set the other account.
■ Searching Gmail
From the "Inbox" screen, tap ` "Search" ` enter a
keyword ` .
■ Displaying Gmail by label
From the "Inbox" screen, tap ` "Go to labels" ` type
of label to display. To label an email, see "Managing
message threads".
■ Replaying to Gmail
Ta p ` enter a message ` .
To reply all members, tap "Reply" ` "Reply All". For more
details about sending, refer to "Changing Gmail settings".
■ Forwarding Gmail
Ta p ` "Reply" ` "Forward" ` enter the forwarding
email address in "To" ` . For more details about
sending, refer to "Changing Gmail settings".
■ Deleting Gmail
Tap "Delete" when the message is displayed.
Note
• In Gmail, email is displayed grouped into a message thread
according to reply. If newly arrived emails are replies to an
existing email, they will be grouped into the same message
thread. A new thread is created for newly created email and
changes of subject name.
Creating and sending Gmail
1 From the "Inbox" screen, tap ` "Compose".
2 Enter each item.
To add a Cc or Bcc, tap ` "Add Cc/Bcc".
To add an attachment, tap ` "Attach".
3 Tap .
■ Saving the entered Gmail as draft
Tap ` "Save draft".
Managing message threads
1 From the "Inbox" screen, touch and hold a
thread.
2 Select any item.
• "Read"; opens a message thread.
•"Archive"; stores message threads. Stored
message threads are not displayed in the inbox.
•"Mute"; hides message threads.
• "Mark read" / "Mark unread"; designates a
message thread as read / unread.
• "Delete"; deletes a message thread.
•"Add star" / "Remove star"; assigns / removes a star
from a message thread.
• "Change labels"; adds or changes the label of a
message thread.
• "Report spam"; displays the report of deleted
thread by Google as spam.
• "Help"; displays the help page.
■ Showing archived or muted message
threads
From the "Inbox" screen, tap ` "Go to labels" ` "All
Mail".
Note
• Labels cannot be created on this product. Create labels on
the Gmail website.
Changing Gmail settings
1 From the "Inbox" screen, tap ` "More" `
"Settings".
2 Tap the item to set.
Page 35

35
Email / Browser
Messaging (SMS / MMS)
Yo u can send and receive text and multimedia messages
with a cell phone number as the address.
Yo u can also send with an email address.
From the application list screen, tap "Messaging".
The message screen appears.
Creating and sending Message
1 From the message screen, tap "New message".
2 Enter the number in "To" and the message in
"Type to Compose".
To enter more than one recipient, enter ";" or ","
between each phone number, or tap after each
phone number entered.
3 Tap "Send".
■ Attaching a file for the sending message
Before step 3, tap ` select item for attaching and
follow screens.
Displaying sent / received Message
Tap a message thread.
To search for a message to display, tap ` "Search".
■ Replying to Message
From displaying the received message to reply, tap
and "Reply".
■ Forwarding Message
From displaying the received message to forward, tap
and "Forward".
■ Adding the received number to "Contacts"
To uch and hold a received message, and tap "OK" to
add. Then tap "Create new contact" or tap a contact.
Displaying the Message conversation
1 From the message screen, tap `
"Conversation view".
2 Tap the message thread to display.
Yo u can send Message from this screen.
■ Deleting all messages of the thread
To uch and hold the thread to delete ` "Delete" ` "Delete".
Displaying the folder list
From the message screen, tap ` "Folder view".
■ Creating a new folder
From the message screen in folder view, tap `
"New folder" ` enter the name for the new folder ` "OK".
Moving Message
1 From the message screen, tap the folder ` `
"Move".
2 Check the box of the message to move.
3 Tap ` "Move" ` select a folder to move to.
Note
• If you move a message to the "Security" folder, you can avoid
accidental deleting and protect. From the message screen,
tap the "Security" folder ` set the password ` "OK".
Deleting Message
1 From the message screen in folder view, tap any
folder ` a message to delete.
2 Tap ` "Delete" ` "OK".
■ Deleting all messages from the sender
From the "Inbox" screen, touch and hold the message to
delete ` "Delete" ` "Delete all messages from the
sender" ` "OK".
■ Deleting all messages from the folder
From the message screen, tap the folder ` `
"Delete". Tap ` "Select all" ` ` "Delete" `
"OK", or check the boxes of messages to delete ` `
"Delete" ` "OK".
■ Setting automatic deletion for Message
From the message screen, tap ` "Settings" ` check
the box of "Delete old messages" ` "Text message limit"
` "+" or "−" for a messages limit ` "Set".
Changing Message settings
1 From the message screen, tap ` "Settings".
2 Tap the item to set.
Page 36

36
Email / Browser
Google Talk
Google Talk is an online instant messaging service by
Google. For setting the Google account, see P.23.
1 From the application list screen, tap "Talk".
2 Tap a chat member.
If there is no chat member, add a member. Tap
` "Add friends" ` enter an email address ` "Send
invitation" ` wait until your friend's accepting.
3 Enter a message and tap "Send".
4 To finish, tap ` "End chat".
■ Switching chat members
Ta p ` "Switch chats" ` a chat member.
■ Chatting with two or more members
Ta p ` "Add to chat" ` chat members.
■ Changing Google Talk settings
Ta p ` "Settings" ` the item to set.
Browser
Yo u can browse web pages using the browser. You can
browse sites via packet communication and Wi-Fi also.
1 Tap on the Idle screen.
2 Tap the address bar.
3 Enter an URL or keywords.
Once you enter an URL or keywords in the address
bar, a list of candidates appears.
4 Tap or the web page you want to display from
the list of candidates.
If you tap ` "More" ` "More actions", you can
select a following item for an action.
•"Set as homepage"
• "Page info"
• "Share page": Select an application to share by.
•"Enter fullscreen"
• "Find on page": Enter the search text ` tap /
` .
■ Using the voice search
Instead of step 3, tap and clearly speak the search
words into the microphone.
■ Opening a new browser window
Tap ` "New window".
■ Switching between windows
If more than one window opens, tap ` "Windows" `
web page to display.
■ Moving to the previous web page
Tap to return to the previous page.
■ Moving the web page by Gesture
Tap ` "More" ` "Gesture" ` "Add gesture" ` select
the type for using gesture ` draw for gesture ` "Done".
■ Copying text contents
1 Tap ` "More" ` "Select text".
2 Drag the text to copy.
3 Drag to the start position and to end
position.
4 Tap the selected text.
The copied text can be pasted into other applications,
such as a browser search box or email. Touch and
hold the text box to paste, and then tap "Paste".
■ Saving images appearing in web pages
To uch and hold an image to save ` "Save image". You
can see the saved image from the list shown by tapping
` "More" ` "Downloads".
Page 37

37
Email / Browser
Using bookmarks
Bookmarking a web page allows you to quickly access
that web page.
■ Adding a bookmark
From the web page to add, tap ` "Bookmarks" `
"Add" ` check / change the bookmark name ` "OK".
To add a bookmark by entering address, tap `
"Add new bookmark" from the "Bookmarks" screen.
Yo u can also add a bookmark from the "Most visited" or
"History" list. Tap "Most visited" or "History" ` of the
item to add.
■ Displaying web pages added to bookmarks
From the web page, tap ` "Bookmarks" ` a
bookmarked page to display.
Yo u can also change the view of bookmarks to the list by
tapping ` "List view".
■ Deleting all bookmarks
From the "Bookmarks" screen, tap ` "Delete all
bookmarks" ` "OK".
Changing browser settings
1 From a web page, tap ` "More" ` "Settings".
2 Tap the item to set.
Page 38

38
Android Market
Installing Applications
1 From the application list screen, tap "Market".
At the first time to open Android Market, tap "Accept"
after confirming the terms of service.
2 Tap an application to install.
3 Tap "Download" for free, or the monetary amount
box for purchasing.
If you purchase at the first time, you need to set
payment information (Google Checkout).
4 Tap "Accept & download" or "Accept & buy".
Downloading starts. After downloading completes,
install starts.
■ Requesting refund
Yo u can request a refund within a stipulated time after
purchase. The application will be deleted, and you will
not be charged for it.
Yo u may obtain only one refund for each application. If
you have previously requested and obtained a refund for
a purchased application, you cannot obtain another
refund for that same application after you purchase it
again.
For information on payment methods and refund terms,
from the market screen, tap ` "Help".
Note
• For an initial purchase by credit card, you must enter
information about the credit card to use with Google
Checkout. Google Checkout is a fast, secure, and convenient
method for purchasing applications. For more information on
Google Checkout, refer to http://checkout.google.com/.
Deleting applications
1 From the "Market" screen, tap ` "My Apps".
2 Tap the application to delete ` "Uninstall" ` "OK".
Changing Android Market settings
1 From the "Market" screen, tap ` "Settings".
2 Tap the item to set.
Page 39

39
GPS
Yo u can use the GPS function and compatible software
to check your present location, find directions to a
destination, etc.
•GPS is operated by the U.S. Department of Defense.
GPS signals are subject to control adjustments
(reduced accuracy, stoppage of signal, etc.) at the
discretion of the Department.
• Some wireless communications products (mobile
phones, data detectors, etc.) block satellite signals and
cause instability of signal reception.
• The display of some maps based on location
information (latitude / longitude information) may be
inaccurate due to the regulations of some co
untries or
regions.
•You may find it impossible or difficult to receive a GPS
signal in the following conditions because GPS uses
radio waves from a satellite.
-Inside or immediately underneath a building
- In a basement or tunnel, underground, or underwater
- In a bag or box
- In a built-up or residential area
- In or under thick trees
- Near a high-voltage cable
-Inside cars or trains
- In heavy rain, snow, or other bad weather
- When there are obstructions (people or objects) near
the product
- When the GPS antenna section is covered by a hand
etc.
Enabling the Location
Service
To use the Location Service, you must enable the GPS
function beforehand. You can also configure your product
to find approximate location information based on
information from Wi-Fi and mobile network base stations.
1 From the Idle screen, tap ` "Settings" `
"Location & security".
2 Check the box of "Use GPS satellites".
Note
• Google Location Service gathers location information in a
manner not enabling pinpointing of individuals. Gathering of
location information occurs regardless of whether an
application is launched.
■ Enabling wireless network
1 From the Idle screen, tap ` "Settings" `
"Location & security".
2 Check the box of "Use wireless networks" `
"Agree".
Page 40

40
GPS
Google Maps
Yo u can use Google Maps display your current location,
search other locations, search directions, etc. To use
Google Maps, a 3G / GPRS or Wi-Fi connection enabling
data communication is required. Set the Location Service
on beforehand. (P.39)
From the application list screen, tap "Maps".
The first time you launch this application, a screen
presenting new map features appears. Tap "OK".
■ Zooming in / out on the map
• Zoom in: Tap "+", slide two of your fingers apart, or
double-tap (tap twice).
• Zoom out: Tap "-", slide two of your fingers together, or
tap with your two fingers.
■ Displaying the current location
Ta p .
■ Searching for a location
Enter a location in "Search Maps" ` or tap a search
candidate.
With tapping , you can also use Voice searching.
Yo u can save the searched location as "Starred Places"
by tapping ` . After saving, you can display the
starred place later by tapping ` "My Places". List of
"Starred Places" appears. You can also display a recently
searched location by tapping "Recent".
■ Viewing Street View
To uch and hold a point to view ` ` "Street view".
Some regions are not supported for Street View.
■ Displaying layers
Ta p ` the item to display information such as traffic
conditions overlaid on a map, or switch to an aerial
photograph.
Traffic conditions and railway lines are provided for
limited regions.
■ Clearing a map
Ta p ` "Clear Map" to clear all displayed layers and
directions search results.
Looking up directions
Yo u can view directions to your destination.
1 While viewing a map, tap ` "Directions".
2 Enter the starting point in the textbox above.
3 Enter the arrival point in the textbox below.
Yo u can tap and specify a contacts address, map
location, etc.
4 Tap the means ( (car) / (public transport) /
(on foot)) ` "Get directions".
When several sets of directions are found, tap the
desired directions.
If you tap , tap after selecting a trip. You can
also set departure time or arrival time before
selecting a trip.
Page 41

41
GPS
Navigation
You can use audio guidance to the destination.
1 From the application list screen, tap
"Navigation".
The first time you launch this application, a
description of Google Maps Navigation is displayed.
Tap "Accept".
2 Select "Walking" or "Driving".
3 Select any item.
• "Speak Destination"; enters your destination by
voice.
• "Type Destination"; enters your destination by text
entry.
• "Contacts"; enters your destination from an address
registered in your contacts.
• "Starred Places"; enters your destination from a
location with a star added in Google Maps.
4 Tap ` "Mute" / "Unmute" for setting the
voice guidance.
To display the route information, tap ` "Route
Info".
■ Exiting navigation
Ta p ` "Exit Navigation".
Notes
• You can use the voice guidance. Tap "Install" ` follow the
screen prompts to install the application when the messge
appears.
• On the navigation screen, following icons appears.
- ; shows a list of routes.
- ; appears after selecting a route. Tap this icon to switch
the screen to street view.
- ; appears after switching to street view. Tap this icon to
change the view at street view.
Places
You can search for shops and facilities near your current
location and display information. Shops and other
locations that were found can be displayed in the Google
Maps screen.
1 From the application list screen, tap "Places".
2 Tap a category to search.
3 Tap an item to display.
Page 42

42
GPS
Latitude
Google Latitude enables you and your friends to check
each others' locations on maps and share status
messages with each other. It also enables you to send
email and SMS messages, make calls and search for
directions to friends' locations.
Location information is not shared automatically. You
must first join Latitude and then invite friends to provide
their locations, or accept invitations from friends to share
your location.
For more information about Latitude, tap from the
"Latitude" screen ` "Help".
1 From the application list screen, tap "Latitude".
2 Tap "Share location with family or friends" `
"Agree & Continue".
3 Tap a member to display the location.
If there is no member, add a member. Tap `
"Add friends" ` "Select from Contacts" or "Add via
email address" ` follow screens.
To refresh the screen, tap ` "Refresh friends".
Page 43
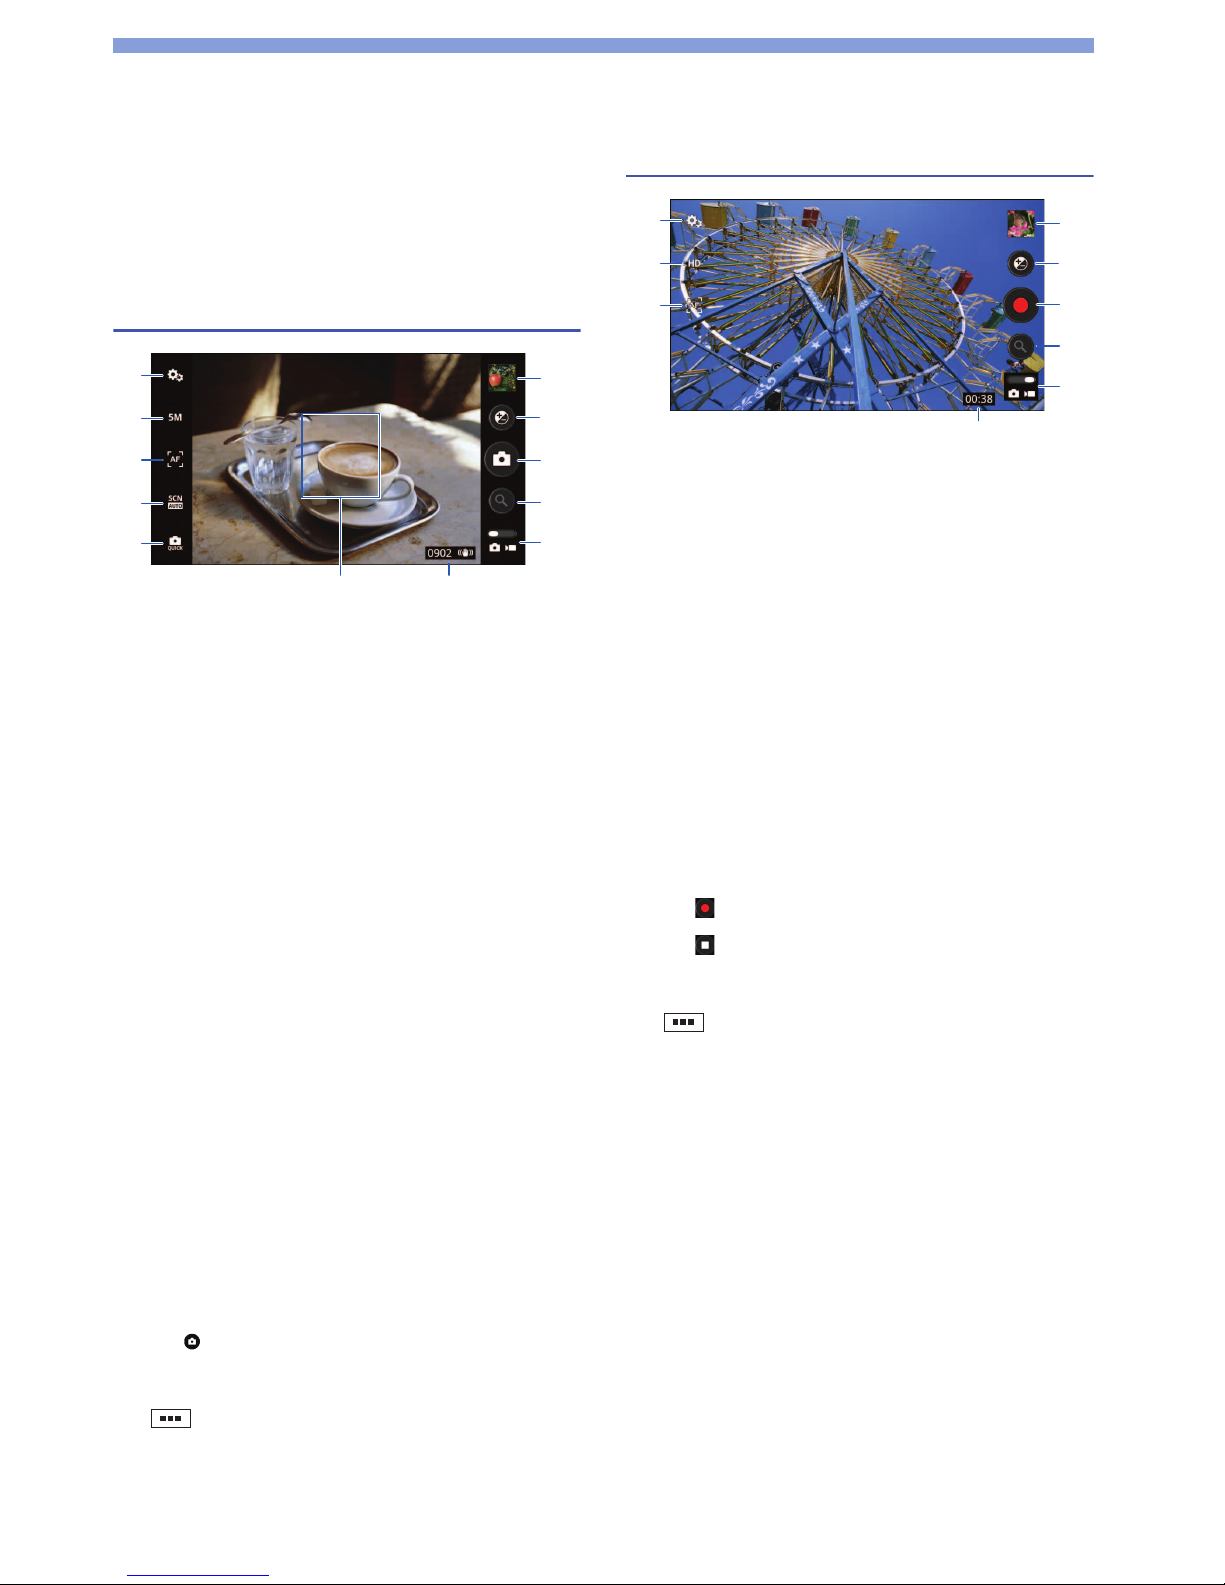
43
Multimedia
Camera
Photos and videos shot on the camera are automatically
saved to the microSD card. If you do not have a microSD
card inserted, you cannot start shooting.
Shooting photos
1 "Other Settings"
Configures the settings for light, image quality,
antishake, self timer, etc.
2 "Size" (image size)
3 "Auto focus"
Configures focus settings.
4 "Scene"
5 "Camera Mode"
• "Standard"
• "Quick Shot": Shoots rapidly in a short timeframe.
• "Multi Shot": Shoots repeatedly at one time. You
can also set the interval time and number of
pictures to shoot. To set "Multi Shot", tap "MultiShot
Settings" ` set "Interval" and "Piece" ` "OK".
6 Focus frame
7 Number of remaining shots / Antishake icon /
Location information acquisition status
8 Photo / video
9 Zoom*
10 Shutter
11 Brightness
12 Gallery
* Depending on the "Size" setting, this may not be activated.
1 From the application list screen, tap "Camera".
2 Focus the camera on the subject.
3 Tap to shoot.
■ Hiding icons
Ta p ` "Hide icons".
Shooting videos
1 "Other Settings"
Configures the settings for light, image quality, etc.
2 "Size"
3 "Auto focus"
4 Remaining shooting time
5 Photo / video
6 Zoom*
7 Recording start / stop
8 Brightness
9 Gallery
* Depending on the "Size" setting, this may not be activated.
1 From the application list screen, tap "Video
Camera".
2 Pint the camera at the subject.
3 Tap to start shooting.
4 Tap to stop shooting.
■ Hiding icons
Tap ` "Hide icons".
1
2
3
4
5
12
11
10
9
8
6 7
1
2
3
9
8
7
6
5
4
Page 44
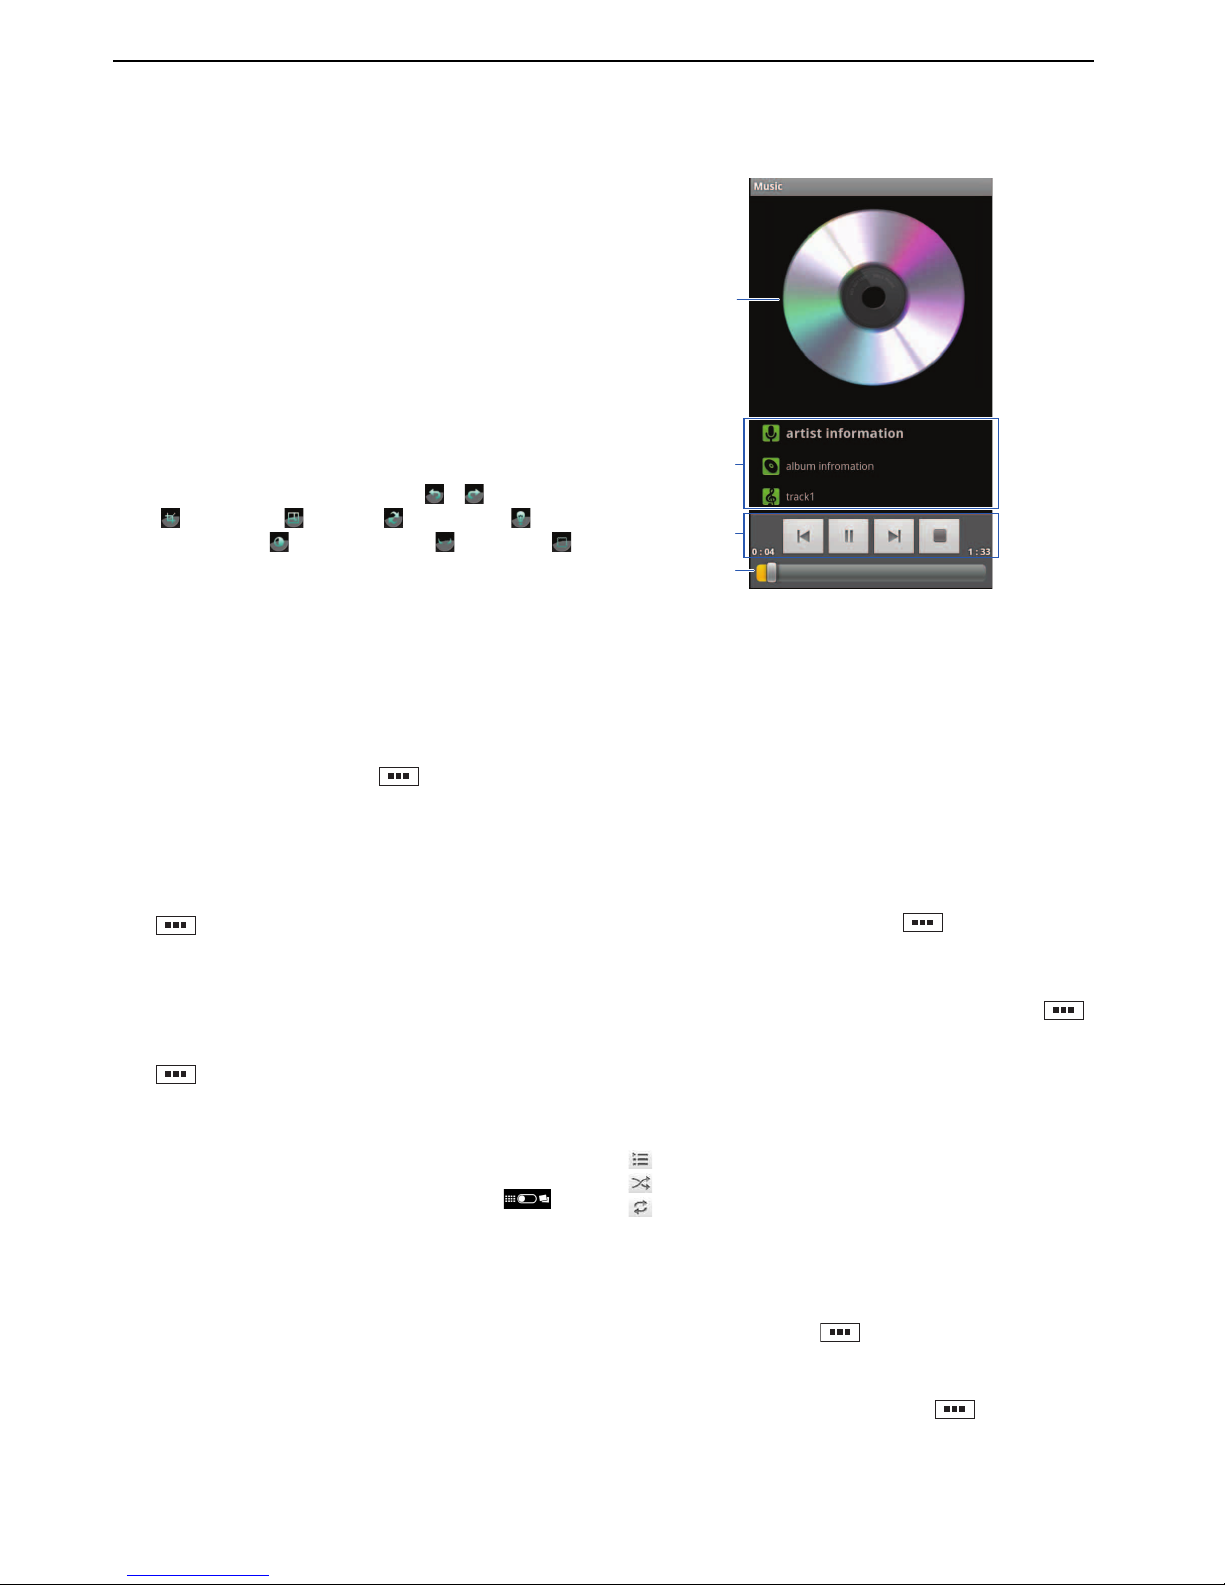
44
Multimedia
Gallery
Yo u can display and play the photos or videos saved on
the microSD card.
1 From the application list screen, tap "Gallery".
2 Tap a category.
3 Tap a photo / video to display or play.
To uch and hold a category , photo, or video to send
data by Bluetooth communication or mail, delete
data, check details, etc.
If you tap "Menu" ` "More", select an item for the
following action.
•"Details"; shows details
•"Set as"; sets as the contact icon or wallpaper.
•"Edit picture"; edits using icons, / (rotating),
(cropping), (sizing), (reflection),
(brightness), (white balance), (drawing),
(adding icons).
• "Crop"; trims the picture.
•"Settings"; sets for general or slideshow.
• "Exif Info"; shows exif properties.
• "Rotate Left"
• "Rotate Right"
■ Slideshow
From the displaying picture, tap twice `
"Slideshow". Slideshow starts with pictures in the same
folder.
■ Sharing files
From the thumbnail list screen of "Gallery", touch and
hold . Check boxes are displayed for each file.
Check the boxes to share ` tap "Share" ` select an
application for sharing ` follow screens.
■ Deleting files
From the thumbnail list screen of "Gallery", touch and
hold . Check boxes are displayed for each file.
Check the boxes to delete ` tap "Delete" ` "Confirm
Delete".
■ Arranging the photos by shooting period
From the thumbnail list screen of "Gallery", tap .
Music Player
Yo u can play music files saved on the microSD card.
1 Album cover image
2 Song details
You can touch and hold to search related information
for each application.
3 Go back to the beginning or previous song / pause /
go to the next song / stop
4 Specify playback position
1 From the application list screen, tap "Music".
The category lists screen appears.
2 Tap a category.
To enter a text searching, tap ` "Search" `
enter a text.
3 Tap an item and song to start playback.
To display the list including a playing song, tap
` "Library".
■ Song list / shuffle play / repeat play
From the "Music" playing screen, tap the image to display
following icons.
; Displays a song list of the current album.
; Switches shuffle play mode to on / off.
; Switches repeat play mode to Repeat all / Repeat
current / off.
■ Using party shuffle mode
Yo u can play several music files selected in random order
from all the songs. Tap ` "Party shuffle".
■ Setting a playing song as a ringtone
From the "Music" playing screen, tap ` "Use as
ringtone".
1
2
3
4
Page 45

45
Multimedia
■ Deleting a playing song
From the "Music" playing screen, tap ` "Delete" `
"OK".
Using playlist
1 From the category lists screen, touch and hold
the artist name, album name, or song name `
"Add to playlist".
Yo u can also add the playing song to the playlist by
tapping ` "Add to playlist" during playback.
2 Tap "Now playing list", "New", or a created
playlist.
Yo u can add all songs in the selected item (artist or
album).
■ Renaming a playlist
From the category lists screen, tap "Playlists" ` touch
and hold the playlist to rename ` "Rename" ` enter a
playlist name ` "Save".
■ Deleting a playlist
From the category lists screen, tap "Playlists" ` touch
and hold the playlist to delete ` "Delete" ` "OK". You
cannot delete playlists from "Recently added".
■ Deleting a song from a playlist
From the category lists screen, tap "Playlists" ` a playlist
` touch and hold the song to delete ` "Remove from
playlist".
For using the supplied earphones to listen, connet via the
supplied earphone cable. (P.30)
Notes
• To use the supplied earphones to listen, connect via the
supplied earphone cable. (P.30)
• To display the properties of a playing song, from the "Music"
playing screen, tap ` "Properties".
Page 46
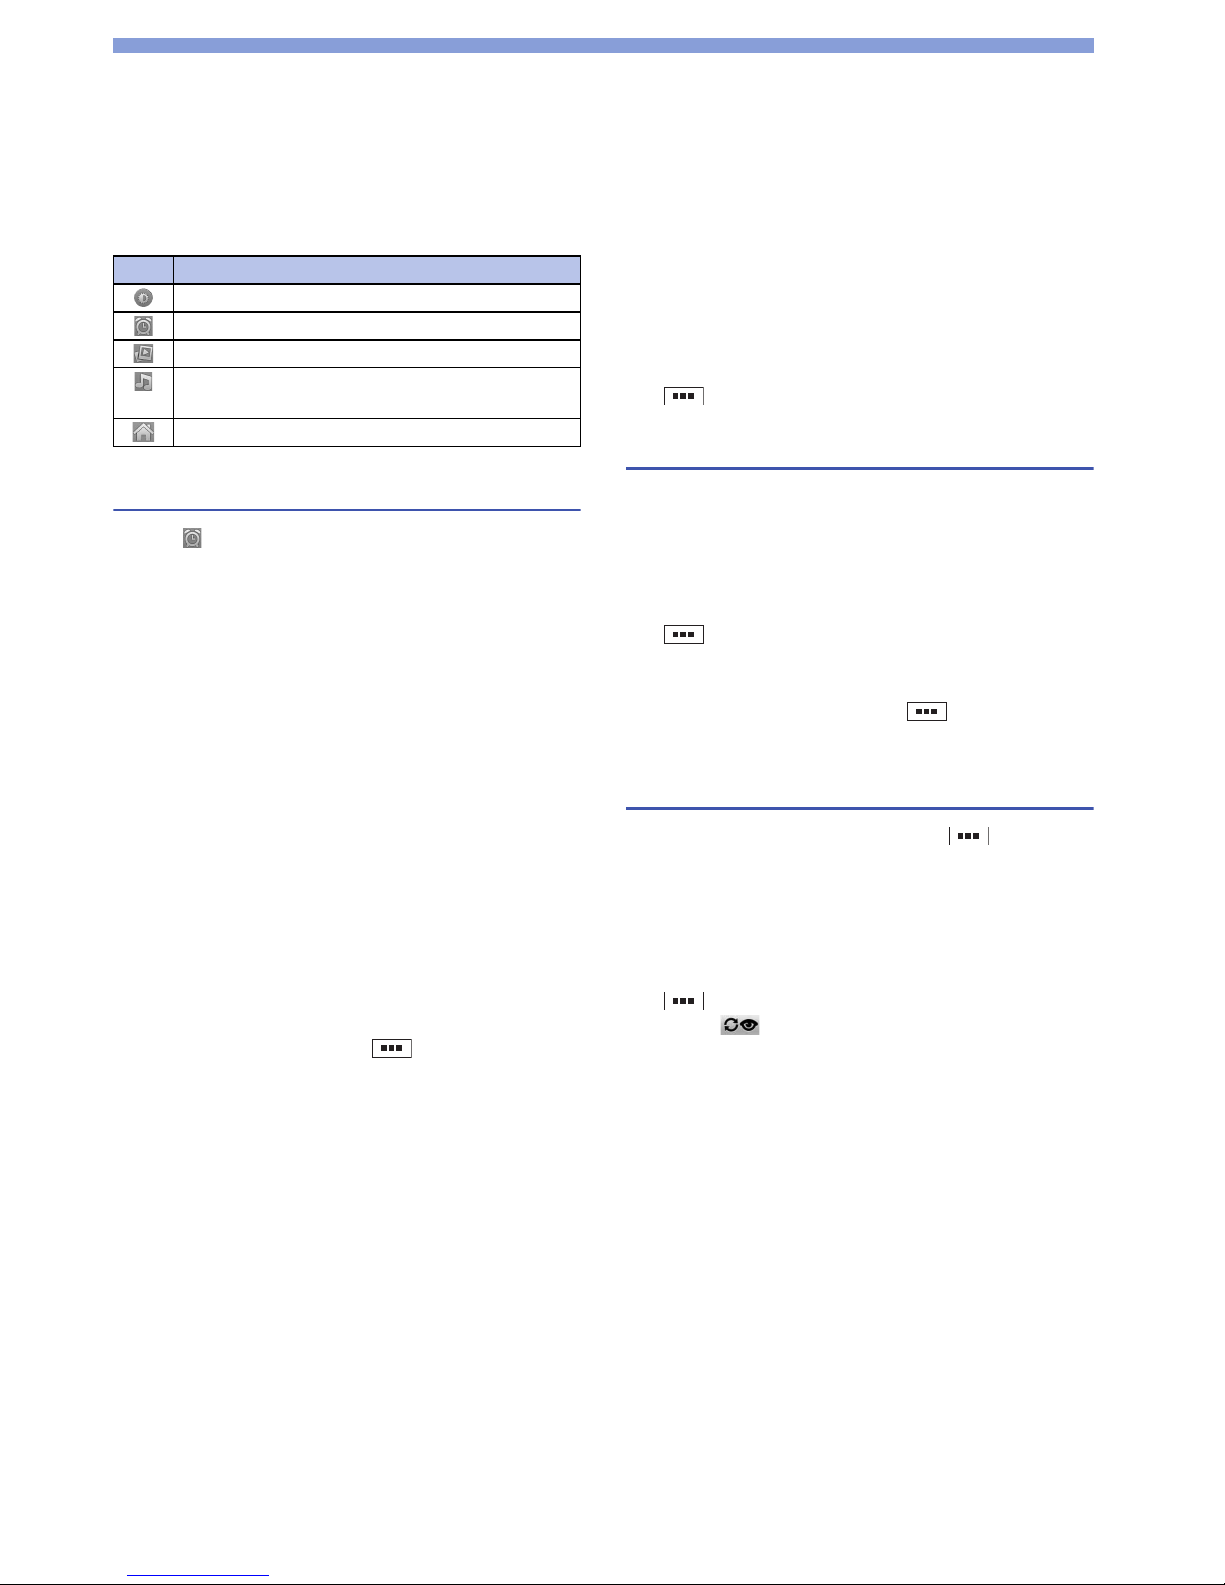
46
Clock / Calendar
Clock
From the application list screen, tap "Clock".
Time, date, and the weather forecast are displayed.
Setting the alarm
1 Tap .
The alarm list screen appears.
2 Tap "Ad d alar m".
3 Set the alarm time ` "Set".
4 Check or select an item to set.
•"Turn alarm on": Set the alarm to operate.
• "Time": Set the alarm time.
• "Repeat": Set the alarm to sound at the same time
on each day.
• "Ringtone": Set the alarm sound.
• "Label": Assign a label to the set alarm.
5 Tap "Done".
■ Stopping the alarm
Ta p "Dismiss". If you tap "Snooze", the alarm sounds
again according to the "Snooze duration" setting.
■ General setting for the alarm
From the alarm list screen, tap ` "Settings". You
can set following items.
•"Alarm in silent mode"
•"Alarm volume"
• "Snooze duration"
•"Volume"
Calendar
Yo u can manage your schedule by synchronizing with an
online calendar provided by Google or other service.
Yo u must configure a Google account beforehand. (P.23)
From the application list screen, "Calendar".
The "Calendar" screen appears.
■ Switching the calendar display
Tap ` "Day", "Week", or "Month".
Creating a schedule
1 From the "Calendar" screen, touch and hold the
date ` "New event".
2 Set each item ` "Done".
■ Checking the agenda
Tap ` "Agenda".
■ Changing / deleting events
Tap an event to change / delete ` ` "Edit event" /
"Delete event".
Changing calendar settings
1 From the "Calendar" screen, tap ` "More" `
"Settings".
2 Change settings.
■ Synchronizing with Google or other
calendar
Ta p ` "More" ` "Calendars" ` the account of the
calendar ` to synchronize / display ` "OK".
Icons Descriptions
Darkening the screen
Setting the alarm
Starting a slideshow
Starting the "Music" application and playing
music
Going back to the Idle screen
Page 47
47
Settings
Setting List
To display the "Settings" screen, tap `
"Settings" from the Idle screen.
Wireless & networks
Call settings
Airplane mode
All wireless functions such as phone calls, packet
communication are disabled.
Wi-Fi
Wi-Fi settings (P.22)
Wi-Fi
Network notification
Set whether to notify when an open Wi-Fi network is
detected.
Wi-Fi Easy Settings (P.22)
Add Wi-Fi network (P.22)
Bluetooth (P.51)
Bluetooth settings (P.52)
Bluetooth (P.51)
Device name
When Bluetooth communication is performed,
change the name displayed on the partner Bluetooth
device.
Discoverable
Scan for devices
Proxy settings
Tethering & portable hotspot
USB tethering
Turn on / off. You can tether to your PC using a
miniUSB cable to share the Internet connection.
Portable Wi-Fi hotspot
Turn on / off. You can share the internet connection
with one or more PCs, or other devices.
Portable Wi-Fi hotspot settings
Help
VPN settings (P.52)
Mobile networks (P.51)
Data enabled
To e n sure immediate data connection after checking
the box of "Data enabled", restart this product.
Data roaming (P.51)
Network Mode (P.51)
Access Point Names (P.21) (P.51)
Network operators (P.51)
Fixed Dialing Numbers
When checking the box of "FDN activation", you can call
only numbers registered on FDN (Fixed Dialing
Numbers). This function can be used depending on the
service provider.
Service Numbers
Voicemail service
Voicemail settings (P.30)
DTMF Tones
Dialpad Tones
Speed dial (P.29)
Call forwarding (P.30)
Additional settings
Caller ID
Setting the display this number for outgoing calls
Call Waiting
When there is a second incoming call while you are
in call, this service notifies you with a ringtone so
you can place that first call on hold to answer. You
can also put a current call on hold and place a call to
another party.
Depending on the service provider you are using,
this function may not be available.
Page 48
48
Settings
Ringtones and sounds
Select one of the profile above or you can create your
own profile by tapping ` "New". Edit the following
items.
•"Name"
•"Alert style"
•"Audible selection"*
•"Volume"
• "Ringtone"
•"Message alert"
• "Email alert"
• "Calendar alert"
• "Alarm alert"
* Set the operation sound when selecting from a menu.
Display
Note
• When the battery level becomes low, "Brightness"
automatically sets to its minimum to conserve power.
eco mode
Location & security
Ring
Vibrate
Silent
Ta p "OK" to set this product not to emit sound, etc., for
etiquette when in a public or similar place.
Alternatively, press and hold the power switch for one
second or longer, and tap "Silent mode".
Ring and vibrate
Airplane
Brightness
Check the box of "Automatic brightness" to detect
surrounding brightness and adjust automatically.
Auto-rotate screen
Set whether the display switches automatically according
to the orientation of this product.
Animation
Set the animation to display if the screen switches.
Screen timeout
Set the time until the screen back light turns off. About
five seconds after the backlight turns off, you can tap
to turn it on again.
eco mode
If you set "AUTO", eco mode turns on automatically
according to the battery level set with "Auto setting".
eco mode option settings
When you set "eco mode" to "ON" or "AUTO", you can
set the below items.
Brightness
Screen timeout
Turn off Bluetooth
Turn off Wi-Fi
Unuse GPS satellites
Stop sync
Stop live wallpapers
Auto setting
If you set "eco mode" to "AUTO", set the battery level at
which eco mode turns on automatically.
About
Use wireless networks (P.39)
Use GPS satellites (P.39)
Set up screen lock
Configure to enter the unlock security code for unlocking
the screen.
Customer Lock Screens (P.24)
Set up SIM card lock
Lock SIM card
Change SIM PIN (P.53)
Visible passwords
Set to display characters when entering a password.
Select device administrators
Use secure credentials
Per mit access to safe certificates and other credentials
information.
A credential information storage password must be set
beforehand.
Install from SD card
Install an encrypted certificate from a microSD card.
Set password
Set a password for credentials information storage.
Clear storage
Delete all credentials information and reset the
credentials information storage password.
Page 49
49
Settings
Applications
Accounts & sync
Yo u can configure accounts for online services such as
Microsoft
®
Exchange ActiveSync®, to synchronize data as
well as exchange data between the product and servers
for the various services. If set to synchronize
automatically, the product is automatically updated with
update information via the web.
For details on adding an account, see P.23.
■ Starting synchronization manually
1 From the "Settings" screen, tap "Accounts &
sync".
2 Check items for synchronization ` tap the
account to synchronize.
3 Tap ` "Sync now".
4 To stop synchronization, tap ` "Cancel
sync".
To delete an account, tap the account to delete `
"Remove account" ` "Remove account".
Note
• To delete the Google account that was configured first, data
on the product must be initialized.
Privacy
This allows you to configure backup for Google
applications if you reset the product.
Storage
Language & keyboard
Unknown sources
Manage applications
Yo u can check the name, version, etc., of applications, or
force-close, delete, etc., applications.
Running services
Running applications appear. Tou ch and hold the
application to stop running.
Storage use
The storage status for an application appears.
Battery use
The battery power used for each application appears.
Development
Configure various settings required for application
development.
USB debugging
Stay awake
Allow mock locations
Background data
All applications carry out data communication
automatically.
Auto-sync
Applications synchronize data automatically.
Back up my data
Set to restore the backed up settings and data when
reinstalling an application.
Automatic restore
Running applications appears. Touch and hold the
application to stop running.
Master reset
Reset all settings. The default password is 1234.
Factory data reset
Delete all data and return to the state at the time of
purchase. Check the box of "Erase SD card" to delete all
data on the microSD card. The default password is 1234.
Change Factory Password
The default password is 1234.
Total s pac e
The capacity of the microSD card is shown.
Available space
The free space on the microSD card is shown.
Unmount / Mount SD card
To cancel recognition or make the microSD card
recognizable by the product so that the microSD card
can be removed safely, set to "Unmount SD card".
Erase SD card
Format the microSD card. Note that formatting eras
es all
contents on the microSD card. Before setting, set
"Unmount SD card" first.
Available space
The free space on this product is shown.
Select language
User dictionary
Yo u can add any words to the dictionary, which are then
displayed as conversion candidates when entering text
with the Android keyboard.
XT9 Text Input (P.28)
Configure settings for the keyboard.
Languages and settings
After checking the box of the language, tap
"Keyboard Input". The keyboard input settings
screen appears. Configure settings for layouts, key
input, etc., of the keyboard.
Preferences
Configure settings for text input.
About
See the version and copyright of TX9 Text Input.
Page 50
50
Settings
Voice input & output
Accessibility
Configure user-aide applications which react with sound
or vibration when operated.
Accessibility applications are not registered at time of
purchase. You must download and install compatible
applications beforehand from Android Market or other
sites before you can set "Accessibility".
Date & time
About phone
Wizard
The language selecting screen appears. See "Turning
power on" (P.20).
Voice recognizer settings
Language
SafeSearch
Block offensive words
Text-to-speech settings
Listen to an example
Always use my settings
Configure application settings to operate according
to your own settings.
Default Engine
Install voice data
Speech rate
Configure the text reading out speed.
Language
Pico TTS
Configure the installed voice synthesis engine.
Accessibility
Set the accessibility functions.
Power button ends call
Set to end a call by pressing the power switch. However,
in sleep mode, this does not end a call, and instead
cancels sleep mode.
Automatic
The time is adjusted automatically.
Set date
Select time zone
Set time
Use 24-hour format
To set the clock to the 24-hour display, check the box.
Select date format
Software update (P.60)
Status
Check the battery level, phone number, etc.
Battery use
The amount of battery used for each application appears.
Legal information
The open source licenses and Google usage agreement
appears.
Model number
Android version
Baseband version
Kernel version
Build number
Page 51

51
Settings
Mobile Networks
This product is configured to automatically detect and
switch the network mode, operator, etc., by default, but
you can also manually switch.
1 From the "Settings" screen, tap "Wireless &
networks" ` "Mobile networks".
2 Tap "Network Mode" ` select the item to check
the network mode.
■ Setting an operator
After step 1, tap "Network operators" ` "Select
automatically" or the network of the operator you want to
use. The operator names that are displayed vary
depending on the setting of the "Network Mode".
■ Enabling data roaming
Check the box of "Data roaming" ` "OK".
■ Switching access points
After step 1, tap "Mobile networks" ` "Access Point
Names" ` ` "New APN".
Set each item to create. After setting each item, tap
` "Save" ` the created access point.
Bluetooth
Connect with a Bluetooth compatible device via
Bluetooth communication. You can connect a wireless
headset, wireless audio device, etc.
There is no guarantee that this product is capable of
wireless communication with all types of Bluetooth
devices.
For information about the settings and operation
procedures, see also the instruction manual of the
Bluetooth compatible device.
Precautions when using Bluetooth devices
Note the following in order to ensure a good connection.
• Connect with another Bluetooth device within about a
10 m viewable distance. Depending on surroundings
(walls, furniture, etc.) and building structure, the
connectable distance may be shorter. The connectable
distance will also be shorter if an obstacle is between
this product and And the other Bluetooth device. You
may be unable to establish connection if this product
and the device are located on opposite sides of walls
containing metal rods, such as on upper and lower
stairs or in adjoining rooms, especially in a building
made of reinforced concrete.
Also note that the above connection distance
s are not
guaranteed.
• Connect this product distanced from other devices
(electric product, AV equipment, OA equipment, etc.)
as much as possible. (Since the product can easily be
affected by a microwave oven in use, distance the
product as far away as possible.)
If the product is brought closer when another device is
on, it may be unable to connect normally, or may be a
cause of television and radio noise or interference
(television picture may be unclear for particular UHF or
satellite channels).
•If you cannot connect normally due to a nearby
broadcasting station, wireless transmitter, etc., change
the location of the partner Bluetooth device. You may
not be able to connect normally if surrounding radio
waves are too strong.
•You can establish a wireless connection while a
Bluetooth device is in a bag or pocket. However, if your
body is located between the Bluetooth device and the
product, decreased communication speed or noise
may occur.
Bluetooth devices and wireless LAN (IEEE 802.11 b/g/n)
use the same frequency band (2.4 GHz). If you use the
product or Bluetooth device near a device equipped with
a wireless LAN, radio wave interference may occur and
can result in decreased communication speed, noise,
poor connection, etc. If this happens, do the following.
• Keep the product and a Bluetooth device in wireless
connection at least 10 m from a wireless
LAN.
•Turn off a wireless LAN when used within 10 m.
Page 52

52
Settings
The radio waves emitted by a Bluetooth device may
affect operation of medical electronics or other
equipment. Since it may cause an accident in some
circumstances, turn off the product and any nearby
Bluetooth devices in the following places.
•Trains
• Airplanes
• Hospitals
• Locations near automatic doors and emergency alert
devices
• Places with ignitable gas, such as petrol stations
Connecting to a Bluetooth device
To connect with another Bluetooth device and exchange
data, first carry out pairing (connection setting) with the
other Bluetooth device and then connect.
Some Bluetooth devices only pair, and some Bluetooth
devices proceed all the way to connection.
Turn on the partner device's Bluetooth function and
check that it is connectable beforehand.
1 From the "Settings" screen, tap "Wireless &
networks" ` "Bluetooth settings".
2 Check the box of "Bluetooth" ` tap "Scan for
devices".
Scanning starts and a list of available Bluetooth
devices appears.
3 Check the box of "Discoverable" to let this
product be recognizable by the partner Bluetooth
device.
4 Tap the Bluetooth device to communicate with.
Connection may be established with this procedure,
depending on the Bluetooth device.
5 Tap "Pair", or enter the passkey (PIN) ` "OK".
■ Canceling the connection
Tap the Bluetooth device to disconnect ` "OK".
■ Canceling the pairing
Touch and hold the Bluetooth device to disconnect `
"Disconnect".
Connecting to a VPN
A VPN (Virtual Private Network) is a technology allowing
a connection externally to information on a protected
local network, such as in a corporation or university.
When configuring VPN connection from this product,
obtain security information from the network
administrator.
Adding a VPN
1 From the "Settings" screen, tap "Wireless &
networks" ` "VPN settings".
2 Tap "Add VPN" ` the VPN type to add.
3 Follow the administrator's instructions to
configure each item of the VPN setting.
4 Tap ` "Save".
Connecting to a VPN
1 From the "Settings" screen, tap "Wireless &
networks" ` "VPN settings".
2 Tap the VPN to connect.
3 Enter the required information ` "Connect".
■ Disconnecting from a VPN
Open the Notifications panel and tap the notification for
the VPN connection ` the connected VPN.
Page 53

53
Settings
Security Code
Some features require security codes, to make various
functions more convenient. These include a password for
locking this product and a network security code for
network services. By using different codes for different
purposes, you can get the most out of this product.
Precautions for all security codes
Avoid setting security codes using your birthday, part of
your phone number, your address or room number,
"1111" or "1234" that can be easily guessed by others.
Be sure to write down the security codes and store them
in a safe location.
PIN1 code / PIN2 code
The SIM card has two settable security codes, PIN1 code
and PIN2 code.
PIN1 code is a 4- to 8-digit number (code) that is entered
to confirm the user when the SIM card is inserted in this
product, or when the product power is turned on. It is
intended to prevent unauthorized use. Entering PIN1
code makes the product operable.
PIN2 code is a 4- to 8-digit number required when using
the user certificate, such as when requesting issue.
Note
• If you enter the incorrect PIN1 / PIN2 code 5 times in
succession, the PIN1 / PIN2 code is locked. Unlock using
"PUK code".
Enabling the SIM's PIN
Set to require entry of the PIN1 code when the power is
turned on.
1 From the "Settings" screen, tap "Location &
security" ` "Set up SIM card lock".
2 Check the box of "Lock SIM card" ` enter the PIN1
code ` "OK".
■ Changing the PIN1 code
After step 1, tap "Change SIM PIN" ` enter the current
PIN1 code ` "OK" ` enter the new PIN1 code ` "OK" `
enter the new PIN1 code again ` "OK".
PIN unblocking key (PUK)
The PIN unblock key (PUK) is an 8- digit number used to
unblock the PIN1 / PIN2 code. You cannot change the
key yourself.
If you enter the incorrect PUK code 3 times in
succession, the SIM card will be locked. If this happens,
please contact your mobile phone company for support.
■ Unblocking the PUK locked SIM
When the message indicating that a SIM card is locked
by PUK is displayed, tap "Emergency call" ` enter
"
**05*
[PUK code]*[new PIN1 code]*[new PIN1
code]#".
For example, to change the SIM PIN 1 code to "2580"
when the PIN unblocking key is "88888888", enter
"
**05*
88888888*2580*2580#".
Page 54

54
File Management
Bluetooth
Communication
Yo u can use the Bluetooth communication function for
wireless exchange of data with another Bluetooth device.
For connecting to a Bluetooth device, refer to P.52.
Sending
Example: sending an image from the "Gallery"
1 From the application list screen, tap "Gallery" `
display the image to send.
2 Tap ` "Share".
3 Select an application to share by.
Receiving
1 Send a file from the other Bluetooth device.
appears in the status bar.
2 Open the Notifications panel and tap the
notification for the received Bluetooth file `
"Accept".
Connecting a PC
Yo u can read and write data on a microSD card from the
connected PC.
1 Connect to a PC using the microUSB cable. (P.19)
2 Open the Notifications panel, tap "USB
Connection" ` "USB Mass Storage" ` "OK" `
"OK".
■ Disconnecting the microUSB cable from the
PC
Open the Notifications panel, tap "Turn off USB storage"
` "OK". Then, you can disconnect the microUSB cable
from the PC.
Note
• Connect the USB plug of the microUSB cable for PC
connection directly to the USB port of the PC. If the cable is
connected via a USB hub or USB extension cable, a
malfunction may occur.
Page 55
55
Appendix
Troubleshooting
•First, check whether the software update is required. If
required, update the software.
•If a symptom does not improve after its cause has been
identified, refer to the web site (http://www1.medias.
net/mx) or contact the shop of purchase.
■ Power supply
■ Charging
■ Operation of the product
Power does not turn ON.
•Is the battery pack inserted correctly? P.18
•Is the battery pack charged? P.19
Cannot charge (Notification LED does not light or
blinks).
•Is the battery pack inserted correctly? P.18
•Is the AC charger plug securely connected
to the power outlet?
P. 1 9
• If you are using the microUSB cable for PC
connection, is the PC powered on?
–
• If you make a call, perform data
communication, or use some other function
for a long time while charging, this product
may become hot and charging may be
stopped. In this case, charge again after the
product cools down.
–
The product becomes hot during operations or
charging.
• The product, battery pack, or AC charger
may become hot during operations or
charging, or if you use the camera function
for a long time while charging.
This is not a safety hazard, so you can
continue to use them.
–
• If you use the camera function for a long
time, the product may become hot and the
camera function may end. Wait a while
before restarting to use the camera function.
–
Battery pack usage time is short.
•Has the product been out of the network
service area for a long time?
As this product searches for radio waves in
order to enable communication when out of
the network service area, more electricity is
consumed than usual.
–
• The battery pack usage time varies
depending on the usage conditions and the
degradation level.
–
• The battery pack is a consumable. The
available usage time shortens every time the
battery pack is recharged.
If the usage time significantly reduces
compared to the time of purchase even if the
battery pack is fully charged, purchase the
specified battery pack.
–
Power turns off or automatic restart occurs.
• If the battery pack terminal is dirty, the
contact may become poor and the power
may be turned off. If dirty, wipe the battery
pack terminals with, for example, a dry
cotton swab.
–
No operation occurs by tapping or pressing a key.
•Is the power turned off? P.20
•Is sleep mode set? Press the power switch
to cancel sleep mode.
P. 2 0
•Is the screen locked? P.20
•Are you touching the touch panel correctly? P.19
Tapping does not work properly.
•Do you tap the screen with gloved hands?–
•Do you tap with the tip of a fingernail, or is
there any foreign matter between your hand
and the screen?
–
•Is the display covered with a protective
sheet? Some types of protective sheets
prevent correct operation.
–
Screen response to tapping or key pressing is slow.
• The screen response may slow down if large
amounts of data are saved in this product or
transferred between the product and the
microSD card.
–
The SIM card is not recognized.
•Is the SIM card inserted in the right
direction?
P. 1 7
Page 56
56
Appendix
■ Telephone call
■ Screen
■ Sound
■ Camera
■ Using overseas
■ Data management
■ Infrared data exchange
The clock shows the wrong time.
• If power is kept on for a prolonged time, the
clock may show the wrong time. Check that
the "Date & time" are set to "Automatic", and
turn the product off then back on in a
location with good signal reception.
–
The ringtone does not sound.
•Is the product in Silent mode? –
•Is the ringtone volume set to its minimum?
Set "Volume" of "Ring" on "Ringtones and
sounds" from "Settings".
–
• If you cover the proximity sensor with your
hand, the ringtone volume may be lower.
P. 1 6
does not display or nothing displays during a
call
• If does not display after cancelling the
sleep mode, the proximity sensor may be
covered by the protection sheet, etc. Do not
cover the sensor, etc. Or, after cancelling the
sleep mode, tap or to display
etc.
P. 1 6
Cannot make a call with shown
•Are you out of the service area or in a place
with poor signal strength? Check on the
Status Bar.
P. 2 4
Cannot make a call ( does not disappear when
you move, or calls cannot be made or received even
when the radio wave is strong enough)
•Turn the power off and then on, or remove
and reinsert the battery pack or the SIM
card.
P.17,
18, 20
•You may not be able to make or receive
calls, depending on the type of radio signal,
even when it indicates otherwise. Move to
another place and call again.
–
• Depending on how congested the radio
waves are, it may be difficult to establish a
connection in crowded places due to a
congestion of calls and emails.
–
The display is dim.
•Has the time set with "Screen timeout"
elapsed?
P. 4 8
•Is the product in eco mode? P.48
•Has "Brightness" setting changed? P.48
•Is battery level low? P.48
During a voice call, the other party's voice is
difficult to hear or is too loud.
•Has the call volume been changed? P.29
Photos and videos shot with the camera are
blurred.
• Check whether the lens is cloudy or has dirt
on it.
–
• When shooting subject close to you, switch
auto focus to "Close-up".
P. 4 3
•Is "Antishake" set to "OFF"? P.43
•Is auto focus set to "AF OFF"? P.43
• When shooting a person, switch auto focus
to "Normal (AF ON)".
P. 4 3
This product becomes unusable while overseas (
is displayed).
• The product may become usable by
rebooting.
–
Data communication is not available while
overseas.
• Activate "Data roaming". P.47
No caller ID is displayed / A notified caller ID is
different from that of the caller / Functions that use
Contacts data or caller ID notifications do not work.
• Even when a caller notifies the caller ID, it is
not displayed on the product unless notified
from the network or network operator used.
And, a notified caller ID may be different
from that of the caller by some networks or
networks operators you use.
–
Data transfer is not working.
•Are you using a USB hub? If you use a USB
hub, data transfer may not work properly.
P. 5 4
Cannot receive all contact data.
•Is there available space in memory? In case
of space shortage while receiving data, data
transfer is stopped at that point. The
received data is saved to the destination.
–
Page 57
57
Appendix
■ Bluetooth function
Error message
Warranty and AfterSales Service
Warranty
•Be sure to receive a Warranty Guide at the time of
purchase of this product. Read the contents of the
Warranty Guide, confirm information such as the "Shop
name and date of purchase" and keep it in a safe place.
If necessary items are not described, immediately
contact the shop of purchase.
The warranty for free repair is valid for 1 year about this
product and accessories, and 6 months about the
battery pack from the date of purchase.
•This product and its accessories are subject to
modification, in part or whole, for improvement without
prior notice.
• Data saved in your contacts, etc., may be modified or
lost due to malfunction, repair or other handling of this
prod
uct. You should therefore make a copy of your
contacts data, etc., as a precautionary measure. If you
have this product repaired, most of the previously
downloaded data will not be transferred to the repaired
product, as prohibited by the Copyright Act.
*You can back up contact data from this product to a
microSD card.
After-sales service
For problems with your product
Before requesting repairs, read "Troubleshooting" in this
instruction manual. If the problem still persists, contact
the shop of purchase or a Call Center on the Warranty
Guide, or see information on the website.
Note that it may take some days to repair the product
depending on the malfunction.
During the warranty period
•This product is repaired at no charge under the
conditions of the warranty.
•Make sure to bring the warranty for repair.
•You will be charged even during the warranty period if
malfunction is caused by the use of devices and
consumables other than those specified.
Repair may not be possible in the following
cases:
• When a repair counter judges the cause of malfunction
is exposure to water (Example: when wet-indication
sticker reacts)
• When, as a result of inspection, corrosion is found due
to exposure to water, condensation or sweat, or any of
the internal boards are damaged or deformed (damage
to the microUSB connector or LCD or cracked body
could be the case as well)
* Since these conditions are outside the scope of the
warranty, any repairs, if at all possible, will be charged.
After expiration of the warranty
All repairs that are requested are charged.
The product cannot find or connect to a Bluetooth
enabled device.
•Put the Bluetooth enabled device
(commercial) on standby and register it. If
you want to delete a registered device and
register it again as a new device, you must
delete the registered device from both the
Bluetooth enabled device (commercial) and
the product before you register it again.
P. 5 1
"Type PUK code to unlock SIM card" and
"Password incorrect, SIM is locked! PUK2
requested."
•This message appears when you turn on the
power while PIN1 code is locked. Tap
"Emergency call" and enter "
**05*
[PUK
code]
*
[New PIN1 code]* [New PIN1 code]
#".
–
•This message appears if you turn on the
power or attempt to perform an operation
related to the SIM card while the PIN
unblocking key is locked.
–
Page 58

58
Appendix
Precautions
Never modify this product or accessories.
• Doing so may result in fire, injuries, or malfunctions.
• The modified product may be repaired only if the owner
agrees that all modified parts are restored to the
original condition. However, repairs may be refused
depending on the modifications.
The following cases may be considered as
modifications.
-A sticker on portions such as of the LCD or keys.
- Decorations attached to this product using adhesion
bond, etc.
-Parts such as the exterior, changed to other than
standard.
-Malfunction and damage due to modifications will be
repaired at the owner's expense, even if the warranty
period is still effective.
The model plate must not be removed from this product.
The model plate certifies that this product satisfies
technical standards.
It should be noted that if the plate is removed or is
replaced with a different plate, and the original model
plate cannot be verified, it may disqualify the product
from repairs due to not being able to determine the
technical standards of that particular phone.
Note that the settings and other information may be reset
(cleared) as a result of malfunction, repair or other
handling of the product. In this case, make the settings
again.
When the repair is executed, MAC address of Wi-Fi /
Bluetooth address in the product may be changed
regardless of repaired part.
Magnetic components are used in part
s of this product
as described below. Do not allow credit cards or other
devices that are vulnerable to magnetism to come into
contact with the phone.
Parts where magnetic components are used: area under
camera, speaker, earpiece, and around mouthpiece
The product has waterproof capability, however, if the
inside of the product becomes wet or moist, immediately
power off the product, remove the battery pack, and then
notify a service center on the Warranty Guide as soon as
possible.
However, note that we may not repair the product
depending on the extent of the damage.
Memory dial (Contacts) and
downloaded data
When you update the model or repair this product, data
that has been imported, downloaded, or created by you
may be changed or lost. NEC de México, S.A. de C.V.
shall have no liability for any change or loss of any kind.
Under some circumstances, NEC de México, S.A. de
C.V. may replace your product with its equivalent instead
of repairing it. The data stored in your product will not be
transferred to the new product (some of the data may be
able to be transferred).
Page 59
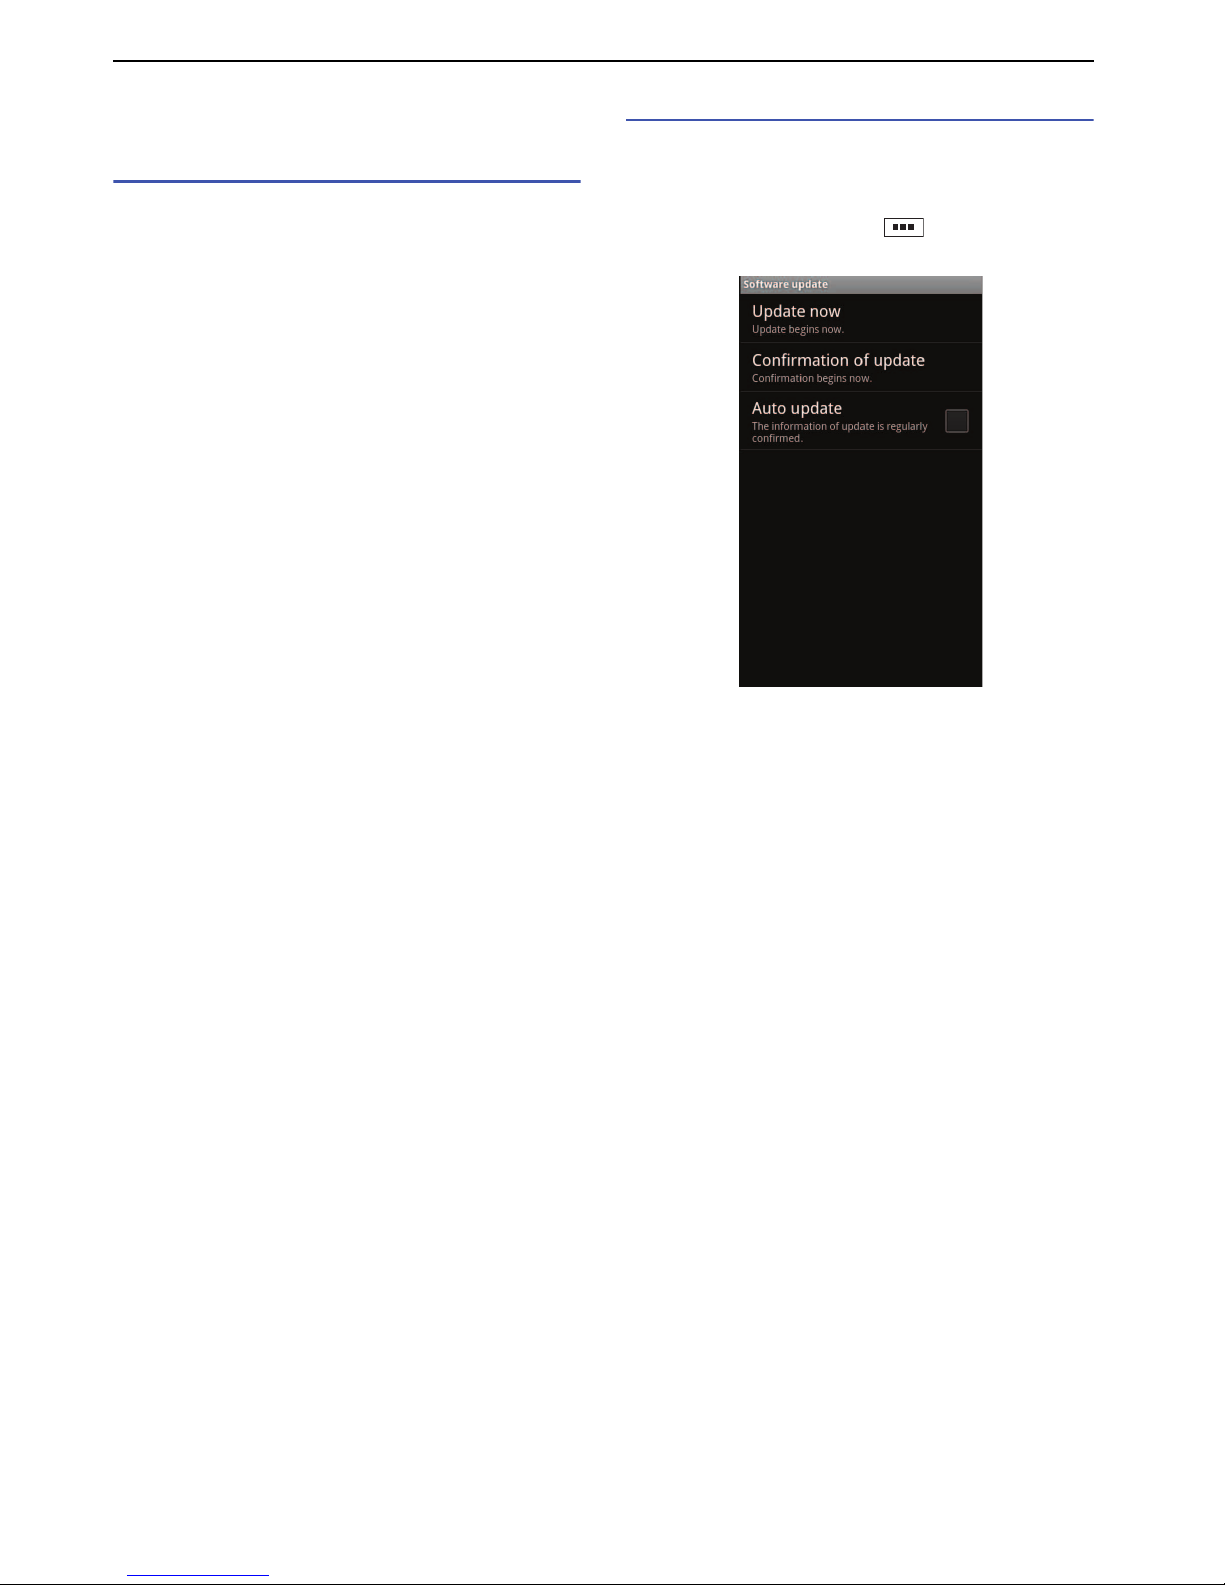
59
Appendix
Updating Software
Before updating software
• Software update through network can be done in
Mexico only.
• Do not remove the battery pack while updating
software. This may result in a failed update.
• Fully charge the battery pack before updating software.
• Software update is done through microSD card so that
insert the microSD card before updating software.
• Software update (download, installation) may take a
long time.
• When updating software, the product performs SSL/
TLS communication with the server (manufacturer's
site).
• We recommend that you update software without
moving and when you have strong reception (4 wavelevel bars).
* If the reception deteriorates during a software update or
the download is stopped, move to a location with a better
reception and start the software update again.
• A message appears to inform you that you cannot
update during international roaming or when outside
the service area.
• When there is insufficient battery level for a software
update, a message appears to inform you that charge
is insufficient for updating.
• If the software has already been updated, a message
appears to inform you that no update is needed when
you check for software updates.
• SMS messages sent to you during a software update
are stored at the SMS center.
• During a software update, the product information
(model and manufacturing numbers) are automatically
sent to a software update server managed by the
manufacture. The manufacturer shall not use this
information for any purpose other than software
update.
• If the software update fails, a message appears to
inform you that the rewrite failed and no further
operation may be possible. In this case, take the
product to a repair counter.
• If a PIN code has been set, you will need to enter the
PIN code when you restart this product after the update
has been installed.
• Do not start any other applications during an
installation of the software update.
• All operations are disabled during an installation of the
software update. Also, you cannot stop updating.
Note
• You can update software while still retaining data (such as
contacts, camera images, email, downloaded data, etc.) on
this product.
Note, however, that such data may not be protected,
depending on the state of the product (malfunction, damage,
exposure to water, etc.). It is recommended to back up
necessary data. Some data, such as downloaded data,
cannot be backed up.
Updating immediately
If the software update is available, you can start the
software update immediately. For the latest software
information, refer to the manufacturer's site.
1 From the Idle screen, tap ` "Settings" `
"About phone" ` "Software update".
2 Tap "Update now" and follow the instructions on
the screen.
■ Updating through Network
Choose "Updates by network" when you want to use a
network for software update. After update package is
downloaded, the product restarts, and then update
starts.
• Since software updates are carried out via a microSD
card, you must insert a microSD card beforehand.
• Packet communication charges are incurred for a
software update using a GSM / WCDMA network.
Since packet communication charges can become
costly, a flat-rate packet rate is strongly recommended.
• Connection to a Wi-Fi network may be necessary
depending on the version of the software to be
updated.
• Before updating software via a Wi-Fi network, configure
Wi-Fi settings beforehand and check that the product is
connected to a Wi-Fi network (P.22).
• "Updates by network" cannot be done in the following
circumstances.
- When outside service area
- During international roaming
- Airplane mode
- When the USB cable is connected and mounted
- When the "USB tethering" is being used
- When the "Portable Wi-Fi hotspot" is being used
- When the date / time are not correctly set
- When the battery level is too low for software update
- When there is insufficient free space in the microSD
card for software update
Page 60

60
Appendix
■ Updating through microSD Card
Choose "Updates by SD card" when you want to use a
microSD card for software update.
• To carry out a software update, connect the product to
a PC (P.54), and download the update software from
the manufactu rer's site to a microSD card by the PC.
For more information, refer to the manufacturer's site.
• After the software update is completed, manually
delete the update software downloaded to your
microSD card (the software can be safely removed
once the software update has completed normally).
• "Updates by SD card" cannot be done in the following
circumstances.
- When the battery level is too low for software update
Confirming update
Check whether the software update is available for the
product.
• "Confirmation of update" cannot be done in the
following circumstances.
- When outside service area
- Airplane mode
- When the date / time are not correctly set
1 From the Idle screen, tap ` "Settings" `
"About phone" ` "Software update".
2 Tap "Confirmation of update".
The confirmation starts.
Automatically Software Update (Auto
update)
Yo u can regularly check the update information
automatically, and check whether you can upgrade the
version. For the latest software information, refer to the
manufacturer's site.
1 From the Idle screen, tap ` "Settings" `
"About phone" ` "Software update".
2 Check the box of "Auto update".
Notes
• "Auto update" is not set by default.
• The product cannot automatically check the update
information when the "Auto update" is not set, during data
communication for an immediate software update, etc.
■ Operation when an update is available
"Software update" screen appears when an update is
available.
■ Starting the software update immediately
Tap "Now" and follow the instructions on the screen.
• Software update cannot be done in the following
circumstances.
- When outside service area
-During international roaming
- Airplane mode
- When the USB cable is connected and mounted
- When the "USB tethering" is being used
- When the "Portable Wi-Fi hotspot" is being used
- When the date / time are not correctly set
- When the battery level is too low for software update
- When there is insufficient free space in the microSD
card for software update
Notes
• After restarting by your operation, the product automatically
restarts again.
• If you tap "Later", you can update later. From the Idle screen,
tap ` "Settings" ` "About phone" ` "Software update" `
"Update now".
Page 61
61
Appendix
Specifications
■ Phone
Operating
frequency range
WCDMA Band1 Transmitter (TX): 1922.40 to 1977.60 MHz
Receiver (RX): 2112.40 to 2167.60 MHz
Band2 Transmitter (TX): 1852.40 to 1907.60 MHz
Receiver (RX): 1932.40 to 1987.60 MHz
Band5 Transmitter (TX): 826.40 to 846.60 MHz
Receiver (RX): 871.40 to 891.60 MHz
GSM850 Transmitter (TX): 824.20 to 848.80 MHz
Receiver (RX): 869.20 to 893.80 MHz
EGSM900 Transmitter (TX): 880.20 to 914.80 MHz
Receiver (RX): 925.20 to 959.80 MHz
DCS Transmitter (TX): 1710.20 to 1784.80 MHz
Receiver (RX): 1805.20 to 1879.80 MHz
US PCS Transmitter (TX): 1850.20 to 1909.80 MHz
Receiver (RX): 1930.20 to 1989.80 MHz
Extent of the
precision
frequency
WCDMA Not exceed ± (0.1 ppm + 10 Hz)
GSM, DCS,
US PCS
Not exceed ±0.1 ppm
CPU MSM8255 (1 GHz)
Tr ansmitting
output
WCDMA 250 mW
GSM 2 W
DCS, US PCS 1 W
Operating temperature 5 °C to +40 °C
5 °C to +35 °C (while charging)
Relative humidity 45% to 85%
Dimensions Approx. 128 mm (height) × 65 mm (width) × 8.2 mm (thickness)
Weight (±1 g) Approx. 117 g (with the battery pack)
Memory ROM 2048 MB
RAM 512 MB
Display Type TFT 16,777,216 colors
Size Approx. 4.0 inches
Pixels 409,920 pixels (480 × 854 dots)
Image pickup
device
Ty pe CMOS
Size 1 / 4.0 inch
Effective pixels Approx. 5.0 million pixels
Camera Recorded pixels
(maximum)
Approx. 4.9 million pixels
Digital zoom Approx. 2 times max.
Recorder Number of photos
that can be recorded
When recorded in the microSD card (2 GB): Approx. 9,999 photos max.
*2
Continuous photo
shooting
Shooting interval 0.04 / 0.1 seconds: 5 to 25 photos; Shooting interval 0.5 / 1
/ 2 seconds: 5 to 100 photos
Photo file format JPEG
Video recording time When recorded in the microSD card (2 GB): Approx. 1,162 minutes max.
*3
Video file format MP4
Wireless LAN
*5
IEEE802.11b/g/n (2.4GHz band) compliant
Operating frequency
range
2412 to 2472 MHz (802.11 b/g/n)
Tr ansmitting output 10 mW
Page 62

62
Appendix
*1 To set the network connection change, use "Mobile networks" (P.47).
*2 This is the maximum number of photos that can be saved to 1 folder, when Size = VGA (640 × 480) and Quality = Normal
(file size = 95 KB).
*3 This is the recording time per video under the following conditions: Size = QCIF (176 × 144), Quality = Normal
*4 Background playback is supported.
*5 The wireless LAN of this product has received Wi-Fi certification.
*6 It is confirmed that this product and all Bluetooth devices are compliant with Bluetooth standards designated by Bluetooth
SIG, and they are authenticated. However, procedures may differ or data transfer may not be possible depending on the
device's characteristics or specifications.
*7 The available connection distance may be much s
horter, depending on the ambient environment (wall, furniture, etc.) or
building structure.
Bluetooth Operating frequency
range
Tr an smission and reception : 2402 to 2480 MHz
Tr ansmitting outputMaximum 1 mW
Compliant version Bluetooth Specification Version 2.1 + EDR compliant
*6
Power Bluetooth Specification Power Class 2
Line-of-sight
communication
distance
*7
Up to approx. 10 m
Compliant profile HSP,HFP,A2DP,AVRCP,OPP,PBAP,SPP
Page 63

63
Appendix
■ Battery pack
Note
• Specifications of this product and other supplied devices may
be changed without notice.
Radio Frequency (RF)
Signals
The operation of this equipment is subject to the
following two conditions:
(1) It is possible that this equipment or device may not
cause harmful interference, and
(2) The equipment or device must accept any
interference, including interference that may cause
undesired operation.
THIS MODEL PHONE MEETS THE U.S.
GOVERNMENT'S REQUIREMENTS FOR EXPOSURE
TO RADIO WAVES.
Yo ur wireless phone contains a radio transmitter and
receiver. Your phone is designed and manufactured not
to exceed the emission limits for exposure to radio
frequency (RF) energy set by the Federal
Communications Commission of the U.S. Government.
These limits are part of comprehensive guidelines and
establish permitted levels of RF energy for the general
population. The g
uidelines are based on standards that
were developed by independent scientific organizations
through periodic and thorough evaluation of scientific
studies.
The exposure standard for wireless mobile phones
employs a unit of measurement known as the Specific
Absorption Rate (SAR).
The SAR limit set by the FCC is 1.6 W/kg.*
Te sts for SAR are conducted using standard operating
positions accepted by the FCC with the phone
transmitting at its highest certified power level in all
tested frequency bands. Although the SAR is determined
at the highest certified power level, the actual SAR level
of the phone while operating can be well below the
maximum value. This
is because the phone is designed
to operate at multiple power levels so as to use only the
power required to reach the network. In general, the
closer you are to a wireless base station antenna, the
lower the output. Before a phone model is available for
sale to the public, it must be tested and certified to the
FCC that it does not exceed the limit established by the
U.S. government-adopted requirement for safe exposure.
The tests are performed on position and locations (for
example, at the ear and worn on the body) as required by
FCC for each model. The highest SAR value for this
model phone as reported to the FCC when tested for use
at the ear is 1.14 W/kg, and when worn on the body, is
1.21 W/kg. (Body-worn measurements differ among
phone models, depending upon available accessories
and FCC requirements). While there may be differences
between the SAR levels of various phones and at various
positions, they all meet the U.S. government
requirement.
The FCC has granted an Equipment Authorization for
this model phone with all reported SAR levels evaluated
as in compliance with the FCC RF exposure guidelines.
SAR information on this phone is on file with the FCC
Product name Battery pack N1101WB
Battery type Lithium ion battery
Nominal voltage 3.7 V DC
Nominal capacity 1230 mAh
Page 64

64
Appendix
and can be found under the Display Grant section at
https://gullfoss2.fcc.gov/oetcf/eas/reports/
GenericSearch.cfm after search on FCC ID A98IQF1504.
For body worn operation, this phone has been tested and
meets the FCC RF exposure guidelines when used with
an accessory designated for this product, or when used
with an accessory that contains no metal and that
positions the handset a minimum of 1.0 cm from the
body.
Non-compliance with the above restrictions may result in
violation of FCC RF Exposure guidelines.
---------------------------------------------------------------------------
* In the United States, the SAR limit for wireless mobile
phones used by the public is 1.6 watts/kilogram (W/kg)
averaged over one gram of tissue.
SAR values may vary depending upon national reporting
requirements and the network band.
FCC Regulations
This mobile phone complies with part 15 of the FCC
Rules. Operation is subject to the following two
conditions: (1) This product may not cause harmful
interference, and (2) this product must accept any
interference received, including interference that may
cause undesired operation.
This mobile phone has been tested and found to comply
with the limits for a Class B digital device, pursuant to
Part 15 of the FCC Rules. These limits are designed to
provide reasonable protection against harmful
interference in a residential installation.
This product generates, uses and can radiate radio
frequency energy and, if not installed and used in
accordance with the instructions, may cause harmful
interference to radio communications. However, there is
no guarantee that interference will not occur in a
particular installation; if this product does cause harmful
interference to radio or television reception, which can be
determined by turning the product off and on, the user is
encouraged to try to correct the interference by one or
more of the following measures:
• Reorient or relocate the receiving antenna.
•Increase the separation between the product and
receiver.
• Connect the product into an outlet on a circuit different
from that to which the receiver is connected.
•Consult the dealer or an experienced radio / TV
technician for help.
Changes or modifications not expressly approved by the
party responsible for compliance could void the user's
authority to operate the eq
uipment.
Page 65
65
Appendix
Declaration of
Conformity
Hereby, NEC de México, S.A. de C.V. declares that this
product is compliance with the essential requirements
and other relevant provisions of Directive 1999/5/EC.
Declaration of Conformity can be found on
http://www.n-keitai.com/lineup/index.html (Japanese
only).
This product uses a non-harmonised frequency and is
intended for use in all European countries. The Wi-Fi can
be operated in the EU without restriction indoors, but
cannot be operated outdoors in France.
This mobile phone complies with the EU requirements for
exposure to radio waves.
Yo ur mobile phone is a radio transceiver, designed and
manufactured not to exceed the SAR* limits** for
exposure to radio-freq
uency (RF) energy, whose SAR*
value, when tested for compliance against the standard,
was 0.817 W/kg. While there may be differences
between the SAR* levels of various phones and at
various positions, they all meet*** the EU requirements
for RF exposure.
* The exposure standard for mobile phones employs a
unit of measurement known as the Specific
Absorption Rate, or SAR.
** The SAR limit for mobile phones used by the public is
2.0 watts/kilogram (W/kg) averaged over ten grams of
tissue, recommended by The Council of the
European Union. The limit incorporates a substantial
margin of safety to give additional protection for the
public and to account for any variations in
measurements.
*** Te
sts for SAR have been conducted using standard
operating positions with the phone transmitting at its
highest certified power level in all tested frequency
bands. Although the SAR is determined at the
highest certified power level, the actual SAR level of
the phone while operating can be well below the
maximum value. This is because the phone is
designed to operate at multiple power levels so as to
use only the power required to reach the network. In
general, the closer you are to a base station antenna,
the lower the power output.
Intellectual Property
Right
Copyright and portrait rights
Yo u have no right to copy, modify, or distribute contents
such as text, images, music, or software downloaded
from websites on the Internet, or images captured by the
camera of this product without permission from the
copyright holder, except when the copy or quote is for
personal use that is allowed under Copyright Law.
Note that it may be prohibited to capture or record live
performances or exhibitions even for personal use.
Refrain from taking portraits of other people and
uploading such portraits to websites using this product
without their consent, as this violates portrait rights.
Trademarks
•"Quick Shot", "MEDIAS", and "MEDIAS NAVI" are
trademarks or registered trademarks of NEC CASIO
Mobile Communications, Ltd.
•Microsoft
®
, Windows®, Windows Media® and Windows
Vista
®
are trademarks or registered trademarks of
Microsoft Corporation in the United States and / or
other countries.
•Microsoft
®
Exchange ActiveSync® is a trademark or
registered trademark of Microsoft Corporation in the
United States and / or other countries.
• T9, T9 Trace & XT9 are trademarks and/or registered
trademarks of Nuance Communications, Inc. and/or its
affiliates in the United States and/or other countries. All
other trademarks are the properties of their respective
companies.
• "Google", "Android", "Android Market", "Gmail",
"Google Calendar", "Google Maps", "Google Talk",
"Google Latitude", "YouTube", "Picasa", "Google" logo,
"Android" logo and "Android Market" logo are
trademarks or registered trademarks of Google Inc.
•Wi-Fi
®
, WPA®, Wi-Fi CERTIFIED logo, and Wi-Fi
Protected Setup logo are registered trademarks of WiFi Alliance.
• Wi-Fi CERTIFIED™ and Wi-Fi Protected Setup are
trademarks of Wi-Fi Alliance.
• Other company names or product names described in
this manual are trademarks or registered trademarks of
those companies.
Page 66

66
Appendix
Others
•This product is licensed in compliance with the MPEG-
4 Visual Patent Portfolio License.
Yo u are allowed to use it for private nonprofit purposes
and only when:
- Recording moving pictures that are compliant with
the standard of MPEG-4 Visual (hereinafter referred
to as MPEG-4 Video)
- Playing MPEG-4 Videos recorded personally by
consumers not engaged in profit activities
- Playing MPEG-4 Video supplied from a provider
licensed by MPEG-LA
When using the product for any other purpose, such as
commercial promotion, internal use or profit, contact
MPEG LA, LLC of the U.S.
• The Bluetooth word mark and logos are owned by the
Bluetooth SIG, INC. Other trademarks and trade
names are those of their respective owners.
Notational conventions for Windows
The abbreviations of operating systems below are used
in this manual.
• Windows 7 stands for Microsoft
®
Windows® 7 (Starter,
Home Basic, Home Premium, Professional, Enterprise
and Ultimate).
• Windows Vista stands for Windows Vista
®
(Home
Basic, Home Premium, Business, Enterprise and
Ultimate).
• Windows XP indicates the Microsoft
®
Windows® XP
Professional operating system or Microsoft
®
Windows®
XP Home Edition operating system.
GPL / LGPL - applicable software
This product contains software licensed complying with
GNU General Public License (GPL) or GNU Lesser
General Public License (LGPL). You can obtain the
source code for the software and reproduce, redistribute,
or modify the software in accordance with the GPL or
LGPL.
For information on GPL and LGPL, from the Idle screen,
tap ` "Setting" ` "About phone" ` "Legal
information" ` "Open source licenses".
 Loading...